

Page 1

CHAPTER
Operation section
@
Page 2

CONTENTS
@. Operation section
1. NAME OF EACH SECTION OF THE OPERATION PANEL .......... @- 1
(1) Body.....................................................................................................................@- 1
(2) Buttons to be used in common.........................................................................@- 2
2. BASIC OPERATION OF THE SEWING MACHINE....................... @- 2
3. LCD DISPLAY SECTION AT THE TIME
OF INDEPENDENT SEWING........................................................ @- 8
(1) Data input screen ...............................................................................................@- 8
(2) Sewing screen ..................................................................................................@- 10
4. PERFORMING PATTERN No. SELECTION ............................... @- 12
5. NAMING THE PATTERN ............................................................. @- 13
6. SEWING METHOD AND SEWING SHAPE LIST ....................... @- 14
7. PERFORMING DATA SETTING OF SEWING BUTTON
WITH BLINDSTITCH (SHANK AND MARBLE BUTTONS) ....... @- 15
8. PERFORMONG DATA SETTING OF SEWING BUTTON
WITH BLINDSTITCH (FLAT BUTTON)....................................... @- 16
9. PERFORMING DATA SETTING
OF SEWING BUTTON DIRECTLY TO CLOTH............................ @- 17
10. PERFORMING DATA SETTING
OF SEWING FLAT BUTT ON WITH BLINDSTITCH .................... @- 18
11. PERFORMING SETTING OF COUNTER/STAY BUTTONS........ @- 19
12. PERFORMING NECK WRAPPING SEWING DATA ................... @- 20
13. PERFORMING SEWING METHOD SELECTION ....................... @- 21
14. PERFORMING SEWING SHAPE SELECTION .......................... @- 22
15. PERFORMING SETTING NUMBER
OF REVOLUTIONS OF SEWING MACHINE .............................. @- 23
16. PERFORMING SETTING STAY THREAD ................................... @- 24
17. PERFORMING INPUT
OF BUTTON SEWING THREAD TENSION................................. @- 25
(1) In case of simplified input ...............................................................................@- 25
(2) In case of detailed input...................................................................................@- 26
(3) Sewing data that can be changed...................................................................@- 27
18. PERFORMING INPUT
OF NECK WRAPPING THREAD TENSION ................................ @- 29
(1) In case of simplified input ...............................................................................@- 29
(2) In case of detailed input...................................................................................@- 30
(3) Sewing data that can be changed...................................................................@- 31
19. PERFORMING DETAILED INPUT OF NECK WRAPPING......... @ - 33
Page 3

20. CHANGING SEWING DATA ........................................................ @- 36
(1) Initial sewing data at the time of your purchase............................................@- 36
(2) Changing procedure of sewing data............................................................... @- 37
(3) Sewing data list ................................................................................................@- 38
21. PERFORMING NEW REGISTRATION OF THE PATTERN......... @- 42
22. COPYING SEWING PATTERN.................................................... @- 43
23. PERFORMING CHUCK ADJUSTMENT ..................................... @- 45
24. PERFORMING BUTTON CENTERING ....................................... @- 46
25. PERFORMING INPUT AND CHECK
OF DATA WITH STEP MOTION .................................................. @- 47
(1) Performing the step motion.............................................................................@- 47
(2) Data list..............................................................................................................@- 50
26. PERFORMING COMPENSATION
OF UNEVENNESS OF BUTTON................................................. @- 52
27. CHANGING SEWING MODE ...................................................... @- 53
28. LCD DISPLAY SECTION AT THE TIME
OF CYCLE STITCHING............................................................... @- 54
(1) Data input screen .............................................................................................@- 54
(2) Sewing screen ..................................................................................................@- 56
29. PERFORMING CYCLE STITCHING ........................................... @- 58
(1) Selection of the cycle data ..............................................................................@- 58
(2) Editing procedure of the cycle data................................................................@- 59
30. PERFORMING CHANGE OF DISPLAY
OF SEWING PRODUCT.............................................................. @- 61
31. USING COUNTER ....................................................................... @- 62
(1) Setting procedure of the counter....................................................................@- 62
(2) Count-up releasing procedure ........................................................................ @- 64
32. CHANGING MEMORY SWITCH DATA ....................................... @- 64
(1) Changing procedure of memory switch data................................................. @- 64
(2) Memory switch data list ................................................................................... @- 66
33. PERFORMING CHANGE OF NEEDLE....................................... @- 71
34. PERFORMING CHANGE OF CHUCK ........................................ @- 72
35. CUSTOMIZING DATA INPUT SCREEN ...................................... @- 74
(1) Registering procedure ..................................................................................... @- 74
(2) Register state at the time of your purchase ................................................... @- 75
36. CUSTOMIZING SEWING SCREEN............................................. @- 76
(1) Registering procedure ..................................................................................... @- 76
(2) Register state at the time of your purchase ................................................... @- 77
37. PERFORMING KEY LOCK ......................................................... @- 78
38. DISPLAYING VERSION INFORMATION..................................... @- 80
Page 4

39. USING CHECK PROGRAM ........................................................ @- 81
(1) Displaying the check program screen ............................................................ @- 81
(2) Performing sensor check ................................................................................. @- 82
(3) Performing LCD check ..................................................................................... @- 84
(4) Performing touch panel compensation .......................................................... @- 85
40. ERROR CODE LIST .................................................................... @- 87
41. USING COMMUNICATION FUNCTION ...................................... @- 93
(1) Handling possible data .................................................................................... @- 93
(2) Performing communication by using the smart media ................................. @- 94
(3) Performing communication by using RS-232C ............................................. @- 96
(4) Take-in of the data ............................................................................................ @- 97
42. INFORMATION FUNCTION ......................................................... @- 99
(1) Observing the maintenance and inspection information ........................... @- 100
(2) Inputting the inspection time ........................................................................ @- 102
(3) Releasing procedure of the warning ............................................................ @- 103
(4) Observing the production control information............................................ @- 104
(5) Performing setting of the production control information ......................... @- 106
(6) Observing the working measurement information ..................................... @- 109
43. COMMUNICATION SCREEN
OF MAINTENANCE PERSONNEL LEVEL............................... @- 112
(1) Data which are possible to be handledIn case of the maintenance .......... @- 112
(2) Displaying maintenance personnel level ..................................................... @- 113
44. INFORMATION SCREEN
OF THE MAINTENANCE PERSONNEL LEVEL ....................... @- 114
(1) Display of error record ................................................................................... @- 114
(2) Display of the cumulative working information ........................................... @- 115
Page 5
@. Operation section
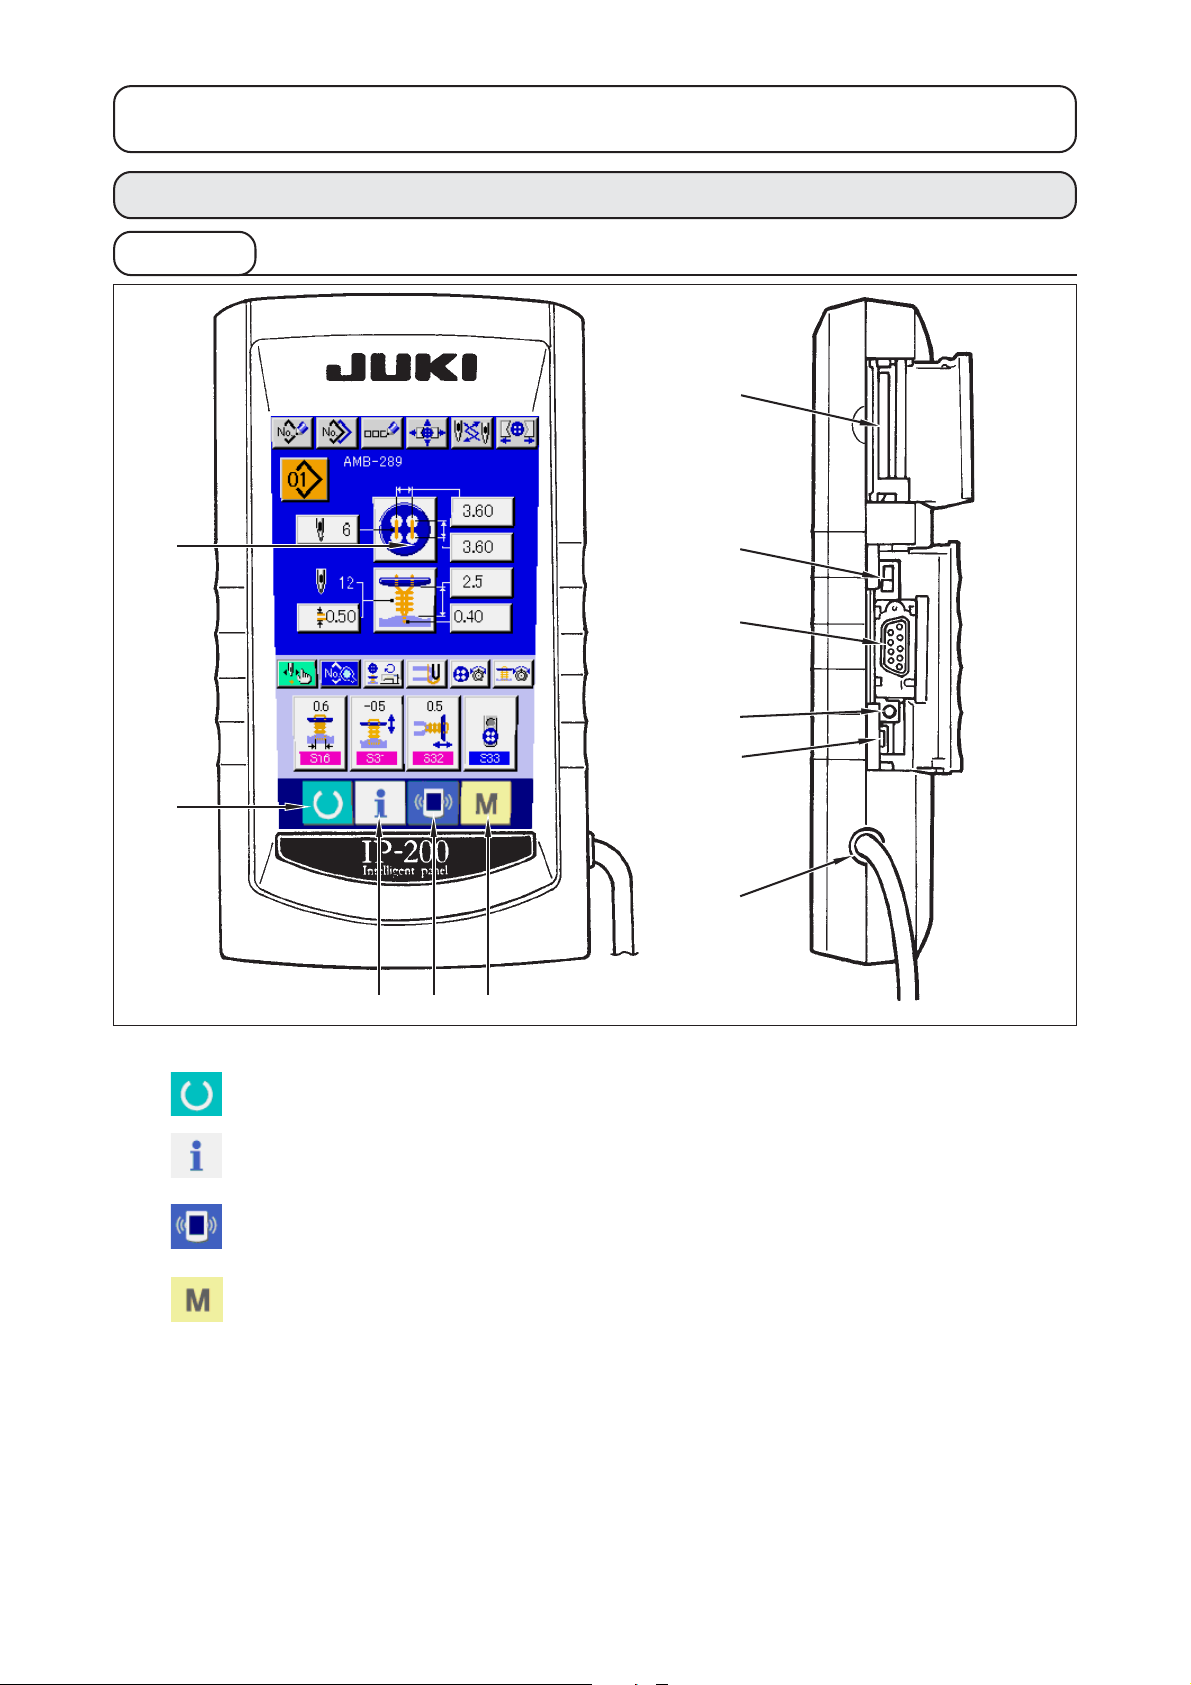
1. NAME OF EACH SECTION OF THE OPERATION PANEL
(1) Body
6
1
2
3 4 5
1 Touch panel・LCD display section
2 READY key → Changeover of the data input screen and
7
8
9
!0
!1
the sewing screen can be performed.
3 INFORMATION key → Changeover of the data input screen and
the information screen can be performed.
4 COMMUNICATION key → Changeover of the data input screen and
the communication screen can be performed.
5 MODE key → Changeover of the data input screen and
the mode changeover screen which
performs various detail settings can be
performed.
6 Smart media card slot (Close the cover for use.)
7 Slide switch (Not used・OFF)
8 Connector for RS-232C communication
9 Variable resistor for color LCD → Screen contrast can be adjusted. Adjust it
screen contrast adjustment as you desire.
!0 Connector for external input
!1 Cable
@– 1
Page 6
(2) Buttons to be used in common
The buttons which perform common operations in each screen of IP-200 are as follows :
CANCEL button → This button closes the pop-up screen.
In case of the data change screen, the data being
changed can be cancelled.
ENTER button → This button determines the changed data.
UP SCROLL button → This button scrolls the button or the display in the
upward direction.
DOWN SCROLL button → This button scrolls the button or the display in the
downward direction.
RESET button → This button performs the release of error.
NUMERAL INPUT button → This button displays ten keys and input of numerals
can be performed.
SEWING DATA DISPLAY button → This button displays the sewing data list corresponding
to the pattern No. being selected.
→ Refer to
CHARACTER INPUT button → This button displays the character input screen.
→ Refer to
"20. CHANGING SEWING DATA".
"5. NAMING THE PATTERN".
2. BASIC OPERATION OF THE SEWING MACHINE
1) Turn ON the power switch.
First, turn ON the power switch. DATA INPUT
1
screen is displayed after displaying WELCOME
screen.
2) Select the pattern No. you desire to sew.
When the power is turned ON, the data input
screen is displayed. Pattern No. button
1 which is selected at present is displayed in
the upper section of the screen. Press the
button to select the pattern No. For selecting
procedure of the pattern No., refer to
"4.
PERFORMING PATTERN No. SELECTION
When you purchase the sewing machine,
Pattern Nos. 1 to 10 described in
sewing data at the time of your purchase
have been registered". Select the pattern No.
you desire to sew from among these numbers.
(The No. to which the pattern has not been
registered is not displayed.)
".
"20. (1) Initial
* For the detailed explanation of this
screen, see
"3. LCD DISPLAY SECTION AT
THE TIME OF INDEPENDENT SEWING".
@– 2
Page 7
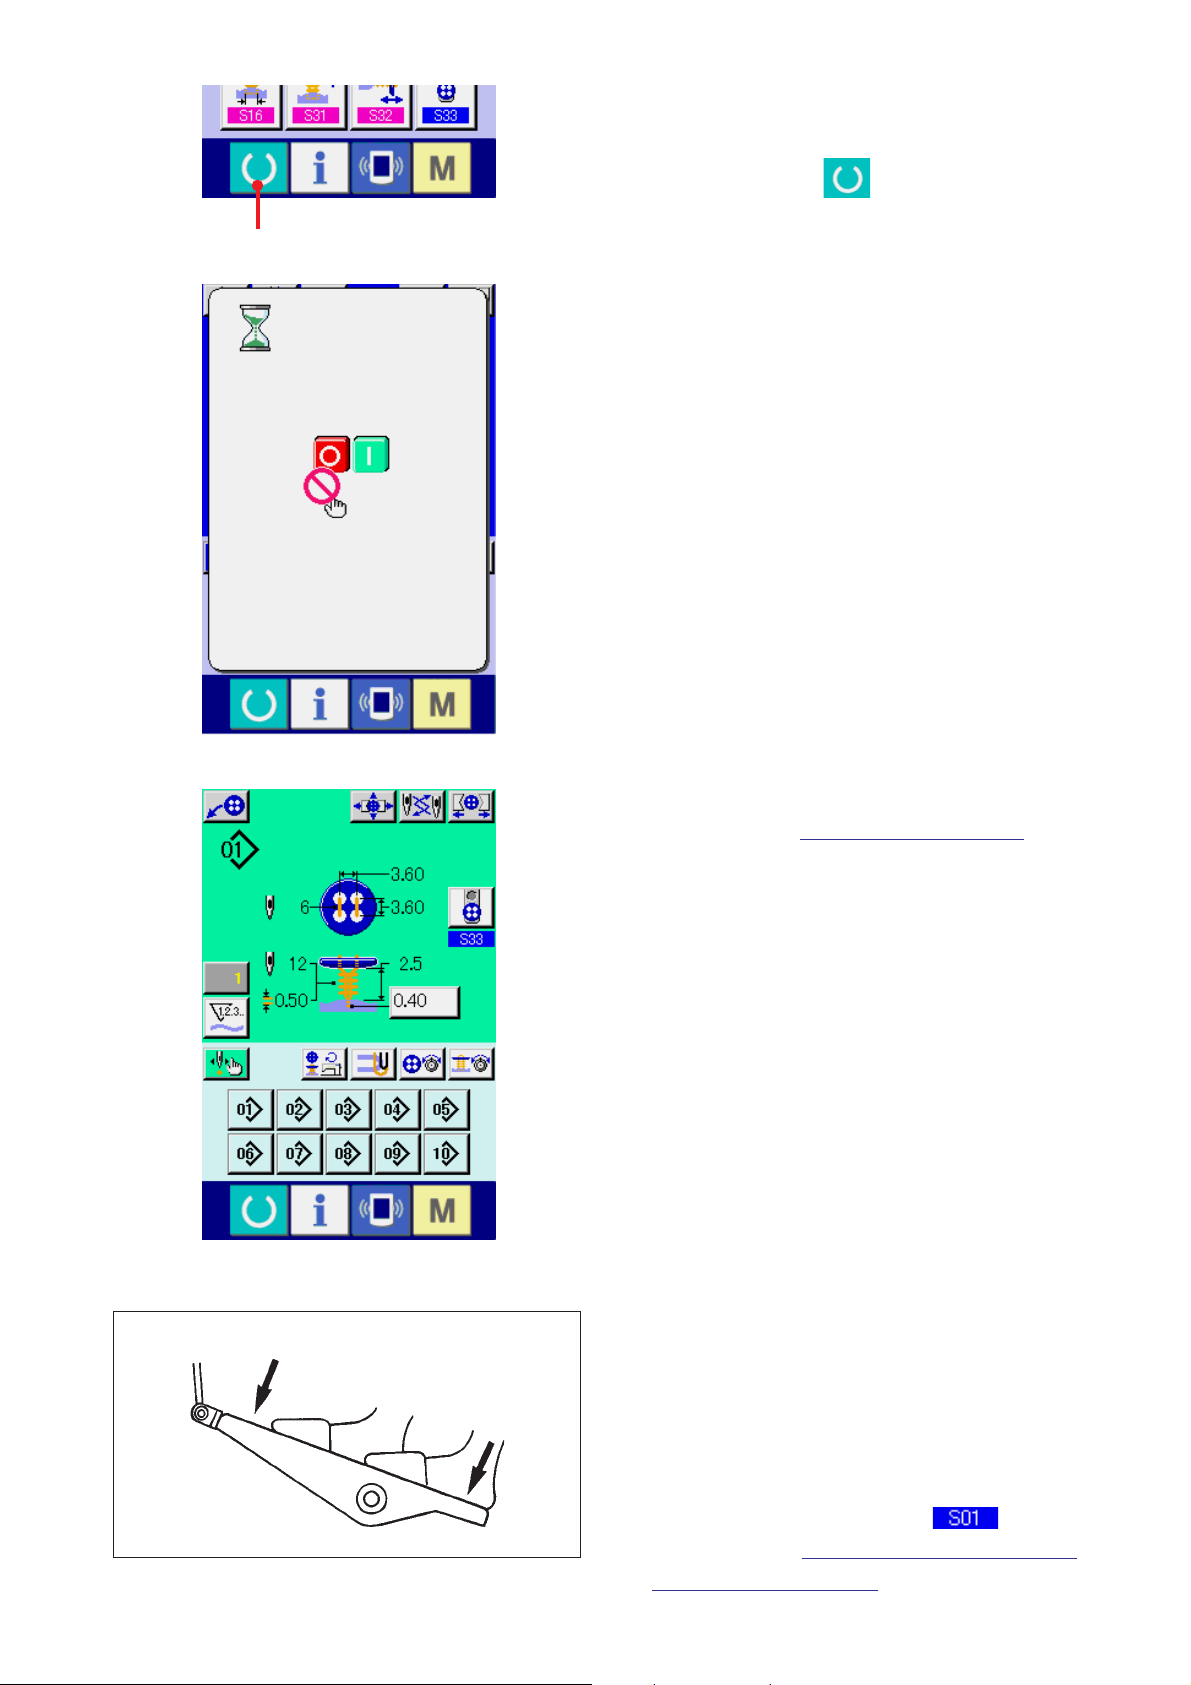
3) Set the sewing machine to sewing possible
state.
2
Press READY key
2 , and POWER OFF
PROHIBITION screen is displayed. Make
preparations for sewing while this screen is
displayed.
When the sewing is in a possible state, the
back-light of LCD display changes to green
color.
A
B
* For the detailed explanation of the sewing
screen, refer to
"3. (2) Sewing screen".
4) Settimg of the sewing products
Setting procedures of materials and buttons are
different in sewing method.
Set them while operating the device by
depressing front part A or back part B of the
foot pedal.
* For the setting procedure of
method, refer to
"13. PERFORMING SEWING
Sewing
METHOD SELECTION".
@– 3
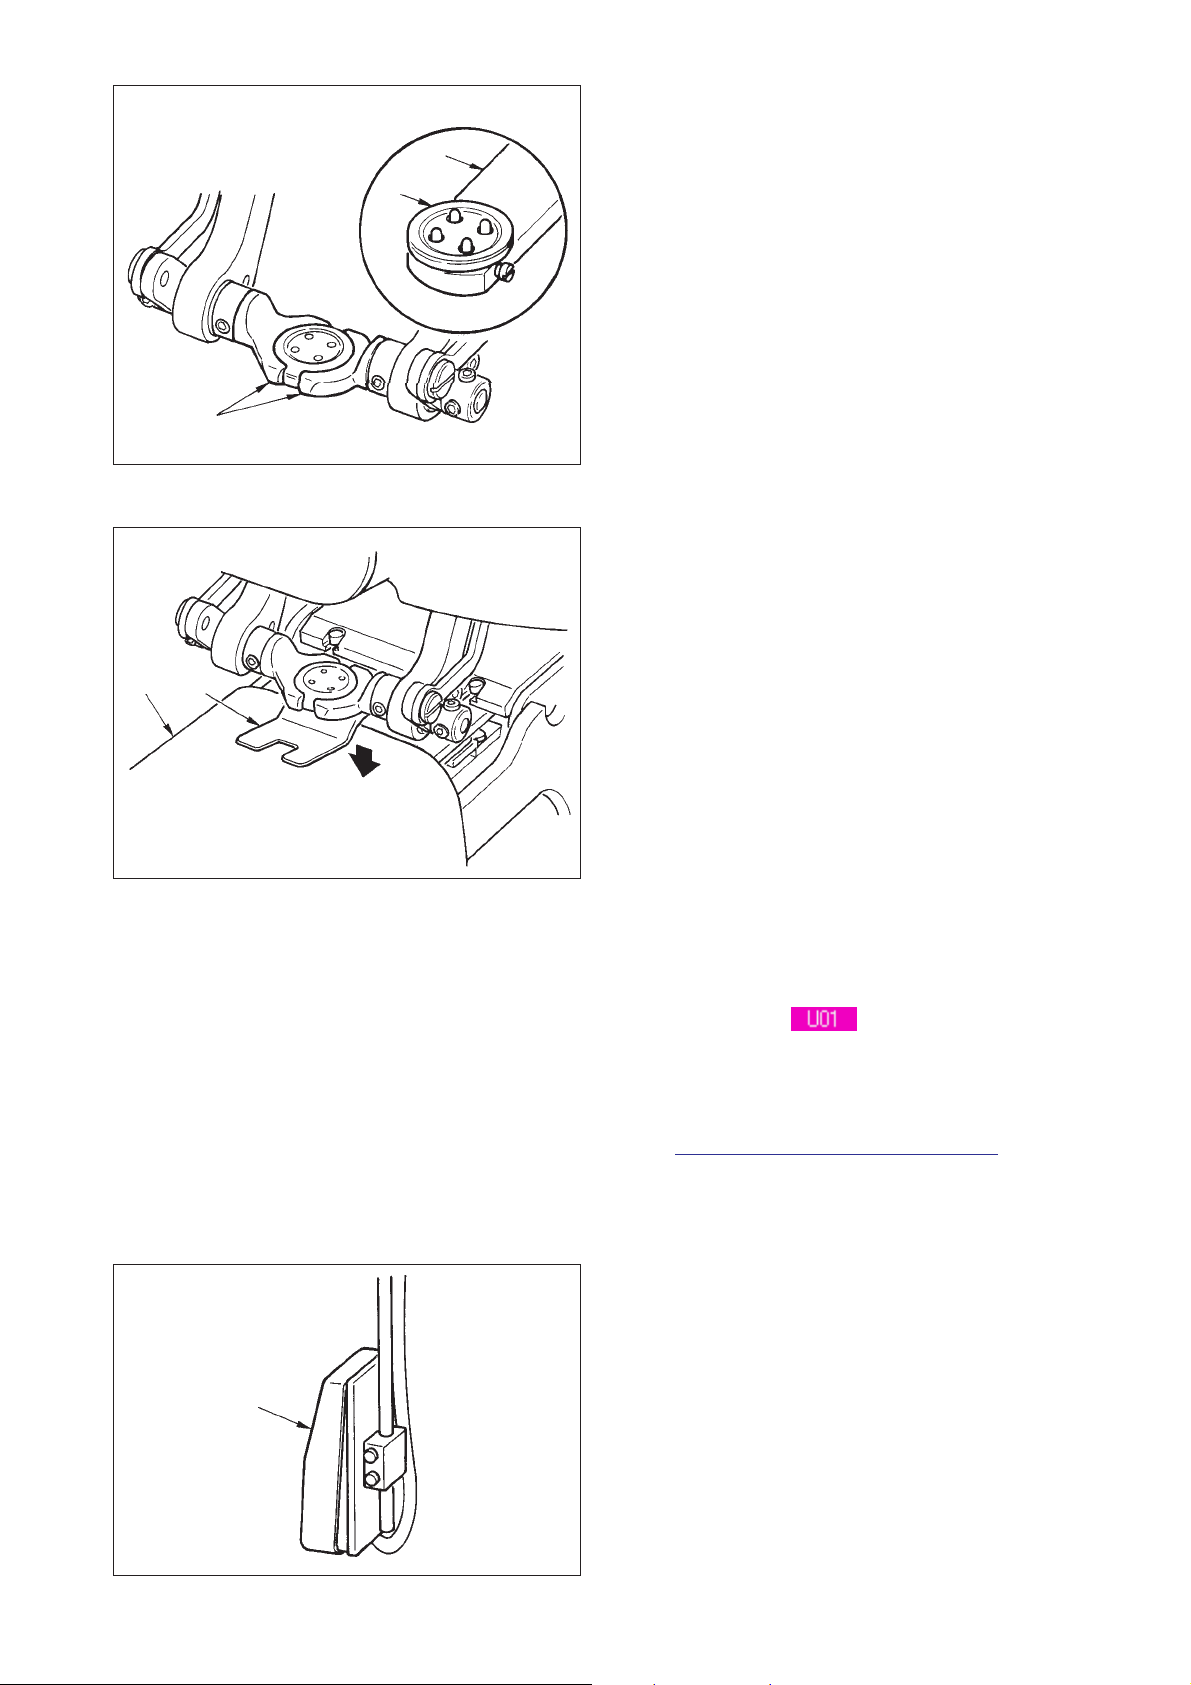
Page 8
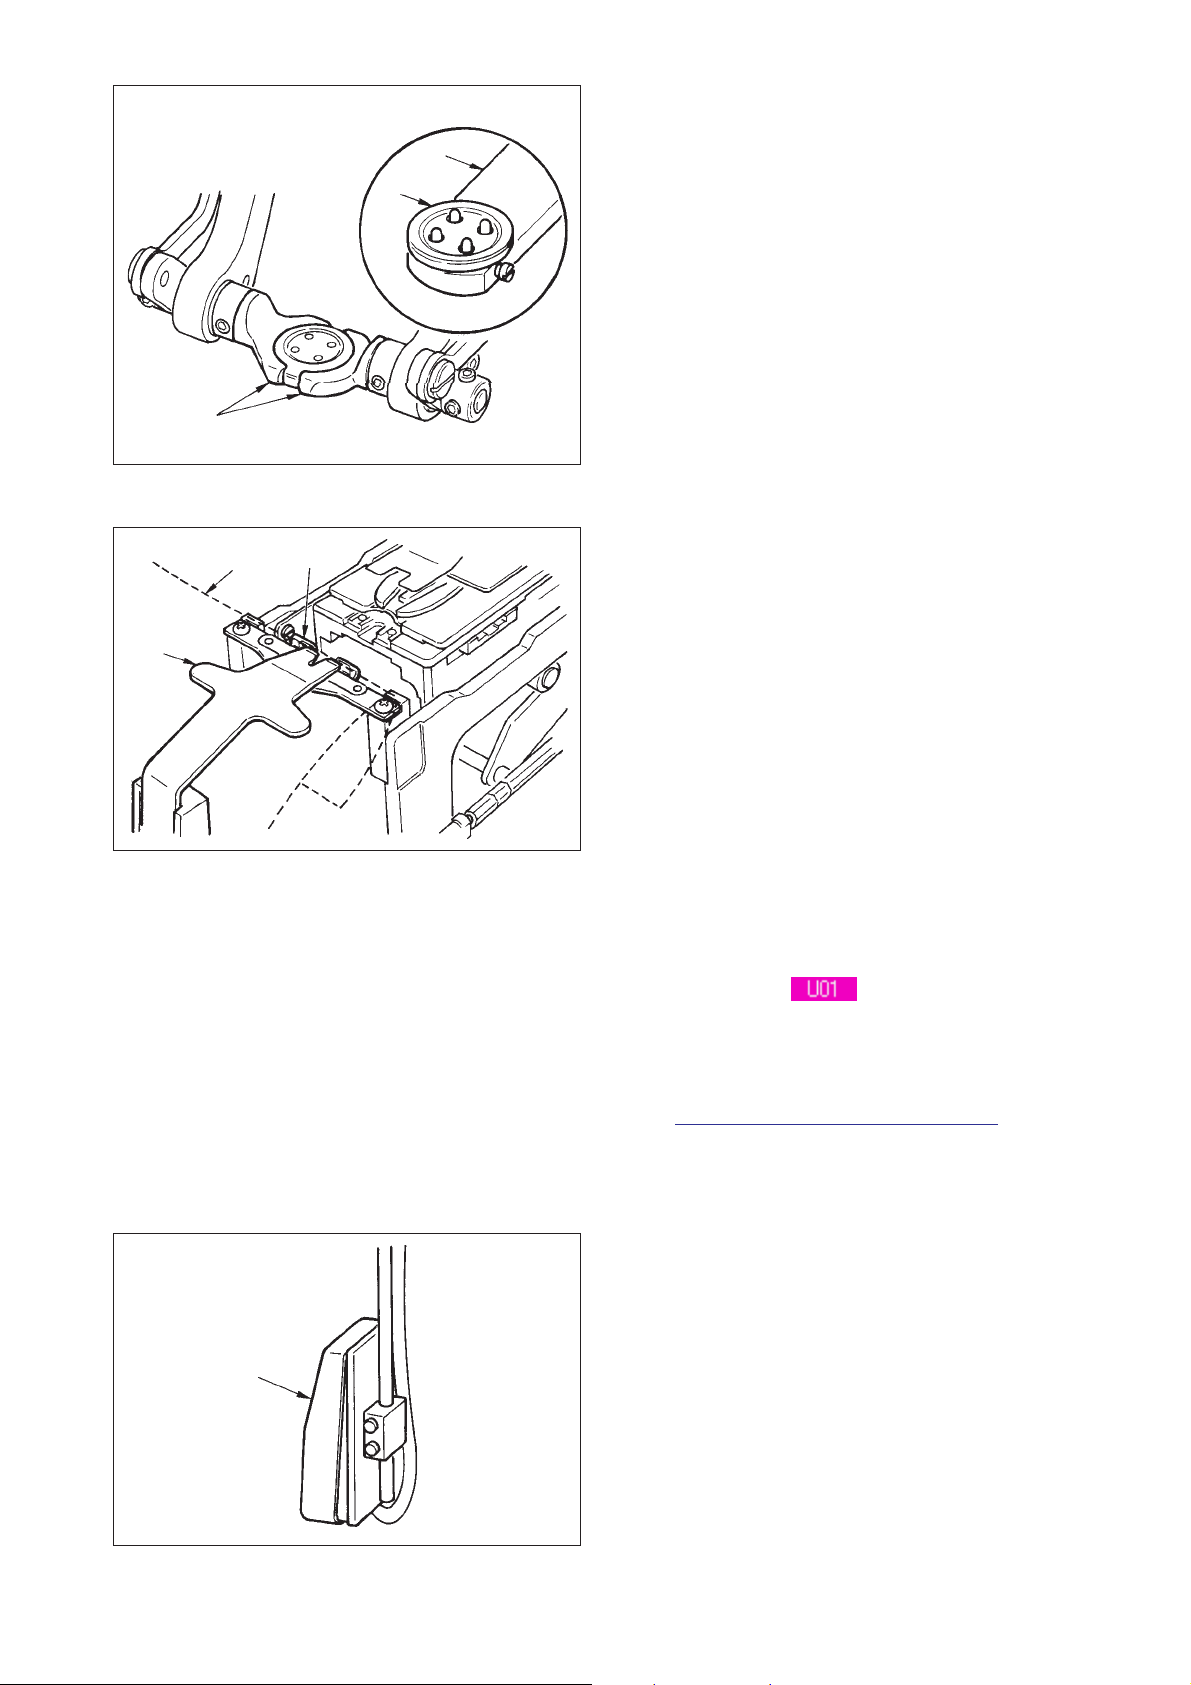
3
1
2
<In case of sewing flat/wrapped-around button
with blindstitch or sewing flat button with
blindstitch>
Set button 1 to button loader 2 and depress the
back part of the pedal to insert the button into button
chucks 3.
(When the button loader is not used, insert the
button by hand since the chuck is opened by
depressing the back part of the pedal.)
↓
5
4
6
Set cloth 4 to tongue 5 and make it come in contact
with tongue stopper 6. (Release of the tongue is
performed by depressing the back part of the pedal.)
↓
When the front part of the pedal is depressed, the
button chuck comes down to the sewing position
where the sewing is possible.
* By setting the pedal motion mode of memory
switch data
, the button chuck
automatically comes down to the sewing
position.
→ For the details of the memory switch data, refer
"32. (2) Memory switch data list".
to
7
↓
Sewing starts when start switch 7 is turned ON.
@– 4
Page 9
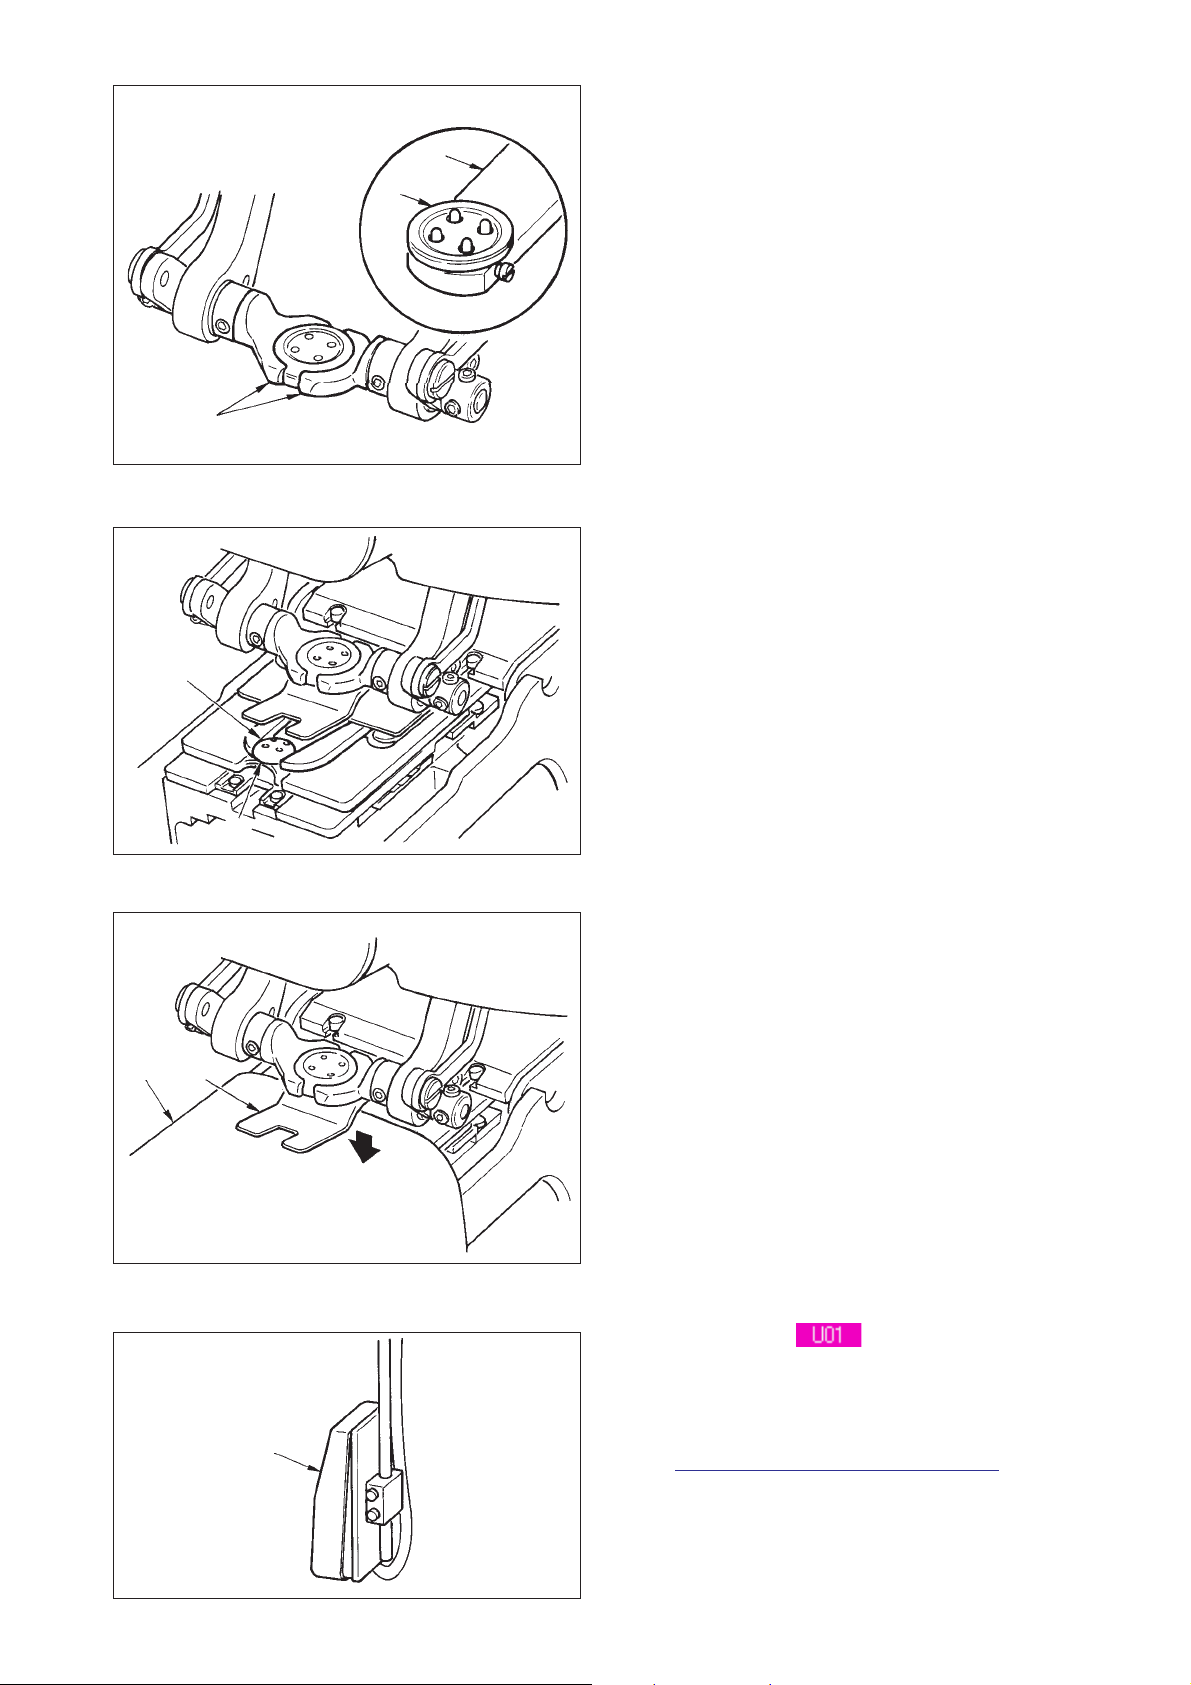
4
5
3
1
2
<In case of sewing flat button directly to cloth>
Set button 1 to button loader 2 and depress the
back part of the pedal to insert the button into button
chucks 3.
(When the button loader is not used, insert the
button by hand since the chuck is opened by
depressing the back part of the pedal.)
↓
Set cloth 4 under the needle, make the tongue
come in contact with the tongue stopper, and make
cloth presser 5 come down by depressing the front
part of the pedal to fix the cloth.
(By depressing the pedal reversely, the cloth presser
is released.)
↓
When depressing the front part of the pedal again,
the button chuck comes down to the sewing position
where the sewing is possible.
* By setting the pedal motion mode of memory
switch data
, the button chuck
automatically comes down to the sewing
position.
→ For the details of the memory switch data, refer
"32. (2) Memory switch data list".
to
↓
Sewing starts when start switch 6 is turned ON.
6
@– 5
Page 10
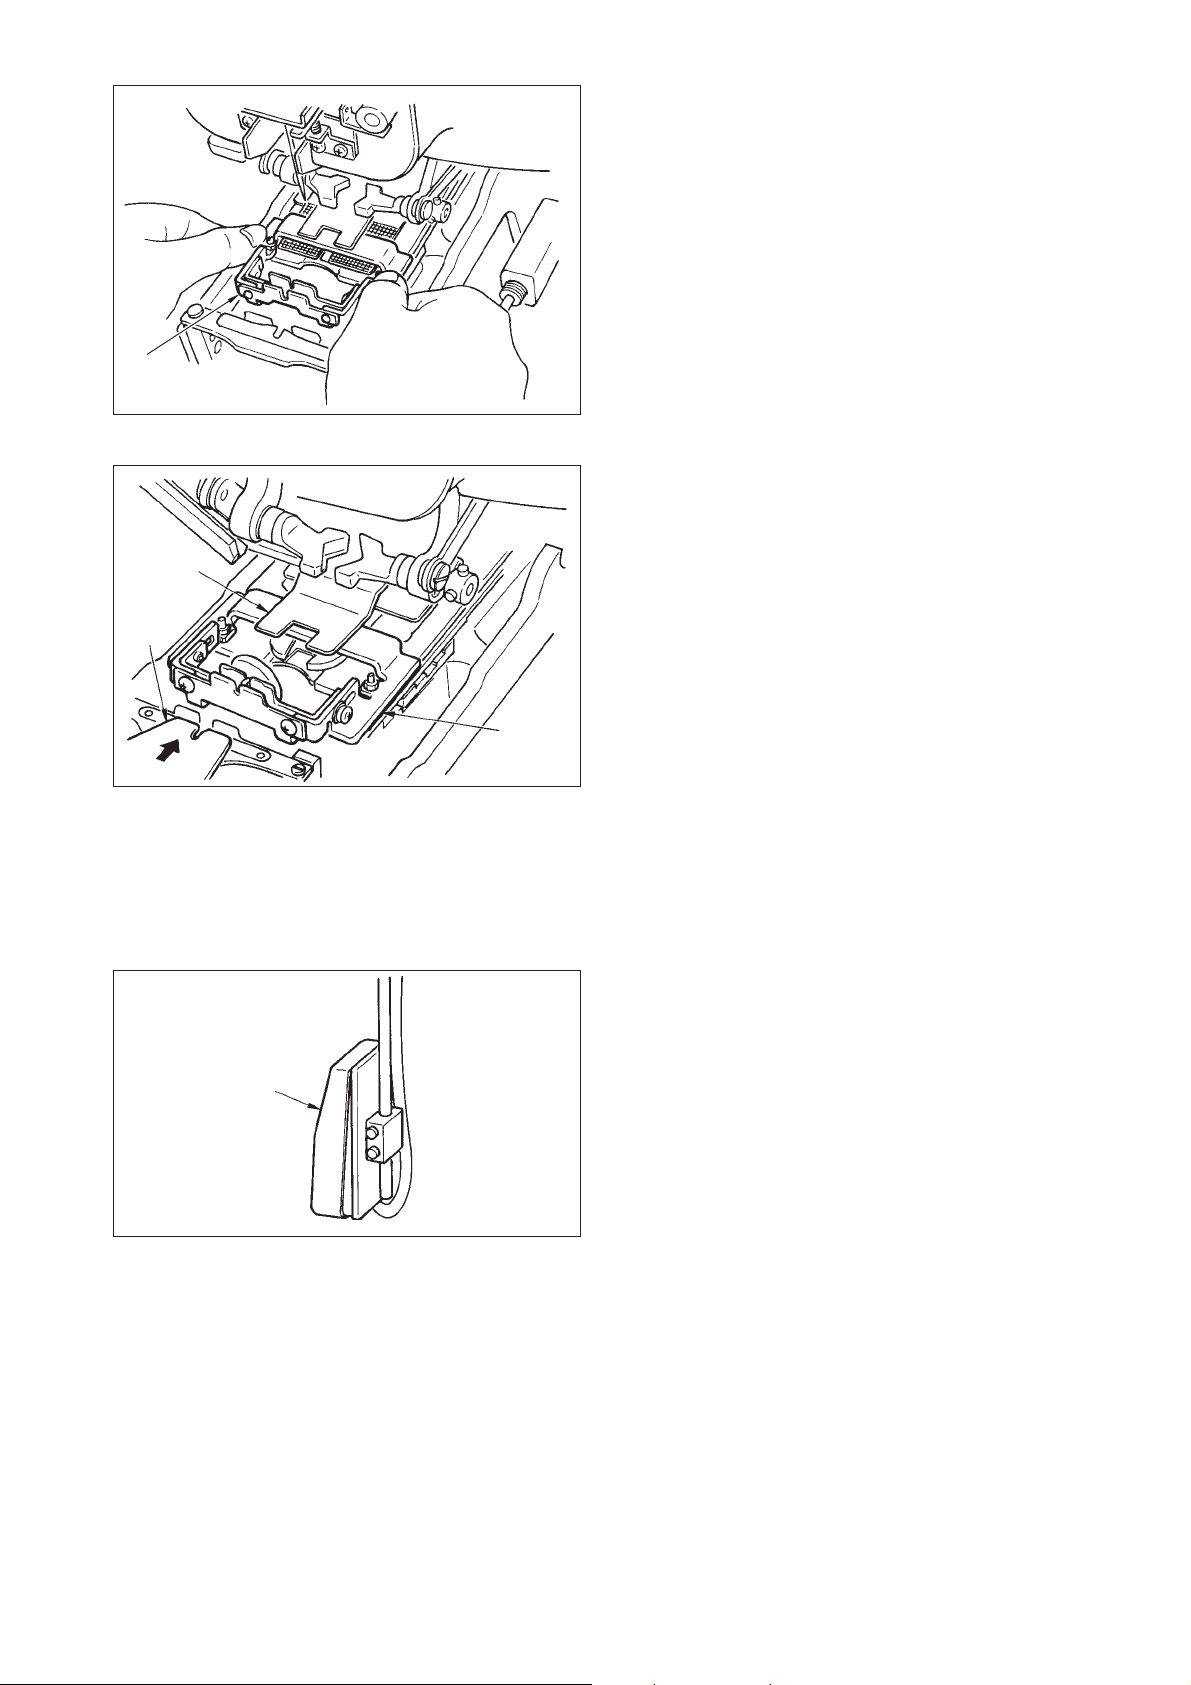
4
3
1
2
<In case of counter/stay button>
Set upper button 1 to button loader 2 and depress
the back part of the pedal to insert the button into
button chucks 3.
(When the button loader is not used, insert the
button by hand since the chuck is opened by
depressing the back part of the pedal.)
↓
Insert lower button 4 into button setting section 5
of the feed plate.
6
7
5
8
↓
Set cloth 6 under the needle, make the tongue
come in contact with the tongue stopper, and make
cloth presser 7 come down by depressing the front
part of the pedal to fix the cloth.
(By depressing the pedal reversely, the cloth
presser is released.)
↓
When the front part of the pedal is depressed, the
button chuck comes down to the sewing position
where the sewing is possible.
*By setting the pedal motion mode of memory
switch data
, the button chuck
automatically comes down to the sewing
position.
→ For the details of the memory switch data, refer
"32. (2) Memory switch data list".
to
↓
Sewing starts when start switch 8 is turned ON.
@– 6
Page 11
1
3
<In case of neck wrapping sewing>
Install neck wrapping sewing unit 1 to the inserting
hole of the feed plate.
↓
Set tongue 2 by hand, and make cloth presser 3
come down to fix neck wrapping sewing unit 1.
(Tongue and neck wrapping sewing unit are
released by depressing the pedal reversely.)
2
4
1
↓
Set the sewing product to neck wrapping sewing
unit 1.
↓
Transport the sewing product up to the sewing start
position by depressing the front part of the pedal.
(When depressing the front part of the pedal again,
the sewing product returns to the set position.
↓
The sewing starts when start switch 4 is turned
ON.
@– 7
Page 12
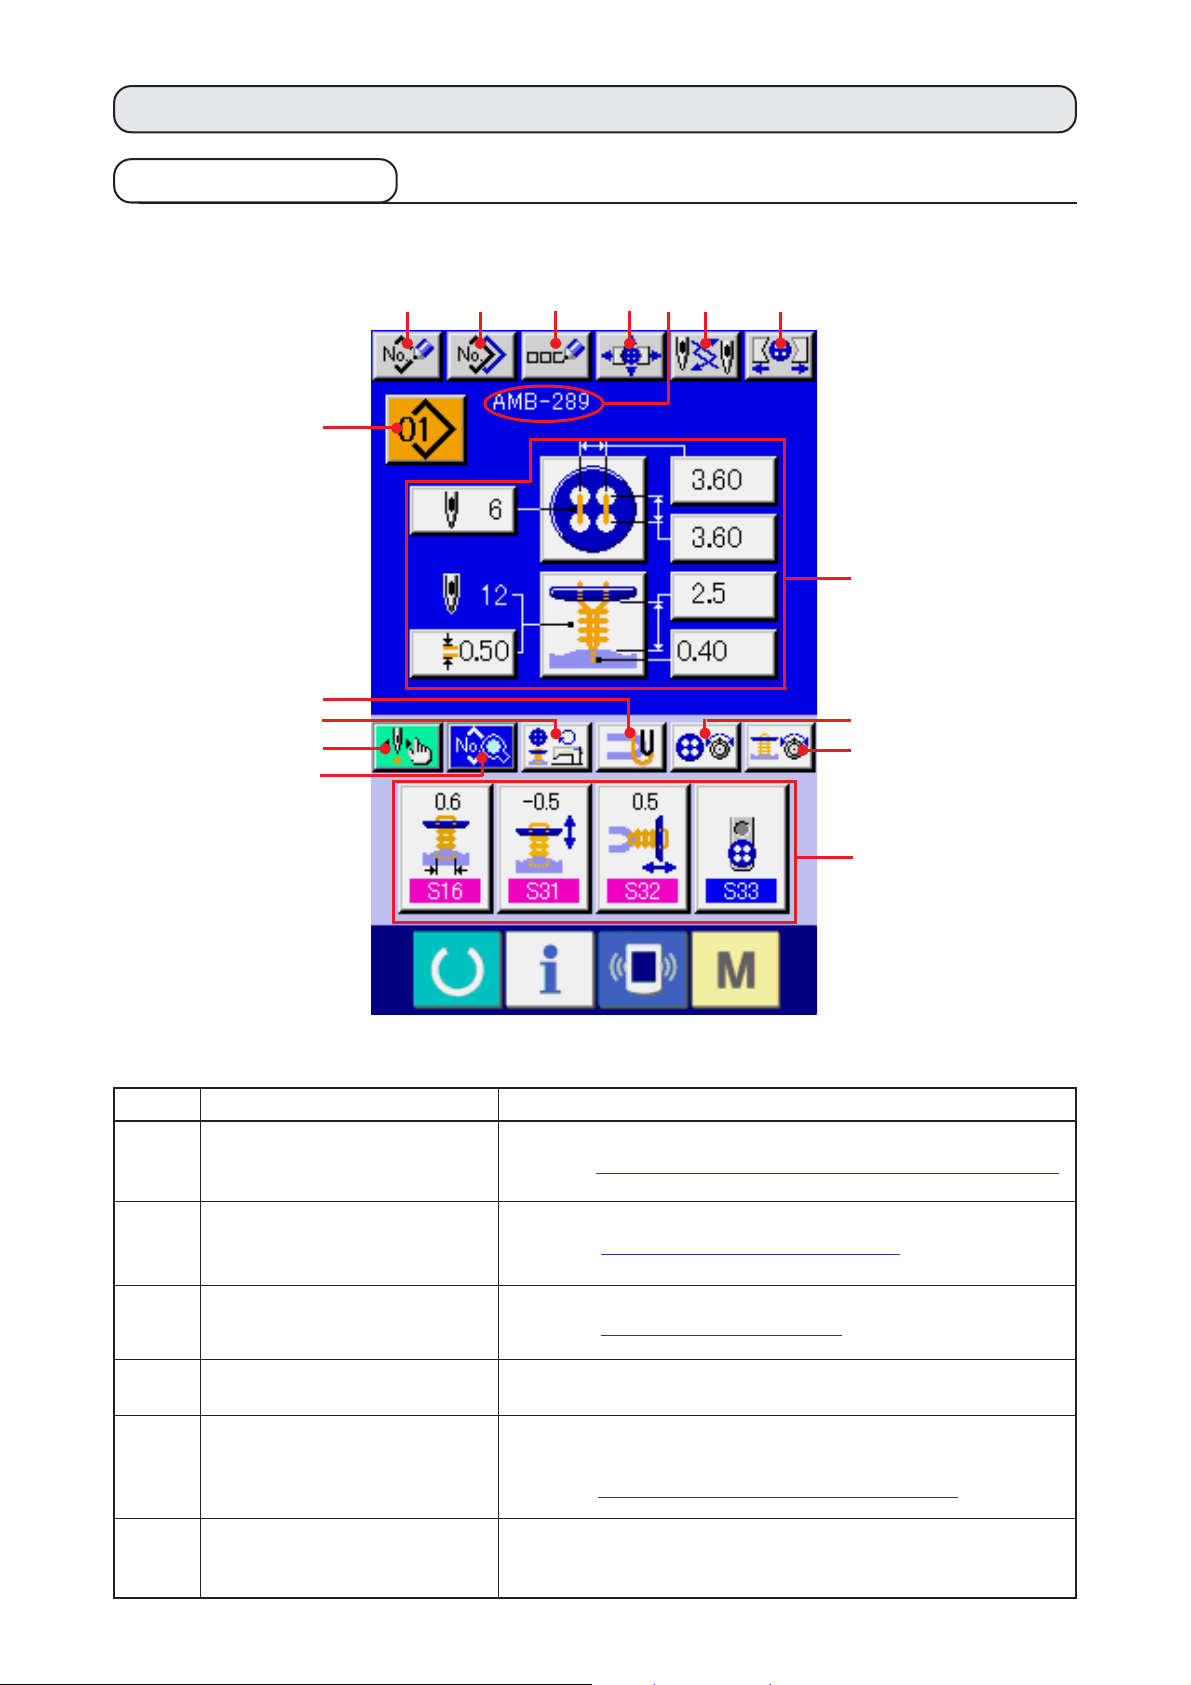
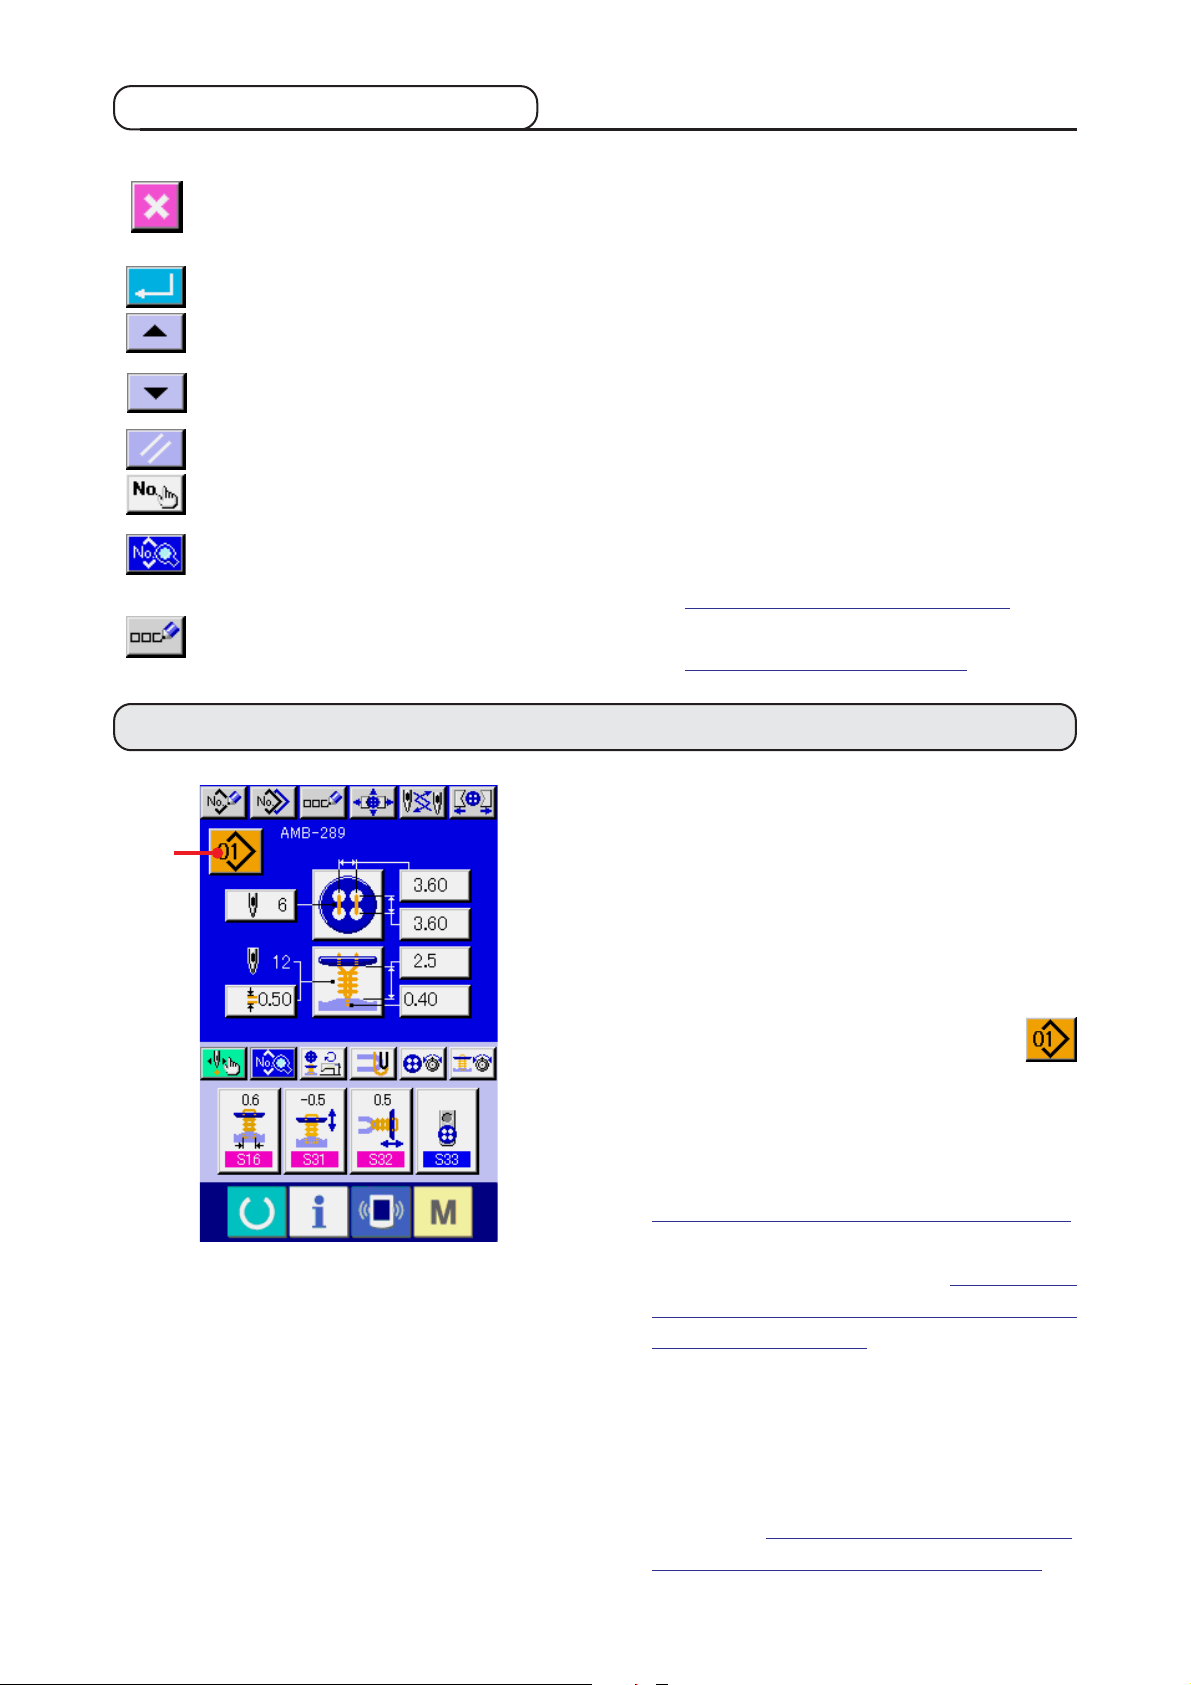
3. LCD DISPLAY SECTION AT THE TIME OF INDEPENDENT SEWING
(1) Data input screen
G
K
J
P
I
AB C EFD
O
H
L
M
N
Symbol Display Description
A
B
C
D
E
F
PATTERN NEW REGISTER button
PATTERN COPY button
PATTERN NAME SETTING button
PATTERN NAME display
NEEDLE CHANGE button
CHUCK CLOSE/OPEN button
Pattern No. new register screen is displayed.
→Refer to
Sewing pattern copy screen is displayed.
→Refer to "22. COPYING SEWING PATTERN".
Sewing pattern name input screen is displayed.
→Refer to "5. NAMING THE PATTERN".
Name which has been inputted to the sewing pattern being selected is displayed.
This button performs origin retrieval, makes needle come down, and
displays the needle change screen.
→
Refer to "33. PERFORMING CHANGE OF NEEDLE".
This button performs close/open of the chuck.
Chuck is opened as long as the button is pressed.
"21. PERFORMING NEW REGISTER OF SEWING PATTERN"
@– 8
.
Page 13
Symbol Display Description
G
PATTERN SELECTION button
Pattern No. being selected at present is displayed on this button and
when the button is pressed, the pattern No. change screen is displayed.
→
Refer to "4. PERFORMING PATTERN NO. SELECTION".
H
I
CONTENTS OF PATTERN display
SEWING DATA CHANGE button
Contents of the pattern which is registered to the pattern No. being selected at
present are displayed. The respective display sections consist of buttons and can
be changed. The contents of display differ in accordance with the sewing method.
* Sewing flat/wrapped-around button with blindstitch
→
Refer to "7. PERFORMING DATA SETTING OF SEWING
BUTTON WITH BLINDSTITCH (SHANK/MARBLE BUTTON)"
and "8. PERFORMING DATA SETTING OF SEWING BUTTON
WITH BLINDSTITCH (FLAT BUTTON)".
* Sewing flat button directly to cloth
→
Refer to "9. PERFORMING DATA SETTING OF SEWING FLAT
BUTTON DIRECTLY TO CLOTH".
* Sewing flat button with blindstitch
→
Refer to "10. PERFORMING DATA SETTING OF SEWING FLAT
BUTTON WITH BLINDSTITCH".
* Counter/stay button
→
Refer to
* Neck wrapping sewing
→
Refer to
Sewing data list screen is displayed.
→
Refer to "20. CHANGING SEWING DATA".
"11. PERFORMING SETTING OF COUNTER/STAY BUTTONS"
"12. PERFORMING DATA SETTING OF NECK WRAPPING SEWING DATA"
.
.
J
K
L
M
N
O
NUMBER OF REVOLUTIONS
SETTING button
STAY THREAD SETTING button
BUTTON SEWING THREAD
TENSION SETTING button
NECK WRAPPING THREAD
TENSION SETTING button
CUSTOMIZE button
CHUCK ADJUSTMENT button
Number of revolutions setting screen is displayed. Change of number of revolutions
of sewing machine for button sewing and that for neck wrapping can be performed.
→
Refer to "15. PERFORMING SETTING NUMBER OF REVOLUTIONS
OF SEWING MACHINE",
Stay thread setting screen is displayed.This screen is displayed only in
case of sewing flat/wrapped-around button with blindstitch or flat button
with blindstitch, and setting of stay thread is possible.
→
Refer to "16. PERFORMING SETTING STAY THREAD".
Button sewing thread tension setting screen is displayed.
→
Refer to
Neck wrapping thread tension setting screen is displayed. This screen is displayed only
in case of sewing flat/wrapped-around button with blindstitch or neck wrapping sewing.
→
Refer to
Sewing data which are more frequently used can be laid out to four buttons.
When this button is pressed, the laid-out sewing data change screen is displayed.
→
Refer to
Chuck adjustment screen is displayed.
→
Refer to "23. PERFORMING CHUCK ADJUSTMENT".
"17. PERFORMING INPUT OF BUTTON SEWING THREAD TENSION"
"18. PERFORMING INPUT OF NECK WRAP THREAD TENSION"
"35. CUSTOMIZING DATA INPUT SCREEN"
.
.
.
P
STEP SEWING button
When this button is pressed, the step sewing screen which performs
input and check of needle entry point is displayed.
→
Refer to "25. PERFORMING INPUT AND CHECK OF DATA WITH
STEP MOTION".
@– 9
Page 14
(2) Sewing screen
G
H
J
K
M
L
DEFA
BC
R
I
N
O
P
Q
Symbol Display Description
A
B
C
D
E
CHUCK ADJUSTMENT button
BUTTON CENTERING button
PATTERN NAME display
LOADER MOTION button
NEEDLE CHANGE button
Chuck adjustment screen is displayed.
→Refer to "23. PERFORMING CHUCK ADJUSTMENT".
This is not displayed in the initial state.
→Refer to "24. PERFORMING BUTTON CENTERING".
Pattern name which is set in the pattern data during sewing is displayed.
When this button is pressed, loader works and sets button to the chuck.
This button makes needle come down, and the needle change screen is displayed.
→Refer to "33. PERFORMING CHANGE OF NEEDLE".
@– 10
Page 15
Symbol Display Description
F
CHUCK CLOSE/OPEN button
This button performs close/open of the chuck.
Chuck is opened as long as the button is pressed.
G
H
I
J
K
L
M
PATTERN NO. display
PATTERN CONTENTS display
BLINDSTITCH AMOUNT SETTING
button
COUNTER VALUE CHANGE
button
COUNTER CHANGE OVER button
STEP SEWING button
NUMBER OF REVOLUTIONS
SETTING button
Pattern No. during sewing is displayed.
Contents of pattern registered to pattern No. during sewing are displayed.
Contents of display depend on the sewing method. Blindstitch amount
only can be set in the sewing screen.
Setting of blindstitch amount is possible.
* This is displayed only in case of sewing flat/wrapped-around button
with blindstitch or flat button with blindstitch.
Existing counter value is displayed on this button. When the button is
pressed, the counter value change screen is displayed.
→Refer to
Display of sewing counter/No. of pcs. counter can be changed over.
→Refer to ""31. USING COUNTER".
When this button is pressed, the step sewing screen which performs
input and check of needle entry point is displayed.
→Refer to
Number of revolutions setting screen is displayed. Change of number of revolutions
of the sewing machine for button sewing and that for neck wrapping can be performed.
→
Refer to "15. PERFORMING SETTING NUMBER OF
REVOLUTIONS OF SEWING MACHINE".
"31. USING COUNTER".
"25. PERFORMING INPUT AND CHECK OF DATA WITH STEP MOTION"
.
N
O
P
Q
R
STAY THREAD SETTING button
BUTTON SEWING THREAD
TENSION SETTING button
NECK WRAPPING THREAD
TENSION SETTING button
DIRECT button
BUTTON LOADER SELECTION
button
Stay thread setting screen is displayed. This screen is displayed only in
case of sewing flat/wrapped-around button with blindstitch or flat button
with blindstitch, and setting of stay thread is possible.
→Refer to "16. PERFORMING SETTING STAY THREAD".
Button sewing thread tension setting screen is displayed.
→Refer to
Neck wrap thread tension setting screen is displayed. This screen is
displayed only in case of sewing flat/wrapped-around button with
blindstitch or neck wrapping sewing.
→Refer to
Pattern No. is changed over to pattern No. which is registered to the button.
→Refer to "36. CUSTOMIZING SEWING SCREEN".
Button loader being selected at present is displayed on the button.
When the button is pressed, the state of button loader can be changed.
"17. PERFORMING INPUT OF BUTTON SEWING THREAD TENSION"
"18. PERFORMING INPUT OF NECK WRAP THREAD TENSION"
.
.
@– 11
Page 16
4. PERFORMING PATTERN No. SELECTION
1) Display the data input screen.
Only in case of the data input screen (blue), the
2
1
contents of setting can be changed. In case of
the sewing screen (green), press READY key
1 and display the data input screen.
2) Call the pattern No. selection screen.
Press PATTERN NO. SELECTION button
2 and the pattern No. selection screen
is displayed. Pattern No. which is selected at
present and the contents are displayed in the
upper part of the screen and the list of the
pattern No. buttons which have been registered
is displayed in the lower part.
4
5
3
6
3) Select the pattern No.
When UP or DOWN SCROLL button
3 is pressed, the pattern No.
buttons 4 which have been registered are
changed over in order. The contents of the
sewing data inputted in the pattern No. are
displayed in the button. Here, press the pattern
No. button 4 you desire to select.
4) Determine the pattern No.
Press ENTER button
5, and the pattern
No. selection screen is closed. Then the
selection has been finished.
* When you desire to delete the registered
pattern, press DELETE button
6.
However, the pattern which has been registered
to the cycle stitching cannot be deleted.
@– 12
Page 17
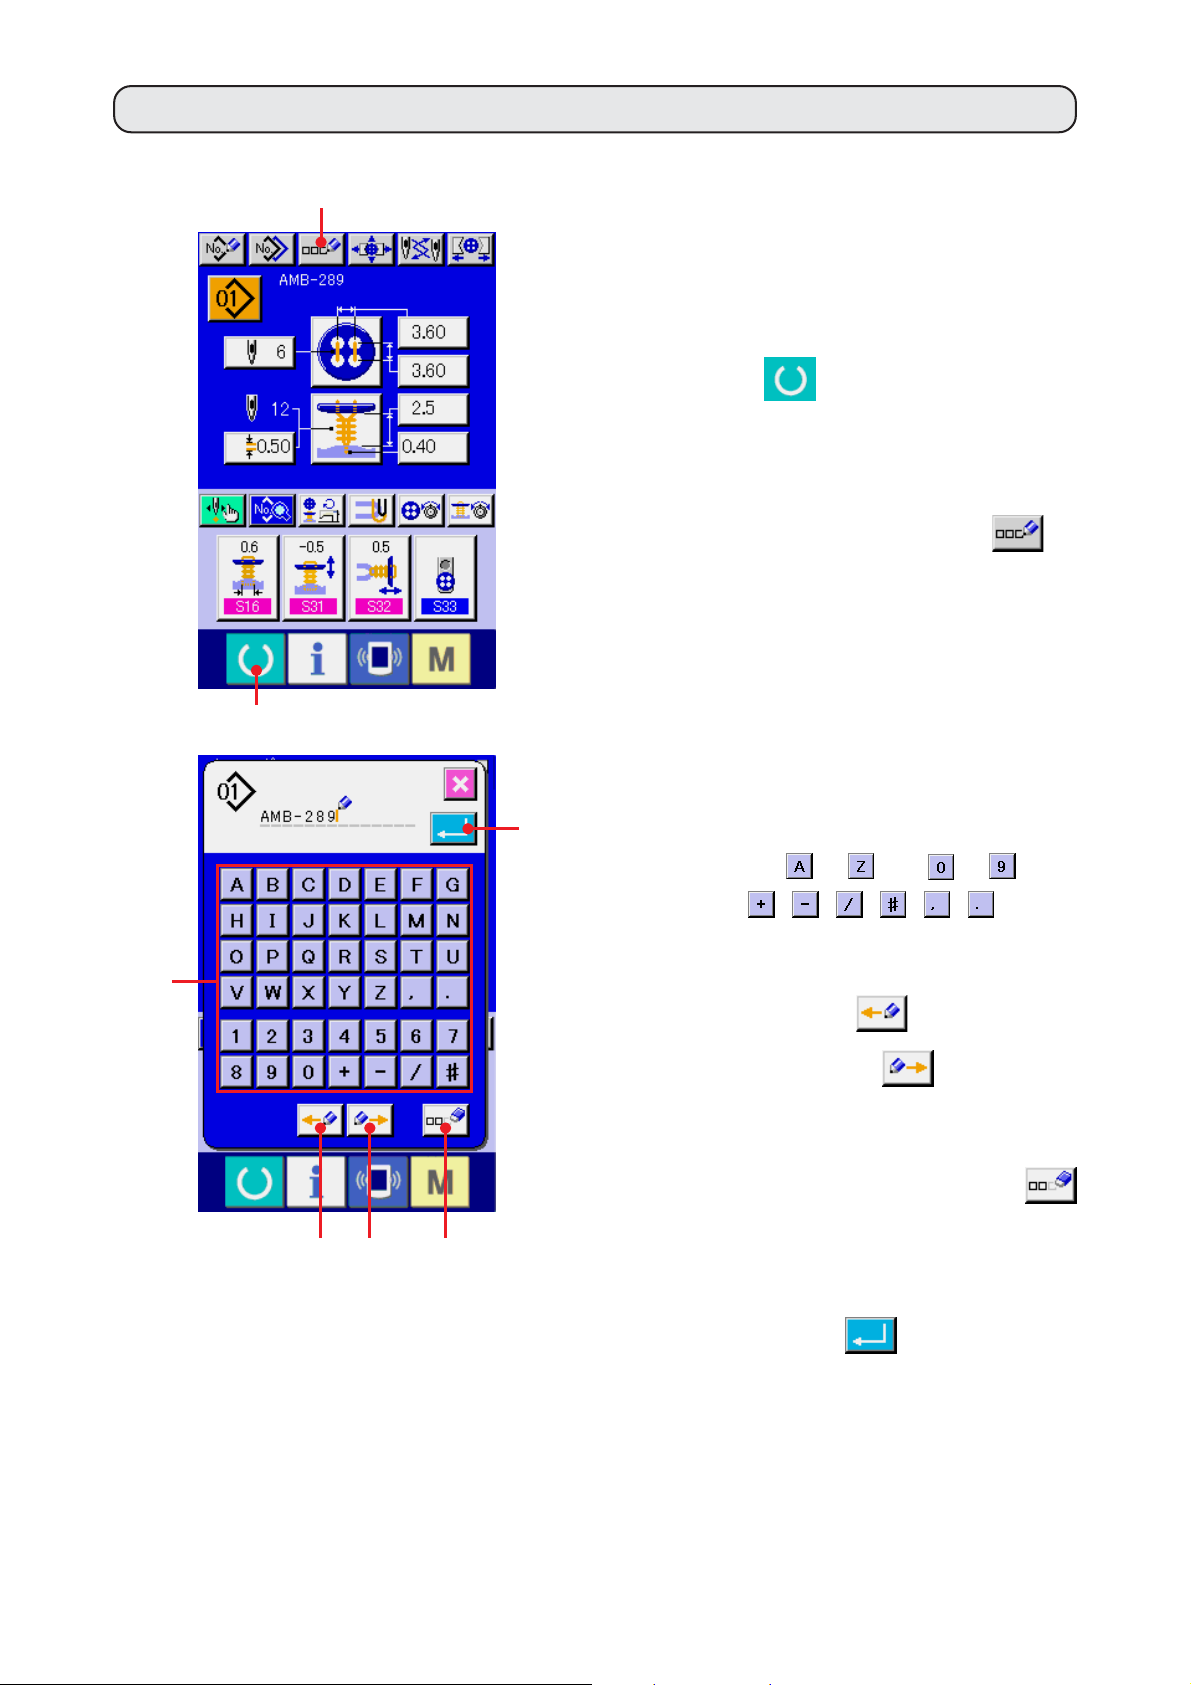
5. NAMING THE PATTERN
As many as 14 characters can be inputted to the patterns respectively.
2
1) Display the data input screen.
Only in case of the data input screen (blue),
input of the pattern name can be performed. In
case of the sewing screen (green), press
3
1
7
READY key
1 and display the data input
screen (blue).
2) Call the character input screen.
Press CHARACTER INPUT button
and the character input screen is displayed.
3) Input the character.
Press the character button 3 you desire to input,
and input of the character can be performed.
Characters (
symbols (
to and to ) and
, , , , , ) can be
inputted. As many as 14 characters can be
inputted. The cursor can travel with CURSOR
LEFT TRAVEL button
4 and CURSOR
2
4 5 6
RIGHT TRAVEL button
desire to delete the inputted character, adjust
the cursor to the position of the character you
desire to delete and press DELETE button
6.
4) Finish inputting the character.
Press ENTER button 7 and inputting the
character is finished. After the finish, the
inputted character is displayed in the upper part
of the data input screen (blue).
@– 13
5. When you
Page 18
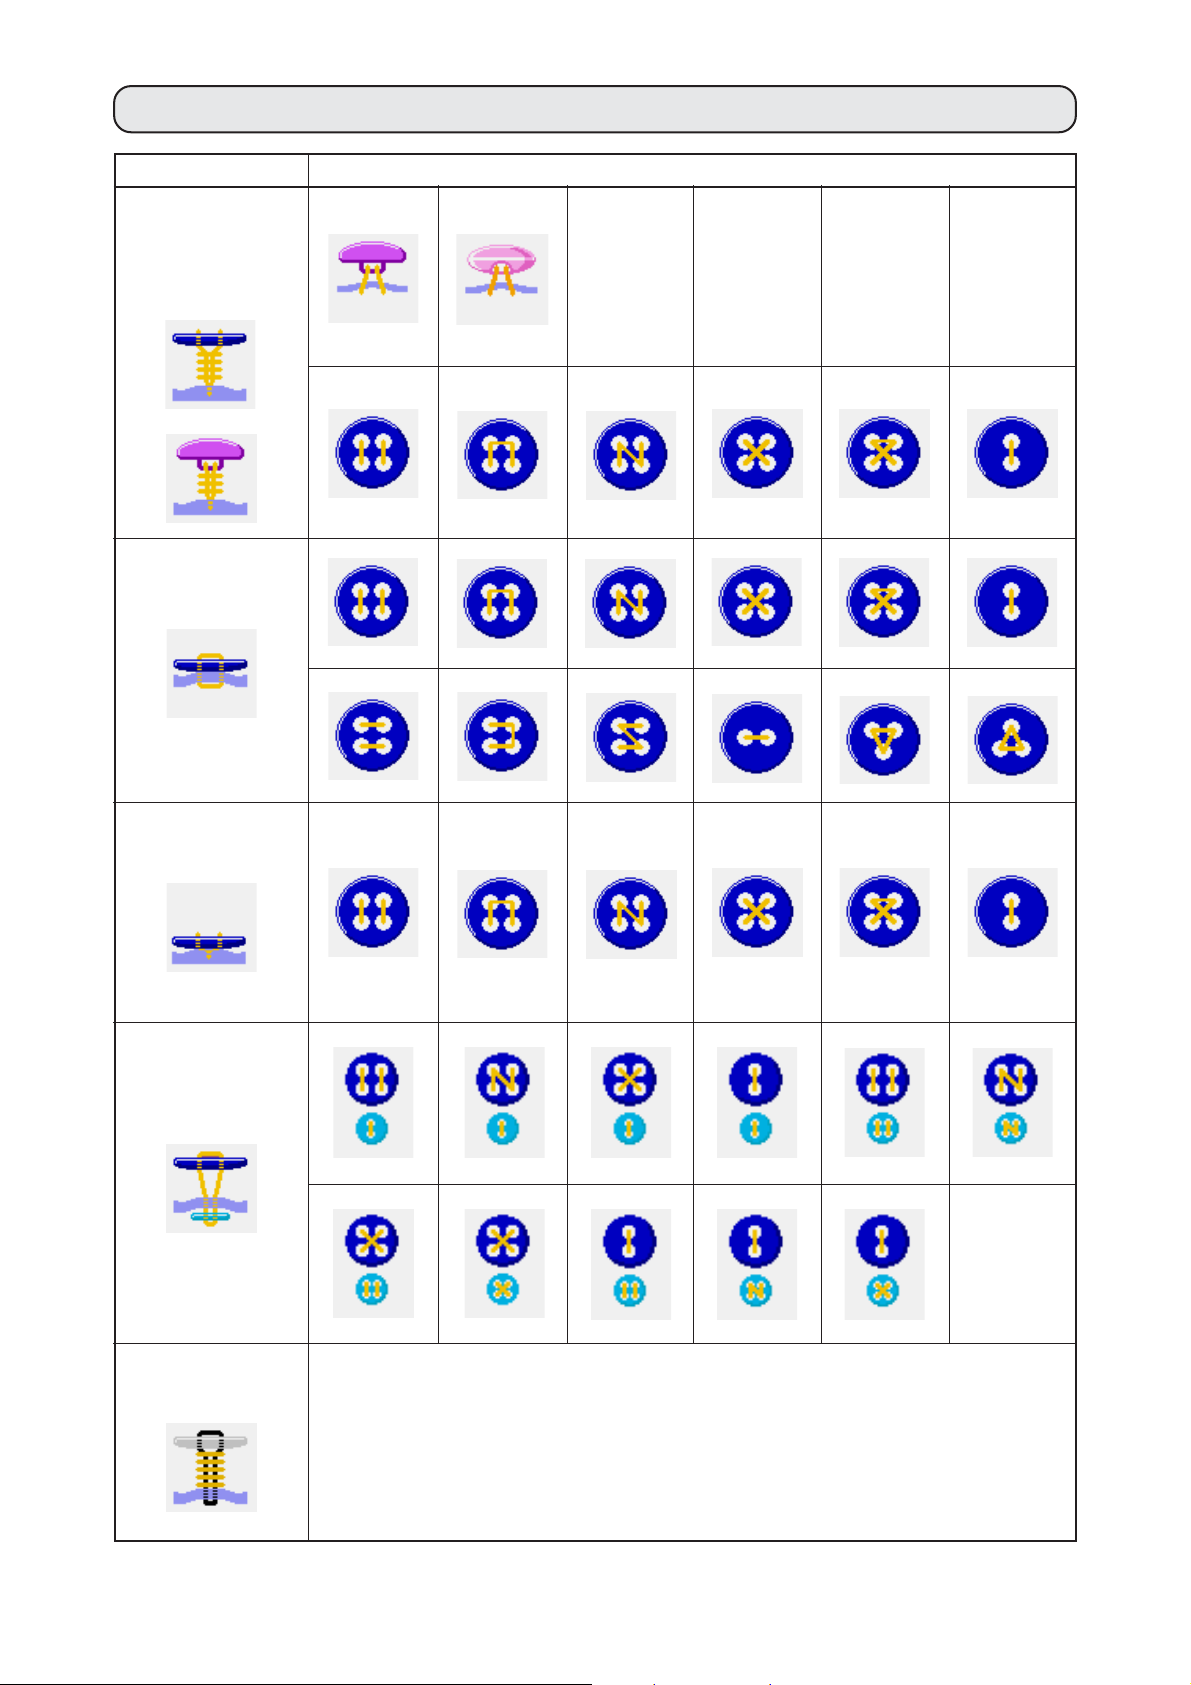
6. SEWING METHOD AND SEWING SHAPE LIST
Sewing method Sewing shape
Sewing flat/
wrapped-around
button with
blindstitch
Sewing flat button
directly to cloth
Sewing flat button
with blindstitch
Sewing counter/
stay button
Sewing button with
neck wraps
–––
@– 14
Page 19

7.
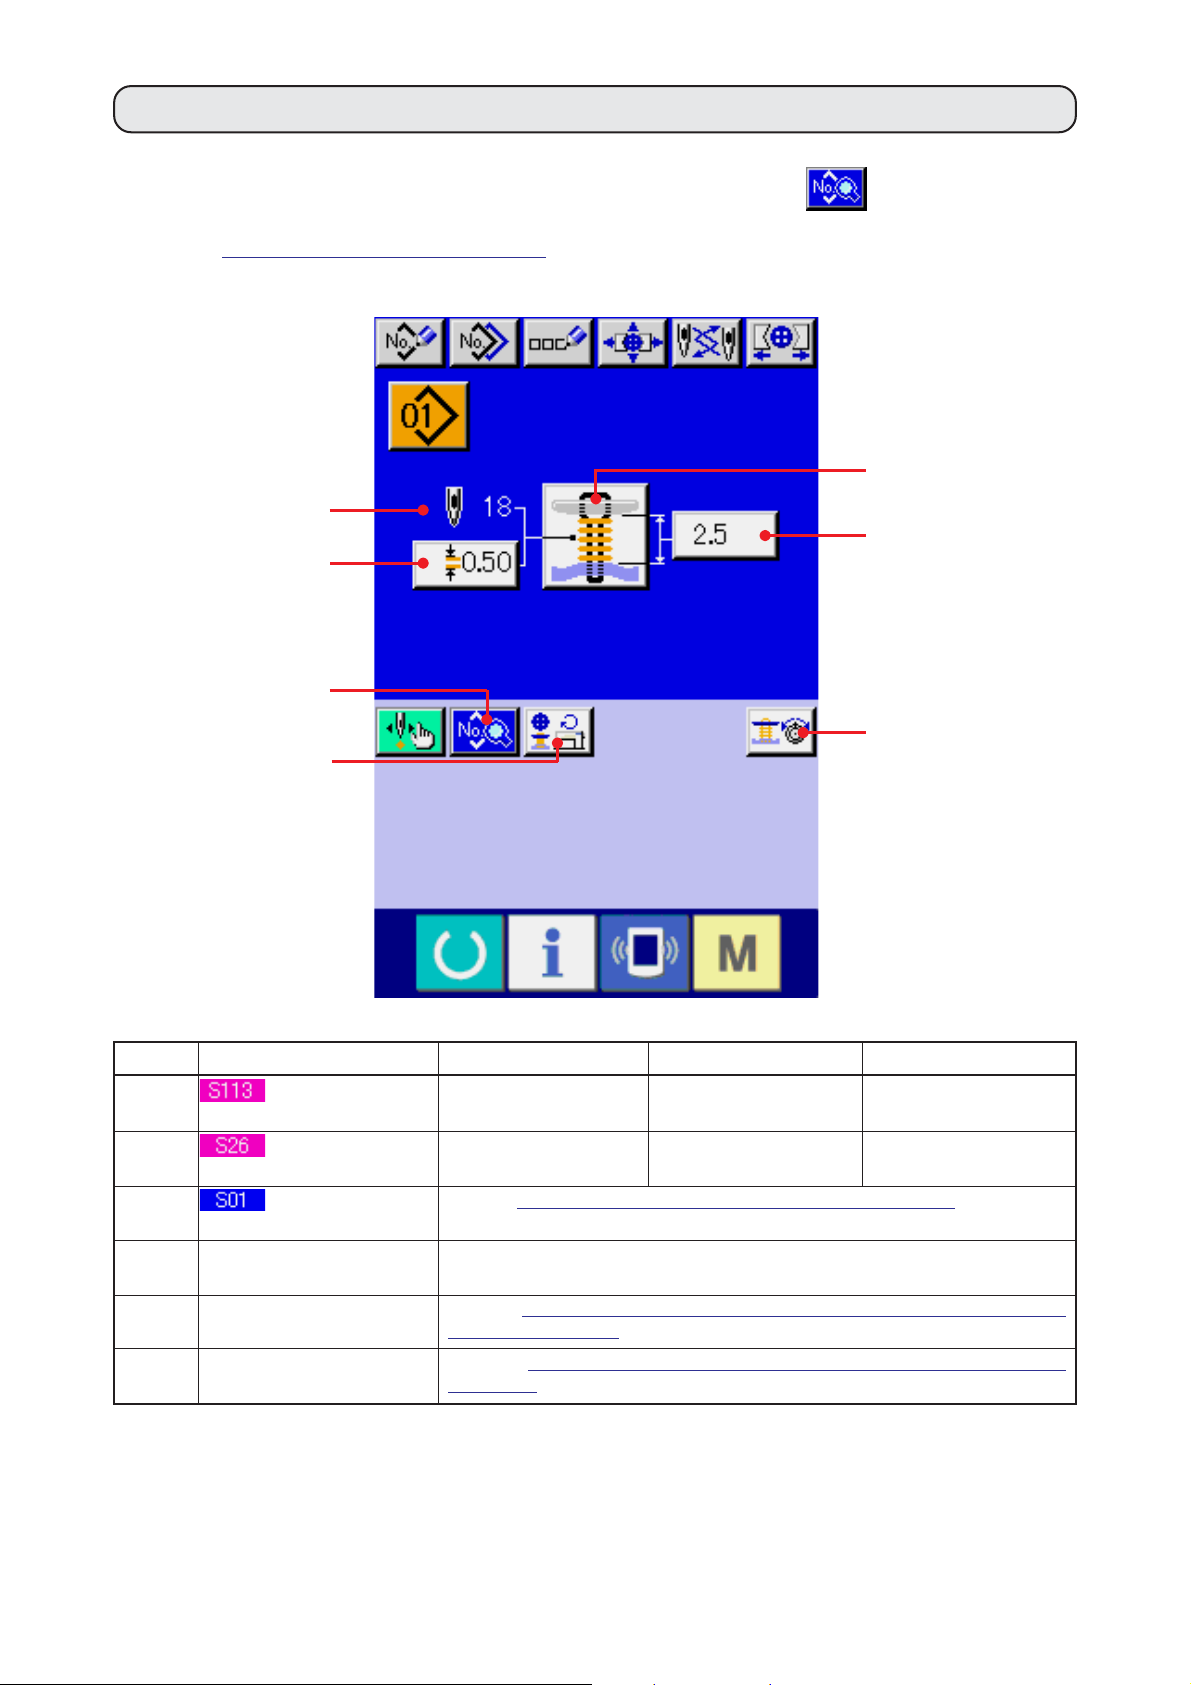
PERFORMING DATA SETTING OF SEWING BUTTON WITH BLINDSTITCH
(SHANK AND MARBLE BUTTONS)
Items that can be set in the data input screen of sewing flat/wrapped-around button with blindstitch (shank
and marble buttons) are those below. In case of performing more detailed setting, press SEWING DATA
DISPLAY button
→Refer to
"20. CHANGING SEWING DATA".
H and set it from the sewing data screen.
A
G
B
J
H
I
F
C
D
E
L
K
Symbol Item Input range Edit unit Initial value
A
B
C
D
E
F
G
I
J
K
L
Number of stitches
of button sewing
Neck wrapping pitch
Button sewing height
Blindstitch amount
Sewing method
selection
Sewing shape
selection
Number of stitches of neck
wrapping display
Number of revolutions of
sewing machine setting
Stay thread setting
Button sewing thread
tension setting
Neck wrapping thread
tension setting
2 to 32
0.05 to 2.00
0 to 15.0
–1.00 to 5.00
Refer to
Refer to "14. PERFORMING SEWING SHAPE SELECTION".
Number of stitches of neck wrapping actually sewn is displayed.
Refer to "15. PERFORMING SETTING NUMBER OF REVOLUTIONS OF
SEWING MACHINE"
Refer to "16. PERFORMING SETTING STAY THREAD".
Refer to "17. PERFORMING INPUT OF BUTTON SEWING THREAD
TENSION".
Refer to "18. PERFORMING INPUT OF NECK WRAPPING THREAD
TENSION".
"13. PERFORMING SEWING METHOD SELECTION".
.
2 stitches
0.05mm
0.1mm
0.05mm
6
0.50
4.0
0.40
@– 15
Page 20
8.
PERFORMONG DATA SETTING OF SEWING BUTTON WITH BLINDSTITCH
(FLAT BUTTON)
Items that can be set in the data input screen of sewing flat/wrapped-around button with blindstitch (flat
button) are those below. In case of performing more detailed setting, press SEWING DATA DISPLAY
button
N and set it from the sewing data screen. →Refer to "20. CHANGING SEWING DATA".
H
B
C
A
I
D
K
J
N
Symbol Item Input range Edit unit Initial value
A
B
C
D
Buttonhole interval
(longitudinal)
Buttonhole interval
(lateral)
Number of stitches
of button sewing
Neck wrapping pitch
0.10 to 6.00
0.10 to 6.00
2 to 32
0.05 to 2.00
0.05mm
0.05mm
2 stitches
0.05mm
E
F
G
M
L
3.60
3.60
6
0.50
E
F
G
H
I
J
K
L
M
Button sewing height
Blindstitch amount
Sewing method
selection
Sewing shape
selection
Number of stitches of neck
wrapping display
Number of revolutions of
sewing machine setting
Stay thread setting
Button sewing thread
tension setting
Neck wrapping thread
tension setting
0.5 to 15.0
–1.00 to 5.00
Refer to "13. PERFORMING SEWING METHOD SELECTION".
Refer to "14. PERFORMING SEWING SHAPE SELECTION".
Number of stitches of neck wrapping actually sewn is displayed.
Refer to "15. PERFORMING SETTING NUMBER OF REVOLUTIONS OF
SEWING MACHINE"
Refer to
Refer to "17. PERFORMING INPUT OF BUTTON SEWING THREAD
TENSION".
Refer to
TENSION".
"16. PERFORMING SETTING STAY THREAD".
"18. PERFORMING INPUT OF NECK WRAPPING THREAD
.
0.1mm
0.05mm
2.5
0.40
@– 16
Page 21

9.
PERFORMING DATA SETTING OF SEWING BUTTON DIRECTLY TO CLOTH
Items that can be set in the data input screen of sewing flat button directly to cloth are those below. In case
of performing more detailed setting, press SEWING DATA DISPLAY button
H and set it from the
sewing data screen.
→Refer to
"20. CHANGING SEWING DATA".
G
B
C
A
E
D
H
I
Symbol Item Input range Edit unit Initial value
A
B
C
D
E
F
G
I
J
Buttonhole interval
(longitudinal)
Buttonhole interval
(lateral)
Number of stitches
of button sewing
Interval of bottom
needle entry (longitudinal)
Interval of bottom
feed needle entry (lateral)
Sewing method
selection
Sewing shape
selection
Number of revolutions of
sewing machine setting
Button sewing thread tension
setting
feed
0.10 to 6.00
0.10 to 6.00
2 to 32
0.10 to 6.00
0.10 to 6.00
Refer to
Refer to "14. PERFORMING SEWING SHAPE SELECTION".
Refer to "15. PERFORMING SETTING NUMBER OF REVOLUTIONS OF
SEWING MACHINE"
Refer to
TENSION".
"13. PERFORMING SEWING METHOD SELECTION".
.
"17. PERFORMING INPUT OF BUTTON SEWING THREAD
0.05mm
0.05mm
2 stitches
0.05mm
0.05mm
F
J
3.60
3.60
6
3.60
3.60
@– 17
Page 22

10.
PERFORMING DATA SETTING OF SEWING FLAT BUTTON WITH BLINDSTITCH
Items that can be set in the data input screen of sewing flat button with blindstitch are those below. In case
of performing more detailed setting, press SEWING DATA DISPLAY button
G and set it from the
sewing data screen.
→Refer to
"20. CHANGING SEWING DATA".
F
B
C
A
D
G
H
Symbol Item Input range Edit unit Initial value
A
B
C
D
Buttonhole interval
(longitudinal)
Buttonhole interval
(lateral)
Number of stitches
of button sewing
Blindstitch amount
0.10 to 6.00
0.10 to 6.00
2 to 32
–1.00 to 5.00
0.05mm
0.05mm
2 stitches
0.05mm
E
I
J
3.60
3.60
6
0.40
E
F
H
I
J
Sewing method
selection
Sewing shape
selection
Number of revolutions of
sewing machine setting
Stay thread setting
Button sewing thread
tension setting
Refer to "13. PERFORMING SEWING METHOD SELECTION".
Refer to "14. PERFORMING SEWING SHAPE SELECTION".
Refer to "15. PERFORMING SETTING NUMBER OF REVOLUTIONS OF
SEWING MACHINE"
Refer to
Refer to "17. PERFORMING INPUT OF BUTTON SEWING THREAD
TENSION".
"16. PERFORMING SETTING STAY THREAD".
.
@– 18
Page 23
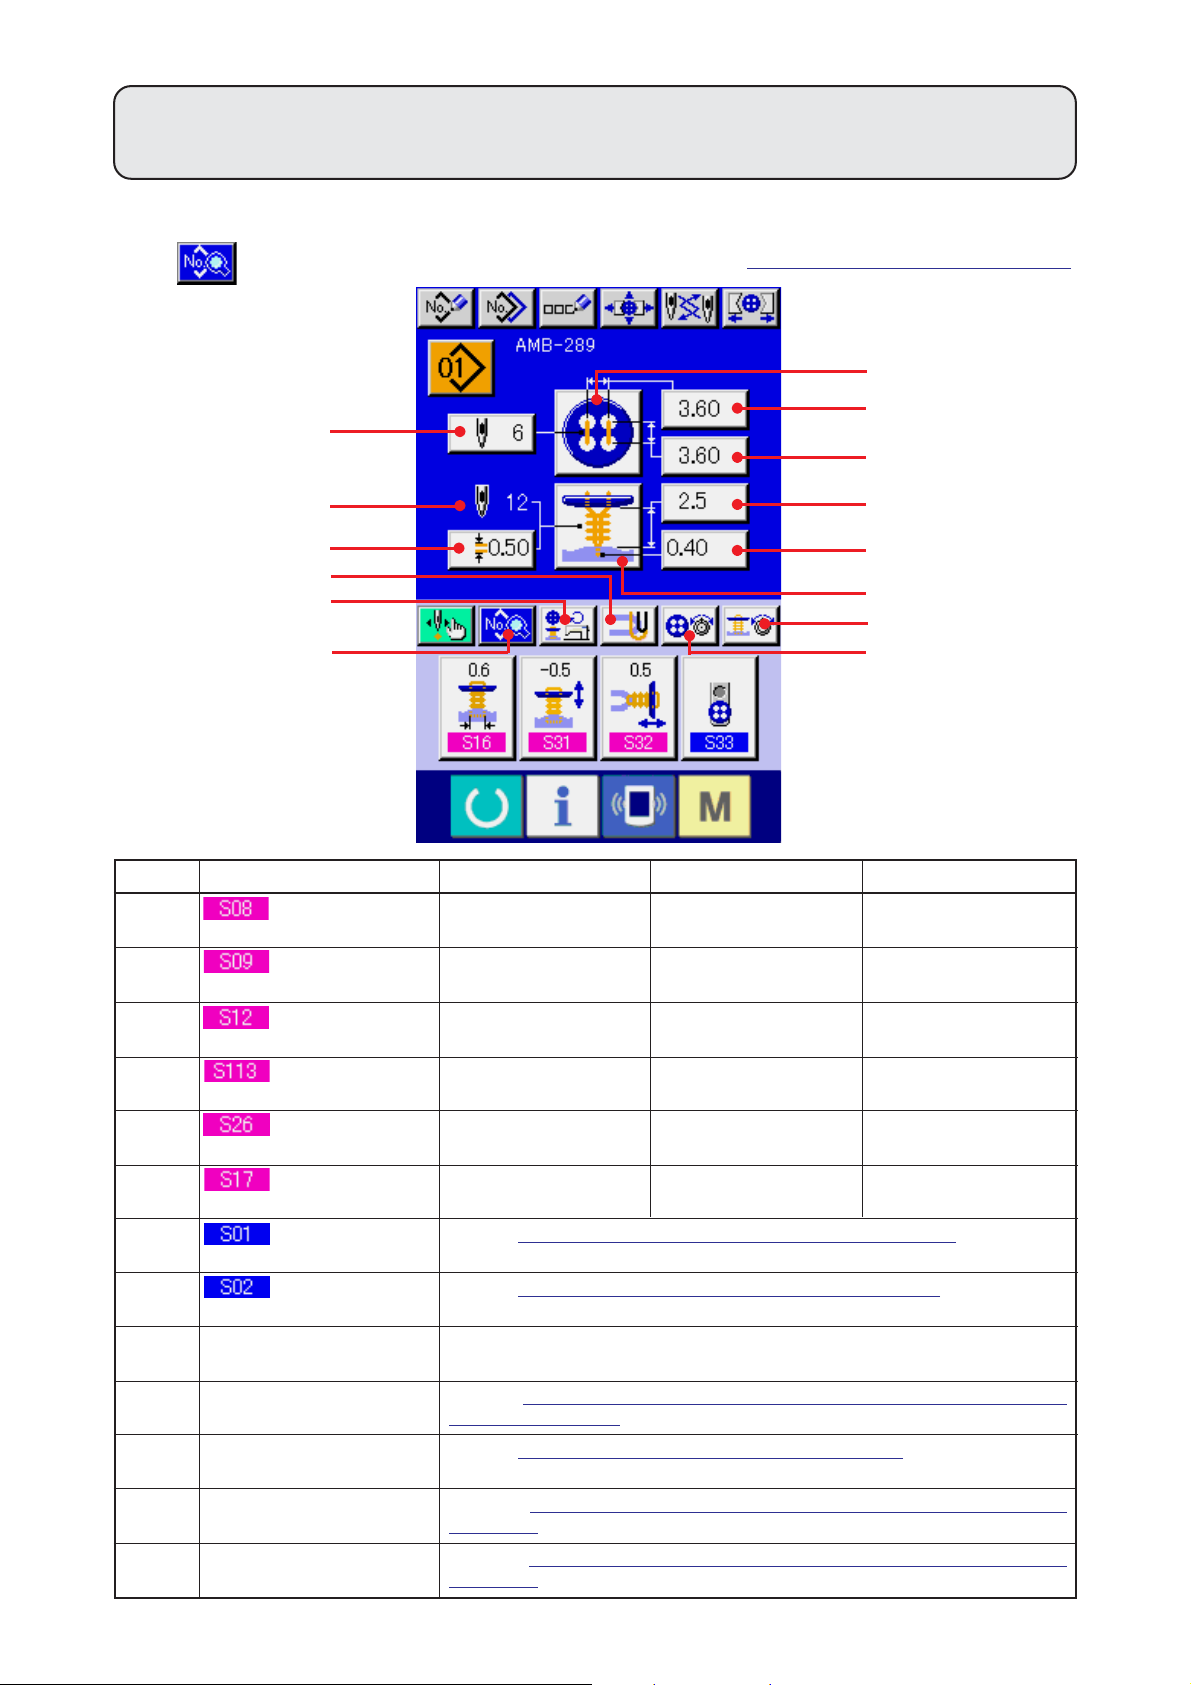
11. PERFORMING SETTING OF COUNTER/STAY BUTTONS
Items that can be set in the data input screen of counter and stay buttons are those below. In case of
performing more detailed setting, press SEWING DATA DISPLAY button
sewing data screen.
→Refer to
"20. CHANGING SEWING DATA".
C
E
D
I and set it from the
H
B
A
F
I
J
Symbol Item Input range Edit unit Initial value
A
B
C
D
E
F
G
H
J
K
Buttonhole interval
(longitudinal)
Buttonhole interval
(lateral)
Number of stitches
of button sewing
Interval of bottom
feed needle entry (longitudinal)
Interval of bottom
feed needle entry (lateral)
Button height
(counter button)
Sewing method
selection
Sewing shape
selection
Number of revolutions of
sewing machine setting
Button sewing thread
tension setting
0.10 to 6.00
0.10 to 6.00
2 to 32
0.10 to 6.00
0.10 to 6.00
0 to 20.0
Refer to "13. PERFORMING SEWING METHOD SELECTION".
Refer to "14. PERFORMING SEWING SHAPE SELECTION".
Refer to "15. PERFORMING SETTING NUMBER OF REVOLUTIONS OF
SEWING MACHINE"
Refer to
TENSION".
"17. PERFORMING INPUT OF BUTTON SEWING THREAD
.
0.05mm
0.05mm
2 stitches
0.05mm
0.05mm
0.1mm
G
K
3.60
3.60
6
3.60
3.60
6.0
@– 19
Page 24
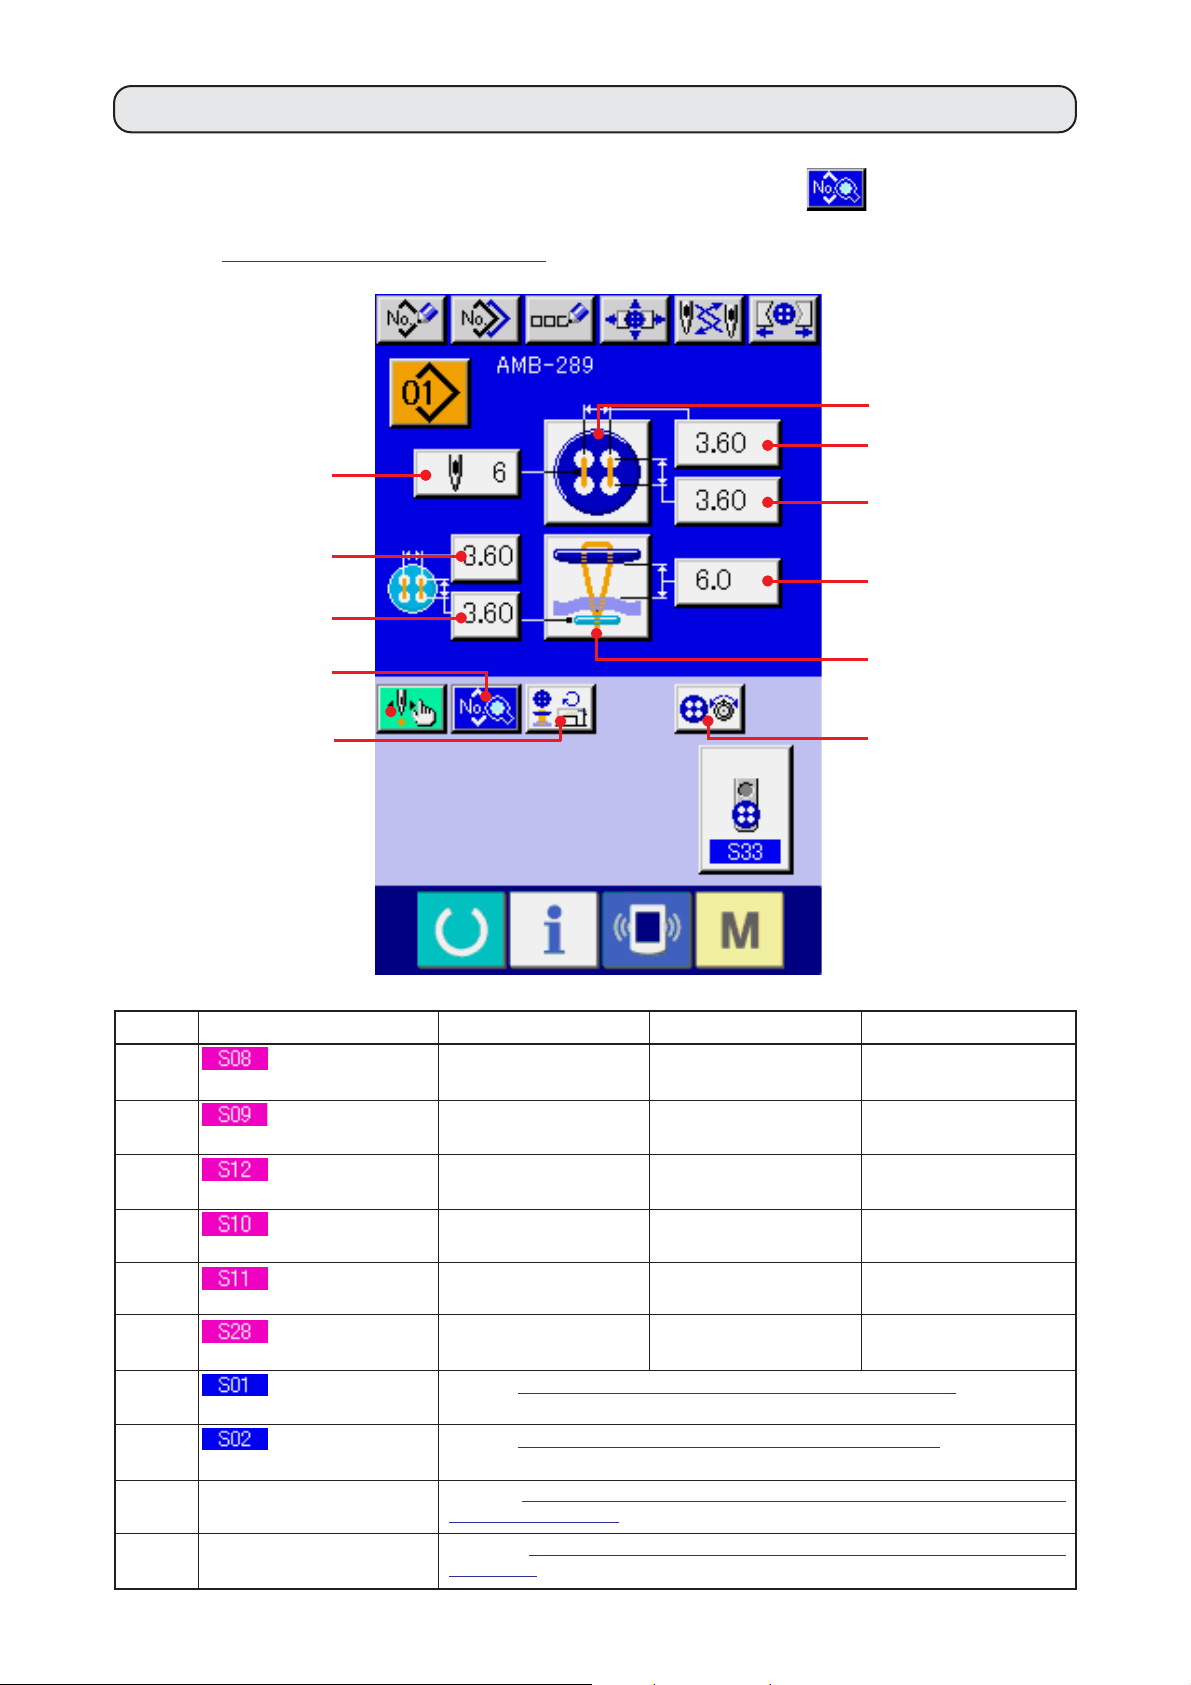
12. PERFORMING NECK WRAPPING SEWING DATA
Items that can be set in the data input screen of neck wrapping sewing are those below. In case of
performing more detailed setting, press SEWING DATA DISPLAY button
sewing data screen.
→Refer to
"20. CHANGING SEWING DATA".
D
A
E
E and set it from the
C
B
G
F
Symbol Item Input range Edit unit Initial value
A
B
C
D
F
G
Neck wrapping pitch
Button sewing height
Sewing method
selection
Number of stitches of neck
wrapping display
Number of revolutions of
sewing machine setting
Neck wrapping thread
tension setting
0.05 to 2.00
0.5 to 15.0
Refer to "13. PERFORMING SEWING METHOD SELECTION".
Number of stitches of neck wrapping actually sewn is displayed.
Refer to "15. PERFORMING SETTING NUMBER OF REVOLUTIONS OF
SEWING MACHINE"
Refer to
TENSION".
"18. PERFORMING INPUT OF NECK WRAPPING THREAD
.
0.05mm
0.1mm
0.50
2.5
@– 20
Page 25

13. PERFORMING SEWING METHOD SELECTION
1) Display the data input screen.
Only in case of data input screen (blue),
selection of the sewing shape can be
performed. In case of the sewing screen
1
2
(green), press READY key
1 and display
the data input screen (blue).
2) Call the sewing method selection screen.
Press SEWING METHOD button
2 and
the sewing shape selection screen is displayed.
3) Select the sewing method.
Select SEWING METHOD button 3you desire
to sew.
4) Finish the sewing method selection.
Press ENTER button
4 to finish the
3
sewing method selection and the selected
sewing shape is displayed in the data input
screen (blue).
4
@– 21
Page 26

14. PERFORMING SEWING SHAPE SELECTION
1) Display the data input screen.
Only in case of the data input screen (blue),
the selection of sewing shape can be
2
performed. In case of the sewing screen
1
(green), press READY key
1 and display
the data input screen (blue).
2) Call the sewing shape selection screen.
Press SEWING SHAPE button
2 and
the sewing shape selection screen is displayed.
3) Select the sewing shape.
Select SEWING SHAPE button 3 you desire
to sew.
4) Finish the sewing shape selection.
Press ENTER button
4 to finish the
3
shape selection and the selected sewing shape
is displayed in the data input screen (blue).
4
@– 22
Page 27
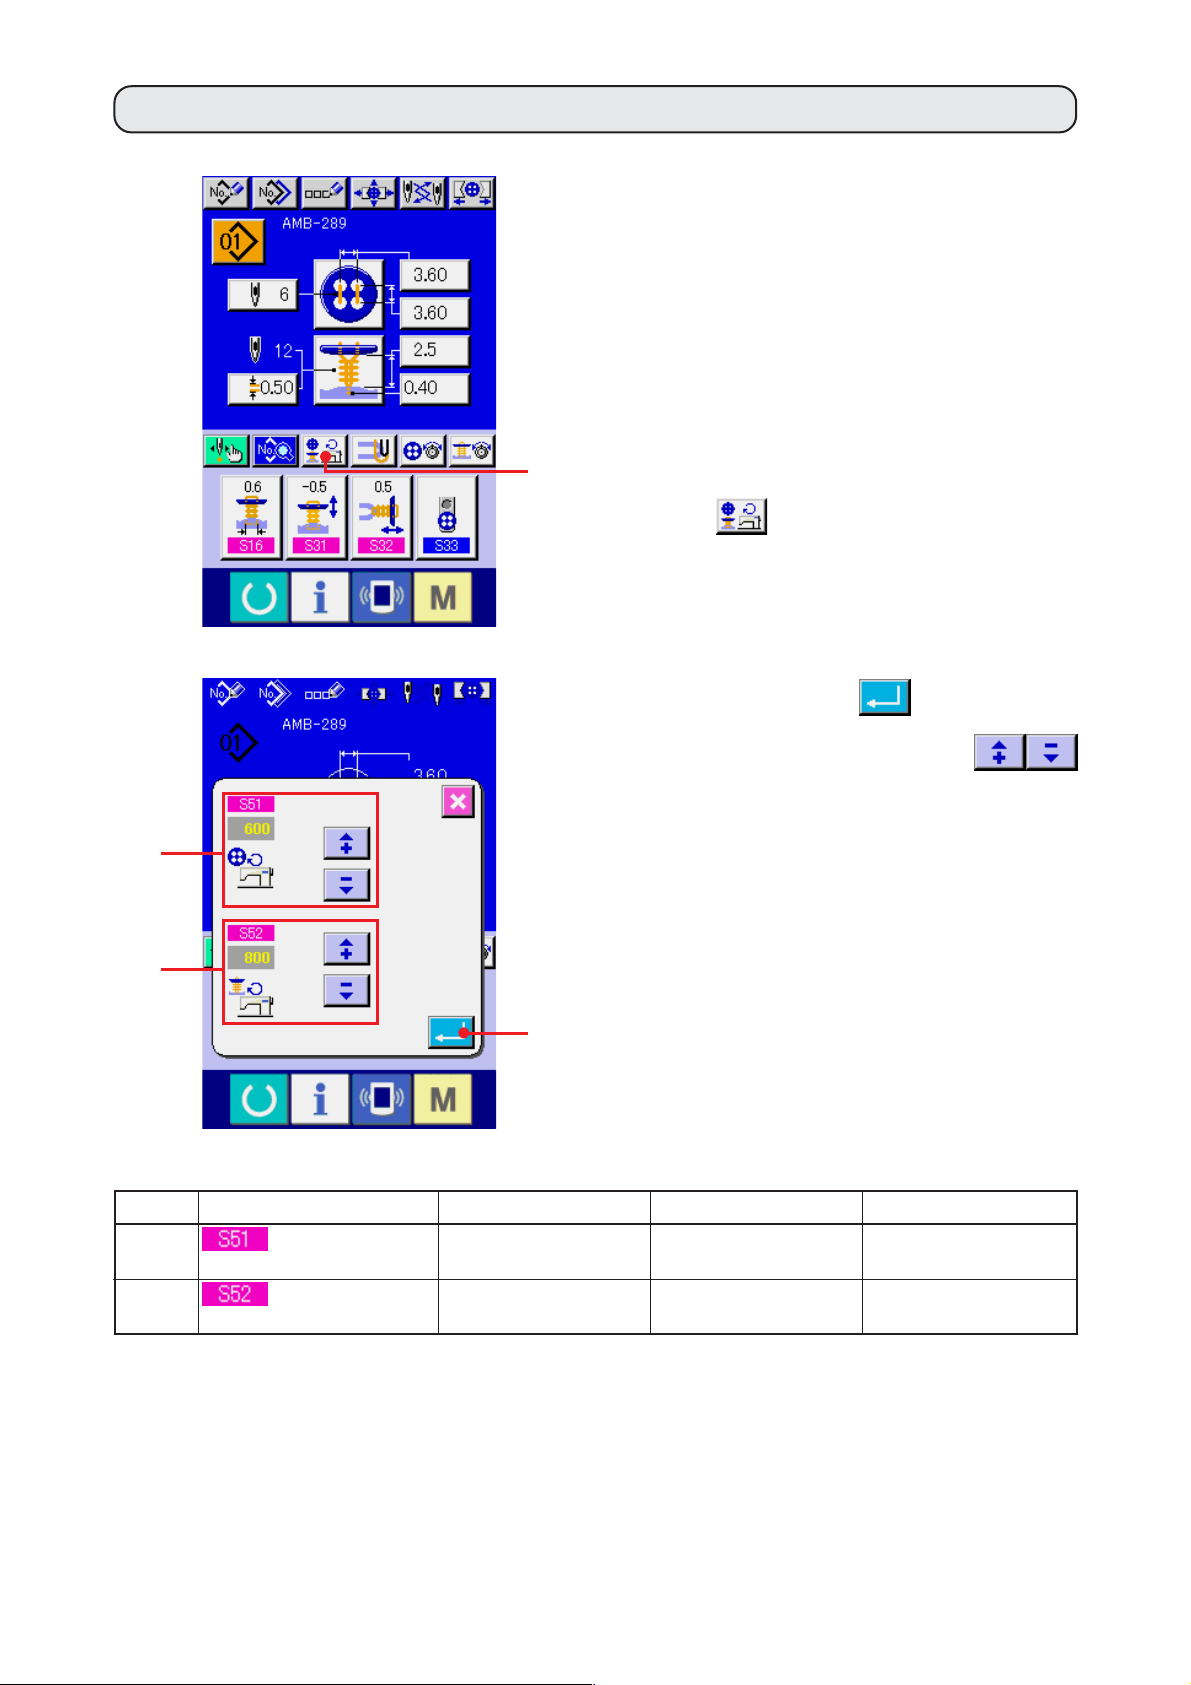
15.
PERFORMING SETTING NUMBER OF REVOLUTIONS OF SEWING MACHINE
1) Display the data input screen.
Setting of number of revolutions of sewing
machine can be performed in the data input
screen and the sewing screen.
2) Display the number of revolutions setting
screen.
1
Press NUMBER OF REVOLUTIONS SETTING
2
3
4
button
1 and the number of revolutions
setting screen is displayed. Setting of number
of revolutions for button sewing and that for
neck wrapping can be performed.
Press ENTER button
4 after inputting
with the arrow mark (up/down)
buttons 2 and 3, and determine the data.
Symbol Item Input range Edit unit Initial value
2
3
Number of
revolutions for button sewing
Number of
revolutions for neck wrapping
200 to 1200
200 to 1800
100rpm
100rpm
600
800
@– 23
Page 28
16. PERFORMING SETTING STAY THREAD
When sewing flat/wrapped-around button with blindstitch or sewing flat button with blindstitch is selected,
STAY THREAD SETTING button is displayed in the data input screen and the sewing screen.
1) Display the stay thread setting screen.
Press STAY THREAD SETTING button
1 and the stay thread setting screen is
displayed.
1
Setting of number of stitches 2 of the stay
thread and amount 3 of the stay thread can
be performed.
Press ENTER button
2
3
4
Symbol Item Input range Edit unit Initial value
2
of stay thread
Number of stitches
Without
:
stay thread
and determine the data.
– – –
4 after inputting,
:
1 stitche
3
thread
Amount of stay
:
1 stitche
:
2 stitches
:
3 stitches
0 to 5.0
@– 24
0.1mm
1.5
Page 29
17. PERFORMING INPUT OF BUTTON SEWING THREAD TENSION
When selecting sewing flat/wrapped-around button with blindstitch, sewing flat button directly to cloth,
sewing flat button with blindstitch, or sewing counter/stay button in the data input screen and the sewing
screen, BUTTON SEWING THREAD TENSION SETTING button is displayed.
(1) In case of simplified input
1) Display the button sewing thread tension
simplified setting screen.
Press BUTTON SEWING THREAD TENSION
2
1
5
SIMPLIFIED SETTING button
1 and the
button sewing thread tension simplified setting
screen is displayed, and setting of the thread
remaining length before sewing and the thread
tension of the normal stitches for button sewing
can be performed.
Initial set value is the value when
polyester spun thread #50 thread is
used.
The edit of data can be performed with ARROW
MARK (UP/DOWN)
buttons (2 and
4) and SCROLL BAR 3 respectively. The data
can be determined at the time of editing.
When CANCEL button
5 is pressed,
3
4
the screen is closed and the data input screen
is displayed.
@– 25
Page 30

(2) In case of detailed input
Display the data input screen and the sewing screen after the button sewing thread tension setting button
has been set to the detailed input state in the customizing screen.
→ Refer to
"35. CUSTOMIZING DTA INPUT SCREEN" and "36. CUSTOMIZING SEWING SCREEN".
1) Display the button sewing thread tension
detailed setting screen.
Press BUTON SEWING THREAD TENSION
3
2
1
6
DETAILED SETTING button
1 and the
button sewing thread tension detailed setting
screen is displayed, and setting of the thread
remaining length before sewing and the thread
tension of the normal stitches for button sewing
can be performed.
Initial set value is the value when
polyester spun thread #50 thread is
used.
Turn the thread tension screen at each stitch
of the last stitch, 1st stitch and 2nd stitch in
order with TURN PAGE button
2 and
setting of the thread tension can be performed.
The edit of data can be performed with ARROW
MARK (UP/DOWN)
buttons (3 and
4
5
@– 26
5) and SCROLL BAR 4 respectively. The data
can be determined at the time of editing.
When CANCEL button
6 is pressed, the
screen is closed and the data input screen is
displayed.
Page 31

(3) Sewing data that can be changed
1) Normal stitches for button sewing
No. Item Setting range Edit unit Initial value Remarks
Thread tension of lower side of needle for button
sewing (normal stitches)
Changeover angle of thread tension for button
sewing (normal stitches)
Thread tension of upper side of needle for button
sewing (normal stitches)
Thread remaining length before sewing left side
for button sewing
Thread remaining length before sewing right side
for button sewing
0 to 200
180 to 355
0 to 200
1 to 100
1 to 100
1
1˚
1
1
1
110
280
1
45
45
30˚0˚
360˚
2) The last stitch for button sewing (It can be set only at the time of detailed setting.)
No. Item Setting range Edit unit Initial value Remarks
Thread tension of lower side of needle for button
sewing (the last stitch)
Changeover angle of thread tension for button
sewing (the last stitch)
Thread tension of upper side of needle for button
sewing (the last stitch)
0 to 200
180 to 360
0 to 200
1
1˚
1
200
280
70
30˚0˚
360˚
@– 27
Page 32

3) 1st stitch for button sewing (It can be set only at the time of detailed setting.)
No. Item Setting range Edit unit Initial value Remarks
Thread tension of the start of 1st stitch for button sewing
0 to 200
1
200
Thread tension of lower side of needle for button
sewing (1st stitch)
Changeover angle of thread tension for button
sewing (1st stitch)
Thread tension of upper side of needle for button
sewing (1st stitch)
30˚0˚
0 to 200
180 to 355
0 to 200
1
1˚
1
200
280
200
360˚
4) 2nd stitch for button sewing (It can be set only at the time of detailed setting.)
No. Item Setting range Edit unit Initial value Remarks
Thread tension of lower side of needle for button
sewing (2nd stitch)
Changeover angle of thread tension for button
sewing (2nd stitch)
Thread tension of upper side of needle for button
sewing (2nd stitch)
30˚0˚
0 to 200
180 to 360
0 to 200
1
1˚
1
200
280
200
360˚
@– 28
Page 33

18. PERFORMING INPUT OF NECK WRAPPING THREAD TENSION
When sewing flat/wrapped-around button with blindstitch or neck wrapping sewing is selected in the data
input screen and the sewing screen, the neck wrapping thread tension setting button is displayed.
(1) In case of simplified input
1) Display the neck wrapping thread tension
simplified setting screen.
Press NECK WRAPPING THREAD TENSION
2
1
5
SIMPLIFIED SETTING button
1 and the
neck wrapping thread tension simplified setting
screen is displayed. Then setting of thread
remaining length before sewing and the thread
tension of the normal stitches for neck wrapping
can be performed.
Initial set value is the value when
polyester spun thread #50 thread is
used.
The edit of data can be performed with ARROW
MARK (UP/DOWN)
buttons (2 and
4) and SCROLL BAR 3 respectively. The data
can be determined at the time of editing.
3
4
When CANCEL button
5 is pressed,
the screen is closed and the data input screen
is displayed.
@– 29
Page 34

(2) In case of detailed input
Display the data input screen and the sewing screen after the neck wrapping thread tension setting
button has been set to the detailed input state in the customizing screen.
→ Refer to
SCREEN".
"35. CUSTOMIZING DATA INPUT SCREEN" and "36. CUSTOMIZING SEWING
1) Display the neck wrapping thread tension
detailed setting screen.
Press NECK WRAPPING THREAD TENSION
3
2
1
6
DETAILED SETTING button
1 and the
neck wrapping thread tension detailed setting
screen is displayed. Then setting of thread
remaining length before sewing and the thread
tension of the normal stitches for neck wrapping
can be performed.
Initial set value is the value when
polyester spun thread #50 thread is
used.
Turn the thread tension screen at each stitch
of the last stitch, 1st stitch and 2nd stitch in
order with TURN PAGE button
2 and
setting of the thread tension can be performed.
The edit of data can be performed with ARROW
MARK (UP/DOWN)
buttons (3 and
4
5
@– 30
5) and SCROLL BAR 4 respectively. The data
can be determined at the time of editing.
When CANCEL button
6 is pressed, the
screen is closed and the data input screen is
displayed.
Page 35

(3) Sewing data that can be changed
1) Normal stitches for neck wrapping sewing
No. Item Setting range Edit unit Initial value Remarks
Thread tension of lower side of needle for neck
wrapping (normal stitches)
Changeover angle of thread tension for neck
wrapping (normal stitches)
Thread tension of upper side of needle for neck
wrapping (normal stitches)
Thread remaining length before neck wrapping
sewing
0 to 200
180 to 355
0 to 200
1 to 100
1
1˚
1
1
130
290
1
55
30˚0˚
360˚
2) The last stitch for neck wrapping sewing (It can be set only at the time of detailed setting.)
No. Item Setting range Edit unit Initial value Remarks
Thread tension of lower side of needle for neck
wrapping (the last stitch)
Changeover angle of thread tension for neck
wrapping (the last stitch)
Thread tension of upper side of needle for neck
wrapping (the last stitch)
0 to 200
180 to 355
0 to 200
1
1˚
1
200
345
200
360˚
<1 stitch before the last stitch for neck wrapping>
30˚0˚
@– 31
360˚
Page 36

3) 1st stitch for neck wrapping sewing (It can be set only at the time of detailed setting.)
No. Item Setting range Edit unit Initial value Remarks
Thread tension of the start of 1st stitch for neck
wrapping
Thread tension of lower side of needle for neck
wrapping (1st stitch)
Changeover angle of thread tension for neck
wrapping (1st stitch)
Thread tension of upper side of needle for neck
wrapping (1st stitch)
0 to 200
0 to 200
180 to 355
0 to 200
1
1
1˚
1
200
200
290
200
30˚0˚
360˚
4) 2nd stitch for neck wrapping sewing (It can be set only at the time of detailed setting.)
No. Item Setting range Edit unit Initial value Remarks
Thread tension of lower side of needle for neck
wrapping (2nd stitch)
Changeover angle of thread tension for neck
wrapping (2nd stitch)
Thread tension of upper side of needle for neck
wrapping (2nd stitch)
0 to 200
180 to 355
0 to 200
1
1˚
1
200
290
200
@– 32
360˚30˚0˚
Page 37

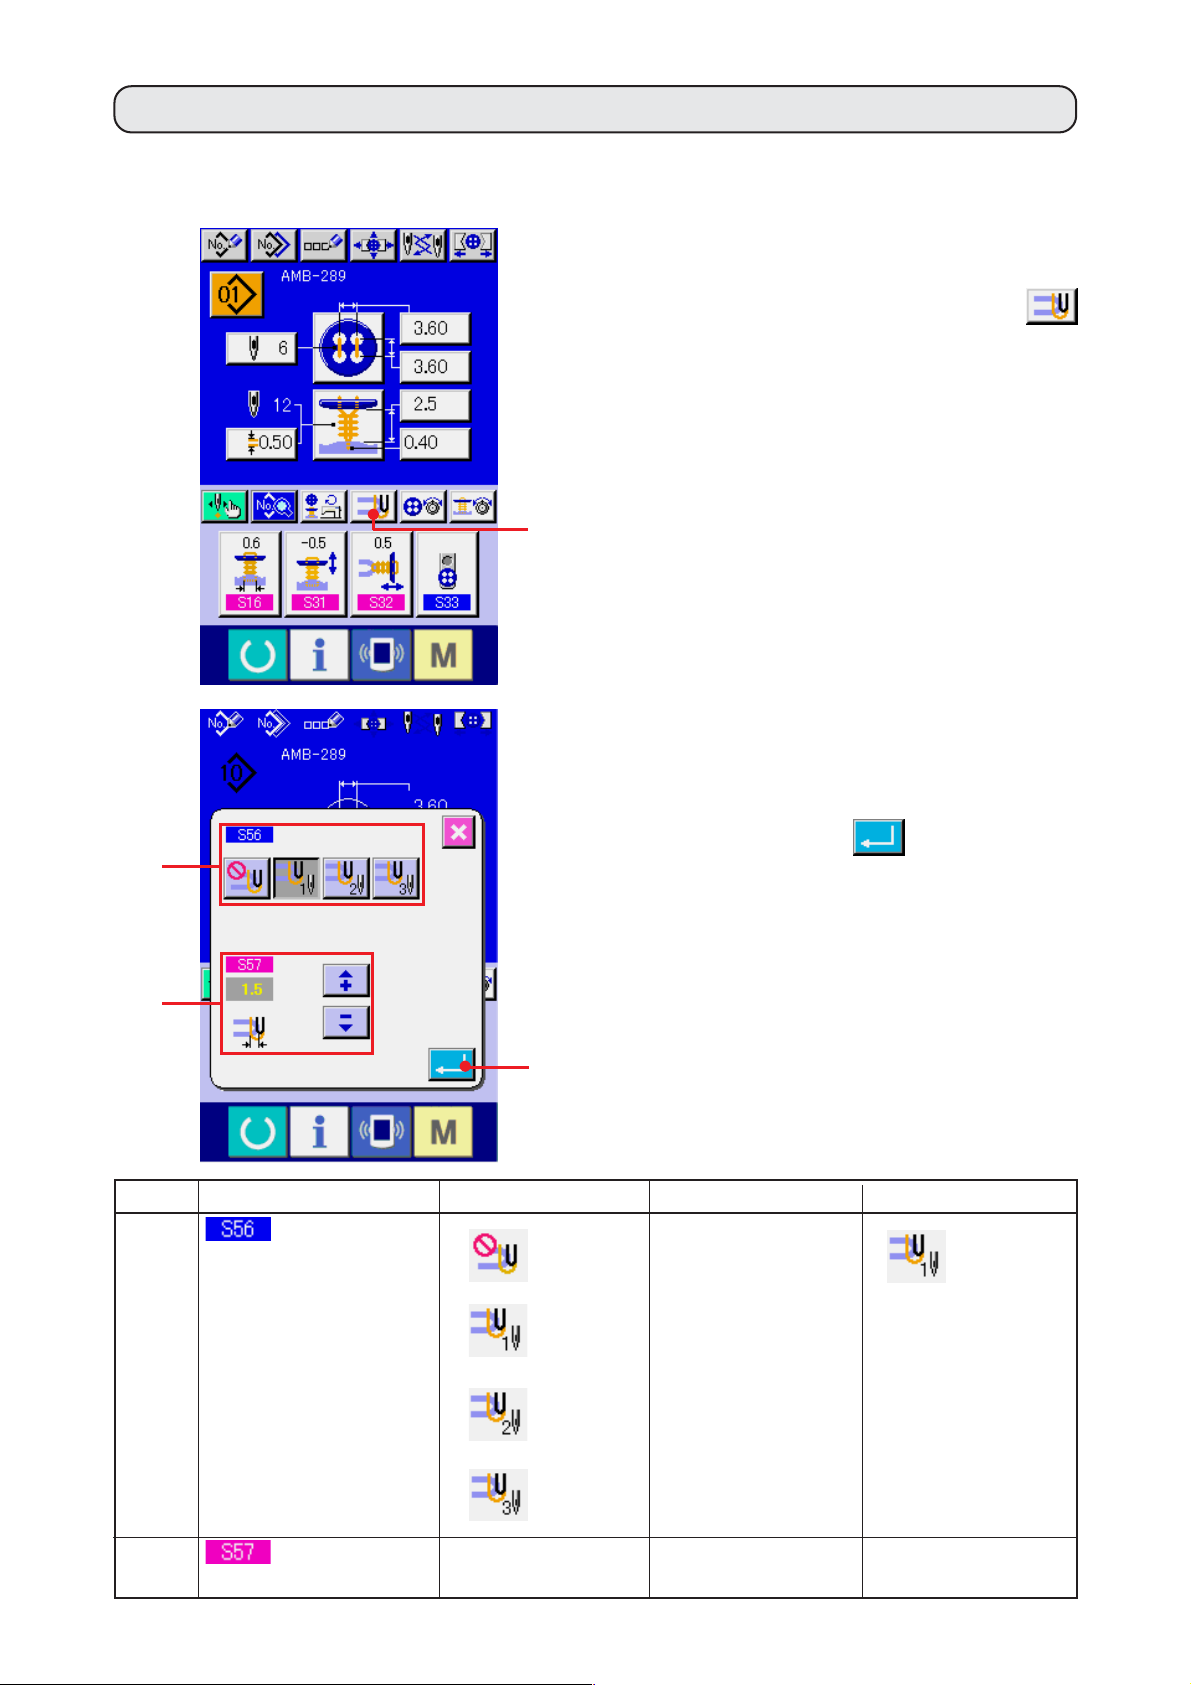
19. PERFORMING DETAILED INPUT OF NECK WRAPPING
When the neck wrapping pitch input button is changed to the neck wrapping detailed input button in the
cutomizing screen, detailed setting of the neck wrapping data can be performed.
→ Refer to
"35. CUSTOMIZING DATA INPUT SCREEN".
1) Display the data input screen.
Only in case of the data input screen (blue),
detailed input of the neck wrapping data can
be performed. In case of the sewing screen
2
4
3
5
!3
!1
1
6
8
!2
7
(green), press READY key
1 to display
the data input screen (blue).
2) Display the neck wrapping data detailed
input screen.
Press NECK WRAPPING DETAILED INPUT
button
2 and display the neck wrapping
data detailed input screen.
The data that can be set at the first page is the
sewing setting data of the last cycle and the
data pages of the previous cycles can be turned
in order with TURN PAGE button
3. In
addition, the page being set is displayed in
orange at 4.
5 is the number of stitches of neck wrapping
which is actually sewn, and the display is
updated every time each setting is changed.
!0
9
When DATA CHANGE buttons (6 to !3) are
pressed, the change pop-up is displayed.
@– 33
Page 38

The edit of data is performed with SELECTION
4
!4
!5
6
button or
button
buttons !4. Press ENTER
!5 to determine the data.
8
!3
!1
!0
Symbol Item Input range Edit unit Initial value
6
Number of times of neck wrapping
!2
7
9
Without
: neck
wrapping
: 1 time
: 2 times
: 2 times
– – –
7
8
wrapping
Neck wrapping height
Number of stitches at the top of neck
: 3 times
: 4 times
Perform editing in the data input screen or the sewing data
screen.
1 to 9
1 time
2
@– 34
Page 39

In case display of 4 is the first. , , ,
Symbol Item Input range Edit unit Initial value
9
!0
!1
!2
!3
Neck wrapping going height
(lower section of top)
Neck wrapping going pitch
(lower section of top)
Neck wrapping going pitch
(center of top)
Neck wrapping going height
(upper section of top)
Neck wrapping going pitch
(upper section of top)
0 to 2.0
0.05 to 2.0
0.05 to 2.0
0 to 2.0
0.05 to 2.0
0.1
0.05
0.05
0.1
0.05
0.10
0.10
0.50
0.0
0.10
In case display of 4 is the second. , ,
Symbol Item Input range Edit unit Initial value
9
!0
!1
!2
!3
Neck wrapping height
(lower section of 2nd)
Neck wrapping pitch
(lower section of 2nd)
Neck wrapping pitch
(center of 2nd)
Neck wrapping height
(upper section of 2nd)
Neck wrapping pitch
(upper section of 2nd)
0 to 2.0
0.05 to 2.0
0.05 to 2.0
0 to 2.0
0.05 to 2.0
0.1
0.05
0.05
0.1
0.05
0.2
0.10
1.0
0
0.10
In case display of 4 is the third. ,
Symbol Item Input range Edit unit Initial value
9
!0
!1
!2
!3
Neck wrapping height
(lower section of 3rd)
Neck wrapping pitch
(lower section of 3rd)
Neck wrapping pitch
(center of 3rd)
Neck wrapping height
(upper section of 3rd)
Neck wrapping pitch
(upper section of 3rd)
0 to 2.0
0.05 to 2.0
0.05 to 2.0
0 to 2.0
0.05 to 2.0
0.1
0.05
0.05
0.1
0.05
0.2
0.10
1.0
0
0.10
In case display of 4 is the fourth.
Symbol Item Input range Edit unit Initial value
9
!0
!1
!2
!3
Neck wrapping height
(lower section of 4th)
Neck wrapping pitch
(lower section of 4th)
Neck wrapping pitch
(center of 4th)
Neck wrapping height
(upper section of 4th)
Neck wrapping pitch
(upper section of 4th)
0 to 2.0
0.05 to 2.0
0.05 to 2.0
0 to 2.0
0.05 to 2.0
0.1
0.05
0.05
0.1
0.05
0.2
0.10
1.0
0
0.10
@– 35
Page 40

20. CHANGING SEWING DATA
(1) Initial sewing data at the time of your purchase
Patterns from 1 to 8 have been already registered at the time of your purchase and the data which are
different in sewing method and sewing shape are inputted in the sewing data as the initial value.
Pattern Data changed from Changed
No. Sewing method
Sewing flat/wrapped-
1
2
around button with
blindstitch
Sewing flat/wrappedaround button with
blindstitch
Sewing shape
Without
initial value value
Thread release compensation
Top position of neck wrapping
0.5 →0.0mm
0.5 →2.7mm
Button height (shank/marble)
Sewing flat/wrapped-
3
4
5
6
7
around button with
blindstitch
Sewing counter/stay button
Sewing counter/stay button
Sewing button with neck wraps
Sewing flat button with
blindstitch
– – –
Without
(longitudinal)
(longitudinal)
(lateral)
start of sewing of neck wrapping (longitudinal)
start of sewing of neck wrapping (longitudinal)
Without
Thread release compensation
Hole position of shank/marble button
N
eedle entry interval of bottom feed
1st stitch hole position of lower button
1st stitch hole position of lower button
Tie stitch position of 1st stitch at the
Tie stitch position of 2nd stitch at the
4.0 →2.5mm
0.5 →0.0mm
0.3 →2.5mm
3.6 →3.2mm
1.8 →1.6mm
1.8 →0.0mm
0.0 →0.5mm
1.0 →1.5mm
8
Sewing flat button directly
to cloth
Without
@– 36
Page 41

(2) Changing procedure of sewing data
1) Display the data input screen.
Only in case of the data input screen (blue),
change of the sewing data can be performed.
In case of the sewing screen (green), press
2
1
READY key
1 and display the data input
screen (blue).
2) Call the sewing data screen.
Press SEWING DATA button
2 and the
sewing data screen is displayed.
3) Select the sewing data to be changed.
Press UP/DOWN SCROLL button
3 and select SEWING DATA ITEM button 4
you desire to change. Data item which is not
used according to the shape is not displayed.
So, be careful.
4
3
5
4) Change the data.
For the sewing data, there are the data item to
change the numeral and data item to select the
pictograph. No. in pink color such as
put on the data item to change the numeral and
the set value can be changed with the + / –
button 5 which is displayed in the change
screen.
is
@– 37
Page 42

No. in blue color such as is put on the
data item to select the pictograph and the
pictograph which is displayed in the change
screen can be selected.
(3) Sewing data list
Sewing data are those that can be inputted to 99 patterns from pattern 1 to 99 and can be inputted
to each pattern.However, the sewing data that can be inputted differ according to the selected sewing
method or sewing shape.
No. Item
Sewing method
This item sets the sewing method.
: Sewing flat/wrapped around button with
blindstitch
: Sewing flat button
with blindstitch
: Counter/stay
button sewing
Stitch shape (sewing flat/wrapped-around button with blindstitch)
This item sets the stitch shape of sewing flat/wrappedaround button with blindstitch.
Stitch shape (sewing flat button directly to cloth)
This item sets the stitch shape of sewing flat button directly to cloth.
: Sewing flat button
directly to cloth
: Neck wrapping
Setting range
– – –
– – –
– – –
Edit unit
– – –
– – –
– – –
Initial display
Sewing flat/
wrapped-
around
button with
blindstitch
4-holed
button without
cross-over
stitches
(longitudinal)
4-holed
button without
cross-over
stitches
(longitudinal)
Remarks
Stitch shape (sewing flat button with blindstitch)
This item sets the stitch shape of sewing flat button with
blindstitch.
@– 38
– – –
– – –
4-holed
button without
cross-over
stitches
(longitudinal)
Page 43

No. Item
Stitch shape (counter/stay button sewing)
This item sets the stitch shape of counter/stay button
sewing.
* Selection of the shape of lower button is performed with
.
Setting range
– – –
Edit unit
– – –
Initial display
Front : 4holed button
without
cross-over
stitches
(longitudinal)
Rear : 4holed button
without
cross-over
stitches
(longitudinal)
Remarks
Upper buttonhole interval (longitudinal)
This item sets the needle entry interval of top feed.
Upper buttonhole interval (lateral)
This item sets the needle entry interval of top feed.
Needle entry interval of bottom feed (longitudinal)
This item sets the needle entry interval of bottom feed.
Needle entry interval of bottom feed (lateral)
This item sets the needle entry interval of bottom feed.
Number of stitches for button sewing
This item sets the number of stitches for button sewing.
Number of stitches at the start of button sewing (1 to 3 stitches)
This item sets the number of stitches at the start
of button sewing.
Compensation of lower left position of upper button
This item is set when cloth is pulled and the amount of blindstitch
on the left side is different from that on the right side.
0.10 to
6.00
0.10 to
6.00
0.10 to
6.00
0.10 to
6.00
2 to 32
1 to 3
–1.00 to
1.00
0.05mm
0.05mm
0.05mm
0.05mm
2 stitchs
1 stitch
0.05mm
3.60
3.60
3.20
3.20
6
1
0
Compensation of 3rd stitch at the start of sewing
This item compensates the position of 3rd stitch
at the start of sewing to prevent thread from
slipping off at the start of button sewing
Blindstitch width
This item has to be set within the range where needle
and tongue do not come in contact with each other.
Blindstitch amount
This item sets the blindstitch amount to cloth.
Buttonhole height of shank/marble button sewing
(Height from the feed plate)
This item is set to prevent the contact of needle
and buttonhole.
* 1 The maximum value of the range of data editing depends on the setting of K05.
0 to 0.5
0.0 to
K05
–1.00 to
5.00
0.0 to
10.0
@– 39
0.05mm
0.2mm
0.05mm
0.1mm
0
0.6
0.40
3.0
* 1
Page 44

No. Item
Thinning level of the stay button
This item decreases the number of cross-over stitches of
the lower side button at the time of stay button sewing.
: Without thinning : Thinning level 1
: Thinning level 2 : Thinning level 3
Setting range
– – –
Edit unit
– – –
Initial display
Without
thinning
Remarks
Lateral compensation of needle entry of lower button at the
time of sewing counter button (front : 4 holes, rear : 2 holes)
Perform compensation to such an extent that needle does not come
in contact with buttonhole within the range of lower buttonhole.
Number of stitches of tie stitch at the end of sewing flat button directly to cloth.
This item sets the number of stitches of tie stitch
at the end of sewing flat button directly to cloth.
Number of stitches of tie stitch at the end of counter sewing
This item sets the number of stitches of tie stitch
at the end of counter sewing.
Button sewing height
(only neck wrapping of sewing flat/
wrapped-around button with blindstitch)
This item sets the button holding height (finished
height) in the neck wrapping process.
Button height (shank/marble)
This item sets the button holding height (finished
height) in the neck wrapping process.
0 to 0.30
2 to 3
1 to 3
0.5 to
15.0
0 to 15.0
0.05mm
1 stitch
1 stitch
0.1mm
0.1mm
0.30
2
2
2.5
3.4
Button height (counter button)
This item sets the button holding height (finished
height) in the button sewing process.
Number of stitches at the start of sewing of neck
wrapping
This item sets the number of stitches at the start
of sewing of neck wrapping.
Number of stitches of tie stitch at the end of sewing
of neck wrapping
This item sets the number of stitches of tie stitch
at the end of sewing in the neck wrapping process.
Compensation of the button holding height at the time
of sewing flat/wrapped-around button with blindstitch
This item sets when compensating the button holding
height in the button sewing process and desiring to give
slackness between button and neck wrapping section.
Thread release compensation
This item is the compensation value of the button holding
height in the button sewing process. Sewing is performed
in the neck wrapping process by gradually returning the
compensation value to the former one.
This item is set when desiring to tightly wrap up to the root
of the button.
0 to 20.0
1 to 3
2 to 3
–5.0 to
5.0
–5.0 to
5.0
0.1mm
1 stitch
1 stitch
0.1mm
0.1mm
4.5
2
2
–0.5
0.5
@– 40
Page 45

No. Item
Button loader selection
<In case of shank/marble button>
: Loader OFF : Loader ON
<In case of normal button>
: Loader OFF : Loader ON
Setting range
– – –
Edit unit
– – –
Initial display
Loader used
(Front side)
Remarks
Number of times of wrapping
This item sets the number of times of thread
wrapping sewing in the neck wrapping process.
Number of stitches of thread air-blow
This item sets the number of stitches of thread
air-blow in the neck wrapping process.
Compensation of button height in the neck wrapping process
This item compensates the button holding height in the
neck wrapping process and adjusts the wrapped condition.
Button positioning motion With/without
: With : Without
This item sets whether the compensation motion of button positioning is
performed at the time of operation by operator before driving the sewing
machine. It is convenient to use this item when sewing buttons which are
uneven in shape.
* Compensation value which has been set here is applied to one button sewing
only and the compensation value returns to 0 after completion of sewing.
0 to 5
0 to 20
–5.0 to
5.0
– – –
1 time
1 stitch
0.1mm
– – –
0
6
0
Without
Needle height at the time of button positioning
This item sets the angle which automatically lowers
needle at the time of button positioning motion.
Set the angle which is easy to perform positioning
according to kinds of buttons, neck wrapping height, etc.
Thread drawing motor start position in the
button sewing process
This item sets the thread slack amount at the
start of sewing to stabilize thread remaining
amount at the start of sewing.
Number of stitches to start thread drawing
motor operation in the button sewing
process
This item sets number of stitches to hold the
thread slack amount set in No. S39.
Compensation of tension timing on cloth
side and rear side in the button sewing
process
This item changes the tension changeover
timing at the needle entry on cloth side and
rear side, and shifts the knotting position.
0 to 130
0 to 100
1 to 2
–90 to 90
1˚
1 pulse
1 stitch
1˚
80
30
1
0
@– 41
Page 46

21. PERFORMING NEW REGISTRATION OF THE PATTERN
2
3
1
6
1) Display the data input screen.
Only in case of the data input screen (blue),
new registration of the pattern can be
performed. In case of the sewing screen
(green), press READY key
1 and display
the data input screen.
2) Call the pattern new registration screen.
Press NEW REGISTRATION button 2
and the pattern new registration screen is
displayed.
3) Input the pattern No.
Input the pattern No. you desire to newly
register with the ten keys 3. When the pattern
No. which has been already registered is
inputted, the sewing shape which has been
registered is displayed in the upper part of the
screen. Select the pattern No. which is not
displayed and has not been registered. New
registration to the pattern No. which has been
already registered is prohibited. It is possible
to retrieve the pattern No. which has not been
4 5
registered with the –・+ button
・5).
4) Determine pattern No.
Press ENTER button
6 and the data
input screen of pattern No. which has been
newly registered is displayed.
(4
@– 42
Page 47

22. COPYING SEWING PATTERN
1
2
The sewing data of the pattern No. which has been
already registered can be copied to the pattern No.
which has not been registered.
Overwriting copy of the pattern is prohibited. When
you desire to overwrite, perform it after erasing the
pattern once.
→ Refer to
"4. PERFORMING PATTERN No. SELECTION"
1) Display the data input screen.
Only in case of the data input screen (blue),
copying is possible. In case of the sewing
screen (green), press READY key
1 and
display the data input screen (blue).
2) Call the pattern copy screen.
When pattern copy button
2 is pressed,
the pattern copy (copy source selection) screen
is displayed.
.
3
3) Select the pattern No. of copy source.
Select the pattern No. of copy source from the
list of pattern buttons 3.
Then press copy destination input button
4
4 and the copy destination input screen is
displayed.
@– 43
Page 48

4) Input the pattern No. of copy destination.
Input the pattern No. of copy destination with
ten keys 5. It is possible to retrieve the pattern
No. which is not used with –・+ buttons
(6・7).
5) Start copying.
Press ENTER button
8 and copying
starts.
8
Pattern No. which has been copied in the
selected state returns to the pattern copy (copy
source selection) screen after approximately
two seconds.
657
*1 Cycle data can be copied by the same method.
*2 When deletion is performed in case the remaining pattern No. which has been registered is
one, pattern deletion error (Error code 402) is displayed.
*3 When trying to perform copying to the pattern No. which has been already registered, copy
disapproval error (Error code 401) is displayed.
@– 44
Page 49

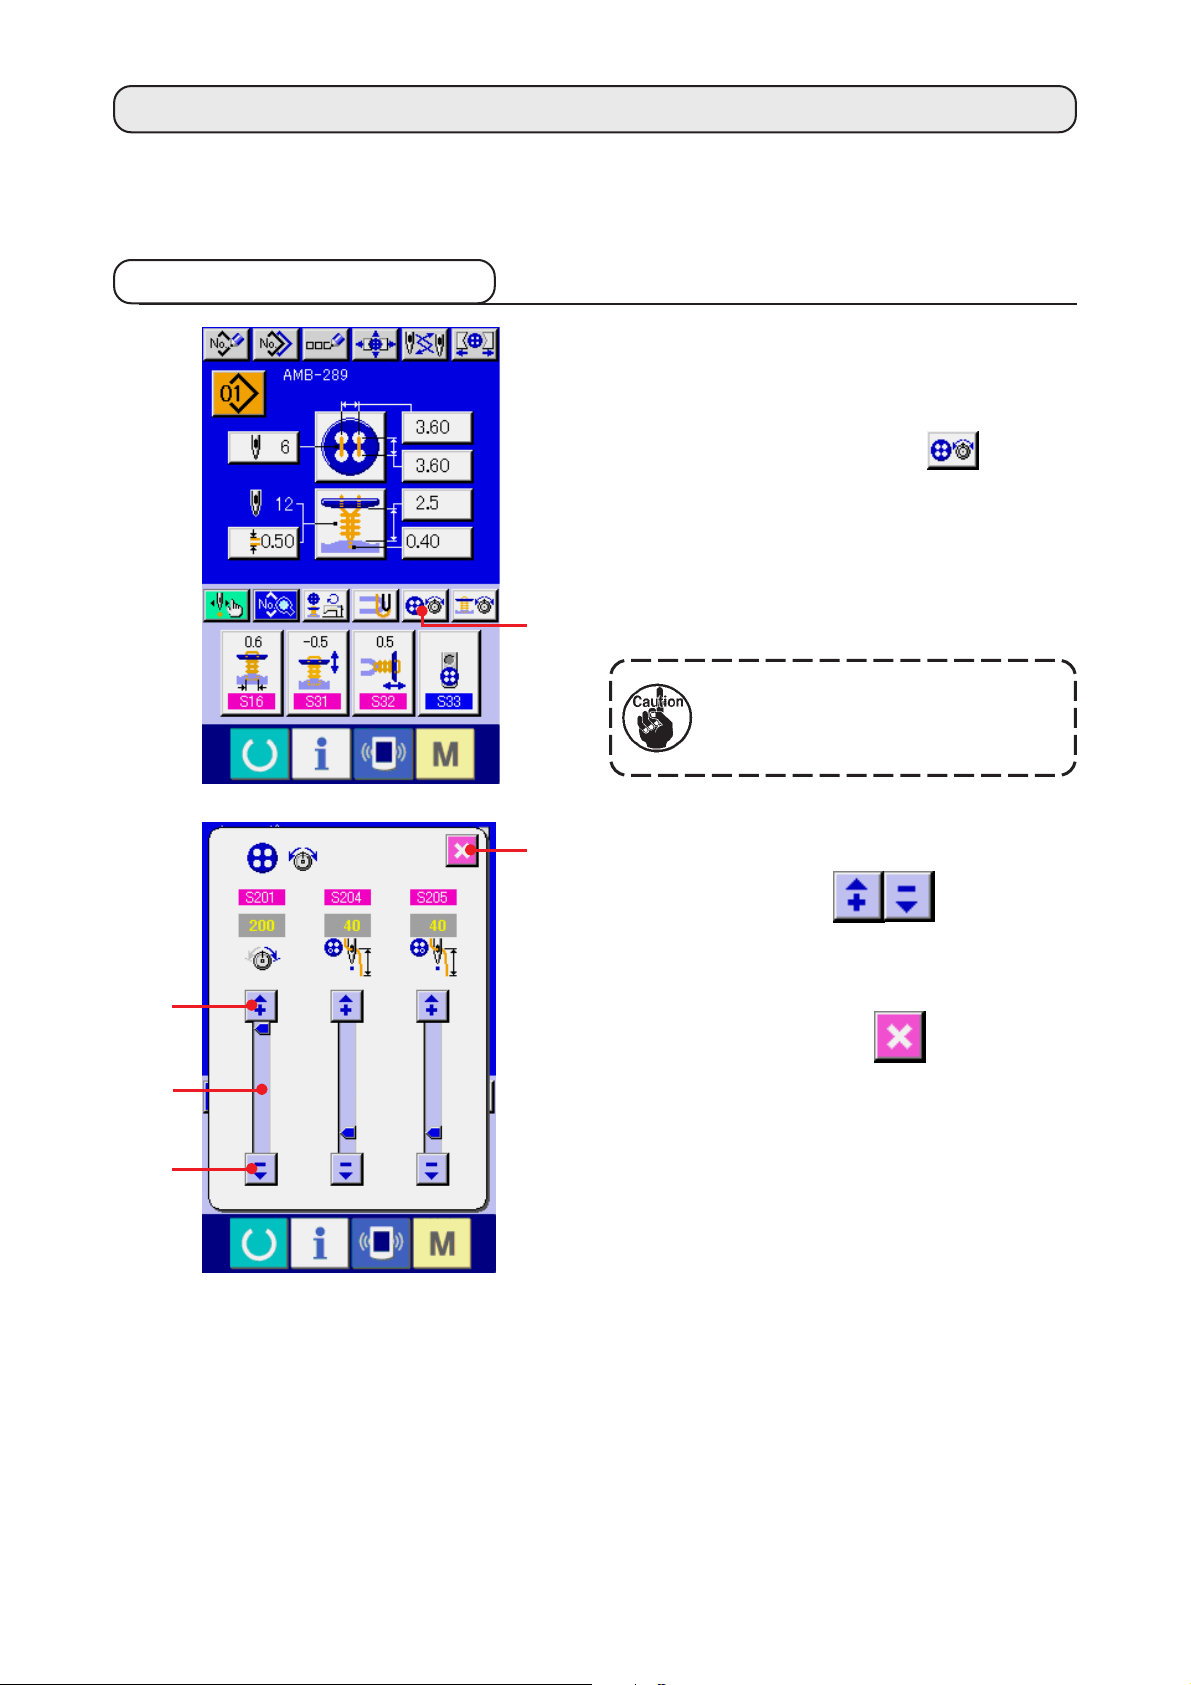
23. PERFORMING CHUCK ADJUSTMENT
1
1) Display the data input screen or the sewing
screen.
Only in case of the data input screen A or the
sewing screen B, the adjustment of chuck can
be performed.
A
2) Display the chuck adjustment screen.
Press CHUCK ADJUSTMENT button
1
and the chuck adjustment screen is displayed.
Origin retrieval is performed and the button
loader moves to the position of chuck.
1
B
2
3
4
5
6
7
@– 45
Height and position can be adjusted with
CHUCK HEIGHT ADJUSTMENT button 2 and
CHUCK LONGITUDINAL/LATERAL
POSITION ADJUSTMENT buttons 3.
Set the chuck to the state that is easy to be
adjusted with ORIGIN RETRIEVAL READJUST
button
4, CHUCK UP/DOWN button
5 and CHUCK OPEN/CLOSE button
6, and confirm the adjustment.
After the adjustment, press ENTER button
7 to determine the adjustment value.
Page 50

24. PERFORMING BUTTON CENTERING
Button centering button is not displayed in the initial state. Set the button centering button to the displayed
state in the customizing screen of the sewing screen.
2
1) Display the sewing screen.
Only in case of the sewing screen, centering of
the button can be performed.
In case of the data input screen (blue), the
sewing data screen, press READY key
1 and display the sewing screen (green).
2) Perform centering of the button.
3
1
4
5
Press BUTTON CENTERING button
2
and the button centering screen is displayed.
Adjust the needle position to the center of
needle with 4-direction ARROW MARK buttons
3. (It is possible to correctly adjust using the
gauge button.)
Then input the longitudinal/lateral data of the
buttonhole interval with
buttons (4
and 5).
After inputting, press ENTER button
6
to determine the data.
6
@– 46
Page 51

25.
PERFORMING INPUT AND CHECK OF DATA WITH STEP MOTION
(1) Performing the step motion
1) Display the data input screen or the sewing
screen.
Only in case of the data input screen A or the
sewing screen B, the step motion can be
performed.
A
1
2) Display the step motion selection screen.
Press STEP MOTION SELECTION button
1 and the step motion selection screen
is displayed.
B
1
It is possible to select SEWING MOTION STEP
3
2
MODE
operating the sewing machine and POINT
SETTING MODE
points in order.
When the respective buttons are pressed, the
input screen of the respective modes is
displayed.
When sewing preparations are not ready,
namely, tongue is not set, button is not set, and
so forth, SEWING MOTION STEP MODE
2 to perform setting while
3 to set needle entry
@– 47
button
sewing selection screen is displayed.
2 is not displayed when the step
Page 52

6
7
!1
8
9
5
3) Perform data setting.
[In case of POINT SETTING MODE]
Press STEP FORWARD/BACK buttons
(5 and 6), and input step moves.
Move to the step you desire to set and perform
setting with ARROW MARK buttons 7 .
Parameter that can be set differs according to
the sewing method and the stitch shape. For
the parameter, refer to
"25. (2) Data list".
In addition, move the needle up or down with
!0
NEEDLE UP/DOWN buttons (8
and 9) and adjust the relation of the position
between button and needle to the state that is
easy to check. It is convenient to set the data
by this adjustment.
After setting the data, press ENTER button
!0 to determine the data. When the data
is not determined, press CANCEL button
!1.
@– 48
Page 53

!5
!2
!6
!4
!8
!3
!7
[In case of SEWING MOTION STEP MODE]
Press NEEDLE FORWARD/BACK buttons
(!2 and !3) and the needle moves
stitch by stitch. In addition, it is possible to move
the needle stitch by stitch while actually sewing
with the start switch. Move the needle to the
needle entry point you desire to set and perform
the adjustment with ARROW MARK buttons !4.
Parameter that can be adjusted differs
according to the sewing method and the stitch
shape.
For the parameter, refer to
"25. (2) Data list".
* However, when
items are limited.
Press TURN PAGE button
!5 and the
screen is changed over to the other parameter
setting screen regarding the present needle
entry point.
In addition, when NUMBER OF
REVOLUTIONS SETTING button
!6 is
pressed, the number of revolutions setting
screen is displayed, and it is possible to set the
number of revolutions for button sewing and
the number of revolutions for neck wrapping.
After setting the data, press ENTER button
!7 to determine the data. When the data
is not determined, press CANCEL button
!8.
Thinning level of stay button is set to 1 to 3 in counter button sewing, the input
@– 49
Page 54

(2) Data list
No. Item
1st stitch hole position of upper button (longitudinal)
1st stitch hole position of upper button (lateral)
1st stitch hole position of lower button (longitudinal)
1st stitch hole position of lower button (lateral)
Whole compensation of button holding position (lateral)
Compensation of shank/marble blindstitch position (left)
Hole position of shank/marble button
Setting range
–2.00 to
4.00
–2.00 to
4.00
–13.00 to
4.00
–2.00 to
4.00
–3.0 to 3.0
–2.0 to 2.0
–5.0 to 5.0
Edit unit
0.05
0.05
0.05
0.05
0.1
0.1
0.1
Initial display Remarks
1.80
1.80
1.60
1.60
0
0
0.5
Tie stitch position of 1st stitch at the start of sewing of
neck wrapping (longitudinal)
Tie stitch position of 1st stitch at the start of sewing of
neck wrapping (lateral)
Tie stitch position of 2nd stitch at the start of sewing of
neck wrapping (longitudinal)
Tie stitch position of 2nd stitch at the start of sewing of
neck wrapping (lateral)
Stitch width of neck wrapping (right side)
Stitch width of neck wrapping (left side)
Start position of neck wrapping
Top position of neck wrapping
–4.0 to 4.0
–4.0 to 4.0
–4.0 to 4.0
–4.0 to 4.0
0 to 5.0
0 to 5.0
–1.0 to 3.0
–1.0 to 5.0
0.1
0.1
0.1
0.1
0.1
0.1
0.1
0.1
0
–0.3
1.0
0.3
3.0
3.0
1.0
0.5
1st stitch of first compensation of tie stitch position at the
end of button sewing (longitudinal)
@– 50
–1.0 to 1.0
0.1
0.3
Page 55

No. Item
1st stitch of first compensation of tie stitch position at the
end of button sewing (lateral)
Setting range
–1.0 to 1.0
Edit unit
0.1
Initial display Remarks
0
2nd stitch of first compensation of tie stitch position at
the end of button sewing (longitudinal)
2nd stitch of first compensation of tie stitch position at
the end of button sewing (lateral)
3rd stitch of first compensation of tie stitch position at the
end of button sewing (longitudinal)
3rd stitch of first compensation of tie stitch position at the
end of button sewing (lateral)
1st stitch of second compensation of tie stitch position at
the end of button sewing (longitudinal)
1st stitch of second compensation of tie stitch position at
the end of button sewing (lateral)
2nd stitch of second compensation of tie stitch position
at the end of button sewing (longitudinal)
2nd stitch of second compensation of tie stitch position
at the end of button sewing (lateral)
–1.0 to 1.0
–1.0 to 1.0
–1.0 to 1.0
–1.0 to 1.0
–1.0 to 1.0
–1.0 to 1.0
–1.0 to 1.0
–1.0 to 1.0
0.1
0.1
0.1
0.1
0.1
0.1
0.1
0.1
0
0
0
0
0.3
0
0
0
3rd stitch of second compensation of tie stitch position at
the end of button sewing (longitudinal)
3rd stitch of second compensation of tie stitch position at
the end of button sewing (lateral)
Tie stitch position at the end of sewing of neck wrapping
(longitudinal)
Tie stitch position at the end of sewing of neck wrapping
(lateral)
Longitudinal position of thread trimming of button sewing
Longitudinal position of thread trimming of neck wrapping
sewing
Blindstitch width of shank/marble (right)
Blindstitch width of shank/marble (left)
–1.0 to 1.0
–1.0 to 1.0
–4.0 to 4.0
–4.0 to 4.0
–4.0 to 8.0
–4.0 to 8.0
–2.0 to 5.0
–2.0 to 5.0
0.1
0.1
0.1
0.1
0.1
0.1
0.1
0.1
0
0
1.2
3.0
–1.0
–0.5
0.3
0.3
@– 51
Page 56

26. PERFORMING COMPENSATION OF UNEVENNESS OF BUTTON
When Button positioning motion of the
sewing data is set to "With" and the sewing
preparations are in the completed state, the needle
bar automatically comes down to the angle which
has been set and the compensation of unevenness
of button screen is displayed.
In this state, adjust the relation between button and
needle with 4-direction ARROW MARK buttons 1.
Then start sewing.
2
1
(Caution) This adjustment value is effective
only for once and cleared after the
completion of sewing.
In addition, when ENTER button
2 is
pressed, the present height of the needle bar is
inputted to the data of
Needle height at the
time of button positioning of the sewing data and it
becomes the effective value at the time of next
sewing as well.
Reference : See
"20. (3) Sewing data list".
@– 52
Page 57

27. CHANGING SEWING MODE
1) Select the sewing mode.
2
1
When MODE key
state that the pattern has been registered,
SEWING MODE SELECTION button
is displayed on the screen. When this button is
pressed, the sewing mode changes alternately
the individual sewing and the cycle stitching.
When individual sewing is selected :
When cycle stitching is selected :
1 is pressed in the
2
@– 53
Page 58

28. LCD DISPLAY SECTION AT THE TIME OF CYCLE STITCHING
This sewing machine can sew the plural sewing pattern data in order in cycle.
As many as 30 patterns can be inputted. Use this function when sewing plural different button holes on the
sewing product. In addition, as many as 20 cycles can be registered. Use this function for new creation or
copying in case of need.
→ Refer to
"21. PERFORMING NEW REGISTRATION OF PATTERN"
(1) Data input screen
. and "22. COPYING SEWING PATTERN".
G
H
I
J
K
ABC EF
D
M
N
O
L
P
@– 54
Page 59

Symbol Display Description
A
CYCLE DATA NEW REGISTER button
Cycle data No. new register screen is displayed.
B
C
D
E
F
G
H
I
J
CYCLE DATA COPY button
CYCLE DATA NAME INPUT button
CYCLE DATA NAME display
NEEDLE CHANGE button
CHUCK CLOSE/OPEN button
CYCLE DATA NO. SELECTION
button
CURSOR display
SEWING PRODUCT display
SEWING PRODUCT SELECTION button
Cycle data No. copy screen is displayed.
Cycle data name input screen is displayed.
→ Refer to "5. NAMING THE PATTERN".
Name inputted in cycle data which is being selected is displayed.
This button lowers the needle and the change of needle screen is displayed.
→
This button performs close/open of the chuck.
Chuck is opened as long as the button is pressed.
Cycle data No. which is being selected is displayed in the button. When
the button is pressed, cycle data No. change screen is displayed.
Cursor can move on sewing product with ARROW MARK button N and
can designate the position on sewing product to input pattern data.
Image of sewing product is displayed.
Image of sewing product I selection screen is displayed.
Refer to "33. PERFORMING CHANGE OF NEEDLE".
K
L
M
N
O
P
SEWING DATA CHANGE button
PATTERN SELECTION button
SEWING ORDER display
ARROW MARK button
PATTERN SEPARATE DELETE
button
PATTERN ALL DELETE button
Sewing data of pattern data inputted in the position of cursor change
screen is displayed.
When the button is pressed, pattern No. change screen is displayed.
In addition, pattern No. can be inputted in the position of cursor.
Sewing order of inputted pattern data is displayed. When the screen is
changed over to the sewing screen,
pattern to be sewn first is displayed in blue color.
Position of cursor H can be moved.
Release of input of pattern data registered in the position of cursor can
be performed.
Release of input of all pattern data inputted in cycle data which is being
selected can be performed.
@– 55
Page 60

(2) Sewing screen
G
W
J
K
L
O
P
Q
R
ABC EF
D
H
I
M
N
T
U
S
Symbol Display Description
A
B
C
D
CHUCK ADJUSTMENT button
BUTTON CENTERING button
CYCLE DATA NAME display
LOADER MOTION button
Chuck adjustment screen is displayed.
→Refer to "23. PERFORMING CHUCK ADJUSTMENT".
This is not displayed in the initial state.
→Refer to "24. PERFORMING BUTTON CENTERING".
Name inputted in cycle data which is being selected is desplayed.
When this button is pressed, loader works and sets button to the chuck.
V
E
F
G
NEEDLE CHANGE button
CHUCK CLOSE/OPEN button
CYCLE DATA No. display
This button makes needle come down, and the needle change screen is displayed.
→Refer to "33. PERFORMING CHANGE OF NEEDLE".
This button performs close/open of the chuck.
Cycle data No. during sewing is displayed.
@– 56
Page 61

Symbol Display Description
H
SEWING PRODUCT display
Image of sewing product is displayed.
I
J
K
L
M
N
O
P
SEWING ORDER display
STEP SEWING button
COUNTER VALUE CHANGE button
COUNTER CHANGE OVER button
SEWING ORDER RETURN button
SEWING ORDER ADVANCE button
PATTERN NO. display
NUMBER OF REVOLUTIONS
SETTING button
Sewing order of inputted pattern data is displayed.
Pattern data during sewing is displayed in blue color.
When this button is pressed, the step sewing screen which performs
input and check of needle entry point is displayed.
→Refer to
Existing counter value is displayed on this button.When the button is
pressed, the counter value change screen is displayed.
→Refer to "31. USING COUNTER".
Display of sewing counter/No. of pcs. counter can be changed over.
→Refer to "31. USING COUNTER".
Sewing order to be sewn next is returned by one.
Sewing order to be sewn next is advanced by one.
Pattern No. during sewing is displayed.
Number of revolutions setting screen is displayed. Change of number of revolutions
of the sewing machine for button sewing and that for neck wrapping can be performed.
→ Refer to "15. PERFORMING SETTING NUMBER OF
REVOLUTIONS OF SEWING MACHINE".
"25. PERFORMING INPUT AND CHECK OF DATA WITH STEP MOTION"
.
Q
R
S
T
U
V
W
STAY THREAD SETTING button
BUTTON SEWING THREAD
TENSION SETTING button
NECK WRAPPING THREAD
TENSION SETTING button
PATTERN NAME display
LOADER MOTION
PATTERN CONTENTS display
DIRECT SELECTION button
Stay thread setting screen is displayed. This screen is displayed only in case of sewing flat/wrapped-
around button with blindstitch or flat button with blindstitch, and setting of stay thread is possible.
→Refer to "16. PERFORMING SETTING STAY THREAD".
Button sewing thread tension setting screen is displayed.
→Refer to
Neck wrap thread tension setting screen is displayed. The screen is displayed only in
case of sewing flat/wrapped-around button with blindstitch and neck wrapping sewing.
→Refer to
Pattern name which is set in the pattern data during sewing is displayed.
Setting of the loader which is registered to the pattern No. during sewing
is displayed.
Contents of pattern registered to pattern No. during sewing are displayed.
Contents of display depend on the sewing method. Blindstitch amount
only can be set in the sewing screen.
When this button is pressed, the screen of the list of pattern Nos. which
have been registered to the direct selection button is displayed.
"17. PERFORMING INPUT OF BUTTON SEWING THREAD TENSION"
"18. PERFORMING INPUT OF NECK WRAP THREAD TENSION"
.
.
@– 57
Page 62

29. PERFORMING CYCLE STITCHING
First, change the sewing mode to the cycle stitching before performing setting.
→ Refer to
(1) Selection of the cycle data
2
"27. CHANGING SEWING MODE".
1) Display the data input screen.
Only in case of the data input screen (pink), it
is possible to select the cycle data No. In case
of the sewing screen (green), press READY key
1 and display the data input screen
(pink).
2) Call the cycle data No. selection screen.
3
1
4
When cycle data No. button
2 is pressed,
the cycle data selection screen is displayed.
Cycle data No. which is selected at present and
the contents are displayed in the upper part of
the screen and other cycle data No. buttons
which have been registered are displayed in
the lower part of the screen.
3) Select the cycle data No.
When UP/DOWN button is pressed, the
registered cycle data No. selection buttons 3
are changed over in order. Contents of cycle
data are displayed in the buttons. Here, press
cycle data No. selection button 3 you desire
to select.
4) Determine the cycle data No.
@– 58
When ENTER button
4 is pressed, the
cycle data No. selection screen is closed and
the selection has been completed.
Page 63

(2) Editing procedure of the cycle data
3
2
4
1
1) Display the data input screen.
Only in case of the data input screen (pink), it
is possible to input the cycle data. In case of
the sewing screen (green), press READY key
1 and display the data input screen
(pink).
2) Move the cursor to the position you desire.
Move cursor 3 to the position you desire with
arrow mark button 2, press pattern No.
selection button 4, and call the pattern No.
selection screen.
6
7
5
3) Select the pattern No.
When UP/DOWN SCROLL button
5 is pressed, the registered pattern No.
selection buttons 6 are changed over in order.
Contents of the pattern data are displayed in
the buttons. Here, press the pattern No.
selection button you desire to select.
4) Determine the pattern No.
When ENTER button
7 is pressed, the
pattern No. selection screen is closed and the
selection has been completed.
@– 59
Page 64

5) Edit the sewing data of pattern inputted in
cycle data.
When the pattern data is inputted in the
designated position, the inputted order is
displayed on the screen as the sewing order.
Adjust the cursor to the position where the
sewing order is displayed and press sewing
8
!0
9
data button
8. Then sewing data input
screen is displayed.
6) Select the sewing data to be changed.
Press scroll UP/DOWN button
and select the data item button !0 you desire
to change. Data items which are not used
according to the shape and data items which
have been set to Without function are not
displayed. So, be careful.
7) Change the data.
There are data items to change numerals and
those to select pictographs in the sewing data.
9
No. in pink color such as
is put on the
data items to change numerals and the set
value can be changed with + / – buttons
displayed in the change screen.
No. in blue color such as
is put on the
data items to select pictographs and the
pictographs displayed in the change screen can
be selected.
→ For the details of sewing data,
refer to
"20.(3) Sewing data list".
@– 60
Page 65

30. PERFORMING CHANGE OF DISPLAY OF SEWING PRODUCT
The picture displayed in the center of the screen can be changed.
1 ) Display the data input screen.
Only in case of the data input screen (pink), it
is possible to change the sewing product. In
case of the sewing screen (green), press
2
1
4
READY key
1 and display the data input
screen (pink).
2 ) Call the sewing product selection screen.
When the sewing product selection button
2 is pressed, the sewing product
selection screen is displayed.
3 ) Select the image of sewing product to be
displayed.
Select the sewing product button 3 you desire
to display.
4 ) Determine the image of the sewing product
to be displayed.
When ENTER button
4 is pressed, the
3
selection is determined and the data input
screen is displayed.
5 ) Image of the selected sewing product is
displayed.
The image of selected sewing product is
displayed in the data input screen. Position and
number of pieces in which pattern data is
inputted are the same as those before the
change of image of sewing product.
@– 61@– 61
Page 66

31. USING COUNTER
(1) Setting procedure of the counter
1 ) Display the counter setting screen.
2
5
3
1
7
Press Mode key
SETTING button
1 and the COUNTER
2 is displayed on the
screen. When this button is pressed, the
counter setting screen is displayed.
2 ) Selection of kinds of counters
This sewing machine has two kinds of
counters, i. e., sewing counter and No. of
pcs. counter.
Press SEWING COUNTER KIND SELECTION
6
4
8
button
SELECTION button
3 or No. OF PCS. KIND
4 to display the
counter kind selection screen. The kinds of the
respective counters can be set separately.
@– 62
Page 67

[Sewing counter]
UP counter
: Every time the sewing of one
shape is performed, the existing value is
counted up. When the existing value is equal
to the set value, the count-up screen is
displayed.
DOWN counter
: Every time the sewing of
one shape is performed, the existing value
is counted down. When the existing value
is reached to "0", the count-up screen is
displayed.
Counter not used
:
[No. of pcs. counter ]
UP counter : Every time one cycle or one continuous stitching is performed, the
existing value is counted up. When the existing value is equal to the
set value, the count-up screen is displayed.
DOWN counter : Every time one cycle stitching is performed, the existing value is counted
down. When the existing value is reached to "0", the count-up screen
is displayed.
Counter not used :
3) Change of counter set value
In case of the sewing counter, press button
7 and in case of the No. of pcs. counter, press
button
8 and the set value input screen is
displayed.
Here, input the set value.
@– 63@– 63
Page 68

4 ) Change of counter existing value
In case of the sewing counter, press button
5 and in case of the No. of pcs. counter,
(2) Count-up releasing procedure
press button
input screen is displayed. Here, input the
existing value.
When count-up condition is reached during sewing
work, the count-up screen is displayed and the
buzzer beeps. Press CLEAR button
reset the counter and the screen returns to the
sewing screen. Then the counter starts counting
again.
6 and the existing value
1 to
1
32. CHANGING MEMORY SWITCH DATA
(1) Changing procedure of memory switch data
1 ) Display the memory switch data list screen.
When MODE key 1 is pressed, memory
2
1
switch button
screen. When this button is pressed, the
memory switch data list screen is displayed.
2 is displayed on the
@– 64
Page 69

2 ) Select the memory switch button you desire
to change.
Press UP/DOWN SCROOL button
3 and select the data item button
4
3
4 you desire to change.
3 ) Change the memory switch data.
There are data items to change numerals and
those to select pictographs in the memory
switch data.
No. in pink color such as
is put on the
data items to change numerals and the set
value can be changed with buttons displayed
in the change screen.
No. in blue color such as
is put on the
data items to select pictographs and the
pictographs displayed in the change screen can
be selected.
→ For the details of memory switch data,
refer to
"32. (2) Memory switch data list".
@– 65@– 65
Page 70

(2) Memory switch data list
1) Level 1
Memory switch data (level 1) are the motion data that the sewing machine has in common and the
data that operate on all sewing patterns in common.
No. Item
Pedal motion mode
Motion mode of the pedal is set.
1 : Lower the button by depressing
the front part of the pedal.
Lower the cloth presser with the
tongue sensor.
2 : Lower the button and the cloth
presser by depressing the front
part of the pedal.
3 : Lower the button and the cloth
presser with the tongue sensor.
Button loader motion mode
Motion mode of the button loader is set.
: Unused
: Automatic inserting mode
: Pedal inserting mode
Cloth take-out time
Waiting time for operator to take out
cloth is set in case of sewing flat button
directly to cloth and counter sewing.
Setting range
1 to 3
– – –
0 to 20.0
Edit unit
1
– – –
0.1s
Initial display Remarks
1
Automatic
inserting
mode
2.0s
Button loader setting position setting
Soft start mode (button sewing)
Display 1st
stitch stitch stitch stitch stitch
: Slow
: Rather fast
: Fast
Soft start 1st stitch (button sewing)
2nd 3rd 4th 5th
300 400 700 900 1100
400 600 800 1000 1200
800 1000 1200 1200 1200
Optional setting
(Unit : rpm)
0 to 90
– – –
200 to 1200
1˚
– – –
100rpm
20˚
Rather fast
400rpm
*1
Soft start 2nd stitch (button sewing)
*1 Displayed only when is set optionally.
@– 66
200 to 1200
100rpm
600rpm
*1
Page 71

No. Item
Soft start 3rd stitch (button sewing)
Setting range
200 to 1200
Edit unit
100rpm
Initial display Remarks
800rpm
*1
Soft start 4th stitch (button sewing)
Soft start 5th stitch (button sewing)
Soft start mode (neck wrapping)
Display 1st
stitch stitch stitch stitch stitch
: Slow
: Rather fast
: Fast
2nd 3rd 4th 5th
300 400 600 900 1200
400 500 700 1000 1600
600 900 1200 1600 1800
Optional setting
200 to 1200
200 to 1200
– – –
100rpm
100rpm
– – –
1000rpm
*1
1200rpm
*1
Rather fast
Soft start 1st stitch (neck wrapping)
Soft start 2nd stitch (neck wrapping)
Soft start 3rd stitch (neck wrapping)
Soft start 4th stitch (neck wrapping)
Soft start 5th stitch (neck wrapping)
Cloth thickness
Height of the chuck motor is
compensated in case of sewing
flat button directly to cloth and
counter sewing.
Tongue cloth presser ON timing
Waiting time from working of
tongue sensor to cloth presser
ON is set.
(Unit : rpm)
200 to 1800
200 to 1800
200 to 1800
200 to 1800
200 to 1800
0 to 10.0
0 to 500
100rpm
100rpm
100rpm
100rpm
100rpm
0.1mm
5ms
400rpm
500rpm
700rpm
1000rpm
1500rpm
2.0mm
100
*2
*2
*2
*2
*2
*1 Displayed only when is set optionally.
*2 Displayed only when
is set optionally.
@– 67@– 67
Page 72

No. Item
Operation speed setting
Motion speed of the feed motor by means of pedal
operation is set.
1: Slow
10 : Fast
Setting range
1 to 10
Edit unit
1
Initial display Remarks
10.0
Bottom feed move amount at the time of manual
mode
As much as the move amount of the
bottom feed motor to which cloth
setting position is set is advanced.
Position of the cloth presser at the time of
manual mode
: Up
: Down
0 to 25.0
– – –
0.1mm
– – –
10.0
Up
2 ) Level 2
Memory switch data (level 2) can be edited when pressing MODE switch for as long as 6 seconds.
No. Item
VCM control starting angle offset
Setting range
– 20 to 20.0
Edit unit
1˚
Initial display Remarks
0
*1
Tongue lifting amount
Thread trimming control mode
: Thread trimming priority mode
: Cycle time priority mode
Button loader inserting height
compensation
Max. value of blindstitch width
setting
Bottom feed position of rear hole
of blindstitch
Bottom feed position from origin at
the rear hole of blindstitch is set.
Head tilt sensor detection ON/OFF
10.0 to 24.0
– – –
10.0 to 25.0
0.0 to 6.0
0.0 to 2.0
– – –
0.1mm
– – –
0.1mm
0.2mm
0.1mm
– – –
16.5mm
Thread
trimming
priority mode
17.0
1.6
1.5
*1
: OFF : ON
ON
*1 Data that have been memorized in the machine head EEP-ROM, and the adjustment value has
been written at the time of delivery.
@– 68
Page 73

No. Item
Head type
1: Standard
2 to 9 : Unused
Each time origin retrieval
1 : Bottom feed only
2 : Bottom feed + needle rocking
3 : Bottom feed + thread drawing
4 : Bottom feed + needle rocking + thread drawing
*Origin retrieval of bottom feed is performed only at the
time of sewing flat/wrapped-around button with blindstitch.
Setting range
1 to 9
1 to 4
Edit unit
1
1
Initial display Remarks
1
1
*1
Button loader lifting amount
Lifting amount after grasping button
is set.
Height from tongue stopper lower plate
Set this item when tongue stopper
parts are changed.
Tongue change display mode
When READY key is pressed, whether AMB-189
type tongue or AMB-289 type one is judged, and
displays below are shown.
* Judge value is determined with
:Without display
When tongue change is
:
necessary
: When AMB-189 type tongue
(wide gauge) is used
.
5.0 to 10.0
0 to 8.0
– – –
0.1mm
0.1mm
– – –
6.5
5.6
When
tongue
change is
necessary
*1
: When AMB-289 type tongue
(narrow gauge) is used
: Tongue type used is displayed
each time.
Tongue change blindstitch width
Blindstich width which is the
standard to make the check screen
display.
Pedal type
Kind of pedal to be used is set.
: Standerd pedal
: PK-47
1.0 to 20.0
– – –
0.1mm
– – –
1.6
Standerd
pedal
*1 Data that have been memorized in the machine head EEP-ROM, and the adjustment value has
been written at the time of delivery.
@– 69@– 69
Page 74

No. Item
Setting range
Edit unit
Initial display Remarks
Needle rocking motor origin compensation
Differential motor origin compensation
Y feed upper motor origin compensation
Y feed lower motor origin compensation
(blindstitch origin)
Y feed lower motor origin compensation
(neck wrapping compensation)
Y feed lower motor origin compensation
(origin of button sewn directly to cloth)
– 5.00 to
5.00
– 2.0 to 2.0
–5.00 to 5.00
–5.00 to 5.00
–5.00 to 5.00
–5.00 to 5.00
0.05mm
0.1mm
0.05mm
0.05mm
0.05mm
0.05mm
0
0
0
0
0
0
*1
*1
*1
*1
*1
*1
Presser motor origin compensation
Thread drawing motor origin compensation
Loader motor origin compensation
–50 to 50
–10 to 10
–50 to 50
1pulse
1pulse
1pulse
0
0
0
*1
*1
*1
*1 Data that have been memorized in the machine head EEP-ROM, and the adjustment value has
been written at the time of delivery.
@– 70
Page 75

33. PERFORMING CHANGE OF NEEDLE
1
1 ) Display the data input screen or the sewing
screen.
Display the data input screen (independent
sewing, cycle stitching) or the sewing screen
(independent sewing, cycle stitching).
2 ) Call the needle change screen.
When NEEDLE CHANGE button
pressed, the needle comes down to the position
where it can be changed and the needle change
screen A is displayed.
Be sure to turn OFF the power
before performing the change of
needle.
1 is
A
™ Refer to the Needle installation drawing below.
[Needle installation drawing]
1
a
™ Hold needle with its recessed part facing
toward side "a" as observed from the
front of the sewing machine, insert the
needle into the needle hole of needle bar
until it will go no further, and tighten
setscrew 1 with a flat-blade screwdriver.
Use a SM332EXTLG-NY(#11 to #18).
@– 71@– 71
Page 76

2
3) Display the threading diagram.
Press THREADING DIAGRAM DISPLAY
button
2 and the threading diagram is
displayed.
Reference : [Mechanical section]
3. PREPARATION BEFORE OPERATION
Be sure to turn OFF the power
before performing the threading.
34. PERFORMING CHANGE OF CHUCK
WARNING :
Turn OFF the power before starting the work so as to prevent accidents caused by abrupt start of the
sewing machine.
1) Display the chuck change screen.
Press MODE key 1 , and CHUCK
2
ADJUSTMENT button
on the screen. When this button is pressed, the
chuck adjustment screen is displayed.
2 is displayed
1
@– 72
Page 77

[Chuck installation drawing]
1
2
2 ) Perform installation of the chuck.
Refer to the chuck installation drawing
below.
™ When replacing chuck 1, loosen screws
2 and replace it.
Reference : [Mechanical section]
3. PREPARATION BEFORE OPERATION
(4) Replacing the button chuck
3 ) Perform checking of installation of the
chuck.
Press CHUCK MOTION button 3 and the
chuck performs open/close and inversion
motions.
Check the level position and the
perpendicular position of the check
3
which has been installed after
installation.
Button Level and perpendicular of chuck Chuck open/close
Level Open
Level Free
Level Close
Perpendicular Open
Perpendicular Free
Perpendicular Close
@– 73@– 73
Page 78

35. CUSTOMIZING DATA INPUT SCREEN
The buttons which are displayed in the data input screen can be customized to the buttons which are
easy for the customers to use.
(1) Registering procedure
1 ) Display the customize screen of the input
screen.
2
1
When MODE key
1 is held pressed for
three seconds, CUSTOMIZE button
of the input screen is displayed on the screen.
Press this button and the customize screen of
the input screen is displayed.
2 ) Select the state of buttons.
Every time buttons from 3 to 7 are pressed,
the state of buttons changes. Set the buttons
to the state that is easy for you to use.
Symbol
3 Neck wrapping simplified setting
display Description
Neck wrapping detailed setting
2
3
4
5
6
7
8
4
5 Stay thread setting button display
6
7
Number of revolutions button display
Number of revolutions button non-display
Stay thread setting button non-display
Button sewing thread tension simplified setting
Button sewing thread tension detailed setting
Button sewing thread tension non-display
Neck wrapping thread tension simplified setting
Neck wrapping thread tension detailed setting
Neck wrapping thread tension non-display
@– 74
Page 79

9
3 ) Register the sewing data to the customize
buttons.
As many as four sewing data can be registered
to CUSTOMIZE buttons 8. Register the sewing
data which are frequently used for use.
When CUSTOMIZE button 8 to which you
desire to register is pressed, the sewing data
list screen is displayed.
Four pieces of data below have been registered
from the left side in order at the time of your
purchase.
4 ) Select the sewing data to be registered.
!0
Select the sewing data you desire to register
with the sewing data buttons 9. When the
selected button is pressed twice, the selection
is released.
5 ) Register to the customize button.
When ENTER button
!0 is pressed,
register to the customize button is finished and
the customize button register screen is
displayed. The registered sewing data is
displayed on the customize button.
(2) Register state at the time of your purchase
The following items have been registered in order from the left at the time of your purchase.
a.
Blindstitch width :
b.
c.
d.
Compensation of button holding
height when sewing flat/wrapped-
around button with blindstitch :
Thread release compensation :
Loader selection :
@– 75@– 75
Page 80

36. CUSTOMIZING SEWING SCREEN
The buttons which are displayed in the sewing screen can be customized to the buttons which are easy
for the customers to use.
(1) Registering procedure
1) Display the customize screen of the sewing
screen.
When MODE key 1 is held pressed for
2
3
1
three seconds, CUSTOMIZE button
of the sewing screen is displayed on the screen.
Press this button and the customize screen of
the sewing screen is displayed.
2) Select the state of buttons.
Every time buttons from 3 to 8 are pressed,
the state of buttons changes. Set the buttons
to the state that is easy for you to use.
Symbol
3 Centering button display
4
display Description
Centering button non-display
Blindstitch amount setting button display
Blindstitch amount setting non-display
2
6
5
4
7
8
9
5
6 Stay thread setting button display
7
8
Number of revolutions button display
Number of revolutions button non-display
Stay thread setting button non-display
Button sewing thread tension simplified setting
Button sewing thread tension detailed setting
Button sewing thread tension non-display
Neck wrapping thread tension simplified setting
Neck wrapping thread tension detailed setting
Neck wrapping thread tension non-display
@– 76
Page 81

!0
!1
3) Register the patterns to the direct buttons.
Direct patterns can register the patterns of
independent sewing and cycle stitching up to
10 patterns.
10 pieces of DIRECT PATTERN REGISTER
buttons 9 are displayed on the screen, and
the pattern list screen is displayed when the
button of the position you desire to register is
pressed.
4) Select the sewing data to be registered.
!2
5) Register to the customize button.
(2) Register state at the time of your purchase
Select the pattern you desire to register with
PATTERN LIST buttons !0. Press CYCLE
PATTERN CHANGE button
!1, and
the cycle pattern list screen is displayed.
Press again the selected button and the
selection is released.
When ENTER button
!2 is pressed, the
register to direct button is completed and the
direct button register screen is displayed.
Pattern No. which has been registered is
displayed on the direct button.
Pattern Nos. 1 to 10 have been registered to the direct buttons at the time of your purchase.
@– 77@– 77
Page 82

37. PERFORMING KEY LOCK
1) Display the key lock screen.
2
1
Press MODE key
and the KEY LOCK button
on the screen. When this button is pressed
down, the key lock screen is displayed.
The existing setting state is displayed on the
KEY LOCK button.
: State that key lock is not set
: State that key lock is set
2) Select and determine the key lock state.
1 for three seconds,
2 is displayed
3
4
Select the key lock state button
the key lock setting screen, and press ENTER
button
screen is closed and the key lock state is set.
4. Then the key lock setting
3 in
@– 78
Page 83

5
3) Close the mode screen and display the data
input screen.
When the mode screen is closed and the data
input screen is displayed, pictograph 5
showing the key lock state is displayed on the
right-hand side of the pattern No. display.
5
A
™ Besides, only the buttons which are possible
to be used even in the key lock state are
displayed.(A)
A
@– 79@– 79
Page 84

38. DISPLAYING VERSION INFORMATION
1) Display the version information screen.
2
1
3
Press MODE key
1 for three seconds,
and the VERSION INFORMATION button
2 is displayed on the screen. When this
button is pressed down, the version information
screen is displayed.
The version information on the sewing
machine you use is displayed on the version
information screen, and it is possible to
check it.
A : Version information on panel program
B : Version information on main program
A
B
C
C : Version information on servo program
When CANCEL button
3 is pressed, the
version information screen is closed and the
mode screen is displayed.
@– 80
Page 85

39. USING CHECK PROGRAM
(1) Displaying the check program screen
2
1
Press MODE key
CHECK PROGRAM button
on the screen.
When this button is pressed down, the check
program screen is displayed.
There are 3 items below in the check program.
1 for three seconds, and
2 is displayed
: Touch panel compensation
/ Refer to “39.(4) Performing touch panel
compensation.”
: LCD check
/ Refer to “39.(3) Performing LCD check”.
: Sensor check
/ Refer to “39.(2) Performing sensor check”.
@– 81
Page 86

(2) Performing sensor check
1) Display the sensor check screen.
2
1
3
When SENSOR CHECK button
the check program screen is pressed, the
sensor check screen is displayed.
2) Perform the sensor check.
Input status of the various sensors can be
checked on the sensor check screen. Input
status of each sensor is displayed as 2. The
display of ON status/OFF status is displayed
as below.
The display of ON status/OFF status is
displayed as below.
1 on
: ON status
: OFF status
Press UP or DOWN button
or 3
and display the sensor which has been
checked.
@– 82
Page 87

20 kinds of sensors below are displayed.
No. Pictograph Description of sensor No. Pictograph Description of sensor
Needle rocking motor origin
Differential motor origin
Y feed upper motor origin
Y feed lower motor origin
Button loader motor origin
Air pressure sensor
Tongue open/close
Feed plate up (rear side)
Feed plate down (front side)
Chuck inversion (left side)
Presser motor origin
Thread drawing motor origin
Temperature detection
Pause
Safety switch
Chuck level (right side)
Chuck open/close
Pedal start
Pedal input
Needle bar angle
@– 83
Page 88

(3) Performing LCD check
1) Display the LCD check screen.
1
When LCD CHECK button
check program screen is pressed, the LCD
check screen is displayed.
2) Check whether any dot of LCD is omitted.
The screen of LCD check screen is displayed
by one color only. Check in this state whether
any dot is omitted or not.
After checking, press a proper place on the
screen. The LCD check screen is closed and
the check program screen is displayed.
1 on the
@– 84
Page 89

(4) Performing touch panel compensation
1) Display the touch panel compensation
screen.
When TOUCH PANEL COMPENSATION
1
2
button
1 on the check program screen
is pressed, the touch panel compensation
screen is displayed.
2) Press the lower left position.
Press red circle
3 located at the lower left
position on the screen.
When finishing the compensation, press
CANCEL button
2.
3
2
4
3) Press the lower right position.
Press red circle
4 located at the lower right
position on the screen.
When finishing the compensation, press
CANCEL button
2.
@– 85
Page 90

5
2
4) Press the upper left position.
Press red circle
5 located at the upper left
position on the screen.
When finishing the compensation, press
6
2
CANCEL button
2.
5) Press the upper right position.
Press red circle
6 located at the upper right
position on the screen.
When finishing the compensation, press
CANCEL button
2.
6) Store the data.
When 4 points have been pressed, the screen
showing power-OFF prohibition is displayed
since the compensation data are to be stored.
Do not turn OFF the power while this screen
is being displayed.
When the power is turned OFF, the
compensated data are not stored.
When storing is finished, the check program
screen is automatically displayed.
@– 86
Page 91

40. ERROR CODE LIST
Error code
E001
E007
E011
E012
E013
Pictograph
Description of error
Contact of EEP-ROM initialization of MAIN
CONTROL p.c.b.
When data is not written in EEP-ROM or data
is broken, data is automatically initialized and
the initialization is informed.
Main shaft motor-lock
When large needle resistance sewing
product is sewn
External media not inserted
External media is not inserted.
Read error
Data read from external media cannot be
performed.
Write error
Data write from external media cannot be
performed.
How to recover
Turn OFF the
power.
Turn OFF the
power.
Possible to
recover by reset.
Possible to
recover by reset.
Possible to
recover by reset.
Place of recovery
Previous screen
Previous screen
E014
E015
E016
E017
E018
Write protect
External media is in the write prohibition state
Format error
Formatting of external media cannot be
performed.
External media capacity over
Capacity of external media is short.
EEP-ROM capacity over
Capacity of EEP-ROM is short.
Type of EER-ROM is different
When the mounted EEP-ROM is different in
type.
Possible to
recover by reset.
Possible to
recover by reset.
Possible to
recover by reset.
Possible to
recover by reset.
Turn OFF the
power.
Previous screen
Previous screen
Previous screen
Previous screen
Previous screen
E019
File size over
File size to be read in is too large.
@– 87
Possible to
recover by reset.
Previous screen
Page 92

Error code
E022
Pictograph
Description of error
File No. error
There is no designated file in the server or
external media.
How to recover
Possible to
recover by reset.
Place of recovery
Previous screen
E023
E024
E027
E028
E029
Detection of step-out of presser lifting
motor error
When step-out of motor is detected at the
time when presser lifting motor passes the
origin sensor.
Pattern data size over
When sewing cannot be performed since
the size of downloaded sewing data is too
large.
Read error
Data read from server cannot be performed.
Write error
Data write to the server cannot be
performed.
Smart media slot release error
Lid of smart media slot is open.
Possible to
recover by reset.
Possible to
recover by reset.
Possible to
recover by reset.
Possible to
recover by reset.
Possible to
recover by reset.
Data input screen
Data input screen
Previous screen
Previous screen
Previous screen
E030
E031
E042
E050
E098
Needle bar upper position failure
When needle does not stop at UP position
at the time of needle UP operation.
Air pressure drop
When air pressure dropped.
Operation error
Operation of sewing data cannot be
performed.
Stop switch
When stop switch is pressed during machine
running.
Needle bar down error
When needle bar cannot be lowered.
Possible to
recover by reset.
Possible to
recover by reset.
Possible to
recover by reset.
Possible to
recover by reset.
Possible to
recover by reset.
Data input screen
Data input screen
Data input screen
Data input screen
Step screen
@– 88
Page 93

Error code
E099
Pictograph
Description of error
Loader motor step-out detection error
When step-out of motor is detected at the
time when loader motor passes origin
sensor.
How to recover
Possible to
recover by reset.
Place of recovery
Step screen
E302
E303
E394
E395
E396
Confirmation of tilt of machine head
When tilt of machine head sensor is OFF.
Main shaft semilunar plate sensor error
Semilunar plate of sewing machine motor
is abnormal.
Feed plate lowering sensor can not
detect.
When feed plate lowering sensor fails to
work.
Feed plate lifting sensor can not detect.
When feed plate lifting sensor fails to work.
Tongue close/open sensor can not
detect.
When the sensor fails to work, or the tongue
is not drawn out at the time of tongue close/
open operation.
Possible to
recover by reset.
Turn OFF
thepower.
Possible to
recover by reset.
Possible to
recover by reset.
Possible to
recover by reset.
Data input screen
Data input screen
Data input screen
Data input screen
Data input screen
E397
E398
E399
E401
E402
Chuck close/open sensor can not detect.
When the button is not in the chuck at the
start of sewing machine operation.
Chuck level sensor can not detect.
When the sensor fails to work at the time of
chuck level operation.
Chuck inversion sensor can not detect.
When the sensor fails to work at the time of
chuck inversion operation.
Copy disapproval error
When trying to perform copying to the
pattern No. which has been registered.
In case of cycle stitching :
Pattern deletion error
When the registered pattern No. is
registered to cycle stitching, or trying to
delete the pattern No. when there is only
one pattern No.
Possible to
recover by reset.
Possible to
recover by reset.
Possible to
recover by reset.
Possible to re-
start after
pressing cancel
button.
Possible to re-
start after
pressing cancel
button.
Data input screen
Data input screen
Pattern list screen
Pattern list screen
In case of cycle stitching :
@– 89
Page 94

Error code
E497
Pictograph
Description of error
Tongue type error
When AMB-289 type tongue and AMB-189
type one are mixedly used in the cycle data.
How to recover
Possible to
recover by reset.
Place of recovery
Data input screen
E498
E499
E702
E703
E704
Button holding height over at the time
of sewing
Button holding height is too high and sewing
cannot be performed at the time of button
sewing.
Y feed motor move limit value over
When input data of shank/marble sewing
exceed the maximum of Y feed move
amount (max. operating amount : 15 mm).
Abnormality of display data
When there is no display data of panel.
Panel is connected to the machine other
than supposed. (Machine type error)
When machine type code of system is
improper in case of initial communication.
Nonagreement of system version
When version of system software is
improper in case of initial communication.
Possible to
recover by reset.
Possible to
recover by reset.
Turn OFF the
power.
Rewriting of
program
Possible to rewrite
program after
pressing down
communication
switch.
Possible to rewrite
program after
pressing down
communication
switch.
Data input screen
Data input screen
Communication
screen
Communication
screen
E730
E731
E733
E801
E802
Main shaft motor encoder defectiveness
or phase-out
When encoder of sewing machine motor is
abnormal.
Main motor hole sensor defectiveness or
position sensor defectiveness
When hole sensor or position sensor of
sewing machine is defective.
Reverse rotation of main shaft motor
When sewing machine motor rotates in
reversedirection.
Phase-lack of power
When phase-lack of input power occurs.
Power instantaneous cut detection
When input power is instantaneously OFF.
Turn OFF the
power.
Turn OFF the
power.
Turn OFF the
power.
Turn OFF the
power.
Turn OFF the
power.
@– 90
Page 95

Error code
E811
Pictograph
Description of error
Overvoltage
When input voltage is 280V or more.
How to recover
Turn OFF the
power.
Place of recovery
E813
E901
E902
E903
E904
Low voltage
When input voltage is 150V or less.
Abnormality of main shaft motor IPM
When IPM of servo control p.c.b. is
abnormal.
Overcurrent of main shaft motor
When current flows excessively to sewing
machine motor.
Abnormality of stepping motor power
When stepping motor power of servo control
p.c.b. fluctuates ±15% or more.
Abnormality of solenoid power
When solenoid power of servo control p.c.b.
fluctuates ±15% or more.
Turn OFF the
power.
Turn OFF the
power.
Turn OFF the
power.
Turn OFF the
power.
Turn OFF the
power.
E905
E907
E908
E910
E915
Abnormality of temperature of heat sink
for servo control p.c.b.
When temperature of heat sink of servo
control p.c.b. is 85 ˚C or more.
Needle rocking width motor origin
retrieval error
When origin sensor signal is not inputted at
the time of origin retrieval motion.
Y-feed motor origin retrieval error
When origin sensor signal is not inputted at
the time of origin retrieval motion.
Presser motor origin retrieval error
When origin sensor signal is not inputted at
the time of origin retrieval motion.
Abnormality of communication between
operation panel and main CPU
When abnormality occurs in data
communication.
Turn OFF the
power.
Turn OFF the
power.
Turn OFF the
power.
Turn OFF the
power.
Turn OFF the
power.
@– 91
Page 96

Error code
E916
Pictograph
Description of error
Abnormality of communication between
main CPU and main shaft CPU
When abnormality occurs in data
communication.
How to recover
Turn OFF the
power.
Place of recovery
E917
E918
E923
E943
E946
Failure of communication between
operation panel and personal computer
When abnormality occurs in data
communication.
Abnormality of heat sink temperature for
MAIN p.c.b.
When temperature of heat sink for MAIN
p.c.b. is 85˚C or more.
Abnormality of VCM temperature
When temperature of VCM has risen to 70˚C
or more.
Main EEP-ROM trouble
When data writing to EEP-ROM cannot be
performed.
Head EEP-ROM trouble
When data writing to EEP-ROM cannot be
performed.
Turn OFF the
power.
Turn OFF the
power.
Turn OFF the
power.
Turn OFF the
power.
Turn OFF the
power.
E948
E996
E997
E998
E999
Abnormality of F ROM.
When deletion or writing of F ROM is not
performed at the time of downloading
program.
Thread drawing motor origin retrieval
error
Origin sensor signal is not inputted at the
time of operation of origin retrieval.
Button loader motor origin retrieval error
Origin sensor signal is not inputted at the
time of operation of origin retrieval.
Differential motor origin retrieval error
Origin sensor signal is not inputted at the
time of operation of origin retrieval.
Y feed upper motor origin retrieval error
Origin sensor signal is not inputted at the
time of operation of origin retrieval.
Turn OFF the
power.
Turn OFF the
power.
Turn OFF the
power.
Turn OFF the
power.
Turn OFF the
power.
@– 92
Page 97

41. USING COMMUNICATION FUNCTION
Communication function can download the sewing data created with other sewing machine, creation of
sewing data and sewing data created by editing device PM-1 to the sewing machine. In addition, the
function can upload the aforementioned data to the smart media or personal computer.
Smart media and RS-232C port are prepared as the vehicle to communicate.
* However, SU-1 (data server utility) is necessary to perform download/upload from the personal
computer.
(1) Handling possible data
Handling possible sewing data is one kind below and the data format is as described below.
Data name Extension Description of data
Pictograph
AMB 00
Format of the data of sewing proper to AMB
.EPDParameter data
such as sewing shape, sewing method, interval
of button holes, etc. created with the sewing
machine
: file No.
In case of saving the data in the smart media, save the data in the state of directory structure below.When
the data are not saved in the correct folder, reading of file cannot be performed.
Smart media
drive
AMB289
AMB00
.EPD
Save parameter data
(exclusive for AMB).
AMB00 .EPD
AMB00
.EPD
There is beforehand the PROG folder in the Smart media purchased from our company.
Do not delete it.
@– 93
Page 98

(2) Performing communication by using the smart media
[ Setting procedure ]
1) When the upper side cover located on the side
Contact part
2) The smart media card stops once in the protruding state by approximately 10 mm while inserting the
card. Further, apply force to insert the card and ease up the force when it is reached to the end.
Setting is completed when the card has returned by approximately 1 mm.
of the operation panel is opened, there is the
inserting opening for smart media card.
Put the contact part of the card to the front side
and insert it into the opening.
3) After completion of setting of the card, close the smart media cover. By closing the cover, it is
possible to perform communication. If the smart media card and the cover come in contact with
each other and the cover is not closed, check the following matters.
• Check that the inserting is stopped in the state that the card protrudes by approximately 10 mm.
• Check that the contact part of the card is put downward and inserted.
• Check that the smart media card other than 3.3V voltage type is used.
[ Removing procedure ]
1) Open the smart media cover, push the card until it goes no further, and ease up force when it goes
to the end. The card returns by approximately 10 mm in the reverse order of the time of setting.
2) Then draw out the card to complete removing.
@– 94
Page 99

[ Performing format ]
In case of re-formating the smart media, be sure to perform it with IP-200. The smart media formated
with the personal computer cannot be read with IP-200.
1) Display the smart media format screen.
2
1
When MODE key
1 is held pressed for
three seconds, smart media format button
2 is displayed on the screen. When this button
is pressed, the smart media format screen is
displayed.
2) Start formating of the smart media.
Set the smart media you desire to format to the
smart media slot, close the cover, press ENTER
button
3 and formating starts.
Save necessary data in the smart
media to the other vehicle before
formating. When formating is
performed, the inside data are
deleted.
3
[ Prohibition items in handling the smart media ]
1 Smart media is a precision electronic instrument. Do not bend it or apply shock to it.
2 It is recommended to periodically save the data saved in the smart media to the other vehicle to
prepare for accidents.
3 When initializing the data, perform it after checking that necessary data do not exist in the card.
4 Avoid using or storing the smart media in a place of high temperature and high humidity.
5 Avoid using the smart media near exothermic and combustible articles.
6 If the contact part of the card becomes dirty, failure of contact will be caused. Do not touch by hand,
and control so that dust, oil, or other foreign material does not adhere to it. In addition, the inside
element is damaged by static electricity or the like. So, be very careful when handling.
7 Smart media has a span of life. Writing and deletion cannot be performed after an extended period
of use. In this case, replace it with a new one.
@– 95
Page 100

(3) Performing communication by using RS-232C
[ Setting procedure ]
It is possible to send and receive the data, by using RS-232C cable, with the personal computer or the
like. For the cable to be connected, connect reverse type 9-pin (female) to the operation panel side.
If the contact part becomes dirty, failure of contact will be caused. Do not touch by
hand, and control so that dust, oil or other foreign material does not adhere to it. In
addition, the inside element is damaged by static electricity or the like. So, be very
careful when handling.
* When the lower part of the cover located on the side of the operation panel is opened, there is the
connector of 9-pin for RS-232C. Connect the cable there. When the screw for locking is attached to
the connector, tighten the screw to prevent it from falling.
@– 96
 Loading...