

Page 1
3. Do not place any ob je ct s in o r on t he se d ev ic es .
4. To avoid the risk of e lectrical sho ck , do n ot a tt em pt t o repair the
device or open the e nc lo su re w it ho ut p rofessiona l gu id an ce .
5. Be sure th at both transmitter and receiver have accepta bl e ai r fl ow
and ventilation to prevent damage from overheating.
3. Support s CE C, A RC
4. Uncompressed transmis si on , ze ro l aten cy
5. 100ft t ra ns mi ss io n di st ance with clear lin e of sight
6. Support s Do lb y Tru eH D, DTS -H D Ma st er A ud io a nd L PC M
audio formats
7. Support s di gi tal audio streams up to 7.1 channels
or 5V power bank via
specification matched if using 3rd party DC adapters
or use Micro USB port to get power . Make sure the
The J TECH-WE X- 60GA ze ro late nc y wirel ess HDM I exten de r is the pe rf ec t
sol ut ion for t ransmit ti ng high d ef initi on v ideo an d audio to any HDTV
dis pl ay up to 100 fee t away (c le ar line of sight ) with no d el ay. The
JTE CH -WEX-60 GA suppor ts res oluti on s up to 4 K x 2K @ 30 Hz , 1080P 3 D
and a lso sup po rts CE C, 7.1 ch annels of High B it Rate ( HBR) lo ss le ss di gi ta l
aud io format s such as D ol by TrueHD a nd DTS-HD Ma ster Au di o. With z ero
lat ency, the J TECH- WE X- 60GA is a n ideal s ol ution for gaming , 3D movi es
and l ive vid eo applic at ions.
Note:
1) Tra ns mi ss io n di st an ces will var y for ea ch e nv ir on me nt
2) This device doe s no t tr an sm it t hr ou gh w al ls , br ic k/ ston e or glass.
1. Support s 4K @3 0H z / 1080P 3D
2. Low power consump ti on
Mou ntx2pcs
USB Power
USB Power
or 5V power bank via
Note: Max 2 k it s wi th in a room. Wh en the tr ansmi tter an d th e re ceive r are
pla ced fac e to f ac e of each o ther, th e tr an smissio n dista nc e is u p to
100 ft; wh en the tr ansmi tter an d th e re ceive r are pla ce d fr eely, to 25f t.
Page 2

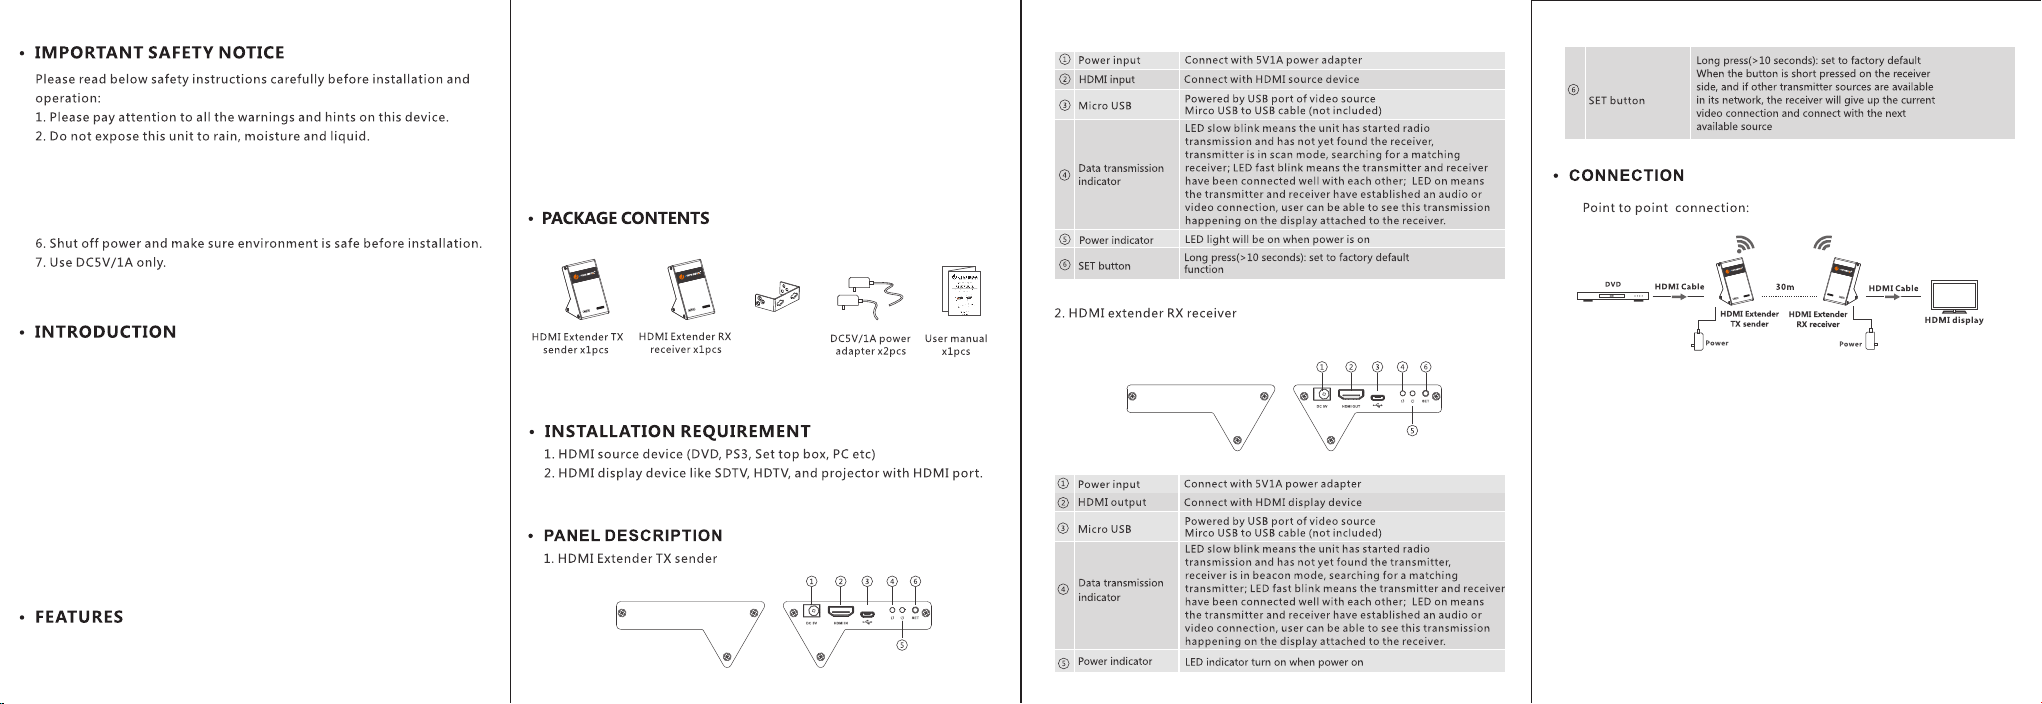
1) Co nn ec t th e HDM I so ur ce d evice t o th e tr an smi tt er H DM I input p or t.
2) Co nn ec t th e HDM I di sp la y devic e to t he r ec eiv er H DM I in pu t por t.
3) Co nn ec t th e pro vi de d po we r ada pt er s to t he tr an sm it te r and rec ei ve r.
1) Long press the “Set” button (> 10 secon ds) to restore the extenders
to a factory default setting. Ple ase note, you must perform a factor y
reset to connect the transmitter and receiver prior to initial use.
2)When conne ct in g th e tr an sm it te r to t he r ec ei ve r, it is better to place
the transmitter and receiver facin g ea ch o th er f or a s uc ce ss fu l pa ir in g.
3)This device do es n ot t ra ns mi t th ro ug h wa ll s, b ri ck /s to ne o r glass.
4) Rem ov e other w irele ss s ignal int er fe rence f rom you r envir on ment
and remo ve a ny obst ru ctions prevent in g clear l in e of si ght bet we en
tra nsmitte r and rec ei ver.
Copyri ght© J-Tech Digital, Inc. All rights reserve d.
A: 1) Please check i f th e da ta t ra ns mi ss io n LE D indicator stays
illuminated.
Q: The data transm is si on L ED i nd ic at or o f th e tr an sm it te r bl in ks s lo wl y,
but there i s no signal output on t he d is pl ay /m on it or .
A: 1) Please verif y th at t he s ou rc e de vi ce i s ou tp utting an HDMI sign al
to th e tr ansmitter
2) Try conn ec ti ng t he s ou rc e de vi ce d ir ec tl y to y ou r di sp la y de vi ce t o
confirm there is an HDMI outpu t si gn al f ro m your s ou rce de vi ce . You
may also try a differe nt HDMI source device and diffe rent HDMI
cable with your wireless trans mi tt er .
100f t
25ft
HZ
HZ
 Loading...