

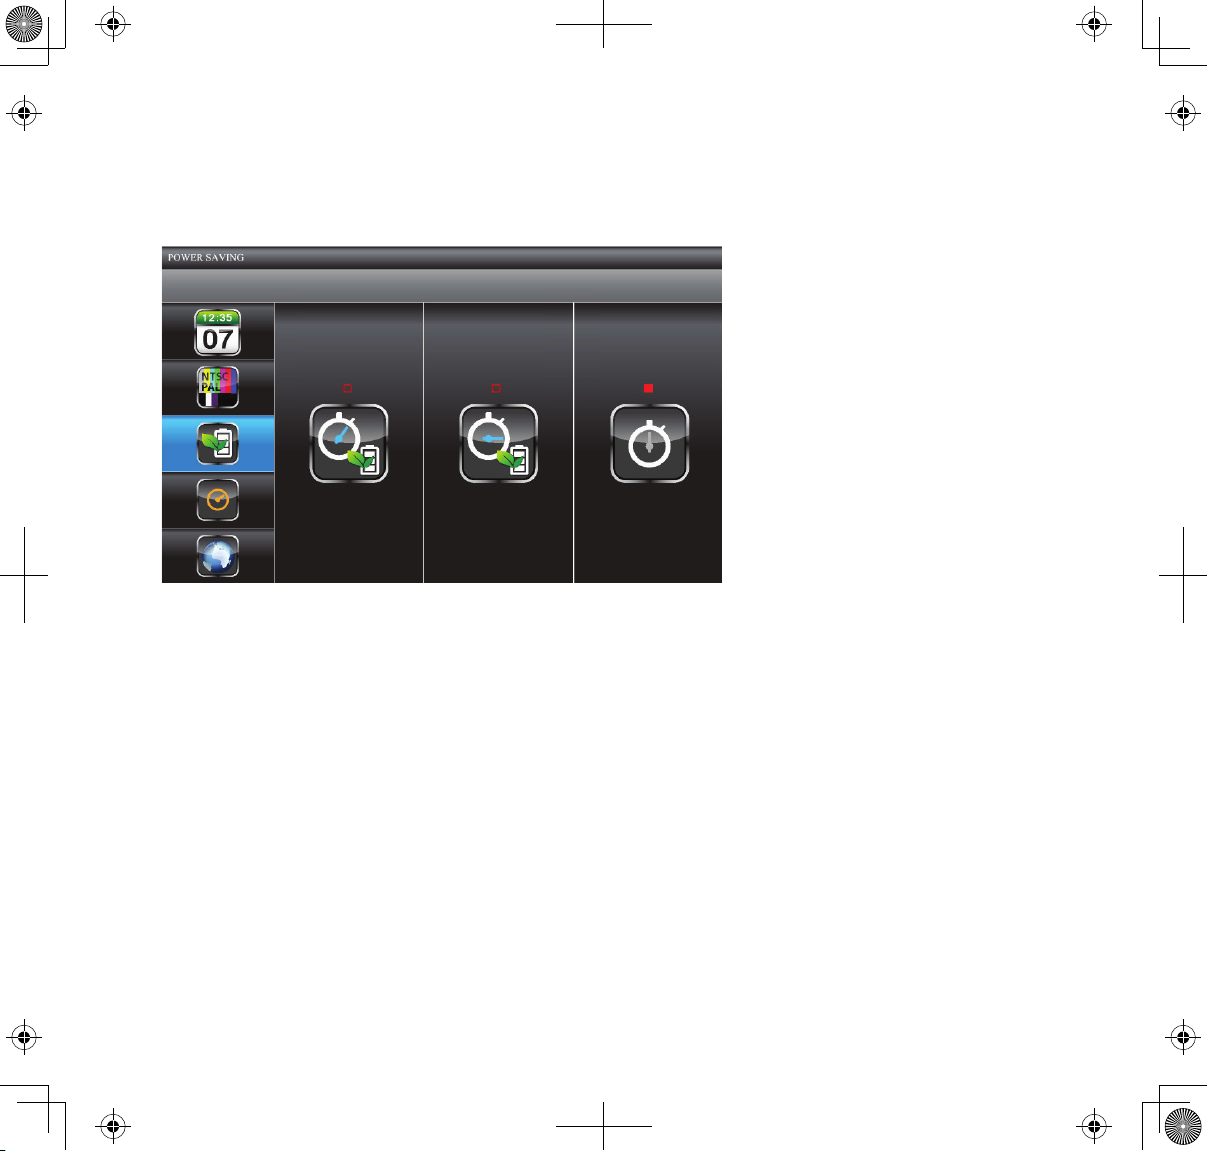
or to not have a bright LCD when sleeping. If Power Saving mode is on, motion detection events
will turn the LCD screen back on.
1. From the
poWeR SAvinG
2. Use
CH+
SYSTEM SETUP
and
CH
screen, use
VOL+
screen displays.
to choose between
and
5 min
VOL
, or
to select
10 min
; the third option is
which keeps the system from entering Power Saving mode. Press
and return to the
poWeR SAvinG
screen.
Multi Channel Idle Display
poWeR SAvinG
ALWAyS on
M
to accept the setting
; press M. The
,
This screen lets you decide if the channels will display in quad mode or if they will cycle individually
in 5, 10, or 15 second intervals.
1. From the
diSpLAy
SYSTEM SETUP
; press M. The
screen, use
VOL+
and
VOL
to select
muLti cHAnneL idLe diSpLAy
muLti cHAnneL idLe
screen displays.
31
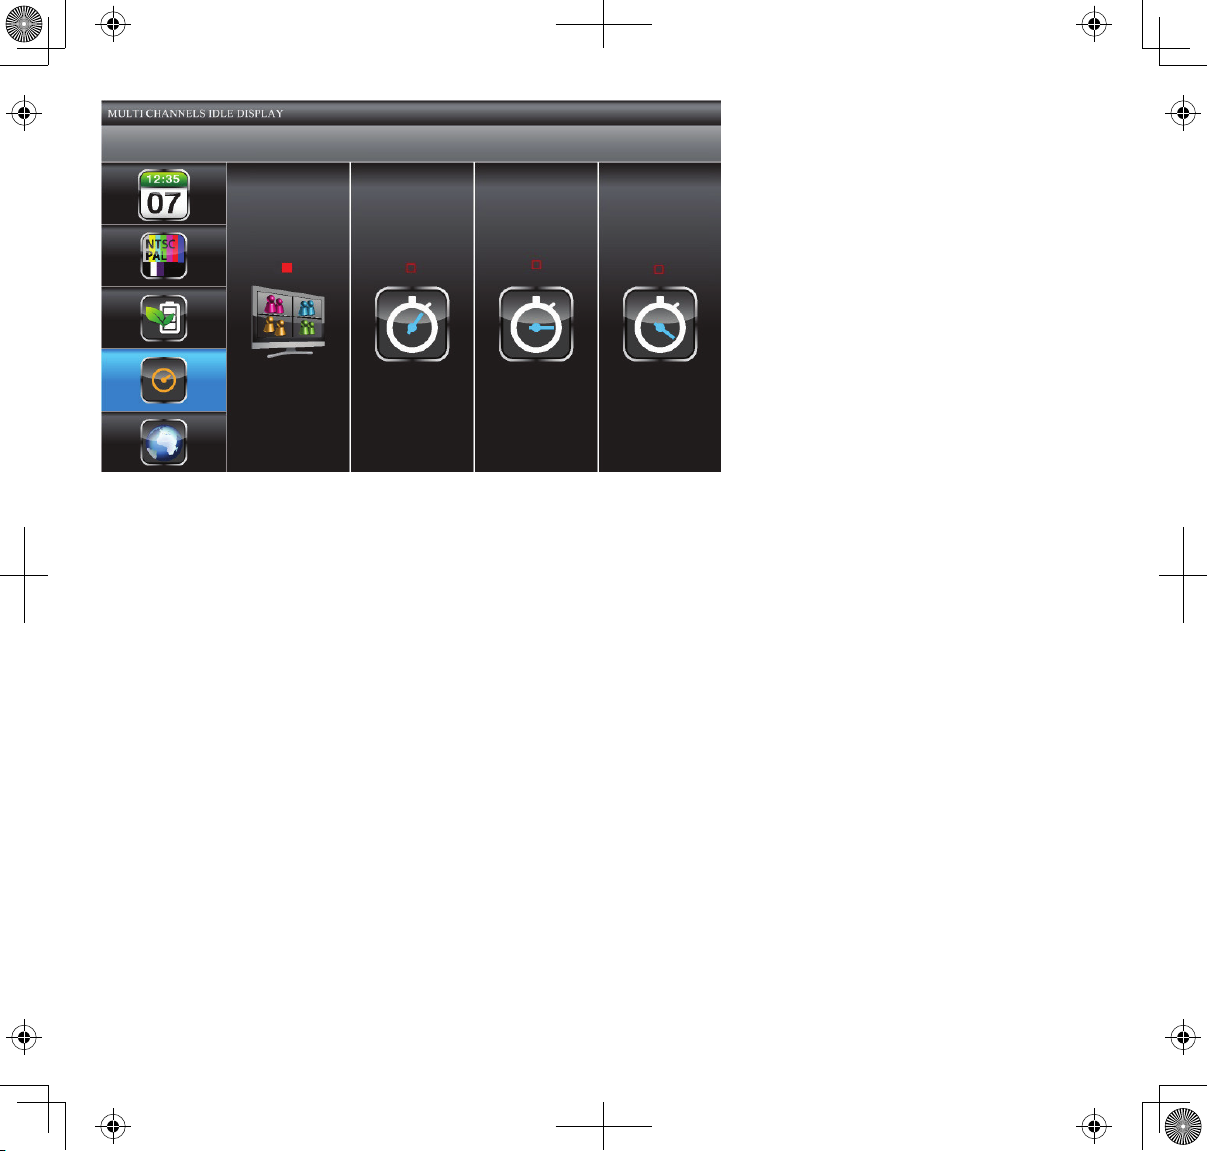
2. Use
CH+
and
CH
to choose between
accept the change and return to the
QUAD
and
5, 10,
and
15
MULTI CHANNEL DISPLAY
second intervals. Press M to
screen.
• The Activate or Deactivate setting (
CAMERA SETUP
screen) affects which cameras display in Scan
mode.
• Audio is available from camera 1 in Quad mode, from whatever camera is a previously viewed
channel, or from a channel triggered by motion detection.
Default
The
DEFAULT
screen gives you the options of selecting a default language. Options are English,
French (Français) or Spanish (Espanol).
1. From the
deFAuLt
SYSTEM SETUP
screen displays.
The language selected when setting the
screen, use
VOL+
and
VOL
to select
deFAuLt
deFAuLt
and press M. The
will be the system language
after any system restoration.
32
2. Use
The
to page 52 for details.
CH+
and
CH
to choose between English, French (Français), or Spanish (Espanol). Press M
to confirm and back out.
DEFAULT
screen will also alert you when it detects a new firmware upgrade on the SD card. Go
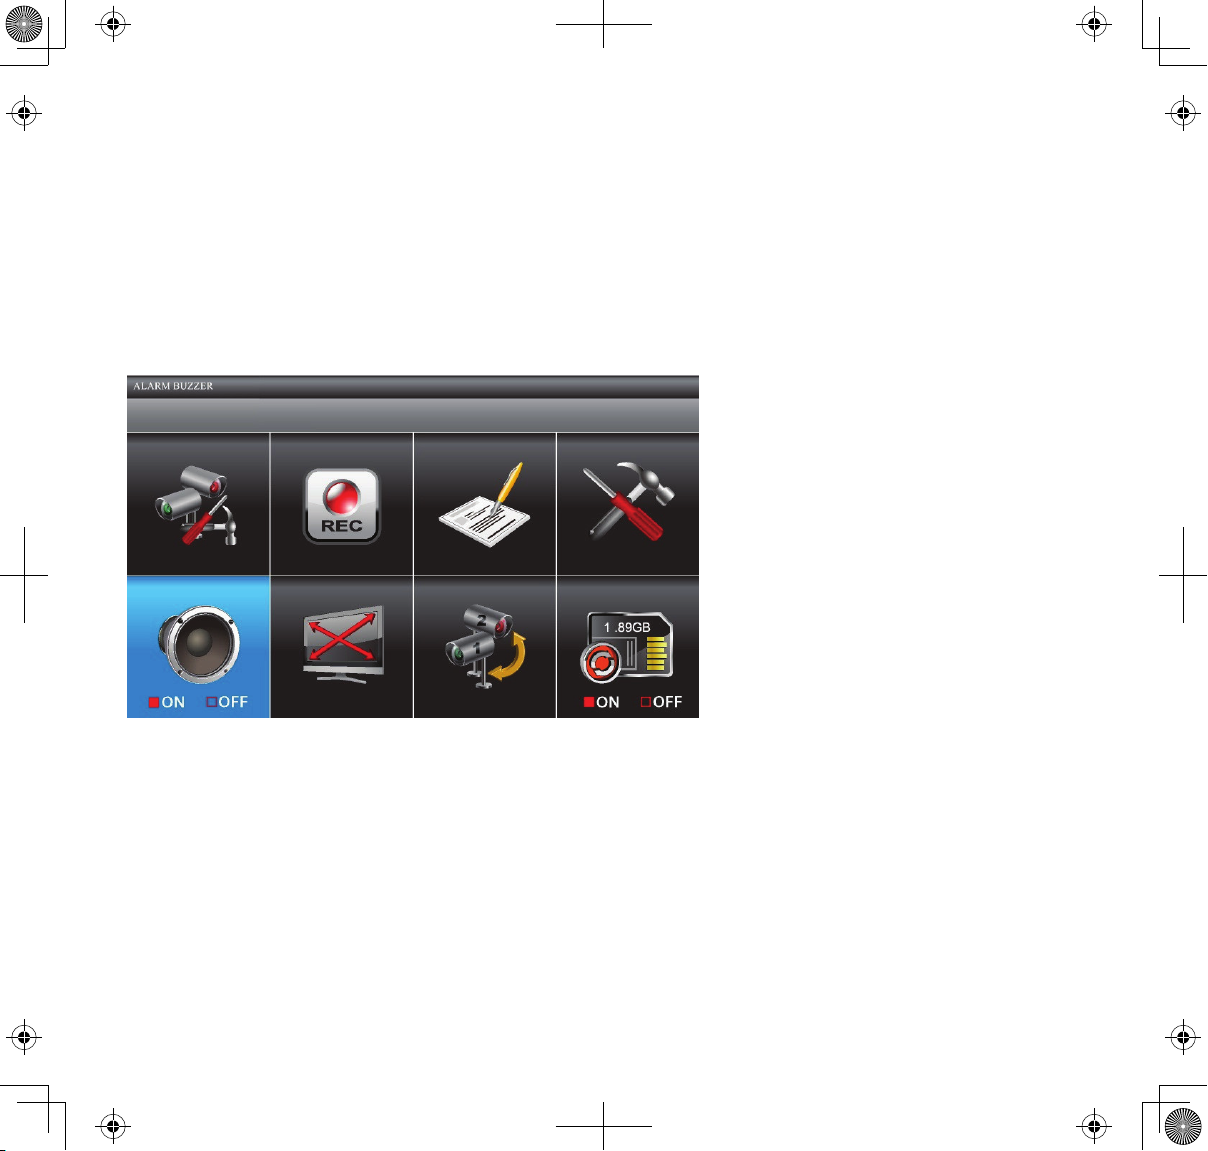
ALARM BUZZER
You can set the alarm buzzer to go off when a camera detects motion and begins recording.
1. From the main menu, use
2. Press M to toggle the setting between on and
CH+, CH, VOL+
, and
VOL
oFF
to select
.
ALARm BuZZeR.
PAN TILT ZOOM
This setting lets you change the orientation of the camera (pan and tilt) and the zoom distance.
33
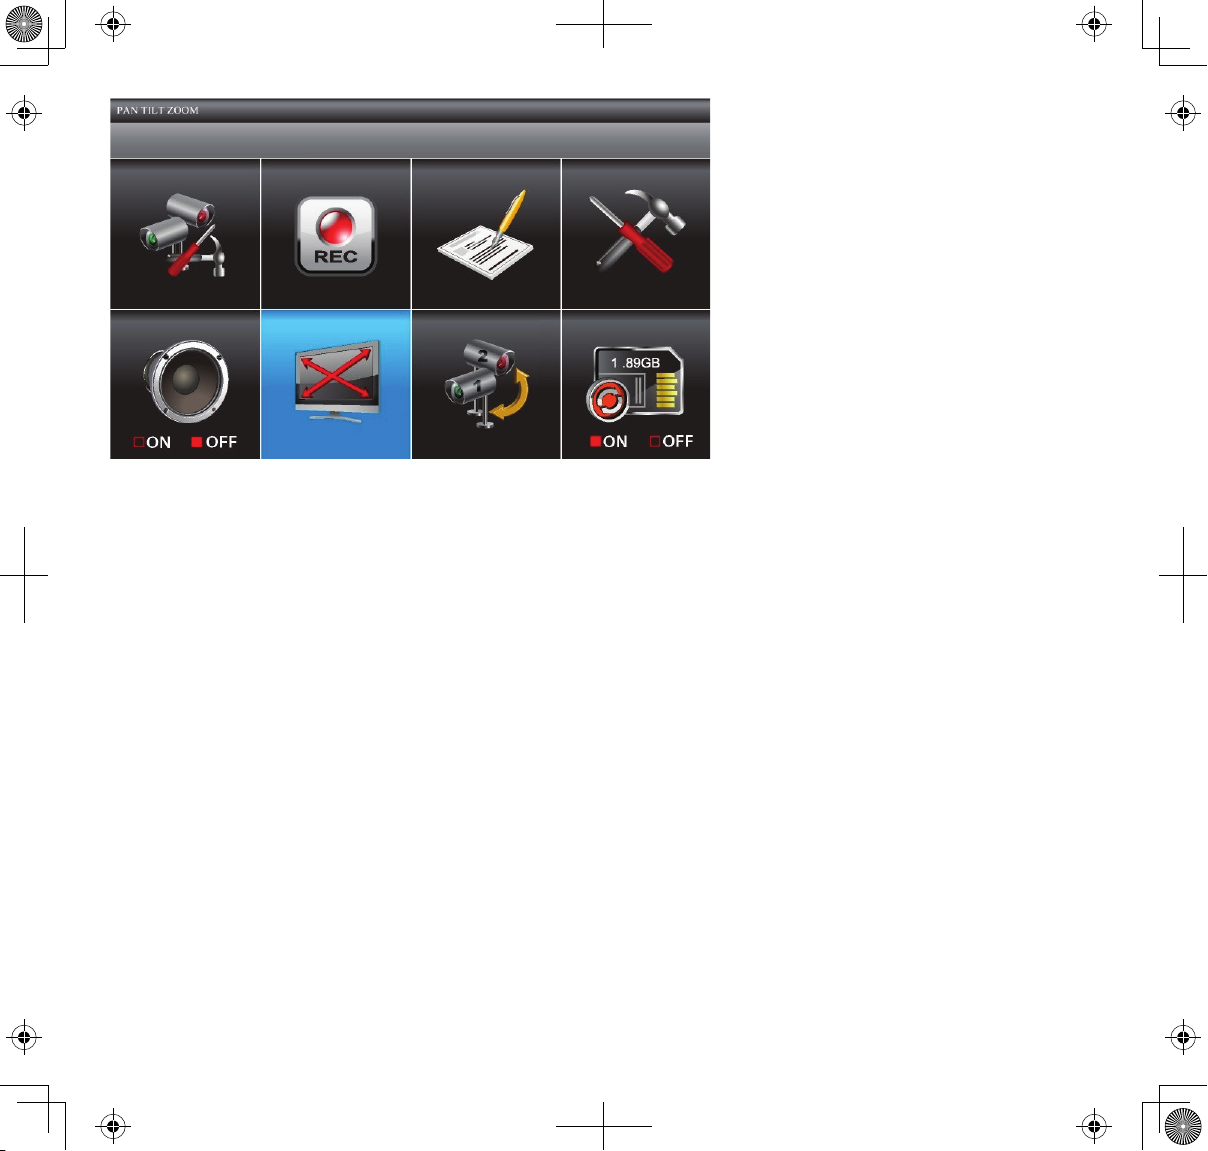
1. From the main menu, use
CH+, CH, VOL+
first camera displays in single camera mode.
, and
VOL
to select
PAN TILT ZOOM
and press M. The
2. Press
ZOOM
(Sample actually goes into QUAD mode, then press
3. Press
CH+
. The camera zooms into Level 1. Press
and
CH
to pan the camera from left to right and back or
ZOOM
ZOOM
again to zoom into Level 2.
and into camera 1.)
the camera up and down.
ESC
4. Press
to return to the the main menu.
The system will exit Zoom mode after it is idle for 2 minutes.
34
VOL+
and
VOL
to tilt
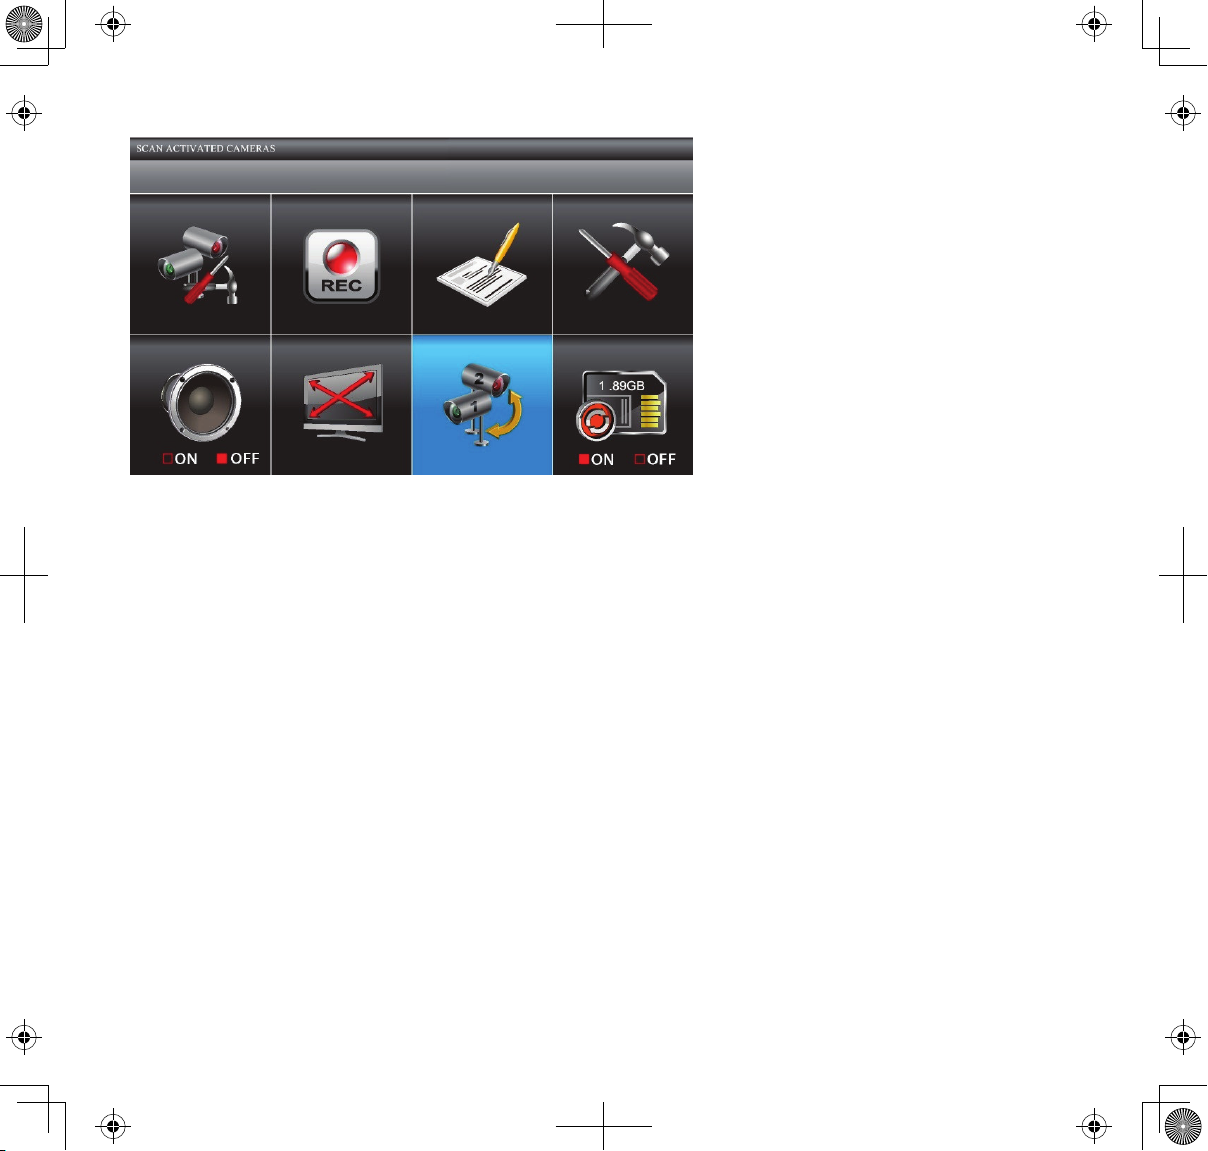
SCAN ACTIVATED CAMERAS
1. From the the main menu, press
cAmeRAS
2. The screen scans between the cameras according to the scan time set up in the
CHANNELS IDLE DISPLAY
If a recording session started during SCAN mode (Schedule or Motion recording), the system
resumes display in quad mode.
and press M to enter Scanning mode.
screen (refer to page 31).
CH+, CH, VOL+
, and
VOL
to select
ScAn ActivAted
MULTI
MEMORY CARD OVERWRITE
Turning on Memory Card Overwrite allows you to overwrite the oldest files when your memory
card is full. If you turn this function off, an error message displays when you have no more room to
save files.
1. From the main menu, press
oveRWRite
and press M.
CH+, CH, VOL+
, and
VOL
to select
memoRy cARd
35
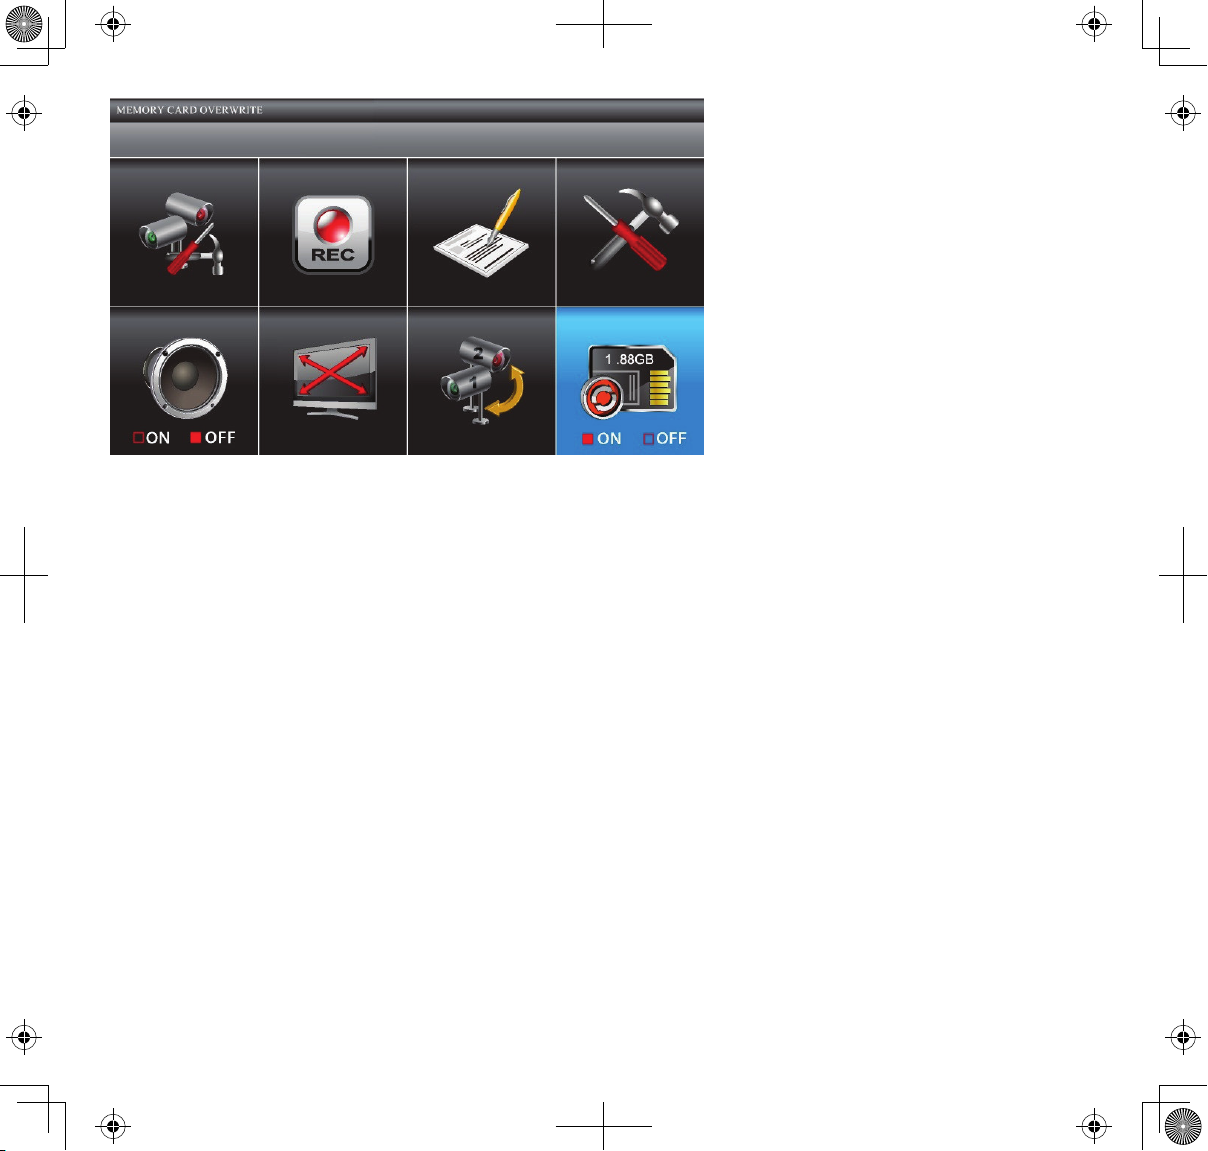
2. Press M again to toggle the overwrite setting between ON and
OFF
. Press M. The system
overwrites the oldest files first. The system displays the following SD card detail
information.
• SD card available storage space
• If no space is available, 0.00GB displays.
• Error indicator displays if:
— SD card not present
— SD card is locked.
— SD card is unformatted
— SD card is damaged.
Please use well-known brands of micro SD cards to avoid operation errors. The UDS655
supports up to 32GB microSD cards.
36

SPECIAL FEATURES
This section provides Remote Access requirements and software installation, setup, and usage
procedures for accessing your live feeds from a number of wired and wireless devices. It also
provides information on other special features such as:
• Recording video and taking pictures through the Portal account
• Viewing live video on TV
• Playing back recorded files on a PC
REMOTE ACCESS
The Uniden USD655 let you view live video from your system on your television or PC (home or
remote) or on wireless devices such as an iPhone®, iPad®, or AndroidTM smartphone or tablet. A free
Uniden Guardian app is available through the iTunes® App Store or the Android Market. You can
also view your recorded video files on any PC with Uniden Media Player installed.
The Uniden Remote System software CD in your kit provides the software you need to install. You
will also need to set up a Uniden Portal account. Multiple user accounts on your PC can access live
video on their accounts through the Portal account as long as they have the Device ID (DID) code
and security code to log in and you have specified that the Portal can provide access to multiple
users on that PC when you set up the account.
The number of remote viewers is determined by the amount of “available upload
bandwidth” on your home network. Each remote viewer requires ~350kbps of bandwidth
on the network.
System Requirements
• Microsoft® Windows XP, Vista, or Windows 7
Uniden Remote Service software operates in a Windows environment only.
• Internet Explorer® 8 or greater.
37
• iPhone® or
• iPad® or
• Android
TM
smartphone or tablet
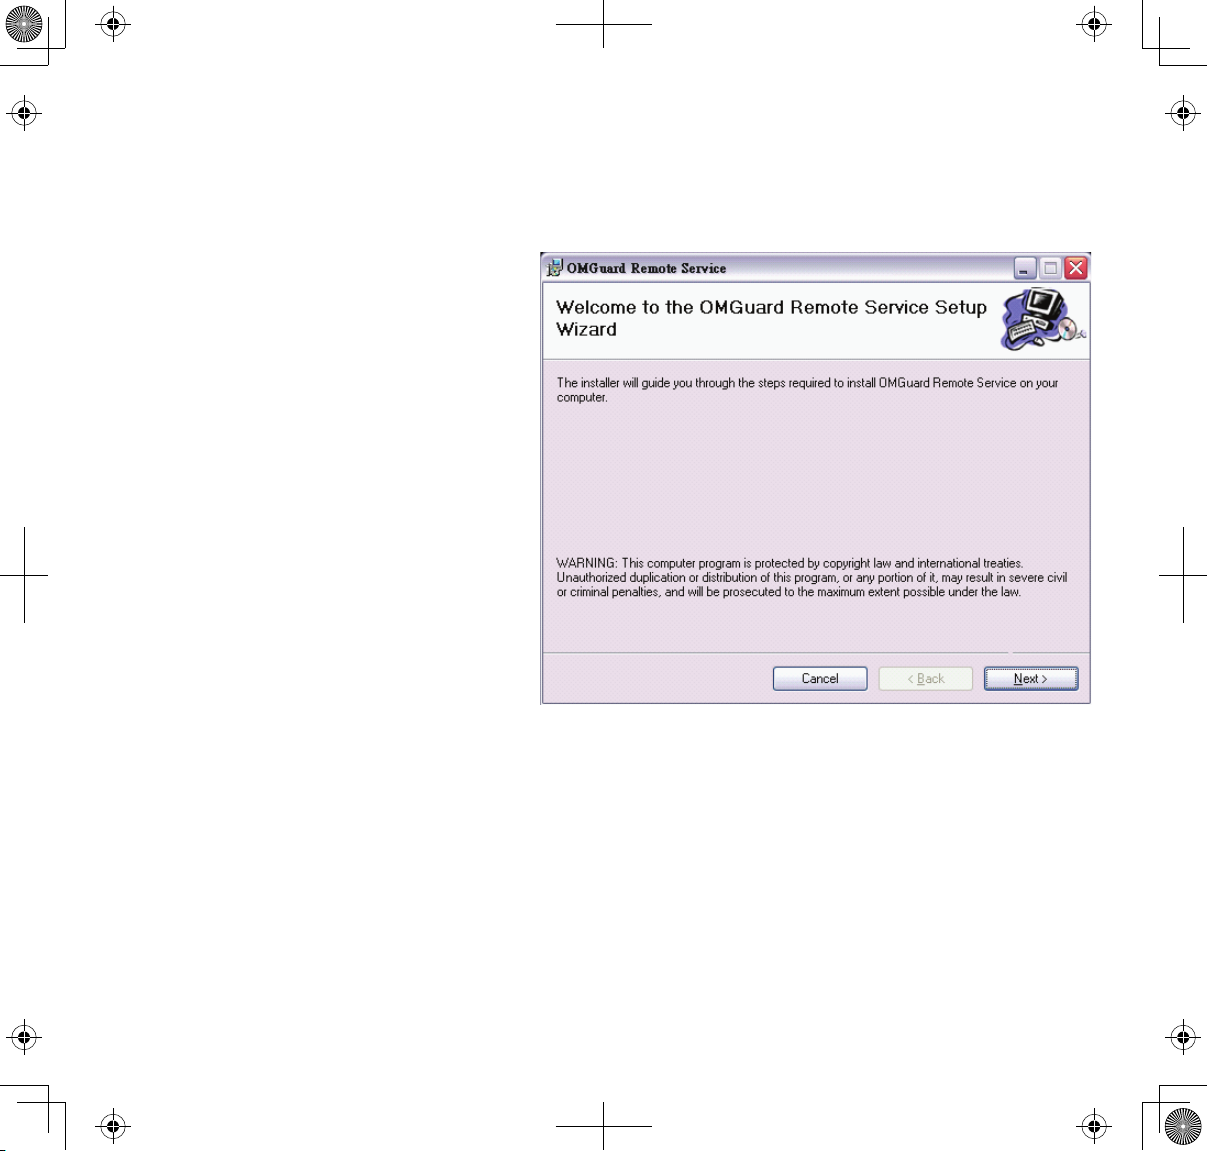
Install Uniden Remote Service Software
1. Insert the UDS655 Remote Software
CD in your PC's CD ROM.
2. Select Uniden Remote Service and
double-click to install.
3. The
Click
WELCOME
NEXT
window appears.
to select an installation
folder.
4. The default folder is located at C:\
Program Files\. If you want to store
it in a different installation location,
click
BROWSE
an installation location, click
. When you have selected
NEXT
to
proceed.
38
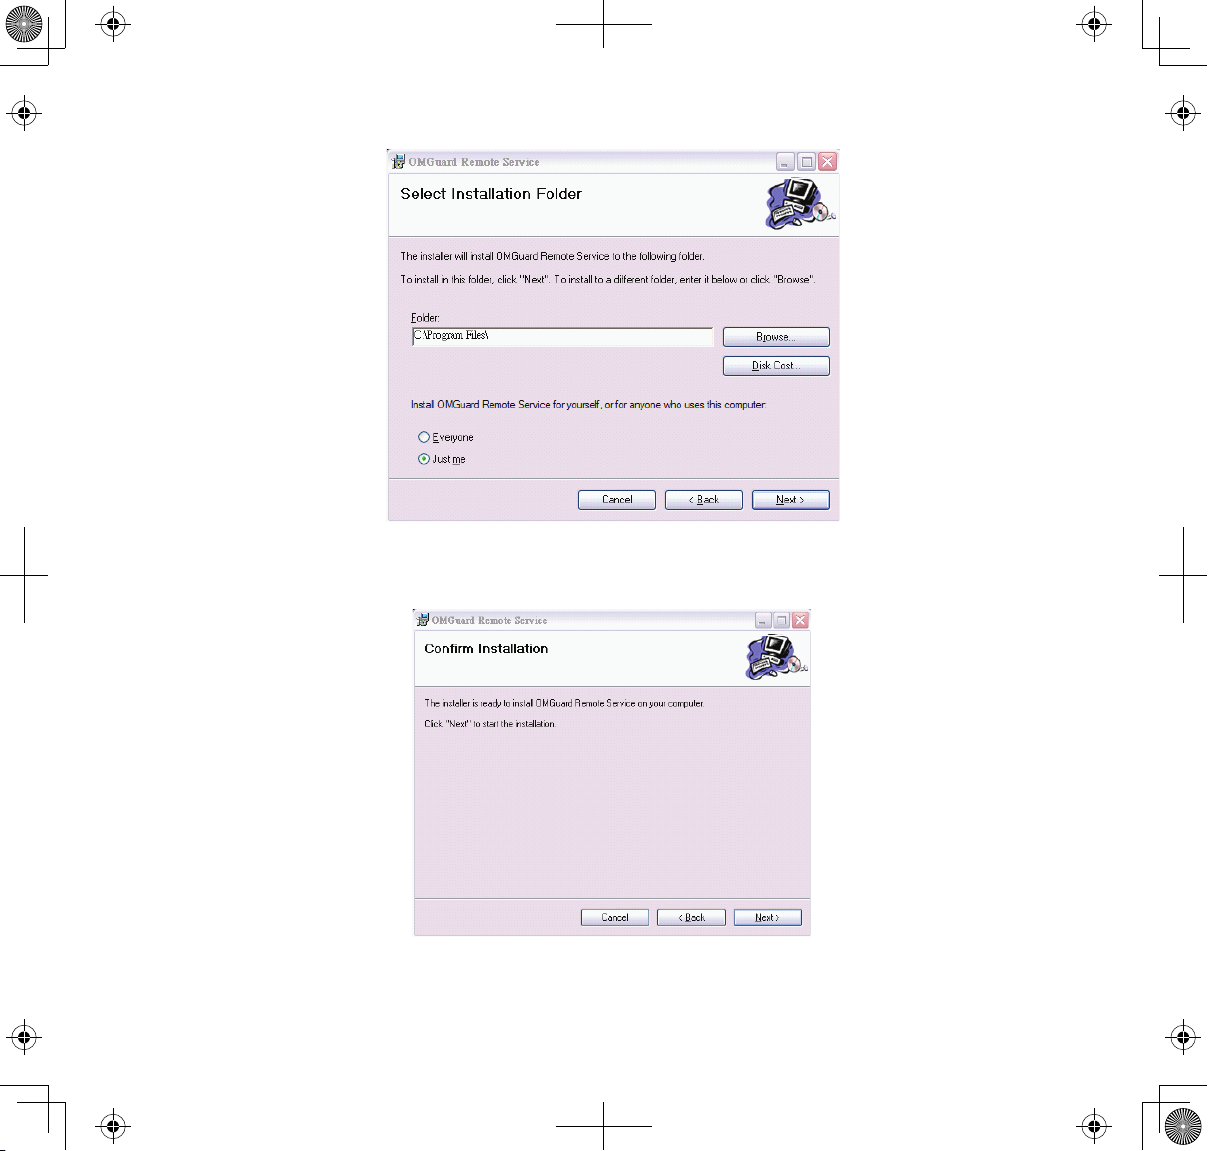
If the computer has more than one user account that needs to access the video feed, select
EVERYONE
; otherwise, select
JUST ME
.
5. The
CONFIRM INSTALLATION
progress bar displays.
screen displays. Click
NEXT
to begin installing the software. A
39

6. The
INSTALLATION COMPLETE
screen displays when the software is installed. Click
the Installation wizard.
7. Turn on the UDS655 monitor and connect it to the PC using the USB cable.
8. A
NEW HARDWARE FOUND INDICATOR
appears on the lower right-hand side of the PC screen.
CLOSE
to leave
9. Click
40
START
to activate OMGuard Remote Service. The
OMGUARD SETUP
screen displays.

10. Select or enter the following:
• Display language (Default = English).
• USB 2.0 Camera (from USB Video Device dropdown list)
• DID Code (located on the back of the monitor)
• Security Code (The default security code is 12345.)
You can set up a different security code at this time, but be sure and use that code when
you're using the app and setting up a Portal account. You can enter up to 8 numeric digits.
11. Click
CONNECT TO INTERNET
.
Setting up a Portal Account
Be sure you have the security code set up through Uniden Remote System software
installation. This is required for remote access to your UDS655 system.
1. Go to http://www.unidenvideo.com.
2. Click
ADD NEW ACCOUNT
LEGAL AGREEMENT
. The
displays.
3. Read and agree to the Legal
Agreement.
41

The
ACCOUNT SETUP
screen displays
4. Enter
5. Enter a
ACCOUNT NAME
PASSWORD
6. Enter it again to
(1).
(2).
VERIFY PASSWORD
(3).
7. Complete all required fields
8. Click in the check box (5)
to receive information on
firmware updates and news. We
recommend you check this box
to receive updates.
9. Click in the check box (6) to
receive information on special
offers from Uniden.
10. Click
SUBMIT
(7). The
ACCOUNT CREATED
NEW
screen
displays.
11. Click
CONTINUE
. The
VIDEO
SYSTEM REGISTRATION
screen
appears.
(4).
12. Provide a
DEVICE NICKNAME
13. Select your retailer from the
list (2).
42
(1).

Select Your Model/Enter the DID Code
1. The
Select
VIDEO SYSTEM REGISTRATION
UDS655
.
screen displays.
2. Click the radio button by your system (3).
3. Enter the DID code in all capital letters (4).
4. Click
5. A
6. The
CONTINUE 5
CONFIRMATION
VIEW NOW
screen displays. At the bottom of the screen is a prompt to install the OCX plug-
.
screen displays; select
VIEW NOW
3
.
in. Install it on whatever PC you want to remotely view your video.
7. Click on the link near the bottom of the page and it will ask you to
RUN
or
SAVE
8. Save it to your desktop. After the download is complete, click on it to install.
9. After the installation is complete, return to the
VIEW NOW
screen on the Portal.
4
5
the file.
10. Now you will see the DID code from your device that you entered during account setup. Enter
the security sode you created in Uniden Remote Service software installation (see page 41).
11. Click
START
.
The security code you enter on the Uniden Video Portal and the apps must match the
security code you entered during Uniden Remote Service software installation. Anytime you
change the security code in that software, you must make the corresponding change on the
Portal or the apps.
43

Using Remote Access
If you want to view your video remotely, you must do the following:
1. Verify that your PC is connected to the internet and that Uniden Remote Service software is
installed.
2. Use the USB cable to connect the monitor and the PC.
3. Launch the Uniden Remote Service software.
4. Enter the security code.
5. Select
Your system is now connected to the internet and your cameras' video can now be remotely
viewed through iPhone, iPad, Android smartphones and tablets, and PC via the UnidenVideo Portal.
CONNECT TO INTERNET
.
RECORD VIDEO THROUGH THE PORTAL
The Portal lets you record live video and save
it to your PC.
1. Click
2. Click
RECORD
STOP RECORD
to start recording.
to stop recording.
44

TAKE A SNAPSHOT THROUGH THE PORTAL
The Portal lets you take snapshots of
video and save to your PC.
Click
SNAPSHOT
.
You specify the save location for all
video and snapshots. Select Save and
then browse to the location where you
want to save them.
PLAY BACK RECORDED FILES ON YOUR PC
The files that record on the UDS655 record onto the microSD card. You can take that card and play
it on your PC. You will need:
• UDS655 microSD card
• Uniden Media Player software (on UDS655 PC Software CD included in the box)
• SD card adapter (included in the box).
1. Insert the UDS655 PC Software CD into your PC..
2. Install Uniden Media Player onto your PC. It will post a shortcut icon to your desktop.
3. Remove SD card from the UDS655. Place it in the adapter and insert adapter into
your PC.
4. Launch Uniden Media Player; click
LOAD
.
5. Navigate to the SD card on your system.
6. Select the files you want to view and click
OPEN
.
7. The files begin playing, in order, on the Uniden Media Player screen.
VIEW LIVE VIDEO ON TV
1. Be sure the UDS655 and the television are turned on.
45

2. Use the AV cable (provided) to connect the television to your monitor.
3. The monitor screen goes blank and video displays on your television.
46

DOWNLOADING AND USING THE APPS
ANDROID
TM
Download
You can use a Google® Android
TM
smart phone or tablet with your Uniden Guardian 2 System to
remotely connect to and view live camera video. Follow these steps to download, add, and use the
app.
1. From your Android
TM
smart phone
or tablet device search the Android
Market for
UNIDEN GUARDIAN 2
.
2. Download the Uniden Guardian 2
app. This app has a black and gold
icon.
ADD
3. Launch the app; select
to add
your system information to the app.
4. Enter a name for your system in the
SYSTEM NAME
field.
5. Enter the same DID code from your
Uniden Guardian monitor in the
DEVICE DID
field
.
6. Enter the same security code that you
set on your Uniden Guardian monitor
in the
7. Select
SECURITY CODE
SAVE
.
field.
8. Select the system you wish to view.
47

The Uniden Guardian 2 app has a Search feature which will automatically find your
UDS655 system on your "intranet." If the phone is connected via WiFi to the same router/
network that the PC is on, selecting the Search button in the app will automatically find
your system and enter the DID code in the DID Code field. You will only have to enter the
Security Code you entered in the Remote Access software.
App Operation
When you open the app on your Android phone, the image displayed on the main screen is the last
camera image, captured automatically, from your previously established session.
Tap to add an additional Guardian system.
Tap to enter
Tap to refresh the system.
Tap to enter the app
the app version number and the API version number. Tap oK to
Main screen
If you have multiple systems, scroll down and tap on the system image you want to view.
exit.
SyStem Setup
inFoRmAtion
page.
page. The screen displays
Follow these steps to view video:
1. Select a system.
2. Select a camera from the drop-down menu.
3. View video.
You can turn your device sideways and for a horizontal
view.
48

4. Tap
RETURN
to stop the video and enter the system page.
You can take snapshots from the video by using the Snapshot and Return icons.
Snapshot icon. Tap to take a picture.
Return icon. Tap to return to the Main screen
IPHONE®
In a similar fashion to the Android smart phone, you can use the Apple® iPhone® smart phone or
iPad® tablet with your Uniden Guardian System to remotely connect to and view camera videos.
Follow these steps to download the Uniden Guardian iPhone®appand set it up to work with your
Uniden Guardian system.
Download
1. From your iPhone® or iPad®, go to the iTunes®app
Store and search for
UNIDEN GUARDIAN 2
2. Download the Uniden Guardian 2 app. This app has the
black and gold icon.
.
3. Launch the app; select
SETTINGS
then
ADD
to add your
system information to theapp.
4. Enter a name for your system in the
SYSTEM NAME
field.
5. Enter the same DID code from your Uniden Guardian
monitor in the
DID
field
.
6. Enter the same security code that you set on your Uniden
Guardian monitor in the
7. Tap
SAVE
. The video streams automatically with Camera 1
SECURITY CODE
field.
selected by default
49

The Uniden Guardian 2 app has a Search feature which will automatically find your UDS655
system on your "intranet." If the phone is connected via WiFi to the same router/network
that the PC is on, selecting the Search button in the app will automatically find your system
and enter the DID code in the DID Code field. You will only have to enter the Security Code
you entered in the Remote Access software.
App Operation
When you open the app on your iPhone or iPad, several icons display on the bottom task bar.
Tap to add an additional Guardian system.
Tap to enter
Tap to refresh the system.
Tap to enter the app
the app version number and the API version number. Tap oK to
Main screen
If you have multiple systems, scroll down and tap on the system image you want to view.
exit.
SyStem Setup
inFoRmAtion
page.
page. The screen displays
To View Video:
1. Select a system.
2. Select a camera from the drop-down M.
3. View video.
You can turn your device sideways and go to a
horizontal view.
4. Tap
RETURN
to stop the video and enter the system page.
You can take snapshots from the video by using the Snapshot and Return icons.
50

Snapshot icon. Tap to take a picture.
Return icon. Tap to return to the Main screen.
51

MAINTAINING YOUR SYSTEM
UPGRADING YOUR UNIDEN UDS655 FIRMWARE
Check your system firmware version by selecting your language again on the
the cameras and monitor firmware display.
Go to www.unidenvideo.com to check the current firmware level. Compare it to your system
firmware level. If you need to update your UDS655 firmware, download the most current firmware
version to your system’s microSD card and then upload that firmware to the monitor.
1. Eject the microSD card from the monitor and insert it into the SD card adapter.
2. Insert the SD card adapter into your PC and go to www.unidenvideo.com.
3. Copy the current firmware to the SD card.
4. Remove the SD card from your PC. Remove the microSD card from the adapter and reinsert it
into the monitor. Plug the AC adapter into the monitor.
5. Upgrade the system firmware by going to the
system displays
M
6. Press
deletes the file after update.
again to automatically update the firmware. The upgrade turns off the system and
MENU : SOFTWARE UPGRADE
DEFAULT
.
screen in
SYSTEM SETUP
DEFAULT
. Press M; the
screen. Both
TAKING CARE OF YOUR HARDWARE
Monitor
As you use your monitor keep the screen clean by wiping it with a microfiber cloth to remove
fingerprints, dust, etc.
Cameras
When dust and grime builds up on the camera lens and glass, it affects night vision capability. The
infrared light reflects off of the dust and grime, limiting the camera’s “vision.” Use a microfiber cloth
to regularly clean the cameras or when night vision video is cloudy or unclear.
52

SOLVING PROBLEMS
If you have any trouble with your system, try these simple steps. If you are still having a problem
with your camera, check the manual that came with your camera.
If… Try..
Motion detection won’t
respond to movement.
Motion detection goes off
when there’s nothing there.
I can’t play my video clips
in another program
I schedule a recording,
save the schedule, and the
recording does not happen
at the scheduled time.
The camera’s signal status
icon shows no bars
The camera’s signal status
icon shows one or two bars
or the video quality is poor
• Increasing the motion sensitivity (see page 24).
• Checking the settings on the
page 22).
• Decreasing motion sensitivity (see page 24).
• Refer to General Placement Considerations on page 6.
• You must install Uniden Media Player to play back recorded files.
This player is found on the CD included in the box.
• Ensure that the system time is set to the current time.
• Make sure that the SD card is inserted into the monitor and there is
still memory available on that card.
• Making sure the camera is plugged in and the red LED is on.
• Making sure the camera is paired to the correct channel.
• Re-pairing the camera and monitor.
• Moving the camera closer to the monitor; it might be out of range.
• Making sure the camera setting is turned on
DEACTIVATE
See General Placement Considerations on page 6 for tips on
improving video quality.
screen on page 21).
RecoRd ScHeduLe
(refer to
screen (see
ACTIVATE OR
The camera won’t pair with
the monitor
• Making sure the camera is plugged in and the red LED is on.
• Pressing and releasing the pairing button quickly. Do not press and
hold the pairing button.
53

If… Try..
When I power up my
monitor and cameras for
the first time, they seem
to be on but there is no
picture on the screen
If the Power Saving feature has been turned on, the monitor’s LCD
screen will power off. Tap the power button to turn the LCD back on.
There is no video (or
audio) when I try to watch
live video on the television.
There is no video on my
wireless device
There is no audio on my
wireless device
The app won't connect. • Checking your internet/Wifi connection.
I can't view video on the
portal through my remote
PC.
Need Help? Get answers 24/7 at our website: www.uniden.com.
If You... Contact Uniden’s... Phone Number
have a question or problem Customer Care Line* 817-858-2929 or 800-297-1023
• Making sure the UDS655 is turned on.
• Making sure the AV plugs are inserted into the correct jacks on the
television.
• Making sure they are fully seated.
• Making sure the UDS655 is turned on and connected properly to
your PC.
• Making sure the Remote View software is on and connected to the
internet.
• Audio is not available for remote viewing; only video is.
• Be sure you install the OCX plug in on that PC during Portal login
(see page 43).
need a replacement part or accessory Parts Department* 800-554-3988
need special help due to a disability Accessibility Help Line 800-874-9314 (voice or TTY)
* During regular business hours, Central Standard Time. Visit our website for detailed business hours.
54

SPECIFICATIONS
Camera Monitor
Maximum Channels 4
Communication Range 500 ft in open space
Monitor Resolution 800 x 480
Camera Resolution 640 x 480
Operating Temperature -10°C ~ +50°C
Operating voltage DC 5V / 1A
Current consumption 550mA (max) 860mA (max)
Night Vision 40 ft
Dimension 123L x 65H x 65W mm 200L x 122H x 25W mm
MicroSD Card Capacity (1GB = 10 hours)
Recycling and Disposal Information
► Do not dispose of electronic devices or any of their components (especially batteries and LCD displays) in
your municipal trash collection.
► Consult your local waste management authority or a recycling organization like Earth911.com to nd an
electronics recycling facility in your area.
► If you are unable to locate proper recycling facilities in your area, please return this product to Uniden for
recycling.
FCC Compliance Information
Part 15 Compliance Statement
This device complies with Part 15 of the FCC Rules. Operation is subjected to the following two conditions:
(1) this device may not cause harmful interference, and (2) this device must accept any interference received,
including interference that may cause undesired operation.
This equipment has been tested and found to comply with limits for a Class B digital device, pursuant to
Part 15 of the FCC rules and ETSI (EN) 300328. These limits are designed to provide reasonable protection
against harmful interference in residential installations. This equipment generates, uses, and can radiate
55

radio frequency energy, and if not installed and used in accordance with the instructions, may cause harmful
interference to radio communications.
However, there is no guarantee that interference will not occur in a particular installation. If this equipment
does cause interference to radio or television equipment reception, which can be determined by turning
the equipment o and on, the user is encouraged to try to correct the interference by one or more of the
following measures:
► Reorient or relocate the receiving antenna.
► Move the equipment away from the monitor.
► Plug the equipment into an outlet on a circuit dierent from that to which the monitor is connected.
► Consult the dealer or an experienced radio/television technician for additional suggestions.
CAUTION! Any changes or modifications to this equipment not expressly approved by the party
responsible for compliance could void your authority to operate the equipment.
RF Exposure Information
The antenna used for this transmitter must be installed to provide a separation distance of at least 20 cm
(7.9”) from all persons and must not be collocated or operating in conjunction with any other antenna or
transmitter.
IC Compliance Information
Radio Equipment Notice
The term “IC:” before the radio certication number only signies that Industry Canada technical
specications were met. Operation is subject to the following two conditions: (1) this device may not
cause interference, and (2) this device must accept any interference, including interference that may cause
undesired operation of the device. “Privacy of communications may not be ensured when using this device”.
CE Compliance Information
Products with CE Marking comply with EMC Directive (2004/108/EC); Low Voltage Directive (73/23/EEC);
R&TTE(1999/5/EC) issued by the Commission of the European Community. Compliance with these directives
implies conformity to the following European Norms:
► EMC: EN 301 489
► LVD: EN 60950
► Radio: EN 300 328
56

One-year Limited Warranty
Important: Evidence of original purchase is required for warranty service.
WARRANTOR: UNIDEN AMERICA CORPORATION (“Uniden”) ELEMENTS OF WARRANTY: Uniden warrants,
for one year, to the original retail owner, this Uniden Product to be free from defects in materials &
craftsmanship with only the limitations or exclusions set out below.
WARRANTY DURATION: This warranty to the original user shall terminate & be of no further eect 12 months
after the date of original retail sale. The warranty is invalid if the Product is (A) damaged or not maintained as
reasonable or necessary, (B) modied, altered, or used as part of any conversion kits, subassemblies, or any
congurations not sold by Uniden, (C) improperly installed, (D) serviced or repaired by someone other than
an authorized Uniden service center for a defect or malfunction covered by this warranty, (E) used in any
conjunction with equipment or parts or as part of any system not manufactured by Uniden, or (F) installed or
programmed by anyone other than as detailed by the owner’s manual for this product.
STATEMENT OF REMEDY: In the event that the product does not conform to this warranty at any time while
this warranty is in eect, warrantor will either, at its option, repair or replace the defective unit & return it to
you without charge for parts, service, or any other cost (except shipping & handling) incurred by warrantor
or its representatives in connection with the performance of this warranty. Warrantor, at its option, may
replace the unit with a new or refurbished unit.
THE LIMITED WARRANTY SET FORTH ABOVE IS THE SOLE & ENTIRE WARRANTY PERTAINING TO THE
PRODUCT & IS IN LIEU OF & EXCLUDES ALL OTHER WARRANTIES OF ANY NATURE WHATSOEVER, WHETHER
EXPRESS, IMPLIED OR ARISING BY OPERATION OF LAW, INCLUDING, BUT NOT LIMITED TO ANY IMPLIED
WARRANTIES OF MERCHANTABILITY OR FITNESS FOR A PARTICULAR PURPOSE. THIS WARRANTY DOES
NOT COVER OR PROVIDE FOR THE REIMBURSEMENT OR PAYMENT OF INCIDENTAL OR CONSEQUENTIAL
DAMAGES. Some states do not allow this exclusion or limitation of incidental or consequential damages so
the above limitation or exclusion may not apply to you.
LEGAL REMEDIES: This warranty gives you specic legal rights, & you may also have other rights which vary
from state to state. This warranty is void outside the United States of America & Canada.
PROCEDURE FOR OBTAINING PERFORMANCE OF WARRANTY: If, after following the instructions in the
owner’s manual you are certain that the Product is defective, pack the Product carefully (preferably in its
original packaging). Disconnect the battery from the Product & separately secure the battery in its own
separate packaging within the shipping carton. The Product should include all parts & accessories originally
57

packaged with the Product. Include evidence of original purchase & a note describing the defect that has
caused you to return it. The Product should be shipped freight prepaid, by traceable means, to warrantor at:
Uniden America Service
4700 Amon Carter Blvd.
Fort Worth, TX 76155

59

60
 Loading...