

Page 1

AlphaScreen 46
LCD Monitor
Installation and Operation Manual
www.jrc.am
Page 2

Contents
I Preface..........................................................................................................4
I.1 Revision History........................................................................................................................................................4
I.2 Glossary.................................................................................................................................................................... 4
I.3 Index of Images........................................................................................................................................................6
II Caution........................................................................................................ 7
III Introduction................................................................................................9
1 Installation Instructions...........................................................................10
1.1 Transportation........................................................................................................................................................ 10
1.2 Unpacking and Checking.......................................................................................................................................10
1.3 Product Labeling....................................................................................................................................................11
1.4 Warning Notice.......................................................................................................................................................11
1.5 Interfaces................................................................................................................................................................12
1.5.1 Definition of the Interfaces............................................................................................................................12
1.5.2 RS232 Interface............................................................................................................................................13
1.5.3 Interface for External Keyboard....................................................................................................................13
1.5.4 RS485 Interface............................................................................................................................................14
1.5.5 DC Voltage Supply........................................................................................................................................15
1.6 Electrical Installation...............................................................................................................................................15
1.6.1 Ergonomics....................................................................................................................................................16
1.7 Connecting the Device...........................................................................................................................................16
2 Operation...................................................................................................17
2.1 OSD - Menu...........................................................................................................................................................17
2.2 LED Indicator......................................................................................................................................................... 17
2.3 Quick OSD Menu...................................................................................................................................................18
2.4 Main OSD Menu....................................................................................................................................................18
2.5 Main Menu - Picture 1 (DVI-1, DVI-2)...................................................................................................................18
2.6 Main Menu - Picture 1 (RGB-1 (VGA) / RGB-2)...................................................................................................19
2.7 Main Menu - Picture 1 (CVBS)..............................................................................................................................19
2.8 Main Menu – Picture 2 (DVI-1, DVI-2, RGB-1, RGB-2, CVBS)............................................................................ 20
2.8.1 Sub-Menu - Picture in Picture (PIP).............................................................................................................21
2.9 Main Menu – Setup...............................................................................................................................................22
2.9.1 Sub-Menu – Source......................................................................................................................................23
2.9.2 Sub-Menu – OSD..........................................................................................................................................23
2.10 Main Menu – Communication..............................................................................................................................24
2.10.1 Sub-Menu – MODBUS Interface (RS485/422)...........................................................................................24
2.10.2 Sub-Menu – SNMP (Ethernet)....................................................................................................................25
2.11 Main Menu – Information.....................................................................................................................................25
2.12 Main Menu – Self-Test........................................................................................................................................ 27
2.13 ECDIS - Radar Settings.......................................................................................................................................27
2.14 Monitor Calibration...............................................................................................................................................27
2.14.1 Calibrating the RGB Input Channel RGB-1 (VGA) and RGB-2..................................................................28
2.14.2 Calibrating the Back-Light Sensor..............................................................................................................28
2.14.3 Calibrating Gamma & Color........................................................................................................................28
2 | Contents
Page 3

2.15 Serial Communication Interfaces.........................................................................................................................28
2.16 Troubleshooting....................................................................................................................................................29
3 Specifications............................................................................................30
3.1 Mechanical Specifications......................................................................................................................................30
3.2 Monitor Mounting Options......................................................................................................................................31
3.3 Sealing the Rear of the Device.............................................................................................................................32
3.4 Display Module.......................................................................................................................................................32
3.5 Voltage Supply.......................................................................................................................................................33
3.6 Digital Signal Input (DVI-1, DVI-2).........................................................................................................................33
3.7 Analog Signal Input (RGB-1(VGA) / RGB-2).........................................................................................................33
3.8 Video Signal Input (CVBS).................................................................................................................................... 34
3.9 Compass – Safe Distance.....................................................................................................................................34
3.10 Environmental Requirements...............................................................................................................................35
3.11 Physical Properties...............................................................................................................................................35
3.12 Packing.................................................................................................................................................................35
3.13 Authorizations.......................................................................................................................................................35
3.14 Annex A................................................................................................................................................................36
3 | Contents
Page 4

I Preface
This document describes the functionality, the intended use and the most important product specifications of the
AlphaScreen 46.
The contents have been examined to verify the hardware and software described herein.
Because of clarity, the document does not contain all the detailed information about this product.
With respect to hardware and/or software, customized versions may be made.
I.1 Revision History
A Summary of changes compared to the first issue.
Revision No. Description Date
V1.0 First Draft 15 July 2015
V1.1 First Issue 25 April 2017
V1.2 Add Annex A 27 September 2018
I.2 Glossary
Definitions used in this manual are shown in the list of Definitions. See Table 1: Definitions on page 4.
Auto Adjustment A function that automatically adjusts the clock, phase, and screen position of the monitor
to their ideal levels.
Auto Adjustment is activated through the monitors’ OSD menu. (applicable only for
analog signal input.)
Auto Back-light Brightness
Stabilization
Back-light The light source positioned behind the LCD panel which illuminates the display screen.
(Pixel) Clock The analog signal input monitor needs to reproduce a clock of the same frequency as the
Color Temperature Color temperature is a method to measure the white color tone, generally indicated in
CR (Contrast Ratio) Is the relation of the luminous density between the brightest "white" and the darkest
DDC (Display Data
Channel)
Dot Pitch The distance from the center of one pixel to the center of the next closest pixel of the
A drift correction circuit that stabilizes the screen brightness level within minutes after
start-up or coming out of power saving mode.
The Raptor monitor uses three replaceable trays containing the back lights.
dot clock of the graphics system in use, when the analog signal is converted to a digital
signal for image display. This is called clock adjustment. If the clock frequency is not set
correctly, some vertical bars appear on the screen.
degrees Kelvin. The screen becomes reddish at a low temperature, and bluish at a high
temperature, like the flame temperature.
• 5000 K: Slightly reddish white
• 6500 K: White referred to as daylight-balanced color
• 9300 K: Slightly bluish white
"black" which can be generated on a monitor.
A communication channel for the transmission of information between the display monitor
and the PC that allows for automatic configuration of the hardware. In other words, "Plug
and Play" compatibility.
same color. Pixel pitch gives a general idea of the monitor's ability to produce sharp
images; the smaller the pixel pitch, the sharper the image.
4 | Preface
Page 5
DVI (Digital Visual
Interface)
DVI is a digital interface standard. DVI allows direct transmission of the PC’s digital data
without loss. This adopts the TMDS transmission system and DVI connectors. There are
two types of DVI connectors. One is a DVI-D connector for digital signal input only. The
other is a DVI-I connector for both digital and analog signal inputs.
ECDIS (Electronic Chart
Display and Information
System)
EDID (Extended Display
Identification Data)
Gain Is used to adjust each color parameter for red, green and blue. An LCD monitor displays
Gamma The relationship between inputs in the computer and the brightness or luminance
Kelvin The ‘Kelvin’ is a unit of measurement for temperature. It is one of the seven base units in
LCD (Liquid Crystal
Display)
LED (Light Emitting Diode) Light Emitting Diodes, these are used for signaling statuses of hardware and software
Luminance The quality of the amount of radiating light perceived to be emitted from the display.
Electronic navigation system for the maritime patch.
A data structure provided by a monitor to describe its capabilities to a video source (e.g.
graphics card ).
the color by the light passing through the panel color filter. Red, green and blue are the
three primary colors. All the colors on the screen are displayed by combining these three
colors. The color tone can be changed by adjusting the light intensity (volume) passing
through the filter of each color.
displayed on the monitor. Gamma is: Brightness (Luminance) = Constant x input-gamma.
While gamma has no effect on black or white, it does affect grey or mid-tones. If the
gamma level of the monitor is set too high, mid-tones will appear too dark. Conversely, if
gamma is set too low, mid-tones will appear too light.
the International System of Units and is assigned the unit symbol K.
A Liquid Crystal Display is a non-emission display. The active element on an
AlphaScreen 46 monitor is a Twisted-Neumatic (TN), Vertically Aligned (VA) or In-Plane
Switching (ISP) liquid crystal.
signals to the user.
This varies from a minimum for a very dim appearance to a maximum for a very bright
appearance.
Management Information
Base (MIB)
MODBUS A simple and robust communications protocol, commonly used for connecting industrial
Phase Phase means the sampling timing to convert the analog input signal to a digital signal.
Refresh Rate The frequency with which the entire image on the screen is redrawn. The refresh rate
Resolution The LCD panel consists of numerous pixels of specified size, which are illuminated to
Response Time The amount of time measured in milliseconds (ms) it takes a pixel to go from black to
A virtual database used for managing the entities in a communications network. Most
often associated with the Simple Network Management Protocol (SNMP).
electronic devices.
Phase adjustment is made to adjust the timing. It is recommended that phase adjustment
be made after the clock is adjusted correctly.
is measured in hertz, therefore, a refresh rate of 60 Hz, means the image is redrawn 60
times per second.
form images. This monitor consists of horizontal 1920 pixels and 1080 vertical pixels). At
a resolution of 1920 × 1080 all pixels are illuminated as a full screen (1:1).
white and back to black again. Faster response times minimize ghosting and blurring on
a monitor displaying moving images. They are indicated by reduced time measurements
in product specifications. Although cited, black-to-white-to-black response time is not
the ideal indicator of a monitor's ability to play moving images smoothly, since it doesn't
measure the transition time between gray-to-gray mid-tones included in all color images.
Therefore, gray-to-gray mid-tones response time is the better metric of a monitor's
performance to play motion pictures.
5 | Preface
Page 6
RoHS (Restriction of
Hazardous Substances)
A European Union directive that stands for "the restriction of the use of certain hazardous
substances in electrical and electronic equipment". The six restricted substances are
lead, mercury, cadmium, hexavalent chromium, PBDE (polybrominated diphenylethers),
and PBB (polybrominated biphenyls). RoHS went into effect in July 2006 and applies
to most electrical and electronic equipment manufactured and imported into the EU. All
AlphaScreen 46 monitors and accessories manufactured after June 2006 are RoHS
compliant.
RS232 (Recommended
Standard 232)
RS422 (Recommended
Standard 422)
RS485 (Recommended
Standard 485)
RTU: Remote Terminal
Unit
TCP/IP: (Transmission
Control Protocol /Internet
Protocol)
T.M.D.S. (TransitionMinimized Differential
Signaling)
VESA DPMS (Video
Electronics Standard
Association - Display
Power Management
Signaling)
VGA (Video Graphics
Array)
The traditional name for a series of standards for serial binary single ended data and
control signals connecting between DTE (data terminal equipment) and DCE (Data
Communication Equipment).
A technical standard that specifies electrical characteristics of a digital signaling circuit.
A technical standard that specifies electrical characteristics of a digital signaling circuit.
A MODBUS variation and a control engineering Instrument of a remote control.
Is a protocol-family for the mediation and the transport of data packet on a local area
network.
A signal transmission system for digital interface.
Is an association that promotes the standardization of signals transmitted by computers in
order to achieve less power consumption by monitors.
Is an analog picture transmission standard for plug and cable splice between graphic
card and display.
Viewing Angle The maximum angle measured in degrees at which an LCD monitor's screen can be
viewed at a minimally acceptable level. A viewing angle is a measure of the contrast ratio
and usually corresponds to a contrast ratio of 10:1 or 5:1.
Table 1: Definitions
I.3 Index of Images
This chapter provides a quick reference to the main images in this manual.
1. Location of labels Figure 1: Product Labeling on page 11.
2. Location of the Interfaces Figure 4: Location of the Interfaces on page 12.
3. OSD Keyboard Figure 9: OSD Keyboard on page 17.
4. OSD menu Figure 10: Main OSD Menu on page 18.
5. Mechanical dimensions Figure 12: Mechanical Dimensions on page 30.
6. Mounting options of the monitor Figure 13: Mounting options of the Device on page 31.
7. Reverse side placement of all around seal Figure 14: Reverse side placement of all around seal on page 32.
6 | Preface
Page 7
II Caution
To safely install and operate this instrument, so as not to adversely affect the warranty, the WARNINGS and CAUTIONS
must be adhered to.
• WARNING - Clarification
• Indicates potential risk of injury or death to users of the product.
• WARNING
• Do not disassemble or modify the equipment. Failure to observe this instruction may cause a fire, electric
shock, or equipment failure.
• WARNING
• If there is smoke, odor, or noise development disconnect the device from the power supply and notify
Alphatron Marine.
• WARNING
• Do not scratch, damage, modify, heat, pull, excessively bend, or heavily load the power supply cable. It may
cause a fire, or electric shock.
• WARNING
• Observe proper lifting technique when moving instrument. Refer to chapter SPECIFICATION for weight.
• WARNING
• The operator of the complete system is responsible for maintaining electromagnetic compatibility according to
EMC regulations.
• WARNING
• Comply with all shielding measures according to the country-specific EMC directives.
• WARNING
• The device must be plugged into a properly grounded socket.
• WARNING
• The permissible leakage current is not exceeded in the first case of an error. To achieve maximum electrical
safety, an additional grounding wire has to be used to ground the device properly.
• CAUTION - Clarification
• Indicates potential risk of damage to equipment.
• CAUTION - Components
• Use only components that have been provided or recommended (e.g., screws). Using other or non-original
parts may cause injury and the device could be damaged.
• CAUTION
• The product contains precision components. To avoid damage, handle with care.
• During transportation of the product follow the instructions in chapter TRANSPORTATION.
• Retain original transport boxes for re-use if the product is to be transported again. The warranty will be void
when the product is improperly packed.
• CAUTION
• Do not allow the Display Unit to fall or immerse into water. The equipment can be damaged.
• CAUTION
• When cleaning the surface, do not use any organic solvent such as thinner or benzine. Otherwise, the paint
and markings on the surface may get damaged. For cleaning the surface, remove the dust and debris and
wipe with a clean dry cloth.
• CAUTION
• Any modification to this equipment without prior written permission from ALPHATRON MARINE will void the
warranty.
7 | Caution
Page 8

• CAUTION
• If the product is placed in an enclosed space, allow for sufficient ventilation and air circulation for cooling.
• CAUTION
• Avoid placement in the immediate vicinity of heat-producing equipment and/or flammable environments.
• CAUTION
• Condensation may form in and on the device if it is placed in a room with a higher or increasing ambient
temperature. Wait until the condensation has evaporated before powering up the device.
8 | Caution
Page 9

III Introduction
This high-quality monitor has been designed specifically for the maritime sector and has been tested in accordance with
international standard IEC 60945.
The high resolution, superior brightness and wide viewing angle ensure very good readability. The frontage is IP 55compliant with regards to water protection.
9 | Introduction
Page 10
1 Installation Instructions
This chapter explains the installation process from unpacking to connecting the monitor.
1.1 Transportation
The AlphaScreen 46 is a sensitive instrument and must be handled with care if it is transported, or moved.
As long as the product is packed in its standard Alphatron Marine box it can be transported anywhere at any distance.
• During transport protect boxes from moisture, movement and fall.
• During transport handle boxes with care and in accordance with instructions on the box.
• During transport ambient temperature should be between range of -20 ~ 70 °C (-4 ~ 158 °F).
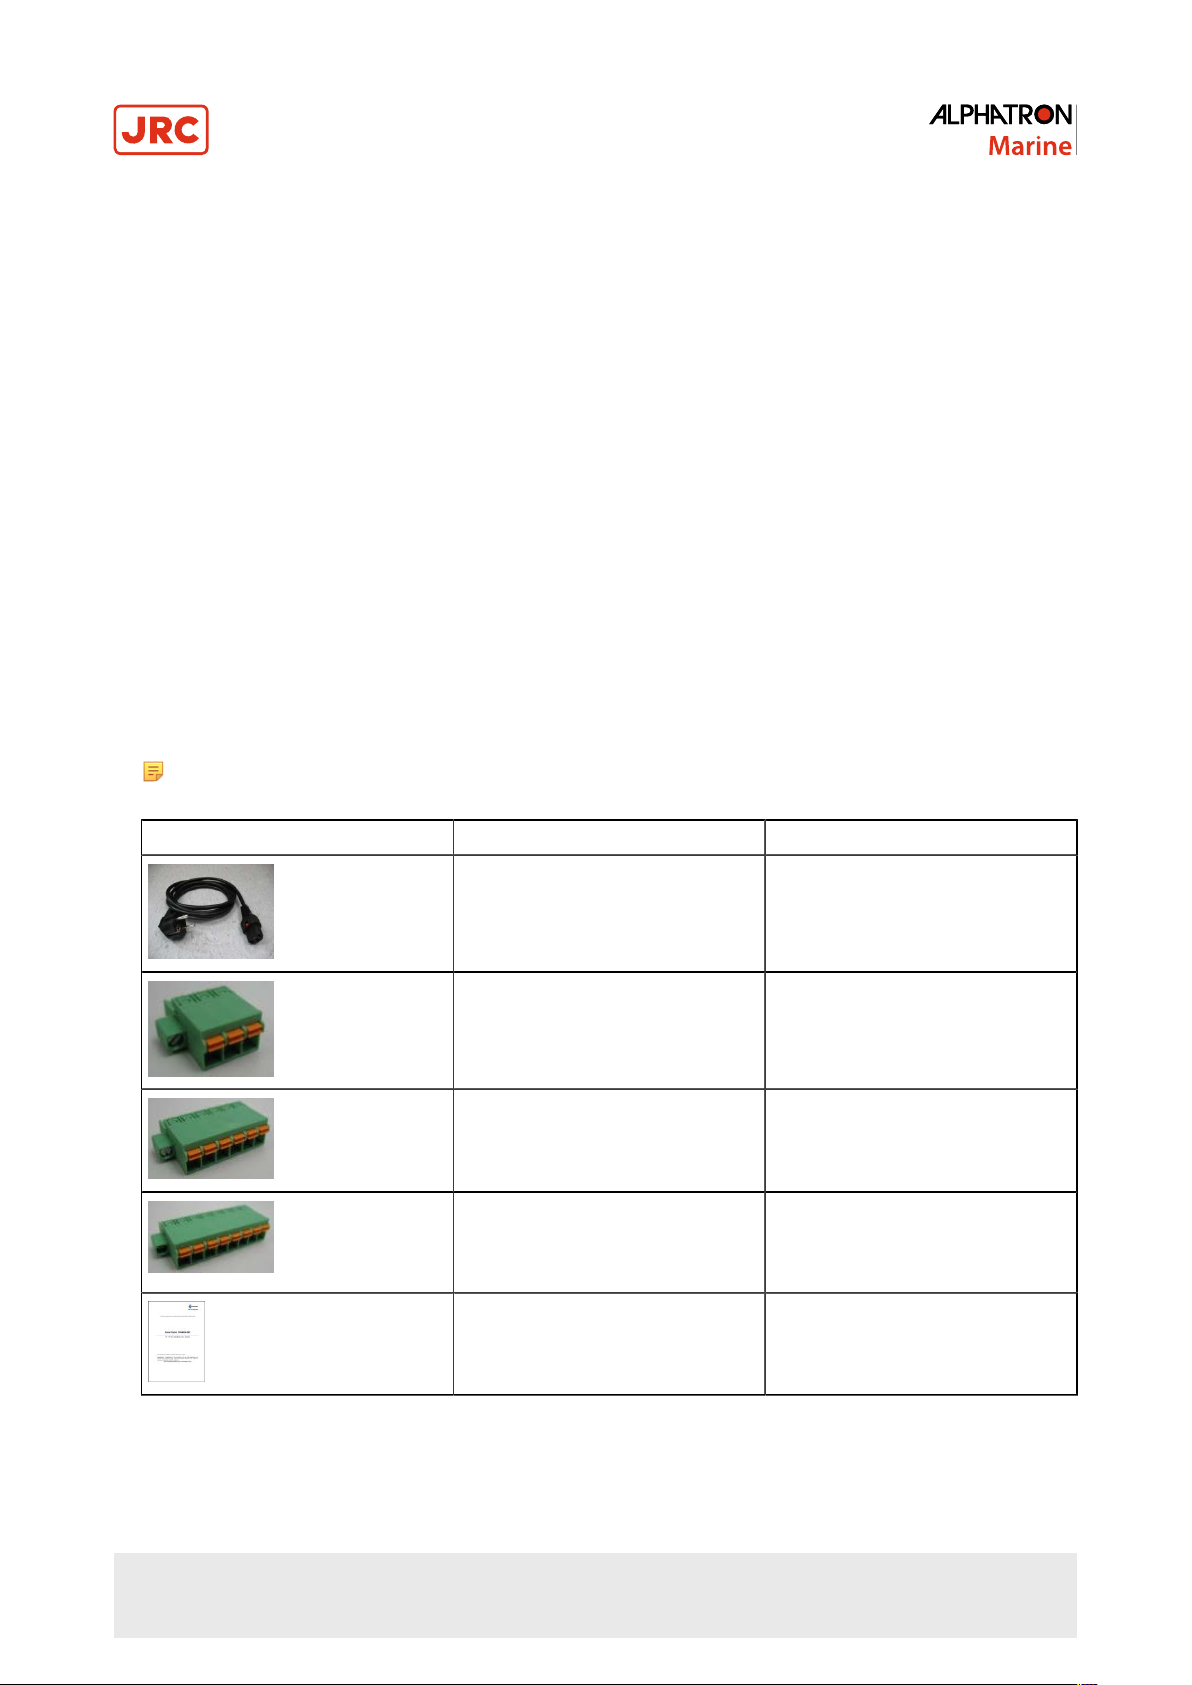
1.2 Unpacking and Checking
Unpack and check the individual parts.
Refer to Cautions with regard to placement.
1. Carefully unpack all of the parts that have been supplied.
2. Check to make sure that all of the components are complete.
3. Check to see if any of the components have visible transportation damages.
4. Contact Alphatron Marine when damage has been discovered.
Note Should any defects be discovered, notify the service department stated in the bill of lading. Have ready
the bill of lading number, the serial number and a description of the defect.
Item Description/Remark Article No.
1 pcs of power cable European type
„Schuko“ to IEC (C13) with IEC
LOCK, Length 2.0m
1 pcs of 3-pin Terminal Block
(Phoenix FKCN 2,5/ 3-STF-5,08)
note: already plugged into the
monitor
1 pcs of 6-pin Terminal Block
(Phoenix FKCN 2,5/ 6-STF-5,08)
note: already plugged into the
monitor
1 pcs of 8-pin Terminal Block
(Phoenix FKCN 2,5/ 8-STF-5,08)
note: already plugged into the
monitor
1 pcs of “Operator Manual and
Product Specification”
CO 013-NC
CON-508-03STF24-001
CON-508-06STF24-001
CON-508-08STF24-001
10 | Installation Instructions
Page 11
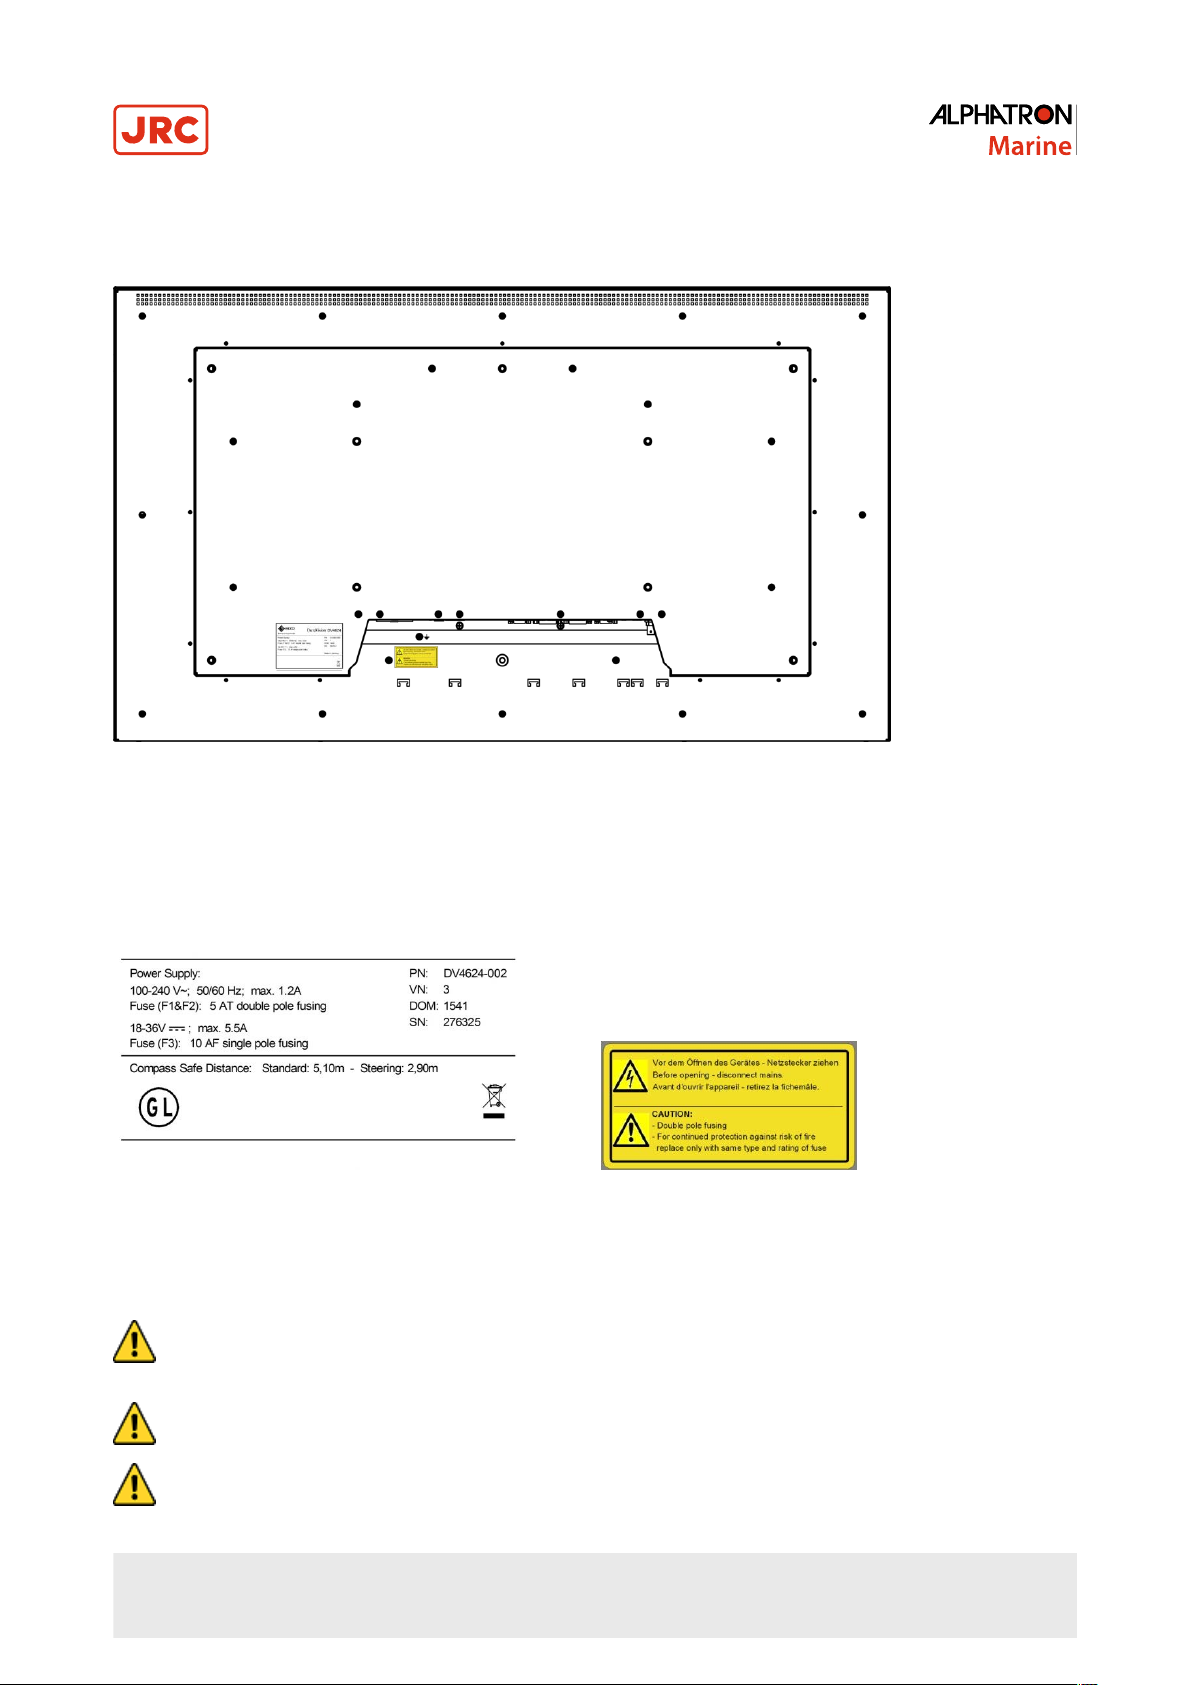
1.3 Product Labeling
Label types and positions on the AlphaScreen 46 are defined as below:
Figure 1: Product Labeling
On the back of the screen an Electrical Label and a Caution Label are adhered.
Figure 2: Electrical Label Figure 3: Caution Label
1.4 Warning Notice
• CAUTION - Components
• Use only components that have been provided or recommended (e.g., screws). Using other or non-original
parts may cause injury and the device could be damaged.
• WARNING - Lifting
• Observe proper lifting technique when moving instrument. Refer to chapter SPECIFICATION for weight.
• CAUTION - Water
• Do not allow the Display Unit to fall or immerse into water. The equipment can be damaged.
11 | Installation Instructions
Page 12
• CAUTION - Ventilation
• If the product is placed in an enclosed space, allow for sufficient ventilation and air circulation for cooling.
• CAUTION
• Avoid placement in the immediate vicinity of heat-producing equipment and/or flammable environments.
1.5 Interfaces
This chapter covers the location of the interfaces and the devices that can be connected to the monitor.
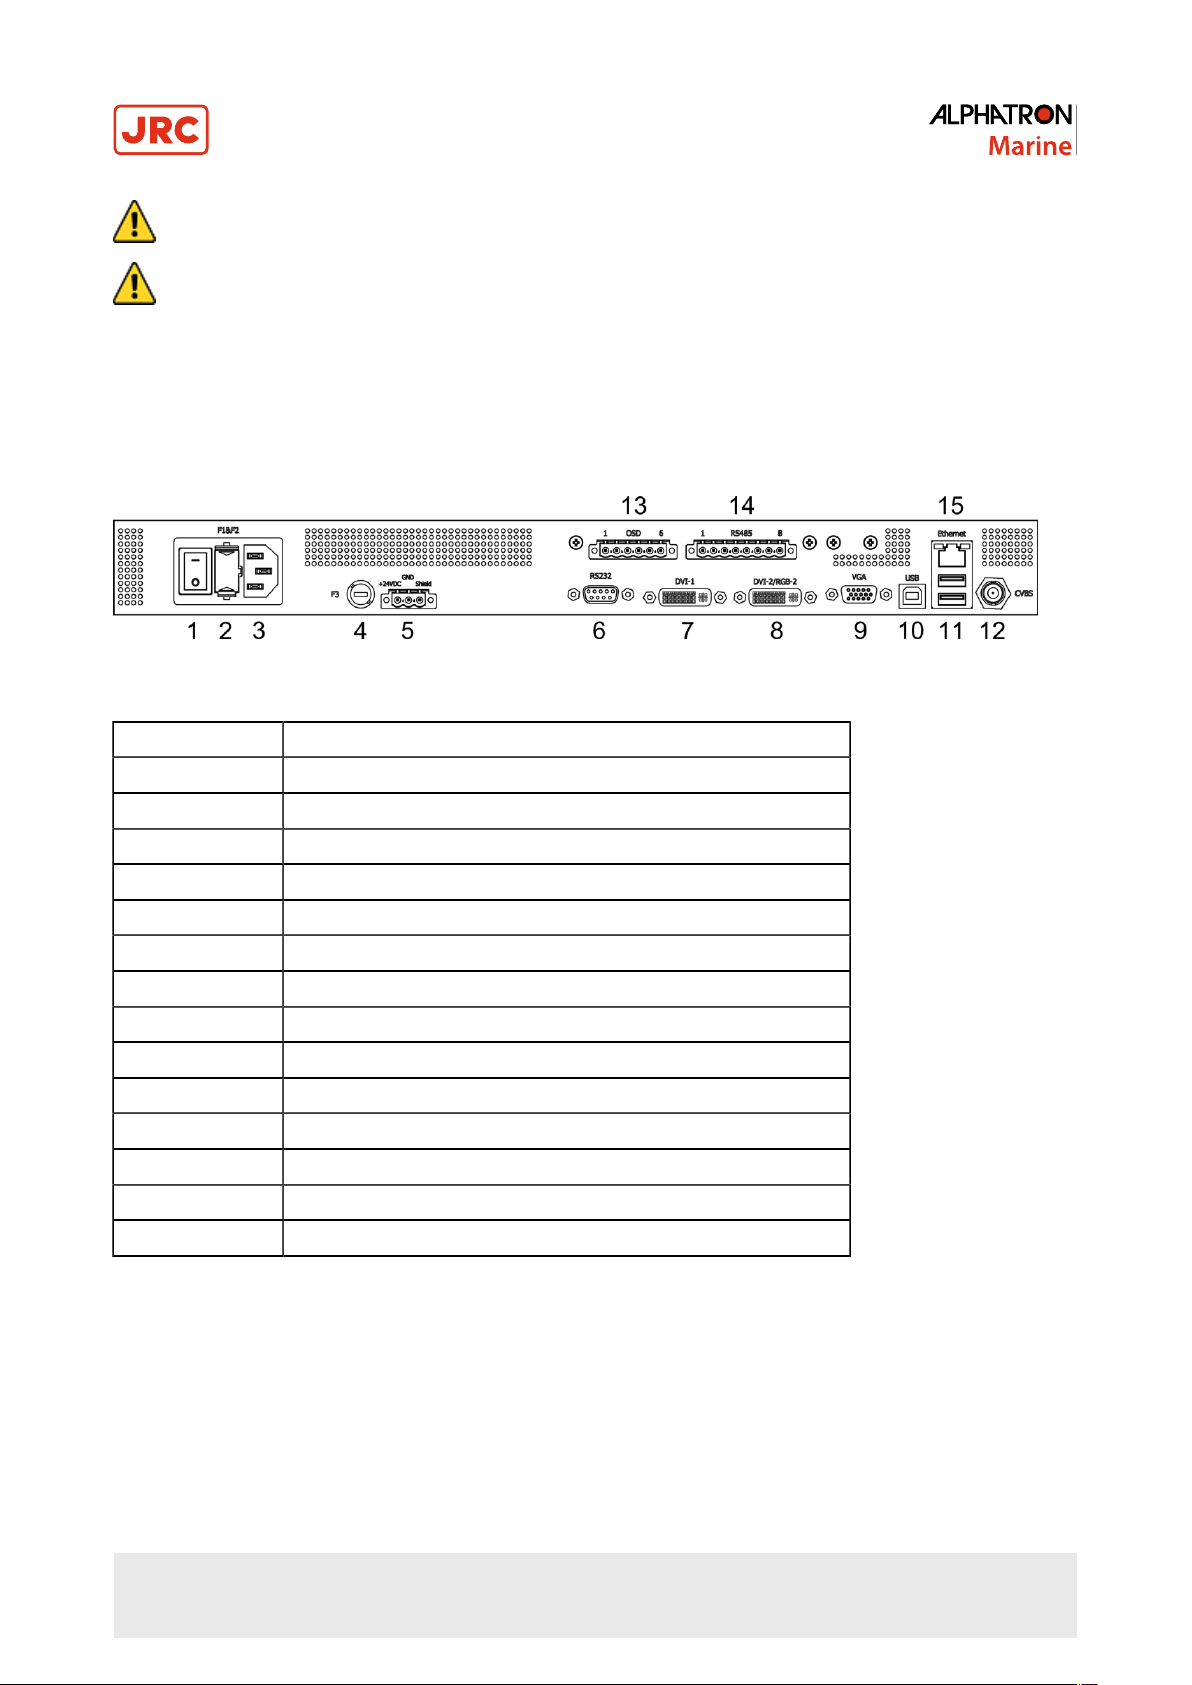
1.5.1 Definition of the Interfaces
This drawing shows the locations of the interfaces.
Figure 4: Location of the Interfaces
1 AC main switch
2 AC fuse, voltage input
3 AC voltage supply
4 DC fuse, voltage input
5 DC voltage supply
6 RS232 interface
7 DVI-1 input
8 DVI-2 / RGB-2 input
9 RGB-1 (VGA) input
10 USB (upstream) interface
11 2 x USB (downstream) interfaces
12 CVBS input
13 External keyboard interface
14 RS485 interface
15 Ethernet interface
Table 2: Definition of Interfaces
12 | Installation Instructions
Page 13

1.5.2 RS232 Interface
This chapter provides information regarding type of plug and counter plug to use for this interface.
Plug Type Counter Plug
D-Sub 9 pin socket D-Sub 9 pin plug
Table 3: Plug Connector
Pin Signal
1 2 TXD (output)
3 RXD (input)
4 5 GND
6 n.c. / color sensor
power supply voltage
7 8 n.c. / color sensor
power supply voltage
Figure 5: D-Sub 9 pin plug
9 -
Table 4: Pin Arrangement
1.5.3 Interface for External Keyboard
The OSD menu can be operated from an external keyboard. This interface is galvanically isolated from the monitor’s
power supply and PE.
Manufacturer Plug type Plug type
Phoenix Contact CC2.5/6-GF-5.08 FKCN 2.5/ 6-STF-5.08
Table 5: Plug Connector
13 | Installation Instructions
Page 14

Pin Signal
1 Key 1 (+ / up)
2 Key 2 (- / down)
3 Key 3 (Menu)
4 Key 4 (Select)
5 Key 5 (Power)
6 GND
Table 6: Interface for external keyboard
Figure 6: Plug Connector
1.5.4 RS485 Interface
This interface is galvanically isolated from the monitor’s power supply and PE.
Manufacturer Plug type Counter plug
Phoenix Contact CC-2.5/8-GF-5.08 FKCN 2.5/ 8-STF-5.08
Table 7: Plug Connector
Pin Signal
1 TX (A) + (output)
2 TX (B) – (output)
3 TX (C)
4 Shielding (connection to
the housing)
5 RX (A) + (input)
6 RX (B) – (input)
7 RX (C) GND
8 Shielding (connection to
the housing)
Table 8: Plug Connector
Figure 7: Plug Connector
14 | Installation Instructions
Page 15

1.5.5 DC Voltage Supply
The 24VDC voltage supply connection is galvanically isolated from the housing and other interfaces.
Manufacturer Plug type Manufacturer Plug type Counter
plug
Phoenix Contact CC 2.5/3-GF-5.08 FKCN 2.5/ 3-STF-5.08
Table 9: Plug Connections
Pin Signal
1 +24VDC
2 GND
3
Table 10: Pin Arrangement
Shielding (connection to
the housing)
Figure 8: Pin Arrangement
1.6 Electrical Installation
Carefully read the following warning and safety instructions before you begin the electrical installation.
If these guidelines are not observed, the device could malfunction, possibly causing a fire or electric shock.
• WARNING
• The operator of the complete system is responsible for maintaining electromagnetic compatibility according to
EMC regulations.
• WARNING
• Comply with all shielding measures according to the country-specific EMC directives.
• WARNING
• The device must be plugged into a properly grounded socket.
• WARNING
• The permissible leakage current is not exceeded in the first case of an error. To achieve maximum electrical
safety, an additional grounding wire has to be used to ground the device properly.
• CAUTION
• Condensation may form in and on the device if it is placed in a room with a higher or increasing ambient
temperature. Wait until the condensation has evaporated before powering up the device.
• CAUTION
• Protect from the weather.
• CAUTION - Cleaning
• When cleaning the surface, do not use any organic solvent such as thinner or benzine. Otherwise, the paint
and markings on the surface may get damaged. For cleaning the surface, remove the dust and debris and
wipe with a clean dry cloth>
15 | Installation Instructions
Page 16

1.6.1 Ergonomics
For optimum viewing it is important to ergonomically install the screen correctly.
An excessively dark or bright screen may affect your eyes. Adjust the brightness of the monitor according to the
environmental conditions.
1. Adjust the brightness of the monitor according to the environmental conditions.
Note For ECDIS applications, the minimum recommended viewing distance is as follows: (IEC62288, Part
7.5 Screen resolution), 46” TFT Pixel pitch: 0.53025 (H) x 0.53025 (W) [mm] = Recommended Viewing
Distance: 1.823 m
1.7 Connecting the Device
The power supply of the device works with 100-230 VAC and/or 24 VDC via the connectors provided.
1. Check whether the plugs for the DVI, VGA and CVBS signal are correctly plugged in and tightly fastened.
2. Connect the device to the power supply.
As soon as a valid signal is recognized, the source of the signal appears on the display screen.
Note The device should be allowed to warm-up for at least 30 minutes before you begin to do any calibrating
or adjustments.
16 | Installation Instructions
Page 17

2 Operation
This chapter describes MENU handling, RADAR settings, CALIBRATION and TROUBLESHOOTING.
2.1 OSD - Menu
The “On-Screen Display” (OSD) is a menu system shown on the display screen. All settings and adjustments to the
monitor can be made with the help of the menu system and the operating elements described.
The OSD Keyboard is placed at the front panel and is operated with four buttons (plus additional On/Off button). Two
status LED's indicate monitor operating status. The ambient light sensor placed at the left side is not implemented in the
monitor application. See Figure 9: OSD Keyboard on page 17.
Figure 9: OSD Keyboard
The OSD can be also operated with four buttons (plus additional On/Off button) that are connected via a special
interface. See Table 6: Interface for external keyboard on page 14.
Essentially there are two OSD menu's available:
1. Quick OSD menu:
The most important parameters, e.g. back-light brightness, or signal source can be preset here for quick access.
2. Main OSD menu:
All settings, configurations, measurements and calibrations can be made here.
Note Blocked OSD access (OSD lockout).
• When OSD lockout is enabled, an access code is needed to get into the OSD every time you try to open it.
• After entering the access code, the OSD opens; however, the OSD lockout remains active.
• To permanently enable OSD, the OSD lockout has to be deactivated in the OSD “SETUP”.
Note Delayed monitor On/Off-Sequence.
• When switching “On” or “Off” the monitor via the OSD press the button for around 2...3 seconds.
• This prevents the monitor from switching “Off” if the operator touches the On/Off-button unintentionally.
2.2 LED Indicator
The two LED's on the front OSD keyboard indicate following status:
LED Status Description
On If backlight brightness is set to one of the four predefined ECDIS-modes the
CALIB
STAT
Off For any other backlight brightness setting the LED is Off.
On Monitor powered On with valid input signal or Monitor powered On and is
Off No Power, Monitor powered Off
Blinking Monitor powered On, no signal (only if DPMS is set to On)
LED is On.
waiting for valid input signal (only if DPMS is set to Off)
17 | Operation
Page 18

2.3 Quick OSD Menu
Use the quick OSD Menu to quickly get started:
1. Press the ▼ or ▲ button to call up the “Backlight” Quick OSD Menu to change backlight brightness and also to change
backlight brightness.
Note 0.5 .. 400 cd/m² if “Backlight Controller is set to “On”, or 0 .. 100 if “Backlight Controller is set to “Off”.
2. Press the ↵ button to call up the “Signal Source” Quick OSD Menu or the PiP OSD menu if monitor is in PiP-mode.
3. Press the ▼ or ▲ button to select the input source and quit your choice by pressing the
↵button.
2.4 Main OSD Menu
Structure of the OSD menu. Depending on the input signal displayed (DVI, RGB (VGA) or CVBS), different parameters
can be set.
Figure 10: Main OSD Menu
2.5 Main Menu - Picture 1 (DVI-1, DVI-2)
This chapter explains the settings of parameters in the main window for DVI-1 and DVI-2.
Parameter Setting Description
Focus
Back-light
f(T): BL real [%]
Brightness 0 ~ 100 Setting the brightness (default value:
Contrast 0 ~ 100 Setting the contrast(default value: 50)¹
Table 11: Main Menu - Picture 1 (DVI-1, DVI-2)
Main Window (1) / PiP Window (2) Determines in which window (Main/
PIP) a setting should be made.
0 ~ 100 Brightness in % -> back-light regulator
= Off.
0.5 ~ 400 Brightness in cd/m² - > backlight
regulator = On.
Back-light brightness in %.
The display is shown only when the
backlight brightness is reduced due to
a higher operating temperature.
50)¹
Note ¹ Important: Adjusting the brightness and the contrast changes the image information displayed, i.e.,
improper adjustments can distort the information displayed or it may no longer be visible.
18 | Operation
Page 19

2.6 Main Menu - Picture 1 (RGB-1 (VGA) / RGB-2)
This chapter explains the settings of parameters in the main window for RGB-1 and RGB-2.
Parameter Setting Description
Focus
Back-light
f(T): BL real [%]
Phase 0 ~ 63 Setting the phase.
Brightness 0 ~ 100 Setting the brightness²
Contrast 0 ~ 100 Setting the contrast²
Auto adjust Automatic adjustment of image
H Position 0 ~ 100 Setting the horizontal image position
V Position 0 ~ 100 Setting the vertical image position
Frequency Setting the scanning frequency/pixel
Main Window (1) / PiP Window (2) Determines in which window (Main/
PIP) a setting should be made.
0 ~ 100 Brightness in % -> back-light regulator
= Off.
0.5 ~ 400 Brightness in cd/m² -> backlight
regulator = On.
Back-light brightness in %.
The display is shown only when the
backlight brightness is reduced due to
a higher operating temperature.
position, frequency and phase relative
to the applied RGB analog signal.
rate
Table 12: Main Menu - Picture tab 1 (RGB-1 (VGA) - RGB-2)
Note ² Important: Adjusting the brightness and the contrast changes the image information displayed, i.e.,
improper adjustments can distort the information displayed or it may no longer be visible.
2.7 Main Menu - Picture 1 (CVBS)
This chapter explains the settings of parameters in the main window for CVBS.
Parameter Setting Description
0 ~ 100 Brightness in % -> back-light regulator
Back-light
0.5 ~ 400 Brightness in cd/m² -> backlight
f(T): BL real [%]
Brightness 0 ~ 100 Setting the brightness (default value:
= off
regulator = on
Back-light brightness in %.
The display is shown only when the
back-light brightness is reduced due
to a higher operating temperature.
50)³
19 | Operation
Page 20

Parameter Setting Description
Contrast 0 ~ 100 Setting the contrast (default value:
50)³
H Position 0 ~ 100 Setting the horizontal image position
V Position 0 ~ 100 Setting the vertical image position
Hue 0 ~ 100 Setting the hue. Just for NTSC signal
Saturation 0 ~ 100 Setting color saturation
Table 13: Main menu - Picture tab 1 (CVBS)
Note ³ Important: Adjusting the brightness and the contrast changes the image information displayed, i.e.,
improper adjustments can distort the information displayed or it may no longer be visible.
2.8 Main Menu – Picture 2 (DVI-1, DVI-2, RGB-1, RGB-2, CVBS)
This chapter explains the settings of parameters in the main window for DVI-1, DVI-2, RGB-1, RGB-2 and CVBS.
Parameter Setting Description
Focus Main Window (1) / PIP Window (2) Determines in which window (main/
PIP) a setting should be made.
Custom
Day
ECDIS mode
Scaling
Picture in Picture (PiP) Off / On Activates the PIP window, see Table
Color Temperature
Dusk
Night
One to One For DVI-1, DVI-2, RGB-1, RGB-2.
Fit to aspect ratio
Fill screen
One to One For CVBS.
Fit to aspect ratio
Fill screen
9500 Kelvin
7500 Kelvin
5500 Kelvin
User
Setting the ECDIS operating status.
Only available when the function
“ECDIS & Radar” in the Main menu –
Setup is enabled, see Table 16: Main
menu - Setup on page 22.
.
Only available for the main window
and when the signal resolution is less
than or more than 1920 x 1080 pixels
(native resolution).
Only available for the main window
and when the signal resolution is less
than or more than 1920 x 1080 pixels
(native resolution).
15: Sub - menu - PIP on page 21.
Setting the color temperature.
(factory setting = 7500k).
This menu item is not visible when
gamma = “calibrated” is selected or
the “ECDIS & Radar” function in the
Main menu – Setup is activated, see
Table 16: Main menu - Setup on page
22.
20 | Operation
Page 21

Parameter Setting Description
The “calibrate” setting is possible only
after a gamma calibration is carried
Gamma
Calibrate & Measure
Table 14: Main menu - Picture tab 2 (DVI-1, DVI-2, RGB-1, RGB-2, CVBS)
Variable (2.2)
Calibrate (G:2.2, x:0.300, y:0.310)
Analog RGB
Backlight sensor
Gamma & color
Brightness/color measurements
out.
This menu item is not visible when the
“ECDIS & Radar” function in the Main
menu – Setup, see Table 16: Main
menu - Setup on page 22.
This function is used to calibrate
the analog RGB input channels, the
backlight brightness and the gamma
or color temperature.
Brightness and color measurements
as well as the gamma and color
calibration can be made with the
Calibration Sensor.
2.8.1 Sub-Menu - Picture in Picture (PIP)
This chapter provides information regarding the possible settings in the PIP - menu.
Parameter Setting Description
PIP On/Off Turns the PIP window on or off.
DVI-1
DVI-2
Source Main Window
Source PiP Window
Source Swap (Main<->PiP) Swaps the signal source between the
Frame-lock Source Main Window This function determines for which
Reference Source PIP Window This function should be used for the
RGB-2
VGA
CVBS
DVI-1
DVI-2
RGB-2
VGA
CVBS
When selecting the source, the
following limitations apply:
One source (either the main window
or the PIP window) has to be DVI-1.
main window and the PIP window.
window the frame lock function will be
used.
window where moving images (e.g.,
from a camera) are displayed.
Auto adjust
21 | Operation
Only available for RGB-1(VGA) or
RGB-2.
Page 22

Parameter Setting Description
This function starts the automatic
image balance of the frequency,
phase and image position of the
analog image signal displayed.
PIP size
PIP Adjustment
PIP H Position
PIP V Position
PIP Transparency
Table 15: Sub - menu - PIP
Setting the properties of the PIP
window.
2.9 Main Menu – Setup
This chapter explains the settings in the Main Menu.
Parameter Setting Description
Enables the automatic back-light
brightness stabilizer.
Back-light Controller Off/On
ECDIS & Radar Off/On
Visible only when the back-light
regulator is calibrated and the “ECDIS
& Radar” = Off.
Turns the ECDIS & Radar properties
on/off.
This function can be turned on only
when the appropriate calibrations and
settings such as the following have
been made:
• Back-light calibration
• Gamma & color calibration
• Back-light regulator = On
See ECDIS - Radar Settings on page
27
Display Power Management System
DPMS Off/On
OSD OSD Settings Sub-Menu – OSD on
Source Selects the input signal (DVI-1,
If the DPMS function is enabled, the
back-light is turned off when there is
no image signal.
page 23
RGB-1, ...) that should be taken into
account in the automatic source
search, see Sub-Menu – Source on
page 23
22 | Operation
Page 23

Parameter Setting Description
English
Language
Test pattern Displays various test images
Factory/User Settings Saves user settings and resets to
Table 16: Main menu - Setup
German
Spanish
French
Selects the OSD language
factory or user settings.
2.9.1 Sub-Menu – Source
This chapter provides settings information regarding the Source parameters.
Parameter Setting Description
Source Scan Off/On Automatic source scan.
Scan DVI-1 Off/On
Scan DVI-2 Off/On
Scan RGB-2 Off/On
Scan VGA Off/On
Scan CVBS Off/On
Table 17: Sub-menu - Source
Includes the respective input signal
(source) during the automatic source
scan.
2.9.2 Sub-Menu – OSD
This chapter provides settings information regarding the parameters of the OSD sub-menu.
Parameter Setting Description
Transparency 0 ~ 100 Settings of the OSD window
transparency.
OSD Timeout [sec] 15 ~ 60 Display time of the OSD after the last
time the button was pressed.
Default: 45 sec.
OSD lock (de-)activate.
OSD Lock Off/On
(Default access code: 1 2 3 4 ).
The OSD lock remains enabled until
the menu item is deactivated.
23 | Operation
Page 24

Parameter Setting Description
Locking keyboard input for OSD
operations.
To deactivate the keyboard lock,
Key Lock Off/On
OSD Access Code Defines a new OSD access code.
Table 18: Sub-menu - OSD
when the monitor is being powered
up (turning on the power supply), the
“down/-” button must be pressed until
a confirmation window appears in the
lower right-hand corner of the screen.
2.10 Main Menu – Communication
This chapter provides settings information regarding the parameters in the Main Communications Menu.
Parameter Setting Description
RS232 Interface
RS485 Interface
SNMP Sub-menu SNMP, see Table 21: Sub-
Restart SNMP / RS485
Communication.
Table 19: Main menu - Communication
Standard SCOM Sets the RS232 interface
communication.
MODBUS SCOM Sub-menu MODBUS – see Table
20: Sub-menu - MODBUS interface
(RS485/422) on page 25.
menu - SNMP (Ethernet) on page
25.
Restart the communication interface
to accept the MODBUS and SNMP
settings.
2.10.1 Sub-Menu – MODBUS Interface (RS485/422)
This chapter provides settings information regarding the parameters of this Modbus Interface.
24 | Operation
Page 25

Parameter Setting Description
Slave Address 1 - 254 Defines a MODBUS slave address.
Baud rate
Parity
Bus Mode Two-wire:
Bus Termination Off/On Final termination of the bus system.
Table 20: Sub-menu - MODBUS interface (RS485/422)
19200 Baud
9600 Baud
Even
Odd
Off
Four-wire:
Transmission speed for the RS
485/422.
Parity check configuration.
Selection of the bus topology.
Half-duplex/full-duplex.
As far as is possible, termination
should be activated on the last bus
device.
2.10.2 Sub-Menu – SNMP (Ethernet)
This chapter provides setting information regarding SNMP parameters.
Parameter Setting Description
IP Address xxx xxx xxx xxx
Subnet Mask xxx xxx xxx xxx
Standard Gateway
Primary DNS Server
GET Community String SNMP Community string for GET
SET Community String SNMP Community string for GET
Table 21: Sub-menu - SNMP (Ethernet)
Configuration of the network interface.
inquiry.
inquiry.
2.11 Main Menu – Information
This chapter provides information regarding the functions in the Main Menu.
Function Description
Selected Source Active signal source (DVI-1, DVI-2, VGA, RGB-2, CVBS).
Resolution (H x V) Picture resolution of the active signal source.
Total (H x V) Display of the total number of pixels per line and lines per
picture.
Horiz. Frequency [Hz] Horizontal frequency of the active signal source.
Vert. Frequency [Hz] Vertical frequency of the active signal source.
25 | Operation
Page 26

Function Description
Timing Index Index of the active signal source from the internal timing
table.
Table 22: Page 1/5: (Information to the active input signal)
Function Description
Selected Source Active signal source (DVI-1, DVI-2, VGA, RGB-2, CVBS).
Resolution (H x V) Picture resolution of the active signal source.
Total (H x V) Display of the total number of pixels per line and lines per
picture.
Horiz. Frequency [Hz] Horizontal frequency of the active signal source.
Vert. Frequency [Hz] Vertical frequency of the active signal source.
Timing Index Index of the active signal source from the internal timing
table.
Table 23: Page 2/5: Source PiP Window (Information to the active inpit signal)
Function Description
Temperature [ºC] Internal temperature of the monitor.
Power Surplus Backlight [%] Power reserve of the back-light for the currently set
brightness level.
Power Supply 1 (AC) Supply voltage on the AC input applied.
Power Supply 2 (DC) Supply voltage on the DC input applied.
Table 24: Page 3/5: System (Information on the internal operating conditions)
Function Description
Monitor Operating hours counter.
Back-light Operating hours counter for the back-light.
Power Supply 1 (AC) Operating hours counter power supply 1 (AC).
Power Supply 2 (AC) Operating hours counter power supply 2 (AC).
Table 25: Page 4/5: On Time (Hours)
Function Description
Firmware Version Firmware version of the monitor.
26 | Operation
Page 27

Function Description
Serial number Serial number of the monitor.
(Always provide this number when contacting
ALPHATRON MARINE).
Table 26: Page 5/5: Version
2.12 Main Menu – Self-Test
This sub-menu shows the detailed results of the internal monitor self-test. It is used by service personnel for purposes of
analysis.
Note There are no detailed results shown!
2.13 ECDIS - Radar Settings
This monitor features an ECDIS-compatible operating mode to display colors corresponding to the image content
(nautical charts) according to the specifications of the IHO (International Hydrographic Organization).
This operating mode can be enabled only when the following preconditions are in place:
• The monitor is calibrated with gamma 2.2 and the white point x=0.300, y=0.310.
• The back-light sensor is calibrated.
These requirements have been met at the time of delivery.
Note When ECDIS mode is enabled, no changes can be made to the color temperature, gamma and back-light
controller.
Note For the correct representation of ECDIS image files, there are corresponding color tables for the three
operating conditions of DAY, DUSK and NIGHT. The respective RGB values for the color tokens from the S-52
"Presentation Lib" are recorded in these tables.
Note To obtain these tables, please contact ALPHATRON MARINE.
2.14 Monitor Calibration
To be able to use the monitor as an ECDIS-compliant display it has to be set as described in ECDIS - Radar Settings on
page 27.
Prior to calibration operate the monitor for at least two hours at a medium back-light brightness level. Place the color
sensor in the middle of the screen, see Figure 11: Color Sensor placement on page 27.
Figure 11: Color Sensor placement
27 | Operation
Page 28

A color sensor that is connected to the DV4624 via the RS232 interface is required to perform this calibration. Control of
the calibration process is done through the monitor itself and can be started using the OSD. No additional hardware or
software is necessary.
All necessary calibrations were done at the factory. Recalibration may be required to compensate for variations in color
and gamma characteristics, due to e.g. age, and to ensure ECDIS compatibility.
Note Start individual calibrations like Analog RGB, Back-light Sensor and Gamma Color in the OSD sub-menu
“Picture 2 / Calibrate and Measure”, see Table 14: Main menu - Picture tab 2 (DVI-1, DVI-2, RGB-1, RGB-2,
CVBS) on page 20.
2.14.1 Calibrating the RGB Input Channel RGB-1 (VGA) and RGB-2
1. Execute this adjustment in the final application to compensate for the influences from transfer cable and graphic
cards.
Note The signal differences between red, green and blue signals are compensated for to make this
adjustment.
2. Display a white image (100%) on an imaging computer system.
3. The OSD performs the calibration procedure with the corresponding instructions.
2.14.2 Calibrating the Back-Light Sensor
The back-light sensor in the device ensures that the cd/m² brightness level set in the OSD is correctly transmitted and
remains unchanged during operation.
1. Use an external brightness measuring device, to run the calibration.
Note The OSD differentiates between brightness level set in the OSD and the Color Sensor.
2. The OSD performs the calibration procedure with the corresponding instructions.
2.14.3 Calibrating Gamma & Color
Gamma and color (white point) must be correctly calibrated to operate the monitor in the ECDIS or radar mode.
1. Preset the correct color coordinate (white point) of X=.300, Y=.310 and a gamma of 2.2.
Note If other values are used, the monitor cannot be set in the ECDIS or radar mode.
2. The OSD performs the calibration procedure with the corresponding instructions.
2.15 Serial Communication Interfaces
The monitor has several serial interfaces that are controlled via the monitor or can be used to retrieve status information,
like:
• RS-485 and RS-422
• RS-232
• USB
• Ethernet
Different protocols are available for communication via these interfaces.
1. Communication via the RS232, RS485 and USB is based on the MODBUS standards.
Note The format is identical for all three interfaces.
2. For communication via the Ethernet interface, the SNMP protocol is available.
28 | Operation
Page 29

Note The detailed description of each of the communication protocols is available in separate documents
available from ALPHATRON MARINE
2.16 Troubleshooting
This chapter provides information concerning fault finding and fixing.
Problem Cause Solution
No image when the monitor is
powered up
Table 27: Troubleshooting
Note Contact your sales representative if the device is not operating normally.
No input signal to DVI-x, RBG-x or
CVBS
Incorrect OSD setting Check the source selection.
Too little back-light brightness Increase the back-light brightness
No voltage supply Connect the corresponding voltage to
Connect the appropriate input signal.
level.
either the AC or DC input.
29 | Operation
Page 30

3 Specifications
This chapter details the specific characteristics of the monitor.
3.1 Mechanical Specifications
Dimensions of the monitor.
Figure 12: Mechanical Dimensions
30 | Specifications
Page 31

3.2 Monitor Mounting Options
Installation requires M8 screws with a 1.25 mm thread pitch.
Note The maximum screw depth is 16 mm.
Figure 13: Mounting options of the Device
31 | Specifications
Page 32

3.3 Sealing the Rear of the Device
To be IP55 compliant the monitor requires to be water resistant
Figure 14: Reverse side placement of all around seal
1. Install seal between the front cover and mounting location for use in areas requiring an IP55 rating.
2. Glue fix 2x10mm sealing tape around the entire back edge, see
3.4 Display Module
This chapter explains the values of the various parameters of the monitor.
Parameter Values
Model Active Matrix TFT-LCD
Size 46.0” / 116.8 cm
Resolution / pixel aperture 1920 x 1080 / 0.4845 mm²
Viewing angle (h/v) 178 ° /178 °
Contrast 4,000:1 (type)
Colors 1073.7 million
Brightness 700 cd/m² (type)
Backlight LED (Edge-Light)
32 | Specifications
Page 33

Parameter Values
Pixel error class Class II (ISO 9241)
Table 28: Display Module
3.5 Voltage Supply
This chapter provides an overview of Input Voltage and Power Consumption of the monitor.
Parameter Values
AC input voltage 90 - 264 VAC, 47 - 63 Hz
Fuse 2 x 5 A
Maximum 110 W (Brightness =. 100% w/o BL-
Reg.)
Power consumption
DC input voltage 18 - 36 VDC
Fuse 10A
Power consumption (supply: 24 VDC)
Typical 35 W (Brightness = 80 cd/m²)
Standby mode 4 W
Maximum 100 W (Brightness =. 100% w/o BL-
Reg.)
Typical 30 W (Brightness = 80 cd/m²)
Standby mode 2W
Table 29: Voltage supply
3.6 Digital Signal Input (DVI-1, DVI-2)
This chapter provides information with regards to Input Signal and Digital Clock.
Parameter Values
Input signal Signal link T.M.D.S. DVI Rev. 1.0 compliant
Pixel clock 25 ~ 155 MHz
Table 30: Digital signal input (DVI-1, DVI-2
3.7 Analog Signal Input (RGB-1(VGA) / RGB-2)
This chapter provides information regarding signal levels, frequencies and impedance.
Parameter Values
Signal level (RGB) 0.7 Vpp / 1 Vpp (when Sync on green)
Band width 500 MHz (-3 dB)
Impedance RGB input 75
33 | Specifications
Ω
Page 34

Parameter Values
Synchronization Separate sync, composite sync to H, Composite sync to
green
Impedance H/V input 470
Pixel frequency 25 ~ 155 MHz
H frequency 15 ~ 100 MHz
V frequency 50 ~ 100 MHz
Table 31: Analog signal input (RGB-1(VGA) / RGB-2)
Ω
3.8 Video Signal Input (CVBS)
This chapter provides information regarding signal input for CVBS.
Parameter Values
Signal level 1.0 Vpp
Impedance 75
Input type Differential
V frequency 50 / 60 Hz
H frequency 15.625 / 15.734 kHz
Coding PAL, NTSC, SECAM
Ω
Table 32: Video signal input (CVBS)
3.9 Compass – Safe Distance
This chapter provides information regarding safe distances to compasses.
Parameter Values
Safety distance to:
Standard magnetic compass
Controlling magnetic compass
Standard magnetic compass
Controlling magnetic compass
Table 33: Compass - safety distance
5.10m
2.90 m
3.10 mReduced safety distance to:
1.75 m
34 | Specifications
Page 35

3.10 Environmental Requirements
This chapter provides requirements for safe operating and storage conditions.
Parameter Values
Operating temperature -15 ~ 55 °C (5 ~ 131 °F)
Storage temperature -20 ~ 70 °C (-4 ~ 158 °F)
Humidity
Table 34: Environmental requirements
(no condensation)
≤95%
3.11 Physical Properties
This chapter provides information regarding the physical properties of the monitor.
Parameter Values
Dimension 1067 x 622.5 x 94 mm
Weight (net) 31 kg / 68 lbs.
Device protection
Protective screen 4 mm (T92) ESG
Housing material Stainless steel
Housing color Munsell Color N2.5 (black)
Table 35: Physical properties
IP55 front
IP20 back
3.12 Packing
This chapter provides information regarding size and weight of packaged product.
Parameter Values
Size (W x H x D) 1195 x 780 x 320 mm
Weight (gross) 34kg
Table 36: Packing
3.13 Authorizations
This chapter provides information regarding compliance with standards.
Standards & Certificates
IEC 60945 (ed.4) (EN60945:2002)
DNV GL
Table 37: Authorizations
35 | Specifications
Page 36

3.14 Annex A
The Displays could be used in combination with the following MFD, Radar, and ECDIS equipment:
Device Type NB Type Approval
Radar JRC JMR-9200 0168 BABT-MED-000060
ECDIS JRC JAN-9201 0168 BABT-MED-000062
Table 38: The AlphaScreen 46 (Eizo DuraVision DV4624-002)
36 | Specifications
Page 37

All over the world,
close to the customer
JRC/Alphatron Marine B.V.
Schaardijk 23 (harbor 115)
3063 NH Rotterdam
The Netherlands
T +31 10 453 4000 Document name: AlphaScreen 46
F +31 10 453 4010 Document nr. : 1001
service@jrc.am Version : V1.2
www.jrc.am
The information in this document is subject to change without notice and
does not represent a commitment on the part of Alphatron Marine B.V.
©
All rights reserved Alphatron Marine B.V.
Centers of Excellence
Houston, Rotterdam, Singapore, Tokyo
 Loading...