

Page 1
www.joy-it.net
Pascalstr. 8 47506 Neukirchen-Vluyn
Experimental and education case
Page 2

www.joy-it.net
Pascalstr. 8 47506 Neukirchen-Vluyn
1. TABLE OF CONTENT
1. Table of content
2. General information & saey instructions
3. Details
4. Commissioning & operation
5. Changing modules and using the GPIOs
6. Usage of Python and Linux
7. Lessons
1. Lesson : Using the buzzer for warning sounds
2. Lesson : Controlling the buzzer with key inputs
3. Lesson : How a relay is working and how to control it
4. Lesson : Sending a vibration signal
5. Lesson : Detecting noises with the sound sensor
6. Lesson : Detecting brightness with the light sensor
7. Lesson : Detecting the temperature and the humidity
8. Lesson : Detecting movements
9. Lesson : Measuring distances with the ultrasonic sensor
10. Lesson : Controlling the LCD display
11. Lesson : Reading and writing RFID cards
12. Lesson : Using stepper motors
13. Lesson : Controlling servo motors
14. Lesson : Controlling the 8 x 8 LED matrix
15. Lesson : Controlling the 7 segment display
16. Lesson : Detecting touches
17. Lesson : Detecting tilts with the tilt sensor
18. Lesson : Using the button matrix
19. Lesson : Controlling and using the IR sensor
20. Lesson : Own circuits with the breadboard
21. Lesson : Photographing with the Raspberry Pi camera
8. Other information
9. Copyright information
10. Support
The login data is:
Username : pi
Password : 12345
Page 3

www.joy-it.net
Pascalstr. 8 47506 Neukirchen-Vluyn
2. GENERAL INFORMATION & SAFETY INSTRUCTIONS
Dear customer,
Thank you very much for choosing our product. In the following, we will
show you what has to be observed during commissioning and use.
Should you encounter any unexpected problems during use, please feel
free to contact us.
The following lessons are designed so that, regardless of how much prior
knowledge you already have, you can complete all lessons without any
problems. For the dierent lessons, you have to download sample files
and run them on the Joy-Pi. How to do this can also be found in this
manual.
But these tutorials are only the beginning you can use your Joy-Pi for a
variety of projects.
We are looking forward to see what you will do with our Joy-Pi.
Safety instructions
1. This device is intended for use in dry indoor areas. It must not
become wet or damp! Also do not touch the device with wet hands!
2. The permissible ambient temperature is : 5 - 40 °C
3. Do not expose the device to direct sunlight, as the Joy-Pi could heat
up by this.
4. If the unit is damaged or has faults, do not longer use it and contact
our service for further instructions
5. Unplug the power supply from the power outlet if you are not going
to use it for a longer period of time.
6. Handle this product with care. It must not contain high exposed to
temperature, humidity or pressure. It may not be short-circuit
either.
Page 4
www.joy-it.net
Pascalstr. 8 47506 Neukirchen-Vluyn
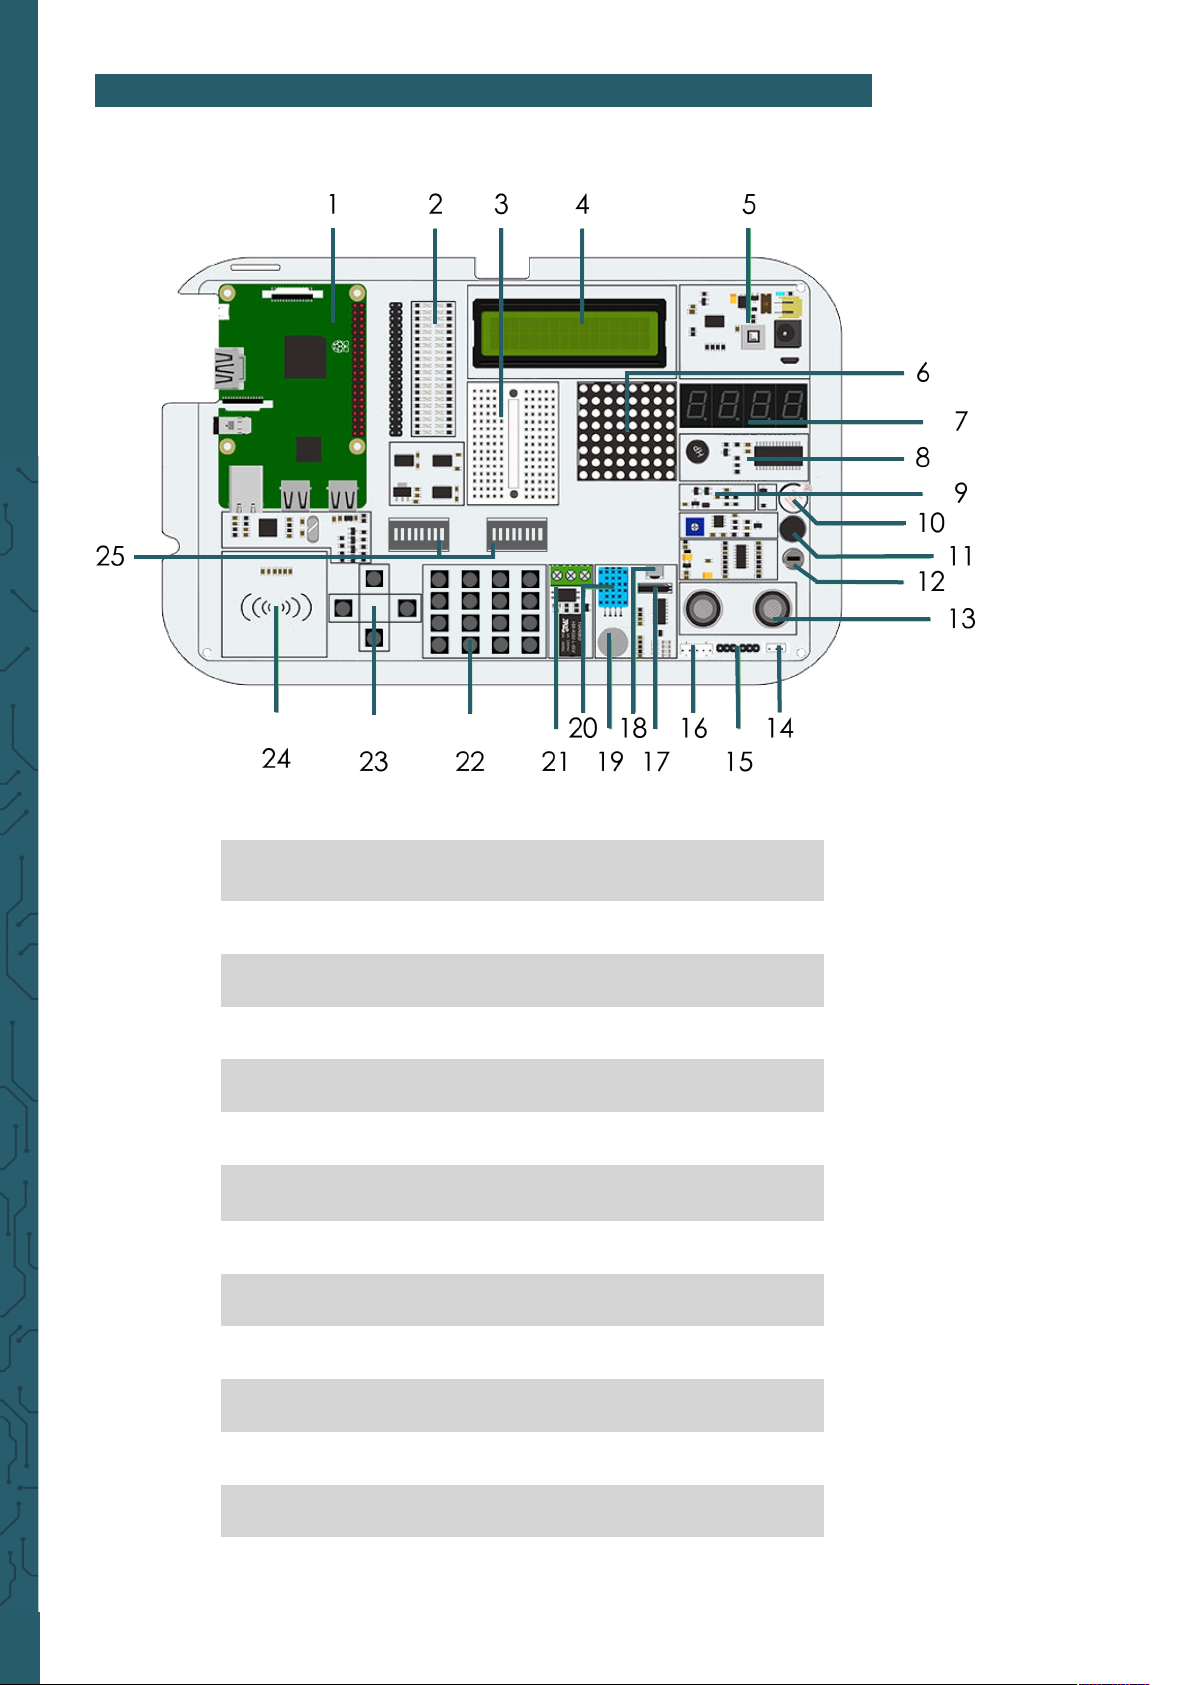
3. DETAILS
1 Raspberry Pi
2 GPIO LED display
3 Breadboard
4 16 x 2 LCD module (MCP23008)
5 Power supply
6 8 x 8 LED matrix (MAX7219)
7 7 segment LED display(HT16K33)
8 Vibration module
9 Light sensor (BH1750)
10 Buzzer
11 Sound sensor
12 Motion sensor (LH1778)
13 Ultrasonic distance sensor
14 / 15 Servo interfaces
Page 5
www.joy-it.net
Pascalstr. 8 47506 Neukirchen-Vluyn
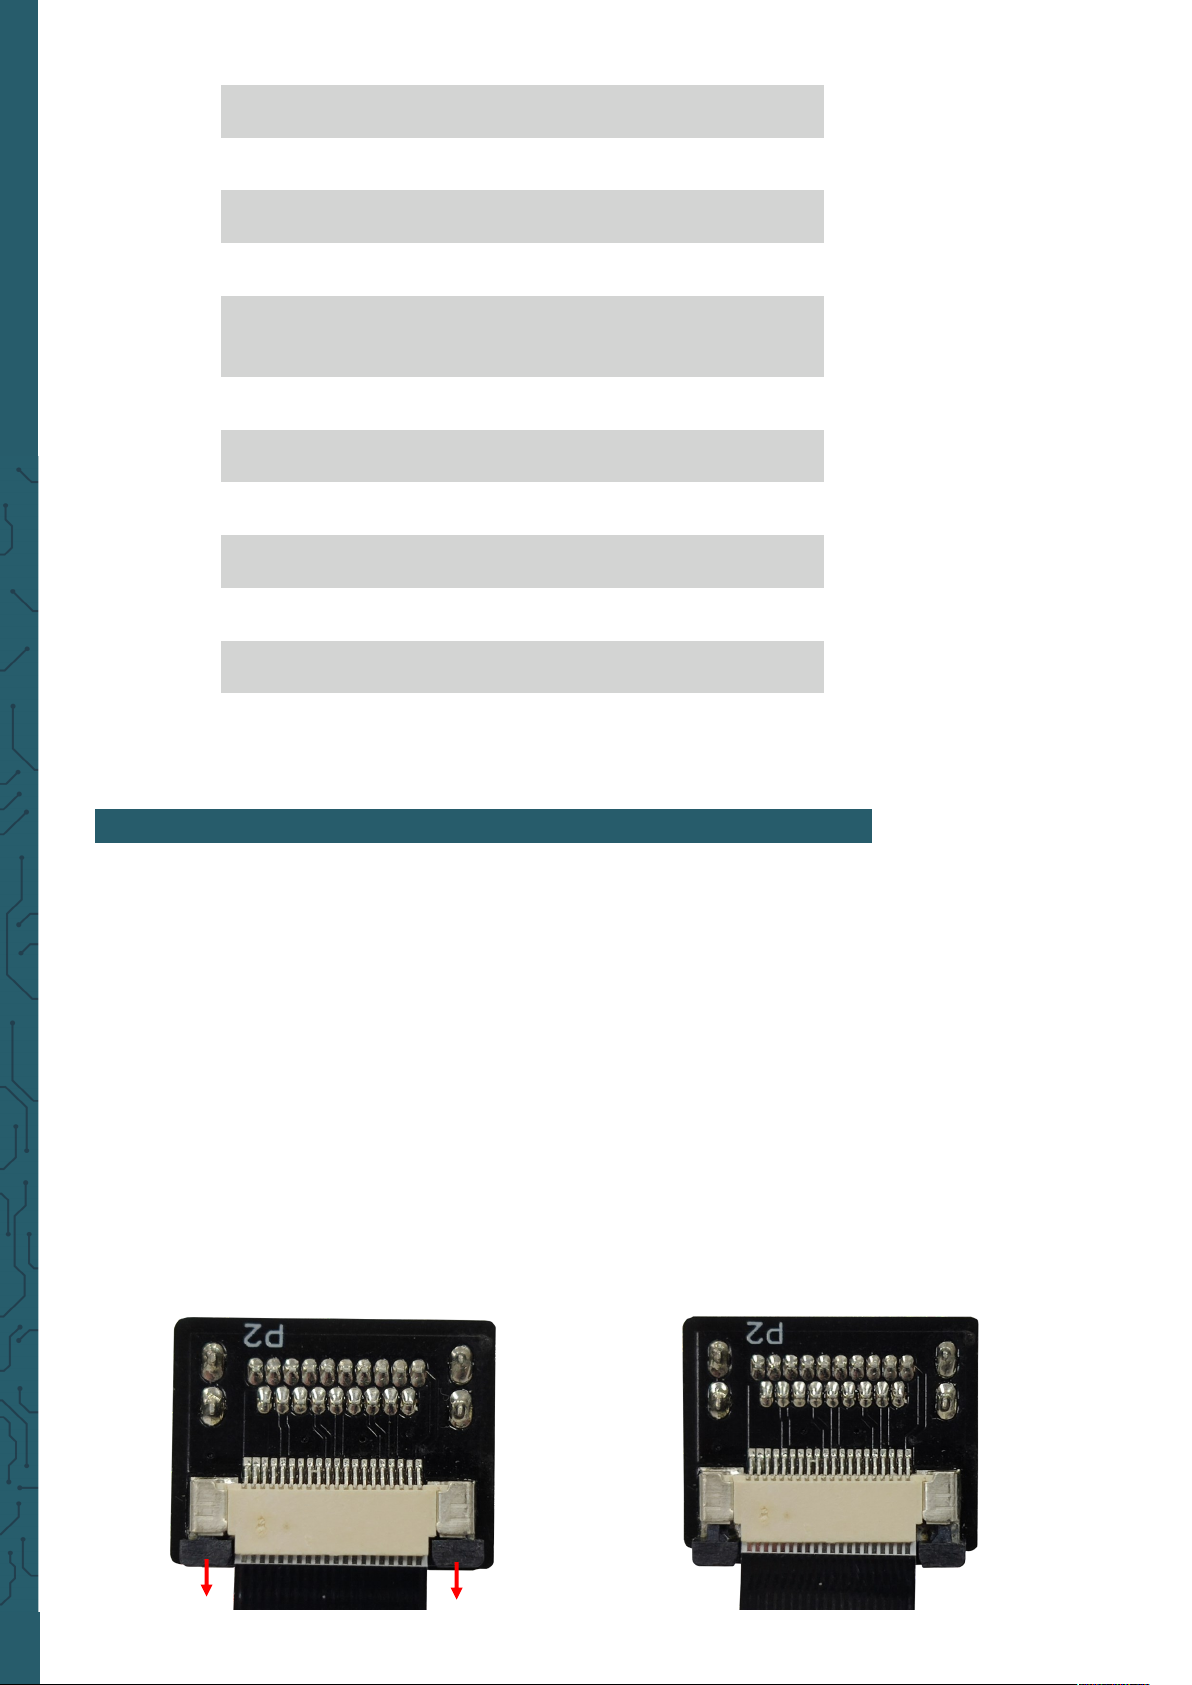
16 Stepper motor interface
17 Tilt sensor (SW-200D)
18 Infrared sensor
19 Touch sensor
20
DHT11 temperature and
humidity sensor
21 Relay
22 Key matrix
23 Independent keys
24 RFID module (MFRC522)
25 Switch
26 Fan connection
27 Power supply microUSB
4. COMMISSIONING & OPERATION
First you must insert your microSD card into the slot provided by the
Raspberry Pi. If you do not want to use our image, please read chapter 5.3
and chapter 6.1 to create your own image.
Now you can wire the Raspberry Pi to the Joy-Pi. For this purpose
plug the AUX adapter into the AUX port and the USB cable into one of the
USB ports. Then connect both GPIO bars, one from the Raspberry Pi and
one from the Joy-Pi with the supplied cable.
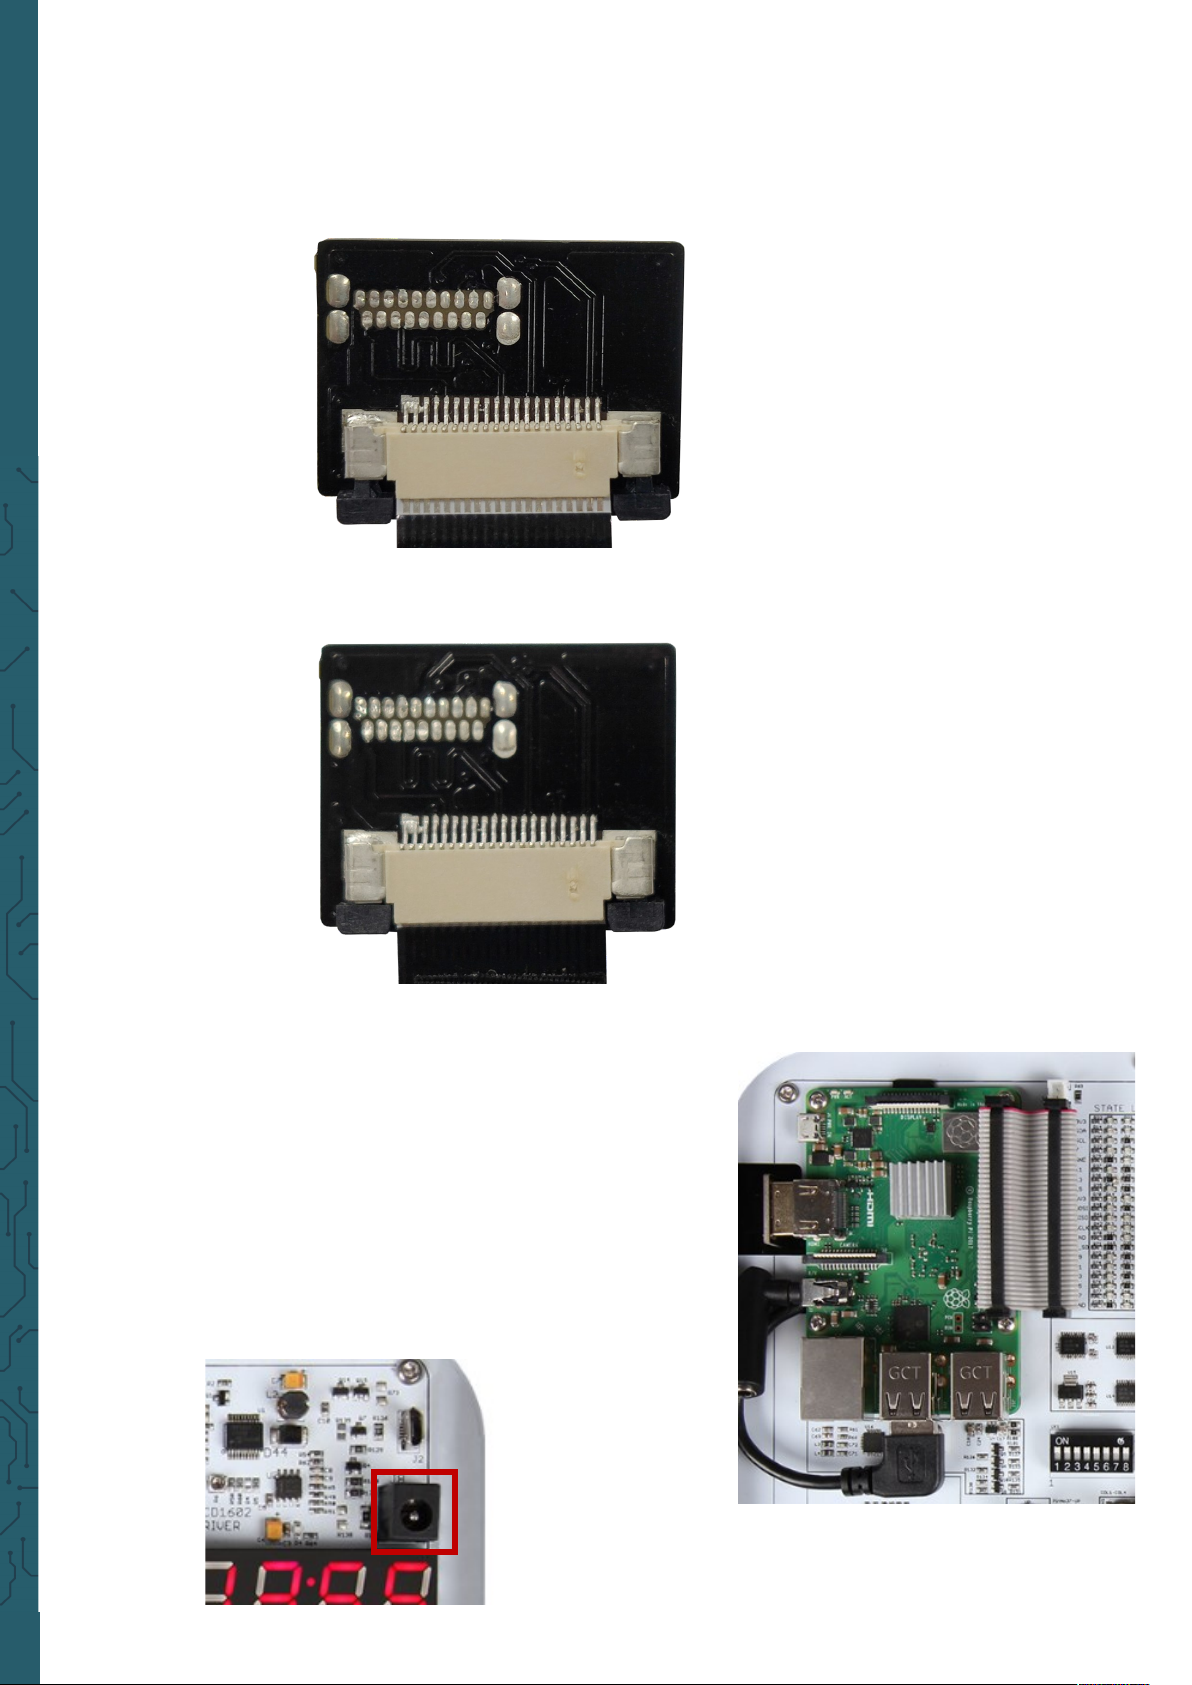
With the HDMI cable, please note that you may need to replace the HDMI
adapter depending on the Raspberry Pi you are using. For the Raspbbery
Pi 4 you need the small micro HDMI adapter, for all older Raspberry Pi
models you need the big HDMI adapter.
Changing the adapter is done quickly.
Pull the plastic lock of the connector carefully downwards to release the
HDMI cable, as shown by the arrows in the picture below. Now you can
simply pull the cable out of the adapter.
Page 6
www.joy-it.net
Pascalstr. 8 47506 Neukirchen-Vluyn
Now take the other HDMI adapter and, as in the previous step, carefully
pull the plastic latch of the connector downwards to release the lock.
Now you can plug the HDMI cable into the connector. Make sure that the
side of the cable with the silver contacts, as shown in the picture below,
points away from the adapter.
When the cable is fully inserted into the connector, you can close the lock
by carefully pushing the plastic latch of the connector upwards.
Now you can plug the HDMI cable into your Raspberry Pi
and screw the Raspberry Pi firmly onto the board of the JoyPis.
To start the Joy-Pi, all you have to do is to supply it with
power. The power cable which is included, should be
connected on the right side of the board. The Joy-Pi should
now start as soon as you flip the switch on the power cord.
Page 7
www.joy-it.net
Pascalstr. 8 47506 Neukirchen-Vluyn
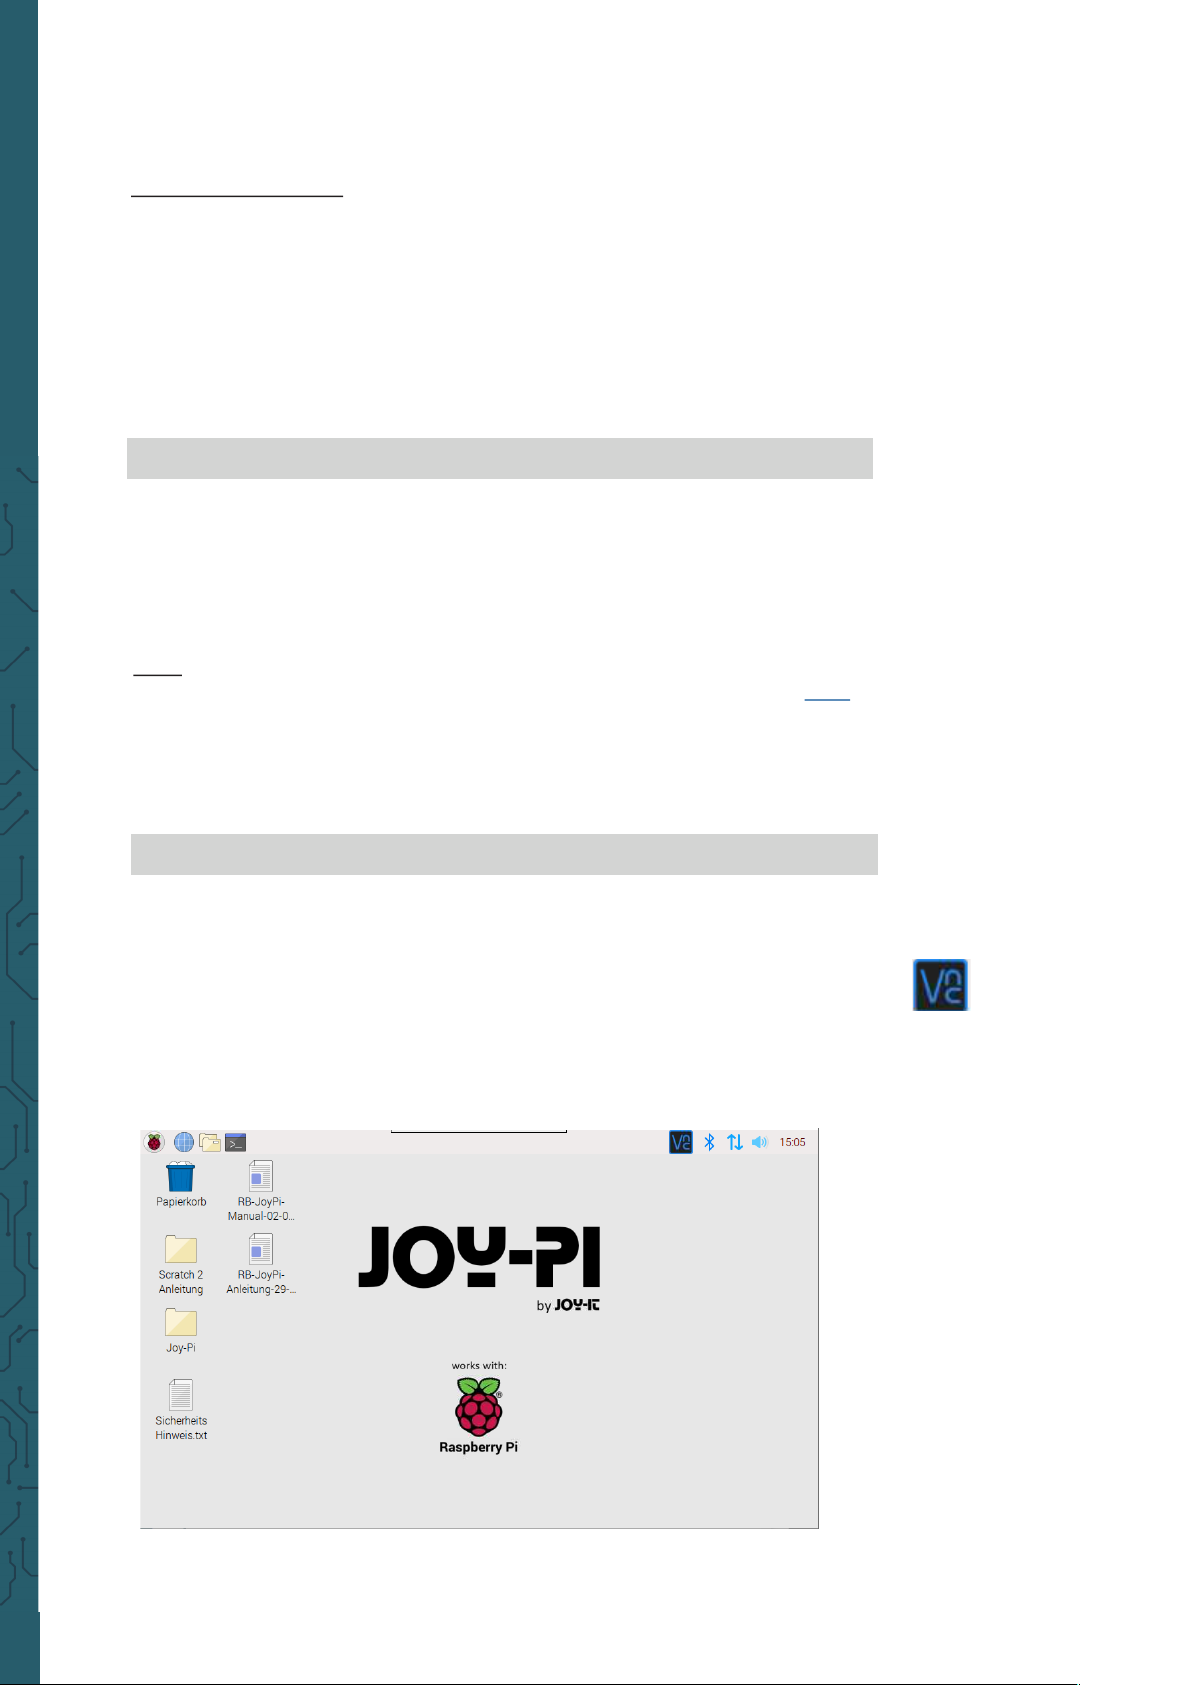
You have various possibilities to operate your Joy-Pi. One is via the wireless keyboard, which can be used in combination with the touch display,
or you can provide a connection to your computer using VNC or SSH.
Wireless keyboard
First, connect the USB stick of the keyboard to one of your USB ports of
the Raspberry Pi. Now you can switch it on at the right side of the keyboard and with the help of the key combination Fn+RF it will connect to
the Joy-Pi. In order to make the key assignment match the German keyboard layout of the keyboard, German must be selected as language in
the system preferences.
To do this, open the terminal and enter the following command to open
the system settings:
sudo raspi-config
There you select
4 Localisation Options → I1 Change Locale
to select Ger-
man as language. There is also a touchpad on the keyboard that you can
use to move the cursor. Further functions are described in the enclosed
instructions. The enclosed microUSB cable is intended for charging the
keyboard.
VNC
With the help of the program VNC Viewer, which you can download here.
With this program, you can see the desktop of your Joy-Pi on your
computer and you can operate it completely.
To use this function you must first allow a VNC connection. You enable
this in the system settings. To do this, execute the following command:
sudo raspi-config
There you activate VNC in
5 Interfacing Options → P3 VNC
. Now you can
connect to the Raspberry Pi via your network. To do so, enter the IP
address of the Joy-Pi. You can see the IP address of the Joy-Pi by clicking
on the VNC sign in the upper right corner. Now you only have to login
with the login data and then you have fully access from your computer to
your Joy-Pi.
user name : pi
password : 12345
Page 8
www.joy-it.net
Pascalstr. 8 47506 Neukirchen-Vluyn
SSH
SSH is a dierent connection path than VNC to connect wirelessly to your
Joy-Pi from a PC. You can use for example MobaXTerm, which you can
download here. To be able to establish an SSH connection, you must
enable SSH and your Joy-Pi must be connected to your network. Enable
SSH in system preferences
5 Interfacing Options → P2 SSH
.
Open system preferences with:
sudo raspi-config
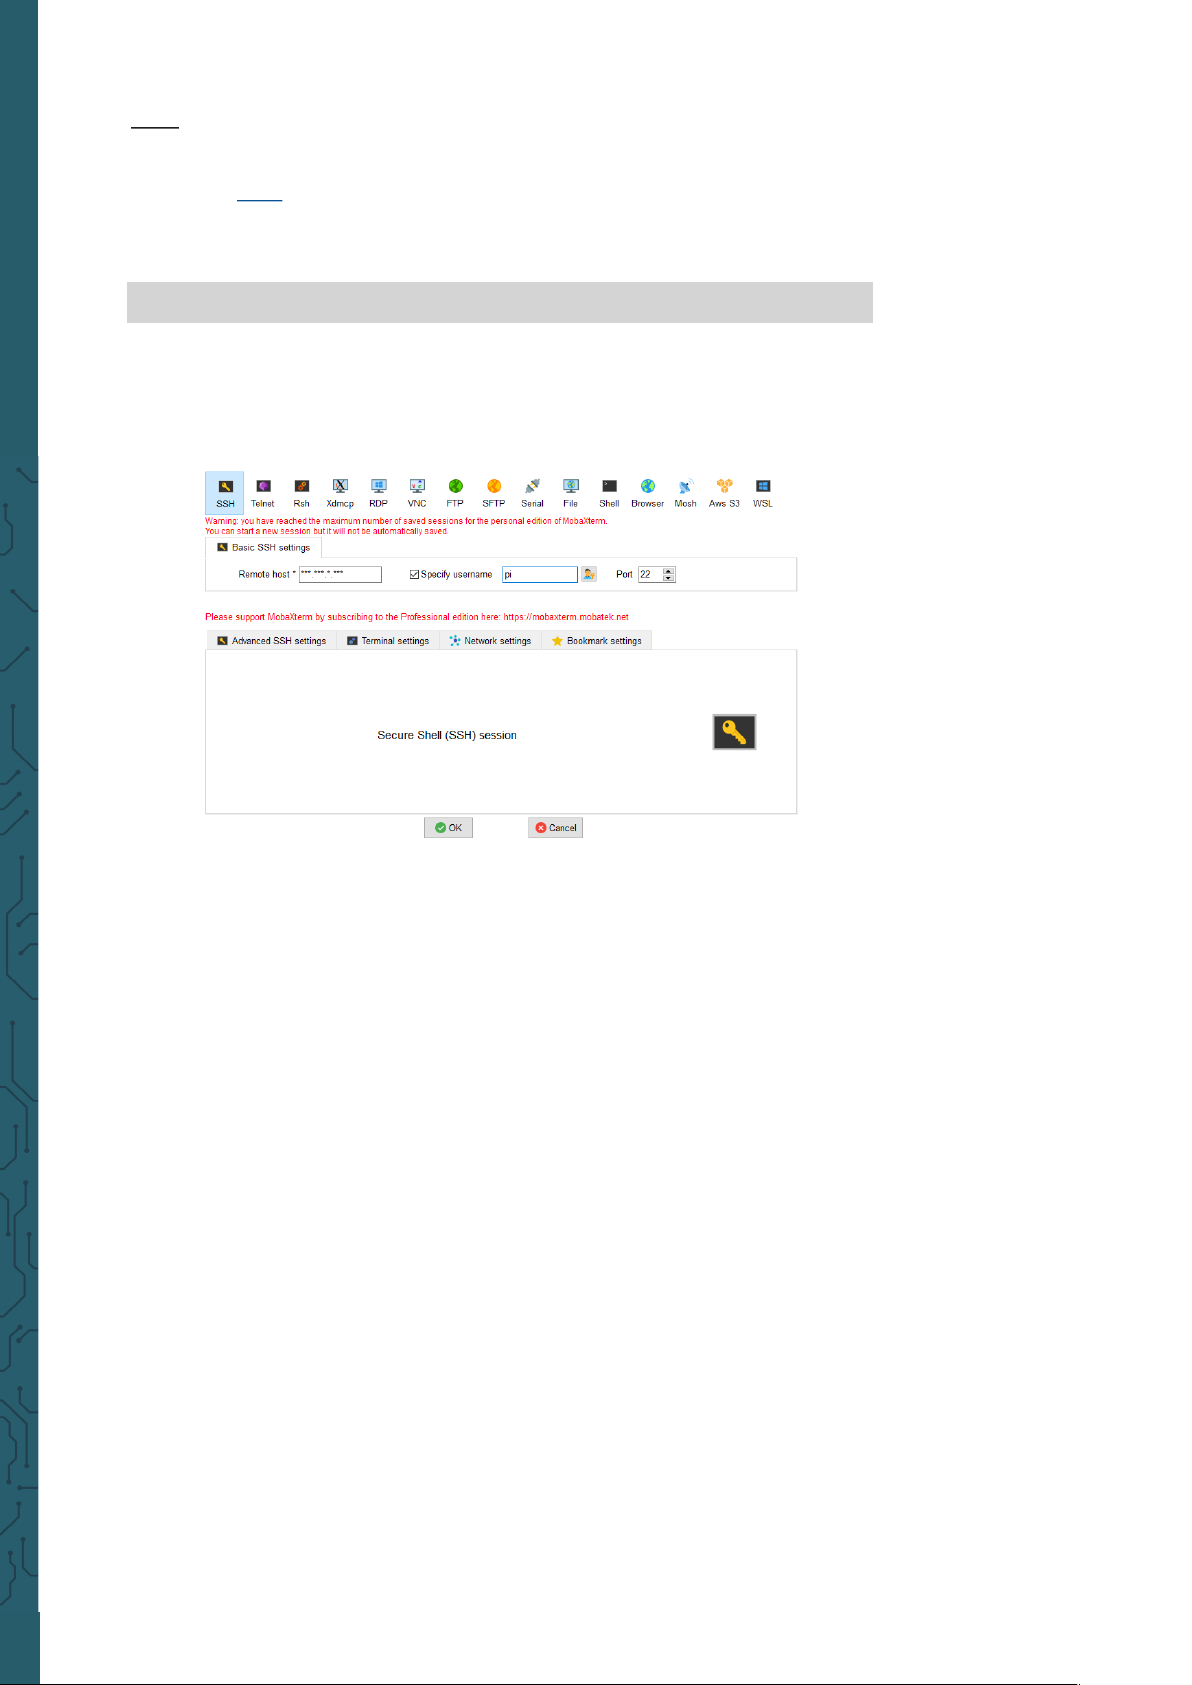
Now click on Session in MobaXTerm to establish a new connection. There
you enter the IP address and the user name. The IP address can be displayed by clicking on the VNC icon in the upper right corner.
user name : pi
password : 12345
You must then enter the password. Attention! It is possible that the
keystrokes are not displayed when entering the password. Now, you can
see a terminal which can control the Joy-Pi.
Page 9
www.joy-it.net
Pascalstr. 8 47506 Neukirchen-Vluyn
5. CHANGING MODULES AND USING THE GPIOS
5.1 Change of modules
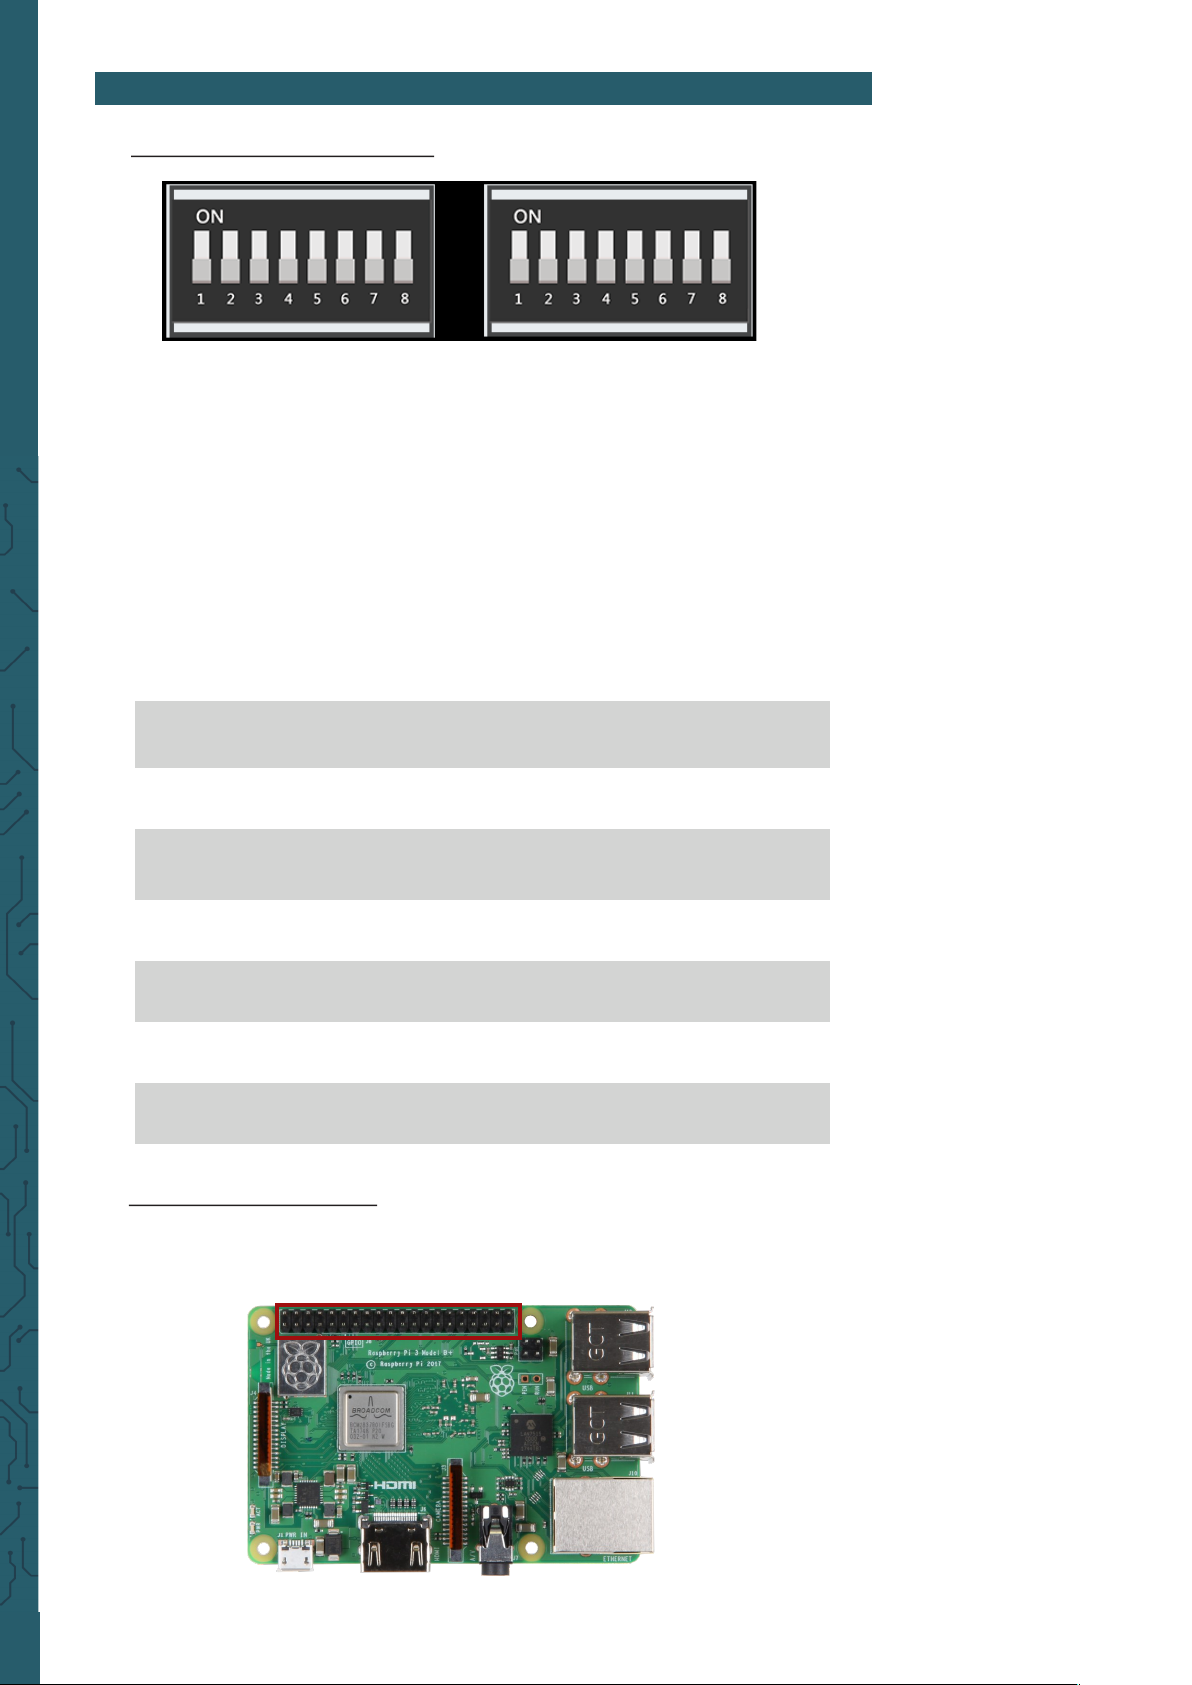
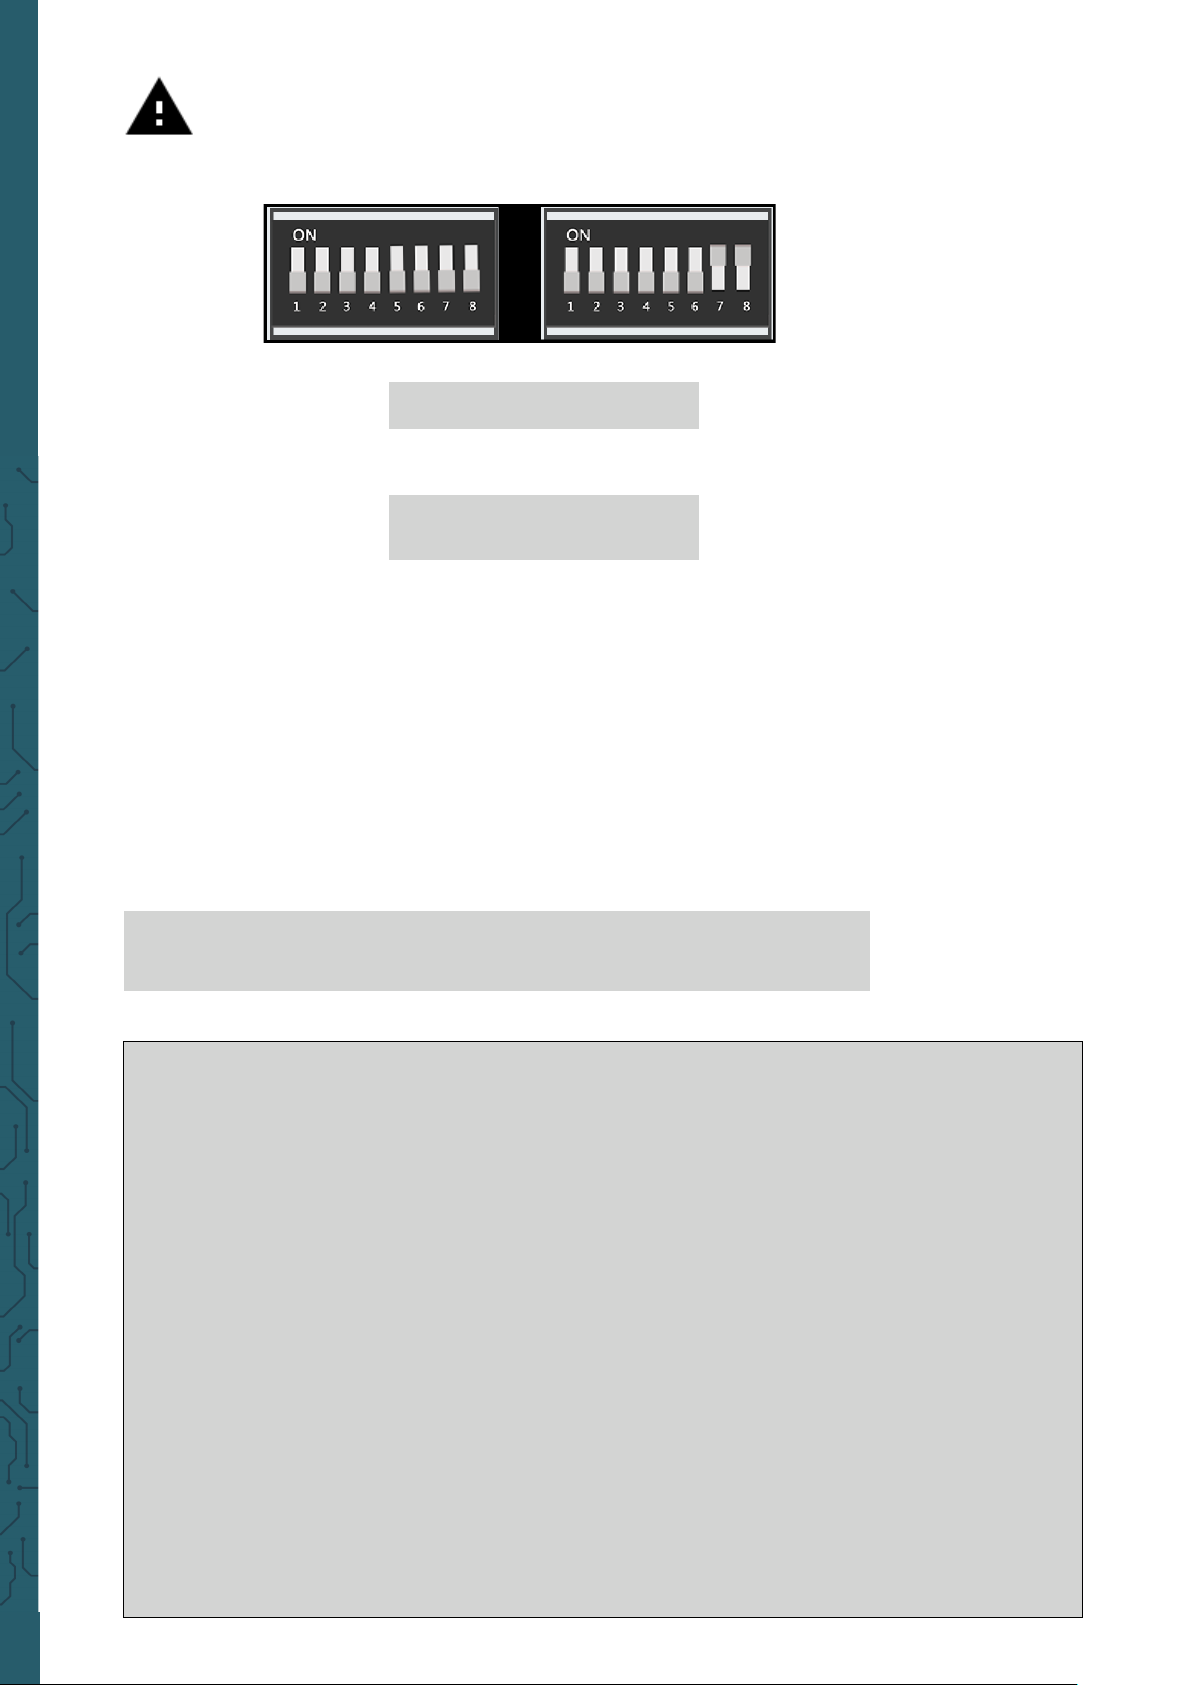
On the Joy-Pi board there are two switching units with 8 switches each.
The switches make it possible to switch between dierent sensors and
modules. Since the Raspberry Pi has only a limited number of GPIO pins,
these switches are needed to use more sensors and modules than GPIO
pins are available.
Using these switches is quite simple and will be needed in some of the
following lessons.
In the table you can see which switch switches which sensor or module.
Sensors / modules Switching unit Keys
Key matrix Le 1 - 8
Independent keys Le 5 - 8
Vibration module Right 1
Tilt sensor Right 2
Stepper motor Right 3, 4, 5, 6
Servo motor Right 7, 8
5.2 Usage of GPIOs
In the following we will explain in more detail what GPIO's are, how they
work and how they are controlled.
Page 10
www.joy-it.net
Pascalstr. 8 47506 Neukirchen-Vluyn
GPIO stands for:
General - purpose input / output (universal input /
output).
GPIO pins do not have a specific purpose. They can be configured as ei-
ther input or output and have a general purpose. This depends on what
you want to achieve.
Example input pin: Button
If the button is pressed, the signal will be transferred through the
input pin of the Raspberry Pi.
Example output pin: Buzzer
A signal will be sent via the output pin of the Raspberry Pi to the
buzzer to control it.
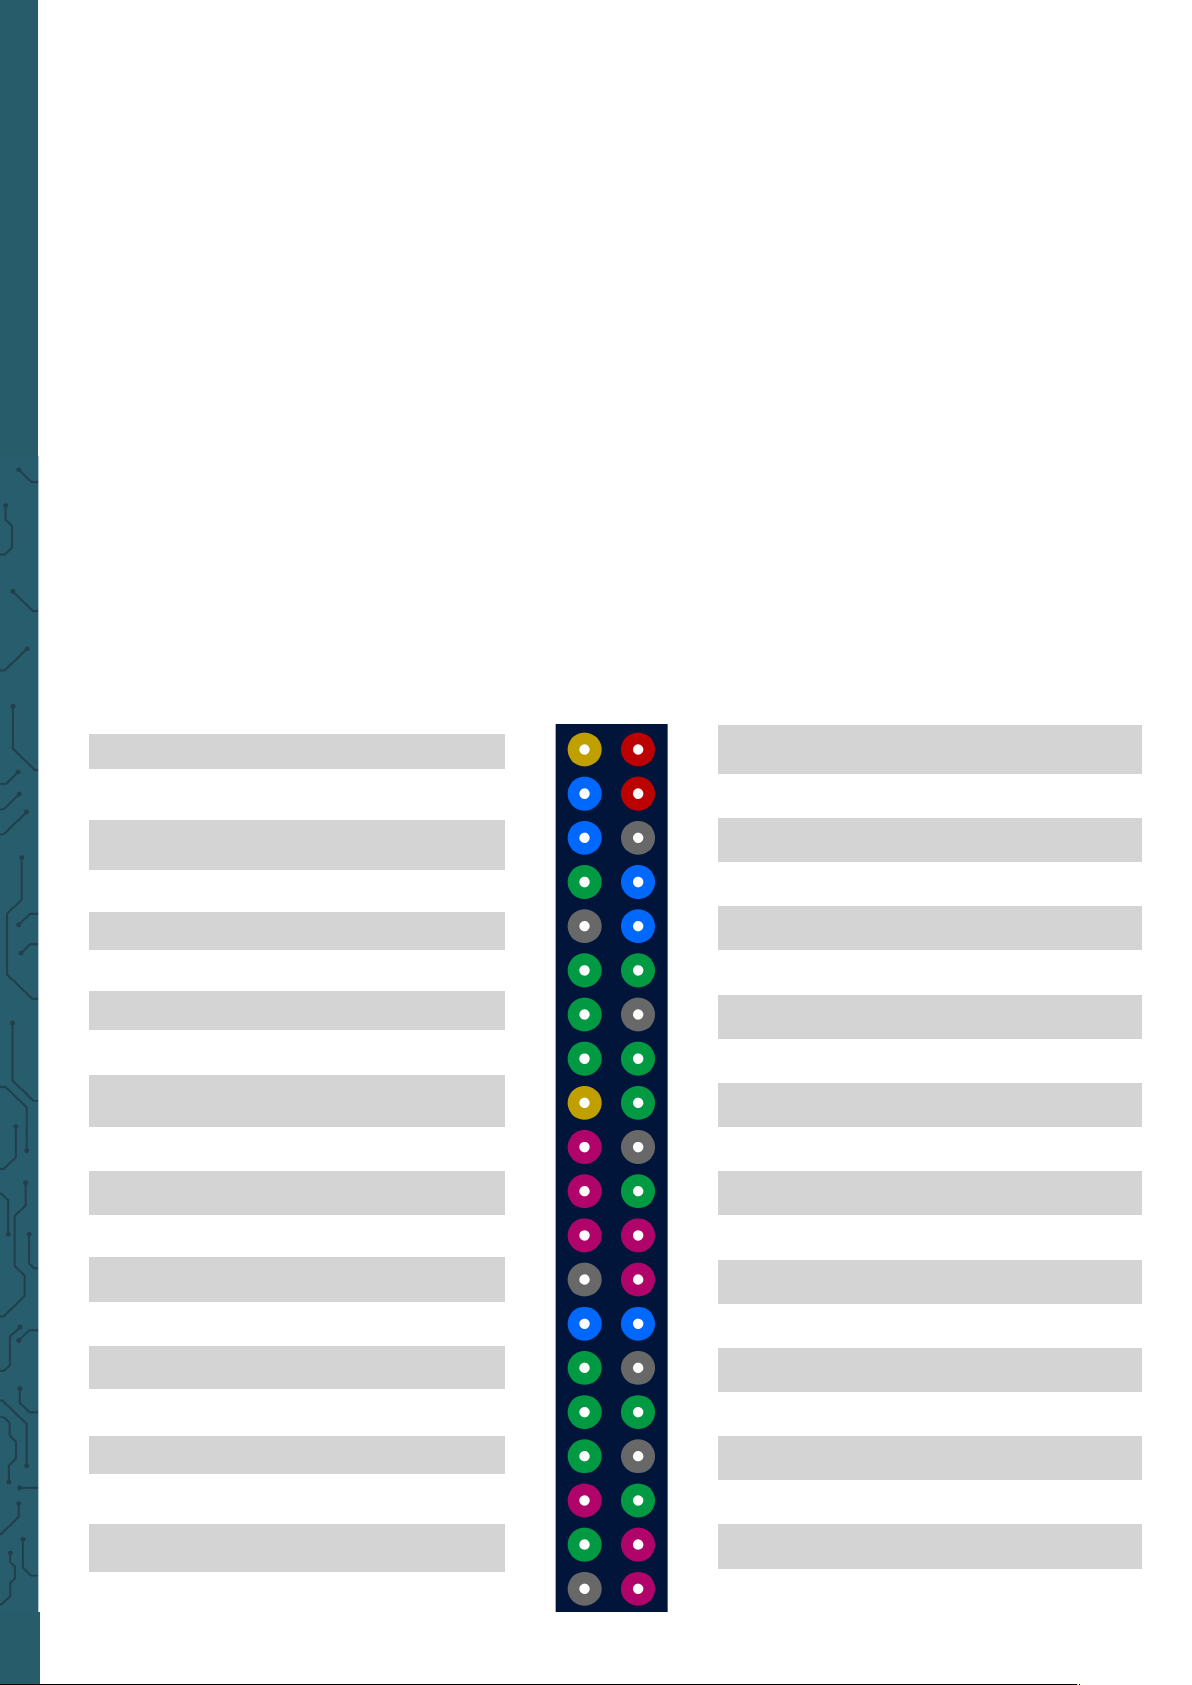
If you look on the opened Joy-Pi from the front, the GPIO pins will be on
the right side of the Raspberry Pi.
There are 2 possible schemata of the Raspberry Pi GPIO:
GPIO - BOARD and GPIO - BCM.
The GPIO - BOARD schemata that reference pins via the actual pin number. That means that the pin numbers of the following picture is used.
The schemata GPIO - BCM means that the pins reference
Broadcom SOC
Channel.
These are the numbers aer GPIO:
1 3.3 V DC
3 GPIO 2 (SDA1, I2C)
5 GPIO 3 (SCL1, I2C)
7 GPIO 4
9 Ground
11 GPIO 17
13 GPIO 27
15 GPIO 22
17 3.3 V
19 GPIO 10 (SPI, MOSI)
21 GPIO 9 (SPI, MISO)
23 GPIO 11 (SPI, CLK)
25 Ground
27 ID_SD (I2C, EEPROM)
29 GPIO 5
31 GPIO 6
33 GPIO 13
35 GPIO 19
37 GPIO 26
39 Ground
2 5 V DC
4 5 V DC
6 Ground
8 GPIO 14 (TXD0)
10 GPIO 15 (RXD0)
12 GPIO 18
14 Ground
16 GPIO 23
18 GPIO 24
20 Ground
22 GPIO 25
24 GPIO 8 (SPI)
26 GPIO 7 (SPI)
28 ID_SC
30 Ground
32 GPIO 12
34 Ground
36 GPIO 16
38 GPIO 20
40 GPIO 21
Page 11

www.joy-it.net
Pascalstr. 8 47506 Neukirchen-Vluyn
GPIO - BOARD Sensors and modules
1 3.3 V
2 5.0 V
3 I2C, SDA1 (Light sensor, LCD display, 7 segment display)
4 5.0 V
5 I2C. SCL1 (Light sensor, LCD display, 7 segment display)
6 Ground
7 DHT11 sensor
8 TXD0
9 Ground
10 RXD0
11 Touch sensor
12 Buzzer
13 Button matrix(ROW1), vibration motor
14 Ground
15 Button matrix (ROW2), tilt sensor
16 Motion sensor
17 3.3 V
18 Sonic sensor
19 SPI
20 Ground
21 SPI
22 Servo2, Button matrix (COL1), le button
23 SPI
24 RFID module
25 Ground
26 LED matrix
27
ID_SD (I2C, EEPROM (Electrically Erasable
Programmable Read - only Memory))
28 ID_SC
29 Stepper motor (STEP1), button matrix (ROW3)
30 Ground
31 Stepper motor (STEP2), button matrix (ROW4)
32 Ultrasonic sensor (Echo)
33
Stepper motor (STEP3), button matrix(COL4),
down button
34 Ground
35
Stepper motor (STEP4), button matrix (COL3),
right button
36 Ultrasonic sensor (TRIG)
37 Servo1, button matrix (COL2), up button
38 Infrared sensor
39 Ground
40 Relay
Page 12

www.joy-it.net
Pascalstr. 8 47506 Neukirchen-Vluyn
In our examples, we use the programming language
Python
to control
the GPIO pins. In Python exists a library which is known as RPi.GPIO. This
library is necessary to control the pins with Python.
The following example and comments in the code should help you to understand the program.
First, you have to import the required library with the import command.
The variable TOUCH and BUZZER references to the pins of the touch sensor and the buzzer. Aerwards, you define the connection with
GPIO.setmode(GPIO.BOARD)
as the used GPIO schemata. As the next
step, you configurate the earlier set variables with the command
GPIO.setup()
as input or rather output. Pin 11 (TOUCH) is set as input and
pin 12 (BUZZER) as output.
The main function queries if a touch has been detected by the touch sensor. If this is the case, the function do_smth will be executed.
This function prints the text
Touch detected
and sets the buzzer
HIGH
and one second later
LOW
again(buzzer will sum one second):
import RPi.GPIO as GPIO
import time #import libraries
import signal
TOUCH = 11 #declaring variables
BUZZER = 12
def setup_gpio(): #definition of inputs and outputs
GPIO.setmode(GPIO.BOARD)
GPIO.setup(TOUCH, GPIO.IN, pull_up_down=GPIO.PUD_UP)
GPIO.setup(BUZZER, GPIO.OUT)
def do_smt(channel): #function for the output if touch was dected
print(“Touch detected“) #and output that touch was detected
GPIO.output(BUZZER, GPIO.HIGH) #signal output
time.sleep (1) #wait 1 second
GPIO.output(BUZZER, GPIO.LOW) #stop signal output
def main():
setup_gpio()
try: #checking if touch is detected
GPIO.add_event_detect(TOUCH,GPIO.FALLING,callback=do_smt,bouncetime=200)
except KeyboardInterrupt: #CTRL + C exists the script
pass
finally:
GPIO.cleanup()
if _name_==‘_main_‘:
main()
To learn more about the purpose and usage of GPIO, we recommend that
you read the oicial documentation on that topic of GPIO pins which is
written by the Raspberry Pi Foundation.
https://www.raspberrypi.org/documentation/usage/gpio/
Page 13
www.joy-it.net
Pascalstr. 8 47506 Neukirchen-Vluyn
5.3 Soware installation for the Joy-Pi
On the included microSD card is a preinstalled operating system already
installed. If you want to rewrite the card, you can do it like described in
the following:
First of all, you should download the latest image file for the Joy-Pi from
our website www.joy-pi.net.
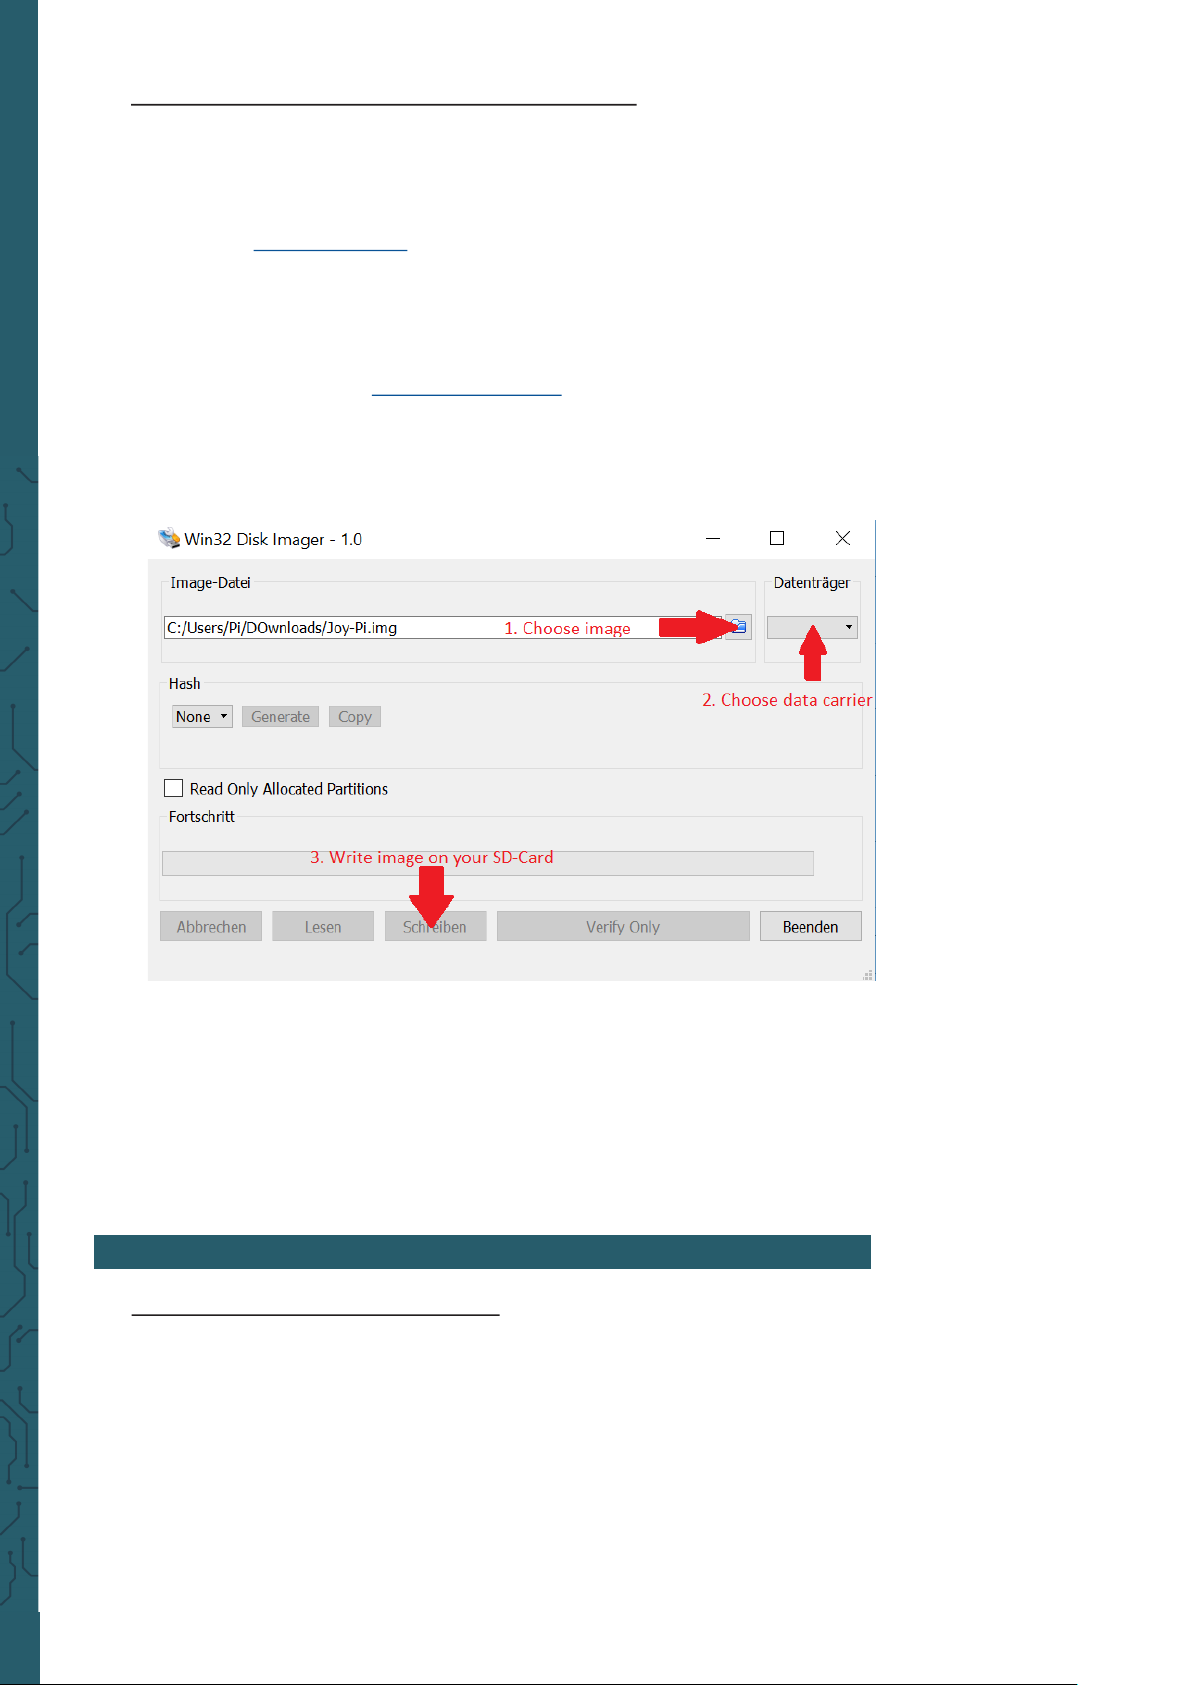
1. Download the image file (.zip format). Aer
unzipping the file, you get a file that ends with .img.
2. Connect your microSD card to your computer and format it with
the program SD formatter. A microSD card reader is included in the
scope of delivery.
3. Start the program Win32-Disk-Imager and choose
① the downloaded image file.
② the device which is to be written.
4. Now the card is written with the operating system and you can in-
sert it into the microSD card slot of the Raspberry Pi.
5. At the end, you have to edit the image to the size of your SD card.
Therefore, start the Raspberry Pi, open the terminal and enter
sudo raspi-config.
Click now on
Advanced Options
and aer that
Expand Filesystem
.
Aer a restart, the size of the image will be adjusted to your SD
card.
6. USAGE OF PYTHON AND LINUX
6.1 Download of code examples
This step is optional but it makes it easier to execute scripts without
having to create them individually. On our prepared image for the Joy-Pi
all code examples are already downloaded. So all scripts are already on
the desktop.
The scripts which are used in this guide can be downloaded directly from
a package. Therefore, follow the following instructions:
Page 14
www.joy-it.net
Pascalstr. 8 47506 Neukirchen-Vluyn
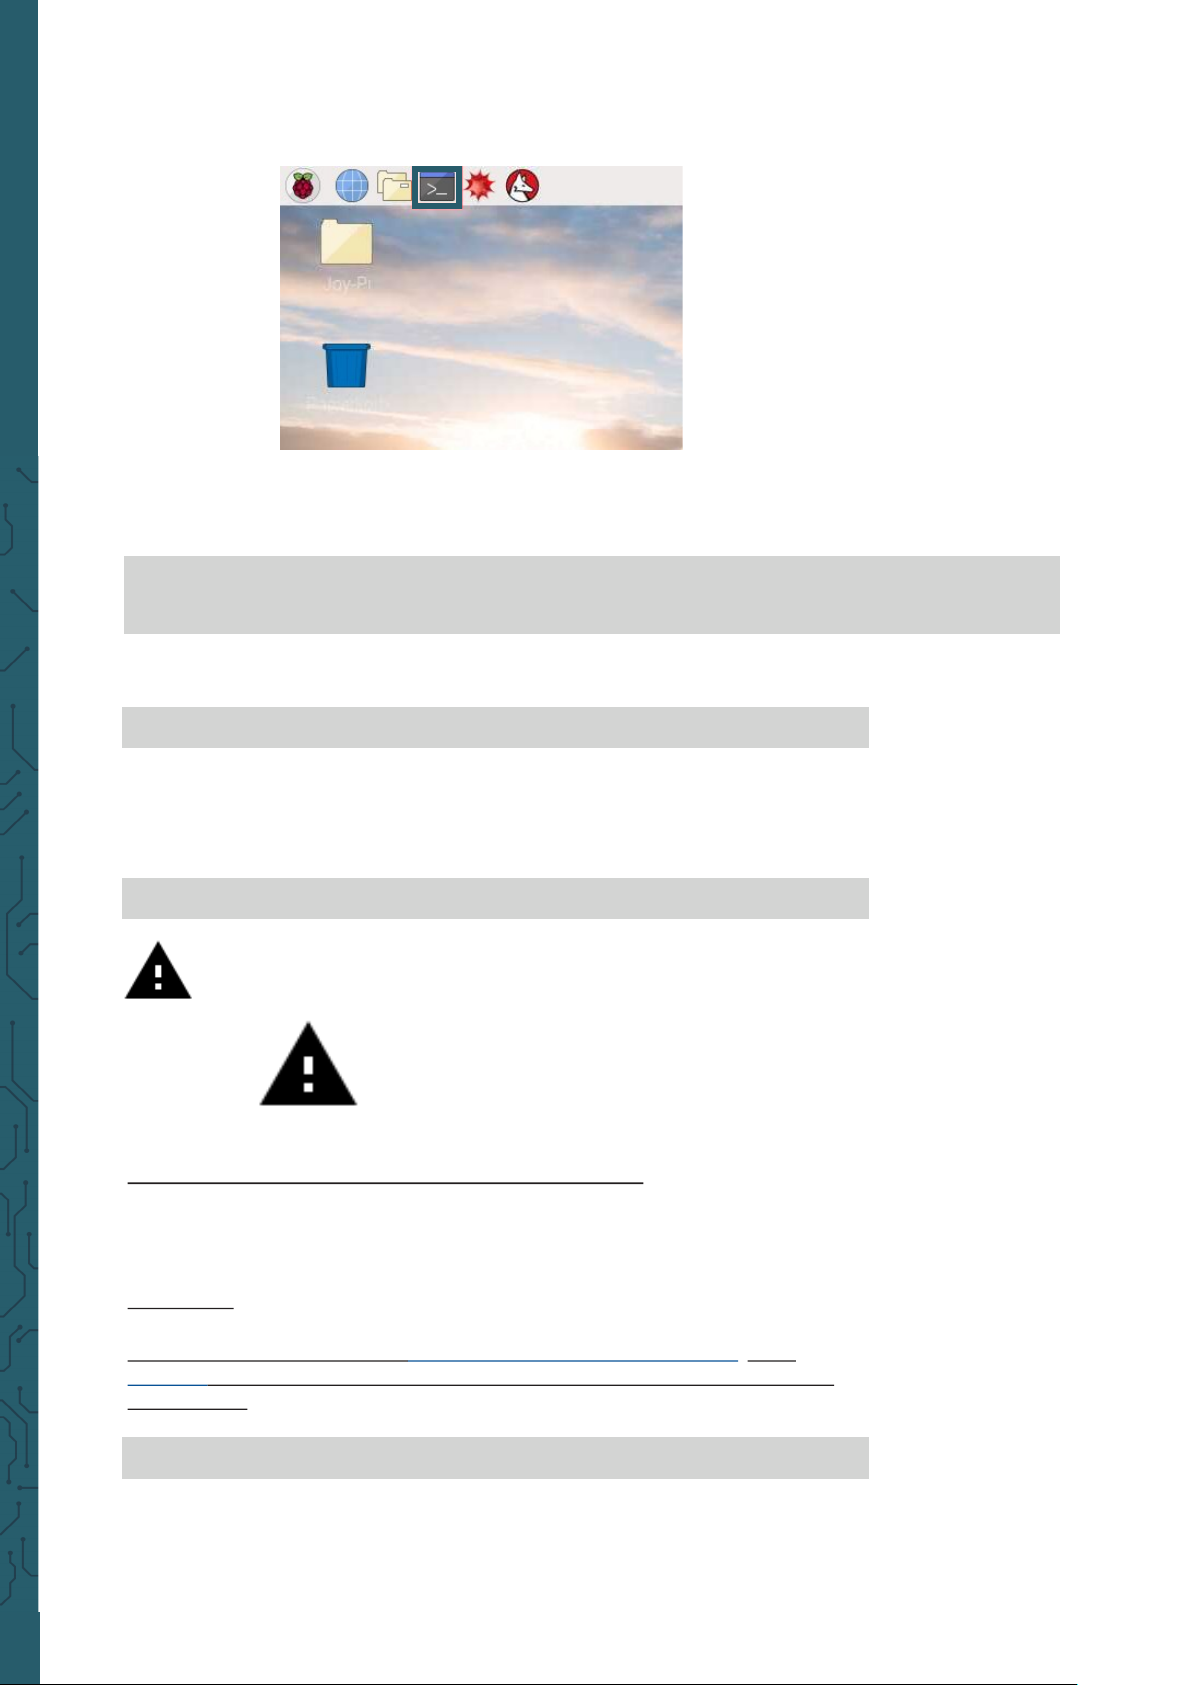
1. Open the Terminal. We will need this to perform most of our
Python scripts and to download scripts and expansions.
2. Aer we have successfully opened the terminal, we need to download the script archive to the desktop (included on the image) using
the following command
cd Desktop/
wget https://joy-pi.net/wp-content/uploads/2020/09/Joy-Pi.zip
3. Press Enter on your keyboard. Now you have to unzip the archive:
unzip Joy-Pi.zip
4. Press Enter again on your keyboard and wait until the process
succeeded.
5. With the command cd, you can change to the right folder to be able
to use the scripts which are placed there:
cd Joy-Pi
Attention! Every time you shut down your Joy-Pi, you must
repeat these steps to change the folder.
The login data is:
Username : pi
Password : 12345
6.2 Installation of the required libraries
If you are not using our prepared image, you can install the required
libraries as follows:
16x2 LCD
For the 16x2 LCD the library Adafruit_CircuitPython_CharLCD from
adafruit is used. Enter the following command into the terminal for the
installation:
sudo pip3 install adafruit-circuitpython-charlcd
Page 15
www.joy-it.net
Pascalstr. 8 47506 Neukirchen-Vluyn
Segment Anzeige
For the segment display the library Adafruit_Python_LED_Backpack from
adafruitis used. Enter the following commands into the terminal for the
installation:
sudo git clone https://github.com/adafruit/Adafruit_Python_LED_Backpack.git
cd Adafruit_Python_LED_Backpack/
sudo python3 setup.py install
LED-Matrix
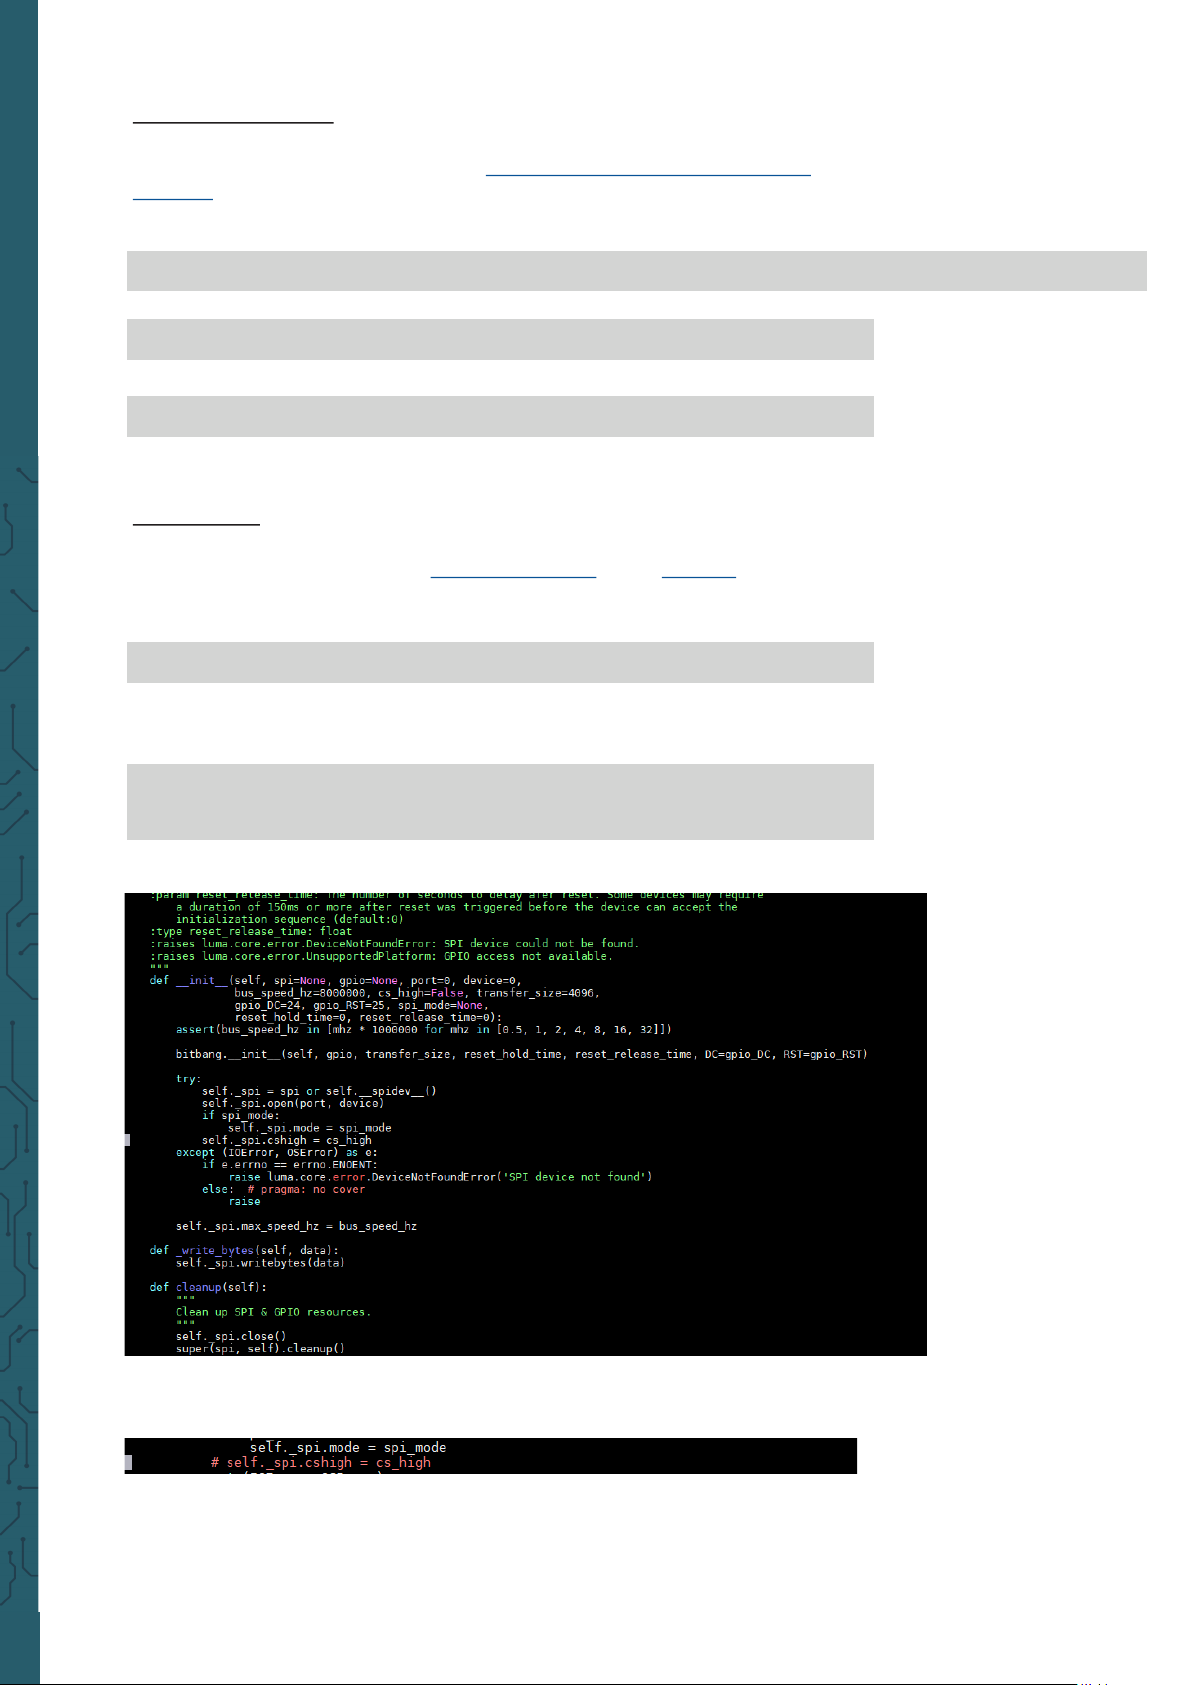
For the LED matrix the library luma.led_matrix from rm-hull is used. En-
ter the following command into the terminal for the installation:
In addition, you must comment out a line in the library by entering the
following command:
Suchen Sie nun folgende Stelle:
Comment the line: "self._spi.cshigh = cs_high" by inserting a # at the beginning of the line.
Save the changes with Ctrl + O and close the file with Ctrl + X.
sudo pip3 install luma.led_matrix
sudo nano "/usr/local/lib/python3.7/dist-packages/luma/
core/interface/serial.py"
Page 16
www.joy-it.net
Pascalstr. 8 47506 Neukirchen-Vluyn
6.3 Performing Python scripts
Aer we successfully downloaded our script, we would like to execute it.
Open the terminal again and follow the instructions below to run the
script:
1. Enter the command sudo python3 <script name> to perform
a Python script like for example:
sudo python3 buzzer.py
This command consist of 3 parts. Because of the command sudo , the following part of the command line will be performed with root right (admin
rights).python3 is the command of the programming language with the
same name, in which the scripts are written in. At the end of the
command, the name of the script is stated. Therefore, you should note
that you must be in the right folder in which the script is saved or the
indicated path (e.g. ~/Joy-Pi/buzzer.py).
IR-Sensor
For the IR-Sensor the library IR-Remote-Receiver-Python-Module from
owainm713 is used. Enter the following commands into the terminal for
the installation:
You can save the file IRModule.py in your library folder under "/usr/lib/
python3.7/IRModule.py". This allows you to run the sample script from
any folder. You can use this command to do this:
sudo git clone https://github.com/owainm713/IR-RemoteReceiver-Python-Module.git
sudo mv "/home/pi/IR-Remote-Receiver-Python-Module/
IRModule.py" "/usr/lib/python3.7/IRModule.py"
DHT11
For the DHT11 the library DHT11_Python from szazo is used. Enter the
following command into the terminal for the installation:
sudo pip3 install Adafruit_DHT
Note that also the last command must be entered as just one line.
sudo git clone https://github.com/lthiery/SPI-Py.git
cd SPI-Py/
sudo python3 setup.py install
sudo git clone --single-branch --branch python3-spi-updates https://
github.com/lucassarcanjo/MFRC522-python.git
RFID-MFRC522
For the RFID Module the library MFRC522-python from lucassarcanjo is
used. Furthermore the library SPI-Py from lthiery is required. Enter the
following commands into the terminal for the installation:
Page 17
www.joy-it.net
Pascalstr. 8 47506 Neukirchen-Vluyn
7. LESSON
Lesson 1 : Using the buzzer for warning sounds
In the previous explanation, we learned how to use the GPIO pin both as
output and input. To test this now, we go ahead with a real example and
apply our knowledge from the previous lesson. The module we will use is
the Buzzer.
We will use the GPIO output to send a signal to the buzzer and to close
the circuit, to generate a loud buzz. Then we will send another signal to
turn it o.
The buzzer is located on the right side of the Joy-Pi-Board and is easily
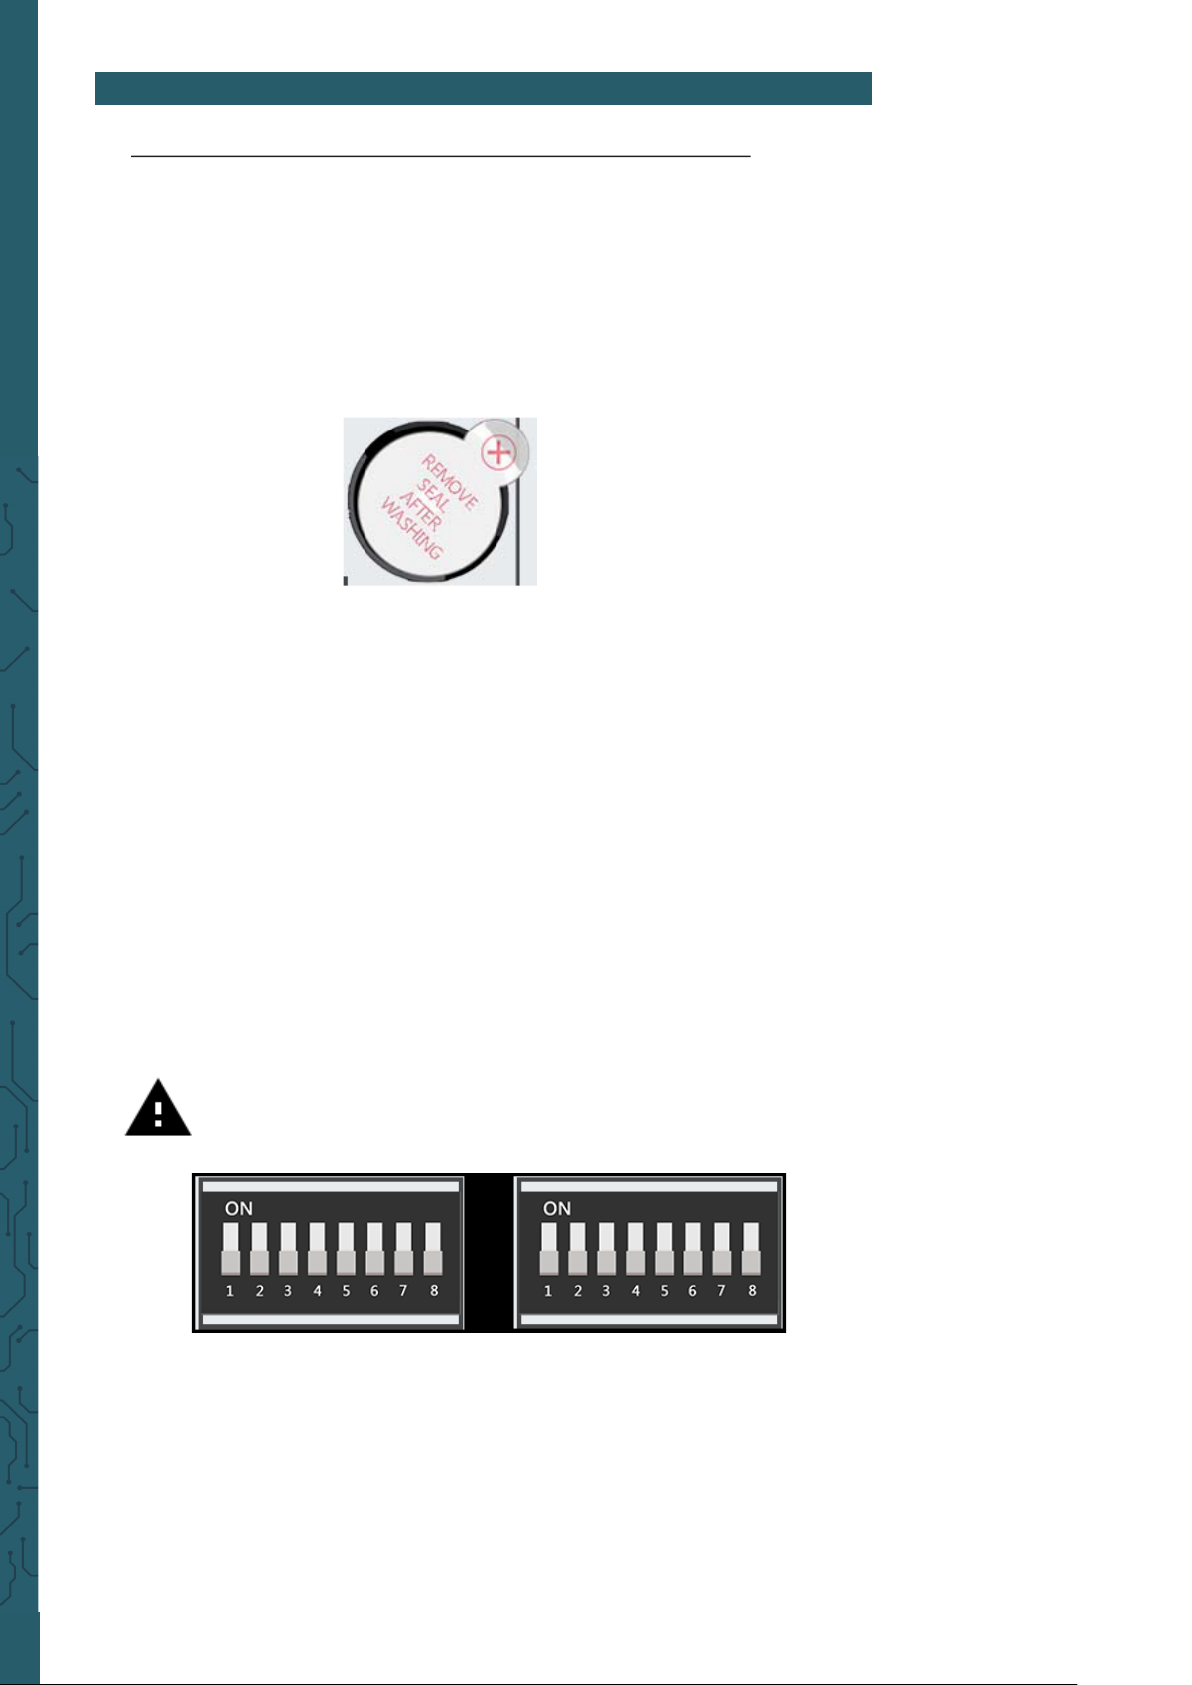
recognized by the loud noise that it will make when activated. When you
use your Joy-Pi for the first time, the buzzer may have a protective sticker
on it. Make sure this sticker has been removed before using the Buzzer.
Just like in the previous example, we have prepared a special script with
detailed comments that will explain how the whole buzzer process
works, and how we can control the buzzer with the GPIOs.
First, we import the RPi.GPIO library and the time library. Then we
configure the buzzer. At pin 12 we set the GPIO mode to GPIO BOARD and
the pin as OUTPUT.
We output a signal for 0.5 seconds and then turn it o.
Attention! In this example, you have to switch all switches on
the le as well as on the right OFF.
Page 18
www.joy-it.net
Pascalstr. 8 47506 Neukirchen-Vluyn
#!/usr/bin/python
import RPI.GPIO as GPIO #import the required librarys
import time
buzzer_pin = 12 #define buzzer pin
GPIO.setmode(GPIO.BOARD)
GPIO.setup(buzzer_pin, GPIO.OUT)
GPIO.output(buzzer_pin, GPIO.HIGH) #make buzzer sound
time.sleep(0.5) #wait 0.5 seconds
GPIO.output(buzzer_pin, GPIO.LOW) #stop buzzer sound
GPIO.cleanup()
Execute the following commands and try it yourself:
cd /home/pi/Desktop/Joy-Pi
sudo python3 buzzer.py
Lesson 2 : Controlling the buzzer with key inputs
Aer successfully demonstrating how to turn the buzzer on and o, it is
time to make things a little more exciting. In this lesson, we will combine
a button with the buzzer so that the buzzer is only turned on by pressing
the button.
This time we will use 2 GPIO setups. One will be the GPIO.INPUT, which
takes the button as an input, another will be the GPIO.OUTPUT, which
sends a signal to the buzzer to output a sound.
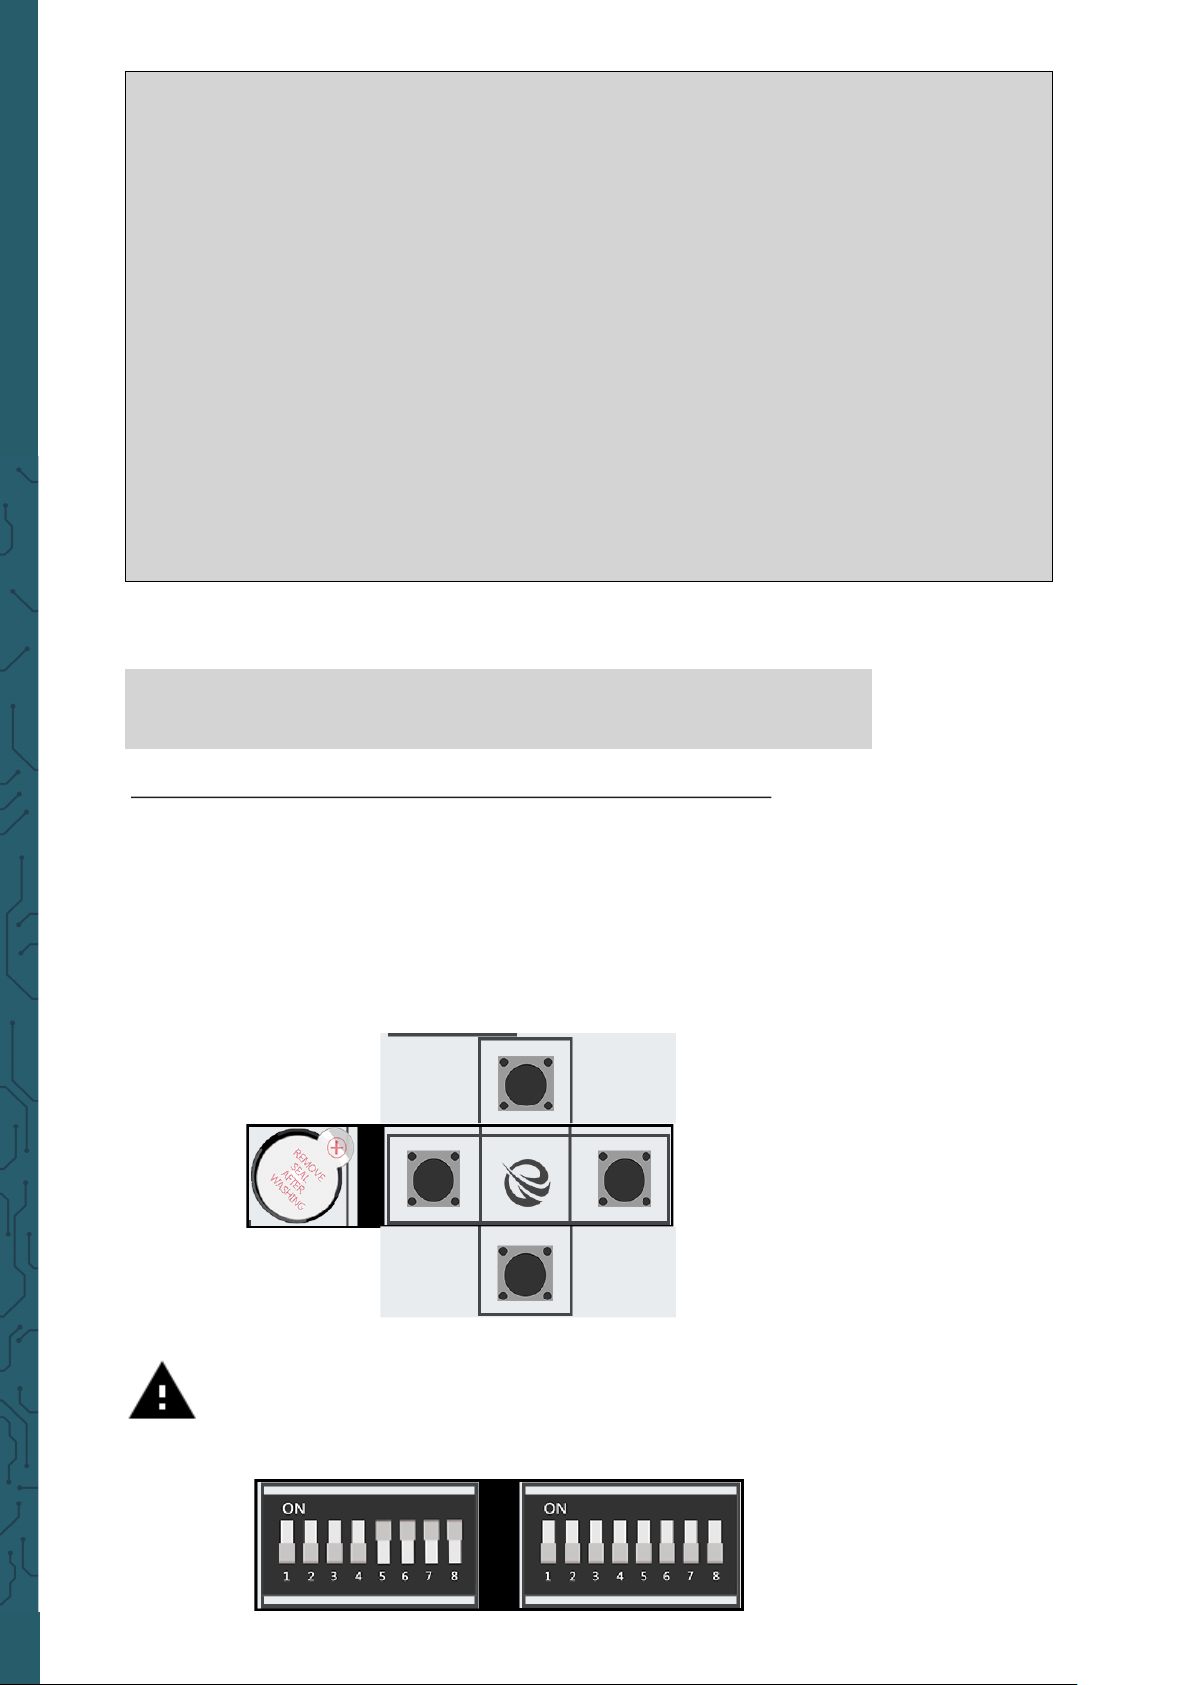
Attention! For this example, you have to switch between the
modules. Turn switch numbers 5, 6, 7 and 8 on the le switching
unit ON. All the other switches should be turned OFF.
Page 19

www.joy-it.net
Pascalstr. 8 47506 Neukirchen-Vluyn
In our example we use the upper of the 4 keys on the lower le side.
Theoretically, however, any of the 4 keys can be used. If you still want to
use another key, you have to change the pin assignment accordingly.
GPIO37 Upper button
GPIO33 Lower button
GPIO22 Le button
GPIO35 Right button
For this part of our tutorial we need to use 2 GPIO settings. One input and
one output. The GPIO input is used to determine when a key was pressed
and the GPIO output is used to activate the buzzer when that key is
pressed.
If you press the button on your Joy-Pi, the buzzer does a sound! Release
the key and the buzzer will stops. The programm will be performed as
long as CTRL + C is not beeing pressed.
Code example:
#!/usr/bin/python
import RPI.GPIO as GPIO #import necessary libraries
import time
#define pins
button_pin = 37
buzzer_pin = 12
#set board mode to GPIO.BOARD
GPIO.setmode(GPIO.BOARD)
#setup button_pin as input and buzzer_pin as output
GPIO.setup(button_pin, GPIO.IN, pull_up_down=GPIO.PUD_UP)
GPIO.setup(buzzer_pin, GPIO.OUT)
try:
while True:
#check if button pressed
if (GPIO.input(button_pin) == 0):
#set buzzer on
GPIO.output(buzzer_pin, GPIO.LOW)
else:
#button is not pressed, set buzzer off
GPIO.output(buzzer_pin, GPIO.LOW)
except KeyboardInterrupt:
GPIO.cleanup()
Page 20
www.joy-it.net
Pascalstr. 8 47506 Neukirchen-Vluyn
Execute the following commands and try it yourself:
Lesson 3 : How a relay is working and how to control it
cd /home/pi/Desktop/Joy-Pi
sudo python3 button_buzzer.py
Now that we know everything we need to know about the buzzer, it is
time for the next lesson. Now we will learn how to use the relay, what the
function of the relay is and how to control it.
Simplified a relay is a switch that can be turned on and o with the help
of GPIO pins. Relays are used to control a circuit through a separate low
power signal or in case that more than circuit must be controlled through
one signal. In our example, we show you how a GPIO signal is sent to
close the relay to activate an individual circuit and how to sent another
signal, to open the relay and to deactivate the circuit.
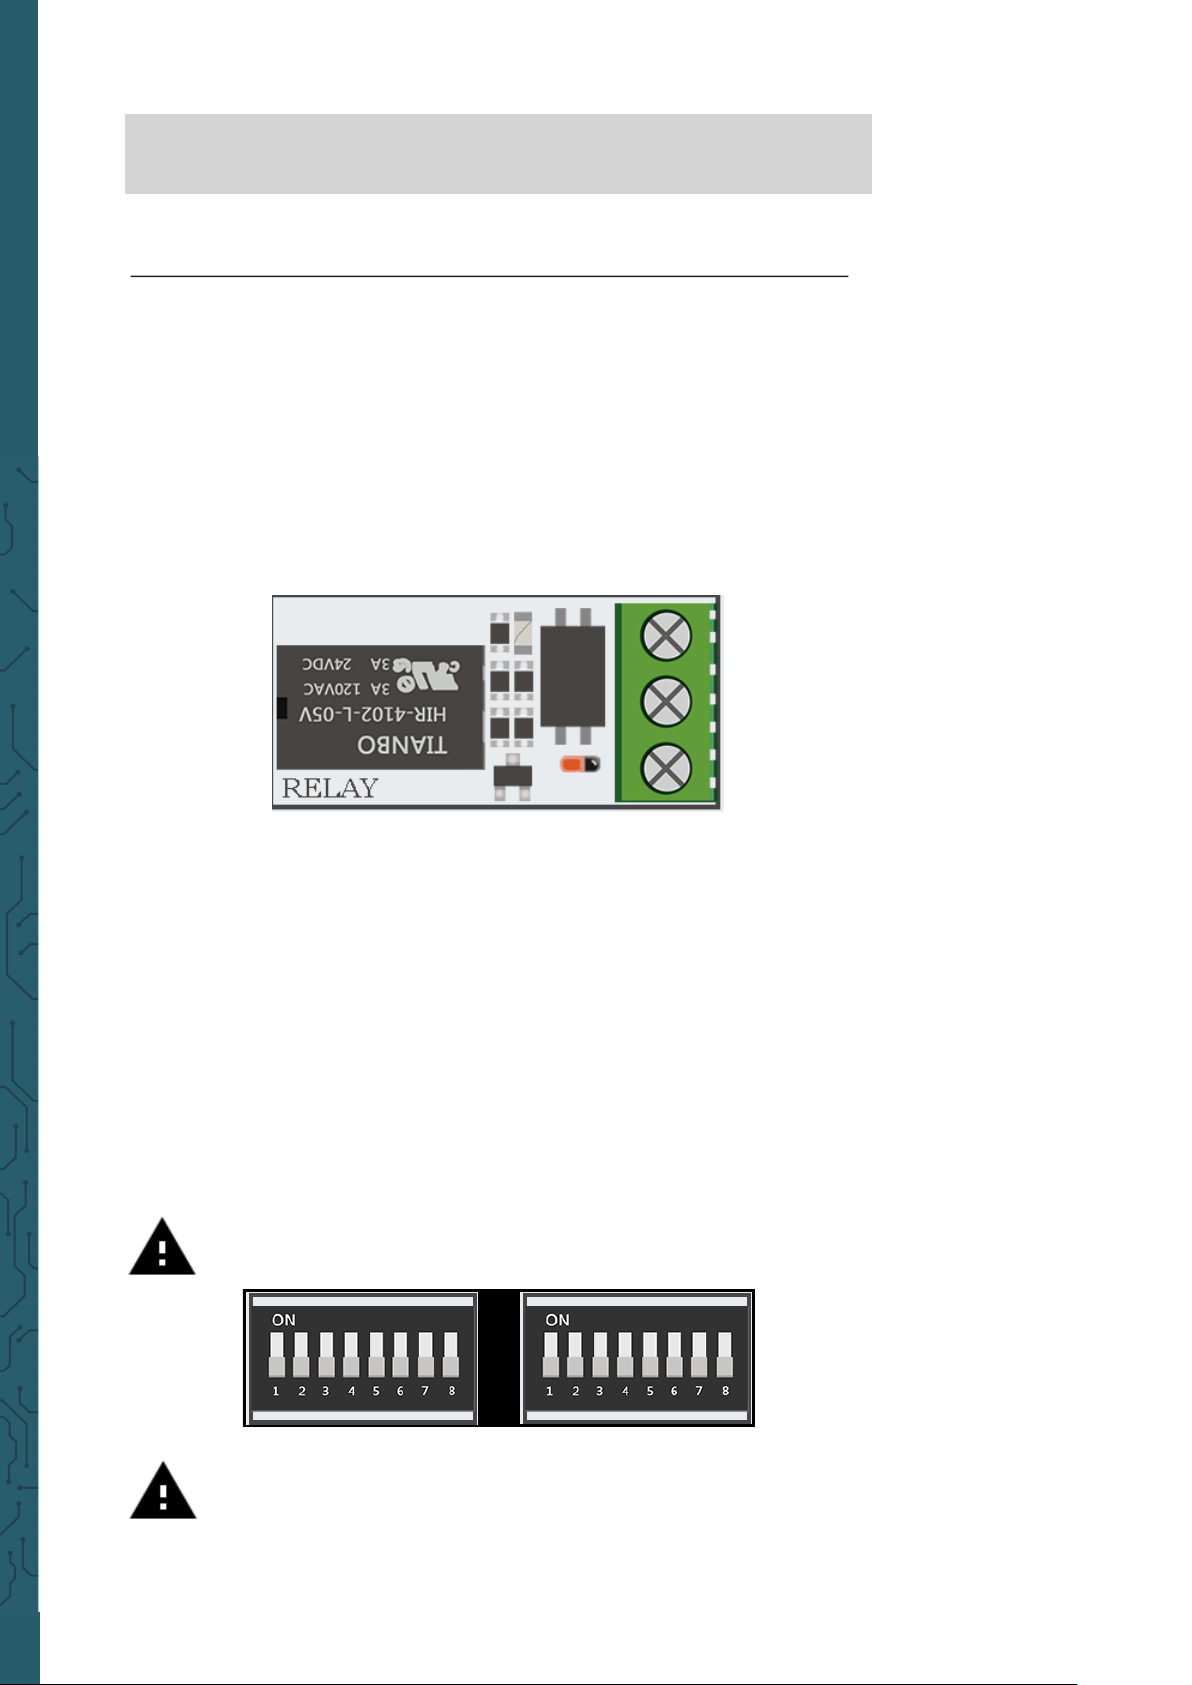
The relay is located in the middle, lower part of the board, next to the key
matrix. It has 3 inputs of which we will use 2 in this example. NC means
normally closed
, NO means
normally open
and COM means
common
.
Common
means, in this case, the common ground.
If a circuit is connected to NC and COM, the circuit is closed if the control
current circuit has not any voltage (GPIO.LOW). If the control current has
a voltage (GPIO.HIGH), the relay opens the connection of the operating
current circuit and the current flow will be stopped
The usage of NO and COM is exactly the opposite. If the control current
circuit has no current (GPIO.LOW), the relay is opened and the operating
current circuit is interrupted. If the control current circuit is supported by
current (GPIO.HIGH), the relay closes the operating current and the current flows.
Attention! In this example you have to switch all switching units
on the le as well as all on the right OFF.
Attention! It is essential that you do not try to connect high
voltage devices to the relay (e.g. table lamp, coee machine,
etc.) This could cause electric shocks and serious injuries.
Page 21
www.joy-it.net
Pascalstr. 8 47506 Neukirchen-Vluyn
Execute the following commands and try it yourself:
#!/usr/bin/python
import RPI.GPIO as GPIO
import time
#define relay pin
relay_pin = 40
#set GPIO mode as GPIO.BOARD
GPIO.setmode(GPIO.BOARD)
#setup relay_pin as OUTPUT
GPIO.setup(relay_pin, GPIO.OUT)
#open relay
GPIO.output(relay_pin, GPIO.LOW)
#wait haf a second
time.sleep(0.5)
#close relay
GPIO.output(relay_pin, GPIO.HIGH)
GPIO.cleanup()
cd /home/pi/Desktop/Joy-Pi
sudo python3 relay.py
Lesson 4 : Sending a vibration signal
Have you ever wondered how your phone vibrates when someone calls
you or when you receive a message? We built exactly the same module
into our Joy-Pi and now we will learn how to use it.
The vibration module is located on the right side of the LED matrix and
below the segment LED. If it is on, it is diicult to tell where the vibration
is coming from because it feels like the whole Joy-Pi board is vibrating.
The vibration module uses a GPIO.OUTPUT signal just like the Buzzer and
other modules previously used. If you send an output signal, the module
will start vibrating. If you stop the signal with GPIO.LOW, the
vibration will stop.
You can adjust the vibration length with dierent time.sleep() intervals.
Try it yourself and maybe you can expand this example.
Page 22
www.joy-it.net
Pascalstr. 8 47506 Neukirchen-Vluyn
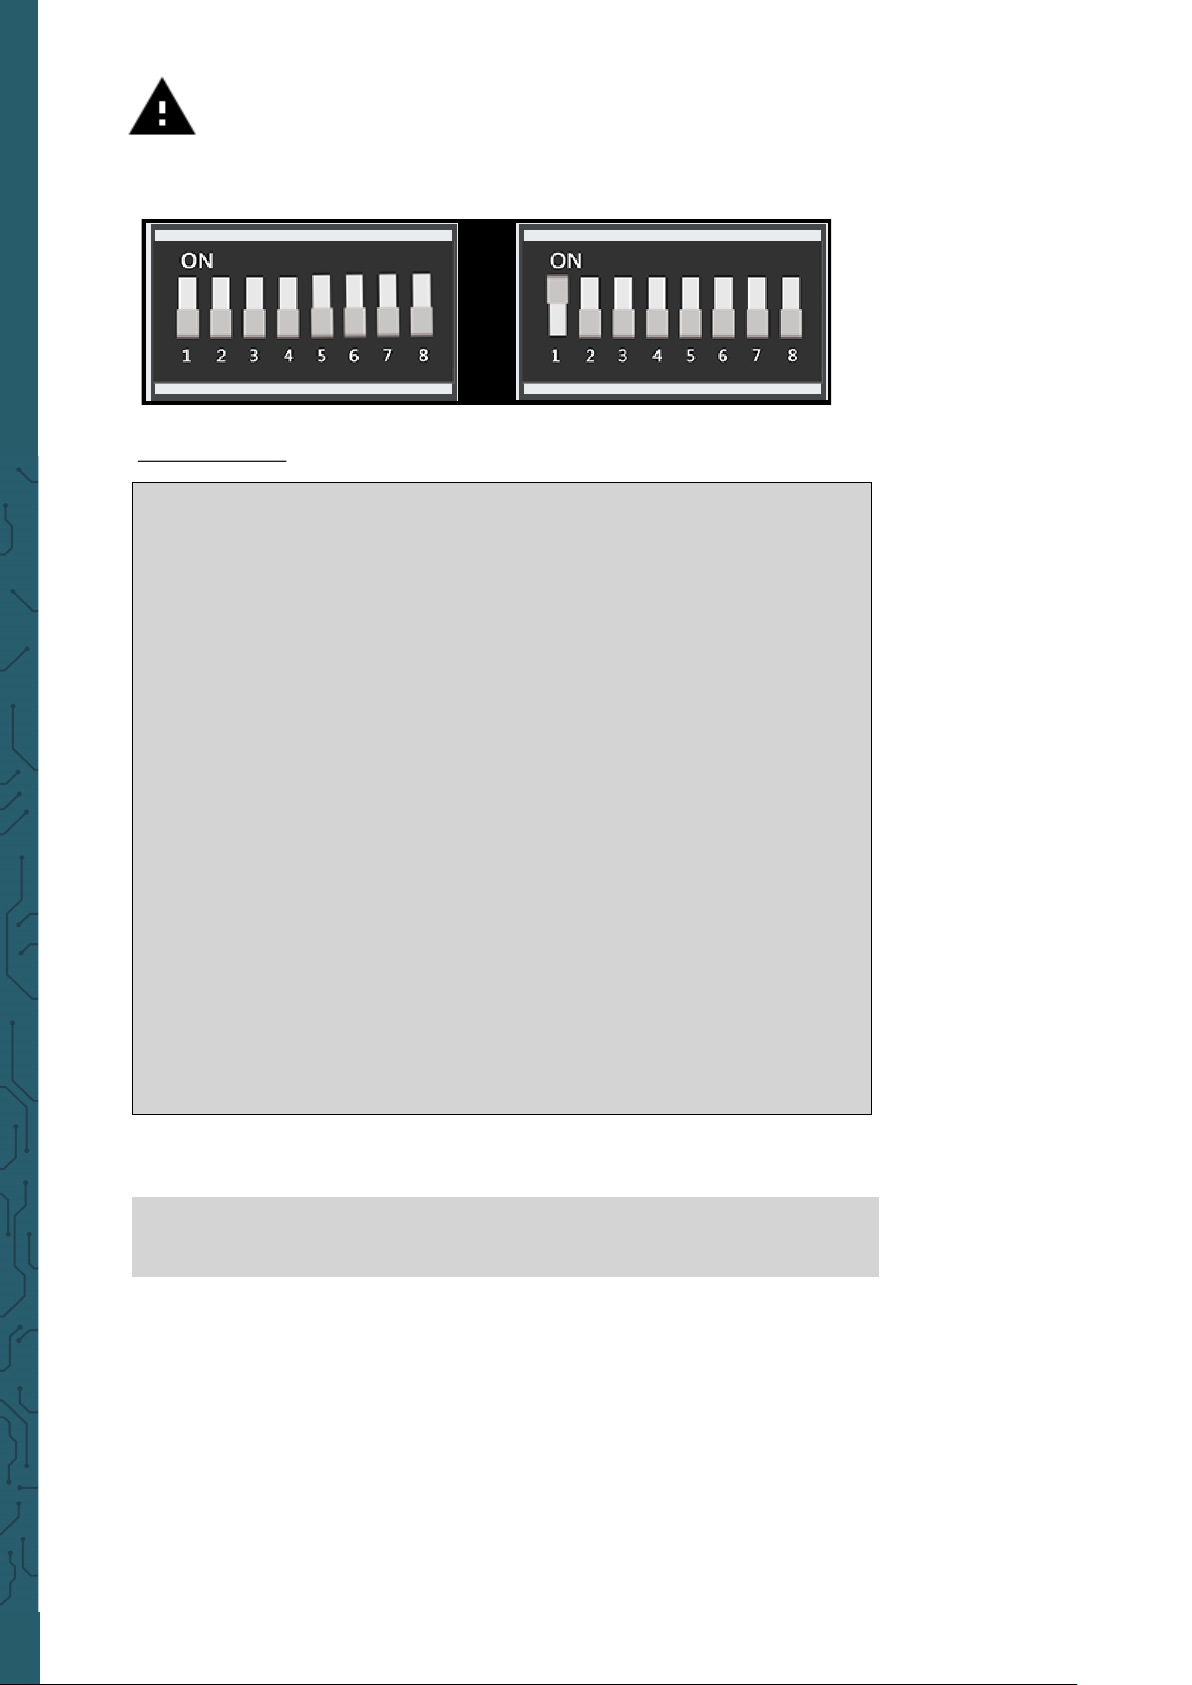
Attention! For this example you have to switch between the
modules. Turn switch number 1 on the right switching unit ON.
All the other switches should be turned OFF.
Code example:
#!/usr/bin/python
import RPI.GPIO as GPIO
import time
#define vibration pin
vibration_pin = 13
#set board mode to GPIO.BOARD
GPIO.setmode(GPIO.BOARD)
#setup vibration pin to OUTPUT
GPIO.setup(vibration_pin, GPIO.OUT)
#turn on vibration
GPIO.output(vibration_pin, GPIO.HIGH)
#wait one second
time.sleep(1)
#clean up GPIO
GPIO.output(vibration_pin, GPIO.LOW)
GPIO.cleanup()
Execute the following commands and try it yourself:
cd /home/pi/Desktop/Joy-Pi
sudo python3 vibration.py
Page 23
www.joy-it.net
Pascalstr. 8 47506 Neukirchen-Vluyn
Lesson 5 : Detecting noises with sound sensor
In this lesson, we will learn how to use the sound sensor to make inputs,
detect loud noises and react accordingly. So you can build your own
alarm system that detects loud noises or turn on an LED by clapping!
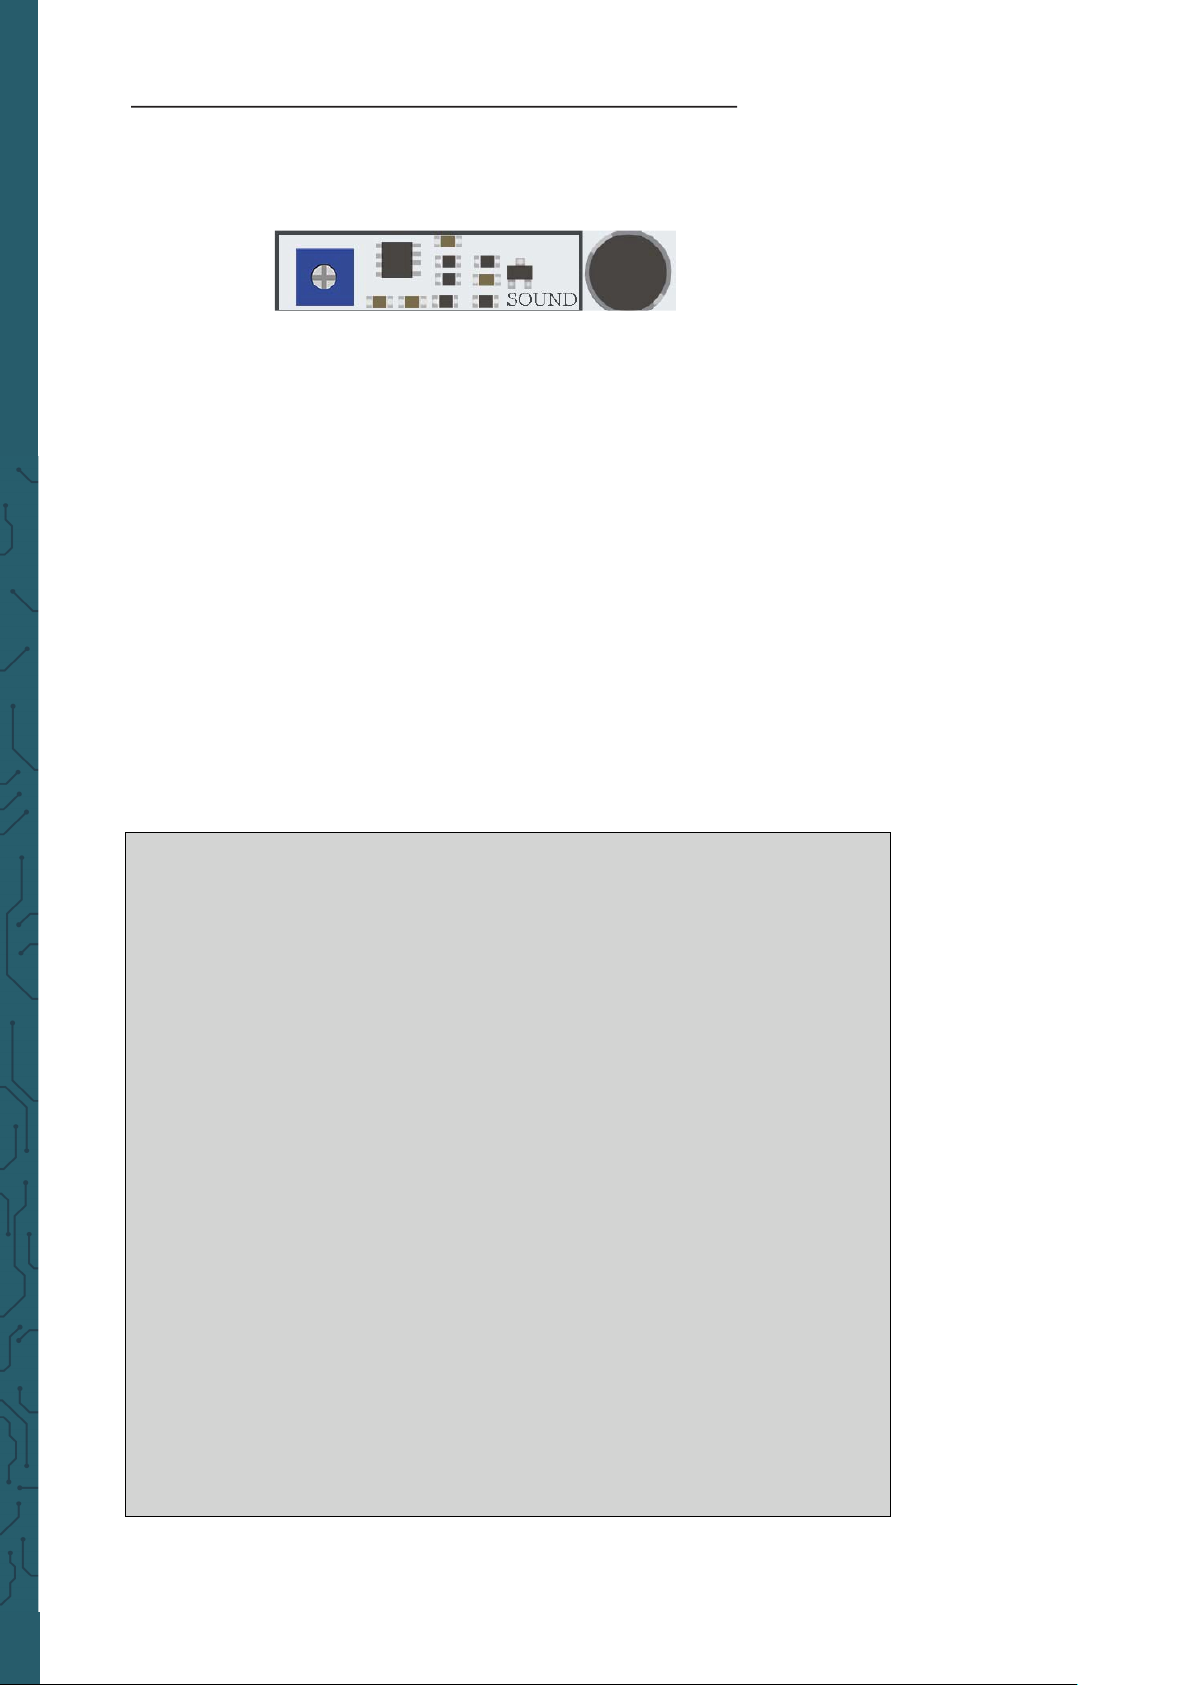
The sound sensor consists of two parts: a blue potentiometer, which
regulates the sensitivity, and the sensor itself, which detects the input of
sounds. The sound sensor can be easily recognized by the blue
potentiometer and the sensor itself is located on the right under the
buzzer.
With the help of the potentiometer we can regulate the sensitivity of the
sensor. For our script to work, we must first learn how to control the sensitivity. To adjust the sensitivity you have to turn the small screw on the
potentiometer with a screwdriver to the le or right. The best way to test
the sensitivity is to run the script. Clap your hands and see if the device is
receiving a signal. If no signal is received this means that the sensitivity of
the sensor is not set high enough. This can be easily corrected by turning
the potentiometer.
#!/usr/bin/python
import RPI.GPIO as GPIO
import time
#define sound_pin
sound_pin = 18
#set GPIO mode to GPIO.BOARD
GPIO.setmode(GPIO.BOARD)
#setup sound_pin as INPUT
GPIO.setup(sound_pin, GPIO.IN, pull_up_down=GPIO.PUD_UP)
try:
while True:
#check if sound detected or not
if(GPIO.input(sound_pin)==GPIO.LOW):
print(‘Sound detected‘)
time.sleep(0.1)
except KeyboardInterrupt:
#CTRL+C detected, cleanning and quitting the script
GPIO.cleanup()
Page 24
www.joy-it.net
Pascalstr. 8 47506 Neukirchen-Vluyn
First, we define our pin GPIO 18. Aerwards, we set a while loop to run
this script permanently. We check if we have received an input from the
sound sensor indicating that loud noises have been detected and then
we print
Sound detected
.
If you press CTRL + C, the programm will be closed.
Execute the following commands and try it yourself:
cd /home/pi/Desktop/Joy-Pi
sudo python3 sound.py
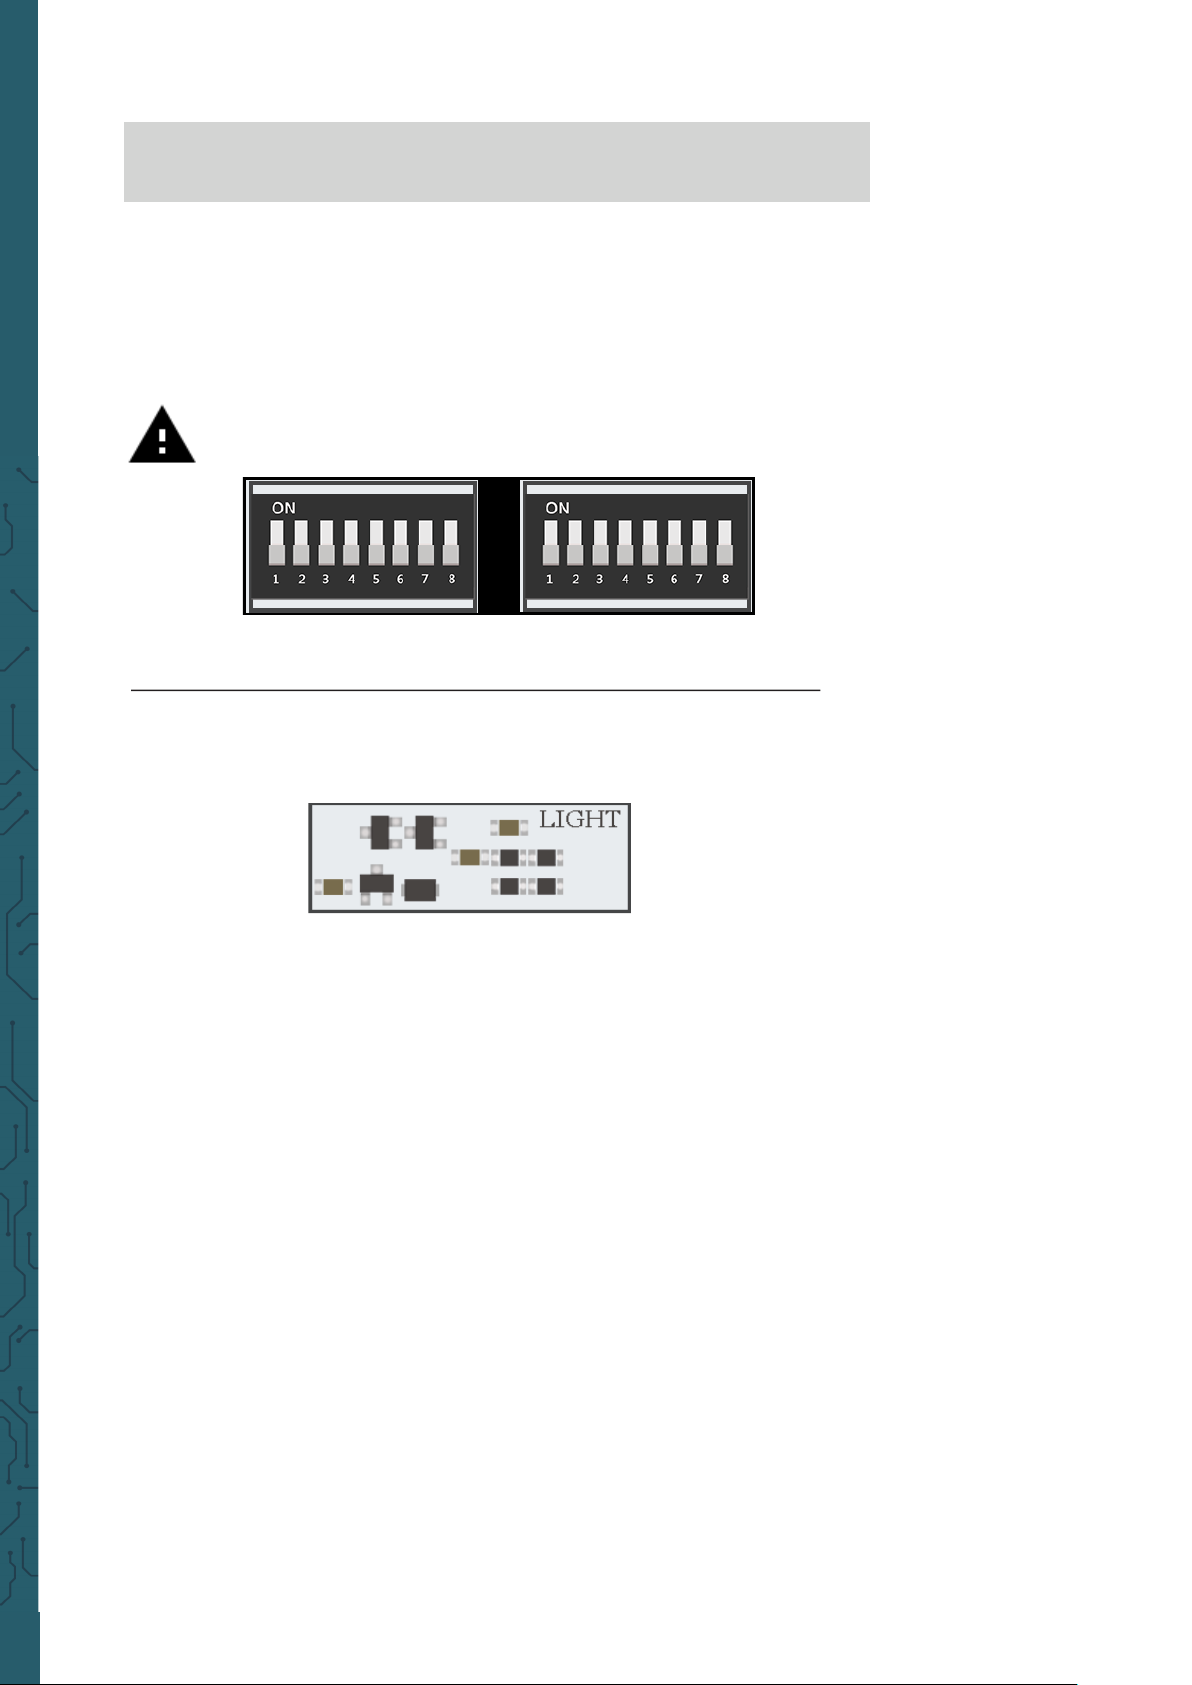
Attention! In this example you have to switch all switching units
on the le as well as all on the right OFF.
Lesson 6 : Detecting brightness with the light sensor
The light sensor is one of our favorites. It is extremely useful in many
projects and situations, e.g. with lamps that switch on automatically as
soon as it gets dark. With the light sensor we can see how bright the
module surface is.
The light sensor is diicult to detect because it consists of very small
parts. The sensor is to the le of the buzzer. If you cover it with your
finger, the output of the light sensor should be close to zero, as no light
can reach it.
It is time to test it in real time and see how it works. However, the light
sensor is a little dierent from other sensors because it works with I2C
and not with the normal GPIOs as we learned in the lessons before.
In this script we use a function to communicate with the sensor, this way
we can get the wished output with the brightness. The higher the displayed number, the brighter is the surrounding.
Page 25

www.joy-it.net
Pascalstr. 8 47506 Neukirchen-Vluyn
#!/usr/bin/python
# -*- coding: utf-8 -*-
# Author: Matt Hawkins
# Author's Git: https://bitbucket.org/MattHawkinsUK/
# Author's website: https://www.raspberrypi-spy.co.uk
import RPi.GPIO as GPIO
import smbus
import time
if(GPIO.RPI_REVISION == 1):
bus = smbus.SMBus(0)
else:
bus = smbus.SMBus(1)
class LightSensor():
def __init__(self):
#define some constants from the datasheet
self.DEVICE = 0x5c #default device I2C address
self.POWER_DOWN = 0x00 #no active state
self.POWER_ON = 0x01 #power on
self.RESET = 0x07 #reset data register value
#start measurement at 4 Lux
self.CONTINUOUS_LOW_RES_MODE = 0x13
#start measurement at 1 Lux
self.CONTINUOUS_HIGH_RES_MODE_1 = 0x10
#start measurement at 0.5 Lux
self.CONTINUOUS_HIGH_RES_MODE_2 = 0x11
#start measurement at 1 Lux
#device is automatically set to power down mode after measurement
self.ONE_TIME_HIGH_RES_MODE_1 = 0x20
#start measurement at 0.5 Lux
#device is automatically set to power down mode after measurement
self.ONE_TIME_HIGH_RES_MODE_2 = 0x21
#start measurement at 4 Lux
#device is automatically set to power down mode after measurement
self.ONE_TIME_LOW_RES_MODE = 0x23
def convertToNumber(self, data):
#Simple function to convert 2 Bytes of data
#into a decimal number
return ((data[1] + (256 * data[0])) / 1.2)
def readLight(self):
data = bus.read_i2c_block_data(self.DEVICE,self.ONE_TIME_HIGH_RES_MODE_1)
return self.convertToNumber(data)
def main():
sensor = LightSensor()
try:
while True:
print("Light Level : " + str(sensor.readLight()) + " lx")
time.sleep(0.5)
except KeyboardInterrupt:
pass
if __name__ == "__main__":
main()
Page 26
www.joy-it.net
Pascalstr. 8 47506 Neukirchen-Vluyn
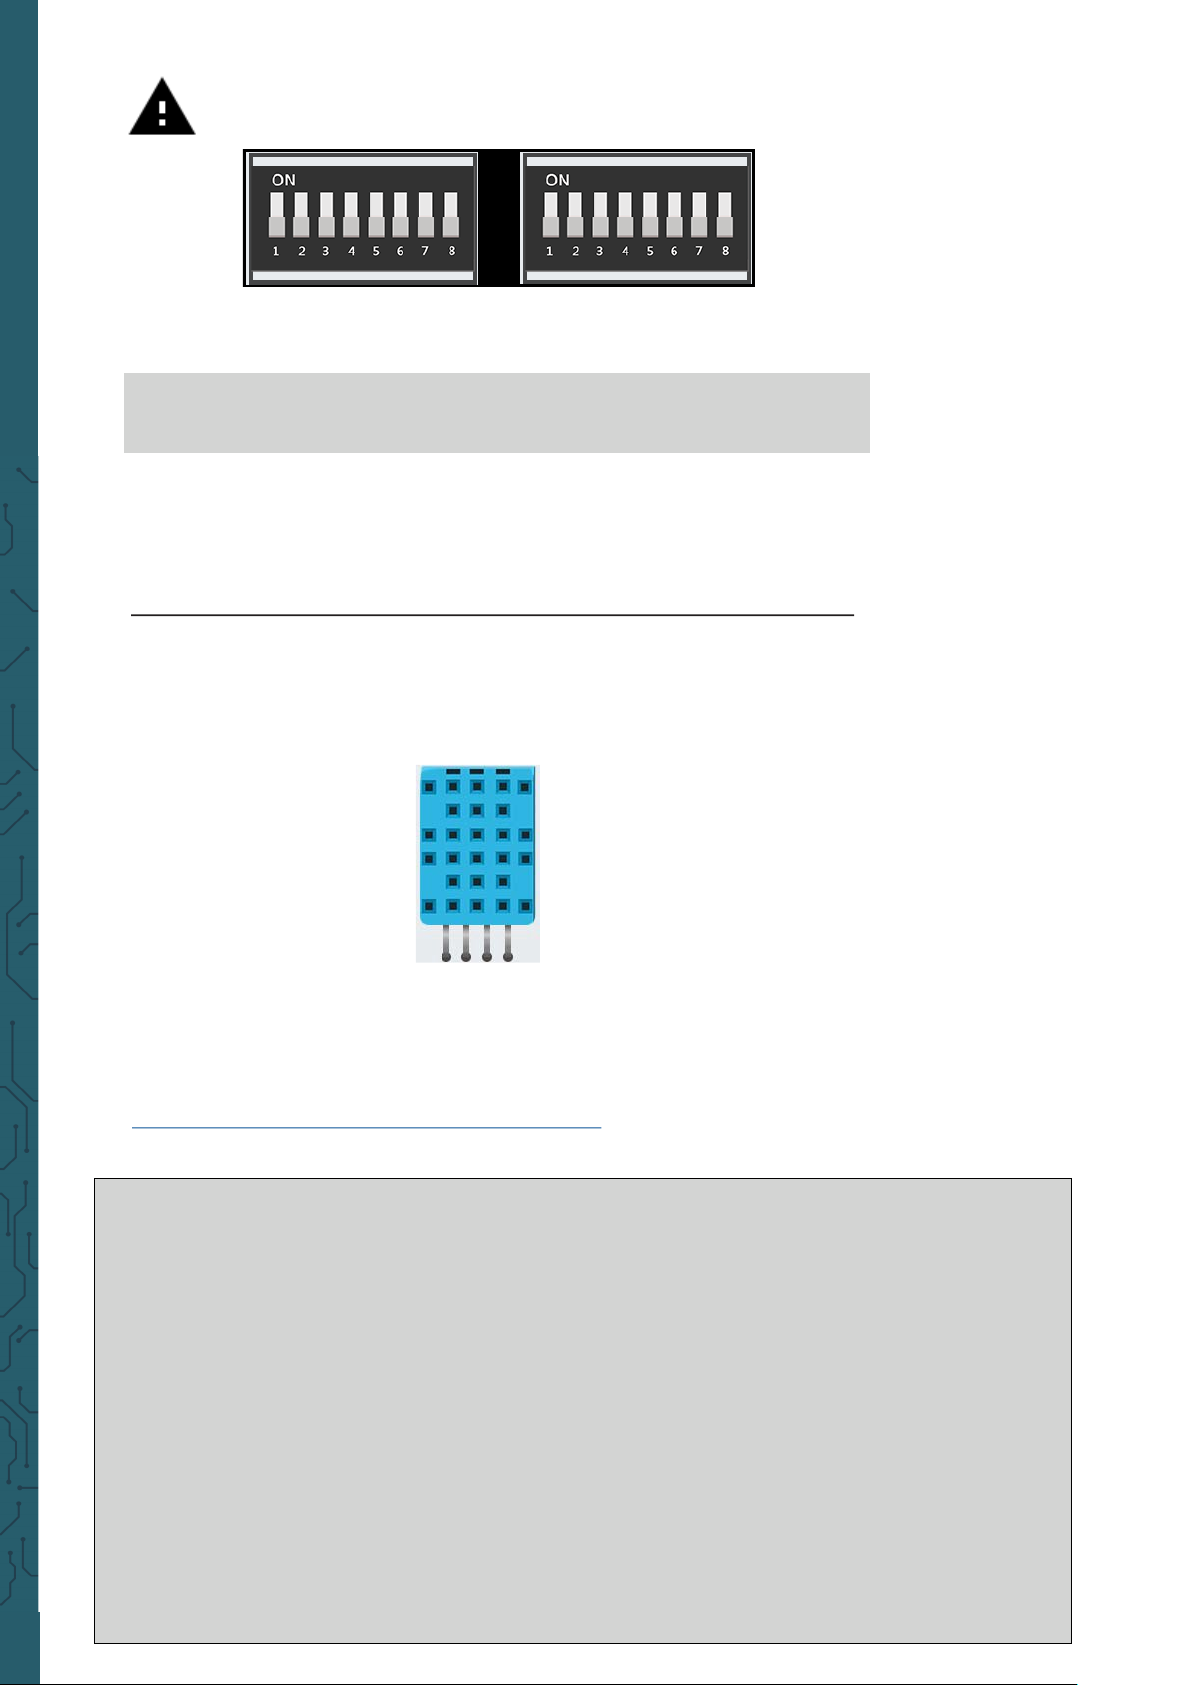
Attention! In this example you have to switch all switching units
on the le as well as all on the right OFF.
Lesson 7 : Detecting the temperature and the humidity
The DHT11 sensor is very easy to recognize. A small blue sensor with
many small holes. It is located to the right of the relay and above the
touch sensor. As specially accessible, we recommend the Python DHT
Sensor Library which was published on
https://github.com/coding-world/Python_DHT .
The library is used to display the values for the temperature and humidity
Execute the following commands and try it yourself:
cd /home/pi/Desktop/Joy-Pi
sudo python3 light_sensor.py
The DHT11 is a very interesting sensor, because it has not only one
function, but two! It contains both a humidity sensor and a temperature
sensor, both of which are very accurate. Ideal for any weather station
project, or if you want to check the temperature and humidity in the
room!
import RPi.GPIO as GPIO
import dht11
# initialize GPIO
GPIO.setwarnings(False)
GPIO.setmode(GPIO.BCM)
GPIO.cleanup()
# read data using pin 14
instance = dht11.DHT11(pin = 4)
result = instance.read()
while not result.is_valid(): # read until valid values
result = instance.read()
print("Temperature: %-3.1f C" % result.temperature)
print("Humidity: %-3.1f %%" % result.humidity)
Page 27
www.joy-it.net
Pascalstr. 8 47506 Neukirchen-Vluyn
Attention! In this example you have to switch all switching units
on the le as well as all on the right OFF.
Execute the following commands and try it yourself:
cd /home/pi/Desktop/Joy-Pi
sudo python3 dht_11.py
Lesson 8 : Detecting movements
The motion sensor is one of the most useful and frequently used sensors.
It can be used, for example, to build an alarm system. When the sensor
detects a movement, it can send a signal to the buzzer, which then makes
a loud alarm.
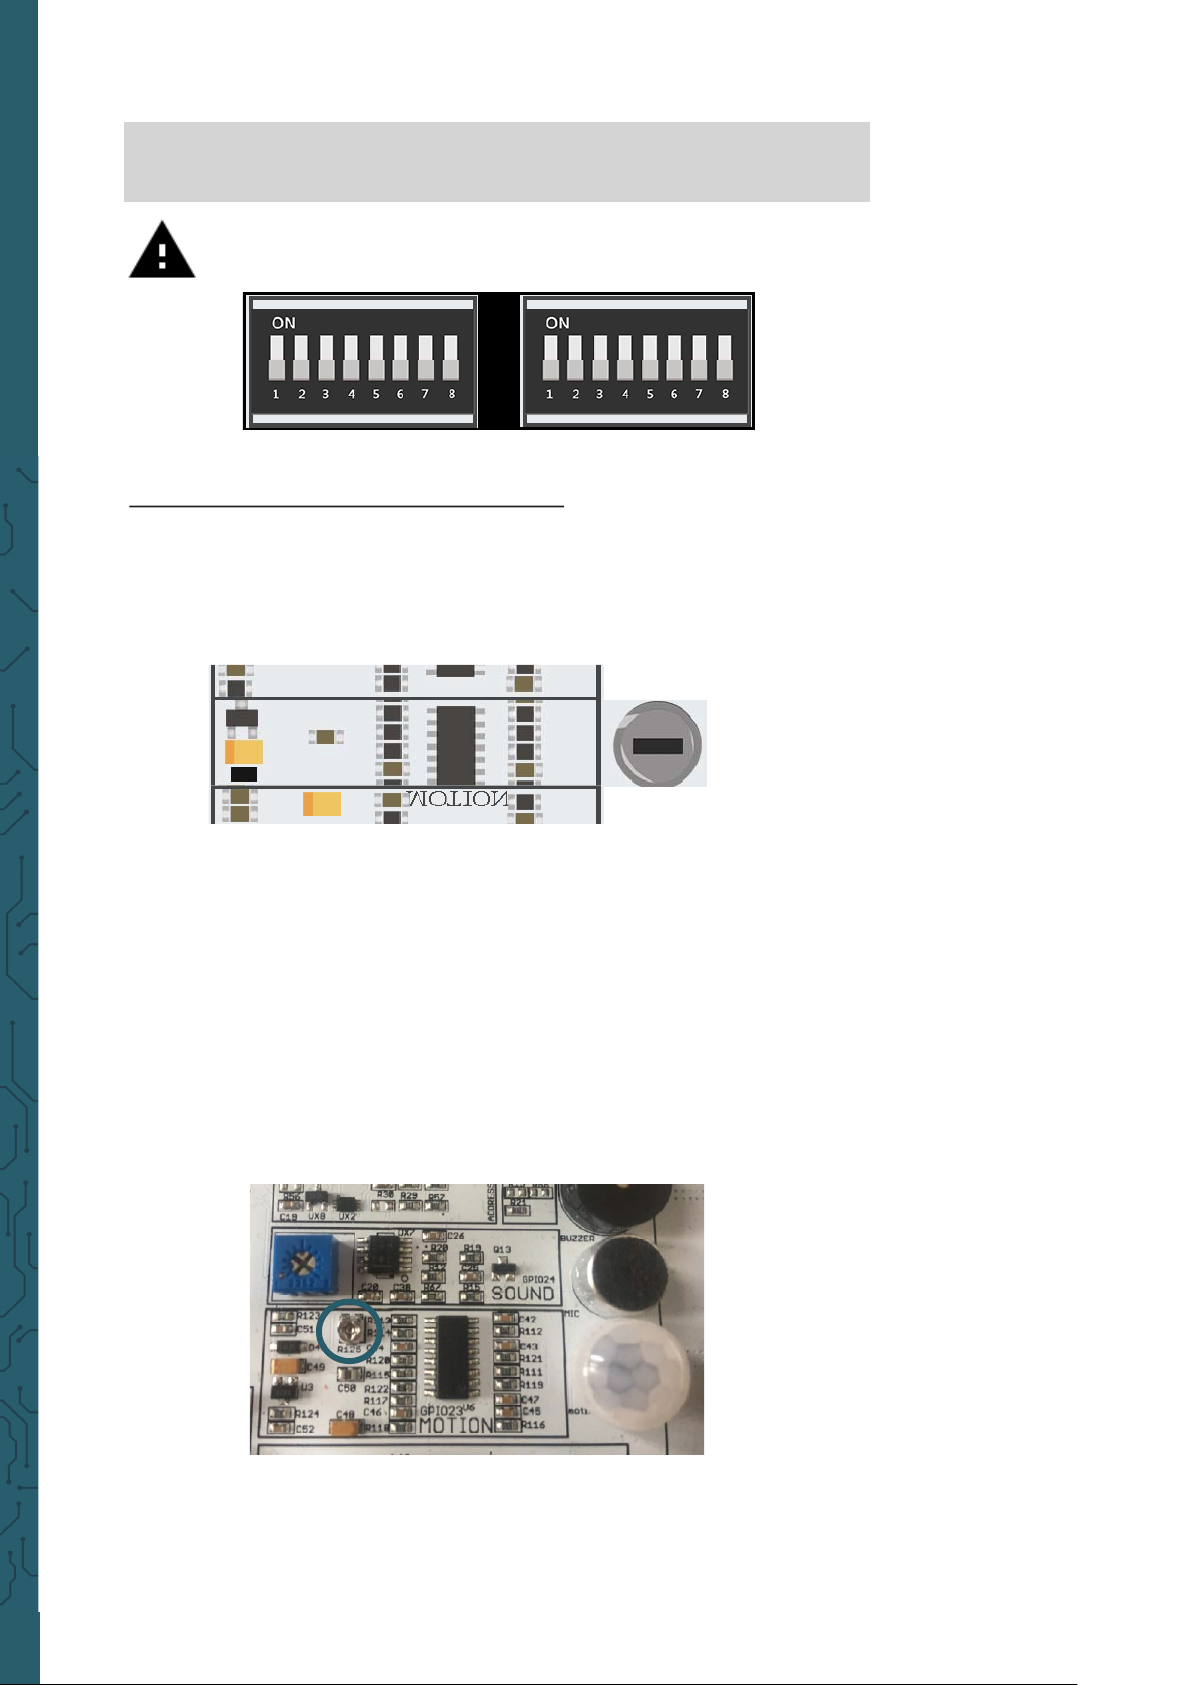
The motion sensor is located directly under the sound sensor and is
covered by a small, transparent cap. The cap helps the sensor to detect
more movements by refracting the infrared light of the environment. The
sensitivity of the motion sensor, like that of the sound sensor, is controlled with a potentiometer. This is located below the potentiometer of
the sound sensor, but is much smaller. By using a screwdriver, you can
set the distances, over which the motion sensor should react. By turning
it clockwise the sensitivity decreases and counter-clockwise it increases.
The motion sensor is controlled by the GPIO pins. When a motion is
detected, the motion sensor will send a signal. This will stop for some
time and then start again until the sensor detects the next movement.
Page 28
www.joy-it.net
Pascalstr. 8 47506 Neukirchen-Vluyn
#!/usr/bin/python
# -*- coding: utf-8 -*-
import RPi.GPIO as GPIO
import time #import of the libraries
motion_pin = 16 #define motion pin
GPIO.setmode(GPIO.BOARD) #set GPIO as GPIO.BOARD
GPIO.setup(motion_pin, GPIO.IN) #set motion pin as INPUT
try: # beginning of loop
while True:
if(GPIO.input(motion_pin) == 0): #If sensor input = 0
print("No movement ...") # print-command will be executed
elif(GPIO.input(motion_pin) == 1): #If sensor input = 1
print("Motion detected!") #print-command will be executed
time.sleep(0.1) #wait 0.1 seconds
except KeyboardInterrupt:
GPIO.cleanup() #enable GPIO ports again
Attention! In this example you have to switch all switching units
on the le as well as all on the right OFF.
Execute the following commands and try it yourself:
cd /home/pi/Desktop/Joy-Pi
sudo python3 motion.py
Lesson 9 : Measuring distances with the ultrasonic sensor
Now we will learn how to use the ultrasonic sensor to measure distances
and display them on the Joy-Pi screen. By the way, cars use the same
method to measure distances.
Page 29
www.joy-it.net
Pascalstr. 8 47506 Neukirchen-Vluyn
Attention! In this example you have to switch all switching units
on the le as well as all on the right OFF.
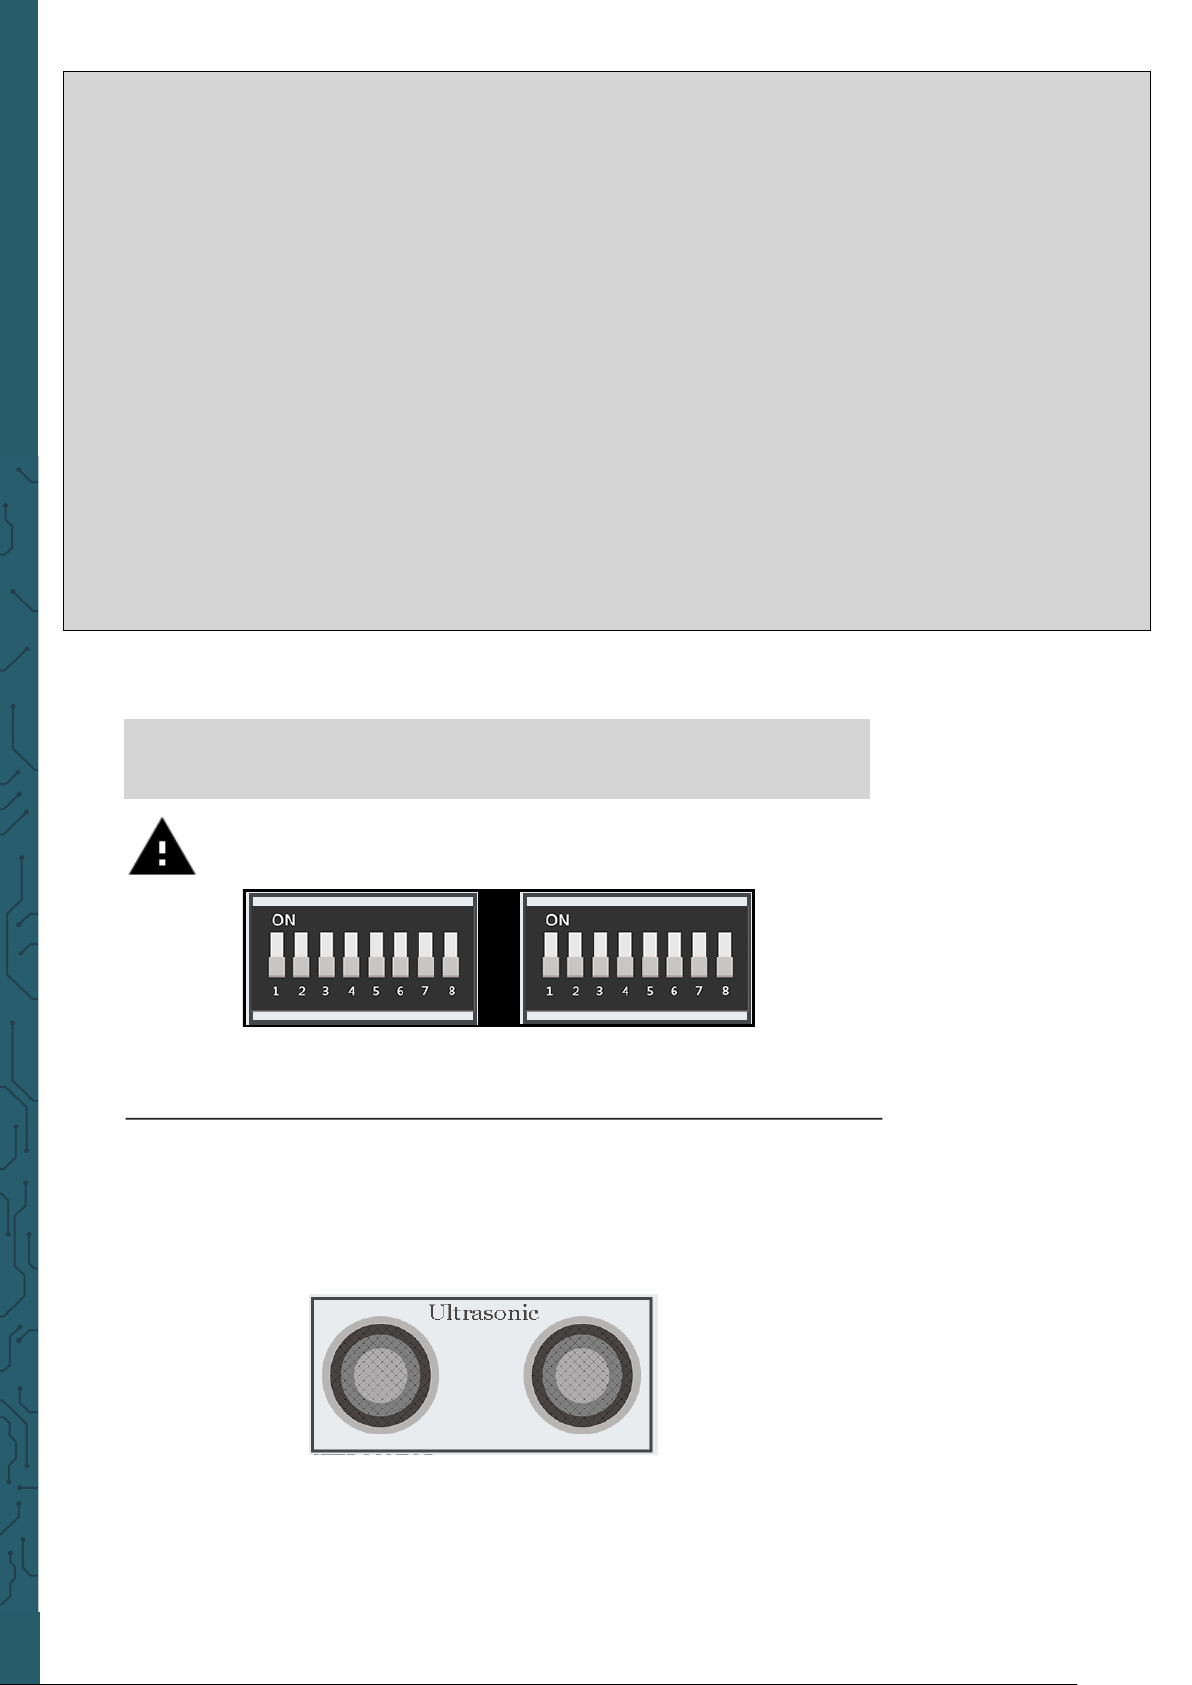
The ultrasonic sensor is located at the bottom right of the Joy-Pi board,
directly above the stepper motor and servo interfaces. It is easily recognizable by the two large circles. We will move our hands over the distance
sensor to measure the distance between our hands and the Joy-Pi.
The distance sensor works with GPIO INPUT, but it is slightly dierent
from what we used in our previous lessons. The sensor needs a certain
interval to be able to detect the distance in an accurate way. It sends an
ultrasonic signal and with a built-in sensor it receives the echo reflected
by an obstacle. From the time dierence between sending the signal and
receiving the echo, the distance is calculated.
#!/usr/bin/python
# -*- coding: utf-8 -*#Author : www.modmypi.com
#Link: https://www.modmypi.com/blog/hc-sr04-ultrasonic-range-sensor-on-the-raspberry-pi
import RPi.GPIO as GPIO
import time
GPIO.setmode(GPIO.BOARD) #set GPIO board configuration
TRIG = 36 #declaration of variable
ECHO = 32 #declaration of variable
print ("Distance measurement in progress.") #issues text in console
GPIO.setup(TRIG,GPIO.OUT) #set variable TRIG as output
GPIO.setup(ECHO,GPIO.IN) #set variable ECHO as input
GPIO.output(TRIG, False)
print ("Warte auf den Sensor.")
time.sleep(2) #wait 2 seconds
GPIO.output(TRIG, True) #start sending ultrasonic signal
time.sleep(0.00001) #waits 0.00001 seconds
GPIO.output(TRIG, False) #stops sending a signal
while GPIO.input(ECHO)==0:
pulse_start = time.time()
while GPIO.input(ECHO)==1:
pulse_end = time.time()
Page 30
www.joy-it.net
Pascalstr. 8 47506 Neukirchen-Vluyn
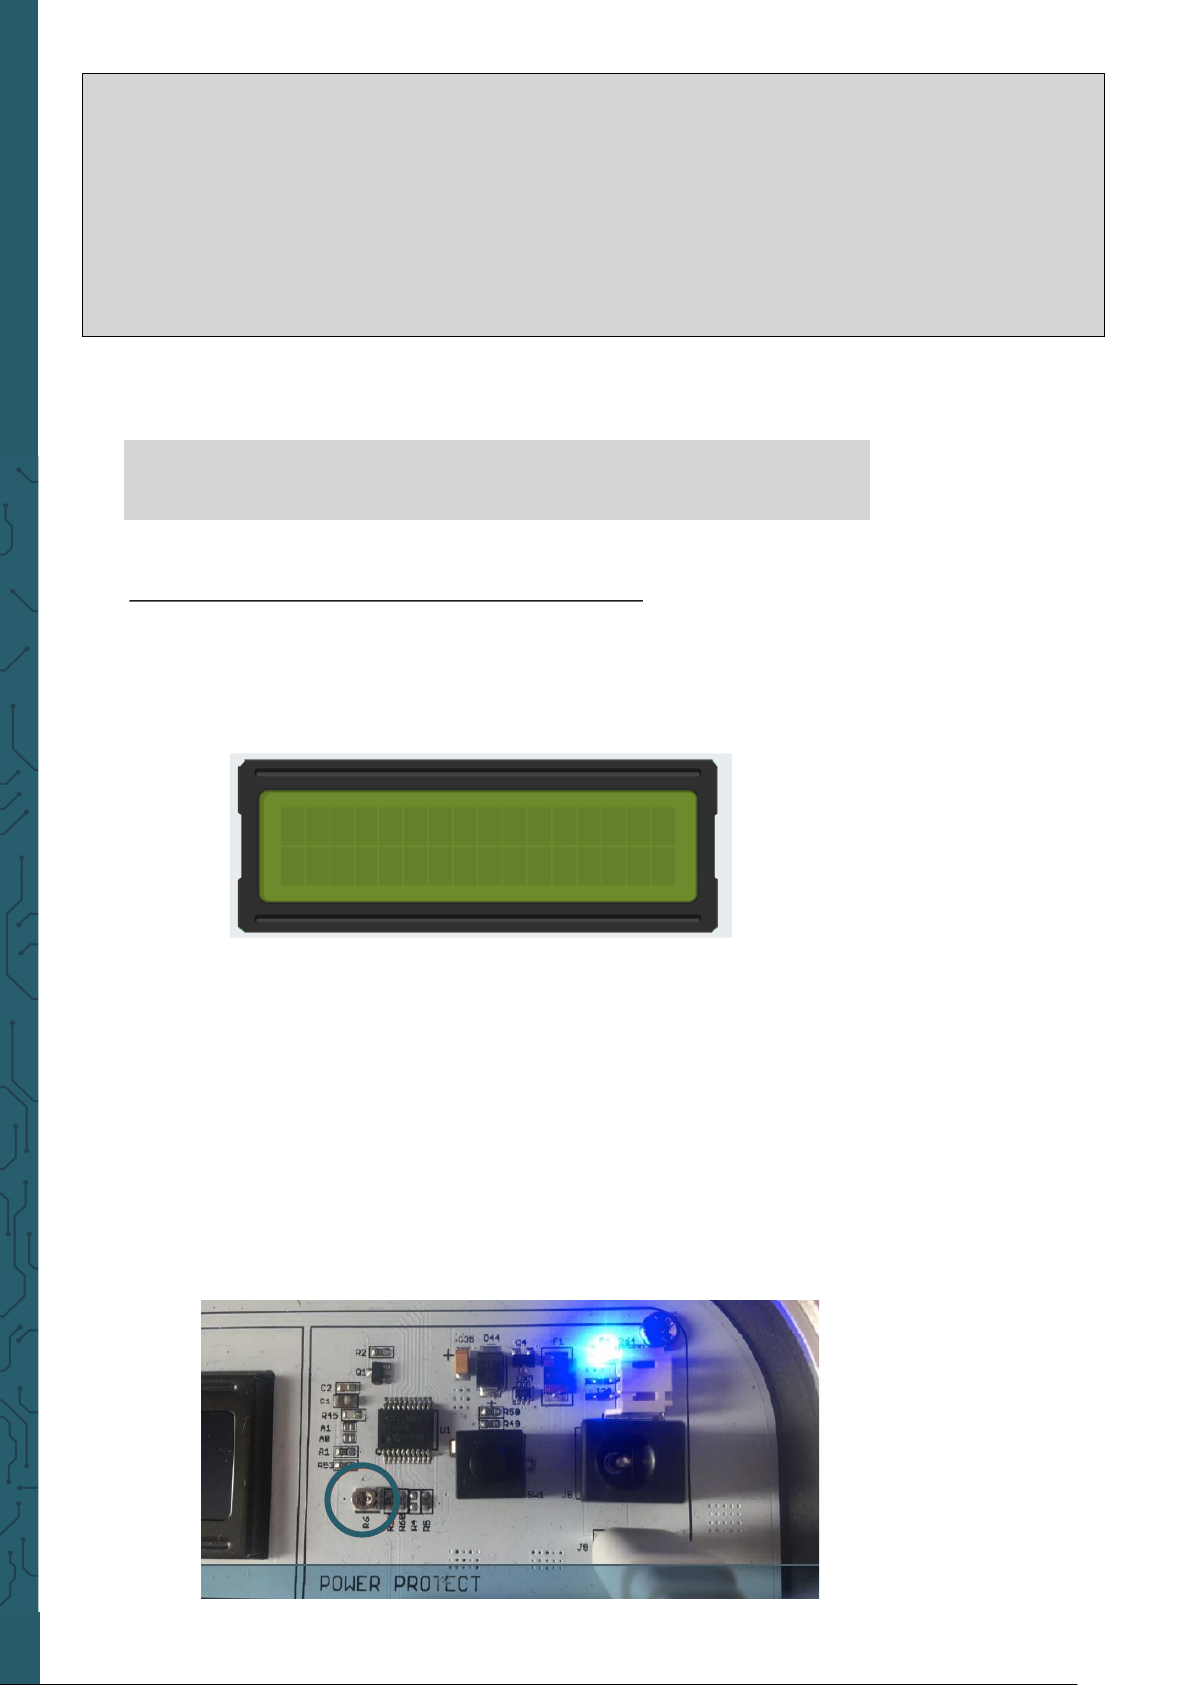
The LCD screen takes up a large part of the Joy-Pi board - it is located at
the top center of the Joy-Pi, to the right of the GPIO LED display. As soon
as the demo script and the examples are executed, the display turns on.
Thanks to the integrated backlight you can read data on the display even
in complete darkness.
Like the sound and motion sensors, the LCD also has an associated
potentiometer. With this potentiometer, you can adjust the brightness of
the backlight of the display. If you turn it counterclockwise the brightness
gets higher and if you turn it clockwise it will get lowered.
Rotate the potentiometer counterclockwise to increase the contrast,
rotate it clockwise to decrease the contrast.
pulse_duration = pulse_end - pulse_start #calculation for duration of pulse
distance = pulse_duration * 17150 #calculation for determining distance
distance = round(distance, 2) #solution is rounded to 2 decimal place
print ("Distance:",distance,"cm") #output in console of distance in cm
GPIO.cleanup() #enable GPIO ports again
Execute the following commands and try it yourself:
cd /home/pi/Desktop/Joy-Pi
sudo python3 distance.py
Lesson 10 : Controlling the LCD display
With the Joy-Pi you can display the LCD data that you collect with your
sensors and update it in real time depending on the changes that the
modules go through. For example, in conjunction with the temperature
sensor - always display the current temperature and humidity on the
LCD.
Page 31
www.joy-it.net
Pascalstr. 8 47506 Neukirchen-Vluyn
Das LCD, sowie einige andere Sensoren funktionieren nicht mit der
GPIO-Technologie. Deshalb wird das Bussystem "I2C" verwendet, das
eignet sich besonders gut um mehrere integrierte Schaltungen
kommunizieren zu lassen. Das LCD hat die Adresse 0x21, indem wir eine
Verbindung zu dieser I2C-Adresse herstellen, können Befehle wie z.B.
schreiben von Text, Einschalten der Hintergrundbeleuchtung des LCDs,
Aktivieren des Cursors usw. gesendet werden.
Zur Steuerung des LCDs wird die Adafruit_CharLCDBackpack Bibliothek
verwendet.
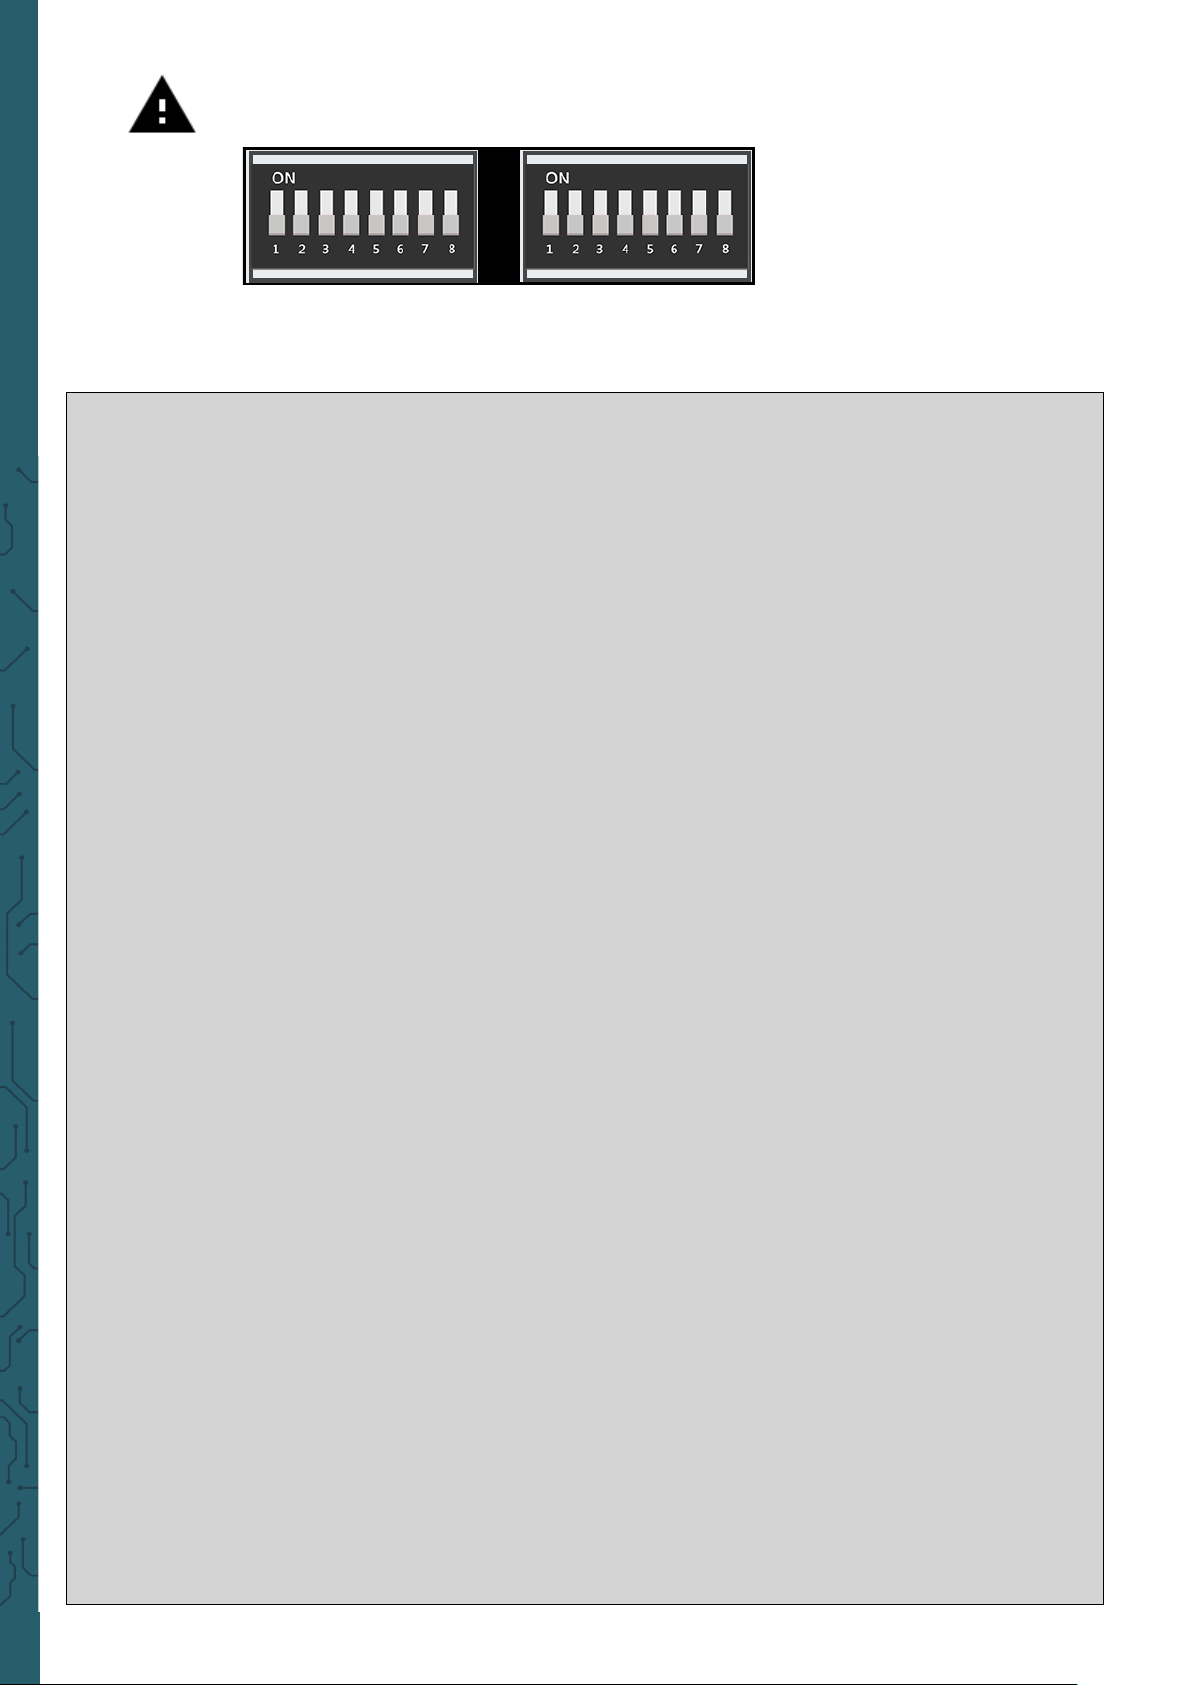
Attention! In this example you have to switch all switching units
on the le as well as all on the right OFF.
#!/usr/bin/python
# -*- coding: utf-8 -*-
import time
import board
import busio
import adafruit_character_lcd.character_lcd_i2c as character_lcd
#define amount of lines and columns from LCD
lcd_columns = 16
lcd_rows = 2
#initialization of I2C Bus
i2c = busio.I2C(board.SCL, board.SDA)
#set the LCD in the variable LCD
lcd = character_lcd.Character_LCD_I2C(i2c, lcd_columns, lcd_rows, 0x21)
try:
#turn on the background
lcd.backlight = True
#issues 2 words with line break
lcd.message = "Hello\nWorld!"
#wait 5 seconds
time.sleep(5.0)
#show cursor
lcd.clear()
lcd.cursor = True
lcd.message = "Show Cursor!"
#wait 5 seconds
time.sleep(5.0)
#let cursor blink
lcd.clear()
lcd.blink = True
lcd.message = "Blinky Cursor!"
#wait 5 seconds, stop nlinking cursor and hide cursor
time.sleep(5)
lcd.blink = False
lcd.clear()
Page 32

www.joy-it.net
Pascalstr. 8 47506 Neukirchen-Vluyn
Das LCD, sowie einige andere Sensoren funktionieren nicht mit der
GPIO-Technologie. Deshalb wird das Bussystem "I2C" verwendet, das
eignet sich besonders gut um mehrere integrierte Schaltungen
kommunizieren zu lassen. Das LCD hat die Adresse 0x21, indem wir eine
Verbindung zu dieser I2C-Adresse herstellen, können Befehle wie z.B.
schreiben von Text, Einschalten der Hintergrundbeleuchtung des LCDs,
Aktivieren des Cursors usw. gesendet werden.
Zur Steuerung des LCDs wird die Adafruit_CharLCDBackpack Bibliothek
verwendet.
# scroll message from right to left
lcd.clear()
scroll_msg = "<-- Scroll -->"
lcd.message = scroll_msg
for i in range(len(scroll_msg)):
time.sleep(0.5)
lcd.move_right()
for i in range(len(scroll_msg)):
time.sleep(0.5)
lcd.move_left()
#turn no and off background lightning
lcd.clear()
lcd.message = "Flash backlight\nin 5 seconds..."
time.sleep(5.0)
#turn off background lightning
lcd.backlight = False
time.sleep(1.0)
lcd.backlight = True
time.sleep(1.0)
lcd.backlight = False
#change message
lcd.clear()
lcd.message = "Goodbye"
#turn on background lightning
lcd.backlight = True
#turn off background lightning
time.sleep(2.0)
lcd.clear()
lcd.backlight = False
except KeyboardInterrupt:
#turn off LCD
lcd.clear()
lcd.backlight = False
Execute the following commands and try it yourself:
cd /home/pi/Desktop/Joy-Pi
sudo python3 lcd.py
Page 33
www.joy-it.net
Pascalstr. 8 47506 Neukirchen-Vluyn
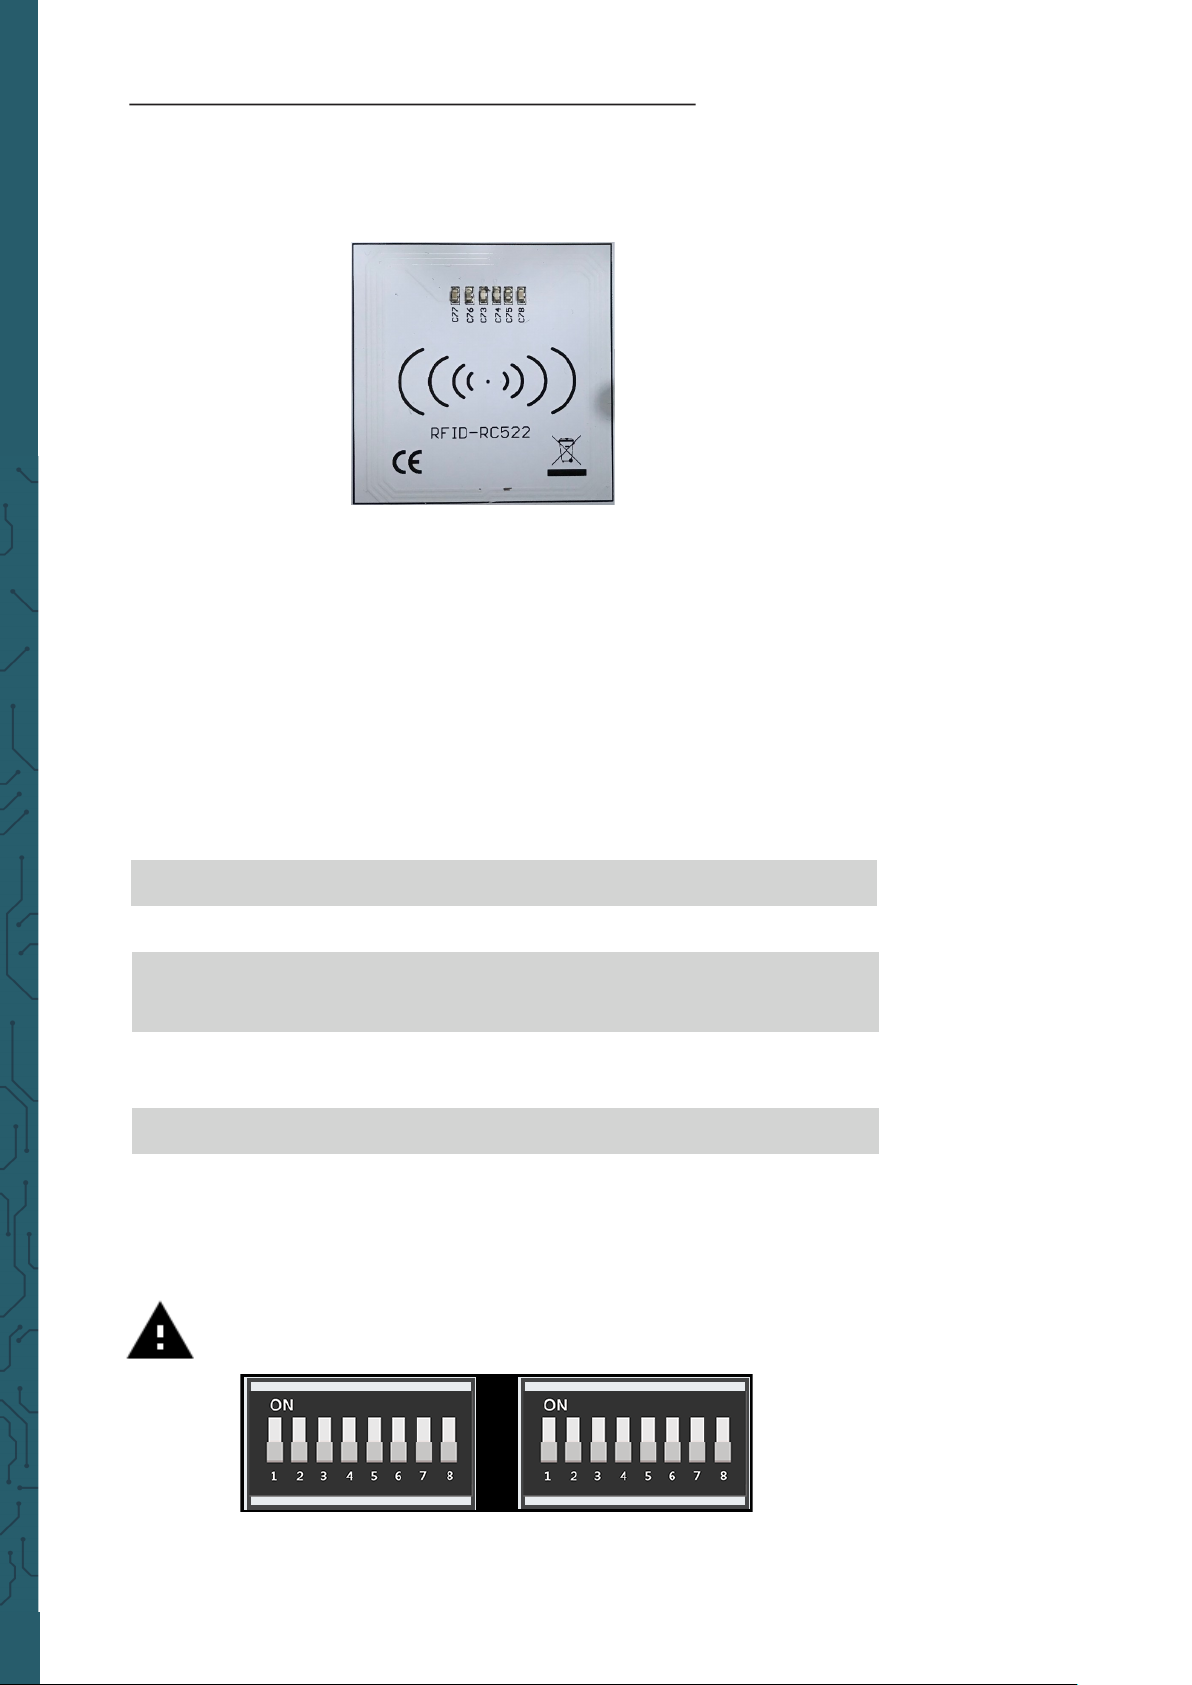
The RFID module is located directly under the Raspberry Pi and looks like
a small Wifi symbol. This symbol means wireless connectivity. To use it,
we need to take the chip, or card, that comes with the Joy-Pi and hold it
over the Joy-Pi RFID chip area. It must be close enough for our script to
be recognized. 2-4cm should be close enough. Just try it out!
To use the RFID RC522 Shield we need the SPI Bus. We have to modify
the config.txt file otherwise the kernel could not start. To get access to
the config.txt, we use the following command:
Lesson 11 : Reading and writing RFID cards
In this lesson, you will learn how to control the RFID module. The RFID
module is a very interesting and useful module. It is used worldwide in a
variety of solutions such as Intelligent door locks, employee IDs,
business cards and even dog collars.
sudo nano /boot/config.txt
The following lines have to be attached to the end of the file:
Save and exit the file with the keys CTRL + O and CTRL + X.
Aerwards, activate SPI:
device_tree_param=spi=on
dtoverlay=spi-bcm2708
sudo raspi-config
Attention! In this example you have to switch all switching units
on the le as well as all on the right OFF.
Activate in
Interfacing Options → SPI
and restart the Raspberry Pi
aerwards.
Page 34
www.joy-it.net
Pascalstr. 8 47506 Neukirchen-Vluyn
To navigate to the folder for the RFID scripts you have to use the
following command:
cd /home/pi/Desktop/Joy-Pi/MFRC522-python
If you want to write on the chip or card you can use the following
command:
sudo python3 Write.py
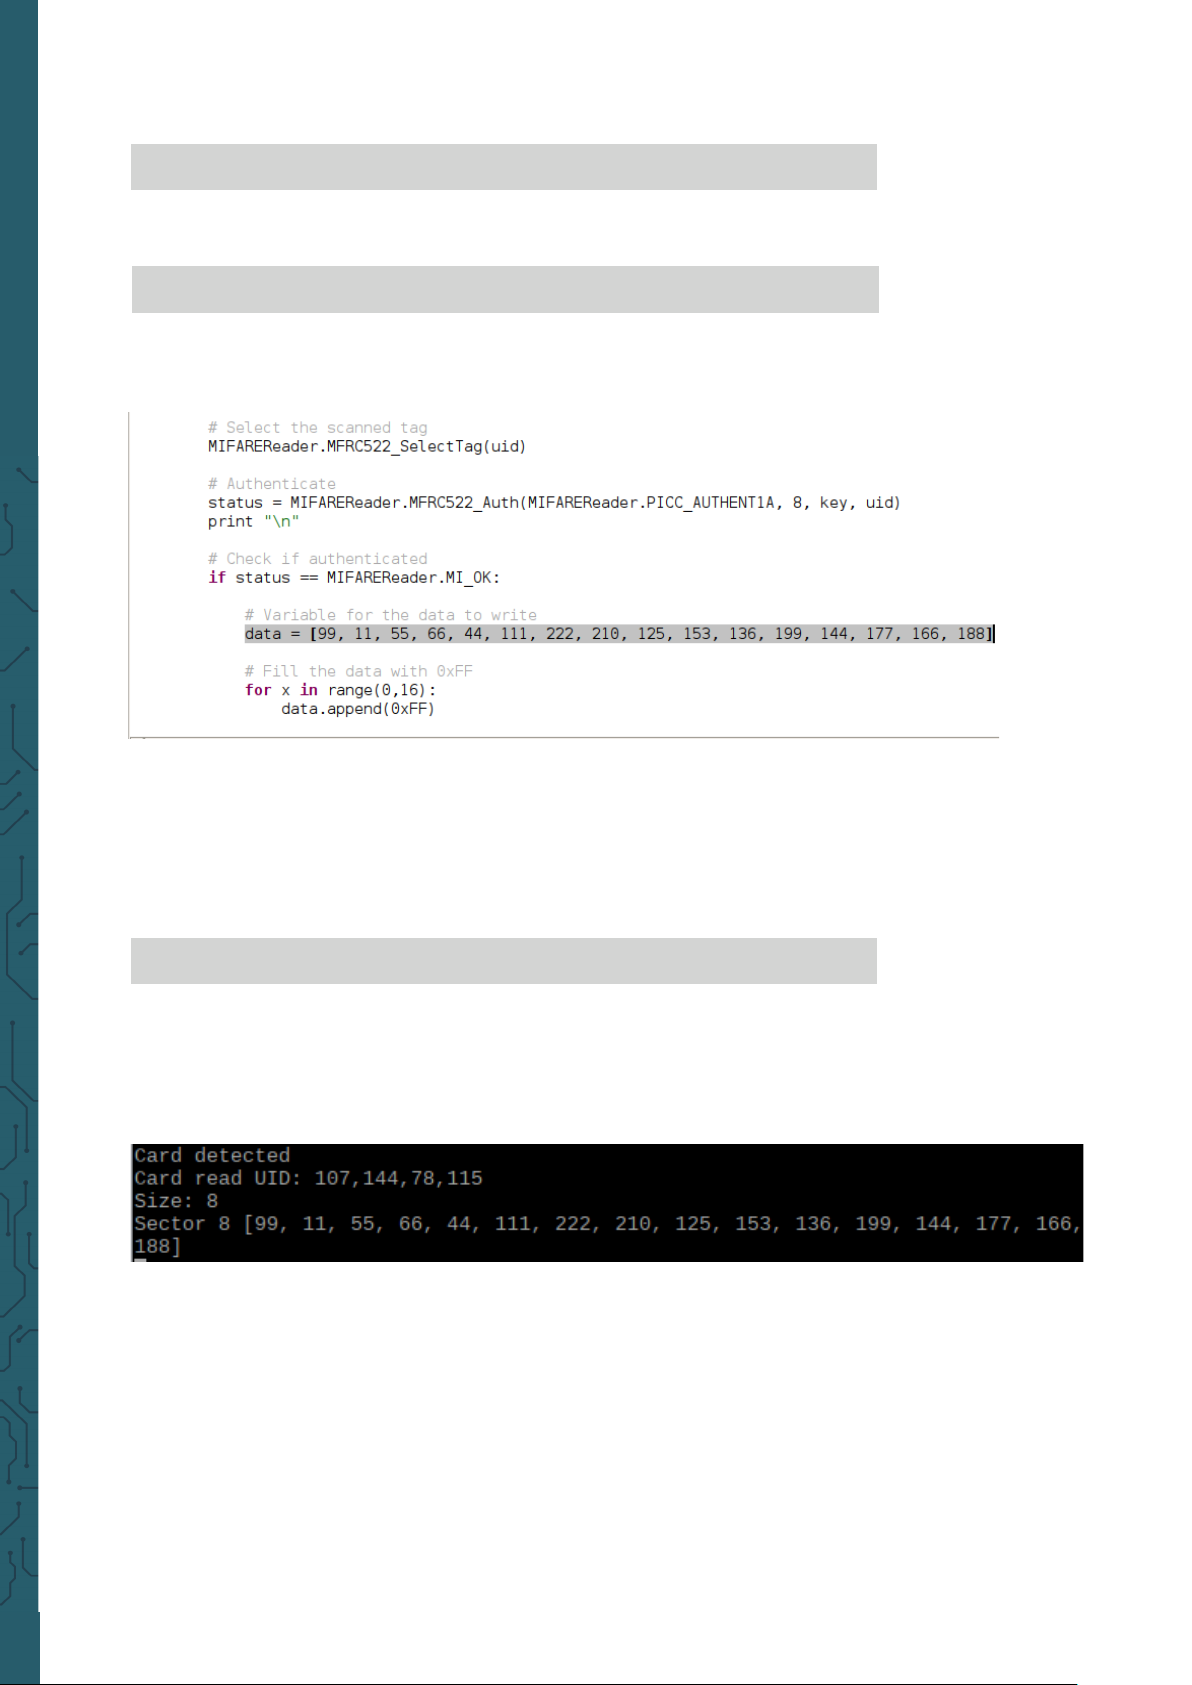
To edit the files which are saved on the catd or the chip, you must modify
the programm:
To modify the data you have to change the numbers in the square
brackets, but the numbers must be higher than 0 and smaller than 255.
If you want to read out the number sequence you have to use the
following command:
sudo python3 Read.py
If you now apply the card or chip onto the reader, the saved number
sequence will be shown in the console.
Page 35

www.joy-it.net
Pascalstr. 8 47506 Neukirchen-Vluyn
#!/usr/bin/env python
# -*- coding: utf8 -*#
# Copyright 2014,2018 Mario Gomez <[email protected]>
# This file is part of MFRC522-Python
# MFRC522-Python is a simple Python implementation for
# the MFRC522 NFC Card Reader for the Raspberry Pi.
# MFRC522-Python is free software: you can redistribute it and/or modify
# it under the terms of the GNU Lesser General Public License as published by
# the Free Software Foundation, either version 3 of the License, or
# (at your option) any later version.
# MFRC522-Python is distributed in the hope that it will be useful,
# but WITHOUT ANY WARRANTY; without even the implied warranty of
# MERCHANTABILITY or FITNESS FOR A PARTICULAR PURPOSE. See the
# GNU Lesser General Public License for more details.
# You should have received a copy of the GNU Lesser General Public License
# along with MFRC522-Python. If not, see <http://www.gnu.org/licenses/>.
import RPi.GPIO as GPIO
import MFRC522
import signal
continue_reading = True
# Capture SIGINT for cleanup when the script is aborted
def end_read(signal,frame):
global continue_reading
print("Ctrl+C captured, ending read.")
continue_reading = False
GPIO.cleanup()
# Hook the SIGINT
signal.signal(signal.SIGINT, end_read)
# Create an object of the class MFRC522
MIFAREReader = MFRC522.MFRC522()
# Welcome message
print("Welcome to the MFRC522 data read example")
print("Press Ctrl-C to stop.")
# This loop keeps checking for chips. If one is near it will get the UID and authenticate
while continue_reading:
# Scan for cards
(status,TagType) = MIFAREReader.MFRC522_Request(MIFAREReader.PICC_REQIDL)
# If a card is found
if status == MIFAREReader.MI_OK:
print("Card detected")
# Get the UID of the card
(status,uid) = MIFAREReader.MFRC522_Anticoll()
Code example RFID-Read:
Page 36

www.joy-it.net
Pascalstr. 8 47506 Neukirchen-Vluyn
# Print UID
print("Card read UID: %s,%s,%s,%s".format(uid[0], uid[1], uid[2], uid[3]))
# This is the default key for authentication
key = [0xFF,0xFF,0xFF,0xFF,0xFF,0xFF]
# Select the scanned tag
MIFAREReader.MFRC522_SelectTag(uid)
# Authenticate
status = MIFAREReader.MFRC522_Auth(MIFAREReader.PICC_AUTHENT1A, 8, key, uid)
# Check if authenticated
if status == MIFAREReader.MI_OK:
MIFAREReader.MFRC522_Read(8)
MIFAREReader.MFRC522_StopCrypto1()
else:
print("Authentication error")
Code example RFID-Write:
#!/usr/bin/env python
# -*- coding: utf8 -*-
import RPi.GPIO as GPIO
import MFRC522
import signal
continue_reading = True
#function to perform cleanup functions if the script is aborted
def end_read(signal,frame):
global continue_reading
print ("Ctrl+C captured, ending read.")
continue_reading = False
GPIO.cleanup()
signal.signal(signal.SIGINT, end_read)
#create an object from the class MFR522
MIFAREReader = MFRC522.MFRC522()
#this loop searches permanently for chips or cards. If one is near, it gets the UID
and identifies itself
while continue_reading:
# SUcht Karten
(status,TagType) = MIFAREReader.MFRC522_Request(MIFAREReader.PICC_REQIDL)
# Wenn Karte gefunden
if status == MIFAREReader.MI_OK:
print ("Card detected")
# UID der Karte erhalten
(status,uid) = MIFAREReader.MFRC522_Anticoll()
Page 37

www.joy-it.net
Pascalstr. 8 47506 Neukirchen-Vluyn
#if UID is found, continue
if status == MIFAREReader.MI_OK:
#issues UID in console
print ("Card read UID: %s,%s,%s,%s" % (uid[0], uid[1], uid[2], uid[3]))
#standard key for authentication
key = [0xFF,0xFF,0xFF,0xFF,0xFF,0xFF]
MIFAREReader.MFRC522_SelectTag(uid)
#authenticating
status = MIFAREReader.MFRC522_Auth(MIFAREReader.PICC_AUTHENT1A, 8, key, uid)
print ("\n")
#Ensure if authenticated
if status == MIFAREReader.MI_OK:
#variables of values which should be saved on card
data = [99, 11, 55, 66, 44, 111, 222, 210, 125, 153, 136, 199, 144, 177, 166, 188]
for x in range(0,16):
data.append(0xFF)
print ("Sector 8 looked like this:")
#read block 8
MIFAREReader.MFRC522_Read(8)
print ("\n")
print ("Sector 8 will now be filled with 0xFF:")
#write files
MIFAREReader.MFRC522_Write(8, data)
print ("\n")
print ("It now looks like this:")
#Checking if written
MIFAREReader.MFRC522_Read(8)
print ("\n")
MIFAREReader.MFRC522_StopCrypto1()
#Ensure to stop reading for cards
continue_reading = False
else:
print ("Authentification error")
Page 38
www.joy-it.net
Pascalstr. 8 47506 Neukirchen-Vluyn
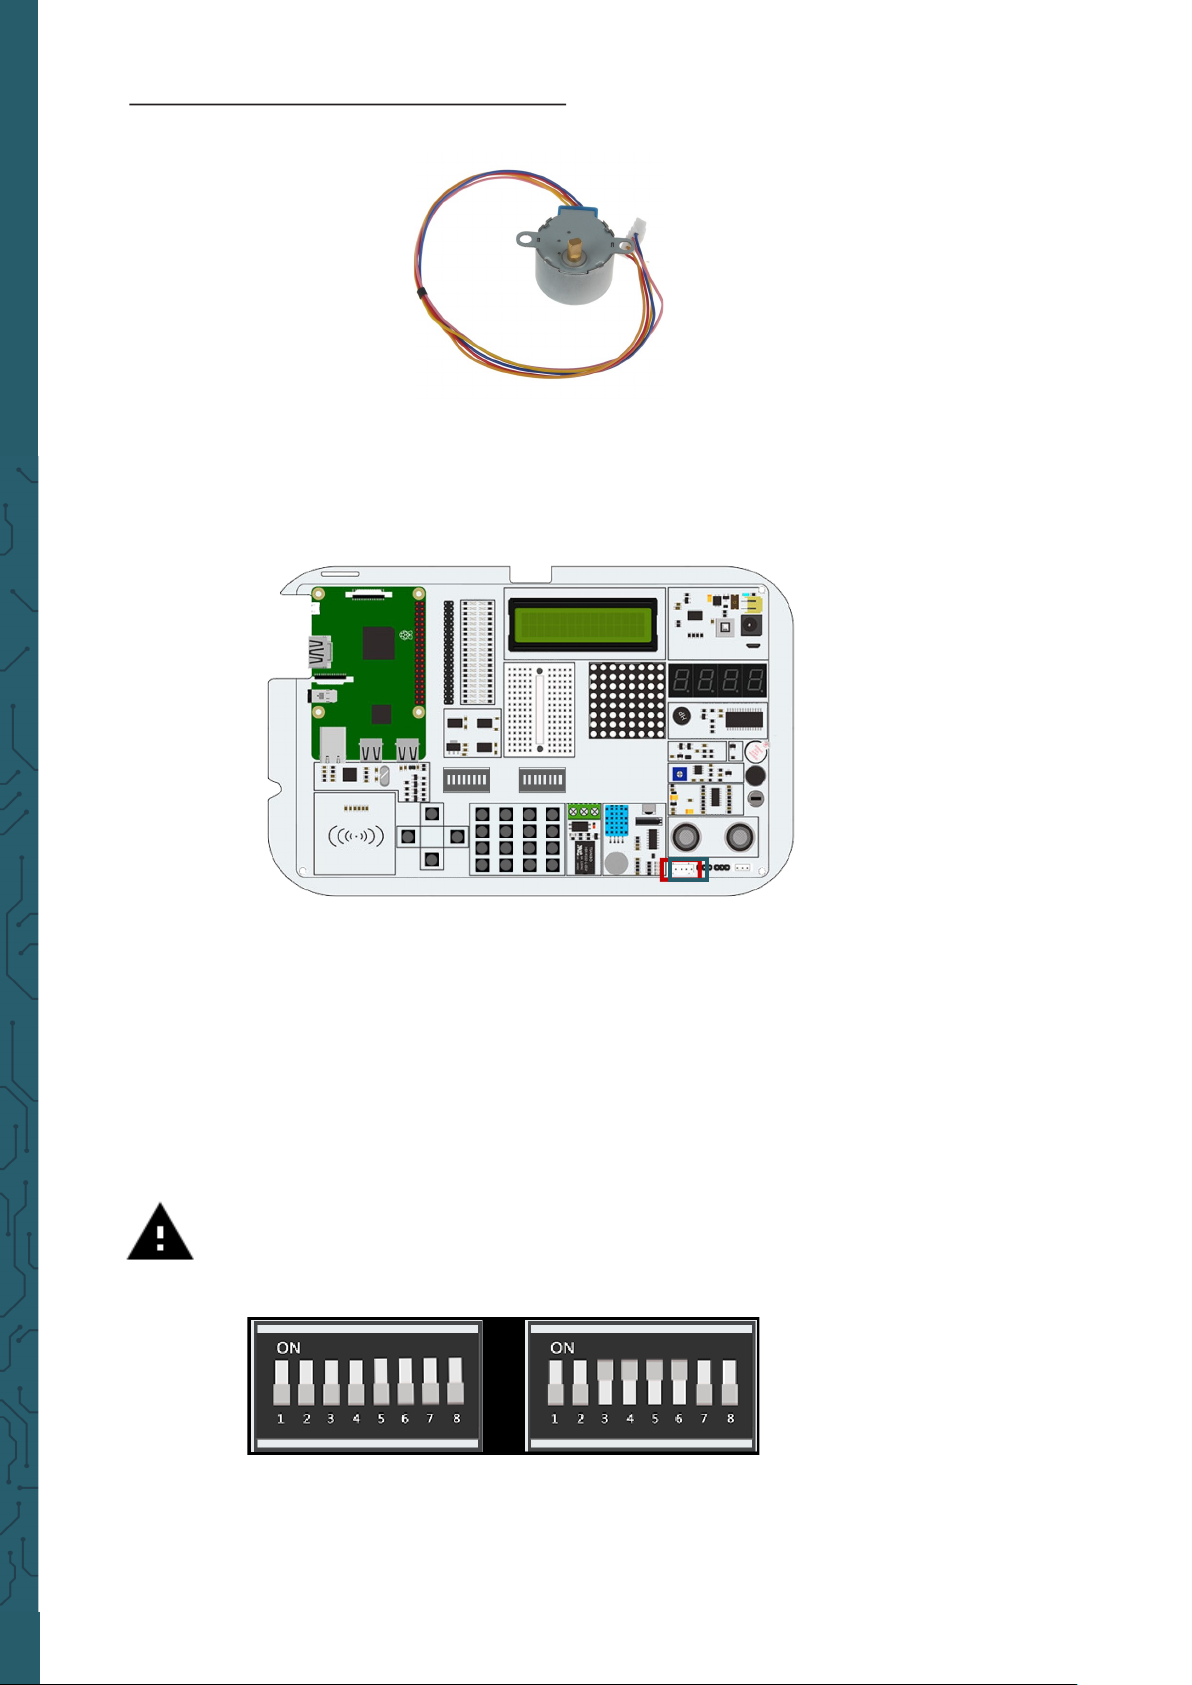
The stepper motor is an independent module that you will have to
connect to the board. We need to take the stepper motor that came with
the kit and connect it to your Joy-Pi.
Simply connect the stepper motor to the following connector on the
Joy-Pi board:
Lesson 12 : Using stepper motors
The module may heat up during use. This is due to technical reasons and
is not unusual.
The stepper motor is connected to 4 GPIO pins, which are switched on
quickly one aer the other. This causes the stepper motor to "push"
forward and take one step. Any number of steps can be executed with the
turnSteps function. The turnDegrees function rotates the motor by a
certain angle.
Attention! For this example you have to switch between the
modules. Turn switch number 3, 4, 5 and 6 on the right
switching unit ON. All the other switches should be turned OFF.
Page 39

www.joy-it.net
Pascalstr. 8 47506 Neukirchen-Vluyn
Code example stepper motor
#!/usr/bin/python
# -*- coding: utf-8 -*-
# Author : Original author ludwigschuster
# Original Author Github: https://github.com/ludwigschuster/RasPi-GPIO-Stepmotor
import time
import RPi.GPIO as GPIO
import math
class Stepmotor:
def __init__(self):
#set GPIO mode
GPIO.setmode(GPIO.BOARD)
#the pins of your Raspberry Pi which are used
self.pin_A = 29
self.pin_B = 31
self.pin_C = 33
self.pin_D = 35
self.interval = 0.010
#declare pins as output
GPIO.setup(self.pin_A,GPIO.OUT)
GPIO.setup(self.pin_B,GPIO.OUT)
GPIO.setup(self.pin_C,GPIO.OUT)
GPIO.setup(self.pin_D,GPIO.OUT)
GPIO.output(self.pin_A, False)
GPIO.output(self.pin_B, False)
GPIO.output(self.pin_C, False)
GPIO.output(self.pin_D, False)
def Step1(self):
GPIO.output(self.pin_D, True)
time.sleep(self.interval)
GPIO.output(self.pin_D, False)
def Step2(self):
GPIO.output(self.pin_D, True)
GPIO.output(self.pin_C, True)
time.sleep(self.interval)
GPIO.output(self.pin_D, False)
GPIO.output(self.pin_C, False)
def Step3(self):
GPIO.output(self.pin_C, True)
time.sleep(self.interval)
GPIO.output(self.pin_C, False)
def Step4(self):
GPIO.output(self.pin_B, True)
GPIO.output(self.pin_C, True)
time.sleep(self.interval)
GPIO.output(self.pin_B, False)
GPIO.output(self.pin_C, False)
def Step5(self):
GPIO.output(self.pin_B, True)
time.sleep(self.interval)
GPIO.output(self.pin_B, False)
Page 40

www.joy-it.net
Pascalstr. 8 47506 Neukirchen-Vluyn
def Step6(self):
GPIO.output(self.pin_A, True)
GPIO.output(self.pin_B, True)
time.sleep(self.interval)
GPIO.output(self.pin_A, False)
GPIO.output(self.pin_B, False)
def Step7(self):
GPIO.output(self.pin_A, True)
time.sleep(self.interval)
GPIO.output(self.pin_A, False)
def Step8(self):
GPIO.output(self.pin_D, True)
GPIO.output(self.pin_A, True)
time.sleep(self.interval)
GPIO.output(self.pin_D, False)
GPIO.output(self.pin_A, False)
def turn(self,count):
for i in range (int(count)):
self.Step1()
self.Step2()
self.Step3()
self.Step4()
self.Step5()
self.Step6()
self.Step7()
self.Step8()
def close(self):
#release GPIOs for other activities
GPIO.cleanup()
def turnSteps(self, count):
#Move n steps
# (n will be set by yourself)
for i in range (count):
self.turn(1)
def turnDegrees(self, count):
#Turn n degrees (small values can cause inaccuracy)
# (n degree from which will be turned)
self.turn(round(count*512/360,0))
def turnDistance(self, dist, rad):
self.turn(round(512*dist/(2*math.pi*rad),0))
def main():
print("Movement started.")
motor = Stepmotor()
print("One step")
motor.turnSteps(1)
time.sleep(0.5)
print("20 steps")
motor.turnSteps(20)
time.sleep(0.5)
Page 41
www.joy-it.net
Pascalstr. 8 47506 Neukirchen-Vluyn
print("quarter of a rotation")
motor.turnDegrees(90)
print("Movement stopped.")
motor.close()
if __name__ == "__main__":
main()
Execute the following commands and try it yourself:
cd /home/pi/Desktop/Joy-Pi
sudo python3 stepmotor.py
Lesson 13 : Controlling servo motors
With the help of the servo motor, devices can be mechanically controlled
and parts can be moved. For example, intelligent waste bins, a box with
an intelligent opening and closing door and many other interesting
projects can be created.
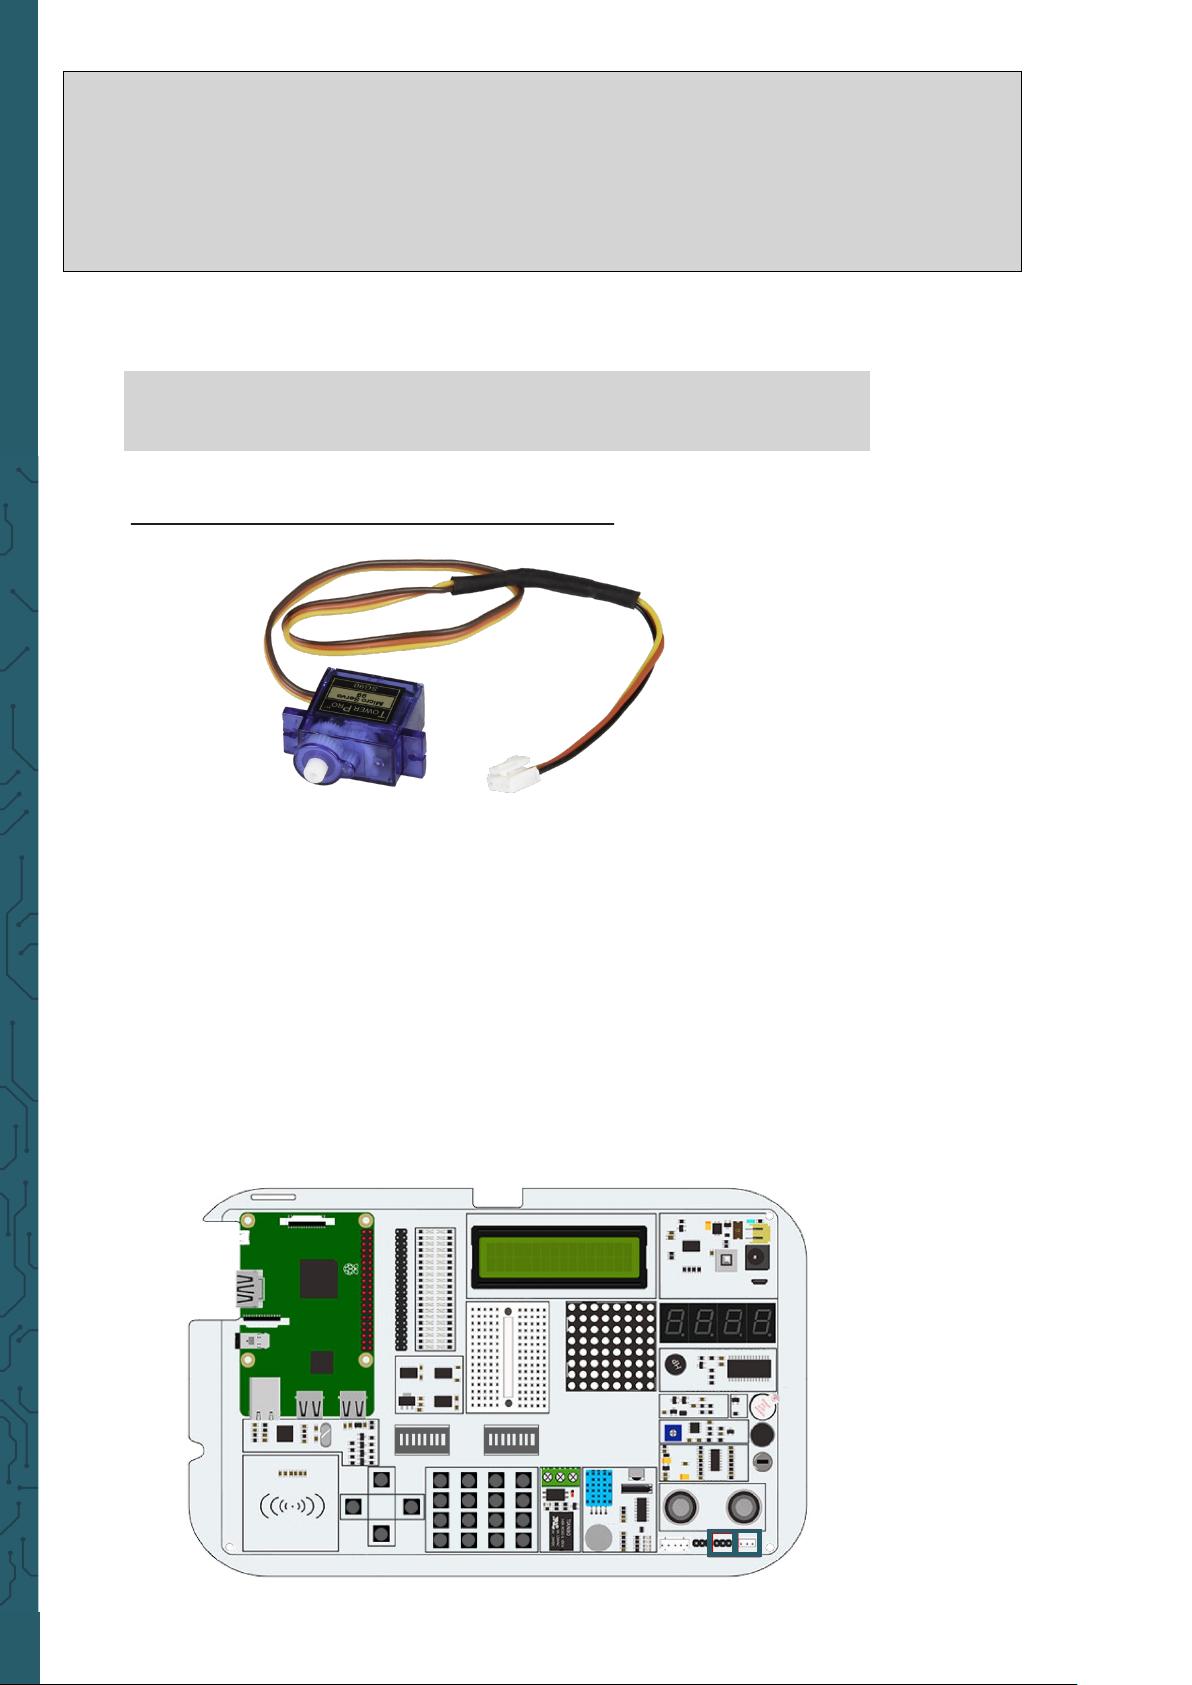
The Joy-Pi has two servo interfaces, both of which can be used to control
servo motors. In this tutorial, we will use interface number two, which is
marked as
Servo2
. Of course, you can also use the other servo interface,
but you have to adapt the script to the correct GPIOs for this.
The servomotor needs three pins: positive, negative, and the data pin.
The positive pin is the red cable, the negative pin is the black cable (also
called ground) and the data cable is yellow.
Page 42
www.joy-it.net
Pascalstr. 8 47506 Neukirchen-Vluyn
Let's take a look at our example code to understand it better:
The servo uses the GPIO.Board pin number 22. Each time the script will
set the direction of the servo motor to rotate. We can use positive
degrees to rotate le and negative degrees to rotate right. Just change
the degrees and see how the rotation of the motor changes.
Attention! For this example you have to switch between the
modules. Turn switch number 7 and 8 on the right switching
unit ON. All the other switches should be turned OFF.
Cable Pin
Brown
Le pin of Ser-
vo2
Red
Middle pin of
Servo2
Orange
Right pin of
Servo2
Execute the following commands and try it yourself:
cd /home/pi/Desktop/Joy-Pi
sudo python3 servo.py
#!/usr/bin/python
# -*- coding: utf-8 -*# Author : Original author WindVoiceVox
# Original Author Github: https://github.com/WindVoiceVox/Raspi_SG90
import RPi.GPIO as GPIO
import time
import sys
class sg90:
def __init__( self, pin, direction ):
GPIO.setmode( GPIO.BOARD )
GPIO.setup( pin, GPIO.OUT )
self.pin = int( pin )
self.direction = int( direction )
self.servo = GPIO.PWM( self.pin, 50 )
self.servo.start(0.0)
def cleanup( self ): #function to stop and to release used GPIOs
self.servo.ChangeDutyCycle(self._henkan(0))
time.sleep(0.3)
self.servo.stop()
GPIO.cleanup()
Code example servomotor:
Page 43
www.joy-it.net
Pascalstr. 8 47506 Neukirchen-Vluyn
Lesson 14 : Controlling the 8 x 8 LED matrix
The LED matrix plays an important role in many flashing LED projects.
Even if you don't see it at first glance, the LED matrix can do much more
than just blink red. It can be used to display small symbols and you can
even play Snake on it.
The LED matrix module is a large square module located on the le side
of the segment LED and just below the LCD. It can easily be recognized by
the small white dots that are the LEDs.
In this example, we display a short text on the LED matrix. In the script,
we create a string with a message and use therefore show_message(), to
display it on the matrix.
We can control properties, such as delays, that make the message faster
or slower. The Matrix LED, unlike other modules, uses an SPI interface
from which it can be controlled. Try this example and modify it to see
how you influence the displayed information.
def currentdirection( self ): #function which set the current position
return self.direction
def _henkan( self, value ):
return 0.05 * value + 7.0
def setdirection( self, direction, speed ): #function to indicate direction
for d in range( self.direction, direction, int(speed) ):
self.servo.ChangeDutyCycle( self._henkan( d ) )
self.direction = d
time.sleep(0.1)
self.servo.ChangeDutyCycle( self._henkan( direction ) )
self.direction = direction
def main():
servo_pin = 22
s = sg90(servo_pin,0) #declaration of pin and motor
try:
while True:
print ("Turn left ...")
s.setdirection( 100, 10 ) #rotate around left
time.sleep(0.5) #wait 0.5 seconds
print ("Turn right ...")
s.setdirection( -100, -10 ) #rotate around right
time.sleep(0.5) #wait 0.5 seconds
except KeyboardInterrupt:
s.cleanup()
if __name__ == "__main__":
main()
Code example continued:
Page 44
www.joy-it.net
Pascalstr. 8 47506 Neukirchen-Vluyn
#!/usr/bin/env python
# -*- coding: utf-8 -*# Copyright (c) 2017-18 Richard Hull and contributors
# License: https://github.com/rm-hull/luma.led_matrix/blob/master/LICENSE.rst
# Github link: https://github.com/rm-hull/luma.led_matrix/
#download all required modules
import re
import time
from luma.led_matrix.device import max7219
from luma.core.interface.serial import spi, noop
from luma.core.render import canvas
from luma.core.virtual import viewport
from luma.core.legacy import text, show_message
from luma.core.legacy.font import proportional, CP437_FONT, TINY_FONT, SINCLAIR_FONT, LCD_FONT
def main(cascaded, block_orientation, rotate):
#create and set matrix device
serial = spi(port=0, device=1, gpio=noop())
device = max7219(serial, cascaded=cascaded or 1, block_orientation=block_orientation,
rotate=rotate or 0)
#display initilisation of matrix in console
print("[-] Matrix initialized")
#show Hello World on matrix
msg = "Hello World"
#show issued text in console
print("[-] Printing: %s" % msg)
show_message(device, msg, fill="white", font=proportional(CP437_FONT), scroll_delay=0.1)
if __name__ == "__main__":
# cascaded = Number of cascaded MAX7219 LED matrices, default = 1
# block_orientation = choices 0, 90, -90, default = 0
# rotate = choices 0, 1, 2, 3, Rotate display 0=0°, 1=90°, 2=180°, 3=270°, default = 0
try:
main(cascaded=1, block_orientation=90, rotate=0)
except KeyboardInterrupt:
pass
Execute the following commands and try it yourself:
cd /home/pi/Desktop/Joy-Pi
sudo python3 matrix_demo.py
Code example LED matrix
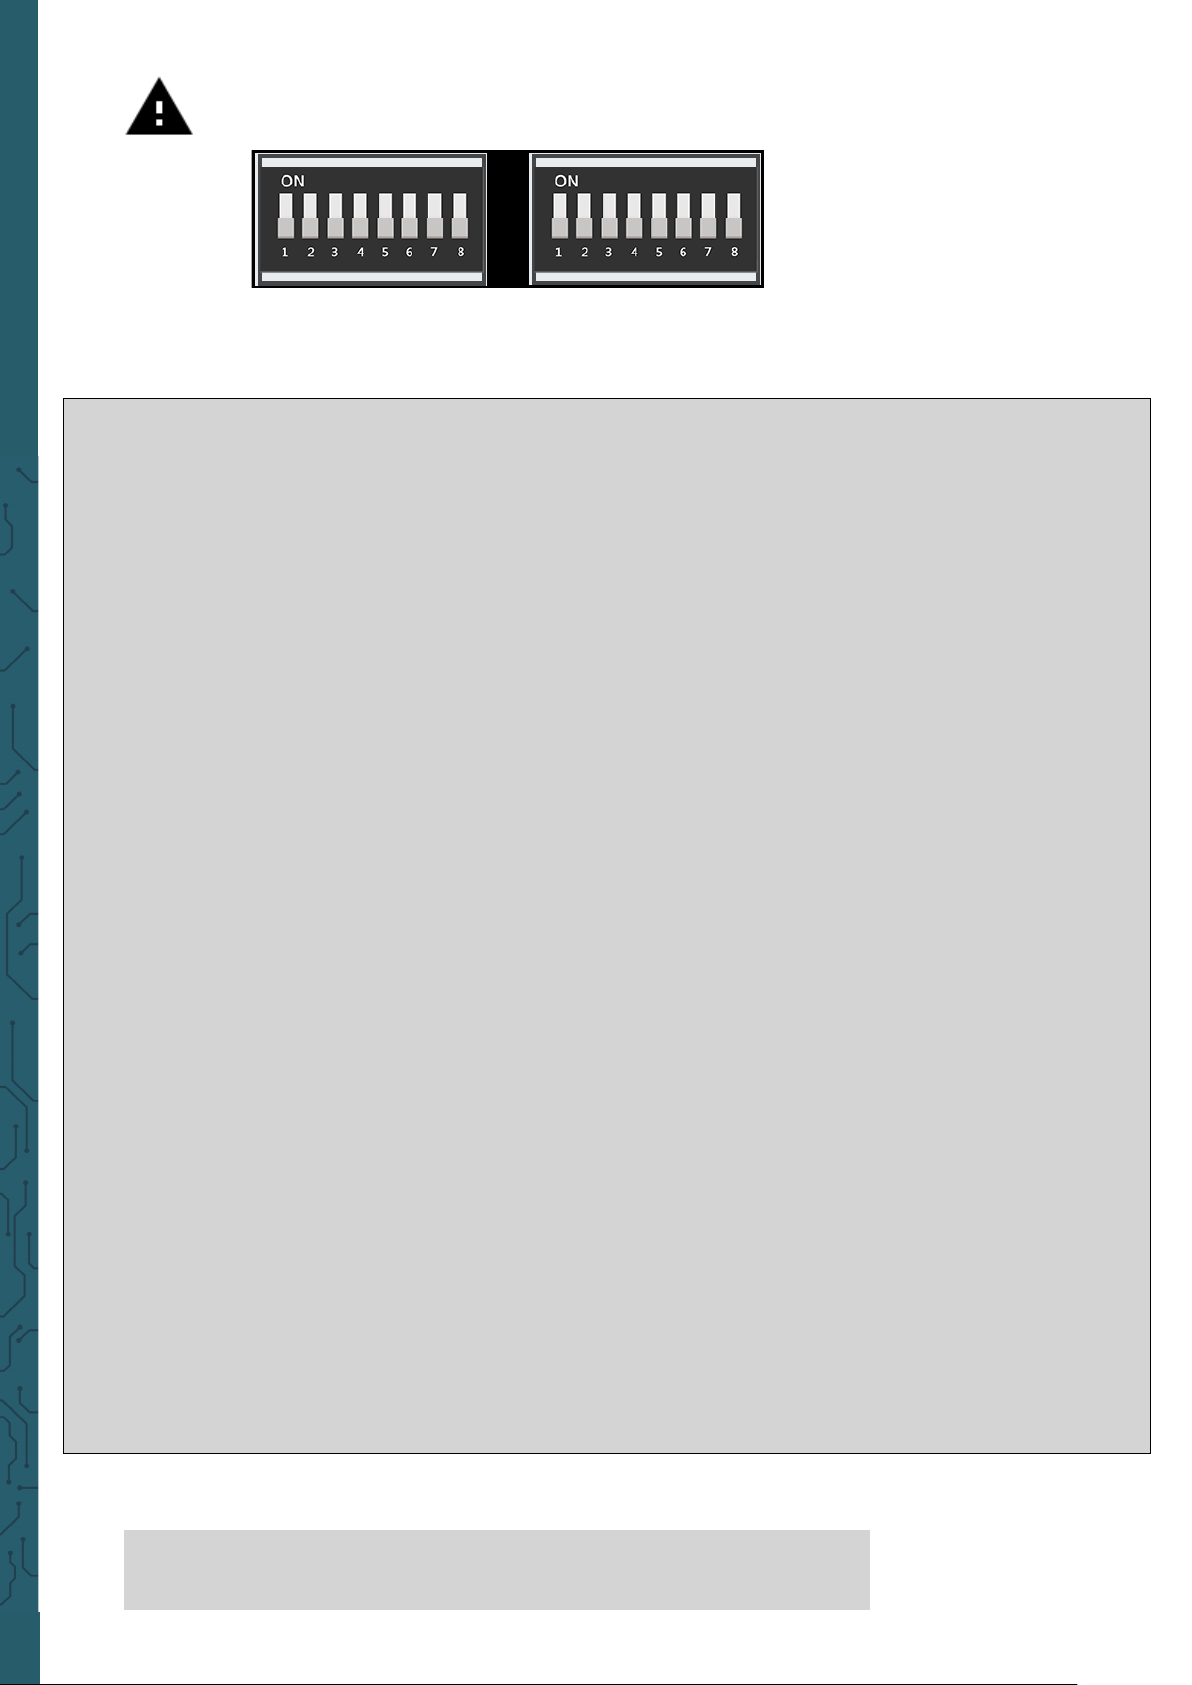
Attention! In this example you have to switch all switching units
on the le as well as all on the right OFF.
Page 45
www.joy-it.net
Pascalstr. 8 47506 Neukirchen-Vluyn
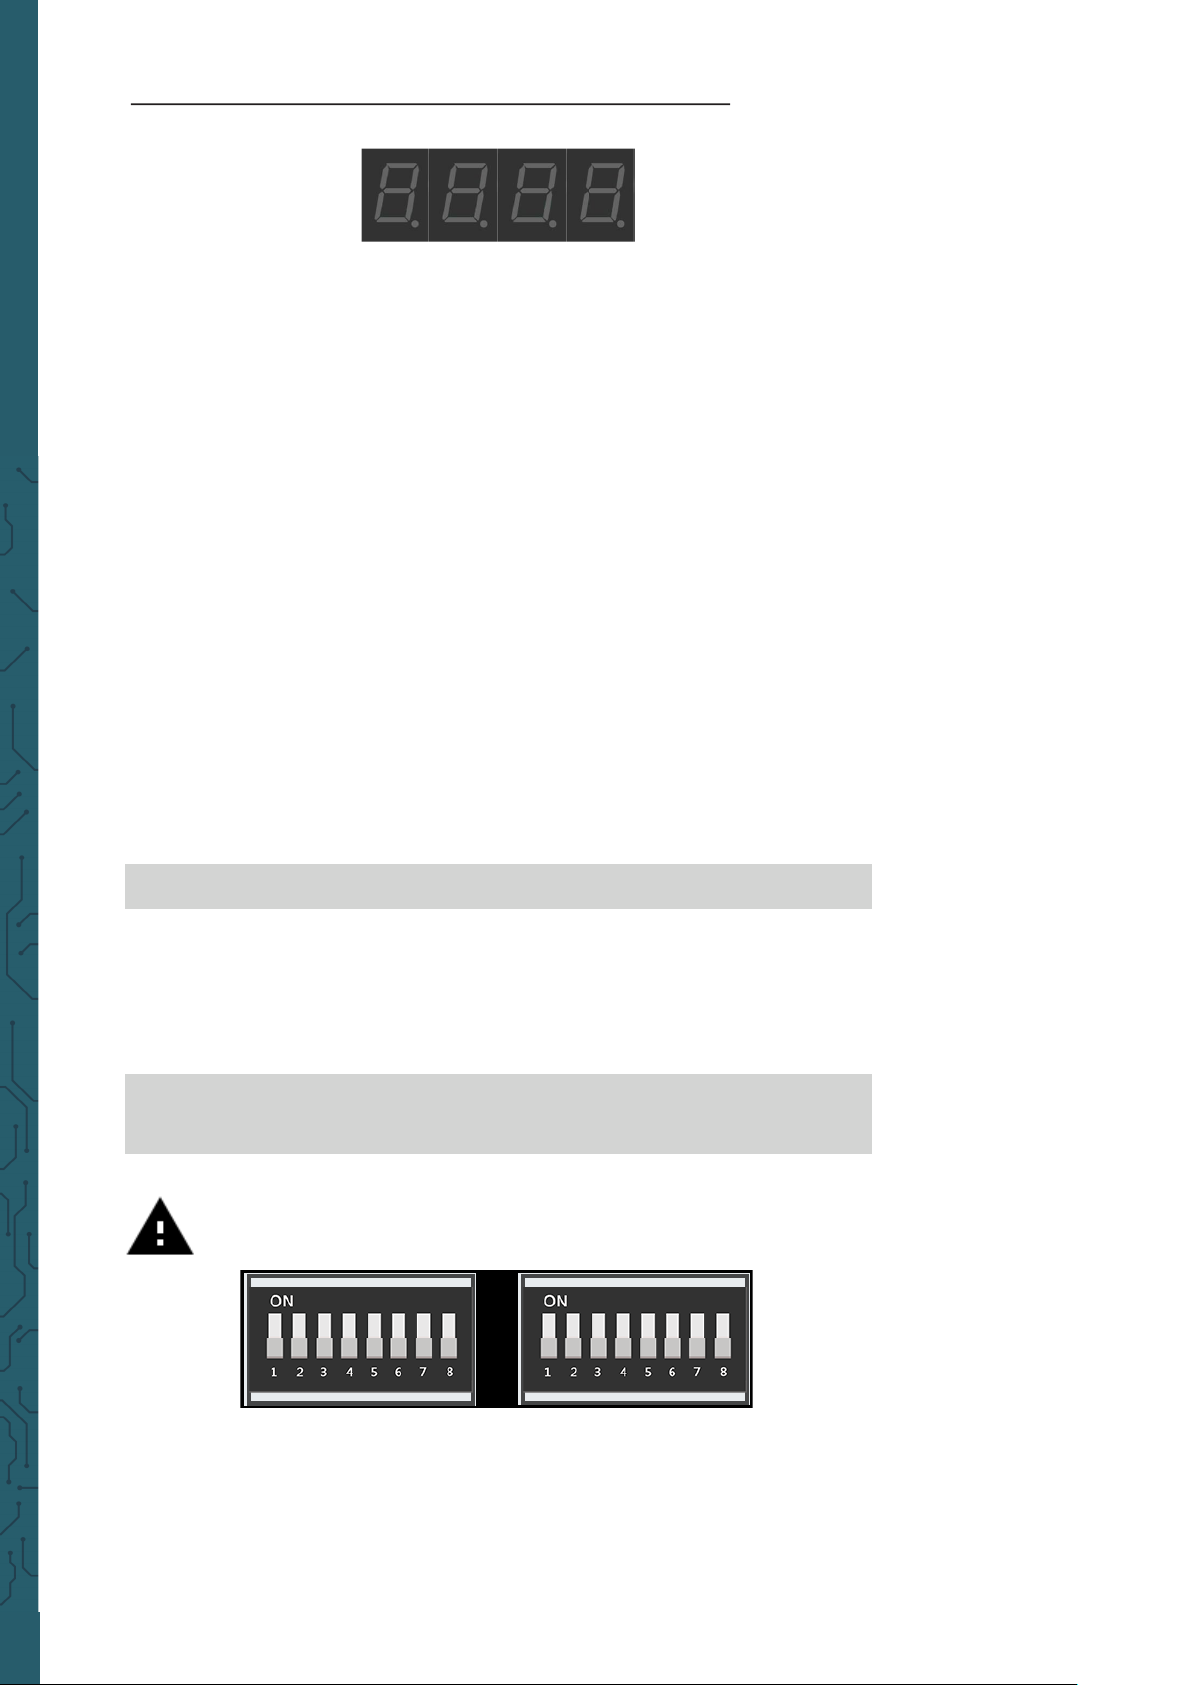
Lesson 15 : Controlling the 7 segment display
The segment LED is a very useful display when it comes to numbers and
data. It can show us the time and can count how many times we have
done certain things. The segment display is also used in many industrial
solutions, such as elevators.
The segment display is located directly above the vibration sensor and
next to the LED matrix. When it is turned o, 4 eights are visible. As soon
as you have activated the segment display module the dark colour becomes a shiny, bright red.
In our example, we demonstrate a clock. We will use the time and date
modules to get the Raspberry Pi system time, which we display using the
segment.write_display() function. The set_digit() function, in
combination with the numbers 0,1,2 and 3, sets the position on the
display where the number should be shown.
Since the current system time is retrieved in this example, it is necessary
to configure the Raspberry Pi to the correct time zone first. Open a terminal window and enter the following command:
sudo dpkg-reconfigure tzdata
A window opens in which you can select your current time zone. Aer you
have selected the correct time zone, confirm with the OK button and
press Enter again to confirm.
Execute the following commands and try it yourself:
cd /home/pi/Desktop/Joy-Pi
sudo python3 segment.py
Attention! In this example you have to switch all switching units
on the le as well as all on the right OFF.
Page 46

www.joy-it.net
Pascalstr. 8 47506 Neukirchen-Vluyn
#!/usr/bin/python
# -*- coding: utf-8 -*-
import time
import datetime
from Adafruit_LED_Backpack import SevenSegment
segment = SevenSegment.SevenSegment(address=0x70)
#segment of I2C address 0x70 and assign the display definition
segment.begin()
#intialisation of the display, must be performed once before the display can be used
print ("CTRL+C Druecken zum beenden.") #print Befehl für Ausgabe zum beenden des Scriptes
#loop which permanently updates the time and shows on the display
try:
while(True):
now = datetime.datetime.now()
hour = now.hour
minute = now.minute
second = now.second
segment.clear()
#display for the hours
segment.set_digit(0, int(hour / 10)) #tens
segment.set_digit(1, hour % 10) #single - figure numerals
#display for the minutes
segment.set_digit(2, int(minute / 10)) #tens
segment.set_digit(3, minute % 10) #single - figure numerals
segment.set_colon(second % 2)
segment.write_display() #is needed to update LEDs
time.sleep(1) #wait one second
except KeyboardInterrupt:
segment.clear()
segment.write_display()
Code example segment display
Page 47
www.joy-it.net
Pascalstr. 8 47506 Neukirchen-Vluyn
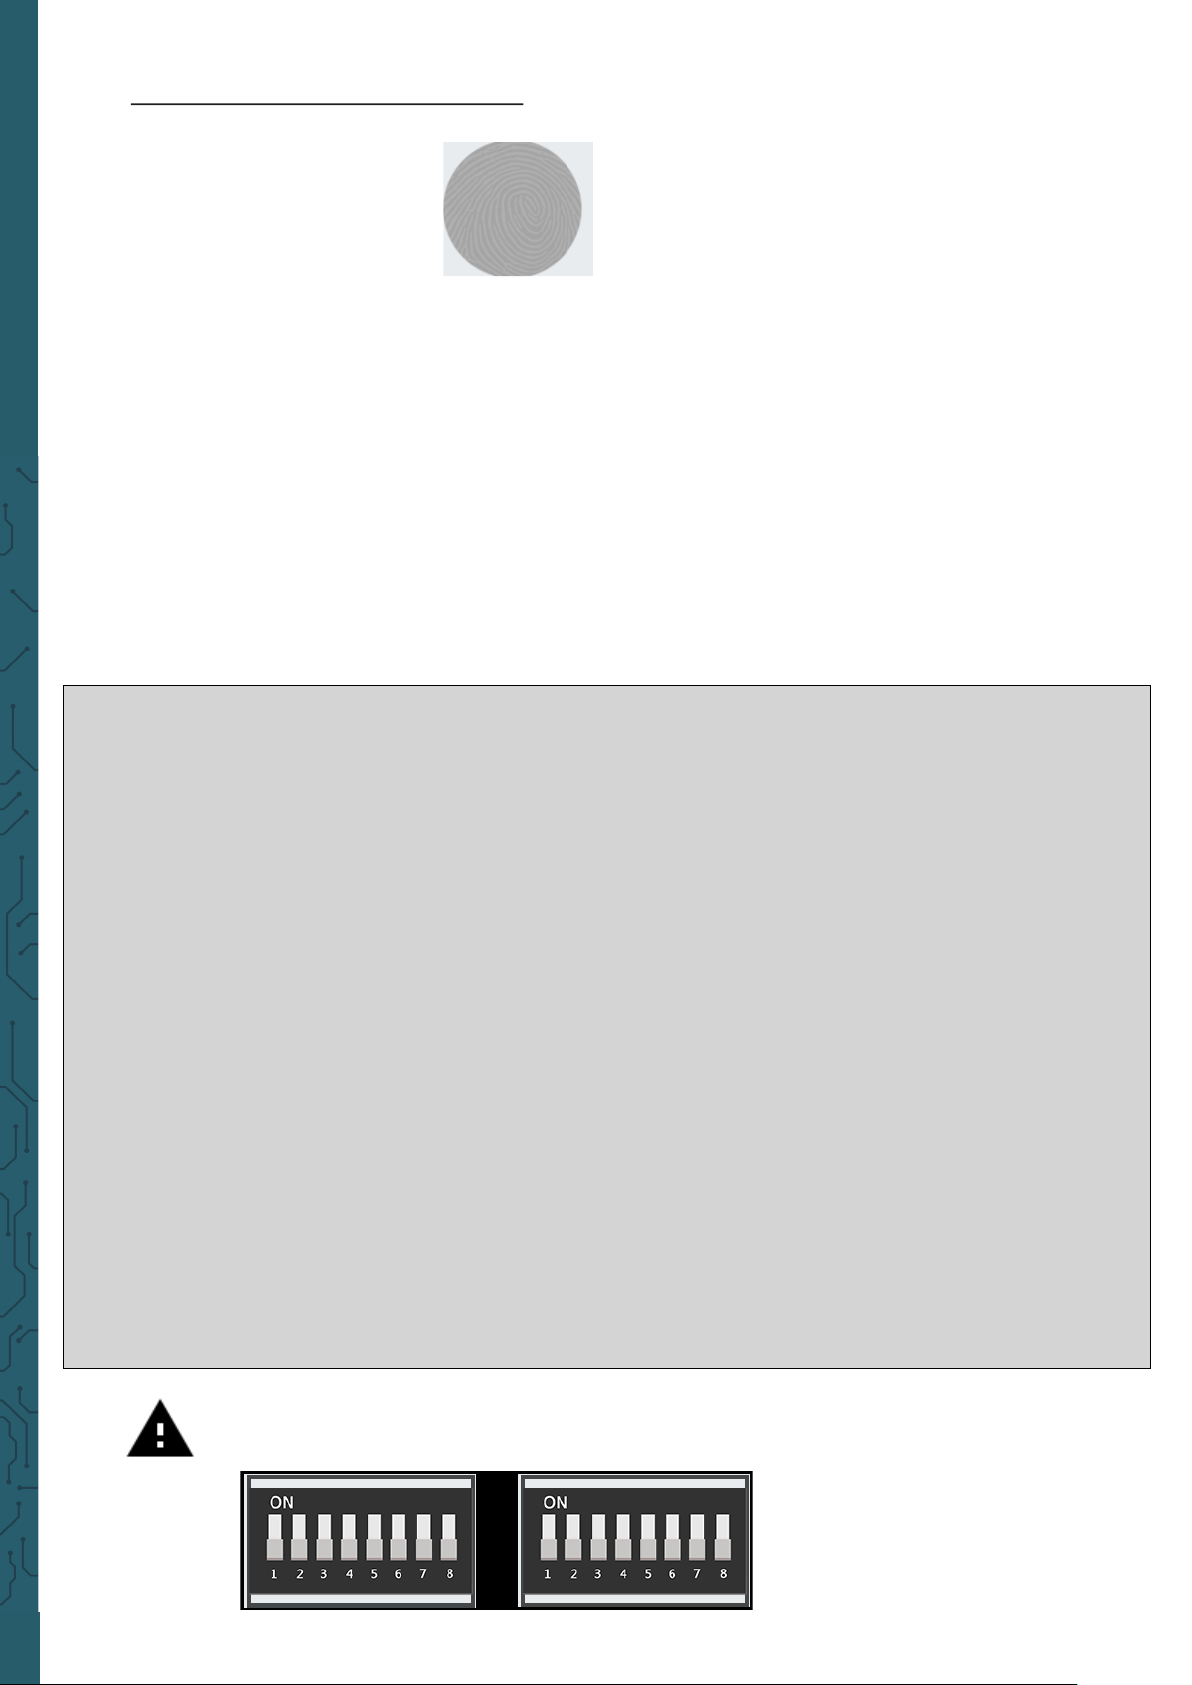
Lesson 16 : Detecting touches
The touch sensor is very useful when it comes to key functions. Many
products on the market use touch instead of pressing a button, such as
smartphones and tablets. The touch sensor is located directly below the
DHT11 sensor and to the right of the relay. The easily accessible
positioning on the Joy-Pi allows easy operation.
The touch sensor works like any other key module. The only dierence is
that it only needs to be touched instead of pressed. By touching the
touch sensor, the module closes a circuit because the computer detects
that the sensor has been touched. The touch sensor uses GPIO board pin
11.
Code examples touch sensor:
Attention! In this example you have to switch all switching units
on the le as well as all on the right OFF.
#!/usr/bin/env python
# -*- coding: utf-8 -*-
from RPi import GPIO #add libraries
import signal
TOUCH = 11 #set TOUCH pin 11 (declaration of variables).
def setup_gpio(): #create function setup_gpio
GPIO.setmode(GPIO.BOARD) #use GPIO pins like in the GPIO board schemata
GPIO.setup(TOUCH, GPIO.IN, pull_up_down=GPIO.PUD_UP)
def do_smt(channel):
print("Touch detected")
def main():
setup_gpio()
try:
GPIO.add_event_detect(TOUCH, GPIO.FALLING, callback=do_smt, bouncetime=200)
signal.pause()
except KeyboardInterrupt:
pass
finally:
GPIO.cleanup()
if __name__ == '__main__':
main()
Page 48
www.joy-it.net
Pascalstr. 8 47506 Neukirchen-Vluyn
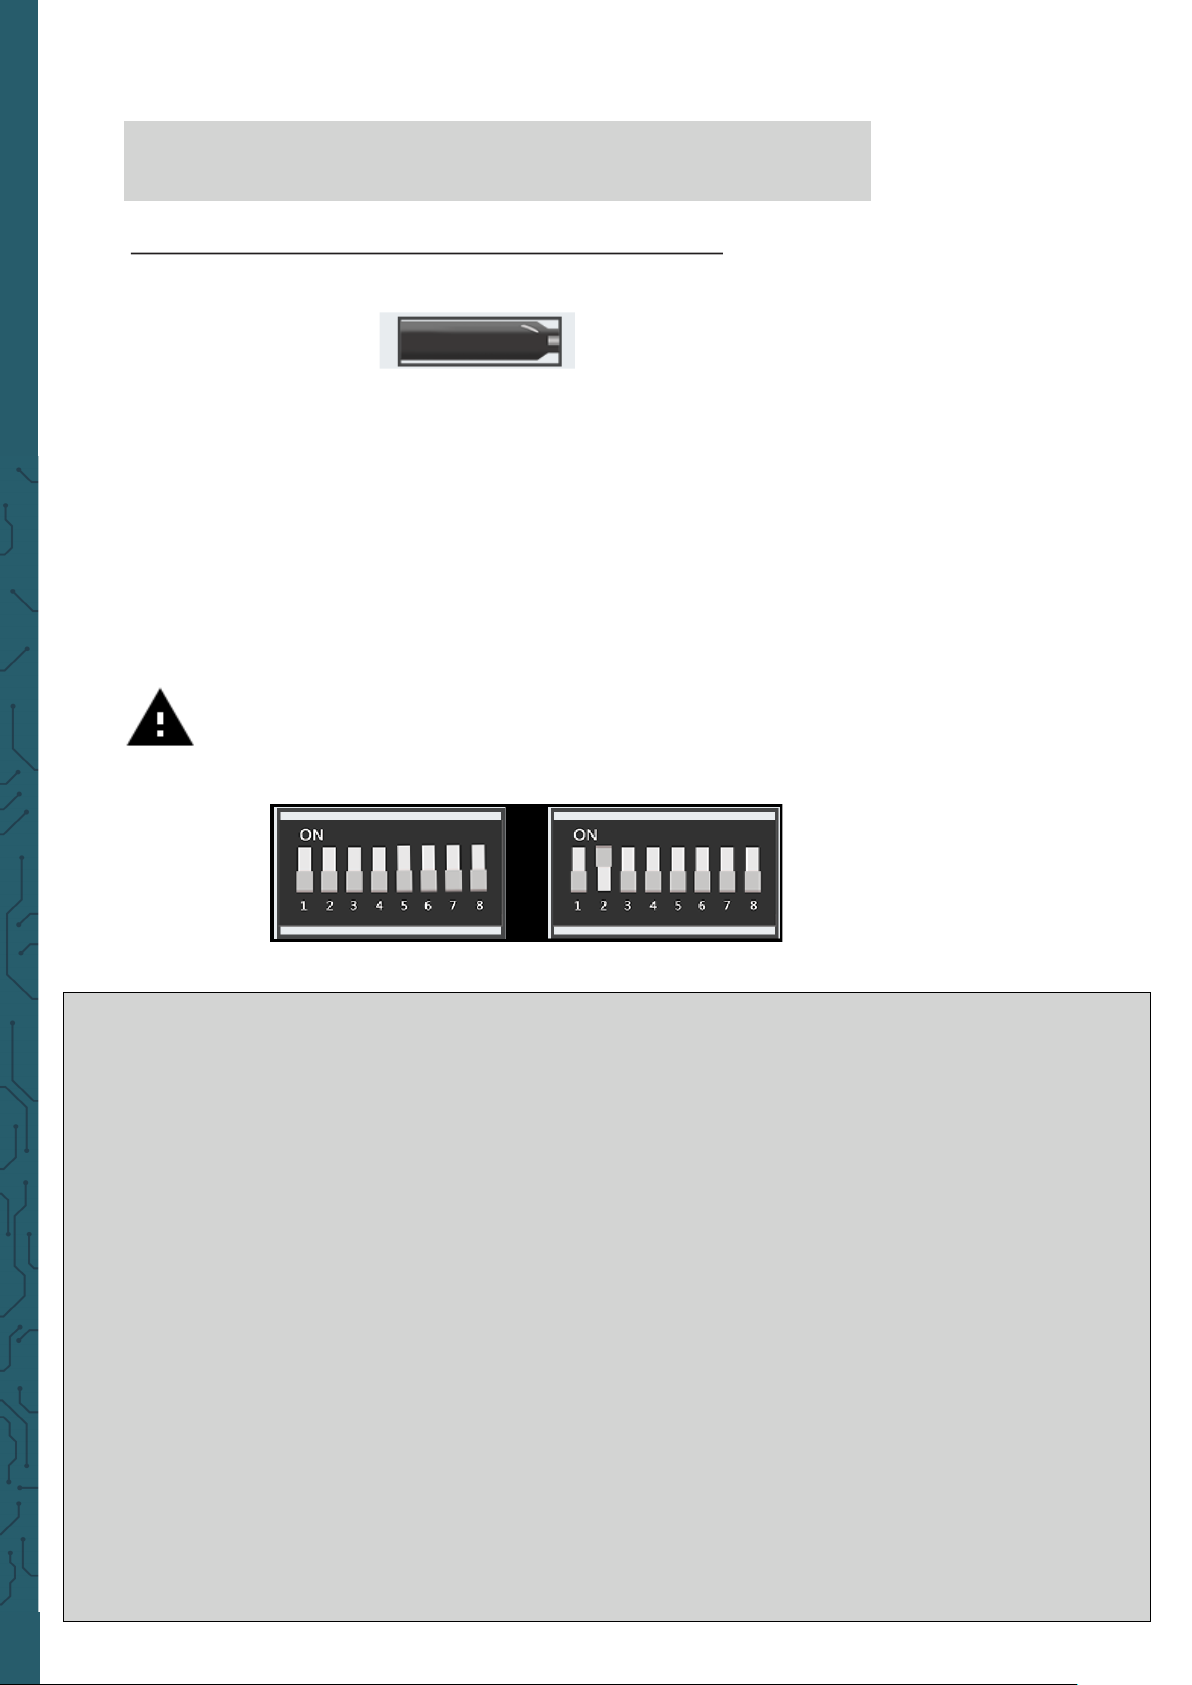
Attention! For this example you have to switch between the
modules. Turn switch number 2 on the right switching unit ON.
All the other switches should be turned OFF.
Execute the following commands and try it yourself:
cd /home/pi/Desktop/Joy-Pi
sudo python3 touch.py
Lesson 17 : Detecting tilts with the tilt sensor
The tilt sensor allows us to detect an inclination to the right or le. It is
used in robotics and other industries to ensure that things are held
straight. It is a small, elongated, black sensor that lies between the
DHT11 sensor and the ultrasonic sensor and can easily be detected by the
sound it makes when you tilt the board a little.
If the tilt sensor is tilted to the le, the circuit is activated and a
GPIO
HIGH
signal is sent. If the tilt sensor is tilted to the right, the circuit is
deactivated and a
GPIO LOW
signal is sent.
Code example tilt sensor:
#!/usr/bin/python
import time
import RPi.GPIO as GPIO
#define tilt_pin
tilt_pin = 15
#set GPIO mode to GPIO.BOARD
GPIO.setmode(GPIO.BOARD)
# set pin as INPUT
GPIO.setup(tilt_pin, GPIO.IN)
try:
while True:
#positive is tilt to the left / negative is tilt to the right
if GPIO.input(tilt_pin):
print ("[-] Left Tilt")
else:
print ("[-] Right Tilt")
time.sleep(1)
except KeyboardInterrupt:
#CTRL+C exists programm
GPIO.cleanup()
Page 49
www.joy-it.net
Pascalstr. 8 47506 Neukirchen-Vluyn
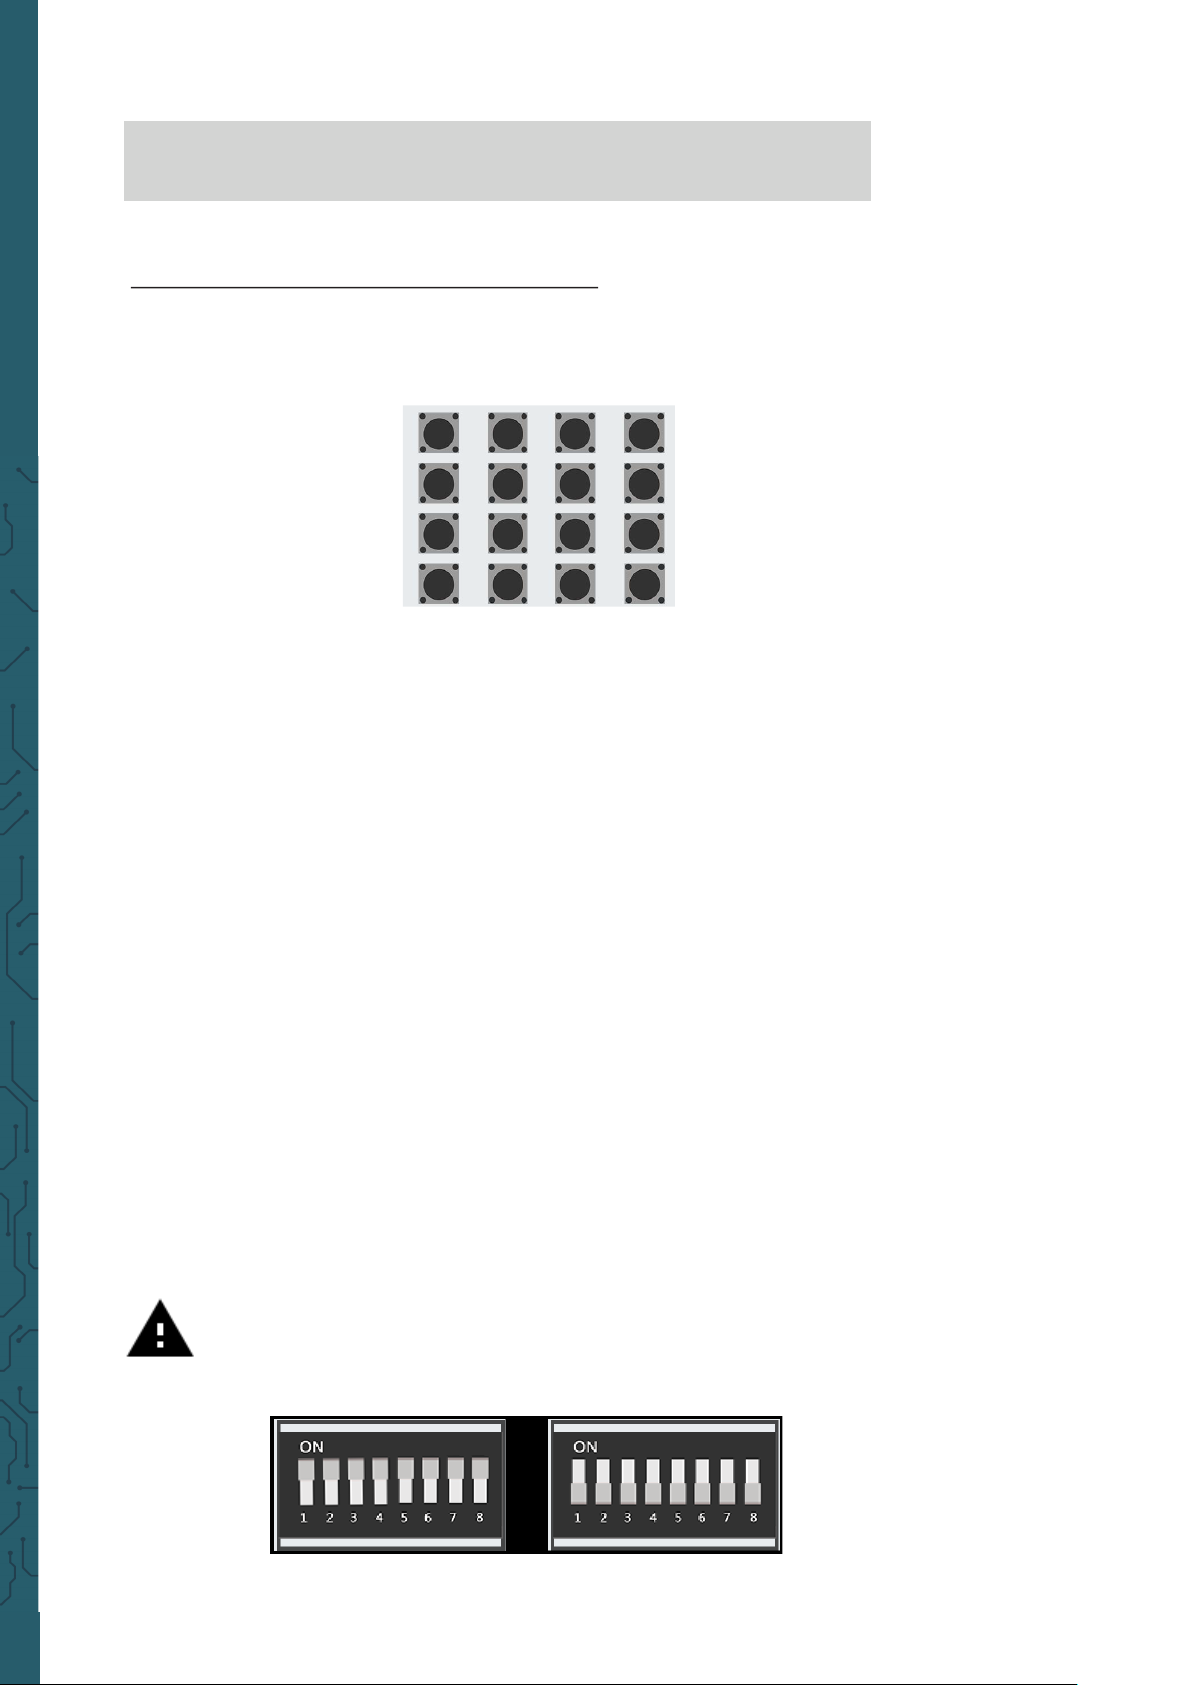
Attention! For this example you have to switch between the
modules. Turn ALL switches on the le switching unit ON. All
the other switches should be turned OFF.
Execute the following commands and try it yourself:
cd /home/pi/Desktop/Joy-Pi
sudo python3 tilt.py
Lesson 18 : Using the button matrix
The button matrix is a module with 16 independent buttons that can be
used for many projects such as a keyboard or a memory game.
The button matrix is located at the bottom center of the Joy-Pi board, to
the right of the relay. It is easily recognizable by the 16 individual buttons.
The excellent positioning on the board allows easy operation of the keys
while still providing a good overview of all other sensors.
The button matrix consists of four columns and rows. We configure the
matrix rows and columns with their GPIO pins and initialize the object
ButtonMatrix() as a variable for buttons. Then we can press any button of
the matrix and see which one has been pressed.
In our example, aer recognizing a keystroke, we activate the function
activateButton(), which displays the number of the pressed button. You
can, of course, edit this module to do anything you can imagine.
Columns (COL):
1 2 3 4
Rows (ROW):
1
2
3 4
Page 50

www.joy-it.net
Pascalstr. 8 47506 Neukirchen-Vluyn
#!/usr/bin/python
# -*- coding: utf-8 -*# Author : original author stenobot
# Original Author Github: https://github.com/stenobot/SoundMatrixPi
import RPi.GPIO as GPIO
import time
class ButtonMatrix():
def __init__(self):
GPIO.setmode(GPIO.BOARD)
#set IDs of the buttons
self.buttonIDs = [[4,3,2,1],[8,7,6,5],[12,11,10,9],[16,15,14,13]]
#declarate GPIO pins for the lines
self.rowPins = [13,15,29,31]
#declarate GPIO pins for the columns
self.columnPins = [33,35,37,22]
#define 4 inputs with pull up resistors
for i in range(len(self.rowPins)):
GPIO.setup(self.rowPins[i], GPIO.IN, pull_up_down = GPIO.PUD_UP)
#define 4 outputs ans set them on high
for j in range(len(self.columnPins)):
GPIO.setup(self.columnPins[j], GPIO.OUT)
GPIO.output(self.columnPins[j], 1)
def activateButton(self, rowPin, colPin):
#get button number
btnIndex = self.buttonIDs[rowPin][colPin] - 1
print("button " + str(btnIndex + 1) + " pressed")
#prevent several presses on a button in a short time
time.sleep(.3)
def buttonHeldDown(self,pin):
if(GPIO.input(self.rowPins[pin]) == 0):
return True
return False
def main():
#initialisation of button matrix
buttons = ButtonMatrix()
try:
while(True):
for j in range(len(buttons.columnPins)):
#every output pin is set on low
GPIO.output(buttons.columnPins[j],0)
for i in range(len(buttons.rowPins)):
if GPIO.input(buttons.rowPins[i]) == 0:
buttons.activateButton(i,j)
#do nothing as long as teh button is pressed
while(buttons.buttonHeldDown(i)):
pass
GPIO.output(buttons.columnPins[j],1)
except KeyboardInterrupt:
GPIO.cleanup()
if __name__ == "__main__":
main()
Page 51
www.joy-it.net
Pascalstr. 8 47506 Neukirchen-Vluyn
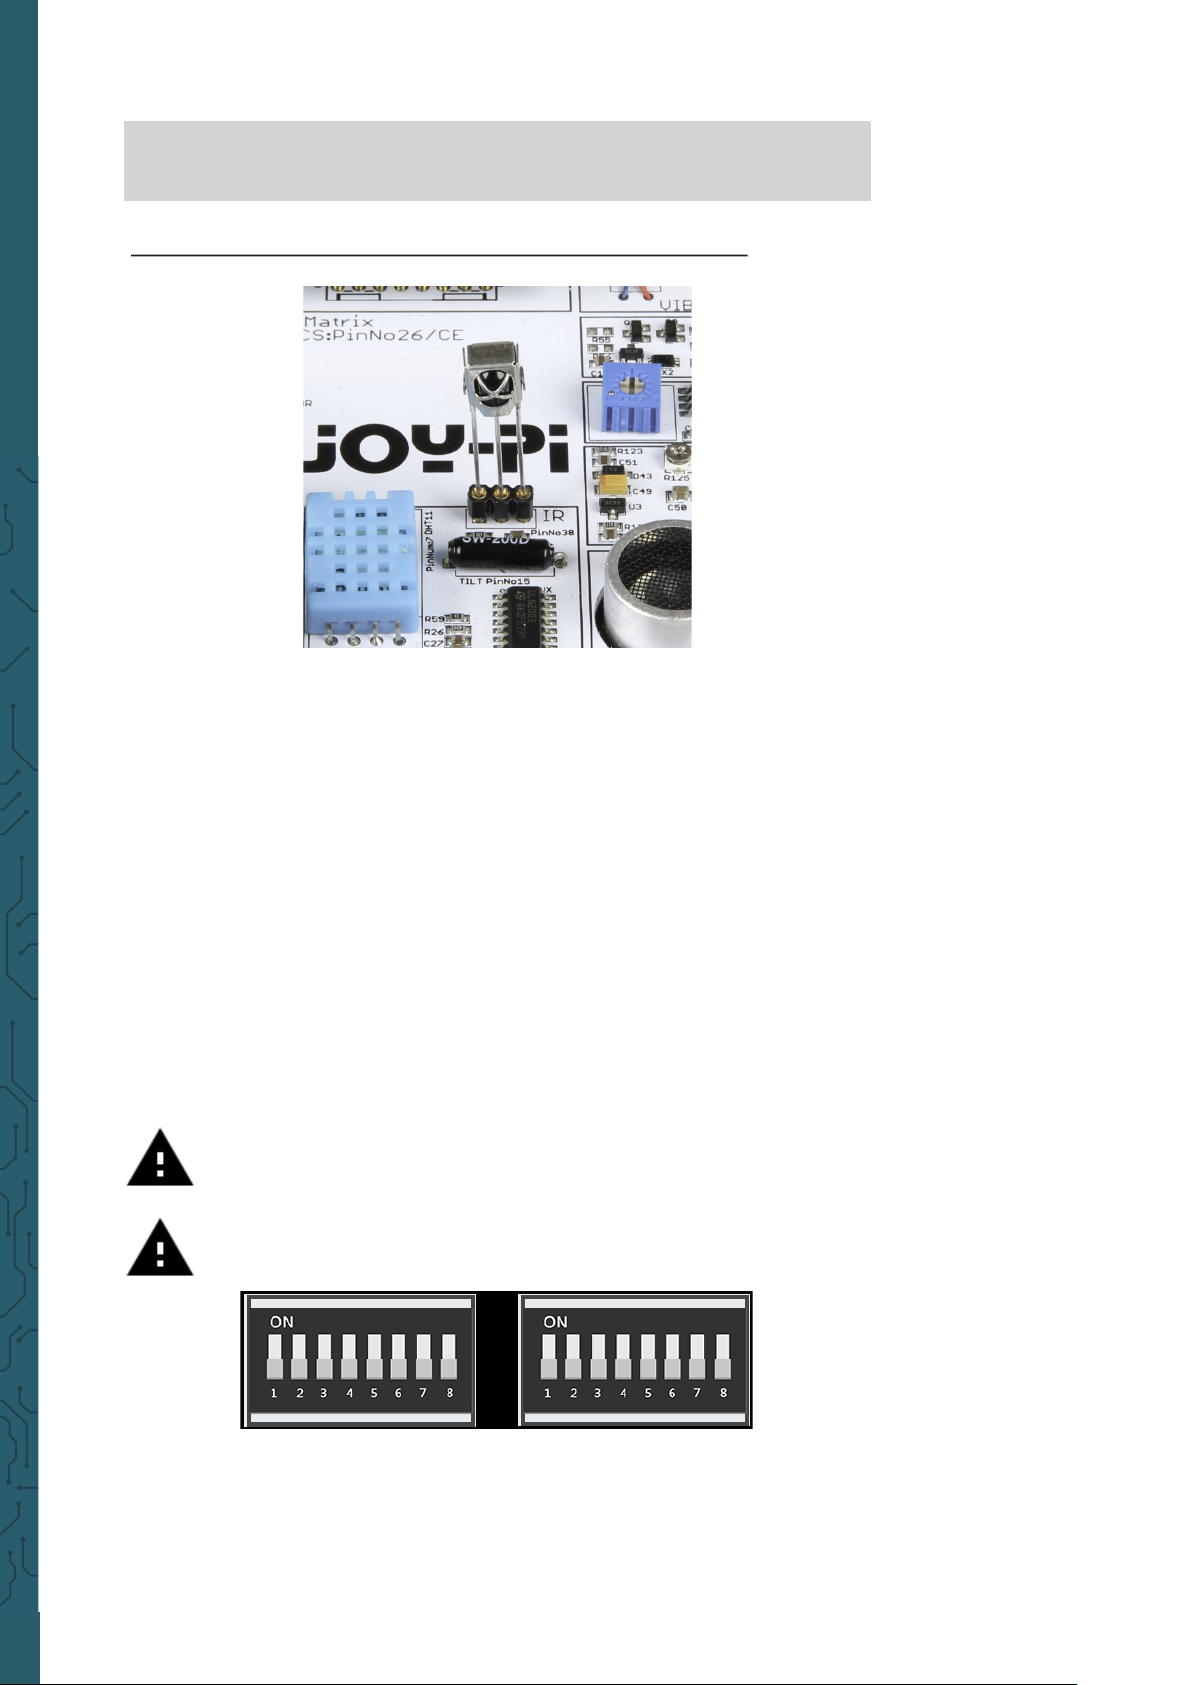
Important! Remove the IR-sensor before you close the Joy-Pi
case.
Execute the following commands and try it yourself:
cd /home/pi/Desktop/Joy-Pi
sudo python3 button_matrix.py
Lesson 19 : Controlling and using the IR sensor
In this lesson, we will learn how to use the infrared receiver and how to
receive IR codes from a remote control. The use of this method is
extremely useful because we can use dierent define actions for dierent
buttons. With a remote control, we can switch on dierent LEDs or control the servo motor each time the button is pressed.
The IR sensor will be delivered with the Joy-Pi but is not pre-installed.
You have to plug it in the slot as shown in the picture above. The IR
sensor is located to the right of the DHT11 sensor and above the tilt sen-
sor. It looks like a small LED with 3 pins. We also need the IR remote con-
trol, which is included in the Joy-Pi-Kit.
Attention! In this example you have to switch all switching units
on the le as well as all on the right OFF.
Page 52

www.joy-it.net
Pascalstr. 8 47506 Neukirchen-Vluyn
#!/usr/bin/env python3
"""IRModuleExample1, program to practice using the IRModule
Created Apr 30, 2018"""
"""
Copyright 2018 Owain Martin
This program is free software: you can redistribute it and/or modify
it under the terms of the GNU General Public License as published by
the Free Software Foundation, either version 3 of the License, or
(at your option) any later version.
This program is distributed in the hope that it will be useful,
but WITHOUT ANY WARRANTY; without even the implied warranty of
MERCHANTABILITY or FITNESS FOR A PARTICULAR PURPOSE. See the
GNU General Public License for more details.
You should have received a copy of the GNU General Public License
along with this program. If not, see <http://www.gnu.org/licenses/>.
"""
import RPi.GPIO as GPIO
import IRModule
import time
def remote_callback(code):
# Codes listed below are for the
# Sparkfun 9 button remote
if code == 0xffa25d:
print("KEY_CH-")
elif code == 0xff629d:
print('KEY_CH')
elif code == 0xffe21d:
print('KEY_CH+')
elif code == 0xff22dd:
print('KEY_PREV')
elif code == 0xff02fd:
print('KEY_NEXT')
elif code == 0xffc23d:
print('KEY_PLAY/PAUSE')
elif code == 0xffe01f:
print('KEY_VOL-')
elif code == 0xffa857:
print('KEY_VOL+')
elif code == 0xff906f:
print('KEY_EQ')
elif code == 0xff6897:
print('KEY_0')
elif code == 0xff9867:
print('KEY_100+')
Code example IR receiver:
Page 53

www.joy-it.net
Pascalstr. 8 47506 Neukirchen-Vluyn
elif code == 0xffb04f:
print('KEY_200+')
elif code == 0xff30cf:
print('KEY_1')
elif code == 0xff18e7:
print('KEY_2')
elif code == 0xff7a85:
print('KEY_3')
elif code == 0xff10ef:
print('KEY_4')
elif code == 0xff38c7:
print('KEY_5')
elif code == 0xff5aa5:
print('KEY_6')
elif code == 0xff42bd:
print('KEY_7')
elif code == 0xff4ab5:
print('KEY_8')
elif code == 0xff52ad:
print('KEY_9')
else:
print('UNKNOWN') # unknown code
return
# set up IR pi pin and IR remote object
irPin = 20
ir = IRModule.IRRemote(callback='DECODE')
# using 'DECODE' option for callback will print out
# the IR code received in hexadecimal
# this can used to get the codes for whichever NEC
# compatable remote you are using
# set up GPIO options and set callback function required
# by the IR remote module (ir.pWidth)
GPIO.setwarnings(False)
GPIO.setmode(GPIO.BCM) # uses numbering outside circles
GPIO.setup(irPin,GPIO.IN) # set irPin to input
GPIO.add_event_detect(irPin,GPIO.BOTH,callback=ir.pWidth)
ir.set_verbose() # verbose option prints outs high and low width durati-
ons (ms)
print('Starting IR remote')
print('Use ctrl-c to exit program')
Code example IR receiver:
Page 54

www.joy-it.net
Pascalstr. 8 47506 Neukirchen-Vluyn
try:
#time.sleep(5)
# turn off verbose option and change callback function
# to the function created above - remote_callback()
print('Turning off verbose setting and setting up callback')
ir.set_verbose(False)
ir.set_callback(remote_callback)
# This is where you could do other stuff
# Blink a light, turn a motor, run a webserver
# count sheep or mine bitcoin
while True:
time.sleep(1)
except:
print('Removing callback and cleaning up GPIO')
ir.remove_callback()
GPIO.cleanup(irPin)
Code example IR receiver:
cd /home/pi/Desktop/Joy-Pi
sudo python3 IR.py
Lesson 20: Own circuits with the breadboard
The breadboard is an extremely useful part of the Joy-Pi that allows us to
create our own circuits and functions. Now that we've learned how to use
all the sensors, it's time to create our own. In this lesson, you will create
your first custom circuit using a flashing LED example. The breadboard is
located in the middle of the Joy-Pi board. It is a small, white, board with
many small holes.
Execute the following commands and try it yourself:
Page 55
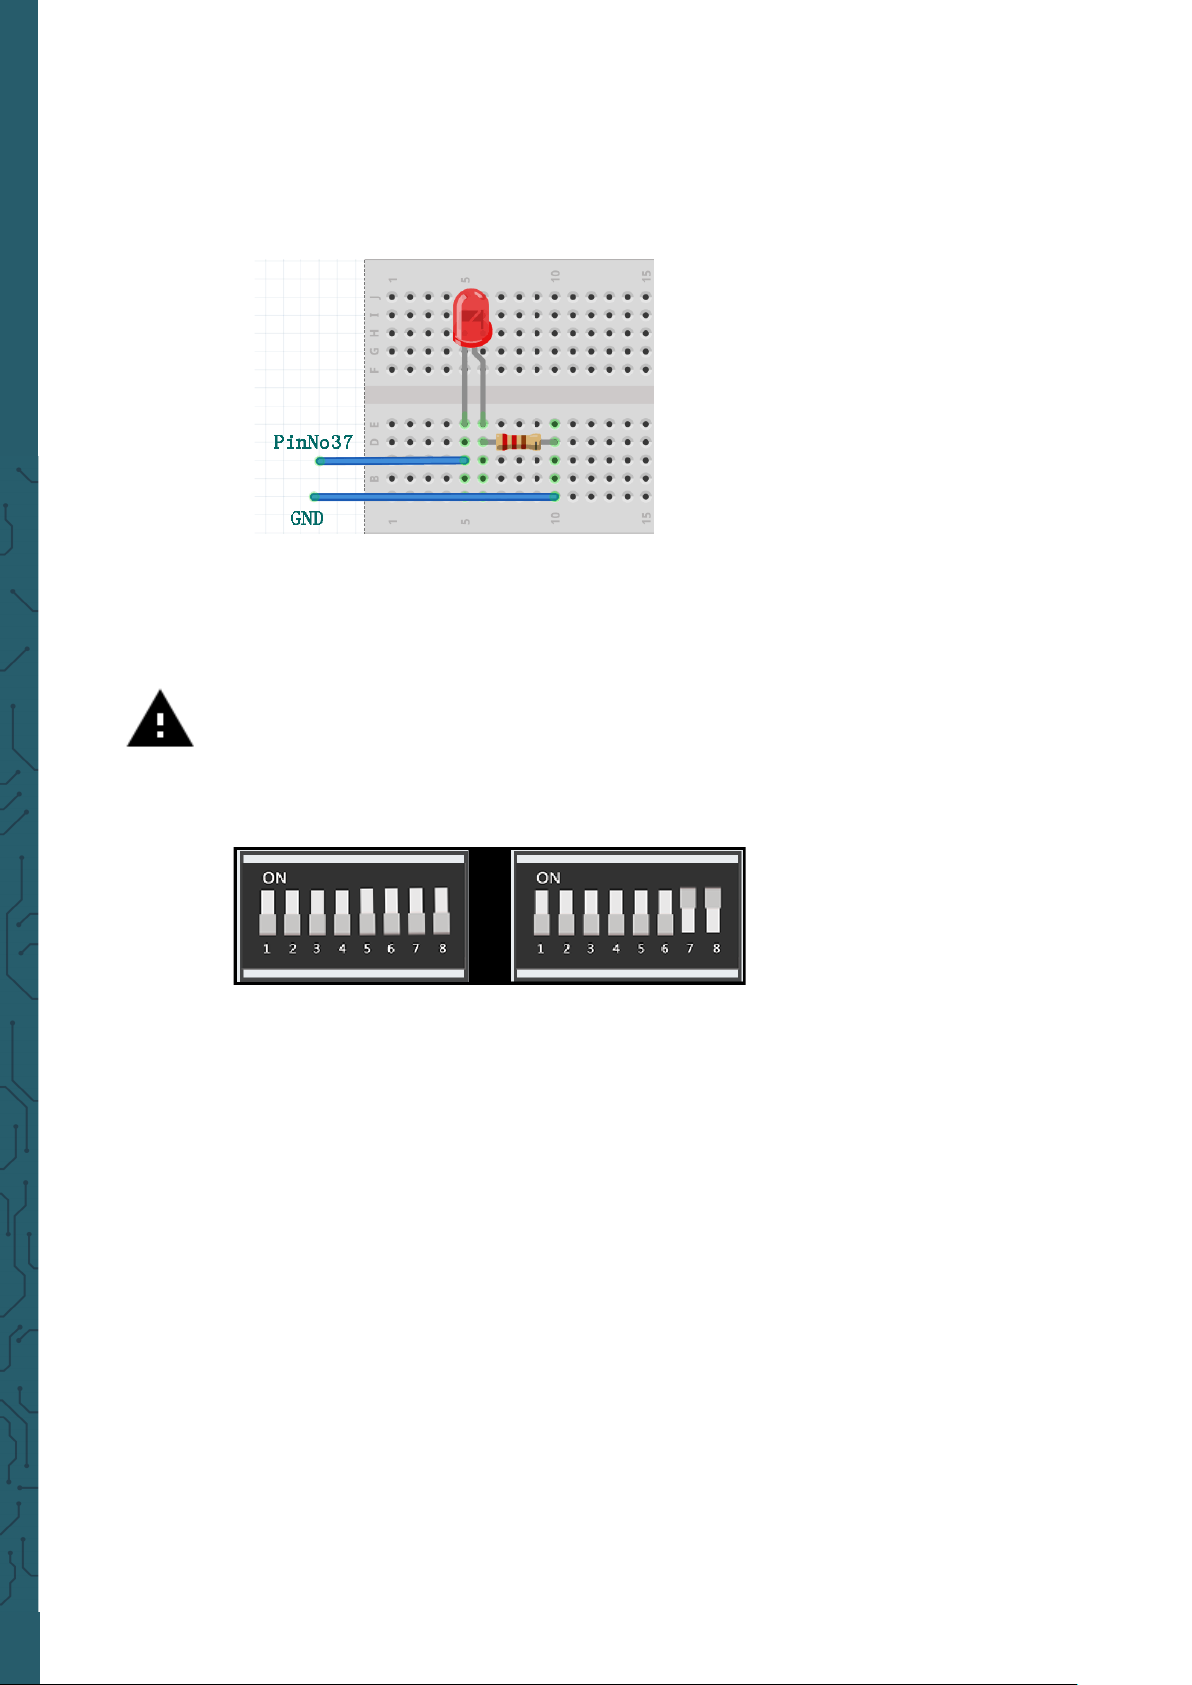
www.joy-it.net
Pascalstr. 8 47506 Neukirchen-Vluyn
We will create a custom circuit with the function to make an LED blink. To
do this, we need to use GPIO as output and GND, as we already did in
earlier lessons. We will connect the servo interface (SERVO1 interface) to
GPIO 37.
Attention! For this example you have to switch between the
modules because the servo pins are used. Turn switch number 7
and 8 on the right switching unit ON. All the other switches
should be turned OFF.
You can use this picture as a guide to create your circuit on the plug-in
board. Remember that pin number 37 is on the GPIO port and GND is on
the GND port of the SERVO1 interface.
We must use a resistor and connect it to the negative side of the LED (the
negative side of the LED is the one with the shorter leg). We will connect
the other side of the resistor directly to the GND pin on the SERVO1
interface using the cable. Connect the positive side of the LED to the
GPIO37 pin of the SERVO1 interface.
Page 56
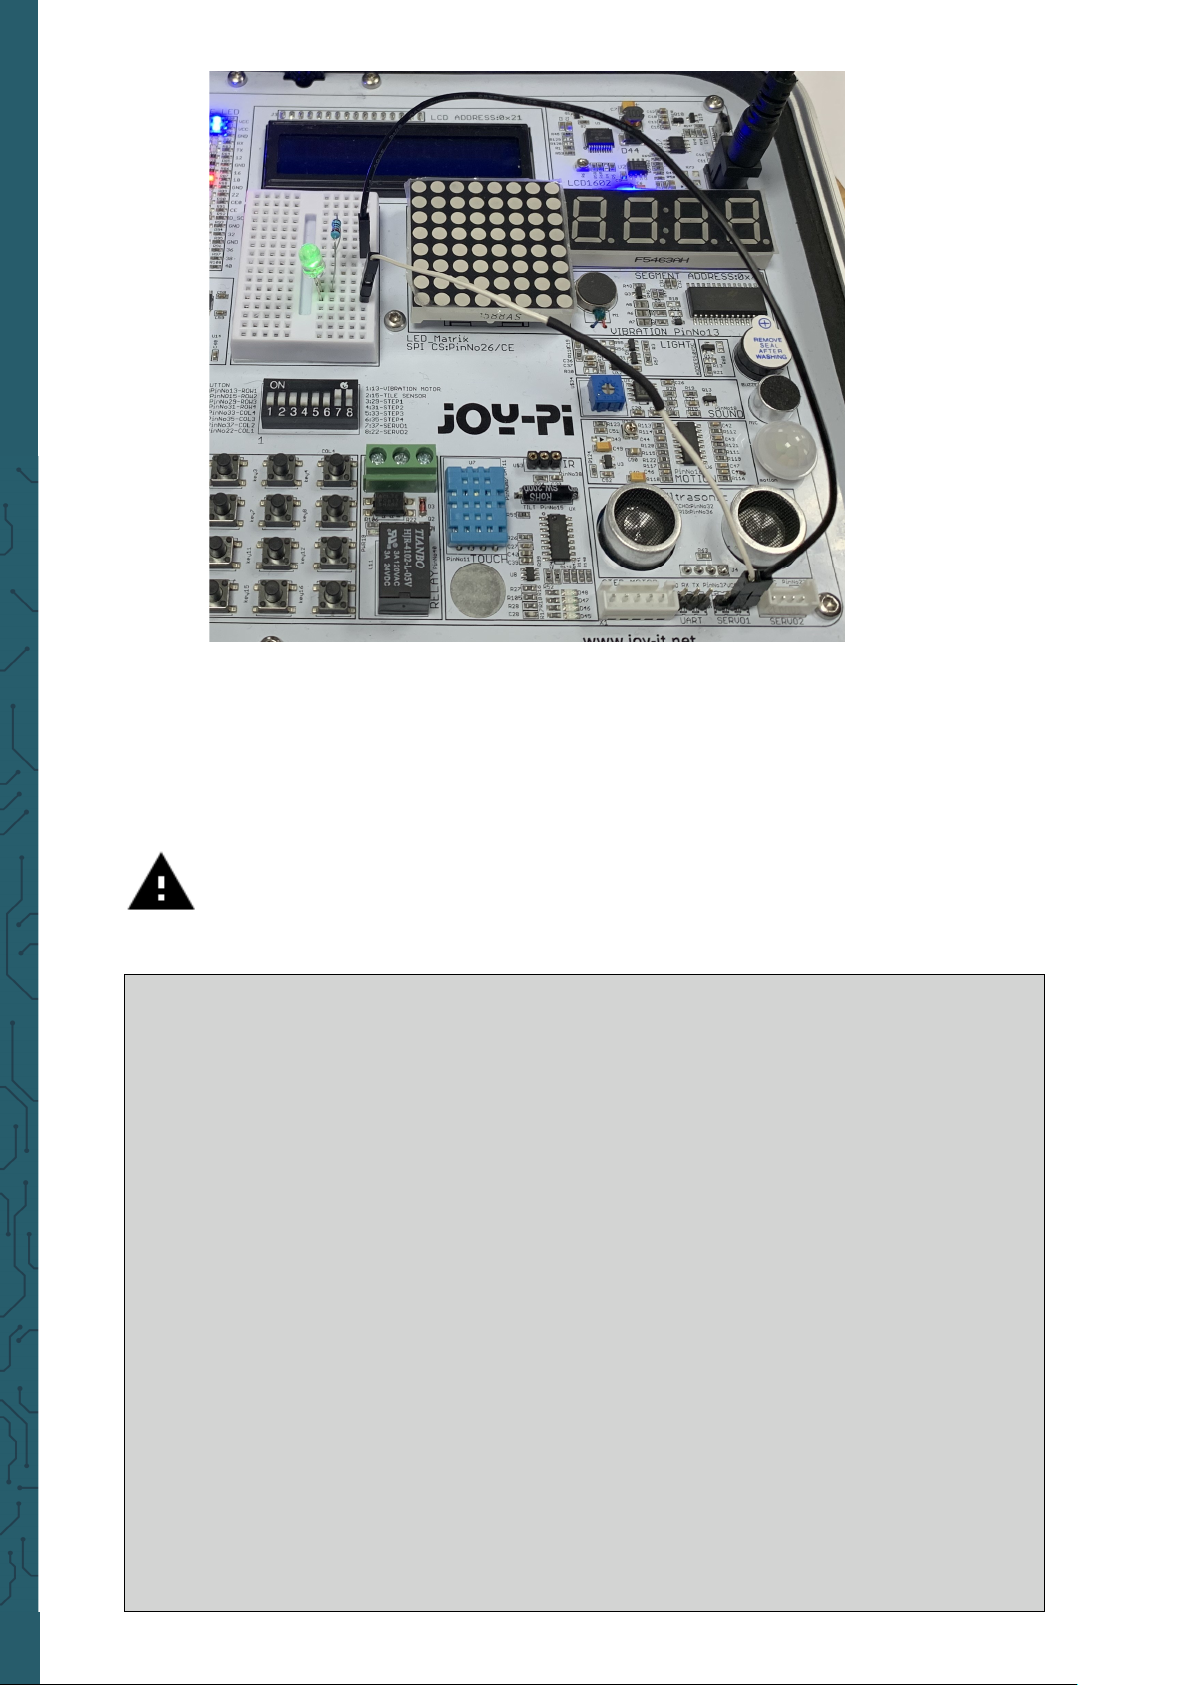
www.joy-it.net
Pascalstr. 8 47506 Neukirchen-Vluyn
Aer you build the circuit ist time to write the code that will control the
LED. The plan is to send GPIO.HIGH to the GPIO37 Pin then wait for 0.2
seconds and cut the signal with GPIO.LOW. This will be looped and the
LED will start blinking.
You can stop the program by clicking CTRL+C.
Important! The LED, the resistor and the cable are not included
in the scope of delivery.
#!/usr/bin/python
import time
import RPi.GPIO as GPIO
#define LED pin
led_pin = 37
#set GPIO mode to GPIO.BOARD
GPIO.setmode(GPIO.BOARD)
#set pin as output
GPIO.setup(led_pin, GPIO.OUT)
try:
while True:
#turn on LED
GPIO.output(led_pin, GPIO.HIGH)
#wait 0.2 seconds
time.sleep(0.2)
#turn off LED
GPIO.output(led_pin, GPIO.LOW)
#wait 0.2 seconds
time.sleep(0.2)
except KeyboardInterrupt:
#CTRL+C to exit the programm
GPIO.cleanup()
Code example:
Page 57
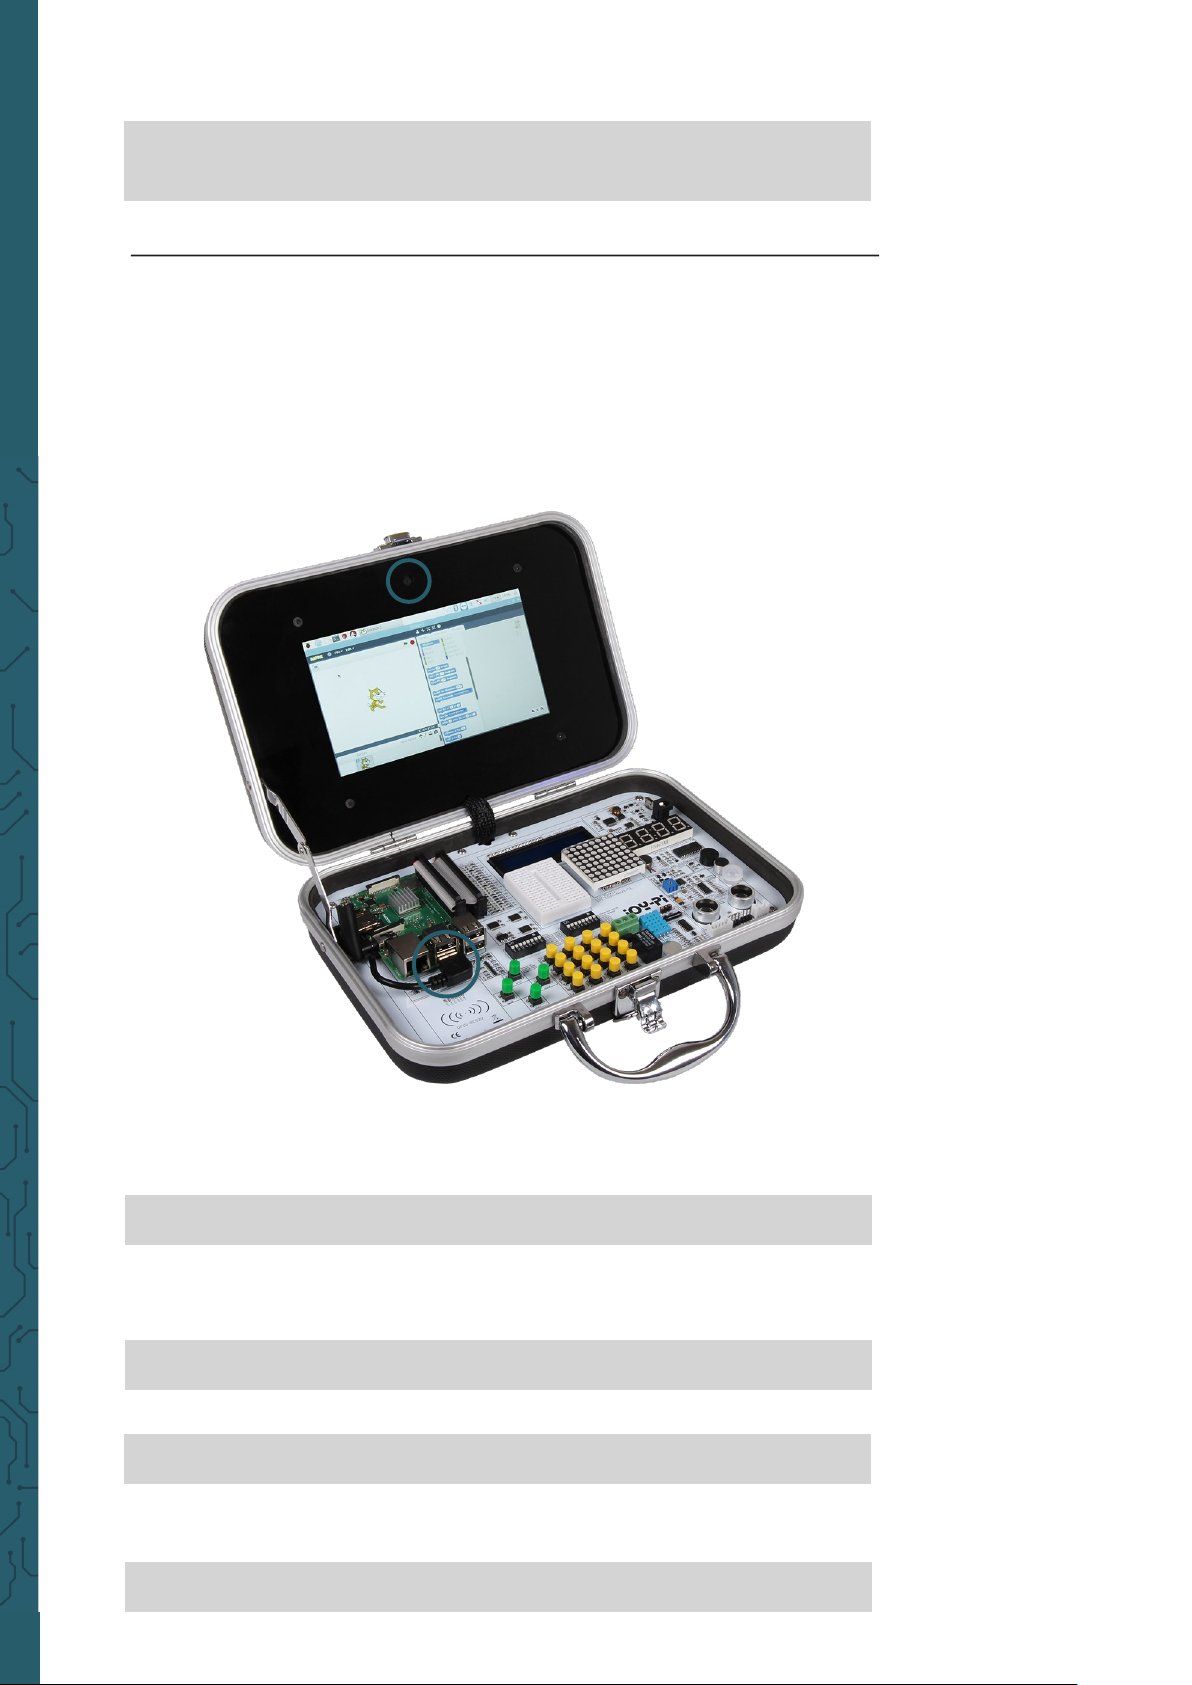
www.joy-it.net
Pascalstr. 8 47506 Neukirchen-Vluyn
Execute the following commands and try it yourself:
cd /home/pi/Desktop/Joy-Pi
sudo python3 blinking_led.py
Lesson 21 : Photographing with the Raspberry Pi camera
The Raspberry Pi camera is extremely useful and can be used for a variety
of projects. For example for security cameras, face recognition and much
more. In the following lesson, we will introduce you to the basics of using
the Raspberry Pi camera. This will teach you how to take a picture.
The camera is located centrally above the Joy-Pi's screen and is
connected directly to the Raspberry Pi with a USB cable.
First, aer you ensured that the camera is connected, install the
fswebcam
package with the following command
(the package is in the prepared image already installed):
sudo apt-get install fswebcam
Enter the command
fswebcam
followed by the name of the file. The
webcam will take a picture and will save it with the entered filename in
the current directory:
fswebcam image.jpg
You can take a picture with the resolution of 1280 x 1024 like that:
fswebcam -r 1280-1024 image2.jpg
If you add now the command
--no-banner
, you remove the time and date
stamp:
fswebcam -r 1280-1024 --no-banner image3.jpg
Page 58
www.joy-it.net
Pascalstr. 8 47506 Neukirchen-Vluyn
To capture a video, we use the following command whereby the
resolution can be modified:
ffmpeg -f v412 -r 25 -s 780x480 -i /dev/video0 Beispiel.avi
8. OTHER INFORMATION
Our Information and Take-back Obligations according to the German Electronic Law (ElektroG)
Symbol on Electrial and Electronic Products:
This crossed-out bin means that electrical and electronic products do not
belong into the household waste. You must hand over your old appliance to
a registration place. Before you can hand over the old appliance, you must
remove used batteries and replacement batteries which are not enclosed by
the device.
Return Options:
As the end user, you can hand over your old appliance (which has
essentially the same functions as the new one bought with us) free of charge
for disposal with the purchase of a new device.
Small devices, which do not have outer dimensions bigger than 25 cm can be
handed in for disposal independently of the
purchase of a new product in normal household quantities.
1. Possibility of return at our company location during our opening hours
Simac Electronics Handel GmbH, Pascalstr. 8, D-47506 Neukirchen-Vluyn
2. Possibility of return nearby
We will send you a parcel stamp with which you can send us your old
appliance free of charge. For this possibility, please contact us via e-mail at
[email protected] or via telephone.
Information about Package:
Please package your old appliance safe for transport. Should you not
have suitable packaging material or you do not want to use your own
material, you can contact us and we will send you an appropriate
package.
9. COPYRIGHT INFORMATION
This product contains soware wich are available under the terms of an o-
pen content licence of the type GNU General Public License, Version 2 (GPL)
or X11 License (also named MIT). The complete licence texts will you see on
the following sites. You can find more detailed informations at
http://www.gnu.org/licenses/old-licenses/gpl-2.0 and
https://www.gnu.org/licenses/license-list.html. As this is free soware, there
is no warranty, as far as permitted by law. Details hierzu finden Sie in der
GNU General Public License und der X11 License. Please note that the
warranty for the hardware of course is not aected and exists in full
Furthermore we will provide the source code in machine-readable form, calculated only the manufacturing cost of the medium. The request schould be
sent to [email protected].
If you have further questions, we would like to answer them at
Page 59

www.joy-it.net
Pascalstr. 8 47506 Neukirchen-Vluyn
GNU GENERAL PUBLIC LICENSE
Version 2, June 1991
Copyright (C) 1989, 1991 Free Soware Foundation, Inc.
51 Franklin Street, Fih Floor, Boston, MA 02110-1301, USA
Everyone is permitted to copy and distribute verbatim copies of this license document,
but changing it is not allowed.
Preamble
The licenses for most soware are designed to take away your freedom
to share and change it. By contrast, the GNU General Public License is
intended to guarantee your freedom to share and change free
soware--to make sure the soware is free for all its users. This General
Public License applies to most of the Free Soware Foundation's
soware and to any other program whose authors commit to using it.
(Some other Free Soware Foundation soware is covered by the GNU
Lesser General Public License instead.) You can apply it to your programs,
too.
When we speak of free soware, we are referring to freedom, not price.
Our General Public Licenses are designed to make sure that you have the
freedom to distribute copies of free soware (and charge for this service
if you wish), that you receive source code or can get it if you want it, that
you can change the soware or use pieces of it in new free programs; and
that you know you can do these things.
To protect your rights, we need to make restrictions that forbid anyone to
deny you these rights or to ask you to surrender the rights. These
restrictions translate to certain responsibilities for you if you distribute
copies of the soware, or if you modify it.
For example, if you distribute copies of such a program, whether gratis or
for a fee, you must give the recipients all the rights that you have. You
must make sure that they, too, receive or can get the source code. And
you must show them these terms so they know their rights.
We protect your rights with two steps: (1) copyright the soware, and (2)
oer you this license which gives you legal permission to copy, distribute
and/or modify the soware.
Also, for each author's protection and ours, we want to make certain that
everyone understands that there is no warranty for this free soware. If
the soware is modified by someone else and passed on, we want its
recipients to know that what they have is not the original, so that any
problems introduced by others will not reflect on the original authors'
reputations.
Finally, any free program is threatened constantly by soware patents.
We wish to avoid the danger that redistributors of a free program will
individually obtain patent licenses, in eect making the program
proprietary. To prevent this, we have made it clear that any patent must
be licensed for everyone's free use or not licensed at all.
The precise terms and conditions for copying, distribution and
modification follow.
Page 60

www.joy-it.net
Pascalstr. 8 47506 Neukirchen-Vluyn
Terms and conditions for copying, distribution and modification
0. This License applies to any program or other work which contains a
notice placed by the copyright holder saying it may be distributed
under the terms of this General Public License. The "Program",
below, refers to any such program or work, and a "work based on
the Program" means either the Program or any derivative work
under copyright law: that is to say, a work containing the Program
or a portion of it, either verbatim or with modifications and/or
translated into another language. (Hereinaer, translation is
included without limitation in the term "modification".) Each l
icensee is addressed as "you".
Activities other than copying, distribution and modification are not
covered by this License; they are outside its scope. The act of
running the Program is not restricted, and the output from the
Program is covered only if its contents constitute a work based on
the Program (independent of having been made by running the
Program). Whether that is true depends on what the Program does.
1. You may copy and distribute verbatim copies of the Program's
source code as you receive it, in any medium, provided that you
conspicuously and appropriately publish on each copy an
appropriate copyright notice and disclaimer of warranty; keep
intact all the notices that refer to this License and to the absence of
any warranty; and give any other recipients of the Program a copy
of this License along with the Program.
You may charge a fee for the physical act of transferring a copy, and
you may at your option oer warranty protection in exchange for a
fee.
2. You may modify your copy or copies of the Program or any portion
of it, thus forming a work based on the Program, and copy and
distribute such modifications or work under the terms of Section 1
above, provided that you also meet all of these conditions:
a. You must cause the modified files to carry prominent
notices stating that you changed the files and the date of
any change.
b. You must cause any work that you distribute or publish,
that in whole or in part contains or is derived from the
Program or any part thereof, to be licensed as a whole at no
charge to all third parties under the terms of this License.
c. If the modified program normally reads commands
interactively when run, you must cause it, when started
running for such interactive use in the most ordinary way,
to print or display an announcement including an
appropriate copyright notice and a notice that there is no
warranty (or else, saying that you provide a warranty) and
that users may redistribute the program under these
conditions, and telling the user how to view a copy of this
License. (Exception: if the Program itself is interactive but
does not normally print such an announcement, your work
based on the Program is not required to print an
announcement.)
These requirements apply to the modified work as a whole. If
identifiable sections of that work are not derived from the Program,
and can be reasonably considered independent and separate works
in themselves, then this License, and its terms, do not apply to
those sections when you distribute them as separate works. But
when you distribute the same sections as part of a whole which is a
work based on the Program, the distribution of the whole must be
on the terms of this License, whose permissions for other licensees
extend to the entire whole, and thus to each and every part
regardless of who wrote it.
Page 61

www.joy-it.net
Pascalstr. 8 47506 Neukirchen-Vluyn
Thus, it is not the intent of this section to claim rights or contest
your rights to work written entirely by you; rather, the intent is to
exercise the right to control the distribution of derivative or
collective works based on the Program.
In addition, mere aggregation of another work not based on the
Program with the Program (or with a work based on the Program)
on a volume of a storage or distribution medium does not bring the
other work under the scope of this License.
3. You may copy and distribute the Program (or a work based on it,
under Section 2) in object code or executable form under the terms
of Sections 1 and 2 above provided that you also do one of the
following:
a) Accompany it with the complete corresponding
machine-readable source code, which must be distributed
under the terms of Sections 1 and 2 above on a medium
customarily used for soware interchange; or,
b) Accompany it with a written oer, valid for at least three
years, to give any third party, for a charge no more than your
cost of physically performing source distribution, a complete
machine-readable copy of the corresponding source code, to
be distributed under the terms of Sections 1 and 2 above on a
medium customarily used for soware interchange; or,
c) Accompany it with the information you received as to the
oer to distribute corresponding source code. (This alternative is allowed only for noncommercial distribution and only if
you received the program in object code or executable form
with such an oer, in accord with Subsection b above.)
The source code for a work means the preferred form of the work
for making modifications to it. For an executable work, complete
source code means all the source code for all modules it contains,
plus any associated interface definition files, plus the scripts used
to control compilation and installation of the executable. However,
as a special exception, the source code distributed need not include
anything that is normally distributed (in either source or binary
form) with the major components (compiler, kernel, and so on) of
the operating system on which the executable runs, unless that
component itself accompanies the executable.
If distribution of executable or object code is made by oering
access to copy from a designated place, then oering equivalent
access to copy the source code from the same place counts as
distribution of the source code, even though third parties are not
compelled to copy the source along with the object code.
4. You may not copy, modify, sublicense, or distribute the Program
except as expressly provided under this License. Any attempt
otherwise to copy, modify, sublicense or distribute the Program is
void, and will automatically terminate your rights under this
License. However, parties who have received copies, or rights, from
you under this License will not have their licenses terminated so
long as such parties remain in full compliance.
5. You are not required to accept this License, since you have not
signed it. However, nothing else grants you permission to modify or
distribute the Program or its derivative works. These actions are
prohibited by law if you do not accept this License. Therefore, by
modifying or distributing the Program (or any work based on the
Program), you indicate your acceptance of this License to do so,
and all its terms and conditions for copying, distributing or
modifying the Program or works based on it.
6. Each time you redistribute the Program (or any work based on the
Program), the recipient automatically receives a license from the
Page 62

www.joy-it.net
Pascalstr. 8 47506 Neukirchen-Vluyn
original licensor to copy, distribute or modify the Program subject
to these terms and conditions. You may not impose any further
restrictions on the recipients' exercise of the rights granted herein.
You are not responsible for enforcing compliance by third parties to
this License.
7. If, as a consequence of a court judgment or allegation of patent
infringement or for any other reason (not limited to patent issues),
conditions are imposed on you (whether by court order, agreement
or otherwise) that contradict the conditions of this License, they do
not excuse you from the conditions of this License. If you cannot
distribute so as to satisfy simultaneously your obligations under
this License and any other pertinent obligations, then as a
consequence you may not distribute the Program at all. For
example, if a patent license would not permit royalty-free
redistribution of the Program by all those who receive copies
directly or indirectly through you, then the only way you could
satisfy both it and this License would be to refrain entirely from
distribution of the Program. If any portion of this section is held
invalid or unenforceable under any particular circumstance, the
balance of the section is intended to apply and the section as a
whole is intended to apply in other circumstances.
It is not the purpose of this section to induce you to infringe any
patents or other property right claims or to contest validity of any
such claims; this section has the sole purpose of protecting the
integrity of the free soware distribution system, which is
implemented by public license practices. Many people have made
generous contributions to the wide range of soware distributed
through that system in reliance on consistent application of that
system; it is up to the author/donor to decide if he or she is willing
to distribute soware through any other system and a licensee
cannot impose that choice.
This section is intended to make thoroughly clear what is believed
to be a consequence of the rest of this License.
8. If the distribution and/or use of the Program is restricted in certain
countries either by patents or by copyrighted interfaces, the
original copyright holder who places the Program under this
License may add an explicit geographical distribution limitation
excluding those countries, so that distribution is permitted only in
or among countries not thus excluded. In such case, this License
incorporates the limitation as if written in the body of this License.
9. The Free Soware Foundation may publish revised and/or new
versions of the General Public License from time to time. Such new
versions will be similar in spirit to the present version, but may
dier in detail to address new problems or concerns.
Each version is given a distinguishing version number. If the
Program specifies a version number of this License which applies to
it and "any later version", you have the option of following the
terms and conditions either of that version or of any later version
published by the Free Soware Foundation. If the Program does not
specify a version number of this License, you may choose any
version ever published by the Free Soware Foundation.
10. If you wish to incorporate parts of the Program into other free
programs whose distribution conditions are dierent, write to the
author to ask for permission. For soware which is copyrighted by
the Free Soware Foundation, write to the Free Soware
Foundation; we sometimes make exceptions for this. Our decision
will be guided by the two goals of preserving the free status of all
derivatives of our free soware and of promoting the sharing and
reuse of soware generally.
NO WARRANTY
Page 63

www.joy-it.net
Pascalstr. 8 47506 Neukirchen-Vluyn
11. BECAUSE THE PROGRAM IS LICENSED FREE OF CHARGE, THERE IS
NO WARRANTY FOR THE PROGRAM, TO THE EXTENT PERMITTED BY
APPLICABLE LAW. EXCEPT WHEN OTHERWISE STATED IN WRITING
THE COPYRIGHT HOLDERS AND/OR OTHER PARTIES PROVIDE THE
PROGRAM "AS IS" WITHOUT WARRANTY OF ANY KIND, EITHER
EXPRESSED OR IMPLIED, INCLUDING, BUT NOT LIMITED TO, THE
IMPLIED WARRANTIES OF MERCHANTABILITY AND FITNESS FOR A
PARTICULAR PURPOSE. THE ENTIRE RISK AS TO THE QUALITY AND
PERFORMANCE OF THE PROGRAM IS WITH YOU. SHOULD THE
PROGRAM PROVE DEFECTIVE, YOU ASSUME THE COST OF ALL
NECESSARY SERVICING, REPAIR OR CORRECTION.
12. IN NO EVENT UNLESS REQUIRED BY APPLICABLE LAW OR AGREED
TO IN WRITING WILL ANY COPYRIGHT HOLDER, OR ANY OTHER
PARTY WHO MAY MODIFY AND/OR REDISTRIBUTE THE PROGRAM AS
PERMITTED ABOVE, BE LIABLE TO YOU FOR DAMAGES, INCLUDING
ANY GENERAL, SPECIAL, INCIDENTAL OR CONSEQUENTIAL
DAMAGES ARISING OUT OF THE USE OR INABILITY TO USE THE
PROGRAM (INCLUDING BUT NOT LIMITED TO LOSS OF DATA OR
DATA BEING RENDERED INACCURATE OR LOSSES SUSTAINED BY
YOU OR THIRD PARTIES OR A FAILURE OF THE PROGRAM TO
OPERATE WITH ANY OTHER PROGRAMS), EVEN IF SUCH HOLDER OR
OTHER PARTY HAS BEEN ADVISED OF THE POSSIBILITY OF SUCH
DAMAGES.
END OF TERMS AND CONDITIONS
How to Apply These Terms to Your New Programs
If you develop a new program, and you want it to be of the greatest
possible use to the public, the best way to achieve this is to make it free
soware which everyone can redistribute and change under these terms.
To do so, attach the following notices to the program. It is safest to attach
them to the start of each source file to most eectively convey the
exclusion of warranty; and each file should have at least the "copyright"
lineand a pointer to where the full notice is found.
one line to give the program's name and an idea of what it does.
Copyright (C) yyyy name of author
This program is free soware; you can redistribute it and/or modify it
under the terms of the GNU General Public License as published by the
Free Soware Foundation; either version 2 of the License, or (at your
option) any later version.
This program is distributed in the hope that it will be useful, but
WITHOUT ANY WARRANTY; without even the implied warranty of
MERCHANTABILITY or FITNESS FOR A PARTICULAR PURPOSE. See the
GNU General Public License for more details.
You should have received a copy of the GNU General Public License along
with this program; if not, write to the Free Soware Foundation, Inc., 51
Franklin Street, Fih Floor, Boston, MA 02110-1301, USA.
Also add information on how to contact you by electronic and paper mail.
If the program is interactive, make it output a short notice like this when
it starts in an interactive mode:
Gnomovision version 69, Copyright (C) year name of author Gnomovision
comes with ABSOLUTELY NO WARRANTY; for details type `show w'. This
is free soware, and you are welcome to redistribute it under certain
conditions; type `show c' for details.
The hypothetical commands `show w' and `show c' should show the appropriate parts of the General Public License. Of course, the commands
you use may be called something other than `show w' and `show c'; they
could even be mouse-clicks or menu items--whatever suits your program.
Page 64

www.joy-it.net
Pascalstr. 8 47506 Neukirchen-Vluyn
You should also get your employer (if you work as a programmer) or your
school, if any, to sign a "copyright disclaimer" for the program, if
necessary. Here is a sample; alter the names:
Yoyodyne, Inc., hereby disclaims all copyright interest in the program
`Gnomovision'(which makes passes at compilers) written by James
Hacker.
signature of Ty Coon, 1 April 1989
Ty Coon, President of Vice
GNU GENERAL PUBLIC LICENSE
Version 3, 29 June 2007 Copyright © 2007 Free Soware Foundation, Inc.
<https://fsf.org/> Everyone is permitted to copy and distribute verbatim
copies of this license document, but changing it is not allowed.
Preamble
The GNU General Public License is a free, copyle license for soware
and other kinds of works. The licenses for most soware and other
practical works are designed to take away your freedom to share and
change the works. By contrast, the GNU General Public License is
intended to guarantee your freedom to share and change all versions of a
program--to make sure it remains free soware for all its users. We, the
Free Soware Foundation, use the GNU General Public License for most
of our soware; it applies also to any other work released this way by its
authors. You can apply it to your programs, too. When we speak of free
soware, we are referring to freedom, not price. Our General Public
Licenses are designed to make sure that you have the freedom to
distribute copies of free soware (and charge for them if you wish), that
you receive source code or can get it if you want it, that you can change
the soware or use pieces of it in new free programs, and that you know
you can do these things. To protect your rights, we need to prevent
others from denying you these rights or asking you to surrender the
rights. Therefore, you have certain responsibilities if you distribute copies
of the soware, or if you modify it: responsibilities to respect the freedom
of others. For example, if you distribute copies of such a program,
whether gratis or for a fee, you must pass on to the recipients the same
freedoms that you received. You must make sure that they, too, receive
or can get the source code. And you must show them these terms so they
know their rights. Developers that use the GNU GPL protect your rights
with two steps: (1) assert copyright on the soware, and (2) oer you this
License giving you legal permission to copy, distribute and/or modify it.
For the developers' and authors' protection, the GPL clearly explains that
there is no warranty for this free soware. For both users' and authors'
sake, the GPL requires that modified versions be marked as changed, so
that their problems will not be attributed erroneously to authors of
previous versions. Some devices are designed to deny users access to
install or run modified versions of the soware inside them, although the
manufacturer can do so. This is fundamentally incompatible with the aim
of protecting users' freedom to change the soware. The systematic
pattern of such abuse occurs in the area of products for individuals to
use, which is precisely where it is most unacceptable. Therefore, we have
designed this version of the GPL to prohibit the practice for those
products. If such problems arise substantially in other domains, we stand
ready to extend this provision to those domains in future versions of the
GPL, as needed to protect the freedom of users.
Finally, every program is threatened constantly by soware patents.
States should not allow patents to restrict development and use of
soware on general-purpose computers, but in those that do, we wish to
avoid the special danger that patents applied to a free program could
make it eectively proprietary. To prevent this, the GPL assures that
patents cannot be used to render the program non-free. The precise
terms and conditions for copying, distribution and modification follow.
Page 65

www.joy-it.net
Pascalstr. 8 47506 Neukirchen-Vluyn
TERMS AND CONDITIONS
0. Definitions.
“This License” refers to version 3 of the GNU General Public License.
“Copyright” also means copyright-like laws that apply to other
kinds of works, such as semiconductor masks. “The Program” refers
to any copyrightable work licensed under this License. Each
licensee is addressed as “you”. “Licensees” and “recipients” may be
individuals or organizations.
To “modify” a work means to copy from or adapt all or part of the
work in a fashion requiring copyright permission, other than the
making of an exact copy. The resulting work is called a “modified
version” of the earlier work or a work “based on” the earlier work.
A “covered work” means either the unmodified Program or a work
based on the Program.
To “propagate” a work means to do anything with it that, without
permission, would make you directly or secondarily liable for
infringement under applicable copyright law, except executing it on
a computer or modifying a private copy. Propagation includes
copying, distribution (with or without modification), making
available to the public, and in some countries other activities as
well.
To “convey” a work means any kind of propagation that enables
other parties to make or receive copies. Mere interaction with a user
through a computer network, with no transfer of a copy, is not
conveying.
An interactive user interface displays “Appropriate Legal Notices”
to the extent that it includes a convenient and prominently visible
feature that (1) displays an appropriate copyright notice, and (2)
tells the user that there is no warranty for the work (except to the
extent that warranties are provided), that licensees may convey the
work under this License, and how to view a copy of this License. If
the interface presents a list of user commands or options, such as a
menu, a prominent item in the list meets this criterion.
1. Source Code.
The “source code” for a work means the preferred form of the work
for making modifications to it. “Object code” means any
non-source form of a work. A “Standard Interface” means an
interface that either is an oicial standard defined by a recognized
standards body, or, in the case of interfaces specified for a
particular programming language, one that is widely used among
developers working in that language.
The “System Libraries” of an executable work include anything,
other than the work as a whole, that (a) is included in the normal
form of packaging a Major Component, but which is not part of that
Major Component, and (b) serves only to enable use of the work
with that Major Component, or to implement a Standard Interface
for which an implementation is available to the public in source
code form. A “Major Component”, in this context, means a major
essential component (kernel, window system, and so on) of the
specific operating system (if any) on which the executable work
runs, or a compiler used to produce the work, or an object code
interpreter used to run it.
The “Corresponding Source” for a work in object code form means
all the source code needed to generate, install, and (for an
executable work) run the object code and to modify the work,
including scripts to control those activities. However, it does not
include the work's System Libraries, or general-purpose tools or
generally available free programs which are used unmodified in
performing those activities but which are not part of the work. For
example, Corresponding Source includes interface definition files
associated with source files for the work, and the source code for
shared libraries and dynamically linked subprograms that the work
Page 66

www.joy-it.net
Pascalstr. 8 47506 Neukirchen-Vluyn
is specifically designed to require, such as by intimate data
communication or control flow between those subprograms and
other parts of the work.
The Corresponding Source need not include anything that users
can regenerate automatically from other parts of the
Corresponding Source. The Corresponding Source for a work in
source code form is that same work.
2. Basic Permissions.
All rights granted under this License are granted for the term of
copyright on the Program, and are irrevocable provided the stated
conditions are met. This License explicitly airms your unlimited
permission to run the unmodified Program. The output from
running a covered work is covered by this License only if the output,
given its content, constitutes a covered work. This License
acknowledges your rights of fair use or other equivalent, as
provided by copyright law. You may make, run and propagate
covered works that you do not convey, without conditions so long
as your license otherwise remains in force. You may convey covered
works to others for the sole purpose of having them make
modifications exclusively for you, or provide you with facilities for
running those works, provided that you comply with the terms of
this License in conveying all material for which you do not control
copyright. Those thus making or running the covered works for you
must do so exclusively on your behalf, under your direction and
control, on terms that prohibit them from making any copies of
your copyrighted material outside their relationship with you.
Conveying under any other circumstances is permitted solely under
the conditions stated below. Sublicensing is not allowed; section 10
makes it unnecessary.
3. Protecting Users' Legal Rights From Anti-Circumvention Law.
No covered work shall be deemed part of an eective technological
measure under any applicable law fulfilling obligations under
article 11 of the WIPO copyright treaty adopted on 20 December
1996, or similar laws prohibiting or restricting circumvention of
such measures. When you convey a covered work, you waive any
legal power to forbid circumvention of technological measures to
the extent such circumvention is eected by exercising rights under
this License with respect to the covered work, and you disclaim any
intention to limit operation or modification of the work as a means
of enforcing, against the work's users, your or third parties' legal
rights to forbid circumvention of technological measures.
4. Conveying Verbatim Copies.
You may convey verbatim copies of the Program's source code as
you receive it, in any medium, provided that you conspicuously and
appropriately publish on each copy an appropriate copyright
notice; keep intact all notices stating that this License and any
non-permissive terms added in accord with section 7 apply to the
code; keep intact all notices of the absence of any warranty; and
give all recipients a copy of this License along with the Program.
You may charge any price or no price for each copy that you convey,
and you may oer support or warranty protection for a fee.
5. Conveying Modified Source Versions. You may convey a work based
on the Program, or the modifications to produce it from the
Program, in the form of source code under the terms of section 4,
provided that you also meet all of these conditions:
a. The work must carry prominent notices stating that you
modified it, and giving a relevant date.
b. The work must carry prominent notices stating that it is
released under this License and any conditions added under
section 7. This requirement modifies the requirement in
Page 67

www.joy-it.net
Pascalstr. 8 47506 Neukirchen-Vluyn
section 4 to “keep intact all notices”.
c. You must license the entire work, as a whole, under this
License to anyone who comes into possession of a copy. This
License will therefore apply, along with any applicable section
7 additional terms, to the whole of the work, and all its parts,
regardless of how they are packaged. This License gives no
permission to license the work in any other way, but it does
not invalidate such permission if you have separately received
it.
d. If the work has interactive user interfaces, each must
display Appropriate Legal Notices; however, if the Program
has interactive interfaces that do not display Appropriate
Legal Notices, your work need not make them do so.
A compilation of a covered work with other separate and
independent works, which are not by their nature extensions of the
covered work, and which are not combined with it such as to form a
larger program, in or on a volume of a storage or distribution
medium, is called an “aggregate” if the compilation and its
resulting copyright are not used to limit the access or legal rights of
the compilation's users beyond what the individual works permit.
Inclusion of a covered work in an aggregate does not cause this
License to apply to the other parts of the aggregate.
6. Conveying Non-Source Forms.
You may convey a covered work in object code form under the
terms of sections 4 and 5, provided that you also convey the
machine-readable Corresponding Source under the terms of this
License, in one of these ways:
a. Convey the object code in, or embodied in, a physical product
(including a physical distribution medium), accompanied by
the Corresponding Source fixed on a durable physical medium customarily used for soware interchange.
b. Convey the object code in, or embodied in, a physical product
(including a physical distribution medium), accompanied by a
written oer, valid for at least three years and valid for as long
as you oer spare parts or customer support for that product
model, to give anyone who possesses the object code either
(1) a copy of the Corresponding Source for all the soware in
the product that is covered by this License, on a durable
physical medium customarily used for soware interchange,
for a price no more than your reasonable cost of physically
performing this conveying of source, or (2) access to copy the
Corresponding Source from a network server at no charge.
c. Convey individual copies of the object code with a copy of the
written oer to provide the Corresponding Source. This
alternative is allowed only occasionally and noncommercially,
and only if you received the object code with such an oer, in
accord with subsection 6b.
d. Convey the object code by oering access from a designated
place (gratis or for a charge), and oer equivalent access to
the Corresponding Source in the same way through the same
Page 68

www.joy-it.net
Pascalstr. 8 47506 Neukirchen-Vluyn
place at no further charge. You need not require recipients to
copy the Corresponding Source along with the object code. If
the place to copy the object code is a network server, the
Corresponding Source may be on a dierent server (operated
by you or a third party) that supports equivalent copying
facilities, provided you maintain clear directions next to the
object code saying where to find the Corresponding Source.
Regardless of what server hosts the Corresponding Source,
you remain obligated to ensure that it is available for as long
as needed to satisfy these requirements.
e. Convey the object code using peer-to-peer transmission,
provided you inform other peers where the object code and
Corresponding Source of the work are being oered to the
general public at no charge under subsection 6d.
A separable portion of the object code, whose source code is
excluded from the Corresponding Source as a System Library, need
not be included in conveying the object code work. A “User
Product” is either (1) a “consumer product”, which means any
tangible personal property which is normally used for personal,
family, or household purposes, or (2) anything designed or sold for
incorporation into a dwelling. In determining whether a product is a
consumer product, doubtful cases shall be resolved in favor of
coverage. For a particular product received by a particular user,
“normally used” refers to a typical or common use of that class of
product, regardless of the status of the particular user or of the way
in which the particular user actually uses, or expects or is expected
to use, the product. A product is a consumer product regardless of
whether the product has substantial commercial, industrial or
non-consumer uses, unless such uses represent the only significant
mode of use of the product. “Installation Information” for a User
Product means any methods, procedures, authorization keys, or
other information required to install and execute modified versions
of a covered work in that User Product from a modified version of
its Corresponding Source. The information must suice to ensure
that the continued functioning of the modified object code is in no
case prevented or interfered with solely because modification has
been made. If you convey an object code work under this section in,
or with, or specifically for use in, a User Product, and the conveying
occurs as part of a transaction in which the right of possession and
use of the User Product is transferred to the recipient in perpetuity
or for a fixed term (regardless of how the transaction is
characterized), the Corresponding Source conveyed under this
section must be accompanied by the Installation Information. But
this requirement does not apply if neither you nor any third party
retains the ability to install modified object code on the User
Product (for example, the work has been installed in ROM). The
requirement to provide Installation Information does not include a
requirement to continue to provide support service, warranty, or
updates for a work that has been modified or installed by the
recipient, or for the User Product in which it has been modified or
installed. Access to a network may be denied when the
modification itself materially and adversely aects the operation of
Page 69

www.joy-it.net
Pascalstr. 8 47506 Neukirchen-Vluyn
the network or violates the rules and protocols for communication
across the network. Corresponding Source conveyed, and
Installation Information provided, in accord with this section must
be in a format that is publicly documented (and with an
implementation available to the public in source code form), and
must require no special password or key for unpacking, reading or
copying.
7. Additional Terms.
“Additional permissions” are terms that supplement the terms of
this License by making exceptions from one or more of its
conditions. Additional permissions that are applicable to the entire
Program shall be treated as though they were included in this
License, to the extent that they are valid under applicable law. If
additional permissions apply only to part of the Program, that part
may be used separately under those permissions, but the entire
Program remains governed by this License without regard to the
additional permissions. When you convey a copy of a covered work,
you may at your option remove any additional permissions from
that copy, or from any part of it. (Additional permissions may be
written to require their own removal in certain cases when you
modify the work.) You may place additional permissions on
material, added by you to a covered work, for which you have or
can give appropriate copyright permission.
Notwithstanding any other provision of this License, for material
you add to a covered work, you may (if authorized by the copyright
holders of that material) supplement the terms of this License with
terms:
a. Disclaiming warranty or limiting liability dierently from the
terms of sections 15 and 16 of this License; or
b. Requiring preservation of specified reasonable legal notices
or author attributions in that material or in the Appropriate
Legal Notices displayed by works containing it; or
c. Prohibiting misrepresentation of the origin of that material, or
requiring that modified versions of such material be marked
in reasonable ways as dierent from the original version; or
d. Limiting the use for publicity purposes of names of licensors
or authors of the material; or
e. Declining to grant rights under trademark law for use of some
trade names, trademarks, or service marks; or
f. Requiring indemnification of licensors and authors of that
material by anyone who conveys the material (or modified
versions of it) with contractual assumptions of liability to the
recipient, for any liability that these contractual assumptions
directly impose on those licensors and authors.
All other non-permissive additional terms are considered “further
restrictions” within the meaning of section 10. If the Program as you
received it, or any part of it, contains a notice stating that it is
governed by this License along with a term that is a further
restriction, you may remove that term. If a license document
contains a further restriction but permits relicensing or conveying
Page 70

www.joy-it.net
Pascalstr. 8 47506 Neukirchen-Vluyn
under this License, you may add to a covered work material
governed by the terms of that license document, provided that the
further restriction does not survive such relicensing or conveying. If
you add terms to a covered work in accord with this section, you
must place, in the relevant source files, a statement of the
additional terms that apply to those files, or a notice indicating
where to find the applicable terms. Additional terms, permissive or
non-permissive, may be stated in the form of a separately written
license, or stated as exceptions; the above requirements apply
either way.
8. Termination. You may not propagate or modify a covered work
except as expressly provided under this License. Any attempt
otherwise to propagate or modify it is void, and will automatically
terminate your rights under this License (including any patent
licenses granted under the third paragraph of section 11). However,
if you cease all violation of this License, then your license from a
particular copyright holder is reinstated (a) provisionally, unless
and until the copyright holder explicitly and finally terminates your
license, and (b) permanently, if the copyright holder fails to notify
you of the violation by some reasonable means prior to 60 days
aer the cessation. Moreover, your license from a particular
copyright holder is reinstated permanently if the copyright holder
notifies you of the violation by some reasonable means, this is the
first time you have received notice of violation of this License (for
any work) from that copyright holder, and you cure the violation
prior to 30 days aer your receipt of the notice. Termination of your
rights under this section does not terminate the licenses of parties
who have received copies or rights from you under this License. If
your rights have been terminated and not permanently reinstated,
you do not qualify to receive new licenses for the same material
under section 10.
9. Acceptance Not Required for Having Copies. You are not required to
accept this License in order to receive or run a copy of the Program.
Ancillary propagation of a covered work occurring solely as a
consequence of using peer-to-peer transmission to receive a copy
likewise does not require acceptance. However, nothing other than
this License grants you permission to propagate or modify any
covered work. These actions infringe copyright if you do not accept
this License. Therefore, by modifying or propagating a covered
work, you indicate your acceptance of this License to do so.
10. Automatic Licensing of Downstream Recipients. Each time you
convey a covered work, the recipient automatically receives a
license from the original licensors, to run, modify and propagate
that work, subject to this License. You are not responsible for
enforcing compliance by third parties with this License. An “entity
transaction” is a transaction transferring control of an organization,
or substantially all assets of one, or subdividing an organization, or
merging organizations. If propagation of a covered work results
from an entity transaction, each party to that transaction who
receives a copy of the work also receives whatever licenses to the
work the party's predecessor in interest had or could give under the
previous paragraph, plus a right to possession of the Corresponding
Page 71

www.joy-it.net
Pascalstr. 8 47506 Neukirchen-Vluyn
Source of the work from the predecessor in interest, if the
predecessor has it or can get it with reasonable eorts. You may not
impose any further restrictions on the exercise of the rights granted
or airmed under this License. For example, you may not impose a
license fee, royalty, or other charge for exercise of rights granted
under this License, and you may not initiate litigation (including a
cross-claim or counterclaim in a lawsuit) alleging that any patent
claim is infringed by making, using, selling, oering for sale, or
importing the Program or any portion of it.
11. Patents.
A “contributor” is a copyright holder who authorizes use under this
License of the Program or a work on which the Program is based.
The work thus licensed is called the contributor's “contributor
version”. A contributor's “essential patent claims” are all patent
claims owned or controlled by the contributor, whether already
acquired or hereaer acquired, that would be infringed by some
manner, permitted by this License, of making, using, or selling its
contributor version, but do not include claims that would be
infringed only as a consequence of further modification of the
contributor version. For purposes of this definition, “control”
includes the right to grant patent sublicenses in a manner
consistent with the requirements of this License. Each contributor
grants you a non-exclusive, worldwide, royalty-free patent license
under the contributor's essential patent claims, to make, use, sell,
oer for sale, import and otherwise run, modify and propagate the
contents of its contributor version. In the following three
paragraphs, a “patent license” is any express agreement or
commitment, however denominated, not to enforce a patent (such
as an express permission to practice a patent or covenant not to
sue for patent infringement). To “grant” such a patent license to a
party means to make such an agreement or commitment not to
enforce a patent against the party. If you convey a covered work,
knowingly relying on a patent license, and the Corresponding
Source of the work is not available for anyone to copy, free of
charge and under the terms of this License, through a publicly
available network server or other readily accessible means, then
you must either (1) cause the Corresponding Source to be so
available, or (2) arrange to deprive yourself of the benefit of the
patent license for this particular work, or (3) arrange, in a manner
consistent with the requirements of this License, to extend the
patent license to downstream recipients. “Knowingly relying”
means you have actual knowledge that, but for the patent license,
your conveying the covered work in a country, or your recipient's
use of the covered work in a country, would infringe one or more
identifiable patents in that country that you have reason to believe
are valid. If, pursuant to or in connection with a single transaction
or arrangement, you convey, or propagate by procuring
conveyance of, a covered work, and grant a patent license to some
of the parties receiving the covered work authorizing them to use,
propagate, modify or convey a specific copy of the covered work,
then the patent license you grant is automatically extended to all
recipients of the covered work and works based on it. A patent
license is “discriminatory” if it does not include within the scope of
Page 72

www.joy-it.net
Pascalstr. 8 47506 Neukirchen-Vluyn
its coverage, prohibits the exercise of, or is conditioned on the
non-exercise of one or more of the rights that are specifically
granted under this License. You may not convey a covered work if
you are a party to an arrangement with a third party that is in the
business of distributing soware, under which you make payment
to the third party based on the extent of your activity of conveying
the work, and under which the third party grants, to any of the
parties who would receive the covered work from you, a
discriminatory patent license (a) in connection with copies of the
covered work conveyed by you (or copies made from those copies),
or (b) primarily for and in connection with specific products or
compilations that contain the covered work, unless you entered
into that arrangement, or that patent license was granted, prior to
28 March 2007. Nothing in this License shall be construed as
excluding or limiting any implied license or other defenses to
infringement that may otherwise be available to you under
applicable patent law.
12. No Surrender of Others' Freedom.
If conditions are imposed on you (whether by court order, agreement or otherwise) that contradict the conditions of this License,
they do not excuse you from the
conditions of this License. If you cannot convey a covered work so
as to satisfy simultaneously your obligations under this License and
any other pertinent obligations, then as a consequence you may
not convey it at all. For example, if you agree to terms that obligate
you to collect a royalty for further conveying from those to whom
you convey the Program, the only way you could satisfy both those
terms and this License would be to refrain entirely from conveying
the Program.
13. Use with the GNU Aero General Public License.
Notwithstanding any other provision of this License, you have permission to link or combine any covered work with a work licensed
under version 3 of the GNU Aero General Public License into a single combined work, and to convey the resulting work. The terms of
this License will continue to apply to the part which is the covered
work, but the special requirements of the GNU Aero General
Public License, section 13, concerning interaction through a network will apply to the combination as such.
14. Revised Versions of this License.
The Free Soware Foundation may publish revised and/or new
versions of the GNU General Public License from time to time. Such
new versions will be similar in spirit to the present version, but may
dier in detail to address new problems or concerns. Each version is
given a distinguishing version number. If the Program specifies that
a certain numbered version of the GNU General Public License “or
any later version” applies to it, you have the option of following the
terms and conditions either of that numbered version or of any
later version published by the Free Soware Foundation. If the
Program does not specify a version number of the GNU General
Public License, you may choose any version ever published by the
Free Soware Foundation.
If the Program specifies that a proxy can decide which future
Page 73

www.joy-it.net
Pascalstr. 8 47506 Neukirchen-Vluyn
versions of the GNU General Public License can be used, that
proxy's public statement of acceptance of a version permanently
authorizes you to choose that version for the Program. Later license
versions may give you additional or dierent permissions. However,
no additional obligations are imposed on any author or copyright
holder as a result of your choosing to follow a later version.
15. Disclaimer of Warranty.
THERE IS NO WARRANTY FOR THE PROGRAM, TO THE EXTENT
PERMITTED BY APPLICABLE LAW. EXCEPT WHEN OTHERWISE
STATED IN WRITING THE COPYRIGHT HOLDERS AND/OR OTHER
PARTIES PROVIDE THE PROGRAM “AS IS” WITHOUT WARRANTY OF
ANY KIND, EITHER EXPRESSED OR IMPLIED, INCLUDING, BUT NOT
LIMITED TO, THE IMPLIED WARRANTIES OF MERCHANTABILITY AND
FITNESS FOR A PARTICULAR PURPOSE. THE ENTIRE RISK AS TO THE
QUALITY AND PERFORMANCE OF THE PROGRAM IS WITH YOU.
SHOULD THE PROGRAM PROVE DEFECTIVE, YOU ASSUME THE COST
OF ALL NECESSARY SERVICING, REPAIR OR CORRECTION.
16. Limitation of Liability.
IN NO EVENT UNLESS REQUIRED BY APPLICABLE LAW OR AGREED
TO IN WRITING WILL ANY COPYRIGHT HOLDER, OR ANY OTHER
PARTY WHO MODIFIES AND/OR CONVEYS THE PROGRAM AS
PERMITTED ABOVE, BE LIABLE TO YOU FOR DAMAGES, INCLUDING
ANY GENERAL, SPECIAL, INCIDENTAL OR CONSEQUENTIAL
DAMAGES ARISING OUT OF THE USE OR INABILITY TO USE THE
PROGRAM (INCLUDING BUT NOT LIMITED TO LOSS OF DATA OR
DATA BEING RENDERED INACCURATE OR LOSSES SUSTAINED BY
YOU OR THIRD PARTIES OR A FAILURE OF THE PROGRAM TO
OPERATE WITH ANY OTHER PROGRAMS), EVEN IF SUCH HOLDER OR
OTHER PARTY HAS BEEN ADVISED OF THE POSSIBILITY OF SUCH
DAMAGES.
17. Interpretation of Sections 15 and 16.
If the disclaimer of warranty and limitation of liability provided
above cannot be given local legal eect according to their terms,
reviewing courts shall apply local law that most closely
approximates an absolute waiver of all civil liability in connection
with the Program, unless a warranty or assumption of liability
accompanies a copy of the Program in return for a fee.
END OF TERMS AND CONDITIONS
How to Apply These Terms to Your New Programs
If you develop a new program, and you want it to be of the greatest
possible use to the public, the best way to achieve this is to make it free
soware which everyone can redistribute and change under these terms.
To do so, attach the following notices to the program. It is safest to attach
them to the start of each source file to most eectively state the
exclusion of warranty; and each file should have at least the “copyright”
line and a pointer to where the full notice is found.
Page 74

www.joy-it.net
Pascalstr. 8 47506 Neukirchen-Vluyn
<one line to give the program's name and a brief idea of what it does.>
Copyright (C) <year> <name of author>
This program is free soware: you can redistribute it and/or modify it
under the terms of the GNU General Public License as published by the
Free Soware Foundation, either version 3 of the License, or (at your
option) any later version.
This program is distributed in the hope that it will be useful, but
WITHOUT ANY WARRANTY; without even the implied warranty of
MERCHANTABILITY or FITNESS FOR A PARTICULAR PURPOSE. See the
GNU General Public License for more details.
You should have received a copy of the GNU General Public License along
with this program. If not, see <https://www.gnu.org/licenses/>.
Also add information on how to contact you by electronic and paper mail.
If the program does terminal interaction, make it output a short notice
like this when it starts in an interactive mode:
<program> Copyright (C) <year> <name of author>
This program comes with ABSOLUTELY NO WARRANTY; for details type
`show w'.
This is free soware, and you are welcome to redistribute it under certain
conditions; type `show c' for details.
The hypothetical commands `show w' and `show c' should show the
appropriate parts of the General Public License. Of course, your
program's commands might be dierent; for a GUI interface, you would
use an “about box”. You should also get your employer (if you work as a
programmer) or school, if any, to sign a “copyright disclaimer” for the
program, if necessary. For more information on this, and how to apply
and follow the GNU GPL, see <https://www.gnu.org/licenses/>.
The GNU General Public License does not permit incorporating your
program into proprietary programs. If your program is a subroutine
library, you may consider it more useful to permit linking proprietary
applications with the library. If this is what you want to do, use the
GNU Lesser General Public License instead of this License. But first,
please read <https://www.gnu.org/licenses/why-not-lgpl.html>.
X11 License (MIT License)
Copyright (C) 1996 X Consortium
Permission is hereby granted, free of charge, to any person obtaining a
copy of this soware and associated documentation files (the
"Soware"), to deal in the Soware without restriction, including without
limitation the rights to use, copy, modify, merge, publish, distribute,
sublicense, and/or sell copies of the Soware, and to permit persons to
whom the Soware is furnished to do so, subject to the following
conditions:
The above copyright notice and this permission notice shall be included
in all copies or substantial portions of the Soware.
THE SOFTWARE IS PROVIDED "AS IS", WITHOUT WARRANTY OF ANY KIND,
EXPRESS OR IMPLIED, INCLUDING BUT NOT LIMITED TO THE
WARRANTIES OF MERCHANTABILITY, FITNESS FOR A PARTICULAR
PURPOSE AND NONINFRINGEMENT. IN NO EVENT SHALL THE X
CONSORTIUM BE LIABLE FOR ANY CLAIM, DAMAGES OR OTHER LIABILITY,
Page 75

www.joy-it.net
Pascalstr. 8 47506 Neukirchen-Vluyn
WHETHER IN AN ACTION OF CONTRACT, TORT OR OTHERWISE, ARISING
FROM, OUT OF OR IN CONNECTION WITH THE SOFTWARE OR THE USE OR
OTHER DEALINGS IN THE SOFTWARE.
Except as contained in this notice, the name of the X Consortium shall not
be used in advertising or otherwise to promote the sale, use or other
dealings in this Soware without prior written authorization from the X
Consortium.
X Window System is a trademark of X Consortium, Inc.
10. SUPPORT
If any questions remained open or problems may arise aer your
purchase,we are available by e-mail, telephone and ticket
support system to answer these.
E-Mail: [email protected]
Ticket-system: http://support.joy-it.net
Telephone: +49 (0)2845 98469 – 66 (10 - 17 o'clock)
For further information visit our website:
www.joy-it.net
Published: 29.09.2020
www.joy-it.net
SIMAC Electronics GmbH
Pascalstr. 8, 47506 Neukirchen-Vluyn
 Loading...