

Page 1

MULTIMEDIA CASE
for the Raspberry Pi 4
Expert manual
Page 2

www.joy-it.net
Pascalstr. 8 47506 Neukirchen-Vluyn
1. TABLE OF CONTENTS
1. Table of contents
2. Usage with Raspberry Pi OS
2.1 Setting up the serial interface
2.2 IR-Receiver
2.2.1 learningMode
2.3 Shutdown script
2.4 RGB-LEDs
2.4.1 LED colour mode
2.4.2 Installation of Hyperion
2.5 Fan
2.6 Sowareupdates for the board
2.7 UART Control
3. Usage with Kodi 19 Matrix
3.1 Installation
3.2 Multimedia Case Configuration
3.3 Multimedia Case LED Configuration
3.4 HDMI CEC
3.5 IR Control Configuration
4. Further Information
5. Support
This is an expert manual and should only be used if you do want
to use the Multimedia Case with another operating system or do
not want to use our prepared LibreElec image. The basic manual
can be found here.
i
Page 3

www.joy-it.net
Pascalstr. 8 47506 Neukirchen-Vluyn
2. USAGE WITH RASPBERRY PI OS
The case has several functions, for example fan control and LED control,
which can be used in conjunction with the Raspberry Pi. In this chapter
you will find an exemplary application of these functions in Raspberry Pi
OS and a more detailed explanation of the individual functions. For this
purpose we oer you suitable code examples. You can download these
code examples here and load them onto your Raspberry Pi using an SSH
connection or you can enter the following command into the console of
your Raspberry Pi:
sudo raspi-config
2.1 Setting up the serial interface
Using serial communication, the Raspberry Pi is able to communicate
with the board of the multimedia case. This must be activated separately
on the Raspberry Pi.
unzip /home/pi/MultimediaCase.zip && rm /home/pi/MultimediaCase.zip
wget https://joy-it.net/public/MultimediaCase.zip
If you have downloaded the sample codes, you must first unpack them
with a command, and you can also remove the zip file in the same step.
Please note, however, that the directory in which the file is located does
not necessarily have to match the directory of the command. The com-
mand is the following:
The serial interface is required for communication between the
Raspberry Pi and the board. In some scripts (
learningMode
and
shutdown-function
) a string is sent from the Raspberry Pi to the
board depending on the script. There, this string is used to execute a
program specific to the script.
i
To enable this serial port, type the following command in the console to
access the settings:
There select
3 Interface Options → P6 Serial Port
.
Page 4

www.joy-it.net
Pascalstr. 8 47506 Neukirchen-Vluyn
Now you are asked the question
Would you like a login shell to be
accessible over serial?
which should be declined.
The next question
Would you like the serial port hardware to be
enabled?
should be confirmed.
Exit the raspi-config configuration tool and do not restart your Raspberry
Pi for now.
Add three lines in the
config.txt.
Open the file with the following
command:
sudo nano /boot/config.txt
Add the following three lines to the file at the end:
dtoverlay=pi3-miniuart-bt
core_freq=250
Save the changes with CTRL + O and exit the editor with CTRL + X. Now
restart the Raspberry Pi with the following command:
sudo reboot
Page 5

www.joy-it.net
Pascalstr. 8 47506 Neukirchen-Vluyn
2.2 Infrared-Receiver
An infrared receiver is built into the case, which is positioned in the front
(opposite the connections). This allows, among other things, the control
by a remote control, for example to switch the Raspberry Pi on and o.
This also allows you to operate without mouse and keyboard. The infrared sensor TSOP4838 is connected to the GPIO 7.
2.2.1 learningMode
The script
learningMode.py
is a program that allows to set up a PowerO
button of any remote control. The PowerO button serves as a button
that switches the Multimedia Case on and o. This can be any button on a
separate remote control or an unassigned button of a remote control you
are already using with another device.
IIn the script, the string \x0D X04 \x0D is sent from the Raspberry Pi to
the board of the multimedia case via serial communication (see 2.1). This
string puts the board into the so-called
learningMode
.
The
learningMode
is used to declare the PowerO button. In this mode
you must press the desired button three times to set it. The LEDs will light
up in dierent colors so that the
learningMode
can be recognized from
outside.
sudo python3 /home/pi/MultimediaCase/learningMode.py
You can run the
learningMode
with the following command:
Each time the button is pressed, the LEDs light up white to confirm that
an infrared signal has been received.
If you should press any other key, the LEDs light up red and the program
resets. Then you have to press a key three times again.
The LEDs will light up green when the PowerO button has been set successfully.
The
learningMode
can be executed as oen as desired, so the
PowerO button can be changed again.
i
Page 6

www.joy-it.net
Pascalstr. 8 47506 Neukirchen-Vluyn
You get more information about the learningMode in relation to Kodi in
Chapter 3.1 Multimedia Case Configuration, which is declared using
this script.
2.3 Shutdown script
You can shut down the Raspberry Pi using the Multimedia Case's circuit
board. You can do this with a PowerO button (see 2.2.1 learningMode)
or with the button directly on the case. The shutdown script is needed to
shut down the Raspberry Pi and not only to disconnect the power supply.
When the PowerO button or the button on the Multimedia Case is pressed, the Multimedia Case serially sends the string
xxxShutdownRaspberryPixxx\n\r to the Raspberry Pi. The following
script then interprets the string as a command. This command is sudo
sudo shutdown -h now and shuts down the Raspberry Pi.
Aer starting the Multimedia Case, a green pulsation of the RGB
LEDs indicates that the system is starting up - during this time
the Raspberry Pi starts its operating system.
The displayed pulsation is preset to a time of 30s in the Multimedia
Case and then changes to a permanent green light, which signals readiness for operation.
If the operating system of the Raspberry Pi has started up faster than
in the 30s, the pulsation can be stopped by sending the string \x0D
X05 \x0D via UART, so that the successful startup is displayed more
directly. More about activating the serial interface can be found in
chapter 2.1.
We have also integrated this method in our script of the shutdown
function.
i
The Multimedia Case indicates the startup with a green flashing
of the LEDs. Aer 30s this blinking changes to a permanent light
by default. The shutdown of the Multimedia Case is indicated by
a red blinking of the LEDs. When the Multimedia Case has disconnected
the power supply to the Raspberry Pi, the LEDs will be permanently
red.
i
Page 7

www.joy-it.net
Pascalstr. 8 47506 Neukirchen-Vluyn
sudo python3 /home/pi/MultimediaCase/shutdown-function.py &
You can use the following command to run the program in the background so that the terminal is still available.
We recommend adding this program to the autostart, so that Raspberry
Pi always automatically calls the script at startup and remains permanently activated in the background. To do this, open the file
rc.local
with
the following command:
sudo nano /etc/rc.local
Insert the following line before
exit 0
. Note that the directory where the
script is located may dier.
python3 /home/pi/MultimediaCase/shutdown-function.py &
exit 0
2.4 RGB-LEDs
The case has a RGB LED on each corner. The WS2812B LEDs are
connected in a row and can be color adjusted with GPIO 18. This pin is
connected to the PWM module of the Raspberry Pi. It is mandatory to use
time critical signals (PWM) for WS2812B LEDs, otherwise disturbances
may occur.
To set up the LEDs we recommend Hyperion. Hyperion is an open source
ambient light implementation which is compatible with many platforms.
It also oers you the possibility to add more LEDs to add a backlight to
your monitor and also allows you to play eects on your LEDs. You don't
need any further knowledge about the data processing of LEDs.
Data processing of the LEDs
Because the WS2812B LEDs are arranged in a row / string, the
signal passes through all the LEDs one aer the other. Each LED
takes one data package. Four data packages must always be sent so
that all LEDs receive one data packet. These data packages contain
values in GRB color space.
i
LED 1 LED 2
LED 3
LED 4
Page 8

www.joy-it.net
Pascalstr. 8 47506 Neukirchen-Vluyn
If you want to use the jack plug, you must first switch o the
LEDs, otherwise malfunctions may occur. Both PWM0 pins are
required for audio output via the jack plug.
i
2.4.1 LED colour mode
The firmware of the board supports dierent LED color modes starting
with version 1.0.1. These modes also control the LEDs when the Raspberry Pi is shut down.
You set the LED mode by means of a string, which is transmitted serially
to the board.
Mode 0 - Default colour mode
This is the default color mode, which is set in the factory default
state. Here the LEDs are permanently red when the Raspberry Pi is
powered o and green when it is active. Powering up and powering
down is indicated by pulsing green or red. The string
\x0D LM0 \x0D sets this mode.
Mode 1 - Only pulsating
In this color mode only the startup and shutdown of the Raspberry
Pi is indicated by pulsating. As soon as the Raspberry Pi is switched
o or on, the LEDs are o. For this color mode you have to send this
string \x0D LM1 \x0D serially to the board.
Mode 2 - Only confirming
In this color mode, only the startup and shutdown are
acknowledged. The LEDs only light up briefly, when the signal for
startup and shutdown has been received, to indicate that this signal
has been acknowledged. The string \x0D LM2 \x0D is used to set the
board.
You can send these strings serially to the board using a Python script. The
following is an exemplary formulation of how this might look:
Page 9
www.joy-it.net
Pascalstr. 8 47506 Neukirchen-Vluyn
Now restart the Raspberry Pi with the following command:
sudo reboot
Aer that, you can install Hyperion with the following command:
2.4.1 Installation of Hyperion
Now follows a step by step installation of Hyperion in Raspberry Pi OS.
The first step is to execute the following commands in your console to
prepare the system for Hyperion:
sudo su
sudo apt-get update && sudo apt-get dist-upgrade
apt-get install scons
exit
wget -qO- https://joy-it.net/public/installHyperion.sh| sh
#!/usr/bin/env python
import serial
import os
ser = serial.Serial(
port='/dev/serial0',
baudrate = 38400,
parity=serial.PARITY_NONE,
stopbits=serial.STOPBITS_ONE,
bytesize=serial.EIGHTBITS,
timeout=1
)
ser.write(str.encode('\x0D'))
ser.write(str.encode('LM0')) # Mode 0
ser.write(str.encode('\x0D'))
You have now successfully installed Hyperion on your Raspberry Pi OS.
Hyperion can be run with the following command:
sudo hyperion/build/bin/hyperiond &
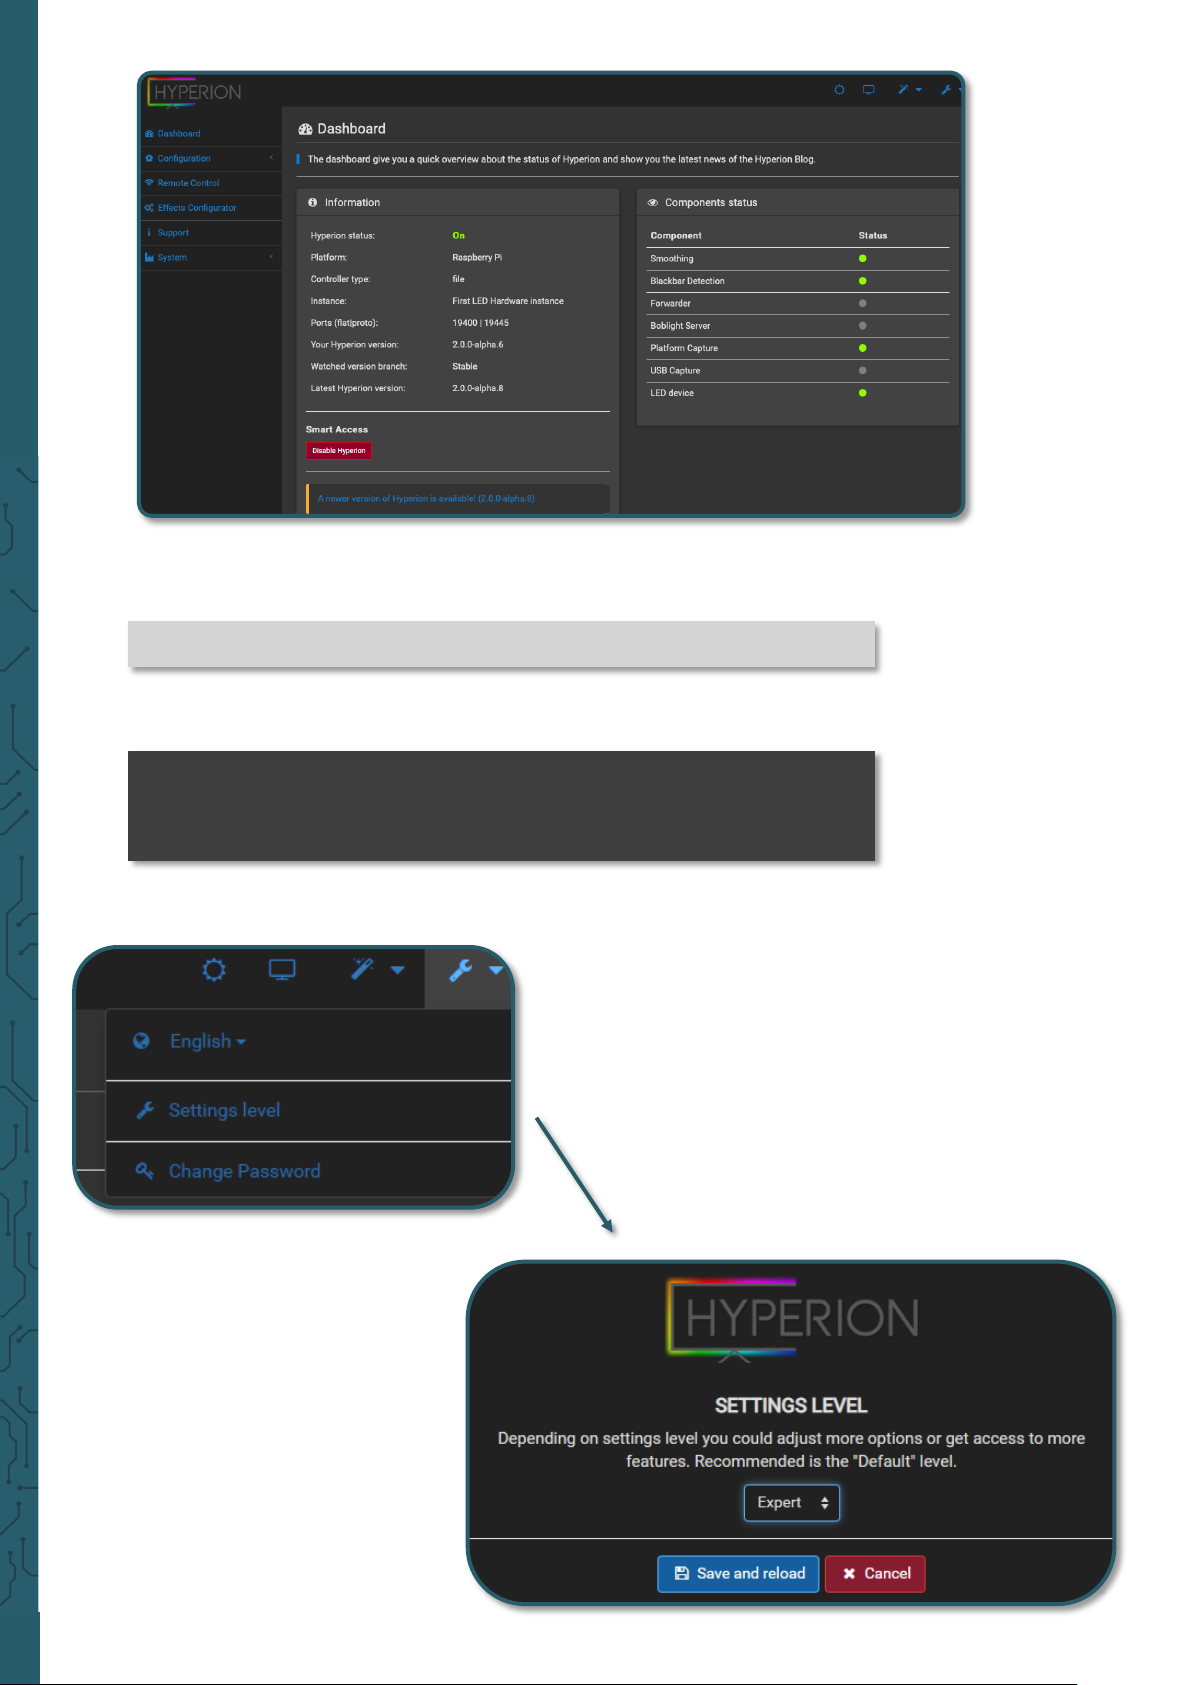
Now you can access Hyperion via web browser. To do so, enter your IP
address of the Pi and attach a :8090. This could look like this, for
example:
192.168.1.100:8090
Now the WebGUI of Hyperion is displayed.
Page 10
www.joy-it.net
Pascalstr. 8 47506 Neukirchen-Vluyn
You can also open Hyperion automatically when starting the Raspberry
Pi. To do this, open the
rc.local
file with the following command:
sudo nano /etc/rc.local
Add the following line before the
exit 0
. Note that your directory where
the script is located may dier.
python3 /home/pi/MultimediaCase/shutdown-function.py &
sudo /home/pi/hyperion/build/bin/hyperiond &
exit 0
To be able to implement the following settings, you must set the
Setting
level
from
Default
to
Expert
.
Page 11
www.joy-it.net
Pascalstr. 8 47506 Neukirchen-Vluyn
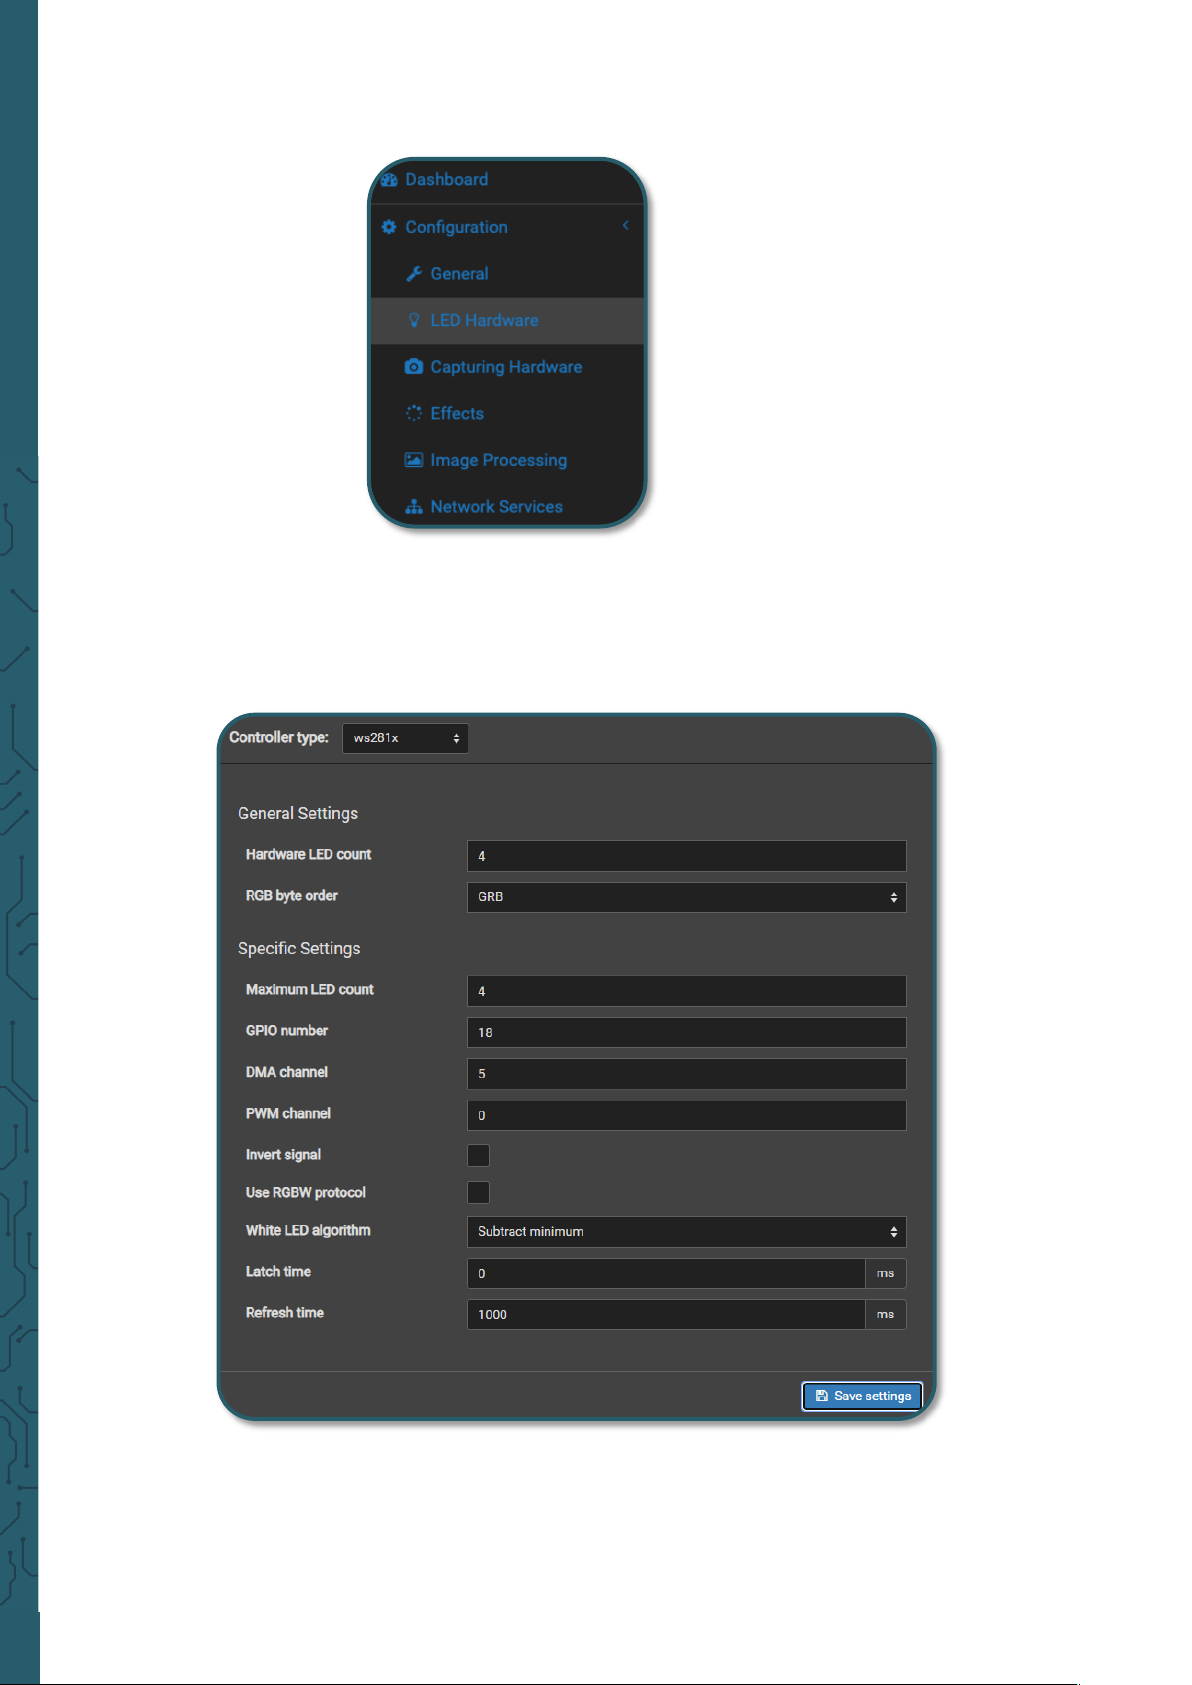
You first have to set up in the GUI which kind of LEDs are installed in the
case. To do this go to Configuration → LED Hardware.
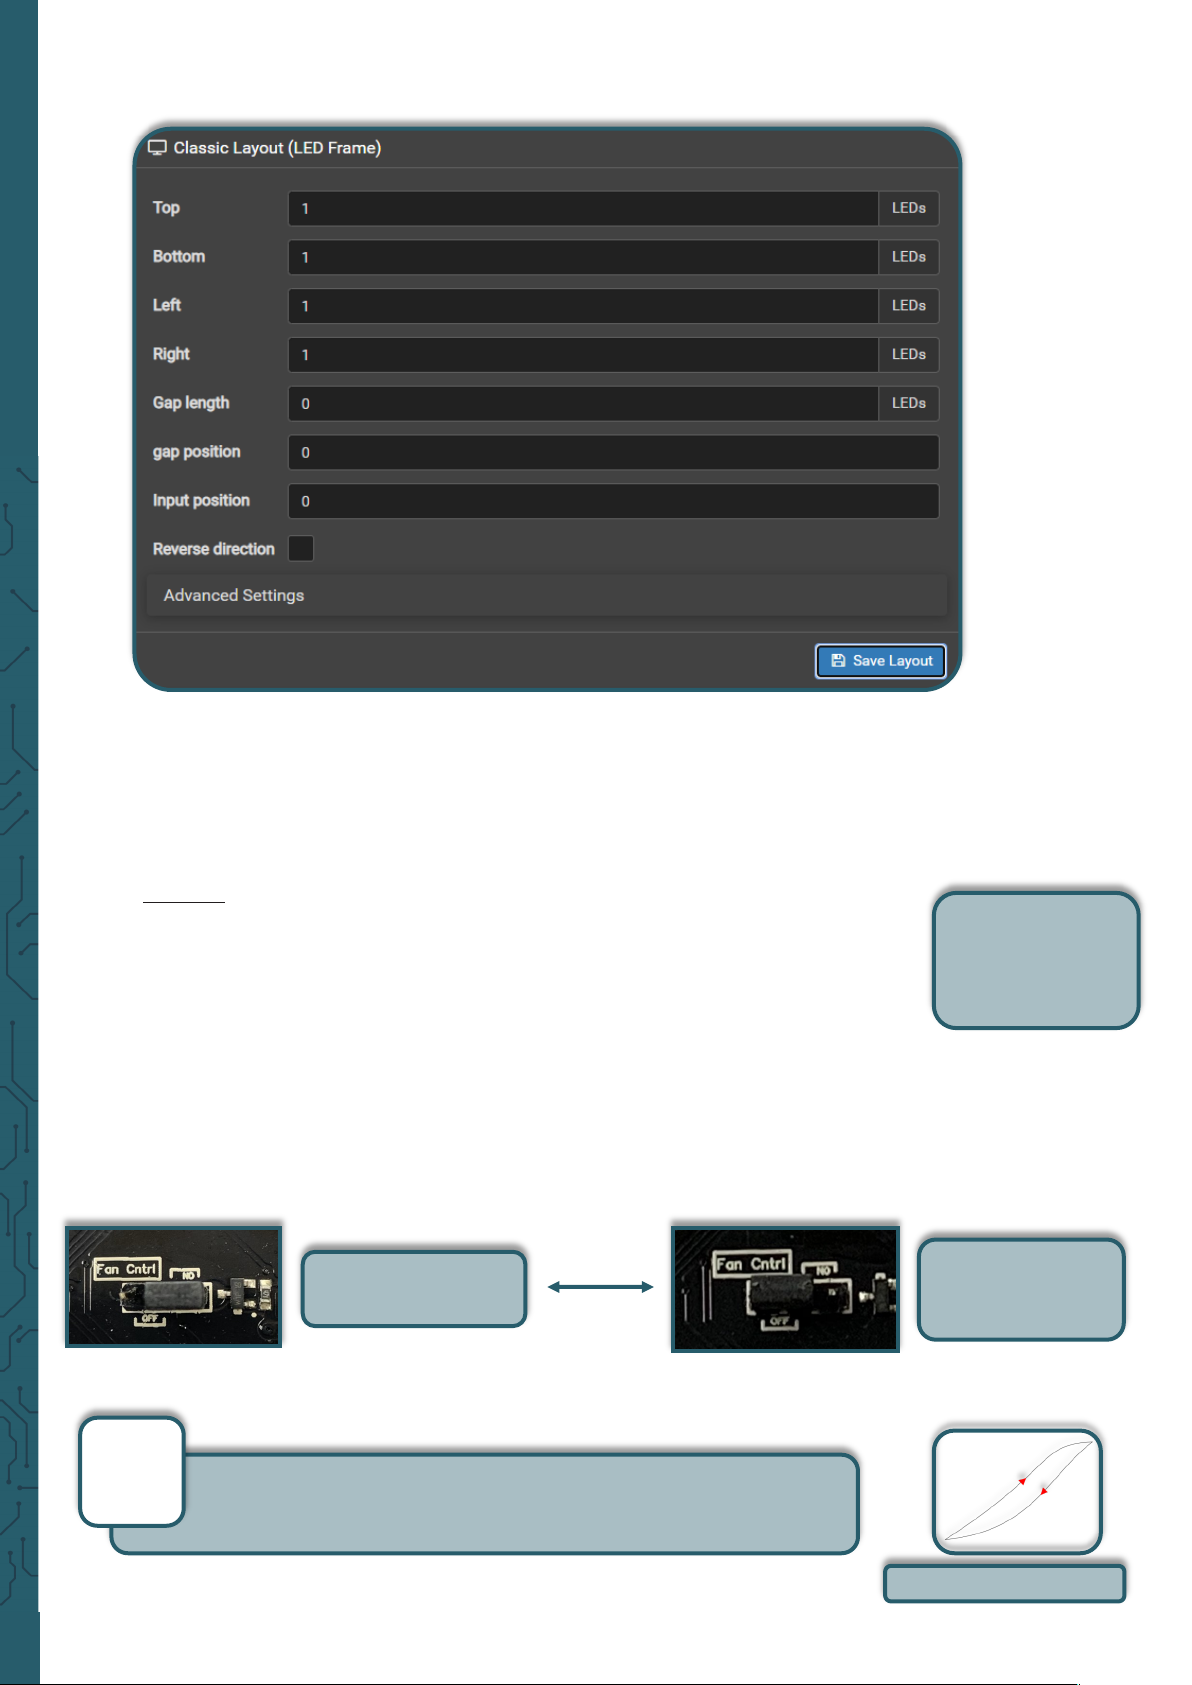
There you make the following settings under LED Controller:
Page 12
www.joy-it.net
Pascalstr. 8 47506 Neukirchen-Vluyn
In Hyperion you can now apply a wide variety of eects to the LEDs.
as well as connect and control additional LEDs.
2.5 Fan
A jumper with the inscription Fan Cntrl is attached to the back of the
board of the Multimedia Case. This jumper allows to use the fan in two
dierent modes.
When the jumper is set to OFF, the fan is supplied with 5 V voltage. This
means that the fan will work at its full speed permanently.
But if it is set to ON, you can use a script to set the fan and even adjust it
to the temperature of the Raspberry Pi.
By default, the jumper is set to ON, which allows programming of the fan.
Without an active script, the fan will not run. Therefore, we provide you
with a script where the speed of the fan is adjusted to the temperature of
the CPU of the Raspberry Pi.
Permanently at
maximum speed
Customizable with
the help of a script
In the provided script a hysteresis is included. This means that if
the maximum temperature of 60 °C is exceeded, the system will
cool down to the set temperature of 50 °C.
i
Hysteresis curve
The transistor to
control the fan is
connected to the
GPIO 17.
Also set the following under LED Layout:
Page 13
www.joy-it.net
Pascalstr. 8 47506 Neukirchen-Vluyn
2.6 Sowareupdates for the board
To keep the board always up to date with the latest soware, it is useful
to install soware updates on the board. A new soware version is written to the flash memory of the board.
Newer soware versions will be released over time to add newer features.
For a firmware update, the serial interface must be configured correctly
(see 2.1)
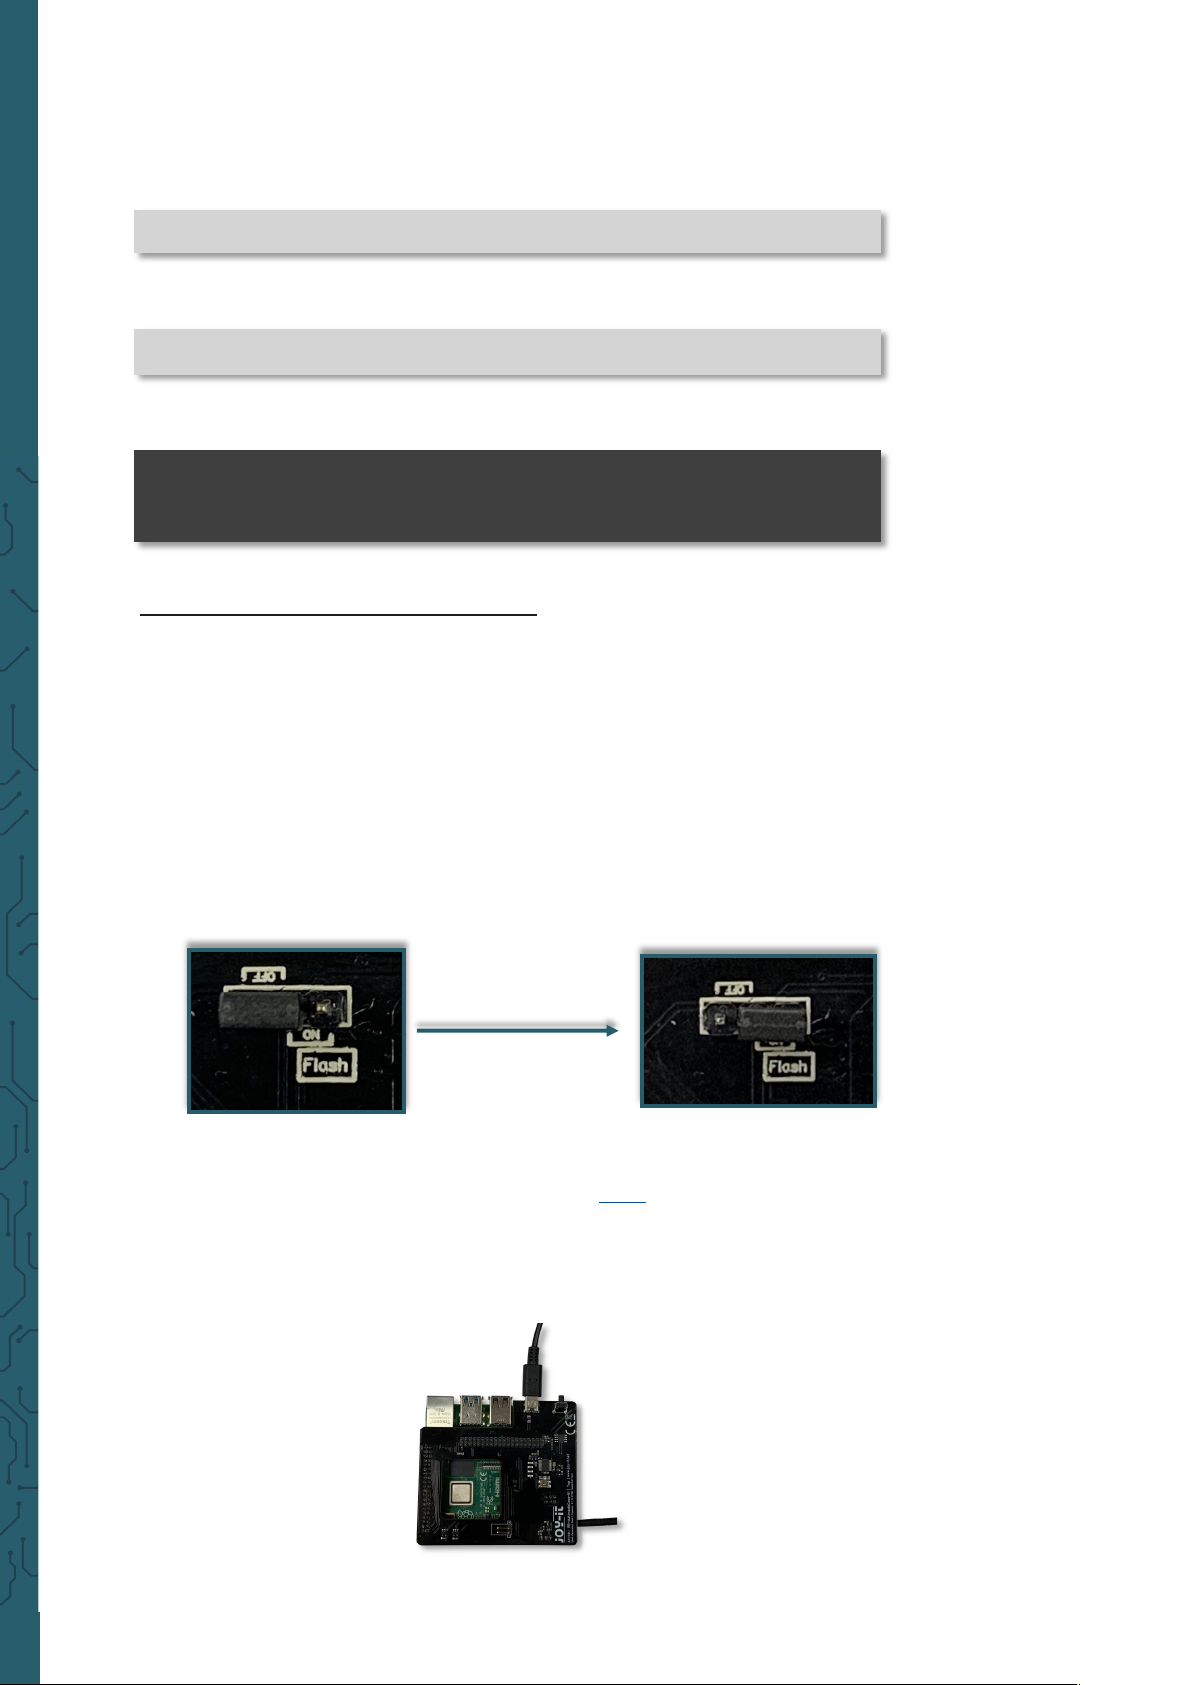
The Raspberry Pi and the circuit board must be removed from the case
for the flash process. Furthermore the jumper marked with Flash has to
be moved so that it is set to ON.
You can download the latest soware version here.
Once the board is plugged into the Raspberry Pi, you need to connect the
Raspberry Pi and the board to the power supply using a USB-C cable.
Please note that both boards must be powered to flash the board.
sudo python3 /home/pi/MultimediaCase/fan.py &
It is useful to start this program in the background or add it directly to the
autostart. This way you can permanently check the temperature of the
Raspberry Pis and if necessary cool the Raspberry Pi.
With the following command you can start the script in the background:
sudo nano /etc/rc.local
Insert the following line before
exit 0
. Note that the directory where the
script is located may dier.
python3 /home/pi/MultimediaCase/shutdown-function.py &
python3 /home/pi/MultimediaCase/fan.py &
exit 0
To run the program automatically when you start the Raspberry Pi, you
must open a file with the following command:
Page 14
www.joy-it.net
Pascalstr. 8 47506 Neukirchen-Vluyn
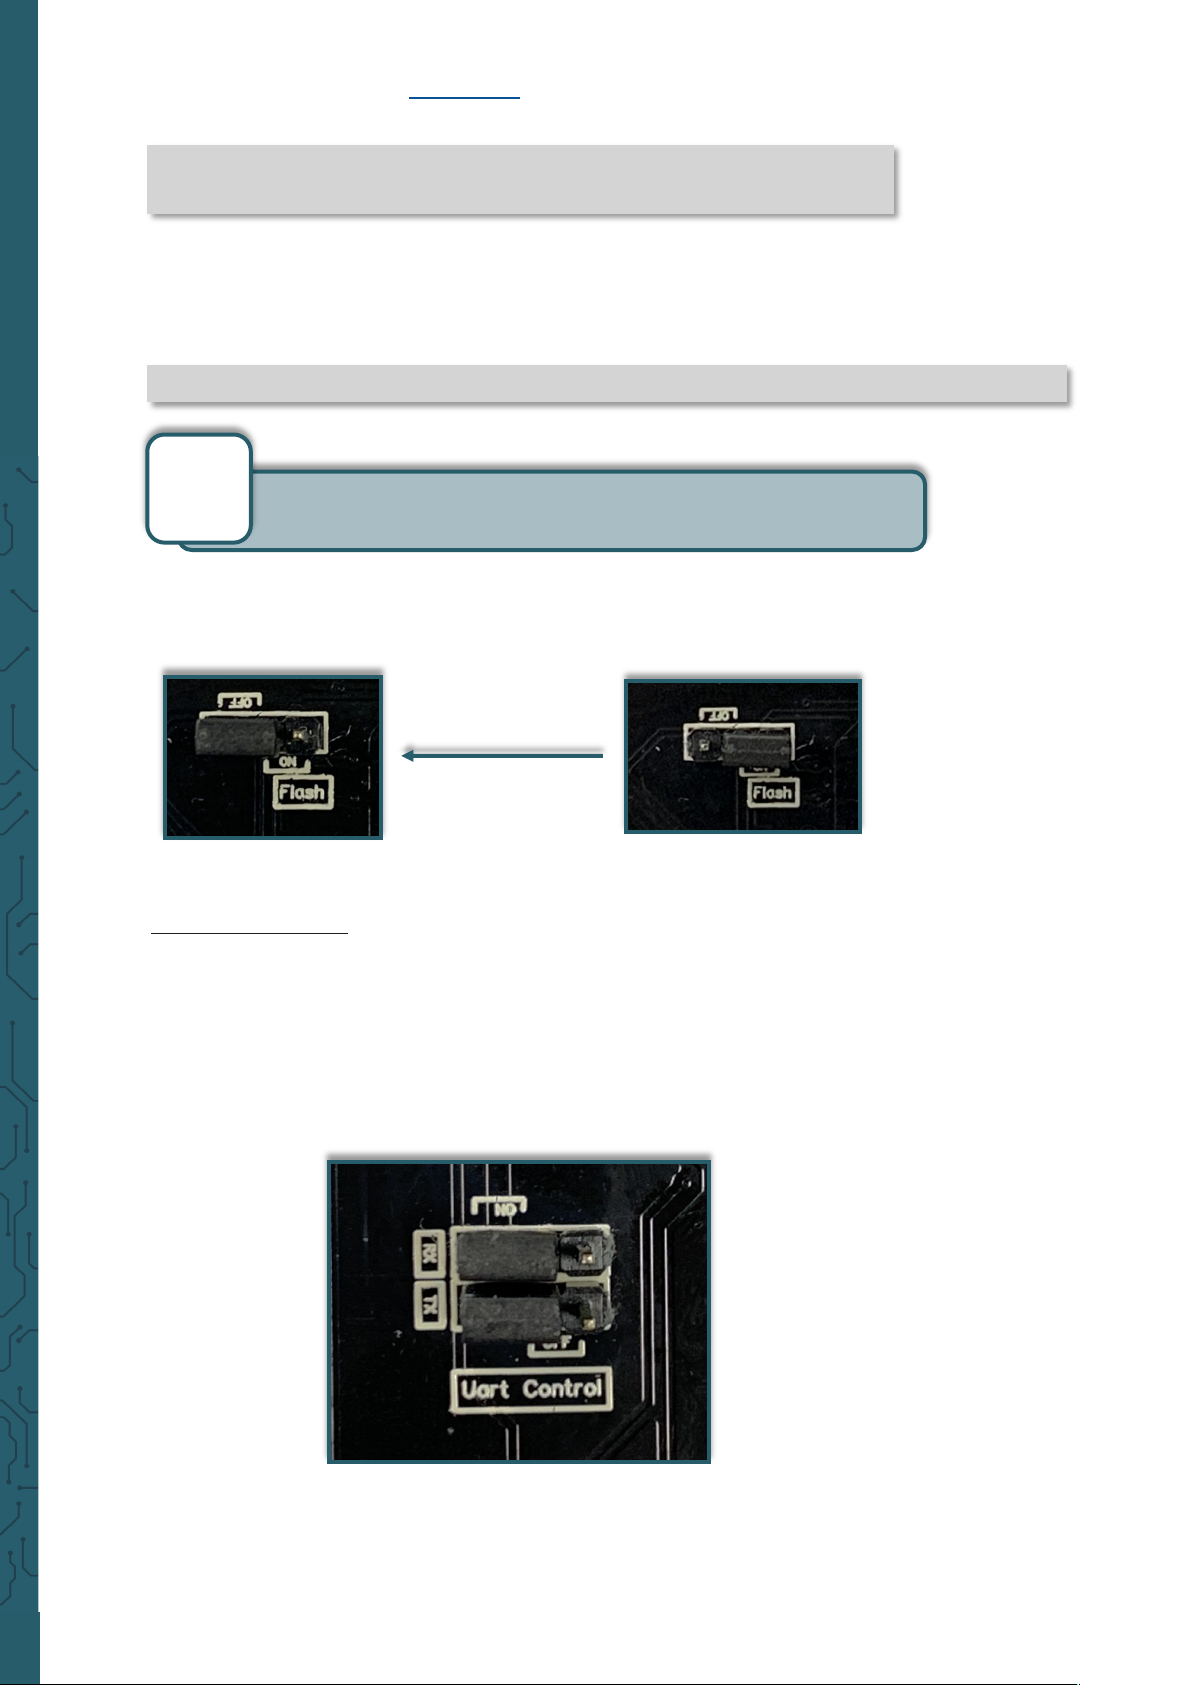
When this process is successfully completed, the board is flashed. Before
reassembling the case, put the jumper under the board back to its
original position.
sudo apt-get update -y
sudo apt-get install -y stm32flash
Make sure that you are in the same directory as the
.bin file
. There you
can enter the following command to start the flash process:
sudo stm32flash /dev/serial0 -w MultimediaCase.bin -b 9600
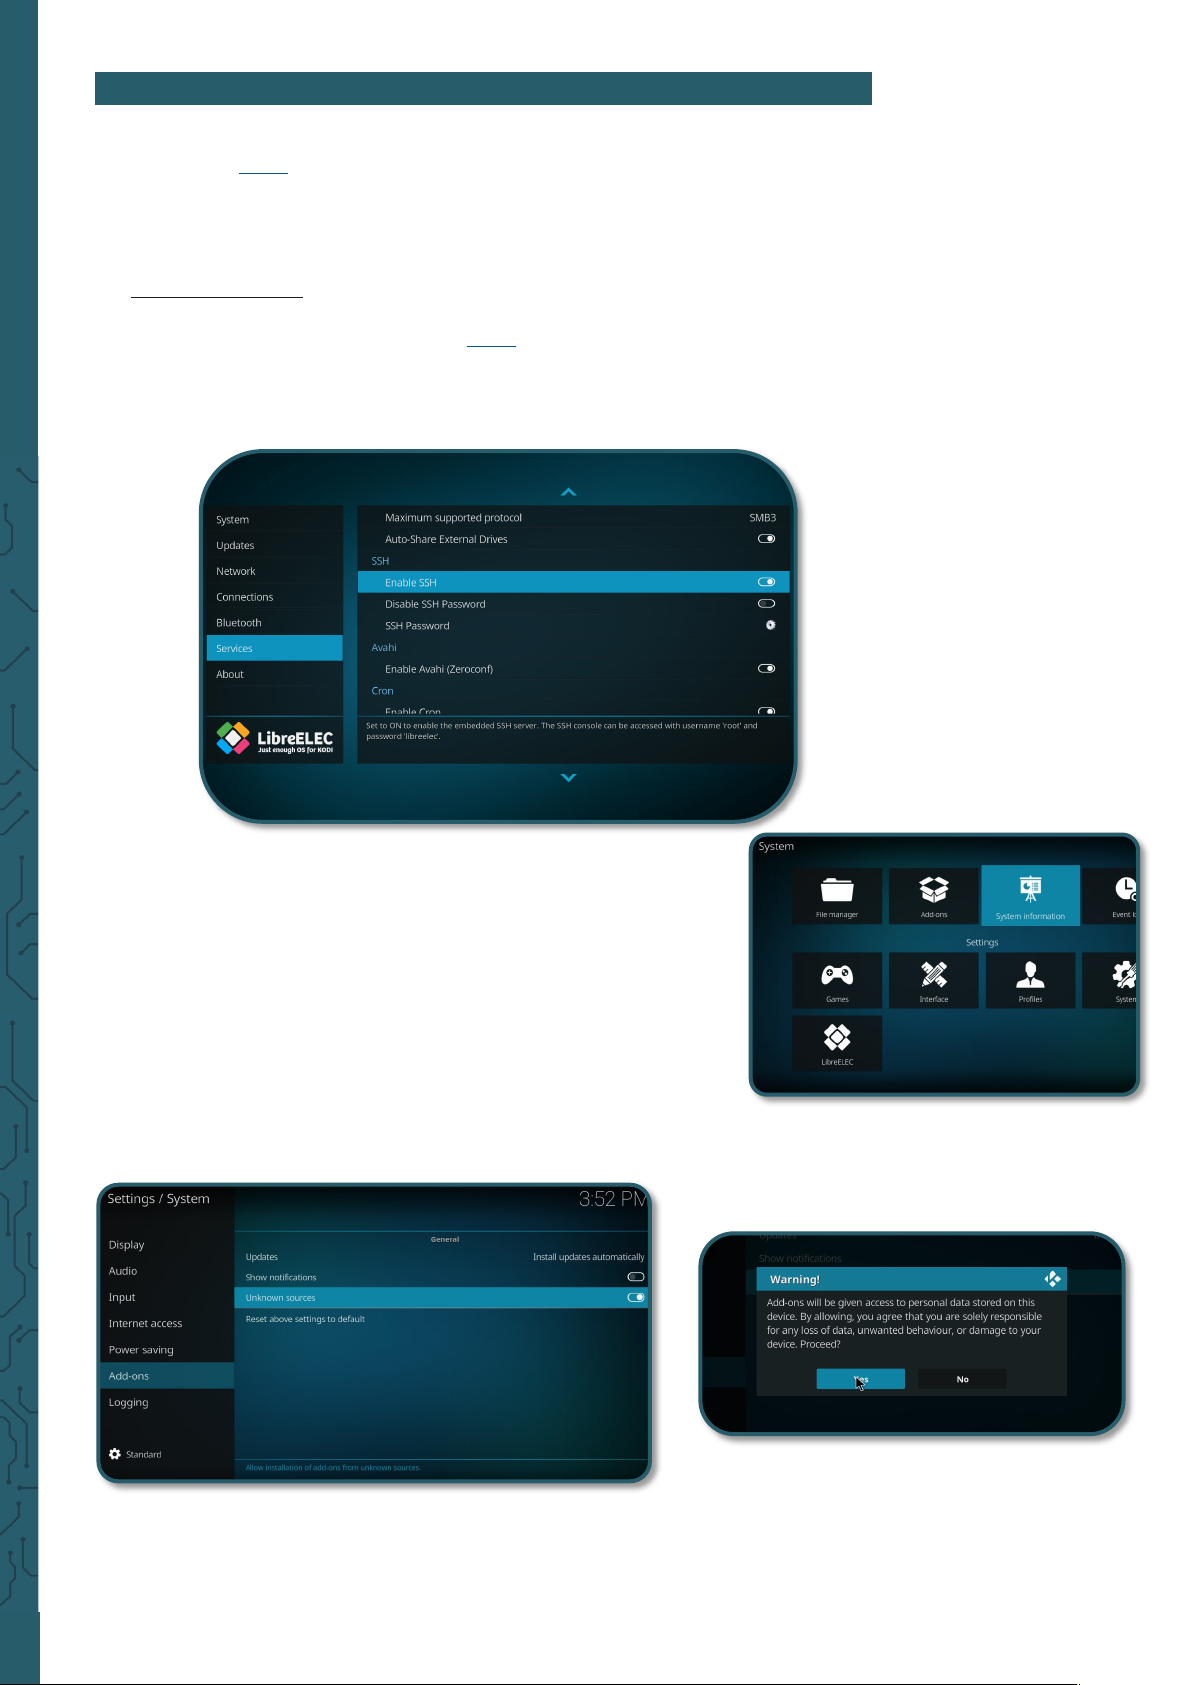
2.7 UART Control
Two jumpers for the UART connection are also attached to the bottom of
the board. To change these jumpers is only useful if the Raspberry Pi and
the Multimedia Case should not communicate with each other anymore.
This occurs for example if the UART interface of the Raspberry Pi is needed to communicate with another device. This could be the case, for example, if you want to extend the Multimedia Case.
For flashing the program stm32flash is required. You can download and
install it with the following commands.
Please note that the name of the soware may dier due to newer soware versions.
i
Page 15
www.joy-it.net
Pascalstr. 8 47506 Neukirchen-Vluyn
3. USAGE WITH KODI 19 MATRIX
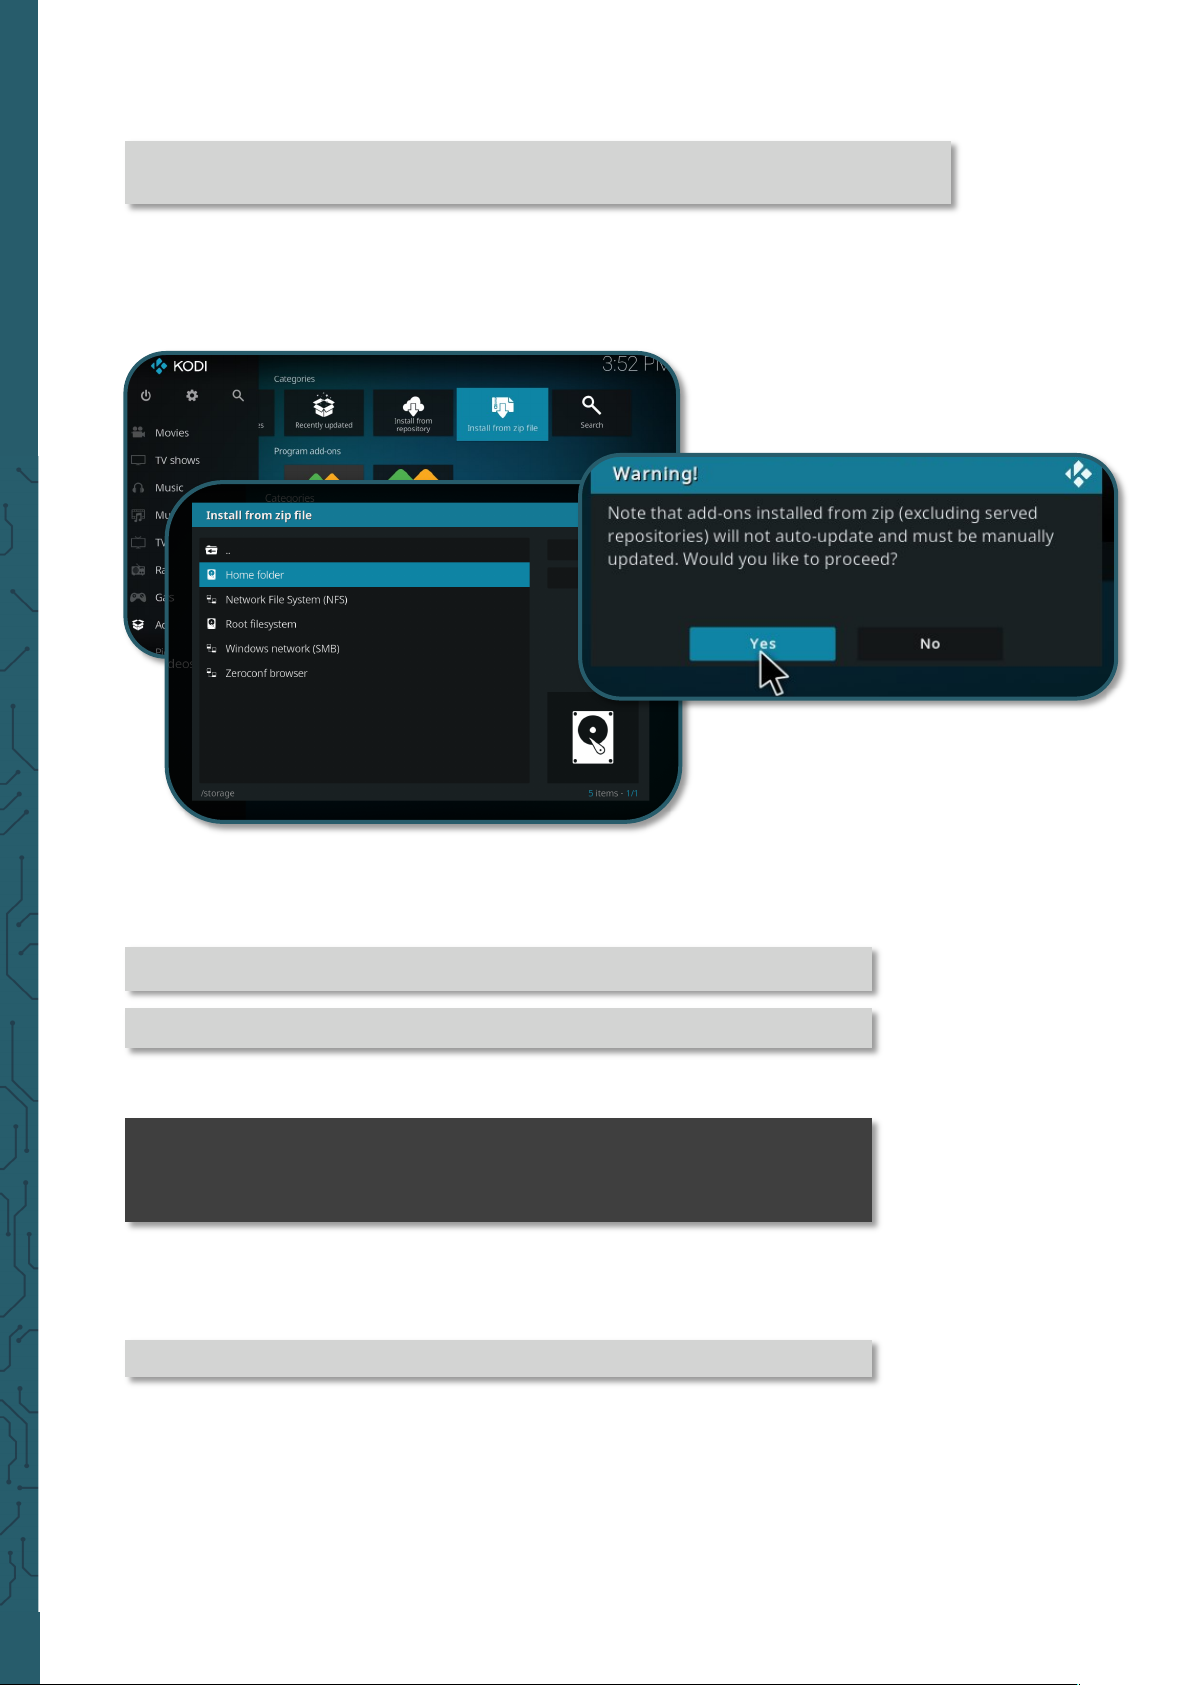
To log in you also need the IP address, which you can read in
the
system information
which is located in the settings. The
username is
root
by default and the password is
libreelec
by
default.
Now you have to download the necessary addons. First you
have to allow that addons can be installed from zip files. To
do so, go back to the settings on
System → Addons
and acti-
vate
Unknown Sources
.
We oer you a prepared image based on LibreElec 10, which you can
download here. In this image all necessary addons are already installed
in Kodi for setting the Multimedia Case. If you don't want to use our prepared image, you can follow this chapter to use the full functionality of
the Multimedia Case.
3.1 Installation
First you have to establish an SSH connection. We recommend MobaXterm, which you can download here. You also need to enable SSH in
LibreElec. You can enable SSH in the settings under
LibreELEC
→
Services → Enable SSH
.
Page 16
www.joy-it.net
Pascalstr. 8 47506 Neukirchen-Vluyn
wget https://mirrors.kodi.tv/addons/krypton/script.module.pyserial/
script.module.pyserial-3.4.0.zip
If you select this, the addon should be installed. To enable serial communication with the Raspberry Pi completely, you also have to edit the
con-
fig.txt
Open it with the following commands:
mount -o remount,rw /flash
Add the following lines at the end of the file:
dtoverlay=pi3-miniuart-bt
enable_uart=1
core_freq=250
Save with CTRL + O and exit the editor again with CTRL + X. Restart the
Raspberry Pi with the following command to allow the changes to take
eect.
reboot
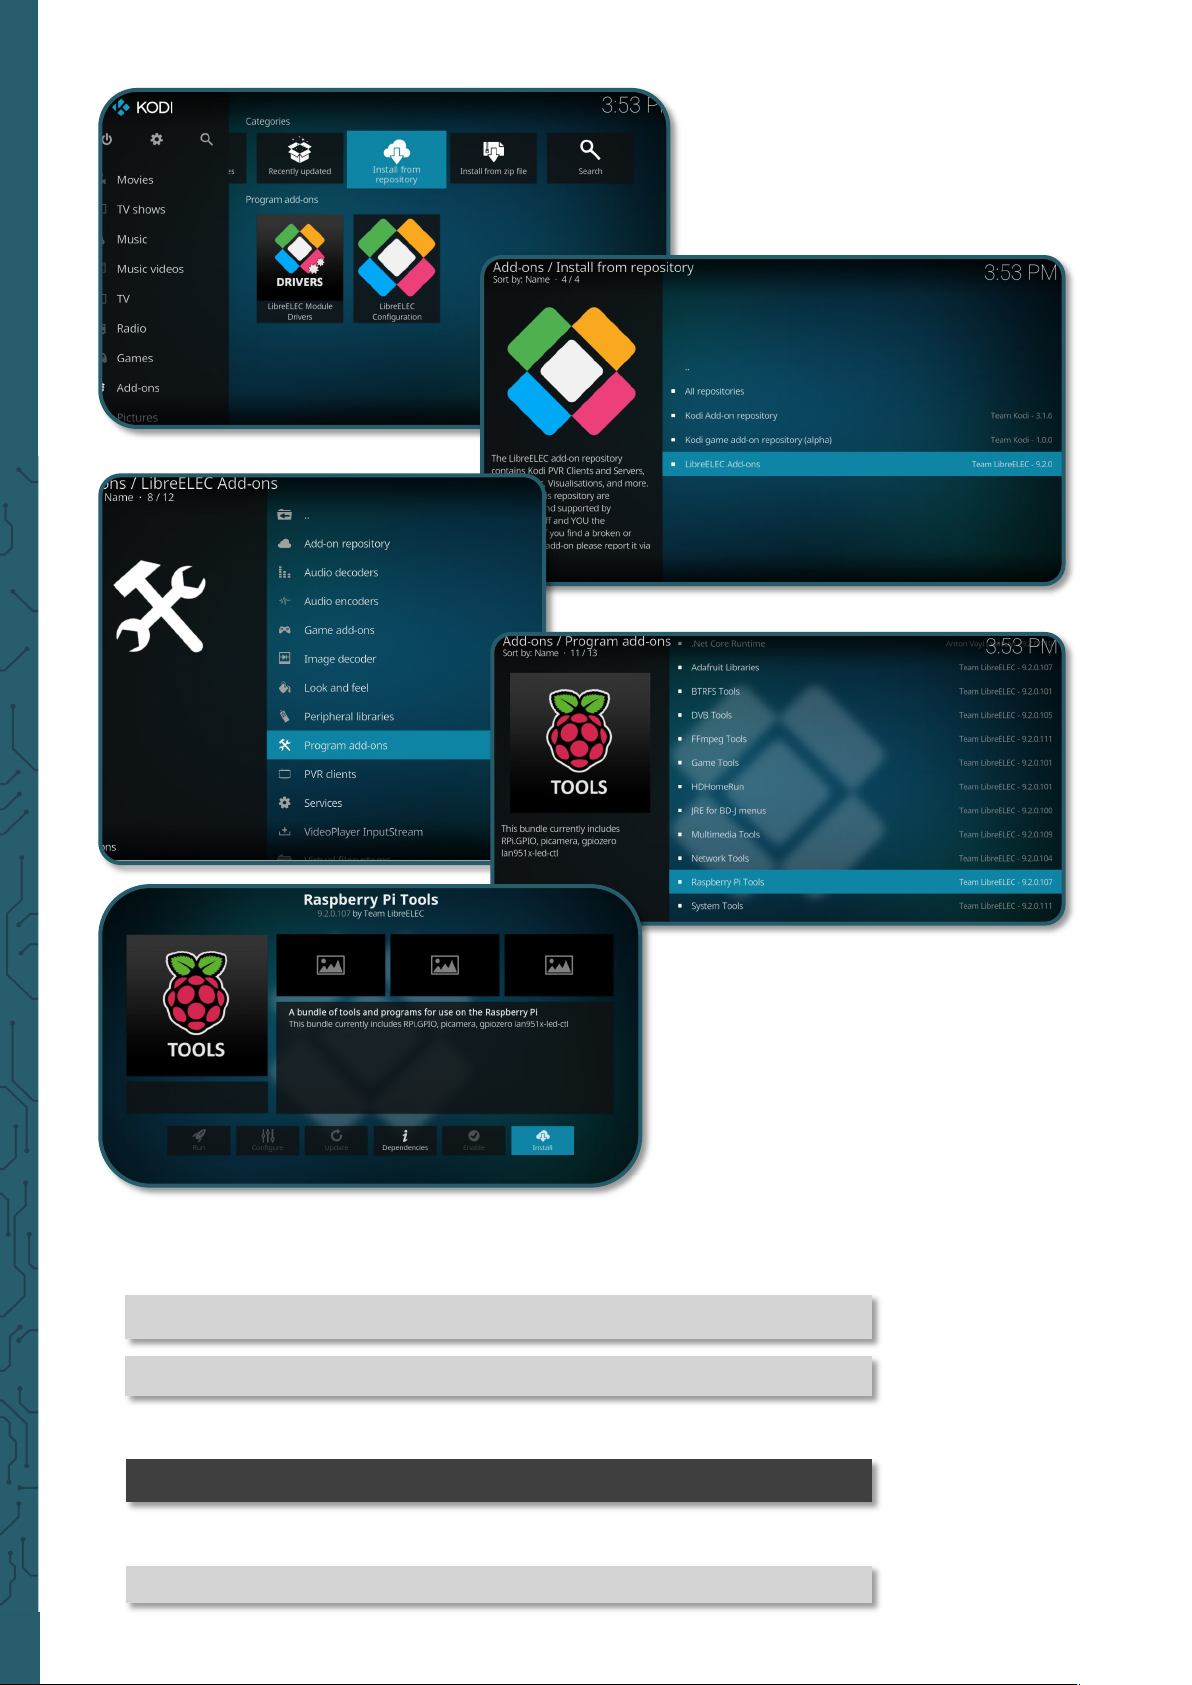
Now download another addon to use the GPIO functions of the Raspberry
Pi. You can find the function
Download from Repository
in the menu
Ad-
dons
. There you can find under
LibreELEC Addons → Program Addons
→
Raspberry Pi Tools
, which you have to install.
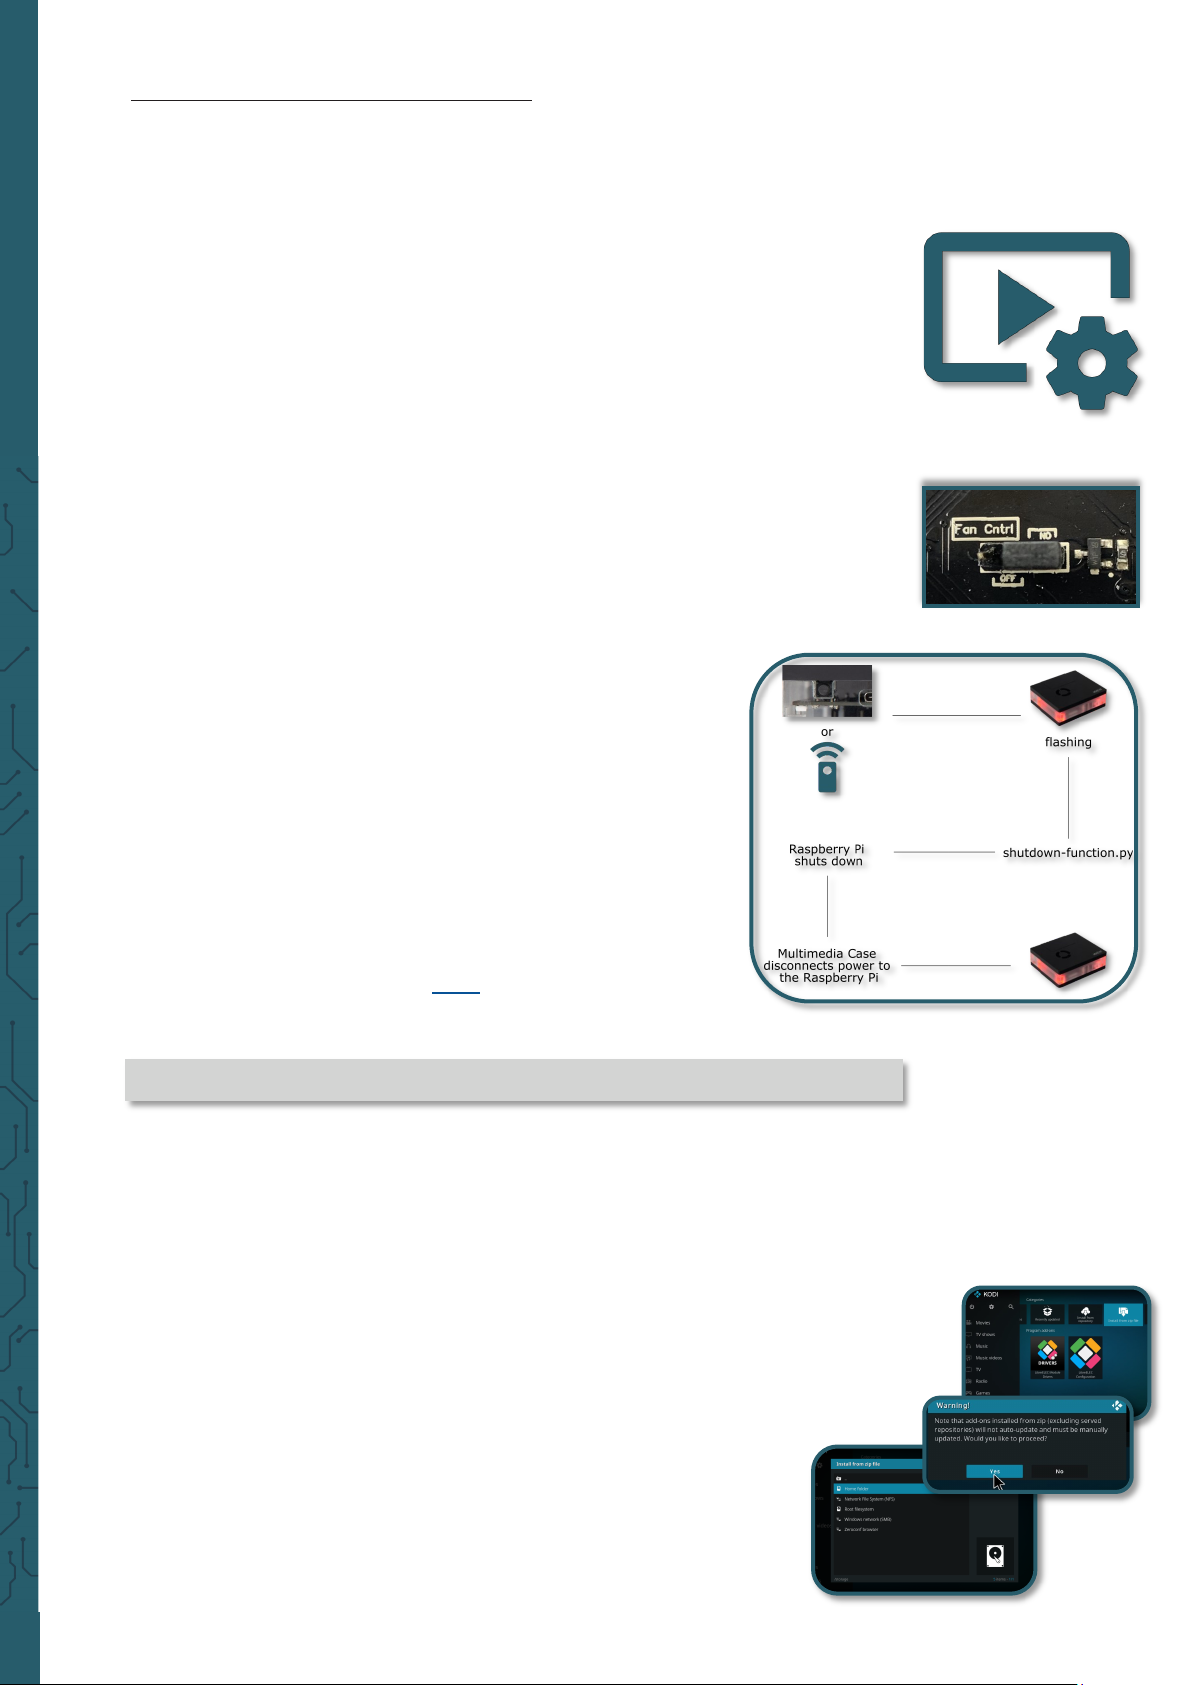
First enter the following command to download the serial communication addon:
Now you can install
addons
with the help of the option Install from Zip
files. If you click on this option, a warning message will be displayed,
which you must confirm. Aer that, click on the home folder. From there
you can find your directory where you downloaded the zip file.
nano /flash/config.txt
Page 17
www.joy-it.net
Pascalstr. 8 47506 Neukirchen-Vluyn
Now open the config.txt again:
mount -o remount,rw /flash
nano /flash/config.txt
dtoverlay=gpio-ir,gpio_pin=7
Now insert the following line at the end of the file again:
Now restart the Raspberry Pi with the following command:
reboot
Page 18

www.joy-it.net
Pascalstr. 8 47506 Neukirchen-Vluyn
However, for Kodi 19 you need to edit the library to run our programs. To
do this, open this file :
There you have to comment out line 45. To do this, insert a # at the
beginning of the line.
str = type('')
from threading import Lock
from itertools import repeat, cycle, chain
# from colorzero import Color
from collections import OrderedDict
nano /storage/.kodi/addons/virtual.rpi-tools/lib/gpiozero/output_devices.py
41
42
43
44
45
46
Now you can download the Addons especially for the Multimedia Case. In
total there are three addons, which have all dierent functions. There is
the Multimedia Case Configuration Addon, Multimedia Case LED Configuration and the IR Control Configuration.
Page 19
www.joy-it.net
Pascalstr. 8 47506 Neukirchen-Vluyn
3.2 Multimedia Case Configuration
With this addon you can activate or modify certain functions of the Multimedia Case to personalize it. This addon contains the programs
fan.py
,
shutdown-function.py
and the
learningMode
(/storage/.kodi/addons/
script.module.MultimediaCase/lib/).
fan.py
This is a script to control the fan automatically. By default it starts cooling
at 60 °C and stops at 50 °C. Of course you can adjust this in the code to
your needs. Make sure that the jumper on the bottom of the board is set
to ON at Fan Cntrl, so that the fan can be controlled. This is the default
position of the jumper. If the jumper is set to OFF, the fan will run permanently at 100% of its capacity. See 2.5 Fan for more information.
shutdown-function.py
This script shuts down your Raspberry Pi before the Multimedia Case disconnects the power supply, when the PowerO button (
learningMode
) or
the button on
Multimedia Case was pressed. This script is automatically active aer
starting the Raspberry Pi, as soon as the addon was executed for the first
time. For more information see 2.3 Shutdown script.
learningMode
This function of the case puts the board into the so-called
learningMode
, where the board declares a PowerO button.
This means that you can shut down the Raspberry Pi properly by pressing any button on any remote control. This
function is activated within the addon, whereby the two upper scripts are stored separately.
The board marks the learningMode with a colored flashing.
You have to press the selected button three times. When the
board has received an infrared signal, it flashes white. However, if you should press another key, the LEDs will light up
red and you have to start again. The LEDs light green when a
key has been successfully set as a PowerO button. For more
information see 2.2.1 learningMode.
You can download the addon here or download it directly to
the Raspberry Pi using the following command:
wget https://joy-it.net/public/script.module.MultimediaCase.zip
Now you can install
addons
with the help of the option Install from Zip
files. If you click on this option, a warning message will be displayed,
which you must confirm. Aer that, click on the home folder. From there
you can find your directory where you downloaded the zip file.
Page 20
www.joy-it.net
Pascalstr. 8 47506 Neukirchen-Vluyn
3.3 Multimedia Case LED Configuration
This addon directly adjusts the LEDs of the case. You have to execute the
following command to download Hyperion.
wget -qO- https://git.io/JUvg7 | bash -s 2.0.0-alpha.9
Now restart the Raspberry Pi with the following command:
reboot
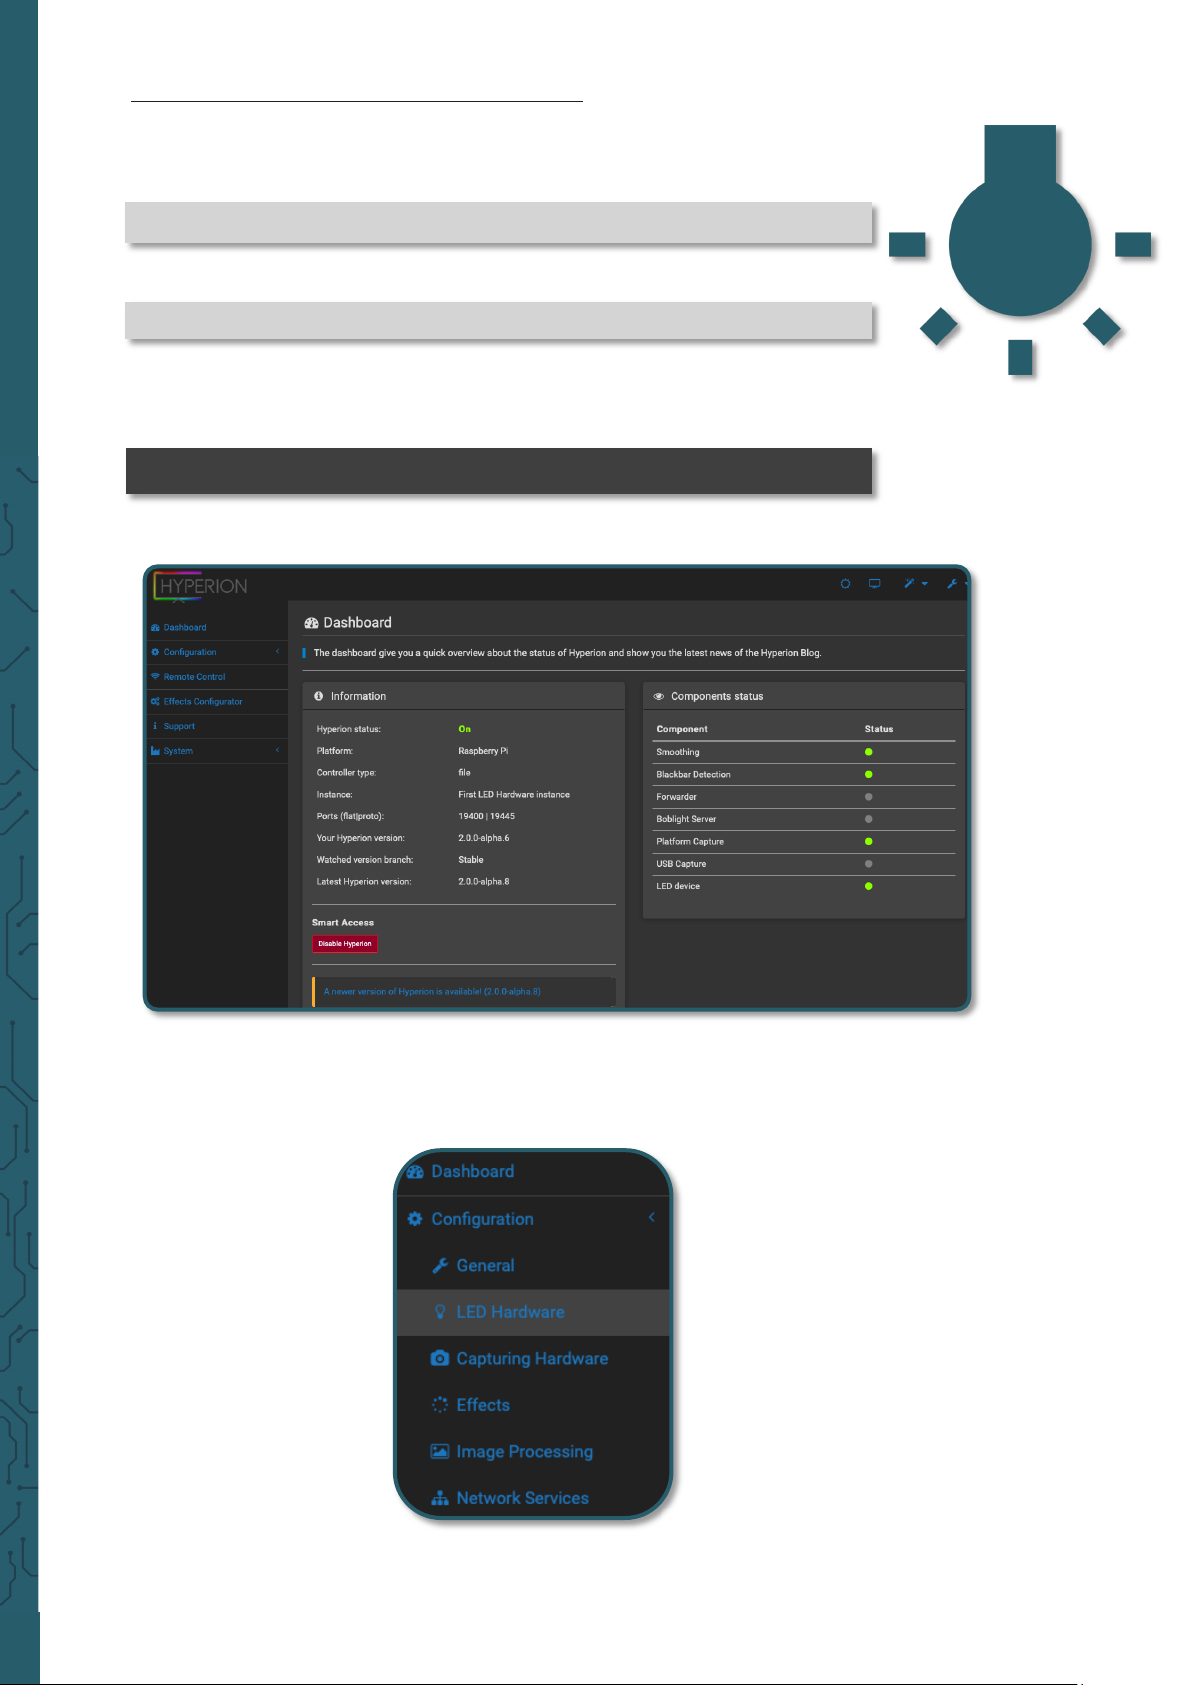
Now the WebGUI of Hyperion is displayed.
Now you can access Hyperion via web browser. To do so, enter your IP
address of the Pi and attach a :8090. This could look like this, for example:
192.168.1.100:8090
You first have to set up in the GUI which kind of LEDs are installed in the
case. To do this go to Configuration → LED Hardware.
Page 21
www.joy-it.net
Pascalstr. 8 47506 Neukirchen-Vluyn
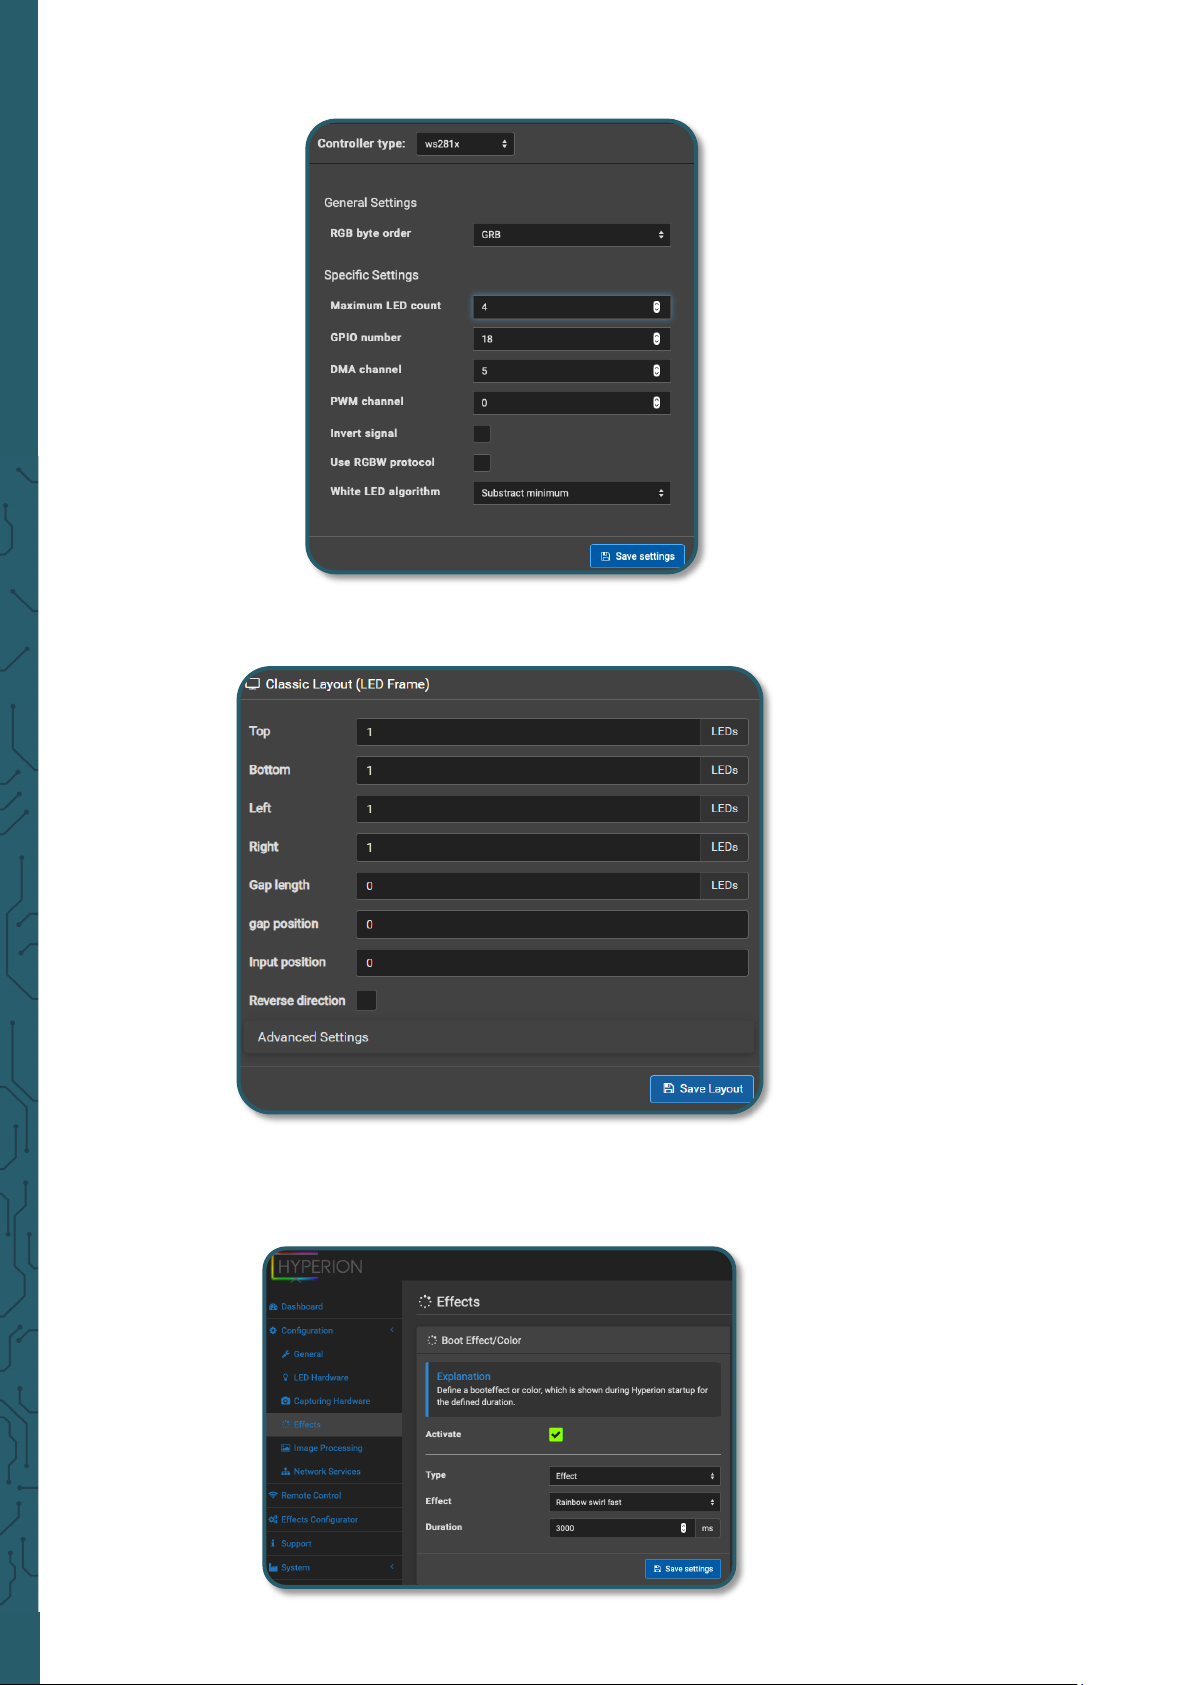
There you make the following settings under LED Controller:
In Hyperion you can also specify for example a start eect under
Configu-
ration → Eects
.
Also set the following under LED Layout:
Page 22
www.joy-it.net
Pascalstr. 8 47506 Neukirchen-Vluyn
If you want to use the addon to make settings, you must enter the following command. Because with the help of this command Hyperion itself
can be switched o and on by using the addon.
systemctl disable hyperion.service --now
You can also undo this with the following command .
systemctl enable hyperion.service --now
Now you can download the addon here or download it directly to the
Raspberry Pi with the following command:
You can install this, as already explained.
In the addon you can adjust eects, static color and brightness of the
LEDs. It is also possible to switch o Hyperion and let the board control
the LEDs again. But in order for the board to take control again, you have
to switch it o and on again manually. More information can be found in
2.4 RGB-LEDs.
In this addon you can set Hyperion as well as the LED colour modes.For
more information about the LED color modes, see 2.4.1 LED color mo-
des.
Note that this addon is only compatible with firmware version 1.0.1 or
higher. How to update the soware can be found in 2.6 Soware-
updates for the board.
wget https://joy-it.net/public/script.module.MCHyperion.zip
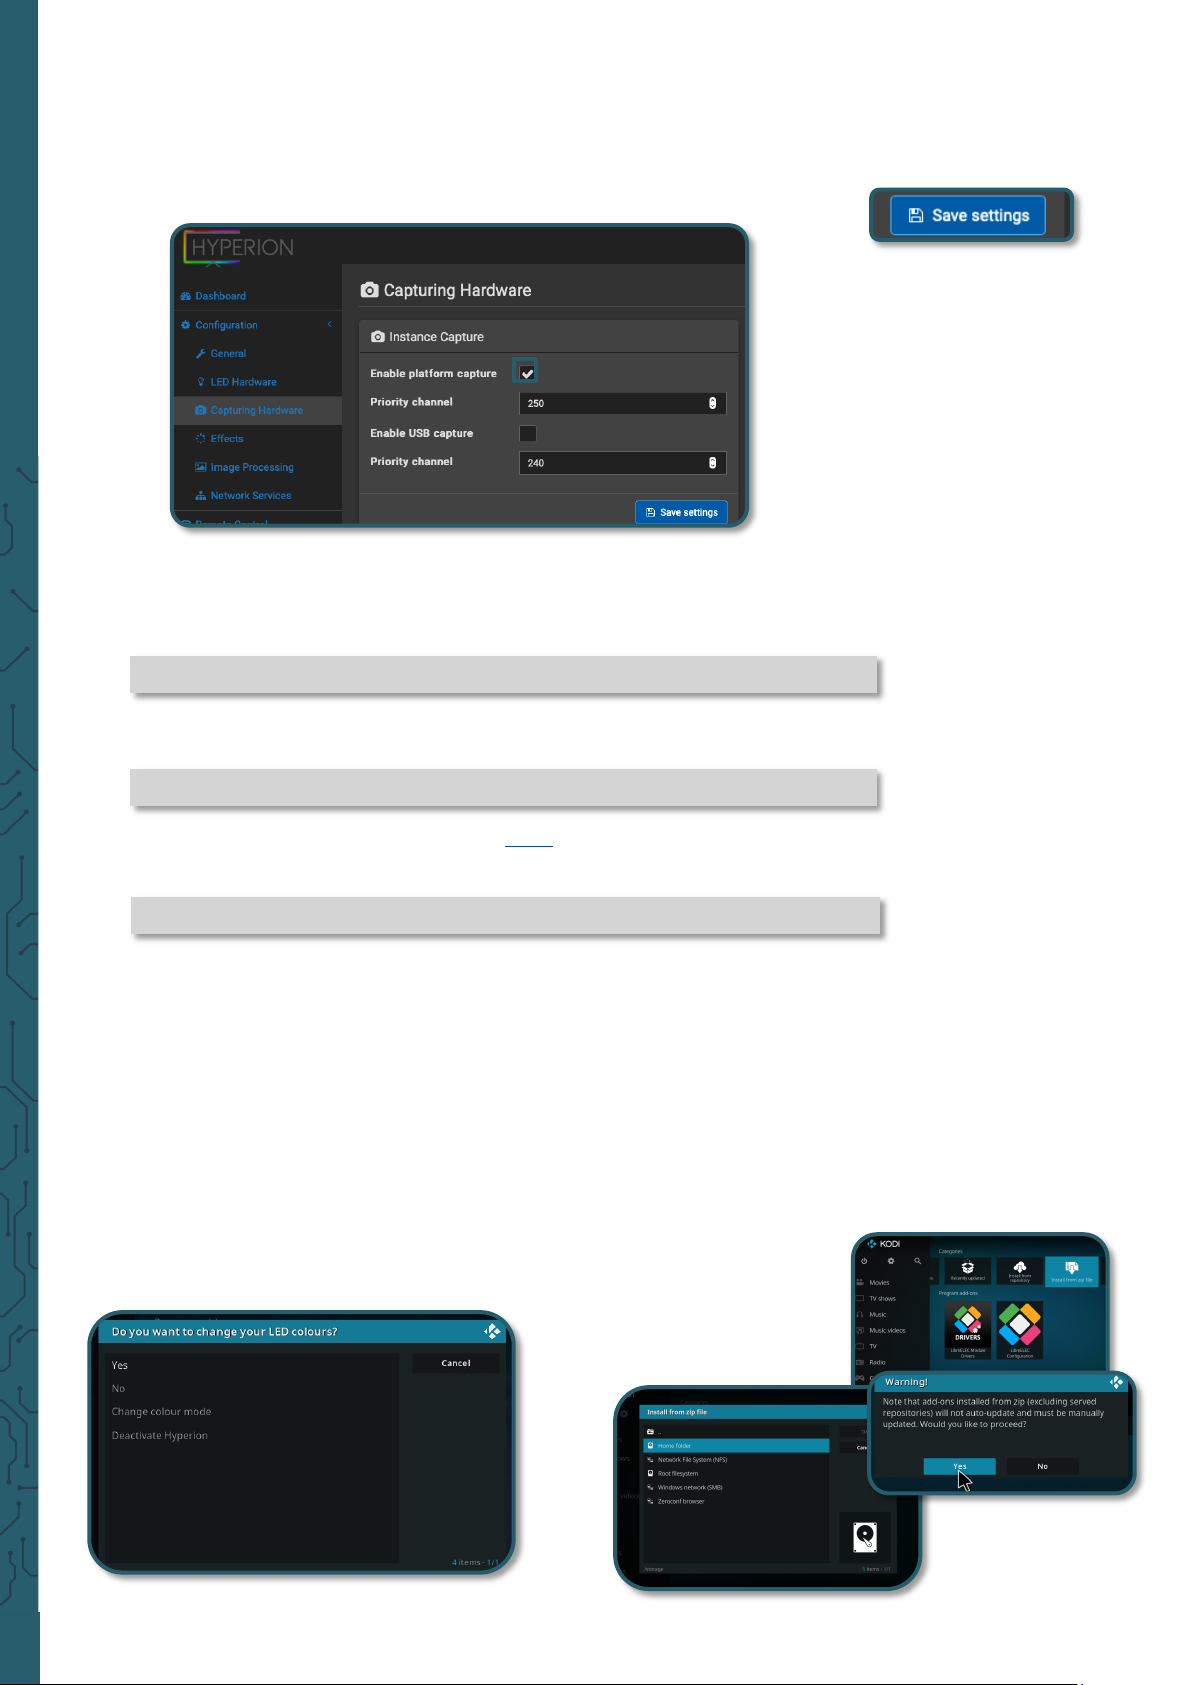
However, in order for the Addon to function correctly, you must deactivate under
Configuration → Capturing Hardware
Enable platform cap-
ture. It is necessary that you save these settings.
Page 23
www.joy-it.net
Pascalstr. 8 47506 Neukirchen-Vluyn
3.5 IR Control Configuration
An alternative to HDMI CEC (3.4 HDMI CEC) is this addon, with which you
can set up a remote control of your choice for the Multimedia Case. It will
walk you through and save the individual keys of the remote control that
are necessary to use Kodi, so you don't need to have a keyboard or
mouse connected to the Raspberry Pi anymore.
Note that you don't get any feedback when you press a key, but only a
message when it has been detected and continues with the next one.
You can download the addon here or download it directly to your Raspberry Pi with the following command:
wget https://joy-it.net/public/script.remote.config.zip
This addon must be installed like all other addons using the
Install
from ZIP files
. More information can be found in 2.2 IR-Receiver.
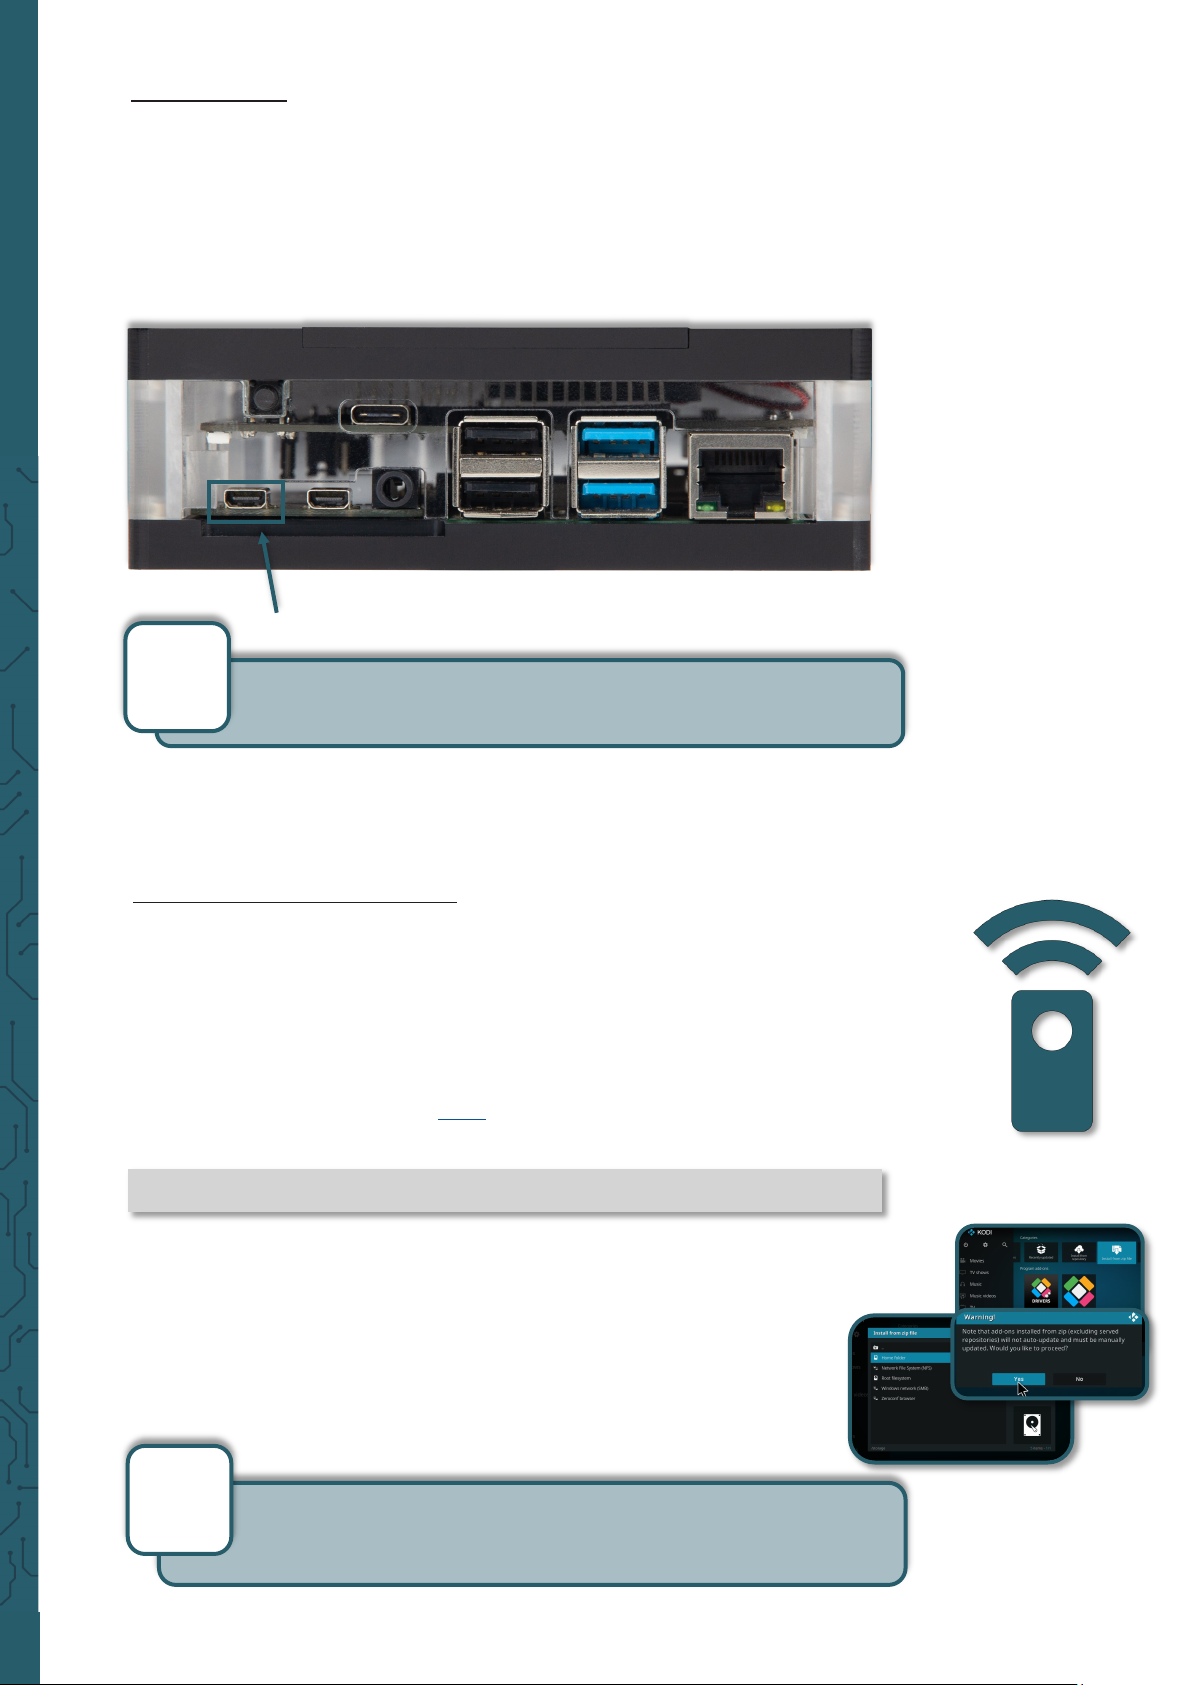
HDMI0
All addons can be configured as oen as desired. With these addons the complete functionality of the Multimedia Case is cover-
ed and oers you an optimal experience.
i
3.4 HDMI CEC
HDMI CEC is a function where the remote control of your TV can operate
the Multimedia Case via the HDMI cable.
Kodi has already enabled this function by default. You can use the remote
control with the Multimedia Case without further configuration.
The HDMI cable used must also support this function. The HDMI0 port
must also be used. HDMI CEC oers an alternative to a separate remote
control.
Note that the TV must also have HDMI CEC enabled. The name of
this function may vary depending on the manufacturer.
i
Page 24

www.joy-it.net
Pascalstr. 8 47506 Neukirchen-Vluyn
PR
4. FURTHER INFORMATION
Our Information and Take-back Obligations according to the
German Electronic Law (ElektroG)
Symbol on Electrial and Electronic Products:
This crossed-out bin means that electrical and electronic products do not belong into the household waste. You must hand over your
old appliance to a registration place. Before you can hand over the old
appliance, you must remove used batteries and replacement batteries
which are not enclosed by the device.
Return Options:
As the end user, you can hand over your old appliance (which has
essentially the same functions as the new one bought with us) free of
charge for disposal with the purchase of a new device.
Small devices, which do not have outer dimensions bigger than 25 cm
can be handed in for disposal independently of the
purchase of a new product in normal household quantities.
1. Possibility of return at our company location during our opening
hours
Simac Electronics Handel GmbH, Pascalstr. 8, D-47506 Neukirchen-Vluyn
2. Possibility of return nearby
We will send you a parcel stamp with which you can send us your old
appliance free of charge. For this possibility, please contact us via e-mail
at [email protected] or via telephone.
Information about Package:
Please package your old appliance safe for transport. Should you not
have suitable packaging material or you do not want to use your own
material, you can contact us and we will send you an appropriate
package.
5. SUPPORT
If any questions remained open or problems may arise aer your
purchase,we are available by e-mail, telephone and ticket
support system to answer these.
E-Mail: [email protected]
Ticket-system: http://support.joy-it.net
Telephone: +49 (0)2845 98469 – 66 (10 - 17 o'clock)
For further information visit our website:
www.joy-it.net
Published: 23.04.2021
www.joy-it.net
SIMAC Electronics GmbH
Pascalstr. 8, 47506 Neukirchen-Vluyn
 Loading...