

User's Manual
TP820 Series
Thermal Receipt Printer

TP820 User’s Manual
Important Safety Instructions
Be sure to have read the manual carefully before your operation. Neither our Corporation nor
its affiliates shall be liable to the purchaser of this product or third parties for damages,
losses, costs, or expenses incurred by purchaser or third parties as a result of: accident,
misuse, or abuse of this product or unauthorized modifications, repairs, or alterations to this
product, or failure to strictly comply with our Corporation’s operating and maintenance
instructions.
Follow the notices and warnings carefully to avoid seriously bodily injury.
Don’t touch the thermal head with your hand and other solid object at any moment to
avoid your body burned or the thermal head damaged.
Be careful the dentate cutter when you replace the paper.
You are forbidden to clean the printer with alcohol or other liquid when the printer is
connected to the power, pull the plug out when which is processed, using the soft cloth
instead of the hard object.
Please don’t use the printer near the water.
Make sure that the printer is connected to a reliable power outlet. It should not be on the
same electric circuit as copiers, refrigerators, or other appliances that cause power
spikes.
Make sure the printer is far away from the appliance that can arouse electromagnetic jam,
such as loudhailer.
The power outlet you plan to connect to should be nearby and unobstructed.
Make sure that the surrounding area is clean, dry, and free of dust and not exposed to
direct sunlight.
Don’t remove the printer’s out-cover and repair the printer. When needed, call or take it to
the professional.
Make sure to set the power switch OFF when connects the printer to the power or
computer.
When the following error or problem occurs, please contact the professional or dealer:
A: The power cable is damaged or broken.
B: The printer is sloppy by some liquid.
C: The printer didn’t work when you operate according to the manual.
D: The printer out-cover is broken.
E: The specification or print quality is going wrong obviously, it needs repaired.
Warning: In order to ensure the use life of printer , strictly prohibit printing full lin e full black
exceeding 2 CM.
Notice: The contents of this manual are subject to change without notice.
*All the parts of the printer can be recycled. When it is abandoned, we can call it back freely.
Please contact us when you abandon it.
- i -

TP820 User’s Manual
Table of contents
Important Safety Instructions.................................................................................................................i
Chapter 1 Overview................................................................................................................................1
1.1 Features..........................................................................................................................................1
1.2 Part Description ..............................................................................................................................1
1.3 Parts Identification ..........................................................................................................................1
Chapter 2 Installing the Printer.............................................................................................................3
2.1 Unpacking & Checking....................................................................................................................3
2.2 Unpacking the Protective Materials.................................................................................................3
2.3 Connecting to Your Computer or Other Equipment.........................................................................3
2.3.1 Connecting the Parallel Interface Cable...................................................................................3
2.3.2 Connecting the USB Interface Cable........................................................................................4
2.3.3 Connecting the Serial Interface Cable......................................................................................4
2.3.4 Connecting the Ethernet Cable ................................................................................................5
2.3.5 Connecting the Cash Drawer Cable.........................................................................................5
2.4 Connecting the Power Cord............................................................................................................6
2.5 Installing the Print Driver and Selecting the Cutter..........................................................................6
2.6 Network Settings.............................................................................................................................9
2.6.1 Connecting Printer....................................................................................................................9
2.6.2 Setting IP Address....................................................................................................................9
2.6.3 Installing Printer Network Driver.............................................................................................12
Chapter 3 Control Panel.......................................................................................................................19
3.1 Control Panel ................................................................................................................................19
3.1.1 Indicator .................................................................................................................................19
3.1.2 Key.........................................................................................................................................19
3.2 Self-Printing
3.3 Hex Dump Printing........................................................................................................................19
3.4 Restoring Factory Printer Settings ................................................................................................20
3.5 Setting Slip Stitch..........................................................................................................................20
3.6 Online-aptitude Parameter Settings..............................................................................................20
Chapter 4 Installing and Replacing the Roll Paper............................................................................22
4.1 Paper Installation Steps ................................................................................................................22
Chapter 5 Features...............................................................................................................................24
5.1 General Specification....................................................................................................................24
5.2 Interface Features.........................................................................................................................25
5.2.1 Parallel Interface ....................................................................................................................25
5.2.2 USB Interface.........................................................................................................................26
5.2.3 Serial Interface.......................................................................................................................26
5.2.4 Ethernet Interface ...................................................................................................................27
5.2.5 Cash Drawer Interface ...........................................................................................................27
5.2.6 Power Supply Interface..........................................................................................................28
Chapter6 Troubleshooting and Maintenance.....................................................................................29
..................................................................................................................................19
6.1 Maintenance .................................................................................................................................29
6.2 Error Message on the Control Panel.............................................................................................29
6.3 Cutter Jammed or Error ................................................................................................................29
Chapter 7 Control Commands.............................................................................................................31
7.1 General .........................................................................................................................................31
7.2 Explanation of Terms ....................................................................................................................31
Appendix Commands List...................................................................................................................43
- ii -
TP820 User’s Manual
Chapter 1 Overview
1.1 Features
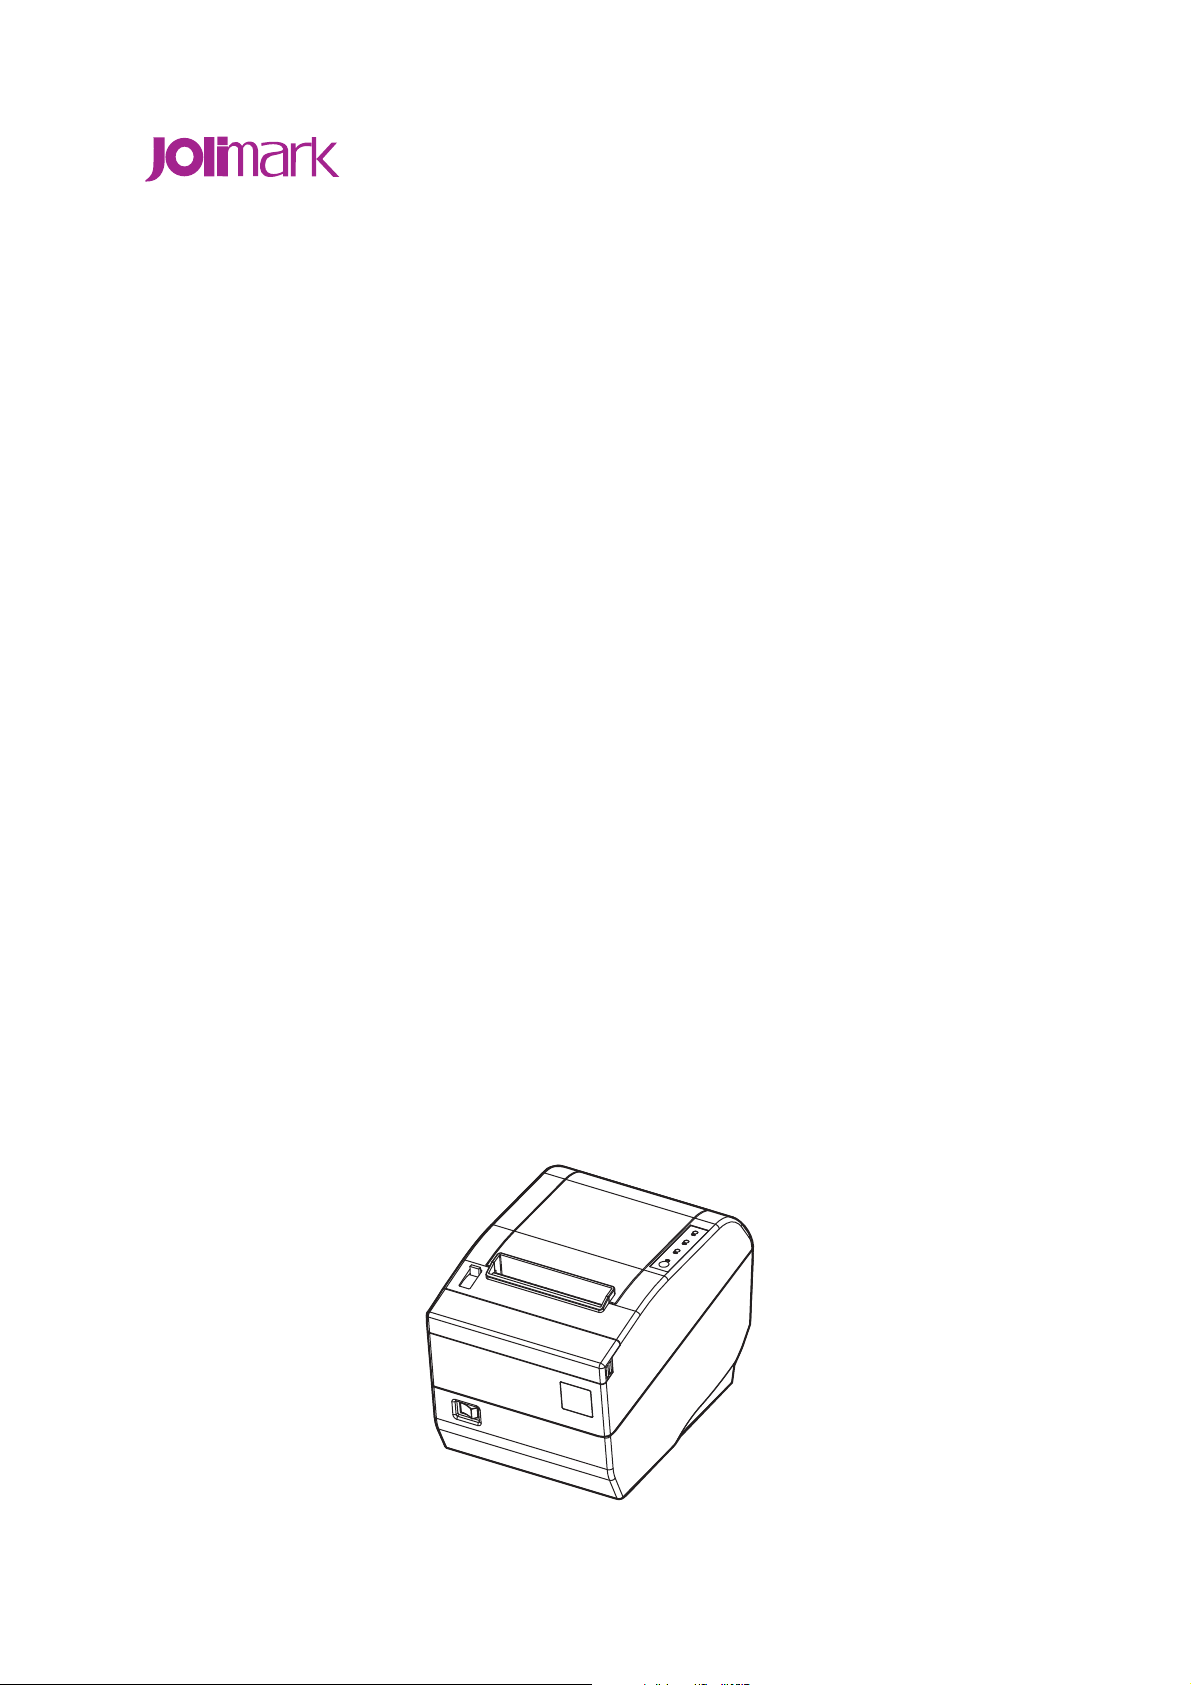
TP820 printer is a kind of high-speed mini thermal printer. It is a high-quality, high-reliability and
low-noise POS printer and operated easily, which can be widely used in ECR, PC-POS and BANK
POS for printing a variety of receipt.
1.2 Part Description
According to different data port (interface), TP820 serials are divided into several different names:
TP820 is the printer equipped with parallel interface, TP820US is equipped with serial interface and
USB interface, TP820U is equipped with USB interface and TP820UE with Ethernet interface and
USB interface.
TP820 serials printer is equipped with auto cutter, It has two kinds of cutter for the consumer to
selected: partial cutter can only cut the paper with one point left while full cutter cuts the paper fully.
Parallel interface USB interface
MODEL TP820 TP820U TP820US TP820UE
Note: Please contact the dealer for changing the interface if needed.
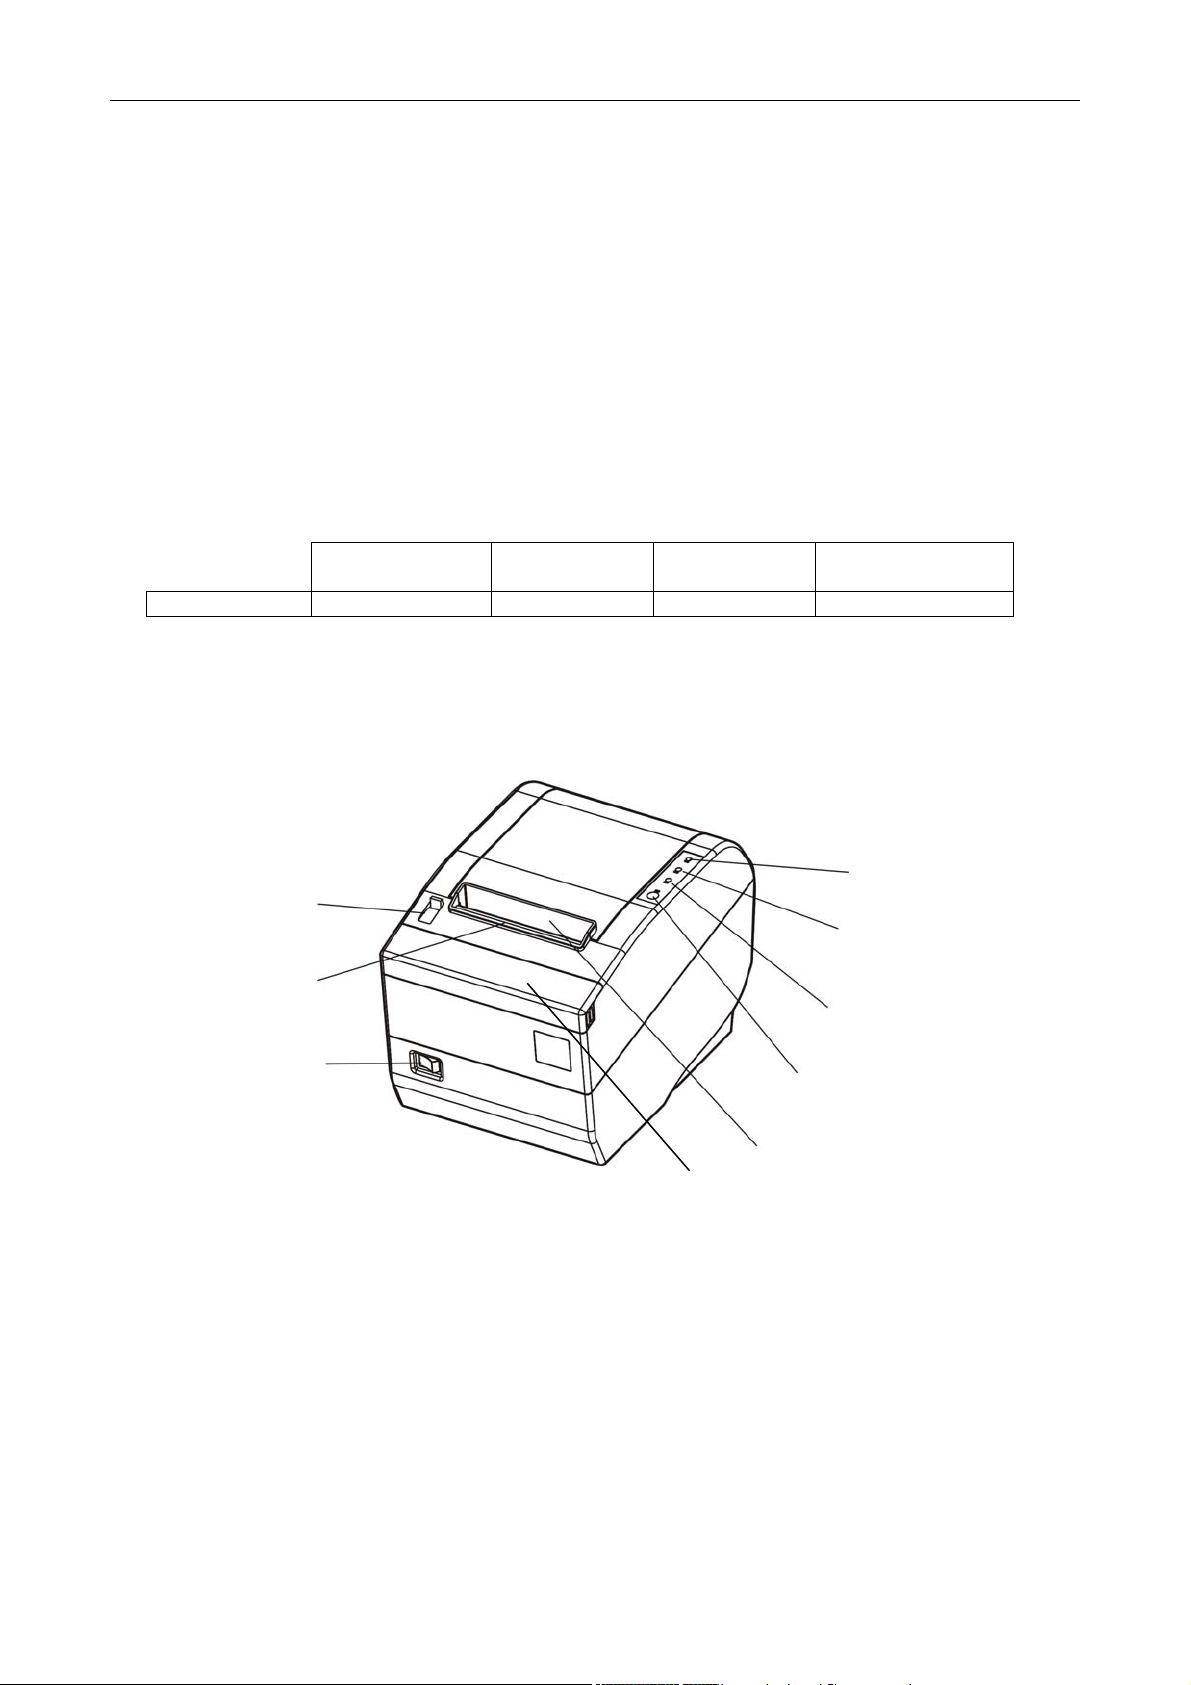
1.3 Parts Identification
Cover Open Lever
(Dentate) Manual Cutter
Power Switch
Fig 1-1 Main parts of the printer
USB + Serial
interface
Paper out Tunnel
Small Cover
USB + Ethernet
interface.
Power Indicator (Green)
Error Indicator (Red)
Paper out Indicator (Red)
FEED Key
- 1 -

TP820 User’s Manual
Data Interface
( Parallel / Serial / USB / Ethernet )
Fig 1-2 Back of the printer
Cash Drawer Interface
Power Supply Interface
★ According to specific interface standards
- 2 -

TP820 User’s Manual
A
Chapter 2 Installing the Printer
2.1 Unpacking & Checking
Check each item against the following packing list. If any of these items is missing, please contact
your dealer.
The interface cable is optional, which will be equipped or cancelled by the customer’s request.
(Includes Windows Driver and User’s Manual)
Printer
Driver CD
Fig 2-1 Packing List
Power Cord
C Adapter
Interface Cable
Facility User’s Guide
2.2 Unpacking the Protective Materials
1. Open the packing box, lift up the printer.
2. Save all the original packing materials, so that it can be used when transport the printer.
2.3 Connecting to Your Computer or Other Equipment
The printer can be configured with parallel interface, USB interface, serial & USB interface or
Ethernet & USB interface and Cash drawer interface. (According to specific interface standards)
Connect the printer to your computer as described below.
Note: Before connecting or disconnecting the interface cable, make sure that power to the
printer and all the devices connected to the printer are turned off. Also make sure the
power cable plug is disconnected from the AC outlet.
2.3.1 Connecting the Parallel Interface Cable
1. Make sure the host and the printer are both turned off, connect the parallel interface cable to the
connector on the rear panel of the printer, fasten the wire clips as shown in Fig 2-2.
- 3 -

TP820 User’s Manual
Wire Clips
Parallel Interface Parallel Cable
Fig 2-2 Connecting the parallel interface cable
2. Connect the other end of the cable to the host. Tighten the connector screws.
3. This printer can carry out a network printing through connecting parallel interface to network print
server, which you can use are PS-1206, SX-110 and SX-3100 that have been validated.
2.3.2 Connecting the USB Interface Cable
1. Plug the USB cable A end (flat shape) into the computer's USB interface as shown in Fig2-3.
2. Plug the USB cable B end (square shape) into the printer's USB interface.
Note: Please take the reference to the user’s manual about the specification of Internet’s
setting of the Ethernet’s printer.
USB Interface
USB Cable
Fig 2-3 Connecting the USB interface cable
2.3.3 Connecting the Serial Interface Cable
1. Make sure the host and the printer are both turned off, connect the serial interface cable to the
connector on the rear panel of the printer. Tighten the connector screws as shown in Fig 2-4.
- 4 -

TP820 User’s Manual
Screws
Serial Interface
Serial Cable
Fig 2-4 Connecting the serial interface cable
2. Connect the other end of the cable to the host’s serial interface and tighten the connector screws.
2.3.4 Connecting the Ethernet Cable
1. Plug the crystal end of the Ethernet cable (RJ-45) into the printer's Ethernet interface as shown in
Fig 2-5.
2. Plug the other end of the Ethernet cable (flat) to the LAN’s entrance.
Ethernet Cable
Fig 2-5 Connecting the Ethernet cable
Ethernet Interface
2.3.5 Connecting the Cash Drawer Cable
Turn off the printer and plug the cash drawer cable into the cash drawer interface on the back of the
printer as shown in Fig 2-6.
Cash Drawer Interface
Fig 2-6 Connecting the cash drawer cable
Cash Drawer Cable
- 5 -

TP820 User’s Manual
Caution: You must use the appropriate cash drawer, or else our company will not
guarantee to keep the printer in good repair when it is damaged by improper
cash drawer.
2.4 Connecting the Power Cord
1. Make sure the printer’s power switch is turned off. Plug the AC adapter’s supply cable as
shown below. Connect the AC adapter to the power cord.
2. Make sure the voltage of the electrical outlet matches that of the AC adapter.
3. Plug the AC adapter to the printer’s power supply interface.
4. Plug the power cord one end to the AC adapter and the other to the electrical outlet with ground
wire.
Note: 1. If the rated voltage doesn’t match the outlet voltage, contact your dealer for
assistance. Do not plug in the power cord.
2. Please use the exactitude electrical outlet with ground wire.
3. Please use original AC adapter, our company will not guarantee to keep in good
repair, when it is damaged by unauthorized AC adapter.
Fig 2-7 connecting the AC adapter
AC Adapter
Power Supply Interface
Power Cord
2.5 Installing the Print Driver and Selecting the Cutter
You must setup the printer driver in Windows before using the TP820 printer.
Please use the cable to connect computer with printer, then turn on the computer and the printer,
put the driver CD into the CD-ROM. Install driver by the following ways:
Auto-install way
Double click the file “Setup.exe” in the driver disc, install driver by the following direct.
Note: Auto-install way needs the operating system of Windows 2000 or above.
Hand operated installing way
Note: The hand-operated install ways of serial interface and parallel interface are the same.
1) The installing steps of parallel interface for Windows 2000/XP/Vista are as follows:
1. Click “Start” -->"Settings", select “Printers”.
2. Click “Add Printer”, then it will show a window of “Add Printer Wizard”, click “Next”, then please
read the select direct carefully, such as, select “Local printer” in the "Local or Network Printer"
window, then click “next”.
3. Come out a window of “Select the Printer Port”, select a usable port. Such as, select “LPT1:
- 6 -

TP820 User’s Manual
printer port”, click “Next”.
4. Come out a window of “Manufacturers/Printers", click "Have Disk...", click “Next”.
5. Come out a window of “Install From Disk”. Please according to the operating system
environment, you should select the path as follow: CD-ROM-“Driver”-“WIN2000
(XP-Vista-Win7)”, which you can find a file named: TP820.inf, click “Open”, then click “OK” to
return to the window of "Manufacturers/Printers" , click “Next”.
6. Follow the direct click “Next” gradually till the installation is finished.
2) The installing steps of parallel interface for Windows 7 are as follows:
1. Click “Start” -->"Settings and Printers”.
2. Click “Add Printer”, then it will show a window of “Add Printer Wizard”, click “Next”, then please
read the select direct carefully, Such as, select “Local printer” in the "Local or Network Printer"
window, then click “next”.
3. Come out a window of “Select the Printer Port”, select a usable port. Such as, select “LPT1:
printer port”, click “Next”.
4. Come out a window of "Manufacturers/Printers", click "Have Disk...", click “Next”.
5. Come out a window of “Install From Disk”. Please according to the operating system
environment, such as Windows XP operating system you should select the path as follow:
CD-ROM-“Driver”-“WIN2000 (XP-Vista-Win7)”, where you can find a file named: TP820.inf, click
“Open”, then click “OK” to return to the window of "Manufacturers/Printers" , click “Next”.
6. Follow the direct click “Next” gradually till the installation is finished.
The USB interface installing steps for Windows 2000/XP/Vista/Win7 are as follows:
The following steps are used Windows XP as example. There are slight differences among different
operating systems.
1. Connect an USB cable and turn on the printer.
2. After the computer find out new hardware and finish searching, come out a window of "Found
New Hardware Wizard", choose "Install from a list or specific location (Advanced)", click "Next".
3. Come out a window of "Add New Hardware Wizard"---"Windows operation", choose "Don't
search, I will choose the driver to install", click "Next".
4. Come out a window of "Hardware Type", select "Printers", click "Next". Come out a window of
"Manufacturers/Printers", click "Have Disk..." click "Browse".
5. Come out a window of “Install From Disk”. Please according to the operating system environment,
you should select the path as follow : CD-ROM-“Driver”-“WIN2000 (XP-Vista-Win7)”,where you
can find a file named: TP820.inf, click “Open”, then click “OK” to return to the window of “Add
Printer Wizard", click “Next”.
6. Follow the direct click “Next” gradually till the installation is finished.
The installing steps for Windows 98 are as follows:
(1)The installing steps with a parallel cable or a serial cable:
1. Click "Start" -->"Settings"-->"Printers".
2. Click "Add Printer", then it will show a window of "Add Printer Wizard", click "Next", then please
read the select direct carefully, Such as, select "Local printer" in the "Local or Network Printer"
window, then click "Next".
3. Come out a window of "Click the manufacturer and model of your printer”, click "Have Disk...",
please click "Browse", select the path as follow: CD-ROM-"Driver"-"WIN98 (WINME) ", where
you can find a file named:TP820.inf, click "Open", then click "OK".
4. Come out a window of “Install From Disk”, click "OK, return to a window of “Add Printer", then
click "Next".
5. Come out a window of "Printer port", select "Available ports", Such as, select "LPT1: Printer Port",
click "Next", and then show the printer’s name. If the system is not installed by other printer driver
process, the printer is treated as default printer by the application process of Window98
environment, click "Next". otherwise according to prompt, choose the printer is default: "Yes",
- 7 -

TP820 User’s Manual
click "Next", choose "Yes-(recommended)", click "Finish". Come out a window of "Printer test
page completed!", click "Yes".
6. The printer driver process is installed successfully.
(2)The installing steps with an USB cable:
Note: 1. As the system of Windows 98/ME doesn’t have integrated USB driver control,
please install USB driver before using USB interface printing. Then install USB
printer driver.
2. If it has installed the USB driver, please install the USB printer driver directly as
the following steps.
USB driver installing steps:
1. Connect an USB cable and turn on the printer.
2. After the computer find out new hardware and finish searching, come out a window of "Add New
Hardware Wizard", click "Next".
3. Come out a window of "Add New Hardware Wizard" —"Windows operation", choose "Search the
best driver for the device (recommended)", click "Next".
4. Come out a window of "Search for new drivers", check "Specify a location", click ”Browse" ,
select the path as follows: CD-ROM-“Driver”-"【WIN98(WINME)\USBdriver】", then click "OK".
5. Return to a window of "Search for new drivers", click "Next"; Come out a window of "Windows
driver file search for the device”, click "Next".
6. After the system finishing installing the file automatically, come out a window of "USB Print
Supported, click "Finish".
7. The printer USB driver process is installed successfully.
USB printer driver installing steps:
1. Click "Start" -->"Settings"-->"Printers"
2. Click "Add Printer", then it will show a window of "Add Printer Wizard", click "Next".
3. Come out a window of "Click the manufacturer and model of your printer", click "Have Disk...",
please click "Browse", select the path as follow: CD-ROM-"Driver"-"WIN98 (WINME) ", where you
can find a file named: TP820.inf "Open", and then click "OK".
4. Come out a window of “Install From Disk”, click “OK”, return to a window of “Add Printer", then click
"Next".
5. Come out a window of "Printer port", select "Available ports", select "JMUSB", click "Next", and
then show the printer’s name. If the system is not installed by other printer driver process, the
printer is treated as default printer by the application process of Window98 environment, click
"Next”. Otherwise according to prompt, choose the printer is default: "Yes", click "Next" choose
"Yes-(recommended)", click "Finish". Come out a window of "Printer test page completed", click
“Yes".
6. The printer driver process is installed successfully.
Please setup the driver following the setup description in the CD going along with the printer. What’s
more, you can use the TM-T88II, TM-T88III serials driver from EPSON.
If you want to cut the paper after printing, please select the “Full cut” or “Partial cut” in the
Paper/Quality page after clicking the “Printing Preferences” button, which lies in the “General” page
of the driver properties. Referring figure is shown below.
It is noted that if paper cut effect is the same whichever you select “full cut” or “partial cut” in the
driver properties, which means that the cutter (the printer equipped with) can only carry out one kind
of cut-methods.
- 8 -

TP820 User’s Manual
Fig 2-8 TP820 Printing Preferences
2.6 Network Settings
Please use Jolimark network setting software NetFinder to set the IP address for Jolimark printers,
which can be found in the CD or downloaded from www.jolimark.com
Caution: The network printing function needs the operation system of Windows2000 or above.
2.6.1 Connecting Printer
Power on the printer, connect with the Ethernet cable which has been connected to LAN, and look
into the information of Ethernet LED indicator to ensure the printer has entered into the normal
connection.
Yellow LED Green LED Description
ON Flash Normal
OFF OFF Not connecting to network
2.6.2 Setting IP Address
1. Run NetFinder Software
Double click NetFinder.exe in the PC which connects the printer in the same LAN. The figure of
the software is shown as follows:
.
- 9 -
 Loading...