

Johnson Controls HIC2018B21S, CIC2024B21S, CIC2018B21S, YIC2018B21S, HIC2024B21S Operation Manual
...Page 1

Operation
Manual
INVERTER-DRIVEN
MULTI-SPLIT SYSTEM
HEAT PUMP
AIR CONDITIONERS
Type Model
2-Way Cassette
(H,Y,C)IC2018B21S
(H,Y,C)IC2024B21S
IMPORTANT:
READ AND UNDERSTAND
THIS MANUAL BEFORE
USING THIS HEAT PUMP
AIR CONDITIONER.
KEEP THIS MANUAL FOR
FUTURE REFERENCE.
P5417051
Page 2

Page 3

Important Notice
● Johnson Controls, Inc. pursues a policy of continuing improvement in design and performance in its
products. As such, Johnson Controls reserves the right to make changes at any time without prior
notice.
● Johnson Controls cannot anticipate every possible circumstance that might involve a potential hazard.
● This heat pump air conditioning unit is designed for standard air conditioning applications only. Do not
use this unit for anything other than the purposes for which it was intended.
● The installer and system specialist shall safeguard against leakage in accordance with local codes. The
following standards may be applicable, if local regulations are not available. International Organization
for Standardization: (ISO 5149 or European Standard, EN 378). No part of this manual may be
reproduced in any way without the expressed written consent of Johnson Controls.
● This heat pump air conditioning unit is operated and serviced in the United States of America and
comes with a full complement of the appropriate Safety, Dangers, Cautions, and Warnings.
● If you have questions, please contact your distributor or contractor.
● This manual provides common descriptions, basic and advanced information to maintain and service
this heat pump air conditioning unit which you operate, as well for other models.
● This heat pump air conditioning unit has been designed for a specic temperature range. For optimum
performance and long life, operate this unit within the range limits according to the table below.
Temperature
Maximum Minimum
Cooling
Operation
Heating
Operation
Indoor 89
Outdoor 118
Indoor 80
Outdoor 59
DB: Dry Bulb, WB: Wet Bulb
* The temperature may change depending on the outdoor unit.
o
F DB/73oF WB (32oC DB/23oC WB) 69oF DB/59oF WB (21oC DB/15oC WB)
o
F DB (48oC DB) * 14oF DB (-10oC DB) *
o
F DB (27oC DB) 59oF DB ( 15oC DB)
o
F WB (15oC WB) * -4oF WB (-20oC WB) *
● This manual should be considered as a permanent part of the air conditioning equipment and should
remain with the air conditioning equipment.
P5417051-rev.1
i
Page 4

TABLE OF CONTENTS
1. Introduction .....................................................................................................................................................1
2. Safety Instructions ..........................................................................................................................................1
3. Before Operation .............................................................................................................................................6
3.1 Operating Range ....................................................................................................................................6
3.2 Efcient Use of Indoor Unit .....................................................................................................................6
3.3 Efcient Use of Cooling and Heating ......................................................................................................7
4. Names of Parts and Indications for Safety Consideration ..............................................................................8
4.1 Indoor Unit ..............................................................................................................................................8
4.2 Wired Controller (CIW01) .......................................................................................................................9
5. Operation Method .........................................................................................................................................10
5.1 Basic Operation ....................................................................................................................................10
5.2 Cooling / Heating / Fan Operation ........................................................................................................ 11
5.3 Temperature Setting .............................................................................................................................12
5.4 Fan Speed ............................................................................................................................................13
5.5 Operation ..............................................................................................................................................13
5.6 Louver Swing Direction ........................................................................................................................14
5.7 Individual Louver Setting ......................................................................................................................15
5.7.1 Individual Louver Settings ........................................................................................................... 15
5.7.2 Cancellation of Louver Setting .................................................................................................... 17
5.8 Motion Sensor ......................................................................................................................................18
5.8.1 Function ...................................................................................................................................... 18
5.8.2 Details for Motion Sensor Control ............................................................................................... 19
5.8.3 Descriptions for Setting Functions .............................................................................................. 19
5.8.4 Setting the Motion Sensor .......................................................................................................... 20
5.9 Automatic Heating/Cooling Operation ..................................................................................................22
5.10 Setback Operation ................................................................................................................................22
6. Automatic Control .........................................................................................................................................23
7. Maintenance .................................................................................................................................................24
7.1 Maintenance .........................................................................................................................................24
7.1.1 Cleaning Air Filter .......................................................................................................................24
7.1.2 Removing, Cleaning and Attaching Air Inlet Flat Grille ...............................................................26
7.2 Maintenance Before and After Use ......................................................................................................26
8. Troubleshooting ............................................................................................................................................27
8.1 These are Not Abnormal ......................................................................................................................27
8.2 Before Contact .....................................................................................................................................28
8.3 Contact Distributor ................................................................................................................................29
8.4 Alarm Codes .........................................................................................................................................30
ii
P5417051-rev.1
Page 5

1. Introduction
Read this manual carefully before working with this product.
Keep this information with the product.
Forward this manual and the warranty to the next team of installers and then users.
Ask them to keep this manual with the air conditioning unit.
(Refrigerant Piping Work) (Electrical Wiring Work) (Ref. Charge Work) (Test Run) (User)
● For details on wiring between the indoor unit and the outdoor unit, refer to the installation and maintenance
manual for the outdoor unit.
● For details on the optional decorative panel, refer to the installation and maintenance manual for the
optional decorative panel.
● For details on the optional controller, refer to the installation and maintenance manual for that optional
controller module.
● For details on each optional part, refer to the installation and maintenance manual for each optional part.
● For central controller, refer to the installation and maintenance manual for the central controller.
2. Safety Instructions
Signal Words
Indicates a hazardous situation that, if not avoided, could result in death or
serious injury.
Indicates a hazardous situation that, if not avoided, could result in minor or moderate
injury.
Indicates information considered important, but not hazard-related (for example,
messages relating to property damage).
General Precautions
To reduce the risk of serious injury or death, read these instructions thoroughly
and follow all warnings or cautions included in all manuals that accompanied the
product and are attached to the unit. Refer back to these safety instructions as
needed.
● This system, including the controller, should be installed by personnel certied by Johnson Controls, Inc.
Personnel must be qualied according to local, state and national building and safety codes and regulations.
Incorrect installation could cause leaks, electric shock, re or an explosion. In areas where Seismic
Performance requirements are specied, the appropriate measures should be taken during installation
to guard against possible damage or injury that might occur in an earthquake. If the unit is not installed
correctly, injuries may occur because of a falling unit.
P5417051-rev.1
1
Page 6

● Use appropriate personal protective equipment (PPE), such as gloves, protective goggles and electrical
protection equipment and tools suited for electrical operation purposes.
● When transporting, be careful when picking up, moving and mounting these units. Although the controller
may be packed using plastic straps, do not use them for transporting from one location to another. Do not
stand on or put any material on the controller.
● When installing the controller cabling to the units, do not touch or adjust any safety devices inside
the indoor or outdoor units. All safety features, disengagement, and interlocks must be in place and
functioning correctly before the equipment is put into operation. If these devices are improperly adjusted
or tampered with in any way, a serious accident can occur. Never bypass or jump-out any safety device
or switch.
● Use only Johnson Controls recommended, provided as standardized, or replacement parts.
● Johnson Controls will not assume any liability for injuries or damage caused by not following steps outlined
or described in this manual. Unauthorized modications to Johnson Controls products are prohibited as
they…
◦ May create hazards that could result in death, serious injury or equipment damage.
◦ Will void product warranties.
◦ May invalidate product regulatory certications.
◦ May violate OSHA standards.
Take the following precautions to reduce the risk of property damage.
● Do not touch the main circuit board or electronic components in the controller or remote devices. Make
sure that dust and/or steam does not accumulate on the circuit board.
● When installing the unit in a hospital or other facility where electromagnetic waves are generated from
nearby medical and/or electronic devices, be prepared for Electromagnetic Interference (EMI). Do not
install where the waves can directly radiate into the electrical box, controller cable, or controller. Inverters,
appliances, high-frequency medical equipment, and radio communications equipment may cause the unit
to malfunction. The operation of the unit may also adversely affect these same devices. Install the unit at
least 10 ft. (approximately 3m) away from such devices.
● Locate the wireless controller at a distance of at least 3 ft. (approximately 1m) between the indoor unit and
electric lighting. Otherwise, the receiver part of the unit may have difculty receiving operation commands.
● If the wired controller is installed in a location where electromagnetic radiation is generated, make sure
that the wired controller is shielded and cables are sleeved inside conduit tubing.
● If there is a source of electrical interference near the power source, install noise suppression equipment
(lter).
● During the test run, check the unit’s operation temperature. If the unit is used in an environment where
the temperature exceeds the operation boundary, it may cause severe damage. Check the operational
temperature boundary in the manual. If there is no specied temperature, use the unit within the operational
temperature boundary of 32 to 104°F (0 to 40°C).
● Read installation and appropriate user manuals for connection with PC or peripheral devices. If a warning
window appears on the PC, the product stops, does not work properly or works intermittently, immediately
stop using the equipment.
Installation Precautions
To reduce the risk of serious injury or death, the following installation precautions
● If the remote sensors are not used with this controller, then do not install this controller
- in a room where there is no thermostat.
- where the unit is exposed to direct sunshine or direct light.
- where the unit will be in close proximity to a heat source.
- where hot/cold air from the outdoors, or a draft from elsewhere (such as air vents, diffusers or
grilles) can affect air circulation.
- in areas with poor air circulation and ventilation.
2
must be followed.
P5417051-rev.1
Page 7

● Perform a test run using the controller to ensure normal operation. Safety guards, shields, barriers,
covers, and protective devices must be in place while the compressor/unit is operating. During the test
run, keep ngers and clothing away from any moving parts.
After installation work for the system is completed, explain the “Safety Precautions,” use, and maintenance
of the unit to the customer according to the information in all manuals that accompanied the system. All
manuals and warranty information must be given to the user or left near the Indoor Unit.
Electrical Precautions
Take the following precautions to reduce the risk of electric shock, re or explosion
● Only use electrical protection equipment and tools suited for this installation.
● Insulate the wired controller against moisture and temperature extremes.
● Use specied cables between units and the controller.
● Communication cabling shall be a minimum of AWG18 (0.82mm2), 2-Conductor, Stranded Copper.
Shielded cable must be considered for applications and routing in areas of high EMI and other sources
of potentially excessive electrical noise to reduce the potential for communication errors. When shielded
cabling is applied, proper bonding and termination of the cable shield is required as per Johnson Controls
guidelines. Plenum and riser ratings for communication cables must be considered per application and
local code requirements.
● This equipment can be installed with a Ground Fault Circuit Breaker (GFCI), which is a recognized measure
for added protection to a properly grounded unit. Install appropriate sized breakers/fuses/overcurrent
protection switches, and wiring in accordance with local, state and NEC codes and requirements. The
equipment installer is responsible for understanding and abiding by applicable codes and requirements.
● The polarity of the input terminals is important, so be sure to match the polarity when using contacts that
have polarity.
● Highly dangerous electrical voltages may be used in this system. Carefully refer to the wiring diagram
and these instructions when wiring. Improper connections and inadequate grounding can cause serious
injury or death.
● Before installing the controller or remote devices, ensure that the indoor and outdoor unit operation has
been stopped. Further, be sure to wait at least ve minutes before turning off the main power switch to
the indoor or outdoor units. Otherwise, water leakage or electrical breakdown may result.
● Do not open the service cover or access panel to the indoor or outdoor units without turning OFF the
main power supply. Before connecting or servicing the controller or cables to indoor or outdoor units,
open and tag all disconnect switches. Never assume electrical power is disconnected. Check with a
meter and equipment.
● Use an exclusive power supply at the controller’s rated voltage.
● Be sure to install circuit breakers (ground fault circuit interrupter, isolating switch, molded case circuit
breaker, and so forth) with the specied capacity. Ensure that the wiring terminals are tightened securely
to recommended torque specications.
● Clamp electrical wires securely with a cable band after all wiring is connected to the terminal block. In
addition, run wires securely through the wiring access channel.
● When installing the power lines, do not apply tension to the cables. Secure the suspended cables at
regular intervals, but not too tightly.
● Make sure that the terminals do not come into contact with the surface of the electrical box. If the
terminals are too close to the surface, it may lead to failures at the terminal connection.
● Do not clean with, or pour water into, the controller as it could cause electric shock and/or damage the
unit. Do not use strong detergent such as a solvent. Clean with a soft cloth.
● Check that the ground wire is securely connected. Do not connect ground wiring to gas piping, water
piping, lighting conductor, or telephone ground wiring.
resulting in serious injury or death:.
P5417051-rev.1
3
Page 8

Operation
NOTICE
● Do not insert ngers or objects into an air inlet/outlet. Injury can result from rotating fan blades or
energized electrical components.
● Do not touch the wired controller with wet hands. It can result in a malfunction of the wired controller or
an electrical shock.
● Hair spray, insecticides, lacquers, and other pressurized substances should not be used within 3.3ft (1m)
of any air conditioning unit. It can react with energized electrical components and cause re.
● Do not install the indoor unit anywhere discharge airow can pass directly toward nearby heating
equipment (space heaters). It may interfere with the combustion process in these units.
● When the indoor unit is operating in an area with heat sources, ventilate a room sufciently. Any leaked
refrigerant gases that happen to come into contact with any heat source can become toxic on contact
which can cause asphyxiation in the immediate area.
● Shut down at the main power source if the GFCI (Ground Fault Circuit Interrupter) activates frequently.
Contact your distributor or contractor immediately. Failure to act accordingly can result in serious injury
and damage to the unit.
● If you smell anything burning, shut down the unit and turn OFF the power at the main power source.
Contact the re department and your installer or electrical contractor.
● Make sure that a test for leakage of refrigerant gases has been performed. The refrigerant used for this
unit (HFC R410A), is a non-ammable, non-toxic, and odorless gas. However if refrigerant should leak
and make contact with sparks, re and toxic gas will be generated. Also, because uorocarbon is heavier
than air, it will accumulate on the oor causing asphyxiation.
● If uorocarbon gas should leak, turn OFF all heating equipment and ventilate the room immediately. Mop
or vacuum oor areas to remove residual toxic particulate.
● Do not operate indoor units with the electrical box and switch panel open and exposed. Accidental contact
with energized components can be fatal.
● Air circulation should be optimized to achieve the best distribution pattern and not settle into isolated
pockets creating an uncomfortable environment.
4
P5417051-rev.1
Page 9

Repair / Relocation
NOTICE
● When the air conditioner is to be repaired or transported to a new location, contact your distributor or
contractor. If the repair and the installation are not completed correctly, it may cause an electric shock or
re.
Other
● Turn OFF all power at the main power source before performing maintenance work. Failure to do so can
result in damage to internal components with severe or fatal electrical shock.
● Insulate all electrical components and connections from exposure to moisture. Failure to do so can result
in an electrical short circuit and re.
● Do not tamper with or attempt to "repair" electrical wiring or connections. Call your installer or electrical
contractor. Serious or fatal injury can occur.
● Perform all maintenance work on a rm and stable foundation to minimize the risk of injury.
● Do not attempt to "clean" indoor unit components with liquid or powdered cleaning agents during
maintenance. Electric shock, sparks, ame, and serious or fatal injury can occur.
● System piping is charged with refrigerant and highly pressurized.
● Hold the air lter and the air inlet at grille rmly when attaching or removing it. Carelessness can result in
accident or injury.
● When cleaning the lens surface of the motion sensor, do not make unnecessary contact as it can be easily
scratched.
P5417051-rev.1
5
Page 10

3. Before Operation
NOTICE
Apply power to the outdoor unit(s) at least 12 hours prior to system operation to allow for preheating
of the compressor oil. Do not start the system immediately without preheating the compressor.
Otherwise, the compressor can be damaged. Check that the outdoor unit is free of ice and snow
cover. If snow covered, remove with hot water at 122°F (50°C). If hot water temperature is higher
than 122oF (50oC), it can cause damage to plastic parts.
● When the system is restarted after a shutdown longer than approximately three months, it is recommended
that the system be checked over by your service contractor.
● Turn OFF at the main switch when the system has been off for a long period of time.
If the main switch is not turned OFF, electricity is consumed because the oil heater is always energized
during periods of compressor stoppage.
3.1 Operating Range
This heat pump air conditioner has been designed for the following temperatures. Operate the heat pump air
conditioner within this range.
Temperature
Maximum Minimum
Cooling
Operation
Heating
Operation
DB: Dry Bulb, WB: Wet Bulb
* The temperature may change depending on the outdoor unit.
Indoor 89
Outdoor 118
Indoor 80
Outdoor 59
o
F DB/73oF WB (32oC DB/23oC WB) 69oF DB/59oF WB (21oC DB/15oC WB)
o
F DB (48oC DB) * 14oF DB (-10oC DB) *
o
F DB (27oC DB) 59oF DB ( 15oC DB)
o
F WB (15oC WB) * -4oF WB (-20oC WB) *
3.2 Efcient Use of Indoor Unit
● Do not leave windows or doors open.
Operating efciency will be degraded.
Condensation and problems relating to it can result. (Also ventilate a room sufciently.)
● Attach a curtain or a blind to a window.
Direct sunlight is blocked so the cooling efciency is enhanced.
● Avoid using heating equipment during the cooling operation as much as possible.
Cooling efciency will be decreased. It may cause condensation and dripping.
● Use the built-in circulating fan if warm air tends to remain around the ceiling.
Comfort will be increased. Contact your distributor for details.
● Redirect airow downward if ceiling surface areas become discolored due to airborne particulate.
It is recommended that airow be redirected 35° downward.
● Turn OFF power at the main power source if the indoor unit is not being used over a prolonged
period of time.
This results in excess electrical consumption while the unit rests in standby mode.
6
P5417051-rev.1
Page 11

3.3 Efcient Use of Cooling and Heating
HEATINGCOOLING
(1) Airow Direction
The appropriate air outlet angle is approximately 35
If cooling is not sufcient, change the airow direction.
35°
35°
(1) Airow Direction
o
.
The appropriate air outlet angle is approximately 60
If heating is not sufcient, change the airow direction.
60° 60°
o
.
Air Outlet Angle (Above Center)
Louver
Angle
(2) Airow Volume
”AUTO” should usually be used.
Air Outlet Angle (Below Center)
(2) Airow Volume
”AUTO” should usually be used.
Louver
Angle
NOTE
For Multi-Split Systems
When the number of the indoor units in operation or the operating mode is changed, the change in air outlet
temperature can cause the indoor temperature to change. In this case, adjust the settings as follows.
● During Cooling Operation: Lower the temperature setpoint slightly.
● During Heating Operation: Raise the temperature setpoint slightly.
P5417051-rev.1
7
Page 12
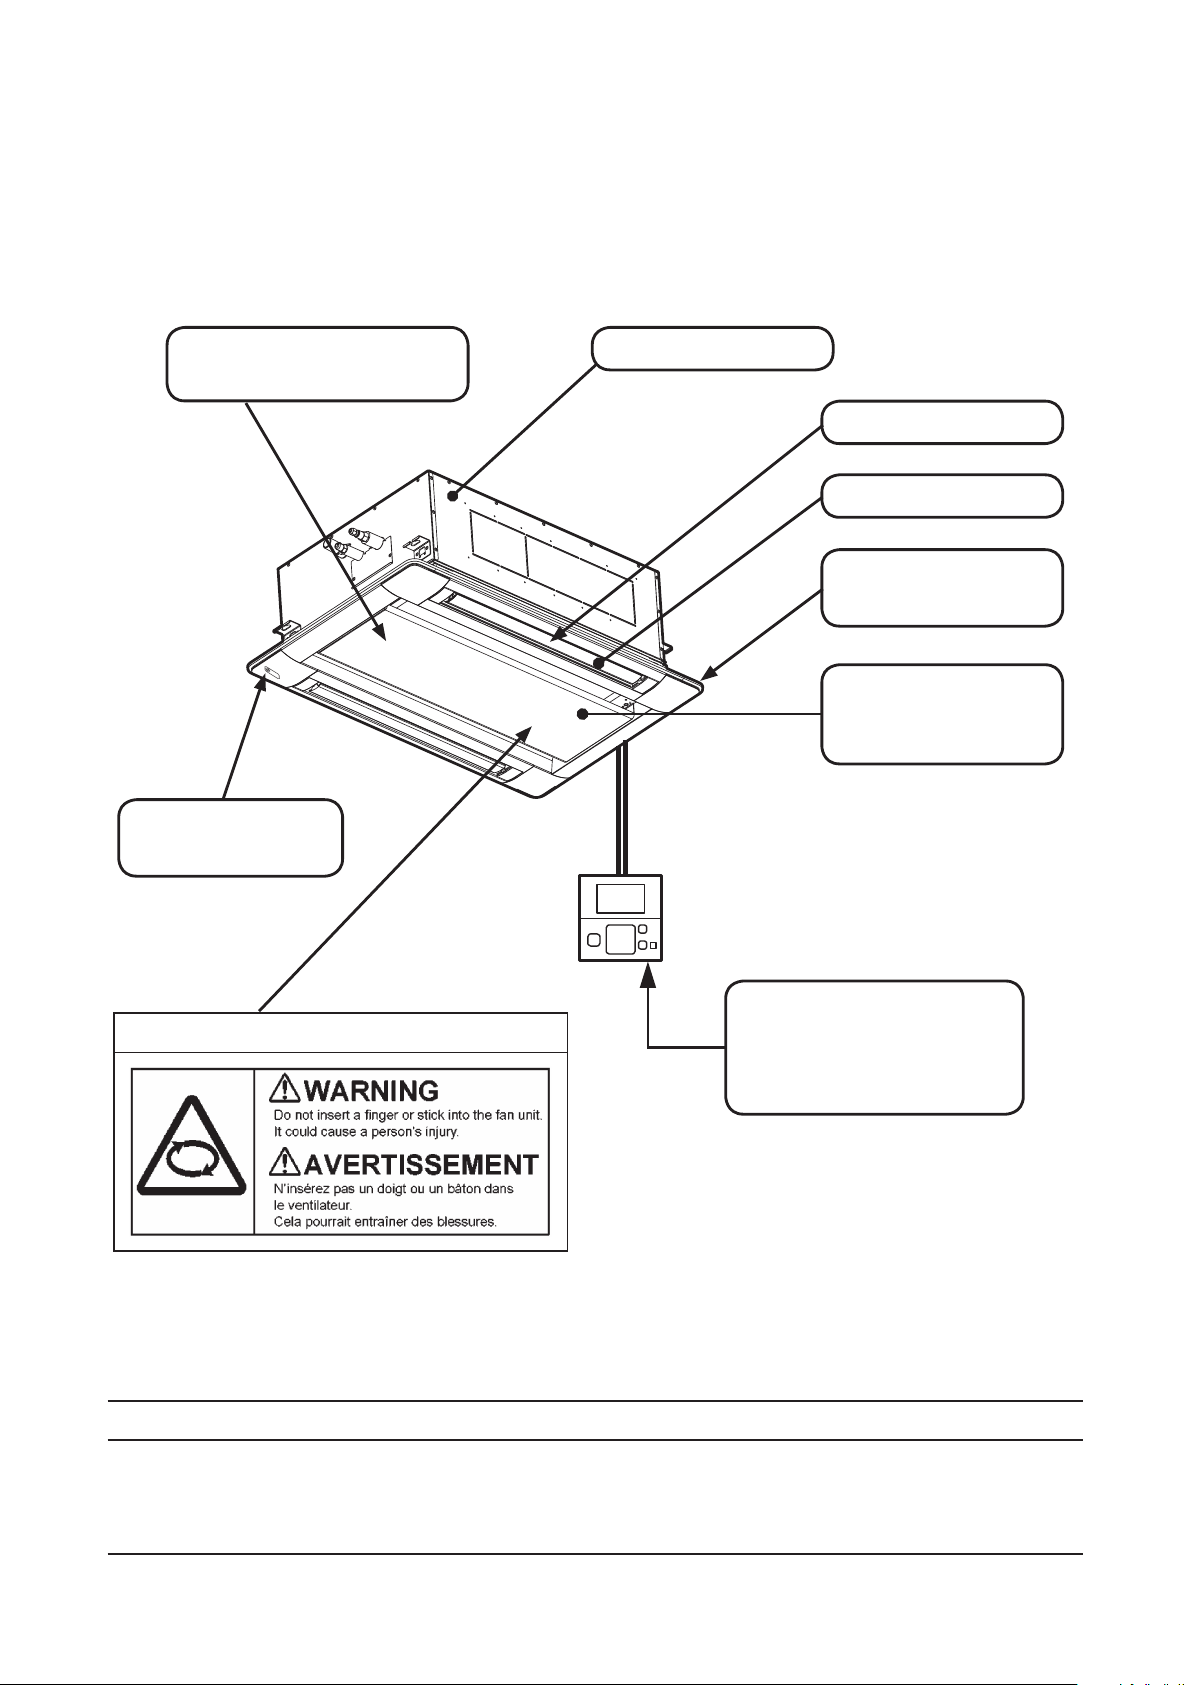
4. Names of Parts and Indications for Safety Consideration
Safety labels are afxed to the indoor unit in order to ensure safe use.
Read and understand this manual before using the indoor unit.
4.1 Indoor Unit
Specication Label
(Electrical Box Cover)
Motion Sensor Kit
(Optional)
Indoor Unit
Air Outlet
Louver
Decorative Panel
(Optional)
Air Inlet Flat Grille
(The air lter is attached
inside.)
Wired Controller
WARNING Label
The operating condition is
displayed on the LCD.
(Optional)
NOTE
● Press switches lightly to control the wired controller. Do not press them with a sharp object such as a pen,
as it could cause damage to the controller.
● Review the installation manual for the optional Wireless Controller and Receiver Kit.
8
P5417051-rev.1
Page 13
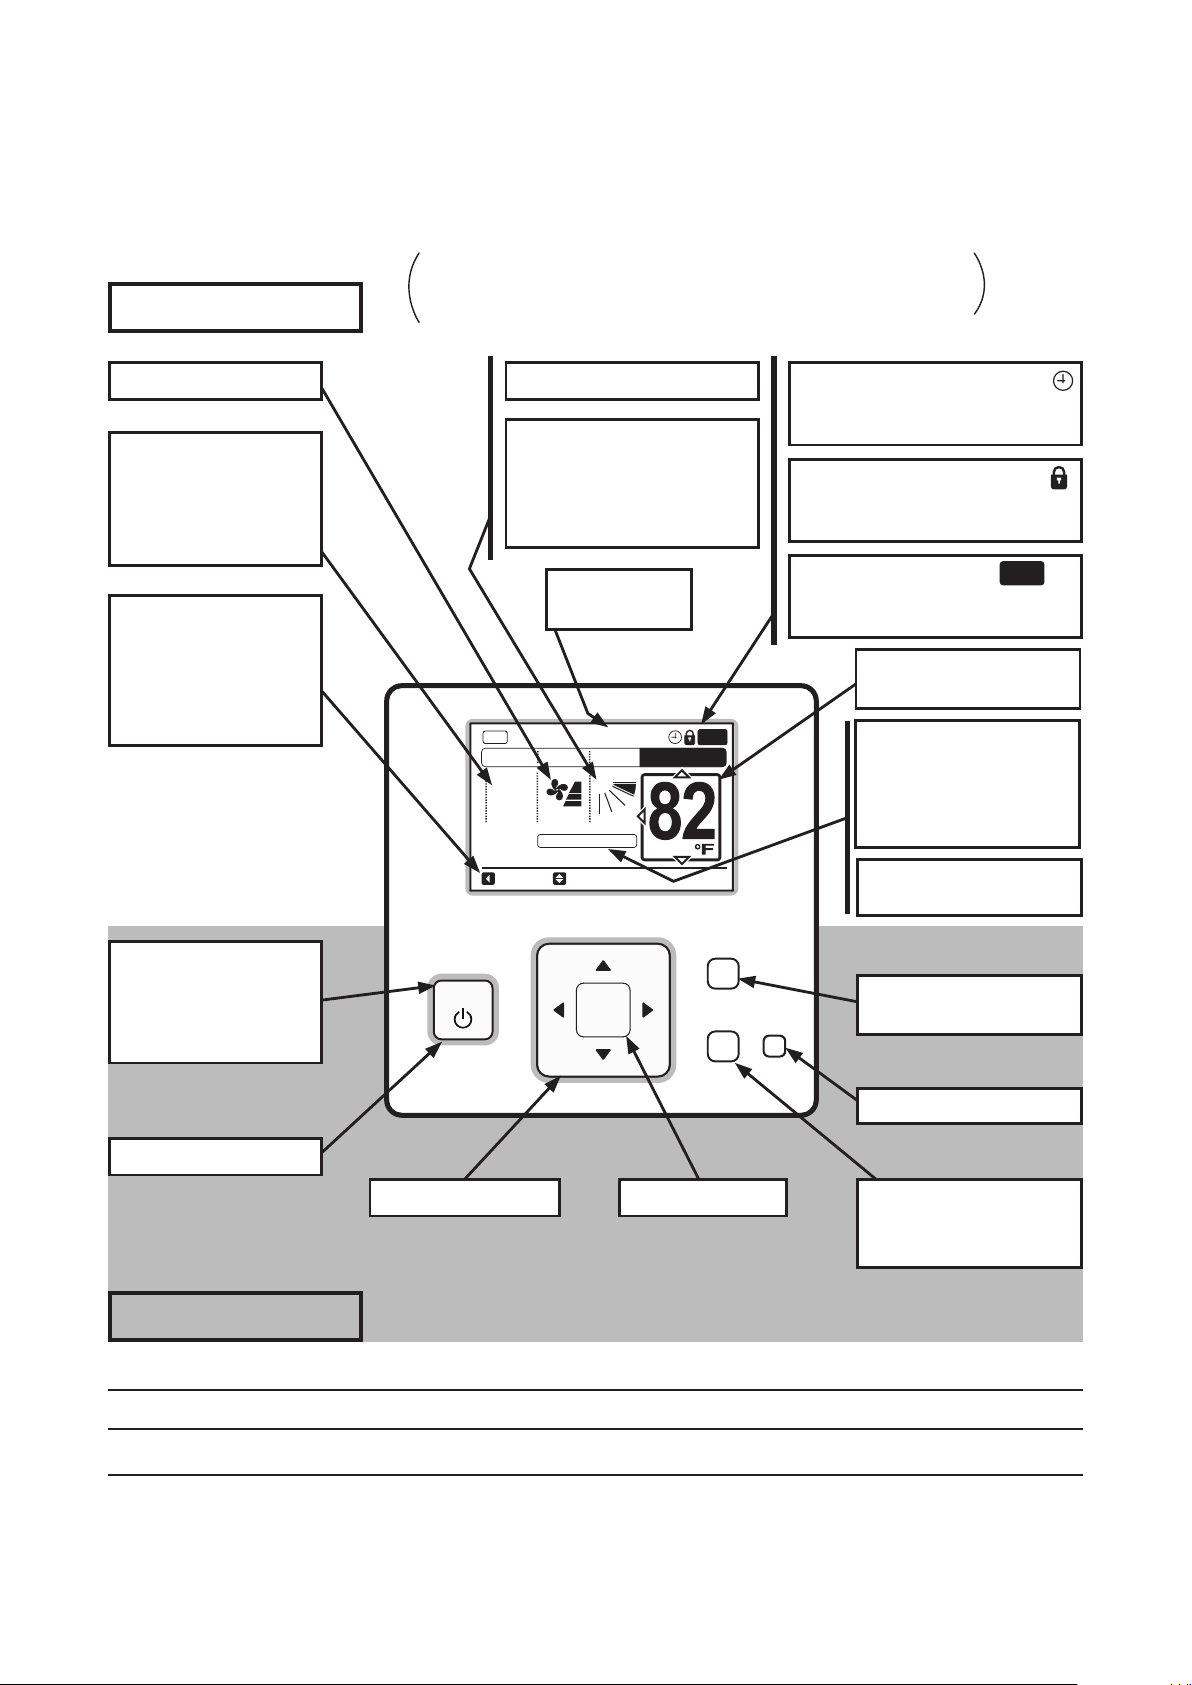
FLTR
4.2 Wired Controller (CIW01)
Following is an example of how the CIW01 is utilized. If other models of the controller are utilized, operate
the unit according to the manual for that controller.
The example below references the control panel and all
adjustable settings. The wired controller display may be
Display Part
different during actual operation.
Operation Mode
Indicator
“HEAT” and “AUTO” are
indicated only for the
heat pump type models.
Operation Guide
Indicator
“Central Control” is
indicated while the
controller operation is
prohibited.
Run Indicator
Illuminates while the
unit is operating. It
ashes during abnormal
conditions.
On/Off
Swing Louver IndicatorFan Speed Indicator
Avoid Air and Receive
Indicator
is displayed only for the
decorative panel with motion
sensor.
Room Name
Indicator *
A/C
MODE SPEED
COOL
Meeting Room
Motion Sensor ON
LOUV. Adj.
LOUV.
Avoid
TEMP
OK
FLTR
Menu
Back/Help
Schedule Timer Indicator
is displayed when the schedule
timer function is set. *
Operation Lock Indicator
is displayed when the operation
lock function is set. *
Filter Sign Indicator
is displayed to indicate that the
lter needs to be cleaned.
Setting Temperature
Indicator
Motion Sensor
Indicator
is displayed only for
the decorative panel with
motion sensor.
Cold Draft Rest
Indicator
Menu Switch
ECO
To display Menu.
*
On/Off Switch
Directional Key Enter Key
Operation Part
NOTE
* For detailed descriptions, refer to the "Operation Manual" for the wired controller.
P5417051-rev.1
ECO Switch
*
Back/Help Switch
To return to the previous
screen.
9
Page 14
Menu
p
Menu
p
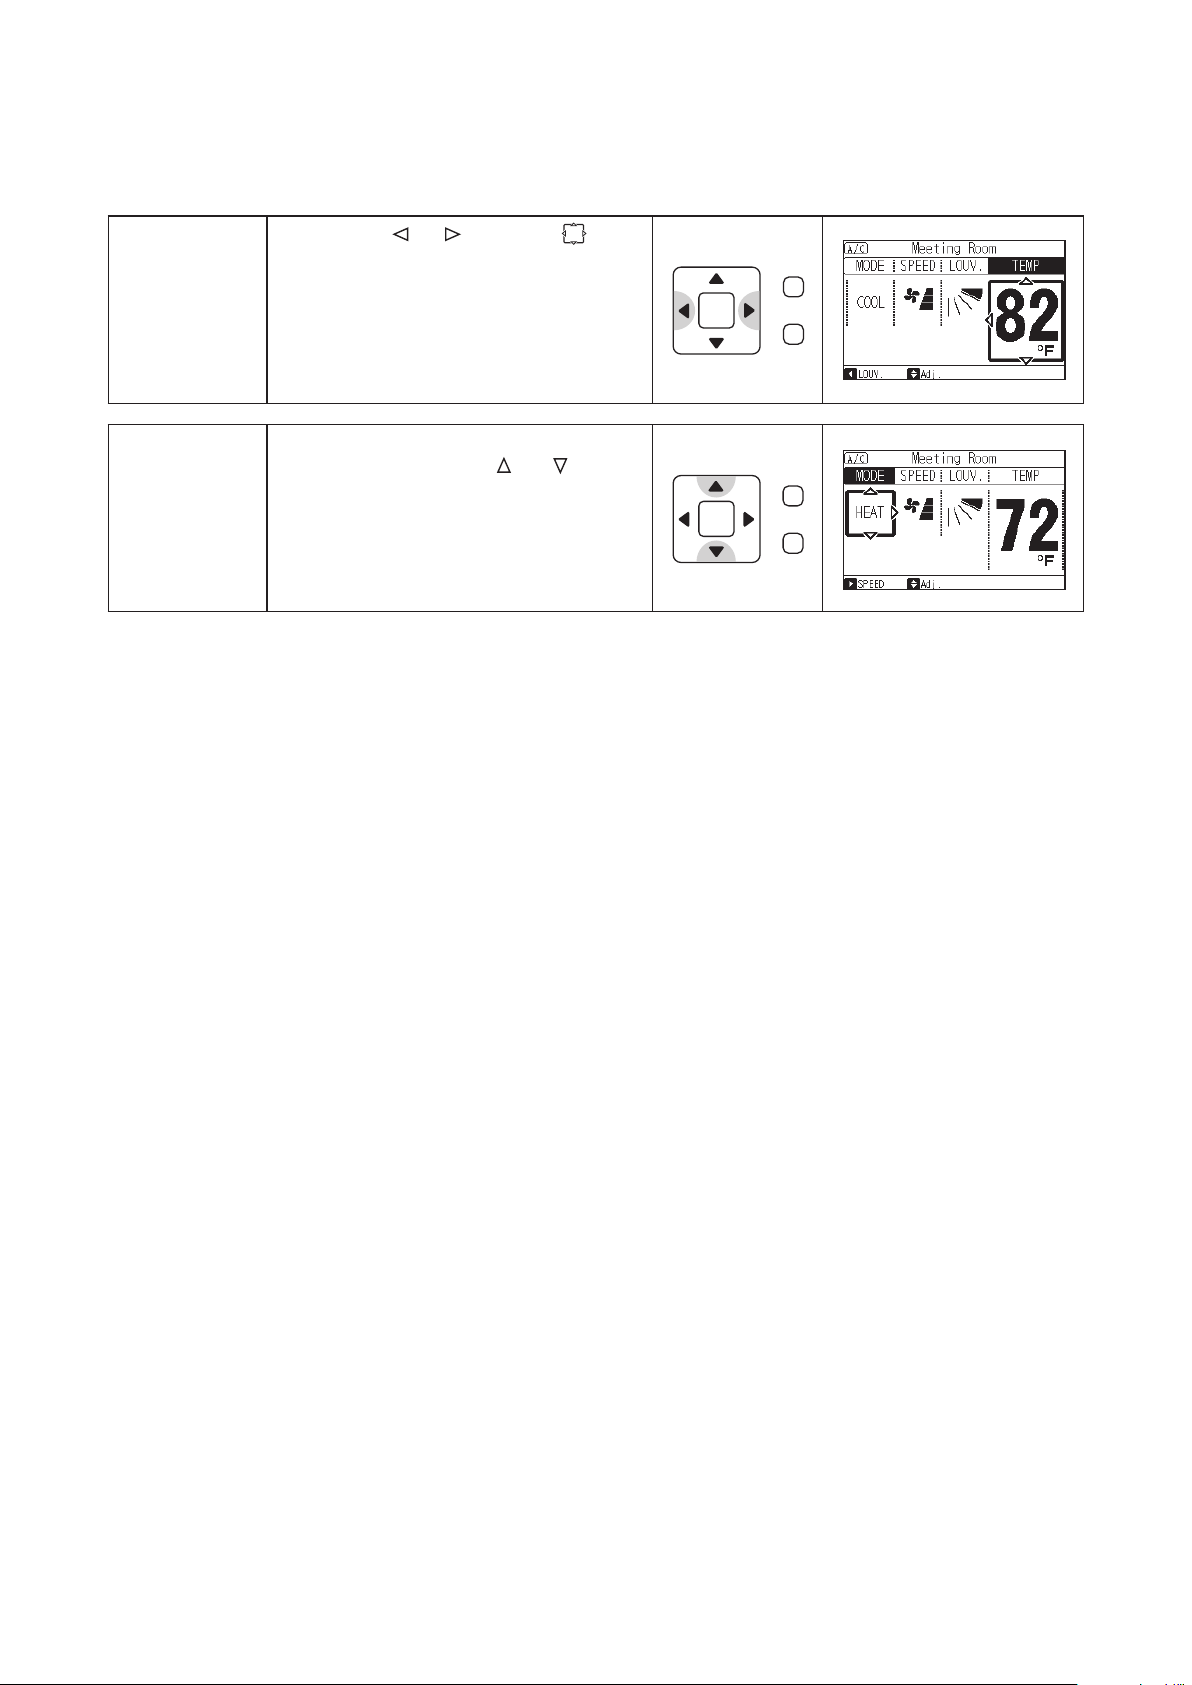
5. Operation Method
5.1 Basic Operation
By pressing “ ”or “ ”, the icon “ ”
will move between “MODE”, “SPEED”,
“LOUV.” and “TEMP”.
Item
Selection
With “MODE”, “SPEED”, “LOUV.” or
“TEMP” selected, press “ ” or “ ”.
The setting will change.
Change of
Settings
OK
OK
Back/Hel
Back/Hel
10
P5417051-rev.1
Page 15

Menu
p
Menu
p
5.2 Cooling / Heating / Fan Operation
Heating Operation is for VRF systems only and is not available for typical systems.
Function
* Cooling Operation: To decrease room temperature.
* Heating Operation: To increase room temperature.
* Dry Operation: To decrease humidity in the room.
* Fan Operation: To increase air circulation in the room.
● Dry operation may not run properly if there are other heat sources that exceed the capacity of the unit.
● The humidity control is unavailable for this unit. If you require dehumidification and the control of humidity,
choose specialized equipments.
● Decreasing of the humidity during dry operation might be unavailable.
Turn ON the power supply.
Turn ON the main power approximately
12 hours before operation in order to
Before
preheat the compressor.
Connecting
Operation
Do not turn OFF the main power to the
indoor unit during heating or cooling
season.
Press “ ” or “ ” to select “MODE”.
1
OK
Back/Hel
By pressing “ ” or “ ”, the mode is
changed as follows.
2
OK
FAN(AUTO)DRYHEATCOOL
Back/Hel
● Automatic heating/cooling operation requires extra settings. Contact your distributor or contractor for
details.
P5417051-rev.1
11
Page 16

Menu
p
Menu
p
5.3 Temperature Setting
Press “ ” or “ ” and select “TEMP”.
1
OK
Back/Hel
By pressing “ ”, temperature is increased
by 1oF (0.5oC).
(Max. 86oF (30oC))
2
By pressing “ ”, temperature is
decreased by 1oF (0.5oC).
OK
Back/Hel
COOL, FAN operation: Min. 66oF (19oC)
HEAT operation: Min. 62oF (17oC)
● If the optional function “Automatic Reset of Setting Temperature” is set.
Even if changing the temperature setpoint on the wired controller, it automatically returns to the set
temperature by “Automatic Reset Temperature” after a set time.
● The minimum/maximum temperature settings can be changed by adjusting the lower limit for the set
temperature for cooling (or the upper limit for setting temperature for heating) from the function selection.
● Contact your distributor for details on optional functions “Automatic Reset for Setting Temperature”,
"Cooling Lower Limit for Set Temperature”, and “Heating Upper Limit for Set Temperature.”
12
P5417051-rev.1
Page 17

Menu
p
Menu
p
5.4 Fan Speed
Press “ ” or “ ” and select “SPEED”.
1
OK
Back/Hel
By pressing “ ” or “ ”, fan speed is
changed as follows.
2
HIGH 2
HIGH MED LOW
OK
AUTO
Back/Hel
● During the dry operation, the fan speed is automatically adjusted to “LOW” and cannot be changed to any
other fan speed. (“LOW” is NOT displayed on the Liquid Crystal Display (LCD) at this time. The present
setting condition is displayed on the LCD.)
● The fan speed setting “HIGH 2” may not be available depending on the indoor unit type.
5.5 Operation
Press “ On/Off”.
The RUN indicator is turned ON and the
Operation
operation will start.
On/Off
OK
Start
Temperature/Airow Setting
● The setting condition is memorized. Therefore, no daily setting is required. Temperature setpoint and
airow settings are retained after the indoor unit is turned OFF at the controller. In case the setting
change is required, refer to Sections 5.2 to 5.4.
Press “ On/Off” again.
The RUN indicator is turned OFF and the
operation will stop.
Operation
On/Off
OK
Stop
● The indoor unit fan may continue to operate for up to two minutes following the heating cycle to dissipate
residual heat from the indoor unit.
P5417051-rev.1
13
Page 18
5.6 Louver Swing Direction
Menu
p
Menu
p
Approx. 30
o
Approx. 30
7-
Press “ On/Off”.
Make sure that the operation is started.
Press “
” or “ ” and select “LOUV.”.
1
By pressing “ ” or “ ”, the louver
direction will be changed as follows.
OK
Back/Hel
2
OK
Step 1 23456
LCD Indication
o
Louver Angle
FAN
Louver Angle Approx. 25
COOL and DRY
Louver Angle
HEAT
Approx. 25
Approx. 30
Approx. 35oApprox. 42oApprox. 52oApprox. 60oApprox. 65oApprox. 70
Recommended
Angle
o
Approx. 35oApprox.42oApprox. 52oApprox. 60
Recommended
Angle
o
Approx. 35oApprox. 41oApprox. 47oApprox. 53oApprox. 60oApprox. 65
Angle Range
Auto-Swing Range
Angle Range
Auto-Swing Range
Angle Range
Auto-Swing Range
Back/Hel
o
Approx. 65oApprox. 70
Recommended
Angle
o
o
Auto
Swing
o
NOTE:
Even if 65o or 70o is selected during cooling and drying operations, the louver angle
is automatically xed at 60o.
If “Individual Louver Setting” mode is used, a louver setting of 65o or 70o can be
corrected.
: Auto-swing operation is activated.
At this time, animated louver graphic on the LCD will appear to swing.
● The louver angle indicated on the LCD and the actual louver angle do not correspond precisely with
each other during auto-swing mode operation. When the louver angle is established, set the louver angle
according to the louver position indicated on the LCD.
● Louver movement may NOT stop immediately after the switch is pressed.
Swing Louver Direction during Heating Operation
* When the heating operation
starts
The louver angle is xed
approximately 30o.
* When the defrost operation
starts
* When thermo-controller
14
activates
o
When the discharge temperature
is higher than 86°F(30°C), the
louver angle is automatically
returned to the setting condition.
P5417051-rev.1
Page 19

5.7 Individual Louver Setting
NOTICE
Menu
p
Menu
p
Function
● This setting is available only for indoor models equipped with the individual louver.
● Each louver angle can be set individually.
Example
Units equipped with Auto-Swing have a set of options to allow for airow adjustment from vertical to
horizontal.
● This function cannot be set if the unit is not operating.
● After the individual louver setting is set during the heating operation, the louver angles can be adjusted
automatically to 30
● Fan speed slows down to “LOW” while this function is being set. (After the setting process is completed,
the unit operation will return to normal speed.)
● As for “Start-up of Heating Operation”, “During Defrost Operation” and “Activation of Thermistors”, all
louver angles will become xed at 30
● This function will not be displayed if two controllers (including wired controller + wireless controller) are
used.
● Maximum of 16 units can be set for Individual Louver Setting using one wired controller.
o
. Louver angles will assume this setting after a short period of time.
o
automatically, even when this function is set.
5.7.1 Individual Louver Settings
Press “Menu”.
Select “Individual Louver Setting” from
the menu by pressing “ ” or “ ” and
press “OK”.
1
The Individual Louver Setting menu is
displayed.
Select “Individual Louver Setting” from the Individual Louver
Setting menu and press “OK”.
The connected indoor unit's selection for the individual louver
2
setting will be displayed.
NOTE:
If the connected indoor unit is one (1) in the system, the
louver direction setting at procedure “4” is displayed.
Select the indoor unit to change the louver direction by
pressing “ ”, “ ”, “ ” or “ ”. Press “OK”.
The louver direction setting will be displayed.
3
NOTE:
The indoor unit displayed on the screen ashes when the
individual louver is set.
OK
OK
Back/Hel
Back/Hel
Menu
Individual Louver Setting
Louver Open/Close
VENTI
Total Heat Exchanger SET
Motion Sensor Setting
OK Back
Individual Louver Setting
Individual Louver Setting
Cancel INDV Louver SET
OK Back
Individual Louver Setting
01-01
01-02
01-03
01-04
Select unit to set.
OK Back
15:10(Fri)
03
/
05
Entr RtrnSel.
Entr RtrnSel.
Entr RtrnSel.
P5417051-rev.1
15
Page 20

Press “ ” or “ ” and select the louver direction from 1 to 2 (as
INDVINDVINDVINDVINDVINDVINDVINDV
shown). The selected louver is opened and the other louvers
Individual Louver Setting:01-03
1 2
are seen horizontally.
4
Adjust air direction & louver angle.
● If the louver position is hard to distinguish, press “ ” or “ ” to set the position .
● In the default setting, the louver on the side where the electrical box position is located is the number one
louver. Looking up from underneath the unit, the louver numbers run in a clockwise direction: numbered
"one" and "two". The louver number can also be changed. Contact your distributor for details.
Select the louver angle by pressing “ ” or “ ” and press “OK”.
The conrmation screen will be displayed.
The louver angle will be changed as shown below.
Individual Louver Setting:01-03
1 2
OK Back
Entr RtrnSel. Adj.
5
NOTE:
The louver direction without “INDV” complies with the setting
of the normal mode.
Adjust air direction & louver angle.
OK Back
Entr RtrnSel. Adj.
6
7
Select “Yes” by pressing “ ” or “ ” and press “OK”. The
setting is conrmed and the screen returns to the normal
mode.
Verify that “INDV” is turned on at the airow section on the
normal mode.
Individual Louver Setting:01-03
Fix individual louver setting?
Yes No
Sel. Entr Rtrn
A/C
MODE SPEED LOUV. TEMP
COOL
SPEED Adj.
OK Back
Meeting Room
INDV
16
P5417051-rev.1
Page 21

Menu
p
Menu
p
5.7.2 Cancellation of Louver Setting
Press “Menu”.
Select “Individual Louver Setting” from
the menu by pressing “ ” or “ ” and
press “OK”.
1
The Individual Louver Setting menu is
displayed.
Select “Cancel INDV Louver SET” from the Individual Louver
Setting menu and press “OK”.
The connected indoor unit's selection of the cancelled louver
setting will be displayed.
2
NOTE:
If the connected indoor unit is one (1) in the system,
the Cancel Individual Louver Setting at procedure “4” is
displayed.
OK
OK
Back/Hel
Back/Hel
Menu
Individual Louver Setting
Louver Open/Close
VENTI
Total Heat Exchanger SET
Motion Sensor Setting
OK Back
Individual Louver Setting
Individual Louver Setting
Cancel INDV Louver SET
OK Back
15:10(Fri)
03
/
05
Entr RtrnSel.
Entr RtrnSel.
3
4
Select the indoor unit to cancel by pressing “ ”, “ ”, “ ” or
“ ”. Press “OK”.
NOTE:
The indoor unit displayed on the screen ashes when the
individual louver is set.
Select “Yes” by pressing “ ” or “ ” and press “OK”. The
Individual Louver Setting is canceled and the screen returns
to the normal mode.
NOTE:
All the individual louver settings are canceled.
Cancel INDV Louver SET
01-01
01-02
01-03
01-04
Select unit to cancel.
Cancel INDV Louver SET:01-01
Cancel individual
louver setting?
Yes No
Sel. Entr Rtrn
OK Back
Entr RtrnSel.
OK Back
P5417051-rev.1
17
Page 22

5.8 Motion Sensor
NOTICE
5.8.1 Function
This setting is available only for the decorative panel with motion sensor kit.
● The motion sensor can detect human activity by measuring the level of change in infrared light emitted by
humans or objects.
This function saves air conditioning capacity (adjusting the set temperature, the airow volume and the
airow direction) automatically depending on a situation.
● The operation after the motion sensor detects an absence can be selected from “Running”, “Stand-by” or
“Stop” on the controller with the capacity saving.
● The motion sensor detects human activity (room occupancy). Do not use the motion sensor function in
situations where there may be little or no activity such as for disabled persons or infants. The motion
sensor may detect an absence and the operation may be stopped if there is too little motion during a period
of time.
● The motion sensor may detect human activity if the indoor unit with the motion sensor is installed near a
moving object which is difference in temperature against the atmosphere.
● If the indoor units are operated by two controllers, the motion sensor setting is available only from the main
controller.
● The indoor unit operation can be stopped by the motion sensor control.
NOTE:
Indoor units with and without a motion sensor kit can be integrated together into a system installation.
In this instance, when the operation is stopped by the motion sensor control, the indoor unit without the
motion sensor kit will also stop the operation.
● While air conditioning capacity is saved or operation is stopped by the motion sensor control, “Motion
sensor is activated” is displayed on the LCD.
● If the function “Prohibiting operation by controller” is activated from the centralized controller, select the
command “Running” or “Standby” inside an “If absent” condition at the motion sensor controls setting. If
the command “Stop” is selected, the motion sensor control is lost and cannot be performed correctly as
follows.
* In an instance where “If absent: Stop” of motion sensor setting is set by the controller and “Prohibiting
operation by controller” (for all functions) is set by the centralized controller, the operation will not be
stopped even if in the indoor unit operation stoppage condition of “If absent: Stop”.
* In an instance where “If absent: Stop” of motion sensor setting is set and “Prohibiting operation by
controller” (for some functions) is set by the centralized controller, the indoor unit operation will be
stopped by the motion sensor control. However, the indoor unit operation cannot be restarted from the
centralized controller.
18
P5417051-rev.1
Page 23

5.8.2 Details for Motion Sensor Control
The motion sensor control automatically adjusts the following functions depending on a situation.
* Setting Temperature:
The temperature is adjusted 2
o
F or 3oF (1oC or 2oC) for saving capacity.
* Airow Volume:
The airow volume is adjusted to lower one volume or to “Slow” (except during the dry operation).
* Airow Direction:
The airow direction is adjusted to horizontal.
5.8.3 Descriptions for Setting Functions
● Motion Sensor Setting
* ON: The operating control function by the motion sensor is activated.
* OFF: The operating control function by the motion sensor is not activated.
(The default setting is “ON”.)
● If Absent
The operation mode for activations can be selected from “Running”, “Stand-by”, or “Stop” on the wired
controller. It is set for the indoor unit operation after the motion sensor detects as an absence for set
time in “Check Interval”.
* Running:
The operation is continued with saving capacity after detected as an absence.
If human activity (occupancy) is detected over a period of time, the normal operation will be performed
again.
* Stand-by:
The operation mode is the fan operating at “Slow” speed. If human activity is detected for a period of
time, the normal operation will be performed again.
* Stop:
The operation is stopped by the wired controller when all the indoor units with motion sensor kits
detect an absence and are connected with the same wired controller. If human activity is detected for
a period of time by the stoppage, the normal operation will be performed again.
● Check Interval
When the motion sensor kit detects an absence at selected check time interval, the function “If absent”
(Function 1) will be executed. The interval can be selected from choices ranging from: 30, 60, 90, 120,
or 180 minutes.
(The default setting is 30 minutes.)
P5417051-rev.1
19
Page 24

5.8.4 Setting the Motion Sensor
Menu
p
Menu
p
Menu
p
Menu
p
Menu
p
Menu
p
Menu
p
Press “Menu”.
Select “Motion Sensor Setting” from the
menu by pressing “ ” or “ ” and press
“OK”.
1
"Motion Sensor Setting” is displayed.
The highlighted item changes to “Sensor”,
“If absent”, and “Check interval” by
pressing “ ” or “ ”.
2
• To set “Sensor”,
go to procedure “3” below.
• To set “If absent”,
go to procedure “5” below.
• To set “Check interval”,
go to procedure “7” below.
OK
OK
OK
Back/Hel
Back/Hel
Back/Hel
Menu
Individual Louver Setting
Louver Open/Close
VENTI
Total Heat Exchanger SET
Motion Sensor Setting
OK Back
Motion Sensor Setting
Sensor
If absent
Check interval
Running
30MIN
OK Back
15:10(Fri)
03
/
05
Entr RtrnSel.
ON
Entr RtrnSel. Adj.
3
4
5
Press “ ” or “ ” and select “Sensor”.
The display is switched “ON” and “OFF”
in order by pressing “ ” or “ ” to change
the setting.
If other settings are not required, go to
procedure “9” below.
Press “ ” or “ ” and select “If absent”.
OK
OK
OK
Back/Hel
Back/Hel
Back/Hel
Motion Sensor Setting
Sensor
If absent
Check interval
Motion Sensor Setting
Sensor
If absent
Check interval
Motion Sensor Setting
Sensor
If absent
Check interval
ON
Running
30MIN
OK Back
Entr RtrnSel. Adj.
ON
Running
30MIN
OK Back
Entr RtrnSel. Adj.
ON
Running
30MIN
OK Back
Entr RtrnSel. Adj.
20
6
The display changes to “Running”,
“Stand-by” and “Stop” in order by
pressing “ ” or “ ” to change the setting.
If other settings are not required, go to
procedure “9” below.
OK
Back/Hel
Motion Sensor Setting
Sensor
If absent
Check interval
ON
Running
30MIN
OK Back
Entr RtrnSel. Adj.
P5417051-rev.1
Page 25

NOTICE
7
Menu
p
Menu
p
Menu
p
Menu
p
Menu
p
Press “ ” or “ ” and select “Check
interval”.
OK
Back/Hel
Motion Sensor Setting
Sensor
If absent
Check interval
ON
Running
30MIN
OK Back
Entr RtrnSel. Adj.
8
9
The display shows: “30MIN”, “60MIN”,
“90MIN”, “120MIN”, and “180MIN” in
order by pressing “ ” or “ ” to change
the setting.
If other settings are not required, go to
procedure “9” below.
Press “OK” after the setting is made.
The conrmation screen is displayed.
Select “Yes” by pressing “ ” or “ ” and
press “OK”. The motion sensor setting is
conrmed and the screen returns to the
normal mode (operation mode indicator).
OK
OK
OK
OK
Back/Hel
Back/Hel
Back/Hel
Back/Hel
Motion Sensor Setting
Sensor
If absent
Check interval
Motion Sensor Setting
Save changes in
motion sensor setting?
Yes No
Sel. Entr Rtrn
ON
Running
30MIN
OK Back
Entr RtrnSel. Adj.
OK Back
If more than two controllers are utilized, setting of the motion sensor is available by simply using the main
controller only.
P5417051-rev.1
21
Page 26

An automatic heating/cooling operation and setback operation requires extra settings.
Contact your distributor or contractor for details.
5.9 Automatic Heating/Cooling Operation
In case dual setpoint is selected in automatic heating/cooling
operation, during auto mode both cooling setpoint and heating
setpoint can be selected.
By default, temperature when the heating/cooling mode changes is
as follows.
Cooling mode changes to heating mode when the indoor
temperature is at the heating setpoint -2oF (-1oC).
Heating mode changes to cooling mode when the indoor
temperature is at the cooling setpoint +2oF (+1oC).
If the temperature for changing modes must be changed, contact
your distributor or contractor for details.
5.10 Setback Operation
If the setback operation is enabled and the card key is removed,
the louver starts to open in approximately 5 seconds, the setpoint is
adjusted for setback, and the fan operates at “Low” speed.
During this time, “Setback” is displayed on the LCD.
By default,
Cooling: Setpoint +4oF (+2.5oC)
Heating: Setpoint -4oF (-2.5oC)
If the adjustment for setback operation must be changed, contact
your distributor or contractor for details.
NOTE:
In case of Celsius Indication.
NOTE:
In case of Fahrenheit Indication.
22
P5417051-rev.1
Page 27
6. Automatic Control
This air conditioner automatically starts the following operations based on conditions.
The system is equipped with the following functions:
Enforced Stoppage:
The compressor remains OFF for at least three minutes once it has
stopped.
If the system is restarted within approximately three minutes after it has
stopped, the RUN indicator is activated.
However, the cooling operation or the heating operation remains OFF
Three-Minute Guard
Cooling
Frost Prevention
and
Dry
Self-Cleaning of
Expansion Valve
Hot Start
Defrosting
Heating
Operation
Residual
Heat Removal
and does not start until after three minutes have elapsed.
Enforced Operation:
If all indoor units of a system are Thermo-OFF
three minutes after the compressor has started, compressor operate
continuously during those three minutes.
However, if all indoor units of a system are stopped by a controller, the
compressor is stopped.
When the indoor unit is operating at a low discharge air temperature,
the cooling operation may be changed to a fan operation for a while to
avoid frost formation on the indoor heat exchanger.
Self-cleaning of the expansion valve when the operation is stopped at
cooling. The sound of refrigerant ows may be heard from the indoor
unit during the self-cleaning. However, it is not abnormal.
To prevent cold air discharge into a heated space, the fan speed is
controlled from the SLOW / LOW setting and then to a set position
based on discharge air temperature.
At this time, the louver is in a xed horizontal position and “HOT
START” is displayed on the LCD of the wired controller.
The indoor unit fan operation is stopped to prevent cold air discharge
during the defrosting operation. At this time, the message “HOT-START”
is displayed on the LCD of the wired controller and the indoor unit fan
louver angle is xed horizontally.
When the heating operation is stopped, indoor fan operation may
remain at the slow speed for a maximum of two minutes to lower the
internal temperature of the indoor unit.
within approximately
*
Prevention
of Overload
Operation
* Thermo-OFF: The outdoor unit and some indoor units stay on, but don't run.
Thermo-ON: The outdoor unit and some indoor units are running.
When the outdoor temperature is high (approximately 70oF (21oC) or
more) during heating operation, the operation is stopped by activation
of the outdoor thermistor.
NOTE
● This air conditioner adopts a hot air circulation system for the heating operation.
● Any oversized room with a low ambient air temperature will require an extended amount of time to warm
up. Once the air temperature gets to the required temperature setpoint, the display “HOT START” is
turned OFF.
● If “HOT-START” displays during, or right after, the defrosting operation, this is NOT abnormal. Activation
of the hot start operation prevents cold drafts.
P5417051-rev.1
23
Page 28

7. Maintenance
NOTICE
A
ir Inlet Flat Grille
A
● Turn OFF the power source before maintenance work. If the power source is not turned off, it may cause
a re or an electric shock.
● Perform the maintenance work with a stable foothold or foundation. This may prevent falling or injury.
● Hold the air lter and the air inlet grille securely by hand when attaching or removing it. Not doing so may
cause the unit to fall, resulting in serious injury.
● Use light pressure with a clean soft cloth when cleaning the lens of the motion sensor. The surface
material of the lens is easily scratched, blemished, and can result in degraded performance of the sensor.
7.1 Maintenance
7.1.1 Cleaning Air Filter
Clean the air lter when the lter sign is turned ON.
On/Off
A/C
MODE SPEED
COOL
Motion Sensor ON
LOUV. Adj.
Meeting Room
Avoid
OK
LOUV.
TEMP
FLTR
Menu
Back/Help
Filter Sign
ECO
(1) Open the air inlet at grille.
While sliding the hinge on both sides of the
air inlet at grille, open the air inlet at grille.
(2) Remove the air lter.
Remove the air lter from the decorative
panel by turning the six knobs for air lter
90 degrees.
Knob
24
ir Inlet Flat Grille Air Filter
Knob
Turn
o
90
P5417051-rev.1
Page 29

(3) Clean the air lter.
•Vacuum dust off with a hand-held vacuum cleaner, or wash the air lter with water or a neutral
detergent.
• Dry the air lter in a shaded area.
NOTE
• Do not use water warmer than 122°F (50°C). Filter elements can be damaged.
• Do not dry the air lter by holding it over open ame, with a hair dryer, or any type of heating device. Filter
elements can be damaged by heat.
(4) Install the air lter.
After the air lter is dried, install it in the reverse order from what is shown in procedure “2”.
(5) Close the air inlet at grille.
NOTE
• Be sure to install the air lter.
Operating the indoor unit without a lter installed will cause serious damage and breakdown.
• Make sure that the air inlet at grille is securely locked in place by the knobs. If not properly secured, it
could swing open, strike someone below and cause injuries.
(6) Reset the lter sign.
NOTE
If the accumulated operation time is shorter than that indicated by the lter sign setting, the icon displaying
“ ” activates and “Setting Disabled” is displayed.
•Press “Menu”.
Select “Reset Filter Sign Time” from the menu and press “OK”.
The conrmation screen is displayed.
Menu
Simple Timer
Reset Filter Sign Time
Operation Schedule
Elevating Grille
Power Saving Setting
•Select “Yes” by pressing “
” or “ ” and press “OK”.
The “FLTR” indication is turned OFF and the screen returns to the normal mode.
15:10(Fri)
OK Back
Entr RtrnSel.
01
/
05
P5417051-rev.1
25
Page 30

7.1.2 Removing, Cleaning and Attaching Air Inlet Flat Grille
NOTICE
A
ir Inlet Flat Grille
Air Inlet Flat Grille
Tilting the air inlet flat grille,
Wipe down the decorative panel with a soft cloth soaked in lukewarm water and wrung out.
● Gently wipe down using only a clean soft cloth. Avoid the use of benzene type thinners or chemical
detergents and abrasives such as cleaning agents which will damage the nish of outer plastic surfaces
and louvers. Avoid using excessive force when cleaning these surfaces as they can be easily damaged.
The air inlet at grille can be removed and cleaned.
(1) Open the air inlet at grille.
While sliding the knobs on both sides of the air inlet
at grille, open the air inlet at grille.
(2) Remove the air inlet at grille.
Remove the supporting chain from the decorative panel.
•
Open the air inlet at grille at an approximately 40° angle from the decorative panel surface.
•
Tilt the air inlet at grille and lift it up to remove it.
•
NOTE:
Although the air inlet at grille can be opened up to 90°, it cannot be removed from the decorative panel at
that angle. Tilt it at a 40° angle when removing it.
Ceiling
Decorative Panel
lift it up to remove it.
40°
Chain
(3) Clean the air inlet at grille.
(4) Attach the air inlet at grille.
Attach the air inlet at grille in the reverse procedure to removing.
7.2 Maintenance Before and After Use
Before Use After Use
• Remove any obstacles around the air inlet at
grilles and the air outlets of both the indoor and
outdoor units.
• Check that the air lter is not clogged with dust
and dirt.
26
• Clean the air lter, the air inlet at grille and the
decorative panel.
P5417051-rev.1
Page 31

8. Troubleshooting
8.1 These are Not Abnormal
Event Cause
All indicator LEDs on the
wired controller are turned
OFF.
Operation Stopped
White Steam
from Indoor Unit
White Smoke
from Indoor Unit
Mist from Indoor Unit
Odor from Indoor Unit
Sound from Indoor Unit
Condensation on
Decorative Panel
Temperature Irregularity
“HOT-START” on LCD Illuminated (ON)
Operation Mode on LCD Flashing
“Motion Sensor ON” is turned
ON the wired controller.
After Power Failure
During Heating Operation
At Beginning of Heating
Season
In Restaurant or Kitchen
During Dry Operation
During Cooling Operation
in Humid Environment
Odors Emanating from Indoor
Unit Air Discharge
A grating sound is heard
when starting or stopping the
operation.
Sound of water owing or
bubbling is heard during the
operation.
A growling sound may be
heard temporarily right after
the airow volume is changed.
Condensation on Decorative
Panel or Cabinet
Airow volume and
temperature irregularities exist
for each outlet.
The microprocessor is activated to protect the
device from electromagnetic interference (EMI).
Restart the operation.
The operation has stopped automatically because
the motion sensor is set as “If absent: Stop”. It
detected an absence of motion for a period of time.
(All indoor units connected to the same controller
are stopped.)
Restart the operation. If the instantaneous power
failure is within two seconds, the operation restarts
automatically.
Dust that accumulated over time on the evaporative
coil of the indoor unit will be pushed into the
occupied space, which could generate white steam
coming out of the discharge side of the indoor unit.
This might occur when dust attached to the heat
exchanger has been dried.
This can occur when oily residue coats the ns and
heat exchanger efciency is degraded.
This might occur due to the air outlet temperature
decreasing. Change the operation mode.
This might occur due to the air outlet temperature
decreasing. Raise the set temperature and airow
volume.
The intake of cigarette smoke is the likely reason,
with nicotine deposits coating or clogging the cells
and surfaces of the air lter.
Ventilate the unit well in fan mode and clean the air
lter, the air outlet and air inlet grill.
This is the sound made when the components are
rubbing up against one another due to expansion
and contraction of plastic parts brought on by
temperature change.
This is the sound made when the refrigerant ows
or the drain-up mechanism drains water. The sound
may be heard especially when starting the operation
or stopping the compressor (for approximately three
minutes).
It is generated because the fan motor makes
temporary sound with change of fan speed.
This might occur when the operation is performed
in a humid environment over a prolonged period of
time (relative humidity around 80%).
This might occur for structural reasons, such as
the size of an air outlet and the location of heat
exchanger.
This might occur according to the operation mode
or operational conditions.
P5417051-rev.1
27
Page 32

8.2 Before Contact
Check these problems before contacting a contractor.
Problem Checking Point Action
Check that the main power
source is turned ON.
Operation Unavailable
Cooling
Immediate
shutdown after
start-up
Insufcient Cooling or
Heating
Heating
Check that the fuse is not
blown or the circuit breaker
from the main power source is
not tripped.
Check that the air inlet and
outlet for the outdoor unit are
not obstructed.
Check if there are any
obstacles impeding the airow
near the air inlet and outlet of
the outdoor unit.
Check that the outlet air is not
redirected into the air inlet.
Check that the operation
mode is appropriate.
Check that the set
temperature is appropriate.
Check that the airow
direction is appropriate.
Check that the air lter is not
clogged.
Verify that there are no open
windows and doors.
Check that there are no
obstacles impeding airow
near the air inlet and outlet for
both indoor and outdoor units.
Turn ON the power at the main power source for
the air conditioner.
Replace the fuse or reset the circuit breaker.
If the problem recurs, contact your contractor or
distributor.
Remove objects obstructing the air inlet and outlet.
Remove any obstacles obstructing airow.
If the fan mode is selected, switch the operation
mode to cooling/heating.
If not, change the temperature setting by pressing
” or “ ” with the wired controller.
“
If not, change the airow direction.
If the room is not heated well during the heating
operation, change the louver downward.
Clean the air lter.
Close windows and doors.
Remove the obstacles.
28
P5417051-rev.1
Page 33

8.3 Contact Distributor
Indoor Unit Number
If trouble still persists, even after looking for off previously listed items or detecting problems not mentioned in
the previous pages, stop using this product and call your distributor or contractor immediately.
If there is any perceived abnormality present (noises or odors associated with electrical short,
re, or burning elements), shut down immediately and shut OFF at the main power source.
Contact your distributor or contractor without delay.
Problem Action before Contact
Protection devices (fuses, breakers, and GFCIs) activate
frequently or the operation switch does not work.
Water leakage from the indoor unit. Stop the operation.
"Motion Sensor ON" is ashing.
● The RUN indicator (red) is ashing.
● The indoor unit number, alarm code, unit model code,
and the number of connected indoor units are displayed
on the LCD.
● If multiple indoor units are connected to one controller,
the above abnormality information for each indoor unit
is displayed individually.
Turn OFF the power source.
There is a possibility of malfunction of the motion
sensor. Make the setting of motion sensor and
HEAT Control
invalid and contact your distributor.
”
Floor
“
In that case, after the LCD of the wired controller
display disappears and until service is nished, the
unit is operable.
Check the details on the LCD and contact your distributor.
Refer to the Alarm Code Table.
Contact your distributor and advise of the alarm code
details indicated on the LCD of the wired controller.
01-02
Alarm Code:
MODEL : F .08
I.U. :
IDU :
ODU :
O.U. :
RCI-3.0FSN3
******
RAS-3HVRNM2
******
Sel. OP MODE
23
OK
Chek
AlarmRST
Address
Entr
Provide the following information when contacting your distributor.
1) Unit model
2) Symptoms and nature of the problem.
3) Number of the alarm code or any ashing indicator on the LCD.
P5417051-rev.1
29
Page 34

8.4 Alarm Codes
Code Category Content of Abnormality Code Category Content of Abnormality
01 Indoor Unit Activation of Protection Device 35
02 Outdoor Unit
03
Communication
04
05 Supply Phase Problem of Power Source Phases 42 Overload Heating
06 Voltage
07
Cycle
08
09 Outdoor Unit
11
12 Outlet Air Thermistor Failure 48
13 Freeze Protection Thermistor Failure 51
14 Gas Piping Thermistor Failure 52
19 Fan Motor
20
21 High Pressure Sensor Failure 56
Sensor on
Indoor Unit
Activation of Protection Device
(High Pressure Cut)
Operational Irregularities between
Indoor and Outdoor
Problem between Inverter PCB and
Outdoor PCB
Abnormal Voltage Drop in
Outdoor Unit
Decrease in Superheated Discharge
Gas
Increase in Discharge Gas
Temperature
Activation of Protection Device for
Outdoor Fan
Inlet Air Thermistor Failure 47
Activation of Protection Device for
Indoor Fan
Compressor Thermistor Failure 54
38
39 Compressor
41
43
44
45
46
53
System
Pressure
Protection
Device
Inverter
Incorrect Setting of Indoor Unit No.
Problem with Protective Pickup Circuit
in Outdoor Unit
Problem with Running Current at
Constant Speed Compressor
Overload Cooling
Activation of Pressure Ratio Decrease
Protection Device
Activation of Low Pressure Decrease
Protection Device
Activation of Low Pressure Increase
Protection Device
Activation of High Pressure Increase
Protection Device
Activation of High Pressure Decrease
Protection Device
Activation of Overcurrent Protection
Device
Problem with Inverter Current Sensor
Activation of Inverter Overcurrent
Protection
Activation of Transistor Module
Protection
Abnormality of Inverter Fin
Temperature
Abnormality of Detection for Fan
Motor Position
22 Outdoor Air Thermistor Failure 57 Activation of Fan Controller Protection
23 Discharge Gas Thermistor Failure 58 Abnormality of Fan Controller
24 Evaporating Thermistor Failure b0
29 Low Pressure Sensor Failure b1
31
32
Sensor on
Outdoor Unit
System
Incorrect Capacity Setting of
Outdoor Unit and Indoor Unit
Incorrect Setting of Other Indoor Unit
Number
Outdoor Fan
Incorrect Setting of Unit Capacity
System
EE Compressor Compressor Protection Alarm
Incorrect Setting of Unit and
Refrigerant System No.
30
P5417051-rev.1
Page 35

Page 36

© 2017 Johnson Controls, Inc.
P5417051-rev.1
Code No. LIT-12012966
Revised January 2018
 Loading...