

Page 1
Instruction manual
Octave internet radio
Page 2

2
Contents
3 Important safety information
4 Packing list
4 Your Octave internet radio
7 Quick-steps guide to getting started
8 DAB mode instructions
11 FM mode instruction
13 Bluetooth instructions
14 AUX-IN instructions
15 Internet radio instructions
17 Music Player instructions
21 Alarm
22 Sleep
23 Setting the clock
24 Connecting to a network
25 Connecting with UNDOK
26 Setting up music server
28 System settings
31 Troubleshooting
33 Technical specification
Instruction Manual
Octave internet radio
Page 3

Important safety information
Thank you for purchasing this John Lewis internet radio. Please read the
instructions and warnings carefully before use, to ensure safe and
satisfactory operation of this product.
It is most important this instruction leaflet be retained with the product for
future reference. These warnings have been provided in the interest of
safety. You MUST read them carefully before using the appliance. If you are
unsure of the meanings of these warnings contact the John Lewis store
from which you purchased the appliance.
- This appliance is not intended for use by persons (including children)
with reduced physical, sensory or knowledge, unless they have been
given supervision or instruction concerning use of the appliance by a
person responsible for their safety.
- To protect against fire, electric shock and injury to persons DO
NOT IMMERSE CORD, plug or base unit in water or other liquids.
- Unplug from the mains when not in use, before putting on or taking
off parts and before cleaning.
- Do not operate any appliance with a damaged cord or plug, or after
the appliance malfunctions or has been damaged in any manner.
Return the appliance to the nearest John Lewis store.
- Do not let power cord hang over edge of table or counter, or touch
hot surfaces.
- In the event of a fault, contact your nearest John Lewis store. No
repair should be attempted by the consumer.
- Do not use the appliance for anything other than intended use.
- For household use only, do not use outdoors.
- Save these instructions for future reference.
Warning! Polythene bags over the product or packaging may be dangerous.
To avoid danger of suffocation, keep away from babies and children.
3
Instruction Manual
Octave internet radio
Page 4

Packing list
1 Octave internet radio
1 DC 12V 2.5A power adapter
1 Instruction manual
1 Remote control
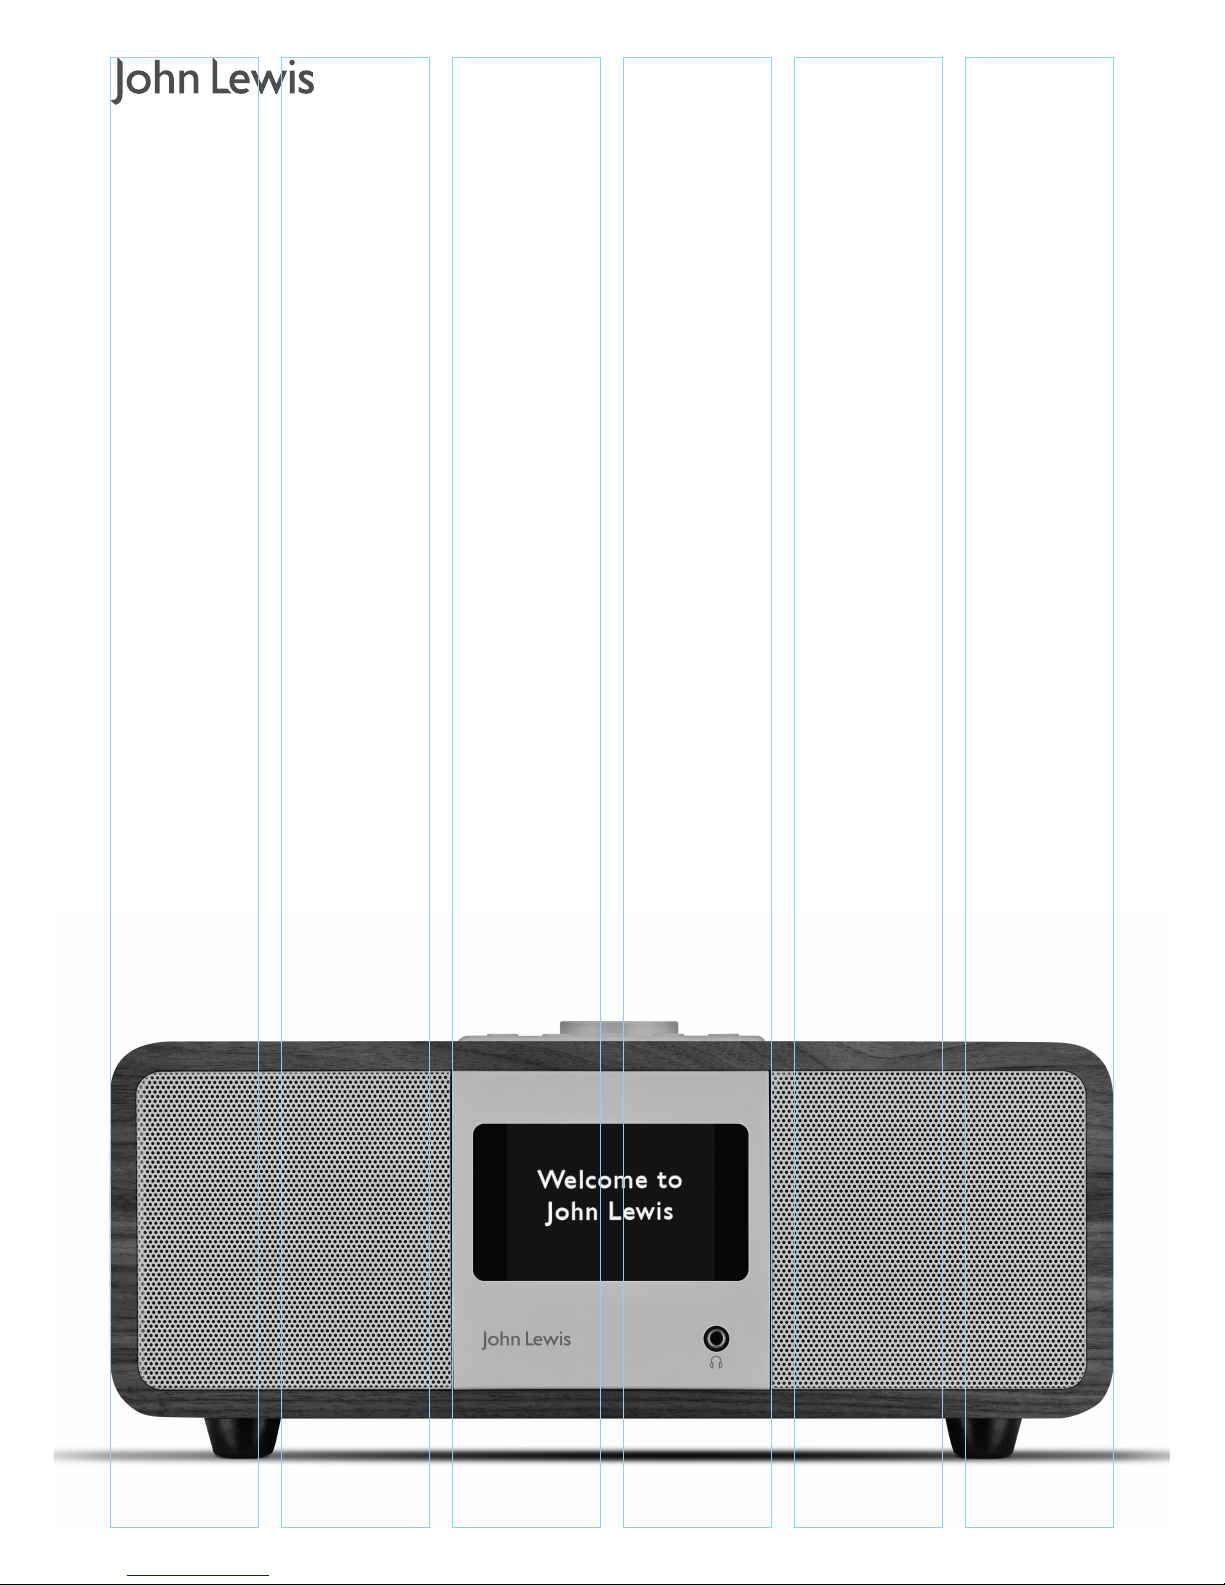
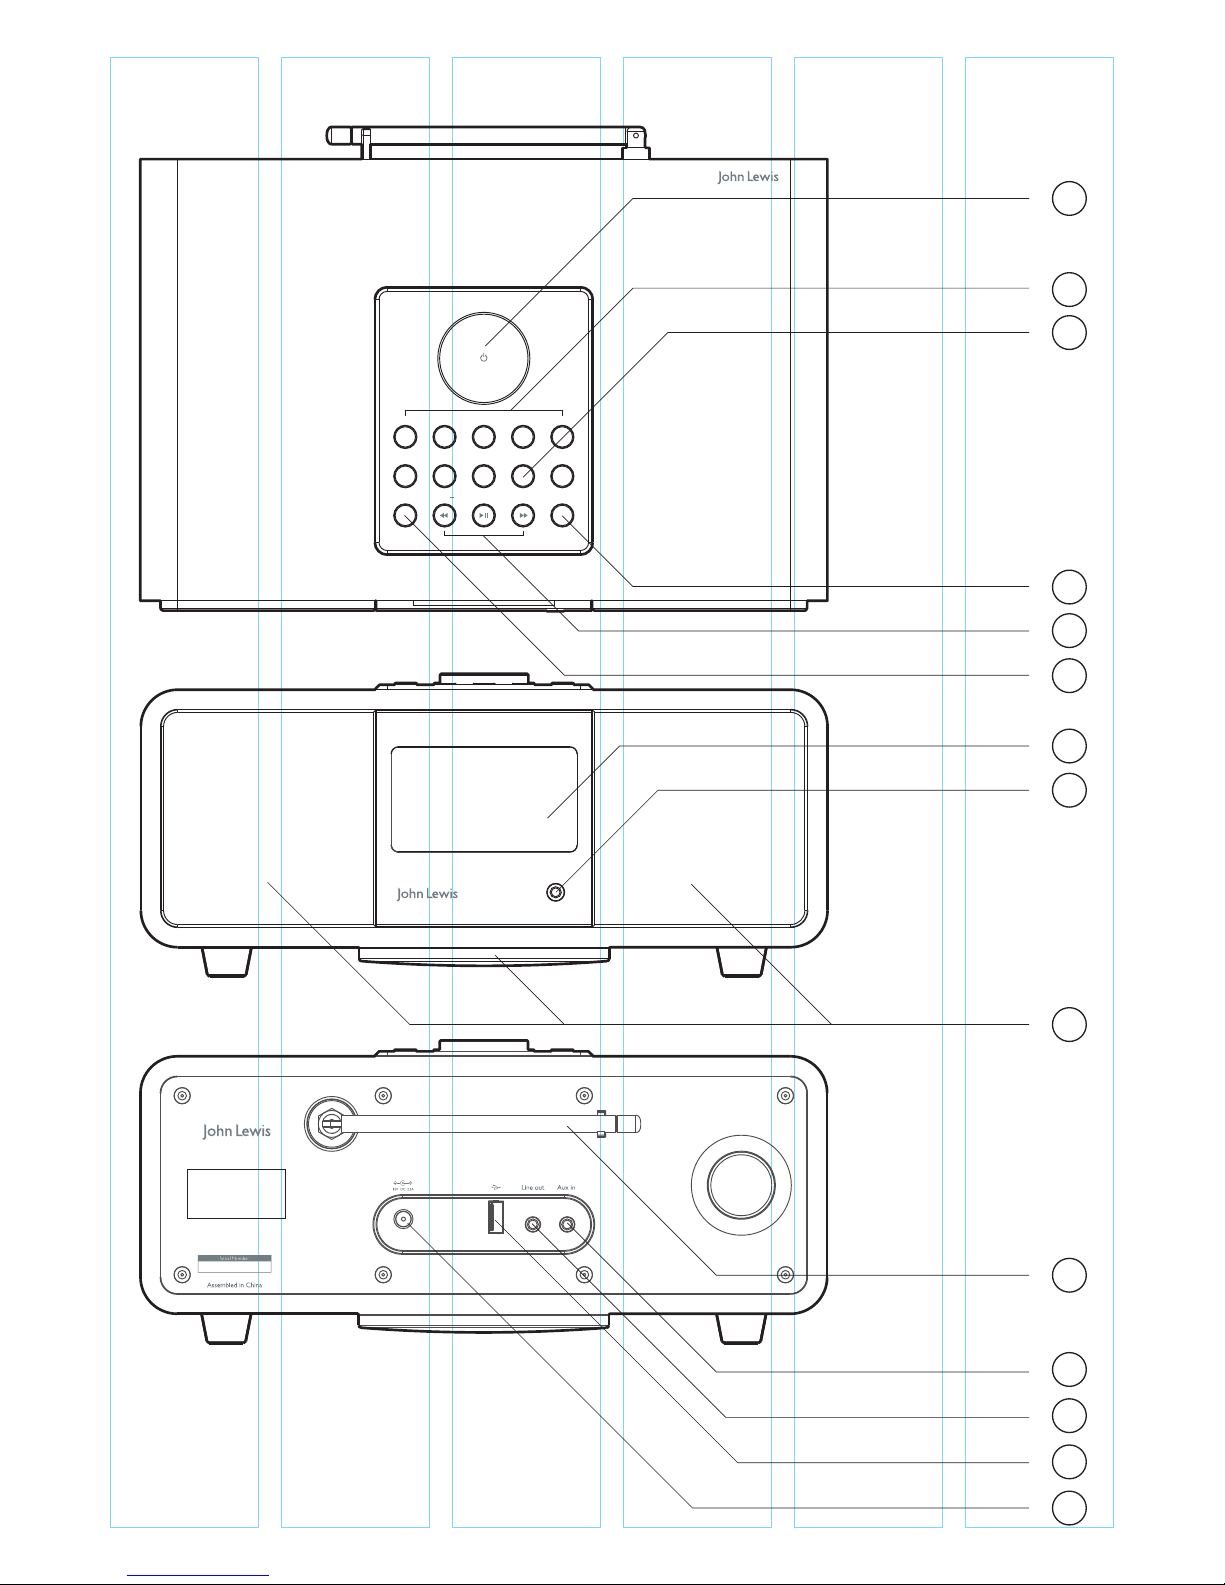
Your Octave internet radio
1 Multi-function navigation dial and Select button
a) Press once to turn ON
b) Long press to turn OFF
c) When audio is playing, rotate to change volume
d) When audio is playing, press once to mute audio
e) When in a menu, rotate to navigate, press once to select option
f) When alarm is sounding, press once to SNOOZE
2 Presets
3 Info button
4 Menu/back button
5 a) Bluetooth mode : Previous track, Play/Pause and Skip track button
b) In radio modes : Tune - and Tune +
6 Source button - Press once to enter audio source menu
7 TFT color display
8 Headphones socket
9 Speakers
10 Aerial
11 AUX-IN (to connect external MP3 music source from the iPod, or
other devices)
12 Line-out socket
13 USB socket for USB stick with MP3 music playback (not for
charging)
14 DC power in (12V)
4
Instruction Manual
Octave internet radio
Page 5
5
Instruction Manual
Octave internet radio
Alarm 1
1 2 3 4
Source
Alarm 2 Sleep Info Mute
Menu/BackTune +Tune
5 +
S
n
o
o
z
e
M
u
t
e
− Volume +
Octave - Radio
1
2
3
4
5
6
7
8
9
11
10
12
13
14
Page 6
Select/Mute
21 3
54 6
87 9
10P 10 +
Menu Back
Prog Shuffle Rep Info
SnoozeSleepAlarm 1
Source
Alarm 2
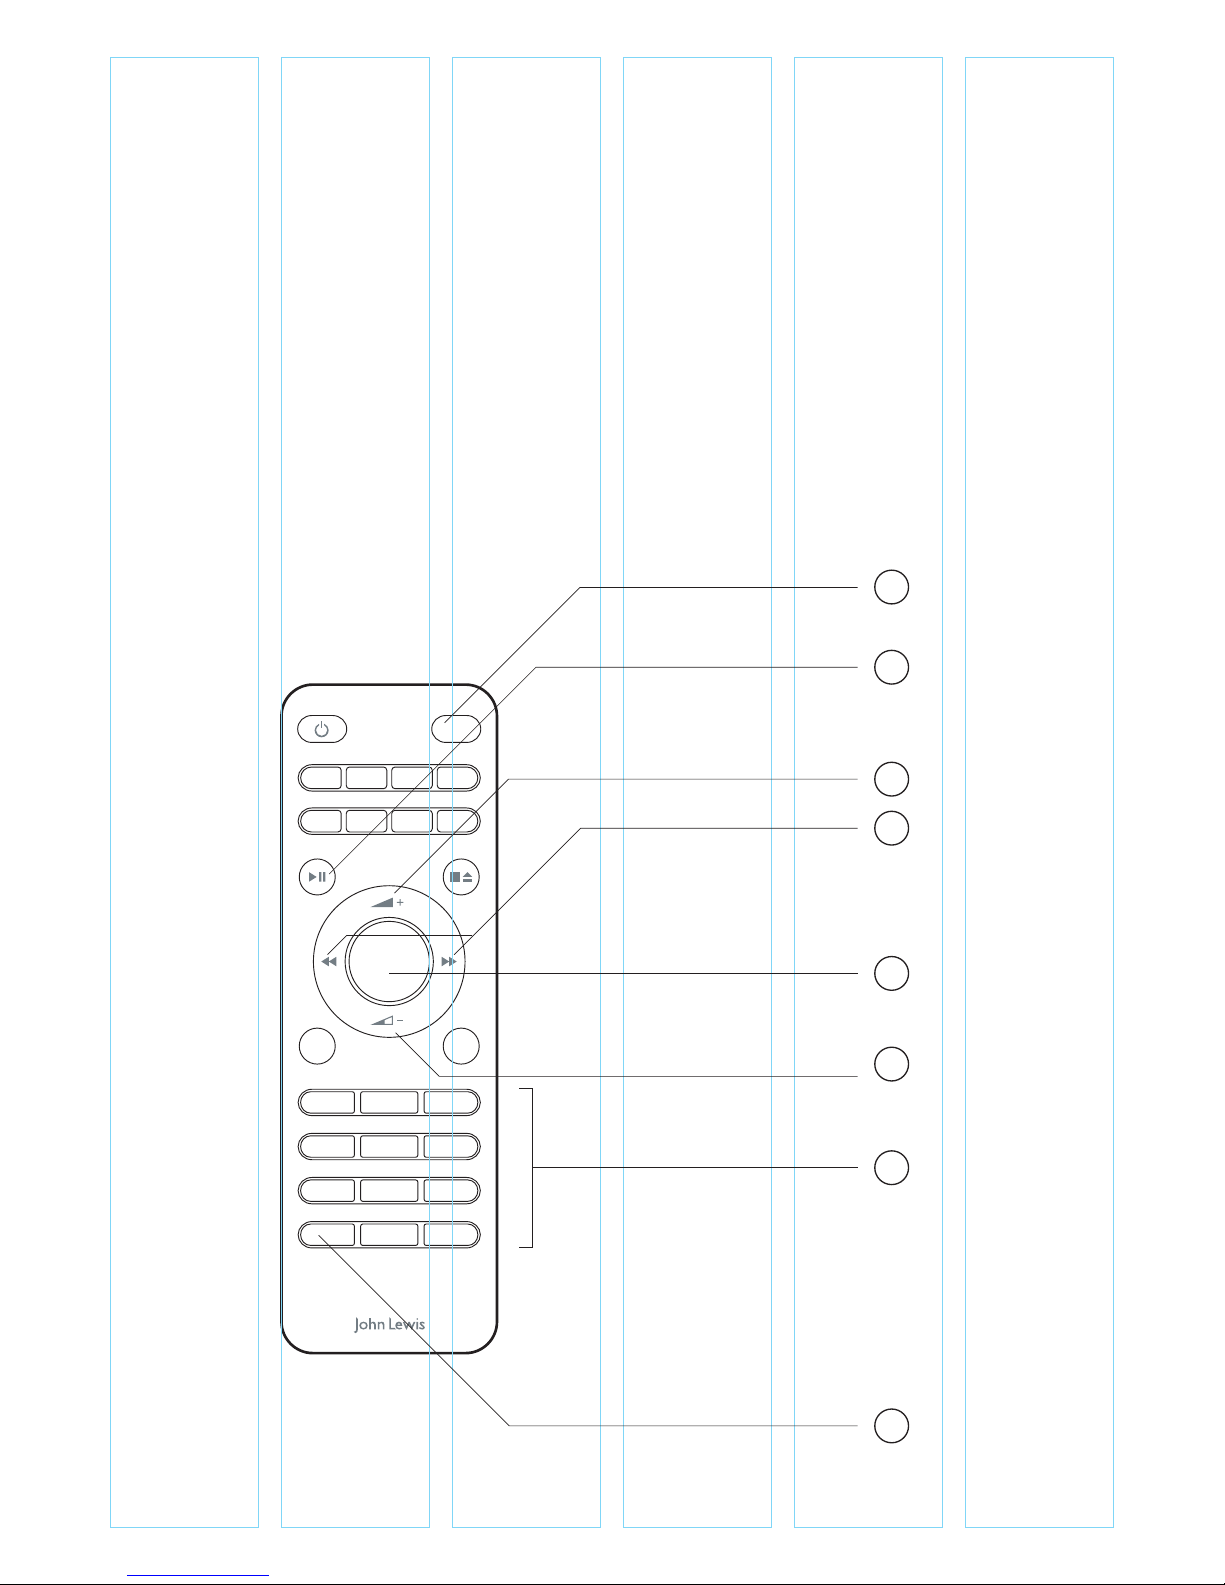
Your Octave internet radio remote control
15 Source button - Press once to enter audio source menu
16 a) Internet Radio, MyPlayer and BT : Play/Pause
b) FM mode - Auto Scan
17 a) Volume up & down buttons
b) Press up or down to navigate menu.
18 a) DAB mode : Show station list
b) FM mode : Manual Tune - and Tune +
c) MusicPlayer mode : Skip/Previous Track
19 Select/Mute
20 Preset buttons
21 Preset recall menu
Instruction Manual
Octave internet radio
6
15
16
17
18
19
17
20
21
Page 7
7
Quick-step guide to getting started
To get started
1 Place Octave on a suitable shelf or table.
2 Extend the telescopic antenna.
3 Connect the power adapter between Octave and the
mains supply.
4 Press the ‘ / Volume’ dial to turn on.
For DAB
1 Product defaults to DAB mode.
2 If this is the first time you use, it will automatically start scanning.
This may take a few minutes - previously-selected station or first
station on the station list will automatically play.
3 To change station, press ‘Tune +’ button and use the ‘rotational
navigation’ to choose a radio station, press dial to select.
4 Adjust volume using ‘ /Volume’ dial, turn anticlockwise to
decrease and clockwise to increase volume.
For FM
1 Press ‘source’ button to enter source Menu and use the ‘rotational’
dial to select FM.
2 To automatically scan for station, long press ‘Tune +’ or ‘Tune -’.
3 To manual tune in 0.05MHz increments press ‘Tune +’ or ‘Tune -’.
4 Adjust volume using ‘ /Volume’ dial, turn anti-clockwise to
decrease and clockwise to increase volume.
Note: During the scanning, the sound will be muted automatically.
For Bluetooth
1 Press ‘source’ button to enter Audio Source Menu and ‘rotational’
dial to select Bluetooth.
2 Radio TFT screen displays ‘discoverable…’. Activate your Bluetooth
device and select the search mode.
3 ‘JL Octave’ will appear on your Bluetooth device. Select it and enter
‘0000’ for the password if necessary.
4 Your radio with display \ BLUETOOTH connected.
5 Press ‘ ’, ‘ ’ or ‘ ’ button for music playback.
Note: The unit will automatically switch to standby mode after 10
minutes if the source device is disconnected, switched off or the
volume is too quiet.
For Internet radio
You must first connect to a network - see page 15
For Music player
You must set up a music server – see page 17
Instruction Manual
Octave internet radio
Page 8

DAB radio mode
Detailed instructions
DAB radio mode receives DAB/DAB+ digital radio and displays information
about the station and programme/track as broadcast.
To enter DAB mode, press ‘source’, use the navigation dial and select
button to choose DAB from the icon menu.
Scanning for stations
The first time you use Octave, or if the station list is empty, the radio
automatically performs a full scan to see what stations are available. You
may also need to start a scan manually to update the list of stations for one
of the following reasons:
- New stations may become available from time to time.
- If reception was not good for the original scan (for example the
antenna was not up), this may result in an empty or incomplete list
of available stations.
To do a full scan
Select Menu > Scan. Once a scan is complete, the radio returns to playing
the previously-selected station or first station on the station list.
To remove stations that are listed but unavailable
Select Menu > Prune invalid.
Presets
Octave has 20 preset stores for DAB stations. Presets 1-4 have dedicated
buttons, presets 4-20 are within the on-screen menu.
To store preset 1, 2, 3 or 4
Press and hold the preset 1, 2, 3 or 4 button until the display shows the text
‘preset saved’ with a tick icon.
To store preset 5-20
Press and hold preset button 5+. The display will shows a list of the preset
stores numbered 1 to 20 these are displayed as either ‘Empty’ or with the
currently stored station name. Use the navigation dial to choose a preset
memory then press ‘select’ to store the currently-playing station. After
confirming the preset station is stored the display reverts to the Now
Playing screen.
To recall preset 1, 2, 3 or 4
Press preset button 1, 2, 3 or 4. This will play the radio station stored in
preset 1, 2, 3 or 4.
To recall a preset 5-20
Press preset button 5+ The display will show a list of the presets stored
number 1-20. Use the navigation dial to chose a preset and press ‘select’ to
play that station.
8
Instruction Manual
Octave internet radio
Page 9

Now playing information
While a station is playing, the screen shows its name and DLS (Dynamic
Label Segment) information broadcast by the station such as programme
name, track title and contact details.
Press Info button to cycle through
- Programme type
- Ensemble name
- Channel number/frequency
- Signal strength
- Power status (Mains)
- Date
Note: DL Plus presents additional information that can be broadcast by
stations and stored temporarily on your radio.
DAB menu
Press the ‘Menu’ button to access all DAB radio options, you are presented
with the following list
> Station list
> Scan
> Manual tune
> Prune invalid
> DRC
> System settings
Station list
All available DAB stations will be listed here. Use the ‘navigation’ dial and
‘select’ button to choose a radio station.
Note: If there is a ‘?’ before the name of the radio station, that means that
station is not available in your current location. See Prune invalid on page 9.
Full scan
Press Menu > Full Scan to scan the airwaves of your location for all available
DAB radio station.
Manual tune
As well as the normal method of scanning, you can also manually tune to a
particular channel/frequency. This can be useful for adjusting your antenna
to achieve the best possible reception.
To manually tune
Press Menu > Manual tune
Then use the ‘navigation’ dial and ‘select’ button to chose a particular
channel/frequency.
The display shows a live indication of the received signal strength on the
selected frequency.
Instruction Manual
Octave internet radio
9
Page 10

Manual tune cont.
Adjustments to your antenna will be manifested in the received signal
strength displayed.
Note: The division in the signal strength bar indicates the audio quality
threshold – if the signal strength, as indicated by the solid rectangles, falls
below this threshold the audio quality will deteriorate.
When a channel/frequency is selected Octave also scans for any DAB
stations on the selected frequency and updates the station list with any new
stations found. To listen to any stations found, return to the Now playing
screen and select the required station from the station list as normal.
Prune invalid
If a station is not available in your current location a ‘?’ will appear before
the name of the station as shown in the ‘station list’.
Prune invalid will remove these stations leaving only ones that are available
at your current location.
Press Menu > Prune Invalid > YES
Dynamic range compression (DRC)
This function reduces the difference between the loudest and quietest
audio being broadcast. Effectively, this makes quiet sounds comparatively
louder, and loud sounds comparatively quieter.
Note: DRC only works if it is enabled by the broadcaster for a specific
station.
To change the DRC setting
Select Menu > DRC > The options available are: DRC high | low | off.
System settings
You can access system settings from all audio settings menus.
For more information see page 28
Instruction Manual
Octave internet radio
10
Page 11

FM radio mode
Detailed instructions
FM radio mode receives analogue radio from the FM band and displays RDS
(Radio Data System) information about the station and show (where
broadcast).
To enter FM mode, press ‘source’, use the ‘navigation’ dial and ‘select’
button to chose FM from the icon menu.
Selecting stations
The first time you select FM radio, Octave is set to the lowest frequency in
the FM band. On subsequent selections the last used frequency/station is
displayed.
To scan for a station in FM mode
Press and hold ‘Tune +/-’ to automatically scan through the FM band
frequencies, showing the current frequency on the screen display. A scan
stops when a signal is found. The search will stop at each station with a
strong signal.
Alternatively, you can manually tune, by a single press of ‘Tune +/-’. This will
move up or down in 0.05 MHz increments.
Presets
Octave has 20 preset stores for FM stations. Presets 1-4 have dedicated
buttons, presets 5-20 are within the on-screen menu
To store preset 1, 2, 3 or 4
Press and hold the preset 1, 2, 3 or 4 button until the display shows the text
‘preset saved’ with a green tick icon
To store preset 5-20
Press and hold preset button 5+
The display will shows a list of the Preset stores numbered 1 to 20 these are
displayed as either ‘Empty’ or with the currently stored station name. Use
the navigation dial to choose a preset memory then press ‘select’ to store
the currently-playing station. After confirming the preset station is stored
the display reverts to the Now playing screen.
To recall preset 1, 2, 3 or 4
Press preset button 1, 2, 3 or 4 This will play the radio station stored in
preset 1, 2, 3 or 4
To recall a preset 5-20
Press preset button 5+
The display will show a list of the presets stored number 1 -20
Use the navigation dial to choose a preset and press ‘select’ to play that
station.
Instruction Manual
Octave internet radio
11
Page 12

Display information
While FM radio is playing, the screen shows its frequency, or if RDS
information is available, station name and any further ‘RadioText’
information. If no information is available, just the frequency and a No
RadioText message is shown.
Press Info to cycle through info display options:
- RDS Radio text
- Programme type
- Frequency, name
- Mono/stereo
- Power status
- Date
FM radio menu
Press the ‘Menu’ button to access all FM radio options, you are presented
with the following list
> Scan settings
> Audio settings
> System settings
Scan settings
By default, FM scans stop at only stations with a strong signal.
To change scan settings to stop at all stations.
Press Menu > Scan settings > All stations
Audio settings
By default, all stereo stations are reproduced in stereo. For weak stations,
this may result in poor quality audio. The audio quality can be improved
using mono.
To play weak stations in mono
Press Menu > Audio settings > Forced mono.
System settings
You can access system settings from all audio settings menus.
For more information see page 28
Instruction Manual
Octave internet radio
12
Page 13

Bluetooth mode
Detailed instructions
Bluetooth mode allows Octave to act as a wireless speaker playing audio
content from a connected Bluetooth capable device.
To enter BLUETOOTH mode, press ‘source’, use the ‘navigation’ dial and
‘select’ button to choose BLUETOOTH from the icon menu.
To connect a Bluetooth capable device, use your Bluetooth capable smart
device to pair and connect with the Octave.
Use the Press ‘ ’, ‘ ’ or ‘ ’ button for music playback.
Bluetooth menu
Octave does not have BLUETOOTH menu settings, please check your
connected device for settings.
Instruction Manual
Octave internet radio
13
Page 14

AUX-IN mode
Detailed instructions
AUX-IN mode plays audio from an external source such as an MP3 player.
To enter AUX-IN mode, press ‘source’, use the ‘navigation’ dial and ‘select’
button to chose AUX-IN from the icon menu.
To connect to an external audio source:
1 Turn the volume low on both Octave and, if adjustable, the audio
source device.
2 Connect the external audio source to the AUX-IN 3.5mm stereo
socket.
3 Adjust the volume of Octave (and, if necessary, the audio source
device) as required.
AUX-IN menu
Octave does not have AUX-IN menu settings, please check your external
source for settings.
Instruction Manual
Octave internet radio
14
Page 15

Internet radio mode
Detailed instructions
Octave can play thousands of radio stations and podcasts from around the
world through a broadband Internet connection.
To enter Internet Radio mode, press ‘source’, use the ‘navigation’ dial and
‘select’ button to chose Internet Radio from the icon menu.
Note: The station list menu is provided from the Internet radio portal, so it
is only accessible when Octave is connected to the Internet. Station lists
and sub menus may change from time to time.
Connecting to the internet – see page 24
Select a station through one of the menu options
> Last listened
> Station List
> Favourites lists
> Browse by Country, Genre, Most popular, Newest
> Search by keyword
> My added stations
Last listened
When Internet radio mode restarts, the last-listened station is selected. To
select another recently used station, select Menu > Last listened then one
of the stations listed. Most recent stations appear at the top of the list.
Presets
Octave has 20 preset stores for Internet Radio stations. Presets 1-4 have
dedicated buttons, presets 5-20 are within the on-screen menu
To store preset 1, 2, 3 or 4
Press and hold the preset 1, 2, 3 or 4 button until the display shows the text
‘preset saved’ with a green tick icon
To store preset 5-20
Press and hold preset button 5+
The display will shows a list of the Preset stores numbered 1 to 20 these are
displayed as either ‘Empty’ or with the currently stored station name. Use
the navigation dial to choose a preset memory then press ‘select’ to store
the currently-playing station. After confirming the preset station is stored
the display reverts to the Now playing screen.
To recall preset 1, 2, 3 or 4
Press preset button 1, 2, 3 or 4 This will play the radio station stored in
preset 1, 2, 3 or 4
To recall a preset 5-20
Press preset button 5+
The display will show a list of the presets stored number 1 -20
Use the navigation dial to choose a preset and press ‘select’ to play that
station.
Instruction Manual
Octave internet radio
15
Page 16

Favourites
Favourites are stored on the Internet radio portal. Before you set up an
account on the portal from its Web interface (www.wifiradio-frontier.com),
the favourites are associated solely with the radio on which you set them.
After you set up a portal account, all the favourites from your different
radios are merged into a combined favourites list. This combined list is
available to all the radios on your account.
To store a playing station as a favourite, press and hold Select until the
display shows ‘Favourite added’. The station appears in the default favourites
list Stations.
To select a favourite, select Menu > Station list > My favourites >
[Favourites list] > [Station].
Browse
To browse Internet broadcasts, select Menu > Station list > then either
Stations > or Podcasts > Browse through the menus to find broadcasts.
Search
You can also search through Internet broadcasts for stations or podcasts
with particular keywords in their title.
To search, select Menu > Station list > then either Stations > or Podcasts >
Enter a keyword by selecting characters then OK. The search entry screens
are similar in operation to the Wi-Fi password entry screen.
Select a broadcast from the list.
For podcasts, you may be able to select a particular episode.
My added stations
Even though the Internet radio portal contains thousands of stations, you
may want to listen to stations not listed. You can add your own stations via
the portal. These added stations are accessible from Octave by selecting
Menu > Station list > My added stations > [Station].
Now playing information
While the stream is playing, the screen shows its name and description. If
artist and track information is available, this is also shown. To view further
information, press Info.
Each time you press Info, another set of information is displayed, cycling
through the following details:
- Artist and track name (default; where available)
- Description
- Genre and show country
- Reliability
- Bit rate and Codec and Sampling
- Playback buffer
- Today’s date
Instruction Manual
Octave internet radio
16
Page 17

Music player mode (network)
Detailed instructions
Music player mode plays audio files such as MP3s, AACs, WMAs or FLACs
from a computer on the local network.
See Setting up a music server on page 26
To enter Music Player mode, press ‘source’, use the ‘navigation’ dial and
‘select’ button to chose Music Player from the icon menu.
You can use and to move through tracks. Press and hold to rewind
or fast forward and press quickly to select previous or next track. Press the
back button to move to the previous level of the menu tree.
Shared media (from UPnP media server)
Select Menu > Shared media >
If you have set up shared media (as described on page 22), you should see
an entry consisting of <computer name>: <Shared media name>, for
example JB-Laptop: Audio. If you have more than one computer sharing
media, the alternatives are listed. Select the shared media you want to play.
From this point on, the menus are generated from the shared media server
(typically Windows Media Player).
The first menu shows a list of media types, for example Music, Video,
Pictures and Playlists. Octave can only play music and playlists.
There is also a search function, which finds tracks in a similar way to Internet
radio search.
From Music, there are numerous ways of selecting tracks, including:
- Genre
- Artist
- Album
- Composer
- Rating
Once you have found a track you want to play, press Select. A short press
plays the track immediately and a long press adds the track to the playlist.
You can also add entire albums to the playlist.
Octave plays either the selected track or the playlist.
Instruction Manual
Octave internet radio
17
Page 18

18
Wake-on-LAN
If shared media is selected a list of available music servers will be displayed.
If a ‘?’ appears before the server name, this indicates that the server has
been seen before and supports Wake-on-LAN functionality, but cannot
currently be found on the network.
If a server with a ‘?’ mark is selected by the user, the device will try to wake
the server up and connect to it. In some instances this may not be possible
as the server may not be connected to the network any more or may be
switched off.
Prune servers
From time to time it may be necessary to remove servers displaying ‘?’ in
front of the server name from the server list. For example, if the device is
moved to a new network or if a Wake-on-LAN server is removed from
your current network.
To perform this function go to Menu > Prune servers > Yes
USB playback
To play audio from a USB mass-storage device such as a USB Flash stick or
USB hard drive, select Menu > USB playback.
Browsing folders from this point on, menus are generated from the folders
on the USB device. Browse folders with the Select control and Back button.
The display shows folder and file names (not necessarily track names).
Once you have found a track that you want to play, press Select. A short
press plays the track immediately.
A long press (at any time while the track is displayed or playing) adds the
track to My playlist. You can also add entire folders to My playlist.
Playlists
Octave holds a queue of up to 200 tracks in the playlist.
Playlist tracks can be mixed from multiple UPnP servers.
To manage the playlist, select Menu > My playlist.
To view the playlist, scroll though it by turning Select. UPnP tracks show
their track name.
To play the playlist from a certain track, quick Select.
To erase a track from the playlist, long Select then confirm YES.
If you select a track/album/folder for instant playback (without using the
playlist), the playlist is preserved. The playlist is also preserved during
standby.
Instruction Manual
Octave internet radio
Page 19

19
Repeat/shuffle
You can repeat tracks or play them in random order by selecting Menu >
Repeat play or Menu > Shuffle play.
Now playing information
While a track is playing, the screen shows its track and artist (UPnP). There
is also a progress bar with figures for elapsed and total track time. At the
bottom of the screen, an icon indicates UPnP. To view further information,
press Info. Each time you press Info , another set of information is displayed,
cycling through:
UPnP: playback progress bar (default), album, codec/sampling rate, playback
buffer bar, today’s date.
Using the ‘Play To’ feature in Windows 7 to stream media
One of the new Windows 7 features includes a feature called ‘Play To’ and
this lets your PC running Windows 7 control Octave to push media and
use as a universal remote control for your media collection.
Octave supports the industry standard DLNA (Digital Living Network
Alliance) 1.5 digital media renderer. This allows you to ‘Play To’ other
devices around your home and combine media streaming with controlling a
connected media receiver while streaming content to it from another
Windows 7 PC on a home network.
Before you can use the ‘Play To’ feature you need the set-up Octave for
Windows 7 streaming media.
Use ‘Play To’ in Windows Media Player
Windows Media Player makes it easy to manage your media, find items
that you want to play, and open ‘Play To’. To select items that you want to
play, follow these steps:
1 Click the Start button, click All Programs, and then click Windows
Media Player. If the Player is currently open and you’re in Now
Playing mode, click the Switch to Library button in the upper-right
corner of the Player.
2 If the list pane is closed or if the Burn or Sync tabs are exposed,
click the Play tab.
3 Find the items that you want to play in the Player Library, and then
drag those items from the details pane into the list pane.
4 Click the ‘Play To’ button at the top of the list pane, click the device
on your network that will receive the media.
5 In the ‘Play To’ dialogue box, use the playback controls to play,
pause, or stop the media stream, and to change to the next or
previous item in the list.
Instruction Manual
Octave internet radio
Page 20

Use ‘Play To’ elsewhere in Windows 7
Outside of Windows Media Player, you can stream media to Octave with
‘Play To’ by right-clicking music files. To select music files and stream them
to Octave, follow these steps:
1 Click the files you want to stream to Octave.
2 Right-click the selected files, point to ‘Play To’, and then click the
device on the network that will receive the media.
3 In the ‘Play To’ dialogue box, use the playback controls to play,
pause, or stop the media stream, and to change to the next or
previous item in the list.
Now playing information
While a track is playing, the screen shows its track name (UPnP). There is
also a progress bar with figures for elapsed and total track time. At the
bottom of the screen, an icon indicates UPnP. To view further information,
press Info.
Each time you press Info, another set of information is displayed, cycling
through the following:
Artist, album, codec/sampling rate, playback buffer.
20
Instruction Manual
Octave internet radio
Page 21

Alarms
Detailed instructions
Octave has 2 alarms which can be set independently of each other. Icons
on the ‘home screen’ will indicate which alarms are active. If there are no
icons, no alarms are active.
Note: Alarms will only function when the Octave unit is On (mains power)
or in Standby mode (Mains power only).
Note: Alarms can be switched on or off in standby mode (see below),
however, the alarm parameters can only be set when the Octave is on.
To set alarms
Press either Alarm 1 or Alarm 2 button.
Navigate to either Alarm 1 or 2
The alarm setup prompts you for the parameters listed below
Use the navigation dial and select button to input the alarm parameters
Parameters
Enable – Off | Daily | Once | Weekends | Weekdays
Time - Set the desired alarm time
Mode - Buzzer | Internet Radio | DAB | FM
Preset - Play previously saved preset as alarm sound
Volume - Set alarm volume from 0-32
To activate the new settings, scroll down and select Save.
The screen shows active alarms with an icon at the bottom left.
At the set time, the alarm will sound. To temporarily silence it, press Snooze
You can change the snooze period with the Select control if you like. The
radio returns to standby for the set period, with the silenced alarm icon
flashing.
Snooze sounding alarm
To snooze sounding alarm - press the navigation dial once to snooze the
alarm for 5 minutes, The radio returns to standby for 5 minutes with a
snooze countdown displayed. When the countdown reaches 0 (zero) the
alarm is triggered again.
Press the snooze button multiple times to changes the snooze period from
5, 10, 15 30 minutes
To cancel a sounding alarm and switch the radio to standby either alarm
button
21
Instruction Manual
Octave internet radio
Page 22

Sleep
Detailed instructions
To set the sleep timer while the radio is playing press
Menu/Back
> System Settings > Sleep
You can choose the sleep delay time in minutes from:
Sleep Off | 15 | 30 | 45 | 60
Use the ‘navigation’ dial and ‘select’ button to chose an option.
Once you select a sleep delay period, the display returns to the Now
playing screen displaying a Crescent moon icon and the remaining time, in
minutes, before the sleep time expires.
After the sleep delay period the radio switches to standby mode.
22
Instruction Manual
Octave internet radio
Page 23

Setting the clock / auto-update
Auto-update works with data sent over DAB, FM or the Internet. The clock
is only updated when in a corresponding mode, so it is best to select a
mode you use regularly.
DAB and FM use time signals broadcast with radio transmissions.
Network uses a time signal sent from the Internet radio portal when in any
network-connected mode.
1 Select Update from DAB, Update from FM, Update from Network
or No update.
2 If you are updating from the network, set your time zone.
3 If your country uses daylight saving, the automatically updated time
from the network may be wrong by one hour. When daylight
savings are in effect (during the winter), turn on the Daylight savings
option to rectify this.
Note: That if you are updating the time from DAB or FM, the Daylight
savings option has no effect on the clock’s time.
Octave will auto-update from the selected source when time information
is available.
Manual set
If you set No update, the wizard now prompts you to set the time and date
manually.
The date and time are displayed as dd-mm-yyyy and hh:mm AM/PM with
the first value, dd, active (flashing).
Adjust each value with the Select control.
As each value is set, the next value becomes active and flashes.
23
Instruction Manual
Octave internet radio
Page 24

Connecting to a network
Octave is compatible with all common network protocols and encryption
methods, including Wi-Fi Protected Setup (WPS).
To connect Octave to your network, you need a Wi-Fi wireless router,
together with password key if set Select WLAN region/country >Wi-Fi
network (SSID), and then select a network from the list.
If the network is open (non-encrypted), Octave connects and no further
details are required; see Completion below.
Standard encrypted network
To enter the network’s key (password), use the ‘select’ control to highlight
the next relevant character and press to select each character in turn. As
each character is selected, the key is built up near the top of the display.
The three options – Backspace, OK and Cancel are included in the
selection loop.
These can be accessed just using the ‘select’ control, or, a shortcut is
available, pressing the ‘Info’ key, which moves the selection highlight to the
Backspace option.
WPS setup
WPS encrypted networks are identified by ‘[WPS]’ at the start of the
Network name, and have two methods of connection. Select one and
follow the prompts. When using the network wizard an additional option to
Skip WPS is available.
Select one and follow the prompts:
- Push button >
Octave prompts you to press the connect button on the router.
It then press the select control.
- Pin > (code number)
Octave generates an 8-digit code number which you enter into the
wireless router, access point.
- Skip WPS >
Enter key as for a standard encrypted network, see above. For more
information on setting up a WPS encrypted network, see your
router‘s WPS instructions.
On completion
Octave connects to the selected network.
If connecting fails, Octave returns to the previous screen to try again. To
exit the process use the ‘Back/Menu’ button.
24
Instruction Manual
Octave internet radio
Page 25

Connecting your Smartphone to the radio
via UNDOK app.
To connect your Smartphone with Octave you need to download the free
app ‘UNDOK’ from Apple Store or Google Play Store. IMPORTANT: The
phone must be on the same wireless network as the music system.
- Download the app and open it.
- The app automatically searches for available devices. Select ‘JL
Octave’ from the list.
- Open SOURCE to choose between different input signals.
- Open BROWSE to get a list of available stations. Select the desired
station.
- Open NOW PLAYING to get more information about the channel.
- Open the settings to adjust the equaliser, set sleep timer and other
functions easily.
Internet radio portal registration
Octave uses the Frontier Silicon Internet radio portal website that allows
you to organise your favourites lists and also listen to Internet radio on a
computer.
To register your Octave with the portal, switch to Internet radio mode and
then obtain your radio’s unique portal access code by selecting Menu
>Station list > Help > Get access code >Write down the access code.
Note: The displayed access code is only valid for a few minutes. If you fail to
register your radio within the time window you will need to repeat the
above step to get a new access code and try again. Do not confuse the
portal access code with the Radio ID (from Menu > System settings >
Info.)
Visit the portal website at www.wifiradio-frontier.com.
If this is your first visit to the portal, register for a new account, entering the
following information:
- access code
- your e-mail address
- passphrase
- radio model (Octave)
If you already have an account and wish to add an additional radio, log in to
your account and select My preferences > Add another Wi-Fi radio.
Once your radio is registered with the portal, you can immediately use the
Internet radio favourites and added stations features.
25
Instruction Manual
Octave internet radio
Page 26

Setting up a music server
In order for Octave to play music files from a computer, the computer must
be set up to share files or media.
UPnP media sharing allows devices like Octave to play music from a shared
media library navigating through tag menus such as Artist, Album or Genre.
If you are running a suitable server system such as a PC with Windows
Media Player 10 or later (WMP), and your music library is well-tagged, then
it is recommended to use media sharing. Only the UPnP server needs to be
set up.
Notice: iTunes does not currently work as a UPnP media server, but there
are add-ons available to work with an iTunes library.
Sharing media with Windows Media Player
The most common UPnP server is Windows Media Player (10 or later).
Alternatively, other UPnP platforms and servers may be used. To set up
WMP for media sharing, perform the following steps:
1 Ensure that the PC is connected to the network.
2 Ensure that the radio is powered on and connected to the same
network.
3 In WMP, add to the media library the audio files and folders you
want to share with Octave (Library > Add to Library…).
4 In WMP, enable media sharing (Library > Media sharing…).
Note: Setup can differ depending on which version of WMP you have.
Note: It may show; Octave, ‘Unknown device’, ‘Frontier Silicon’ or the
Jupiter logo as shown below.
Make sure that the radio has access to the shared media by selecting it and
clicking Allow.
You can also set a name for the shared media in Settings… Click OK to
close the dialogue boxes.
The PC is now ready to stream the music to the radio. The WMP UPnP
service runs in the background; there is no need to start WMP explicitly.
26
Instruction Manual
Octave internet radio
Page 27

Setting up Octave for ‘Play To’ Windows 7 streaming media feature
To set up Octave to be controlled and to stream music via Windows Media
Player 12
(Windows 7 only), perform the following steps:
1 Ensure that the PC is connected to the network.
2 Ensure that Octave is powered on and connected to the same
network.
Note: Octave must be in Internet radio mode to be detected.
3 From the Windows 7 main screen, select Start > Devices
and Printers.
4 Select the Add a device tab in the top left of the Devices and
Printers window and follow the instruction prompts given by
the wizard. In the Devices and Printers window a icon *) will appear
and you are now ready to stream your Windows media music files
to Octave.
*) To change the name of your device, right click on icon and choose
properties. Then choose UPnP and click on ‘device web page’.
27
Instruction Manual
Octave internet radio
Page 28

28
Instruction Manual
Octave internet radio
System settings
System setting can be accessed whichever mode you are in.
Press ‘Menu/Back’ button > System Settings
Then choose from the various options as described in the menu as below.
> Equaliser
>My EQ
> Network
> Time/Date
> Set time/date
> 12/24 hour display
> Time/date
> Auto-Update
> Manual set
> Language
> Factory Reset
> Software update
> Setup Wizard
> Info
> Backlight
> Inactive timeout
Equaliser
This presents a number of preset settings plus a My Equaliser option to
allow you to create your own equaliser settings.
My EQ… | Normal | Classic | Jazz | Pop | Rock | Speech
Equaliser > My EQ
This option allows you to set a bias in the treble and bass audio frequencies
and turn ‘Loudness’ On or Off.
Treble – (Use the ‘select’ control button to choose a bias value between
-14 and +14)
Bass – (Use the ‘select’ control button to choose a bias value between
-14 and +14)
Loudness – On or Off. (When On, low-level high and low frequency
sounds are boosted to give a ‘fuller’ sound.)
Network
Octave remembers the last four wireless networks it has connected to, and
automatically tries to connect to whichever one of them it can find. You can
see the list of registered networks through Menu > System settings >
Network > Network profile > from here you can delete unwanted
networks by turning and pressing Select then confirming delete Yes.
There are also other options for viewing and manually altering network
settings from Menu > System settings > Network > (for example setting
up a wired network).
Users experienced with networking may find these options useful for
diagnosing and fixing network problems.
Page 29

29
Instruction Manual
Octave internet radio
Time/Date
The time and date can be updated manually or automatically. With
auto-update, the time and date are automatically synchronised with national
time signals broadcast over DAB and FM (when available).
You can also select the display format for the time and date.
The time menu contains the following options:
- Set Time/Date – (see below)
- Auto update – Update from Any | Update from DAB |
Update from FM | No Update
- Set 12/24 hour – 12 | 24
- Set date format – dd-mm-yyyy | mm-dd-yyyy.
Time/Date > Set time/date
This option is for manually setting the time and date displayed. The time
displays as hh:mm, with the first value, hh, active (flashing). Adjust each
value using the select control button and press Select to confirm. The next
value then becomes active and flashes. The date values follow and are set in
the same way.
Note: The date displays as dd-mm-yyyy or mm-dd-yyyy depending on your
choice of date format (see previous page).
Time/Date > Auto-update
Auto-update works with data sent over DAB, FM or Network. The clock is
only selected when in a corresponding mode, so it is best to select a mode
you use regularly.
Time/Date > Set format
To change between 12 and 24 hour display, select Set 12/24 hour and then
select your preference.
Language
The language used for display messages can be selected from:
English | Français | Deutsch | Italiano
Factory reset
A factory reset clears all user defined settings, replacing them with the
original default values, so time/date, preferences/settings, DAB station list
and preset stations are all lost.
If you select Factory reset, you are asked to confirm by selecting ‘Yes’.
Backlight
The Octave has a backlight with three brightness settings, and adjustable
timeout (this is the time delay, in seconds, after which the display switches
to the Dim level).
There are three settings:
- Timeout - Light On | 10 | 20 | 30 | 45 | 60 | 90 | 120 | 180
- On level - High | Mid | Low
- Dim level - High | Mid | Low
Note: A green tick indicates the currently selected value for each setting.
Page 30

30
Troubleshooting and error messages
Error messages
Message
Failed to connect
Format error
Network error
Network not ready
Network timeout
No UPnP media found
Service not available
(DAB)
No USB device found
Unauthorised
Update failed
USB device
unsupported
USB error
USB read error
USB underpowered
Description
Correct key entered,
but router rejects
request
Cannot recognise file
format - independent
of network
Problem past router incorrect data being
received from network
Problem with
connection to router
Problem past router –
no response being
received from network
No UPnP servers
found
No DAB reception
Access not granted by
UPnP server
Software upgrade
failed
Unsupported USB
device plugged in
General USB problems
Unable to read
particular data from
memory
Power failure to USB
device - user have to
remove the device
Example
MAC filtering enabled
on router
Received wma, but
found that the stream
wasn’t WMA when
trying to decode
Data obtained from
server is unreadable.
Router switched off
Streaming IR station
and suddenly station
becomes unavailable
Trying to access USB
menu, but no USB
plugged in
Allow access for
Octave in UPnP server
settings
Bad memory sector
found on USB device
Instruction Manual
Octave internet radio
Page 31

31
Troubleshooting
Problem
FM: Hiss
DAB: Burbling/
intermittent
cut-out
DAB: ‘No stations
available’ message
Cannot connect to
network
Cause
Low signal strength
Low signal strength
Network down
Router restricts access
to listed MAC
addresses
Insufficient Wi-Fi
signal strength
Unknown encryption
method
Unusual network
configuration
Solutions
Check/move antenna
Move radio
Rescan local
(high-strength) stations
only
For DAB, check local
coverage at
www.ukdigitalradio.com
/coverage
As above then rescan
stations
Check that network is
working between a
computer and the
router
Obtain the Octave
MAC address from
Menu > System
settings > Network >
View settings and add
to router list
Note: Octave has
separate MAC
addresses for wired
and wireless networks;
only the current
network adapter
method address is
displayed, but the
other address can be
obtained by changing
the first pair of digits
between ‘00’ (wireless)
and ‘02’ (wired)
Check distance to
router; see if a
computer can connect
to the network in this
location
Change encryption
method on router.
Octave supports WEP,
WPA and WPA2
Setup network
manually through Menu
> System settings >
Network > Manual
settings
Instruction Manual
Octave internet radio
Page 32

32
Troubleshooting
Problem
Cannot connect to
network
Cannot connect to
Internet
Cannot play particular
Internet radio station
Cause
Firewall preventing
access
Internet connection
down
Firewall preventing
access
Station not
broadcasting,
overloaded or
insufficient bandwidth.
Station broadcasting
using unknown codec.
Link out of date.
Solutions
Check the following
ports are open on the
router: UDP and TCP
ports 80 and 123; DNS
port 53. Windows
shares: ports 135 – 139
and 445.
Windows Media
Player: varies –
non-Microsoft firewalls
may require
configuration for UPnP
Check that Internet is
working for a
computer connected
to the same network
Check the following
ports are open: UDP
and TCP ports 80 and
123; DNS port 53.
Some Internet radio
stations may require
additional ports to be
opened
Try other stations; try
listening on computer
via Internet radio
portal website; try later
Instruction Manual
Octave internet radio
Page 33

Technical specifications:
Speaker: 2 x 2½” full range driver (2x5w), 1 x 4 woofer (1X10W)
Power: 20W RMS
Power Supply: 12V 2.5A
Dimensions (mm): 270W x 110H x 180D
Weight: 2.6kg
33
Instruction Manual
Octave internet radio
Page 34

Page 35

Page 36

Service
This product should only be repaired or serviced by an authorised service
engineer and only genuine approved spare parts should be used.
This symbol indicates that this product should not be treated as normal
household waste and it should be recycled. John Lewis do not operate
instore take back, but as members of the Distributor Take Back scheme
have funded the development and upgrade of recycling facilities across the
UK. Please take it to your nearest collection facility or for further details
contact your local council or visit www.recycle-more.co.uk.
Guarantee
For 2 years in respect of defects found to be due to faulty workmanship or
material. Proof of purchase is required for validity of the guarantee. This
guarantee is no longer valid if the damage has been caused by accidental
damage, alteration, repair by any unauthorised persons or poor
maintenance. This guarantee in no way affects your statutory rights.
Retain these instructions for future reference
John Lewis Partnership
171 Victoria Street
London SW1E 5NN
johnlewis.com
 Loading...