

Page 1
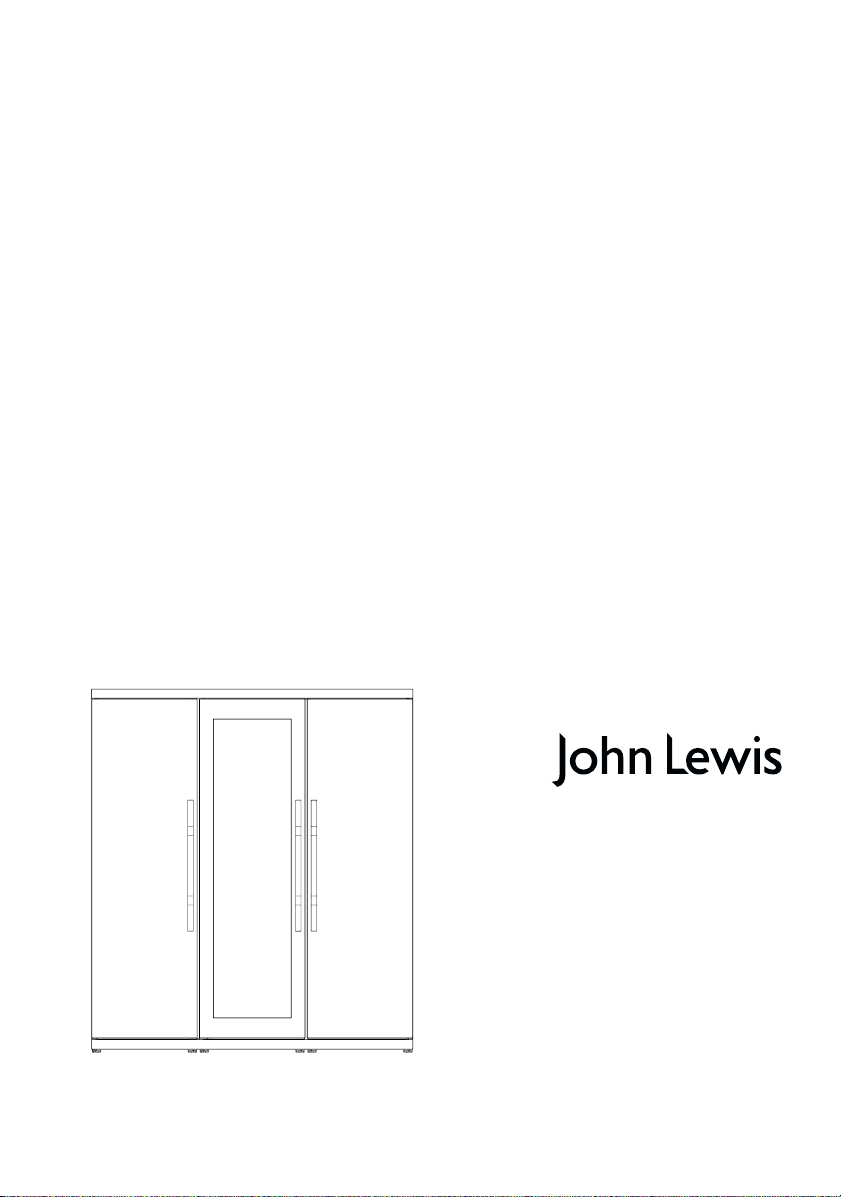
JLWFF1552
Wine cooler fridge freezer
Instruction manual
Page 2

Installation
• Any electrical work required to install this appliance
should be carried out by qualified and competent
personnel to the relevant National Standards.
• This appliance is heavy. Care should be taken
when moving it.
• Do not attempt to modify this product in any way.
• Care must be taken to ensure that the appliance
does not stand on the electrical supply cable.
Important: If the supply cord is damaged, it
must be replaced by the manufacturer, its service
agent or similarly qualified persons in order to
avoid a hazard.
• The appliance should be left for 2 hours after
installation before it is turned on, in order to
allow the refrigerant to settle.
• Parts which heat up should not be exposed.
Whenever possible, the back of the appliance should
be close to a wall but leaving the required distance for
ventilation as stated in the installation instructions.
Child safety
• This appliance is designed to be operated by
adults. Do not allow children to tamper with the
controls or play with the product.
• Keep all packaging away from children.
General safety
• This appliance contains hydrocarbons in its cooling
unit; maintenance and recharging must therefore
only be carried out by authorised technicians.
• Take utmost care when handling your appliance
so as not to cause any damages to the cooling
unit with consequent possible fluid leakages.
• The appliance must not be located close to
cookers, radiators or boilers.
• Avoid prolonged exposure of the appliance to
direct sunlight.
• Do not use other electrical appliances (such as ice
cream makers) inside of refrigerating appliances.
Use
• This appliance is designed for domestic use only,
specifically for the storage of edible foodstuffs.
• Frozen food must NOT be re-frozen once it has
thawed out.
• Do not place carbonated or fizzy drinks in the
freezer.
• Do not remove items from the freezer if your
hands are damp/wet, as this could cause skin
abrasions or frost/freezer burns.
• Ice lollies can cause ‘frost/freezer burns’ if
consumed straight from the freezer.
• Manufacturers’ storage recommendations should
be strictly adhered to. Refer to relevant
instructions.
• The cooling plate or refrigerated freezer shelves
in this appliance contain channels through which
the refrigerant passes. If these are punctured this
will cause substantial damage to the appliance
and result in food loss. DO NOT USE SHARP
INSTRUMENTS to scrape off frost or ice. Under
NO circumstances should solid ice be forced off
the lining or shelves. Solid ice should be allowed
to thaw, when defrosting the appliance. See
Defrost Instructions.
Maintenance and cleaning
• Switch off and unplug the appliance before
carrying out any cleaning or maintenance work.
Service
• This product should be serviced by an authorised
engineer and only genuine spare parts should be
used.
2
Important safety information
It is most important that this instruction book should be retained with the appliance for future
reference. Should the appliance be sold or transferred to another owner, or should you move house
and leave the appliance, always ensure that the book is supplied with the appliance in order that the
new owner can get to know the functioning of the appliance and the relevant warnings.
These warnings have been provided in the interest of safety.You MUST read them carefully before use
of installation by a qualified person. If you are unsure of the meanings of these warnings contact the
John Lewis branch from which you purchased the appliance.
Page 3
3
Environmental information
• After installation, please dispose of the packaging with
due regard to safety and the environment.
• When disposing of your appliance use an authorised
disposal site. Remove the plug and ensure that all
locks and catches are removed to prevent young
children being trapped inside.
• The symbol on the product or on its packaging
indicates that this product may not be treated as
household waste. Instead it should be taken to the
appropriate collection point for the recycling of
electrical and electronic equipment. By ensuring this
product is disposed of correctly, you will help prevent
potential negative consequences for the environment
and human health, which could otherwise be caused
by inappropriate waste handling of this product. For
more detailed information about recycling of this
product, please contact your local council, your
household waste disposal service or the shop where
you purchased the product.
Ecological hints
To save energy and help protect the environment, we
recommend that you follow these hints.
Do not install the appliance close to sources of heat such
as a boiler or radiator.
Locate the appliance in a well-ventilated room and make
sure that any air openings of the appliance are not
obstructed.
Pack all foods into airtight packages before placing them
into the freezer compartment.
Food, which is to be frozen (when cool), should be placed
in the fridge compartment before being transferred to
the freezer.
Try to avoid keeping the door open for long periods or
opening the door too frequently as warm air will enter
the cabinet and cause the compressor to switch on
unnecessarily often.
Ensure there are no obstructions preventing the door
from closing properly.
Warning
IF YOU ARE DISCARDING AN OLD APPLIANCE THAT
HAS A LOCK OR CATCH ON THE DOOR,YOU MUST
ENSURE THAT IT IS MADE UNUSABLE TO PREVENT
YOUNG CHILDREN BEING TRAPPED INSIDE.
Positioning
This appliance should only be installed at a location
where the ambient temperature corresponds to the
climate classification indicated on the rating plate, which
is located at the left on the inside of the appliance.
The following table shows which ambient temperature is
correct for each climate classification:
SN +10°C to + 32°C
N +16°C to + 32°C
ST +18°C to + 38°C
T +18°C to + 43°C
It should be located in a dry atmosphere, out of direct
sunlight and away from extreme temperature e.g. not
next to a boiler or radiator, or in a very cold room e.g. an
outhouse . If these temperatures are exceeded i.e. colder
or warmer, then the appliance may not operate correctly.
The floor where the appliance is placed must be flat and
level. If necessary, make adjustments with the positioning
feet.
Important
It must be possible to disconnect the appliance from the
mains power supply; the plugs must therefore be easily
accessible after installation.
Page 4
4
Important safety information 2
Description of the appliance 5
Electrical connection 6
The refrigerator control panel 7
When the fridge is first installed 7
Switching off 7
Temperature setting buttons 7
Using the refrigerator 8
Before use 8
Temperature display 8
Quick cool 8
Fresh food refrigeration 8
Normal operating sounds 8
Movable shelves 9
Positioning the door shelves 9
Air recycling 9
Storage time chart (refrigerator) 10
The wine cooler control panel 11
When the wine cooler is first installed 11
Temperature setting buttons 11
Temperature display 12
Switching the appliance off 12
Using the wine cooler 13
Wine arrangement 13
Use 13
Storage advise 13
Temperature regulation 13
Normal operating sounds 13
Inside accessories 14
The freezer control panel 15
Temperature setting buttons 15
Temperature display 15
Starting up - setting the temperature 15
Quick freeze 16
Alarm reset button 16
Switching the appliance off 16
Using the freezer 17
Before use 17
Freezing fresh food 17
Frozen food storage 17
Thawing 17
How to make ice cubes 17
Cold accumulators 17
Hints and tips 18
Maintenance and cleaning 19
Internal cleaning 19
When the appliance is not in use 19
External cleaning 19
Changing the light bulb 19
Defrosting 20
Something not working 21
Repairs - After sales service 22
Installation 23
Technical specifications 23
Guide to use the instruction
manual
The following symbols will be found in the text to
guide you throughout the instructions:
Safety instructions
Hints and tips
Environmental information
This appliance complies with the following
E.E.C. Directives:
* 73/23 - 90/683 (Low Voltage Directive);
* 93/68 ("General Product Safety Directive");
* 87/308 (Radio Interference Suppression);
* 89/336 (Electromagnetic Compatibility
Directive) and subsequent modifications.
Contents
For the user
Page 5
5
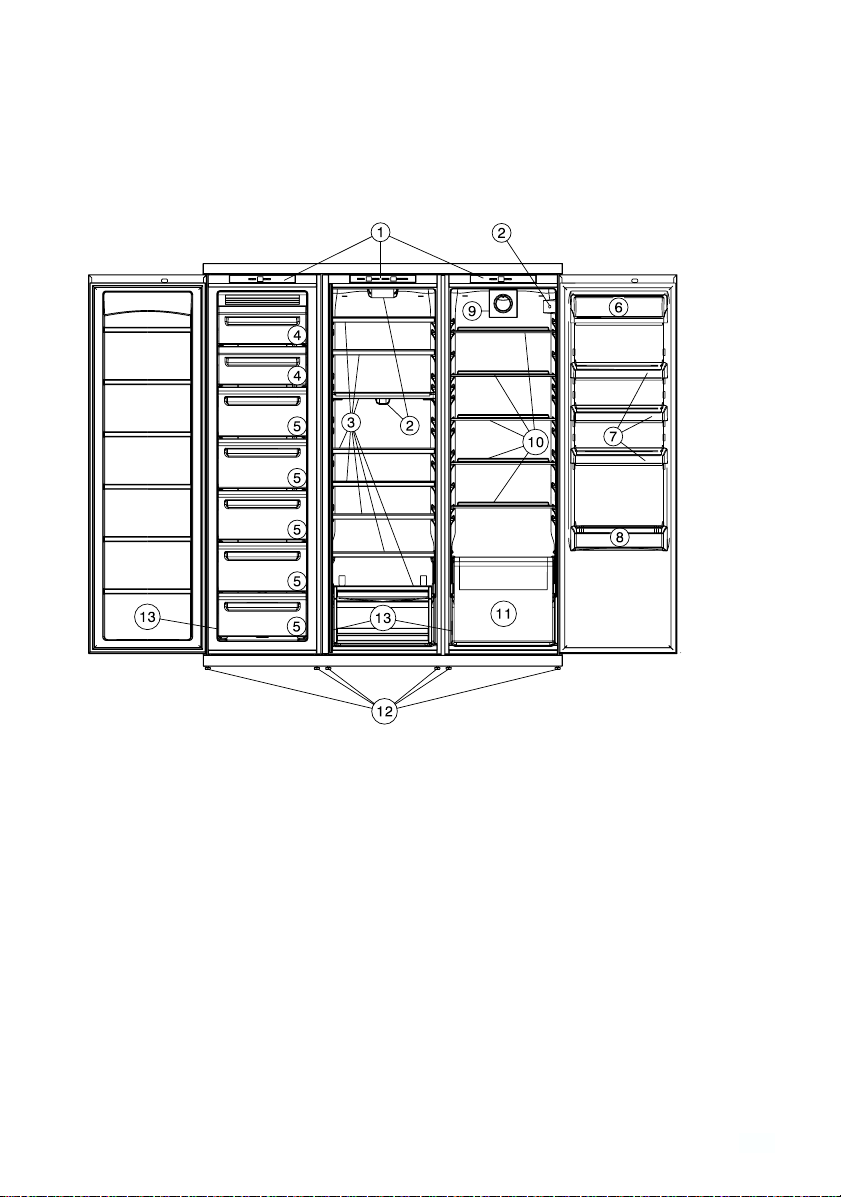
Description of the appliance
1. Control panel
2. Interior lights
3. Bottle shelves
4. Freezing fresh food compartment
5. Frozen food storage compartments
6. Dairy compartment
7. Moveable storage shelves
8. Bottle shelf
9. Quick cool system
10. Glass shelves
11. Salad/vegetable drawer
12. Adjustable feet
13. Rating plate
Page 6

6
Electrical connection
Any electrical work required to install this appliance
should be carried out by a qualified electrician or
competent person.
WARNING:THIS APPLIANCE MUST
BE EARTHED.
Should the appliance power supply
cables need to be replaced, this must be
carried out by a Service Force agent
(see page 22)
The manufacturer declines any liability
should this safety measure not be
observed.
Before switching on, make sure the electricity supply
voltage is the same as that indicated on the
appliance’s rating plate. (See picture on page 5).
The appliances are supplied with 3 x 13amp
independent plugs.
In the event of having to change the fuse in the plug
supplied, a 13amp ASTA approved BS 1363/A fuse
must be used.
Should the plug need to be replaced for any reason,
proceed as described below.The wires in the mains
lead are coloured in accordance with the following
code:
Green and Yellow - Earth
Blue - Neutral
Brown - Live
If you fit your own plug, the colours of the wires in
the mains lead of your appliance may not
correspond with the markings identifying the
terminals in your plug.
Proceed as follows:
1. Connect the Green and Yellow (earth) wire to the
terminal in the plug which is marked with the letter
"E"or the earth symbol or coloured green and
yellow.
2. Connect the Blue (neutral) wire to the terminal in
the plug which is marked with the letter "N" or
coloured black.
3. Connect the Brown (live) wire to the terminal in
the plug which is marked with the letter "L" or
coloured red.
4. Upon completion there must be no cut, or stray
strands of wire present and the cord clamp must
be secure over the outer sheath.
WARNING: A cut off plug inserted into
a 13 amp socket is a serious safety
(shock) hazard.
Ensure that the cut off plug is disposed
of safely.
The plugs must still be accessible after
the appliance has been installed.
The appliance should not be connected
to the electrical supply by means of an
extension cable.
GREEN & YELLOW
13 AMP. FUSE
13 AMP
BLUE
D207
BROWN
CORD CLAMP
Page 7
7
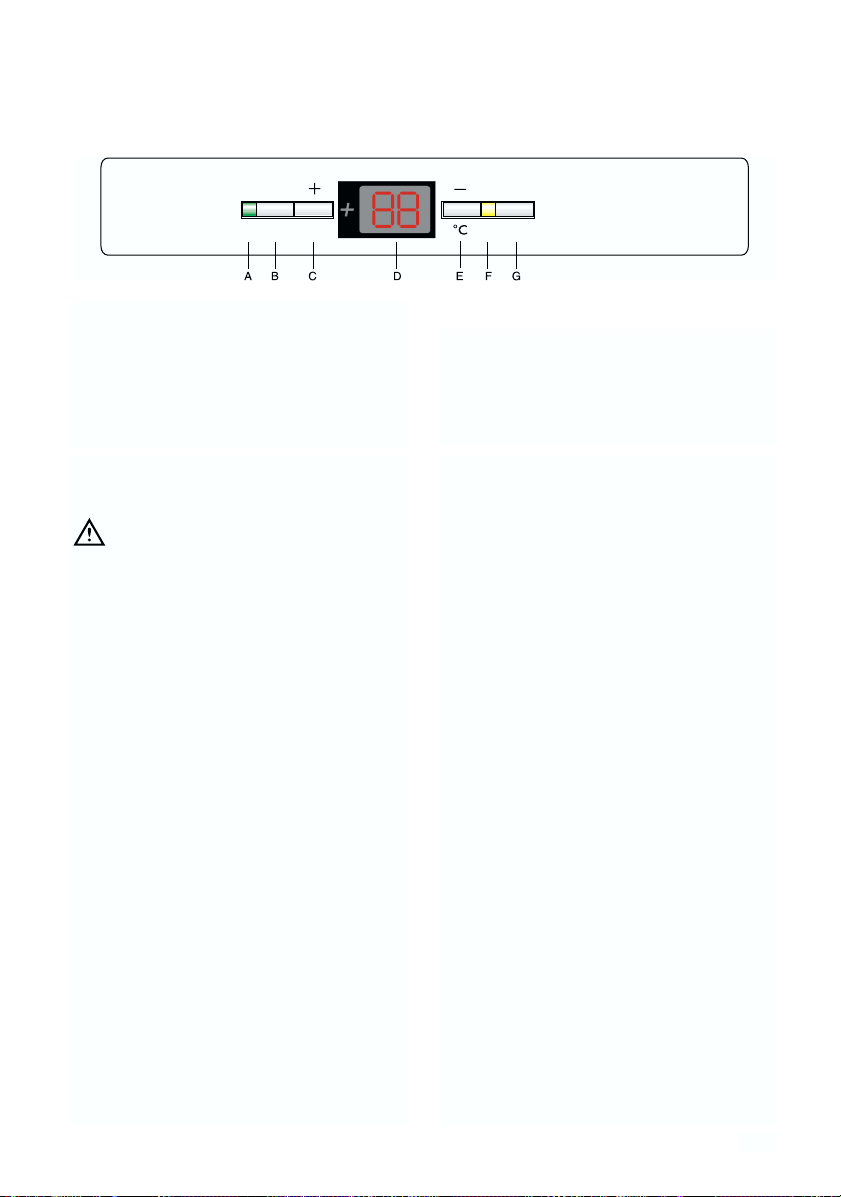
Push button
A. Mains indicator light (green)
B. Fridge compartment button ON/OFF
C. Temperature setting button (+) (for warmer
temperatures)
D. Temperature display
The refrigerator control panel
Switching off
The appliance is switched off by holding in button (B)
for more than 1 second. After this, a countdown on
the temperature display from -3 -2 -1 will be shown.
When the appliance is switched off, the display (D)
also goes off.
Temperature setting buttons
The temperature is adjusted using the “C“ (+) and
“E“ (-) buttons.These buttons are connected to the
temperature display.
The temperature display is switched over from the
display of the ACTUAL temperature (Temperature
display is illuminated) to the display of the DESIRED
temperature (Temperature display flashes) by
pressing one of the two buttons,“C“ (+) or “E“ (-).
Each time one of the two buttons is pressed again
the DESIRED temperature is adjusted by 1 °C. The
DESIRED temperature must be reached within 24
hours.
If neither button is pressed, the temperature display
automatically switches back after a short period
(approx. 5 sec.) to the display of the ACTUAL
temperature.
DESIRED temperature means:
The temperature that has been selected for inside
the fridge.The DESIRED temperature is indicated by
flashing numbers.
ACTUAL temperature means:
The temperature display indicates the current
temperature inside the fridge. The ACTUAL
temperature is indicated with illuminated numbers.
E. Temperature setting button (-) (for colder
temperatures)
F . Quick cool function "on" indicator light (yellow)
G. Quick cool button
When the fridge is first
installed
Warning
Allow the appliance to stand for 2 hours after
installation.
Insert the plugs into the wall socket.
If the display is OFF press the ON/OFF button.
The green mains indicator light illuminates.
The appliance starts.
Press either the “C“ (+) or “E“ (-) button. The
temperature display switches over and the DESIRED
temperature currently set flashes on the
temperature display.
Set the required temperature by pressing the “C“ (+)
or “E“ (-) buttons (see section "Temperature setting
buttons"). The temperature display will immediately
show the changed setting. Each time a button is
pressed the temperature is adjusted by 1 °C.
From a food safety point of view +5 °C should be
considered sufficiently cold for storing food in the
fridge.
Once the required temperature has been set, after a
short period (approx. 5 sec.) the temperature
display will change and again indicate the current
ACTUAL temperature inside the fridge.The display
will change from flashing to continuous illumination.
Information! When the setting is changed, the
compressor does not start immediately if automatic
defrosting is currently taking place. As the storage
temperature within the fridge is reached quickly you
can store food immediately after switching on.
Quick
OffOn /
˚C
cool
Page 8

8
Fresh food refrigeration
To obtain the best performance, do not store warm
food or evaporating liquids in the refrigerator; do
cover or wrap the food, particularly if it has a strong
flavour.
Do not cover the shelves with any protective
material, such as paper, cardboard or plastic, which
may obstruct the air circulation through them.
To help you use your refrigerator correctly, here are
some more useful hints:
Raw meat (beef, pork, lamb & poultry): wrap in
polythene bags and place on top of the salad drawer.
Meat can only be stored safely in this way for
one or two days at the most.
Fruit & vegetables: these should be thoroughly
cleaned and placed in the bottom salad drawer.
Butter & cheese: these should be placed in special
airtight containers or wrapped in aluminium foil or
polythene bags to exclude as much air as possible.
Milk bottles: these should have a cap and should
be stored in the bottle rack on the door.
Normal operating sounds
• You may hear faint gurgling or bubbling sounds
when the refrigerant is pumped through the coils
or tubing at the rear, to the cooling
plate/evaporator or to the fixed freezer shelves.
• When the compressor is on, the refrigerant is
being pumped round, and you will hear a whirring
sound or pulsating noise from the compressor.
Using the refrigerator
Before use
Remove all securing tapes.Wash inside the appliance
with lukewarm water and bicarbonate of soda (5 ml
to 0.5 litre of water).
Do not use soap or detergent as the smell
may linger. Dry thoroughly.
Temperature display
The temperature display can indicate several pieces
of information.
During normal operation, the temperature currently
present in the fridge (ACTUAL temperature) is
displayed.
When the temperature is being adjusted a flashing
display indicates the fridge temperature currently
set (DESIRED temperature).
Quick cool
The Quick cool function is suitable for quickly
cooling large quantities of fresh food in the
refrigerator.
The Quick cool function is switched on by pressing
the Quick cool button "G".The yellow light
illuminates. The Quick cool function is ended
automatically after a period of 6 hours.
The Quick cool function can be ended manually at
any time by pressing the Quick cool button again.
The yellow light goes out.
Page 9

9
Movable shelves
The walls of the refrigerator have runners so that
the shelves can be positioned as desired.
Positioning the door shelves
To accommodate the storage of larger items, the
door shelves can be adjusted in height.
To adjust the shelves proceed as follows:
Gradually pull the shelf in the direction of the
arrows until it comes off, then reposition as
required.
Air recycling
The refrigerator compartment is equipped with a
special D.A.C.(Dynamic Air Cooling) fan which can
be turned on with the switch (fig.1).When the green
light is on, the fan system is working.
It is recommended that the fan (D.A.C.) be used
when the ambient room temperature exceeds
25°C.
This feature enables the rapid cooling of foods and a
more uniform temperature in the compartment.
Fig. 1
D338
SWITCH
Page 10

10
Foods Storage time in days Method of packaging
1 234 567
Raw meat XXx x x cling film, airtight
Cooked meat XXXx x x dish covered
Roasted meat XXXx x dish covered
Raw minced meat X dish covered
Cold cuts,Vienna sausage XXx x cling film, cellophane, grease-proof paper
Fresh fish X x x cling film, airtight
Cooked fish XXx x dish covered
Fried fish XXx x x dish covered
Tinned fish, open X x x dish covered
Fresh chicken XXXx x x cling film, airtight
Fried chicken XXXx x x dish covered
Fresh duck, goose XXXx x x cling film, airtight
Roasted duck, goose XXXXx x x dish covered
Butter unopened X XX X XXXoriginal packaging
Butter opened X XXX XXXoriginal packaging
Milk XXXx x original packaging
Cream XXx x plastic box
Sour cream XXXXx x x plastic box
Cheese (hard) XXXX XXXaluminium foil
Cheese (soft) XXXXx x x cling film
Curds XXXXx x x cling film
Egg XXXX XXX
Spinach, sorrel XXx x cling film
Green peas, green beans XXXXx x x cling film
Mushroom XXx x x cling film
Carrot, roots X XXX XXXcling film
Bell-pepper XXx x x cling film
Tomato X X X X X X X cling film
Cabbage XXXX Xx x cling film
Soft fruits (strawberries,
raspberries, etc.) XXXx x cling film
Other fruits XXXXx x x cling film
Tinned fruits opened XXXx x dish covered
Cakes filled with cream XXx x dish covered
Storage time chart (refrigerator)
Time and method of storage of fresh foods in the refrigerator
Notation:
X usual storage time
x possible storage time (concerns to really fresh product only)
Page 11

11
A. Mains indicator light (green)
B. Button On/Off
C. Temperature setting button (+) (for warmer
temperatures)
D. Temperature display
E. Temperature setting button (-) (for colder
temperatures)
F. Temperature setting button (+) (for warmer
temperatures)
The wine cooler control panel
When the wine cooler is first
installed
Warning
Allow the appliance to stand for 2 hours after
installation.
Insert the plug into the wall socket.
Press On/Off.
The green mains indicator light illuminates.
Press either the “C“/“F“(+) or “E“/“H“ (-) buttons.
The temperature display switches over and the
DESIRED temperature currently set flashes on the
temperature display.
Set the required temperature by pressing the
“C“/“F“(+) or “E“/“H“ (-) buttons (see section
"Temperature setting buttons"). The temperature
display will immediately show the changed setting.
Each time the button is pressed the temperature is
adjusted by 1 °C.
Once the required temperature has been set, after a
short period (approx. 5 sec.) the temperature
display will change and again indicate the current
ACTUAL temperature inside the Wine Cooler.
The display will change from flashing to continuous
illumination.
Information! When the setting is changed, the
compressor does not start immediately if automatic
defrosting is currently taking place.
As the storage temperature within the Wine cooler
is reached quickly you can store beverage
immediately after switching on.
Important: If the wine cooler is switched off,
the door must be closed to ensure that the
freezer is working properly.
When switched off, the electronic control of
the appliance functions automatically and
periodically circulating the air to prevent
unpleasant smells and humidity within the
compartment.
Temperature setting buttons
The temperature is adjusted using the “C“/“F“(+) or
“E“/“H“ (-) buttons.These buttons are connected to
the temperature display.
The temperature display is switched over from the
display of the ACTUAL temperature (Temperature
display is illuminated) to the display of the DESIRED
temperature (Temperature display flashes) by
pressing one of the buttons,“C“/“F“(+) or “E“/“H“
(-).
Each time one of the two buttons is pressed again
the DESIRED temperature is adjusted by 1 °C. The
DESIRED temperature will be reached within 24
hours.
G. Temperature display
H. Temperature setting button (-) (for colder
temperatures)
I. Light Button “LIGHT”
J. LIGHT button
K. Alarm reset light
L. Door-Alarm OFF button
L
H
K
J
I
Page 12

12
If neither button is pressed, the temperature display
automatically switches back after a short period
(approx. 5 sec.) to the display of the ACTUAL
temperature.
DESIRED temperature means:
The temperature that has been selected for inside
the wine cooler. The DESIRED temperature is
indicated by flashing numbers.
ACTUAL temperature means:
The temperature display indicates the current
temperature inside the wine cooler. The ACTUAL
temperature is indicated with illuminated numbers.
Temperature display
The temperature display can indicate several pieces
of information.
During normal operation, the temperature currently
present in the wine cooler. (ACTUAL temperature)
is displayed.
When the temperature is being adjusted a flashing
display indicates the wine cooler temperature
currently set (DESIRED temperature).
Switching the appliance off
The 3 compartments can be switched off
independently of each other - as there are 3
separate control panels. To switch off one
compartment, hold down the On/Off button (B) for
approx. 5 seconds. This will result in a count down
from "3" to "1" taking place in the temperature
display. On reaching "1" the appliance will switch off.
The temperature display will go off.
Acoustic alarm with door
open
An acoustic alarm sounds when the door remains open
for about 5 minutes.
Door open alarm status is indicated by:
The alarm reset light (K) flashing;
The buzzer sounding.
To stop the acoustic alarm, press the Button ALARM
OFF (L).
The acoustic signal goes off when normal conditions are
restored (door closed).
Button “Light On” and light
indicator
If you would like the light to remain on, with the door
closed, it is sufficient to open and close the door and the
light will remain ON automatically for 10 minutes.
If you want to switch off the light before the automatic
turn off time, open the door and push the switch button
(I) The light indicator “J” will switch off.The light has no
negative effect on the quality on the wine.
Page 13

13
Normal operating sounds
• You may hear faint gurgling or bubbling sounds
when the refrigerant is pumped through the coils
or tubing at the rear, to the cooling
plate/evaporator or to the fixed freezer shelves.
• When the compressor is on, the refrigerant is
being pumped round, and you will hear a whirring
sound or pulsating noise from the compressor.
Wine arrangement
Top Compartment:
The temperature can be adjusted between +6 and
+ 11°C.This compartment is ideal for wines,
especially new reds and whites, to be consumed
immediately.
Bottom Compartment:
The temperature can be adjusted between + 12 and
+ 18°C.This compartment is ideal for storing and
refining red or white wines for long periods.
The temperatures of this compartment are suitable
for storing aged and full-bodied wines.
Lay the bottles down in such a way that the
corks do not dry.
Keep the wine in the dark. The oven door is in
anti-UV darkened double glass to protect the wine
from the light in case the refrigerator is located in a
well-lit place.
Avoid switching the appliance light on too
often or for too long.Wine keeps better in the
dark.
Handle the bottles with care, to avoid agitating
the wine.
Follow the recommendations and advice
received at the time of purchase or given in the
technical documentation regarding the quality,
duration and optimum storage temperature of the
wine.
Storage advice
The storage time for wine depends on ageing, the
type of grapes, alcoholic content and level of
fructose and tannin contained in it.At the time of
purchase, check if the wine is already aged or if it
will improve over time.
Recommended storage temperatures:
- For champagne and sparkling wines, between 6
and 8°C
- For white wines, between 10 and 12°C
- For rose’ and light red wines, between 12 and
16°C
- Aged red wines, 14 -16°C
When placing various bottles on top of each
other, make sure they do not touch the refrigerator
cooling plate.
Using the wine cooler
Operation
After inserting the plug in the socket, if the display is
not lit press the appliance On key (A).
Temperature regulation
Set the temperature by using “C“/“F“(+) or “E“/“H“
(-) buttons.
The correct position must in any case be determined
bearing in mind that the inside temperature depends
on these factors:
• Room temperature
• How often the doors are opened
• The quantity of bottles stored
• The position of the appliance
To p
compartment
Bottom
compartment
Use
The wine refrigerator is divided into two
compartments with differentiated temperatures.
Page 14

14
Inside accessories
Shelves
The shelves can be removed for cleaning.
Bottle holder
Remove the shelf and insert it between the two
guides
The maximum possible weight on the bottle shelves
is 30 kg.
Air circulation
The refrigerator compartment has a special
AIRLIGHT fan which is automatically activated in
function of the appliance thermostat setting and
ambient conditions.
The bottom compartment is fitted with a basket
useful for placing upright and sloping bottles.
Page 15

15
A. Mains indicator light (green)
B. Button On/Off for the appliance
C. Temperature setting button (for warmer
temperatures)
D. Temperature display
E. Temperature setting button (for colder
temperatures)
Temperature setting buttons
The temperature is adjusted using the “C“ and “E“
buttons. These buttons are connected to the
temperature display.
The temperature display is switched over from the
display of the ACTUAL temperature (Temperature
display is illuminated) to the display of the DESIRED
temperature (Temperature display flashes) by
pressing one of the two buttons,“C” or “E“.
Each time one of the two buttons is pressed again
the DESIRED temperature is adjusted by 1 °C.The
DESIRED temperature must be reached within 24
hours.
If neither button is pressed, the temperature display
automatically switches back after a short period
(approx. 5 sec.) to the display of the ACTUAL
temperature.
DESIRED temperature means:
The temperature that has been selected for inside
the freezer. The DESIRED temperature is indicated
by flashing numbers.
ACTUAL temperature means:
The temperature display indicates the current
temperature inside the freezer.The ACTUAL
temperature is indicated with illuminated numbers.
H
I
Temperature display
The temperature display can indicate several pieces
of information.
During normal operation, the temperature currently
present in the freezer (ACTUAL temperature) is
displayed.
When the temperature is being adjusted a flashing
display indicates the freezer temperature currently
set (DESIRED temperature).
Starting up - setting the temperature
Plug the mains plug into the mains socket.
Press ON/OFF button (A) for the functioning of the
whole appliance. The green mains pilot indicator
illuminates. The alarm light flashes until the
temperature is reached.The buzzer sounds.
Pressing button “I” stops the buzzer.
Press either the C“ or “E” button. The temperature
display switches over and the DESIRED temperature
currently set flashes on the temperature display.
Set the required temperature by pressing the “C“ or
“E“ button (see section "Temperature setting
buttons"). The temperature display will immediately
show the changed setting. Each time the button is
pressed the temperature is adjusted by 1 °C.
From a food safety point of view -18 °C should be
considered sufficiently cold for storing food in the
freezer.
The alarm light goes off, when the set temperature
is reached.
The freezer control panel
F. Quick freeze function "on" indicator (yellow)
G. Quick freeze button
H. Alarm off reset light
I. Alarm off reset button
Page 16

16
Quick freeze
The Quick freeze function accelerates the freezing
of fresh food and, at the same time, protects
foodstuffs already stored from undesirable warming.
The Quick freeze function is switched on by
pressing the Quick freeze button. The yellow light
illuminates.
If the Quick freeze function is not ended manually,
the appliance will switch off the Quick freeze
function after 52 hours.The yellow light goes out.
The Quick freeze function can be ended manually at
any time by pressing the Quick freeze button again.
The yellow light goes out.
Alarm reset button
In the event of an abnormal temperature rise inside
the freezer (e.g. power cut) warning light (H) will
start to flash and a buzzer will sound.
After the temperature has returned to normal, the
warning light (H) will continue to flash, although the
buzzer has stopped.
When the alarm button is pushed, the warmest
temperature reached in the compartment flashes on
the indicator.
Switching the appliance off
To switch off the appliance hold down the On/Off
button (A) for approx. 5 seconds.This will result in a
count down from "3" to "1" taking place in the
temperature display. On reaching "1" the appliance
will switch off.The temperature display will go off.
Note:
The appliance cannot be switched on or off if
unplugged, or if there is no power being supplied to
it. Following connection to the mains power supply,
the appliance returns to the same operating state as
before the interruption of main power.
If the appliance is not going to be used for an
extended period:
Switch off the appliance, holding down the On/Off
button (A) until the display goes off (see above).
Remove the main plug .
Finally, leave the doors open so as to avoid a build
up of odours.
Page 17

17
Before use
Remove all securing tapes.Wash inside the appliance
with lukewarm water and bicarbonate of soda (5 ml
to 0.5 litre of water).
Do not use soap or detergent as the smell
may linger. Dry thoroughly.
Freezing fresh food
The 4-star compartment is suitable for the long
term storage of commercially frozen food and for
freezing fresh food.
To freeze fresh foods it is not necessary to move
the thermostat knob from the normal setting. Push
the quick freeze switch at least 3 hours before
loading food.
In any 24 hours you can freeze up to 20 kg.of fresh food.
Place the food to be frozen in drawer 4 as indicated
in the diagram on page 5, as this is the coldest part.
To guarantee a good operation of the appliance during
normal use, the drawers should not be removed.
Frozen food storage
When using for the first time or after a period out
of use, before putting the frozen food products in
the compartment let the appliance run for at least
two hours on the coldest setting, then turn the
thermostat knob to the normal operating position.
Do not exceed the storage period indicated by the
manufacturer.
Finally, do not open the door frequently or leave it
open longer than is absolutely necessary.
Warning
Do not put carbonated liquids, (fizzy drinks etc.), in
the freezer compartment.
Ice lollies, if consumed immediately after removal from
the freezer, can cause low temperature skin burns.
Do not remove items from the freezer if your hands
are damp/wet, as this could cause skin abrasions or
“frost/freezer burns”.
Important
In the event of a power cut the food in the freezer
will not be affected if the power cut is short and if
the freezer is full. Do not open the door. Should the
food begin to thaw, it must be consumed quickly and
must not be re-frozen.
Thawing
Frozen food, prior to being used, can be thawed in
the fridge or at room temperature depending on the
time available. Small food items may even be cooked
from frozen; in this case cooking will take longer.
Any frozen food which is allowed to thaw
accidentally should either be eaten as soon as
possible or thrown away. Alternatively, if the food is
uncooked and has not been completely defrosted it
can be cooked and then refrozen.
Meat, fish and fruit should be thawed in the
refrigerator compartment and small pieces of meat
can even be cooked while still frozen, but you must
ensure that it is thoroughly cooked through.
Vegetables should be directly immersed in boiling
water; ready-cooked dishes can be placed directly in
the oven in their aluminium wrapping.
A microwave oven is particularly suitable for
thawing any type of frozen or deep-frozen food:
follow the oven instructions, particularly regarding
the placement of aluminium wrapping or containers
in the oven.
Defrosted cooked food must never be
refrozen.
Cold accumulators
Two cold accumulators are supplied in the freezer;
these increase the length of time the food will keep
in the event of a power failure or breakdown.
They must be placed in the top drawer.
Using the freezer
Page 18

18
Hints and tips
Food storage
• To obtain the best results from your appliance,
neither hot foods nor liquids which may
evaporate, should be placed in the larder
compartment.
• Keep the time between buying chilled food and
placing it in your fridge as short as possible.
• Do not push food together too much, try to
allow air to circulate around each item.
• Do not store food uncovered.
• Remove suspect food from your refrigerator and
clean, refer to ‘Maintenance and Cleaning’.
• Ensure that food placed in the freezer is dated
and labelled and used in date order to ensure
that food is consumed at its best.
• Avoid buying frozen food if you cannot store it
straight away.The use of an insulated container is
advisable.When you arrive home place the
frozen food in the freezer immediately.
• The symbols on the drawers show different
types of frozen goods.The numbers indicate
storage times in months for the appropriate
types of frozen goods.Whether the upper or
lower value of the indicated storage time is valid
depends on the quality of the foods and pretreating before freezing.
Energy saving advice
• Do not install the cabinet close to sources of
heat, i.e. boiler or radiator.
• Locate the appliance in a cool well ventilated
room and make sure that the air openings of the
cabinet are not obstructed.
• Avoid unnecessary frosting in the cabinet by
packing all foodstuffs into airtight packages
before placing them in the freezer.
• Always leave warm food to cool down to room
temperature before placing in the freezer.
• Food which is to be frozen (when cool) should
be placed in the fridge before being transferred
to the freezer.
• Try to avoid keeping the door open for long
periods, or opening the door too frequently as
warm air will enter the cabinet, and cause the
compressor to switch on unnecessarily often.
• Ensure there are no obstructions preventing the
door from closing properly.
In the event of a power failure
If there is a power failure during the storage of
frozen foods, keep the door closed. If the
temperature within your freezer should rise do not
refreeze the food without checking it’s condition.
The following guidelines should assist you.
Ice Cream:
Once thawed should be discarded.
Fruit and Vegetables:
If soft should be cooked and used up.
Bread and Cakes:
Can be refrozen without danger.
Shellfish:
Should be refrigerated and used up quickly.
Cooked Dishes:
i.e. casseroles, should be refrigerated and used up.
Large Pieces of Meat:
Can be re-frozen providing there are ice crystals
remaining within them.
Small Joints:
Should be cooked and then re-frozen as cooked
dishes.
Chicken:
Should be cooked and re-frozen as a fresh dish.
Page 19

19
Before any connection, maintenance or cleaning
work is carried out, DISCONNECT the appliance
from the ELECTRICITY supply.
Internal cleaning
Clean the inside and accessories with warm water
and bicarbonate of soda (5ml to 0.5 litre of water).
Rinse and dry thoroughly.
NEVER USE DETERGENTS,
ABRASIVE POWDERS, HIGHLY
PERFUMED CLEANING PRODUCTS
OR WAX POLISHES, TO CLEAN THE
INTERIOR AS THESE WILL DAMAGE
THE SURFACE AND LEAVE A
STRONG ODOUR.
When the appliance is not in use
When the appliance is not in use for long periods,
disconnect from the electricity supply, empty all
foods and clean the appliance, leaving the doors ajar
to prevent unpleasant smells.
External cleaning
Once or twice a year dust the condenser (black
grill) and the compressor at the back of the
appliance, with a brush or vacuum cleaner, see
figure, as an accumulation of dust will affect the
performance of the appliance and cause excessive
electricity consumption.
Changing the light bulb
Refrigerator
Should the interior light fail to work, first switch off
the appliance and disconnect from the electricity
supply, then replace the bulb as follows;
Maintenance and cleaning
Press on the rear hook and at the same time slide the
cover in the direction indicated by the arrow.
Unscrew the bulb and replace it with one of the same
power (the maximum power is shown on the light
diffuser) available from your nearest Service Force
Centre.
Replace the light cover by sliding it into its original
position.
Wine cooler
Lamp replacement safety
instructions
For safety reasons this appliance is provided with
special lamps specifically tested and certified for the
foreseen use.
They can only be replaced with lamps of the same
type and having the same characteristics.
Replacement lamps must only be requested from
our authorised service centre.
Do not use non-certified normal lamps.
PR259
Page 20

20
Defrosting
Freezer
Your appliance is frost free, which means there is no
need to manually defrost your appliance as this will
be carried out automatically.
Refrigerator
The refrigerator automatically defrosts every time
the compressor stops.The water is discharged, via
the pipe, into a tray located at the back of the
appliance above the compressor, where it
evaporates.
Important
To avoid defrost water overflowing into the fridge,
periodically clean the water discharge hole in the
centre of the V shaped drip collector at the back of
the refrigerator compartment behind the fruit and
vegetable drawer. Use the defrost cleaner provided
which you will find already inserted into the
discharge hole.
Remember to wash the defrost cleaner in hot soapy
water at regular intervals. Dry thoroughly before
replacing.
Lighting lamps
To replace the top lamp, remove the transparent cover by
pressing it inwards with a tool (e.g. screwdriver) to free
the rear side hookings.At the same time, free the middle
hook and slide off the cover in the direction of the
arrows.
To replace the bottom lamp, remove the transparent
cover by pressing the front hooking with a tool (e.g.
screwdriver) and at the same time pull in the direction of
the arrow.
D037
Page 21

21
Cause
Thermostatic control can be set incorrectly.
If products are not cold enough or placed
incorrectly.
The door does not close tightly or it is not
shut properly.
Thermostatic control can be set incorrectly.
The door does not close tightly or it is not
shut properly.
Products to be frozen are placed too closely to
each other.
A large amount of fresh food was placed
in the freezer.
It is normal. During automatic defrosting frost
melts on the back plate.
The outlet of the chamber can be clogged up.
Products placed in can prevent water from
flowing into the collector.
The melting water does not flow not into the
evaporative tray above the compressor.
Products are not wrapped properly.
Doors are not shut properly or do not close
tightly.
The thermostatic control may be set
incorrectly.
The thermostatic control is set incorrectly.
Doors are not shut properly or do not close
tightly.
A large amount of fresh food was placed
in the freezer.
Too warm food was put in.
The room temperature is too warm.
Plug is not connected to the mains socket
properly.
The fuse is burnt out.
The thermostatic control is not on.
There is no voltage in the mains socket.(Try to
connect another appliance into it.)
The appliance is not levelled.
Solution
Adjust the thermostat setting to higher position.
Place the products to the appropriate place.
Check if the door closes well and the
gasket is undamaged and clean.
Adjust the thermostat setting to higher position.
Check if the door closes well and the
gasket is undamaged and clean.
Wait some hours and then check the
temperature again.
Place the products in a way so that cold air
could circulate among them.
Clean the outlet.
Replace the contents so that they can not
touch the back plate directly.
Put the melting water outlet to the
evaporative tray.
Wrap the contents better.
Check if the doors close well and the
gaskets are undamaged and clean.
Adjust the thermostat setting to a position that
gives higher temperature.
Adjust the thermostat setting to a position that
gives higher temperature.
Check if the doors close well and the
gaskets are undamaged and clean.
Wait some hours and then check the
temperature again.
Put food at max. room temperature.
Try to reduce the temperature in the room
where the appliance stands.
Connect the mains plug properly.
Change the fuse.
Start the appliance according to
instructions in chapter 'Putting it into use'.
Call a qualified electrician.
Check if the appliance stands stable (all the
four feet should be on the floor).
Symptom
It is too warm in the
refrigerator.
It is too warm in the
freezer.
Water flows at the back
plate of the refrigerator.
Water flows into the
chamber.
Water flows onto the
floor.
There is too much frost
and ice.
The compressor operates
continually.
The appliance does not
work at all. Neither
cooling, nor lighting works.
The appliance is noisy.
Certain problems are due to a lack of simple maintenance or oversights, which can be solved easily without
calling out an engineer. Please carry out the following checks before contacting the extended warranty
administrators see Repairs - After Sales Service.
IMPORTANT: If you call out an engineer to a fault listed below, or to repair a fault caused by incorrect use
or installation, a charge will be made even if the appliance is under guarantee.
Something not working
If the problem persists after the above checks have been carried out, please contact your local John Lewis
branch who will give you details for your local Service Force centre.
Page 22

22
In the unlikely event of your appliance requiring
service, or if you wish to purchase spare parts,
please contact our extended warranty
administrators by telephoning:
0870 010 7887
They will give you details for your local Service
Force Centre.
Before calling out an engineer, please ensure you
have read the details under the heading “Something
Not Working”.
When you contact your local Service Force Centre
you will need to give the following details:
1. Your name, address and post code
2. Your telephone number
3. Clear and concise details of fault
4. The purchase date found on your receipt.
5. The model and serial number of the appliance
(found on the rating plate - see picture on page 5)
So that you always have these numbers at hand, we
recommend you to make a note of them here:
Mod. :......................................................................................
PNC :......................................................................................
S.N. :.......................................................................................
Your Wine Cooler Fridge Freezer is covered
by a 3 year parts and labour guarantee (see
separate details given at point of sale). Please
retain your purchase receipt safely for the
service engineer to verify the purchase
details.
Spare parts
An authorised service engineer should service this
product, and only genuine spare parts should be
used.
Under no circumstances should you attempt to
repair the machine yourself. Repairs carried out by
inexperienced persons may cause injury or serious
malfunctioning. Contact your local Service Force
Centre.
Repairs - after sales service
Page 23

23
Installation
It is dangerous to alter the specifications or
attempt to modify this product in any way.
Care must be taken to ensure that the
appliance does not stand on the electrical
supply cable.
Dimensions Width 1640 mm
Height 1855 mm
Depth 575 mm
Power supply voltage 230-240V/50Hz
Rated current 1.1 A + 0.6 A + 1.0 A
Gross capacity Refrigerator 332 l
Wine cooler 330 l
Freezer 220 l
Net capacity Refrigerator 330 l
Wine cooler 325 l
Freezer 208 l
Freezing capacity 20 kg/24 h
Energy consumption 1,926 kWh/24h
703 kWh/year
Energy class, according to EU
standards A
Rising time 21 h
Noise Lc 38 dB
Weight 192.5 kg
Number of compressors 3
Technical specifications
Any electrical work required to install this
appliance should be carried out by a qualified
electrician or competent person.
Page 24

John Lewis Partnership
171 Victoria Street
London SW1E 5NN
www.johnlewis.com
2223 492-01
05/08
 Loading...