

Page 1

JLUCLFW6003
refrigerator
Instruction manual
Page 2

2
Important safety information
It is most important that this instruction book should be retained with the appliance for future reference.
Should the appliance be sold or transferred to another owner, or should you move house and leave the
appliance, always ensure that the book is supplied with the appliance in order that the new owner can get
to know the functioning of the appliance and the relevant warnings.
These warnings have been provided in the interest of safety. You MUST read them carefully before
installing or using the appliance.
If you are unsure of the meanings of the these warnings contact the John Lewis branch from which you
purchased the appliance.
Installation
This appliance is heavy. Care should be taken when
moving it.
Check your Refrigerator for any transport damage. Do
not connect the appliance if there is damaged. If the
Refrigerator is damaged, you should contact the John
Lewis branch from which you purchased it.
Any electrical work required to install this appliance
should be carried out by a qualified electrician or
competent person.
Care must be taken to ensure that the appliance does
not stand on the electrical supply cable. If the supply
cable is damaged it must be replaced; contact our
extended warranty administrators on 08700 107 887
who will give you details for your local Service Force
centre.
Parts which heat up should not be exposed.Whenever
possible, the back of the appliance should be close to a
wall, but leaving the required distance for ventilation, as
stated in the installation instructions.
This appliance should be left for 2 hours after
installation before it is turned on, in order to allow the
refrigerant to settle.
Use
This appliance is designed for domestic use only,
specifically for the storage of edible foodstuffs only.
It is not intended for commercial or industrial use.
Containers with flammable gases or liquids can leak at
low temperatures. Do not store any containers with
flammable materials, such as spray cans, fire
extinguisher refill cartridges etc. in the refrigerator or
the vicinity of the refrigerator or any other appliance.
Manufacturers recommended food storage times
should be adhered to. Refer to the relevant
instructions.
Safety precautions for
isobutane
Warning
The refrigerant of the appliance is isobutane (R600a)
that is inflammable and explosive to a greater extent.
Keep ventilation openings, in the appliance enclosure
or in the built-in structure, clear of obstruction.
Do not use mechanical devices or other means to
accelerate the defrosting process, other than those
recommended by the manufacturer.
Do not damage the refrigerant circuit.
Do not use electrical appliances inside the food storage
compartments of the appliance, unless they are of the
type recommended by the manufacturer.
For the safety of life and property keep the
precautions of these user's instructions as the
manufacturer is not responsible for damages
caused by omission.
Maintenance and Cleaning
Before cleaning, always switch off the appliance and
disconnect from the electrical supply
Check and clean the drain for defrosted water
regularly; if the drain is blocked water will gather in
the bottom of the refrigerator.
when unplugging always pull the plug from the mains
socket, do not pull on the cable.
Further information on cleaning is on page 14 of this
manual.
Child Safety
This appliance is designed to be operated by adults.
Children should not be allowed to tamper with the
controls or play with the product.
Pets and children have been known to climb into the
appliance. Please check the appliance before use.
Keep all packaging well away from children.
When the appliance is to be scrapped,cut off the electrical
supply cable and destroy the plug with the remaining cable.
Disable the door catch in order to prevent children from
becoming trapped inside while playing
Do not use electrical appliances inside the
Refrigerator.
Do not damage the refrigerant circuit.
Page 3
3
Ecological hints
To save energy and help protect the environment, we
recommend that you follow these hints.
Do not install the appliance close to sources of heat
such as a boiler or radiator.
locate the appliance in a well ventilated room and make
sure that any air openings of the appliance are not
obstructed.
Try to avoid keeping the door open for long periods or
opening the door too frequently as warm air will enter
the cabinet and cause the compressor to switch on
unnecessarily often.
Ensure there are no obstructions preventing the door
from closing properly.
Environmental information
After unpacking please dispose of the packaging with due
regard to safety and the environment.
Materials marked with the symbol are recyclable.
Avoid damaging the cooling unit, especially at the rear near
the heat exchanger. Check with your local Council or
Environmental Health Office to see if there are facilities in
your area for recycling this appliance.
When the appliance is to be scrapped, cut off the power
supply cable and remove the door,to prevent young children
from being trapped inside.
This appliance does not contain gases which could damage
the ozone layer, in either its refrigerant circuit or insulation
materials.
The symbol on the product or on its packaging
indicates that this product may not be treated as
household waste.
Instead it shall be handed over to the applicable collection
point for the recycling of electrical and electronic
equipment. By ensuring this product is disposed of
correctly, you will help prevent potential negative
consequences for the environment and human health,
which could otherwise be caused by inappropriate waste
handling of this product. For more detailed information
about recycling of this product, please contact your local
city office, your household waste disposal service or the
shop where you purchased the product.
Warning
A cut off plug inserted into a 13 amp socket is a serious
safety (shock) hazard. please ensure the cut off plug is
disposed of safely.
Service
This product should only be serviced by an authorised
engineer and only genuine spare parts should be used.
Under no circumstances should you attempt to repair
the appliance yourself. repairs carried out by
inexperienced persons may cause injury or serious
malfunction.
Service Force are the authorised repair agents for John
Lewis branded domestic appliances.
Page 4
4
Contents
For the User
Important safety information 2
Intallation 2
Description of the appliance 5
Using the refrigerator 11
Hints for storage 11
Storage time and temperature of foods 11
Storage Shelves 11
Hints & Tips 12
Normal Operating Sounds 12
Food Storage 12
Energy Saving Advice 12
In the Event of a Power Failure 12
Storage time chart (refrigerator) 13
Maintenance and Cleaning 14
Defrosting 14
Internal cleaning 14
External cleaning 14
Changing the Light Bulb 14
When the appliance is not in use 14
Something Not Working 15
Repairs - After Sales Service 16
For the Installer
Installation 6
Technical Specifications 6
Unpacking 7
Transportation, unpacking 7
Cleaning 7
Location 7
Ventilation Requirements 7
Levelling 7
Door Reserval 8
Electrical connection 9
When the refrigerator is first
installed
10
General information 10
Using the Appliance 10
Before Use 10
Thermostat control 10
Guide to using the Instruction
Manual
The following symbols will be found in the text to guide
you throughout the instructions:
Safety precautions
Hints, useful information
Environmental information
This appliance complies with the following
E.E.C. Directives:
73/23 EEC of 19.02.73 (Low Voltage Directive) and
subsequent modifications,
89/336 EEC of 03.05.89 (Electromagnetic
Compatibility Directive) and subsequent
modifications.
Page 5
5
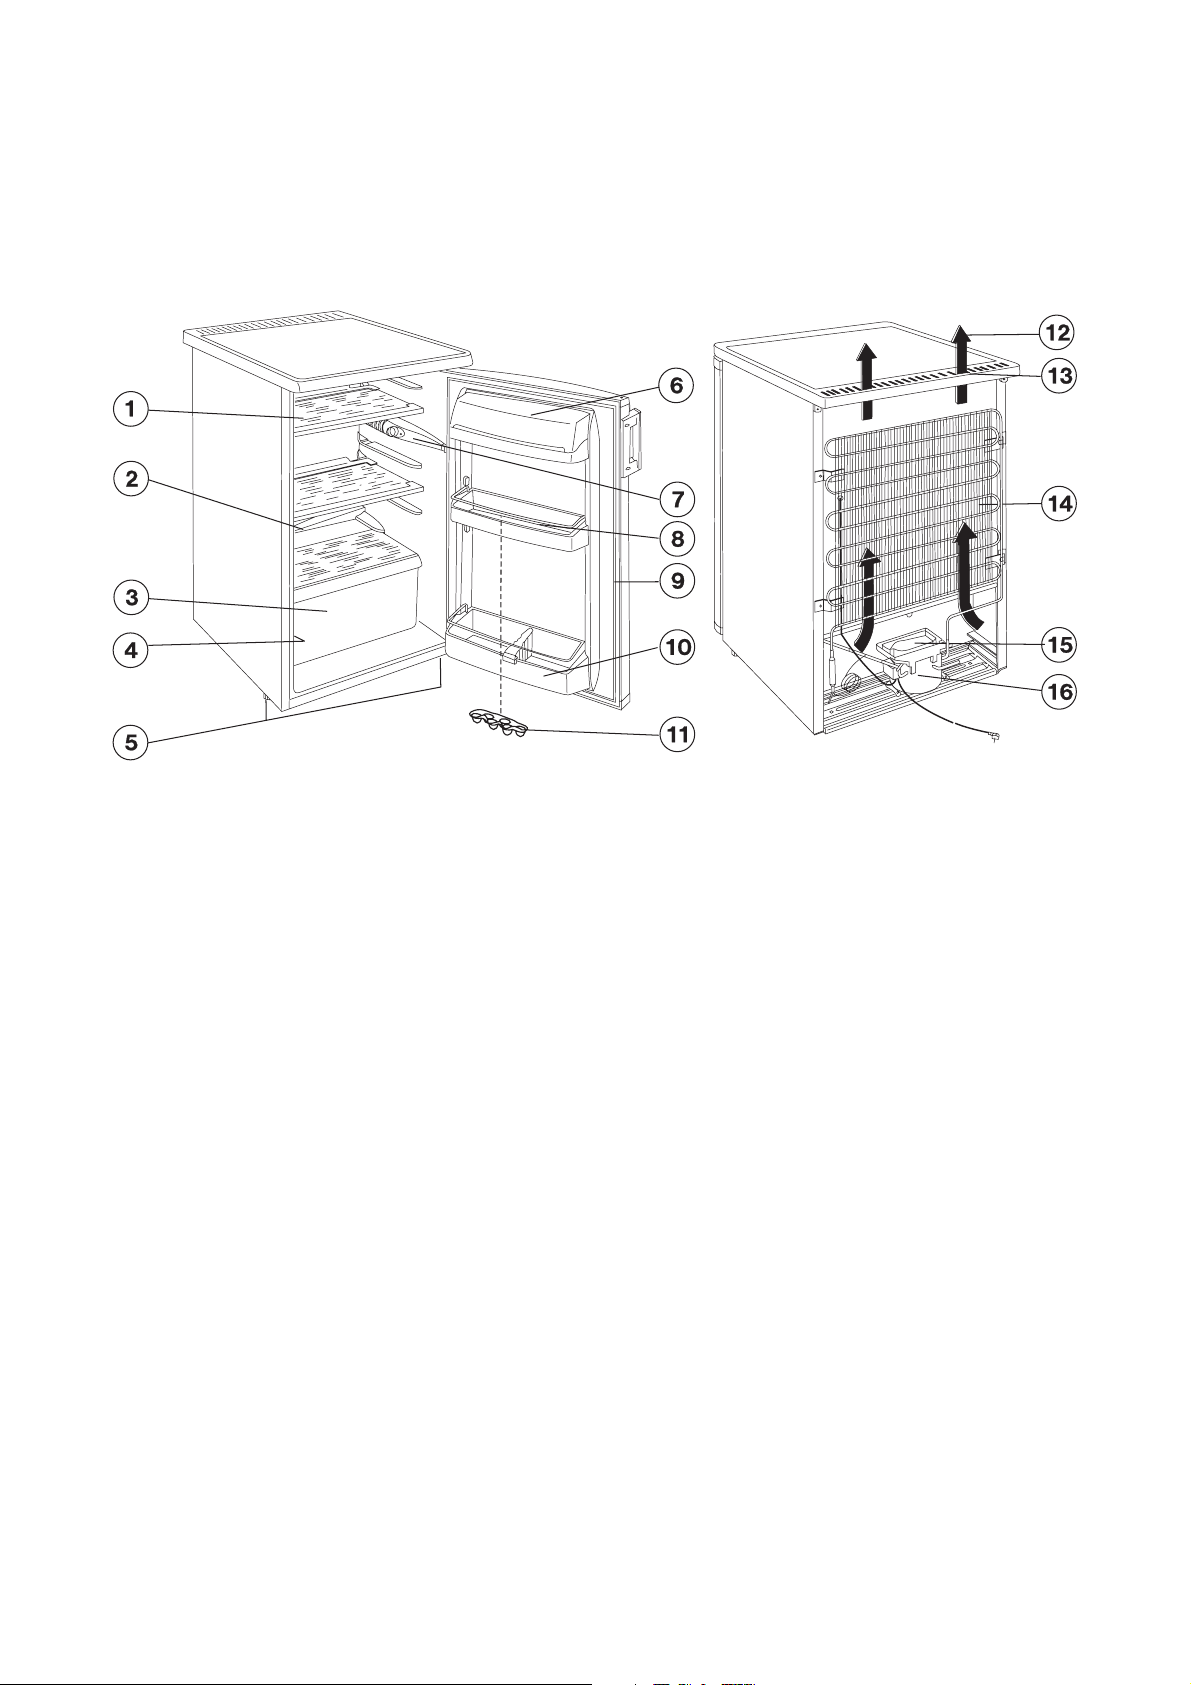
Description of the appliance
9. Door gasket
10. Bottle shelf
11. Egg tray
12. Air circulation
13. Air grid
14. Condenser
15. Evaporator tray
16. Compressor
1. Glass shelf
2. Defrost water drain
3. Salad drawer
4. Rating plate
5. Adjustable feet
6. Butter compartment
7. Interior light/Thermostat control
8. Door shelf
Page 6
6
Technical Specifications
DIMENSIONS Width 595 mm
Height 850 mm
Depth 635 mm
POWER SUPLY VOLTAGE 230V/50Hz
RATED CURRENT 0,55 A
GROSS CAPACITY Refrigerator 155 l
NET CAPACITY Refrigerator 152 l
ENERGY CONSUMPTION 0,3261 kWh/24h
119 kWh/year
ENERGY CLASS,ACCORDING
TO EU STANDARDS A+
NOISE LC 38 dB
WEIGHT 38 kg
It is dangerous to alter the specifications or attempt
to modify this product in any way.
Care must be taken to ensure that the appliance
does not stand on the electrical supply cable.
Any electrical work required to install this appliance
should be carried out by a qualified electrician or
competent person.
Installation
Page 7

7
It is recommended to deliver the appliance in original
packaging, in vertical position considering the
protective warning on packaging.
After positioning, the appliance must not be switched on for
approx. 2 hours to allow the refrigerant to settle.
Unpack the appliance and check if there are damages on it.
Report any damage immediately to the place where you
bought it. In this case retain packaging.
Cleaning
Remove all adhesive tape and packaging, which ensure the
accessories do not move in the appliance.
Wash the inside of the appliance using lukewarm water and
bicarbonate of soda (5ml to 0.5 litre of water).
After cleaning dry the inside of the appliance thoroughly.
Unpacking
Location
The appliance should be placed in a well ventilated, dry
room.
The appliance energy use is affected by the ambient
temperature.
The appliance should therefore:
not be installed next to radiators, cookers or other
sources of heat
only be installed at a location where the ambient
temperature corresponds to the climate classification,for
which the appliance is designed.
Climate Classification
The climate classification can be found on the rating plate
located inside the appliance.
The following table shows the ambient temperature for
each climate classification:
Climate Classification Ambient Temperature
SN +10 to +32 °C
N +16 to +32 °C
ST +18 to +38 °C
Ventilation Requirements
The appliance must have adequate ventilation to ensure
correct operation.
Diagram shows the ventilation requirements when
installed:
A:* Under a worktop, or cupboard.
* The clearance space of 10 cm above the appliance
may be reduced to 5 cm providing a clearance
space 2,5 cm is left on either side of the appliance.
B: When freestanding
Levelling
The appliance must be level. Level the appliance by
adjusting the two adjustable feet (1) at the front of the
appliance.
If required the washer (2) can be removed.
2
1
Page 8

8
Door Reversal
If required the opening direction of the door can be changed
as follows:
To reverse the bottom hinge assembly proceed as follows:
Disconnect the appliance from the electricity supply.
Tilt the appliance backwards, resting the top edge of the
appliance on a stool or something similar.
Unscrew the adjustable feet situated on both sides (2
pieces), in addition the screws fixing the lower door
holders (3 pieces) respectively the screw on the other
side.
Take off the freezer door by pulling it slightly downwards.
Unscrew the top door hinge pin of the refrigerator then
screw it back on the other side.
Fit the freezer door on the upper door hinge pin.
Put over the pin in the lower door holding plate in the
direction of the arrow.
Fix the plate on the other side leaving the position of the
door unchanged.
Then screw in the one screw in the place set free on the
other side as well as the adjustable feet (2 pieces) and
set up the box.
Put over the handles on the other side and put the plastic
covering nails supplied in the plastic bag of this
instruction book into the holes set free.
Put the appliance to its place, set it level and plug it into
the mains socket.
Page 9

9
Any electrical work required to install this appliance should
be carried out by a qualified electrician or competent
person.
WARNING: THIS APPLIANCE MUST BE
EARTHED.
Should the appliance power supply cable need to be
replaced, this must be carried out by a Service
Force agent (see page 16).
The manufacturer declines any liability should this
safety measure not be observed.
Before switching on,make sure the electricity supply voltage
is the same as that indicated on the appliance’s rating plate.
(See picture on page 5).
The appliance is supplied with a 13amp plug supplied. In the
event of having to change the fuse in the plug supplied, a
13amp ASTA approved BS 1363/A fuse must be used.
Should the plug need to be replaced for any reason, proceed
as described below.The wires in the mains lead are coloured
in accordance with the following code:
Green and Yellow - Earth
Blue - Neutral
Brown - Live
If you fit your own plug, the colours of the wires in the
mains lead of your appliance may not correspond with the
markings identifying the terminals in your plug.
Proceed as follows:
1. Connect the Green and Yellow (earth) wire to the
terminal in the plug which is marked with the letter "E"
orthe earth symbol or coloured green and yellow.
2. Connect the Blue (neutral) wire to the terminal in the
plug which is marked with the letter "N" or coloured
black.
3. Connect the Brown (live) wire to the terminal in the
plug which is marked with the letter "L" or coloured
red.
4. Upon completion there must be no cut, or stray strands
of wire present and the cord clamp must besecure over
the outer sheath.
WARNING: A cut off plug inserted into a
13 amp socket is a serious safety (shock)
hazard. Ensure that the cut off plug is
disposed of safely.
The plug must still be accessible after the
appliance has been installed.
The appliance should not be connected to
the electrical supply by means of an
extension cable.
Permanent connection
In the case of permanent connection it is necessary that
you install a double pole switch between the appliance
and the electricity supply (mains), with a minimum gap of
3mm between the switch contacts and of a type suitable
for the required load in compliance with the current
electrical regulations.
The switch must not break the yellow and green earth
cable at any point.
Electrical connection
Page 10

10
When the refrigerator is first
installed
General information
This appliance is designed for domestic use only.
To ensure correct operation, the appliance should be
located where the ambient temperature of between
10-32°C.
Using the Appliance
Before Use
Remove all packaging and adhesive tape.
Wash the inside of the appliance with lukewarm water and
bicarbonate of soda (5 ml to 0,5 litre of water). Do not use
soap or detergent as the smell may linger. Dry the appliance
thoroughly.
perfumed cleaning products, wax polishes or products
containing alcohol.
)
To Start the Appliance
1. Allow the appliance to stand for 2 hrs after installation.
2. Plug in the appliance and switch on at the mains supply.
3. Turn the thermostat control to the required setting. A
setting of 3 is usually suitable for normal operation (see
thermostat control).
4. Leave the appliance for approximately 4 hours for the
correct temperature to be reached before placing food
inside.
Thermostat Control
The thermostat control knob situated inside the
refrigerator regulates the temperature of the larder
compartment. Thermostat control is marked from 1-5 the
higher the number, the colder the setting.
Position 0 - Off
Position 1 - minimum coldness
Position 5 - maximum coldness
Page 11

11
Storage time and
temperature of foods
The enclosed charts at the end of the instruction book
give information about storage time in the fresh food
compartment.
The storage times quoted are intended as a guide only.
Using the refrigerator
Hints for storage
Below is the recommended storage positions for various
food types:
1. Ready-cooked foods, convenience foods, fresh meat,
could cuts
2. Dairy products, foods in dishes
3. Fruits, vegetables, salads
4. Cheese, butter
5. Eggs
6. Yoghurt, sour cream
7. Small bottles, soft drinks
8. Large bottles, drinks, milk
Storage Shelves
The shelves in the refrigerator compartment are
adjustable to allow storage of large items.
The shelves can be removed and adjusted opening the
door to 90°.
The door shelves are also adjustable.
To allow the air to circulate within the fridge
compartment do not cover the air circulation
gaps behind the shelves (e.g. with tray etc.)
Page 12

12
In this chapter practical hints and ideas are given about how
to use the appliance to reach maximum efficiency.
Environmental information is also supplied.
Hints & Tips
Normal Operating Sounds
You may hear faint gurgling or bubbling sounds when the
refrigerant is pumped through the coils or tubing.
When the compressor is on, the refrigerant is being
pumped round and you will hear a whirring sound or
pulsating noise from the compressor.
A thermostat controls the compressor and you will hear
a faint 'click' when the thermostat cuts in and out.
Food Storage
To obtain the best performance from your appliance:
To obtain the best results from your appliance
neither hot foods nor liquids which may evaporate,
should be placed in the larder compartment. Allow
to cool first before placing in the appliance.
Keep the time between buying chilled food and
placing it in your fridge as short as possible.
Do not push food together too closely, try to allow
air to circulate around each item.
Do not store food uncovered.
Remove suspect food from your refrigerator and
clean, refer to cleaning and maintenance.
Energy Saving Advice
Do not install the cabinet close to sources of
heat, such as a cooker, dishwasher or radiator.
Locate the appliance in a cool well ventilated
room and make sure that the air openings of the
cabinet are not obstructed.
Always leave warm food to cool down to room
temperature before placing in the fridge.
Try to avoid keeping the door open for long
periods, or opening the door too frequently as
warm air will enter the cabinet, and cause the
compressor to switch on unnecessarily often.
Ensure there are no obstructions preventing the
door from closing properly.
It is advisable to periodically clean the
refrigeration system at the back of the appliance
with a duster or vacuum cleaner.
Page 13

13
Foods Storage time in days Method of packaging
1 234 567
Raw meat XXx x x cling film, airtight
Cooked meat XXXx x x dish covered
Roasted meat XXXx x dish covered
Raw minced meat X dish covered
Roasted minced meat XXx x dish covered
Cold cuts,Vienna sausage XXx x cling film, cellophane, grease-proof paper
Fresh fish X x x cling film, airtight
Cooked fish XXx x dish covered
Fried fish XXx x x dish covered
Tinned fish, open X x x dish covered
Fresh chicken XXXx x x cling film, airtight
Fried chicken XXXx x x dish covered
Fresh duck, goose XXXx x x cling film, airtight
Roasted duck, goose XXXX x x x dish covered
Butter unopened XXXX XXXoriginal packaging
Butter opened X XXX XXXoriginal packaging
Milk XXXx x original packaging
Cream XXx x plastic box
Sour cream XXXX x x x plastic box
Cheese (hard) X XXX XXXaluminium foil
Cheese (soft) XXXX x x x cling film
Curds XXXX x x x cling film
Egg X XXX XXX
Spinach, sorrel XXx x cling film
Green peas, green beans XXXX x x x cling film
Mushroom XXx x x cling film
Carrot, roots X XXX XXXcling film
Bell-pepper XXx x x cling film
Tomato XXXX XXXcling film
Cabbage XXXX Xx x cling film
Soft fruits (strawberry,
raspberry,etc.) XXXx x cling film
Other fruits XXXX x x x cling film
Tinned fruits opened XXXx x dish covered
Cakes filled with cream XXx x dish covered
Storage time chart (refrigerator)
Time and method of storage of fresh foods in the refrigerator
Notation:
X recommended storage time
x ,aximum recommended storage time
Page 14

14
Maintenance and Cleaning
Internal Cleaning
Clean the inside and accessories with warm water and
bicarbonate of soda (5 ml to 0.5 litre of water). Rinse and
dry thoroughly.
Do not use detergents, abrasive powders, highly
perfumed cleaning products, wax polishes or cleaning
products containing
bleach or alcohol.
Clean the drain hole of the water trough at regular intervals
and ensure that the drain hole is clear at all times. If blocked
carefully clear using a piece of flexible curtain wire inserted
into the drain outlet to remove the blockage.
Regularly check the door seals and wipe clean to ensure
they are clean and free from debris.
External Cleaning
Wash the outer cabinet with warm soapy water.
Do NOT use abrasive products.
There are sharp edges on the underside of the
product so care should be taken when
cleaning.
Once or twice a year dust the condenser (black grille)
and the compressor at the back of the appliance with a
brush or vacuum cleaner, as an accumulation of dust will
affect the performance of the appliance and cause
excessive electricity consumption.
Changing the Light Bulb
Should the light fail to work you can change it as below:
Disconnect the appliance from the electricity supply.
Remove the lamp cover retaining screws, then take the
lamp cover off in the direction of the arrow and the bulb
can be changed. (Type of the bulb: 230 V, 15 W, E 14
thread)
After changing the bulb replace the lamp cover, and
retaining screws and reconnect the appliance to the
electricity supply.
Defrosting Your Appliance
The fridge compartment is defrosted automatically, when
the motor stops. Defrost water from the cooling plate
runs out of the drain and onto a tray on the motor
compressor where it evaporates. Droplets of water on
the cooling plate during defrosting are quite normal and
will freeze on the plate afterwards.
When the appliance is not in
use
When the appliance is not in use for long periods
disconnect from the electricity supply, empty all of the
food and clean the appliance, leaving the door ajar to
prevent unpleasant smells.
Before any maintenance of cleaning work is carried
out DISCONNECT the appliance from the
ELECTRICITY SUPPLY.
Page 15

15
Something Not Working
If the appliance is not working correctly, please carry out the following checks before contacting your local Service Force
agent.
IMPORTANT: If you call out an engineer to a fault listed below, or to repair a fault caused by incorrect use or
installation, a charge will be made even if the appliance is under guarantee.
Symptom
No power to the appliance
The temperature in the appliance is too
high
The temperature in the appliance is too low
Excessive frost and ice has built up
The appliance is noisy.
Water under the salad drawer.
Solution
Check there is power at the socket.
Check there is not a power cut by checking the household lights.
Check the fuse has not blown.
Check the thermostat control knob setting is not off.
Check the ambient temperature is within the appliances operating limits
of 10 °C to 32 °C.
Check that the thermostat control knob is turned to the correct setting
relative to ambient conditions.
Set the thermostat control knob to a warmer position.
Check the door has not been left open.
Check nothing is preventing the door from closing.
Check the door gasket is intact and clean.
Check if the appliance stands stable (all four feet should be on the floor).
Check the drain hole is not blocked (see 'Maintenance and Cleaning').
Page 16

16
Repairs - After Sales Service
In the unlikely event of your appliance requiring service,
or if you wish to purchase spare parts, please contact our
extended warranty administrators by telephoning:
0870 010 7887
They will give you details for your local Service Force
Centre.
Before calling out an engineer, please ensure you have
read the details under the heading “Something Not
Working”.
When you contact your local Service Force Centre you
will need to give the following details:
1.Your name, address and post code
2.Your telephone number
3. Clear and concise details of fault
4.The purchase date found on your receipt.
5.The model and serial number of the appliance (found on
the rating plate - see picture on page 5)
So that you always have these numbers at hand, we
recommend you to make a note of them here:
Mod. :.................
PNC :..................
S.N. :..................
Your Fridge - Freezer is covered by a 3 year parts
and labour guarantee (see separate details given
at point of sale). Please retain your purchase
receipt safely for the service engineer to verify the
purchase details.
Spare parts
Always insist on genuine spare parts. An authorised
service engineer should service this product, and only
genuine spare parts should be used. Under no
circumstances should you attempt to repairthe machine
yourself. Repairs carried out by inexperienced persons
may cause injury or serious malfunctioning. Contact your
local Service Force Centre. An authorised service
engineer always insist on genuine spare parts.
Page 17

17
Page 18

18
Page 19

19
Page 20

08/06
John Lewis Partnership
171 Victoria Street
London SW1E 5NN
www.johnlewis.com
200380417
 Loading...