

Page 1

JLDWW1307
User Manual
Dishwasher
Page 2

Contents
Safety information 3
Children and vulnerable people safety 3
General Safety 3
Safety instructions 5
Installation 5
Electrical connection 5
Water connection 5
Use 5
Service 5
Disposal 6
Product description 7
Control panel 8
Programmes 9
Settings 10
Programme selection mode and user mode 10
The water softener 10
AirDry 11
Before first use 13
The salt container 13
How to fill the rinse aid dispenser 14
Daily use 15
Loading cutlery and dishes 15
Using the detergent 18
Setting and starting a programme 19
Hints and tips 20
General 20
Using salt, rinse aid and detergent 20
What to do if you want to stop using multi-
tablets 20
Loading the baskets 20
Before starting a programme 21
Unloading the baskets 21
Care and cleaning 22
Cleaning the filters 22
Cleaning the spray arms 23
External cleaning 23
Internal cleaning 23
Troubleshooting 24
The washing and drying results are not
satisfactory 26
Technical information 28
Installation 29
Unpacking 29
Fitting under the kitchen worktop 29
Removing the appliance worktop 29
Levelling of the appliance 30
Water connection 31
Water inlet connection 31
Water drain connection 31
Electrical connection 33
Repairs - after sales service 34
Dishwasher User Manual
2
Page 3

Safety information
Before the installation and use of the appliance, carefully read the
supplied instructions. The manufacturer is not responsible for any
injuries or damages that are the result of incorrect installation or
usage. Always keep the instructions in a safe and accessible location
for future reference.
Children and vulnerable people safety
• This appliance can be used by children aged from 8 years and above
and persons with reduced physical, sensory or mental capabilities
or lack of experience and knowledge if they have been given
supervision or instruction concerning the use of the appliance in a
safe way and understand the hazards involved.
• Do not let children play with the appliance.
• Keep detergents away from children.
• Keep children and pets away from the appliance when the door is
open.
• Children shall not carry out cleaning and user maintenance of the
appliance without supervision.
General Safety
• This appliance is intended to be used in household and similar
applications such as:
– farm houses; staff kitchen areas in shops, offices and other
working environments;
– by clients in hotels, motels, bed & breakfast and other residential
type environments.
• Do not change the specification of this appliance.
• The operating water pressure (minimum and maximum) must be
between 0.5 (0.05) / 8 (0.8) bar (MPa)
Dishwasher User Manual
3
Page 4

• Obey the maximum number of 13 place settings.
• If the supply cord is damaged, it must be replaced by the
manufacturer, its Authorised Service Centre or similarly qualified
persons in order to avoid a hazard.
• Put the cutlery in the cutlery basket with the sharp ends pointing
down or put them in the cutlery drawer in a horizontal position
with the sharp edges down.
• Do not leave the appliance with the open door unattended to avoid
stepping accidentally onto it.
• Before any maintenance operation, deactivate the appliance and
disconnect the mains plug from the socket.
• Do not use high pressure water sprays and/or steam to clean the
appliance.
• If the appliance has ventilation openings in the base, they must not
be covered e.g. by a carpet.
• The appliance is to be connected to the water mains using the new
supplied hose-sets. Old hose sets must not be reused.
Dishwasher User Manual
4
Page 5

Safety instructions
Installation
Warning! Only a qualified
person must install this
appliance.
• Remove all the packaging.
• Do not install or use a damaged appliance.
• Do not install or use the appliance where the
temperature is less than 0 °C.
• Follow the installation instruction supplied with
the appliance.
• Always take care when moving the appliance as
it is heavy. Always use safety gloves and
enclosed footwear.
Electrical connection
Warning! Risk of fire and
electrical shock.
• The appliance must be earthed.
• Make sure that the parameters on the rating
plate are compatible with the electrical ratings
of the mains power supply.
• Always use a correctly installed shockproof
socket.
• Do not use multi-plug adapters and extension
cables.
• Make sure not to cause damage to the mains
plug and to the mains cable. Should the mains
cable need to be replaced, this must be carried
out by our Authorised Service Centre.
• Connect the mains plug to the mains socket
only at the end of the installation. Make sure
that there is access to the mains plug after the
installation.
• Do not pull the mains cable to disconnect the
appliance. Always pull the mains plug.
• This appliance complies with the E.E.C.
Directives.
• UK and Ireland only. This appliance is fitted with
a 13 A mains plug. If it is necessary to change
the mains plug fuse, use only a 13 A ASTA (BS
1362) fuse.
Water connection
• Do not cause damage to the water hoses.
• Before connection to new pipes, pipes not used
for a long time, where repair work has been
carried out or new devices fitted (water
meters, etc.), let the water flow until it is clean
and clear.
• Ensure that there are no visible water leaks
during and after the first use of the appliance.
• If the water inlet hose is damaged, immediately
close the water tap and disconnect the mains
plug from the mains socket. Contact the
Authorised Service Centre to replace the water
inlet hose.
Use
• Do not sit or stand on the open door.
• Dishwasher detergents are dangerous. Obey
the safety instructions on the detergent
packaging.
• Do not drink and play with the water in the
appliance.
• Do not remove the dishes from the appliance
until the programme is complete. Some
detergent may remain on the dishes.
• The appliance can release hot steam if you open
the door while a programme operates.
• Do not put flammable products or items that
are wet with flammable products in, near or on
the appliance.
Service
• Contact the Authorised Service Centre to
repair the appliance. We recommend only the
use of original spare parts.
Dishwasher User Manual
5
Page 6

• When you contact the Authorised Service
Centre, ensure that you have the following
information that is available on the rating plate.
Model :
PNC :
Serial Number :
Disposal
Warning! Risk of injury or
suffocation.
• Disconnect the appliance from the mains
supply.
• Cut off the mains cable and discard it.
• Remove the door catch to prevent children and
pets to get closed in the appliance.
Dishwasher User Manual
6
Page 7
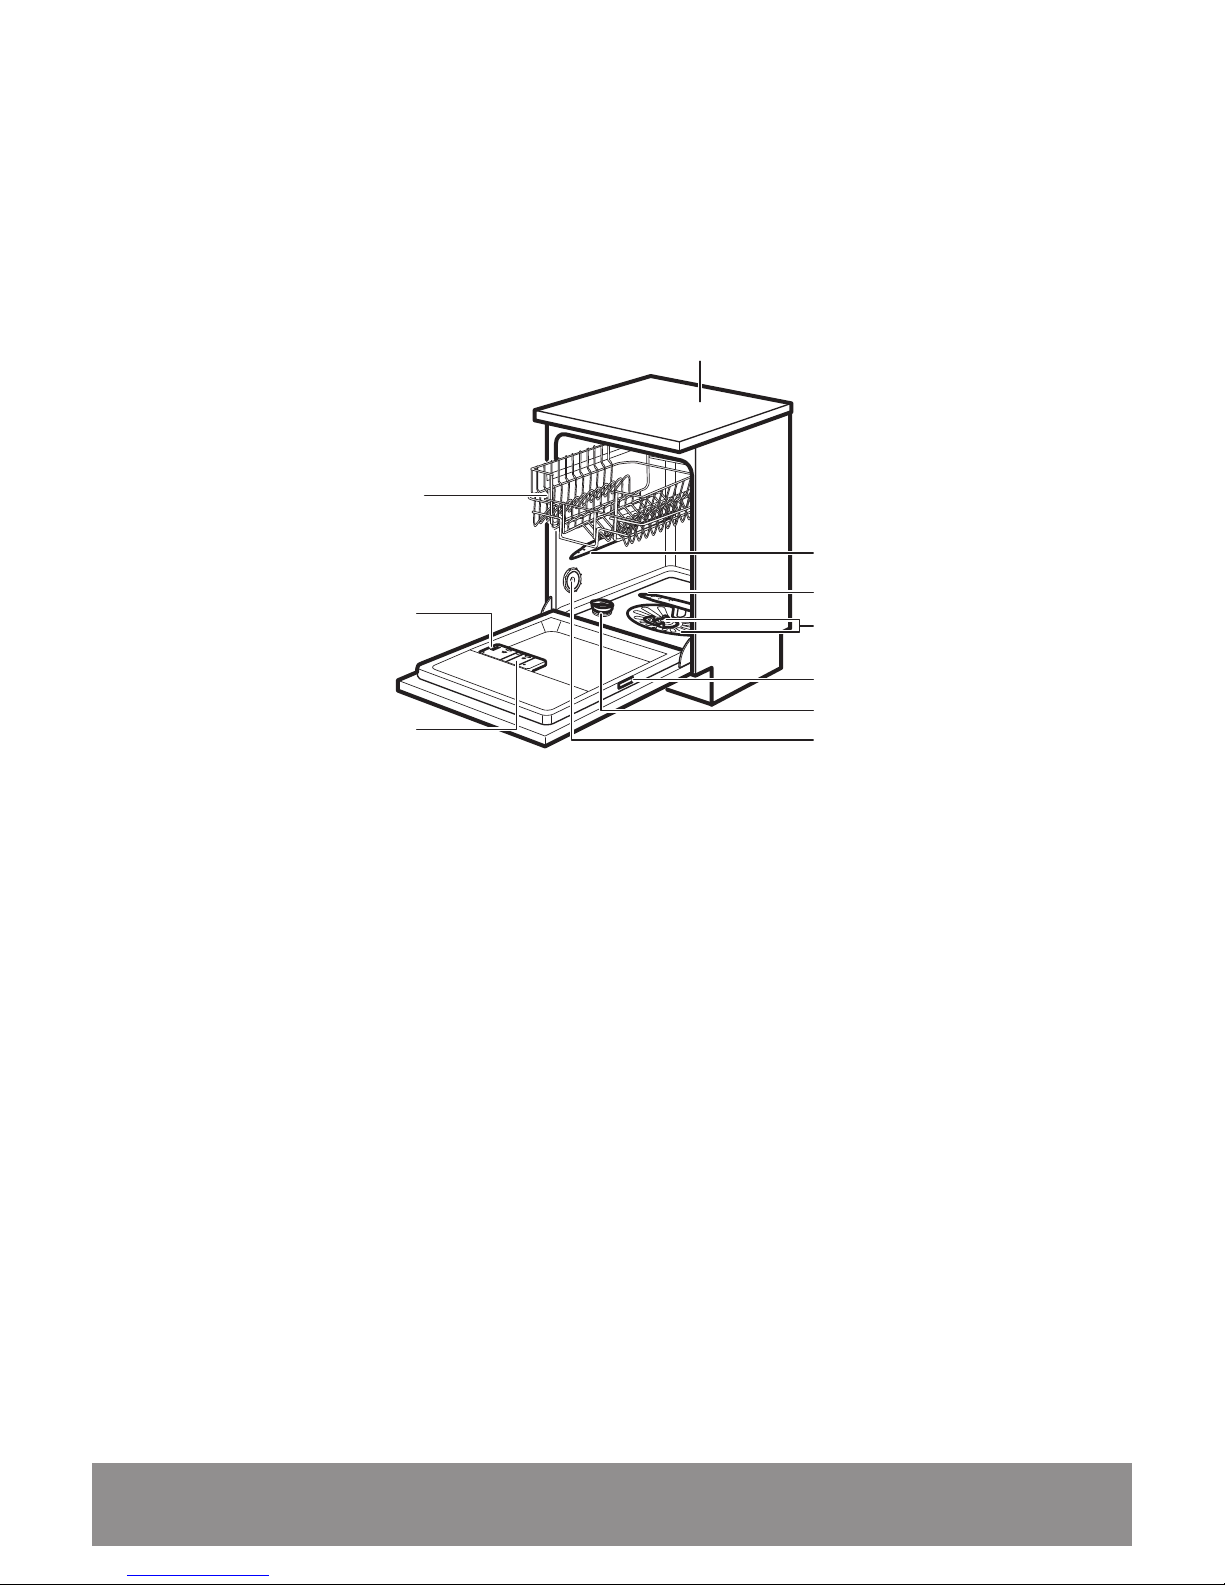
Product description
1
10
9
8
3
2
5
6
7
4
1. Worktop
2. Upper spray arm
3. Lower spray arm
4. Filters
5. Rating plate
6. Salt container
7. Air vent
8. Rinse aid dispenser
9. Detergent dispenser
10. Upper basket
Dishwasher User Manual 7
Page 8
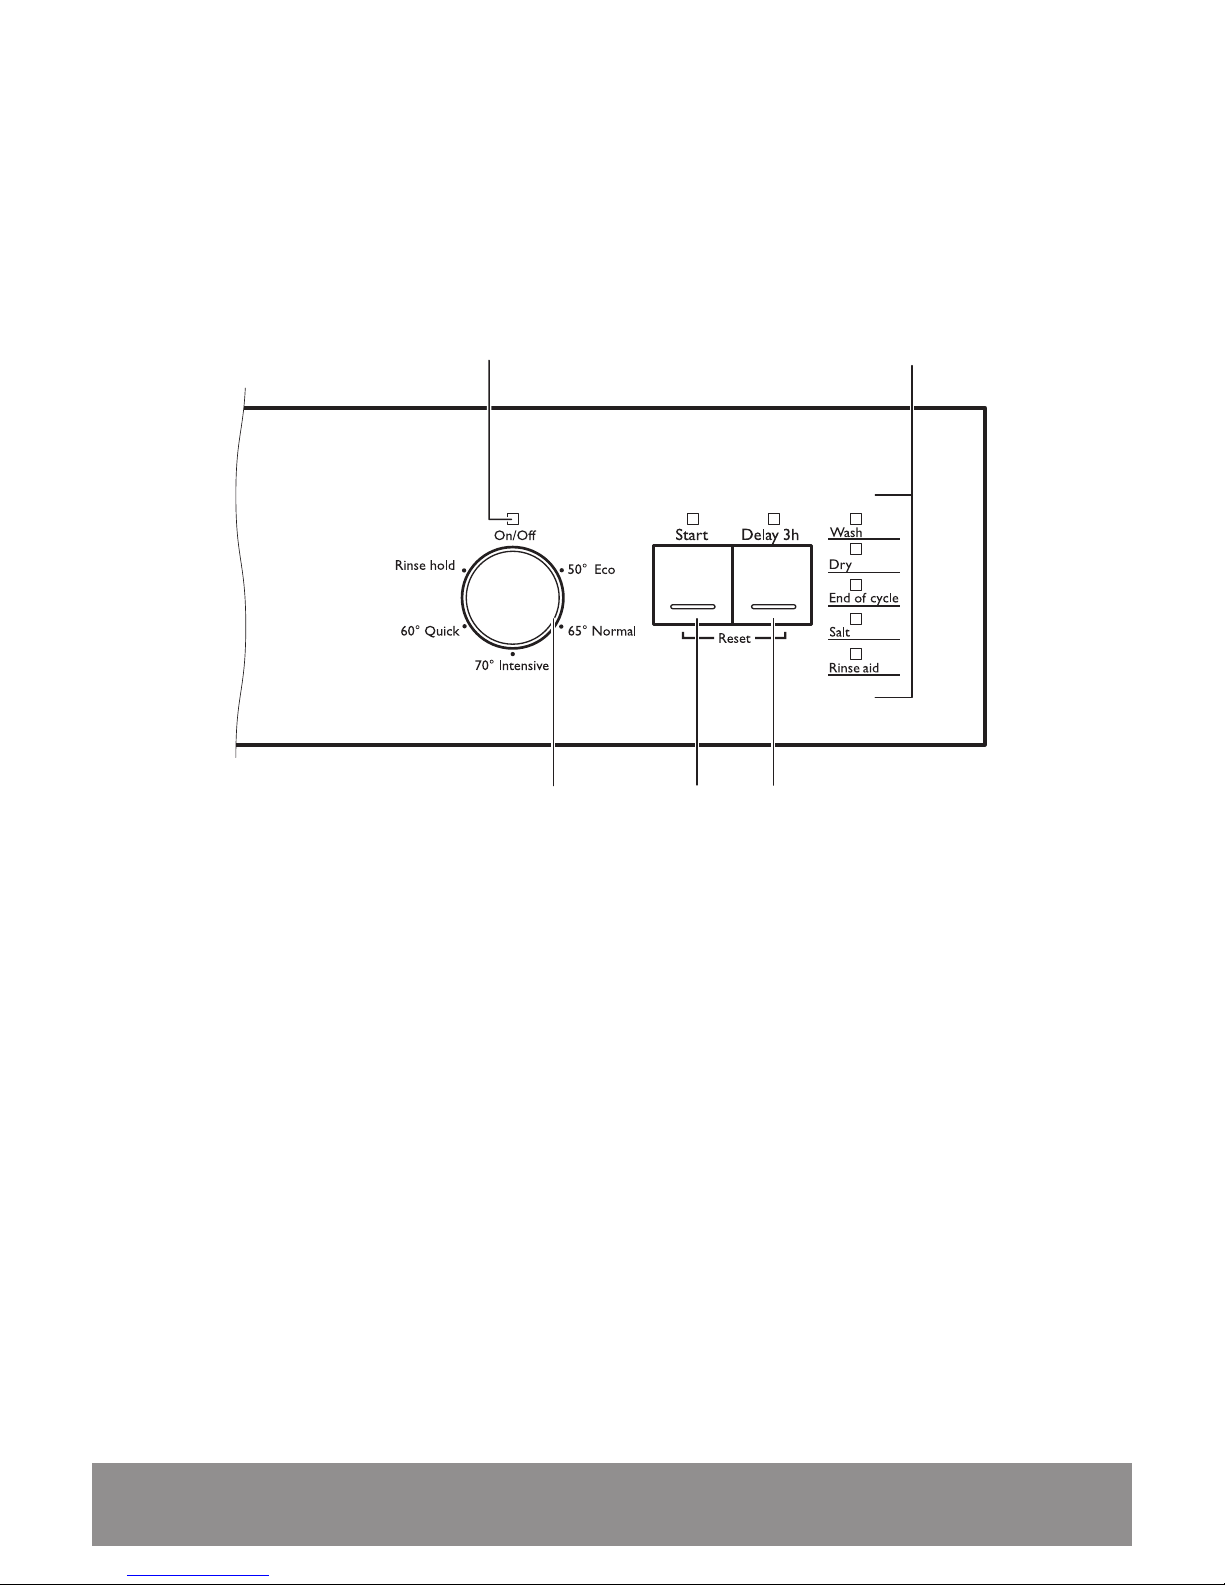
Control panel
1
4
2
35
1. On/off indicator
2. Indicators
3. Delay button
4. Start button
5. Programme knob
Dishwasher User Manual8
Page 9

Programmes
Programme Degree of soil
Type of load
Programme phases
Consumption values
1)
Duration
(min)
Energy
(kWh)
Water
(l)
50° Eco
2)
Normal soil
Crockery and cutlery
• Prewash
• Wash 50 °C
• Rinses
• Dry
227 1.039 11
70° Intensive Heavy soil
Crockery, cutlery,
pots and pans
• Prewash
• Wash 70 °C
• Rinses
• Dry
155 - 170 1.5 - 1.7 14-15
65° Normal Normal soil
Crockery and cutlery
• Prewash
• Wash 65 °C
• Rinses
• Dry
130 - 140 1.4 - 1.6 15-17
60° Quick
3)
Fresh soil
Crockery and cutlery
• Wash 60 °C or 65
°C
• Rinses
30 0.8 10
Rinse hold
4)
All • Prewash 14 0.1 5
1) The pressure and the temperature of the water, the variations of the mains supply, the options and the quantity of dishes can
change the values.
2) With this programme you have the most efficient use of water and energy consumption for crockery and cutlery with normal
soil. (This is the standard programme for test institutes).
3) With this programme you can wash a load with fresh soil. It gives good washing results in a short time.
4) Use this programme to quickly rinse the dishes. this prevents the remaining food to bond on the dishes and bad odours to
come out from the appliance. Do not use detergent with this programme.
Dishwasher User Manual 9
Page 10
Settings
Programme selection mode
and user mode
When the appliance is in programme selection
mode it is possible to set a programme and to
enter the user mode.
Settings available in the user mode:
• The level of water softener according to the
water hardness.
• Activation or deactivation of AirDry.
As the appliance stores the saved
settings, there is no need to configure it
before every cycle.
How to set the programme selection
mode
The appliance is in programme selection mode
when the on/off indicator is on and Start
indicator flashes.
After activation, the appliance is in programme
selection mode by default. If not, set the
programme selection mode the following way:
Press and hold simultaneously Start and Delay
until the appliance is in programme selection mode.
The water softener
The water softener removes minerals from the
water supply, which would have a detrimental
effect on the washing results and on the
appliance.
The higher the content of these minerals, the
harder your water is. Water hardness is
measured in equivalent scales.
The water softener should be adjusted
according to the hardness of the water in your
area. Your local water authority can advise you
on the hardness of the water in your area. It is
important to set the right level of the water
softener to assure good washing results.
Water hardness
German degrees
(°dH)
French degrees
(°fH)
mmol/l Clarke de-
grees
Water softener level
47 - 50 84 - 90 8.4 - 9.0 58 - 63 10
43 - 46 76 - 83 7.6 - 8.3 53 - 57 9
37 - 42 65 - 75 6.5 - 7.5 46 - 52 8
29 - 36 51 - 64 5.1 - 6.4 36 - 45 7
23 - 28 40 - 50 4.0 - 5.0 28 - 35 6
19 - 22 33 - 39 3.3 - 3.9 23 - 27
5
1)
15 - 18 26 - 32 2.6 - 3.2 18 - 22 4
Dishwasher User Manual10
Page 11
German degrees
(°dH)
French degrees
(°fH)
mmol/l Clarke de-
grees
Water softener level
11 - 14 19 - 25 1.9 - 2.5 13 - 17 3
4 - 10 7 - 18 0.7 - 1.8 5 - 12 2
<4 <7 <0.7 < 5
1
2)
1) Factory setting.
2) Do not use salt at this level.
Whether you use a standard detergent
or multi-tabs (with or without salt), set
the proper water hardness level to keep
the salt refill indicator active.
Multi-tabs containing salt are not
effective enough to soften hard
water.
How to set the water softener level
The appliance must be in programme selection
mode.
1. Make sure that the programme marker on the
knob is set to on/off position .
2. To enter the user mode, press and hold
Delay. At the same time turn the knob
counterclockwise until the programme marker
indicates the first programme. Release Delay
when the indicators Start and on/off start
flashing.
• The intermittent flashing of End of cycle
shows the current setting, e.g. 5 flashes +
pause + 5 flashes = level 5.
3. Press Delay.
• The indicator End of cycle starts flashing.
• The indicators Start and on/off still flash.
4. Press Delay repeatedly to change the setting.
Each pressing of Delay increases the level
number. After reaching level 10, the count
starts again from level 1.
5. Turn knob to on/off position to confirm the
setting.
AirDry
AirDry improves the drying results with less
energy consumption.
During the drying phase, the door
opens automatically and remains
ajar.
Caution! Do not try to close
the appliance door within 2
minutes after automatic
opening. This can cause
damage to the appliance.
AirDry is automatically activated with all
programmes excluding Rinse hold.
Caution! If children have
access to the appliance, it is
advised to deactivate AirDry
as opening the door may pose
a danger.
How to deactivate AirDry
The appliance must be in programme selection
mode.
Dishwasher User Manual
11
Page 12

Make sure that the programme marker on the
knob is set to on/off position.
1. To enter the user mode, press and hold
Delay. At the same time turn the knob
counterclockwise until the programme marker
indicates the first programme. Release Delay
when the indicators Start and on/off start
flashing.
2. Turn the knob counterclockwise until the
programme marker indicates the second
programme.
• The indicator End of cycle shows the
current setting: on = AirDry is activated.
3. Press Delay to change the setting.
• If the indicator End of cycle is off = AirDry
is deactivated.
4. To confirm the setting, keep turning the
programme knob until the programme marker
is back in the on/off position.
Dishwasher User Manual
12
Page 13

Before first use
1. Make sure that the current level of the
water softener agrees with the hardness
of the water supply. If not, adjust the
level of the water softener.
2. Fill the salt container.
3. Fill the rinse aid dispenser.
4. Open the water tap.
5. Start a programme to remove any processing
residuals that can still be inside the appliance.
Do not use detergent and do not load the
baskets.
After starting a programme, it may take up to 5
minutes for the appliance to recharge the resin
in the water softener. It seems that the
appliance is not working. The washing phase
starts only after this procedure is completed.
The procedure is repeated periodically.
The salt container
Caution! Use rough salt
designed for dishwashers only.
Fine salt increases the risk of
corrosion.
The salt is used to recharge the resin in the
water softener and to assure good washing
results in daily use.
How to fill the salt container
1. Turn the cap of the salt container
counterclockwise and remove it.
2. Put 1 litre of water in the salt container (only
for the first time).
3. Fill the salt container with 1 kg of salt (until it is
full).
4. Carefully shake the funnel by its handle to get
the last granules inside.
5. Remove the salt around the opening of the salt
container.
6. Turn the cap of the salt container clockwise to
close the salt container.
Caution! Water and salt can
come out of the salt container
when you fill it. After you fill
the salt container,
immediately start a
programme to prevent
corrosion.
Dishwasher User Manual 13
Page 14

How to fill the rinse aid
dispenser
A
B
D
C
M
A
X
1
2
3
4
+
-
A
B
D
C
Caution! Only use rinse aid
specifically designed for
dishwashers.
1. Press the release button (D) to open the lid
(C).
2. Pour the rinse aid in the dispenser (A) until the
liquid reaches the fill level 'max'.
3. Remove the spilled rinse aid with an absorbent
cloth to prevent too much foam.
4. Close the lid. Make sure that the release
button locks into position.
You can turn the selector of the
released quantity (B) between
position 1 (lowest quantity) and
position 4 or 6 (highest quantity).
Dishwasher User Manual14
Page 15

Daily use
1. Open the water tap.
2. Press the on/off button to activate the
appliance.
Make sure that the appliance is in programme
selection mode.
• If the salt indicator is on, fill the salt
container.
• If the rinse aid indicator is on, fill the rinse
aid dispenser.
3. Load the baskets.
4. Add the detergent.
5. Set and start the correct programme for the
type of load and the degree of soil.
Loading cutlery and dishes
Warning! Always close the
appliance door after loading
the baskets. An open door can
be a hazard.
Caution! Always ensure that
the spray arms can rotate
freely before you close the
appliance door and start the
programme.
The lower basket
The lower basket is designed to take pots, pans,
lids, dishes, salad bowls and cutlery. Serving
dishes and large lids should be arranged around
the edge of the basket, ensuring that the spray
arms can turn freely.
Dishwasher User Manual
15
Page 16

The cutlery basket
Warning! Knives with long
blades, stored in an upright
position, are a potential
hazard. Long and/or sharp
items of cutlery such as
carving knives must be
positioned horizontally in the
upper basket. Take care when
loading or unloading sharp
items such as knives. Forks
and spoons should be placed
in the removable cutlery
basket with the handles facing
downwards and the knives
with their handles facing
upwards
Mix spoons with other cutlery to prevent them
from sticking together. For best results we
recommend you use the cutlery grid. If the size
and dimensions of the cutlery do not allow the
use of the grid, this can be easily removed.
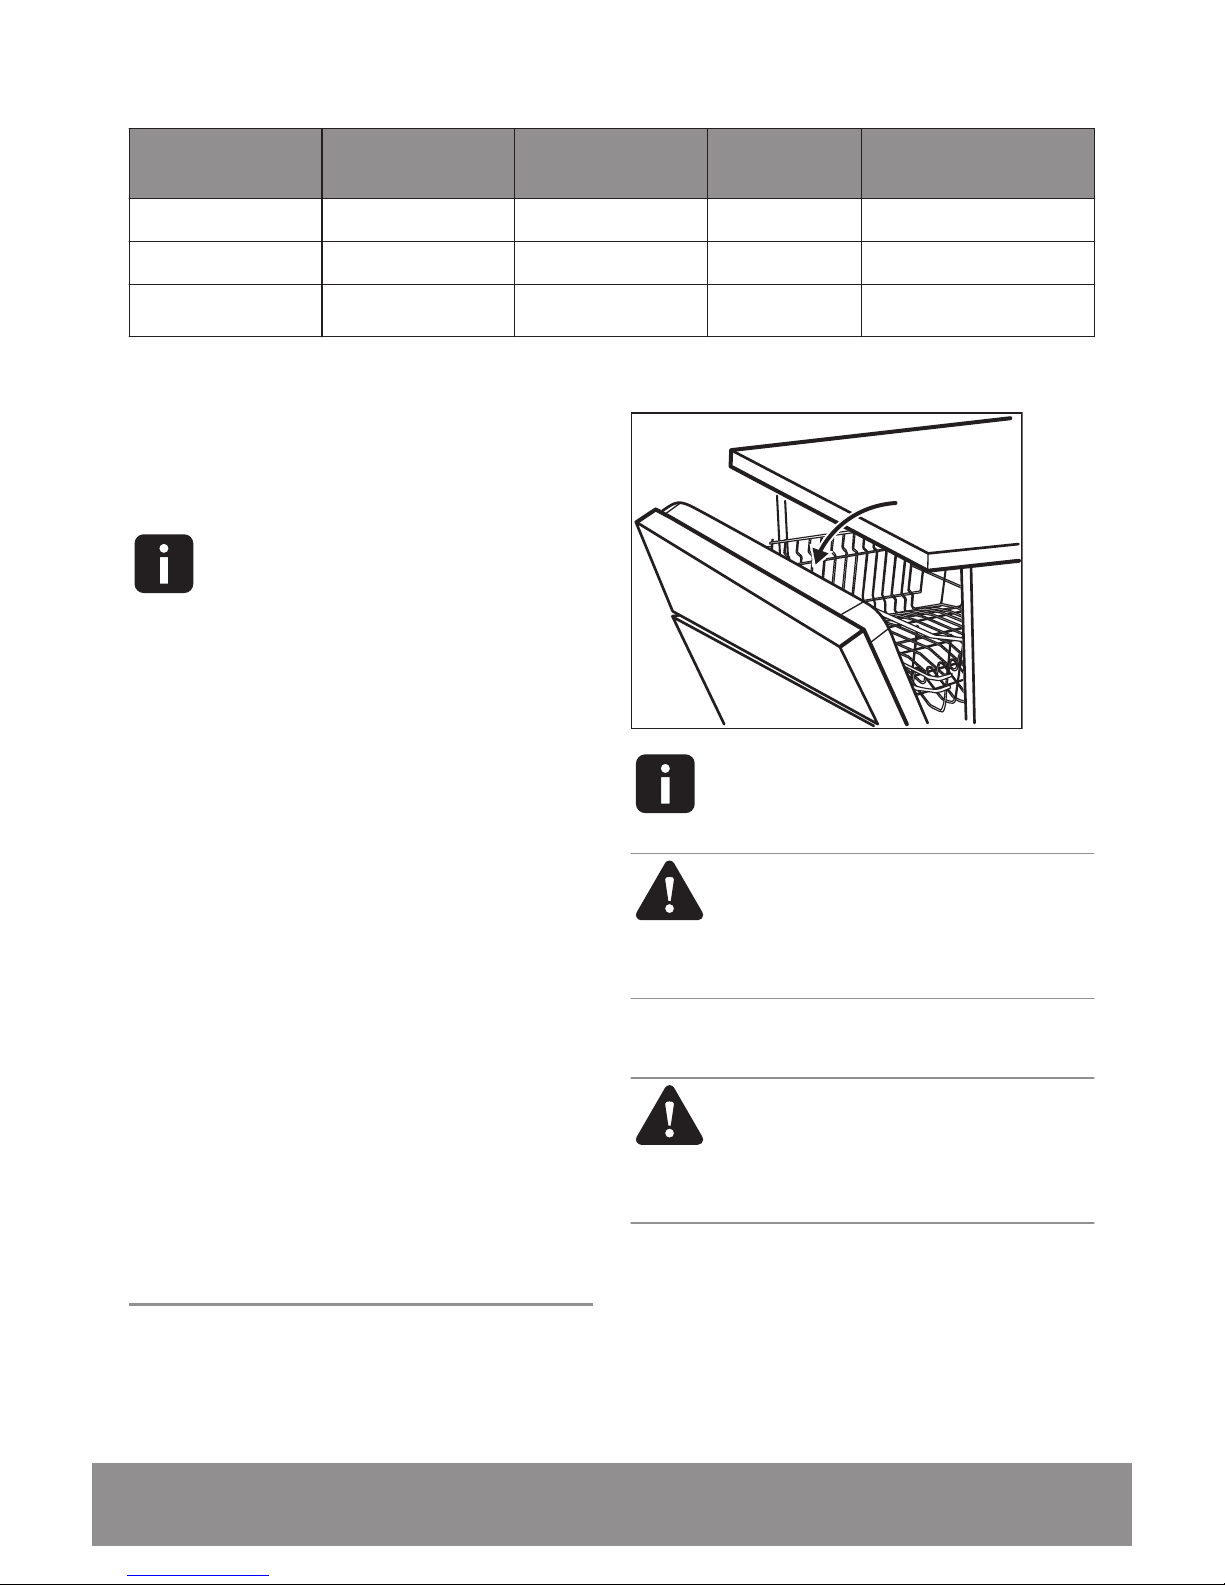
The upper basket
Arrange items on and underneath the cup racks
so that water can reach all surfaces.
Dishwasher User Manual
16
Page 17

Glasses with long stems can be placed upside
down in the cup racks. For taller items, the cup
racks can be folded upwards.
Caution! Ensure that the
spray arms can rotate freely
before you close the appliance
door.
Adjusting the height of the upper basket
Caution! Never lift or lower
the basket on one side only.
To load very large plates move the upper basket
to the higher position.
Dishwasher User Manual
17
Page 18

27 cm
24 cm
31 cm
20 cm
Moving the upper basket to the higher
position
1. Pull out the basket until it stops.
2. Carefully lift both sides upwards until the
mechanism is engaged and the basket is stable.
Moving back the upper basket to the lower
position
1. Pull out the basket until it stops.
2. Carefully lift both sides upwards and then allow
the mechanism to drop back down slowly,
keeping hold of it.
Using the detergent
30
20
A BD
C
Dishwasher User Manual18
Page 19

20
30
B
A D
C
1. Press the release button (B) to open the lid
(C).
2. Put the detergent, in powder or tablets, in the
compartment (A).
3. If the programme has a prewash phase, put a
small quantity of detergent in the compartment
(D).
4. Close the lid. Make sure that the release
button locks into position.
Setting and starting a
programme
The Auto Off function
This function decreases energy consumption by
deactivating automatically the appliance when it
is not operating.
The function comes into operation:
• 5 minutes after the completion of the
programme.
• After 5 minutes if the programme has not
started.
Starting a programme
1. Open the water tap.
2. Close the appliance door.
3. Turn the knob until the programme marker is
aligned with the programme you want to set.
• On/off indicator comes on.
• Start indicator starts to flash.
4. Press Start.
• The programme starts and the indicator of
the washing phase is on.
• On/off indicator and start indicator are on.
Starting a programme with delay start
1. Set the programme.
2. Press Delay to delay the start of the
programme of 3 hours.
The delay indicator comes on.
3. Press Start.
Start indicator comes on.
When the countdown is completed, the
programme starts.
Opening the door while the appliance
operates
If you open the door while a programme is
running, the appliance stops. It may affect the
energy consumption and the programme
duration. When you close the door, the
appliance continues from the point of
interruption.
If the door is opened for more than
30 seconds during the drying
phase, the running programme will
end. This will not happen when
programme 50° Eco with AirDry is
running.
Cancelling the delay start while the
countdown operates
1. Press and hold Start and Delay until the start
indicator starts to flash.
2. Press Start to start the programme.
Cancelling the programme
Press and hold Start and Delay until the start
indicator starts to flash.
Make sure that there is detergent in the
detergent dispenser before you start a new
programme.
End of the programme
When the programme is completed the End of
cycle indicator is on. After 5 minutes of non-use,
the appliance enters standby mode and all the
indicators are off. It decreases energy
consumption.
1. To deactivate the appliance, turn the
programme knob until the programme marker
is in on/off position.
2. Close the water tap.
Dishwasher User Manual
19
Page 20

Hints and tips
General
The following hints will ensure optimal cleaning
and drying results in daily use and also help to
protect the environment.
• Remove larger residues of food from the dishes
into the waste bin.
• Do not pre-rinse dishes by hand. When
needed, use the prewash programme (if
available) or select a programme with a
prewash phase.
• Always use the whole space of the baskets.
• When loading the appliance, make sure that the
dishes can be completely reached and washed
by the water released from the spray arm
nozzles. Make sure that items do not touch or
cover each other.
• You can use dishwasher detergent, rinse aid
and salt separately or you can use the multitablets (e.g. ''3in1'', ''4in1'', ''All in 1''). Follow
the instructions written on the packaging.
• Select the programme according to the type of
load and degree of soil. With the ECO
programme you have the most efficient use of
water and energy consumption for crockery
and cutlery with normal soil.
Using salt, rinse aid and
detergent
• Only use salt, rinse aid and detergent for
dishwasher. Other products can cause damage
to the appliance.
• In areas with hard and very hard water we
recommend to use plain dishwasher detergent
(powder, gel, tablets containing no additional
agents), rinse aid and salt separately for optimal
cleaning and drying results.
• At least once a month run the appliance with
the use of appliance cleaner which is particularly
suitable for this purpose.
• Detergent tablets do not fully dissolve with
short programmes. To prevent detergent
residues on the tableware, we recommend that
you use the tablets with long programmes.
• Do not use more than the correct quantity of
detergent. Refer to the instructions on the
detergent packaging.
What to do if you want to stop
using multi-tablets
Before you start to use separately detergent,
salt and rinse aid do the following procedure.
1. Set the highest level of the water softener.
2. Make sure that the salt and rinse aid containers
are full.
3. Start the shortest programme with a rinsing
phase. Do not add detergent and do not load
the baskets.
4. When the programme is completed, adjust the
water softener according to the water
hardness in your area.
5. Adjust the released quantity of rinse aid.
Loading the baskets
• Only use the appliance to wash items that are
dishwasher-safe.
• Do not put in the appliance items made of
wood, horn, aluminium, pewter and copper.
• Do not put in the appliance items that can
absorb water (sponges, household cloths).
• Remove remaining food from the items.
• Make soft the remaining burned food on the
items.
• Put hollow items (cups, glasses and pans) with
the opening down.
• Make sure that cutlery and dishes do not bond
together. Mix spoons with other cutlery.
• Make sure that glasses do not touch other
glasses.
Dishwasher User Manual
20
Page 21

• Put small items in the cutlery basket.
• Put light items in the upper basket. Make sure
that the items do not move.
• Make sure that the spray arm can move freely
before you start a programme.
Before starting a programme
Make sure that:
• The filters are clean and correctly installed.
• The cap of the salt container is tight.
• The spray arms are not clogged.
• There is dishwasher salt and rinse aid (unless
you use multi- tablets).
• The position of the items in the baskets is
correct.
• The programme is applicable for the type of
load and for the degree of soil.
• The correct quantity of detergent is used.
Unloading the baskets
1. Let the tableware cool down before you
remove it from the appliance. Hot items can
be easily damaged.
2. First remove items from the lower basket,
then from the upper basket.
At the end of the programme
water can still remain on the sides
and on the door of the appliance.
Dishwasher User Manual 21
Page 22

Care and cleaning
Warning! Before
maintenance, deactivate the
appliance and disconnect the
mains plug from the main
socket.
Dirty filters and clogged spray arms
decrease the washing results. Make
a check regularly and, if necessary,
clean them.
Cleaning the filters
The filter system is made of 3 parts.
C
B
A
1. Turn the filter (B) counterclockwise and
remove it.
2. Remove the filter (C) out of filter (B).
3. Remove the flat filter (A).
4. Wash the filters.
5. Make sure that there are no residues of food
or soil in or around the edge of the sump.
6. Put back in place the flat filter (A). Make sure
that it is correctly positioned under the 2
guides.
Dishwasher User Manual
22
Page 23

7. Reassemble the filters (B) and (C).
8. Put back the filter (B) in the flat filter (A). Turn
it clockwise until it locks.
Caution! An incorrect
position of the filters can
cause bad washing results and
damage to the appliance.
Cleaning the spray arms
Do not remove the spray arms. If the holes in
the spray arms are clogged, remove remaining
parts of soil with a thin pointed object.
External cleaning
• Clean the appliance with a moist soft cloth.
• Only use neutral detergents.
• Do not use abrasive products, abrasive cleaning
pads or solvents.
Internal cleaning
• Carefully clean the appliance, including the
rubber gasket of the door, with a soft damp
cloth.
• If you regularly use short duration programmes,
these can leave deposits of grease and limescale
inside the appliance. To prevent this, we
recommend to run long duration programmes
at least 2 times per month.
• To maintain the performance of your appliance
at its best, we recommend to use monthly a
specific cleaning product for dishwashers.
Follow carefully the instructions on the
packaging of the product.
Dishwasher User Manual 23
Page 24

Troubleshooting
If the appliance does not start or it stops during
operation, before you contact an Authorised
Service Centre, check if you can solve the
problem by yourself with the help of the
information in the table.
Warning! Repairs not
properly done may result in
serious risk to the safety of
the user. Any repairs must be
performed by qualified
personnel.
With some problems the end indicator flashes
intermittently indicating a malfunction.
The majority of problems that can occur
can be solved without the need to
contact an Authorised Service Centre.
Problem and alarm code Possible cause and solution
You cannot activate the appliance. • Make sure that the mains plug is connected to the mains
socket.
• Make sure that there is no damaged fuse in the fuse box.
The programme does not start. • Make sure that the appliance door is closed.
• Press Start.
• If the delay start is set, cancel the setting or wait for the
end of the countdown.
• The appliance has started the procedure to recharge the
resin inside the water softener. The duration of the procedure is approximately 5 minutes.
The appliance does not fill with water.
• The end indicator flashes 1 time intermittently.
• The Start indicator flashes continuously.
• Make sure that the water tap is open.
• Make sure that the pressure of the water supply is not too
low. For this information, contact your local water authority.
• Make sure that the water tap is not clogged.
• Make sure that the filter in the inlet hose is not clogged.
• Make sure that the inlet hose has no kinks or bends.
The appliance does not drain water.
• The end indicator flashes 2 times intermittently.
• The Start indicator flashes continuously.
• Make sure that the sink spigot is not clogged.
• Make sure that the drain hose has no kinks or bends.
Dishwasher User Manual24
Page 25

Problem and alarm code Possible cause and solution
The anti-flood device is on.
• The end indicator flashes 3 times intermittently.
• The Start indicator flashes continuously.
• Close the water tap and contact an Authorised Service
Centre.
The appliance stops and starts more times during operation.
• It is normal. It provides optimal cleaning results and energy
savings.
The programme lasts too long. • If the delayed start option is set, cancel the delay setting or
wait for the end of the countdown.
Small leak from the appliance door. • The appliance is not levelled. Loosen or tighten the adjust-
able feet (if applicable).
• The appliance door is not centred on the tub. Adjust the
rear foot (if applicable).
The appliance door is difficult to close. • The appliance is not levelled. Loosen or tighten the adjust-
able feet (if applicable).
• Parts of the tableware are protruding from the baskets.
Rattling/knocking sounds from inside the appliance.
• The tableware is not properly arranged in the baskets. Refer to "Loading cutlery and dishes" .
• Make sure that the spray arms can rotate freely.
The appliance trips the circuit-beaker. • The amperage is insufficient to supply simultaneously all
the appliances in use. Check the socket amperage and the
capacity of the meter or turn off one of the appliances in
use.
• Internal electrical fault of the appliance. Contact an Authorised Service Centre.
Refer to "Before first use",
"Daily use", or "Hints and
tips" for other possible causes.
Once you have checked the appliance, press
Start. If the problem occurs again, contact an
Authorised Service Centre.
For alarm codes not described in the table,
contact an Authorised Service Centre.
Dishwasher User Manual 25
Page 26

The washing and drying results are not satisfactory
The washing and drying results are not satisfactory
Poor washing results.
• Refer to "Daily use", "Hints and tips" and "Loading cutlery
and dishes".
• Use more intensive washing programmes.
• Clean spray arm jets and filter. Refer to "Care and Cleaning".
Poor drying results. • Tableware has been left for too long inside the closed appliance.
• There is no rinse aid or the dosage of rinse aid is not enough. Set
the rinse aid dispenser to a higher level.
• Plastic items may need to be towel dried.
• We recommend to always use rinse aid, even in combination with
multi-tablets.
• For the best drying performance activate AirDry.
There are streaks, whitish stains, or
bluish layers on glasses and dishes.
• The release quantity of rinse aid is too large. Adjust the rinse aid selector to a lower position.
• The quantity of detergent is too large.
Dry water drops on glasses and
dishes.
• The released quantity of rinse aid is not sufficient. Adjust the rinse
aid selector to a higher position.
• The quality of the rinse aid can be the cause.
The dishes are wet. • The programme does not have a drying phase or has a drying phase
with low temperature.
• The rinse aid dispenser is empty.
• The quality of the rinse aid can be the cause.
• For the best drying performance activate AirDry.
The interior of the appliance is wet. • This is not a defect of the appliance. it is caused by the humidity in
the air that condenses on the walls.
Unusual foam during washing. • Use the detergent for dishwashers only.
• There is a leak in the rinse aid dispenser. Contact an Authorised
Service Centre.
Traces of rust on cutlery.
• There is too much salt in the water used for washing. Refer to
"The water softener".
• Silver and stainless steel cutlery were placed together. Avoid to put
silver and stainless steel items close together.
There are residues of detergent in the
dispenser at the end of the programme.
• The detergent tablet got stuck in the dispenser and therefore was
not completely washed away by water.
• Water cannot wash away the detergent from the dispenser. Make
sure that the spray arm is not blocked or clogged.
• Make sure that items in the baskets do not impede the opening of
the lid of the detergent dispenser.
Dishwasher User Manual26
Page 27

The washing and drying results are not satisfactory
Odours inside the appliance.
• Refer to "Internal cleaning".
Limescale deposits on the tableware,
on the tub and on the inside of the
door.
• Refer to "The water softener".
Dull, discoloured or chipped tableware.
• Make sure that only dishwasher-safe items are washed in the appliance.
• Load and unload the basket carefully. Refer to "Loading cutlery
and dishes".
• Place delicate items in the upper basket.
Dishwasher User Manual 27
Page 28

Technical information
Dimensions Width / height / depth (mm) 600 / 850 / 625
Electrical connection
1)
Voltage (V) 220 - 240
Frequency (Hz) 50
Water supply pressure Min. / max. bar (MPa) 0.5 (0.05) / 8 (0.8)
Water supply
Cold water or hot water
2)
max 60 °C
Capacity Place settings 13
Power consumption Left-on mode (W) 5.0
Power consumption Off-mode (W) 0.50
1) Refer to the rating plate for other values.
2) If the hot water comes from alternative source of energy, (e.g. solar panels, aeolian energy), use the hot water supply to decrease energy consumption.
Dishwasher User Manual28
Page 29

Installation
Warning!
• It is dangerous to alter the
specifications or attempt to
modify the appliance in any way.
• This appliance is heavy. Care
should be taken when moving it.
• Care must be taken to ensure
that the appliance does not stand
on the electrical supply cable.
• Any electrical or plumbing work
required to install this appliance
must be carried out by a qualified
electrician or plumber.
Unpacking
• Remove all packaging before positioning the
appliance.
• Position the appliance next to a water tap and a
drain.
Fitting under the kitchen
worktop
By removing the worktop of the appliance, you
can install it under the kitchen worktop or a
close fitting sink. The dimensions of the recess
must correspond to those shown in the picture.
625 mm
600 mm
850-860 mm
Removing the appliance
worktop
1. Remove the appliance worktop by unscrewing
the two rear retaining screws (1).
1
2. Pull the worktop from the back of the
appliance (2).
Dishwasher User Manual
29
Page 30

2
3. Lift the worktop (3) and slide it out of the front
slots.
3
Insert the appliance once the levelling has been
done. When inserting the appliance, ensure that
the water inlet and drain hoses are not kinked
or squashed. During all operations that involve
accessibility to internal components the
appliance must be unplugged. Be sure that once
the appliance has been installed, it is easily
accessible for the service engineer in the event
that a repair is required. If the appliance is later
used as a freestanding appliance, the original
worktop must be reassembled The plinth on
freestanding appliances is not adjustable.
Caution! It is necessary to
protect the underside of the
kitchen worktop from
condensation. A plastic top
cover can be purchased,
contact your local John Lewis
branch.
Levelling of the appliance
Good levelling is essential for correct closure
and sealing of the appliance door. When the
appliance is correctly levelled, the door will not
catch on either side of the cabinet. If the
appliance door does not close correctly, loosen
or tighten the adjustable feet until the level of
the appliance is perfect.
Dishwasher User Manual30
Page 31

Water connection
Water inlet connection
This appliance may be fed with either hot
(maximum 60 °C) or cold water. Nevertheless
we advise you use a cold water supply. A hot
water supply is not always efficient with heavily
soiled crockery as it shortens the washing
programmes a lot. For making the connection
itself, the coupling nut fitted to the appliance
inlet hose is designed to screw onto a 3/4" gas
thread spout or to a purpose made quickcoupling tap such as the Press-block. The water
pressure must be within the limits given in the
‘Technical data’. Your local Water Authority will
advise you on the average mains pressure in
your area. The water inlet hose must not be
kinked, crushed, or entangled when it is being
connected. The appliance features inlet and
drain hoses which can be turned either to the
left or the right to suit the installation by means
of the locknut. The locknut must be correctly
fitted to avoid water leaks. If the appliance is
connected to new pipes or pipes which have not
been used for a long time, you should run the
water for a few minutes before connecting the
inlet hose. This appliance has been fitted with
safety features which will prevent the water
used in the appliance from returning back into
the drinking water system. This appliance
complies with the applicable plumbing
regulations.
Caution! Do not use inlet and
drain hoses which have
previously been used on
another appliance.
Water drain connection
The end of the drain hose can be connected in
the following ways:
• To the sink outlet spigot, securing it to the
underside of the work surface. This will prevent
waste water from the sink running into the
appliance.
• To a stand pipe provided with venthole,
minimum internal diameter 4 cm.
max.
4000 mm
min. 400 mm
max. 850 mm
The drain hose can face either to the right or left
of the appliance. Ensure the drain hose is not
bent or squashed as this could prevent or slow
down the discharge of water. The sink plug must
not be in place when the appliance is draining as
this could cause the water to syphon back into
the appliance. If you use a drain hose extension,
the internal diameter must be no smaller than
the diameter of the hose provided. Likewise the
internal diameter of the couplings used for
connections to the waste outlet must be no
smaller than the diameter of the hose provided.
Our appliances are supplied with a security
device to protect against the return of dirty
water back into the appliance. If the spigot of
your sink has a "no return valve" incorporated
this can prevent the correct draining of your
appliance. We therefore advise you to remove
it. When connecting the drain hose to an under
sink trap spigot, the entire plastic membrane (A)
Dishwasher User Manual
31
Page 32

must be removed. Failure to remove all the
membrane will result in food particles building
up over time eventually blocking the appliance
drain hose spigot.
A
Dishwasher User Manual32
Page 33

Electrical connection
Warning! The manufacturer
accepts no liability for failure
to observe the following
safety precautions.
• Safety standards require the appliance to be
earthed.
• Prior to using the appliance for the first time,
ensure that the rated voltage and type of supply
on the rating plate match that of the supply
where the appliance is to be installed. The fuse
rating is also to be found on the rating plate.
• Always plug the mains plug into a correctly
installed shockproof socket.
• Multi-way plugs, connectors and extension
cables must not be used. This could constitute a
fire hazard through overheating.
• If necessary, have the domestic wiring system
socket replaced. In case that the electrical cable
has to be replaced, contact your local repair
agent.
• The plug must be accessible after the appliance
has been installed.
• Never unplug the appliance by pulling on the
cable. Always pull the plug.
• The appliance is supplied with a 13 amp plug
attached. Use a 13 amp ASTA approved (BS
1362) fuse if it is necessary to change the fuse in
the plug supplied.
• This appliance complies with the E.C.C.
Directives.
Dishwasher User Manual 33
Page 34

Repairs - after sales service
Your original receipt acts as your guarantee and
confirms your guarantee period. Please make
sure you retain it. The guarantee does not cover
you against faults caused by accidental damage
or misuse. For further details visit
johnlewis.com/customer-services. If it is not
working correctly refer to the "Troubleshooting"
chapter in this user manual. If a fault occurs
which you can not resolve through following the
advice and information contained within this
instruction manual, the next step is to contact
John Lewis technical support on:
0330 1230106
They will give you details for your local service
engineer. Before calling out an engineer, please
ensure you have read the details under the
heading “Troubleshooting”.
When you contact your local service engineer
you will need to give the following details:
1. Your name, address and post code
2. Your telephone number
3. Clear and concise details of fault
4. The purchase date as found on your receipt
5. The model and serial number of the appliance.
So that you always have these numbers at
hand, we recommend you to make a note of
them here:
• Mod.......................................
• P.N.C.....................................
• S.N.........................................
IMPORTANT: If you call out an engineer
to a fault listed under the heading
''Troubleshooting'', or to repair a fault
caused by incorrect use or installation, a
charge will be made even if the appliance
is under guarantee.
Spare parts
Always insist on genuine spare parts.
An authorised service engineer should service
this product, and only genuine spare parts
should be used. Under no circumstances should
you attempt to repair the appliance yourself.
Repairs carried out by inexperienced persons
may cause injury or serious malfunctioning.
Please contact John Lewis technical support on
0330 1230106 for assistance.
Shopping is easy with John Lewis Shops
John Lewis, Aberdeen 01224 625 000
John Lewis, Basingstoke 01256 406200
John Lewis, Bluewater 01322 624 123
John Lewis, Brent Cross 020 8202 6535
John Lewis, Birmingham 0345 604 9049
John Lewis, Cambridge 01223 361 292
John Lewis, Cardiff 02920 536 000
John Lewis, Cheadle 0161 491 4914
John Lewis, Chelmsford 0124 545 8400
John Lewis, Cribbs Causeway 0117 959 1100
John Lewis, Edinburgh 0131 556 9121
John Lewis, Exeter 01392 284150
John Lewis, Glasgow 0141 353 6677
John Lewis, High Wycombe 01494 462 666
John Lewis, Kingston 020 8547 3000
John Lewis, Leicester 0116 242 5777
John Lewis, Leeds 0113 3946299
John Lewis, Liverpool 0151 709 7070
John Lewis, Milton Keynes 01908 679 171
John Lewis, Newcastle upon Tyne 0191 232 5000
John Lewis, Norwich 01603 660 021
John Lewis, Nottingham 0115 941 8282
John Lewis, Oxford Street 020 7629 7711
John Lewis, Peterborough 01733 344 644
John Lewis, Reading 0118 957 5955
John Lewis, Sheffield 0114 276 8511
Peter Jones, Sloane Square 020 7730 3434
John Lewis, Solihull 0121 704 1121
John Lewis, Southampton 02380 216 400
Knight & Lee, Southsea 02392 827 511
Dishwasher User Manual34
Page 35

John Lewis, Stratford 020 8532 3500
John Lewis, The Trafford Centre 0161 491 4040
John Lewis, Watford 01923 244 266
John Lewis, Welwyn 01707 323 456
John Lewis at home
John Lewis, Ashford 01233 811 010
John Lewis, Chester 01244 393 880
John Lewis, Chichester 01243 813 030
John Lewis, Croydon 020 8662 4730
John Lewis, Horsham 01403 214 740
John Lewis, Ipswich 01473 275 850
John Lewis, Newbury 01635 263 980
John Lewis, Poole 01202 756 020
John Lewis, Swindon 01793 733 180
John Lewis, Tamworth 01827 300 580
John Lewis, Tunbridge Wells 01892 506 830
John Lewis, York 01904 557 950
Dishwasher User Manual 35
Page 36

ENVIRONMENTAL CONCERNS
Recycle materials with the symbol . Put the
packaging in relevant containers to recycle it.
Help protect the environment and human health
by recycling waste of electrical and electronic
appliances. Do not dispose of appliances
marked with the symbol with the household
waste. Return the product to your local
recycling facility or contact your municipal office.
Dishwasher User Manual36
*
Page 37

Dishwasher User Manual 37
Page 38

Dishwasher User Manual38
Page 39

Dishwasher User Manual 39
Page 40

156919170-A-222017 ( Subject to change without notice. )
 Loading...