

Page 1

JLBIWM1403
User Manual
Washing Machine
Page 2

Contents
Safety information 4
Children and vulnerable people safety 4
General Safety 4
Safety instructions 6
Installation 6
Electrical connection 6
Water connection 6
Use 6
Service 7
Disposal 7
Product description 8
Appliance overview 8
How to activate the child safety device 8
Installation on suspended flooring 8
Control panel 9
Control panel description 9
Display 9
Programmes 11
Programme dial 11
Programme Chart 11
Consumption values 14
Options 15
Spin 15
Rinse hold 15
Stain 15
Prewash 15
Quick 15
Extra rinse 15
Delay start 15
Door lock indicator 15
Settings 16
Child Lock 16
Acoustic signals 16
Daily use 17
Before first use 17
Loading the laundry 17
Filling the detergent and other treatments 17
Setting a programme 18
Starting a programme with the delay start option
18
Starting a programme without the delay start
18
Cancelling a running programme 18
Interrupting a programme and changing the
options 18
Opening the door when a programme or the
delay start operates 19
At the end of the programme 19
Draining water out after end of cycle 19
Stand by 19
Hints and tips 20
The laundry load 20
Stubborn stains 20
Detergents and other treatments 20
Ecological hints 20
Water hardness 20
Care and cleaning 22
External cleaning 22
Descaling 22
Maintenance wash 22
Door seal 22
Cleaning the detergent dispenser 23
Cleaning the drain filter 23
Cleaning the inlet hose and the valve filter 25
Emergency emptying out 25
Frost precautions 26
Troubleshooting 27
Introduction 27
Possible failures 27
Service 29
Installation 30
Unpacking 30
Positioning and levelling 32
The inlet hose 33
Water drainage 34
Building in 36
Washing Machine User Manual
2
Page 3

Technical Data 39 Repairs - after sales service 40
Page 4

Safety information
Before the installation and use of the appliance, carefully read the
supplied instructions. The manufacturer is not responsible for any
injuries or damages that are the result of incorrect installation or
usage. Always keep the instructions in a safe and accessible location
for future reference.
Children and vulnerable people safety
• This appliance can be used by children aged 8 years and above and
by persons with reduced capabilities provided that they have been
given instruction and/or supervision regarding the safe use of the
appliance and understand the potential hazards involved.
• Do not let children play with the appliance.
• Children under 3 years of age should be kept away from the
appliance unless continuously supervised.
• Keep all packaging away from children and dispose of appropriately.
• Keep detergents away from children.
• Keep children and pets away from the appliance door when it is
open.
• If the appliance has a child safety device, this should be activated.
• Children shall not carry out cleaning and user maintenance of the
appliance without supervision.
General Safety
• Do not change the specification of this appliance.
• Do not exceed the maximum load of 7 kg (refer to the
“Programme chart” chapter).
• The operating water pressure at the water entry point from the
outlet connection must be between 0.5 bar (0.05 MPa) and 8 bar
(0.8 MPa).
Washing Machine User Manual
4
Page 5

• The ventilation opening in the base (if applicable) must not be
covered by a carpet, mat, or any floor covering.
• The appliance must be connected to the water mains using the new
supplied hose sets, or other new hose sets supplied by the
Authorised Service Centre.
• Old hose sets must not be reused.
• If the mains power supply cable is damaged, it must be replaced by
the manufacturer, its Authorised Service Centre or similarly
qualified persons to avoid an electrical hazard.
• Before any maintenance operation, deactivate the appliance and
disconnect the mains plug from the socket.
• Do not use high pressure water sprays and/or steam to clean the
appliance.
• Clean the appliance with a moist cloth. Use only neutral,
detergents. Do not use abrasive products, abrasive cleaning pads,
solvents or metal objects.
Washing Machine User Manual
5
Page 6

Safety instructions
Installation
• Remove all the packaging and the transit bolts.
• Keep the transit bolts in a safe place. If the
appliance is to be moved in future they must be
reattached to lock the drum to prevent internal
damage.
• Always take care when moving the appliance as
it is heavy. Always use safety gloves and
enclosed footwear.
• Do not install or use a damaged appliance.
• Follow the installation instruction supplied with
the appliance.
• Do not install or use the appliance where the
temperature can be less than 0°C or where it is
exposed to the weather.
• The floor area where the appliance is to be
installed must be flat, stable, heat resistant and
clean.
• Make sure that there is air circulation between
the appliance and the floor.
• Adjust the feet to have the necessary space
between the appliance and the flooring.
• Do not install the appliance where the appliance
door cannot be fully opened.
Electrical connection
• The appliance must be earthed.
• Always use a correctly installed shockproof
socket.
• Make sure that the electrical information on the
rating plate agrees with the power supply. If
not, contact an electrician.
• Do not use multi-plug adapters and extension
cables.
• Make sure not to cause damage to the mains
plug and to the mains cable. Should the mains
cable need to be replaced, this must be carried
out by our Authorised Service Centre.
• Connect the mains plug to the mains socket
only at the end of the installation. Make sure
that there is access to the mains plug after the
installation.
• Do not touch the mains cable or the mains plug
with wet hands.
• Do not pull the mains cable to disconnect the
appliance. Always pull the mains plug.
• UK and Ireland only. This appliance is fitted with
a 13 A mains plug. If it is necessary to change
the mains plug fuse, use only a 13 A ASTA (BS
1362) fuse.
• This appliance complies with the E.E.C.
Directives.
Water connection
• Do not cause damage to the water hoses.
• Before connection to new pipes, pipes not used
for a long time, where repair work has been
carried out or new devices fitted (water
meters, etc.), let the water flow until it is clean
and clear.
• Ensure that there are no visible water leaks
during and after the first use of the appliance.
Use
Warning! Risk of injury,
electrical shock, fire, burns or
damage to the appliance.
• This appliance is for domestic household use
only.
• Follow the safety instructions on the detergent
packaging.
• Do not put flammable products or items that
are wet with flammable products in, near or on
the appliance.
• Make sure that all metal objects are removed
from the laundry.
• Do not put a container to collect possible
water leakage under the appliance. Contact the
Washing Machine User Manual
6
Page 7

Authorised Service Centre to ensure which
accessories can be used.
• Do not touch the glass door while a
programme is in operation. The glass can get
hot.
Service
• To repair the appliance contact an Authorised
Service Centre.
• Use original spare parts only.
Disposal
Warning! Risk of injury or
suffocation.
• Disconnect the appliance from the mains
electrical and water supplies.
• Cut off the mains electrical cable close to the
appliance and dispose of it.
• Remove the door catch to prevent children or
pets from becoming trapped in the drum.
• Dispose of the appliance in accordance with
local requirements for the disposal of Waste
Electrical and Electronic Equipment (WEEE).
Washing Machine User Manual
7
Page 8
Product description
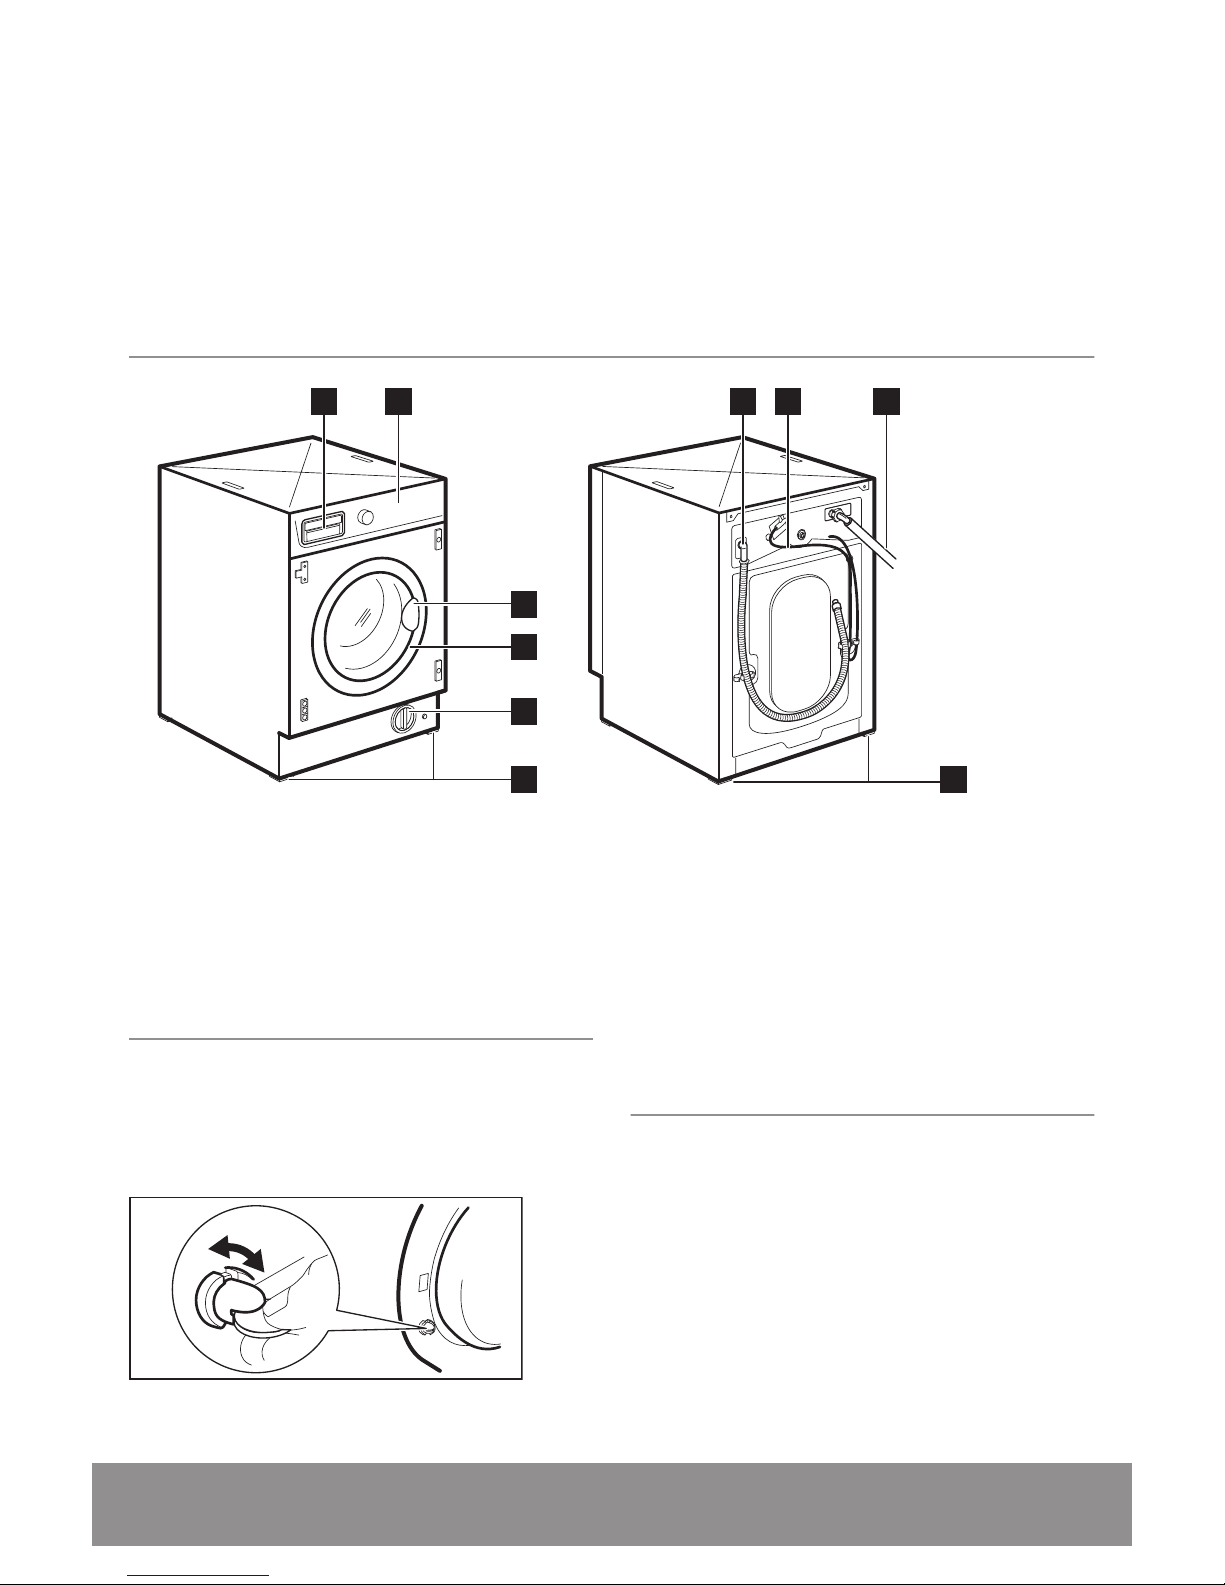
Appliance overview
7 8 9
10
1 2
3
4
5
6
1. Detergent dispenser
2. Control panel
3. Door handle
4. Rating plate
5. Drain pump filter
6. Feet for levelling the appliance
7. Water drain hose
8. Mains cable
9. Water inlet hose
10. Feet for levelling the appliance
How to activate the child
safety device
This device prevents children or pets from being
closed in the drum.
Turn the device clockwise, until the groove is
horizontal.
You cannot close the door.
To close the door, turn the device anticlockwise
until the groove is vertical.
Installation on suspended
flooring
Suspended wooden floors are particularly
susceptible to vibration.
To limit vibration we recommend placing a
waterproof wooden panel, at least 15 mm thick,
under the appliance. It should be screwed to at
least 2 floor beams and should extend beyond
the front feet.
If possible, install the appliance where the floor
is more stable.
Washing Machine User Manual
8
Page 9
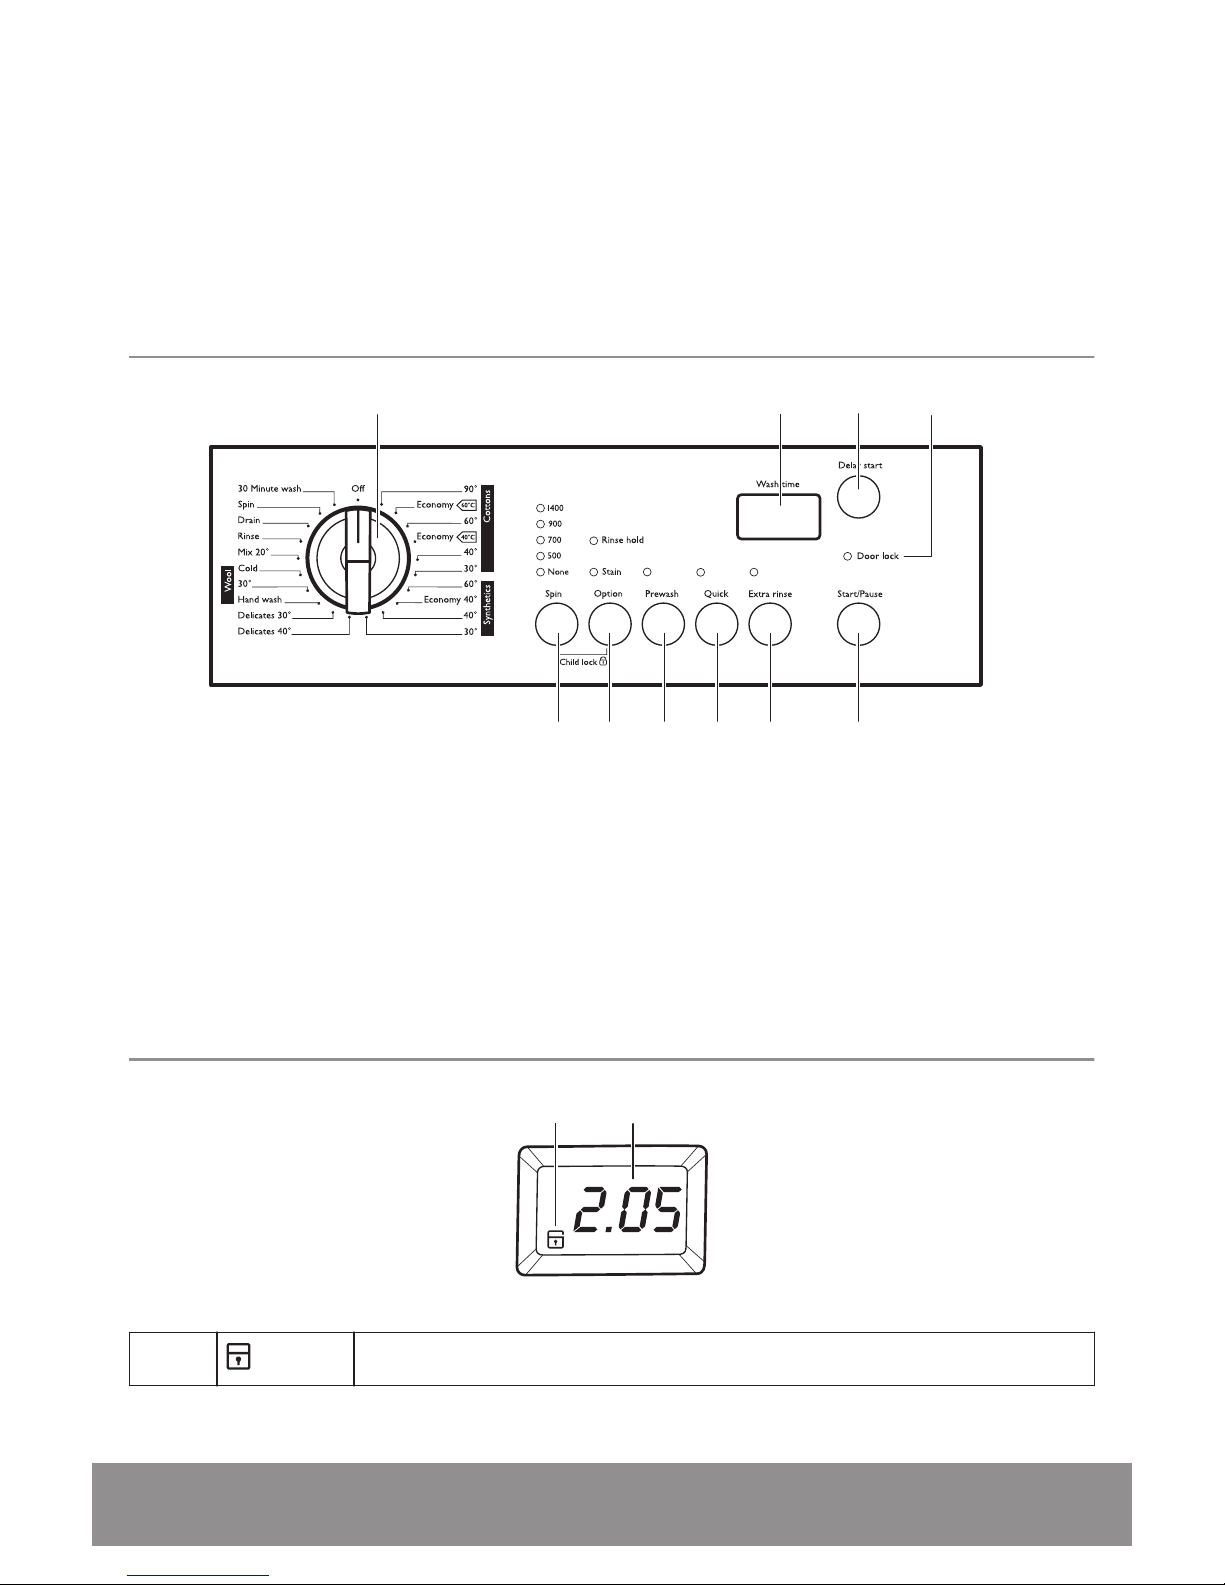
Control panel
Control panel description
2 3 4
5
678910
1
1. Programme dial
2. Display
3. Delay start button
4. Door lock indicator
5. Start/Pause button
6. Extra rinse button
7. Quick button (for reduced wash time)
8. Prewash button
9. Option button
• Stain
• Rinse hold
10. Spin selection button
Display
BA
A
Child Lock
Washing Machine User Manual 9
Page 10
B
Time indicator:
Programme duration
When the programme starts, the time decreases in one minute steps.
Delay start
When you press the delay start button, the display shows the delay start time.
Alarm codes
If the appliance has a malfunction, the display shows alarm codes. Refer to "Troubleshooting" chapter.
Error message
The display shows this message for several seconds when:
• You cannot set an option with the washing programme.
• You try to change the washing programme while it operates.
Programme is completed.
Washing Machine User Manual10
Page 11
Programmes
Programme dial
Switch the appliance on and select the desired
washing programme using the dial.
Turn the dial to the Off position to switch the
appliance off.
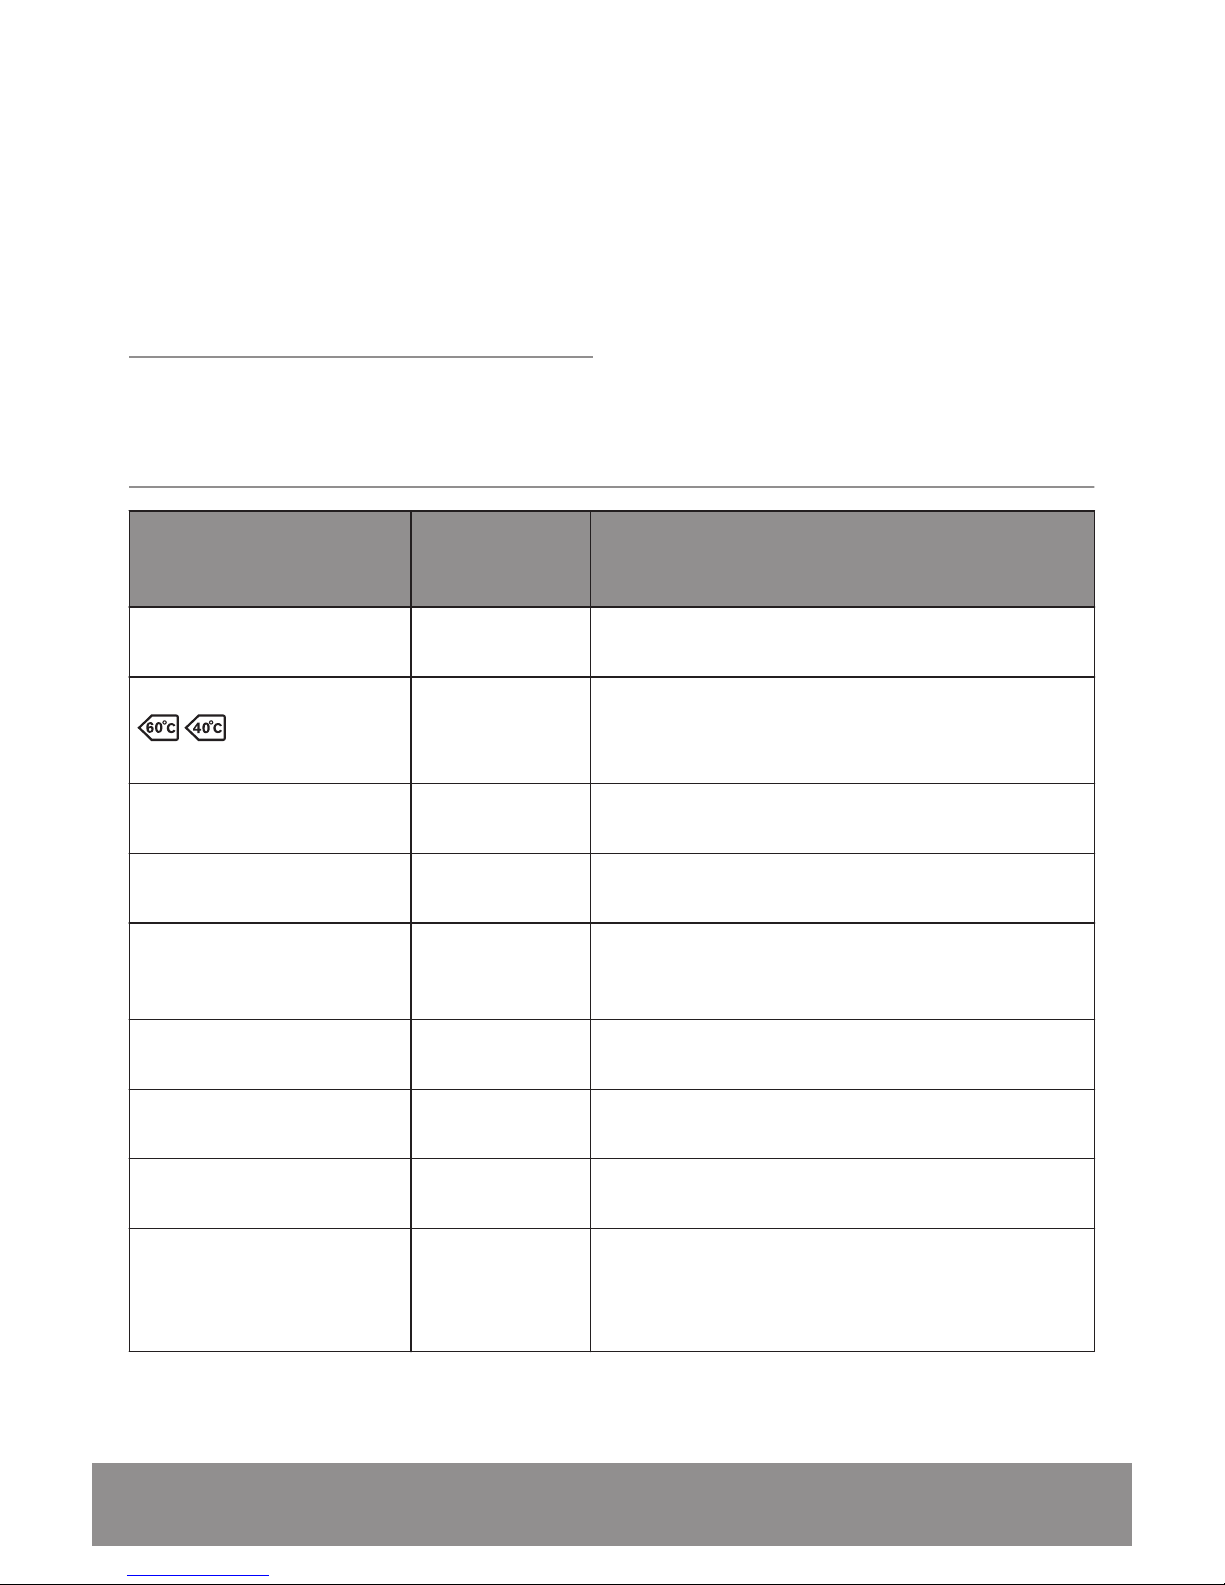
Programme Chart
Programme
Temperature range
Maximum load
Maximum spin
speed
Programme description
(Type of load and soil level)
Cottons
90°C - 60°C
7 kg
1400 rpm
White cotton and coloured cotton. Normal soil
and light soil.
Cottons
1)
60°C - 40°C
7 kg
1400 rpm
White cotton and colour-fast cotton. Normal soil.
The energy consumption decreases and the time of the
washing programme is extended.
Cottons
40°C - 30°C
7 kg
1400 rpm
Coloured cotton. Normal soil and light soil.
Synthetics
60°C - 40°C - 30°C
3 kg
900 rpm
Synthetic items or mixed fabric items. Normal
soil.
Synthetics
Economy
40°C
3 kg
900 rpm
Synthetic items and mixed fabric items. Normal
soil. The energy consumption decreases and the time of
the washing programme is extended.
Delicates
40°C - 30°C
3 kg
700 rpm
Delicate fabrics such as acrylics, viscose, polyester items. Normal soil.
Handwash
30°C
2 kg
900 rpm
Delicate fabrics with hand wash only label2).
Wool
30°C - Cold
2 kg
900 rpm
Machine washable wool and hand washable wool.
Mix 20°
20°C
3 kg
900 rpm
Cotton, synthetic and mixed fabrics. Light soil. Select this programme to reduce the energy consumption.
Use a detergent suitable for low temperatures to achieve
good washing results.
Washing Machine User Manual 11
Page 12
Programme
Temperature range
Maximum load
Maximum spin
speed
Programme description
(Type of load and soil level)
Rinses
7 kg
1400 rpm
To rinse and spin the laundry. All fabrics, except woollens and very delicate fabrics. Reduce the spin speed accordingly to the type of laundry.
Drain
7 kg To drain the water after the programme ends where the
Rinse Hold option has been selected.
Spin
7 kg
1400 rpm
To spin and drain the water after the programme ends
where the Rinse Hold option has been selected.
Set the spin speed accordingly to the type of fabric to be
spun.
Mini 30'
30°C
3 kg
900 rpm
Cotton and synthetic items with light soil level or
worn only once.
1) Standard programmes for the Energy Label consumption values. According to regulation 1061/2010, the "Cotton
" with "Eco option and the "Cotton " with "Eco option are respectively the «Standard 60°C cotton programme» and the «Standard 40°C cotton programme». They are the most efficient programmes in terms of combined energy and
water consumption for washing normally soiled cotton laundry.
The water temperature of the washing phase may differ from the temperature declared for the selected programme.
2) During this cycle the drum rotates slowly to ensure a gentle wash. It can seem that the drum doesn't rotate or doesn't rotate
properly, but this is normal for this programme.
Programme options compatibility
Programme
Spin
None
Rinse hold
Stain
1)
Prewash
2)
Quick
3)
Extra rinse
Delay start
Cottons ■ ■ ■ ■ ■ ■ ■ ■
Cottons
■ ■ ■ ■ ■ ■ ■
Synthetics ■ ■ ■ ■ ■ ■ ■ ■
Synthetics Economy ■ ■ ■ ■ ■ ■ ■
Delicates ■ ■ ■ ■ ■ ■ ■ ■
Handwash ■ ■ ■ ■
Washing Machine User Manual12
Page 13

Programme
Spin
None
Rinse hold
Stain
1)
Prewash
2)
Quick
3)
Extra rinse
Delay start
Wool ■ ■ ■ ■
Mix 20° ■ ■ ■ ■
Rinses ■ ■ ■ ■ ■
Drain
Spin ■ ■
Mini 30' ■ ■ ■
1) Stain option is not available with a temperature lower than 40°C.
2) If using liquid detergent, a programme without prewash must be selected.
3) If you select this option, we recommend that you decrease the load size. It is possible to fully load the appliance, however the
washing results can be less satisfactory.
Washing Machine User Manual 13
Page 14
Consumption values
The data in this table are approximate. Different variables can affect the data: the
quantity and type of laundry, the water and ambient temperature.
Programmes Load (kg) Energy con-
sumption
(kWh)
Water consumption (litre)
Approximate
programme
duration (minutes)
Remaining
moisture
(%)
1)
Cottons 60 °C 7 1.35 67 150 52
Cottons 40 °C 7 0.85 67 140 52
Synthetics 40 °C 3 0.55 42 90 35
Delicates 40 °C 3 0.55 63 65 35
Wool 30 °C
2)
2 0.25 55 60 30
Standard cotton programmes
Standard 60°C cotton 7 1.01 52 180 52
Standard 60°C cotton 3.5 0.78 44 149 52
Standard 40°C cotton 3.5 0.61 44 140 52
1) At the end of spin phase.
2) Not available for some models.
Off Mode (W) Left On Mode (W)
0,10 0,98
The information given in the chart above is compliant with the EU Commission regulation 1015/2010 implementing directive 2009/125/EC.
Washing Machine User Manual14
Page 15

Options
Spin
Press this button to decrease the default spin
speed or select the None option.
The indicator of the selected speed comes on.
None:
• By selecting this option all the spinning phases
are cancelled and the last rinse water is drained.
• To compensate for the absence of spinning, the
rinse phase uses more water for some washing
programmes.
This option is recommended for very delicate
fabrics.
Rinse hold
Select this option to reduce creasing:
• The washing programme ends with water in the
drum. The drum turns regularly to reduce
creasing.
• The door stays locked. You must drain the
water to unlock the door.
To drain the water refer to
"Draining water out after the end
of the cycle".
Stain
Select this option for laundry with stubborn
stains:
• Pour the stain remover into compartment .
• The Stain phase increases the programme
duration.
This option is not available with a
temperature lower than 40° C.
Prewash
By selecting this option, the appliance performs
a prewash phase before the main wash:
• The option increases the programme duration.
This option is recommended for heavily soiled
laundry.
Quick
Press this button to decrease the programme
duration.
This option is recommended for lightly soiled
items or items needing a quick refresh.
Extra rinse
By selecting this option the appliance adds a few
rinses to the washing programme.
This option is recommended for people allergic
to detergents and in areas where the water is
soft.
Delay start
Press this button to delay the start of a
programme from 30 minutes to 20 hours.
The display shows the selected delay time.
Door lock indicator
The Door lock indicator shows when the door
can be opened:
• The indicator is on: the door cannot be
opened.
• The indicator is flashing: the door is opening in a
few minutes.
• The indicator is off: the door can be opened.
Washing Machine User Manual
15
Page 16

Settings
Child Lock
With this option you can ensure that should
children touch the panel, the settings will not be
altered.
• To activate/deactivate this option, press the
Spin button and the Option button
simultaneously until the indicator comes
on/goes off.
You can activate this option:
• After you press the Start/Pause button: the
options and the programme knob are locked.
• Before you press the Start/Pause button: the
appliance cannot start.
Acoustic signals
The acoustic signals operate when:
• The programme is completed.
• The appliance has a malfunction.
To deactivate/activate the acoustic signals,
press Prewash and Easy Iron simultaneously
for 6 seconds.
Acoustic signals still operate when
the appliance has a malfunction.
Washing Machine User Manual16
Page 17

Daily use
Warning! Refer to Safety
chapters.
Before first use
1. Pour 2 litres of water into the detergent
compartment for washing phase.
This activates the drain system.
2. Pour a small quantity of detergent into the
compartment for washing phase.
3. Set and start a programme for cotton at the
highest temperature without placing any
laundry in the drum.
This removes all possible dirt from the drum and
the tub.
Loading the laundry
Open the water tap. Connect the mains plug to
the mains socket.
1. Pull the door handle to open the appliance
door.
2. Put the laundry in the drum, one item at a
time.
3. Shake the items before you put them in the
appliance.
Make sure not to put too much laundry in the
drum. Refer to "Programmes" chapter for the
maximum recommended loads.
4. Close the door.
Caution! Make sure that no
laundry becomes trapped
between the seal and the
door. There is a risk of water
leakage or damage to the
laundry.
Filling the detergent and other
treatments
MAX
Compartment for prewash phase, soak
programme or stain remover.
Compartment for washing phase.
Compartment for liquid treatments (fabric
conditioner, starch).
Washing Machine User Manual 17
Page 18

Always follow the instructions that
you find on the packaging of the
detergent products.
Setting a programme
1. Turn the programme dial to switch the
appliance on and to select the desired
programme:
• The indicator of the Start/Pause button
flashes.
• The display shows the programme
duration.
2. If necessary, change the temperature and the
spin speed or add available options. When you
select an option the related indicator comes
on.
If you select something incorrectly,
the display shows the message
.
Starting a programme with
the delay start option
1. Press the Delay start button repeatedly until
the display shows the desired delay. The delay
start indicator comes on.
2. Press the Start/Pause button:
• The door is locked and the Door lock
indicator is on.
• The appliance starts the countdown.
• When the countdown is completed, the
programme starts automatically.
You can cancel or change the
setting of the Delay start before
pressing the Start/Pause button.
After pressing the Start/Pause
button, you can only cancel the
Delay start.
To cancel the Delay start option:
a. Press the Start/Pause button to pause the
appliance. The Start/Pause indicator
flashes.
b. Press the Delay start button until the
display shows .
Press the Start/Pause button again to start
the programme immediately.
Starting a programme without
the delay start
Press the Start/Pause button.
• The Start/Pause indicator stops flashing
and stays on.
• The programme starts, the door locks, the
Door lock indicator illuminates.
• The programme time decreases in one
minute steps.
The drain pump can operate for a
short time as the appliance fills with
water.
Cancelling a running
programme
1. Turn the programme dial to the Off position to
cancel the programme and to switch the
appliance off.
2. Turn the programme dial again to switch the
appliance on. Now, you can select a new
washing programme.
Before starting the new
programme the appliance could
drain the water. In this case, make
sure that the detergent is still in the
detergent compartment. If
necessary, refill the detergent.
Interrupting a programme and
changing the options
Only a few options can be changed while the
programme operates.
1. Press the Start/Pause button.
The indicator flashes.
2. Change the options.
3. Press the Start/Pause button again.
The programme continues.
Washing Machine User Manual
18
Page 19

Opening the door when a
programme or the delay start
operates
While a programme or the delay start operates,
the appliance door is locked. The Door lock
indicator is on.
Caution! If the temperature
and level of the water in the
drum are too high and/or the
drum still rotates you cannot
open the door.
To open the door during the first few minutes of
the cycle or when the delay start operates:
1. Press the Start/Pause button to pause the
appliance.
2. Wait until the Door lock indicator goes off.
3. Open the door.
4. Close the door and press the Start/Pause
button again. The programme continues.
At the end of the programme
• The appliance stops automatically.
• The acoustic signal operates (if it is activated).
• The display shows .
• The Start/Pause indicator goes off.
• The Door lock indicator goes off.
Turn the programme dial to the Off position to
switch the appliance off.
• You can open the door.
• Remove the laundry from the appliance. Make
sure that the drum is empty.
• Close the water tap.
• Keep the door and the detergent drawer ajar to
prevent mildew and odours.
Draining water out after end
of cycle
The washing programme is completed,
but there is water in the drum:
• The drum turns regularly to reduce creasing.
• The Rinse hold indicator stays on to remind you
to drain the water.
• The Door lock indicator is on. The Start/Pause
indicator flashes. The door stays locked.
• You must drain the water to open the door.
Draining the water:
1. Select the Drain or the Spin programme.
2. Press the Start/Pause button. The appliance
drains the water.
3. When the programme is completed and the
Door lock indicator goes off, you can open the
door.
4. Turn the programme dial to the Off position to
switch the appliance off.
Stand by
If you do not switch the appliance off within a
few minutes of the washing programme coming
to an end, the appliance will enter stand by
mode to save energy.
• All indicators and the display go off.
• The Start/Pause indicator flashes slowly.
Press any button to deactivate the stand-by.
Washing Machine User Manual
19
Page 20

Hints and tips
The laundry load
• Divide the laundry into: white, coloured,
synthetics, delicates and wool.
• Follow the washing instructions on the laundry
care labels.
• Do not wash white and coloured items
together.
• Some coloured items can discolour with the
first wash. We recommend that you wash them
separately for the first couple of times.
• Button up pillowcases, close zippers, hooks and
poppers. Tie up belts.
• Empty pockets and unfold.
• Turn multilayered fabrics, wool and items with
printed illustrations inside out.
• Remove hard stains.
• Wash heavy soil stains with a special detergent.
• Be careful with curtains. Remove the hooks or
put the curtains in a washing bag or pillowcase.
• Do not wash laundry without hems or with
cuts. Use a washing bag to wash small and/or
delicate items (e.g. underwired bras, belts,
tights, etc. ).
• A very small load can cause balance problems
with the spin phase leading to excessive
vibration. If this occurs:
a. interrupt the programme and open the
door (refer to "Opening the door when a
programme or the delay start operates");
b. manually redistribute the load so that the
items are spaced evenly around the tub;
c. press the Start/Pause button. The spin
phase continues.
Stubborn stains
For some stains, water and detergent is not
sufficient.
We recommend that you pre-treat these stains
before you put the items in the appliance.
Special stain removers are available. Use the
special stain remover that is applicable to the
type of stain and fabric.
Detergents and other
treatments
• Only use detergents and other treatments
specially made for washing machines:
– powder detergents for all types of fabric,
– powder detergents for delicate fabrics (40
°C max) and woollens,
– liquid detergents, preferably for low
temperature wash programmes (60 °C
max) for all types of fabric, or special ones
for woollens only.
• Do not mix different types of detergents.
• To help the environment, do not use more than
the recommended quantity of detergent.
• Follow the instructions that you find on the on
packaging of these products.
• Use the recommended products for the type
and colour of the fabric, the programme
temperature and the level of soil.
Ecological hints
• Set a programme without the prewash phase to
wash laundry with normal soil.
• Always start a washing programme with the
maximum load of laundry allowed.
• If necessary, use a stain remover when you set
a programme with a low temperature.
• To use the correct quantity of detergent, check
the water hardness of your domestic system.
Refer to "Water hardness".
Water hardness
If the water hardness in your area is high or
moderate, we recommend that you use a water
Washing Machine User Manual
20
Page 21

softener for washing machines. In areas where
the water hardness is soft it is not necessary to
use a water softener.
To find out the water hardness in your area,
contact your local water authority.
Use the correct quantity of water softener.
Follow the instructions that you find on the
packaging of the product.
Washing Machine User Manual 21
Page 22

Care and cleaning
Warning! Refer to Safety
chapters.
External cleaning
Clean the appliance with soap and warm water
only. Fully dry all the surfaces.
Caution! Do not use alcohol,
solvents or chemical
products.
Descaling
If the water hardness in your area is high or
moderate, we recommend that you use a water
descaling product for washing machines.
Regularly examine the drum to prevent
limescale and rust particles.
To remove rust particles use only special
products for washing machines. Do this
separately from the laundry wash.
Always follow the instructions that
you find on the packaging of the
product.
Maintenance wash
With the low temperature programmes it is
possible that some detergent stays in the drum.
Perform a maintenance wash regularly. To do
this:
• Remove all laundry from the drum.
• Select the cotton programme with the highest
temperature with a small quantity of detergent.
Door seal
Regularly examine the seal and remove all
objects from the inner part.
Washing Machine User Manual
22
Page 23

Cleaning the detergent dispenser
1.
MAX
1
2
2.
MAX
3. 4.
MAX
Cleaning the drain filter
The pump should be inspected regularly and
particularly if:
• The appliance does not empty and/or spin.
• The appliance makes an unusual noise during
draining due to objects such as safety pins, coins
etc. blocking the pump.
• A problem with water drainage is detected (see
chapter “Troubleshooting” for more details).
Warning! Before unscrewing
the pump cover, switch the
appliance off and remove the
mains plug from the socket.
Warning! When the appliance
is operating and depending on
the programme selected
there can be hot water in the
filter. Never remove the filter
cover during a wash cycle.
Always wait until the
appliance has finished the
cycle and it is empty. When
refitting the filter cover,
ensure it is securely retightened so as to stop leaks
and young children being able
to remove it.
To clean the drain filter:
Washing Machine User Manual 23
Page 24

1. Unplug the appliance.
2. If necessary, wait until the water has cooled down.
A B
3. Place a container close to the pump to collect any
spillage.
A = Cover filter.
B = Emergency emptying hose.
4. Release the emergency emptying hose, place it in the
container and remove its cap cover.
1
2
5. When the water stops flowing, unscrew the filter
cover by turning it anti-clockwise and remove the filter.
Use pliers if necessary. Always keep a rag nearby to dry
up any water spillages when removing the cover. Clean
the filter under a tap to remove any traces of fluff.
6. Remove foreign bodies and fluff from the filter seat
and from the filter impeller.
7. Check carefully whether the pump impeller rotates
(rotation is not completely smooth). If it doesn’t rotate,
please contact the Authorised Service Centre.
Washing Machine User Manual24
Page 25

1
2
8. Put the cap back on the emergency emptying hose
and push back into position. Use the guides to push the
filter pump back into place. Tighten the filter cover by
turning it clockwise.
Cleaning the inlet hose and the valve filter
1.
1
2
3
2.
3. 4.
45°
20°
Emergency emptying out
If the appliance does not drain the water,
proceed as follows:
1. Disconnect the mains plug from the mains
socket.
2. Close the water tap.
3. If necessary, wait until the water has cooled
down.
4. Place a bowl on the floor and put the end of
the emergency emptying hose into the bowl.
Remove its cap.
Washing Machine User Manual 25
Page 26

The water should drain into the bowl.
5. When the bowl is full, put the cap back on the
emergency hose.
6. Empty the bowl. Repeat the procedure until
water stops flowing.
7. Clean the pump if necessary as previously
described ("Cleaning the drain filter").
8. Ensure the cap is back on the emergency
emptying hose and insert back into position.
When you drain the water with the emergency
drain procedure, you must activate the drain
system again:
1. Put 2 litres of water in the main wash
compartment of the detergent dispenser.
2. Start the programme to drain the water.
Frost precautions
If the appliance is installed in an area where the
temperature can be less than 0° C, remove the
remaining water from the inlet hose and the
drain pump.
1. Disconnect the mains plug from the mains
socket.
2. Close the water tap.
3. Place the end of the emergency emptying hose
and that of the inlet hose in a bowl placed on
the floor and let water flow out of the hoses.
4. Select the draining programme and let it
operate until the end of the cycle.
5. Turn the programme dial to Off to disconnect
the appliance from the power supply.
6. Screw the water inlet hose back on and re-fit
the emergency emptying hose after having put
the cap on again.
Warning! Make sure that the
temperature is higher than 0
°C before you use the
appliance again.
The manufacturer is not
responsible for damages
caused by low temperatures.
Washing Machine User Manual26
Page 27

Troubleshooting
Warning! Refer to Safety
chapters.
Introduction
First try to find a solution to the problem (refer
to the table). If the problem persists, contact the
Authorised Service Centre.
With some problems, the acoustic
signals operate and the display shows an
alarm code:
• - The appliance does not fill with water
properly.
• - The appliance does not drain the
water.
• - The appliance door is open or not
closed correctly. Please check the door!
• - The mains supply is unstable. Wait until
the mains supply is stable.
•
- No communication between electronic
elements of the appliance. Switch off and switch
on again.
Warning! Deactivate the
appliance before you do the
checks.
Possible failures
Problem Possible solution
The programme does not start. Make sure that the mains plug is connected to the mains socket.
Make sure that the appliance door is closed.
Make sure that there is not a damaged fuse in the fuse box.
Make sure that the Start/Pause button has been pressed.
If the delay start is set, cancel the setting or wait for the end of countdown.
Deactivate the Child Lock function if it is on.
The appliance does not fill with
water properly.
Make sure that the water tap is open.
Make sure that the pressure of the water supply is not too low. For this infor-
mation, contact your local water authority.
Make sure that the water tap is not clogged.
Make sure that the filter of the inlet hose and the filter of the valve are not
clogged. Refer to “Care and cleaning”.
Washing Machine User Manual 27
Page 28

Problem Possible solution
Make sure that the inlet hose has no kinks or bends.
Make sure that the connection of the water inlet hose is correct.
The appliance does not fill with
water and drain immediately.
Make sure that the drain hose is in the correct position. The hose may be too
low.
The appliance does not drain
the water.
Make sure that the sink spigot is not clogged.
Make sure that the drain hose has no kinks or bends.
Make sure that the drain filter is not clogged. If necessary, clean the filter. Re-
fer to "Care and cleaning".
Make sure that the connection of the drain hose is correct.
Set the drain programme if you set a programme without drain phase.
Set the drain programme if you set an option which ends with water in the
tub.
The spin phase does not operate or the washing cycle lasts
longer than usual.
Set the spin programme.
Make sure that the drain filter is not clogged. If necessary, clean the filter. Re-
fer to "Care and cleaning".
This may be caused by balance problems. Adjust the items in the tub manually
and start the spin phase again.
There is water on the floor. Make sure that the couplings of the water hoses are tight and there is no wa-
ter leakage.
Make sure that the drain hose is not damaged.
Make sure you use the correct type and quantity of detergent.
You cannot open the appliance
door.
Make sure that the washing programme is finished.
Set the drain or the spin programme if there is water in the drum.
The appliance makes an unusual noise.
Make sure the levelling of the appliance is correct. Refer to installation leaflet.
Make sure that the packaging and/or the transit bolts are removed. Refer to
installation leaflet.
Add more laundry to the drum. The load may be too small.
Washing Machine User Manual28
Page 29

Problem Possible solution
The washing results are not
satisfactory.
Increase the amount of detergent or use a different detergent.
Use special products to remove stubborn stains before you wash the laundry.
Make sure that you set the correct temperature.
Decrease the laundry load.
You cannot set an option. Make sure that you press only the desired button(s).
After the check, activate the appliance. The programme continues from the point of interruption.
If the problem occurs again, contact the Authorised Service Centre.
If the display shows other alarm codes, deactivate and activate the appliance. If the problem continues, contact
the Authorised Service Centre.
Service
We recommend the use of original spare parts.
When contacting the Authorised Service
Centre, make sure that these data are available.
You can find the information on the rating plate:
model, PNC and Serial Number. (Mod., Prod.
No., Ser. No.)
Washing Machine User Manual 29
Page 30

Installation
Unpacking
Warning! Remove all the packaging and the transit bolts before installing
the appliance.
1. Use safety gloves. Remove the external film. If
necessary, use a cutter.
2. Remove the cardboard top. Remove the polystyrene
packaging materials.
3. Remove the internal film.
Washing Machine User Manual30
Page 31

4. Open the door. Remove all the items from the drum.
5. Put one of the polystyrene packaging elements on the
floor behind the appliance. Carefully place the appliance
rear-side down onto the polystyrene making sure hoses
are not damaged.
1
2
6. Remove the polystyrene protection from the bottom.
Pull the appliance back up to a vertical position.
7. Remove the polystyrene block fitted on the door seal
(if present).
Washing Machine User Manual 31
Page 32

8. Remove the power supply cable and the drain hose
from the hose holders.
9. Remove the three bolts. Use the key supplied with the
appliance. Pull out the plastic spacers.
10. Cover the holes with the caps you can find inside the
user manual bag.
We recommend that you keep the packaging and the transit bolts for future
movements.
Positioning and levelling
1. Install the appliance on a flat hard floor.
2. Make sure that air circulation around the appliance is
not impeded by carpets, rugs etc.
3. Level the appliance by raising or lowering the feet.
Washing Machine User Manual32
Page 33

4. The feet may be tight to adjust as they incorporate a
self locking nut, but the appliance MUST be level and
stable. If necessary, check with a spirit level. Any
necessary adjustment can be made with a spanner.
Accurate levelling prevents vibration, noise and
displacement of the appliance during operation.
5. After having levelled the appliance, tighten the locking
nuts.
Warning! Never place cardboard, wood or similar materials under the
appliance to compensate for any unevenness in the floor.
The inlet hose
20O20
O
45O45
O
1. Remove the inlet hose from inside the drum.
2. Connect the hose to the back of the appliance. Do
not turn the inlet hose downwards, but turn it left or
right depending on the position of your water tap.
3. Loosen the ring nut to fix it in the correct position.
Washing Machine User Manual 33
Page 34

4. Connect the water inlet hose to the cold water tap
with 3/4 thread.
Caution! Make sure that there
are no leaks from the couplings.
Use the hose supplied with appliance.
Do not use an extension hose if the inlet hose is too short. Contact the Authorised
Service Centre for an inlet hose replacement.
Water drainage
There are different procedures to connect the drain hose:
With the plastic hose guide.
• Make a U shape with the drain hose.
On the edge of a sink
• Make sure that the plastic guide cannot move when
the appliance drains. Attach the guide to the water
tap or the wall.
Washing Machine User Manual34
Page 35

To a stand pipe with vent-hole
• Directly into a drain pipe at a height of not less than
60 cm (23.6”) and not more than 100 cm (39.3”).
Refer to the illustration.
• The end of the drain hose must always be ventilated ,
i.e. the inner diameter of the drain pipe (min. 38 mm
- min. 1.5”) must be larger than the external
diameter of the drain hose.
Drain hose end
• If the end of the drain hose looks like this (see the
picture), you can push it directly into the stand pipe.
Without the plastic hose guide.
To a sink spigot
• Refer to the illustration. Put the drain hose in the
spigot and tighten it with a clip.
• Make sure that the drain hose makes a loop to
prevent particles going into the appliance from the
sink.
To a wall-pipe
• Directly to a built-in drain pipe in the room wall and
tighten it with a clip.
You can extend the drain hose to maximum 400 cm. Contact the service centre for the
other drain hose and the extension.
Washing Machine User Manual 35
Page 36

Building in
600 mm
555 mm
596 mm
170 mm
75 mm
100 mm
60 mm
min.
820 mm
min.
560 mm
818 mm
This appliance has been designed to be built into the
kitchen furniture. The recess should have the dimensions
shown in this picture.
Preparation and assembly of the door
The appliance is originally pre set for the assembly of a
door opening from right to left.
16-22 mm
22±1,5 mm
416
mm
X
595-598 mm
Ø 35 mm
14 mm
Door
The dimensions of the door should be:
• width 595 - 598 mm
• thickness 16-22 mm
• the height X depends on the height of the adjacent
furniture's base.
Washing Machine User Manual36
Page 37

1
2
Hinges
To mount the hinges it is necessary to drill two holes
(dia. 35 mm, depth12.5-14 mm depending on the depth
of door furniture) on the inner side of the door.
The distance between the hole fixing centres must be
416 mm. The distance from upper edge of the door to
the centre of the hole depends on the adjacent
furniture's dimensions.
The hinges will be fixed to the door by means of screws
for wood 1 and 2 supplied with the appliance.
B
A
Mounting the door
Warning! Do not remove the
screw B.
Fix the hinges to the appliance by means of the M5x15
screws.
The hinges can be adjusted to compensate for possible
uneven thickness of the door.
To align the door perfectly it is necessary to loosen the
screw, adjust the door and tighten the screw A again.
A
B
C
Counter-magnet
Warning! Do not remove the
screw B.
The appliance is pre set for a magnetic door closure. To
position the closure correctly, it is necessary to screw
the counter-magnet A (steel disk + rubber ring) into the
inner side of the door.
Its position must correspond to the magnet B on the
appliance.
Washing Machine User Manual 37
Page 38

A
B
C
E
D
Warning! Do not remove the
screw B.
If the door has to be opened from left to right, invert the
position of the plates E, the magnet D and the plate C.
Mount the counter-magnet D and the hinges A as
previously described.
Washing Machine User Manual38
Page 39

Technical Data
Dimension Width/ Height/ Depth/ Total
depth
596 mm/ 820 mm/ 544 mm/ 560 mm
Electrical connection Voltage
Overall power
Fuse
Frequency
230-240 V
2050
13 A
50 Hz
Level of protection against ingress of solid particles and moisture
ensured by the protective cover, except where the low voltage
equipment has no protection against moisture
IPX4
Water supply pressure
1)
Minimum
Maximum
0,5 bar (0,05 MPa)
8 bar (0,8 MPa)
Water supply
2)
Cold water
Maximum Load Cotton 7 kg
Energy Efficiency Class A++
Spin Speed Maximum 1400 rpm
1) The appliance works correctly if the water pressure is not lower than 0.05 MPa (0.5 bar). If you cannot connect the water inlet
hose to the cold water tap of the primary hydraulic system, connect it to your domestic cold water storage system. Make sure not
to exceed a distance of 5.02 m (16.5 ft) between the appliance inlet hose and the bottom of the water storage tank.
2) Connect the water inlet hose to a water tap with a 3/4'' thread.
Washing Machine User Manual 39
Page 40

Repairs - after sales service
Your appliance comes with a three year
warranty. If it is not working correctly refer to
the "Troubleshooting" chapter in this user
manual. If a fault occurs which you can not
resolve through following the advice and
information contained within this instruction
manual, the next step is to contact John Lewis
technical support on:
0330 1230106
They will give you details for your local service
engineer. Before calling out an engineer, please
ensure you have read the details under the
heading “Troubleshooting”.
When you contact your local service engineer
you will need to give the following details:
1. Your name, address and post code
2. Your telephone number
3. Clear and concise details of fault
4. The purchase date as found on your receipt
5. The model and serial number of the appliance.
So that you always have these numbers at
hand, we recommend you to make a note of
them here:
• Mod.......................................
• P.N.C.....................................
• S.N.........................................
IMPORTANT: If you call out an engineer
to a fault listed under the heading
''Troubleshooting'', or to repair a fault
caused by incorrect use or installation, a
charge will be made even if the appliance
is under guarantee.
Spare parts
Always insist on genuine spare parts.
An authorised service engineer should service
this product, and only genuine spare parts
should be used. Under no circumstances should
you attempt to repair the appliance yourself.
Repairs carried out by inexperienced persons
may cause injury or serious malfunctioning.
Please contact John Lewis technical support on
0330 1230106 for assistance
John Lewis, Aberdeen 01224 625000
John Lewis, Ashford 01233 811010
John Lewis, Bluewater 01322 624123
John Lewis, Birmingham 0121 6346000
John Lewis, Brent Cross 020 8202 6535
John Lewis, Cambridge 01223 361292
John Lewis, Cardiff 02920 536000
John Lewis, Cheadle 0161 491 4914
John Lewis, Chichester 01243 813030
John Lewis, Cribbs Causeway 0117 959 1100
John Lewis at home, Croydon 020 8662 4730
John Lewis, Edinburgh 0131 556 9121
John Lewis, Exeter 01392 284150
John Lewis, Glasgow 0141 353 6677
John Lewis, Home and Leisure, High Wycombe
01494 462666
John Lewis, Horsham 01403 214740
John Lewis, Ipswich 01473 275850
John Lewis, Kingston 020 8547 3000
John Lewis, Leicester 0116 242577
John Lewis, Liverpool 0151 709 7070
John Lewis, Milton Keynes 01908 679171
John Lewis, Newbury 01635 263980
John Lewis, Newcastle upon Tyne 0191 232
5000
John Lewis, Norwich 01603 660021
Washing Machine User Manual
40
Page 41

John Lewis, Nottingham 0115 941 8282
John Lewis, Oxford Street 020 7629 7711
John Lewis, Peterborough 01733 344644
John Lewis at home, Poole 01202 756020
John Lewis, Reading 0118 957 5955
John Lewis, Sheffield 0114 276 8511
Peter Jones, Sloane Square 020 7730 3434
John Lewis, Solihull 0121 704 1121
John Lewis Southampton 023 8021 6400
John Lewis, Southsea 023 9282 7511
John Lewis, Stratford 020 8532 3500
John Lewis at home, Swindon 01793 733180
John Lewis, Tamworth 01827 300580
John Lewis, Trafford 0161 491 4040
John Lewis at home, Turnbridge Wells 01892
506830
John Lewis, Watford 01923 244266
John Lewis, Welwyn 01707 323456
John Lewis, York 01904 557950
John Lewis electrical appliances are also
available in Waitrose Food and Home
Cheltenham 01242 241425
Rushden 01933 355099
Salisbury 01722 329429
Southend 01702 603403
Washing Machine User Manual
41
Page 42

ENVIRONMENT CONCERNS
Recycle the materials with the symbol . Put
the packaging in applicable containers to recycle
it. Help protect the environment and human
health and to recycle waste of electrical and
electronic appliances. Do not dispose appliances
marked with the symbol with the household
waste. Return the product to your local
recycling facility or contact your municipal office.
Washing Machine User Manual42
*
Page 43

Washing Machine User Manual 43
Page 44

132931200-A-432015 ( Subject to change without notice. )
 Loading...