

Page 1
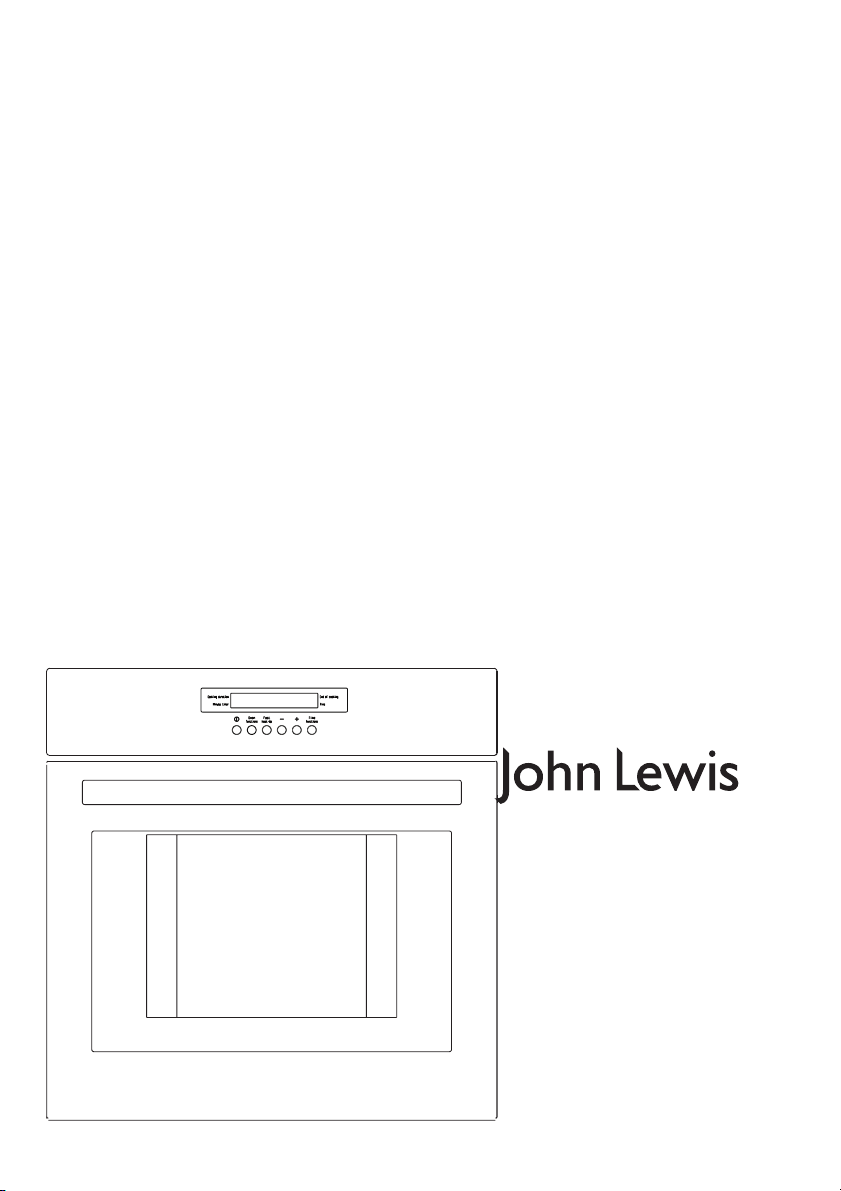
JLBIOS662
Built-in oven
Instruction manual
Page 2

Safety information
It is mo
st important that this instruction book should be retained with
the appliance for future reference. Should the appliance be sold or
transferred to another owner, or should you move house and leave the
appliance, always ensure that the book is supplied with the appliance in
order that the new owner can get to know the functioning of the appliance
and the relevant warnings.
These warnings have been provided in the interest of safety. You MUST
read them carefully before installing or using the appliance. If you are
unsure of the meanings of these warnings contact the John Lewis branch
from which you purchased the appliance.
Ins
tallation
•
This oven must be installed by qualified and
competent personnel to the relevant
National Standards.
• Refer to Installation information chapter
before installation.
• This oven is heavy. Take care when moving
it.
• Remove all packaging, both inside and
outside the oven, before using the oven.
• Do not attempt to modify the oven in any
way.
People Safety
•
This oven is designed to be operated by
adults. Do not allow children to play near
or with the oven.
• The oven gets hot when it is in use. Children
should be kept away until it has cooled.
• This appliance is not intended for use by
children or other persons whose physical,
sensory or mental capabilities or lack of
experience and knowledge prevents them
from using the appliance safely without
supervision or instruction by a responsible
person to ensure that they can use the
appliance safely.
Use
This oven is intended for domestic cooking
•
only. It is not designed for commercial or
industrial purposes.
• Appliances become very hot with use, and
retain their heat for long periods after use.
Care should be taken to avoid touching
heating elements inside the oven.
• Always stand back from the oven when
opening the oven door during cooking or
at the end of it to allow any build up of
steam or heat to release.
• Never line any part of the oven with
aluminium foil.
• Do not allow heatproof cooking material,
e.g. roasting bags, to come into contact
with oven elements.
• Never place plastic or any other material
which may melt in or on the oven.
• Do not place sealed cans or aerosols inside
the oven. They may explode if they are
heated.
2
Page 3

Do not hang towels, dishcloths or clothes
•
from the oven or its handle.
• Do not use this oven if it is in contact with
water and never operate it with wet hands.
• Take great care when heating fats and oils
as they will ignite if they become too hot.
• Always use oven gloves to remove and
replace food in the oven.
• Ensure that all control knobs are in the OFF
position when not in use.
• Do not leave cookware containing
foodstuffs, e.g. fat or oil in or on the oven
in case it is inadvertently switched ON.
• When using other electrical appliances,
ensure the cable does not come into
contact with the hot surfaces of the oven.
Maintenance and
Cleaning
•
Only clean this oven in accordance with the
instructions.
• The oven should be kept clean at all times.
A build-up of fats or other foodstuffs could
result in a fire, especially in the grill pan.
• Never use steam or high pressure steam
cleaners to clean the appliance.
• Always allow the oven to cool down and
switch off the electrical supply before
carrying out any cleaning or maintenance
work.
• Do not use abrasive cleaners or sharp metal
scrapers. These can scratch the glass in the
oven door, which may result in the
shattering of the glass.
Service
•
This oven should only be repaired or
serviced by an authorised Service Engineer
and only genuine approved spare parts
should be used.
3
Page 4

Contents
For the user
Safety information
Description of the appliance
General overview 5
Oven accessories 6
The Control Panel 6
Be
fore using for the first time
“On / Off”
How to select a cooking function 8
To set the temperature and cooking time 8
Function symbols 8
- button 8
Using the oven
Programming the oven 10
Special functions 11
Use, Tips and Tables
Telescopic shelf supports 14
The Safety Thermostat 15
The Cooling Fan 15
The Fan Oven 16
The Conventional Oven 17
Conventional Cooking and Fan Cooking 18
Grilling 23
Thermal grilling 24
Pizza 24
Defrosting 25
7
10
13
For the installer
Electrica
2
5
Building I
Technical data
l Connections
n
Guide to use the
instruction manual
32
33
34
Ca
re and cleaning
Cleaning the oven door 26
Care of catalytic liners 28
Removable shelf runners and catalytic panels 29
Something no
Dis
posal
Packaging material 31
Old appliance 31
t working
25
30
31
following symbols will be found in the text
The
to guide you throughout the instructions:
Saf
ety instructions
and tips
Hints
Environme
4
ntal information
Page 5
Description of the appliance
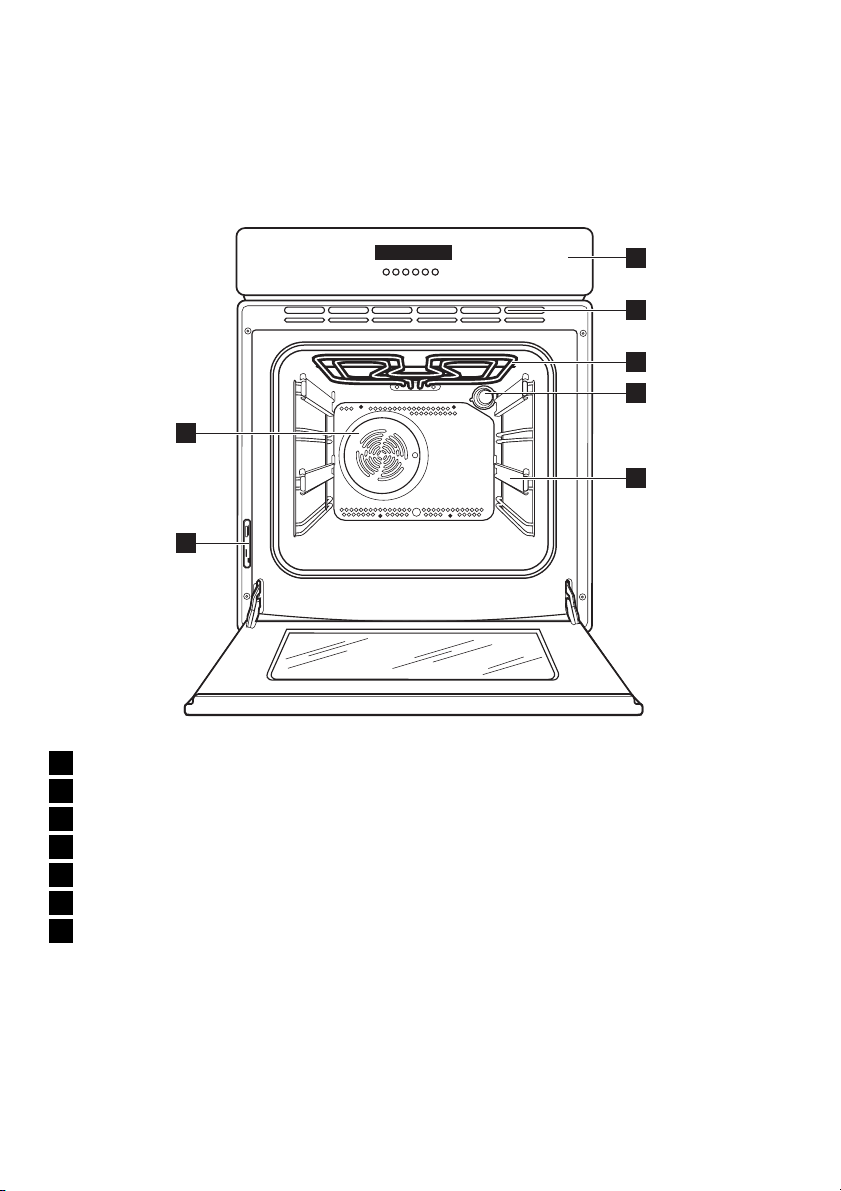
General overview
1
2
3
4
7
5
6
1 Control panel
Vents for Cooling Fan
2 Air
3 Grill
4 Oven ligh
elescopic Shelf Supports
5 T
6 Rating plate
7 Fan
t
5
Page 6
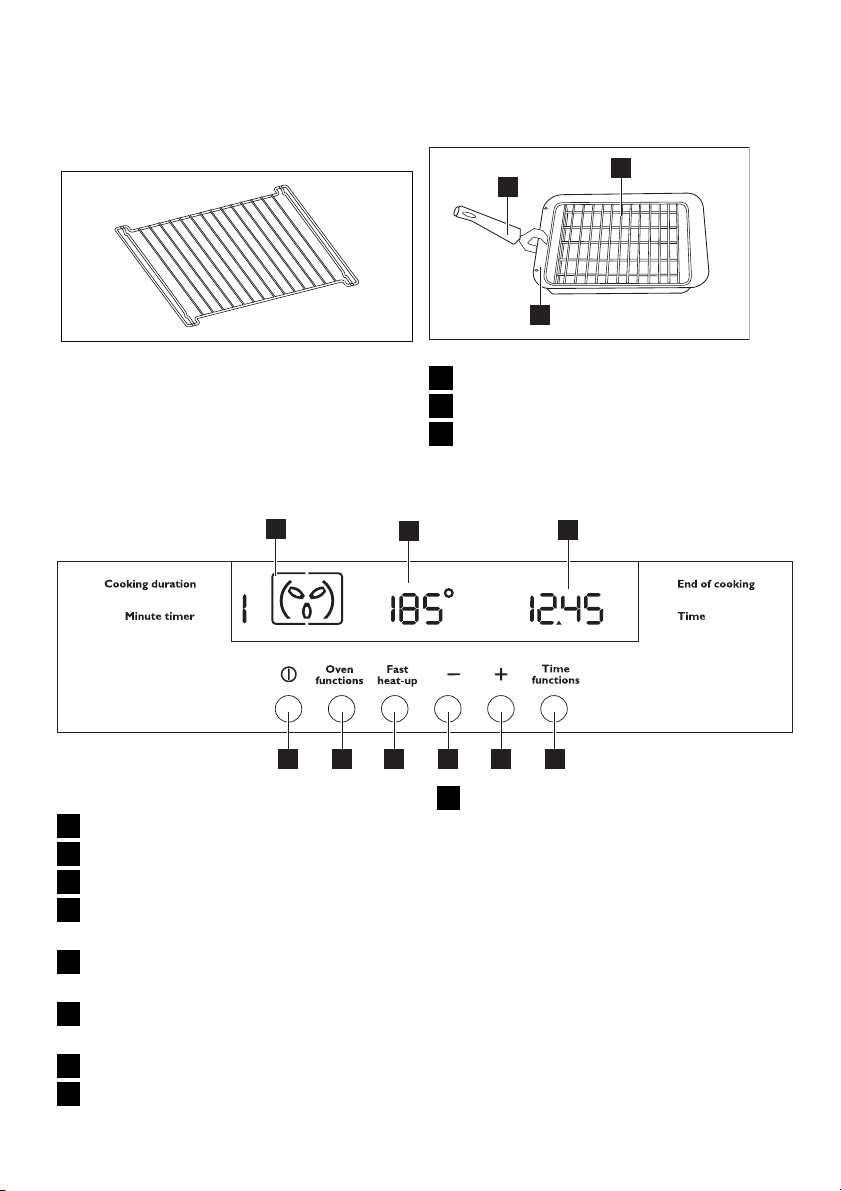
Oven accessories
Shelf
1
3
1 Removable hand
2 Grill Pan Grid
3 Grill / Roastin
The Control Panel
1
2
3
2
le
g pan
Pu
sh buttons
1 Cooking
2 Te
3 Ti
4 Minute
function
mperature display
me display
minder / Cooking duration
function / End of cooking function
5
ncreasing Control " + " (Time or
I
Temperature)
6
Decreasing Contro
l " - " (Time or
Temperature)
Heat Up Function
7 Fast
8 Oven Fu
nction Control
456789
9 ON / OF
F
All the oven functions are controlled by an
electronic programmer.
You can select any combination of cooking
function, cooking temperature and automatic
timing.
In the event of a power failure, the
programmer will keep all the settings (time of
day, programme setting or programme in
operation) for about 3 minutes. If power fails
for a longer time, all the settings will be
cancelled. When the power is restored, the
numbers in the display will flash, and the
clock/ timer has to be reset
6
Page 7
Before using for the first time
Wa
rning! Remove all packaging,
both inside and outside the oven,
before using the oven.
the oven is first connected to the
When
electrical supply, the display will automatically
show 12:00 and the symbol
Ensure
the correct time of day is set before
using the oven.
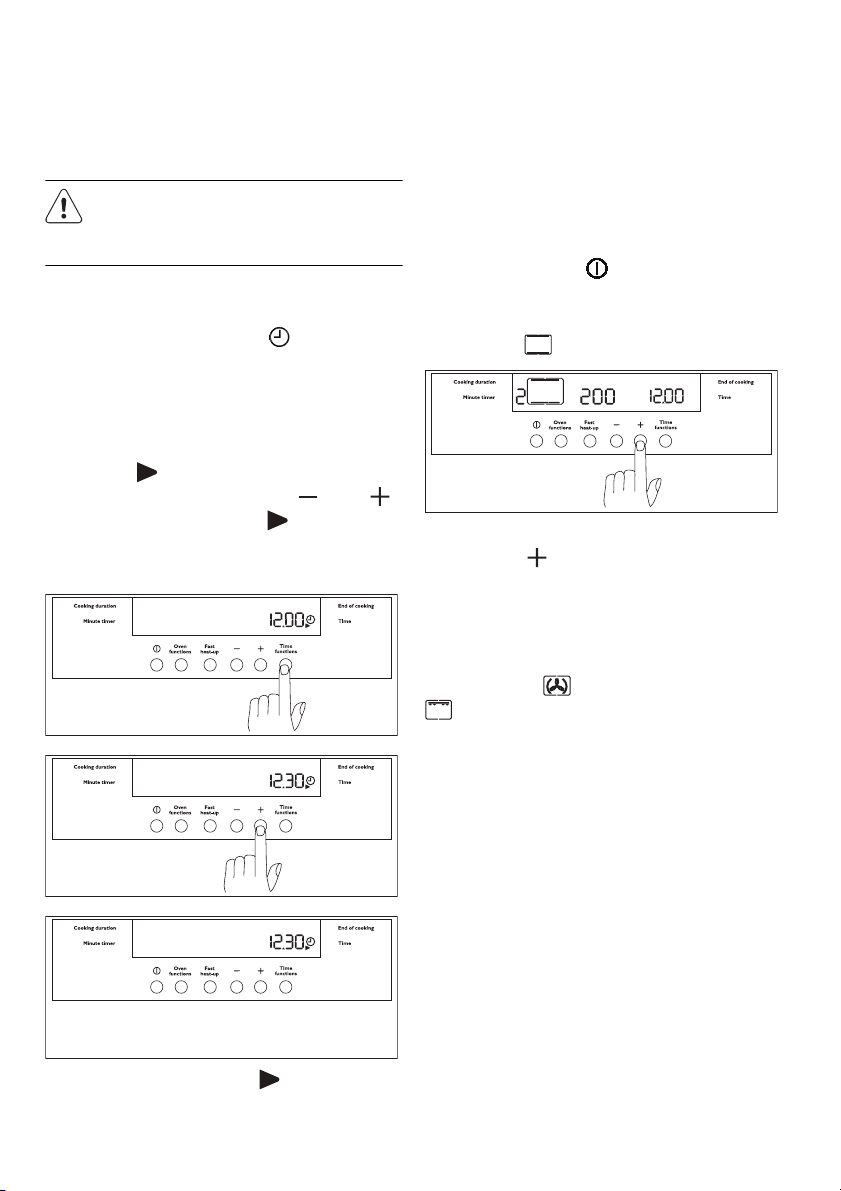
Setting the clock:
1. Press Time function button and, while the
symbol
of day by pressing buttons “
The
time arrow symbol
about 5 seconds after the correct time is
displayed.
lashing, set the correct time
is f
flashes.
”
will
disappear
or “
Then, proceed as described in point 1.
Before the first use, the oven should be heated
while empty.
1.
Press the button
2. Press button Oven function twice and
select the "Conventional Cooking"
function
”
Set the temperature to 250°C by using the
3.
button “
4.
Allow the
approximately 45 minutes.
5. Open a window for ventilation.
This procedure should be repeated with the
"Fan Cooking" and "Full Grill" function
for approximately 5-10 minutes.
During
this time, an unpleasant odour may be
emitted. This is absolutely normal. It is caused
by manufacturing residues.
Once this operation is carried out, let the
oven cool down, then clean the oven cavity
with a soft cloth soaked in warm soapy water.
Before cooking for the first time, carefully
wash the oven accessories as well.
To open the oven door, always hold the
handle in the centre, until it is fully open.
”.
oven to run empty for
to
switch on the oven.
.
2.
As soon as the symbol
press Time function button twice.
stop
s flashing,
7
Page 8
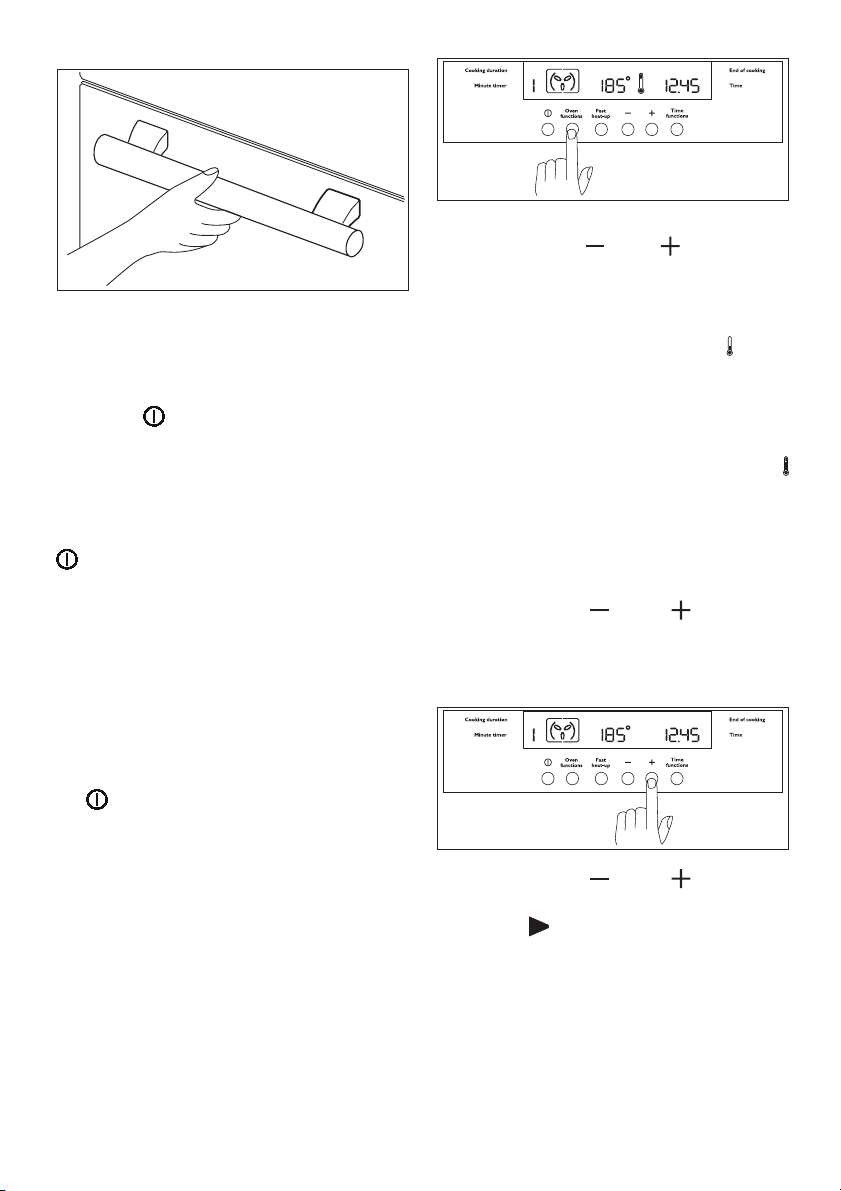
“On / Off” - button
he oven must be switched on before setting
T
any cooking functions or programmes. After
the button
appear in the display, and the oven light will
switch on
o switch off the oven, you can press button
T
. This is possi
function or programme will stop, the oven
light will switch off and the time display will
show the time of day only.
It is possible to switch off the oven at any time.
ow to select a cooking
H
ssed, the oven symbol will
is pre
ble at any time. Any cooking
function
1.
Switch on the oven by pressing the button
.
2.
Press button Oven function to select the
required oven function. Each time button
Oven funtion is pressed, a cooking symbol
will appear in the display and the
corresponding cooking function number
will appear to the left of the currently
selected cooking function symbol.
If the pre-set temperature is not suitable,
3.
press button “
correct temperature. The temperature is
adjusted in 5 degree steps.
– As soon as the oven heats up, the
thermometer symbol rises slowly
indicating
currently heated.
When the required temperature is
reached, an acoustic alarm will sound for a
short time and the thermometer symbol
will ligh
the degree to which the oven is
ts up.
or “ ” to set the
”
To set the temperature
and cooking time
Pre
ss the buttons “
or
decrease the pre-set temperature while
the “ ° ” symbol is flashing The maximum
temperature is 250°C.
ss the buttons “
Pre
decrease the pre-set cooking time while
or
the symbol
fla
” and “ ” to increase
” and “ ” to increase
shes.
8
Page 9
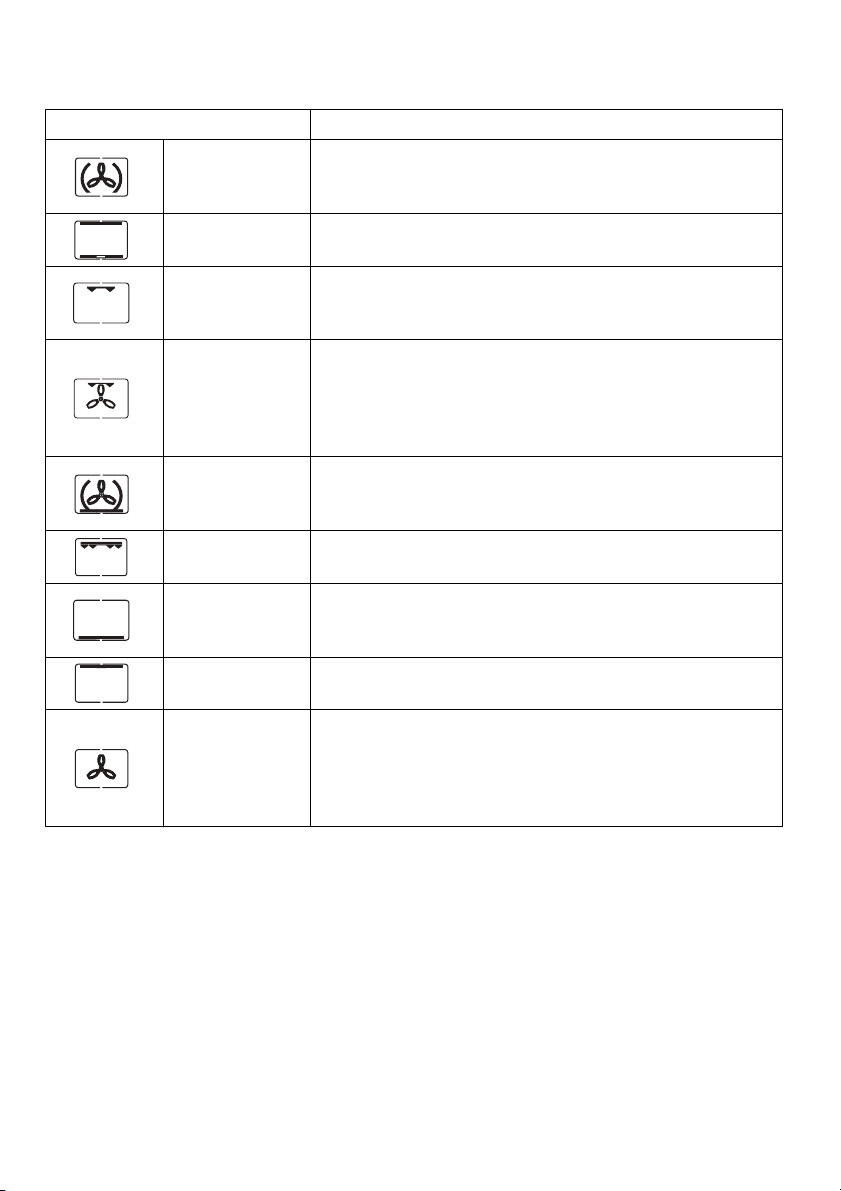
Function symbols
Oven Function Application
Fan cooking
Conventional
cooking
Inner Grill
Thermal grill
Pizza Oven
Full Grill
Bottom oven
element
Top heating
element
Defrosting
This allows you to roast or roast and bake simultaneously using
any shelf without flavour transference. Preset temperature:
175ºC
The heat comes from both the top and bottom element, ensuring
even heating inside the oven. Pre-set temperature: 200°C
Direct heat is provided to the central area of the grill pan via the
grill. The grill is perfect for cooking smaller portions. This way,
energy can also be saved. Preset temperature: 250°C
This function offers an alternative method of cooking food items,
normally associated with conventional grilling. The grill element
and the oven fan operate simultaneously, circulating hot air
around the food. Pre-set temperature: 180°C
Highest temperature: 200 °C.
The bottom element provides direct heat to the base of pizzas,
quiches or pies, while the fan ensures air is circulated to cook the
pizza toppings or pie fillings. Pre-set temperature: 175°C
The full grill element will be on. Recommended for large
quantities. Pre-set temperature: 250°C
The heat comes from the bottom heating element only. This
setting is very good for finishing off dishes. Preset temperature:
250ºC
The heat comes from the top of the oven only, to allow you to
finish your dishes. Pre-set temperature: 250 °C
The oven fan circulates the hot air without heat at room
temperature inside the oven. This function is particularly suitable
for defrosting delicate food which could be damaged by heat, e.g.
cream filled gateaux, iced cakes, pastries, bread and other yeast
products.
9
Page 10
Using the oven
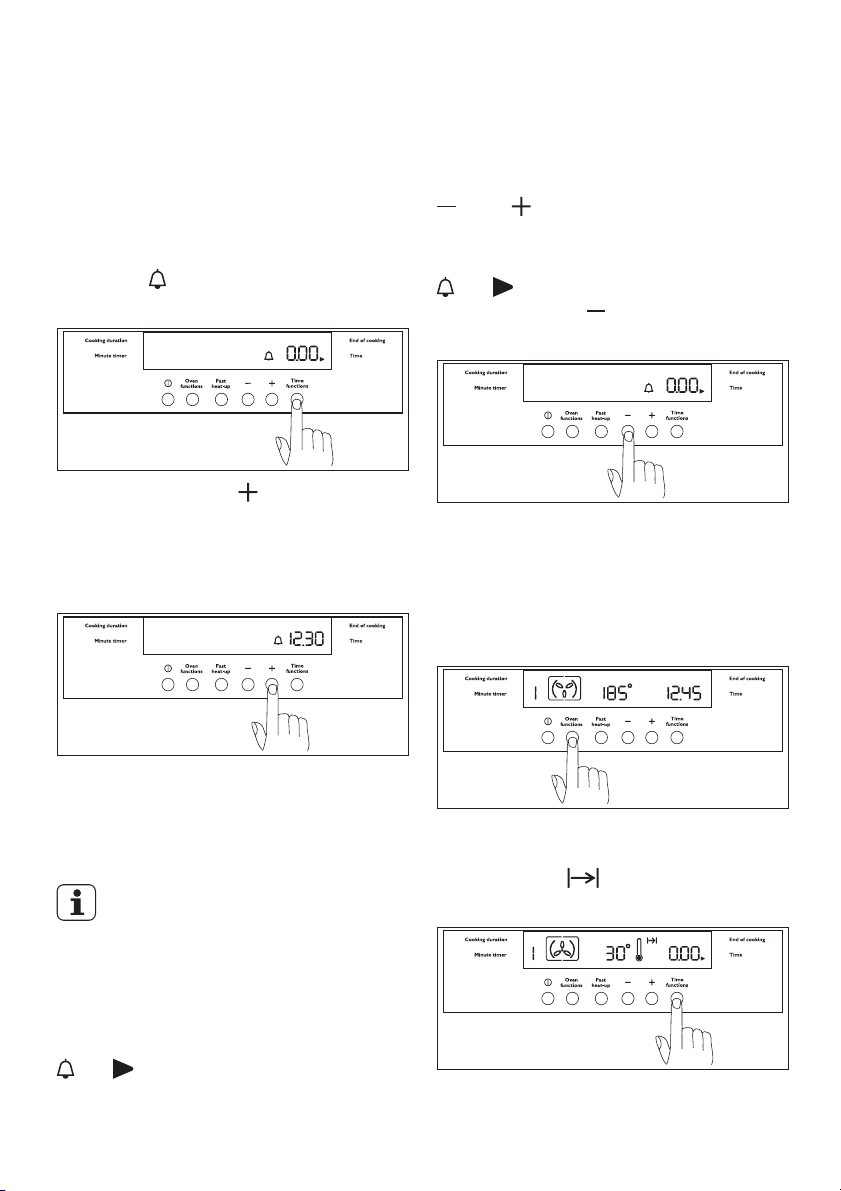
Programming the oven
To set the minute minder
1. Press button Time functions to select the
minute minder function. The relevant
symbol
will display “0.00”
2. Using the button “ ” to enter the
required time. The maximum time is 23
hours 59 minutes. After it has been set,
the minute minder will wait 3 seconds and
then start running.
will flash and the control panel
Now you can change the settings of the
minute minder. To do this, press the button “
” or “ ”.
To cancel the minute minder:
Press Time functions button until the symbols
and flash.
Press the button “
until «0.00» is displayed
” to decrease the time
To programme the oven to
switch off
1. Place food in the oven, switch on the oven,
select a cooking function and adjust the
cooking temperature, if required.
3. When the programmed time has elapsed,
an acoustic alarm will be heard.
4. To switch off the acoustic alarm, press any
button.
The oven will NOT switch off if in use.
The minute minder function can be
used as well when the oven is off.
To use or to change the minute
minder setting:
Press button Time functions until the symbols
and flash.
2. Press the button Time functions to select
the «Cooking time» function. The cooking
time symbol
panel will display «0.00»
10
will flash and the control
Page 11
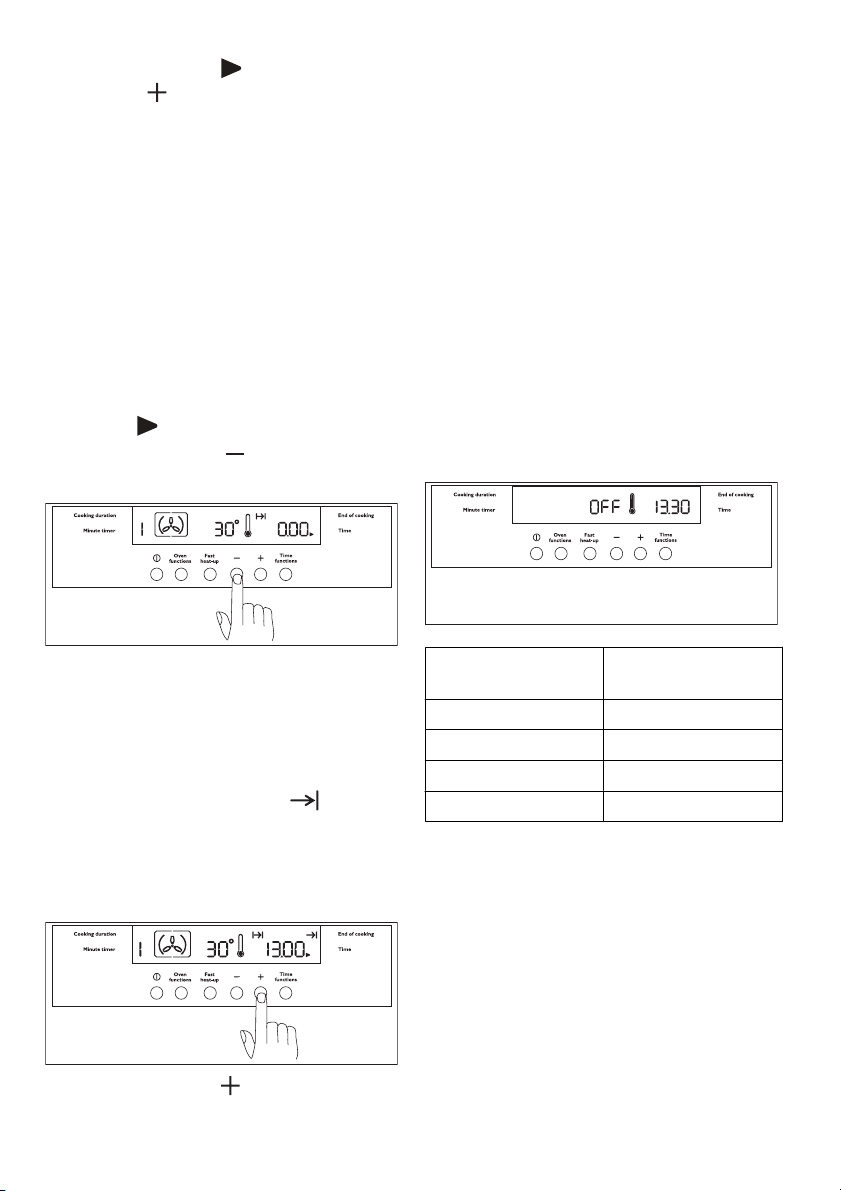
3. While the symbol is flashing, press the
button “
The maximum time is 23 hours 59
minutes. The programmer will wait 3
seconds and then start running.
4. After the time programmed has elapsed,
the oven switches off automatically. An
acoustic alarm will be heard and “0.00”
will appear on the control panel.
5. To switch off the acoustic alarm, press any
button.
” to select the required time.
To cancel the programmed
cooking time:
1. Press Time functions button, until the
symbol
2. Press the button “
time until the display shows “0.00”
flashes.
” to decrease the
4. Once the setting has been made, the
programmer will wait 3 seconds and then
start running.
5. The oven will switch on and off
automatically. The end of cooking will be
marked by an acoustic alarm.
6. To switch off the acoustic alarm, push
ON/OFF button.
To cancel the programme, simply
cancel the Cooking Time.
Special functions
Oven safety switch-off
The oven will switch off automatically if any
change of setting is made, according to the
following table
To programme the oven to
switch on and off
1. Carry out the “Cooking time” setting as
described in the relevant chapter.
2. Push the button Time functions until the
«End of Cooking» function
and the relevant symbol flashes. The
control panel will display the end of
cooking time (that is, the actual time +
Cooking time)
3. Push the button “ ” to select the
required end of cooking time.
is selected
Temperature
setting:
250ºC after 3 hours
from 200 up to 245°C after 5.5 hours
from 120 up to 195°C after 8.5 hours
less than 120°C after 12 hours
the oven will switch
off:
Residual heating function
When a cooking time is set, the oven will
automatically switch off a few minutes before
the end of the programmed time, and use the
residual heat to finish your dishes without
energy consumption.
All current settings will be displayed until the
cooking time is over.
This function will not operate when the
cooking time is less than 15 minutes.
11
Page 12

Child lock for the oven
To prevent children from switching on the
oven, it is possible to lock the oven controls.
1.
Turn off the oven by pressing button
2. Press Oven function and “
the same time for about 3 seconds. An
acoustic signal will be emitted and the
indication ‘ SAFE ’ will appear in the
display
3. The oven is now locked. Neither oven
functions nor temperatures can be
selected.
“ buttons at
To unlock the oven:
Press Oven function and “ ” buttons at the
same time and keep them pressed for about
3 seconds.
An acoustic signal will be emitted and the
indication “SAFE” will go out.
The oven can now be operated.
Fast heat-up function
After a cooking function and the temperature
have been selected, the cavity will gradually
heat up until the selected temperature is
reached.
This will take from 10 to 15 minutes,
depending on the selected function and
temperature.
If it is necessary to reach the required
temperature in a shorter time, the “Fast Heat
Up” function can be used.
1. Switch the oven on by pressing button
.
.
2. Set the required cooking function and
temperature as explained in the previous
pages.
3. Set the temperature by pressing button
“
" or “ ”. The temperature will
appear in the display.
4. Press the button Fast heat up. The
temperature display will show “ FHU ”
5. Press the button Oven function. The
symbol “ ° ” will flash for approximately 10
seconds. Now it is possible to select the
required temperature. To do this, press
the button “
6. When the required temperature is
reached, the electronic control beeps for
a short time, and the temperature display
reverts to the selected temperature.
This function can be used with any cooking
function or temperature.
” or “ ”.
Demo mode
This mode is intended to be used in shops to
demonstrate the oven functionality without
any power consumption except the interior
light, the display and the fan.
This function can only be switched on when
the appliance is first connected.
If there is a power failure, when the power
supply is restored again the Demo function
can only be switched on if, in the display, 12:00
and the symbol
are flashing automatically.
12
Page 13

1. Press the button Time functions for
approx. 2 seconds. A short acoustic alarm
will be heard.
2. Press the buttons Time functions and
“
” at the same time. A short acoustic
alarm will be heard and the time 12:00
appears in the display
When the oven is switched on, the symbol
appears in the display.
This means that the demo function is
activated.
All oven functions can be selected.
The oven is not really working and the heating
elements do not switch on.
Switch off the oven and follow the above
described procedure to disable the demo
mode.
The demo mode remains saved in the
programme in the event of a power
failure.
Beep on touch
You can choose to make the electronic
control beep each time that a button is
pressed.
To enable this function, the oven must be off.
1. Press the buttons Oven functions and
“
” at the same time and keep them
pressed for about 3 seconds. The alarm
signal beeps once
To disable the beep on touch:
1. With the oven switched on, press the
button
2. Press Oven functions button and “
the same time and keep them pressed for
about 3 seconds. The electronic control
beeps once.
to switch the oven off.
” at
Error codes
The electronic programmer does a
continuous diagnostic check of the system.
If some parameters are not correct, the
control unit will stop the activated functions
and it will display the corresponding error
code
For further details, refer to chapter
“Something not working”.
Use, Tips and Tables
Using the Oven
Warning! Always cook with the oven
door closed. Stand back when opening
the oven door.
The oven has four shelf levels. The shelf
positions are counted from the bottom of the
oven as shown in the diagram. It is important
that these shelves are correctly positioned as
shown in the diagram.
13
Page 14

4
3
2
1
°C
Warning! Do not place cookware
directly on the oven base.
Warning! Do not cover any part of
the oven with aluminium foil while
cooking, as this could cause a heat
build-up which would affect the baking
results and damage the oven enamel.
Always place pans, heat-resisting pans
and aluminium trays on the shelf which
has been inserted in the shelf runners.
Telescopic shelf supports
On 2 and 4 shelf levels there are telescopic
shelf supports installed. With telescopic shelf
supports you can insert and remove the
shelves more easily.
1. Pull out the right and left hand telescopic
shelf supports.
2. Put the shelf on the telescopic shelf
supports and carefully push them inside
the oven.
°C
Warning! Do not close the oven
door if the telescopic shelf supports
are not completely inside the oven.
This can damage the door enamel and
glass.
Warning! Telescopic shelf supports
and other accessories become very
hot when you use the appliance. Wear
oven gloves or equivalent.
14
Page 15

Condensation and steam
The oven is supplied with an exclusive system
which produces a natural circulation of air and
the constant recycling of steam. This system
makes it possible to cook in a steamy
environment and keep the dishes soft inside
and crusty outside. Moreover, the cooking
time and energy consumption are reduced to
a minimum. During cooking steam may be
produced which can be released when
opening the oven door. This is absolutely
normal.
Warning! Always stand back from
the oven when opening the oven door
during cooking or at the end of it to
allow any build up of steam or heat to
release.
When food is heated, it produces
steam in the same way as a boiling
kettle does. When steam comes in
contact of the oven door glass, it will
condense and produce water
droplets.
To reduce condensation, ensure the oven is
well heated before placing food in the oven
cavity. A short oven pre-heating (about 10
minutes) will then be necessary before any
cooking.
We recommend you to wipe away
condensation after each use of the appliance.
Cookware
• Use any oven proof cookware which will
withstand temperatures of 250°C.
• Baking trays, oven dishes, etc. should not
be placed directly against the grid covering
the fan at the back of the oven, or placed
on the oven base.
• Do not use baking trays larger than 30 cm
x 35 cm (12 in x 14 in) as they will restrict
the circulation of heat and may affect
performance.
The effects of dishes on
cooking results
Dishes and tins vary in their thickness,
conductivity, colour, etc. which affects the
way they transmit heat to the food inside
them.
•
A -aluminium, earthenware, oven
glassware and bright shiny utensils reduce
cooking and base browning
•
B -enamelled cast iron, anodised
aluminium, aluminium with non-stick
interior and coloured exterior and dark,
heavy utensils increase cooking and base
browning.
The Safety Thermostat
To prevent dangerous overheating (through
incorrect use of the appliance or defective
components), the oven is fitted with a safety
thermostat, which interrupts the power
supply. The oven switches back on again
automatically, when the temperature drops.
Should the safety thermostat trigger due to
incorrect use of the appliance, it is enough to
remedy the error after the oven has cooled
down; if on the other hand, the thermostat
triggers because of a defective component,
please contact Customer Service
The Cooling Fan
The oven is provided with a cooling fan, meant
to keep the front panel, the knobs and the
oven door handle cool. The cooling fan
operates during cooking. It starts to operate
few minutes after the oven is on. Air is
expelled through vents between the oven
15
Page 16

door and the control panel, as shown in the
diagram.
The cooling fan may run on after the oven is
switched off to keep the controls cool. This is
quite normal.
The action of the cooling fan depends on how
long the oven has been used and at what
temperature. It may not switch in at all at
lower temperature settings nor run on where
the oven has only been used for a short time.
The Fan Oven
PRE-SET TEMPERATURE: 175°C
TEMPERATURE SELECTION: 30°C 2 5 0 ° C
The air inside the oven is heated by the
element around the fan situated behind the
back panel. The fan circulates hot air to
maintain an even temperature inside the oven.
The advantage of cooking with this function is
energy saving through:
•
Faster Preheating
As the fan oven quickly reaches
temperature, it is not usually necessary to
preheat the oven although you may find
that you need to allow an extra 5-7 minutes
on cooking times. For recipes which
require higher temperatures, best results
are achieved if the oven is preheated first,
e.g. bread, pastries, scones, souffles, etc.
•
Lower Temperatures
Fan oven cooking generally requires lower
temperatures than conventional cooking.
Follow the temperatures recommended in
the cooking chart. Remember to reduce
temperatures by about 20- 25°C for your
own recipes which use conventional
cooking.
•
Even Heating for Baking
The fan oven has uniform heating on all shelf
positions. This means that batches of the
same food can be cooked in the oven at the
same time. However, the top shelf may
brown slightly quicker than the lower one.
This is quite usual. There is no mixing of
flavours between dishes.
How to use the Fan Oven
1. Switch the oven on.
2. Press the Oven Function Control button
and select the Fan Cooking function.
3. If necessary adjust temperature setting
using the " + " or " - " buttons.
THINGS TO NOTE
• The oven light will come on when the oven
function control knob is set.
• The oven fan will operate continually during
cooking.
• The thermostat control light will remain on
until the correct temperature is reached. It
will then cycle on and off to show the
temperature is being maintained.
16
Page 17

about 20-25°C for your own conventional
recipes.
• When roasting do use the trivet in the meat
tin. Fat and meat juices will drain into the
meat tin below and can be used to make
gravy. The trivet also prevents splashes of
fat from soiling the oven interior.
•
The meat tin should not be placed on a
heated hotplate as this may cause the
enamel to crack.
Hints and Tips
• Shelf positions are not critical, but make
sure the shelves are evenly spaced.
• When cooking more than one dish in the
fan oven, place dishes centrally on the
shelves rather than several dishes on one
shelf.
• When the oven is full, you may need to
allow slightly longer cooking time.
• When the oven is full of the same food, e.g.
equal trays of small cakes or equal size
victoria sandwich cakes, then they will be
cooked in the same time and removed from
the oven together. When different sizes of
trays or types of food, e.g. biscuits and
cakes are cooked, they will not necessarily
be ready together.
• The fan oven can be used to heat foods
through without thawing first, e.g. fruit
tarts, mince pies, sausage rolls, and other
small pastry items. Use a temperature of
190-200°C and allow 20-40 minutes
(depending on the quantity of food in the
oven).
• The use of too high temperatures can cause
uneven browning. Check with the
recommendations for oven temperatures
given in the cooking charts, but be prepared
to adjust the temperature, if necessary.
Remember to reduce temperatures by
The Conventional Oven
PRE-SET TEMPERATURE: 200°C
TEMPERATURE SELECTION: 30°C 250 ° C
When using this setting, heat comes from
both the top and bottom elements. This
allows you to cook on a single level and is
particularly suitable for dishes which require
extra base browning such as quiches and flans.
Gratins, lasagnes and hotpots which require
extra top browning also cook well in the
conventional oven. This form of cooking gives
you the opportunity to cook without the fan
in operation.
How to Use the Conventional Oven
1. Switch the oven ON.
2. Select the Conventional Oven Function by
pressing the button Oven function until
the symbol
3. If necessary adjust temperature setting
using the " + " or " - " buttons.
During cooking, the cooling fan will operate in
the same way as described for the fan oven
function.
appears in the display.
17
Page 18

utensils increase base browning, while oven
glassware, shiny aluminium or polished
steel trays reflect the heat away and give
less base browning.
• Always place dishes centrally on the shelf to
ensure even browning.
• Stand dishes on suitably sized baking trays
to prevent spillage onto the base of the
oven and make cleaning easier.
• Do not place dishes, tins or baking trays
directly on the oven base as it becomes
very hot and damage will occur.
• For faster preheating use the Fast Heat-Up
Function.
• Single level cooking gives best results. If you
require more than one level cooking use
the fan oven function.
Bottom oven element only
This function is particularly useful when blindbaking pastry. It may also be used to finish off
quiches or flans to ensure the base pastry is
cooked through.
Top oven element only
This function is particularly useful to finish off
quiches or flans to ensure the top pastry is
cooked through.
Pre-set temperature is 250°C.
Hints and Tips
• The middle shelf position allows for the
best heat distribution. To increase base
browning simply lower the shelf position.
To increase top browning, raise the shelf
position.
• The material and finish of the baking trays
and dishes used will affect base browning.
Enamelware, dark, heavy or nonstick
Conventional Cooking
and Fan Cooking
Timings do not include pre-heating.
The empty oven should always be preheated for 10 minutes.
18
Page 19

CAKES
Conventional
TYPE OF DISH
level
cooking
Temp.
(°C)
Fan cooking Cooking
level
Temp.
(°C)
time
In
minutes
NOTE
Whisked recipies 2 170
Shortbread dough 2 170
Buttermilk cheese
1 175 2 165 60-80 Cake tin
2(1 and 3)
2(1 and 3)
1)
160 45-60 Cake tin
1)
160 20-30 Cake tin
cake
1)
Apple cake 1 170
2(1 and 3)
160 90-120 Cake tin
Strudel 2 180 2 160 60-80 Baking tray
1)
Jam tart 2 190
2(1 and 3)
180 40-45 Cake tin
Fruit cake 2 170 2 150 60-70 Cake tin
1)
Sponge cake 1 170
2(1 and 3)
165 30-40 Cake tin
Christmas cake 1 150 2 150 120-150 Cake tin
Plum cake 1 175 2 160 50-60 Bread tin
Small cakes 3 170 2 160 20-35 Baking tray
1)
Biscuits 2 160
Meringue 2 135
2(1 and 3)
2(1 and 3)
150 20-30 Baking tray
1)
150 60-90 Baking tray
Fancy biscuits 2 200 2 190 12-20 Baking tray
1)
Pastries: Choux
2 or 3 210
2(1 and 3)
170 25-35 Baking tray
pastry
Tartlets 2 180 2 170 45-70 Cake tin
1) If you cook several dishes at the same time, we recommend that you place them on the levels quoted between
brackets.
The temperatures quoted are guidelines. If
necessary, the temperatures should be
adjusted to personal requirements.
BREAD AND PIZZA
Conventional
cooking
TYPE OF DISH
level
Temp.
(°C)
White bread 1 195 2 185 60-70 Bread tin
Fan cooking Cooking
level
Temp.
In minutes NOTE
(°C)
time
19
Page 20

Conventional
TYPE OF DISH
level
cooking
Temp.
(°C)
Fan cooking Cooking
level
Temp.
In minutes NOTE
(°C)
time
Rye bread 1 190 1 180 30-45 Bread tin
1)
Bread rolls 2 200
2(1 and 3)
175 25-40 Baking tray
Pizza 2 200 2 200 20-30 Baking tray
1) If you cook several dishes at the same time, we recommend that you place them on the levels quoted between
brackets.
The temperatures quoted are guidelines. If
necessary, the temperatures should be
adjusted to personal requirements.
FLANS
Conventional
cooking
TYPE OF DISH
level
Temp.
(°C)
Pasta flan 2 200
Vegetable flan 2 200
Quiches 1 210 1 190 30-40 Baking tin
Lasagne 2 200 2 200 25-35 Baking tin
Cannelloni 2 200 2 200 25-35 Baking tin
1) If you cook several dishes at the same time, we recommend that you place them on the levels quoted between
brackets.
Fan cooking Cooking
level
Temp.
(°C)
1)
2(1 and 3)
2(1 and 3)
175 40-50 Baking tin
1)
175 45-60 Baking tin
time
In minutes NOTE
The temperatures quoted are guidelines. If
necessary, the temperatures should be
adjusted to personal requirements.
MEATS
Conventional
cooking
TYPE OF DISH
level
Temp.
(°C)
Beef 2 190 2 175 50-70 Shelf
Pork 2 180 2 175 100-130 Shelf
Veal 2 190 2 175 90-120 Shelf
Fan cooking Cooking
level
Temp.
In minutes NOTE
(°C)
time
20
Page 21

Conventional
cooking
TYPE OF DISH
English roast beef
- rare 2 210 2 200 50-60 Shelf
- medium 2 210 2 200 60-70 Shelf
- well done 2 210 2 200 70-80 Shelf
Shoulder of pork 2 180 2 170 120-150 with rind
Knuckle of pork 2 180 2 160 100-120 2 pieces
Lamb 2 190 2 175 110-130 Leg
Chicken 2 190 2 200 70-85 Whole
Turkey 2 180 2 160 210-240 Whole
Duck 2 175 2 220 120-150 complete
Goose 2 175 1 160 150-200 complete
Rabbit 2 190 2 175 60-80 In pieces
Hare 2 190 2 175 150-200 In pieces
Pheasant 2 190 2 175 90-120 complete
Meatloaf 2 180 2 175 complete
level
Temp.
(°C)
Fan cooking Cooking
level
Temp.
(°C)
In minutes NOTE
time
Bread tin
150
The temperatures quoted are guidelines. If
necessary, the temperatures should be
adjusted to personal requirements.
FISH
Conventional
cooking
TYPE OF DISH
Trout / Sea bream 2 190
Tuna fish / Salmon 2 190
1) If you cook several dishes at the same time, we recommend that you place them on the levels quoted between
brackets.
level
Temp.
(°C)
Fan cooking Cooking
level
2(1 and 3)
2(1 and 3)
Temp.
(°C)
1)
175 40-55 3-4 fish
1)
175 35-60 4-6 Filets
time
In minutes NOTE
The temperatures quoted are guidelines. If
necessary, the temperatures should be
adjusted to personal requirements.
21
Page 22

Grilling - -
Warning! Grilling must be carried
out with the oven door closed.
The grill pan handles must be removed
from the pan during grilling. Always
use oven gloves to remove and replace
the grill pan handles. Ensure that you
support the grill pan when removing it
from the oven .
FULL GRILL ELEMENT
PRE-SET TEMPERATURE: 250°C
TEMPERATURE SELECTION 200°C 250 ° C
How to Use the Full Grill
1. Switch the oven ON.
2. Select the Full Grill function by pressing
the button Oven function until the symbol
appears in the display.
3. If necessary adjust temperature setting
using the " + " or " - " buttons.
4. Adjust the grid and grill pan runner
position to allow for different thicknesses
of food. Position the food close to the
element for faster cooking and further
away for more gentle cooking.
Preheat the grill on a full setting for a few
minutes before sealing steaks or toasting.
Adjust the heat setting and the shelf as
necessary, during cooking.
During cooking, the cooling fan and the
thermostat control light will operate in the
same way as described for the fan oven
function.
INNER GRILL ELEMENT
PRE-SET TEMPERATURE: 250°C
TEMPERATURE SELECTION 200°C 250 ° C
How to Use the Inner Grill
• The inner grill provides quick direct heat to
the central area of the grill pan. Use the
inner grill element for cooking small
quantities, it can help to save energy.
1. Switch the oven ON.
2. Select the Inner Grill Element by pressing
the button Oven function until the symbol
appears on the display.
3. If necessary adjust temperature setting
using the " + " or " - " buttons.
4. Adjust the grid and grill pan runner
position to allow for different thicknesses
of food and follow the instructions for
grilling.
Hints and Tips
• Most foods should be placed on the grid in
the grill pan to allow maximum circulation
of air to lift the food out of the fats and
juices. Food such as fish, liver and kidneys
may be placed directly on the grill pan, if
preferred.
• Food should be thoroughly dried before
grilling to minimise splashing. Brush lean
meats and fish lightly with a little oil or
melted butter to keep them moist during
cooking.
• Accompaniments such as tomatoes and
mushrooms may be placed underneath the
grid when grilling meats.
• When toasting bread, we suggest that the
top runner position is used.
• The food should be turned over during
cooking, as required.
The grill element is controlled by the
thermostat. During cooking, the grill
cycles on and off to prevent
overheating.
22
Page 23

O
L
I
THERMAL GRILLING
PRE-SET TEMPERATURE: 180°C
TEMPERATURE SELECTION 30°C 200 ° C
DO NOT EXCEED 200°C
How to Use the Thermal Grill
• Thermal grilling offers an alternative
method of cooking food items normally
associated with conventional grilling. The
grill element and the oven fan operate
alternately, circulating hot air around the
food. The need to check and turn the food
is reduced. Thermal grilling helps to
minimise cooking smells in the kitchen.
• With the exception of toast and rare
steaks, you can thermally grill all the foods
you would normally cook under a
conventional grill. Cooking is more gentle,
therefore food generally takes a little longer
to cook with thermal grilling compared with
conventional grilling. One of the advantages
is that larger quantities can be cooked at the
same time.
1. Switch the oven ON.
2. Select the Thermal Grill Oven Function by
pressing the button Oven function until
the symbol
appears on the display.
3. If necessary, press or buttons. to adjust
the temperature setting.
4. Adjust the grid and grill pan runner
position to allow for different thicknesses
of food and follow the instructions for
grilling.
Hints and Tips
• Prepare foods in the same way as for
conventional grilling. Brush lean meats and
fish lightly with a little oil or butter to keep
them moist during cooking.
Grilling
Preheat the empty oven for 10
minutes, before cooking.
Quantity Grilling Cooking time in
minutes
TYPE OF DISH Pieces g
Fillet steaks 4 800 3 250 12-15 12-14
Beef steaks 4 600 3 250 10-12 6-8
Sausages 8 / 3 250 12-15 10-12
Pork chops 4 600 3 250 12-16 12-14
Chicken (cut in 2) 2 1000 3 250 30-35 25-30
Kebabs 4 / 3 250 10-15 10-12
Breast of chicken 4 400 3 250 12-15 12-14
level
Temp.
(°C)
1st side 2nd side
23
Page 24

Quantity Grilling Cooking time in
minutes
TYPE OF DISH Pieces g
Hamburger 6 600 3 250 20-30
Fish Fillet 4 400 3 250 12-14 10-12
Toasted sandwiches 4-6 / 3 250 5-7 /
Toast 4-6 / 3 250 2-4 2-3
level
Temp.
(°C)
1st side 2nd side
Thermal grilling
Warning! Use this function with a
maximum temperature of 200°C.
Quantity Grilling Cooking time in
minutes
TYPE OF DISH Pieces g
Rolled joints (turkey) 1 1000 3 200 30-40 20-30
Chicken (cut in two) 2 1000 3 200 25-30 20-30
Chicken drumsticks 6 - 3 200 15-20 15-18
Quail 4 500 3 200 25-30 20-25
Vegetable gratin - - 3 200 20-25 -
pieces. Scallops - - 3 200 15-20 -
Mackerel 2-4 - 3 200 15-20 10-15
Fish slices 4-6 800 3 200 12-15 8-10
level
Temp.
(°C)
1st side 2nd side
Pizza Oven
PRE-SET TEMPERATURE: 175°C
TEMPERATURE SELECTION: 30°C 250 ° C
The bottom element provides direct heat to
the base of pizzas, quiches or pies, while the
fan ensures air is circulated to cook the pizza
toppings or pie fillings.
1. Switch the oven ON.
2. Select the Pizza Oven Function by pressing
the button Oven function until the symbol
appears on the display.
3.
If necessary, press " + " or " - " buttons to
adjust the temperature setting.
24
Page 25

Pizza
TYPE OF DISH Pizza Function Cooking time in
Level temp.°C
Pizza , large 1 200 15~25 on baking tray
Pizza , small 1 200 10~20 on baking tray or on
Bread rolls 1 200 15~25 on baking tray
Defrosting
TEMPERATURE SETTING CANNOT
BE CHANGED
The oven fan operates without heat and
circulates the air, at room temperature, inside
the oven. This increases the speed of
defrosting. However, please note that the
temperature of the kitchen will influence the
speed of defrosting.
This function is particularly suitable for
delicate food which could be damaged by
heat, e.g. cream filled gateaux, iced cakes,
pastries, bread and other yeast products.
How to Use Defrosting
1. Switch the oven on by pressing button.
2. Select the Defrosting Oven Function by
pressing the button Oven function until
the symbol
appears in the display.
minutes
3.
The display will show the indication " def
".
Hints and Tips
• Cover food with a lid, aluminium foil or
plastic film to prevent drying out during
defrosting.
• ALWAYS COOK THOROUGHLY
IMMEDIATELY AFTER THAWING.
• Frozen food should be placed in a single
layer when ever possible and turned over
half way through the defrosting process.
• Only joints of meat and poultry up to 2 kg.
(4 lb.) are suitable for defrosting in this way.
NOTES
grid
Care and cleaning
Warning! Before cleaning switch the
oven off and let it cool down.
The appliance must not be cleaned
with a superheated steam cleaner or a
steam jet cleaner.
Important: Before carrying out any cleaning
operation, the appliance must be
disconnected from the power supply.
To ensure a long life for your appliance, it is
necessary to perform the following cleaning
operations regularly:
• Only perform when the oven has cooled
down.
• Clean the enamelled parts with soapy
water.
• Do not use abrasive cleaners.
25
Page 26

• Dry the stainless steel parts and glass with
a soft cloth.
• If there are stubborn stains, use
commercially available for stainless steel or
warm vinegar.
The oven’s enamel is extremely durable and
highly impermeable. The action of hot fruit
acids (from lemons, plums or similar) can
however leave permanent, dull, rough marks
on the surface of the enamel. However such
marks in the brightly polished surface of the
enamel does not affect the operation of the
oven. Clean the oven thoroughly after every
use. This is the easiest way to clean dirt off. It
prevents dirt being burnt on.
Cleaning materials
Before using any cleaning materials on your
oven, check that they are suitable and that
their use is recommended by the
manufacturer.
Cleaners that contain bleach should NOT be
used as they may dull the surface finishes.
Harsh abrasives should also be avoided.
External cleaning
Regularly wipe over the control panel, oven
door and door seal using a soft cloth well
wrung out in warm water to which a little
liquid detergent has been added.
To prevent damaging or weakening the door
glass panels avoid the use of the following:
• Household detergent and bleaches.
• Impregnated pads unsuitable for non-stick
saucepans.
• Brillo/Ajax pads or steel wool pads.
• Chemical oven pads or aerosols.
•Rust removers.
• Bath/Sink stain removers.
Clean the outer and inner door glass using
warm soapy water. Should the inner door
glass become heavily soiled it is
recommended that a cleaning product such as
Hob Brite is used. Do not use paint scrapers
to remove soilage.
Oven Cavity
The enamelled base of the oven cavity is best
cleaned whilst the oven is still warm.
Wipe the oven over with a soft cloth soaked
in warm soapy water after each use. From
time to time it will be necessary to do a more
thorough cleaning, using a proprietary oven
cleaner.
Cleaning the oven door
The oven door has two panels of glass
installed one behind the other. To make the
cleaning easier remove the oven door and the
internal panel of glass.
Warning! The oven door can close if
you try to remove the internal panel of
glass when the door is still assembled.
Warning! Make sure that the glass
panels are cool, before you clean the
glass door. There is risk that the glass
breaks.
Warning! When the door glass
panels are damaged or have scratches,
the glass becomes weak and can break.
To prevent this you must replace
them. For more instructions, contact
your local Service Centre.
Removing the oven door and the
glass panel
1. Open the door fully and hold the two
door hinges.
26
Page 27

2. Lift and turn the levers on the two hinges.
3. Close the oven door to the first opening
position (approx. 45°). Then pull forward
and remove it from its seat.
4. Place the door on a stable surface
protected by a soft cloth.
5. Release the locking system to remove the
internal panel of glass.
6. Turn 2 fasteners by 90° and remove them
from their seats.
27
Page 28

90°
7. Carefully lift and remove the panel of glass.
2
1
Clean the glass panel with water and soap.
Dry it carefully.
Warning! Only clean the glass panel
with water and a soap. Abrasive
cleaning agents, stain removers and
sharp objects (e.g. knives or scrapers)
can cause damage to the glass.
Inserting the door and the glass
panel
When the cleaning procedure is completed,
insert the glass panel and the oven door. To
do so, do the steps in reverse.
The decorated internal panel marked with a
decorative frame must be assembled with the
screen-printing outside of the oven. The panel
of glass is assembled correctly if you do not
feel any roughness when you pass your fingers
over the surface.
Insert the internal panel of glass into the right
seats as on the picture.
Care of catalytic liners
Catalytic liners (except for the oven base)
destroy splashes of food and fats when the
oven temperature is raised to around 220°C.
To aid this process it is a good idea to run the
oven for an hour or two per week, without
food, to ensure continued good performance
from the Catalytic liners.
Hints and Tips
• Manual cleaning of the Catalytic liner is not
recommended. Damage will occur if soap
impregnated steel wool pads, aerosol
cleaners and any other abrasives are used.
• Slight discolouration and polishing of the
Catalytic surface may occur in time. This
does not affect the Catalytic properties in
any way.
• Follow the recommendations in Cooking
to reduce soilage
Cooking to reduce soilage
Cook at the recommended temperatures.
Higher temperatures during roasting will
increase soilage. Try cooking at lower
temperatures for an increased length of time,
you will save energy and often the joint is more
tender.
Use minimal, if any, extra oil or fat when
roasting meat; potatoes only require brushing
with fat before cooking. Extra fat in the oven
during roasting will increase splashing and
soilage. It is NOT necessary to add water to
28
Page 29

the meat tin when roasting. The water and the
fat juices from the joint create excessive
splattering during cooking, even at normal
temperatures, as well as causing
condensation.
Covering joints during cooking will also
prevent splashing onto the interior surfaces;
removing the covering for the last 20-30
minutes will allow extra browning, if required.
Some large joints and turkeys especially
benefit from this method of cooking, allowing
the joint to cook through before the outside
is overbrowned.
Do use the roasting tin. During roasting, the
fat from the joint will be contained beneath
the trivet and therefore prevent it from
splattering onto the ’Catalytic’ liner.
Removable shelf runners
2. Hold the shelf runners and catalytic panel
in place and at the same time unhook the
shelf runners at the back.
2
and catalytic panels
To clean the oven cavity remove the shelf
runners and catalytic panels.
Warning! Be careful when you
remove the shelf runners. The catalytic
panels are not attached to the oven
cavity and can fall out when you
remove the shelf runners.
Warning! Before maintenance, make
sure that the appliance is cool. There
is risk of burns because of residual
heat.
Removing the side rails
1. Use one hand to pull the front part of the
shelf runners. Hold the shelf runners and
catalytic panel in place with the other
hand.
1
Clean the shelf runners with warm water and
soap. Wipe it with a soft cloth. Never use
abrasive products which can damage it.
When you finish cleaning put the shelf runners
and catalytic panels back. To put the shelf
runners and catalytic panels back, follow the
procedure in reverse.
Replacing the Oven Light
Warning! Before replacing the oven
light disconnect the appliance from the
electrical supply.
If the oven bulb needs replacing, it must
comply with the following specifications:
• Electric power: 15 W/25 W,
• Electric rate: 230 V (50 Hz),
• Resistant to temperatures of 300°C,
29
Page 30

• Connection type: E14.
These bulbs are available from your local
Repair agent.
To replace the faulty bulb:
1.
Ensure the oven is disconnected
from the electrical supply.
2. Turn the glass cover anticlockwise.
3. Remove the faulty bulb and replace with
the new one.
4. Refit the glass cover.
5. Reconnect to the electrical supply.
Something not working
If the oven is not working correctly, please
carry out the following checks, before
contacting your local Service Force Centre.
Important! If you call out an engineer to a
fault listed below, or to repair a fault caused
by incorrect use or installation, a charge will
be made even if the appliance is under
guarantee.
SYMPTOM SOLUTION
The oven does not come on. • Check that both a cooking function and temperature
have been selected.
• Check the fuse and ensure the socket switch or the
switch from the mains supply to the oven are ON.
• Check that the Demo mode has not accidentally been
activated. To deactivate it, follow the instructions given
in the relevant paragraph.
The oven light does not come on. • Select a function with the oven function control knob.
• Check the light bulb, and replace it if necessary (see
"Replacing the Oven Light").
It takes too long to finish the dishes, or they
are cooked too fast.
• The temperature may need adjusting
• Refer to the cooking function sections and to any
cooking chart provided.
30
Page 31

SYMPTOM SOLUTION
Steam and condensation settle on the food
and the oven cavity.
The electronic timer does not work. • Check the instructions for the timer.
The oven fan is noisy. • Check that shelves and bakeware are not vibrating in
An error code (for example, "F" followed
by digits) appears on the control panel.
The display shows "12.00". • Set the time of day (see chapter "Setting the time of
• Leave dishes inside the oven no longer than 15-20
minutes after the cooking is completed.
contact with the oven back panel.
• Take note of the error code and contact an authorised
Service Centre.
day").
Disposal
The symbol on the product or on its
packaging indicates that this product may not
be treated as household waste. Instead it
should be taken to the appropriate collection
point for the recycling of electrical and
electronic equipment. By ensuring this
product is disposed of correctly, you will help
prevent potential negative consequences for
the environment and human health, which
could otherwise be caused by inappropriate
waste handling of this product. For more
detailed information about recycling of this
product, please contact your local council,
your household waste disposal service or the
shop where you purchased the product.
Packaging material
The packaging materials are
environmentally friendly and can be
recycled. The plastic components are
identified by markings, e.g. >PE<,
>PS<, etc. Please dispose of the
packaging materials in the appropriate
container at the community waste
disposal facilities.
Old appliance
Warning! So that the old appliance
can no longer cause any danger, make
it unusable before disposing of it.
To do this, disconnect the appliance
from the mains supply and remove the
mains cable from the appliance.
31
Page 32

Electrical Connections
Warning! THIS OVEN MUST BE
EARTHED
Electrical Requirements
Any permanent electrical installation must
comply with the latest I.E.E. Regulations and
local Electricity Board regulations. For your
own safety this should be undertaken by a
qualified electrician, e.g. your local Electricity
Board, or a contractor who is on the roll of
the National Inspection Council for Electrical
Installation Contracting (NICEIC).
Electrical Connection
The oven is designed to be connected to 230
V ~ 50 Hz electricity supply.
For UK use only
Connection via Min. size Cable/flex Cable/flex type Fuse
• 13 A socket outlet
• 13 A spur box
Oven Control Circuit 2,5 mm² PVC/PVC twin and earth min: 15 A
2,5 mm² 3 core butyl insulated 13 A min.
Before connecting to the mains supply ensure
that the mains voltage corresponds to the
voltage on the rating plate on the side of the
oven door.
The oven has an easily accessible terminal
block which is marked as follows:
Letter L - Live terminal
Letter N - Neutral terminal
- Earth terminal
Caution! This oven must be earthed!
The cable used to connect the oven to the
electrical supply must comply to the
specifications given below.
max: 20 A
It is necessary that you install a double pole
switch between the oven and the electricity
supply (mains), with a minimum gap of 3 mm
between the switch contacts and of a type
suitable for the required load in compliance
with the current regulations.
Warning! The switch must not break
the yellow and green earth cable at any
point.
It is necessary that the yellow/green
earth wire is about 2 cm longer than
the live and neutral ones.
Important! After installation and
connecting, the cable must be placed so that
it cannot at any point reach a temperature of
more than 60°C above the ambient
temperature.
Before the oven is connected, check that the
main fuse and the domestic installation can
support the load; and that the power supply
is properly earthed.
The manufacturer declines any
responsibility should these safety
measures not be carried out.
32
Page 33

For Europe use only
Min. size Cable/
flex
1,5 mm² H07 RN-F, H05 RN-F, H05 RR-F, H05 VV-F, H05 V2V2-F (T90),
H05 BB-F
Cable/flex type Fuse
Building In
13 A
Warning! The oven must be installed
by qualified and competent personnel
to the relevant National Standards and
according to the instructions supplied
in "Electrical connections" and
"Installation" chapters.
Please ensure that when the oven is
installed it is easily accessible for the
engineer in the event of a breakdown.
Building In
The surround or cabinet into which the oven
will be built must comply with these
specifications:
• the dimensions must be as shown in the
relevant diagrams;
• the materials must withstand a
temperature increase of at least 60°C
above ambient;
• proper arrangements must be made of a
continuous supply of air to the oven to
prevent the oven overheating.
Dimensions of the oven and recess required
are given in the relevant diagrams.
20
590
594
540
50
550 min
560÷570
550 min
560-570
560
570
2
580
593
80÷100
33
Page 34

Securing The Oven To
The Cabinet
1. Fit the oven into the cabinet recess.
2. Open the oven door.
3. Secure the oven to the kitchen cabinet
with the four distance holders "A" which
fit the holes in the oven frame and then fit
the four wood screws "B" .
The screws and distance holders are
supplied with the oven.
Technical data
Dimensions of recess
Height in-column 580 mm
Height undertop 593 mm
Depth 560 mm
Depth 550 mm
Dimensions of the oven cavity
Height 335 mm
Width 395 mm
Depth 400 mm
Oven capacity 53 litres
Heating elements rating
Conventional Oven (Top
element+Bottom element)
Top element 800 W
Bottom element 1,000 W
Fan Oven 2,000 W
Inner Grill element 1,650 W
Full Grill element 2,450 W
1,800 W
A
B
Pizza Oven 2,000 W /
1,000 W
Thermal Grilling 1,675 W
Convection Fan 25 W
Oven Light 25 W
Cooling Fan 25 W
Total Rating 2,500 W
Supply voltage (50 Hz) 230 V
This appliance complies with the
following E.E.C. Directives :
•
2006/95 (Low Voltage Directive);
•
2004/108 (Electromagnetical
Compatibility Directive)
and subsequent modifications.
34
Page 35

Repairs - after sales service
If your oven is not performing satisfactorily;
consult the fault finding guides within this
instruction book (Something not working). If
a fault occurs which you can not resolve
through following the advice and information
contained within this instruction manual, the
next step is to contact our extended warranty
administrators on
0870 010 7887
They will give you details for your local Service
Force Centre.
Before calling out an engineer, please ensure
you have read the details under the heading
“Something Not Working”. When you
contact your local Service Force Centre you
will need to give the following details:
1. Your name, address and post code
2. Your telephone number
3. Clear and concise details of fault
4. The purchase date as found on your
receipt
5. The model and serial number of the
appliance (found on the rating plate) So
that you always have these numbers at
hand, we recommend you to make a note
of them here:
Spare parts
This oven should be serviced by any
authorised service engineer; and only genuine
spare parts should be used.
Under no circumstances should you attempt
to repair the oven yourself.
Repairs carried out by inexperienced persons
may cause injury or serious malfunctioning.
Contact our extended warranty
administrators on 0870 010 7887 who will
give you details for your Service Force repair
agent.
Always insist on genuine spare parts.
• Mod.......................................
• P.N.C.....................................
• S.N.........................................
Your oven is covered by a 3 year parts and
labour guarantee (see separate details given at
point of sale).
Please retain your purchase receipt safely for
the service engineer to verify the purchase
details.
35
Page 36

John Lewis Partnership
171 Victoria Street
London SW1E 5NN
www. johnlewis.com
397126601-A-042009
 Loading...