

Page 1

JLBILIC07
User manual
Page 2

Contents
Helpful hints and tips 3
Hints for energy saving 3
Hints for fresh food refrigeration 3
Hints for refrigeration 3
Control panel 4
Display 4
Switching on 4
Switching off 4
Temperature regulation 5
Drinks Chill function 5
Fan function 5
Child Lock function 5
Intensive Cooling function 6
Holiday function 6
Door open alarm 6
First use 7
Cleaning the interior 7
Daily use 8
Use of the fridge compartment 8
Movable shelves 8
Positioning the door shelves 9
Bottle rack 9
Fan 9
Helpful hints and tips 11
Hints for energy saving 11
Hints for fresh food refrigeration 11
Hints for refrigeration 11
Care and Cleaning 12
Periodic cleaning 12
Defrosting of the refrigerator 12
Periods of non-operation 13
What to do if… 14
Replacing the lamp 15
Technical Information 16
Installation 17
Location 17
Positioning 17
Electrical Connection 17
18
Installing the appliance 19
Environmental concerns 23
Repairs - after sales service 24
2 user manual
Page 3

Helpful hints and tips
Normal Operating Sounds
• You may hear a faint gurgling and a bubbling
sound when the refrigerant is pumped
through the coils or tubing. This is not a fault
with the appliance and is a completely normal
operating sound.
• When the compressor is on, the refrigerant is
being pumped around and you will hear a
whirring sound and a pulsating noise from the
compressor. This is correct.
• The thermic dilatation might cause a sudden
cracking noise. This is not a fault with the
appliance and is a completely normal
operating sound.
Hints for energy saving
• Do not open the door frequently or leave it
open longer than absolutely necessary.
• If the ambient temperature is high and the
Temperature Regulator is set to low
temperature and the appliance is fully loaded,
the compressor may run continuously,
causing frost or ice on the evaporator. If this
happens, set the Temperature Regulator
toward warmer settings to allow automatic
defrosting and so a saving in electricity
consumption.
Hints for fresh food refrigeration
To obtain the best performance:
• do not store warm food or evaporating
liquids in the refrigerator
• do cover or wrap the food, particularly if it
has a strong flavour
• position food so that air can circulate freely
around it
Hints for refrigeration
Useful hints:
Meat (all types) : wrap in polythene bags and
place on the glass shelf above the vegetable
drawer.
For safety, store in this way only one or two
days at the most.
Cooked foods, cold dishes, etc..: these should
be covered and may be placed on any shelf.
Fruit and vegetables: these should be thoroughly
cleaned and placed in the special drawer(s)
provided.
Butter and cheese: these should be placed in
special airtight containers or wrapped in
aluminium foil or polythene bags to exclude as
much air as possible.
Milk bottles: these should have a cap and should
be stored in the bottle rack on the door.
Bananas, potatoes, onions and garlic, if not
packed, must not be kept in the refrigerator.
user manual 3
Page 4
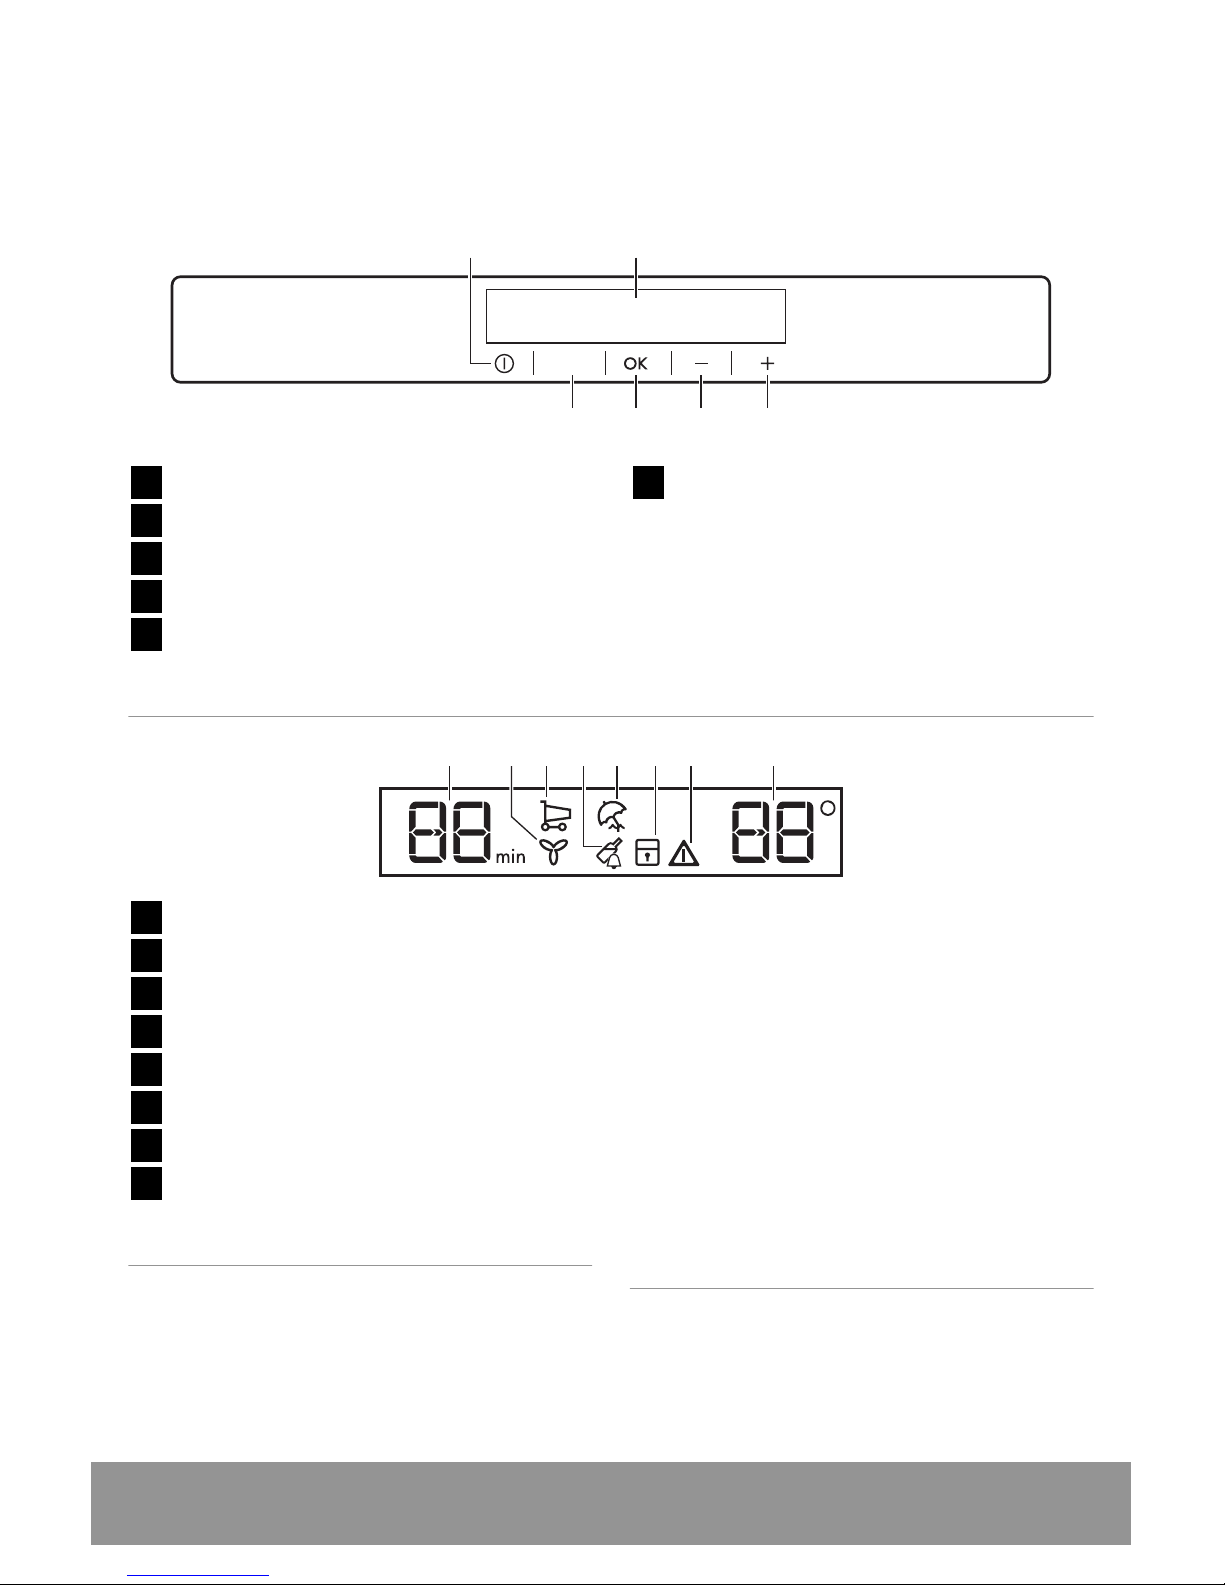
Control panel
1 2
3
456
Functions
1
ON/OFF button
2
Display
3
Temperature warmer button
4
Temperature colder button
5
OK button
6
Functions button
It is possible to change predefined sound of
buttons to a louder one by pressing together the
Functions button and Temperature colder
button for some seconds. Change is reversible.
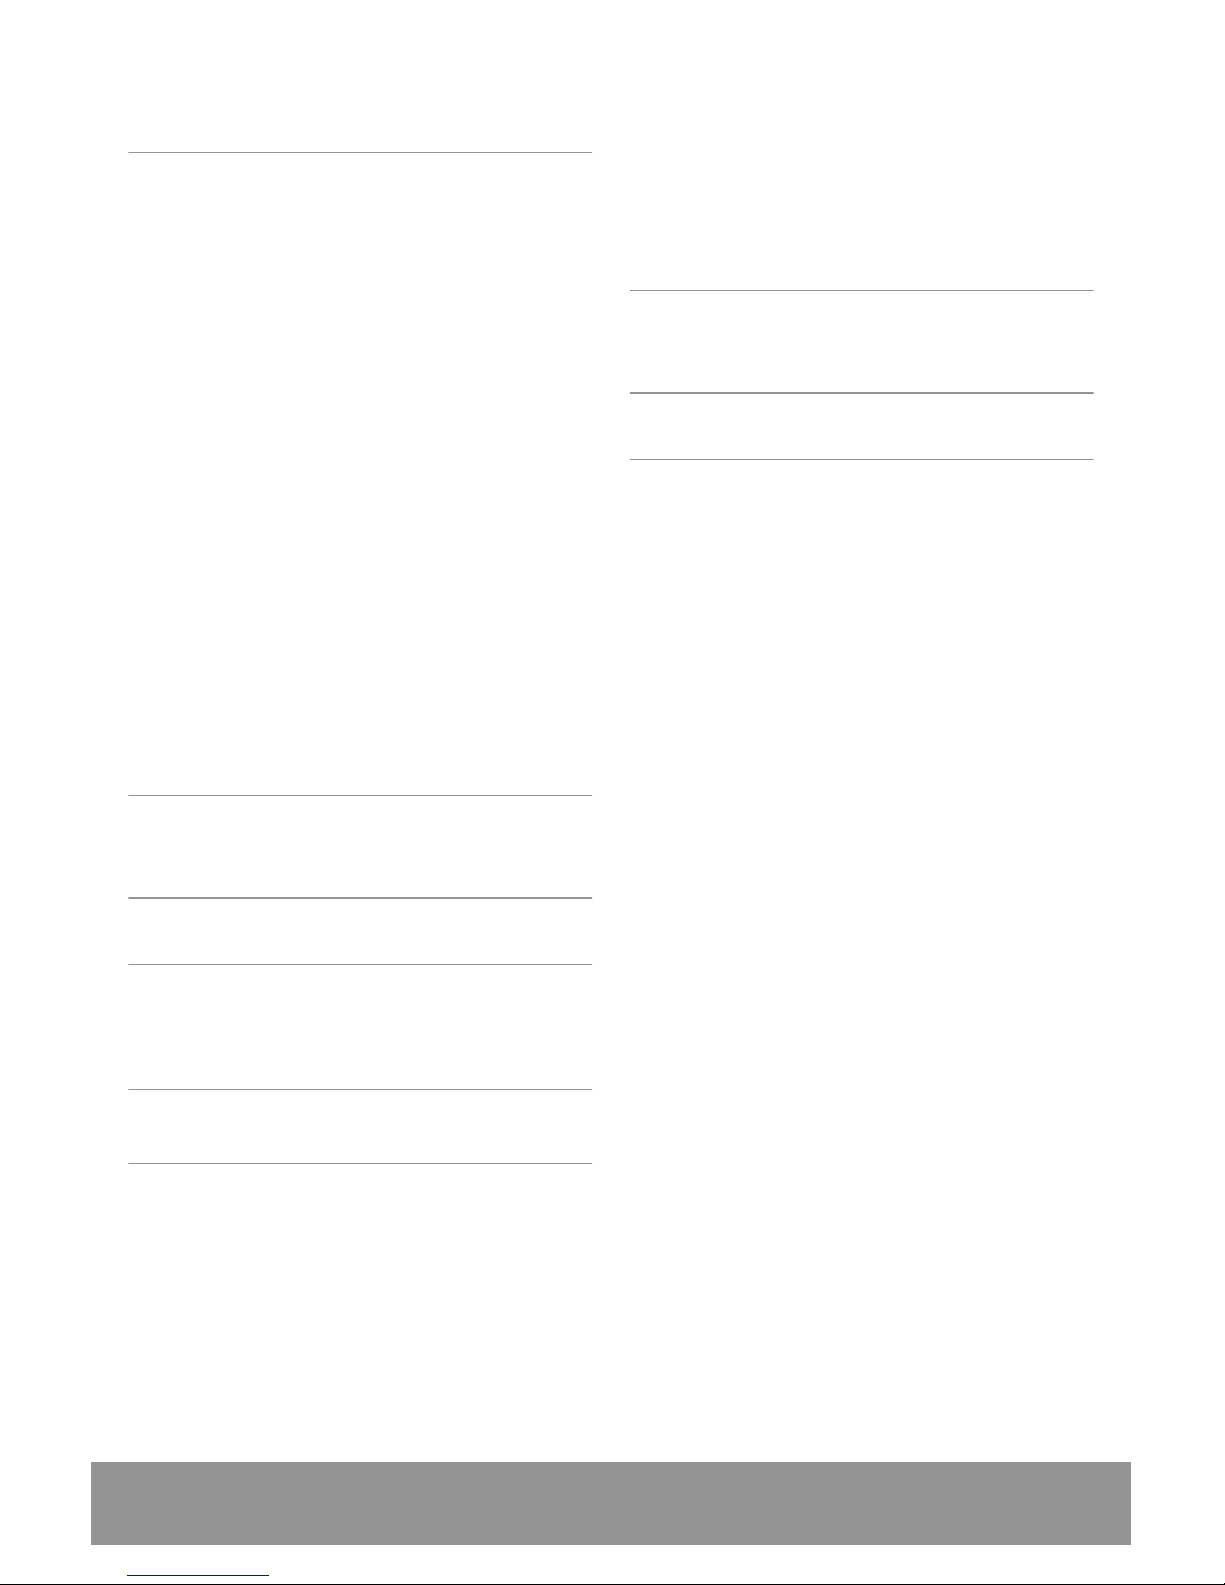
Display
18567324
1
Timer function
2
Fan function
3
Intensive Cooling function
4
Drinks Chill function
5
Holiday function
6
Child Lock function
7
Alarm indicator
8
Temperature indicator
Switching on
To switch on the appliance do these steps:
1. Connect the mains plug to the power
socket.
2. Press the ON/OFF button if the display is
off.
3. The alarm buzzer may sound after a few
seconds.
To reset the alarm refer to "Door open
alarm".
If “DEMO” appears on the Display, the
appliance is in demonstration mode: refer
to “Troubleshooting” paragraph.
4. The temperature indicators show the set
default temperature.
To select a different set temperature refer to
"Temperature regulation".
Switching off
To switch off the appliance do these steps:
1. Press the ON/OFF button for 5 seconds.
2. The display switches off.
4 user manual
Page 5

3. To disconnect the appliance from the
power disconnect the mains plug from the
power socket.
Temperature regulation
The set temperature of the fridge may be
adjusted by pressing the temperature button.
Set default temperature: +5°C for the fridge.
The temperature indicator shows the set
temperature.
The set temperature will be reached within 24
hours.
Important! After a power failure the set
temperature remains stored.
Drinks Chill function
The Drinks Chill function is to be used to set an
acoustic alarm at the preferred time, useful for
example when you want to rapidly chill a bottle
of wine for a certain length of time.
To switch on the function:
1. Press the Functions button until the
corresponding icon appears.
The Drinks Chill indicator flashes.
The Timer shows the set value (30 minutes)
for a few seconds.
2. Press the Temperature colder or
Temperature warmer button to change the
Timer set value from 1 to 90 minutes.
3. Press the OK button to confirm.
The Drinks Chill indicator is shown.
The Timer start to flash (min).
At the end of the countdown the Drinks Chill
indicator flashes and an audible alarm sounds:
1. press OK button to switch off the sound
and terminate the function.
It is possible to deactivate the function at any
time during the countdown:
1. Press the Functions button until the Drinks
Chill indicator flashes.
2. Press the OK button to confirm.
3. The Drinks Chill indicator goes off.
It is possible to change the time at any time
during the countdown and at the end by
pressing the Temperature colder button and the
Temperature warmer button.
Fan function
To switch on the function:
1. Press the Functions button until the
corresponding icon appears.
The Fan indicator flashes.
2. Press the OK button to confirm.
The Fan indicator is shown.
To switch off the function:
1. Press the Functions button until the Fan
indicator flashes.
2. Press the OK button to confirm.
3. The Fan indicator goes off.
Important! If the function is activated
automatically the Fan indicator is not
shown (refer to "Daily use ").
The activation of the Fan function
increases the energy consumption.
Child Lock function
To lock the buttons from unintentional
operation select the Child Lock function.
To switch on the function:
1. Press the Functions button until the
corresponding icon appears.
2. The Child Lock indicator flashes.
3. Press the OK button to confirm.
The Child Lock indicator is shown.
To switch off the function:
1. Press the Functions button until the Child
Lock indicator flashes.
2. Press the OK button to confirm.
3. The Child Lock indicator goes off.
user manual 5
Page 6
Intensive Cooling function
If you need to insert a large amount of warm
food, for example after doing the grocery
shopping, we suggest activating the Intensive
Cooling function to chill the products more
rapidly and to avoid warming the other food
which is already in the refrigerator.
To switch on the function:
1. Press the Functions button until the
corresponding icon appears.
The Intensive Cooling indicator flashes.
2. Press the OK button to confirm.
The Intensive Cooling indicator is shown.
The Intensive Cooling function shuts off
automatically after approximately 6 hours.
To switch off the function before its automatic
end:
1. Press the Functions button until the
Intensive Cooling indicator flashes.
2. Press the OK button to confirm.
3. The Intensive Cooling indicator goes off.
Important! The function switches off by
selecting a different fridge set
temperature.
Holiday function
This function allows you to keep the refrigerator
closed and empty during a long holiday period
without the formation of bad odours.
Important! The fridge compartment
must be empty with holiday function on.
To switch on the function:
1. Press the Functions button until the
corresponding icon appears.
The Holiday indicator flashes.
The fridge temperature indicator shows the
set temperature.
2. Press the OK button to confirm.
The Holiday indicator is shown.
To switch off the function:
1. Press the Functions button until the Holiday
indicator flashes.
2. Press the OK button to confirm.
3. The Holiday indicator goes off.
Important! The function switches off by
selecting a different fridge set
temperature.
Door open alarm
An acoustic alarm will sound if the door is left
open for a few minutes. The door open alarm
conditions are indicated by:
• flashing Alarm indicator
• acoustic buzzer
When normal conditions are restored (door
closed), the alarm will stop.
During the alarm, the buzzer can be switched off
by pressing any button.
6 user manual
Page 7
First use
Cleaning the interior
Before using the appliance for the first time,
wash the interior and all internal accessories
with lukewarm water and some neutral soap so
as to remove the typical smell of a brand-new
product, then dry thoroughly.
Important! Do not use detergents or
abrasive powders, as these will damage
the finish.
If “dEMo” appears on the Display, the
appliance is in demonstration mode:
refer to “WHAT TO DO IF...”
paragraph.
user manual 7
Page 8
Daily use
Use of the fridge compartment
The temperature of this compartment may be
regulated between +2°C and +8°C.
During normal functioning the indicator shows
the temperature inside the fridge.
A medium setting is generally the most
suitable.
The exact setting should be chosen keeping in
mind that the temperature inside the appliance
depends on:
• room temperature
• how often the door is opened
• the quantity of food stored
• the location of the appliance.
Important! If the ambient temperature is
high or the appliance is fully loaded, and
the appliance is set to the lowest
temperatures, it may run continuously
causing frost to form on the rear wall. In
this case the Temperature regulator
must be set to a higher temperature to
allow automatic defrosting and therefore
reduced energy consumption.
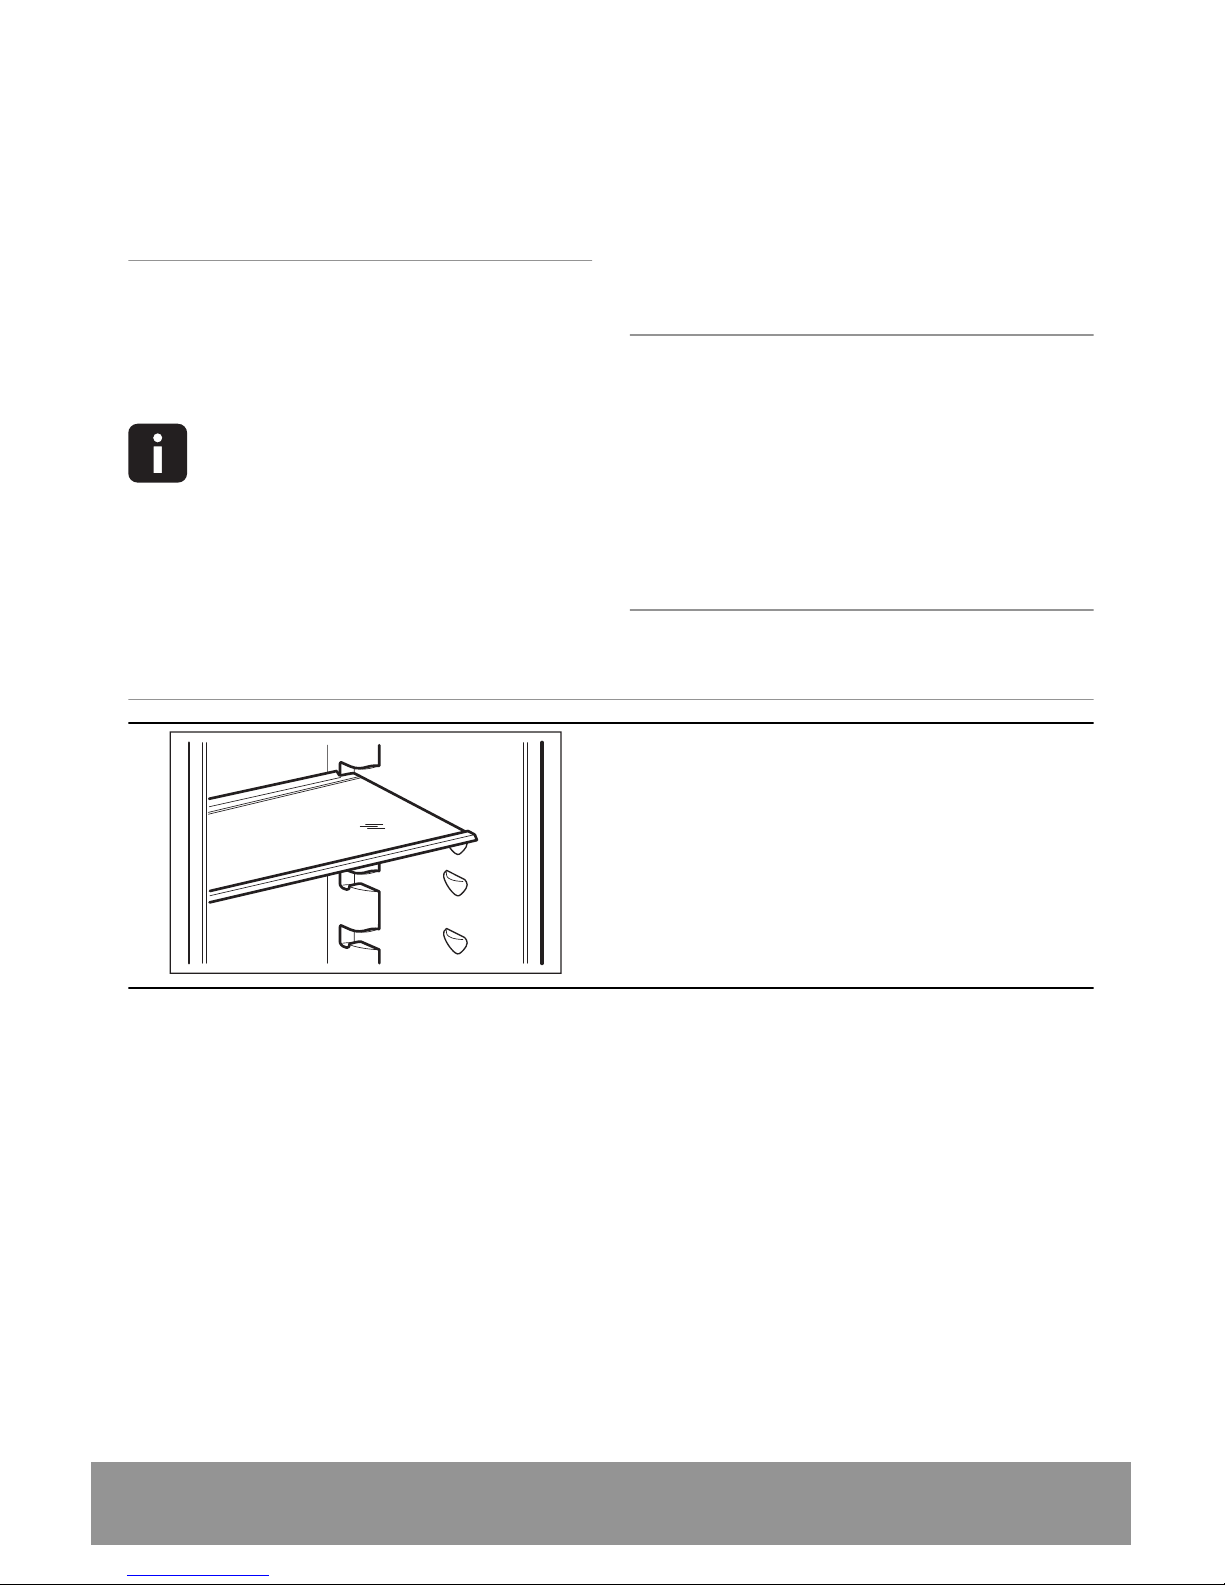
Movable shelves
The walls of the refrigerator are equipped with a
series of supports so that the shelves can be
positioned as desired.
8 user manual
Page 9
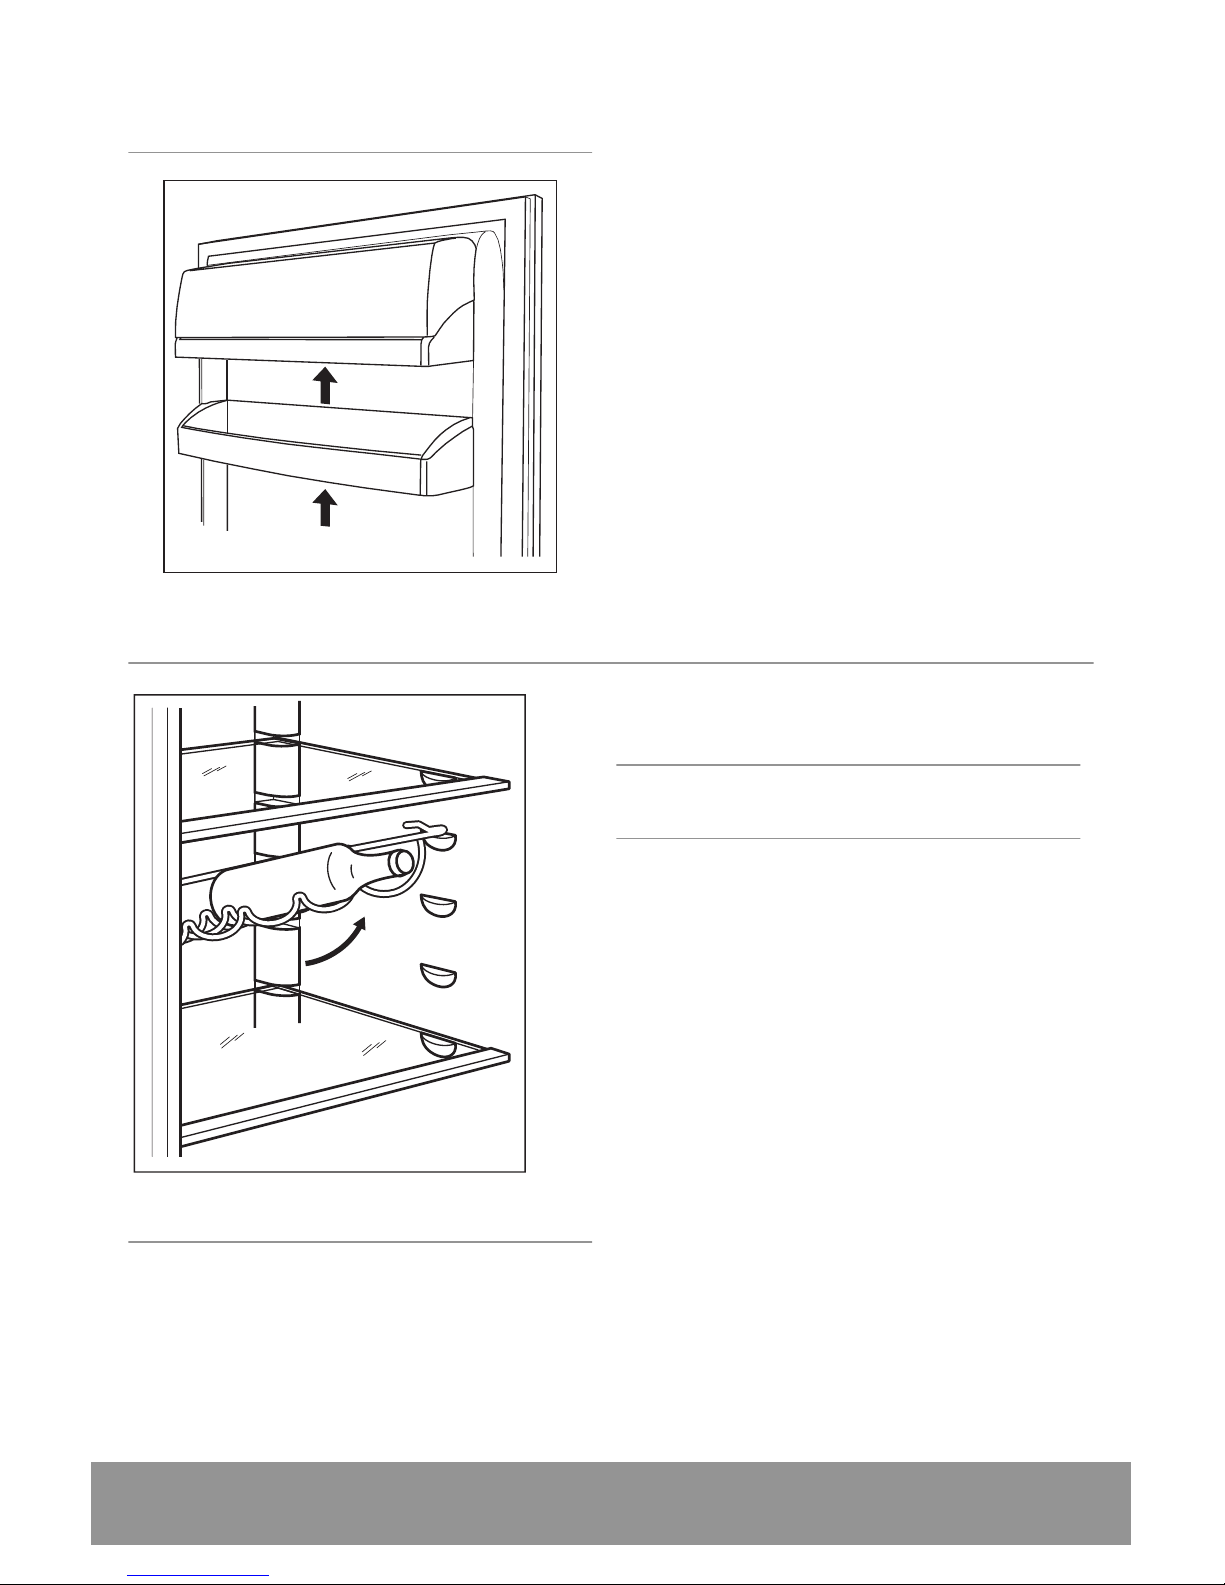
Positioning the door shelves
To permit storage of food packages of various
sizes, the door shelves can be placed at different
heights.
To make these adjustments proceed as follows:
gradually pull the shelf in the direction of the
arrows until it comes free, then reposition as
required.
Bottle rack
Place the bottles (with the opening facing front)
in the pre-positioned shelf.
Important! If the shelf is positioned
horizontally, place only closed bottles.
This bottle holder shelf can be tilted in order to
store previously opened bottles. To obtain this
result, pull the shelf up so it can rotate upwards
and be placed on the next higher level.
Fan
The refrigerator compartment is equipped with
a fan that allows for rapid cooling of foods and
more uniform temperature in the compartment.
This fan activates by itself when needed, for
example for a quick temperature recovering
after door opening or when the ambient
temperature is high.
Allows you to switch on the fan manually when
needed (refer to " Fan Function").
user manual 9
Page 10

Important! The Fan stops when the door
is open and restarts immediately after
the door closing.
10 user manual
Page 11

Helpful hints and tips
Normal Operating Sounds
• You may hear a faint gurgling and a bubbling
sound when the refrigerant is pumped
through the coils or tubing. This is not a fault
with the appliance and is a completely normal
operating sound.
• When the compressor is on, the refrigerant is
being pumped around and you will hear a
whirring sound and a pulsating noise from the
compressor. This is correct.
• The thermic dilatation might cause a sudden
cracking noise. This is not a fault with the
appliance and is a completely normal
operating sound.
Hints for energy saving
• Do not open the door frequently or leave it
open longer than absolutely necessary.
• If the ambient temperature is high and the
Temperature Regulator is set to low
temperature and the appliance is fully loaded,
the compressor may run continuously,
causing frost or ice on the evaporator. If this
happens, set the Temperature Regulator
toward warmer settings to allow automatic
defrosting and so a saving in electricity
consumption.
Hints for fresh food refrigeration
To obtain the best performance:
• do not store warm food or evaporating
liquids in the refrigerator
• do cover or wrap the food, particularly if it
has a strong flavour
• position food so that air can circulate freely
around it
Hints for refrigeration
Useful hints:
Meat (all types) : wrap in polythene bags and
place on the glass shelf above the vegetable
drawer.
For safety, store in this way only one or two
days at the most.
Cooked foods, cold dishes, etc..: these should
be covered and may be placed on any shelf.
Fruit and vegetables: these should be thoroughly
cleaned and placed in the special drawer(s)
provided.
Butter and cheese: these should be placed in
special airtight containers or wrapped in
aluminium foil or polythene bags to exclude as
much air as possible.
Milk bottles: these should have a cap and should
be stored in the bottle rack on the door.
Bananas, potatoes, onions and garlic, if not
packed, must not be kept in the refrigerator.
user manual 11
Page 12

Care and Cleaning
Caution! Unplug the appliance
before carrying out any
maintenance operation.
This appliance contains hydrocarbons
in its cooling unit; maintenance and
recharging must therefore only be
carried out by authorized technicians.
Periodic cleaning
The equipment has to be cleaned regularly:
• clean the inside and accessories with
lukewarm water and some neutral soap.
• regularly check the door seals and wipe clean
to ensure they are clean and free from debris.
• rinse and dry thoroughly.
Important! Do not pull, move or damage
any pipes and/or cables inside the
cabinet.
Never use detergents, abrasive powders,
highly perfumed cleaning products or
wax polishes to clean the interior as this
will damage the surface and leave a
strong odour.
Clean the condenser (black grill) and the
compressor at the back of the appliance with a
brush. This operation will improve the
performance of the appliance and save
electricity consumption.
Important! Take care of not to damage
the cooling system.
Many proprietary kitchen surface cleaners
contain chemicals that can attack/damage the
plastics used in this appliance. For this reason it
is recommended that the outer casing of this
appliance is only cleaned with warm water with
a little washing-up liquid added.
After cleaning, reconnect the equipment to the
mains supply.
Defrosting of the refrigerator
Frost is automatically eliminated from the
evaporator of the refrigerator compartment
every time the motor compressor stops, during
normal use. The defrost water drains out
through a trough into a special container at the
back of the appliance, over the motor
compressor, where it evaporates.
12 user manual
Page 13

It is important to periodically clean the defrost
water drain hole in the middle of the refrigerator
compartment channel to prevent the water
overflowing and dripping onto the food inside.
Use the special cleaner provided, which you will
find already inserted into the drain hole.
Periods of non-operation
When the appliance is not in use for long
periods, take the following precautions:
•
disconnect the appliance from
electricity supply
• remove all food
• defrost (if foreseen) and clean the appliance
and all accessories
• leave the door/doors ajar to prevent
unpleasant smells.
If the cabinet will be kept on, ask somebody to
check it once in a while to prevent the food
inside from spoiling in case of a power failure.
user manual 13
Page 14

What to do if…
Warning! Before
troubleshooting, disconnect the
mains plug from the mains
socket.
Only a qualified electrician or
competent person must do the
troubleshooting that is not in this
manual.
Important! There are some sounds
during normal use (compressor,
refrigerant circulation).
Problem Possible cause Solution
The appliance does not
operate. The lamp does
not operate.
The appliance is switched off. Switch on the appliance.
The mains plug is not connected to
the mains socket correctly.
Connect the mains plug to the mains
socket correctly.
The appliance has no power. There
is no voltage in the mains socket.
Connect a different electrical
appliance to the mains socket.
Contact a qualified electrician.
The lamp does not work.
The lamp is in stand-by. Close and open the door.
The lamp is defective. Refer to "Replacing the lamp".
The compressor operates
continually.
The temperature is not set
correctly.
Set a higher temperature.
The door is not closed correctly. Refer to "Closing the door".
The door has been opened too
frequently.
Do not keep the door open longer
than necessary.
The product temperature is too
high.
Let the product temperature
decrease to room temperature
before storage.
The room temperature is too high. Decrease the room temperature.
Water flows on the rear
plate of the refrigerator.
During the automatic defrosting
process, frost defrosts on the rear
plate.
This is correct.
Water flows into the
refrigerator.
The water outlet is clogged. Clean the water outlet.
Products prevent that water flows
into the water collector.
Make sure that products do not touch
the rear plate.
14 user manual
Page 15

Problem Possible cause Solution
Water flows on the
ground.
The melting water outlet does not
flow in the evaporative tray above
the compressor.
Attach the melting water outlet to the
evaporative tray.
The temperature in the
appliance is too low.
The temperature regulator is not set
correctly.
Set a higher temperature.
The temperature in the
appliance is too high.
The temperature regulator is not set
correctly.
Set a lower temperature.
The door is not closed correctly. Refer to "Closing the door".
The product temperature is too
high.
Let the product temperature
decrease to room temperature
before storage.
Many products are stored at the
same time.
Store less products at the same time.
There is no cold air circulation in the
appliance.
Make sure that there is cold air
circulation in the appliance.
Upper or lower square is
shown in the temperature
display.
An error has occurred in measuring
the temperature
Call your service representative (the
cooling system will continue to keep
food products cold, but temperature
adjustment will not be possible).
dEMo appears on the
Display.
The appliance is in demonstration
mode (dEMo)
Keep pressed approximately 10 sec.
the OK button since a long sound of
buzzer is heard and the Display shut
off for a short while: appliance start
works regularly.
Replacing the lamp
The appliance is equipped with a longlife LED
interior light.
Only service is allowed to replace the lighting
device. Contact your Service Center .
Closing the door
1. Clean the door gaskets.
2. If necessary, adjust the door. Refer to
"Installation".
3. If necessary, replace the defective door
gaskets. Contact the Service Force Centre.
user manual 15
Page 16

Technical Information
Dimension
Width 560 mm
Height 1780 mm
Depth 550 mm
Further technical information are situated in the
rating plate on the internal left side of the
appliance.
16 user manual
Page 17

Installation
Read the "Safety Information"
carefully for your safety and
correct operation of the
appliance before installing the
appliance.
Location
To ensure best performance, if the appliance is
positioned below an overhanging wall unit, the
minimum distance between the top of the
cabinet and the wall unit must be at least 40
mm . Ideally, however, the appliance should not
be positioned below overhanging wall units.
If the cabinet is placed in a corner and the side
with the hinges facing the wall, the distance
between the wall and the cabinet must be at
least 10 mm to allow the door to open enough
so that the equipment can be removed.
50mm
The ventilation space can be:
• directly above the appliance
• behind and above the top cupboard.
In this case, the space behind the top
cupboard must be at least 50 mm deep.
Positioning
Warning! If you are discarding an
old appliance that has a lock or
catch on the door, you must
ensure that it is made unusable
to prevent young children being
trapped inside.
Important! The appliance should have
the plug accessible after installation.
Install this appliance at a location where the
ambient temperature corresponds to the
climate class indicated on the rating plate of the
appliance:
Climate
class
Ambient temperature
SN +10°C to + 32°C
N +16°C to + 32°C
ST +16°C to + 38°C
T +16°C to + 43°C
Electrical Connection
Caution! Any electrical work
required to install this appliance
should be carried out by a
qualified electrician or
competent person.
user manual 17
Page 18

Warning! This appliance must be
earthed.
The manufacturer declines any
liability should these safety
measures not be observed.
Important! The wires in the mains lead
are coloured in accordance with the
following code:
GREEN & YELLOW
13 AMP. FUSE
BROWN
CORD CLAMP
BLUE
1
Green and Yellow: Earth
3
Brown: Live
5
Blue: Neutral
As the colours of the wires in the mains lead of
this appliance may not correspond with the
coloured markings identifying the terminals in
your plug, proceed as follows:
1. Connect the wire coloured green and
yellow to the terminal marked either with
the letter “E“ or by the earth symbol
or
coloured green and yellow.
2. Connect the wire coloured blue to the
terminal either marked with the letter
“N“ or coloured black.
3. Connect the wire coloured brown to the
terminal either marked with the “L“ or
coloured red.
4. Check that no cut, or stray strands of wire
is present and the cord clamp
4
is secure
over the outer sheath.
5. Make sure the electricity supply voltage is
the same as that indicated on the appliance
rating plate.
6. Switch on the appliance.
The appliance is supplied with a 13 amp plug
fitted
2
. In the event of having to change the
fuse in the plug supplied, a 13 amp ASTA
approved (BS 1362) fuse must be used.
Warning! A cut off plug inserted
into a 13 amp socket is a serious
safety (shock) hazard. Ensure
that it is disposed of safely.
Door reversibility
The door of the appliance opens to the right. If
you want to open the door to the left, follow
these steps before you install the appliance:
1. Loosen and remove the upper pin.
2. Remove the door.
3. Remove the spacer.
4. With a key, loosen the lower pin.
On the opposite side:
1. Tighten the lower pin.
18 user manual
Page 19

2. Install the spacer.
3. Install the door.
4. Tighten the upper pin.
Installing the appliance
Caution! Make sure that the
mains cable can move freely.
Do the following steps:
1. If necessary cut the adhesive sealing strip
and then apply it to the appliance as shown
in figure.
X
X
2. Drill the unit using a Ø 2.5 mm drill (10 mm
max. penetration).
Fix the square fitting to the appliance.
13mm
2,5
3. Install the appliance in the niche.
Push the appliance in the direction of the
arrows (1) until the upper gap cover stops
against the kitchen furniture.
Push the appliance in the direction of the
arrows (2) against the cupboard on the
opposite side of the hinge.
user manual 19
Page 20

1
2
4. Adjust the appliance in the niche.
Make sure that the distance between the
appliance and the cupboard front-edge is 44
mm.
The lower hinge cover (in the accessories
bag) makes sure that the distance between
the appliance and the kitchen furniture is
correct.
Make sure that the clearance between the
appliance and the cupboard is 4 mm.
Open the door. Put the lower hinge cover
in position.
44mm
4mm
5. Attach the appliance to the niche with 4
screws.
I
6. Remove the correct part from the hinge
cover (E). Make sure to remove the part
DX, in the case of right hinge, SX in
opposite case.
7. Attach the covers (C, D) to the lugs and the
hinge holes.
Install the vent grille (B).
Attach the hinge covers (E) to the hinge.
20 user manual
Page 21

B
E
E
D
C
8. Disconnect the parts (Ha), (Hb), (Hc) and
(Hd).
Ha
Hb
Hc
Hd
9. Install the part (Ha) on the inner side of the
kitchen furniture.
ca. 50 mm
ca. 50 mm
21 mm
21 mm
10. Push the part (Hc) on the part (Ha).
Ha
Hc
11. Open the appliance door and the kitchen
furniture door at an angle of 90°.
Insert the small square (Hb) into guide
(Ha).
Put together the appliance door and the
furniture door and mark the holes.
Remove the small squares and drill holes
with ø 2 mm at 8 mm from the outer edge
of the door.
Place the small square on the guide again
and fix it with the screws supplied.
user manual 21
Page 22

Ha
Hb
8 mm
12. Align the kitchen furniture door and the
appliance door by adjusting the part Hb.
Hb
13. Press the part (Hd) on the part (Hb).
Hb
Hd
Do a final check to make sure that:
• All screws are tightened.
• The sealing strip is attached tightly to the
cabinet.
• The door opens and closes correctly.
22 user manual
Page 23

Environmental concerns
The symbol on the product or on its
packaging indicates that this product may not be
treated as household waste. Instead it should be
taken to the appropriate collection point for the
recycling of electrical and electronic equipment.
By ensuring this product is disposed of correctly,
you will help prevent potential negative
consequences for the environment and human
health, which could otherwise be caused by
inappropriate waste handling of this product.
For more detailed information about recycling of
this product, please contact your local council,
your household waste disposal service or the
shop where you purchased the product.
user manual 23
Page 24

Repairs - after sales service
Your appliance comes with a three year
warranty. If it is not working correctly refer to
"Something not working". If a fault occurs which
you can not resolve through following the advice
and information contained within this instruction
manual, the next step is to contact John Lewis
technical support on:
0844 871 7771
They will give you details for your local service
engineer. Before calling out an engineer, please
ensure you have read the details under the
heading “Something not working”.
When you contact your local service engineer
you will need to give the following details:
1. Your name, address and post code
2. Your telephone number
3. Clear and concise details of fault
4. The purchase date as found on your receipt
5. The model and serial number of the
appliance. So that you always have these
numbers at hand, we recommend you to
make a note of them here:
• Mod.......................................
• P.N.C.....................................
• S.N.........................................
IMPORTANT : If you call out an
engineer to a fault listed under the
heading ''Something not working'', or to
repair a fault caused by incorrect use or
installation, a charge will be made even if
the appliance is under guarantee.
Spare parts
Always insist on genuine spare parts.
An authorised service engineer should service
this product, and only genuine spare parts
should be used. Under no circumstances should
you attempt to repair the appliance yourself.
Repairs carried out by inexperienced persons
may cause injury or serious malfunctioning.
Please contact John Lewis technical support on
0844 871 7771 for assistance
24 user manual
Page 25

John Lewis, Oxford Street 020 7629 7711
Peter Jones, Sloane Square 020 7730 3434
John Lewis, Brent Cross 020 8202 6535
John Lewis, Kingston 020 8547 3000
John Lewis, Aberdeen 01224 625000
John Lewis, Bluewater 01322 624123
John Lewis, Cambridge 01223 361292
John Lewis, Cardiff 02920 536000
John Lewis, Cheadle 0161 491 4914
John Lewis, Cribbs Causeway 0117 959 1100
John Lewis at home, Croydon 020 8662 4730
John Lewis, Edinburgh 0131 556 9121
John Lewis, Glasgow 0141 353 6677
John Lewis, Home and Leisure,
High Wycombe 01494 462666
John Lewis, Leicester 0116 242577
John Lewis, Liverpool 0151 709 7070
John Lewis, Milton Keynes 01908 679171
John Lewis, Newcastle upon Tyne 0191 232
5000
John Lewis, Norwich 01603 660021
John Lewis, Nottingham 0115 941 8282
John Lewis, Peterborough 01733 344644
John Lewis at home, Poole 01202 756020
John Lewis, Reading 0118 957 5955
John Lewis, Sheffield 0114 276 8511
John Lewis, Solihull 0121 704 1121
John Lewis, Southampton 023 8021 6400
John Lewis, Stratford (Opening 2011)
John Lewis at home, Swindon 01793 733180
John Lewis, Trafford 0161 491 4040
John Lewis at home, Turnbridge Wells
01892 506830
John Lewis, Watford 01923 244266
John Lewis, Welwyn 01707 323456
John Lewis electrical
appliances are also available
in Waitrose Food and Home
Canary Wharf 020 7719 0300
Cheltenham 01242 241425
Rushden 01933 355099
Salisbury 01722 329429
Southend 01702 603403
© All rights reserved.
user manual 25
Page 26

26 user manual
Page 27

user manual 27
Page 28

222339578-A-082013
 Loading...