

Page 1
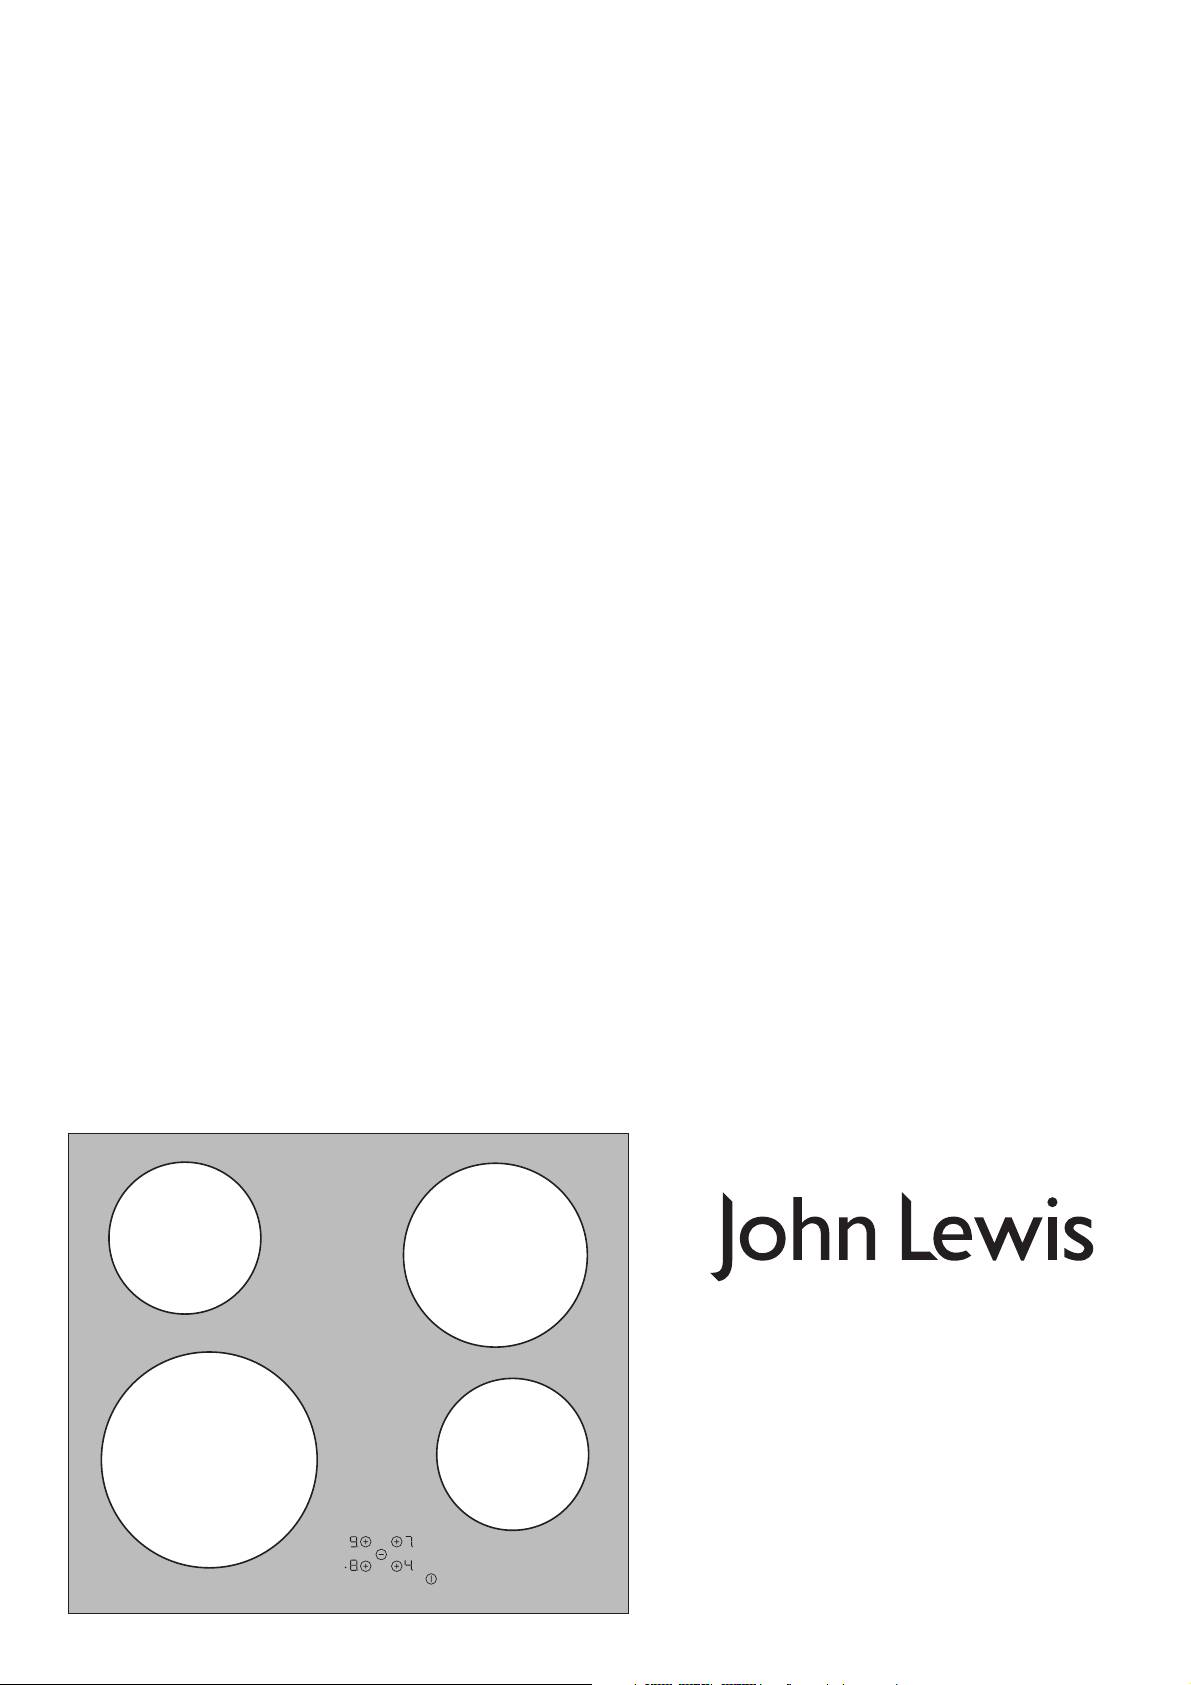
JLBICH602
built-in ceramic hob
Instruction manual
Page 2

Important Safety Information
1 It is most important that this instruction manual should be retained with the appliance for future refer-
ence. Should the appliance be sold or transferred to another owner, or should you move house and leave
the appliance, always ensure that the book is supplied with the appliance in order that the new owner
can get to know the functioning of the appliance and the relevant warnings. These warnings have been
provided in the interest of safety. You MUST read them carefully before use or installation by a qualified
person. If you are unsure of the meanings of these warnings contact the John Lewis branch from which
you purchased the appliance.
• Cookware made of cast iron, cast aluminium or with
Installation
• This hob must be installed by qualified and competent
personnel to the relevant National Standards.
• Refer to Installation Information in chapter “Installation”.
• Remove all packaging, both inside and outside the hob,
before using the hob.
• The appliance must not be used as a work surface or as a
storage surface.
• Additions or modifications to the appliance are not permitted. Repairs to the appliance must only be carried out
by trained registered service engineers.
• Do not place or store flammable liquids, highly inflammable materials or fusible objects (e.g. plastic film, plastic,
aluminium) on or near the appliance.
• Built-in appliances may only be used after they have been
built in to suitable built-in units and work surfaces that
meet the relevant National Standards.
• In the event of faults with the appliance or damage to the
glass ceramic (cracks, scratches or splits), the appliance
must be switched off and disconnected from the electrical
supply to prevent the possibility of an electric shock.
Child safety
damaged bottoms can scratch the ceramic glass if pushed
across the surface.
• Objects that melt and things that boil over can burn onto
the ceramic glass and should be removed straightaway.
• Do not use the cooking zones with empty cookware or
without cookware.
Maintenance and Cleaning
• Only clean this hob in accordance with the instructions.
• For cleaning, the appliance must be switched off and
cooled down.
• For safety reasons, the cleaning of the appliance with
steam jet or high-pressure cleaning equipment is not permitted.
• Always allow the hob to cool down and switch off the
electrical supply before carrying out any cleaning or maintenance work.
Service
• This hob should only be repaired or serviced by an authorised Service Engineer and only genuine approved
spare parts should be used.
• Small children must be kept away from the appliance.
• Only allow older children to use the appliance with adult
supervision.
Use
• This hob is intended for domestic cooking only. It is not
designed for commercial or industrial purposes.
• Remove stickers and film from the glass ceramic.
• There is the risk of burns from the appliance if used care-
lessly.
• Cables from electrical appliances must not touch the hot
surface of the appliance or hot cookware.
• Overheated fat and oil can ignite quickly. When cooking
with fat or oil (e.g. frying chips) do not leave the appliance
unattended.
• Switch the cooking zones off after each use.
• The ceramic glass can be damaged by objects falling onto
it.
• The edge of the ceramic glass can be damaged by being
knocked by the cookware.
2 Environmental Information
• After installation, please dispose of the packaging with due
regard to safety and the environment.
• When disposing of an old appliance, make it unusable, by
cutting off the cable. Remove any door catches, to prevent small children being trapped inside.
• The symbol
cates that this product should not be treated as normal
household waste. Instead it shall be handed over to an approved collection facility for the recycling of electrical and
electronic equipment. By ensuring this product is disposed of correctly, you will help prevent potential negative consequences for the environment and human health,
which could otherwise be caused by inappropriate waste
handling of this product. For more detailed information
about recycling of this product, please contact your local
city office, your household waste disposal service or the
shop where you purchased the product.
W on the product or on its packaging indi-
2
Page 3

Contents
For the User
Important Safety Information - - - - - - - 2
Description of the Appliance - - - - - - - 4
The Control Panel - - - - - - - - - - - - - - 9
Touch Control sensor fields - - - - - - - - - - - - - 9
Displays - - - - - - - - - - - - - - - - - - - - - - 9
Residual heat indicator - - - - - - - - - - - - - - - 10
Switching the appliance on and off - - - - - - - - - - 10
Selecting the cooking zone - - - - - - - - - - - - - 10
Selecting the heat setting - - - - - - - - - - - - - - 10
Using the child safety device- - - - - - - - - - - - - 11
Safety cut-out - - - - - - - - - - - - - - - - - - - 12
When the hob is first installed - - - - - - 13
Hints and Tips on cooking and frying - - - - - - - - - 14
Cookware - - - - - - - - - - - - - - - - - - - - - 14
Energy saving - - - - - - - - - - - - - - - - - - - 14
Cooking chart- - - - - - - - - - - - - - - - - 15
Cleaning the hob - - - - - - - - - - - - - - - 16
Cleaning the appliance after each use- - - - - - - - - 16
Removing deposits - - - - - - - - - - - - - - - - - 16
Something not working- - - - - - - - - - - 17
Repairs - After Sales Service- - - - - - - - 18
Spare parts - - - - - - - - - - - - - - - - - - 18
Rating Plates - - - - - - - - - - - - - - - - - 19
For the Installer
Installation - - - - - - - - - - - - - - - - - - - 5
Technical Data - - - - - - - - - - - - - - - - - - - 5
Electrical Connection - - - - - - - - - - - - - - - - 5
Electrical Requirements - - - - - - - - - - - - - - - 5
Building In - - - - - - - - - - - - - - - - - - - 6
Guide to use the Instruction Manual
The following symbols will be found in the text to guide
you throughout the Instructions:
1 Safety Instructions
3 Hints and Tips
2 Environmental Information
5 This appliance complies with the following
E.E.C. Directives:
✽ 73/23 - 90/683
(Low Voltage Directive);
✽ 93/68 (General Directives)
✽ 89/336 (Electromagnetical Compatibility
Directive)
and subsequent modifications
3
Page 4
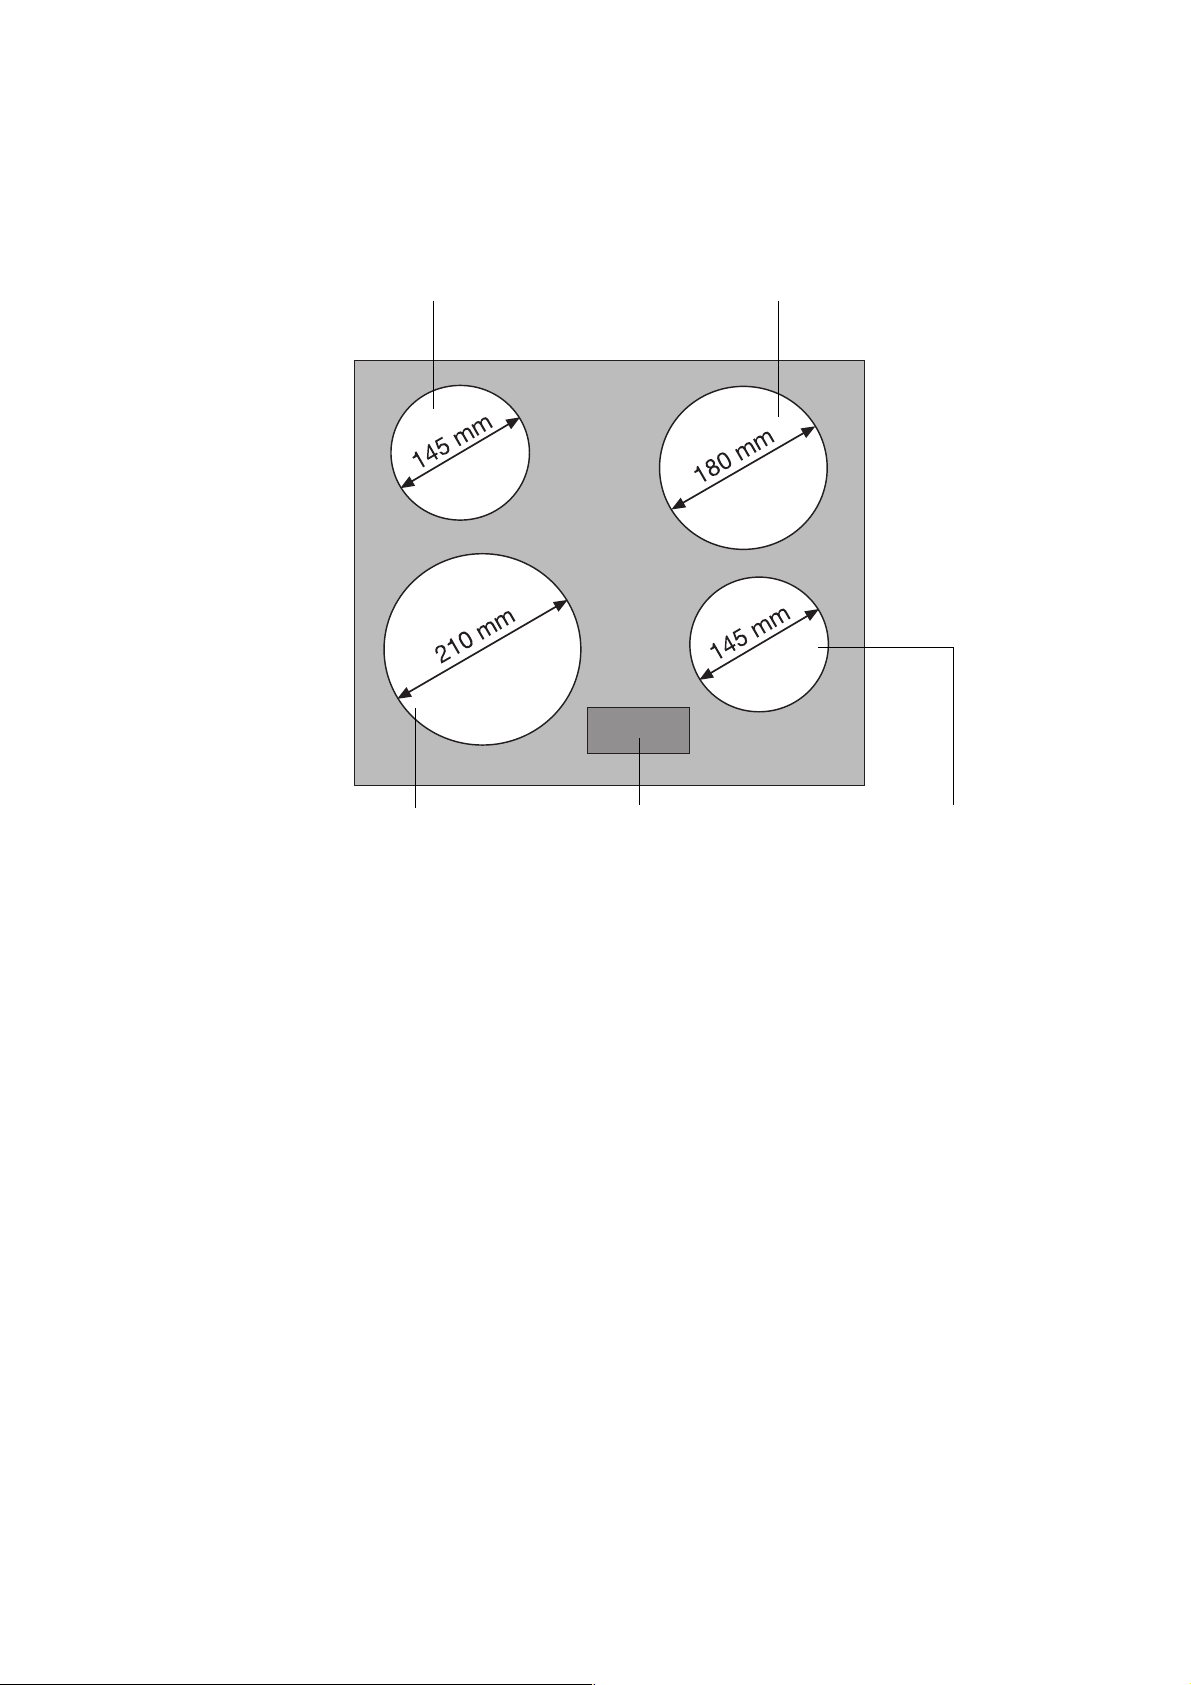
Description of the Appliance
Cooking surface layout
Single cooking zone
1200W
Single cooking zone
1800W
Single cooking zone
2300W
Control panel
Single cooking zone
1200W
4
Page 5
Installation
Technical Data
Appliance dimensions
Width 590 mm
Depth 520 mm
Height 47 mm
Cooking rings
Position Diameter Power
Front left 210mm 2300W
Rear left 145mm 1200W
Rear right 180mm 1800W
Front right 145mm 1200W
Connection voltage 230 V ~ 50Hz
Worktop cut-out dimensions
Maximum connected load power 5,8kW
Width 560 mm
Depth 490 mm
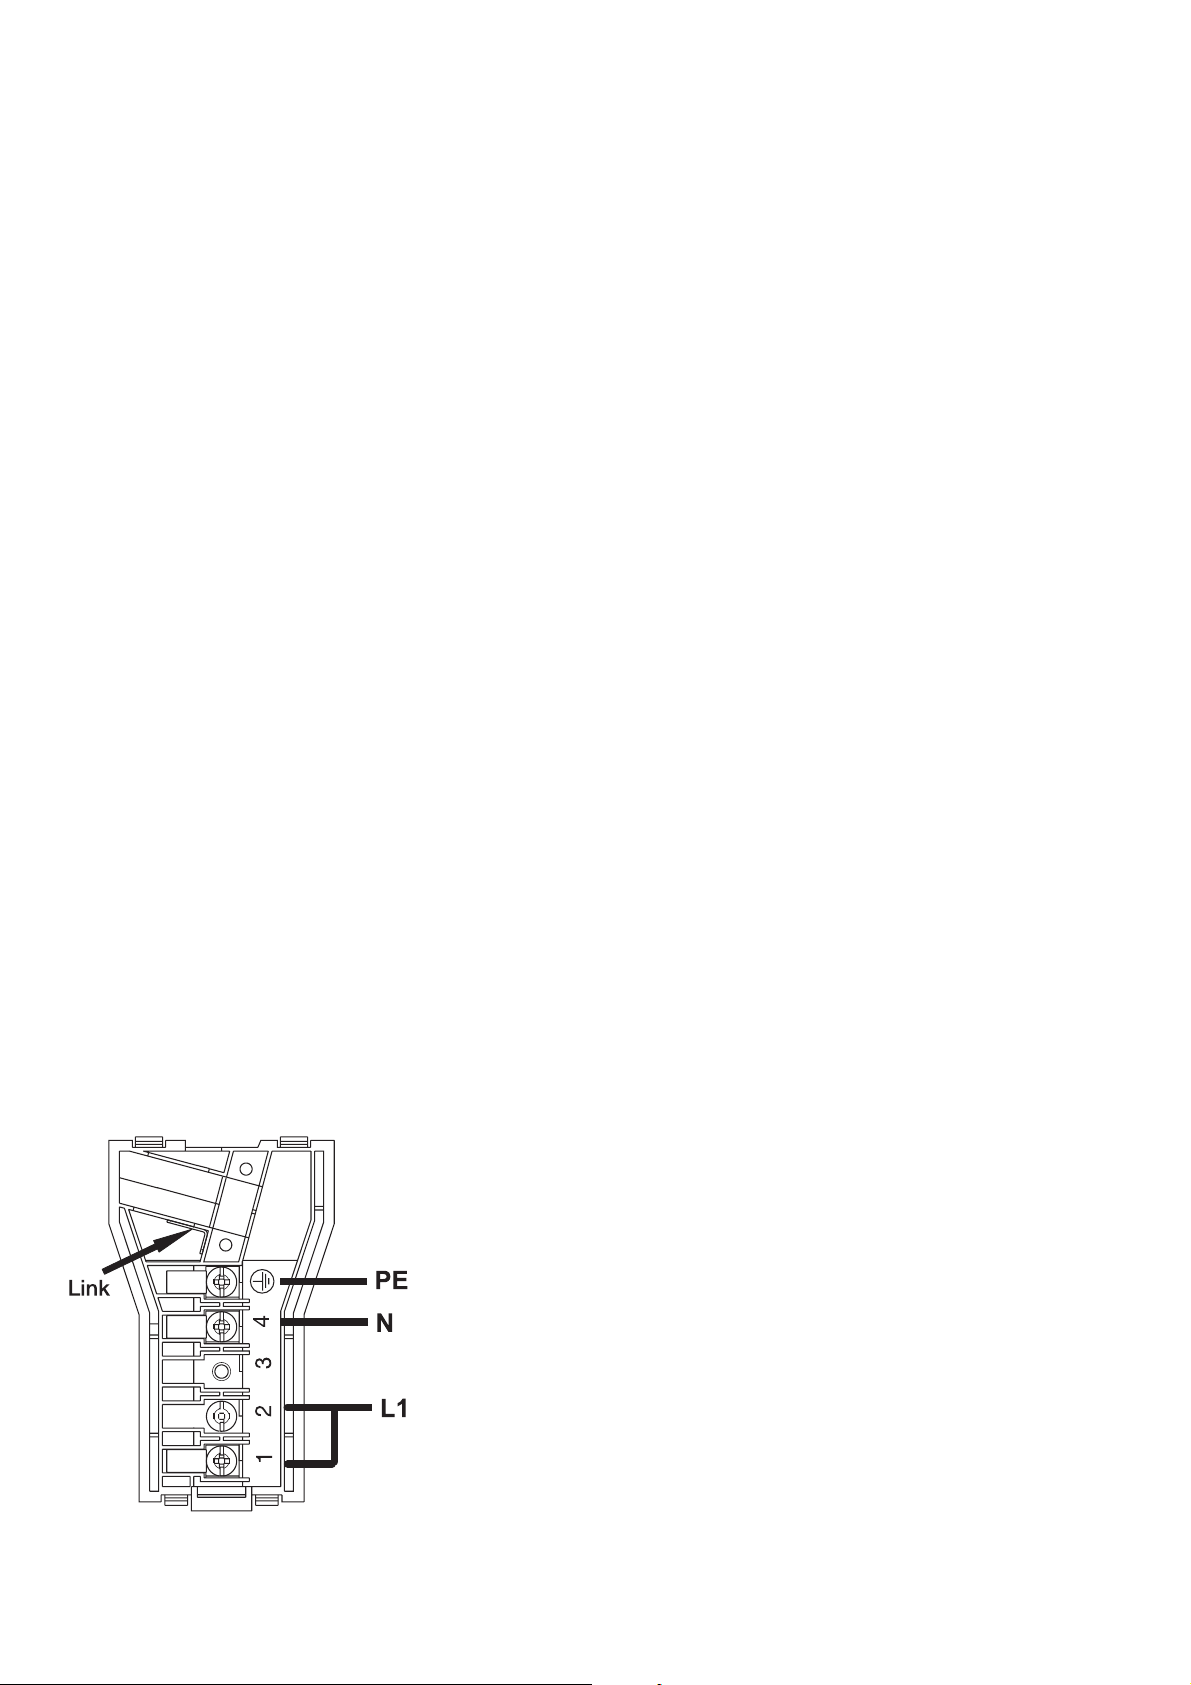
Electrical Connection
1 This hob must be earthed.
Electrical Requirements
Any permanent electrical installation must comply with the
latest I.E.E. Regulations and local Electricity Board regulations. For your own safety this should be undertaken by a
qualified electrician, e.g. your local Electricity Board, or a
contractor who is on the roll of the National Inspection
Council for Electrical Installation Contracting (NICEIC).
Electrical Connection
The hob is designed to be connected to 230 V (50 Hz) electricity supply. Before connecting to the mains supply ensure
that the mains voltage corresponds to the voltage on the
rating plate underneath the hob.
For UK only
It is necessary that you install a double pole switch between
the hob and the electricity supply (mains), with a minimum
gap of 3 mm between the switch contacts and of a type suitable for the required load in compliance with the current
rules.
1 The switch must not break the yellow and
Important
After installation and connecting, the cable must be placed
so that it cannot at any point reach a temperature of more
than 60°C above the ambient temperature.
Before the hob is connected, check that the main fuse and
the domestic installation can support the load; and that the
power supply is properly earthed.
The manufacturer disclaims any responsibility should these
safety measures not be carried out.
green earth cable at any point.
It is necessary that the yellow / green earth
wire is about 2 cm longer than the live and
neutral ones.
5
Page 6
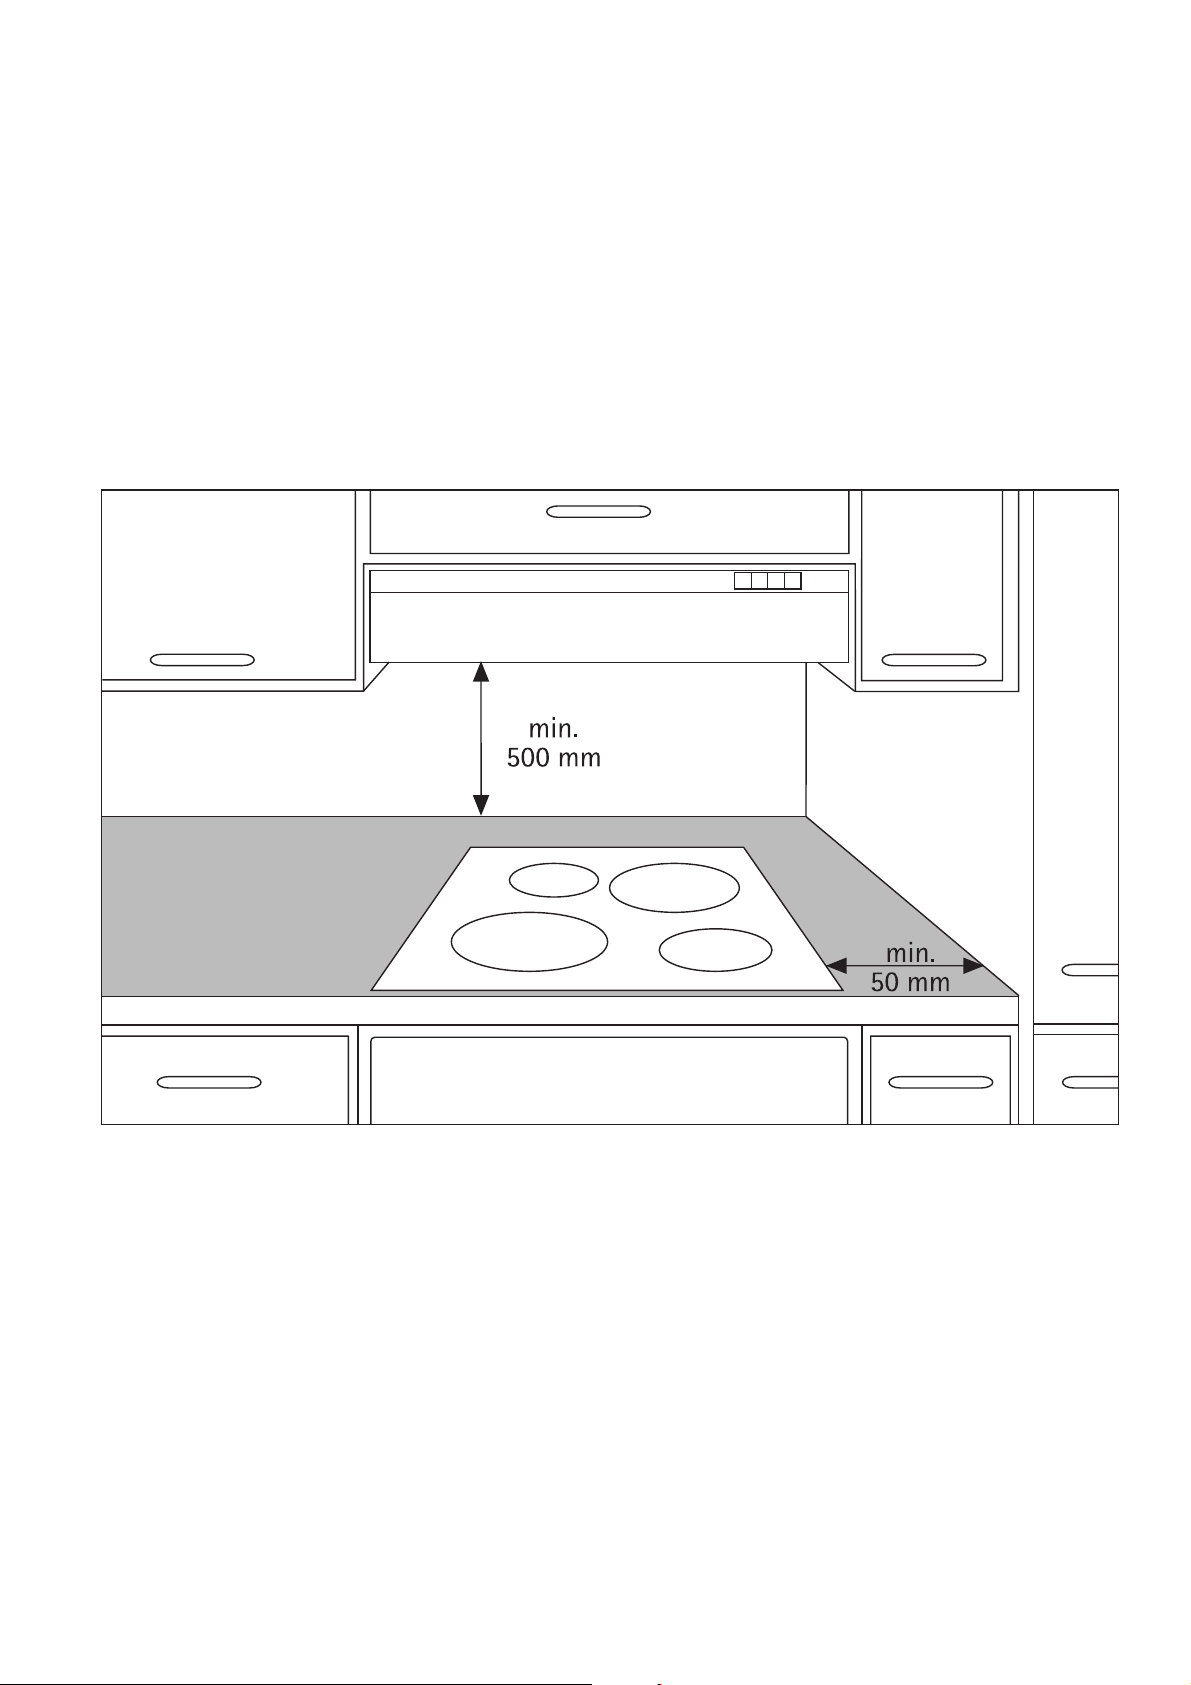
Building In
1 The hob must be installed according to the in-
structions supplied by qualified and competent personnel to the relevant National
Standards.
Building In
• The dimensions of the cut-out section and recess required must be as shown in the relevant diagrams.
• Proper arrangements must be made of a continuous supply
of air to the hob to prevent overheating.
• Clean the worktop in the area of the cut-out section.
• Stick the one-sided self-adhesive sealing tape supplied all
the way round the lower edge of the cooking surface
along the outer edge of the glass ceramic panel. Do not
stretch it. The cut ends should lie in the middle of one
side. When you have cut it to length (add a few mm),
press the two ends flush up against one another.
• A protective floor must be installed under the appliance.
6
Page 7

7
Page 8

8
Page 9

The Control Panel
Cooking zones and heat setting selection
Touch Control sensor fields
Display
On/Off
The appliance is operated using the Touch Control sensor
fields. Functions are controlled by touching sensor fields and
confirmed by displays.
Touch the sensor fields from above, without covering other
sensor fields.
Sensor field Function
On / Off Switches appliance on and off
Increase settings Select cooking zone
Increases heat setting
Reduce settings Reduces heat setting
Displays
Display Description
¾ Cooking zone is switched off
¿ - Ç Heat settings Heat setting is set
ER Fault Malfunction has occurred
h Residual heat Cooking zone is still hot
l Child safety device Lock/child safety device is set.
9
Page 10

Residual heat indicator
1 War ning! Risk of burns from residual heat. After
being switched off, the cooking zones need some
time to cool down. Look at the residual heat indicator
h .
3 Residual heat can be used for melting and keeping
food warm.
Switching the appliance on and off
Control panel Display
Switch on Touch for 2 seconds
Switch off Touch for 1 second
Selecting the cooking zone
Control panel Display
Select Touch
3 The decimal point is displayed by the selected cook-
ing zone. Then a heat setting must be set for this
cooking zone within 6 seconds, otherwise it must be
re-selected.
Selecting the heat setting
3 After selecting the cooking zone, briefly release the
sensor field .
Control panel Display
¾ / Decimal point flashes
h / none
¾ Decimal point illuminates
Increase Touch
Decrease Touch
Switch off Touch and at the same time
3 After 6 seconds with no input the selection is can-
celled and the decimal point goes out. To set the required cooking zone again, make another selection.
10
¾ to Ç
Ç to ¾
¾
Page 11

Using the child safety device
The child safety device prevents unintentional use of the appliance.
Setting the child safety device
Step Control panel Display
1. Switch on appliance (Do not set a heat setting)
2.
3. Touch of the front right cooking zone l
Appliance switches off.
Touch of the front right cooking zone and at
the same time
¾ / h (if hot)
4 x
¾ or h
Decimal points flash
3To override the child safety device or switch it off
successfully, the steps must be performed immediately
one after the other.
No other sensor fields must be touched between the
steps described. If the steps are performed in the
wrong order, the display automatically switches itself
off.
Overriding the child safety lock
The child safety device can be released in this way for a single cooking session; it remains activated afterwards.
Step Control panel Display
1.
2.
Switch on the appliance l / h (if hot)
Touch of the front right cooking zone and at
the same time
4 x
¾ Decimal points flash
Until the appliance is next switched off, it can be used as normal.
Cancelling the child safety device
Step Control panel Display
1. Switch on the appliance
2.
3. Touch
Appliance switches off.
Touch of the front right cooking zone and at
the same time
l / h (if hot)
4 x
¾ or h
Decimal points flash
11
Page 12

Safety cut-out
Cooking surface
• If after switching on the appliance a heat setting is not set
for a cooking zone within approx. 10 seconds, the appliance automatically switches itself off.
• If one or more sensor fields are touched for longer than
approx. 10 seconds, the cooking surface is automatically
switched off. ER03 flashes on the display or changes to h
if there is still residual heat.
• If all cooking zones are switched off, the cooking surface
automatically switches itself off after approx. 10 seconds.
Control panel
3 Moisture (e.g. a wet cloth) or liquid boiling over onto
the control panel switches all cooking zones off.
Cooking zones
• If one of the cooking zones is not switched off after a certain time, or if the heat setting is not modified, the relevant cooking zone switches off automatically. h is
displayed.
Heat setting Switches off after
1 - 2 6 hours
3 - 4 5 hours
5 4 hours
6 - 9 1.5 hours
12
Page 13

When the hob is first installed
1 Remove all packaging, both inside and outside the
hob including the advertising labels and any protective film, before using the hob.
3 When a cooking zone is switched on, it may hum
briefly. This is a characteristic of all ceramic glass
cooking zones and does not impair either the function or the life of the appliance.
13
Page 14

Hints and Tips on cooking and frying
Cookware
• You can recognise good cookware from the bottoms of
the pans. The bottom should be as thick and flat as possible.
• Cookware made of enamelled steel or with aluminium or
copper bottoms can leave discolourations on the ceramic
glass surface which can be impossible to remove.
Energy saving
2 Always place cookware on the cooking zone before
it is switched on.
2 If possible, always place lids on the pans.
2 Switch cooking zones off before the end of the cook-
ing time, to take advantage of residual heat.
2 Bottom of pans and cooking zones should be the
same size.
14
Page 15

Cooking chart
3 This chart is intended as a guide only. It may be nec-
essary to increase or decrease the temperature to
suit your individual requirements. Only experience
will enable you to determine the correct setting for
your personal requirements.
Heat set-
ting
0
1
1-2
2-3 Simmering
3-4
4-5 Boiling
6-7
Cooking
process
Kee ping fo od
warm
Melting
Solidifying Fluffy omelettes, baked eggs 10-40 mins. Cook with lid on
Steaming
Braising
Gentle
frying
suitable for Cooking time Notes
Residual heat setting,
Off position
Keeping cooked foods warm as required Cover
Hollandaise sauce,
melting butter, chocolate, gelatine
Simmering rice and milk-based dishes
Heating up ready-cooked meals
Steaming vegetables, fish
Braising meat
Steaming potatoes 20-60 mins.
Cooking larger quantities of food,
stews and soups
Frying escalope, veal cordon bleu, cut-
lets, rissoles, sausages, liver, roux, eggs,
pancakes, doughnuts
5-25 mins. Stir occasionally
Add at least twice as much liquid
25-50 mins.
20-45 mins.
as rice, stir milk dishes part way
With vegetables add only a little
liquid (a few tablespoons)
Use only a little liquid, e. g.: max.
¼ ltr. water for 750 g of potatoes
60-150 mins. Up to 3 ltrs. liquid plus ingredients
as required Turn halfway through cooking
through cooking
7-8
9
Heavy
frying
Boiling
Searing Deep
frying
Hash browns, loin steaks, steaks, Flädle
(pancakes for garnishing soup)
Boiling large quantities of water, cooking pasta, searing meat (goulash, pot roast), deep frying
5-15 mins.
per pan
chips
Turn halfway through cooking
15
Page 16

Cleaning the hob
1 War ning! Risk of burns from residual heat.
1 Important Sharp objects and abrasive cleaning ma-
terials will damage the appliance. Clean with water
and washing up liquid.
1 Important Residues from cleaning agents will dam-
age the appliance. Remove residues with water and
washing up liquid.
Cleaning the appliance after each use
1. Wipe the appliance with a damp cloth and a little washing
up liquid.
2. Rub the appliance dry using a clean cloth.
Removing deposits
1. Place the scraper on the glass ceramic surface at an angle.
2. Remove residues by sliding the blade over the surface.
3. Wipe the appliance with a damp cloth and a little washing
up liquid.
4. Rub the appliance dry using a clean cloth.
Type of dirt
sugar, food containing sugar yes ---
plastics, tin foil yes ---
limescale and water rings --- yes
fat splashes --- yes
shiny metallic discolorations --- yes
*Scrapers and cleaners for glass ceramic and stainless steel can be pur-
chased from your local John Lewis branch.
immedi-
ately
when the appliance has cooled
down
3 Remove stubborn residues with a cleaner for glass
ceramic or stainless steel.
3 Scratches or dark stains on the glass ceramic that
cannot be removed do not affect the functioning of
the appliance.
Remove
using
a scraper*
cleaner for glass ceramic or
stainless steel*
16
Page 17

Something not working
If the hob is not working correctly, please carry out the following checks, before contacting your local Service Force repair
agent. In the event of any other fault codes that arise, disconnect the appliance from the electrical supply for a few seconds
(take out the fuse from the housing wiring system). If the fault code is displayed again, please call your local Service Force repair
agent and report the fault code.
IMPORTANT: If you call out an engineer to a fault listed below, or to repair a fault caused by incorrect use or installation, a
charge will be made even if the appliance is under guarantee.
Symptom Solution
The cooking zones are not functioning. Select cooking zone (if not selected) within 10 seconds of
switching on (Decimal point lights up)
The cooking zones cannot be selected / Appliance does not
react to the control panel input
The residual heat indicator is not displaying anything • The cooking zone was only on for a short time and is there-
Er03 is displayed
Er21 is displayed
Er25 is displayed
(only for 10 seconds)
If more than 10 seconds has passed since the appliance was
switched on:
Switch on the appliance again.
Select cooking zone within 10 seconds of switching on
If the child safety device is activated
Deactivate the child safety device (See section “Child safety
device”)
If the sensor fields are partly covered by a damp cloth or with
liquid:
Remove the cloth or the liquid
If safety cut-out has been triggered:
Switch on the appliance again
fore not hot.
• If the cooking zone is supposed to be hot, call your local
Service Force Centre.
Several sensor fields were touched at the same time.
Only touch one sensor field
Safety cut-out due to overheating.
Let the appliance cool down.
Remove cookware.
Appliance is incorrectly connected.
Disconnect the appliance from the electrical supply and have
it connected properly
l:
Er40 is displayed The overvoltage protector has been activated (for an incor-
rect connection see above Er25 or for overheating of the
electronic components see Er21).
Separate the appliance from the mains for a few minutes (remove the mains fuse).
Let the appliance cool down.
3 In the event of any other fault codes that arise, dis-
connect the appliance from the electrical supply for a
few seconds (Take out the fuse from the house’s wiring system). If the fault code is displayed again, please
call your local Service Force Centre and report the
fault code.
17
Page 18

Repairs - After Sales Service
If your hob is not performing satisfactorily; consult the fault
finding guide within this instruction book (Something not
working). In the event of a fault occurring which you cannot
resolve yourself from advice given within this instruction
manual your first step is to contact our extended warranty
administrators on 0870 0107887 who will give you details
for your local Service Force.
.
When contacting Service Force, please quote the model
(Mod.) and serial number (S.N.), both of which are shown
on the rating plate located underneath the hob.
So that you always have these numbers at hand, we recommend you to make a note of them here:
Mod.:
PNC:
S.N.:
Your hob is covered by a 3 year parts and labour guarantee
(see separate details given at point of sale). Please retain
your purchase receipt safely for the service engineer to verify the purchase details.
Spare parts
This product should be serviced by any authorised service
engineer; and only genuine spare parts should be used.
Under no circumstances should you attempt to repair the
hob yourself.
Repairs carried out by inexperienced persons may cause injury or serious malfunctioning. Contact our extended warranty administrators on 0870 0107887 who will give you
details for your Service Force repair agent.
Always insist on genuine spare parts.
18
Page 19

Rating Plates
JLBICH602
PEE2019
John Lewis
JLBICH602
PEE2019
John Lewis
230 V 50 Hz
230 V 50 Hz
949 591 900
6,5 kW
949 592 457
6,5 kW
19
Page 20

John Lewis Partnership
171 Victoria Street
London SW1E 5NN
www. johnlewis.com
822 925 327-A-11 01/06
 Loading...