

Page 1
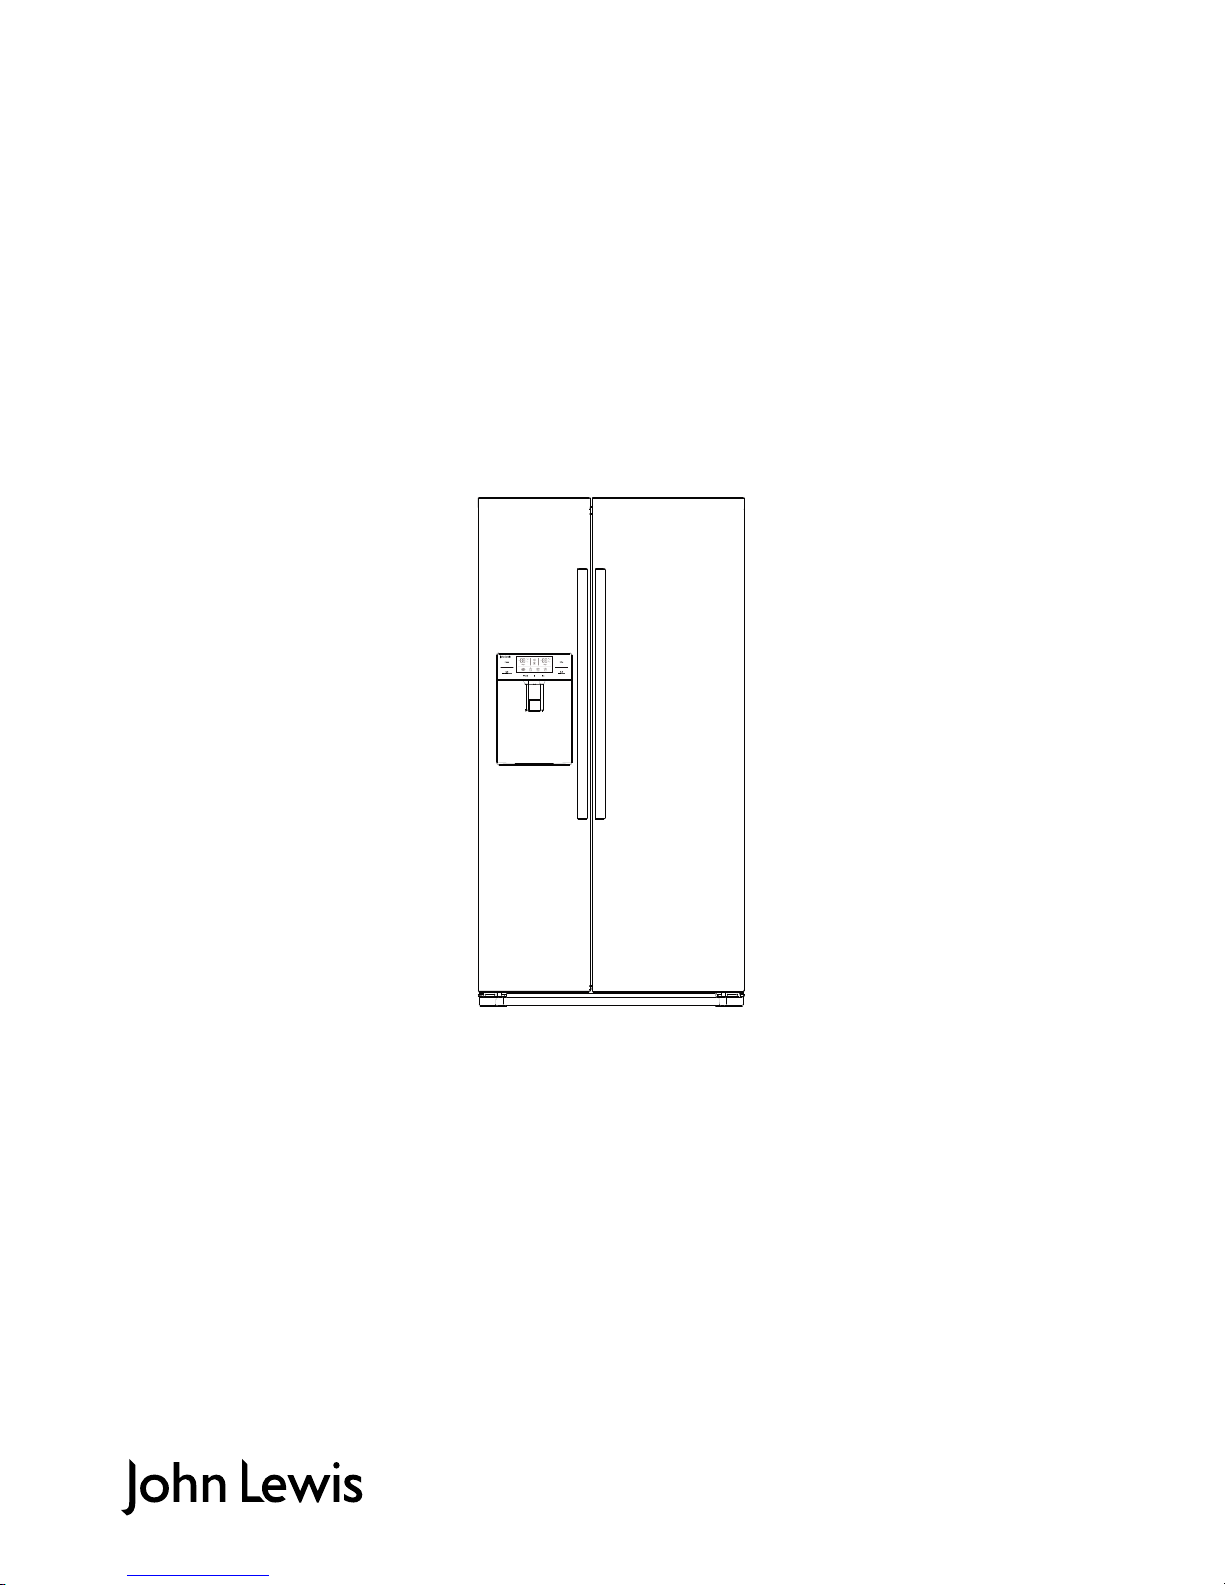
American Style Fridge Freezer
JLP-Model No. JLAFFW2011 - JLAFFS2011 - JLAFFB2011
User guide
Page 2

Fridge freezer user guide
2
Page 3

Fridge freezer user guide
3
Contents
Contents 3
Introduction 4
Safety is important 4
In the box 4
Safety information 5
Important safety information 5
Warnings 5
Cautions 6
Ecological hints 6
Environmental information 6
Electrical information 7
Mains supply 7
Parts identification 8
Control panel 8
Operation 9
Temperature control 9
Changing the temperature display 9
Setting the freezer temperature 9
Setting the fridge temperature
9
How to use the fridge storage areas 10
Food storage tips 11
Automatic ice maker 12
How to use the water / ice dispenser 12
Care, Cleaning and Servicing 13
Care and Cleaning 13
Dispenser water shelf 13
Ice cubes storage case 13
Fridge and freezer containers 13
Fridge and freezer shelves 14
Vegetable cases and freezer drawers 14
Door compartment rack 14
Servicing 15
Installation 16
Preparation for installation 16
Removing the freezer door 16
Removing the fridge door 17
Replacing the freezer door 17
Replacing the fridge door 18
Fridge freezer levelling and door alignment 18
Levelling the fridge freezer 18
Adjust the doors 19
Install the door handles 20
Installing the water filter 21
Installing the water line 21
Disposal and Guarantee 23
Disposal 23
Guarantee 23
Troubleshooting 24
Troubleshooting 24
Repairs - after sales service 29
Spare parts 29
Specification 30
Page 4

Fridge freezer user guide
4
Introduction
Thank you for purchasing this American style fridge freezer.
Please take time to read these instructions and retain for
future reference.
Note: For the remainder of this User Guide, the American
style fridge freezer will be referred to as the fridge freezer.
Safety is important
To ensure your safety and the safety of others, please read the
Safety information before you operate this product.
Keep this information in a safe place for future reference.
In the box
You will find the following:
• Fridge freezer / handles
• User guide
• Spanner
• Egg case
• Water supply kit (connector, water pipe)
Note: If any of the items listed are damaged or missing, please
contact your local John Lewis branch.
• Water filter
Page 5
Fridge freezer user guide
5
Important safety instructions - read
carefully before use
Take note of the following safety information which appears
on the back of this fridge freezer:
Warning! To prevent fi
re or shock hazard,
do not expose this fridge freezer to rain or
moisture.
Warning! Always remove the mains plug
from the wall socket when not in use or
before any service operation.
Warning! There are no user serviceable
parts on this fridge freezer. Refer servicing
to qualifi ed service personnel.
This symbol indicates that there are important
operating and maintenance instructions in the
literature accompanying this fridge freezer.
This symbol indicates that dangerous voltages
constituting a risk of electric shock are present within
this fridge freezer.
Important safety information
It is most important that this user guide and the installation
guide should be retained with the fridge freezer for future
reference. Should the fridge freezer be sold or transferred
to another owner, or should you move house and leave the
appliance, always ensure that the guides are supplied with the
fridge freezer in order that the new owner can get to know
the functionality and the relevant warnings.
These warnings have been provided in the interest of safety.
You MUST read them carefully before installation or use. If you
are unsure of the meanings of these warnings contact the John
Lewis branch from which you purchased the fridge freezer.
To avoid accidents to property or people it is important to
follow the instructions given. Failure to do so removes any
liability from John Lewis.
Warnings
• This fridge freezer is designed to be operated by adults.
Children should not be allowed to tamper with the controls
or play with the fridge freezer.
• Keep all packaging well away from children. There is risk of
suffocation.
• Never let the power cord be crushed by the fridge freezer
itself or other (heavy) objects. Never bend power cord
excessively.
• Never hold the power cord or plug with wet hands.
• Never use a damaged power cord or plug, or loose main
socket.
• Never let the power cord touch or pass over heating
appliances.
• Do not use other electrical appliances inside the appliance.
• Containers with fl ammable gases or liquids can leak at low
temperatures. Do not store any containers with fl ammable
materials, such as spray cans, fi re extinguisher refi ll
cartridges etc.. in the fridge freezer or the vicinity of the
fridge freezer or any other appliance.
• Frozen food should not be refrozen once it has thawed out.
• The small quantity of refrigerant used in this appliance is
eco-friendly R600a (an isobutene) and is nevertheless both
infl ammable / explosive if ignited in enclosed conditions.
• Never insert fi ngers or hands into the bottom of the fridge
freezer, especially into the bottom back.
• When moving the fridge freezer (horizontally or tilted), two
people are required (one to hold the top back handles, the
other to hold the lifting areas at the bottom). If other parts
are gripped, it is very dangerous and likely to slip.
Safety information
Page 6
Fridge freezer user guide
6
• When the fridge freezer is to be scrapped, cut off the
electrical supply cable and destroy the plug with the
remaining cable. Disable the door catch in order to prevent
children from becoming trapped inside while playing.
A cut off plug inserted into a 13 amp socket is a serious
safety (shock) hazard. Please ensure the cut off plug is
disposed of safely.
Cautions
• This fridge freezer is designed for domestic use only,
specifi cally for the storage of edible foodstuffs.
• Do not place carbonated or fi zzy drinks in the freezer
compartment.
• Do not remove items from the freezer if your hands are
damp/wet, as this could cause skin abrasions or frost/freezer
burns.
• Because of the very low temperatures in the freezer some
foods e.g. ice lollies could cause frost burns if consumed
immediately.
• Bottles and cans must not be placed in the freezer
compartment as they can burst as the contents freeze.
• Store pre-packed frozen foods in accordance with the
frozen foods instructions and use by date.
• Do not store medicine, academic research samples which
require strict temperature control in the fridge freezer.
• When cleaning, removing spillages (liquids or frozen food)
or removing the ice tray do not use any implements that
are hard, sharp or pointed as they may cause damage to the
appliance.
• Keep ventilation openings in the appliance enclosure or in
the built-in structure, clear of obstruction.
Ecological hints
To save water and energy and help protect the environment,
we recommend that you follow these hints:
• Do not install the appliance close to sources of heat such as
a boiler or radiator.
• Do not install the fridge freezer on a wet fl oor or in a place
with a high humidity / moisture content.
• Locate the fridge freezer in a well ventilated room and
make sure that any air openings of the appliance are not
obstructed.
• Pack all foods into airtight packages before placing them
into the freezer compartment.
• Food which is to be frozen (when cool) should be placed
in the fridge compartment before being transferred to the
freezer.
• Try to avoid keeping the doors open for long periods
or opening the doors too frequently as warm air will
enter the cabinet and cause the compressor to switch on
unnecessarily often.
• Ensure there are no obstructions preventing the doors from
closing properly.
Environmental information
• RoHS (Directive 20002/95/EC) compliant:
This fridge freezer is environmentally sound and sustainable
free from Pb, Cd, Cr+6, Hg PBBs and PBDEs restricted in
accordance with the directive.
• After installation, please dispose of the packaging with due
regard to safety and the environment.
• Materials marked with the are recyclable.
• Avoid damaging the cooling unit, especially at the rear, near
the heat exchanger.
• This fridge freezer does not contain gases which could
damage the ozone layer, in either its refrigerant circuit or
insulation materials.
• Please dispose of this fridge freezer in accordance with the
disposal instruction on page 16. By ensuring this product
is disposed of correctly, you will help prevent potential
negative consequences for the environment and human
health, which could otherwise be caused by inappropriate
waste handling of this product.
Page 7
Fridge freezer user guide
7
Electrical information
Mains supply
Warning! This fridge freezer MUST BE
EARTHED.
Should the power supply cable need to be replaced, this
must be carried out by an approved service engineer. John
Lewis declines any liability should this safety measure not be
observed.
Before switching on, make sure the electricity supply voltage is
the same as that indicated on the fridge freezer’s rating plate.
The fridge freezer is supplied with a 13 amp plug. In the event
of having to change the fuse in the plug supplied, a 13 amp
ASTA approved BS 1363/A fuse must be used.
Warning! The appliance should not be
connected to the electrical suppl
y by means
of an extension cable.
Page 8

Fridge freezer user guide
8
Parts identification
Control panel
1 Display panel symbol - Current status of the
water filter
2 Display panel symbol – Freezer compartment
temperature indicator
3 Display panel symbol - Water dispensing
selected
4 Display panel symbol – Abnormal fridge
inside temperature rise indicator
1
5 Display panel symbol – Childproof lock
switched on
6 Display panel symbol – Ice cube dispensing
selected
7 Display panel symbol - Fridge compartment
8 Display panel symbol - Ice dispensing lock selected
(“Ice” button for 3 seconds to lock or release)
9 Fridge temperature change/supercool button
10 Childproof lock button (hold 3 seconds to release)
11 Ice cube dispenser button
12 Water dispenser button
13 Ice and water dispenser light button / filter
display reset button(hold for 3 seconds to reset)
2
3 4
5 6
7
8
9
10
11
12
13
14
temperature indicator
14 Freezer temperature change / superfreezing button
Page 9
Fridge freezer user guide
9
Temperature control
When the fridge freezer is first plugged in, the default
temperature settings for the fridge and freezer are mid range.
Changing the temperature display
To change the display temperature from Fahrenheit to Celsius:
1 Press the lock button to access the lock mode.
2 Press and hold the light button for 10 seconds
until the temperature unit changes.
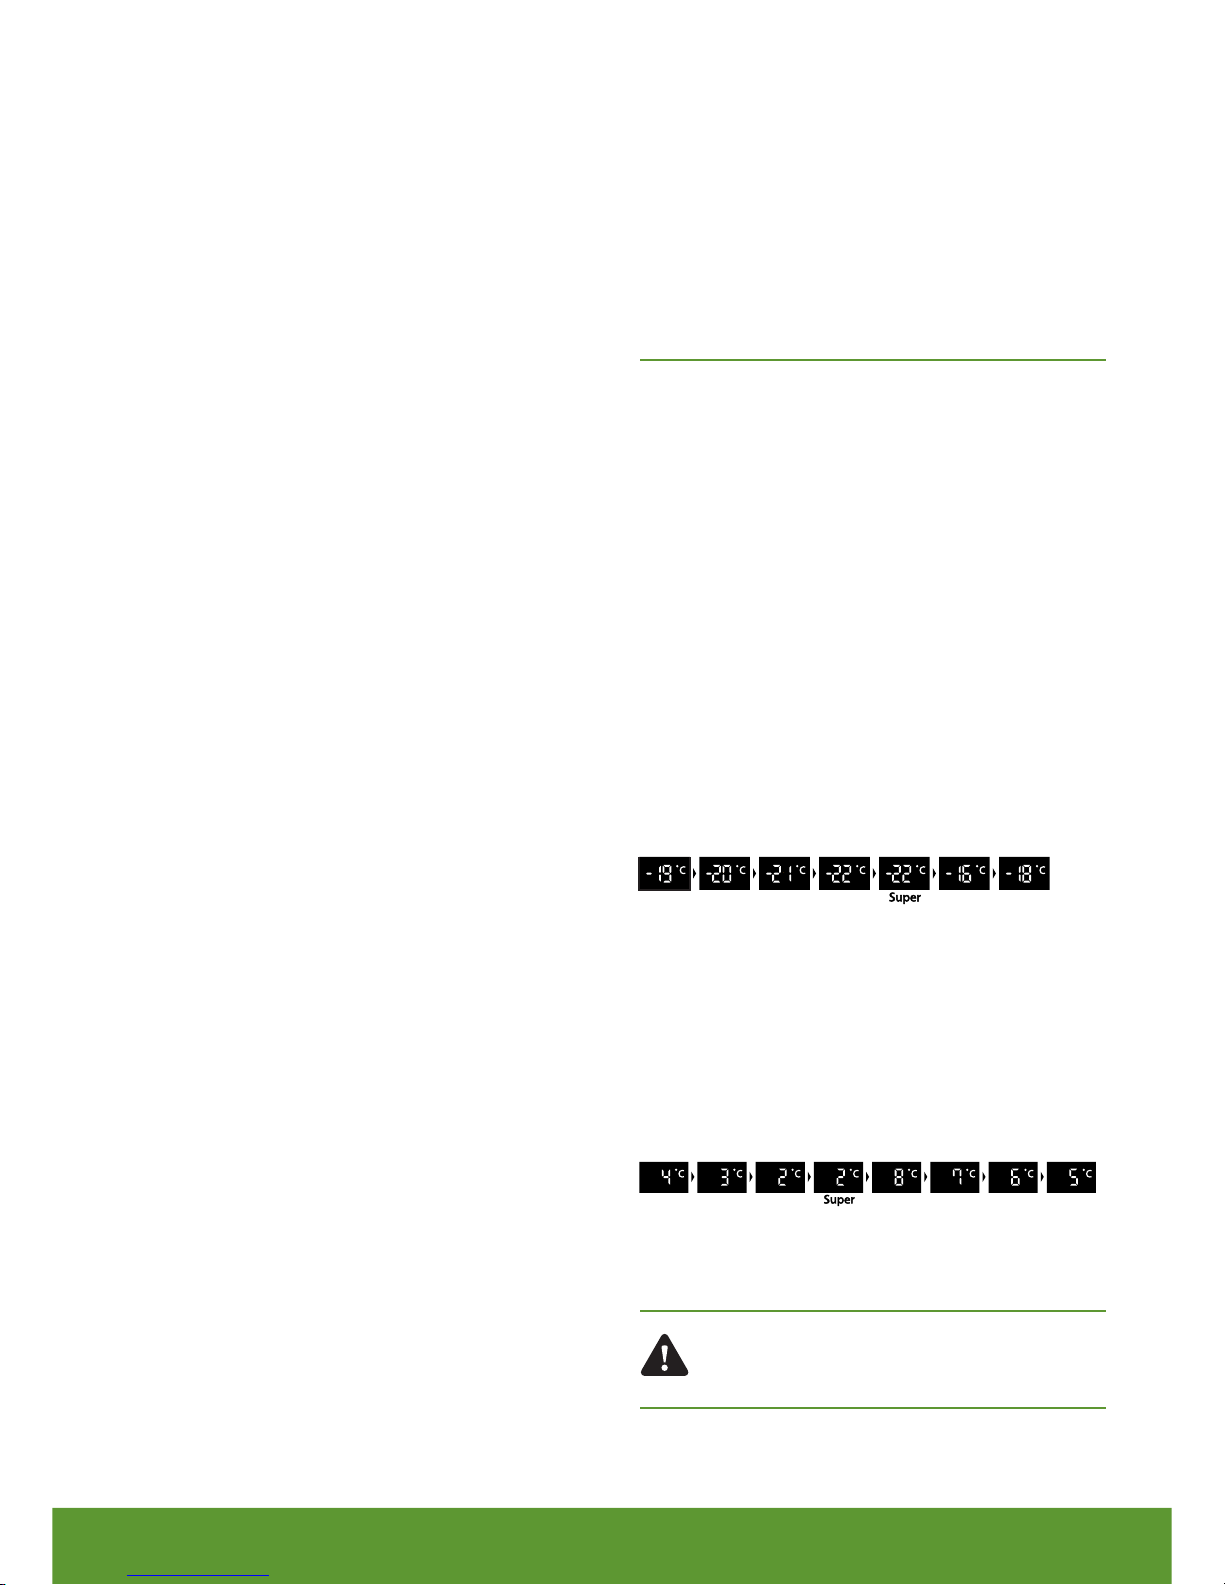
Setting the freezer temperature
Repeatedly press the Freezer button until the desired
temperature is selected. The temperature sequence is
shown below:
If you require faster freezing, press the Freezer
the super icon is illuminated on the display.
Setting the fridge temperature
Repeatedly press the Fridge button until the desired
temperature is selected. The temperature sequence is
shown below:
If you require faster cooling, press the Fridge
the super icon is illuminated on the display.
Caution - Fo
od in the fridge can be frozen
if the ambient temperature of the fridge is
below 5°C.
Operation
Notes:
• The Interior lights of the fridge turn off when the doors are
left open for more than 10 minutes.
• Display off function:
- If the doors are not opened or the display buttons are not
touched for longer than five minutes, the display will go
blank (except the dispenser LED indicator such as water,
- As soon as a button it pressed or a door is opened the
display will return to normal display mode.
• Alarm function:
- In case either the freezer or fridge doors are left open for
more than a minute, the door alarm rings for five minutes
periods with a one minute interval.
- The alarm indicator blinks if the temperature inside the
fridge or freezer is too high, showing the temperature of
inside on the display.
- To switch off the alarm, close the door, if a door is open,
and press lock button.
ice or ice lock based on selection)
water
and
button until
button until
Page 10
Fridge freezer user guide
10
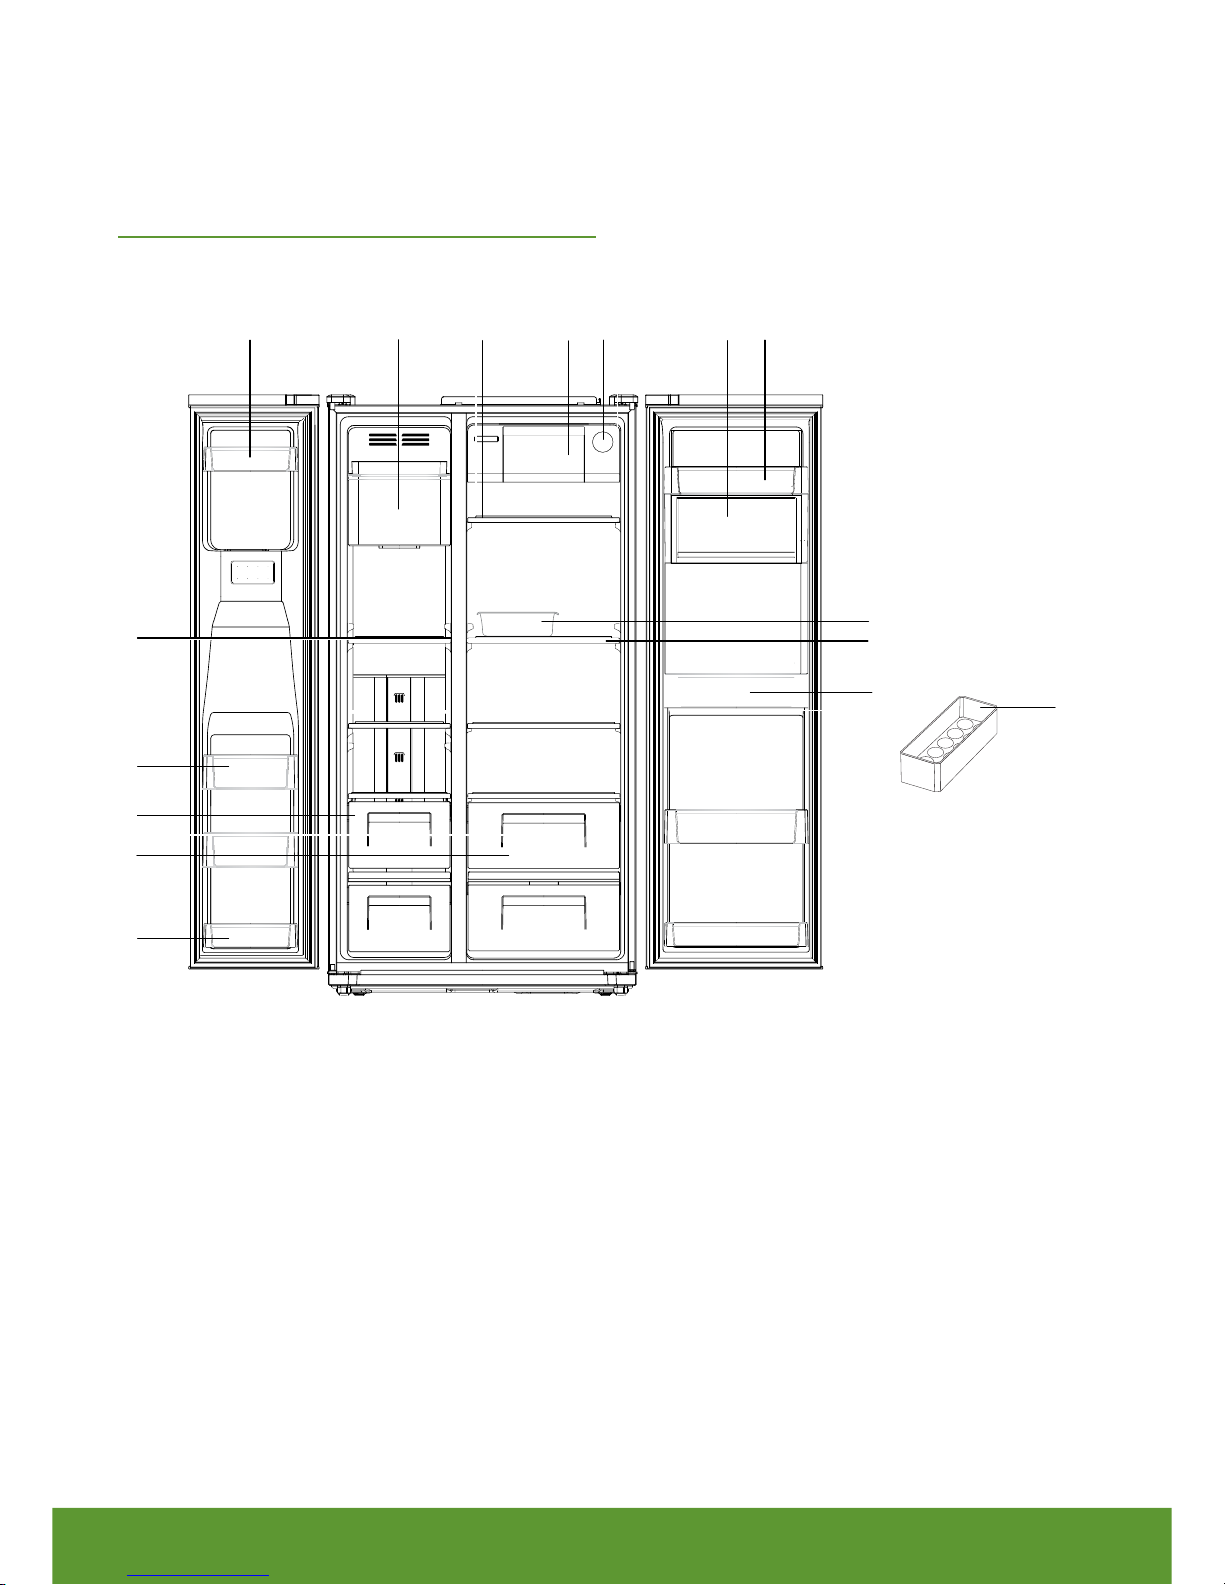
How to use the fridge storage areas
The following list is a suggestion of the usage for each of the compartments within the fridge:
1 Upper / Lower freezer door compartments – for
storing ice cream or short-term storage foood
2 Mid freezer door compartments – for storing
frozen food
3
4 Adjustable freezer glass shelf
Ice maker/Ice storage - for making and storing
ice
7 Quick can cooler - for faster cooling can beverages
5 Freezer drawer
9 Egg case
10 Adjustable fridge glass shelf
11 Vegetable case
12 Multi plus zone - for storing special items such as sauces,
13 Fridge door compartment - for storing smaller items of food
14 Mid Fridge door compartment
9
14
9
11
2
4
1 3 6 7 8 12 13
1
5
10
6 Fridge glass shelf
8 Water filter
cosmetics, medicines and others need to keep cool
Page 11

Fridge freezer user guide
11
Wash you food before storing.
Keep as much space as possible between the
items of food. If you pack the food too tight
or too close, cold air circulation is hindered,
resulting in poor refrigeration.
Be careful when storing food such tropical
fruit e.g. bananas, pineapples, tomatoes,
for they can easily deteriorate in lower
temperatures.
Warm or hot food should be cooled down
before storing to reduce power consumption
and to enhance refrigeration performance.
Place watery food or food with moisture on
the front shelves close to the edges of the
fridge compartment. If they are placed close
to the cold air spout, they can be frozen.
Divide and separate food into smaller pieces.
Food storage tips
Never forget to cover or wrap food to
prevent odours.
Page 12

Fridge freezer user guide
12
Automatic ice maker
The automatic ice maker makes approximately eight ice cubes
at a time and it does these approximately 15 times a day. If
the ice storage case is full, the automatic ice maker detects this
and stops.
• It is normal for the ice maker to make banging sounds when
the ice cubes are falling into the ice storage case.
• To prevent bad odours, regularly clean the ice cube storage
case.
• If the ice stops dispensing the storage case may be empty.
Wait 2 to 3 hours for the automatic ice dispenser to create
more ice cubes.
• If the ice does not dispense easily, ensure the dispenser
outlet is not blocked.
How to use the water / ice
dispenser
Hold an appropriate glass / cup or jug under the ice and water
dispenser.
Select the
with your glass / cup or jug until the desired amount of water or
Water or Ice
ice is received.
Cautions:
• Avoid using thin fragile cups or crystal
glasses when taking ice cubes.
• Never insert your fingers or tools into the
water / ice dispenser outlet.
• If you find discoloured ice, stop using the
ice dispenser and call the service a
gent.
Water
Ice cube
button and push the lever smoothly
Page 13

Fridge freezer user guide
13
Care, cleaning and servicing
Switch off and unplug the fridge freezer before carrying out
any cleaning or maintenance work.
Care and cleaning
Clean the interior exterior casing using a cloth with water and
mild (neutral) Detergent.
Clean the grill at the back of the fridge freezer at least once a
year using the nozzle attachment on a vacuum cleaner.
Dispenser water shelf
Remove the strainer and clean the water collecting tray with
a sponge or absorbent cloth.
Ice cubes storage case
Press the release button and remove the ice cube container.
Empty the ice cube container and clean using tepid water.
Thoroughly dry the container and conveyor mechanism to
prevent new ice cubes from sticking.
Replace the ice cube container by pushing it all the way back
onto the supports until it locks into position.
Note: If the container cannot be pushed all the way back,
rotate the conveyor mechanism a quarter turn and insert
again.
Fridge and freezer containers
Remove a container by withdrawing it as far as it will go and
the lifting up the front and then and fully removing it.
Replace the container by locating the rear lugs and the pushing
it all the way back in.
Page 14

Fridge freezer user guide
14
Freezer & Fridge shelves
Remove a shelf by lifting it up at the front, pulling it, unhook it
and then remove it.
Replace the shelf by locating the rear lugs, lower the shelf and
the pushing it all the way back in.
Vegetable cases & Freezer drawers
Remove a case by withdrawing it as far as it will go and the
lifting up the front and then and fully removing it.
Replace the case by locating it on the rails and the pushing it all
the way back in.
Door compartment rack
Hold both ends of the rack and remove by pulling it up.
Page 15

Fridge freezer user guide
15
Servicing
This fridge freezer should only be serviced by an authorised
service engineer, and only genuine spare parts should be used.
Under no circumstances should you attempt to repair the
fridge freezer yourself. Repairs carried out by inexperienced
persons may cause injury or serious malfunction.
Page 16

Fridge freezer user guide
16
Installation
Preparation for installation
Before unpacking your fridge freezer, be aware of the following
points:
Find a suitable location for the fridge freezer; it should be
positioned as follows:
• In a dry room that can be ventilated.
• Out of direct sun light.
• Away from any heat source, e.g. stove or radiator (if this is
unavoidable, a suitable heat insulator should be used (not
supplied).
• A minimum gap of 25 mm from another fridge or freezer.
• A minimum gap of 10 mm above the fridge freezer.
• On a solid floor that will not sag under the weigh of the
fridge freezer.
Ensure that the fridge freezer can fit through all the doorways
on the route to its final location. The dimensions of the fridge
freezer with it handles installed are; 906 mm wide x 735 mm
deep x 1770 mm high.
If the fridge freezer will not pass through a door way:
Removing the freezer door
1 Pull out bending tube guide and the left hand side water
tube.
3 Turn top hinge fastener (turn in an anti-clockwise direction)
and disconnect the harness wires.
4 Lift up the hinge to remove. (As the hinge is removed
the door may drop down forward. Be careful.)
5 Be careful not to damage the water line when removing
Remove the base panel(cover) first if it is attached.
2. Remove the retaining screws from the top hinge cover and
remove the hinge cover.
the door.
Page 17

Fridge freezer user guide
17
Removing the fridge door
1 Remove the retaining screws from the top hinge cover
and remove the hinge cover.
2 Turn top hinge fastener (turn in anti-clockwise direction)
and remove the top hinge. (As the hinge is removed the
Replacing the freezer door
1 Insert the water tube into the hole of the bottom
2 Align the top of door and ensure it is secure against the
cabinet. Insert the back of hinge into the groove first,
3 Lift off and remove the fridge door.
door may drop down forward. Be careful.)
hinge pint first.
then insert front mounting to top of door. Check carefully
it is well fastened.
3 Install the fastener (turn in a clockwise direction) and
connnect the earth, the harness wires. Then fit the hinge
cover and secure with the retaining screws.
4 Fasten the bending tube guide and insert the water tube
into the coupling.
Page 18

Fridge freezer user guide
18
1 Insert the bottom hole of fridge door straight into the
bottom hinge pin.
2 Align the top of door and ensure it is secure against the
cabinet. Insert the back of hinge into the groove first,
Fridge freezer levelling and door
alignment
The fridge freezer must be level in order to maintain optimal
performance and visual presentation.
If the floor underneath is uneven, the fridge freezer doors will
look unbalance.
Levelling the fridge freezer
2 Close the doors and put a flat-blade screwdriver into
groove of the left wheel (bottom of door).
Replacing the fridge door
then insert front mounting to top of door. Check carefully
it is well fastened.
3 Install the fastener (turn in a clockwise direction) and
connect the earth and harness wires. Fit the top hinge
cover and secure with the retaining screws.
3 Turn the wheel clockwise to raise the level or anti-clockwise
to lower the level.
4 After installation and / or levelling, ensure base panel fits in
place and screw is fastended.
1 Remove the three retaining screws (turn in an
anticlockwise direction) and remove the base panel.
Page 19

Fridge freezer user guide
19
Adjust the doors
If the door heights are uneven, follow the next steps
to adjust the height:
1 Insert a spanner(A part) into the hinge nut(1) and
turn in clockwise direction.
2 Insert a spanner(B part) into the hinge unt(2) and
turn clockwise to lower the door or turn it anti-
3 If the doors are aligned properly, fasten the nut(1)
in anti-clockwise direction.
clockwise to raise the door.
4 After installation and / or door alignment, fit the
base panel and secrew with the retaining screws.
Page 20

Fridge freezer user guide
20
Install the door handles
After final installation and door levelling, install the fridge door
handles.
Note: Both handles are installed in the same way.
• Position one of the door handles into the guides on the
door, the set screws on the handle needs to point to the
centre of the fridge freezer.
• Using the supplied Allen key tighten the two set screws
(turn in a clockwise direction).
• Repeat this process for the other door handle.
Page 21

Fridge freezer user guide
21
Installing the water filter
1 Remove the locking cap befgore installing the filter.
connect your fridge freezer to the water supply:
The water pipe / tube should only be connected to your cold
water supply.
1 Connect the water pipe / tube to the fridge freezer.
2 Connect the pipe / tube to the tap connector, place the
rubber washer inside the tap connector and screw onto
the water tap.
Notes:
The water pressure should be 1.96~8.62 Bar or more to run
the automatic icemaker. Checkup your tap water pressure; if a
cup of 180cc is full within 10 seconds, the pressure is OK.
When installing the water tubes, ensure they are not close to
any hot surfaces.
The water filter only filters water; it does not eliminate any
bacteria or microbes.
If your water pressure exceeds 8.62 bar a pressure reducing
valve must be installed.
Use sealing tape on each pipe / tube connection to ensure
there are no water leaks.
Installing the water line
You will require the following component (not supplied to
connect your fridge freezer to the water supply:
• Connector
• Water pipe / tube
Connector Water pipe / tube
(note: The ice and water dispenser can also be used without
water filter, in which case the locking cap must be used.)
2 Carefully push in the water filter and turn it clockwise.
Change the water filter every 6 months. Concact your local
John Lewis branch or our warranty administrator to buy a
new genuine water filter.
Page 22

Fridge freezer user guide
22
Water Tube Rubber Washer
3 Connect the fridge freezer to the power supply and switch
it on.
Caution - You must wait at least 8 hours
after installing the fridg
e freezer before
switching on to allow for oil in the
compressor to settle.
4 Press and hold the water button on the control panel
for two to three minutes until the water tank is full and
waters starts to fl
ow from the dispenser.
Page 23

Fridge freezer user guide
23
Disposal
This symbol on the product or on its packaging indicates
that this product may not be treated as household waste.
Instead it shall be handed over to the applicable collection
point for the recycling of electrical and electronic equipment.
By ensuring this product is disposed of correctly, you will
help prevent potential negative consequences for the
environment and human health, which could otherwise be
caused by inappropriate waste handling of this product. For
more detailed information about recycling of this product,
please contact your local council office, your household
waste disposal service or the John Lewis branch where you
purchased the product.
Guarantee
Your John Lewis American Style Fridge Freezer is covered
by a three year parts and labour guarantee. This means that
if the American Style Fridge Freezer develops a fault during
the guarantee period we arrange a repair free of charge. Your
original receipt acts as your guarantee so please make sure
that you retain it throughout the guarantee period.
Please note that this guarantee does not cover you against
faults caused by accidental damage or misuse.
Disposal and guarantee
Page 24

Fridge freezer user guide
24
To assist in locating possible faults use the help guide below:
Troubleshooting
Problem Cause Correction
Running of fridge
Compressor does not run.
Fridge is in defrost cycle. This is normal for a fully automatic defrost
fridge. The defrost cycle occurs periodically,
lasting about 30 minutes.
The mains plug is disconnected. Ensure mains plug is tightly pushed into outlet.
House fuse blown or a tripped circuit
breaker.
Check/replace fuse with a 15 amp time-delay
fuse. Reset circuit breaker.
Power cut. Check house lights, if these are not working,
Call your local electric company.
Fridge freezer runs too often or
for too long.
The room or outside temperature is hot. It is normal for the fridge freezer to work
longer under these conditions.
Fridge freezer has recently been disconnected
for a period of time.
It takes 8-12 hours for the Fridge freezer to
get down to it operating temperature.
The doors are opened too frequently or for
too long.
Warm air entering the fridge causes it to run
for longer. Open the doors less often.
Fridge/freezer door maybe slightly open. Ensure fridge freezer is level.
Keep food and containers from blocking door.
See the problem column for opening/closing
of doors/drawers.
The fridge freezer controls are set too cold. Set fridge freezer controls to warmer setting
until fridge freezer temperature is satisfactory.
Allow 24 hours for temperature to stabilize.
Fridge / freezer door seals are dirty, worn,
cracked, or poorly fi tted.
Clean or change the door seal(s). Leaks in
door seal will cause fridge to run longer in
order to maintain desired temperatures.
Compressor goes off and on
frequently.
Electronic control system keeps the fridge at
a constant temperature.
This is normal. Fridge freezers go on and off to
keep temperature constant.
Temperatures are too cold
Freezer temperature too cold.
Fridge temperature is satisfactory.
Freezer control is set too cold. Set the freezer control to a warmer setting.
Allow 24 hours for the temperature to
stabilise.
Fridge temperature too
cold. Freezer temperature is
satisfactory.
Fridge control is set too cold. Set fridge control to a warmer setting. Allow
24 hours for the temperature to stabilise.
Food stored in the fridge drawers
freezes.
Fridge control is set too cold.
Fridge is installed in an environment where
the temperature drops below 5 ºC.
See solution above.
See installation section.
Troubleshooting
Page 25

Fridge freezer user guide
25
Troubleshooting
Temperatures are too warm
Fridge/freezer temperature is too
warm.
Doors are opened too frequently or for too
long.
Warm air enters the fridge freezer whenever
one of the doors is opened. Open the door
less often.
Door is slightly open. See problem column for the opening/closing
of doors/drawers.
Freezer temperature is too
warm. Fridge temperature is
satisfactory.
Freezer control is set too warm. Set freezer control to a colder setting. Allow
24 hours for temperature to stabilise.
Fridge temperature is too
warm. Freezer temperature is
satisfactory.
Fridge control is set too warm. Set fridge control to a colder setting. Allow 24
hours for temperature to stabilise.
Water/moisture/frost inside fridge
Moisture collects on inside of
fridge walls.
Weather is hot and humid. The rate of frost build up and internal
sweating increases.
A door is slightly open. See problem column for the opening/closing
of doors/drawers.
Door is opened too often or too long. Open door less often to allow internal
temperature to stabilise.
Water collects on bottom side of
drawer cover.
Water collects on bottom side of drawer
cover.
It is not unusual to have moisture on the
bottom side of the cover.
Moisture collects in bottom of
drawer.
Washed vegetables and fruit drain while in
the drawer.
Dry items before putting them in the drawer.
Water collecting on bottom of drawer is
normal.
Fruits and vegetables are kept past their
prime.
Routinely clean out old fruits and vegetable
especially if they begin to break down.
Water/moisture/frost outside Fridge Freezer
Moisture collects on outside of
fridge freezer or between doors.
Weather is humid. This is normal in humid weather. When
humidity is lower, the moisture should
disappear.
Door is slightly open, causing cold air from
inside fridge to meet warm air from outside.
See problem column for the opening/closing
of doors/drawers.
(continued)
Page 26

Fridge freezer user guide
26
Troubleshooting
Automatic ice maker
Ice maker is not making any Ice. Water supply is not connected to fridge. Connect water supply (see installation guide).
Household water line valve is not open. Turn on household water line valve.
Freezer is not cold enough. See problem column temperatures are too
warm.
Valve on cold water pipe is clogged or
restricted by foreign material. If valve is of the
self-piercing type, it may not have created
a suffi ciently sized hole in tube for water to
pass through.
Turn off household water line valve. Remove
valve. Ensure that valve is not a self-piercing
valve. Clean valve. Replace valve if necessary.
Check to see if water dispenser is dispensing
water.
If not, the ice and water fi lter cartridge is
clogged or restricted, and must be replaced.
Water fi lter is not completely seated. Push fi rmly until the water fi lter snaps into
place.
Ice maker is not making enough
ice.
Ice maker is producing less ice than you
expect.
Ice maker should produce approximately eight
ice cubes at a time approximately 15 times a
day.
Freezer is not cold enough. See problem column temperatures are too
warm.
Household water line valve is not completely
open.
Turn on household water line valve.
Check to see if water dispenser is dispensing
slower than normal.
If it is, replace the ice and water fi lter
cartridge.
Ice maker is not separating the
ice cubes.
Ice cubes are not being used frequently
enough.
Remove and shake ice container to separate
cubes.
Ice cubes are hollow or smaller than normal. The ice and water fi lter cartridge may be
clogged. Replace fi lter cartridge.
Ice has bad odour and taste. Ice has picked up odour or fl avour from
strong food stored in fridge or freezer.
Ice not used frequently enough.
Cover foods tightly. Discard stale ice. Ice
maker will produce fresh supply.
Discard stale ice.
Ice cubes are hollow or smaller than normal. The ice and water fi lter cartridge could be
clogged.
Replace the fi lter cartridge.
Dispensing system operates best at 2.1 bar,
6.9 bar water pressure.
The water pressure should fall within this
range.
(continued)
Page 27

Fridge freezer user guide
27
Troubleshooting
Water dispenser
Dispenser will not dispense
water.
Water supply not connected. Connect water supply (see connecting the
water supply section).
Household water line valve is not open. Open household water line valve.
Freezer door is not closed. Ensure that freezer door is closed.
Ice and water fi lter cartridge is clogged. Replace fi lter cartridge.
Ice and water fi lter cartridge is clogged. Replace fi lter cartridge.
Water fi lter not fully installed. Push fi lter fi rmly until the fi lter snaps into
place.
Water has an odd taste
and/or odour.
Water has been in the tank for a period of
time.
Draw and discard 10-12 glasses of water to
freshen the supply and completely rinse out
the tank.
Unit not properly connected to cold water
line.
Connect unit to cold water line that supplies
water to the kitchen tap.
Tubing used in the household water supply
and installation may affect water taste and
odour.
For best results, use copper tubing for water
connections.
Water has a high mineral content. Contact water treatment plant for help.
Odours in fridge
Interior is dirty. Interior needs to be cleaned.
Food with strong odours is in fridge.
See care and cleaning chart in care & cleaning.
Cover food tightly.
Opening/closing of doors/drawers
Door(s) will not close. Door was closed too hard, causing other
door to open slightly.
Close doors gently.
Fridge is not level. It rocks on the fl oor when
moved slightly.
Ensure fl oor is level and solid, and can
adequately support the fridge. Contact a
carpenter to correct a sagging or sloping fl oor.
Fridge freezer is touching a wall or cabinet. Ensure fl oor is level and solid, and can
adequately support the fridge freezer. Contact
a carpenter to correct a sagging or sloping
fl oor.
Drawers are diffi cult to move. Food is touching shelf on top of drawer. Keep less food in drawer.
Track that drawers slide on is dirty. Clean drawer, rollers, and track. See care and
cleaning chart in care and cleaning section.
(continued)
Page 28

Fridge freezer user guide
28
Troubleshooting
Lights not working
A light is not working. Light bulb / LED has failed. Call your service agent to replace the failed
bulb /LED.
Freezer light switch is stuck. Release light switch located inside freezer
compartment.
No electric current is reaching fridge freezer. See problem column for the running of fridge
freezer.
Control system has disabled lights because
one or both doors were left open too long.
Close and reopen door(s) to enable lights.
If none of the suggestions seem to work, please contact your local John Lewis branch (see inside back page for full branch listing).
Never attempt to repair the fridge freezer yourself.
Note: The fridge freezer must only be repaired by a qualifi
ed registered service person.
(continued)
Page 29

Fridge freezer user guide
29
Repairs - after sales service
Your fridge freezer comes with a free three year warranty. If
it is not working correctly; consult the troubleshooting section
within this User Guide. If a fault occurs which you can not
resolve through following the advice and information contained
within this User Guide, the next step is to contact our warranty
administrators on 0844 871 7771.
They will give you details for your local service engineer.
When you contact your local service engineer you will need to
give the following details:
• Your name, address and post code
• Your telephone number
• Clear and concise details of fault
• The purchase date as found on your receipt
• The model and serial number of the fridge freezer. So that
you always have these numbers at hand, we recommend
you make a note of them here:
Mod : .......................................
S.N : .......................................
Note: If you call out an engineer to a fault or to repair a fault
caused by incorrect use or installation, a charge will be made
even if the fridge freezer is under guarantee.
Spare parts
Cautions: Always insist on genuine spare
parts.
An authorised service engineer should service this fridge
freezer, and only genuine spare parts should be used.
Under no circumstances should you attempt to repair the
fridge freezer yourself. Repairs carried out by inexperienced
persons may cause injury or serious malfunctioning.
Contact your local John Lewis branch.
Page 30

Fridge freezer user guide
30
Specification
Specifications of the fridge freezer that you have just purchased may vary from the information in this table due to technical
innovations.
Dimensions
(including door handles)
906 mm wide x 735 mm deep x 1770 mm high
Net Weight 122 Kg (boxed), 107 Kg (product)
Net Fridge Capacity 370 litres
Net Freezer Capacity 179 litres
Ambient Operating
Temperature 10 - 43 °C
Energy Rating A+
Page 31

Page 32

John Lewis Partnership
171 Victoria Street
London SW1E 5NN
www.johnlewis.com
 Loading...