

Page 1

Internet radio
Instruction manual
Cyber Internet Radio.indd 1 1/9/11 17:20:43
Page 2

2
Internet radio
Important safety information . . . . . . 3
Your Internet radio . . . . . . . . . . . . . .4
Instructions for use . . . . . . . . . . . . . .6
Check the package contents . . . . 6
Where to put your radio . . . . . . . 6
Setting up . . . . . . . . . . . . . . . . . . . 6
Remote control . . . . . . . . . . . . . . 6
Internet radio . . . . . . . . . . . . . . . .7
Key entry . . . . . . . . . . . . . . . . . . .8
Using your internet radio . . . . . . . . .9
Switch on . . . . . . . . . . . . . . . . . . . 9
Switch off . . . . . . . . . . . . . . . . . . . 8
Changing modes . . . . . . . . . . . . . .9
Adjusting the volume . . . . . . . . . . 9
Choosing an internet radio
station . . . . . . . . . . . . . . . . . . . . .9
Podcasts . . . . . . . . . . . . . . . . . . . . 9
Storing radio station presets . . .11
Tune to a radio station preset . . 11
Help . . . . . . . . . . . . . . . . . . . . . . .11
Music player mode . . . . . . . . . . . . .12
DAB mode
. . . . . . . . . . . . . . . . . . . .13
Changing DAB stations . . . . . . . 13
Scanning for DAB stations . . . . . 13
Dynamic range control . . . . . . . . 14
Station order . . . . . . . . . . . . . . . .15
FM mode . . . . . . . . . . . . . . . . . . . . .16
Tuning to an FM station . . . . . . . 16
FM display information . . . . . . . . 16
Audio setting . . . . . . . . . . . . . . . .16
iPod mode . . . . . . . . . . . . . . . . . . . . 17
Dock your iPod/iPhone . . . . . . . 17
Playing your iPod/iPhone . . . . . .17
Aux in mode . . . . . . . . . . . . . . . . . .18
System settings . . . . . . . . . . . . . . . .19
Manually set the time and date . .19
Setting the alarm . . . . . . . . . . . . . 19
Stop the alarm . . . . . . . . . . . . . . 19
Turn off the alarm . . . . . . . . . . . .20
Sleep timer . . . . . . . . . . . . . . . . . 20
Simple solutions . . . . . . . . . . . . . . . 21
Helpdesk . . . . . . . . . . . . . . . . . . . 22
Technical information . . . . . . . . . . .23
Software update . . . . . . . . . . . . .23
Software version/Radio ID . . . . . 23
Reset your radio . . . . . . . . . . . . .23
General information . . . . . . . . . . . .24
UK guarantee . . . . . . . . . . . . . . . 24
Service . . . . . . . . . . . . . . . . . . . . . 24
Contents
Cyber Internet Radio.indd 2 1/9/11 17:20:44
Page 3

3
Thank you for purchasing this internet radio. Please read the instructions
and warnings carefully before use to ensure safe and satisfactory operation of
this product.
These warnings have been provided in the interest of safety. You MUST read
them carefully before using the appliance.
If you are unsure of the meanings of these warnings contact the John Lewis
branch from which you purchased the appliance.
This appliance is not intended
for use by persons (including
children) with reduced physical,
sensory or mental capabilities,
or lack of experience and
knowledge, unless they have
been given supervision or
instruction concerning use of
the appliance by a personal
responsible for it.
Children should be supervised to
ensure that they do not play with
the appliance.
The supply cord cannot be
replaced. If the cord is damaged
the appliance should be scrapped.
To protect against fire, electric
shock and injury to persons DO
NOT IMMERSE PRODUCT,
batteries or earphones in water
or other liquids.
Do not let the power cord
hang over the edge of a table or
counter, or touch hot surfaces.
In the event of a fault return the
appliance to your nearest John
Lewis store. No repair should
be attempted by the consumer.
Do not use the appliance for
anything other than the intended
use.
•
•
•
•
•
•
•
Do not leave it in high
temperatures as electronic
devices and plastic parts may
warp in heat.
Do not leave it in low
temperatures as moisture can
form inside the product, which
may damage the circuit board.
For household use only.
Do not use outdoors.
Save these instructions for future
reference.
WARNING Polythene bags
over the product or packaging
may be dangerous. To avoid
danger of suffocation, keep away
from babies and children.
•
•
•
•
•
•
Important safety information
Cyber Internet Radio.indd 3 1/9/11 17:20:45
Page 4
4
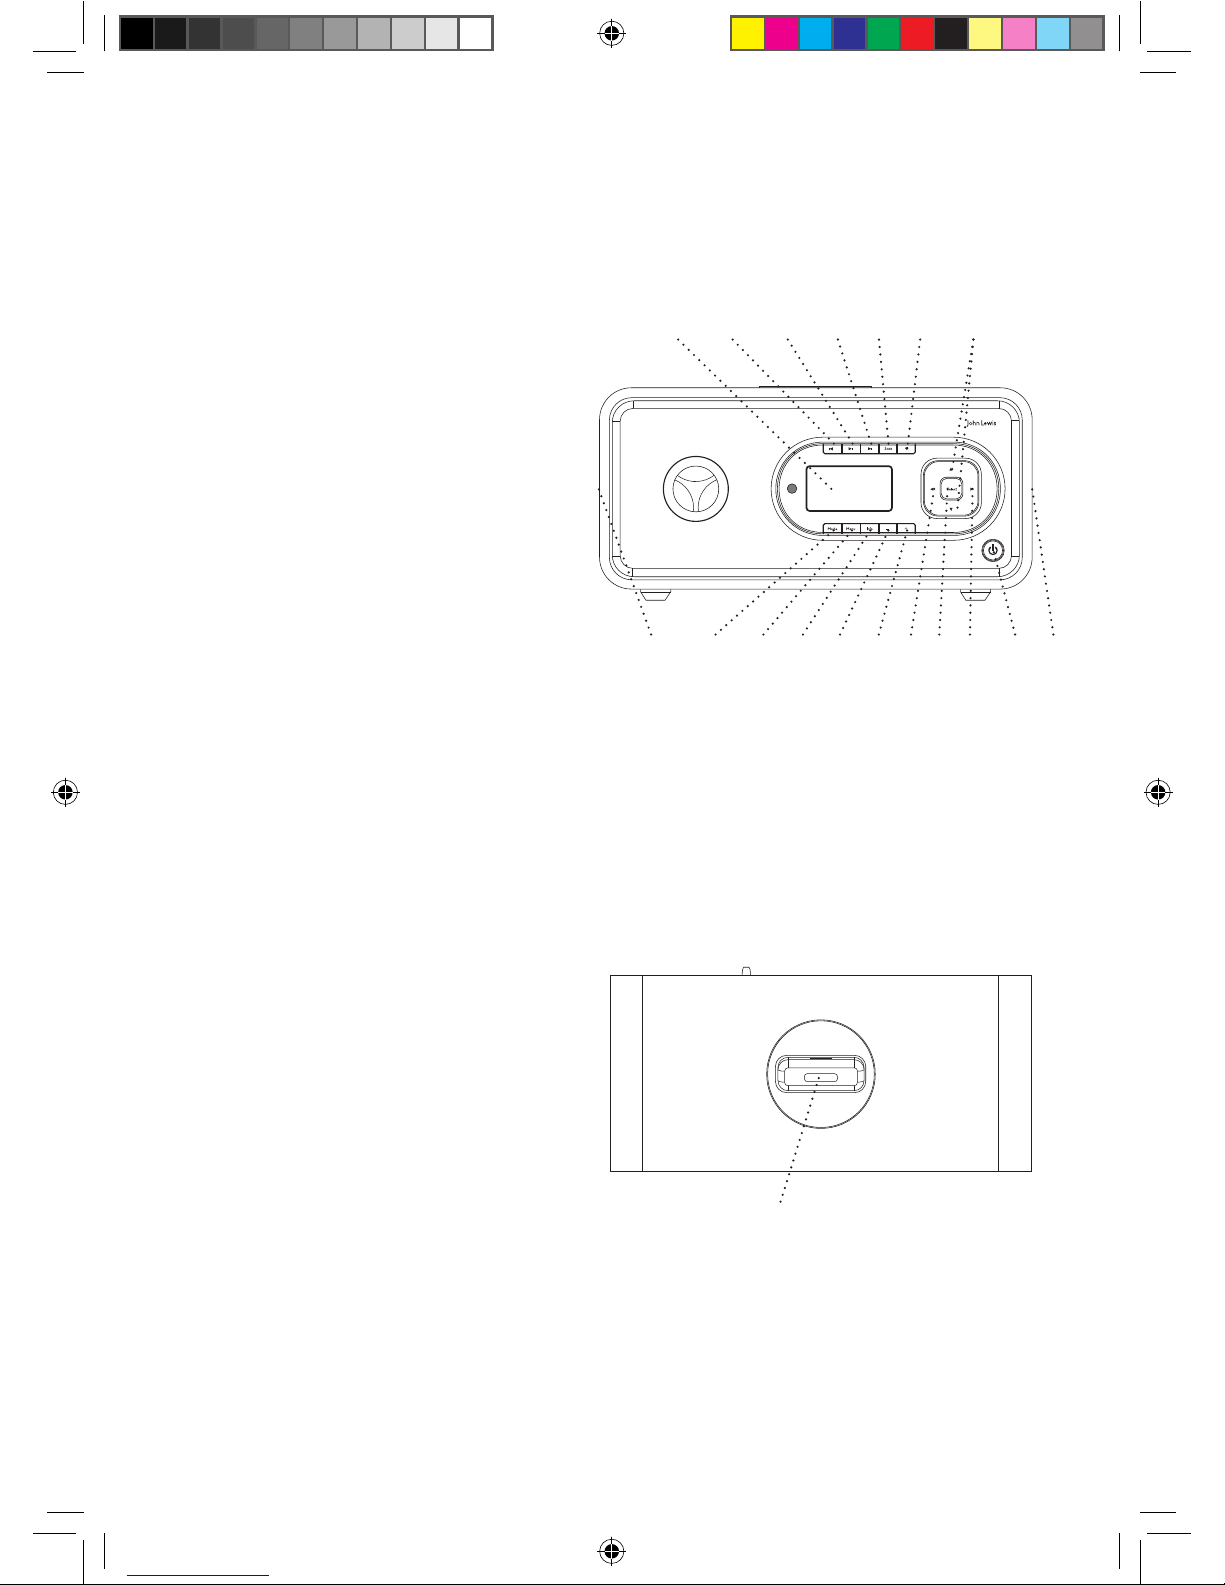
Your internet radio
Front view:
Top view:
1. Power
Press and release to power on
Press and release to power off
When the alarms sounds, press
to turn off the alarm
2. Previous track
(Music player/iPod only)
3. Next track
(Music player/iPod only)
4. Play/Pause
(Music player/iPod only)
5. Scan
(DAB/FM radio only)
6. Store/retrieve presets
(Internet/DAB/FM radio only)
7. Mode
(Internet/Music player/DAB/
FM/iPod/Aux in)
8. Menu
9. Info.
(Internet/DAB/FM radio only)
10. Volume +
11. Volume -
12. Scroll up/down display options
13. Move forward/backward
through display options
14. Select
15. Display
16. Speakers
17. iPod/iPhone dock
113 13
4 5 6
7 8 9 11 10
32 12
1416
15
17
16
Cyber Internet Radio.indd 4 1/9/11 17:20:45
Page 5
5
Your internet radio
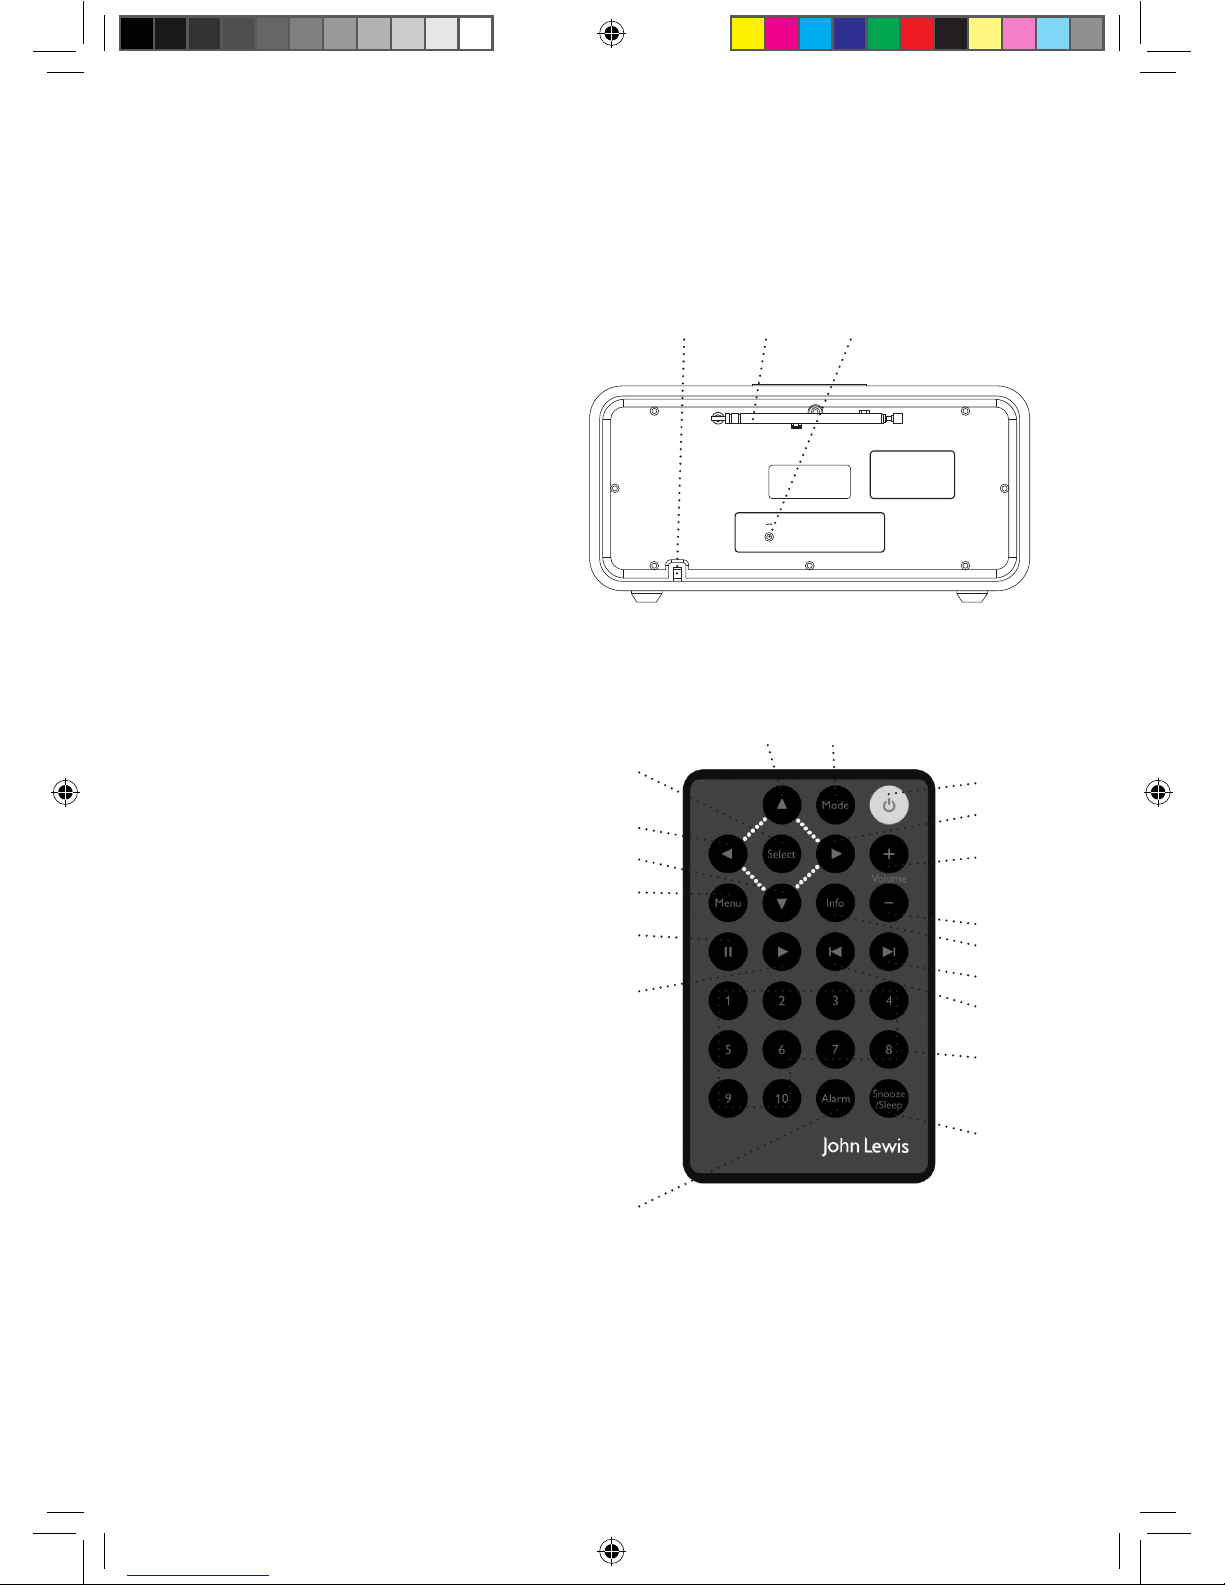
Back view:
Remote control:
Note:
Requires 1 x CR2025 battery
(Supplied and fitted)
1. Power
Press and release to
power on
Press and release to
power off
2. Mode
3. Scroll up/down display
options
4. Move forward/backward
through display options
5. Select
6. Volume up
7. Volume down
8. Menu
9. Info.
10. Pause
11. Play
12. Previous track
13. Next track
14. Preset locations
15. Alarm
16. Snooze/sleep
18. Telescopic aerial
19. Power supply socket
20. Aux in socket
19 18 20
5
4
3
8
10
11
15
1
6
4
7
9
12
13
23
14
16
Cyber Internet Radio.indd 5 1/9/11 17:20:46
Page 6

6
Instructions for use
Where to put your radio
It is important that you consider
carefully in advance where your radio
will be situated and make sure that
it is:
* on a flat and stable surface
Note: Never place your radio
on antique or polished surfaces.
* within 2 metres of a power
socket
* where you have good wireless
network reception
* where you can fully extend the
telescopic aerial
* away from bright sunlight or heat
sources, such as a radiator
* not in a humid or very damp
place such as a bathroom
Setting up
Before you can receive internet radio
stations you will need to check that
you have the following:
* A broadband internet connection
* A wireless access point (Wi-Fi)
connected to your broadband
internet, preferably via a router.
* If your wireless network
is configured to use Wired
Equivalent Privacy (WEP) or
Wi-Fi Protected Access (WPA)
data encryption then you will
need to know the WEP or WPA
code so that your radio can
communicate with your network.
* Depending on the security used
on your network you may need
to enter your Radio’s ‘MAC
address’ into your wireless
access point. To find your Radio’s
MAC address, select ‘Menu ->
Main menu -> System settings
-> Network -> View settings ->
MAC address’.
* To enter the MAC address into
your wireless access point, you
will need to read the instructions
provided with your wireless
access point and router.
* Your radio should work in
all locations where the Wi-Fi
network is available. You will also
need to know the name of your
wireless network, i.e. its SSID.
* Before you continue please make
sure that your wireless access
point is turned on and connected
to your broadband internet.
You may need to read the
instructions provided with your
wireless access point and router.
Note: If you have a wireless laptop
computer available you can use
this to check that the wireless
network is working OK before
you begin to set up your radio.
Remote control
Your remote control requires 1 x
CR2025 battery (supplied).
1. On the back of the remote, pull
the plastic isolation tab to remove it
and activate the battery.
Your remote control is now ready
for use.
Note:
Only use the recommended
battery or those of the same
equivalent type.
Batteries are to be inserted with
the correct polarity.
•
•
Cyber Internet Radio.indd 6 1/9/11 17:20:47
Page 7
7
The supply terminals are not to
be short-circuited.
Remove the battery from the
remote if it will not be used for
an extended period of time.
Do not attempt to recharge nonrechargeable batteries.
Dispose of old batteries carefully.
Never throw batteries in a fire
or attempt to open the outer
casing.
Batteries are harmful if
swallowed, so keep away from
young children.
Internet radio
1. Plug the radio power adaptor into
the mains power wall socket and
switch on. Press the button on the
front of the radio (bottom right).
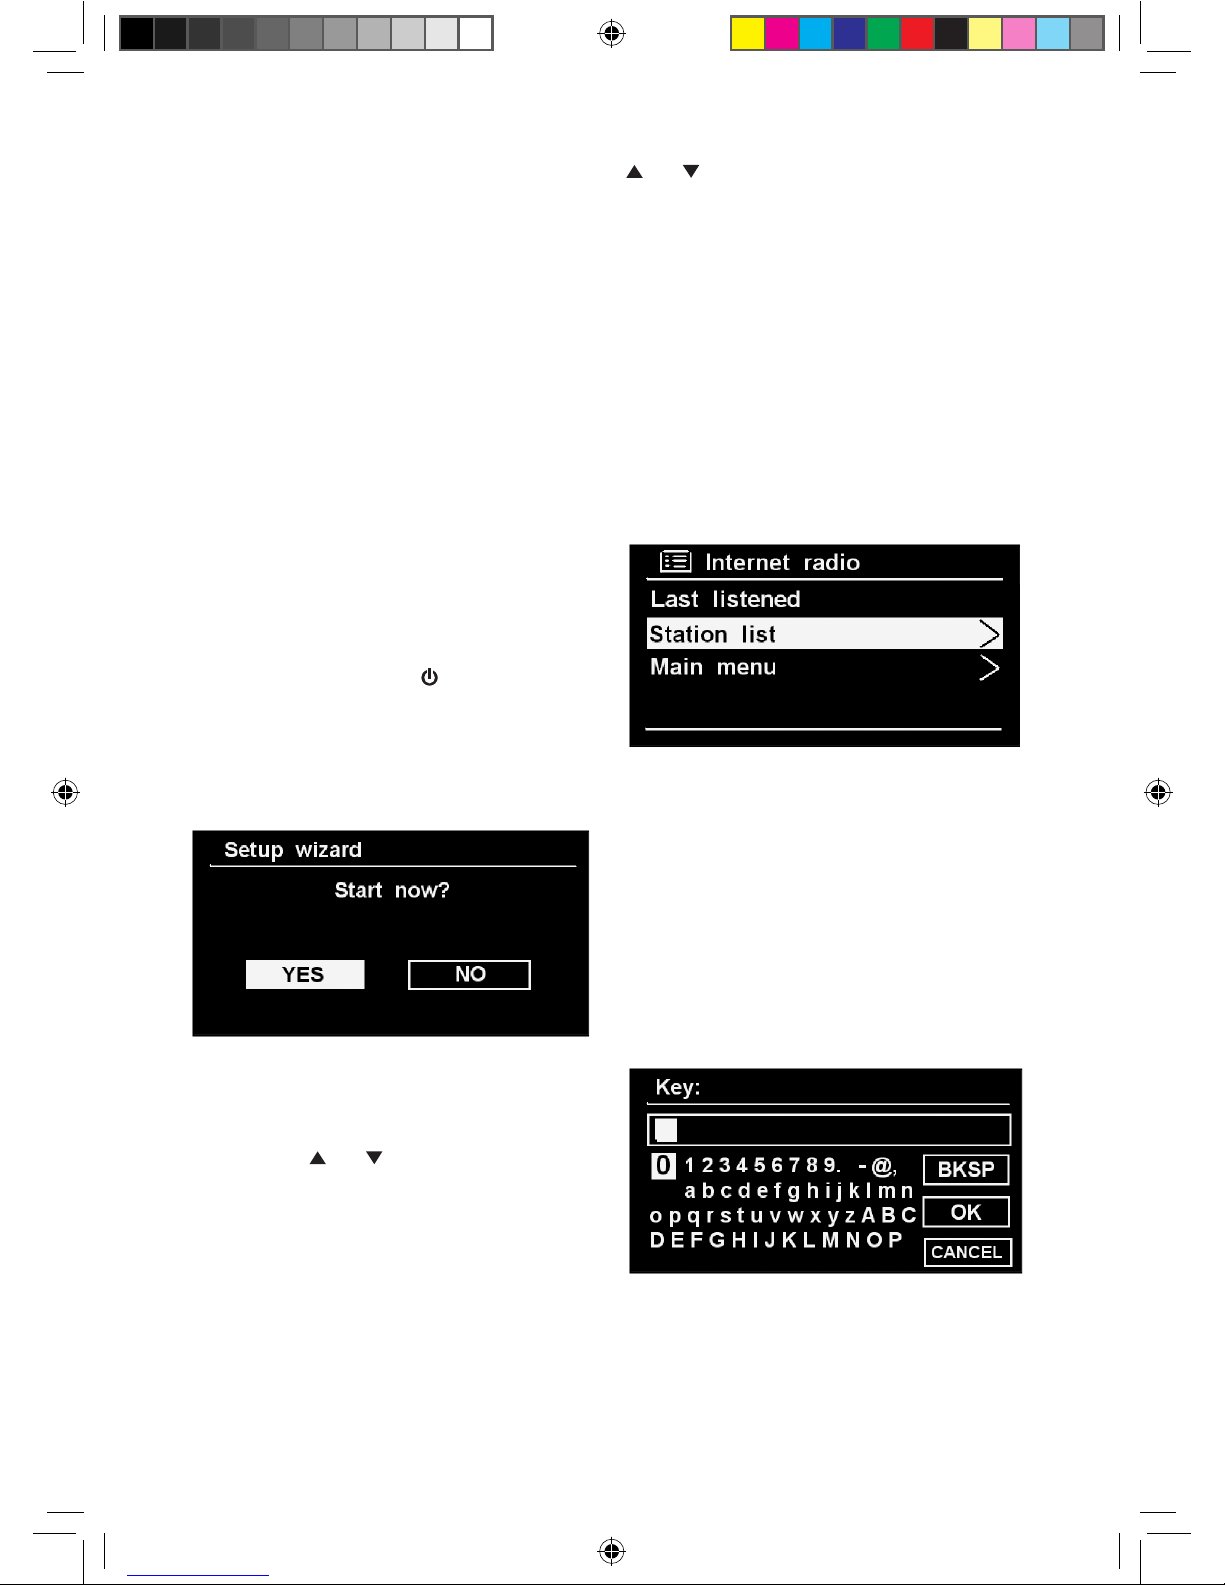
2. ‘Welcome to Digital Radio’ and
‘Starting’ will be displayed followed
by the Setup wizard screen.
3. Ensure that ‘YES’ is highlighted
and press ‘Select’ on the radio or the
remote control.
4. Use the or buttons on the
radio or on the remote control,
together with the ‘Select’ button
to set the 12/24 hour format, auto
update, timezone, daylight saving and
Wlan region. For the UK ‘Most of
europe’ is normally selected.
5. Your radio will scan for available
networks. Your radio may find more
than one network. Please use the
•
•
•
•
•
•
or buttons on the radio or
on the remote control to highlight
the network that you would like
to connect to and press ‘Select’ to
confirm.
If your network is not configured to
request a password (WEP/WPA), the
radio will connect to the network
and the following screen will be
displayed:
Note: You should only connect to
wireless access points/networks that
you own or have agreement to use.
6. If your network does have security
enabled the radio will prompt you to
enter the relevant Wired Equivalent
Privacy (WEP) or Wi-Fi Protected
Access (WPA) code or pass phrase.
WEP/WPA pass codes are case
sensitive.
Note: If you are not prompted to
enter your code, please select ‘Skip
WPA’ to go to the key entry screen.
Note: The security details must
be the same as those saved in the
wireless access point or router, which
would have been set up by the person
who installed your wireless network.
Cyber Internet Radio.indd 7 1/9/11 17:20:48
Page 8
8
Key entry
1. To enter a code or pass phrase,
use the or buttons and press
‘Select’ to confirm each character or
digit.
If you select a character or digit in
error, just select the ‘BKSP’ to delete
each one.
2. When you have selected the final
character or digit of your pass code,
select ‘OK’ to confirm.
Note: To select ‘BKSP’, ‘OK’ or
‘CANCEL’ on the right of the display,
press the button when the cursor
is highlighting the ‘0’. Press to
move down the three options and
select ‘CANCEL’ to return to the
main key entry screen.
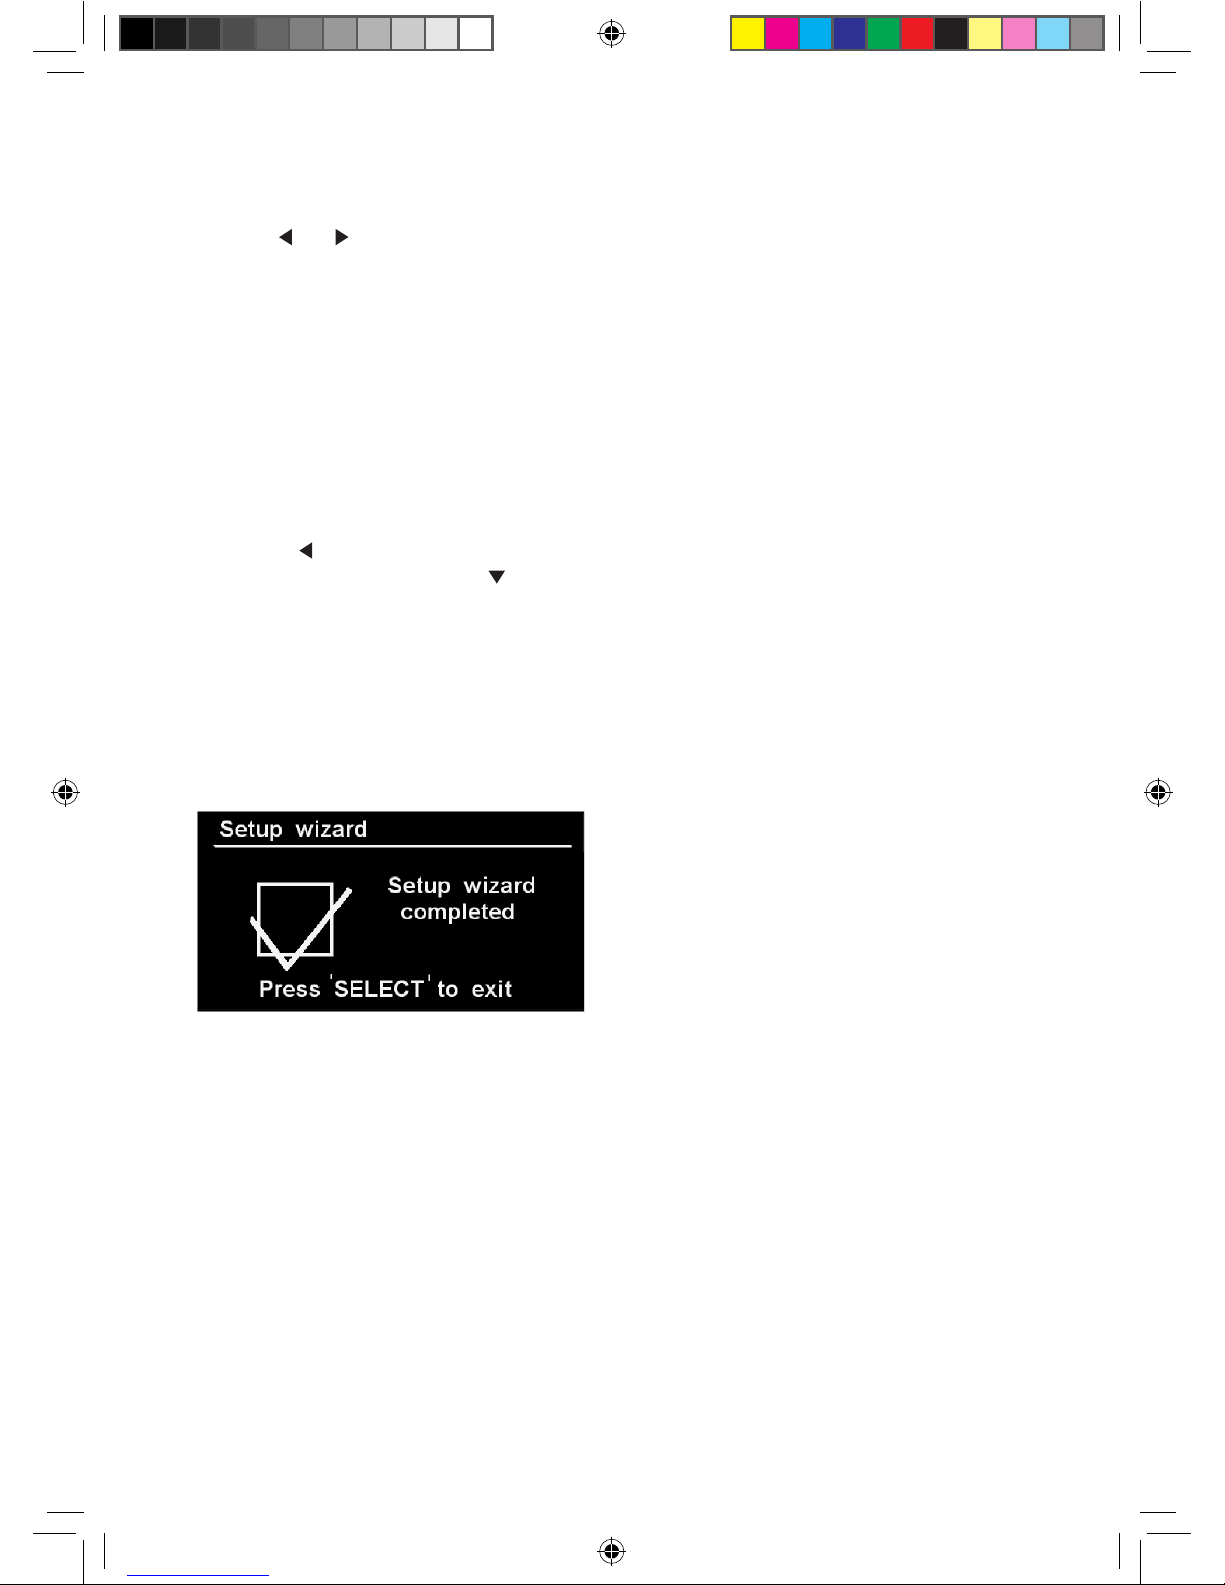
3. Your radio will now connect to
your selected network and after a
short delay the following screen will
be displayed:
4. Press ‘Select’ to exit this screen
and go to the Main menu.
Cyber Internet Radio.indd 8 1/9/11 17:20:49
Page 9

9
Switch on
Press the power switch on the
front of the radio or on the remote
control. The display will switch on
and the radio will return to the mode
it was last used in (Internet/Music
player/DAB/FM/iPod/Aux in). If
you were listening to a radio station
when you switched the radio off,
then this station will automatically be
selected and begin to play.
Note: To select another option, just
press or the ‘Menu’ button on the
radio or on the remote control and
then use the or buttons to scroll
and highlight an option, then press
‘Select’.
Switch off
Press the power switch on the
front of the radio or on the remote
control. The radio will switch off and
the current time will be displayed, if
set (see page 19).
Changing modes
Your radio has 6 modes available,
these are iPod, Internet/Music player/
DAB/FM/iPod and Aux in.
1. Press the ‘Mode’ button on the
front of the radio or on the remote
control each time you wish to change
the mode.
Adjusting the volume
1. Use the ‘+’ and ‘-’ buttons on the
front of the radio or on the remote
control to increase or decrease the
volume.
Choosing an internet radio
station
In internet radio mode:
1. Use the or buttons on the
front of the radio or on the remote
control to highlight ‘Station list’ and
press ‘Select’.
2. Continue to use the or
buttons, followed by ‘Select’ to find
the station that you would like to
listen to.
* Press the or buttons to scroll
through the different types of radio
station or individual stations listed.
* Press the ‘Select’ button to select
an option/station.
3. The radio will then connect to
the radio station. The name of the
station will be displayed as well as the
status eg: ‘Connecting. . .’, ‘Loading. .
.’ then the radio begins to play your
selected station.
Note: Not all radio stations
broadcast 24 hours a day and some
stations are not always online.
Podcasts
Some radio stations enable you
to listen to programmes or a
compilation of programmes that have
already been broadcast. These are
known as ‘On demand’ services or
‘Podcasts’.
There are two ways that you can
select to listen to a podcast.
1. When you select a radio station
that also offers podcasts, the station
will not start playing immediately and
the display will show eg:
BBC Radio 1Xtra
Podcasts
Using your internet radio
Cyber Internet Radio.indd 9 1/9/11 17:20:50
Page 10

10
2. Use the or buttons on the
front of the radio or on the remote
control to highlight ‘Podcasts’ and
press ‘Select’.
3. The names of the podcasts
available from that station will then
be displayed and you can use the
or buttons to highlight the podcast
that you would like to listen to and
press ‘Select.
4. The podcast will then either start
playing or a list of days of the week
will be displayed for you to choose
from. Use the or buttons to
select the day the programme was
broadcast and press ‘Select’.
The second way to listen to a
podcast is:
1. In internet radio mode, use the
or buttons, together with the
‘Select’ button to scroll and select
‘Station list’, followed by ‘Podcasts’.
You will now be presented with 3
options:
Location - enables you to choose
a continent and then a country from
that continent. You can then select
from a list of podcasts from within
your chosen country.
Genre - enables you to choose
podcasts stations according to their
content, eg: Bluegrass, Comedy,
Dance, Folk or Rock.
Search podcasts - enables you to
enter the name of a podcast and then
search for it. (See page 8, key entry).
2. Use the or buttons, together
with the ‘Select’ button to scroll and
select the podcast that you would
like to listen to.
Last listened
If you press the ‘Menu’ key when you
are in internet radio mode, you can
select ‘Last listened’. A list of all the
internet radio stations and podcasts
you have listened to recently will be
displayed and you can use the or
buttons, together with the ‘Select’
button to scroll through the list and
select.
My favourites and My added
stations
In internet radio mode you will also
see two further options:
My favourites - you can create a list
of your own favourite radio stations,
to appear under this option, via the
frontier silicon website http://www.
wifiradio-frontier.com
My added stations - you can add
new stations to listen to via the
frontier silicon website http://www.
wifiradio-frontier.com, which will
then appear under this option.
Before you can add stations to
the ‘My favourites’ and ‘My added
stations’ options you will need
to register on the frontier silicon
website (http://www.wifiradiofrontier.com) and enter the Access
code from your radio.
Access code
To find out your access code, which
you will need to register with the
frontier silicon website:
In internet radio mode:
1. Press the ‘Menu’ button.
2. Use the or buttons, together
with the ‘Select’ button to scroll and
select ‘Station list’, followed by ‘Help’.
Cyber Internet Radio.indd 10 1/9/11 17:20:51
Page 11

11
3. Use the or buttons to scroll
to ‘Get access code’ and press ‘Select’
to display the access code.
Storing radio station presets
Your radio can store up to 30 radio
stations (10 Internet, 10 DAB and
10 FM) in its preset memories for
instant access to your favourite
stations.
On your radio:
1. Tune your radio to the station that
you wish to preset.
2. Press the hold the ‘ ’ button on
the front of the radio until the preset
list is displayed.
3. Use the or buttons, together
with the ‘Select’ button to scroll and
select the preset location.
4. ‘Preset stored’ will be displayed.
Alternatively you can use your remote
control to store station presets:
1. Tune your radio to the station that
you wish to preset.
2. Press the hold the number of
the preset location (1-10) on your
remote control until the radio
displays ‘Preset stored’.
Tune to a radio station preset
On your radio:
1. Press the ‘Mode’ button to go
to ‘Internet’, ‘DAB or ‘FM’ mode as
appropriate.
2. Press the ‘ ’ button on the front
of the radio to open the preset list.
Use the or buttons to highlight
the stored station that you would like
to listen to.
3. Press the ‘Select’ button. Your
radio will tune to your selected
station.
On your remote control:
1. Press the ‘Mode’ button to go
to ‘Internet’, ‘DAB or ‘FM’ mode as
appropriate.
2. Briefly press the number of the
preset location (1-10) on your
remote control. Your radio will tune
to your selected station, under that
preset location.
Help
If you need help with your radio you
can browse through the Frequently
Asked Questions (FAQs), which can
be found in internet radio mode,
under ‘Help’.
1. Press the ‘Menu’ button.
2. Use the or buttons, together
with the ‘Select’ button to scroll and
select ‘Station list’, followed by ‘Help’.
3. Use the or buttons to scroll
to ‘FAQ’ and press ‘Select’. A list of
questions will now be displayed and
you can use the or buttons,
together with the ‘Select’ button to
scroll and select. You can then listen
to the answer to the question.
Alternatively you can call the
Helpline.
The helpdesk is open from 8.30am to
5.00pm, Monday to Friday (excluding
Bank Holidays) and can be contacted
on: 0845 833 1673 (local call rate).
Cyber Internet Radio.indd 11 1/9/11 17:20:53
Page 12

12
Music player mode
In order to play the audio files you
have stored on your computer via
the Music player you must first
ensure the following:
* that the audio files on your
computer are not ‘protected’
* that the audio files are stored
in the correct location on your
computer
* that your computer has the
correct type of audio files and
playlists stored on a networked
computer.
* your computer has file sharing
turned on
* the audio files can be shared on
the network
* you know the name of your
computer
Setting up your Windows
computer to allow access to
your audio files
Shared media, Universal Plug
and Play (UPnP) - If you are
running Microsoft Windows XP or
Windows Vista then you can use
Windows Media Player 11 and above.
This option does not require any
settings to be changed in your radio
but your computer will need to be
configured to allow the radio access
to the media files. You will only need
to do this once.
1. The computer must be connected
to the network that will be used to
share the media with the radio.
2. The radio must be switched on
and connected to the same network
as the computer (see page 7).
3. On the computer, once Windows
Media Player 11 or above has been
installed it will create a library from
all the media files available to it on
your computer.
4. Click on the ‘Library’ tab within
Windows Media Player 11 and select
‘Media sharing’.
5. Your radio will be listed within
Windows Media Player as an
‘Unknown device’. You will be asked
to confirm which devices to share
your media to. Click on ‘Unknown
device’ and then click ‘Allow’,
followed by ‘OK’.
6. Your computer is now ready to
stream music to your radio.
Select Music player mode
1. Press the ‘Mode’ button on the
front of the radio or on the remote
control to go to Music player mode.
2. Use the or buttons to
highlight ‘Shared media’ and press
‘Select’. Continue to use the or
buttons followed by ‘Select’ to
choose the music that you would like
to listen to.
3. You can use the following buttons
to control the music player:
Play/Pause
Press the ll button.
Next track:
Press the l button.
Previous track:
Press the l button.
4. Repeatedly press the ‘Info.’ button
to display further information such as
the Artist, Album, Playback buffer and
the current date.
5. You can use the or buttons
followed by ‘Select’ to select and play
any playlists that you have set up as
well as turn ‘Repeat play’ or ‘Shuffle
play’ on or off.
Cyber Internet Radio.indd 12 1/9/11 17:20:54
Page 13

13
DAB mode
Telescopic aerial
Please make sure that the aerial on
the back of the radio is fully extended
and adjusted before you switch
to DAB mode for the first time (a
vertical position is recommended).
This will ensure that the maximum
signal strength is available when the
radio automatically begins to scan for
DAB radio stations. Extending the
aerial also ensures the best possible
sound quality.
Select DAB mode
1. Press the ‘Mode’ button on the
front of the radio or on the remote
control to go to DAB mode.
The first time you select DAB mode
your radio will automatically begin
to scan for DAB radio stations.
‘Scanning...’ will be displayed and a
progress bar will show the progress of
the scan and the number of stations
found during the scan will also be
displayed. When the scan is complete
your radio will select the first available
station and begin to play.
Changing DAB stations
1. Use the or buttons to scroll
through the available stations and
press ‘Select’ when the station you
like to listen to is displayed. Your
radio will tune to that station.
Scanning for DAB stations
With DAB radio, additional stations
and services regularly become
available so it’s a good idea to carry
out a manual scan every now and
then to make sure that you have
the most up to date station listing
stored within the memory of your
radio. If you have moved your radio
to another location, eg: if you go on
holiday, then it’s also a good idea to
carry out a manual scan.
1. If you are not already in DAB
mode, press the ‘Mode’ button to go
to DAB mode. If you are already in
DAB mode. Press the button until
the DAB menu is displayed.
2. Use the or buttons to scroll
to ‘Scan’ and press ‘Select’. The display
will change to ‘Scanning...’. A progress
bar will show the progress of the scan
and the number of stations found
during the scan will also be displayed.
Manual tune
Using the manual tune feature, you
can select a specific digital radio
channel frequency and then manually
adjust the aerial, or the location
of the radio, to get the strongest
possible signal for that channel in
your location.
1. If you are not already in DAB
mode, press the ‘Mode’ button to go
to DAB mode. If you are already in
DAB mode. Press the button until
the DAB menu is displayed.
2. Use the or buttons to scroll
to ‘Manual tune’ and press ‘Select’.
3. Use the or buttons to scroll
through the digital radio frequencies
and press ‘Select’.
Cyber Internet Radio.indd 13 1/9/11 17:20:55
Page 14

14
A line will appear within a row of solid
rectangles to indicate the minimum
signal strength for acceptable listening.
The row of solid rectangles indicate
the actual signal strength that you are
receiving. The stronger the signal, the
further to the right the row of solid
rectangles will be.
Note: If only a line is displayed
without any solid rectangles, you are
not receiving any signal at all for that
particular digital radio channel in
your area.
4. Adjust the position of the aerial
on the radio, to obtain the maximum
signal strength. Press the button to
go back to the DAB menu.
Prune invalid
You can remove all stations from
the station list that are ‘invalid’ such
as those that are not currently
broadcasting or ‘inactive’.
1. If you are not already in DAB
mode, press the ‘Mode’ button to go
to DAB mode. If you are already in
DAB mode. Press the button until
the DAB menu is displayed.
2. Use the or buttons to scroll
to ‘Prune invalid’ and press ‘Select’.
3. Use the or buttons to scroll
to ‘YES’ and press ‘Select’.
DRC (Dynamic range
control)
The dynamic range for each radio
programme is set by the broadcaster
for each radio station and may be
different for the types of programme
broadcast, such as pop or classical
music or a chat show. The dynamic
range control signal is transmitted in
parallel with the audio signal for each
programme and with your radio you
can use this control signal to expand
or compress the dynamic range (the
difference between the loudest and
quietest sounds) of the reproduced
audio signal. Changing the dynamic
range can affect the ‘loudness’
and/or ‘quality of sound’ of the
programme that you hear so that it
will be more suited to your listening
conditions and your own personal
listening requirements. e.g. in a noisy
environment, where quiet sounds
might be swamped, setting the
compression to maximum will ‘boost’
the quiet sounds, whilst keeping the
loudest sounds at their original level.
There are 3 levels of compression:
DRC Off - no compression. This is
the default setting.
DRC Low - medium compression.
DRC High - maximum compression.
1. If you are not already in DAB
mode, press the ‘Mode’ button to go
to DAB mode. If you are already in
DAB mode. Press the button until
the DAB menu is displayed.
2. Use the or buttons to scroll
to ‘DRC’ and press ‘Select’.
3. Use the or buttons to
highlight the DRC level you require
and press ‘Select’.
Cyber Internet Radio.indd 14 1/9/11 17:20:57
Page 15

15
Station order
There are three different station
order options to choose from which
change the way that your DAB radio
stations are displayed:
Alphanumeric - the stations
are listed in numerical and then
alphabetical order. This is the default
setting.
Ensemble - the stations are listed in
frequency order.
Valid - the stations that can be
received in your area will be
reordered to the top of the DAB
station list and those that you cannot
receive will be at the bottom.
1. If you are not already in DAB
mode, press the ‘Mode’ button to go
to DAB mode. If you are already in
DAB mode. Press the button until
the DAB menu is displayed.
2. Use the or buttons to scroll
to ‘Station order’ and press ‘Select’.
3. Use the or buttons to
highlight the Station order you
require and press ‘Select’.
Cyber Internet Radio.indd 15 1/9/11 17:20:57
Page 16

16
FM mode
Telescopic aerial
Please make sure that the aerial
on the back of the radio is fully
extended and adjusted before you
attempt to tune to an FM station (a
vertical position is recommended).
This will ensure that the maximum
signal strength is available when the
radio begins to scan. Extending the
aerial also ensures the best possible
sound quality.
Select FM mode
1. Press the ‘Mode’ button on the
front of the radio or on the remote
control to go to FM mode.
When your radio is in FM mode it
can receive Radio Data System or
‘RDS’ information if this is being
transmitted by the broadcaster.
RDS information will often include
the station name, detail about the
programme and the current time.
Tuning to an FM station
1. Press and release the ‘Scan’ button
on the front of your radio. Your
radio will search for and stop at the
next available station.
2. You can manually change the
frequency in 0.05MHz steps by
pressing the or buttons on the
remote control to fine tune each
frequency.
The RDS information for each station
will be displayed, if available.
Note: If reception is still poor adjust
the position of the aerial or try
moving the radio to another location.
FM display information
When listening to an FM station you
can change the information that will
appear on the display. There are
several different types of information
that are sent by the broadcaster.
Radiotext (RT)
This is scrolling text information
supplied by the broadcaster.
Information could be the name of an
artist or music title, DJ’s name, contact
details for the radio station etc.
Program Type (PTY)
Such as ‘Rock’, ‘Pop‘, Talk’ or ‘News’
Frequency
Such as 93.30MHz
Date
Supplied by the broadcaster.
1. Repeatedly press the ‘Info’ button
on the front of the radio or on the
remote control to cycle through the
different information options.
Audio setting
The radio will automatically
switch between Stereo and Mono,
depending on the quality of the signal
being received, but you can override
this and manually set your radio to
play stations in Mono only.
1. If you are not already in FM mode,
press the ‘Mode’ button to go to FM
mode. If you are already in FM mode.
Press the button until the FM
menu is displayed.
2. Use the or buttons to scroll
to ‘Audio setting’ and press ‘Select’.
3. Use the or buttons to scroll
to ‘YES’ and press ‘Select’.
Cyber Internet Radio.indd 16 1/9/11 17:20:58
Page 17

17
iPod mode
Press the ‘Mode’ button on the front
of your radio or on the remote
control until ‘iPod’ is displayed. If
your iPod or iPhone is already
connected ‘Connecting...’ will be
displayed, followed by Docked’. The
last track you were listening to will
begin to play.
Dock your iPod/iPhone
Line up the connector on the bottom
of your iPod or iPhone with the
dock connector on the top of the
radio and push down to connect.
‘Connecting...’ followed by ‘Docked’
will be displayed.
The dock will begin to charge your
iPod / iPhone, if necessary. Charging
will stop automatically when your
iPod / iPhone is fully charged (check
your iPod /iPhone display).
Playing your iPod/iPhone
You can use the controls on your
iPod as normal when it is docked
with your radio but you can also use
the following buttons on the front of
your radio or on the remote control.
Play/Pause
Press the ll button.
Forward/Fast forward:
Press the l button.
Backward/Fast backward:
Press the l button.
Cyber Internet Radio.indd 17 1/9/11 17:20:58
Page 18

18
Aux in mode
Press the ‘Mode’ button on the front
of your radio or on the remote
control until ‘Aux in’ is displayed.
Using an Aux in connection lead (not
supplied), Aux in mode allows for
a quick and easy connection to an
external sound source. Your radio is
then transformed into a high quality
digital audio speaker system.
1. Connect one end of an Aux
in audio lead to the headphone
(or auxiliary out) socket of your
secondary device, connect the other
end to the Aux in socket on the back
of your radio.
2. To gain optimal volume levels,
adjust the output volume level on
both the secondary device and on
your radio.
Cyber Internet Radio.indd 18 1/9/11 17:20:59
Page 19

19
System settings
Manually set the time and date
The first time you listen to your radio,
the time and date of your product will
update from the network in 24 hour
clock format; which is in line with
daylight saving, but you can set the
time and date manually.
1. Press ‘Menu’ button on the front of
the radio or on the remote control.
2. Use the or buttons to scroll
to ‘Main menu’ and press ‘Select’.
3. Use the or buttons to scroll
to ‘System settings’ and press ‘Select’.
4. Use the or buttons to scroll
to ‘Time/Date’, press ‘Select’. Use
the or buttons to scroll to ‘Set
Time/Date’ and press ‘Select’.
5. Use the or buttons to change
the day, then press the button to
move to the month. Use the or
buttons, followed by button to
change the month and then the year.
Press ‘Select’ to move to the time.
6. Use the or buttons to change
the hour, then press the button to
move to the minutes. Use the or
buttons to change the minutes and
then press ‘Select’ to confirm.
Note: Within system settings and
using the or buttons together
with ‘Select’ you can also change the
Equaliser, Network, Contrast and
Language settings.
Setting the Alarm
Note: Ensure that you have set the
correct time and date (see this page)
before you set an Alarm. There are 2
alarm settings available.
1. Press ‘Menu’ button on the front of
the radio or on the remote control.
2. Use the or buttons to scroll
to ‘Main menu’ and press ‘Select’.
3. Use the or buttons to scroll
to ‘Alarms’ and press ‘Select’.
4. Use the or buttons to
highlight Alarm 1 or Alarm 2 and
press ‘Select’.
5. Use the or buttons, together
with the button to select the
frequency of the Alarm (under
Enable), Alarm time, Alarm mode
(Internet, DAB, FM, iPod or Buzzer)
and Alarm volume and then scroll to
‘Save’ and press ‘Select’ to save the
alarm settings.
The icon will be displayed to
confirm that an alarm has been set.
Stop the Alarm
1. When the alarm sounds press
the button on the front of the
radio or on the remote control.
Alternatively, you can press ‘Select’
on the radio or ‘Snooze/Sleep’ on the
remote control to Snooze.
Note: Repeatedly press ‘Select’
on the radio or ‘Snooze/Sleep’ on
the remote control to change the
duration of the Snooze time. 5/10/15
and 30 minute options are available.
Cyber Internet Radio.indd 19 1/9/11 17:21:01
Page 20

20
Turn off the Alarm
Follow steps 1 to 5 within ‘Setting
the Alarm’ and select ‘Off’ within
‘Enable’. Remember to scroll to
‘Save’ and press ‘Select’ to save your
new settings.
Sleep timer
You can set your radio to turn off
automatically using the sleep timer.
You can choose from 15, 30, 45 and
60 minutes.
On the radio:
1. Press the ‘Menu’ button and then
use the or buttons to scroll to
‘Main menu’ and press ‘Select’.
2. Use the or buttons to scroll
to ‘Sleep’ and press ‘Select’.
3. Use the or buttons to scroll
through the available sleep timer
options and press ‘Select’.
On the remote control:
1. Repeatedly press the ‘Snooze/Sleep’
button to move through the available
sleep timer options. Stop pressing the
‘Snooze/Sleep’ button when the sleep
time you require is displayed.
Cyber Internet Radio.indd 20 1/9/11 17:21:01
Page 21

21
If you are experiencing problems
with your radio, there are some
quick and easy checks that you
can do, which may help to solve
the problem.
Unable to connect to the wireless
network
- Some access points may be set
up so that only registered MAC
addresses can connect to them. The
person who set up your network
will be able to advise if you need to
enter the MAC address of your radio
to the list of allowed devices in your
access point. See page 6 for how to
find the MAC address of your radio.
You will need to refer to your access
point guide to find out how to add
the radio’s MAC address into the list
of allowed devices.
- If you have an encrypted network,
check that you have entered the
correct key or passphrase into the
radio. Remember that you must
enter the key or passphrase exactly
as it appears in your access point.
You can connect to the network
but cannot play some internet
radio stations
- The station may not be broadcasting
at the time of day that you have tried
to listen to it. (Depending on the
particular radio station if may be in a
different time zone)
- The station may have too many
people trying to connect to its servers
and their server capacity may not be
enough to enable everyone to connect.
- The station is not broadcasting
anymore
- The internet connection between
the server (often located in another
country) and you is slow. Some
Internet Service Providers may fail to
provide service is some geographical
areas. You could use a computer to
check if the internet radio station can
be received.
-If the radio station connection is
intermittent or keeps stopping.
Check your broadband connection
and speed. If you are experiencing
an intermittent service or high
error rate on your broadband
connection your radio will not be
able to continuously connect and
play in internet radio mode. If you
are experiencing problems with your
broadband connection, you will need
to contact your broadband provider
Radio reception is poor
- Please check that the aerial is FULLY
extended for the maximum signal
strength and improved reception.
- Try moving your radio to an
alternative location to see if
the reception improves. Please
remember to scan for DAB
stations again once you have moved
your radio. See page 13.
- Check that you do not have other
electrical equipment too close to
your radio, causing interference.
- Visit www.digitalradionow.com for
information about DAB reception in
your area.
Simple solutions
Cyber Internet Radio.indd 21 1/9/11 17:21:02
Page 22

22
No sound
- Adjust the volume using the ‘+’ and
‘-’ buttons on the front of the radio
or on the remote control.
- Check that the mains power lead
is connected at the back of the radio
and the mains power wall socket is
switched on.
- You may need to re-scan if the
station you last listened to is no
longer available. See page 13.
The function buttons do not
respond
- Check that the power lead is
plugged into the back of the radio
and that the mains adaptor is plugged
in and switched on. Press and release
the ‘ button’ on the front of the
radio or on the remote control.
- Turn off the radio and unplug the
mains power. Leave for one minute
and then reconnect your radio.
- Try a reset to factory defaults. See
page 23.
iPod/iPhone does not play
- Check that the power lead is
plugged into the back of the radio
and that the mains adaptor is plugged
in and switched on. Press and release
the button on the front of the
radio or on the remote control.
- Check that you are in iPod mode.
Press the ‘Mode’ button on the
front of the radio or on the remote
control until ‘iPod’ is displayed.
- Check that the iPod is docked with
the radio. Line up the connector on
the bottom of your iPod/iPhone with
the iPod dock on the top of the radio
and push down to connect.
If you are experiencing any
difficulty after making the above
checks please call the helpdesk for
further assistance.
Helpdesk
The helpdesk is open from 8.30am to
5.00pm, Monday to Friday (excluding
Bank Holidays) and can be contacted
on 0845 833 1673 (local rate call
charge applies).
Cyber Internet Radio.indd 22 1/9/11 17:21:02
Page 23

23
Technical information
Technical specification
Power requirement:
100-240V/50-60Hz
DAB frequency range:
Band III, 174 MHz - 240 MHz
FM frequency range:
87.5 MHz to 108 MHz
Presets:
10 Internet / 10 DAB / 10 FM
Output power:
2 x 10W RMS
This product has been designed
specifically to work with iPod /
iPhone and has been certified by the
developer to meet Apple
performance standards.
Software update
From time to time software upgrades
may become available. If your radio
detects that new software is available
it will prompt you to download the
new software, which is then installed
automatically. Your radio station
presets and settings will not be
affected.
Note: Do not unplug the mains
power or switch your radio off whilst
the software is being updated as this
may permanently damage your radio.
1. Press ‘Menu’
2. Use the or buttons to scroll
to ‘Main menu’ and press ‘Select’.
3. Use the or buttons to scroll
to ‘System settings’ and press ‘Select’.
4. Use the or buttons to scroll
to ‘Software update’, press ‘Select’.
5. Use the or buttons to scroll
to ‘YES’ and press ‘Select’. Your radio
will now regularly check for software
updates.
Software version/Radio ID
If you call the helpdesk they may ask
you for the software or Radio ID of
your radio.
1. Press ‘Menu’
2. Use the or buttons to scroll
to ‘Main menu’ and press ‘Select’.
3. Use the or buttons to scroll
to ‘System settings’ and press ‘Select’.
4. Use the or buttons to scroll
to ‘Info.’, press ‘Select’. The current
software version and Radio ID will be
displayed.
Reset your radio
You can reset your radio and restore
all of the original factory settings.
Note: If you reset your radio all
of your radio station presets and
settings will be deleted.
1. Press ‘Menu’
2. Use the or buttons to scroll
to ‘Main menu’ and press ‘Select’.
3. Use the or buttons to scroll
to ‘System settings’ and press ‘Select’.
4. Use the or buttons to scroll
to ‘Factory reset.’, press ‘Select’.
5. Use the or buttons to scroll
to ‘YES’ and press ‘Select’ to confirm.
Your radio will now reset.
Cyber Internet Radio.indd 23 1/9/11 17:21:04
Page 24

24
UK guarantee
For 2 years in respect of defects
found to be due to faulty
workmanship or material.
Proof of purchase is required for
validity of the guarantee. This
guarantee is no longer valid if
the damage has been caused by
accidental damage, alteration or
repair by any unauthorised persons
or poor maintenance.
This guarantee in no way affects your
statutory rights.
Service
This product should only be repaired
or serviced by an authorised Service
Engineer and only genuine approved
spare parts should be used.
General information
Cyber Internet Radio.indd 24 1/9/11 17:21:05
Page 25

25
This symbol indicates that this
product should not be treated as
normal household waste and it
should be recycled. John Lewis do
not operate instore take back, but
as members of the Distributor
Take Back scheme have funded
the development and upgrade of
recycling facilities across the UK.
Please take it to your nearest
collection facility or for further
details contact your local council or
visit www.recycle-more.co.uk
Batteries contain substances that
may be harmful to the environment
and human health. Keep out of the
reach of children and seek immediate
medical help if swallowed.
This symbol indicates that
batteries should not be disposed of
in the normal household waste but
taken to appropriate local recycling
facilities, where and when these are
available.
Never throw batteries in a fire or
attempt to open outer casing
Cyber Internet Radio.indd 25 1/9/11 17:21:05
Page 26

Cyber Internet Radio.indd 26 1/9/11 17:21:05
Page 27

Cyber Internet Radio.indd 27 1/9/11 17:21:05
Page 28

John Lewis Partnership
171 Victoria Street
London
SW1E 5NN
www.johnlewis.com
Aug11/Issue: 1
Retain this information for future reference
Cyber Internet Radio.indd 28 1/9/11 17:21:05
 Loading...