

Page 1
Group 1-2-3 car seat
Instruction Manual
INSTRUCTIONS: RETAIN FOR FUTURE REFERENCE.
PLEASE READ CAREFULLY.
Page 2

Thank you for purchasing this John Lewis group 1-2-3 booster seat. Please read the instructions
and warnings carefully before use to ensure safe and satisfactory operation of
this product.
Your child’s safety is your responsibility. If you have a query with this product or require
replacement parts, please contact your nearest John Lewis department store.
Do not discard any packaging until you are sure that you have all the parts.
Keep children clear during assembly as pack may contain small parts which may present a
choking hazard. Dispose of plastic bags immediately - do not allow children to play with them.
2
Page 3
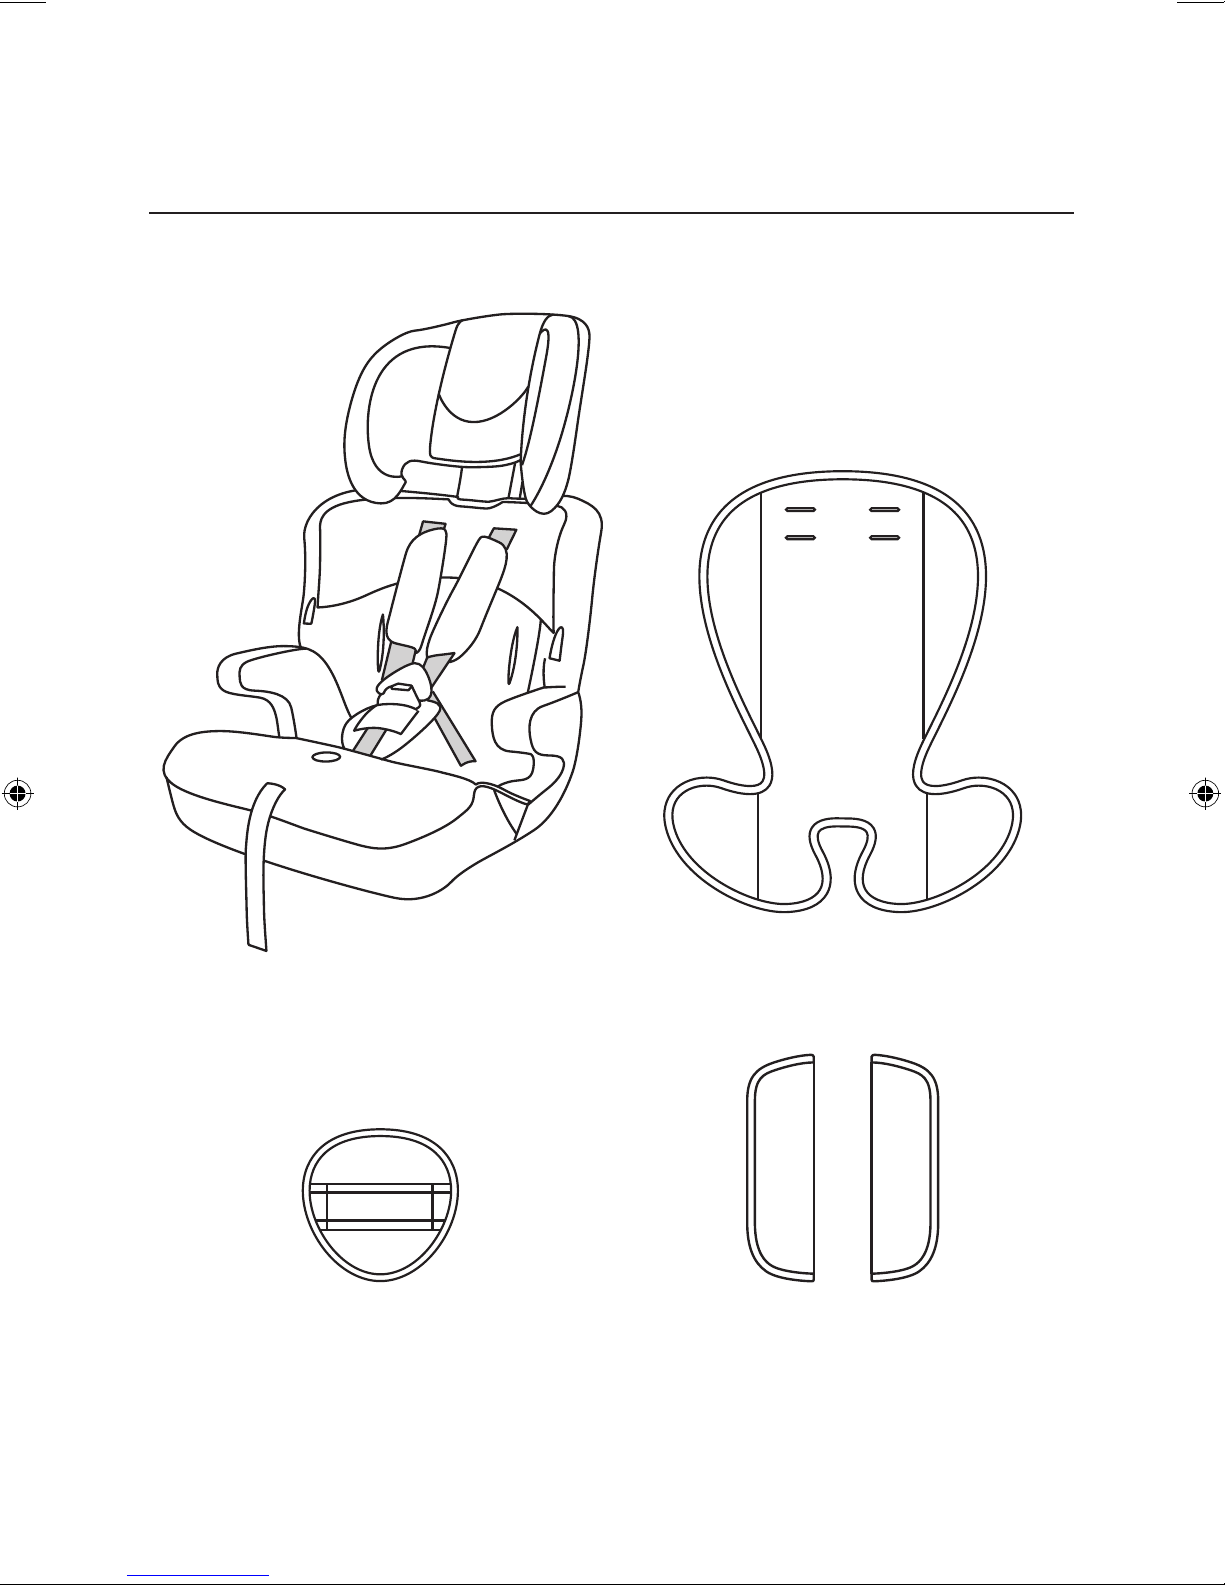
Parts
Seat Unit
Crotch Pad
Note: Some parts may already be assembled as part of the seat unit.
Seat Liner
Harness Pads
3
Page 4
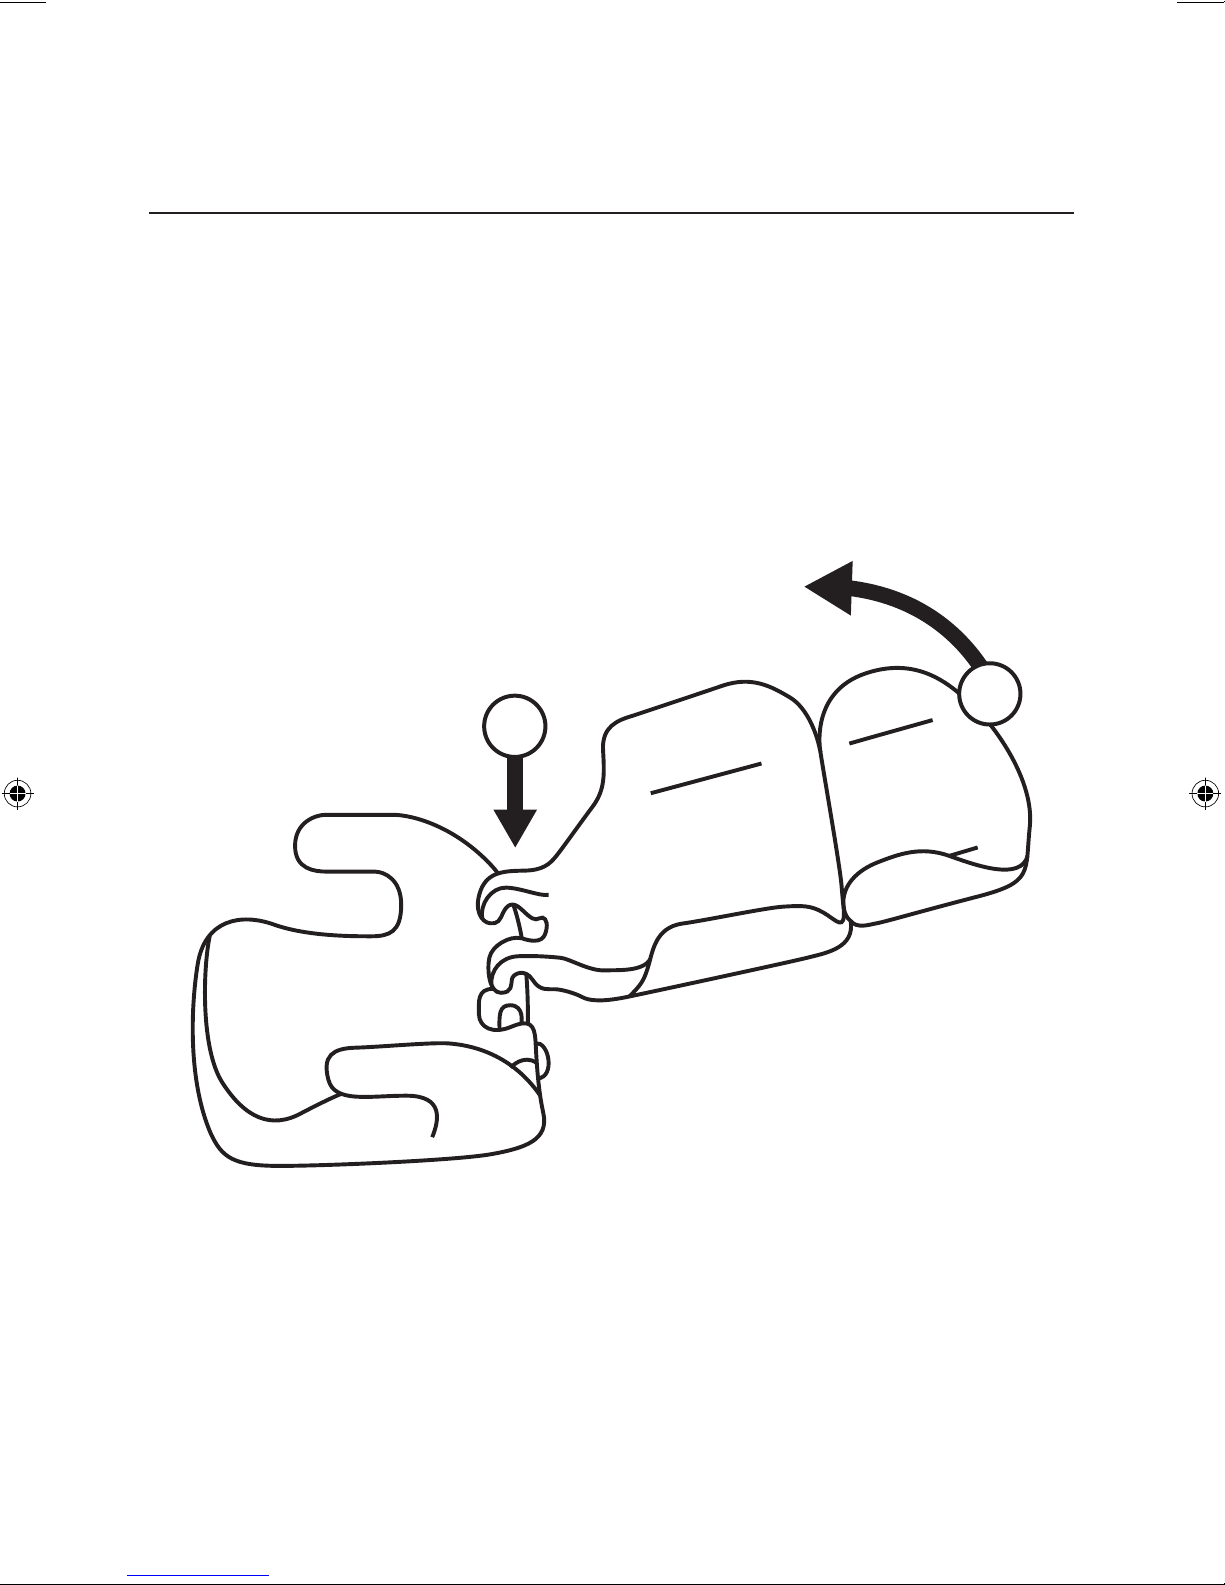
Assembly
Fitting the seat back
1. Lower the hooks at the base of the seat back onto the base.
2. Raise the seat back to secure it in place.
1
2
4
Page 5
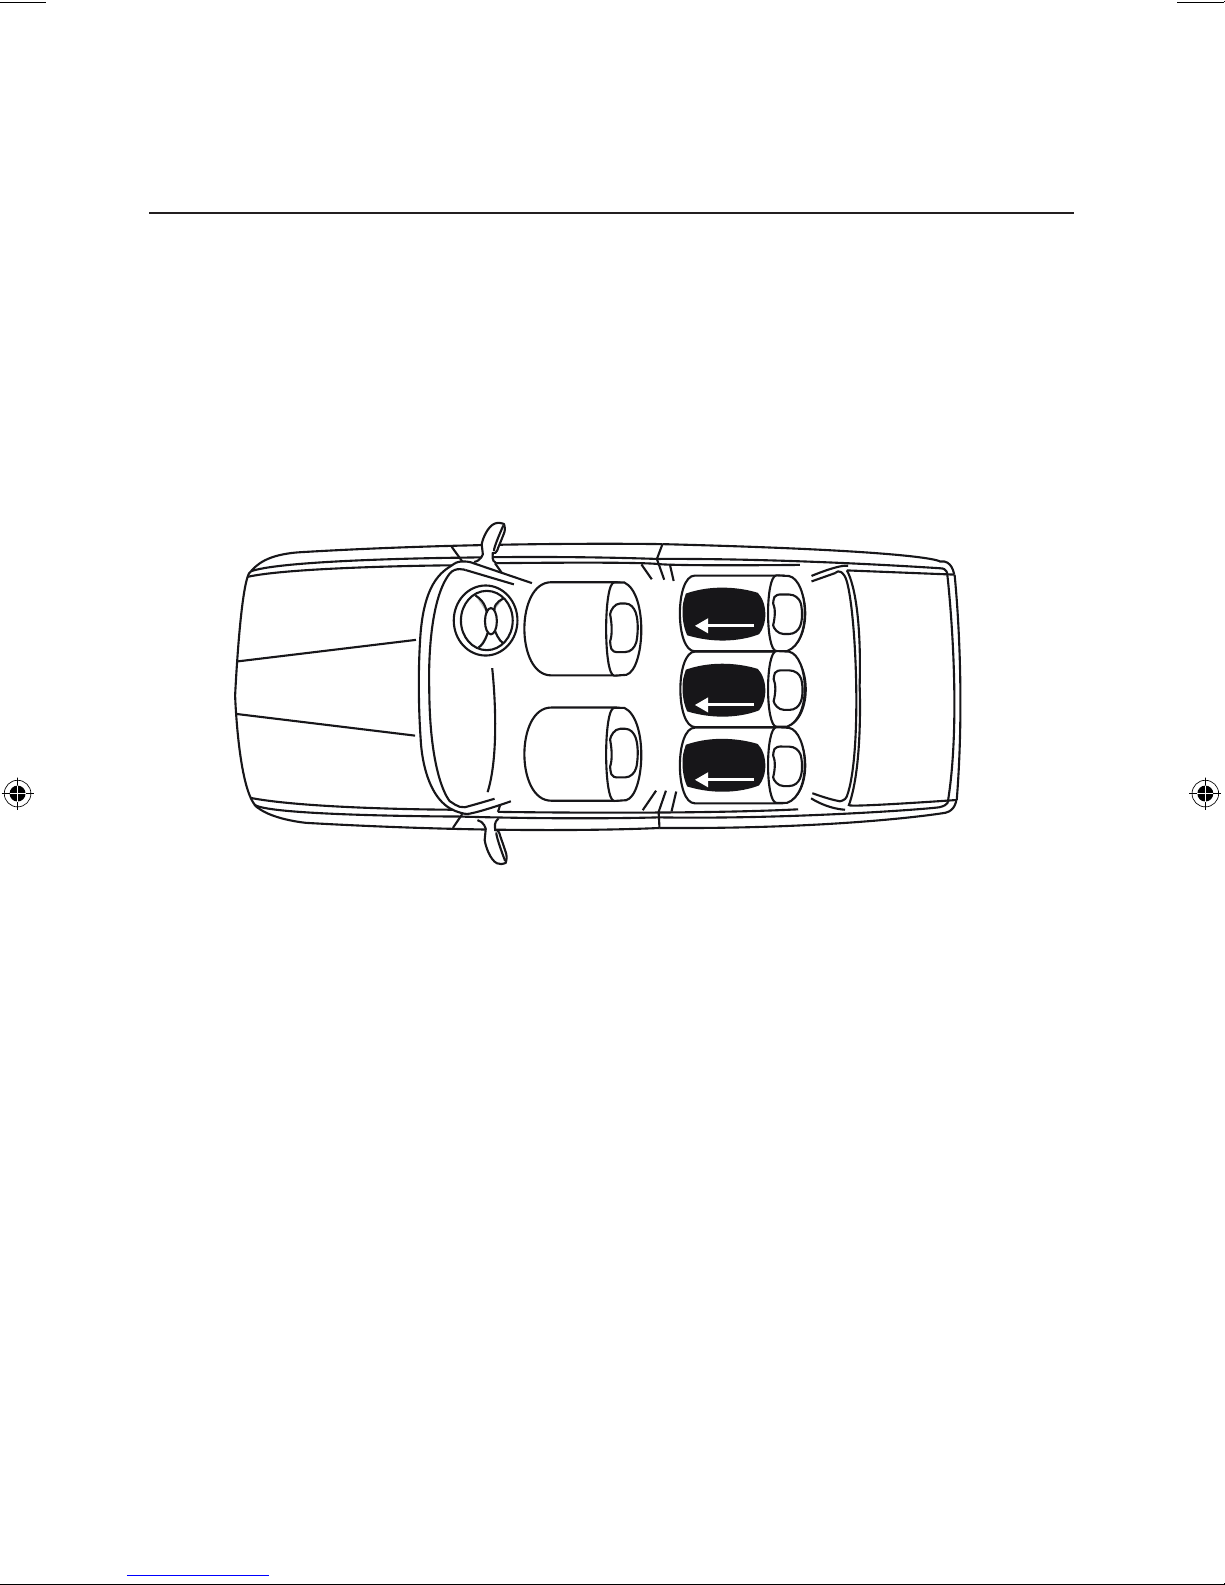
In Use
Group 1: 9-18 kg
This mode is recommended for children who weigh between 9kg (approximately 1 year) and
18kg.
The booster is fixed, facing forwards, to the seat in the vehicle using the 3-point seat belt. The
child is secured in the booster using the 5-point harness.
The booster should not be secured using a lap belt.
OK
OK
OK
The seat should only be used in the rear of the vehicle, facing forwards as shown above, and
only where a 3-point safety belt is present.
5
Page 6
In Use
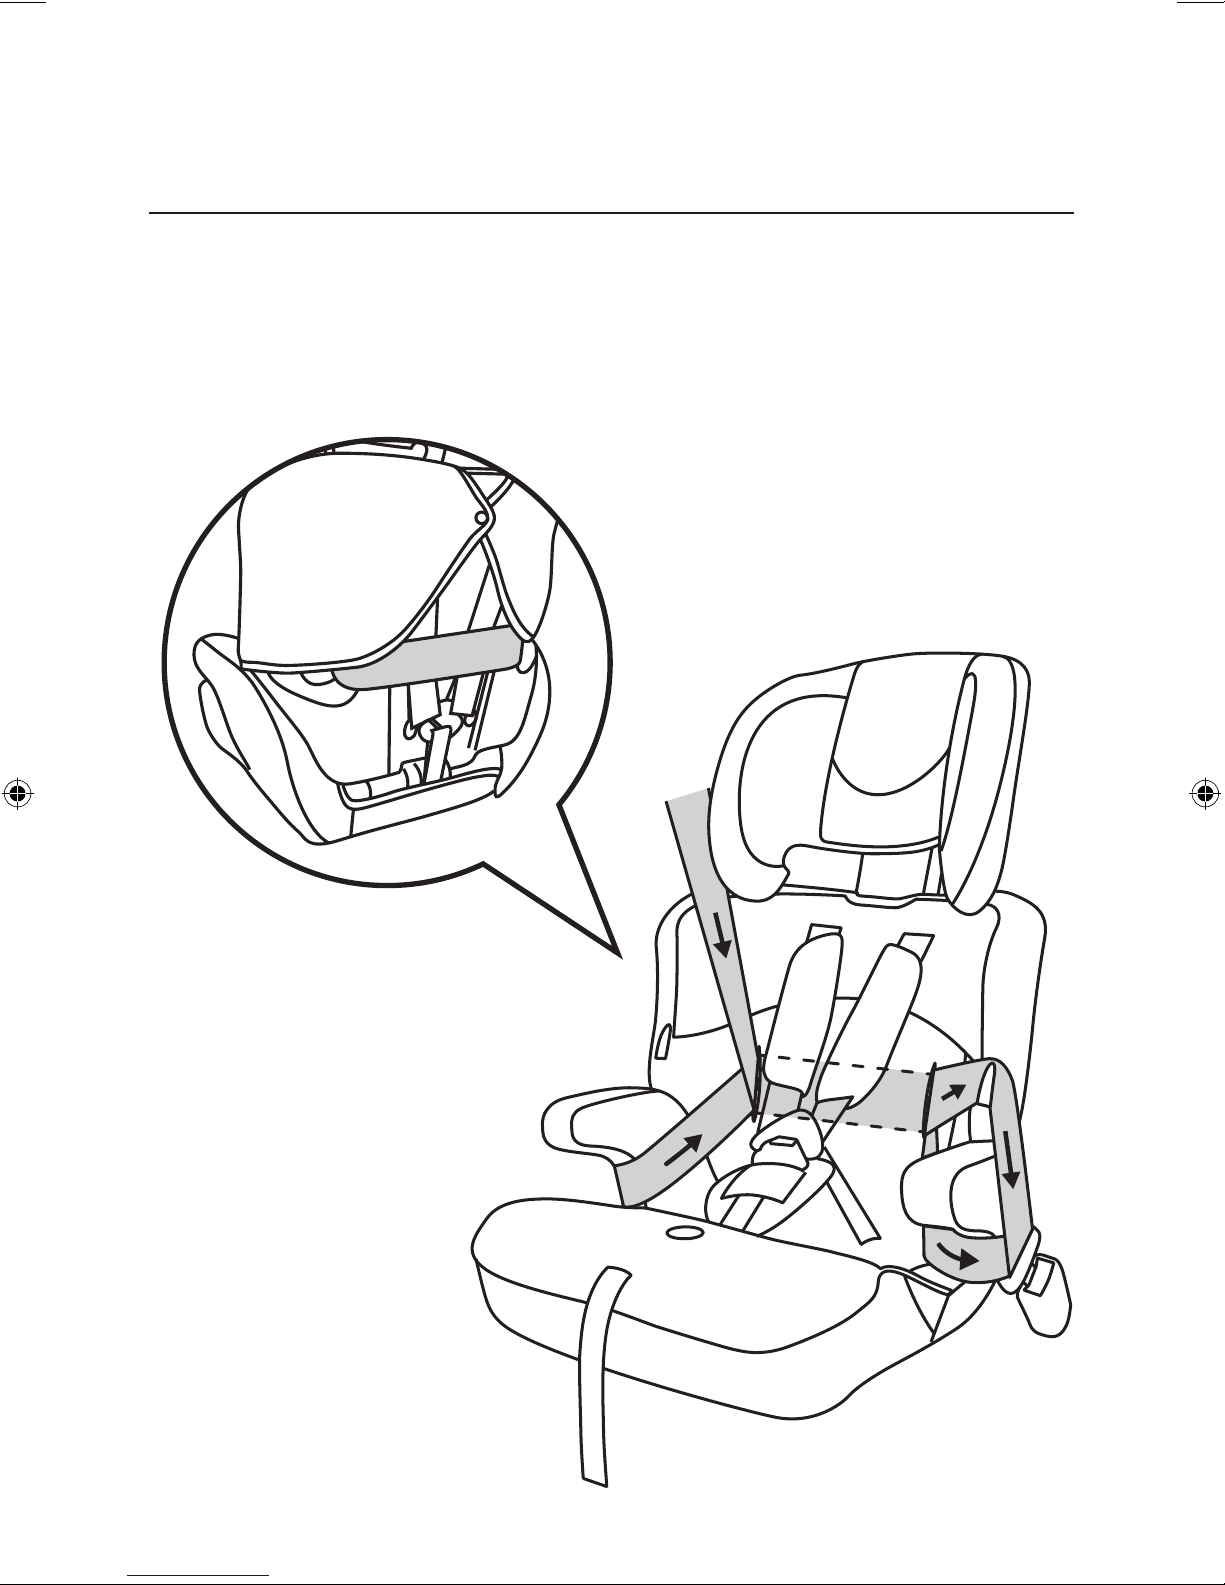
Seatbelt Routing
Route the vehicle’s seatbelt as shown below, taking care to ensure the belt is routed around
the rear of the seat and through the guides correctly.
Pull on the seatbelt after securing to ensure there is no slack in the belt.
6
Page 7
In Use
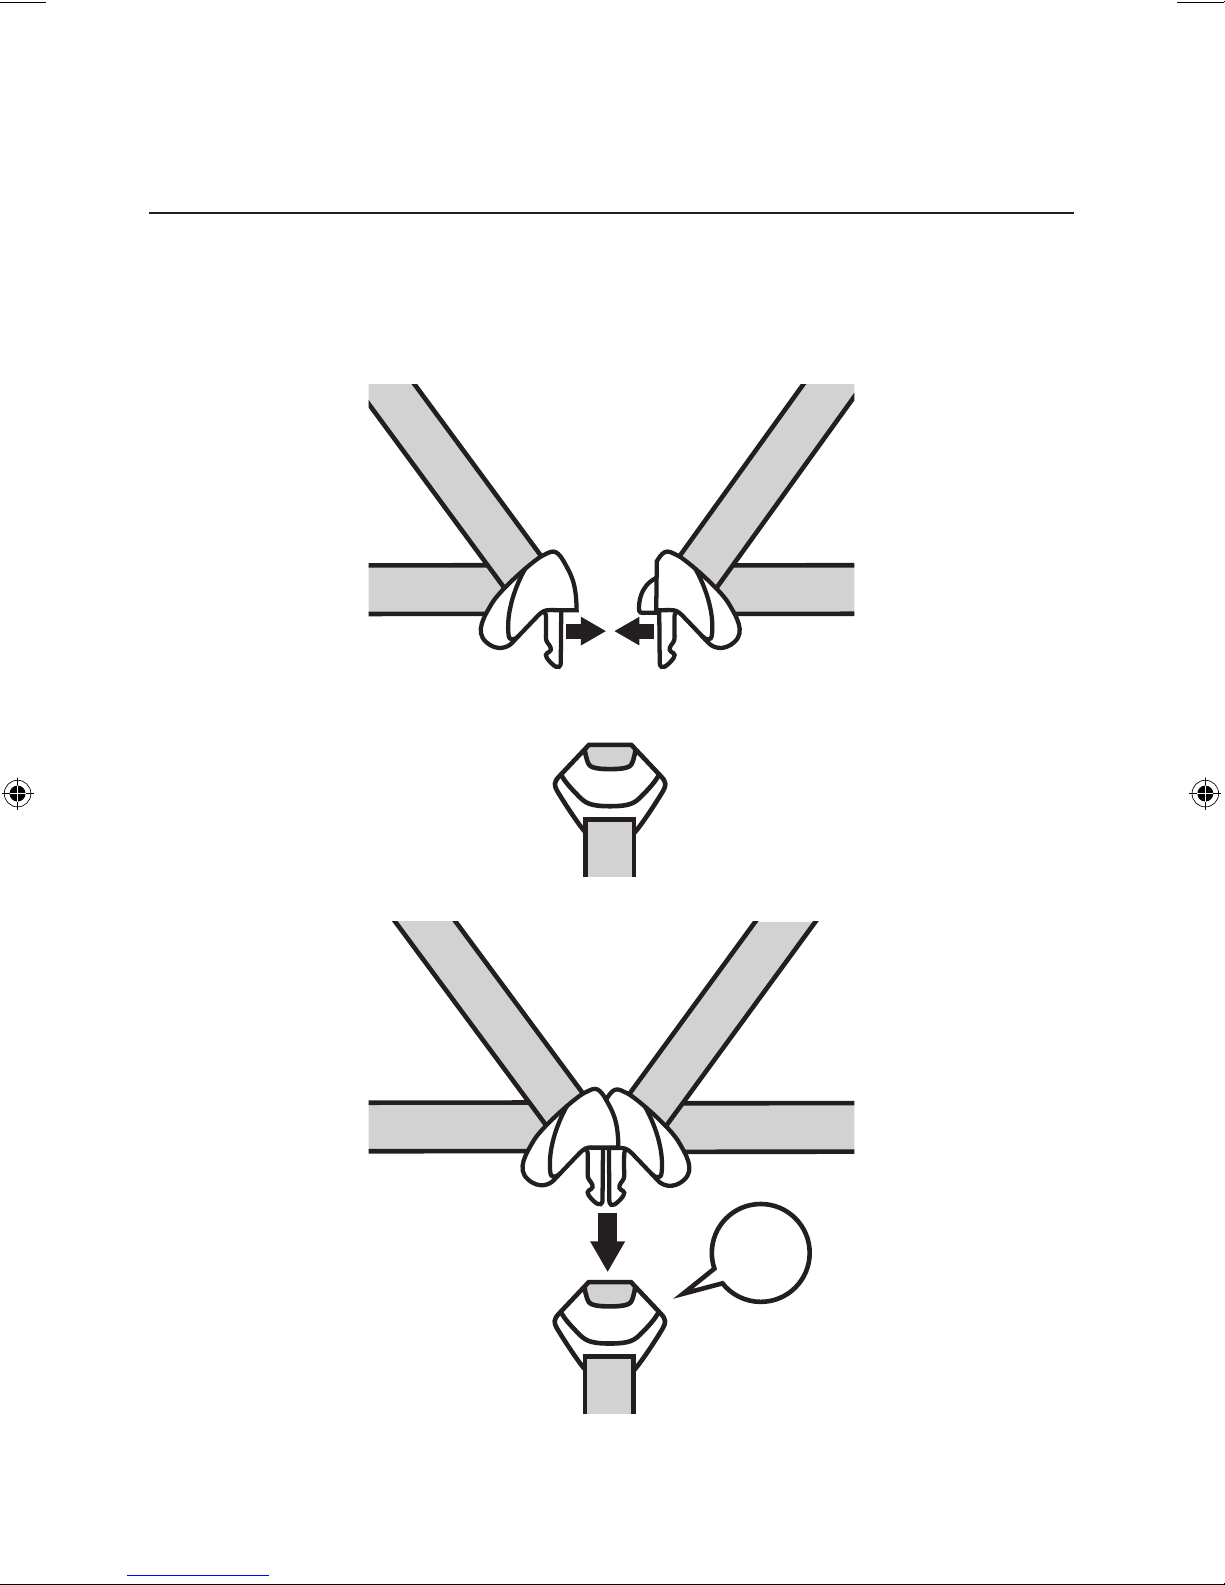
Click
Securing Your Child
Bring the harness clips together, and insert into the buckle together. An audible click will confirm correct attachment. Push the red button firmly to release.
Click
7
Page 8
In Use
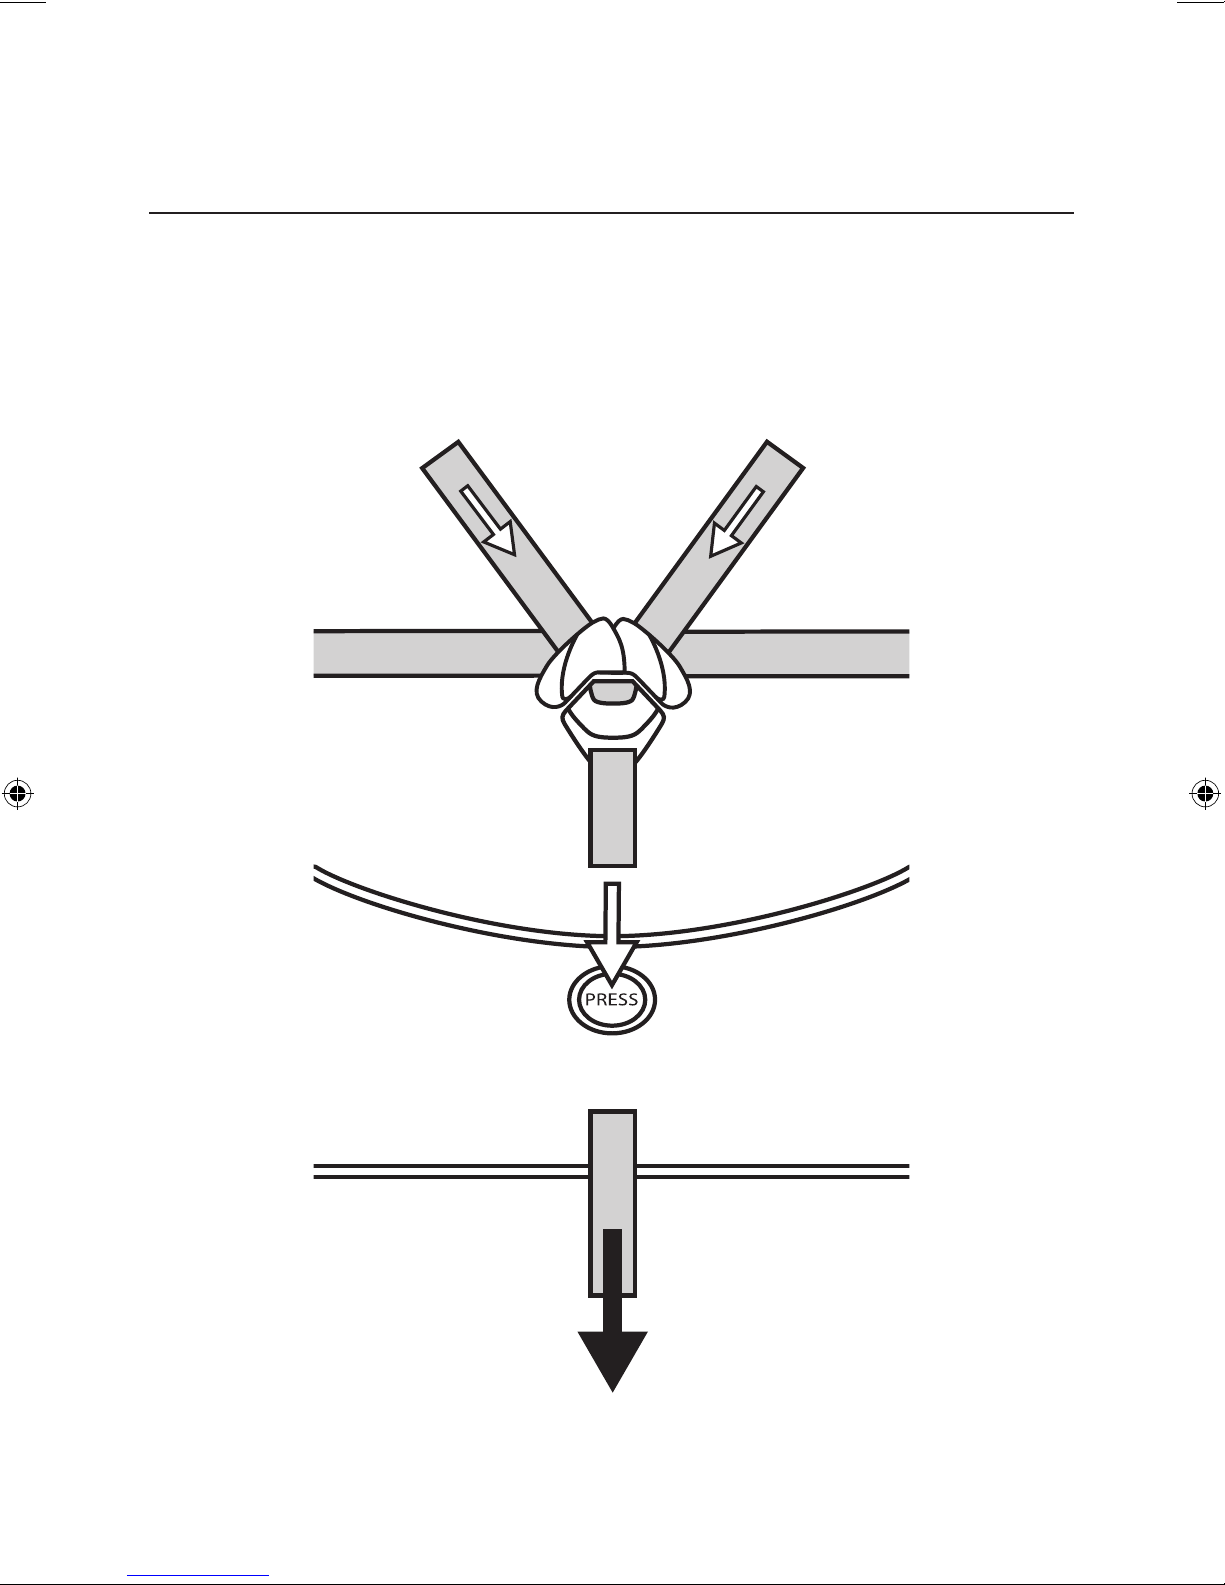
Adjusting the Harness
To tighten the harness, pull the belt at the base of the harness as indicated by the black arrow.
To loosen the harness, press the button marked ‘press’ firmly, and pull gently on the harness
straps as indicated by the white arrows.
8
Page 9

In Use
Adjusting the Harness
It is important that the shoulder straps sit no more than an inch above the shoulders of your
child, and not too low or too high.
It may be necessary to change the height of the shoulder straps. In order to do this, the straps
can be disconnected at the rear of the seat as shown below.
9
Page 10

In Use
Adjusting the Harness
Thread the harness strap through the appropriate hole in the seat back for your child.
10
Page 11

In Use
Adjusting the Harness
It is important that the shoulder straps sit no more than an inch above the shoulders of your
child, and not too low or too high.
11
Page 12

In Use
Group 2: 15-25 kg
This mode is recommended for children who weigh between 15kg and 25kg.
The booster is fixed, facing forwards, to the seat in the vehicle with the child using the 3-point
seat belt.
The booster should not be secured using a lap belt.
OK
OK
OK
The seat should only be used in the rear of the vehicle, facing forwards as shown above, and
only where a 3-point safety belt is present.
We recommend that you do not use the removable liner after the age of 18 months.
12
Page 13

In Use
Removing the Harness
It is necessary to remove the harness when using the seat in group 2 mode.
To do so, firstly remove the straps from the connector on the rear of the seat. Store the con-
nector. Thread the shoulder straps through the back of the seat.
13
Page 14

In Use
Removing the Harness
On the underside of the seat, locate the three point at which the harness threads through the
base of the seat. Turn them to the side and push them through the base in order to remove
the harness from the seat.
14
Page 15

In Use
Securing Your Child
Place the seat in the vehicle and adjust the headrest accordingly. Secure your child into the
seat using the vehicle’s 3-point seat belt, ensuring that the belt passes through the guide in the
headrest, and underneath the guide in the base, as shown below. Ensure there is no slack in
the belt by gently pulling it tight.
15
Page 16

In Use
Incorrect Fitment
It is important that your child is correctly fitted in their seat. Take care to ensure none of the
below situations occur when securing your child.
In some cases, the strap attached to the seat belt buckle can be too long and ride too high
under the armrest, preventing the car seat from being fixed firmly. If this happens, choose
another location in the car. If you have any questions relating to this issue, you should contact
the manufacturer.
16
Page 17

In Use
Group 3: 22-36 kg
This mode is recommended for children who weigh between 22kg and 36kg.
The booster is fixed, facing forwards, to the seat in the vehicle with the child using the 3-point
seat belt.
The booster should not be secured using a lap belt.
OK
OK
OK
The seat should only be used in the rear of the vehicle, facing forwards as shown above, and
only where a 3-point safety belt is present.
17
Page 18

In Use
Removing the Seat Back
Remove the seat back as shown below.
1
2
18
Page 19

In Use
Securing Your Child
Place the seat in the vehicle. Secure your child into the seat using the vehicle’s 3-point seat
belt, ensuring that the belt passes underneath the guides, as shown below. Ensure there is no
slack in the belt by gently pulling it tight.
19
Page 20

In Use
Incorrect Fitment
It is important that your child is correctly fitted in their seat. Take care to ensure the below
situation doesn’t occur when securing your child.
In some cases, the strap attached to the seat belt buckle can be too long and ride too high
under the armrest, preventing the car seat from being fixed firmly. If this happens, choose
another location in the car. If you have any questions relating to this issue, you should contact
the manufacturer.
20
Page 21

In Use
Storage of Instruction Manual
When not in use, the instruction manual can be stored on the product as shown below.
21
Page 22

Care Instructions
Storage
Store this child seat in a safe place when not in use.
DO NOT place heavy objects on top of it.
Always store the child seat in a dry environment.
DO NOT store the child seat near a direct heat source such as a radiator.
Covers
The seat cover is easily removable and can be cleaned with a pH neutral soap and cold water.
Do not press, iron, dry clean, tumble dry or wring the covers.
Do not use solvents, caustic or abrasive cleaning materials.
Dry flat, away from direct heat and sunlight.
If the seat covers need to be replaced only use John Lewis certified parts. They are the only
ones that are guaranteed to have been safety tested and designed to fit this seat.
Plastic/metal parts
Wipe clean using a mild soap and warm water.
You must not remove, dismantle or alter any part of the seat shell.
You must not oil or lubricate any part of the seat shell.
Inspection
Check your child seat regularly for wear and tear.
Seat may have a slight rattle when not in use, this is normal.
Check the adjustable parts of your child seat at intervals of about 6 months to ensure it is still
fits correctly for your growing child.
22
Page 23

Safety Information
This seat should always be used in the forward-facing position.
Please read these instructions carefully, familiarise yourself with the product
before use and keep the instructions in a safe place for future reference. The use of
accessories other than those supplied by the manufacturer may be unsafe.
This car seat is suitable for children weighing 15 - 36 Kg. The car seat is only suitable for use
in the listed vehicles fitted with 3-point with retractor safety-belts approved to ECE Regulation
No. 16.
23
Page 24

Safety Information
WARNING: Use the adult three-point belt to restrain your child. Make sure that the lap
strap of the belt goes across your child’s thighs and never across their stomach. Take care to
ensure that the diagonal part of the belt is kept clear from the child’s neck area and is worn
over the child’s shoulder. Tighten the belt by pulling on the lap section of the three-point belt,
so that it is tight enough (without slack). Make sure that the belts are not twisted. Prevent
the car seat belt from becoming trapped by the seat reclining mechanism or in the car doors.
Do not make any alterations to the seat or belts. Protect from direct sunlight as parts may
become hot.
The car seat MUST be changed after an accident. The user must always ensure that baggage
or other items/objects likely to harm the occupant of the car seat in the event of a crash are
properly secured. Never place heavy objects on the rear parcel shelf as these may be thrown
about during an accident.
The child restraint must not be used without the cover and this should not be replaced with
any cover other than the one recommended by the manufacturer as the cover is an integral
part of the restraint’s performance. Never leave your child unattended in the seat.
The rigid elements and plastic parts of a child car seat must be fitted and positioned in such a
way that, under conditions of normal vehicle use, they cannot become trapped under a moving
seat or in the door of the vehicle. This child car seat is only effective when used in
accordance with the manufacturer’s instructions. Under no circumstances should you modify
this car seat in any way.
NOTICE: This is a universal child restraint. It is approved to Regulation No. 44, 04 series
of amendments, for general use in vehicles and it will fit most, but not all, car seats. A correct
fit is likely if the vehicle manufacturer has declared in the vehicle handbook that the vehicle is
capable of accepting a “Universal” child restraint for that age group.
This child restraint has been classified as “Universal” under more stringent conditions than
those which applied to earlier designs which do not carry this notice.
If in doubt, consult either the child restraint manufacturer or the retailer.
Customer Services,
John Lewis, 171 Victoria Street,
London, SW1E 5NN,
United Kingdom
PO Box 19615, Erskine,
PA8 6WU
Tel: 08456 049 049
..0529130
 Loading...