

Page 1
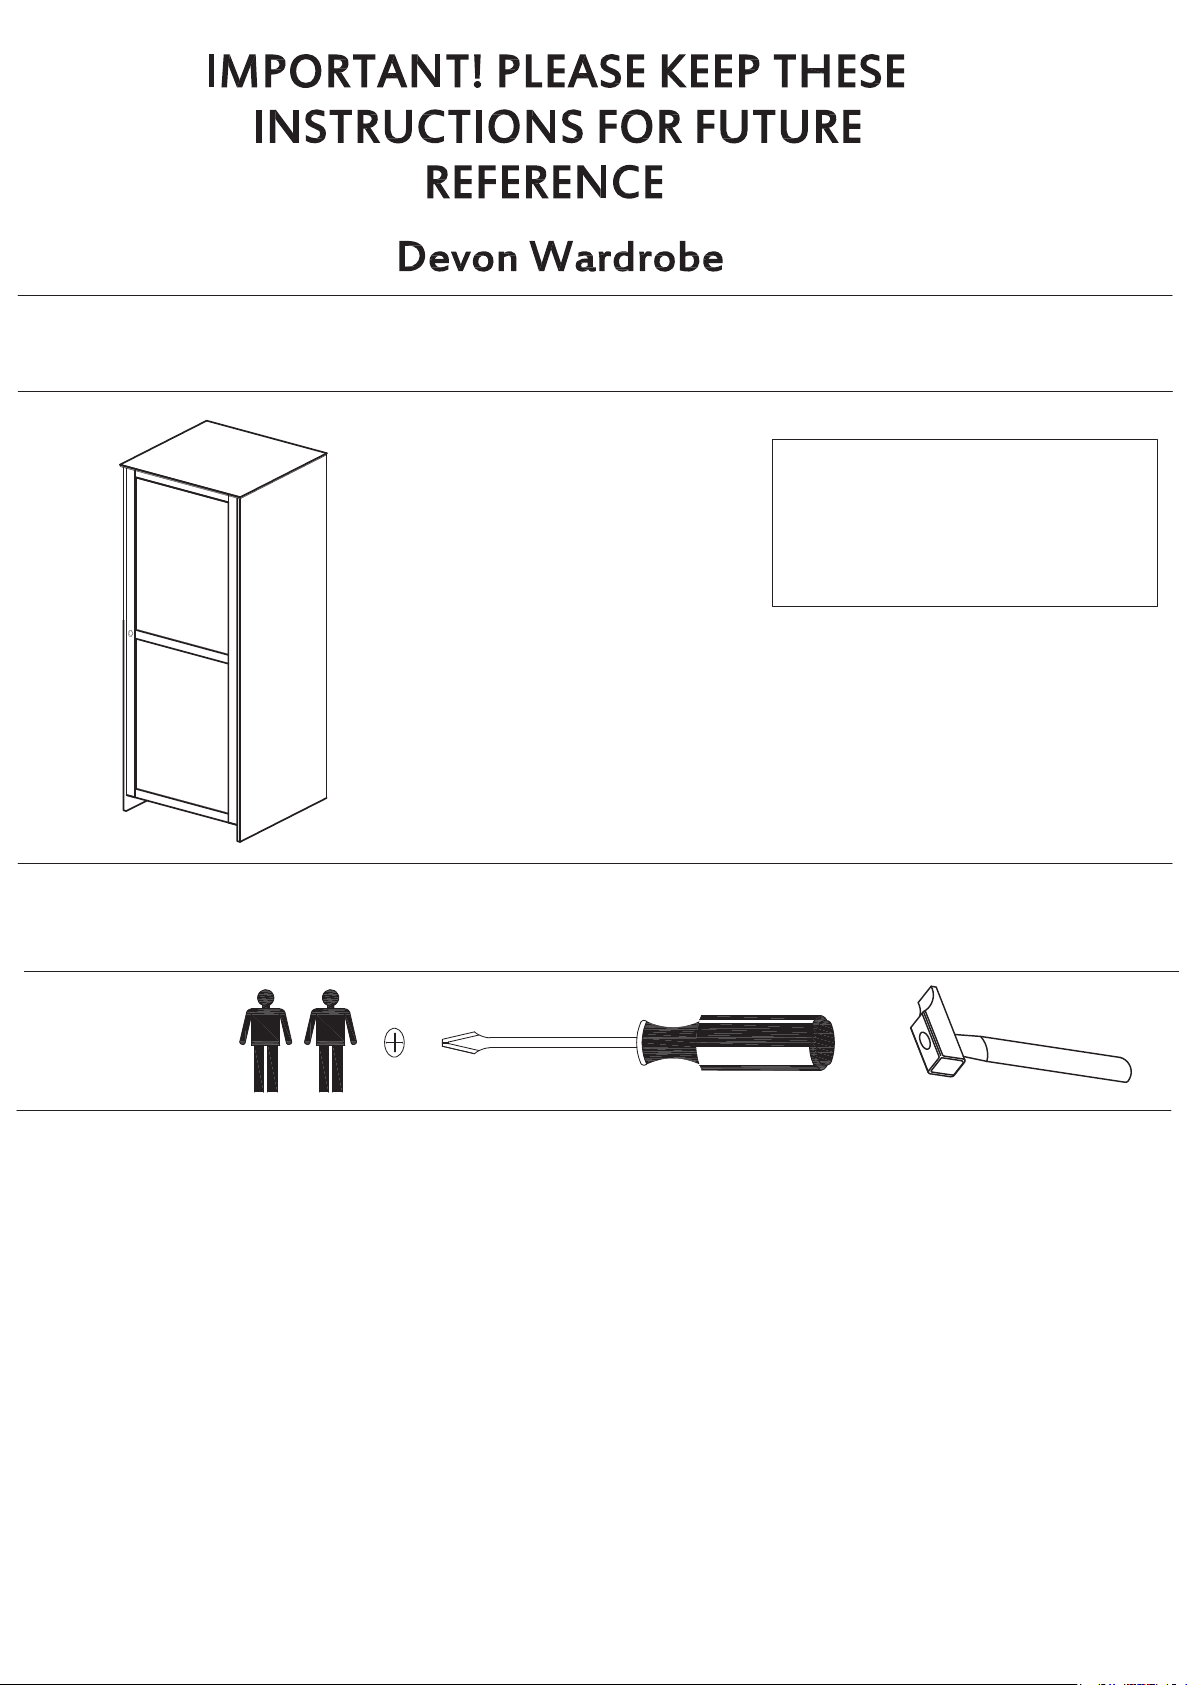
John Lewis Stock Code 803/61807,
803/61607, 803/61707
Thankyou for purchasing this Devon Wardrobe. Please read the instructions carefully
before use to ensure safe and satisfatory operation of the product.
For product support or spare
parts please call the John Lewis
helpline;
T: 01244 489949
E: mail@fwgroup-uk.com
Pre-assembly Preperation
Please ensure that instructions are read in full before attempting to assemble this product.
Necessary Tools
Please check the pack contents before attempting to assemble this product. A full checklist of
components are given in this leaflet. If any components are missing, please contact the John
Lewis helpline.
This product is HEAVY, it should be assembled as near as possible to the point of use. TAKE
CARE WHEN LIFTING to avoid personal injury and (or) damage to the product.
This product takes approximately 90 MINUITES to assemble with 2 PEOPLE.
The fittings pack contains SMALL ITEMS which should be KEPT AWAY FROM YOUNG
CHILDREN.
If you require any additional information or have any issues with this product please call the
John Lewis helpline on 01244 689949 or email mail@fwgroup-uk.com
Page 1 of 16
Page 2
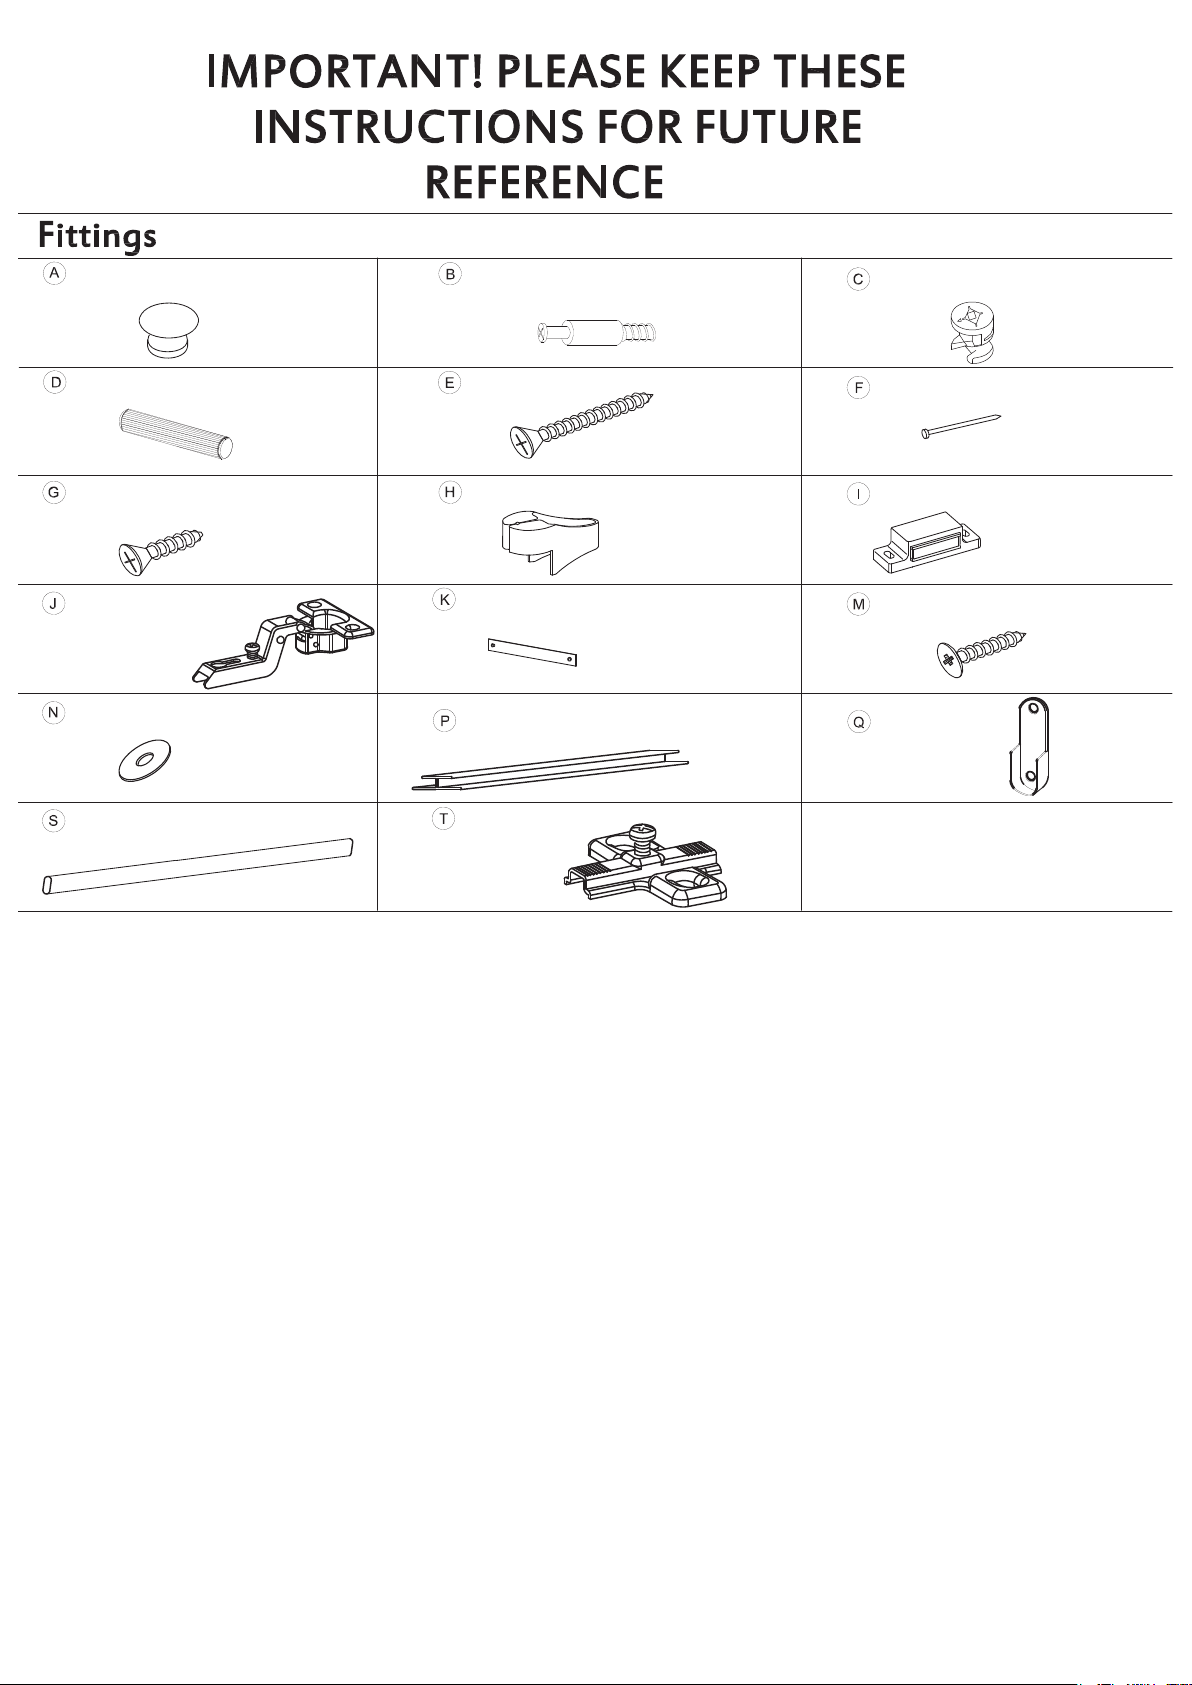
1pc- Door Knob
26pcs- Cam 6 x 24mm
26pcs-Camlock 15 x 10.5mm
28pcs- Dowel 8 x 30mm
20pcs- Screw 4 x 15mm
3pcs- Cup Hinge
4pcs- Washer
1pc- Hanging Rail 25 x 583mm
1pc - Screw 4 x 40mm
1pc- Nail Guide
2cps- Strap
1pc- Joining Strip - 1655mm
3pcs- cross plate
36pcs- Nail
2pc- Magnet
4pcs- Screw 4 x 25mm
2 pcs- Hanging
Rail Cup
Page 2 of 16
Page 3
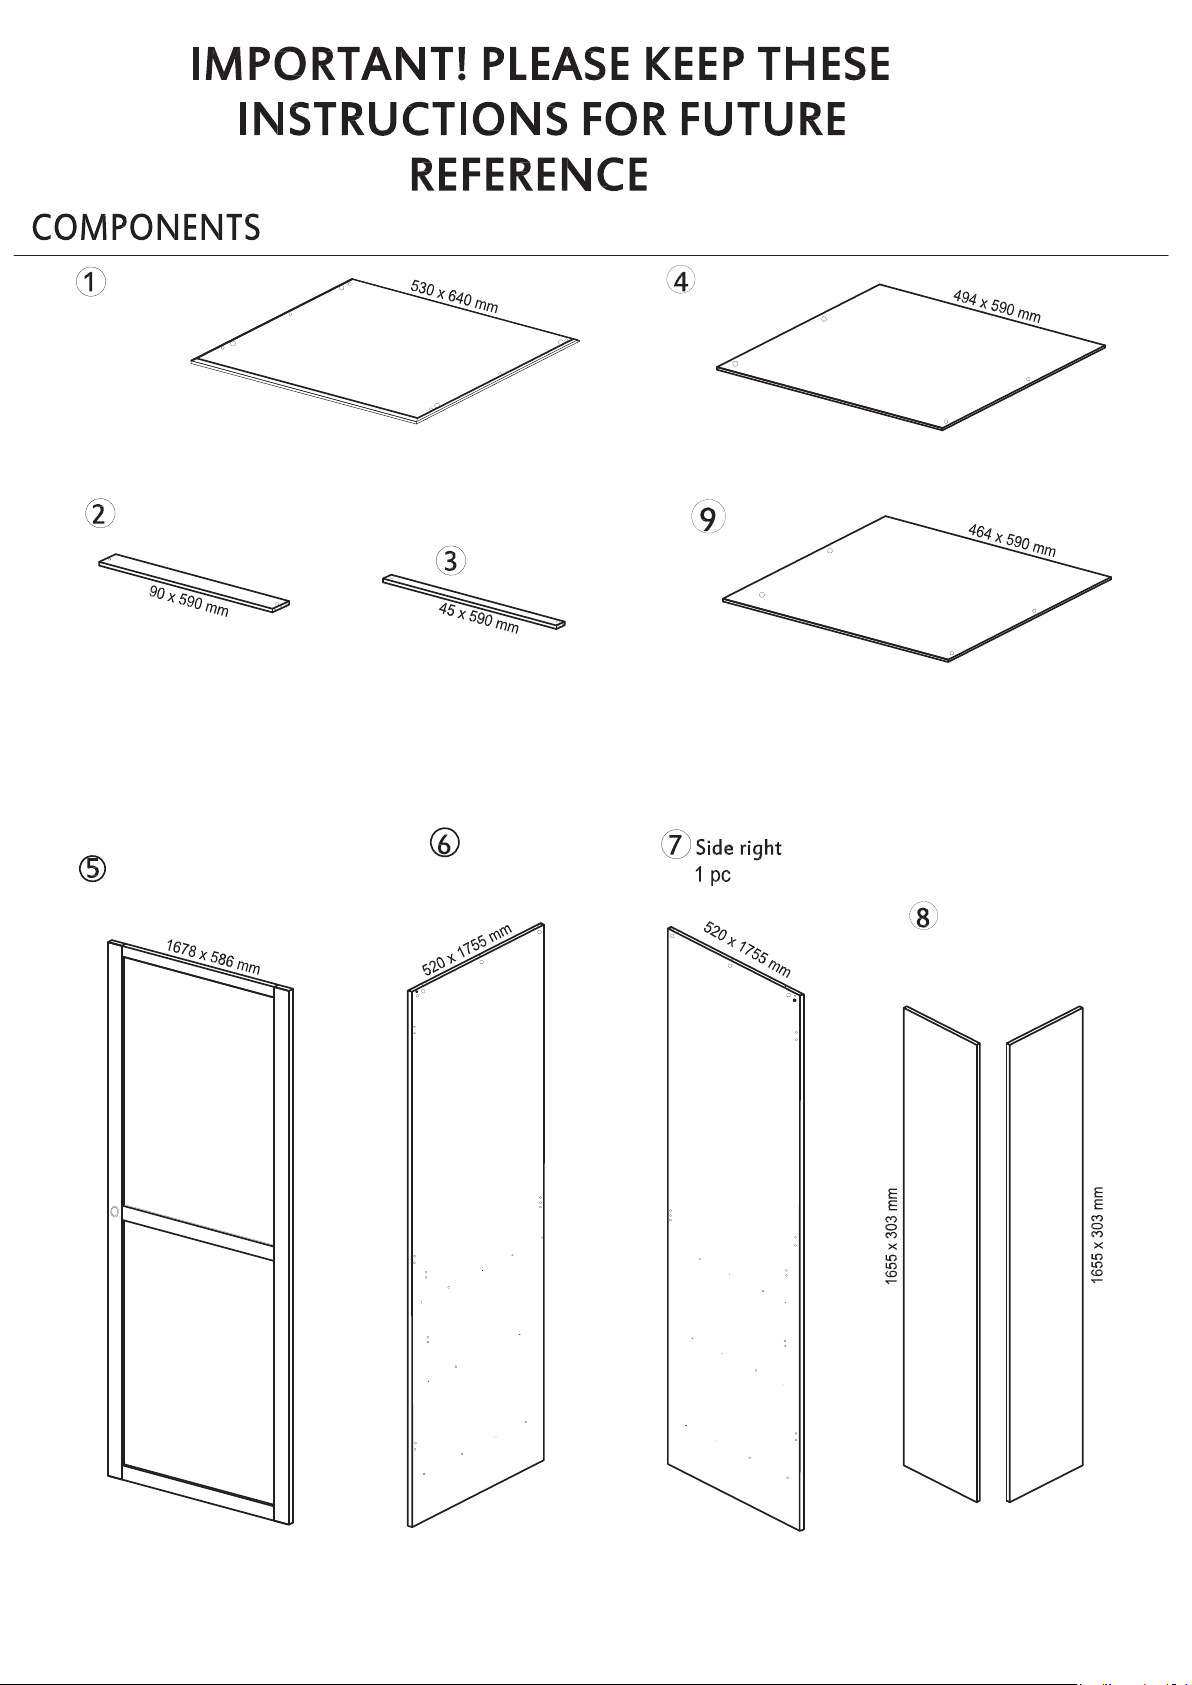
Top
1pc
Shelf
2pcs
Plinth
1pc
Door
1pc
Plinth
3pcs
Side left
1pc
Bottom
1pc
Back 2pcs
Page 3 of 16
Page 4
P
s
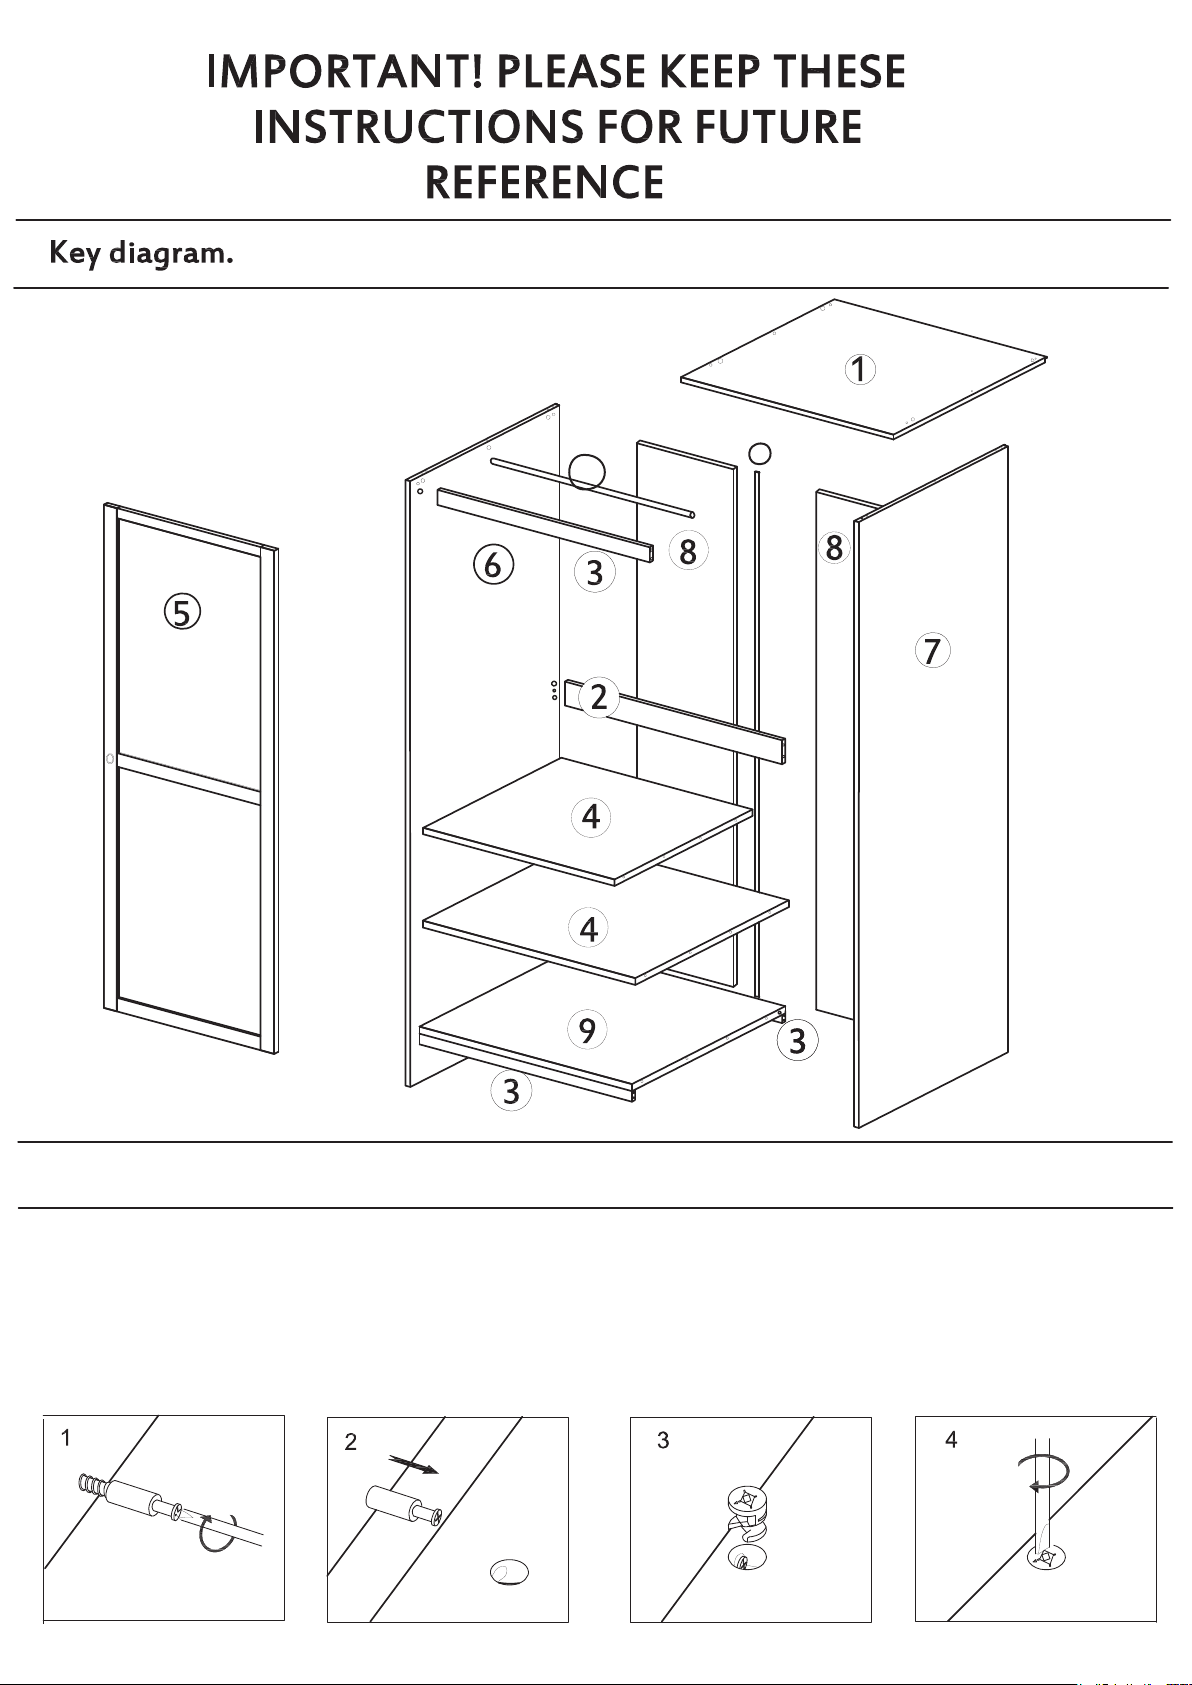
Function of Cam and Camlock
Step 1
Fix the Cam to the
wooden panel
Step 2
Push the wooden
panel with the attached
Cam onto the other
panel
Step 3
Place the Camlock
into the hole, arrow
pointing towards the
bolt.
Page 4 of 16
Step 4
Tighten: turn the
Camlock to the right.
Page 5
Step 1
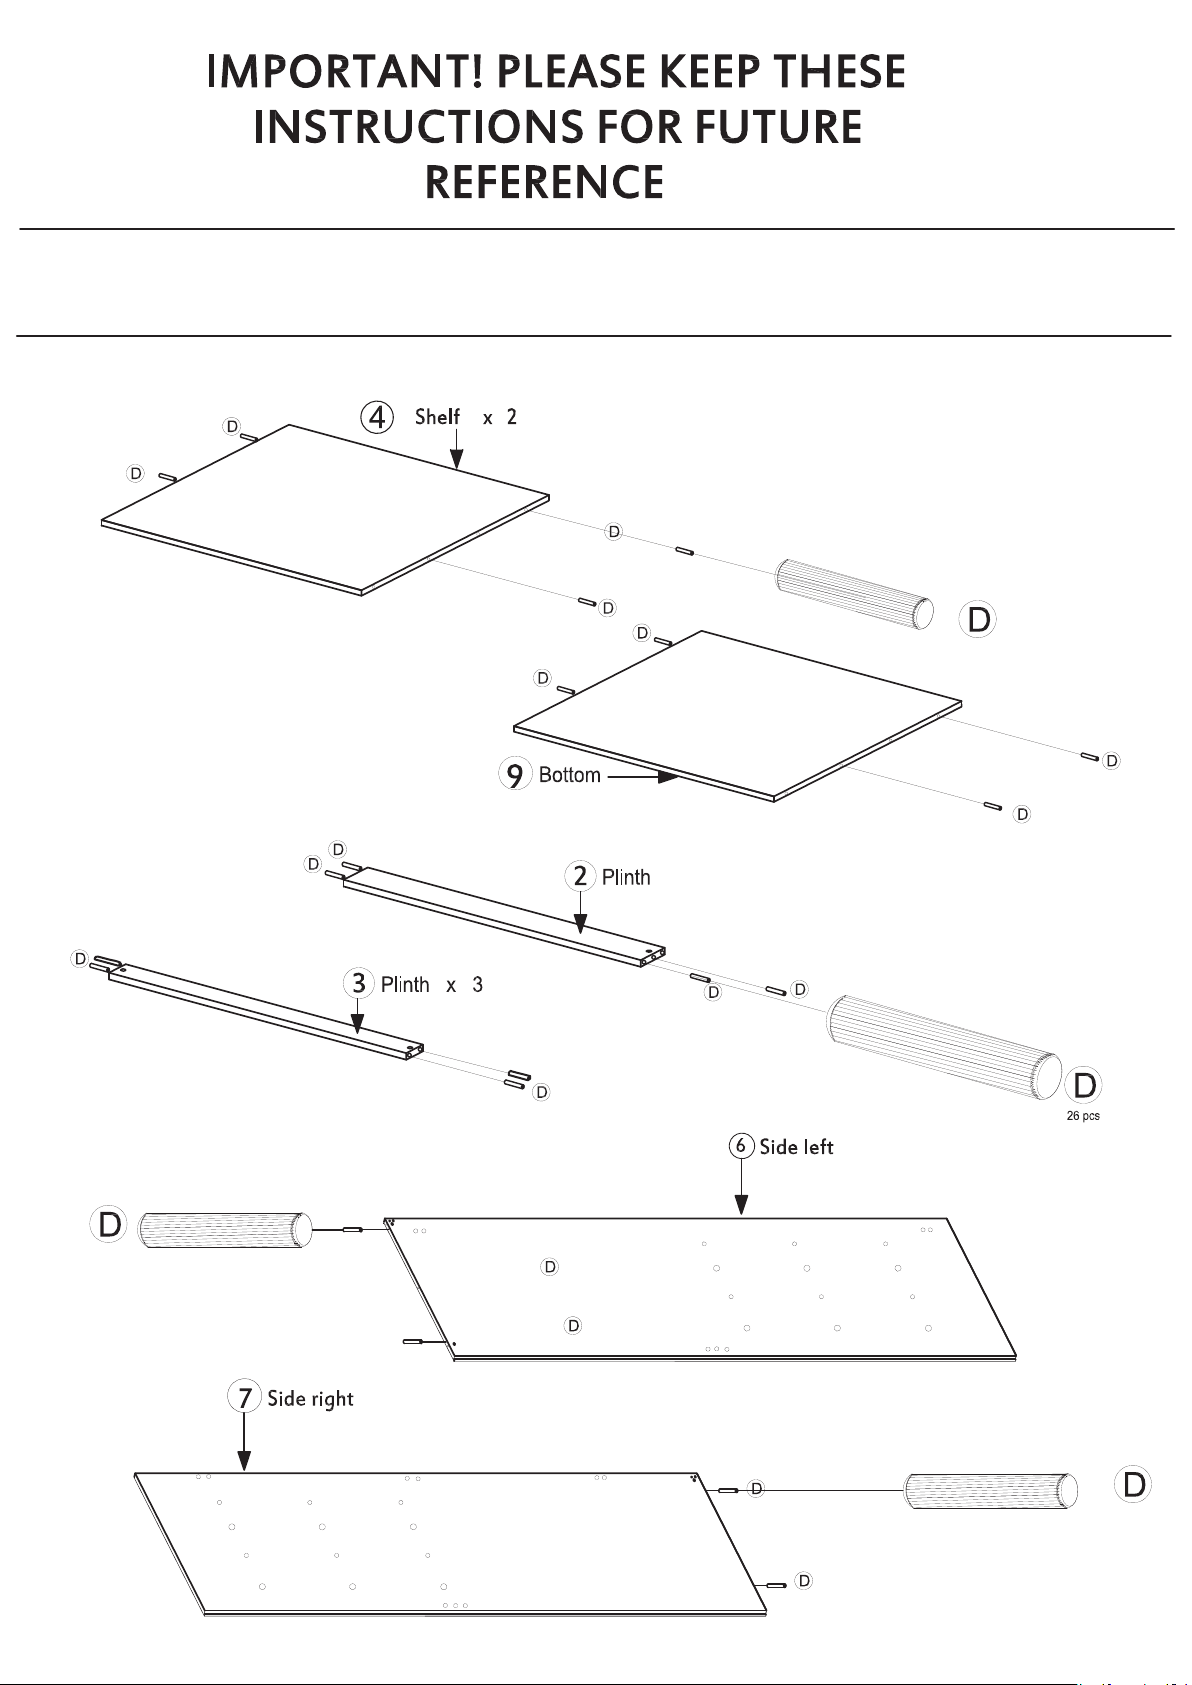
Knock the Dowels (D) in to the pre-drilled holes indicated on the shelf (4), Bottom (9), Plinths (2) and (3)
and on the Sides (6) and (7).
Page 5 of 16
Page 6

Step 2
Attach the Hanging Rail Cup( Q) on to the Side panels (6) & (7) using Screw (G) into the pre-drilled
holes. See fig 6.1. Attach the Cross Plate (T) to the Right Side (7) using the premounted screw and 2 x
Screw (G). The long end of the cross plates must point towards the front edge of the side as shown in
fig 6.2
Step 3
Attach the Magnet (l) to the Left Side (6) using Screw 4 x 15mm (G). The magnet shold be placed excatly
as shown in the diagram below.
Page 6 of 16
Page 7

Step 4
Screw Cam 6 x 24mm (B) into the holes indicated on the Top (1) and both Sides (6) & (7) as shown in
the diagram below.
Step 5
Push the Plinths (2) & (3) into the pre-drilled holes on the Left Side (6), as shown in the diagram below.
Using instructions on “function of Cam and Camlock” on page 4, place the Cam (C) into the pre-drilled
holes indicated on the diagram below and tighten by turning the Camlock (C) to the right.
Page 7 of 16
Page 8

Step 6
Affix the shelf (4) and Bottom (9) onto the the Left Side (6). Using the instructions on “function of cam
and camlock” on page 4, place the Camlock (C) into the pre-drilled holes indicated on the diagram below
making sure that the arrows point towards the side/bolt., and tighten by turning the Camlock (C) to the
right.
Step 7
Affix the Right Side (7) onto the Bottom (9). Shelf (4) and Plinths (2) & (3). Using the instructions on
“function of cam and camlock” on page 4, place the Camlock (C) into the pre-drilled holes indicated
on the diagram below making sure that the arrows point towards the side/bolt., and tighten by turning
the Camlock (C) to the right.
Page 9

Step 8
Affix the Top (1) onto the Sides (6) & (7) Using the instructions on “function of Cam and Camlock” on
page 4, place the Camlock (C) into the pre-drilled holes indicated on the diagram below making sure
that the arrows point towards the side/bolt., and tighten by turning the Camlock (C) to the right.
Page 9 of 16
Page 10

Step 9
Place the Back (8) into the rebate of the Top (1) and Left Side (7), ensuring that there is NO GAP
between the side and the back, or between the top and the back. Fasten the back with Nail (F) along
the top using the nail guide (H), see fig10.1, remembering the angle between the top and the bottom
must be 90 degrees see fig10.2. Fasten the back along the side and bottom.
Page 10 of 16
Page 11

Step 10
Fix the Joining Strip (P) onto theBack Pieces (8), see fig 11.3, and the rebate on the Top (1) and the Right
Side (7), see fig 11.2, remembering the angle between the top and the side must be 90 degrees, see fig
11.2, and ensuring that there is NO GAP between the side and the back or between the top and the back.
When you are sure that they are aligned correctly fasten the back with Nail (F) along the top then down
the side and along the bottom, using the Nail Guide (H) provided. See fig 11.1.
Page 11 of 16
Page 12

Step 11
Affix the Hinges (J) into the holes indicated on the Door (5) and fix them using Screws (G).
Page 12 of 16
Page 13

Step 13
Attach the Door Knob(A) to the door using Screw(E). Place the Hanging Rail(S) into the Hanging Cup(Q),
see fig13.1.
Attach Door(5) to Left Side Panel(6) by placing adjustment screw on Cross Plate(T) through hole on the
Cup Hinge(J) and tighten screws (G). Shut Door(5) to check alignment and reposition if necessary by
repositioning screws in Cup hinge(J).
Page 13 of 16
Page 14

Step 14
Finally secure the wardrobe to the wall using Strap (K), Screw (M) and Washer (N) as shown in the
diagram below.
PLEASE NOTE: Wall fixings are not supplied with this product as different wall materials require
different types of fixing devices. You must use fixing devices suitable for the type of wall you intend
to mount this product to. The screw supplied is to fix the strap to the chest.
Page 14 of 16
Page 15

Wood Furniture
Wood displays different grain patterns depending on which way they are cut - for example, the
“medullary way” which can appear on oak furniture is a mark of good quality timber - these are just
characteristics of the natural beauty of the wood. Some furniture is also deliberately aged and rustic.
Wood Veneer also allows distinctive patterns to be created on flat surfaces, such as table tops and
drawer fronts by the way the slivers are arranged.
All timber surfaces will change colour and mellow over time. New furniture will initially vary in
shades from items that have been previously purchased.
How to care for your wood furniture.
Furniture with a hard lacquer, wax polish or painted surface needs to be dusted with a dry cloth.
Wax furniture will need to be given a coat of beeswax a couple of times a year to help maintain its
lustre.
Spray polishes are best avoided as they contain silicones which may spoil the furniture’s surface by
building up over time.
Our furniture will endure most temperatures in the home but it is best to avoid placing furniture next
to heat sources such as radiators and fires. Be particularly careful with solid wood as the lack of
humidity caused by central heating can cause damage such as warping.
Page 15 of 16
Page 16

Never drag furniture when moving it, always lift it.
periodically check all fixings to ensure non have come loose and re-tighten when necessary.
Please take care when handling or moving furniture as careless handling may cause damage or
injury.
Furniture can be dangerous if incorrectly installed. Any assembly should be carried out by a
competent adult.
No liability will be accepted for damage or injury caused by incorrectly installed or assembled
furniture.During assembly children should be kept away from the product due to possible risk
of injury.Do not use this item if any components are missing or damaged.
It is recommended that care is taken when moving heavy objects to a new location to avaoid
personal injury or damage to the furniture. Please be careful to retain all fittings when doing this.
This product is suitable for children aged 3 - 12 years
Warning: Do not place this child’s wardrobe near heat sources, windows or other furniture.
Warning: Do not use this child’s wardrobe if any part is broken, torn or missing.
Children are likely to play, bounce, jump and climb on furniture, therefore the furniture should
not be placed too close to other furniture or windows, curtain pulls or other strings or cords and
should be placed either tight against any wall or should have a gap of 300mm between the wall
and the side of the bed.
This product complies with BS 4875 - 7:2006 & BS14749:2005
If you need any additional information or have any issues with this product please call the
John Lewis helpline on 01244 689949 or email mail@fwgroup-uk.com
John Lewis Partnership 171 Victory Street London SW1E 5NN
www.johnlewis.com
Page 16 of 16
 Loading...