

Page 1
U2 (International Version - S92P) Product
Manual
Printed Version 2021/04/08 v1.1
Reviewed By: He Yuan
Announcement
JMGO is committed to continuously improving both product performance and functionality. The
images and function descriptions in the product manual are subject to product and factory presets.
JMGO reserves the right to improve the functionality and human-machine interface (HMI)
outlined in this manual without prior notice. The actual product should take precedence.
Take care of the product in a proper manner. JMGO is not responsible for any losses caused by the
improper operation of software, hardware, or maintenance, nor any losses resulting from the
disclosure of personal information to a third party. JMGO is not responsible for any accidental
losses that may occur during the use of this manual, nor will it be responsible for any third-party
claims arising from the use of this product.
The function descriptions of this product have been carefully reviewed and proofread by JMGO
personnel. If you notice any omissions, we apologize and would appreciate it if you could point
them out to us.
The software of this product will be continuously improved and updated to unlock more
functionality. There may be differences between the functions of the purchased product and the
instructions herein. Please scan the QR code to download the latest version of this product manual.
To learn more about JMGO’s products and value-added services, visit our official website at
www.jmgo.com.
FCC Requirement
(1) All Products (required)
Changes or modifications not expressly approved by the party responsible for compliance could
void the user’s authority to operate the equipment.
Page 2

This device complies with Part 15 of the FCC Rules. Operation is subject to the following two
conditions:
(1) this device may not cause harmful interference, and
(2) this device must accept any interference received, including interference that may cause
undesired operation.
(2) Class B Device Warning
Note: This equipment has been tested and found to comply with the limits for a Class B digital
device, pursuant to Part 15 of the FCC Rules. These limits are designed to provide reasonable
protection against harmful interference in a residential installation. This equipment generates, uses,
and can radiate radio frequency energy, and if not installed and used in accordance with the
instructions, may cause harmful interference to radio communications. However, there is no
guarantee that interference will not occur in a particular installation. If this equipment does cause
harmful interference to radio or television reception, which can be determined by turning the
equipment off and on, the user is encouraged to try to correct the interference by one or more of
the following measures:
– Reorient or relocate the receiving antenna.
– Increase the separation between the equipment and receiver.
– Connect the equipment into an outlet on a circuit different from that to which the receiver is
connected.
– Consult the dealer or an experienced radio/TV technician for help.
(3) FCC 20cm RF Exposure Statement (only add the following statement if the product is
used >20cm away from the body)
This equipment complies with FCC radiation exposure limits set forth for an uncontrolled
environment. This equipment should be installed and operated at least 20cm between the radiator
& your body. This transmitter must not be co-located or operating in conjunction with any other
antenna or transmitter.
Product Manual (warnings must be in English and French)
This device contains license-exempt transmitter(s)/receiver(s) that comply with Innovation,
Science and Economic Development Canada’s license-exempt RSS(s). Operation is subject to the
following two conditions:
(1) This device may not cause interference.
(2) This device must accept any interference, including interference that may cause undesired
operation of the device.
Cet appareil contient des émetteurs/récepteurs exempts de licence qui sont conformes aux RSS
exempts de licence d'Innovation, Sciences et Développement économique Canada. Son
fonctionnement est soumis aux deux conditions suivantes :
Page 3

(1) cet appareil ne doit pas causer d'interférences nuisibles.
(2) cet appareil doit accepter toute interférence, y compris les interférences pouvant entraîner un
fonctionnement indésirable.
(2) Canadian 20cm RF Exposure Statement (only add the following statement if the product
is used >20cm away from the body)
The device meets the exemption from the routine evaluation limits in section 2.5 of RSS 102 and
compliance with RSS-102 RF exposure. Users can obtain Canadian information on RF exposure
and compliance.
L'appareil satisfait à l'exemption des limites d'évaluation de routine de la section 2.5 de RSS 102 et
à la conformité à l'exposition RF RSS-102. Les utilisateurs peuvent obtenir des informations
canadiennes sur l'exposition aux RF et la conformité.
This transmitter must not be co-located or operating in conjunction with any other antenna or
transmitter. This equipment should be installed and operated with a minimum distance of 20
centimeters between the radiator and your body.
Cet émetteur ne doit pas être placé au même endroit ou fonctionner en conjonction avec une autre
antenne ou un autre émetteur. Cet équipement doit être installé et utilisé à une distance minimale
de 20 cm entre l’émetteur de radiofréquences et votre corps.
Safety Warning
Read this product manual thoroughly before attempting to use this product. Store the product
manual in a safe location so it may be referenced at any time.
The product can be powered on and off by plugging and unplugging the power cord. The socket
should be located near the product and easily accessible.
This product contains a laser module. Do not disassemble or modify this module without
authorization. Failure to follow this guideline may result in personal injury.
This is a Class 2 laser product. To avoid damage to the eyes, do not stare directly at the beam.
Do not block the air inlet or outlet of the product with any objects when it is projecting an image.
Doing so may result in excessive internal temperatures and damage to the projector.
Do not hit or drop the product from a significant height.
If you encounter an issue with the product, do not attempt to disassemble it without authorization.
Contact professional after-sales personnel to resolve the issue.
If you need to perform repairs on the product, wear a laser face shield with an OD (optical density)
of ≥ 4 and a wavelength range of 440-660nm.
Page 4
Battery Safety Warning
The remote control contains a built-in rechargeable battery. Observe the below safety
guidelines.
Do not disassemble, hit, squeeze, or throw into a fire.
Do not continue use in case of severe malfunction.
Do not expose to high temperatures.
Do not use if battery has become immersed in water.
Replacing the battery with another of the wrong type may result in explosion. Ensure that used
batteries are disposed of carefully.
Product Laser Safety Parameters
Laser Safety Standard
Class 2 laser product in compliance with the GB 7247.1 safety standard
Laser Radiation Parameters
Maximum Laser Radiation Output: ≤66mW
Emission Wavelength:
Blue: 455-475nm
Green: 515-535nm
Red: 630-655nm
PARAMETERS
Dear Customer:
Thank you for purchasing this JMGO product! The JMGO Smart Theater utilizes high-def
projection solutions, smart ICs, and advanced audio technologies to deliver a crisp, detailed,
beautiful, and giant screen audiovisual experience at any time, from anywhere. The product is
designed with portability and home theater applications in mind.
Page 5
Chairman:
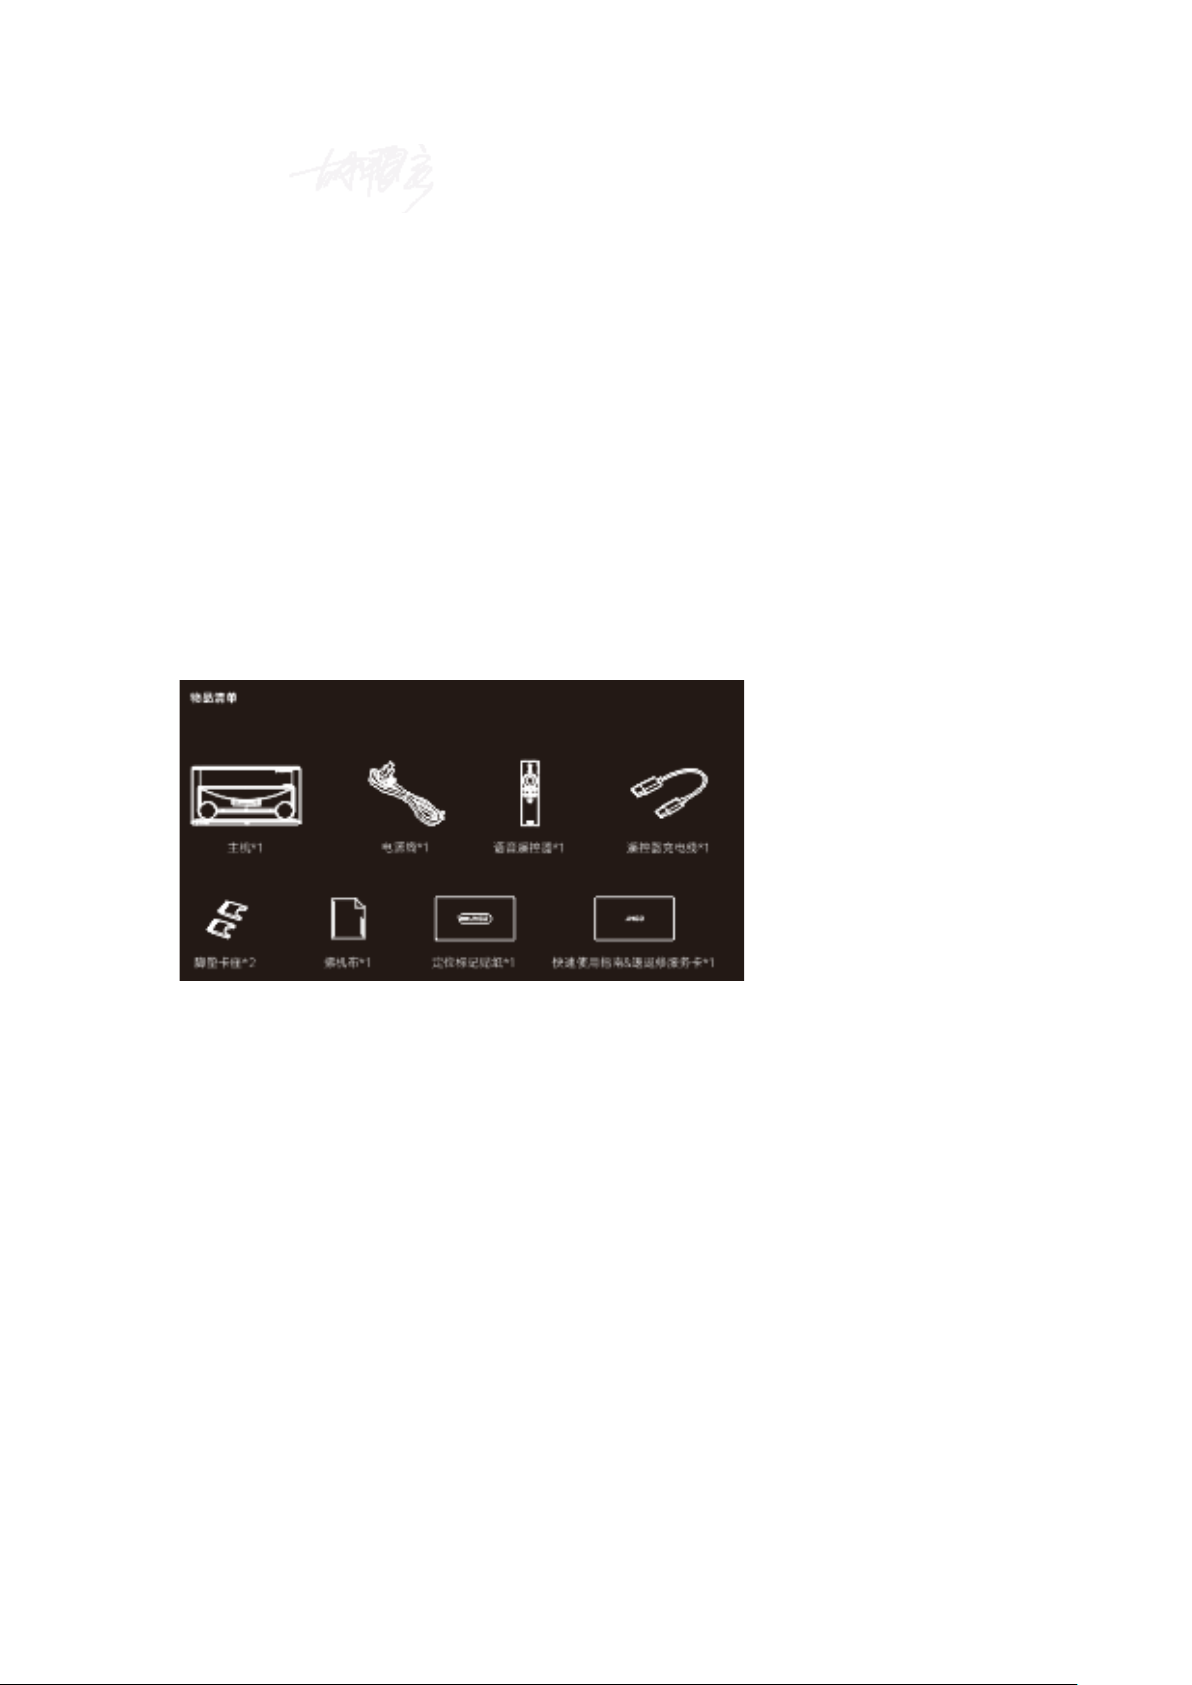
一. Scope of Delivery
Projector Body x1
Power Cord x1
Remote Control x1
Remote Control Charging Cable x1
Grommet Holder x2
Product Manual & Three Guarantees Service Card x1
*Note: Thank you very much for purchasing this JMGO product. Please check the items received
against those listed on the scope of delivery. If the items received are not the same as the scope of
delivery, please contact JMGO customer service as soon as possible.
二. Projector Appearance and Functions
Page 6
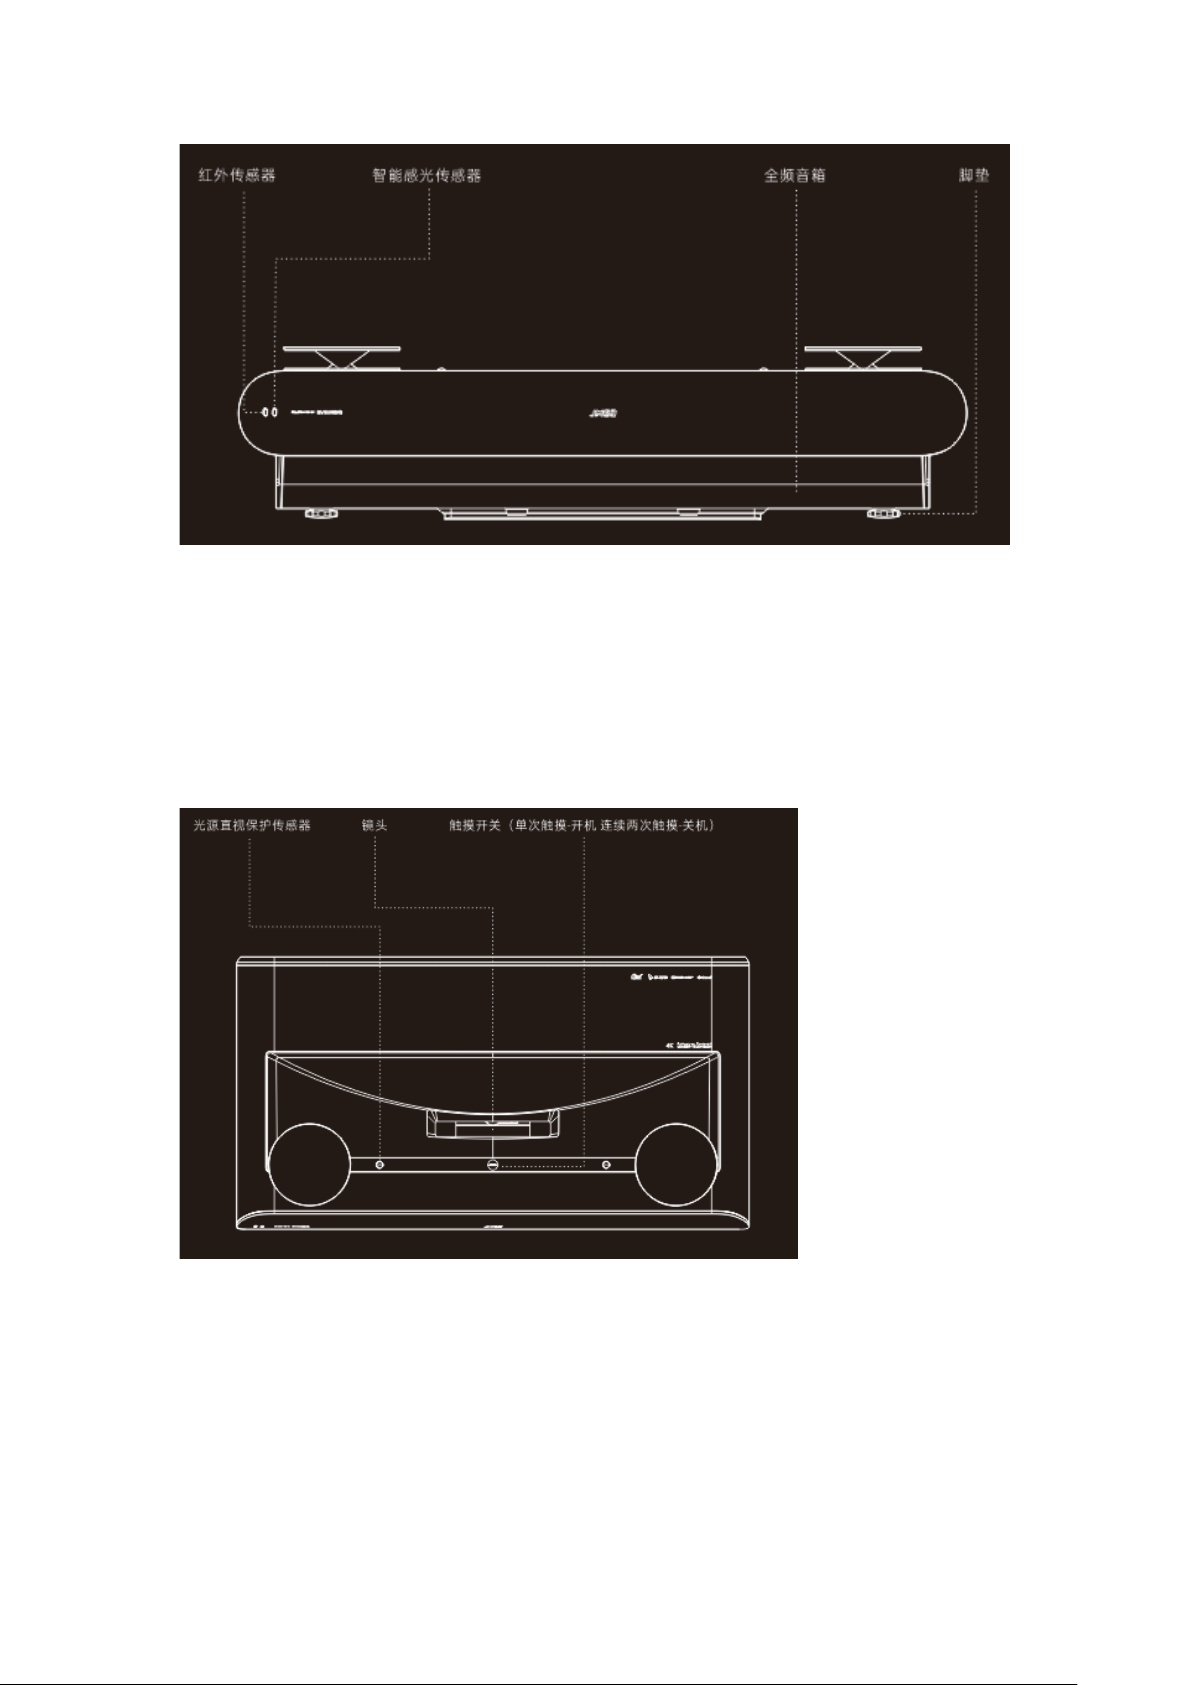
1. Infrared sensor
2. Smart photosensitive sensor
3. Full-range speaker
4. Tilt-Adjustment Foot
1. Eye Protection Motion Sensor
2. Lens
3. Switch (touch once to power on | touch twice to turn off)
Page 7
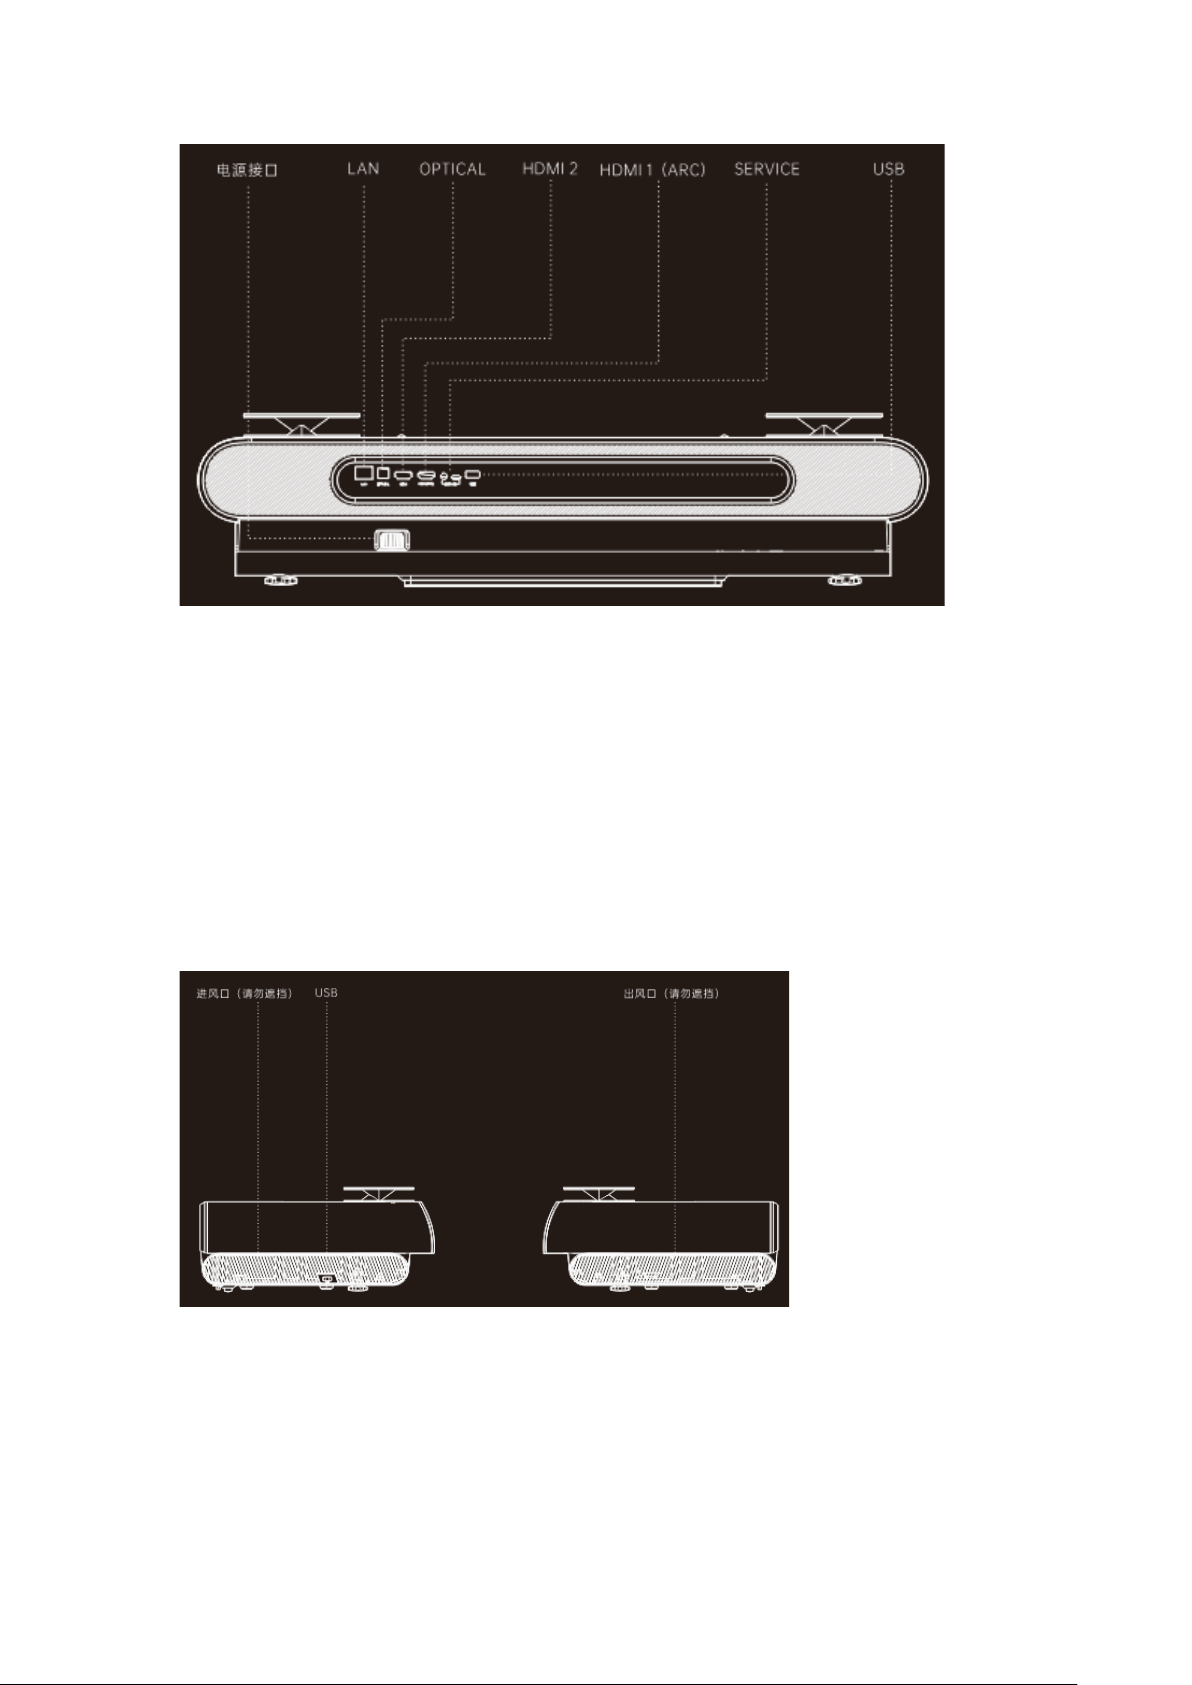
1. Power socket
2. LAN
3. OPTICAL
4. HDMI 2
5. HDMI 1 (ARC)
6. SERVICE
7. USB Port
1. Air inlet (do not cover)
2. USB Port
3. Air outlet (do not cover)
Page 8
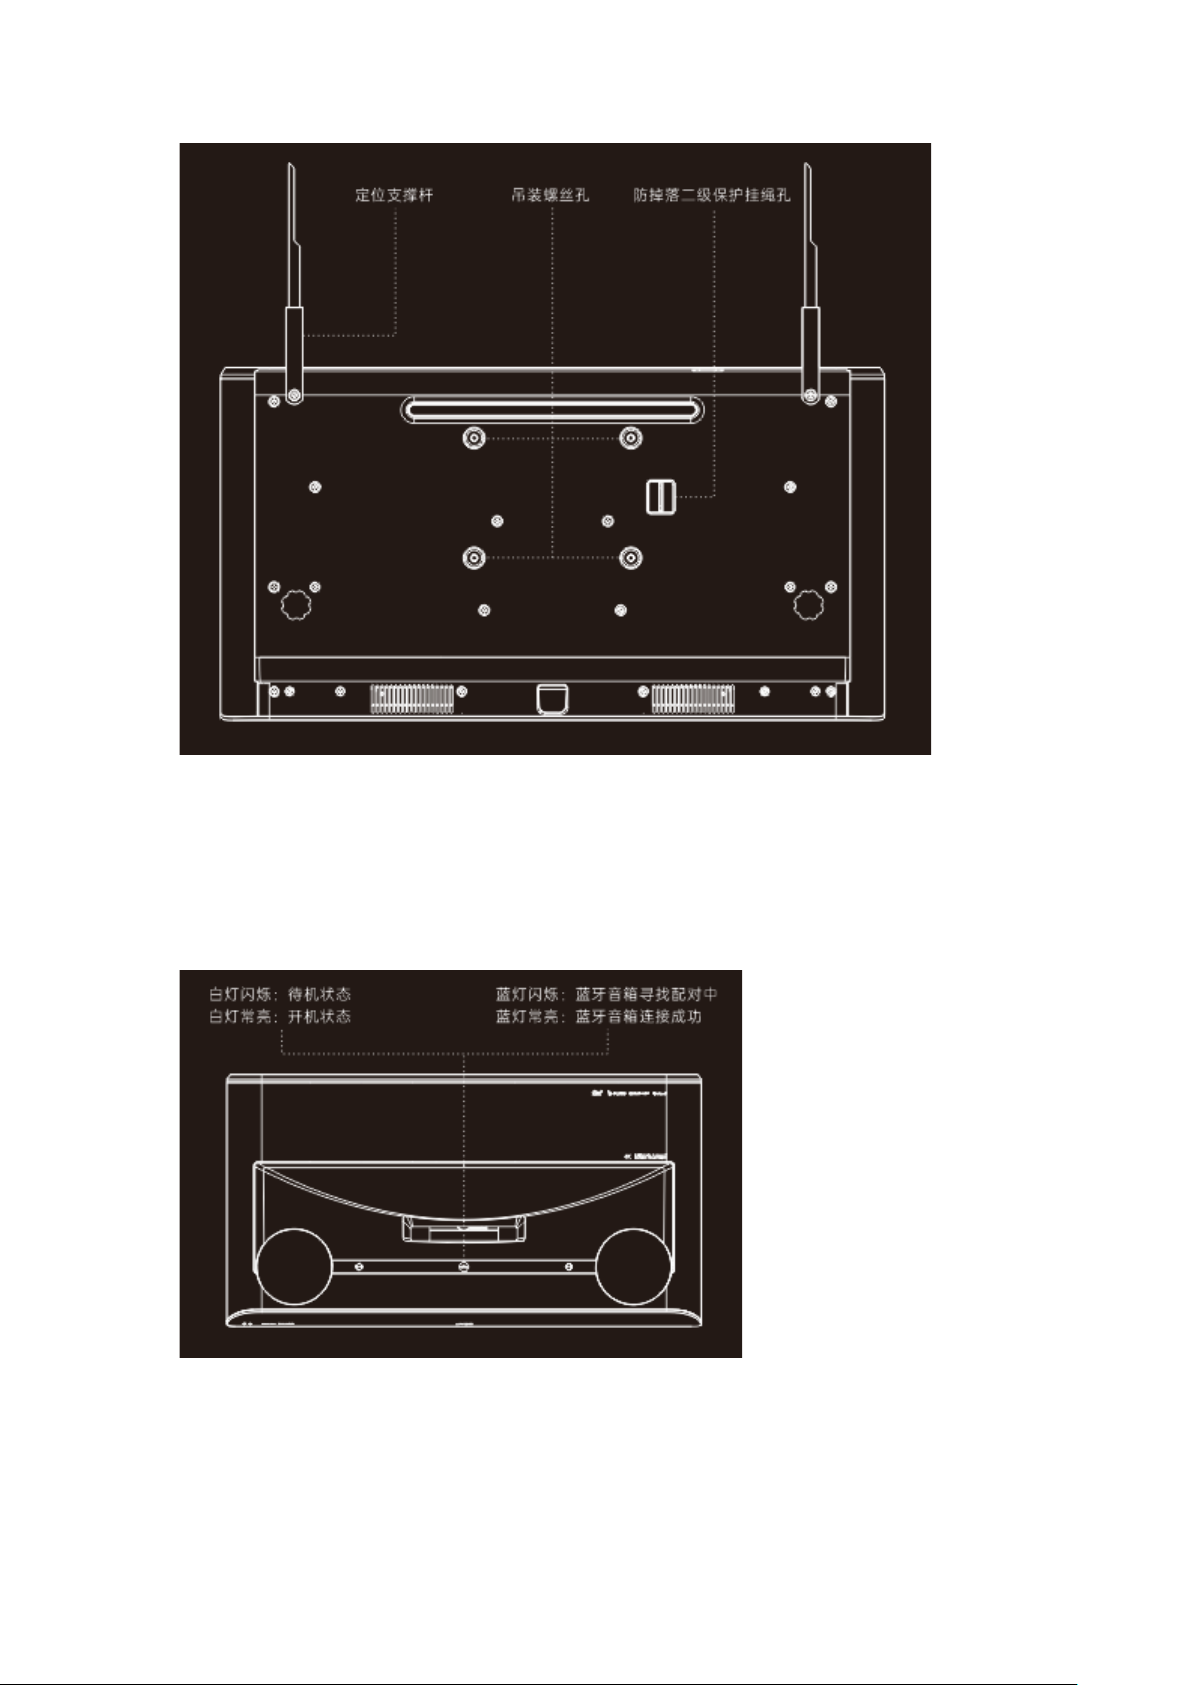
1. Lifting Bracket
2. Mounting screw hole
3. Fall protection mounting hole
1. Flashing White Light: Standby mode
2. Solid White Light: Powered on
3. Flashing Blue Light: Bluetooth speaker ready for pairing
Page 9
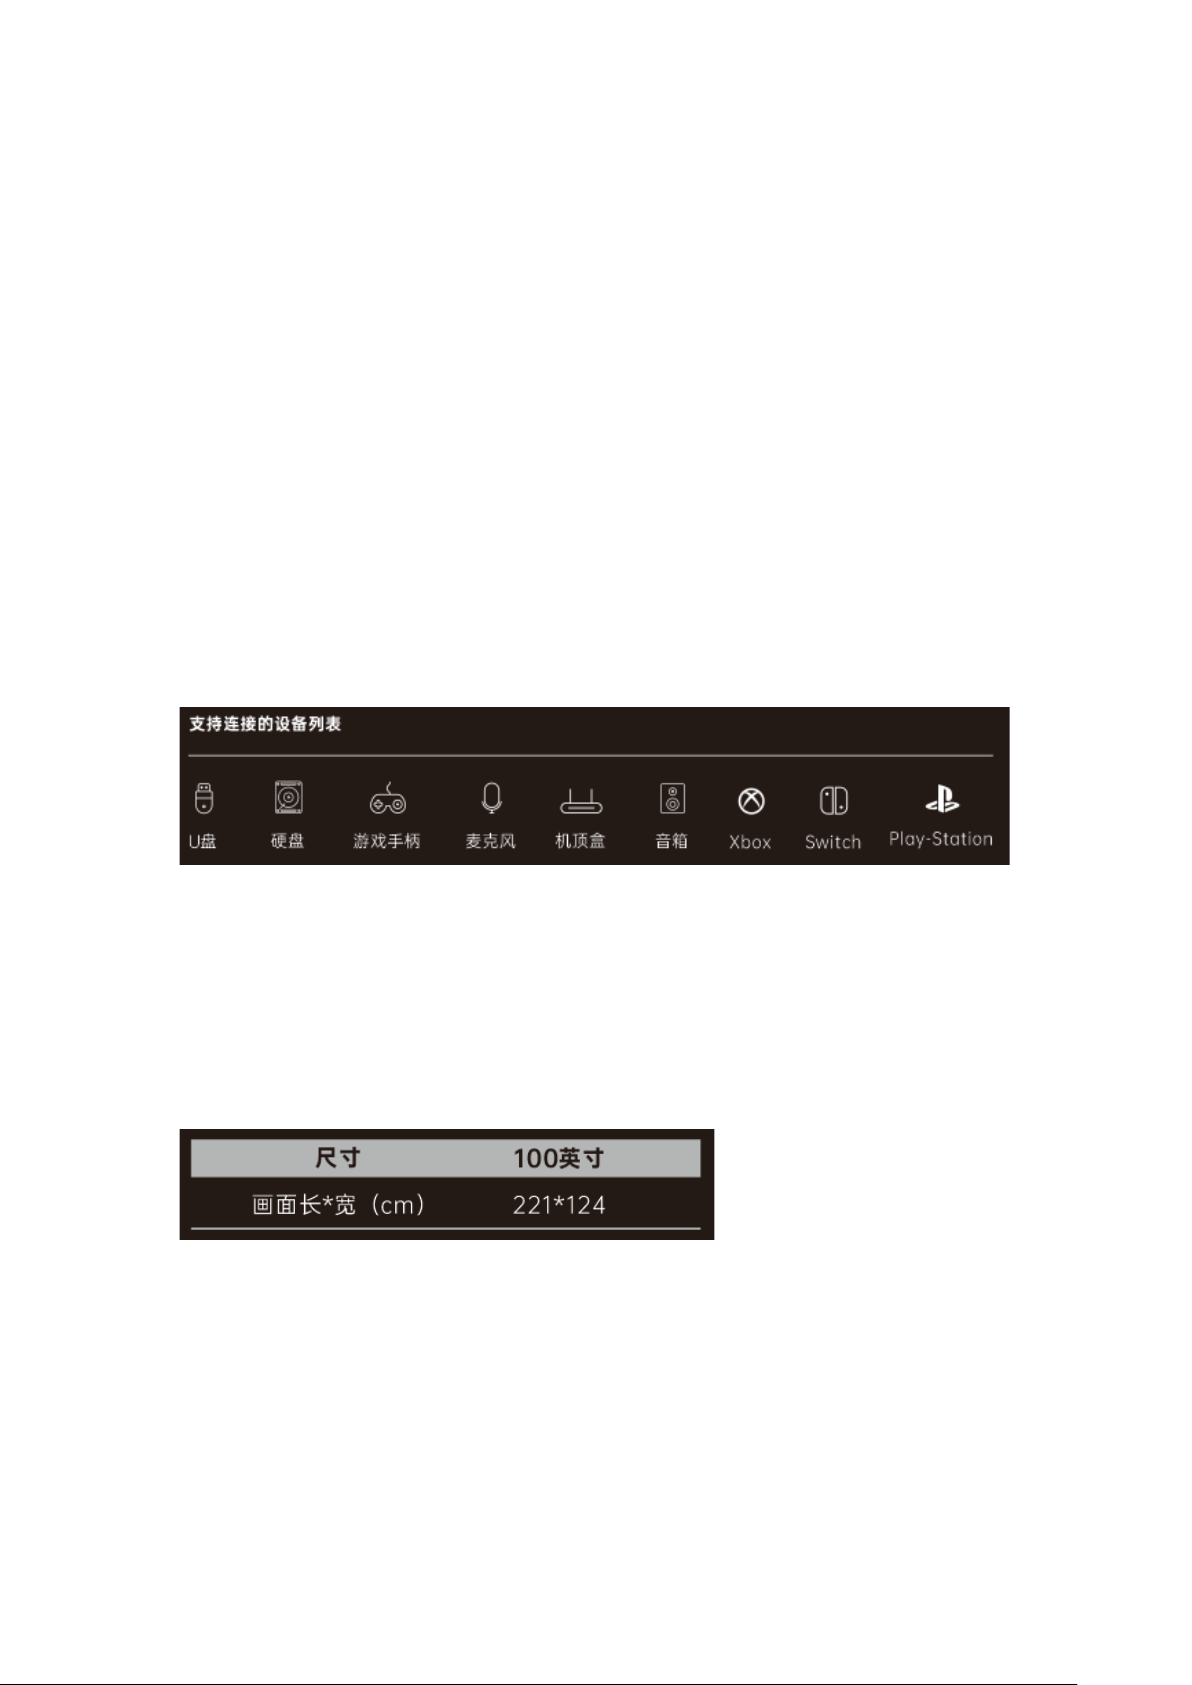
4. Solid Blue Light: Bluetooth speaker successfully connected
Supported Devices
1. TV Stick
2. USB
3. Hard Disk
4. Game Console
5. Microphone (JMGO only)
6. Set-top box
7. Speaker
8. Xbox
9. Switch
10. PlayStation
Projection Distance and Image Size
This product uses a fixed-focus lens with a fixed image size of 100 inches.
Size: 100 inches
Display length * width (in): 87*48.8
Page 10

*Note: The distance between the rear plane of the product and the screen surface should be around
9.5in (24cm) to display a 100-inch screen.
三. Primary System Functions
1. Source Signal(当前无 arwen,请画线框稿时注意隐藏该区域)
Page 11
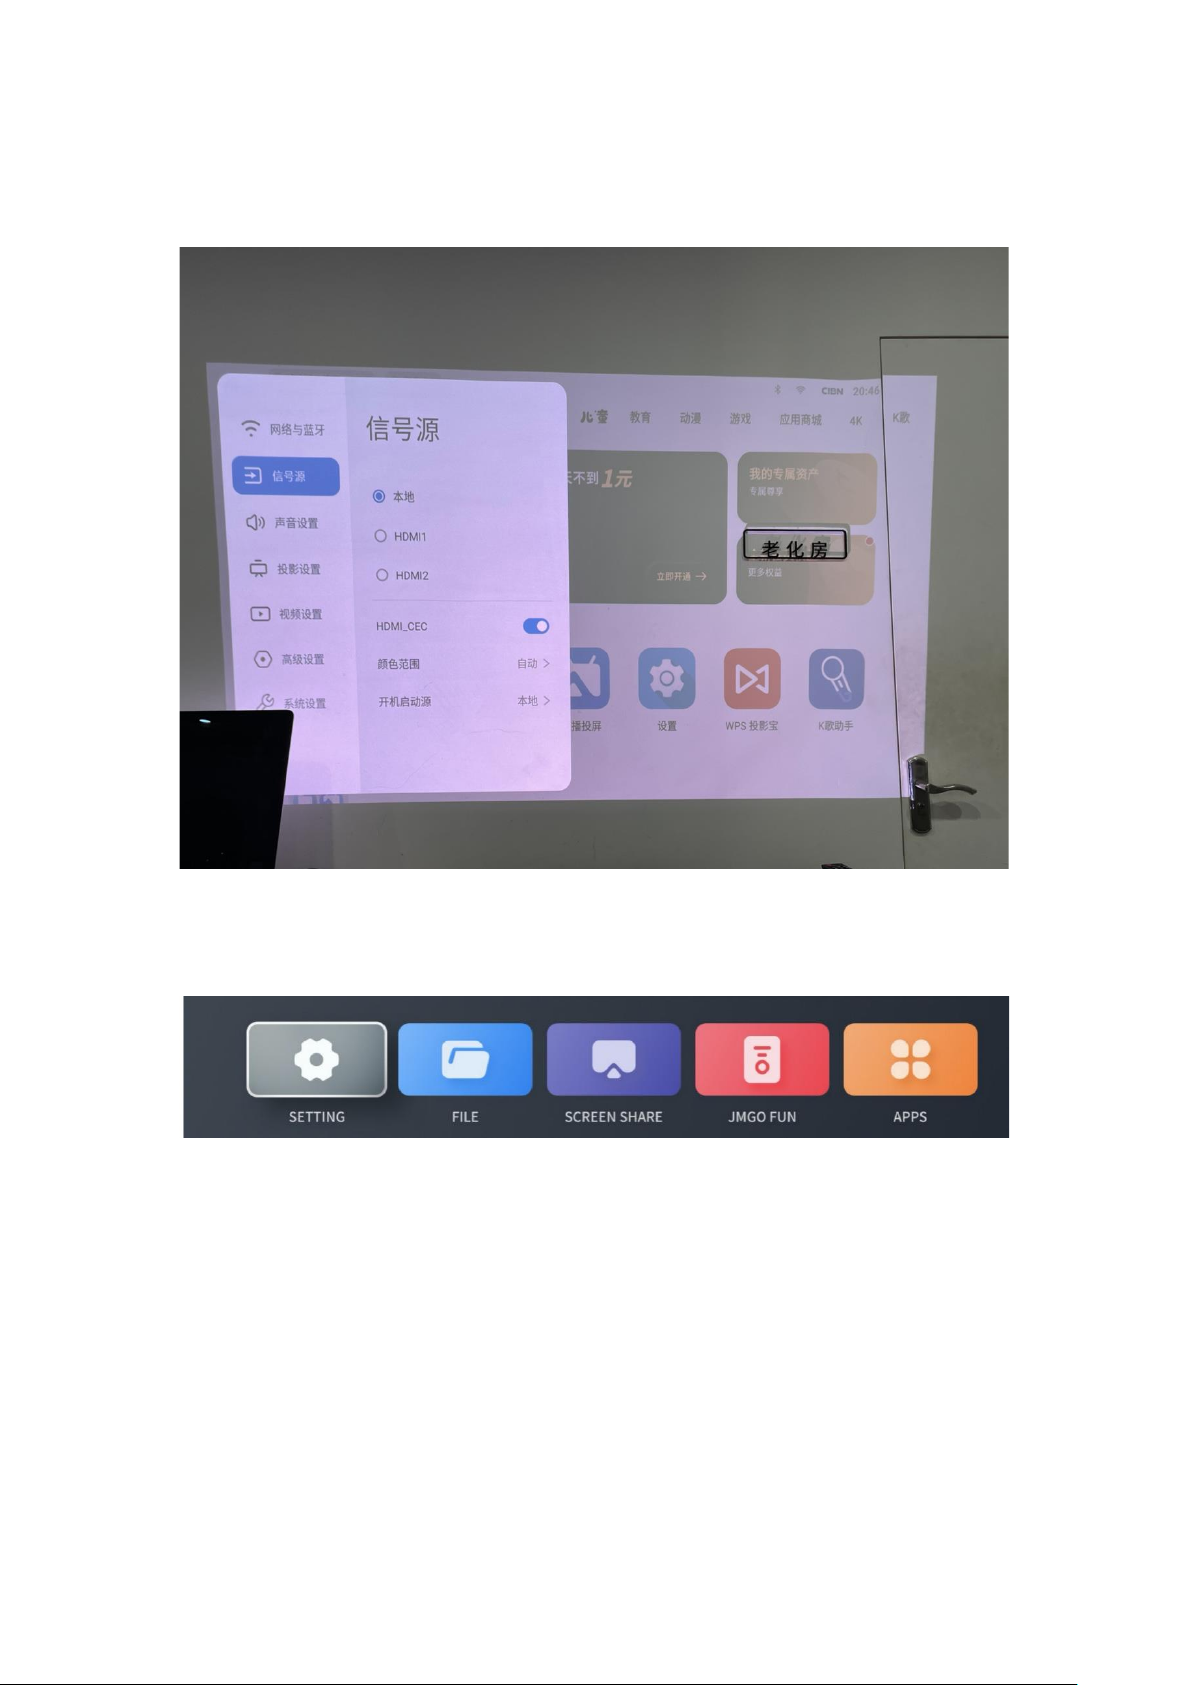
Once a source is connected, select the corresponding button on the homepage to enter the
external source. You can also select a source from Settings > Source, or by pressing the Source
button on the remote control.
2. Settings
You can enter the settings panel by selecting the Settings button from the bottom of the
homepage, or by pressing the Settings button on the remote control.
1) System Update
You can check or update the system version from Settings > System > Update Version.
This product supports both online and local updates.
Page 12
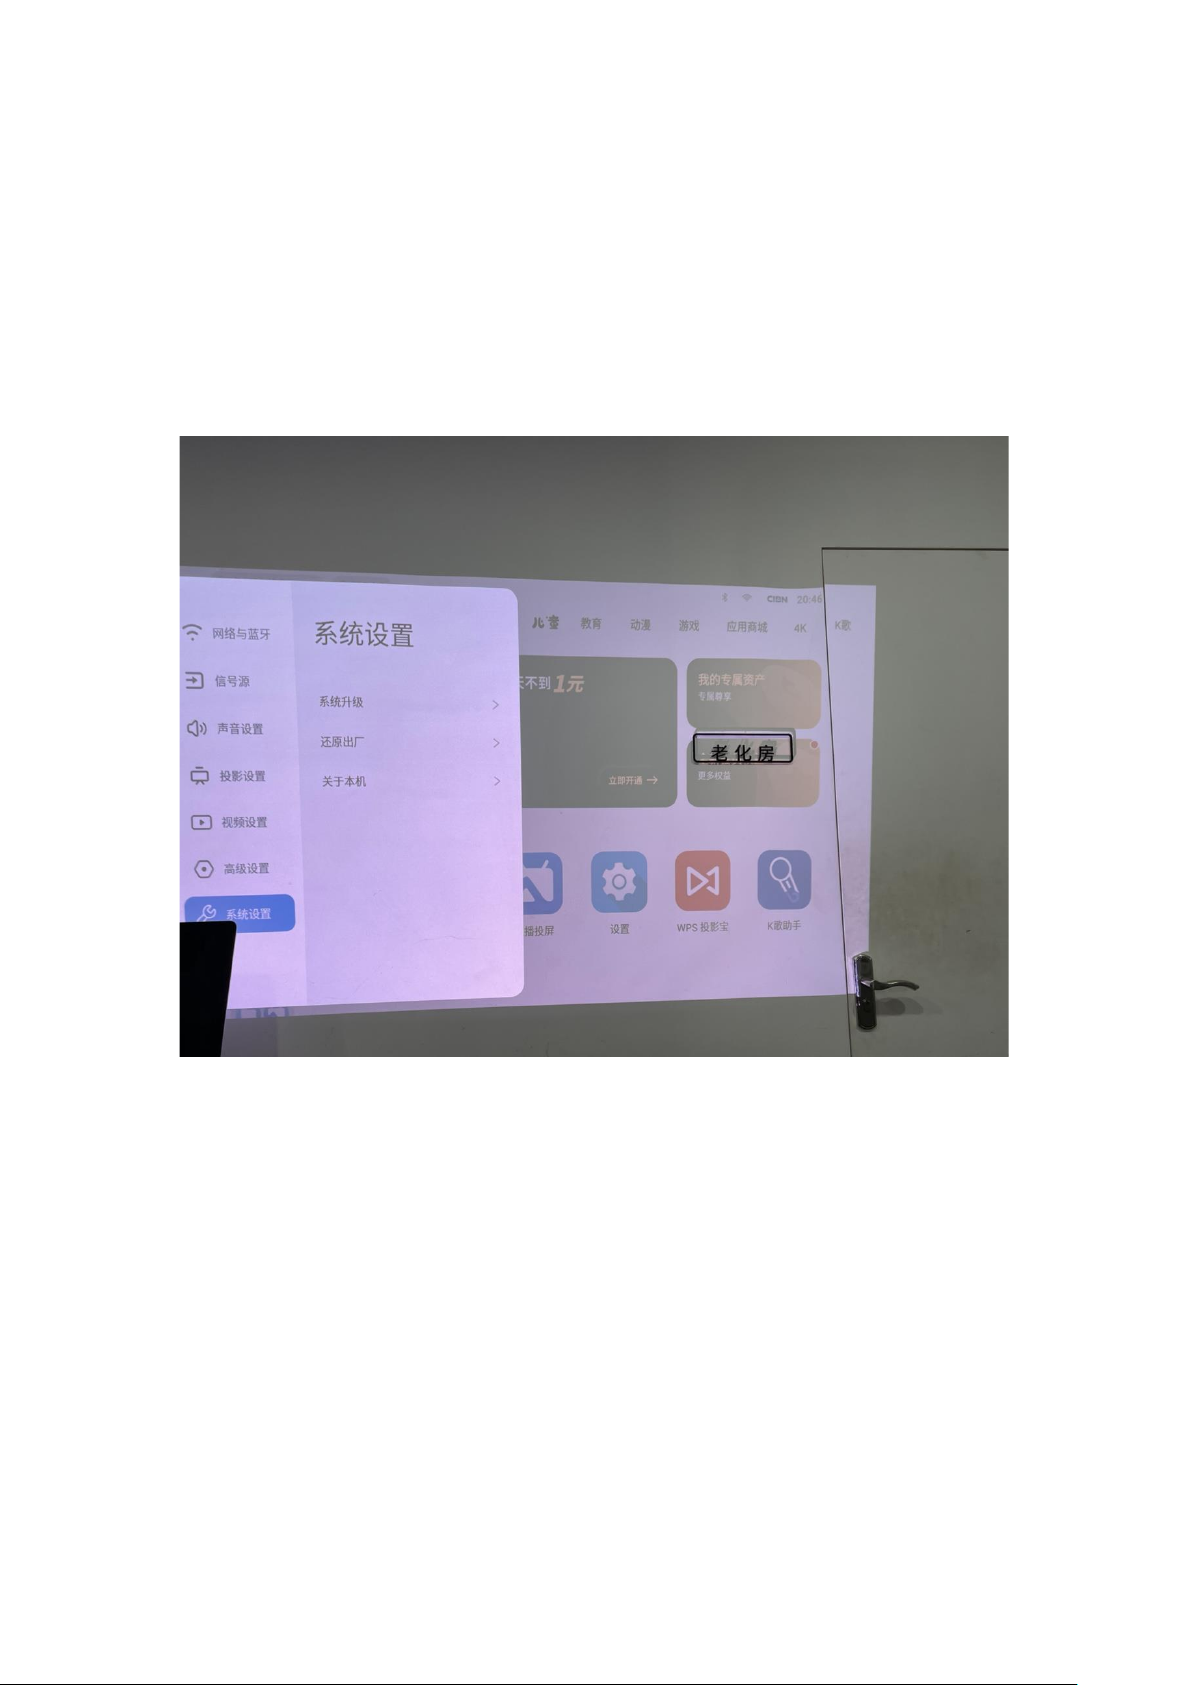
Online Update: Head to Settings > System > Update Version. The system will automatically
detect if your software is up-to-date. You will receive a prompt if the software is already the latest
version. If your software is out-of-date, you will be asked if you wish to update it.
Local Update: Download the software update package from the JMGO website, copy the file to
the root directory of a hard disk or USB, then insert the hard disk or USB into the USB port on the
projector body. Head to Settings > System > Update Version, then select Local Update. The
system will automatically detect and install the update package.
2) Network Settings
This product supports both wired and Wi-Fi networking.
a) To use a wired connection, simply insert the network cable directly into the projector.
b) To connect to Wi-Fi, go to Settings > Network/Bluetooth, then select an available network to
connect. After you’ve successfully connected, a Wi-Fi icon will be displayed on the upper
right corner of the screen.
下方线稿右侧为国内系统的页面,请注意替换
Page 13

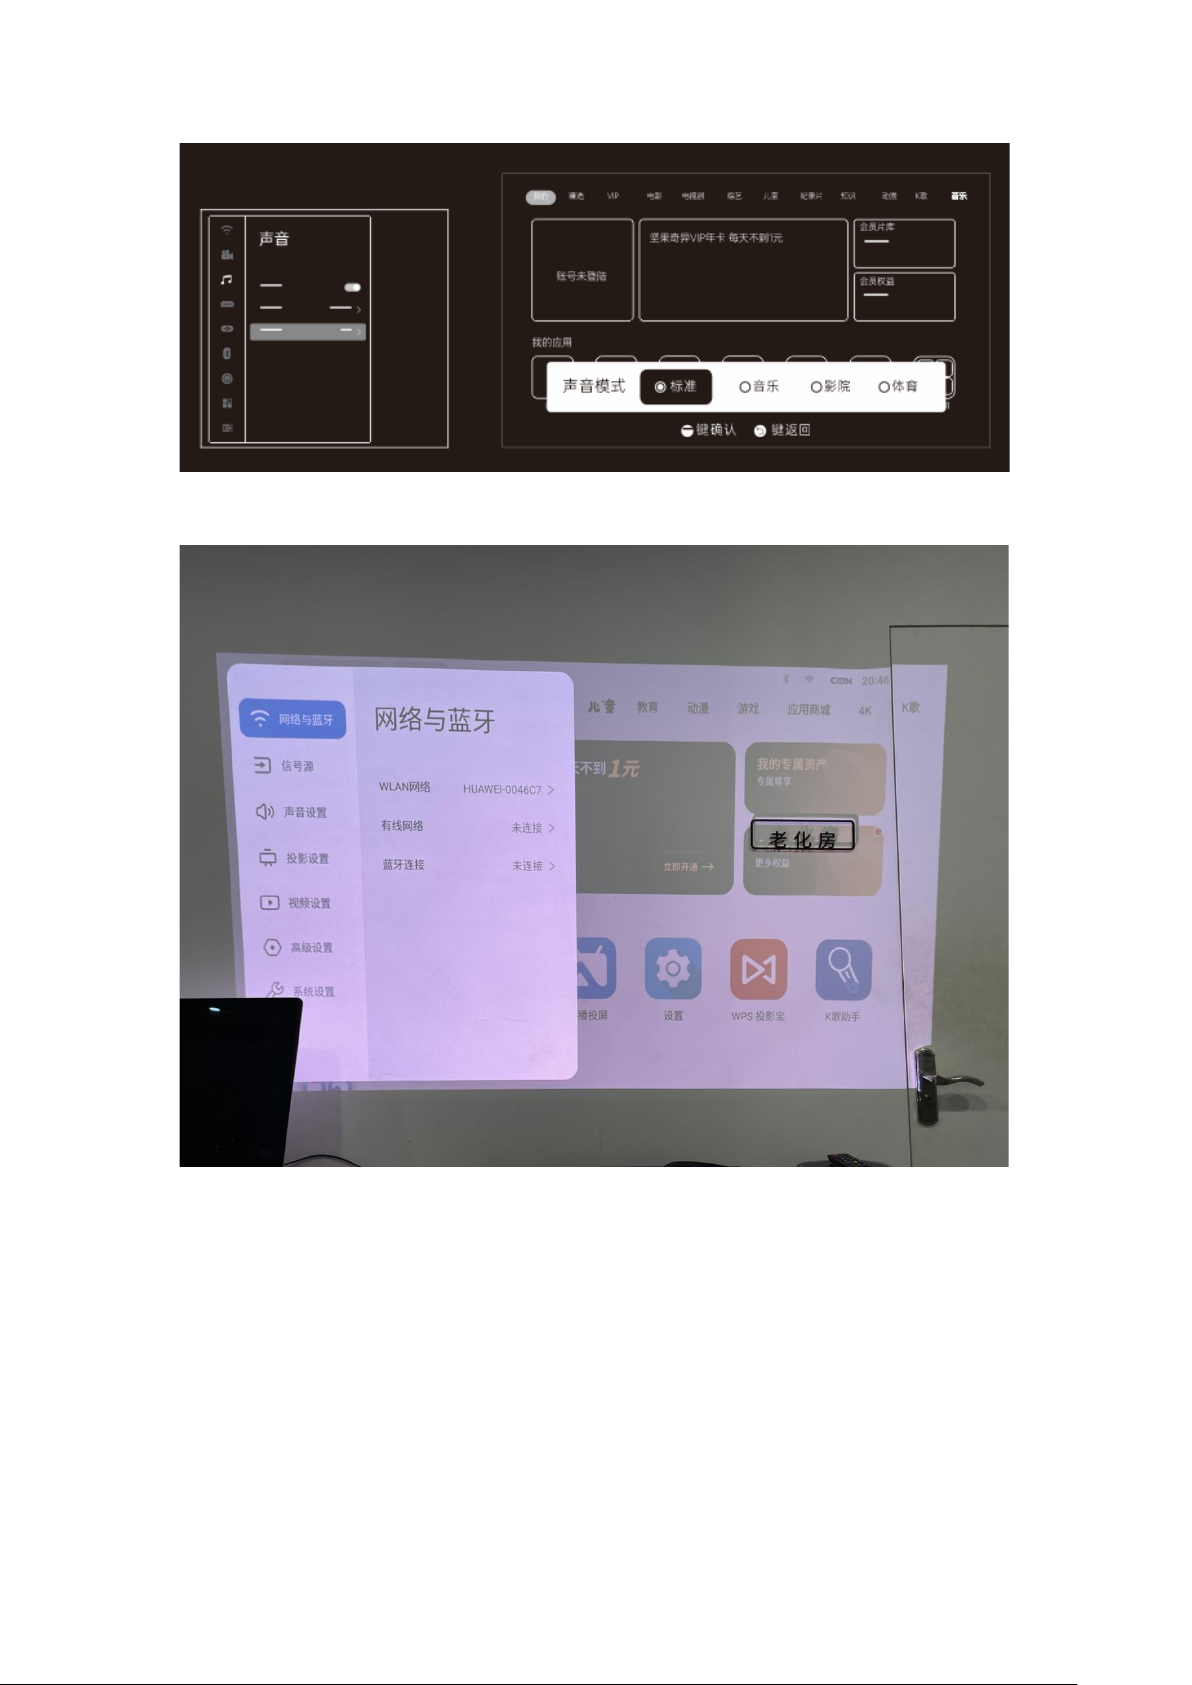
3) Audio Settings
Settings > Audio > Audio Modes
The product includes 4 different audio modes. These are Standard, Music, Film, and Sports. You
can select the mode that best suits your preference.
下方线稿右侧为国内系统的页面,请注意替换
Page 14
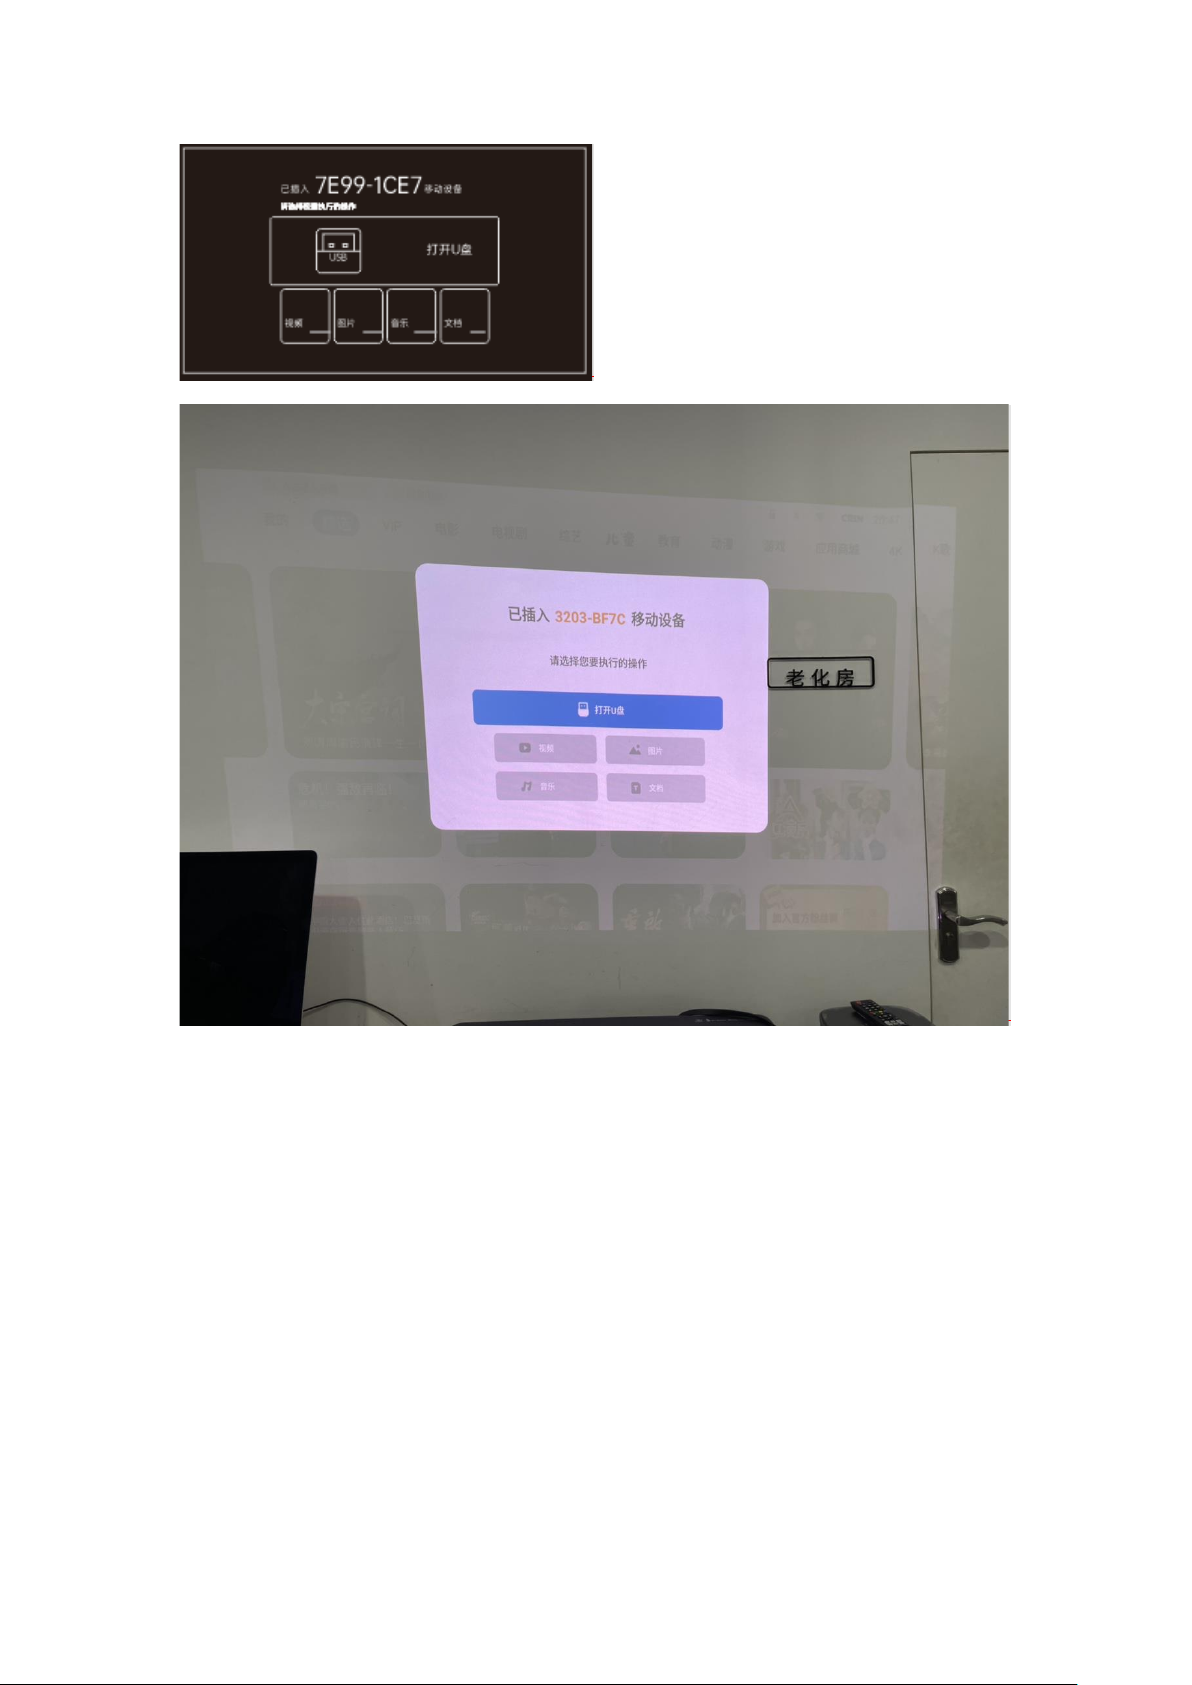
4) USB Storage Devices
This product can automatically identify USB storage devices. After inserting a USB device,
simply follow the system prompts.
Page 15
This product also supports manual switching between video sources.
To switch to another video source, select Settings > Source > Local/HDMI. Alternatively, return
to the homepage and select the corresponding source button to enter an external source.
Page 16

5) Brightness
Users can adjust the brightness of the projector lens manually or through the Smart
Brightness function. The system automatically detects changes to the ambient light and
adjusts the brightness accordingly.
Settings > Projection Settings > Brightness > Smart Brightness/Custom
a) Smart Brightness: Automatically adjusts brightness in accordance with ambient lighting.
Page 17
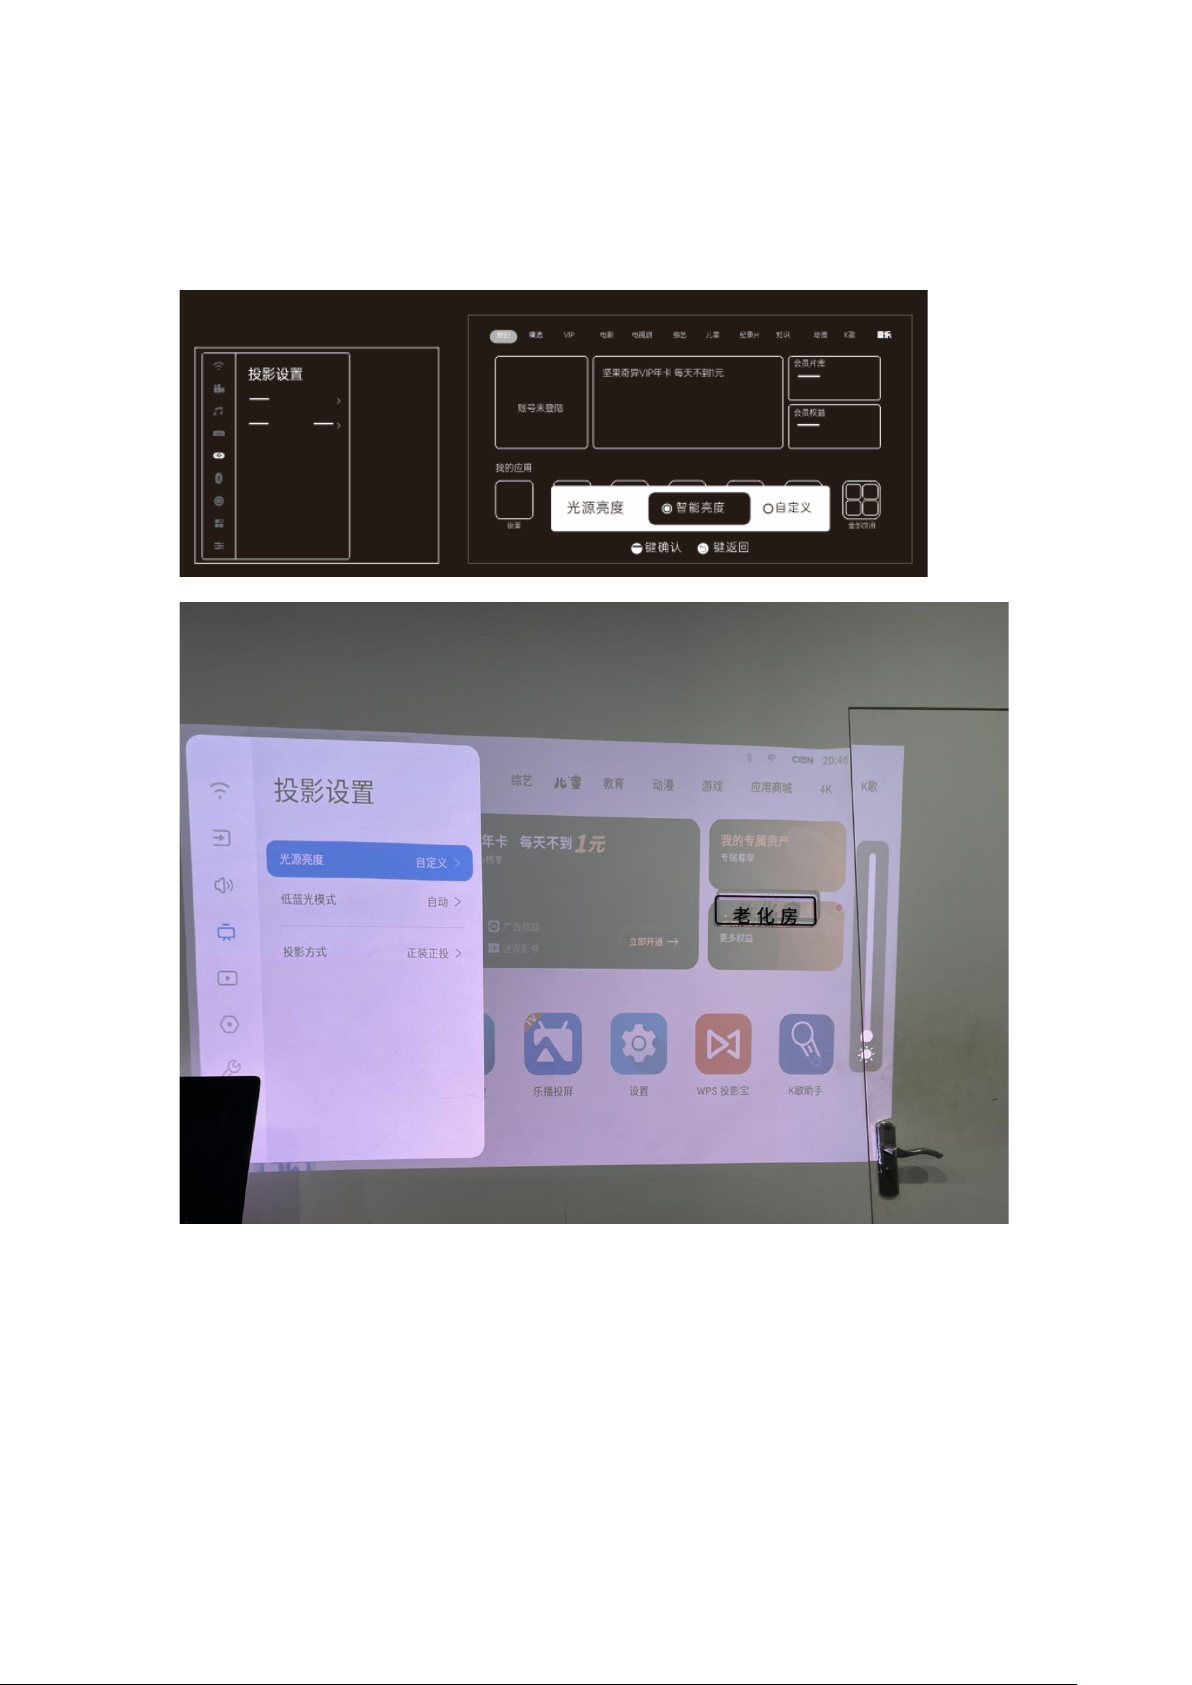
b) Custom: Manually adjust the brightness with the keys on the side of the remote control.
下方线稿右侧为国内系统的页面,请注意替换
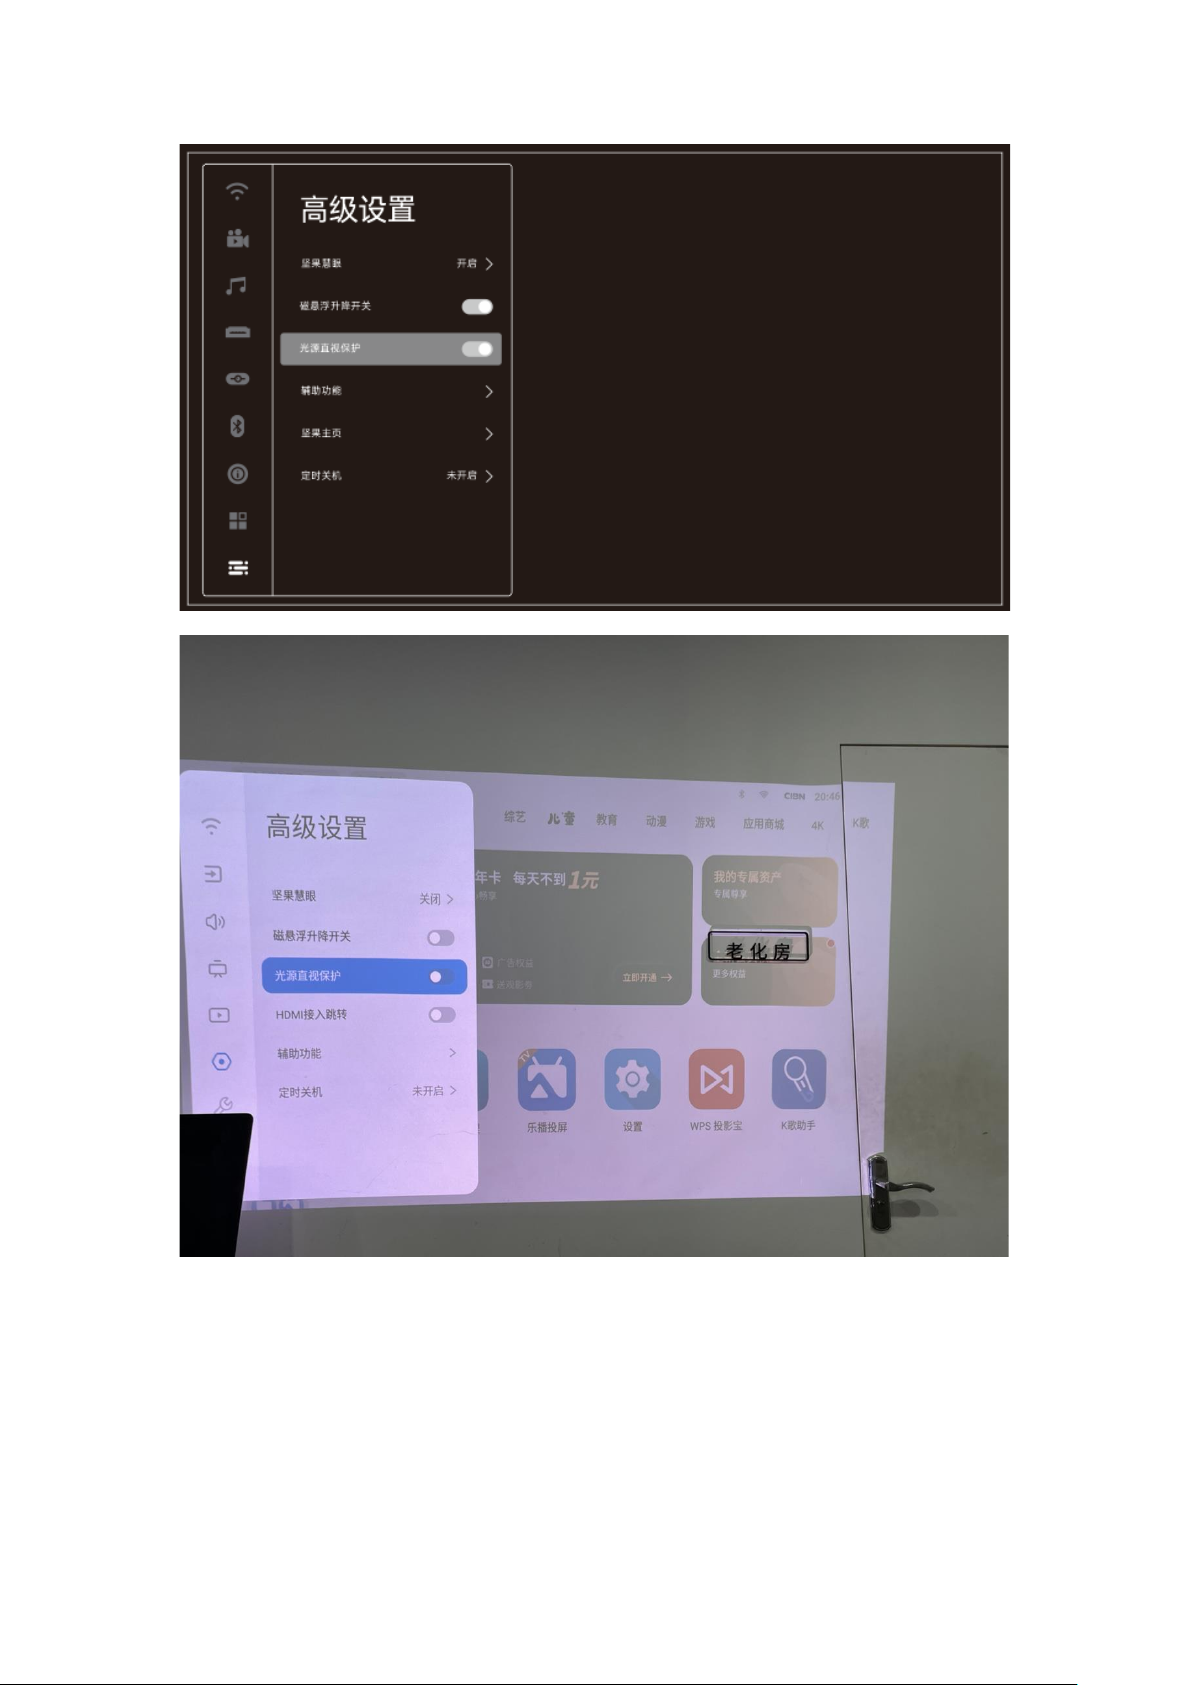
6) Eye Protection Feature
This product includes a smart motion sensor designed to protect the user’s eyes.
Settings > Projection Settings > Eye Protection(注意红字路径有修改,请按此修改)
When this function is enabled, the smart sensor automatically cuts power to the projector lens
when it detects that someone is too close. This helps prevent damage to the human eye.
Page 18
7) Bluetooth Remote Control(本设备没有蓝牙语音,这个按键是 hdmi 信号源键。)
Page 19
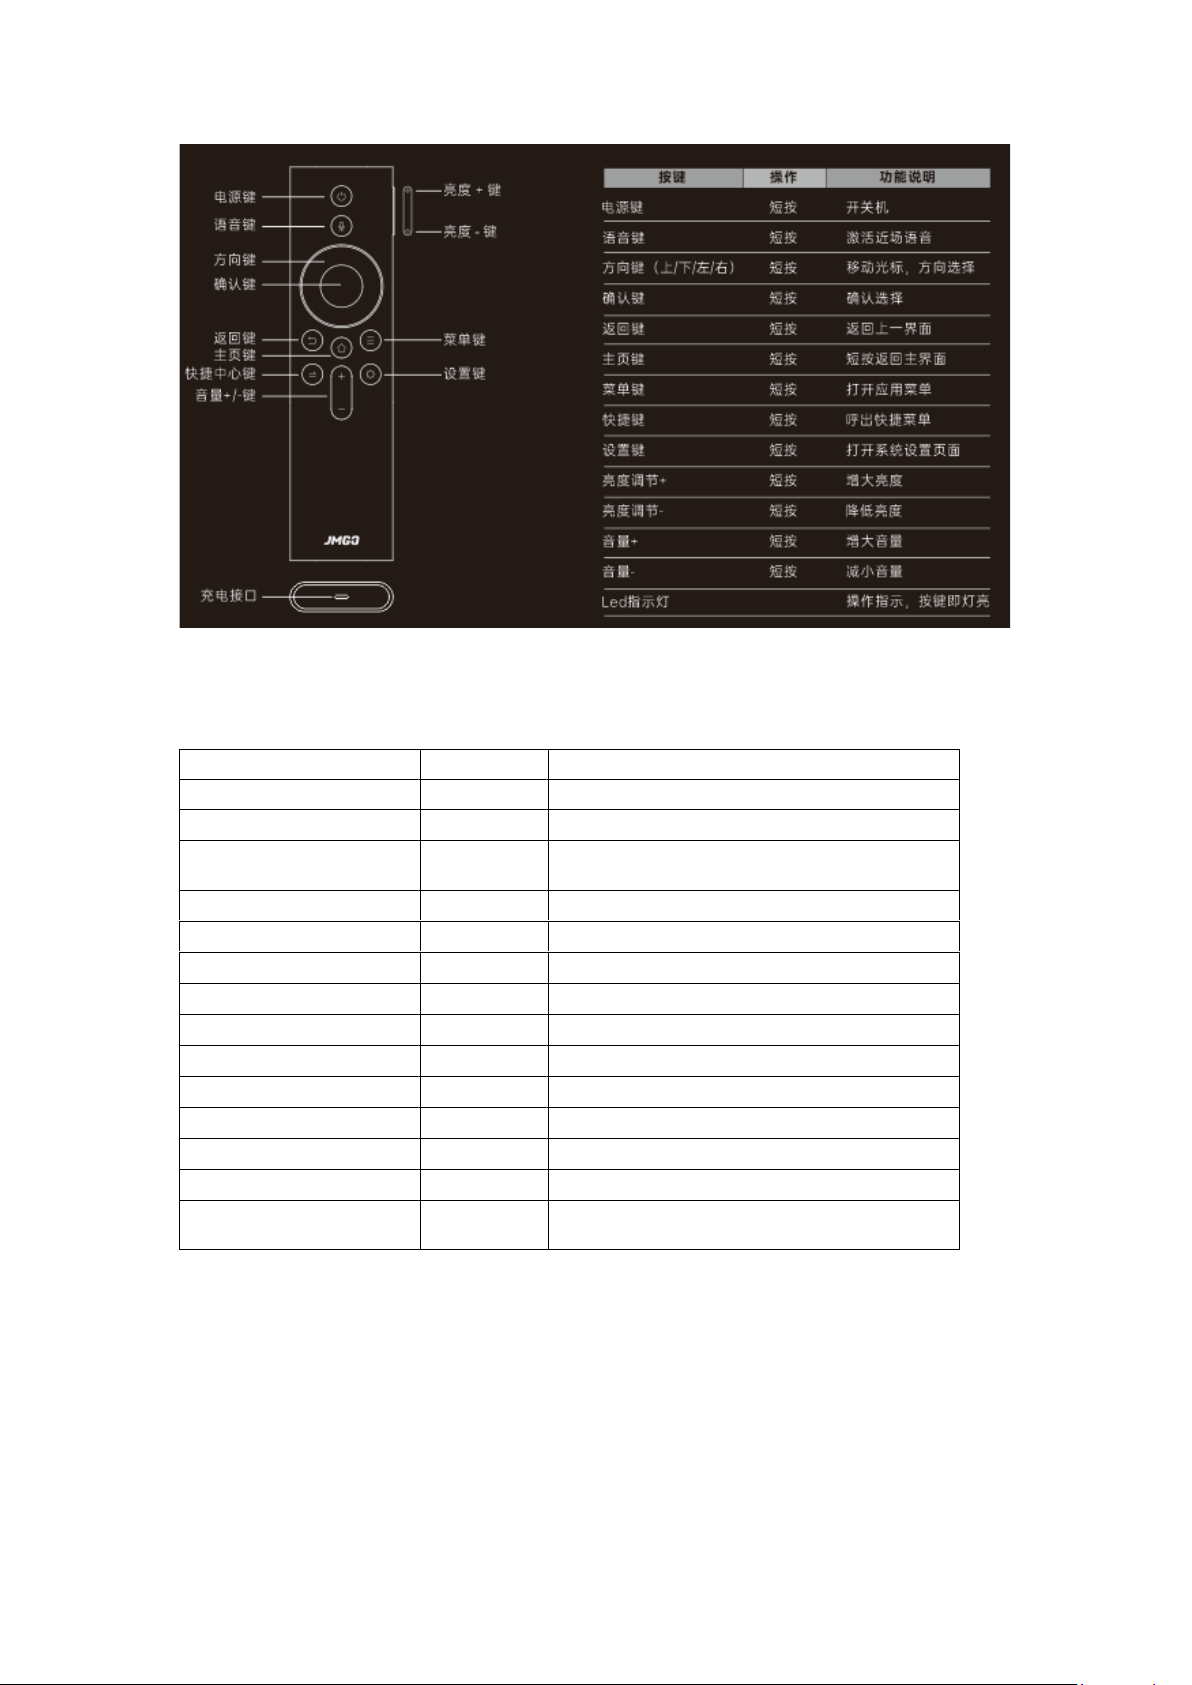
Screenshot
Button
Operation
Function
Power
Press
Turn the device on or off.
Voice Control
Press
Activate near-field voice control.
Direction Pad
(Up/Down/Left/Right)
Press
Move the cursor, or select a direction.
Enter
Press
Confirm a selection.
Return
Press
Return to the previous menu.
Home
Press
Return to the home screen.
Menu
Press
Open the application menu.
Shortcut
Press
Open the shortcut menu.
Settings
Press
Open the system settings page.
Brightness Up
Press
Increase the brightness.
Brightness Down
Press
Decrease the brightness.
Volume Up
Press
Increase the volume.
Volume Down
Press
Decrease the volume.
LED Indicator
Used to guide operations, and lights up when
a button is pressed.
Charging Port
a) Bluetooth Pairing
⚫ Use the remote control buttons to start up the device for the first time.
⚫ After turning on the projector and entering the system, press and hold the Center Shortcut
and Settings keys at the same time for over 2 seconds within the first 5 minutes. The light
will start to flash to indicate the remote control is now in pairing mode. The remote control
Page 20
will automatically attempt to pair and connect. If the pairing is successful, the projector
interface will display the corresponding prompts.
⚫ If the indicator light turns off and there are no prompts on the screen, the pairing has failed
and you will have to try again.
⚫ If you were unable to pair the remote control during initial setup, you can do so manually
within the first 5 minutes of startup. The name of the Bluetooth remote control on the pair
screen should be RemoteControl.
⚫ Enter the settings page through Settings > Bluetooth > Bluetooth Pairing. Center Shortcut
and Settings keys at the same time. After the remote control indicator starts to flash, select
Refresh from the OS Bluetooth interface. Look for the device named RemoteControl, then
select Connect.
⚫ Once you have paired your remote control with Bluetooth, the voice control function will
become available.
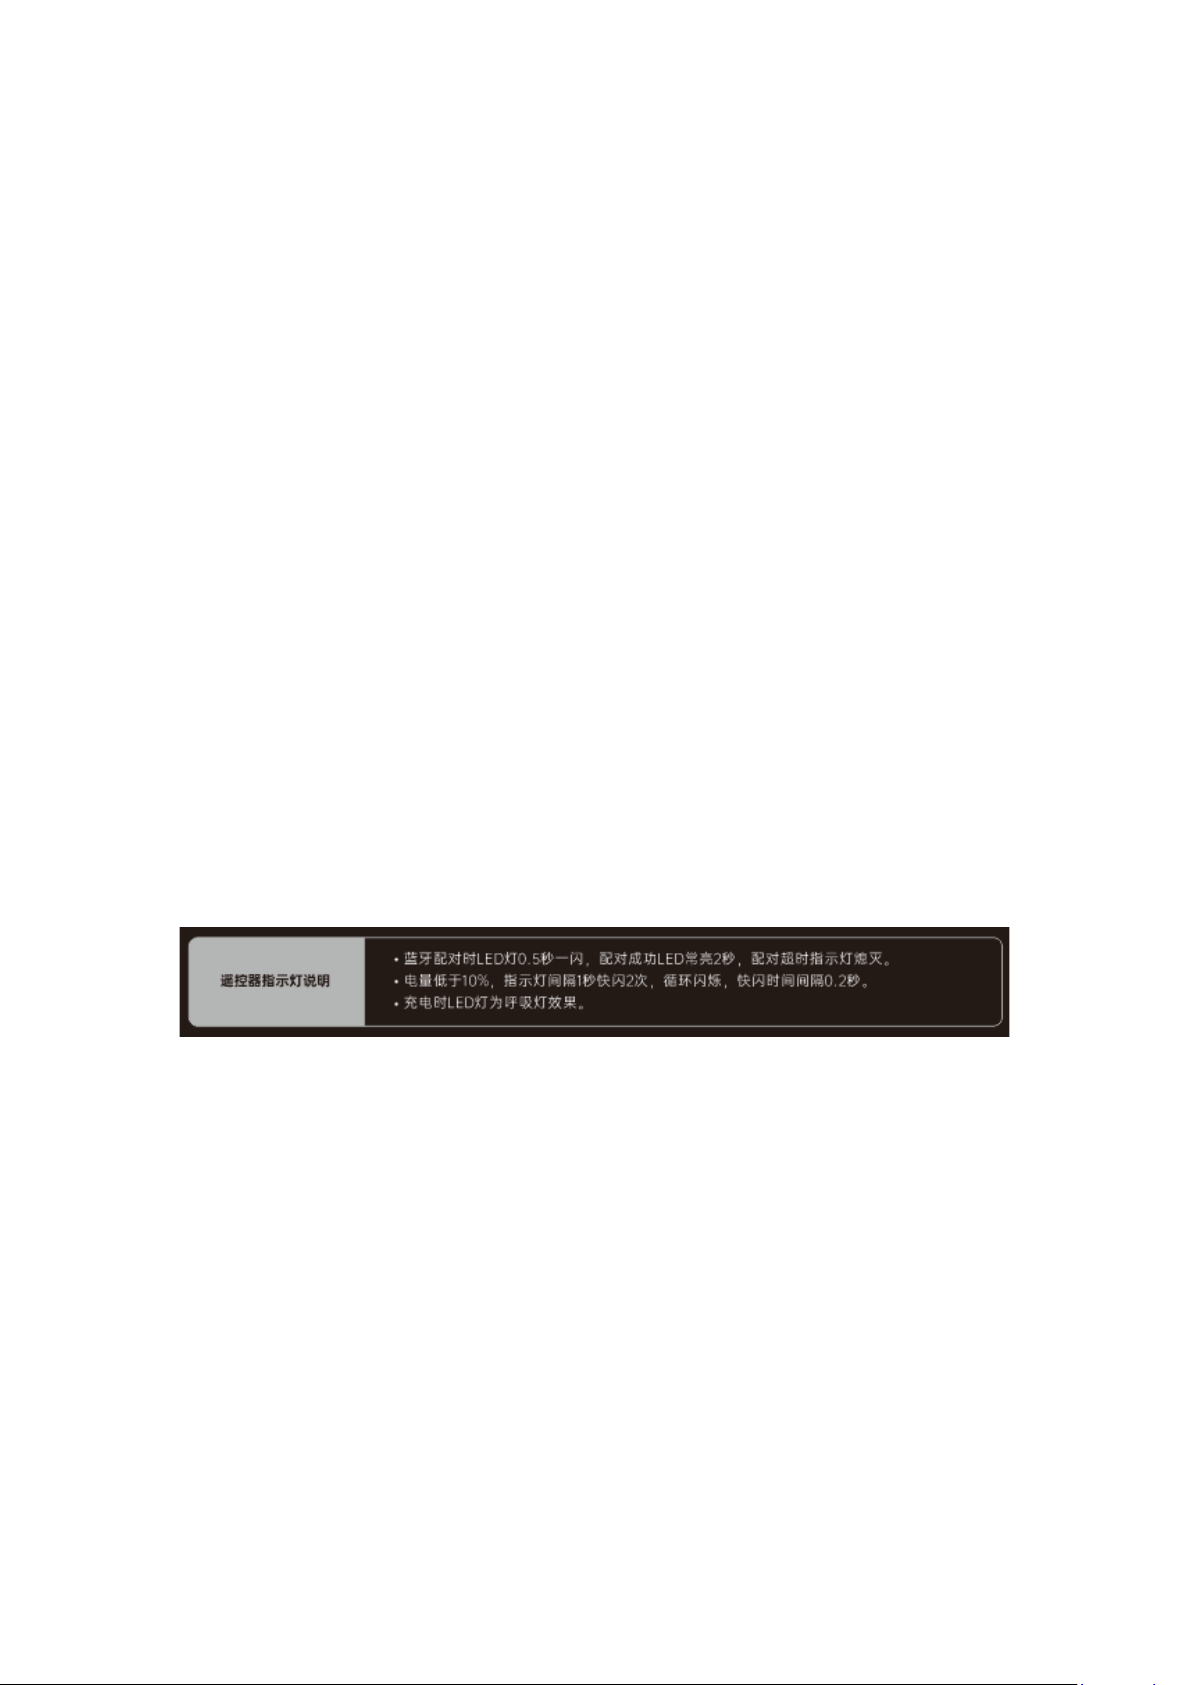
b) Remote Control Indicator
⚫ During Bluetooth pairing, the indicator will flash for 0.5 seconds. After successful pairing,
the indicator will display a constant light for 2 seconds. If the pairing fails, the indicator
switches off.
⚫ When the battery is less than 10%, the indicator will flash twice at a 1-second interval, then
flash cyclically at 0.2-second intervals.
⚫ When charging, the indicator will start pulsating.
8) Bluetooth Speaker Function
⚫ This product can be used as an independent Bluetooth speaker. Press On > Bluetooth
Speaker on the remote control to enter Bluetooth speaker pairing mode. The indicator should
start pulsating in blue.
⚫ Enable Bluetooth on the playback device, then scan for available Bluetooth devices. Find and
pair with the device named JMGO. The pulsating indicator should switch to a solid blue.
⚫ When the pairing is successful and Bluetooth is connected, the volume can be adjusted
through the volume key of the remote control.
9) System Updates (online and offline supported)
a) Online Update: Head to Settings > System > Update Version. The system will automatically
detect if your software is up-to-date. You will receive a prompt if the software is already the
latest version. If your software is out-of-date, you will be asked if you wish to update it.
Page 21
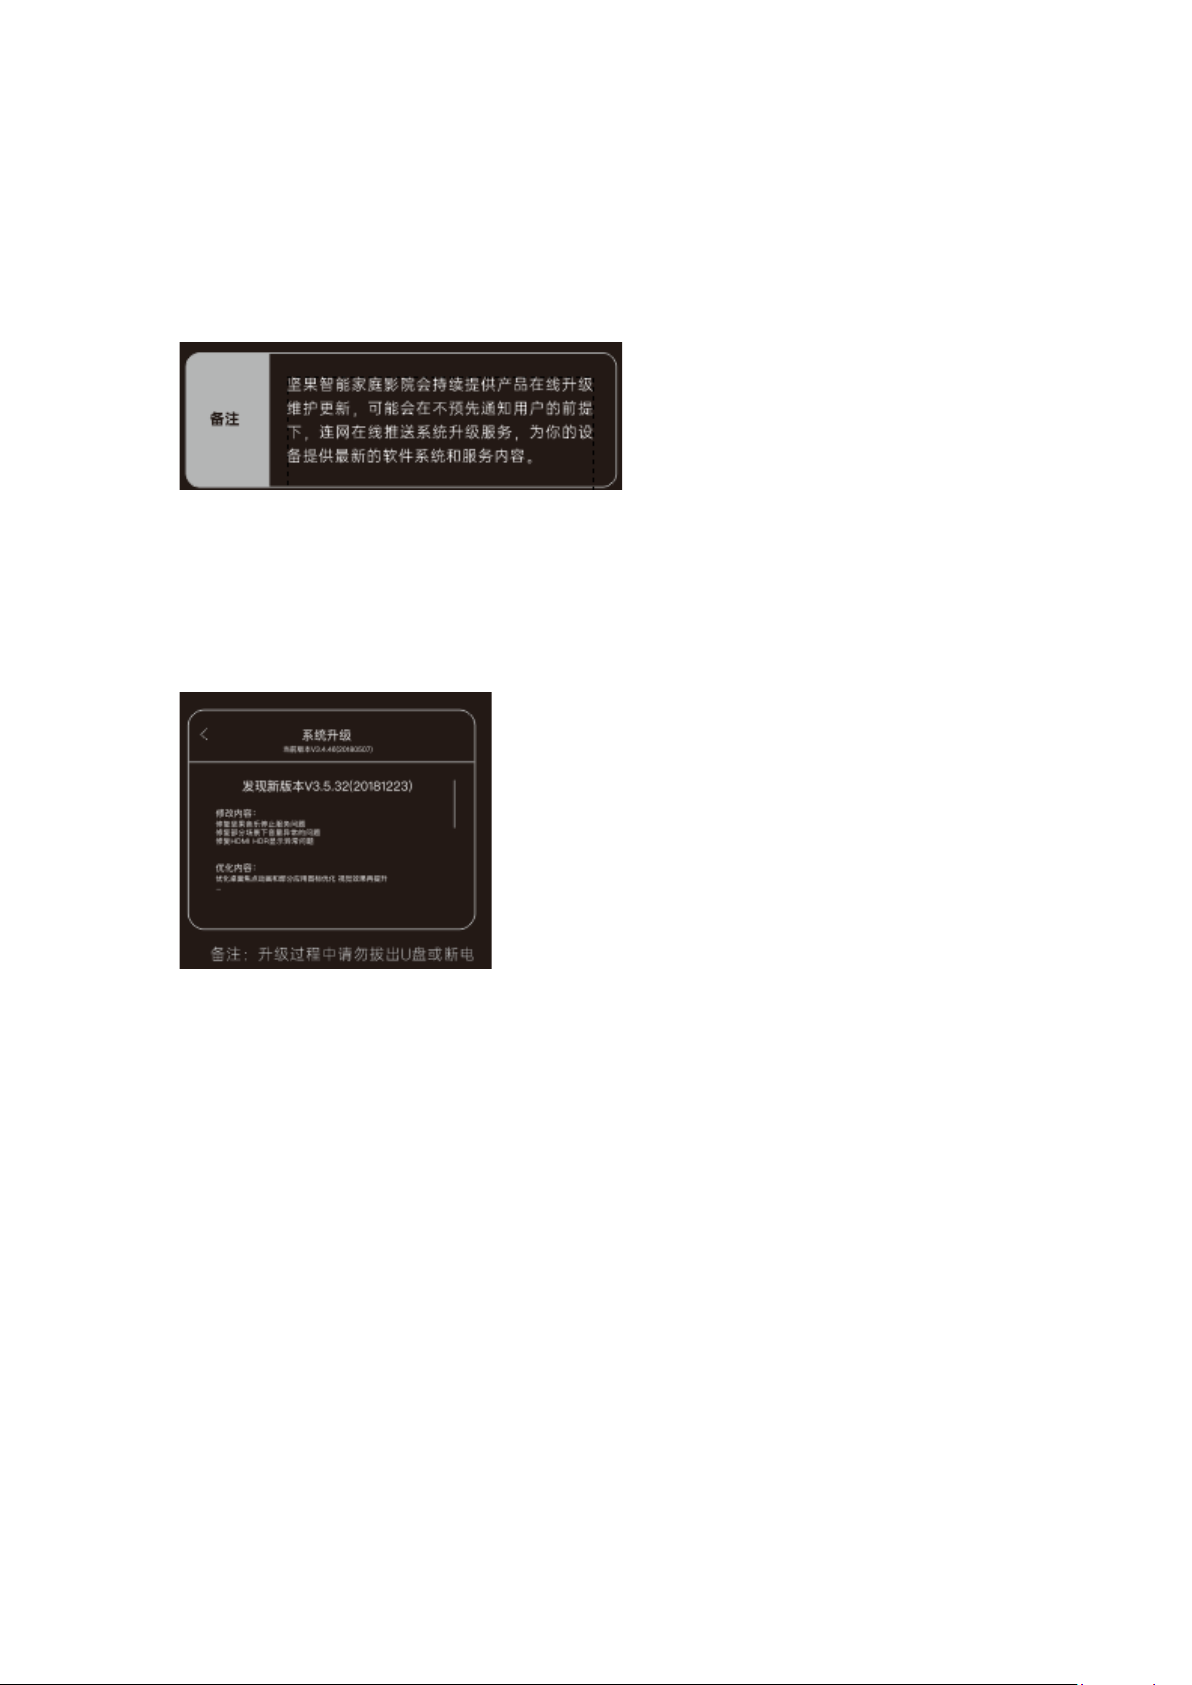
Note:
JMGO regularly releases software updates as continuous maintenance services. We may push
software updates without prior notice to ensure users can enjoy up-to-date experiences and
services.
b) Local Update: Download the software update package from the JMGO website, copy the file
to the root directory of a hard disk or USB, then insert the hard disk or USB into the USB
port on the projector body. Head to Settings > System > Update Version, then select Local
Update. The system will automatically detect and install the update package.
Note:
Do not unplug the USB or cut off power during the update process.
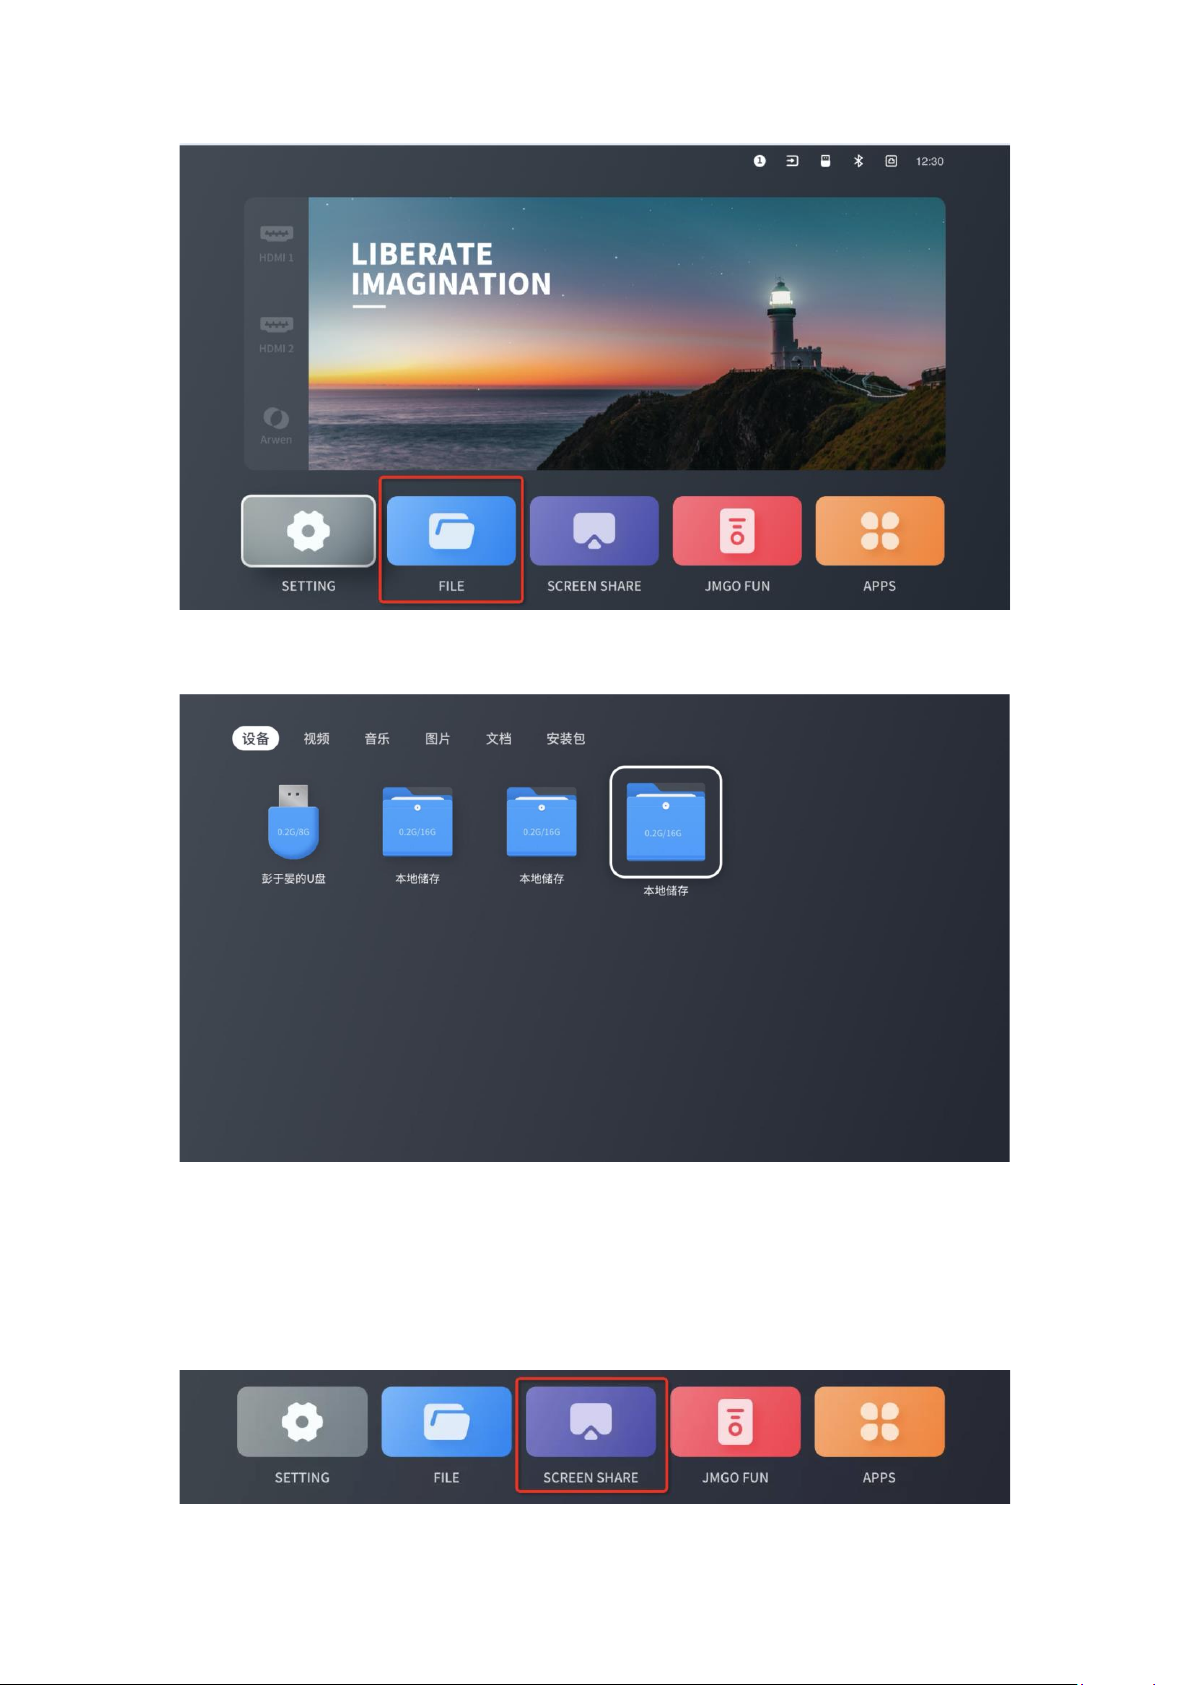
1. File Management
This product can read from and write to local/external files.
Select the File Management button to read from and write to local files, along with files on
external hard disks, USBs, and other devices.
Page 22
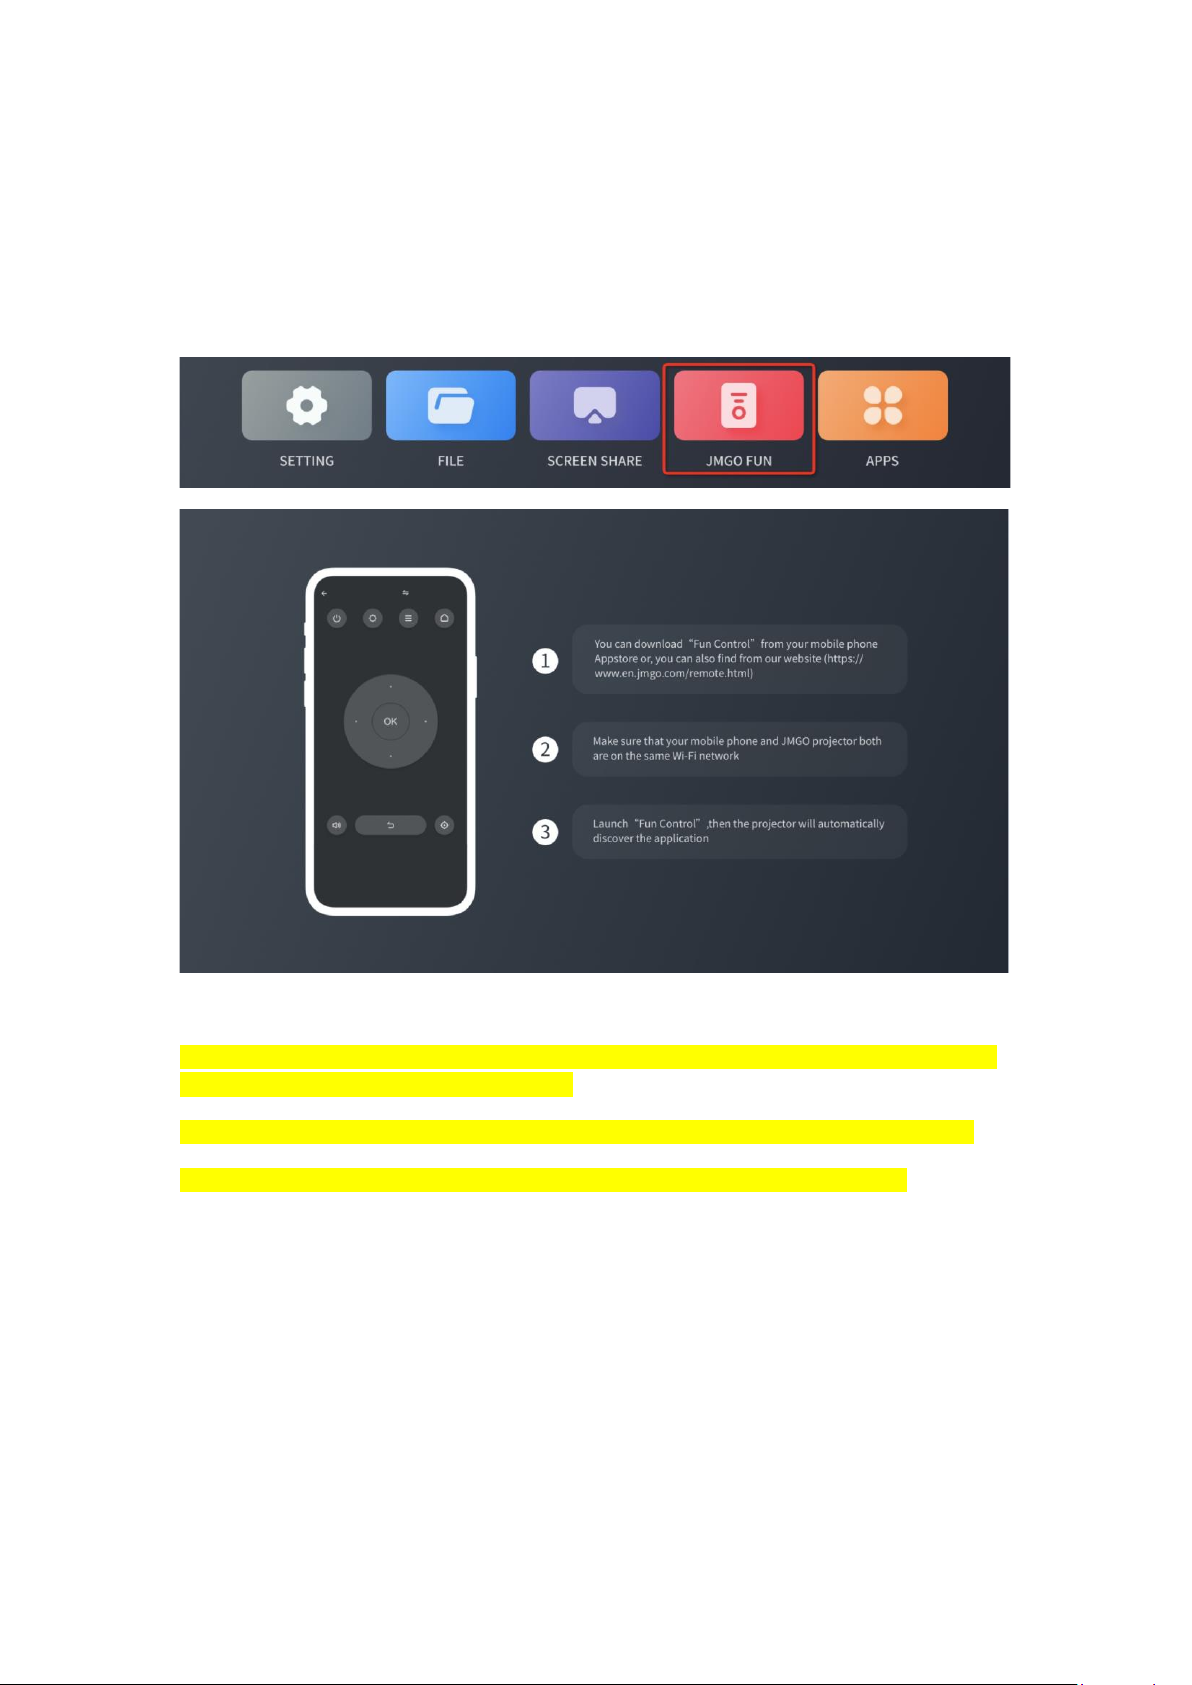
2. Screen Share
To use the screen share function, select the Screen Share button from the homepage, then follow
the prompts to connect a device to the projector.
Page 23
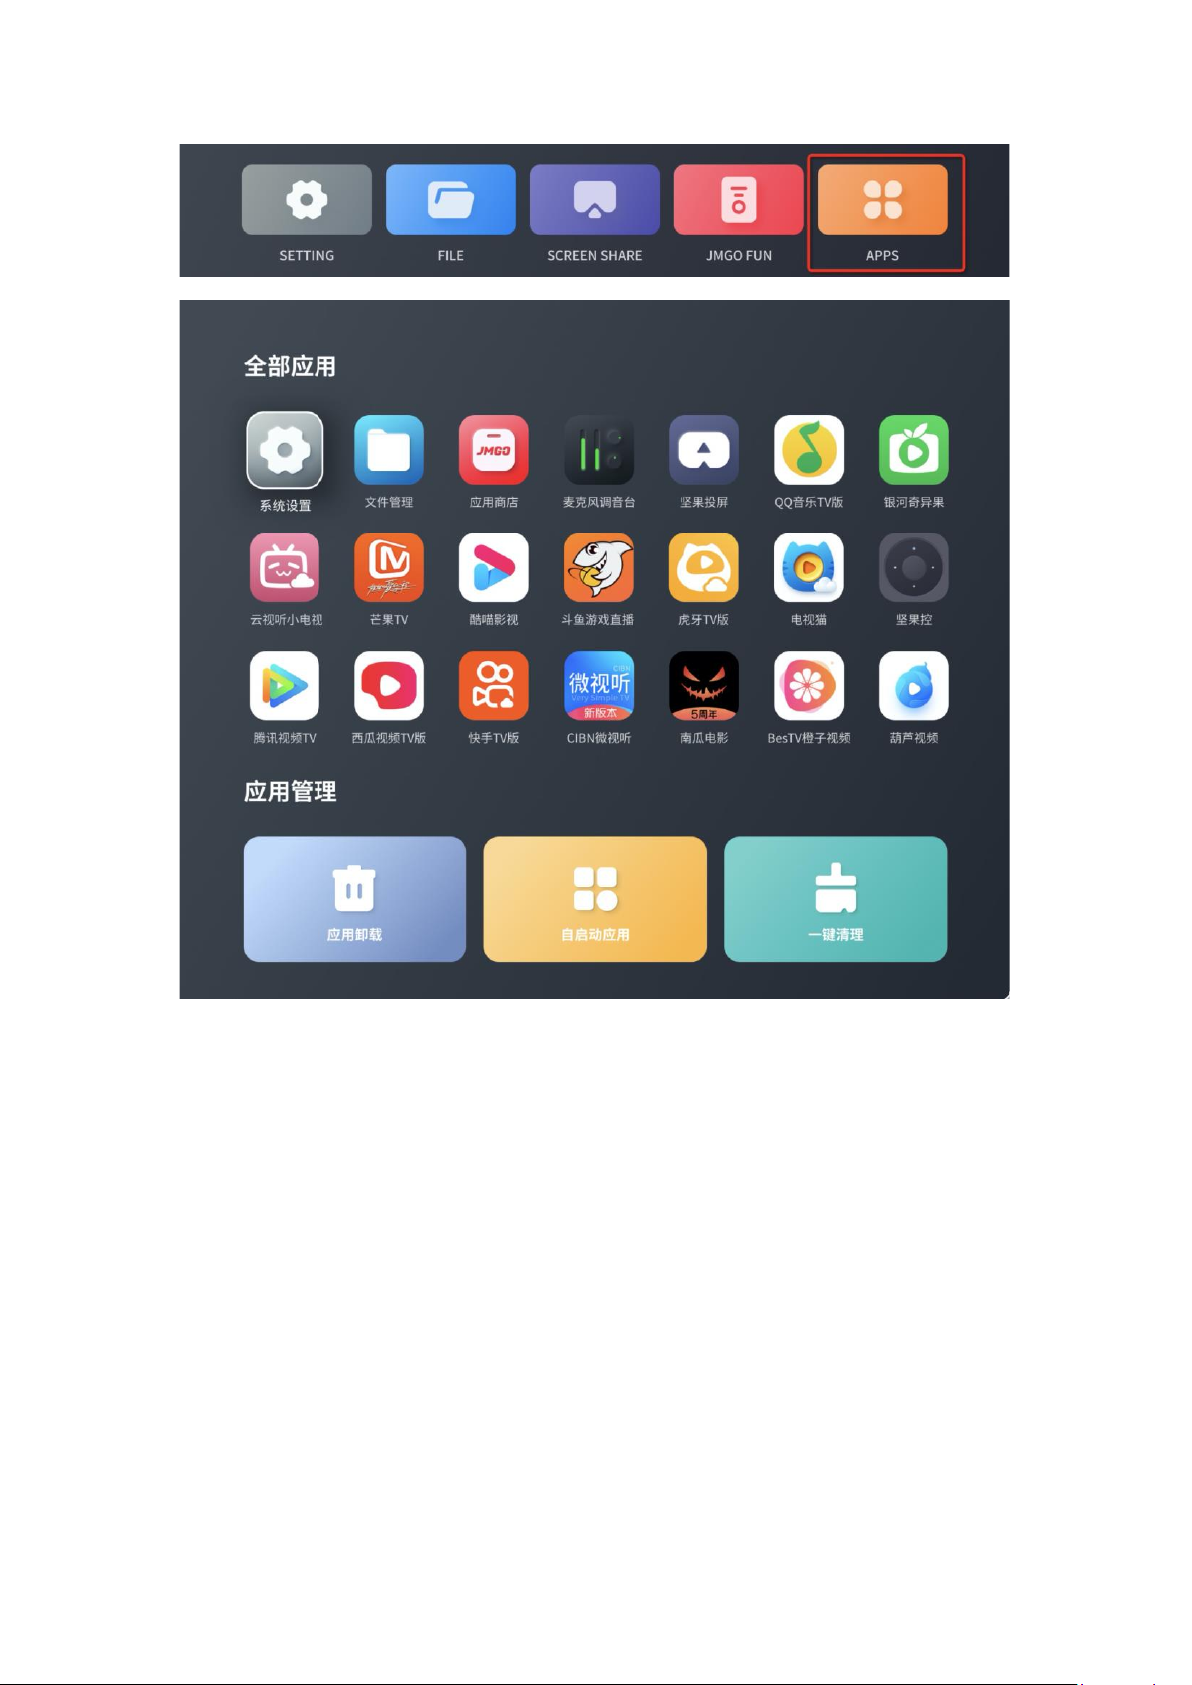
3. JMGO FUN
To control the product through the JMGO FUN app, select the JMGO Fun button from the
homepage, then follow the prompts to download JMGO FUN from the App Store or JMGO
Official Website.
You can download "Fun Control" from your mobile phone Appstore or, you can also find from
our website (http://en.jmgo.com/remote.html)
Make sure that your mobile phone and JMGO projector both are on the same Wi-Fi network
Launch "Fun Control”, then the projector will automatically discover the application
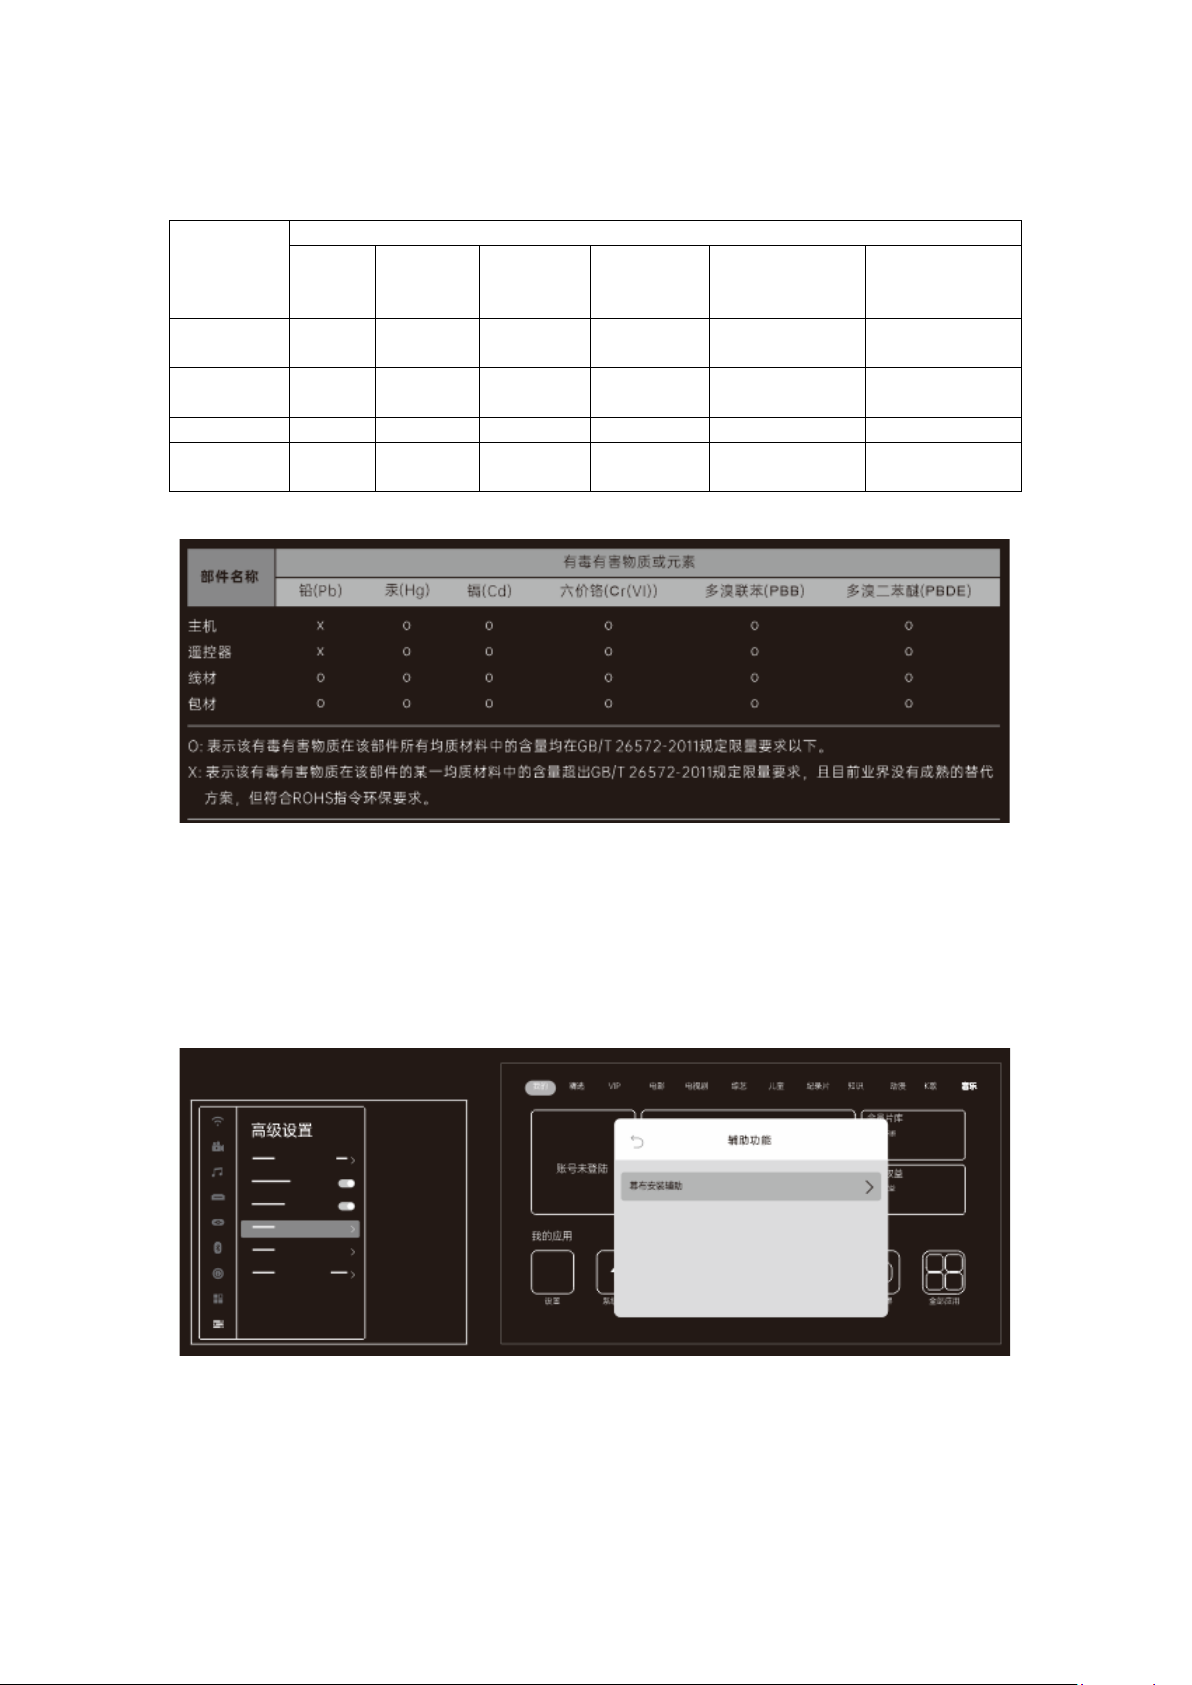
4. App Management
The operating system of this product is based on the Android platform, meaning it is compatible
with mainstream Android applications. To install an app, download its APK file, copy it to the
projector with a USB, then install it. The product also includes uninstallation, auto-startup
management, and one-click clear cache functions.
Page 24
四. Environmental Protection
This Environment-Friendly Use Period (EFUP) label indicates that there is a 10 year period before
hazardous substances contained in this device are likely to leak out during normal use, causing
possible harm to health and the environment.
During normal use conditions, there will be no leakage or sudden change of hazardous substances,
no serious pollution to the environment, and no serious damage to people or property.
Name and content of trace toxic and harmful substances or elements contained in each
component of this product
O: Hazardous substances in all homogeneous materials in this component are under the reporting
requirements of GB/T 26572-2011.
X: Hazardous substances in at least one homogeneous material in this component reaches the
Page 25
reporting requirements of GB/T 26572-2011, and there is no readily available industry alternative
that meets the environmental protection requirements of the China RoHS.
Component
Name
Toxic and or Hazardous Substance or Elements
Lead
(Pb)
Mercury
(Hg)
Cadmium
(Cd)
Hexavalent
Chromium
(Cr (VI))
Polybrominated
Biphenyls
(PBB)
Polybrominated
Diphenyl
Ethers (PBDE)
Projector
Body
X O O O O
O
Remote
Control
X O O O O
O
Wiring
O O O O O
O
Packaging
Material
O O O O O
O
五. Installation and Troubleshooting
1. Projector Screen Installation
Settings > Advanced Settings > Accessibility > Screen Installation
For specific installation instructions, please visit our website at http://en.jmgo.com/faq.
2. Grommet Holder and Lifting Bracket
Page 26

After the position of the projector and screen installation has been determined, tear off the
protective paper from the grommet holder, attach the holder to the front foot, then paste to the
tabletop.
*Ensure that the grommet holder fits in place with the outer contour of the front foot.
Pull out the lifting bracket beside the rear foot, then push it onto the wall surface. Mark the
position on the wall surface, tighten the screws again, then note the relative position between the
projector and the wall.
3. Repositioning the Projector
Step 1: Check whether the foot is stuck on the inlay of the grommet holder. If the foot is not stuck,
realign the front foot with the position of the grommet holder.
Step 2: Pull out the lifting bracket beside the rear foot and check whether it is directly positioned
on the marked area of the wall. If the bracket is off, the relative position with the wall has changed.
Adjust until the lifting bracket exactly hits the marked area on the wall, indicating that the relative
position has been corrected.
Grommet Holder
Lifting Bracket
六. After-Sales Service Policy(维维帮忙核对售后部分)
Shenzhen Holatek Co., Ltd. (hereinafter “JMGO”) formulates its after-sales policies in strict
accordance with relevant laws and regulations to provide the “three guarantees” of repair,
replacement, and return.
1. Warranty Policy
1) Service Period:
a) European Region
Page 27
The validity period is calculated from the date of purchase, or the date of receipt of the package. If
the product experiences a performance failure, the package must be returned within 30 days. The
projector is guaranteed for 2 years.
b) Non-European Region
The validity period is calculated from the date of purchase, or the date of receipt of the package. If
the product experiences a performance failure, the package must be returned within 30 days. The
projector is guaranteed for 1 year.
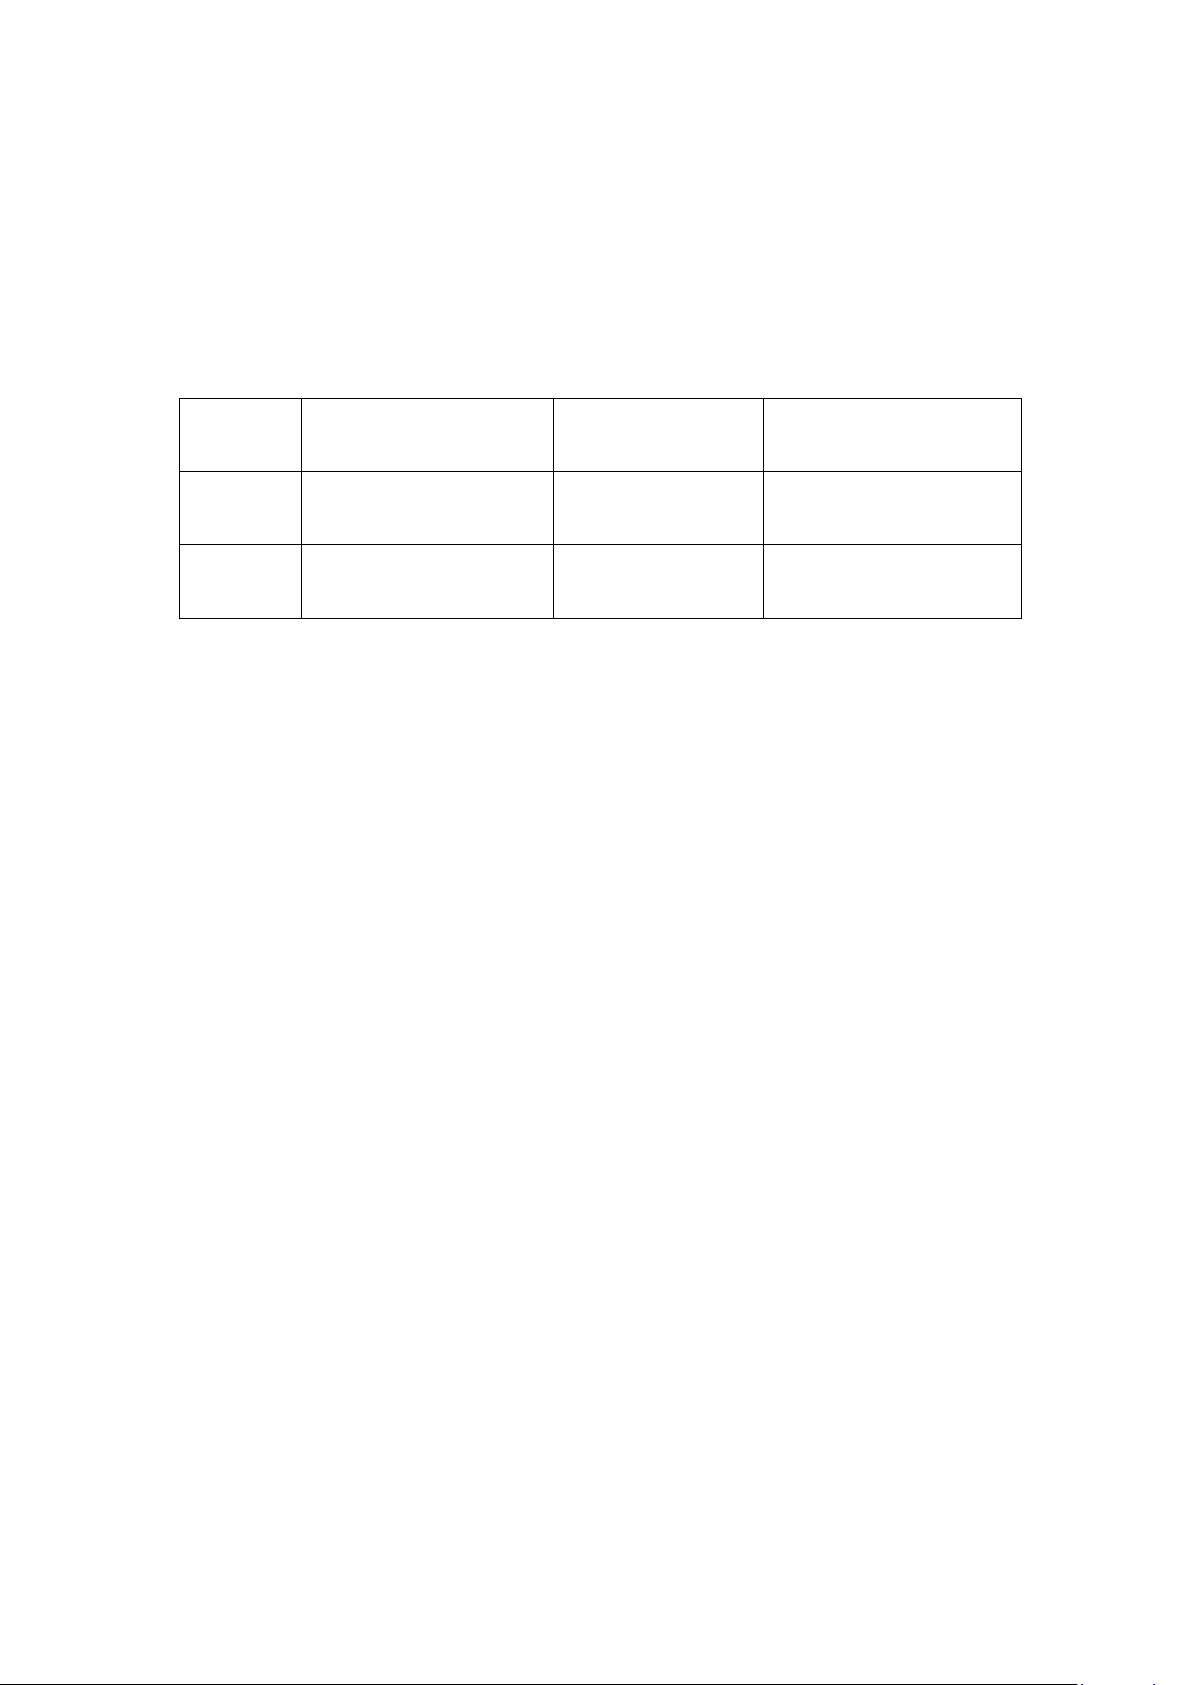
Scope of
Warranty
Warranty Content
Warranty Period
(European Region)
Warranty Period
(Non-European Region)
Projector
The projector and its
constituent components
2 years
1 year
Accessories
Separately sold accessories
and internal accessories
2 years
1 year
If you encounter any problems during use or wish to know more about our after-sales services,
please contact us at [email protected].
2. Non-Warranty Policy
1) This product is not covered by warranty in the below circumstances.
2) The validity period of three guarantees has been exceeded.
3) Any maintenance, misuse, collision, negligence, abuse, liquid ingress, accident, alteration,
disassembly, or improper use of accessories not authorized by JMGO; quality problems
caused by the installation of software; or the destruction or alteration of labels, machine serial
numbers, or anti-counterfeiting labels.
4) The model of the “three guarantees” certificate does not match or the model of the damaged
product, or has otherwise been altered.
5) Damages caused by force majeure.
6) Damage caused by use in environments that do not conform to the specifications of the
product manual.
7) Failure or damage caused by computer viruses, hacker intrusion, or other malicious
intrusions.
8) Damage caused by the use of software that is not authorized by JMGO.
3. Three Guarantees Policy
1) Return or replacement will not be provided in the following circumstances: Damage caused
by human action, missing or damaged packaging, or missing or damaged internal
Page 28
components.
2) When seeking a return or replacement, please return all provided accessories as well
(including but not limited to product accessories, gifts, warranty cards, manuals, etc.).
3) Tip: To ensure a smooth return or replacement process, we recommend that you keep the
outer packaging, accessories, and other gifts provided with the products for 30 days from the
date of receipt.
4) JMGO has the right to refuse the return or replacement of products that do not meet the
replacement requirements or exceed the warranty period.
5) Back up your personal data and applications before seeking replacement or repair. The
maintenance process may result in the loss of your personal data and applications. While
JMGO will protect your personal privacy, it takes no responsibility for the damage or loss of
personal data and applications resulting from the repair or replacement process.
4. After-Sales Service Channels
If you encounter any problems in the process of using the product, contact us through one of
the channels below.
1) After-Sales Website: http://en.jmgo.com/faq/index/categoryshow/cat_id/15/
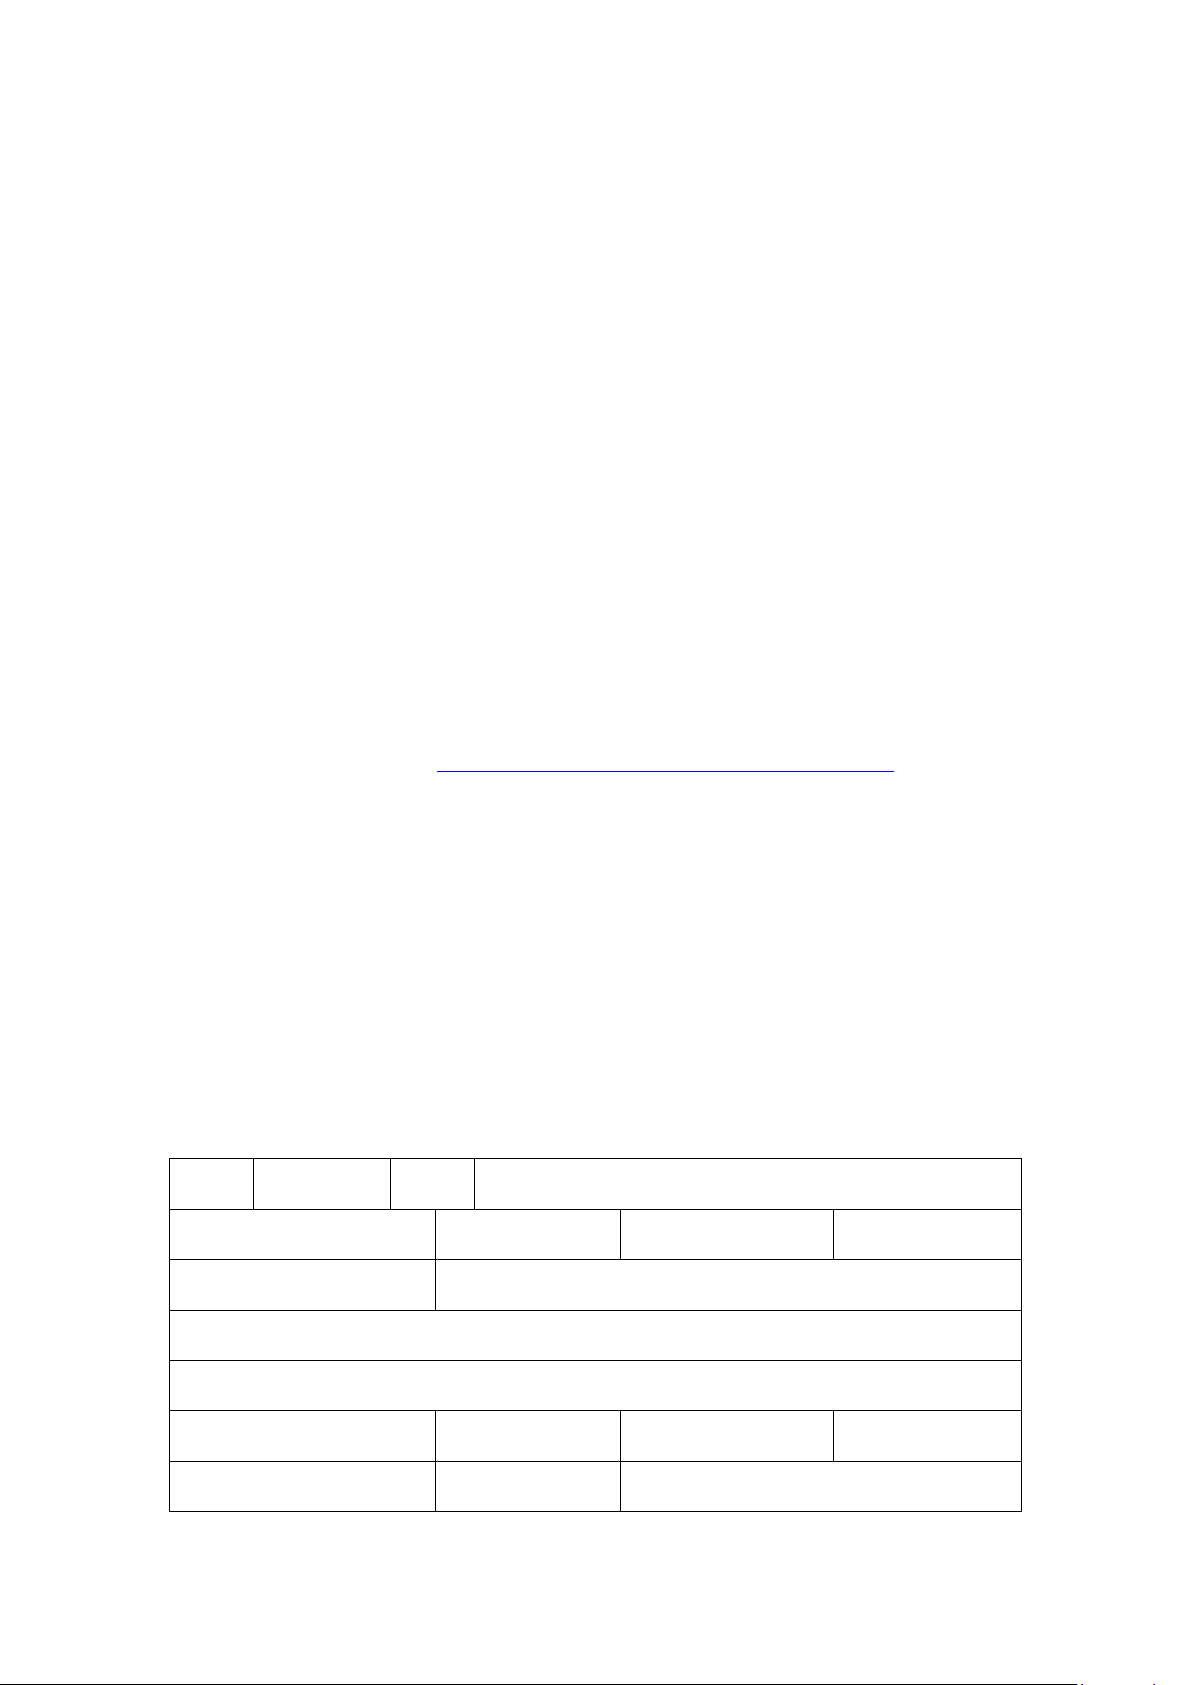
5. Three Guarantees Service Card
Repair/Return/Replacement Service Instructions
This service card helps JMGO process repair, return, and replacement requests faster.
1) Before filling in this service card, please contact our platform or vendor customer service to
ensure that we can help solve the problem.
2) After you have filled in this service card, return it to us in the same package as the product.
Return:
Replacement:
Repair:
Please indicate with a ✓
Component No.:
Return Details:
Reason (required):
*In order to shorten the repair, return, or replacement time, please fill in the reason truthfully. This
helps the request make it through the inspection process as soon as possible.
Order Information
Vendor Store (required):
Purchase Order
(required):
Shopping Account No.
(required):
Date of Purchase:
YYYY____MM____DD____
Page 29
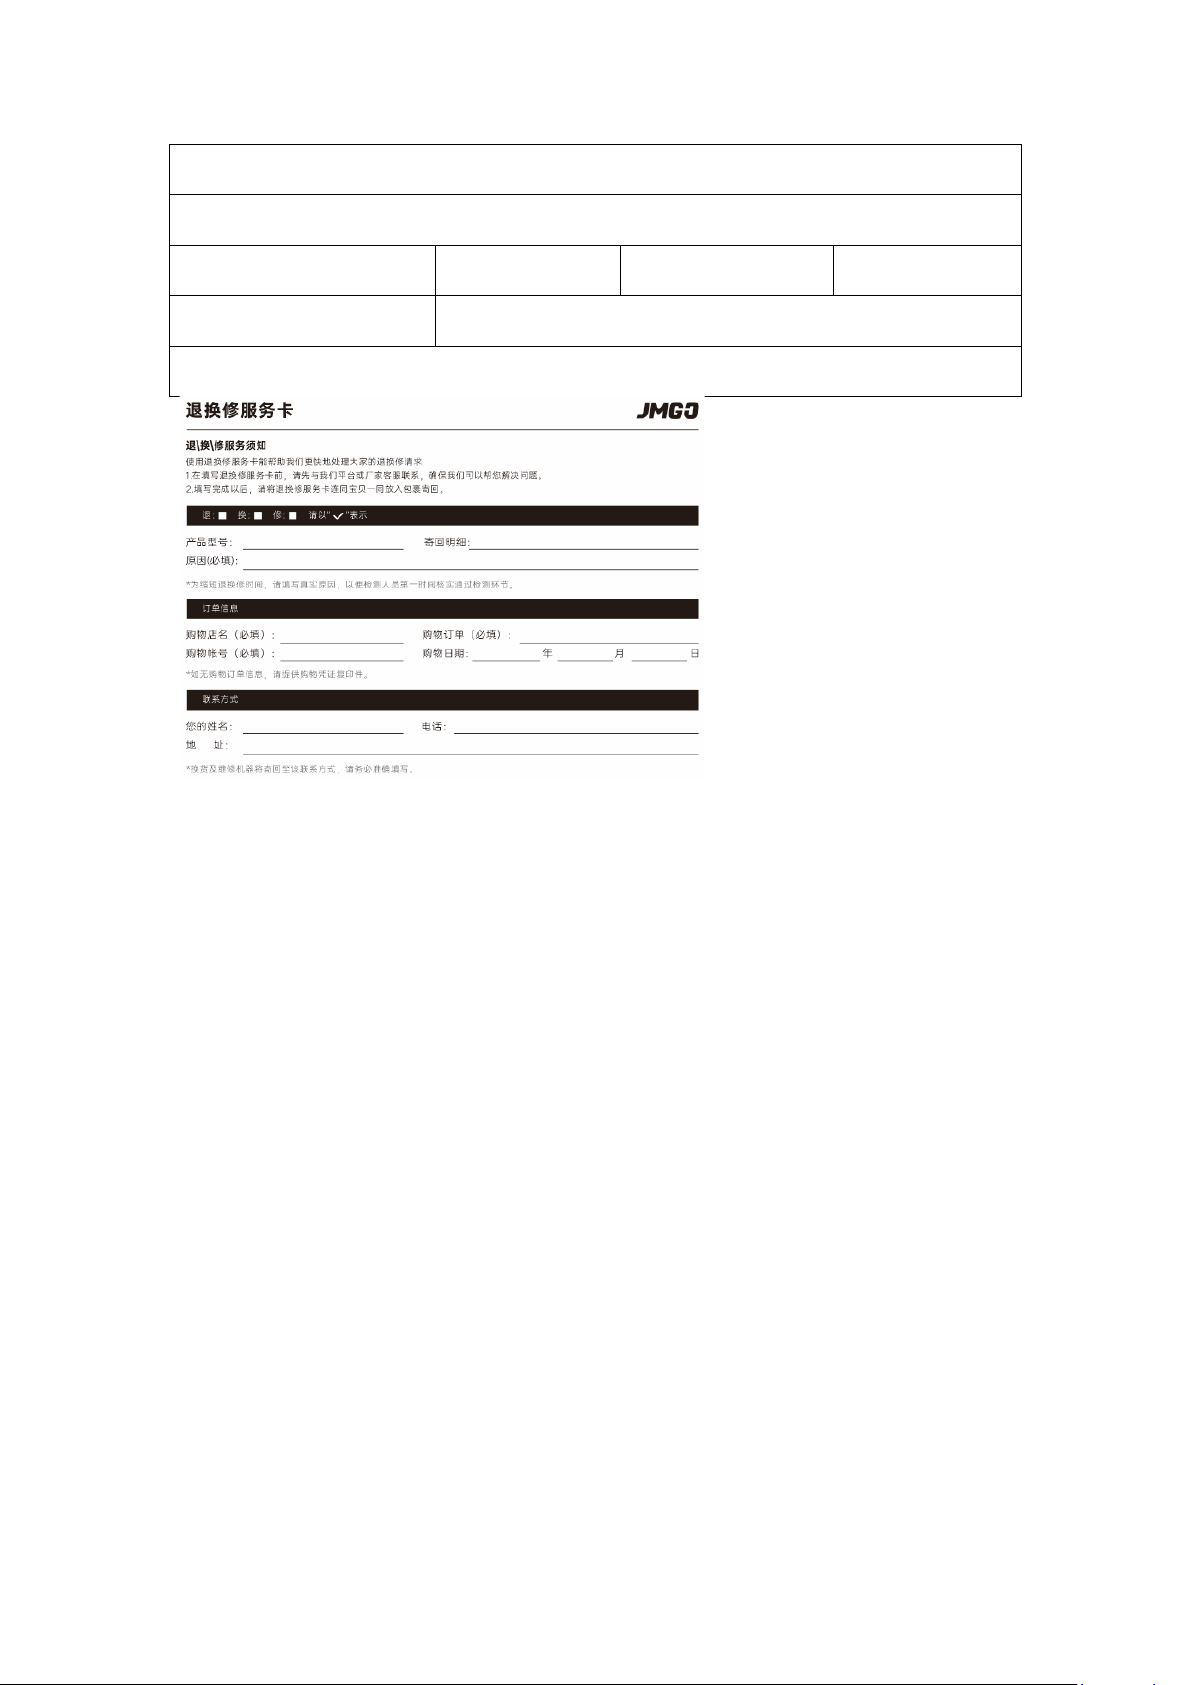
* If you did not receive a purchase order, please provide a copy of the purchase voucher.
Contact Information
Name:
Phone:
Address:
*Replaced and repaired products will be returned to this address. Please ensure your details are
filled in correctly.
Green dotted lines serve as a separator.
Dotted lines are not printed.
 Loading...