

Page 1

Performance Series 4-Channel
Amplifier Kit For 2006-2013
Harley® Road Glide Fairing with
Rear Speakers
#
JMAA-3600HR06-RCR
Installation
and Operation
Instructions
© 2013 J&M Corporation. All rights reserved. 2/13
Page 2
Product Description
This exiting new J&M Performance Series 4-channel amplifier kit has been designed specifically for use in the 2006-
2 ohm load @ 14.4vdc.
Amplifier mounts to the custom made metal mounting
bracket system.
2013 Harley® RoadGlide fairing, with the Harley HK radio
along with a second set of speakers (4 total) mounted in the
rear saddlebag or trunk pod position. (may also work with the
1998-2005 Harley RoadGlide fairing/radio, under the certain
conditions below)
This is a full range class D amplifier and is spec’d at 90watts
RMS per channel X4 channels, driven continuous into a
IMPORTANT NOTE: Some 1998 thru 2005 model Road-Glides require the replacement of the factory grill assembly/speaker adapters in order for
the J&M amp kit and/or 7.25 speaker kit to be installed. It will be necessary to remove the outer fairing and inspect the factory installed grill/adapter
assemblies to determine if they need to be replaced. The early style assemblies can be identified by the method of attachment to the inner fairing.
If the screws attaching the speaker go completely through the grill/adapter and into the inner fairing mounting bosses you have the early style
assemblies and they will need to be replaced with the later style factory grill/adapter assemblies and mounting hardware listed below. The later style
grill/adapter utilizes independent hardware to attach it to the inner fairing then the speaker is attached to the grill/adapter with 4 additional screws. If
you have the later style assemblies, the J&M amp kit and/or 7.25 speaker kit will fit with no additional parts or hardware needed.
UPGRADE PARTS AND HARDWARE TO BE PURCHASED FROM YOUR HARLEY DEALER IF NEEDED
77021-98B LH SPEAKER GRILL KIT (Hardware included)
77022-98B RH SPEAKER GRILL KIT (Hardware included)
76234-05 SCREW PHILLIPS HEAD (8 needed)
Custom made plug-n-play wiring harnesses are included
with this amplifier kit, top quality heavy gauge power/ground
wires are used for the fused battery connection, along with
all necessary mounting hardware & complete installation/
operation instructions.
Amplifier itself measures 7 ¼” X 4 ¾“ X 1 ¾”.
Installation Instructions
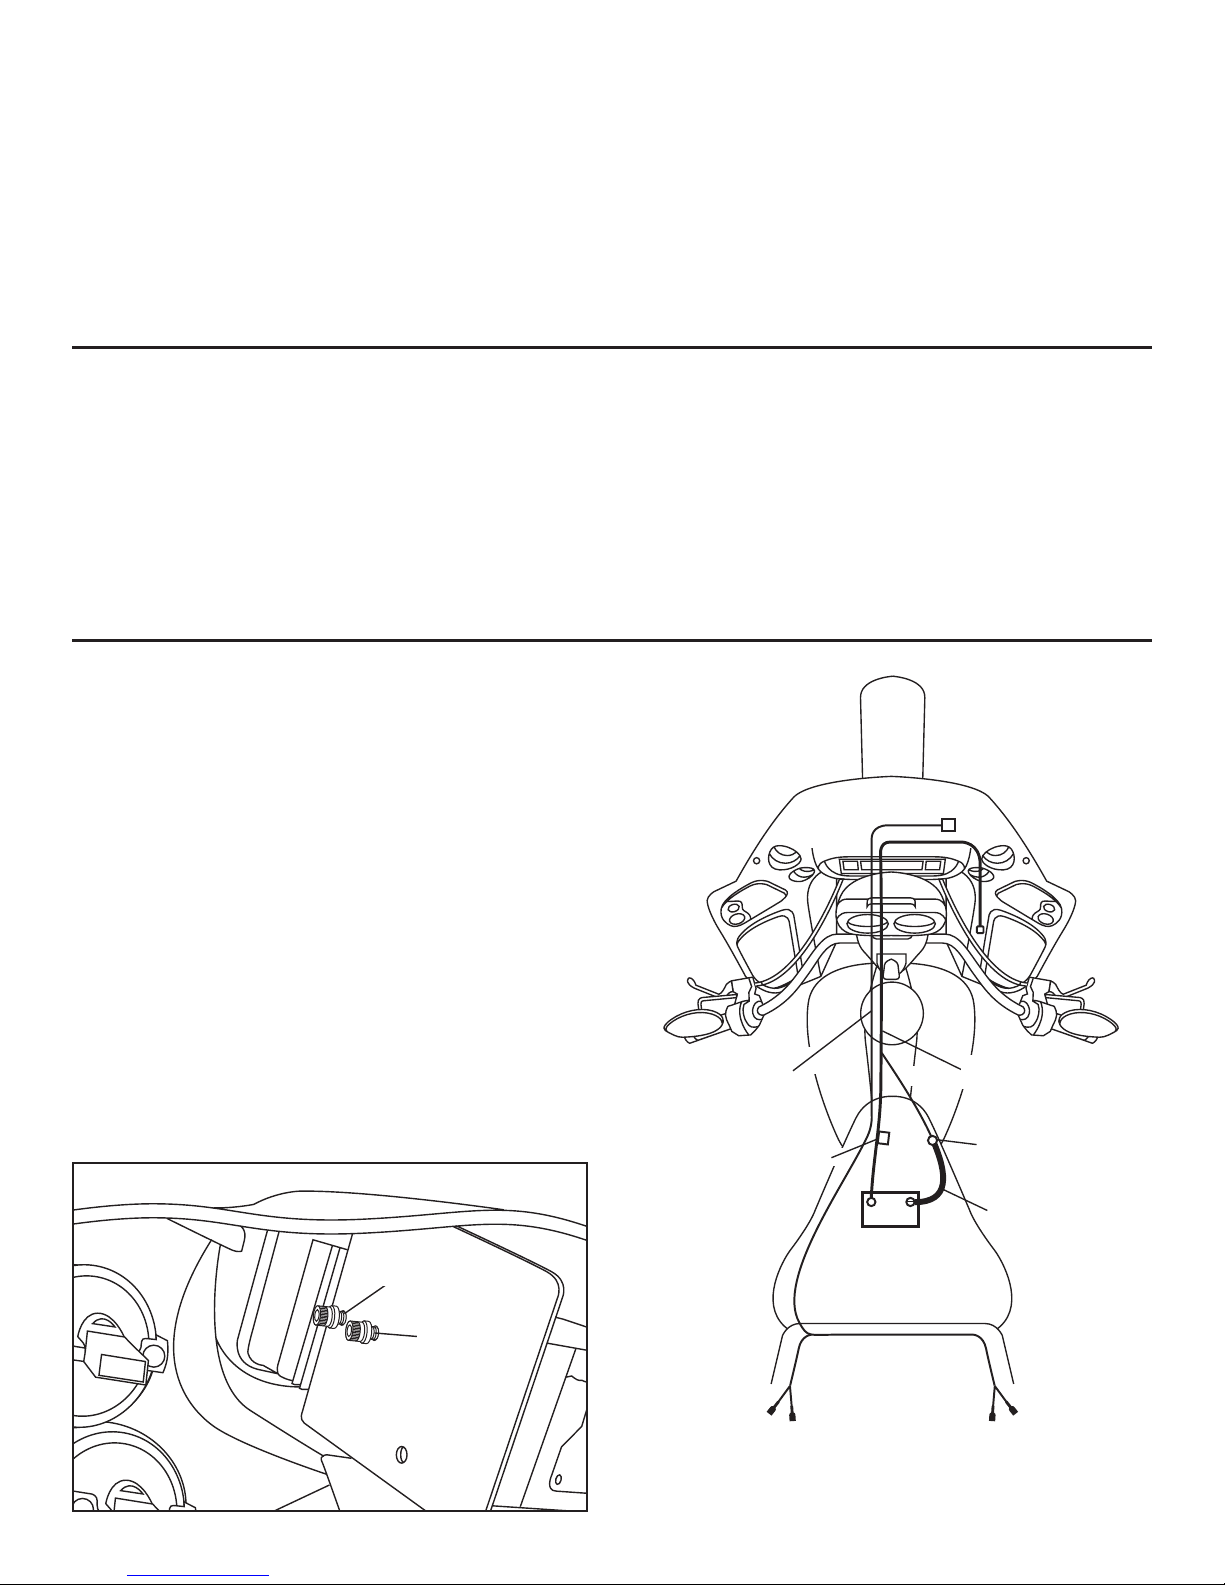
1. Remove the outer fairing shell, seat, and fuel tank.
2. By following along the factory wiring harness, route the
amplifier power harness from the fairing, under the fuel tank,
and on to the battery. (removal of the fuel tank is necessary for
proper installation)
3. Then route the rear speaker wiring harness along the
same path as the power harness to the rear speaker mounting
location.
4. After first disconnecting the negative battery cable from
the battery, connect the positive (red) lead from the amplifier
power harness directly to the positive post of the battery. Then
connect the negative (black) lead from the power harness to
the same bolt/stud on the frame that the negative battery cable
is connected to. Then reconnect the negative battery cable to
the battery. (Figure A) Do not connect the negative (black) lead
from the amplifer to the negative post of the battery.
Fig. B
Fig. A
Rear Speaker
Wiring Harness
Fuse
Red
+
BATT
Black
Heavy Gauge
Amplifier Power/Ground
Wire Harness
Master Frame
Grounding Stud
Negative
Battery Cable
remove
remove
Left Rear Speaker Right Rear Speaker
(Brown &
White/Brown)
(Green &
Green/Brown)
Page 3

5. Remove both of the right-side radio mounting bolts. (Figure
B)
6. Remove the upper inboard speaker screw from the rightside J&M 7.25” speaker. (Figure C) If you are using 5.25”
speakers, remove the top speaker screw from the right-side
speaker. (Figure D)
7. Choose the correct upper amplifier mounting bracket for
the size speakers you are using. (Figure E)
8. Install the bracket into the fairing using the (2) longer Allenhead bolts provided and the previously removed speaker screw.
(Figure F) If using 5.25” speakers, use of the provided longer
self-tapping speaker screw is required. (Figure G)
9. Using (2) of the 6-32 screws, washers, and lock-nuts
provided, attach the lower amplifier mounting bracket to the
amplifier. (Figure H) Do not tighten hardware at this time.
Fig. C
remove
7.25” speaker
Fig. D
remove
Fig. E
Fig. G
5.25” speaker
Fig. F
7.25” speaker
5.25” speaker
Fig. H
Page 4

Fig. I
Fig. J
10. Using the (2) remaining 6-32 screws, washers, and
lock-nuts, attach the amplifier to the already installed upper
mounting bracket. (Figure I) Attach the lower mounting bracket
to the lower right hand fairing mounting stud.
(Figure J) Position the amplifier upward as much as possible
and tighten all hardware.
11. Make amplifier/speaker connections according to diagram.
(Figure K)
12. Test the system for proper operation before reassembling
the fairing, realizing that full sound quality and fidelity will not
be heard until the outer fairing shell is completely reinstalled.
Note: To activate the front/rear fade feature of your Harley
HK radio, ask your dealer to reflash the audio system for
front/rear fade.
White/
Orange
Green/
White
Gray/
Red
Green/
Black
RightLeft
FLWhite
RL
White
Power Harness
FRONT
Left Speaker
Amplifier
White/
Orange
FRRed
RR
Red
Orange
(Optional power harness –
for use with J&M lower
fairing light rings)
Black
Red
Green/
White
Fig. K
Right Speaker
Gray/
Red
Green/
Black
Front Factory
Speaker Harness
Plug into factory
Harman Kardon radio
-ORRemove the four wired pins
from this plug and insert them
into the existing plug in this
position on the back of the
Harley HK radio
Orange/White
Acc. wire from
headlight harness
Cigarette
Lighter
Brown
White/
Brown
REAR
Green
Right SpeakerLeft Speaker
Green/
Brown
Page 5

Specifications
JMAA-3600
Full Range Class D Amplifier
Output Power (RMS)
Stereo @ 2ohms 4 x 90 watts
Frequency Response -3dB 10Hz - 22kHz
Channel Separation >50dB
Input Sensitivity 0.2 - 10v
Thank you for the confidence you have shown in J&M Corporation by
purchasing one of our innovative products.
If you have any question or comments about this product, you may
contact us at USA 1-520-624-7000 Monday thru Friday, 8:00AM
thru 5:00PM Mountain Standard Time.
1415 S. Cherry Avenue
Tucson, AZ 85713 U.S.A.
Tel (800) 358-0881
Website: http://www.jmcorp.com
E-mail: audio@jmcorp.com
Page 6

WARRANTY AND REPAIR INFORMATION
TWO YEAR LIMITED WARRANTY In order to facilitate the servicing of this warranty, the Warranty Registration Form should be filled out and
returned within 10 days of the date of purchase. However, return of the Warranty Registration Form is not a precondition of this warranty,
and this Warranty will be observed by J&M CORPORATION whether or not the Warranty Registration Form is returned,
on the condition that other satisfactory evidence of the date of the original purchase is provided to J&M CORPORATION.
WHO PROVIDES THE WARRANTY? This warranty is provided by J&M CORPORATION.
WHO IS PROTECTED? This warranty is extended only to the original owner of this J&M CORPORATION product and may not be
transferred or assigned.
WHAT IS COVERED AND HOW LONG? This warranty covers all defects in material or workmanship of our product for a period of
2 years from date of original retail purchase. At its option, J&M CORPORATION will repair or replace any defective part(s) or equipment.
The provisions of the warranty shall not apply to any unit which has been subjected to misuse, neglect, incorrect mechanical or
electrical installation, unauthorized modifications, accident, nor to units which have been repaired or altered outside of our factory.
PROCEDURE FOR OBTAINING PERFORMANCE OF WARRANTY In the event that the product does not conform to this warranty, the product
should be shipped prepaid to the J&M CORPORATION service facility. Transportation charges, insurance fees, and labor costs for shipment,
removal, or reinstallation of our product are not covered by this warranty. Loss or damage in shipment is the sole responsibility of the freight
carrier.
FOR YOUR INFORMATION Repair as provided under this warranty is the exclusive remedy of the consumer. J&M CORPORATION shall
not be liable for any incidental or consequential damages or for breach of any express or implied warranty on this product. Except to the
extent prohibited by applicable law, any implied warranty of merchantability or fitness for a particular purpose on this product is limited
in duration to the duration of the warranty. Some states do not allow the exclusion or limitation of incidental or consequential damages,
or allow limitations on how long an implied warranty lasts, so the above limitations or exclusion may not apply to you. This warranty gives
you specific legal rights which vary from state to state.
J&M CORPORATION reserves the right to make changes in design and to make improvements in its products without the obligation to
incorporate the changes or improvements in any of its previously manufactured products.
J&M CORPORATION has not authorized anyone to make representations or warranties other than the warranty contained herein.
The above warranty is effective for all products manufactured after 10/01/86.
NON-WARRANTY REPAIR RATES J&M CORPORATION reserves the right to change the labor repair rates without prior notice. At the time
of this printing the out-of- warranty repair is $40 per hour for labor only. However, the customer is advised to verify the
current rate when he/she calls customer service to obtain the return authorization number.
FACTORY SERVICE ADDRESS J&M Corporation, 1415 S. Cherry Avenue, Tucson, Arizona, 85713, U.S.A. Tel: 1-800-358-0881 audio@
jmcorp.com www.jmcorp.com
CUSTOMER SERVICE NUMBER 1-800-358-0881
WARRANTY REGISTRATION FORM Please fill out this card completely and mail it immediately after purchase. Please be sure that your zip code
and serial number (if applicable) are legible. This will help us to serve you better.
(PLEASE PRINT)
Name ______________________________________________________________________________________________________________________________________________________
Address _____________________________________________________________________________________________________________________________________________________
City _______________________________ _________________________________State __________________________ Zip ______________________________________________________
Motorcycle m Other m E-mail ______________________________________________________________________________________________________
Make ___________________________________________ Model ______________________________________ Year __________________
Product part number ______________________________________________________________________
Serial number (if applicable)________________________________________________________________
Date of purchase _________________________________________________
Name of dealer it was purchased from ____________________________________________________________________________________
Mail to:
J&M Corporation
1415 S. Cherry Avenue
Tucson, AZ 85713
U.S.A.
 Loading...