

Page 1
WARNING! Read and understand all
User manual
[Revision 3.0 May 2018]
safety warnings and instructions carefully
before using this machine. Failure to
follow the warnings and instructions may
result in electric shock, fire and/or serious
injury. Save this manual for future
reference.
ATTENT ION! Products covered by this
manual will vary in appearance, assembly,
inclusions, description and packaging.
NOTE! This manual covers multiple styles
of product as well as options / accessories
that may not be suitable for the machine
you have purchased.
Page 2

Product Manual – Electric Pressure Washer
Index
Index................................................................................................................................................................... 1
Safety ................................................................................................................................................................. 2
Parts Diagram .................................................................................................................................................... 5
Assembly ............................................................................................................................................................ 6
The handle .................................................................................................................................................................................6
Connecting the hoses .................................................................................................................................................................7
Operation ........................................................................................................................................................... 8
Before Use .................................................................................................................................................................................8
Start Up ......................................................................................................................................................................................8
Shut Down..................................................................................................................................................................................8
Nozzle selection .........................................................................................................................................................................9
Turbo nozzle (if equipped) ..........................................................................................................................................................9
Twist-adjustable nozzle (if equipped) ........................................................................................................................................ 10
Angle to the cleaning surface .................................................................................................................................................... 10
How to avoid damaging surfaces .............................................................................................................................................. 10
Detergents................................................................................................................................................................................ 11
Detergent Application ............................................................................................................................................................... 11
Initial High Pressure Rinse ........................................................................................................................................................ 12
Final Rinse ............................................................................................................................................................................... 12
Storage ............................................................................................................................................................. 12
Maintenance..................................................................................................................................................... 13
Nozzle cleaning instructions...................................................................................................................................................... 13
Water screen ............................................................................................................................................................................ 13
Troubleshooting ............................................................................................................................................... 14
Specifications ................................................................................................................................................... 15
Page 3
Product Manual – Electric Pressure Washer
2
2
Safety
It is important you read and
understand the instruction
manual before use and
keep the manual in a safe
place for future reference.
Safety precautions must be
observed to reduce the risk
of personal inj ury when
operating this machine.
If you are not familiar with
the safe operation /
handling of this equipment,
or are in any way unsure of
any object of this products suitability or
correct use for your application you
should complete training conducted by
a person or organisation qualified in
safe use and training related to this
product. This includes fuel / electrical
handling and safety if applicable to this
product or your application.
General safety
Like all equipment this unit must be
handled carefully. Exposure to fumes
and gases can damage the lungs and
respiratory system or cause
asphyxiation. Do not expose yourself or
others to danger. Do not permit others
to use the equipment unless they have
read this manual and are trained in its
operation. Do not operate if the
equipment is damaged or is in an
excessively worn state. The term
“equipment" in all of the warnings refers
to your product be that mains, battery or
fuel powered products refers to any part
of the product(s) / device(s) both directly
and indirectly related to its function and
use.
Work area safety
Keep work area clean and well lit.
Cluttered or dark areas invite accidents.
Do not operate equipment in explosive
atmospheres, such as in the presence
of flammable liquids, gases or dust.
Engines and equipment create sparks
which may ignite the dust or fumes.
Keep children and bystanders away
while operating equipment. Never allow
children to access the equipment. Avoid
operating while people, especially
children or pets are nearby. To reduce
the risk of injury or damage, do not allow
any other persons within a radius of 5
metres of your own position.
Personal safety
Prevent unintentional starting. Ensure
equipment switches are in the offposition before connecting to power
source and/or battery pack, picking up
or carrying the equipment. Stay alert,
watch what you are doing and use
common sense when operating
equipment. Do not use equipment while
you are tired or under the influence of
drugs, alcohol or medication. A moment
of inattention while operating equipment
may result in serious personal injury.
Use personal protective equipment.
Always wear eye protection. Protective
equipment such as a respirator, nonskid safety shoes, hard hat, or hearing
protection used for appropriate
conditions will reduce personal injuries.
Ensure the equipment is switched off
before connecting a to power source,
picking up or carrying the equipment.
Carrying equipment with your finger on
the switch or energising equipment that
have the switch may invite accidents.
Remove any adjusting key or wrench
before turning the equipment on. Do not
overreach. Keep proper footing and
balance at all times. This enables better
control of the equipment in unexpected
situations. If devices are provided for
the connection of dust extraction and
collection facilities, ensure these are
connected and properly used. Use of
dust collection can reduce dust-related
hazards. Never touch the mains plug
and the socket with wet hands. This
(appliance / equipment / product) is not
intended for use by persons with
reduced physical, sensory or mental
capabilities. Do not use the appliance
when there are other persons around
unless they are also wearing safety
equipment. Keep packaging film away
from children - risk of suffocation! The
operator must use the appliance
correctly. When working with the
appliance, he must consider the local
conditions and pay due care and
attention to other persons, in particular
children, who are nearby. If equipped;
high pressure hoses, fixtures and
couplings are important for the safety of
the appliance. Only use high pressure
hoses, fixtures and couplings
recommended by the manufacturer.
Dress properly. Do not wear loose
clothing or jewellery. Keep your hair and
clothing away from the work area. Loose
clothes, jewellery or long hair can be
caught in moving parts. You must wear
appropriate protective equipment when
operating, servicing, or when in the
operating area of the equipment to help
protect you from serious injury, including
eye injury, inhalation of toxic fumes,
burns, and hearing loss. Wear
protective clothing and safety goggles to
protect against splash back containing
water or dirt.
Electrical safety
Electric Shock can kill. Power plugs
must match the outlet. Never modify a
plug in any way. Do not use any adapter
plugs with earthed (grounded)
equipment. Unmodified plugs and
matching outlets will reduce risk of
electric shock. Avoid body contact with
earthed or grounded surfaces, such as
pipes, radiators, ranges and
refrigerators. There is an increased risk
of electric shock if your body is earthed
or grounded. Do not expose equipment
to rain or wet conditions. Water entering
equipment will increase the risk of
electric shock. Do not abuse the cord.
Never use the cord for carrying, pulling
or unplugging the equipment. Keep cord
away from heat, oil, sharp edges or
moving parts. Damaged or entangled
cords increase the risk of electric shock.
When operating any equipment
outdoors, use an extension cord
suitable for outdoor use. Use of a cord
suitable for outdoor use reduces the risk
of electric shock. If operating equipment
in a damp location is unavoidable, use a
residual current device (RCD) protected
supply. Use of an RCD reduces the risk
of electric shock. For safety reasons, we
recommend any electrical equipment
that you operate be via a residualcurrent circuit breaker (RCD). Safety
devices protect the user and must not be
modified or bypassed.
Equipment use and care
Do not force the equipment. Use the
correct equipment for your application.
The correct equipment will do the job
better and safer at the rate for which it
was designed. Do not use the
equipment if the On/Off switch does not
turn it on and off. Any equipment that
cannot be controlled with the On/Off
switch is dangerous and must be
repaired. If applicable, disconnect the
any plugs from a power source and/or
the battery pack from the equipment
before making any adjustments,
changing accessories, or storing
equipment. Such preventive safety
111018150600
Page 4

Product Manual – Electric Pressure Washer
3
3
JETUSA
measures reduce the risk of starting the
equipment accidentally. Do not allow
persons unfamiliar with the equipment
or these instructions to operate the
equipment. Equipment is dangerous in
the hands of un-trained users. Maintain
equipment. Check for misalignment or
binding of moving parts, breakage of
parts and any other condition that may
affect the equipment's operation. If
damaged, have the equipment repaired
before use. Many accidents are caused
by poorly maintained equipment.
If applicable keep equipment properly
maintaine d, cutting tools with sharp
cutting edges are less likely to bind and
are easier to control. Use the equipment
and accessories etc. in accordance with
these instructions, taking into account
the working conditions and the work to
be performed. Use of the equipment for
operations different from those intended
could result in a hazardous situation.
Always clean dust and dirt off the
equipment – do not use any grease
solvents. Always keep the equipment
clean. After use, the equipment and
components may still be hot. Never
place the equipment in any places
where there are flammable materials
such as dry grass, combustible gases or
combustible liquids etc. Let the
equipment cool before storing indoors.
Service
Have your equipment serviced by a
qualified repair person using only
identical replacement parts. This will
ensure that the safety of the equipment
is maintained. Do not attempt any
maintenance or repair work not
described in this instruction manual.
Have all other work performed by an
authorised service person. We
recommend that you have servicing and
repair work carried out exclusively by an
authorised service person. Before
proceeding to adj ust or repair the
equipment; be sure to stop the
equipment and detach and power
source or spark plug (if equipped).
Never attempt to make adjustments
while the equipment is running.
Always make adjustments with the
equipment resting on a flat, clear
surface. Replace any worn, damaged or
removed warning labels immediately.
Portable washer safety
This appliance is not intended for use by
persons (including children) with
reduced physical, sensory or mental
capabilities, or lack of experience and
knowledge, unless they have been
given supervision or instruction
concerning use of the appliance by a
person responsible for their safety.
This product is not intended for pumping
water in a home domestic application.
Do not use it for corrosive, abrasive,
explosive or dangerous liquids. Fluids
other than water will damage the water
pump and/or create a fire hazard. High
pressure jets can be dangerous if
subject to misuse. The jet must not be
directed at persons, live electrical
equipment or the appliance itself. Do not
use the appliance within range of
persons unless they wear protective
clothing. Disconnect from the power
supply before carrying out user
maintenance. High pressure cleaners
shall not be used by children or
untrained personnel. To ensure
appliance safety, use only original spare
parts from the manufacturer or
approved by the manufacturer. High
pressure hoses, fittings and couplings
are important for the safety of the
appliance. Use only hoses, fittings and
couplings recommended by the
manufacturer.
Automatic ON/OFF
The motor on this pressure washer does
not run continuously. It only runs when
the trigger of the spray gun is squeezed.
After following the start-up procedures
in this manual, turn the pressure washer
ON and squeeze the trigger for
activation. See “Operating Instruction”
section in this manual for further details.
The electric supply to this machine
should include either a residual current
device tha t will interrupt the supply if t he
leakage current to earth exceeds 30 mA
or a device that will prove the earth
circuit.
111018150600
Page 5
Product Manual – Electric Pressure Washer
4
4
JETUSA
BEFORE USE! If you are not familiar with the safe operation / handling of this equipment, or are in any way unsure of any object of this products
suitability or correct use for your application you should complete training conducted by a person or organisation qualified in safe use and training related
to this product. This includes fuel / electrical handling and safety if applicable to this product or your application.
WARNING! Only a fully licenced electrician should perform installation or maintenance where terminals/wiring/circuit boards that may at any time be live
with 240V AC electricity are accessed.
111018150600
Page 6
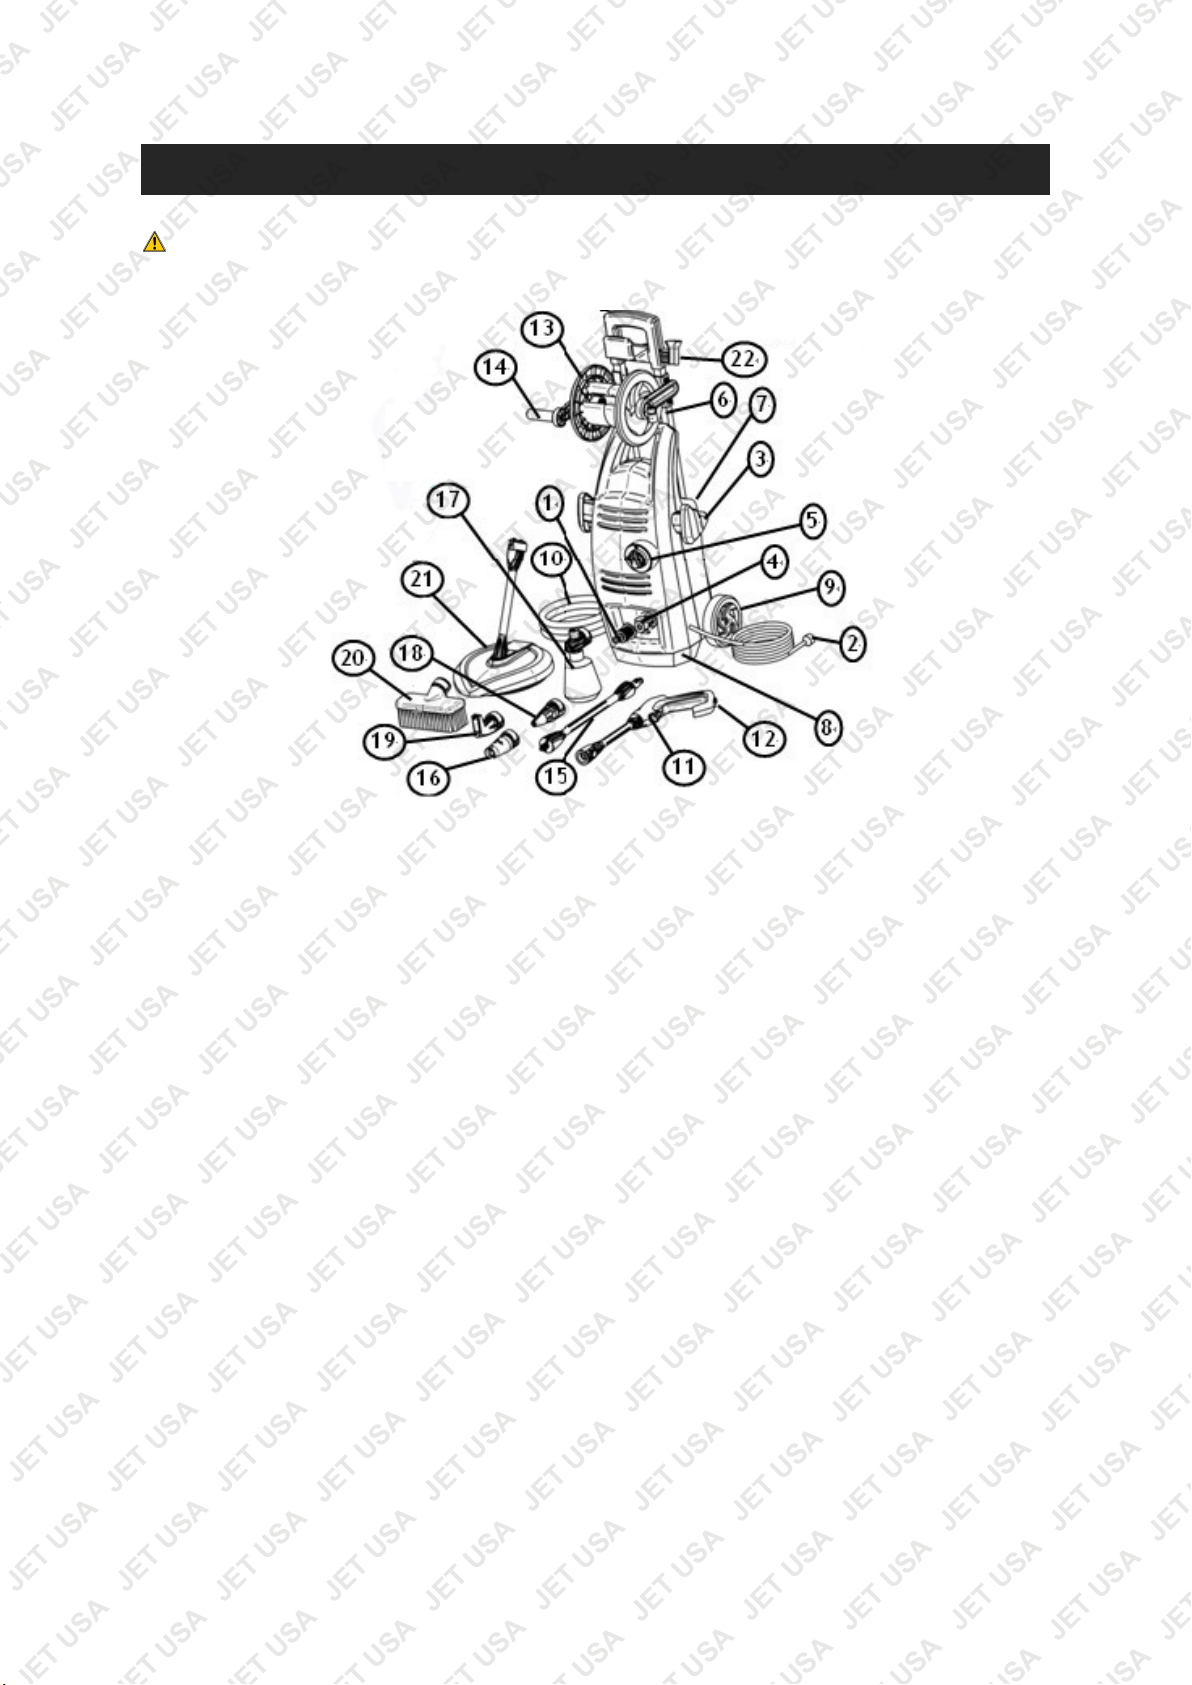
Parts Diagram
ATTENTION! Products covered by this manual will vary in appearance, assembly,
inclusions, description and packaging.
1. Water inlet connector
2. 240V Electrical plug
3. Storage hook*
4. Water outlet
5. Power ON / OFF Switch
6. Trolley handle*
7. Nozzle storage*
*Options displayed above cover a broad range of models and types of electric pressure washers. Some items may not be
suitable for some models while other items may be option extras or promotional items.
8. Foot
9. Wheel
10. High pressure hose
11. Trigger gun
12. Trigger lock
13. Hose reel*
14. Handle for hose reel*
15. Spray Lance*
16. Adjustable Nozzle*
17. Detergent attachment*
18. Turbo Nozzle*
19. Angle Nozzle*
20. Brush*
21. Patio Cleaner*
Page 7
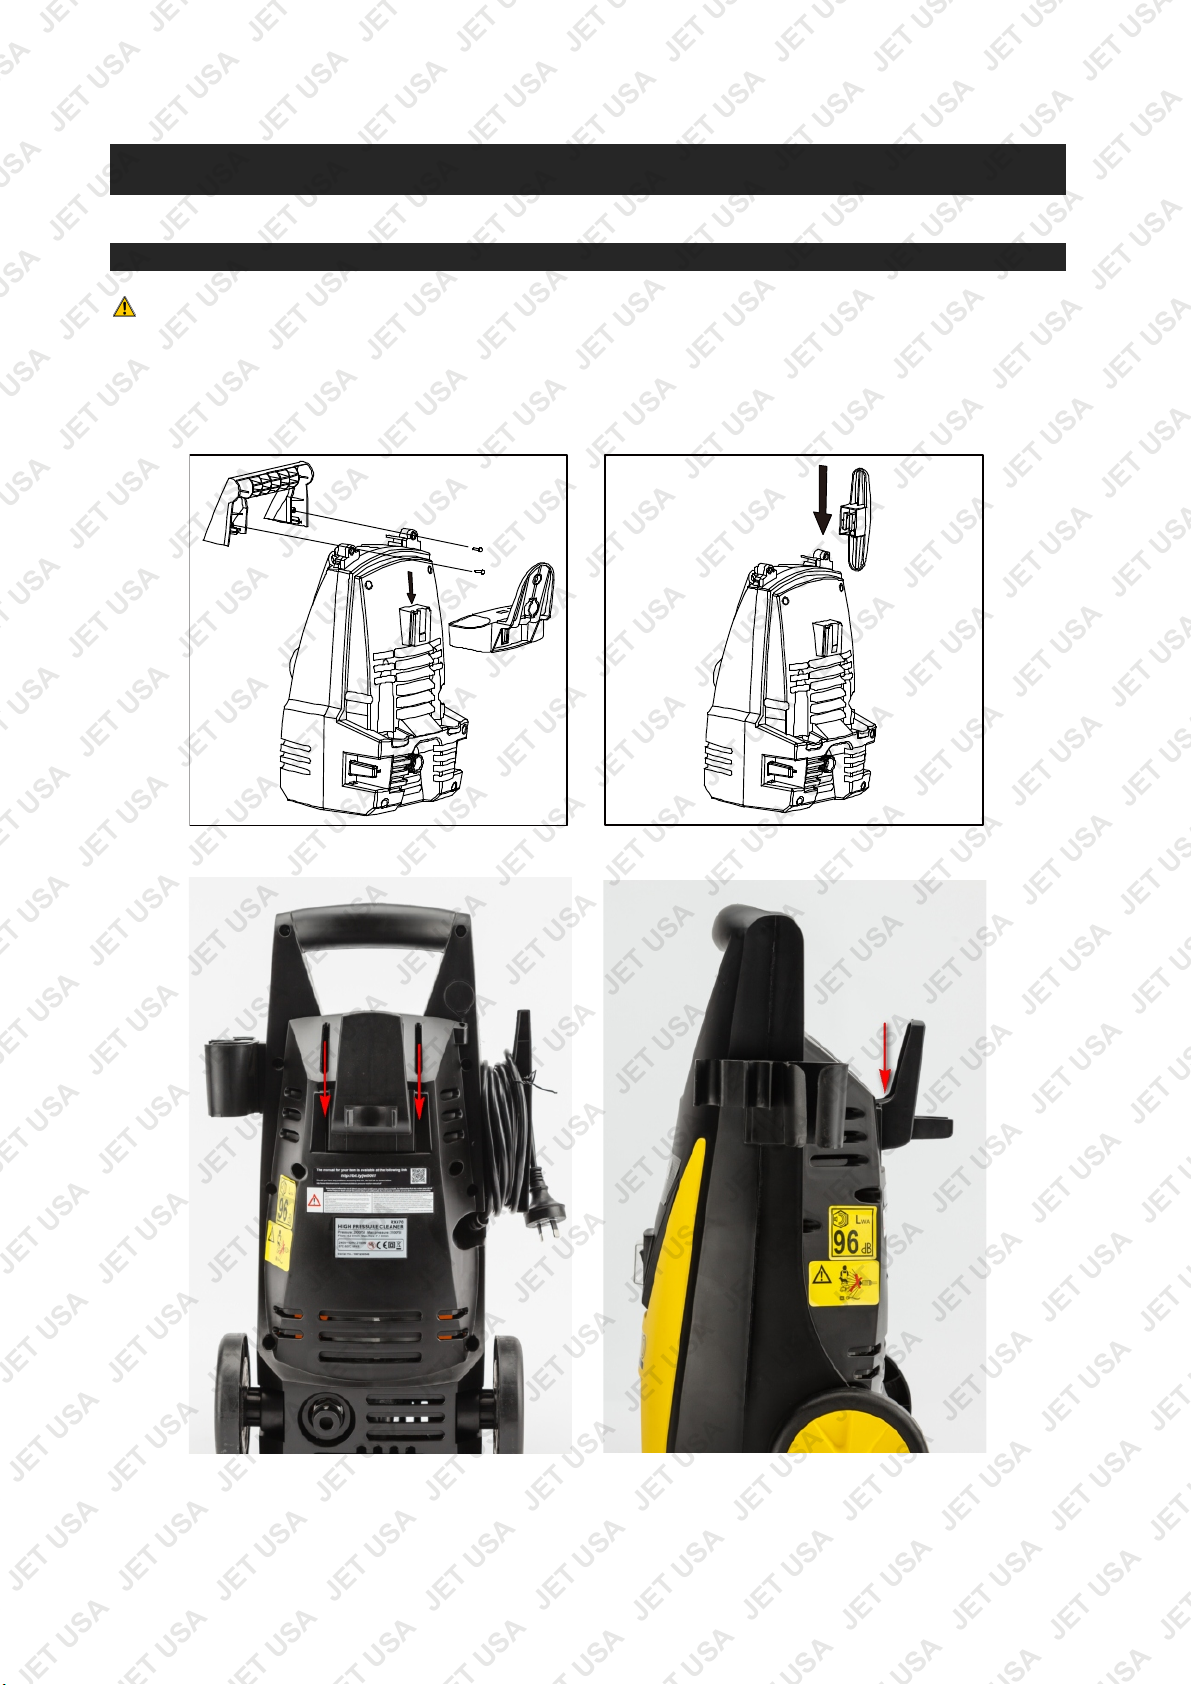
Assembly
The handle
NOTE! Some models come with handles fully assembled.
- Insert cable hook hold into the machine (figure 1a).
- Align holes on the bottom of the pressure cleaner as shown and tighten the 2 screws using a
screwdriver (figure 1b).
Figure 1a Figure 1b
Above images apply to the RX470 model.
Page 8
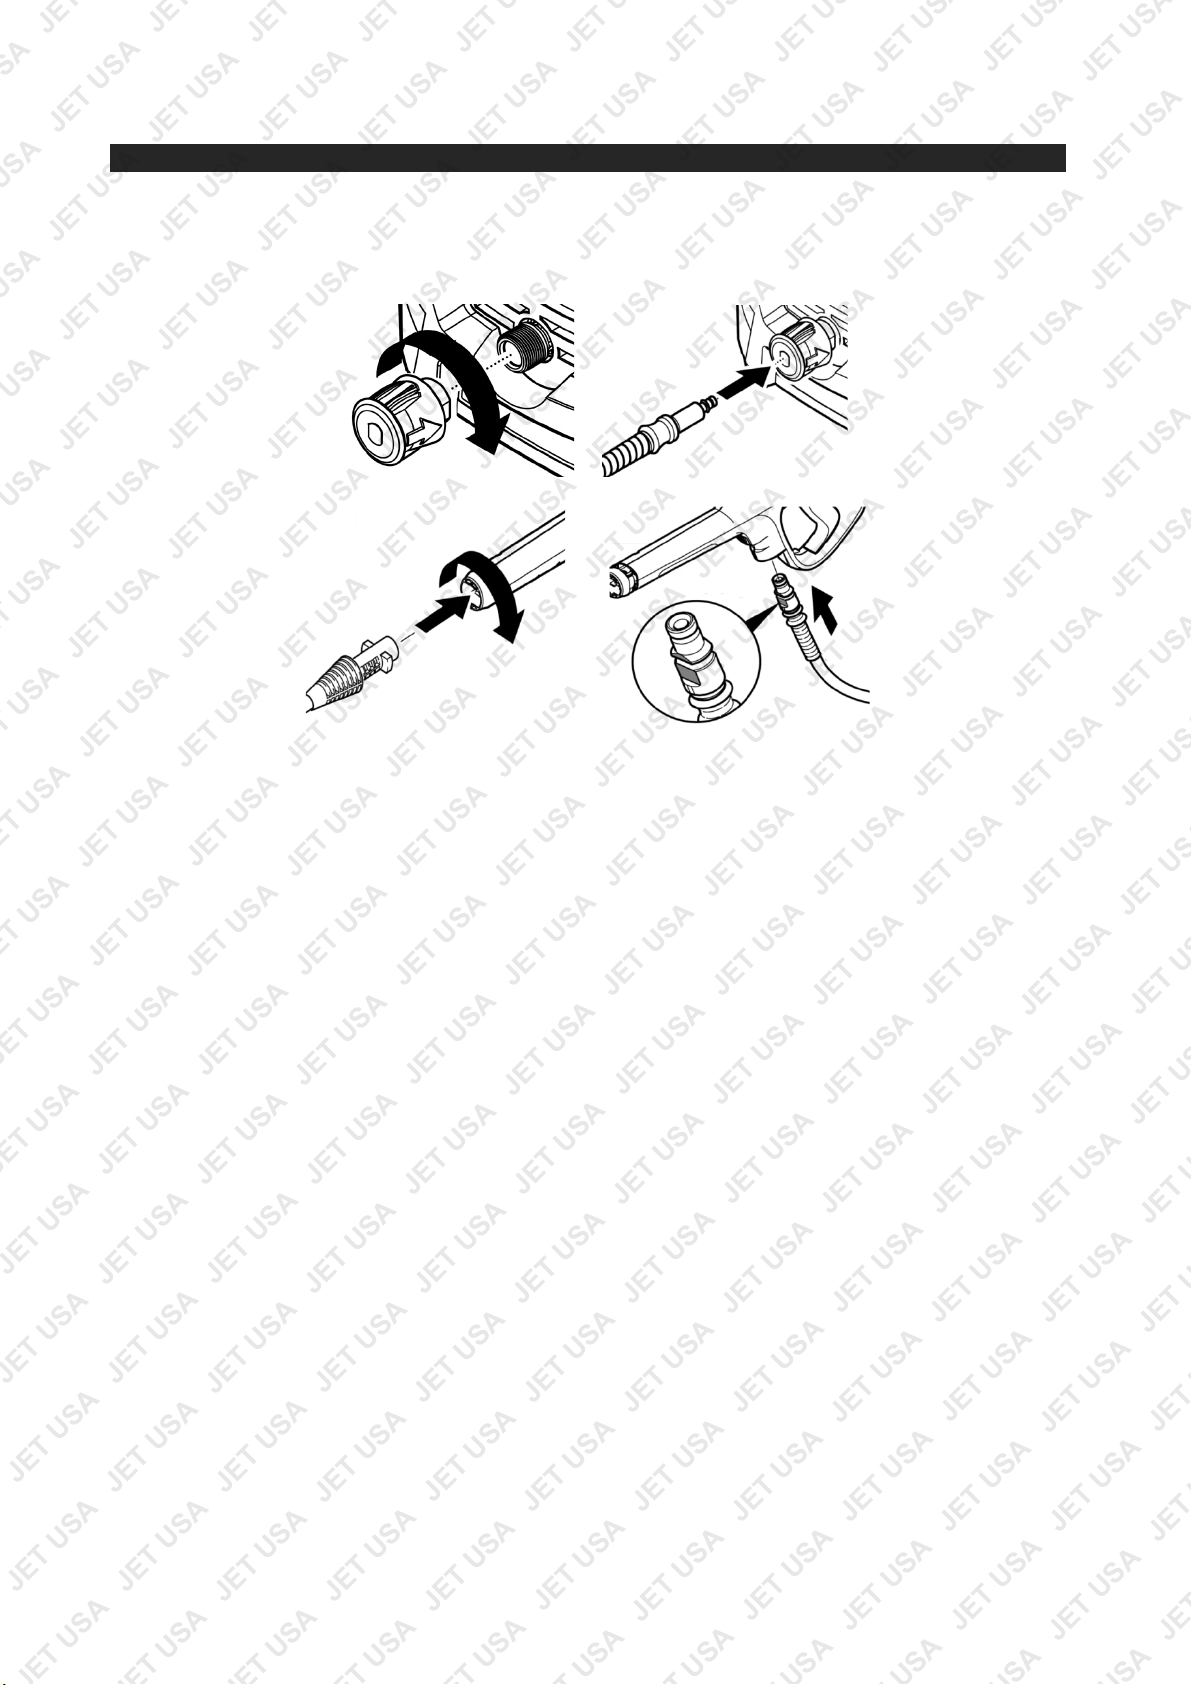
Connecting the hoses
Most hoses are fitted with a quick connect fitting for which you only need to push until it click’s into place.
Threaded connections (if equipped) are right hand thread; screw them on in a clockwise direction until
firmly in place. Do not over tighten or the connector could be damaged.
Page 9

Operation
WARNING! This unit is to be connected to a cold water source only.
IMPORTANT! The motor of yours pressure washer will not run until the trigger is squeezed.
IMPORTANT! Always turn off the unit’s motor before turning off the unit’s water supply. Serious
damage could occur to the motor if the unit is run without water.
WARNING! Never disconnect the high-pressure discharge hose from the machine while the system is
still pressurised. To depressurise the unit, turn off the motor, turn off the water supply and squeeze the
trigger 2-3 times.
Before Use
1. Water Inlet “Screen/filter” located behind the “water inlet connector” must be inspected regularly, so
as to avoid blockage and restriction in the water supply to the pump.
2. Make sure all hoses and parts are fitted securely.
Start Up
1. Connect the outlet hose to the washer and connect the spray gun to the outlet hose.
2. Connect nozzle and nozzle extension (if equipped).
3. Check wire mesh filter is clear of any blockage or debris.
4. Connect the water supply hose.
5. Check that the hose has no kinks in it.
6. Turn on water and check for leaks.
7. Depress trigger to allow air to be expelled though the pump and hoses, lock the trigger.
8. Plug in machine and turn power switch “ON”.
9. Unlock trigger and use the pressure washer.
Shut Down
1. Turn power switch “OFF”.
2. Unplug the unit from the power source.
3. Turn off the water supply.
4. Press the trigger repeatedly of the gun to depressurise the system.
5. Disconnect the garden hose from the pressure washer.
6. Wipe all surfaces of the unit with a damp clean cloth.
7. Engage the gun safety lock.
Page 10
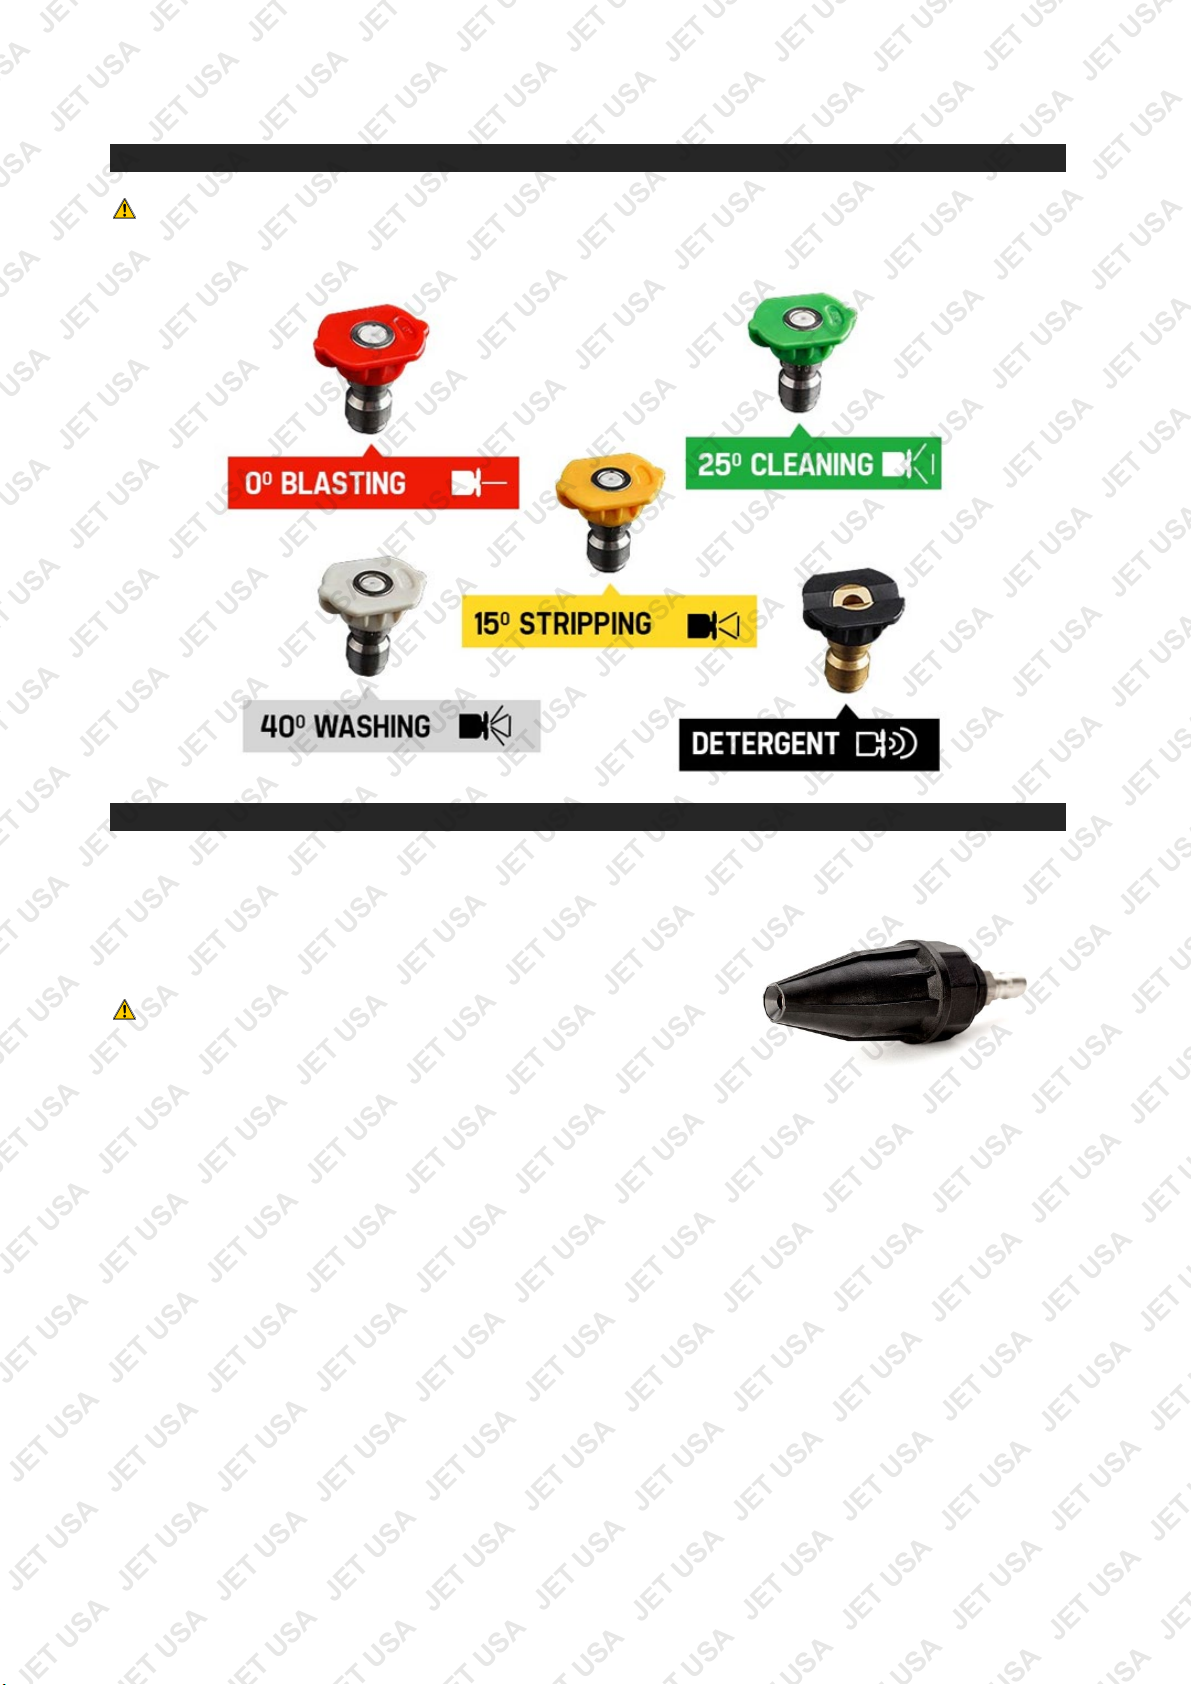
Nozzle selection
NOTE! Some portable pressure washers come with five nozzle attachments for different uses. Refer to
the diagram (below) and on the pressure washer itself to see which nozzle is applicable for your
purpose.
Turbo nozzle (if equipped)
A turbo nozzle is a very effective tool that can significantly reduce
cleaning time. The turbo nozzle combines the power of a narrow high
impact stream and the efficiency of a 25 degree fan pattern. This
swirls the narrow high impact stream into a cone shape that cleans a
larger area.
CAUTION! A turbo nozzle uses a narrow high impact stream;
only use it in applications where the cleaning surface cannot be
damaged by narrow high impact spray. The turbo nozzle is NOT
adjustable and cannot be used to apply detergent.
Page 11
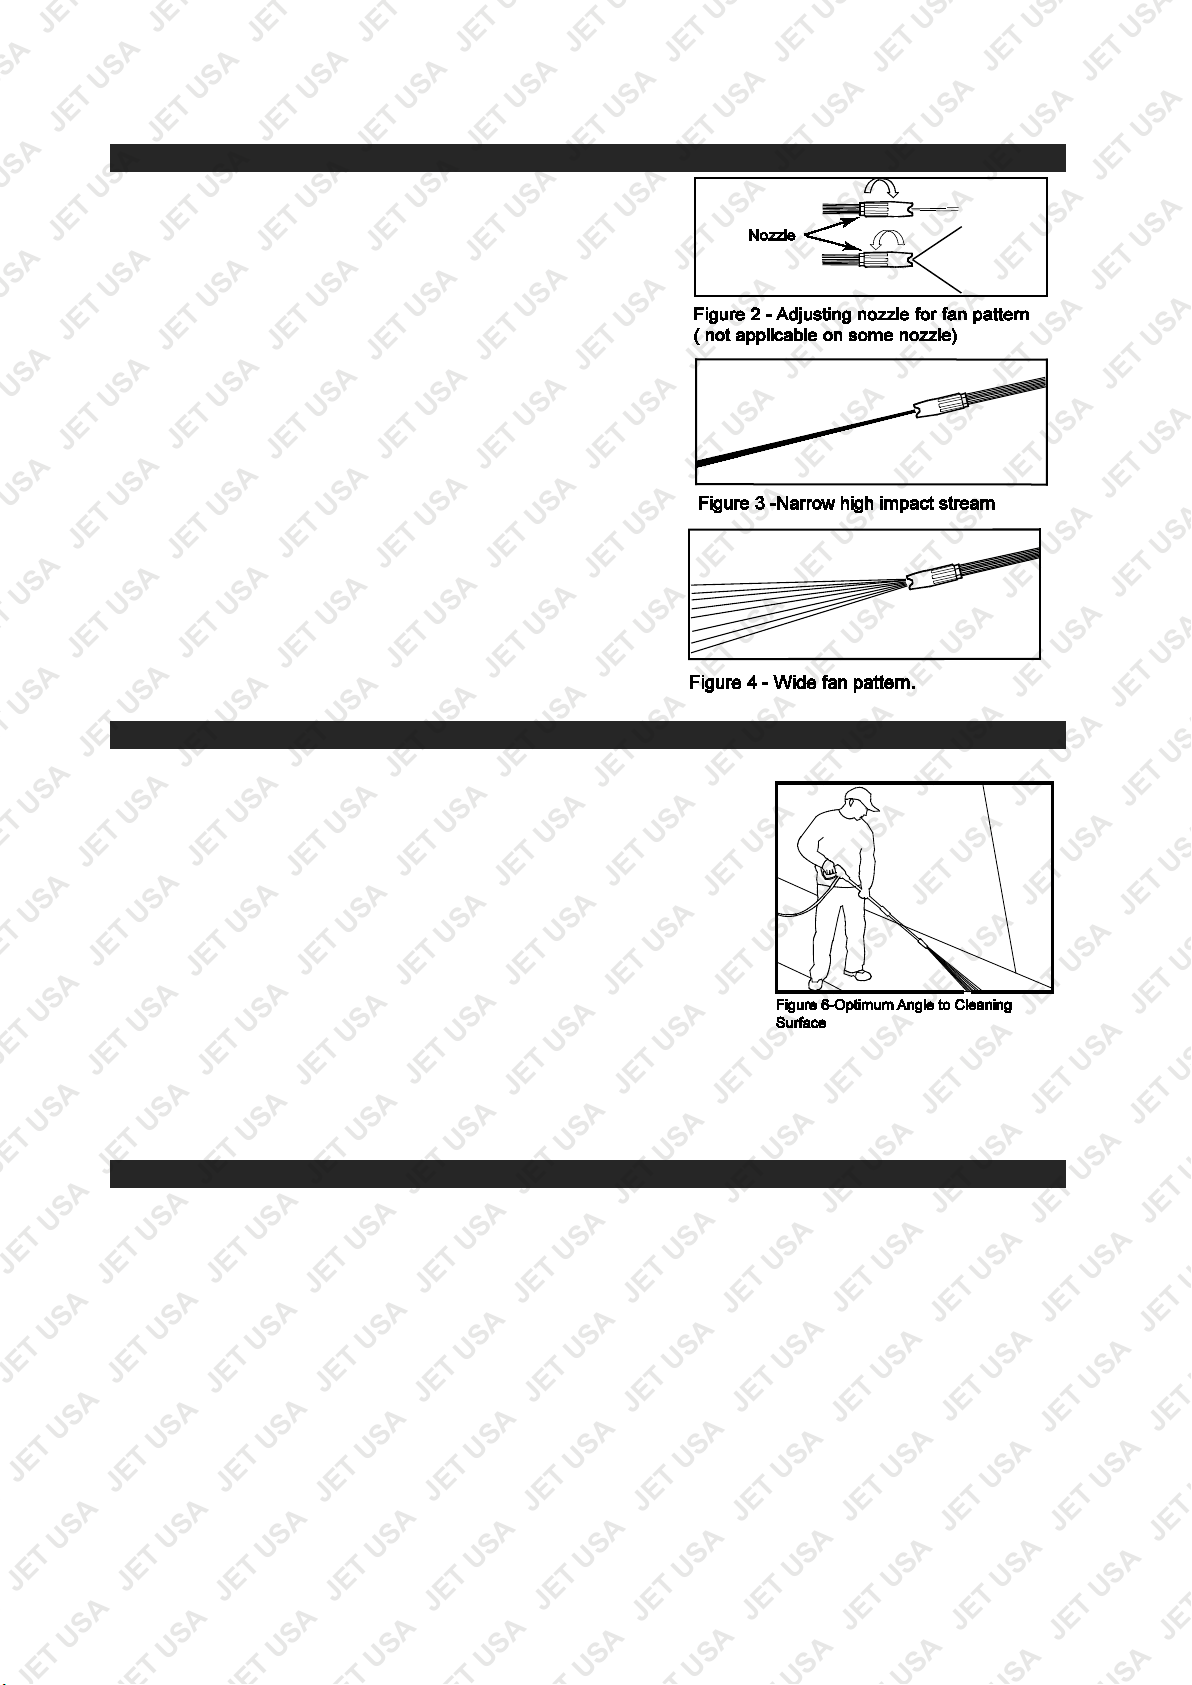
Twist-adjustable nozzle (if equipped)
The angle of spray coming out of the lance may be adjusted on
some lances by rotating the nozzle. This will vary the spray
pattern from approximately a 0° narrow high impact stream to a
60° wide fan spray (Figure2)
A narrow stream has high impact force on the cleaning surface
and results in maximum deep cleaning in a concentrated area.
However, this narrow high impact spray must be used
cautiously, as it may damage some surfaces (figure 3)
A wide fan pattern will distribute the impact of the water over a
larger area, resulting in excellent cleaning action with a
reduced risk of surface damage, Large surface areas can be
cleaned more quickly using a wide fan pattern (figure 4)
Angle to the cleaning surface
When spraying water against a surface, maximum impact is generated
when the water strikes the surface “head on.” However, this type of
impact tends to cause dirt particles to imbed in the surface, thereby
preventing the desired cleaning action.
The optimum angle for spraying water against a cleaning surface if 45
degrees.
Spraying water against a surface at this angle provides for the most
beneficial impact force combined with efficient removal of debris from
the surface.
Distance from cleaning surface
Another factor that determines the impact force of the water is the distance from the spray nozzle to the
cleaning surface. The impact force of the water is increased as the nozzle is moved closer to the surface.
How to avoid damaging surfaces
Damage to cleaning surfaces occurs because the impact force of the water exceeds the durability of the
surface. Never use a narrow high impact stream or a turbo/rotary nozzle on a surface that is susceptible to
damage. Avoid spraying windows with a narrow high impact stream or turbo nozzle as this may cause
breakage.
The recommended way to avoid damaging surfaces is as follows:
- Before triggering the gun, adjust the nozzle to a wide fan pattern.
- Place the nozzle approximately 4-5 feet from and 45 degrees to the cleaning surface, and trigger
the gun.
- Vary the fan pattern spray angle and the distance to the cleaning surface until optimum cleaning
efficiency is achieved without damaging the surface.
Page 12
Detergents
The use of detergents can dramatically reduce cleaning time and assist in the removal of difficult stains.
Some detergents have been customised for pressure washer use on specific cleaning tasks. These
detergents are approximately as thick as water. The use of thicker detergents, such as dish soap, will clog
the chemical injection system and prevent the application of the detergent. The cleaning power of
detergents comes from applying them to a surface and giving the chemicals time to break down the dirt and
grime. Detergents work best when applied at low pressure. The combination of chemical action and high
pressure rinsing is very effective. On vertical surfaces, apply the detergent starting at the bottom and work
your way upward. This will prevent the detergent from sliding down and causing streaks. High pressure
rinsing should also progress from the bottom to top. On particularly tough stains, it may be necessary to
use a brush in combination with detergents and high pressure rinsing.
The following cleaning procedure will help you to organize your cleaning task, and ensure that you achieve
the most beneficial results in the shortest amount of time. Remember to use the spraying/cleaning
techniques previously listed.
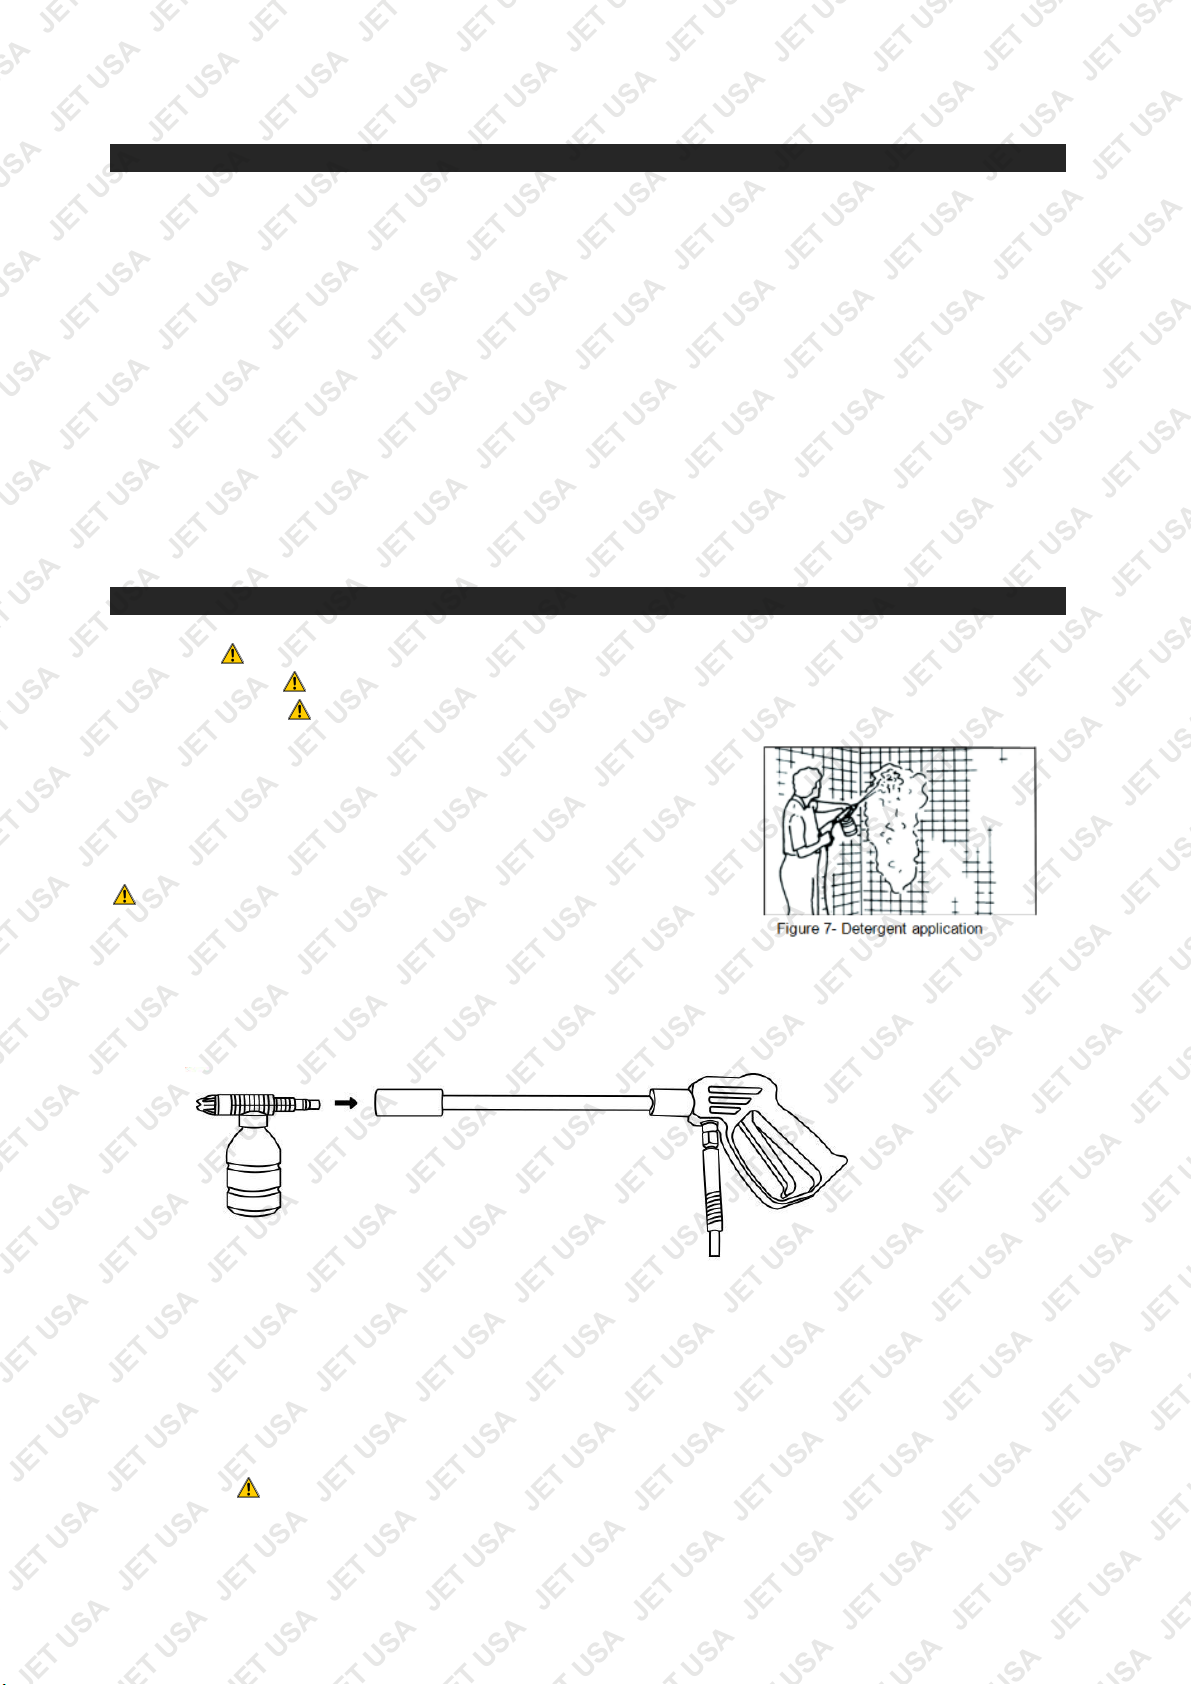
Detergent Application
IMPORTANT! Only use the instructions appropriate for model purchased.
NOTE! Use only detergents formulated for pressure washes.
NOTE! Test detergent in an inconspicuous area before use.
For Units with Detergent Applicator Included; follow manufacturer’s
label directions for mixing correct concentrations of detergent to water
ratio through the pressure washer is approximately 5.4% (1 part
detergent to 19 parts water).
NOTE! Some pressure washers have a built in detergent container,
others have a separate gun attachment for this purpose.
1. Unscrew to top of detergent applicator and fill applicator with detergent.
2. Replace top on applicator.
3. Remove lance from gun.
4. Attach detergent applicator to gun, if equipped (See below).
5. Apply detergent so it thoroughly covers cleaning surface. Apply from bottom to top to prevent
detergent from sliding down and streaking.
6. Allow detergent to remain on the surface for a few minutes. This is a good time to use a brush to
lightly scrub heavily soiled areas. Never allow detergent to dry on the cleaning surface.
7. Remove detergent applicator from gun and replace with the lance, or remove applicator from end
of lance.
8. Rinse detergent from surface.
NOTE! Flush detergent applicator with clear water following each use.
Page 13

Initial High Pressure Rinse
Spray the cleaning surface with water to clear off any dirt or grime that may have collected on the surface.
This will allow your detergent to attack the deep down dirt that has worked its way into the cleaning surface.
Before triggering the gun, adjust the nozzle to a wide fan pattern and slowly adjust to the desired spray
pattern. This will help you avoid applying too much concentrated spray to the surface which could cause
damage.
Final Rinse
Start final rinse from the bottom of your item and work your way upward. Make sure you thoroughly rinse
the surface and that all detergent has been removed.
1. Shut down
2. Be sure all detergent is flushed from system.
3. Turn off motor.
4. Turn off water supply.
5. After motor and water supply are turned off, trigger gun to depressurize system.
DANGER! Never turn water supply off before turning motor off. Serious damage could occur to the
pump and/ or motor.
DANGER! Never disconnect high pressure discharge hose from machine while system is pressurized.
To depressurize, turn motor off, turn water supply off and squeeze gun trigger times.
Storage
Do not store pressure washer outdoors or where it might freeze.
Tips for extending the life of your pressure washer;
• Never operate unit without water.
• Pressure washer is not meant to pump hot water. Never connect to warm water supply – this will
significantly reduce life of the pump.
• Using the wrong detergent other than recommended may cause damage to pump components (O-
rings, etc.).This also applies to chemicals such as bleach, dish soap, etc.
• Before adjusting a nozzles pressure (high-to-low or low-to-high) release trigger. Failure to do so will
reduce life of O-rings in lance.
NOTE! When the pressure washer is not being operated or is being stored more than one month, it is
recommended that you turn off and disconnect the power.
Page 14
Maintenance
Nozzle cleaning instructions
NOTE! A clogged or partially clogged nozzle can cause a significant reduction of water coming out of
the nozzle and cause the unit to pulsate while spraying.
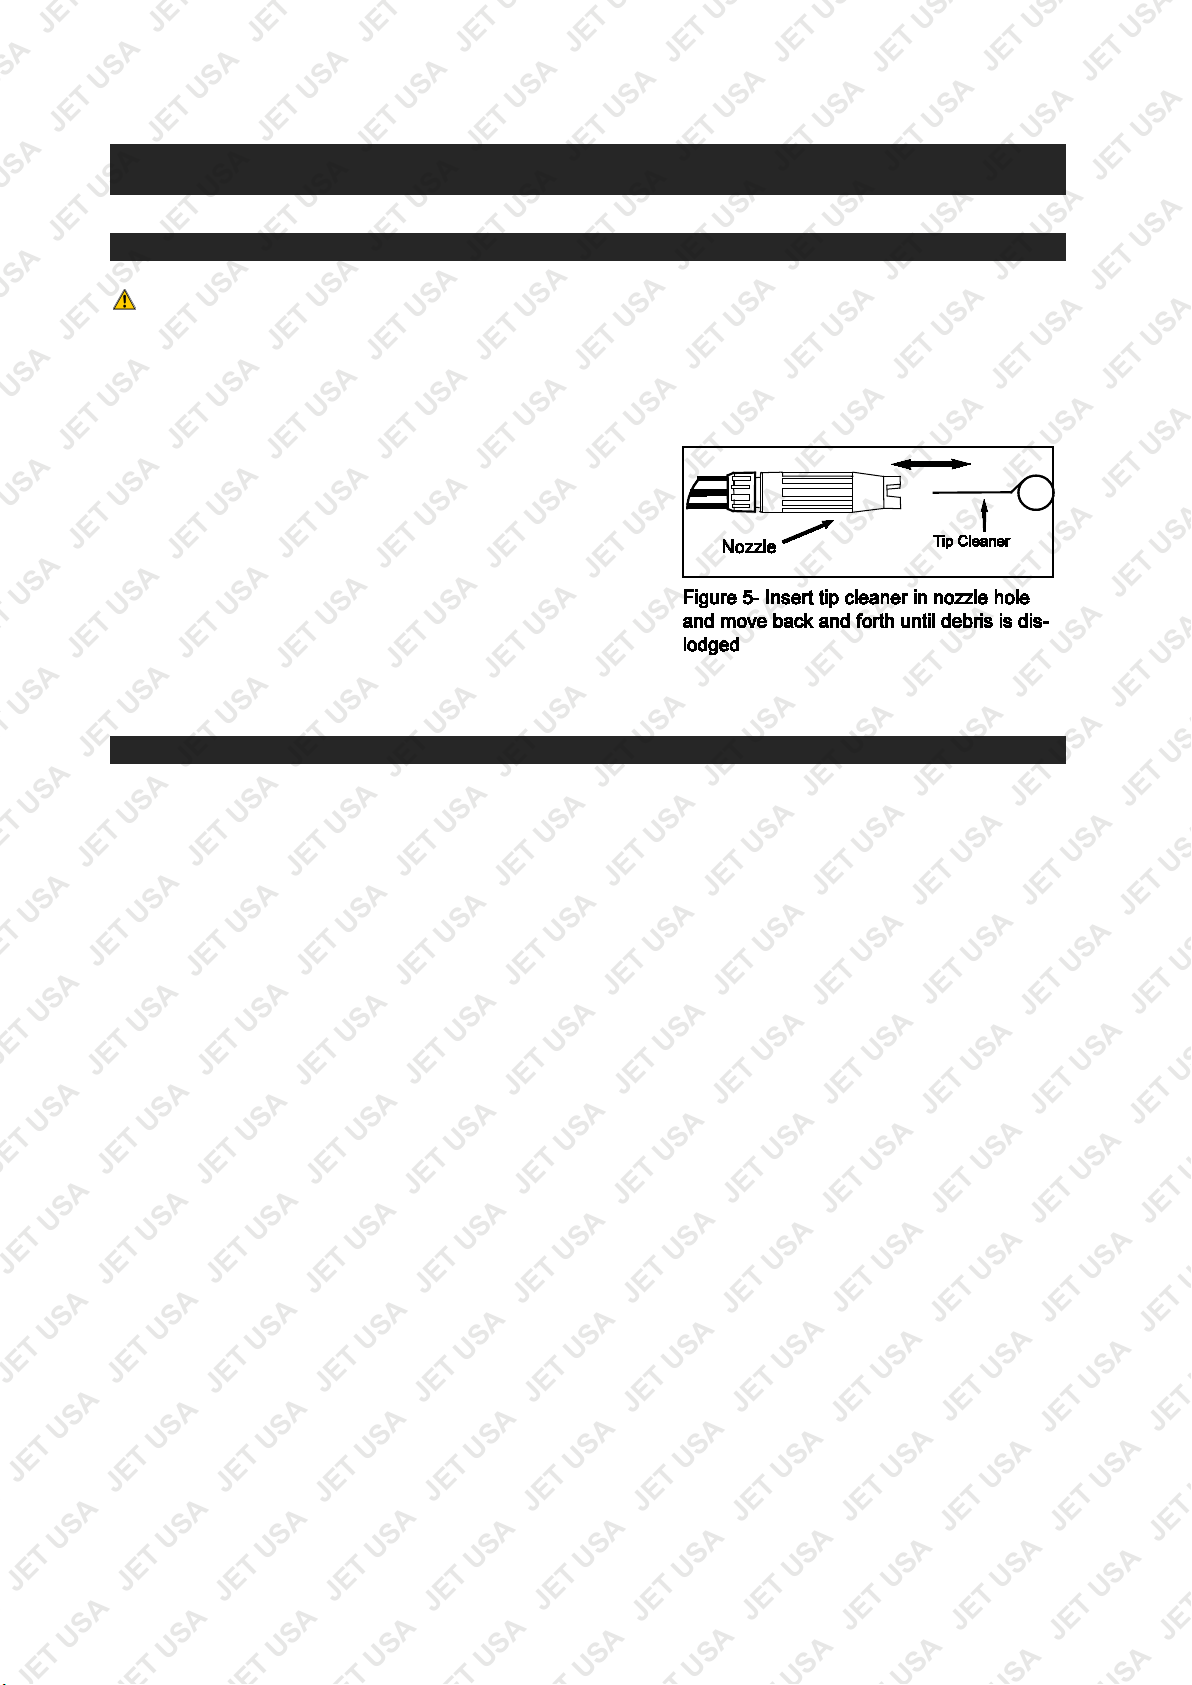
To clean out the nozzle:
1. Turn off and unplug unit.
2. Turn off water supply. Relieve any pressure trapped in the
hose by squeezing trigger 2-3 times.
3. Separate lance from gun.
4. Rotate nozzle to the narrow stream setting. This opens up
the fan blades.
5. Using included tip cleaner, or an unfolded paper clip,
insert wire into the nozzle hole and move back and forth
until debris is dislodged. (See image)
6. Remove additional debris by back-flushing water through
the nozzle. To do this, place end of a garden hose (with
water running) to end of nozzle for 30-60 seconds.
Water screen
Some pressure washers are equipped with a water inlet screen to protect the pump. If the screen is not
kept clean, it will restrict the flow of water to the pressure washer and may cause damage to the pump.
• The screen is fragile so be careful when cleaning or removing it. Any foreign particles entering the
pump may damage it.
• Do not operate the pressure washer without the screen in place (if originally equipped.)
• Remove the screen and back-flush to remove impurities from the screen.
• Replace afterwards immediately
.
Page 15
Troubleshooting
Symptom
Possible cause(s)
Corrective Action(s)
No detergent suction –
1. Nozzle pressure set to
1. Adjust nozzle to “low
3. Contact the distributor
No detergent suction –
applicators
1. Detergent applicator is
1. Clean applicator with warm
Unit begins to smoke
1. Overheated, overloaded or
damaged motor.
1. Turn off and call the dealer.
Pressure washer does
1. Unit is pressurised.
tripped.
1. Squeeze trigger on gun &
allow motor to cook down.
Pump does not reach
1. Water inlet filter is clogged
1. Clean the water inlet filter.
5. Call the dealer.
Fluctuating Pressure
1. Pump is sucking in air.
1. Check that the hoses and
4. Call the sealer
Motor stops suddenly
1. Extension cord is too long or
1. Remove extension cord
specifications.
units with tanks
units with attachable
not start up
necessary pressure
“high”.
2. High pressure extension
hose is too long.
3. Injector clogged on pump.
clogged
2. Plug is not well connected
or electrical socket is faulty.
3. Extension cord is too long or
wire size too small.
4. Main voltage supply is too
low.
5. Thermal safety switch has
2. Pump is sucking air from
hose connections
3. Nozzle is worn or not correct
4. Unloader is clogged or Worn
5. Valves is clogged or worn
pressure” or replace tip with
the low pressure detergent
application tip.
2. Remove high pressure
extension hose or use high
pressure hose shorter than
25 feet.
water.
2. Replace the applicator.
check for blockages.
2. Check plug, socket and
fuse.
3. Remove extension cord.
4. Check that main supply
voltage age is adequate.
5. Switch off motor unit and
2. Check that connections and
locking ring are properly
tightened.
3. Call the dealer.
4. Call the dealer.
2. Clogged nozzle.
3. Valves dirty, worn or stuck.
4. Water Seals worn.
wire size too small.
2. Thermal safety switch has
tripped due to overheating.
connections are tight.
2. Clean with tip cleaner(see
page 8)
3. Call the dealer
(see page 4)
2. Check that main supply
corresponds to
Page 16
Specifications
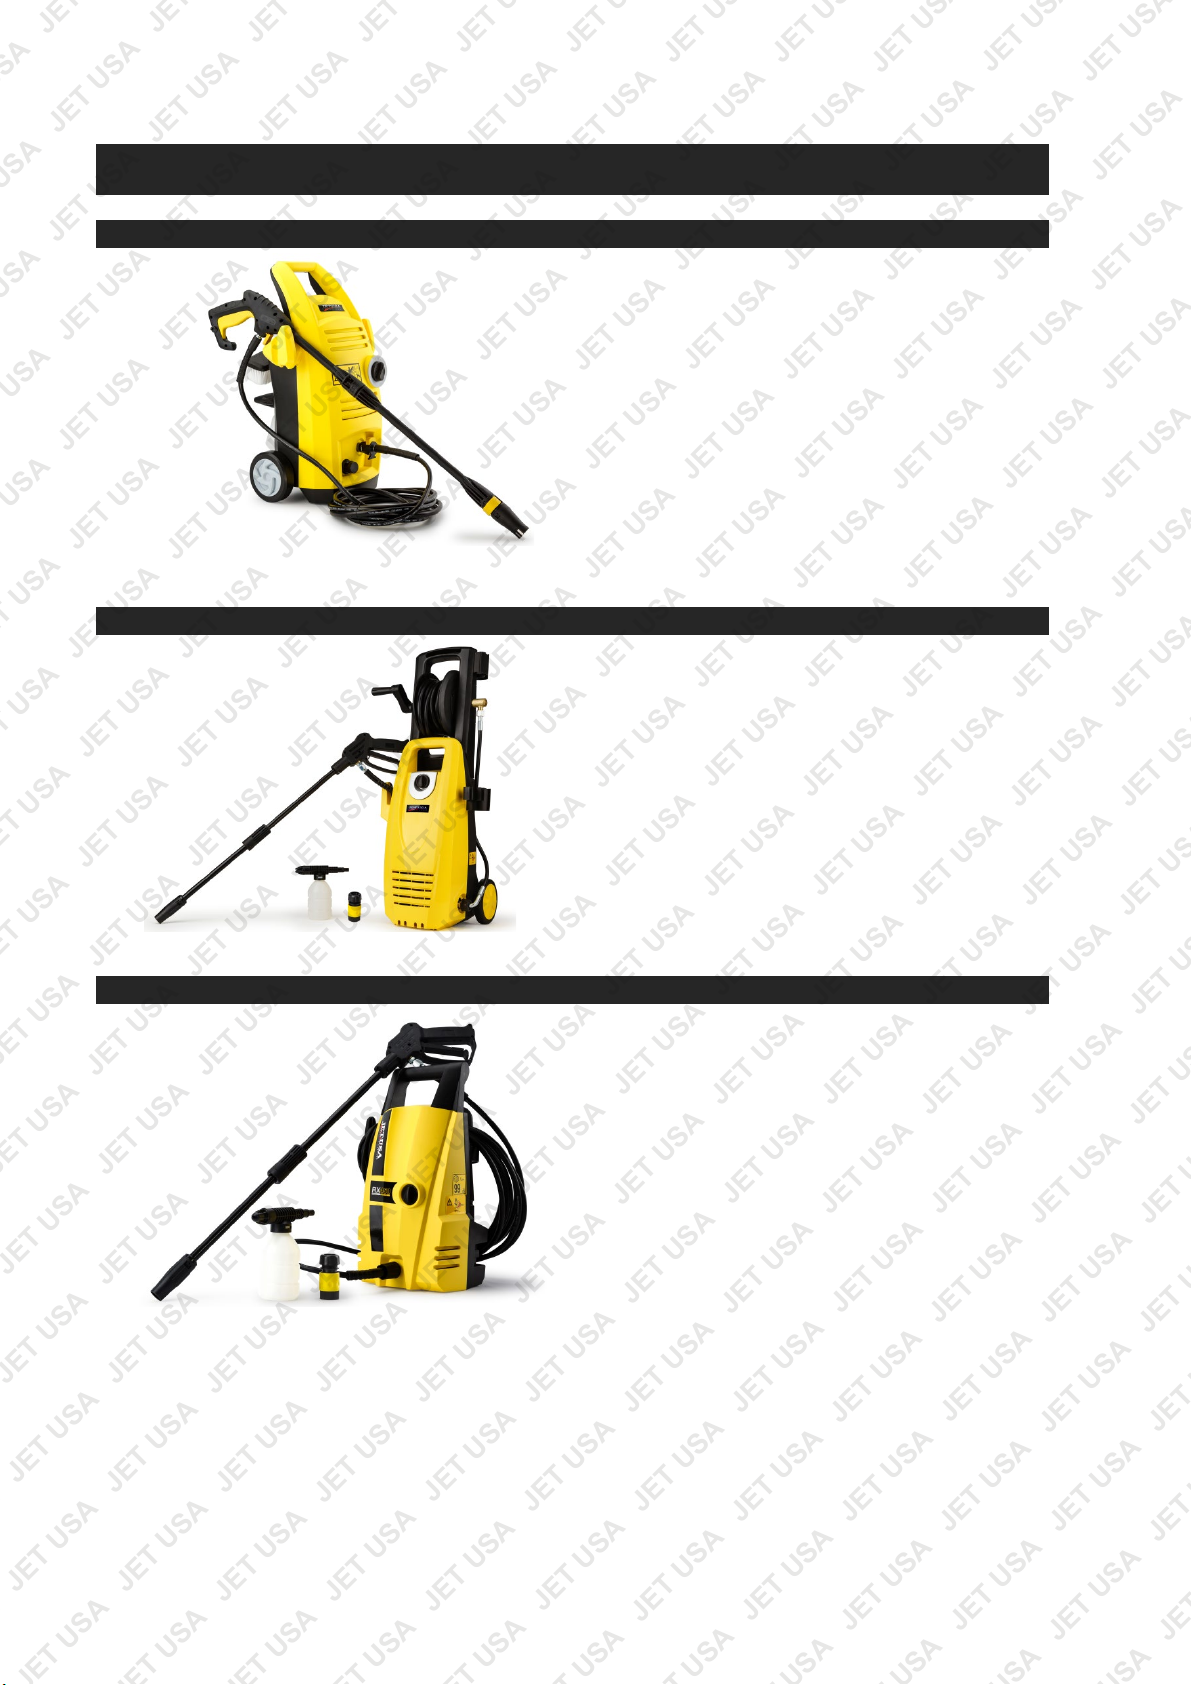
PRES-ELEC-11095
PRES-ELEC-13595
Voltage: 240V / 50Hz (10 Amp Plug)
Motor (W): 2350
Max. Rated PSI: 3200
Continuous rated PSI: 1800
Flow Rate (L/min): 6.5
Hose length (m): 5
Detergent tank: Included
Power Cable Length (m): 5
Max inlet temp (°C): 50
Voltage: 240V / 50Hz (10 Amp Plug)
Motor (W): 1850
Max. Rated PSI: 3200
Continuous rated PSI: 2000
Flow Rate (L/min): 5.7
Hose length (m): 8
Detergent tank: Included\
Power Cable Length (m): 5
Max inlet temp (°C): 50
Hose reel: Included
PRWELC450USAACAB
Voltage: 240V / 50Hz (10 Amp Plug)
Motor (W): 1850
Max. Rated PSI: 2900
Continuous rated PSI: 1600
Flow Rate (L/min): 5
Hose length (m): 8
Detergent tank: Included
Power Cable Length (m): 5
Max inlet temp (°C): 50
Page 17
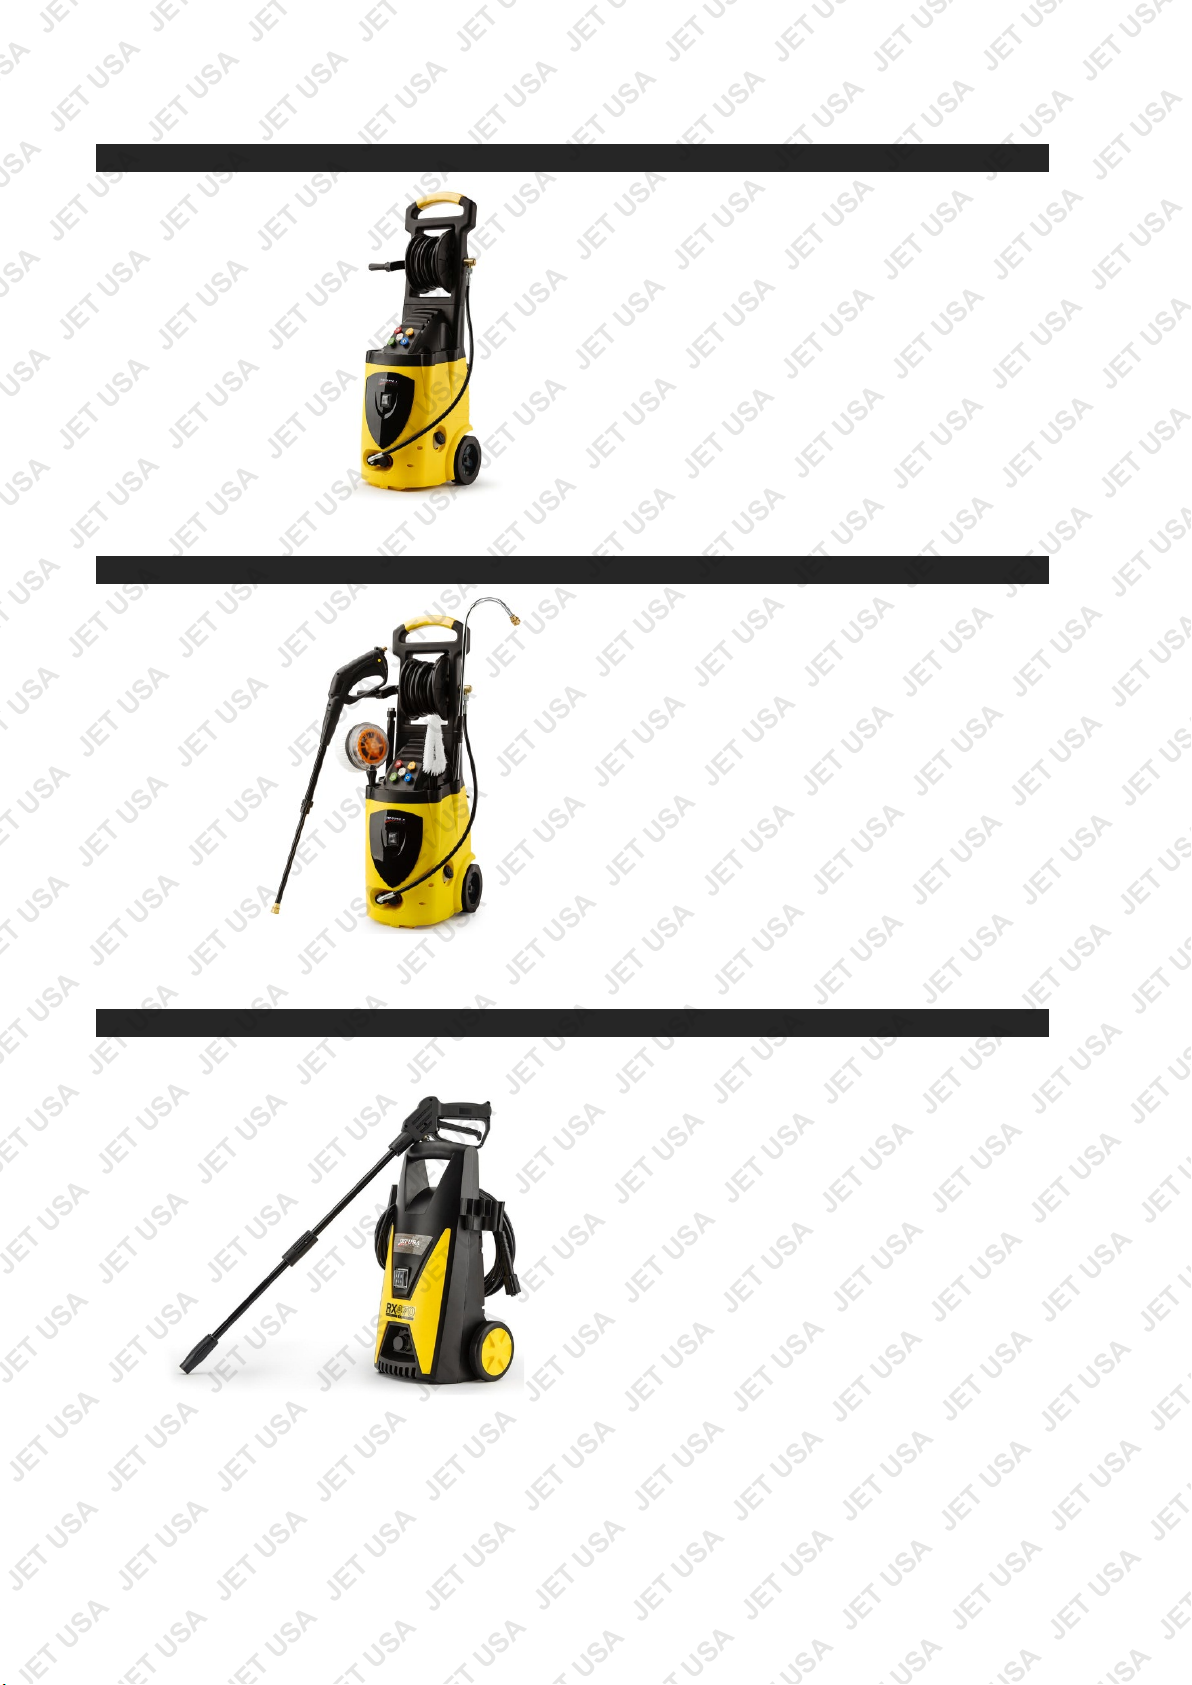
PRWELC550USAACAB
Voltage: 240V/50HZ
PRSWSH-ELEC-3200WF
Voltage: 240V / 50Hz (10 Amp Plug)
Motor (W): 3200
Max. Rated PSI: 3800
Continuous rated PSI: 2500
Flow Rate (L/min): 8.5
Hose length (m): 30
Detergent tank: Included
Power Cable Length (m): 5
Max inlet temp (°C): 50
Hose reel: Included
Voltage: 240V / 50Hz (10 Amp Plug)
Motor (W): 3200
Max. Rated PSI: 3800
Continuous rated PSI: 2500
Flow Rate (L/min): 6.8
Hose length (m): 10
Detergent tank: Included
Power Cable Length (m): 5
Max inlet temp (°C): 50
Hose reel: Included
PRWELCJETA470
Power: 2100W
Motor: Brush Motor (Aluminium)
Maximum Pressure: 3100PSI (241Bar)
Continuous Pressure: 2000PSI (138Bar)
Flow Rate: 6.2L/min
Max Flow Rate: 7.1L/min
Page 18
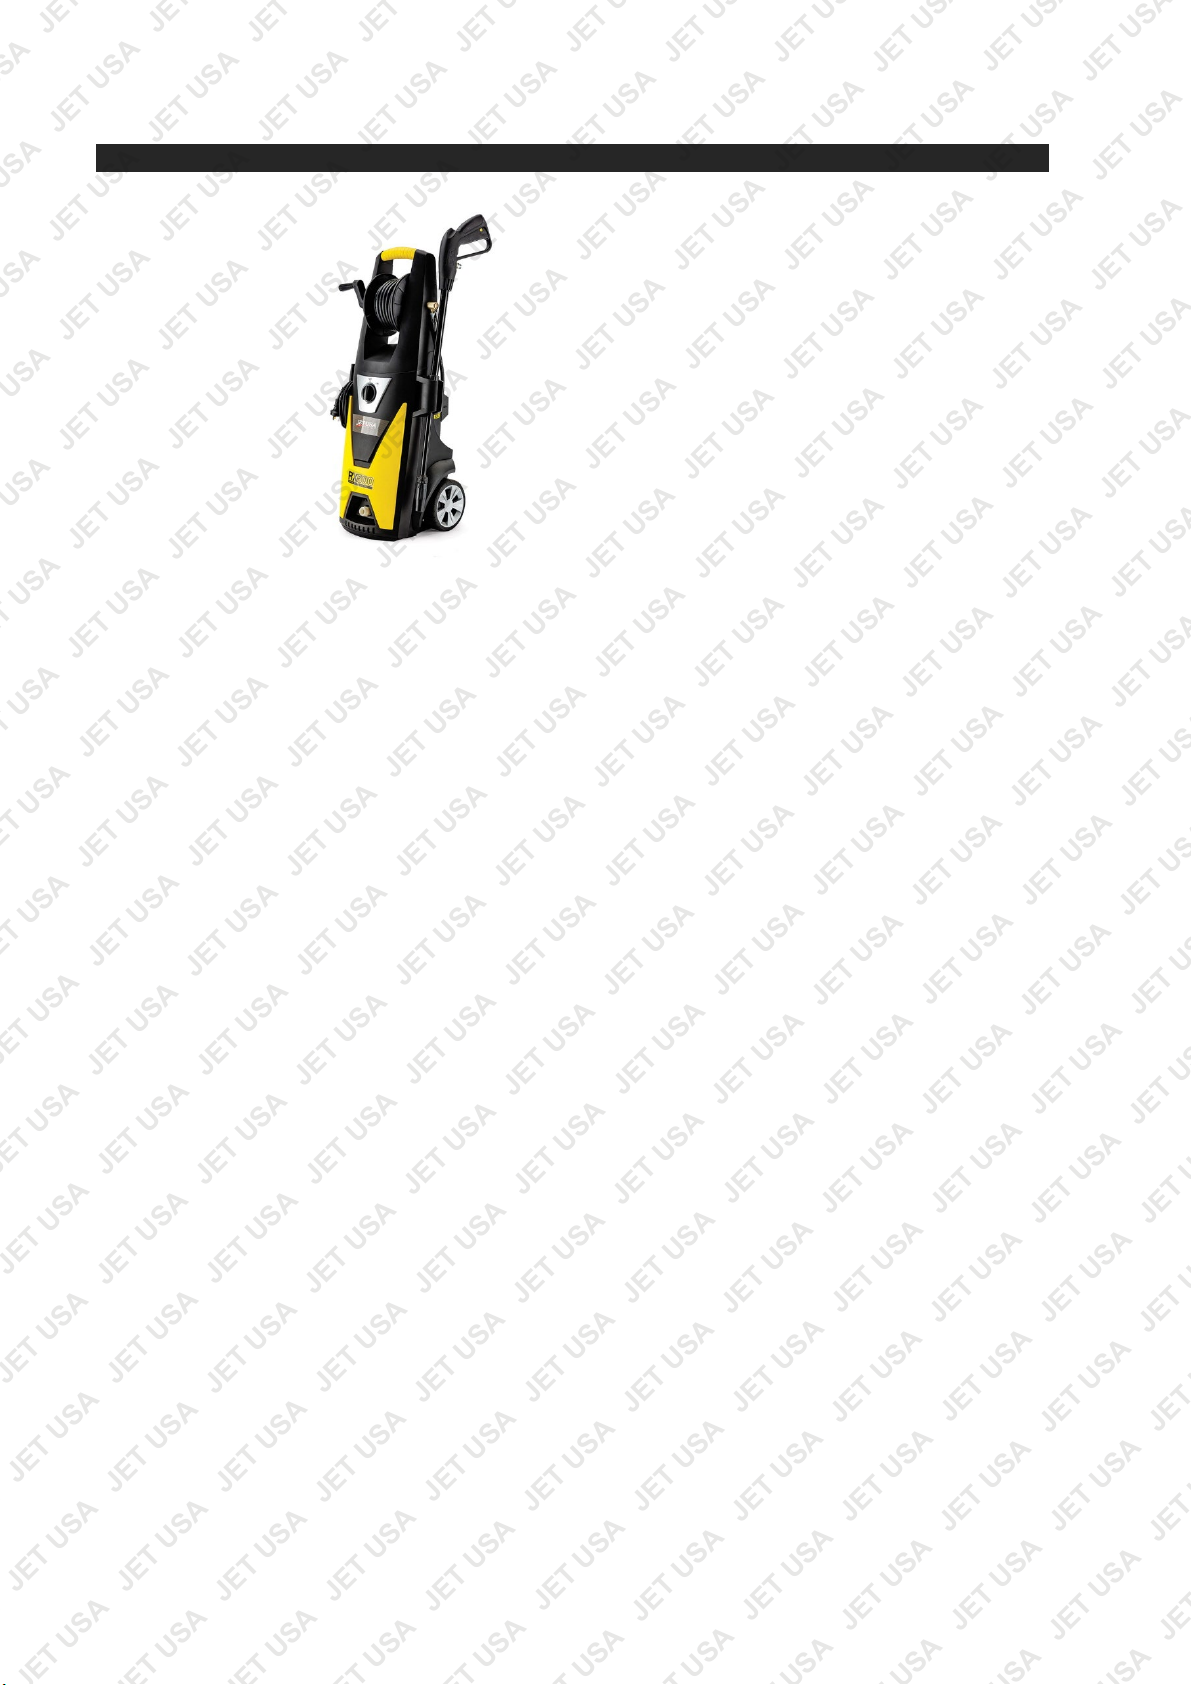
PRWELCJETA500
Voltage: 240V/50HZ
Motor Power: 2400W (Peak) Induction
Maximum Pressure: 3500PSI (241Bar)
Continuous Pressure: 2150PSI (148Bar)
Rated Flow Rate: 6.5L/min
Max Flow Rate: 8.2L/min
Cable Length: 5m
Hose Length: 8m
© Copyright 2018 - Mills International Trading Pty Ltd.
Page 19
Some experts believe that the incorrect or prolonged use of almost any product may
cause serious injury or death. To help reduce your risk of serious injury or death, refer
to the information below. For more information, see www.datastreamserver.com/safety
Consult all documentation, packaging and product
labelling before use. Note that some products feature
documentation available online. It is recommended to
print and retain the documentation.
Before each use, check the product for loose/broken/
damaged/missing parts, wear or leaks (if applicable).
Never use a product with
loose/broken/damaged/missing parts, wear or leaks.
Products must be inspected and serviced (if
applicable) by a qualified te
chnician every 6 months.
This is based on average residential use by persons of
average size and strength, and on a property of
average metropolitan size. Use beyond these
recommendations may require more frequent
inspections/servicing.
Ensure that all users of the product have completed a
suitable industry recognised training course before
being allowed access to the product.
If this product has been purchased in error when
considering the
information presented here, contact
the retailer directly for details of their returns policy, if
required.
The product has been supplied by a general
merchandise retailer that may not be familiar with your
specific application or description of application. Be
sure to attain third-party approval from a qualified
specialist for your application before use, regardless of
any assurances from the retailer or its representatives.
This product is not intended for use where fail-safe
operation is required. As with any product (for
example, automobile, computer, toaster), there is the
possibility of technical issues that may require the
repair or replacement of parts, or the product itself. If
the possibility of such failure and the associated time it
may take to rectify could in any way inconvenience the
user, business or employee, or financially affect the
user, business or emplo
yee, then the product is not
suitable for your requirements. This product is not
intended for use where incorrect operation or a failure
of any kind, including but not limited to, a condition
requiring product return, replacement, parts
replacement or service by a technician may cause
financial loss, loss of employee time or an
inconvenience requiring compensation.
©2018 Jet USA. All rights reserved. No part of this document, including descriptive content, concepts, ideas,
diagrams or images may be reproduced or transmitted in any form or by any means, electronic or
mechanical, including photocopying, scanning or recording, or any information storage and retrieval system,
without express permission or consent from the publisher.
 Loading...