


user manual
JETBOX Blade

1. DES C RIP T ION
2. A D ANC E FE ATUR E S
3. SPE C IFI C ATI O NS
4. SAF E TY I N FOR M ATI O N
3. S P ECIFICAT I O N
3. S P ECIFICAT I O N
Volta ge :
Powe r/ High Sp eed:
Powe r/ Low Spe ed:
Air Temper at ure:
Air Vel oc ity:
Air Fl ow :
Dryi ng Ti me:
Prot ec tion Le vel:
Elec tr ic Isol ation:
Moto r:
Nois e( at 1M):
Cabi ne t Mater ial:
Net Weig ht :
Gros s We ig ht:
3
DAN G E R F ailur e to d iscon nect the po wer sourc e befor e in stall at ion or se rv icing c an r esult i n se rious i njury or
deat h fr om elec tr ic shoc k. Always di sconn ec t the pow er s ource b ef ore ser vi cing or i ns talli ng the hand d ryer.
WA R NING Wh en you di sp ose of an o ld a pplia nc e or any co mp onent s, follow a ny local an d natio na l laws on
669MM
298MM
184MM
220V- 24 0V 50/6 0Hz
110V-120 V 60 Hz
1650 W- 20 50W(H ea ter on) /7 00W-800 W( Heate r of f)
1450 W- 18 50W(H ea ter on) /6 50W-700 W( Heate r of f)
The ha nd d ryer is a s urface- mounted h and dry er p owere d by a b rush mo to r, and del iv ers 165 0 watts of dr ying powe r.
The dr ye r incor porates a r eplacea ble H E PA filter an d a reusable ai r in take pr ef ilter.
An inf ra red sen sor is used t o automat icall y ac tivat e th e dryer. The dry er is int en ded for u se i n comme rc ial, in du stria l,
and office e nv ironm en ts .
Slim, stylish de sign, improves washroom image.
Powerful motor for rapid dry-time, and drip-tray for safe and hygenic washroom environment.
25Se co nds con tinuous t imer prot ectio n.
Anti- sp lash de sign.
Cleaning required once per day.
Air is cleaned by UV sterilisation and easily-changed HEPA airfilter.
Substantial financial and eco savings by illiminating paper towel use.
Adjustable heat and power settings allow optimum comfort and economy in all environments.
15℃ above room temperature
100M /S
130M /H
7-9S
IPX 1
CLA S S 1
Brus h Mo tor at 220 00R P M
70dB
ABS Plas tic
7.5 K GS
9.1 K GS
WA R NING Ri sk of fir e, e lectr ic s hock, p er sonal i nj ury or pr op erty da mage are po ssibl e if l ocal co de s or safe ty
reco mm endat ions are no t follo we d.
Do not u se h and dry er for any pu rpose o th er than d ry ing han ds .
Care fu lly fol low all ins tructio ns for in st allat io n on the en cl osed in st allat io n templ at e/ins tr uctio n
s.
Inst al latio n sh ould on ly be perfo rmed by q ua lifie d pe rsons i n co mplia nc e with al l applica ble natio nal and l oc al
code s an d stand ards.
When c ut ting or d ri lling i nto wall or c eilin g, d o not dam ag e elect ri cal wir in g and oth er h idden u ti litie s.
Alwa ys c onnec t to a branch c ircui t wi th circ ui t break er o r fuse pr ot ectio n wi th an ele ct rical r at ing gre ater than
the ha nd d ryer’s rat ed a mpera ge .
Use on ly t he elec trical po wer(v ol tage an d fr equen cy ) speci fi ed for th e mo del han d dr yer bei ng instal led.
Each h an d dryer m ust have a de dicated c ircui t.
For in do or use on l
y. Do not use o ut doors . Do n ot expo se t o rain, s un o r extre me t emper at ures. D o not use nea r
sour ce o f water o r extreme h eat.
To limit a v ol tage dr op, and ins ure efficie nt operat ion, the correct size cable must be used.
Repa ir w ork sho uld only be p erfor me d by an aut ho rized e le ctric ia n.
This a pp lianc e is not inte nded for us e by pers on s with re du ced phy si cal, se ns ory or me nt al capa bilitie s, or lack
of exp er ience a nd knowle dge, un le ss they h av e been gi ve s uperv is ion or in structi on concer ning us e of t he
appl ia nce by a pe rson re sp onsib le f or thei r sa fety.
WA R NING Ri sk of fir e, e lectr ic s
hock , pe rsona l injury or p roper ty d amage a re p ossib le i f the fol lo wing sa fe ty
prec au tions a re not foll owed.
Repa ir w ork sho uld use only ge nuine r ep lacem en t parts .
Do not i ns ert for eign obje cts in the un it or pla ce h eavy ob je cts on th e un it.
Do not u se i n corro sive envi ronme nt s or expl os ive atm os phere s.
Do not u se i n extre mely humi d locatio ns or nea r so urce of w at er.
Do not i mm erse ap pliance i n water o r ot her liq ui d.
Chil dr en shou ld be sup er vised and must not p la y with th e ap plian ce .
disp os al of ele ctronic w aste. This ap pliance m ust not be di spose d to gethe r wi th the do me stic wa st e. This
appl ia nce must be di spose d at a n autho ri zed pla ce f or recy cl ing of el ec trica l an d elect ro nic app liances .

5. U NPACK ING / STANDAR D ACCE SSORIE S
6. I N STAL L AT ION
1. Rem ov e all pac king mate rial. Rec yclin g is r ecomm en ded.
2. Car ef ully re mo ve the ha nd dryer fr om the ship ping ca rt on, usi ng c are not t o dr op the ap pl iance .
3. Ins pe ct care fu lly for a ny damage t hat may hav e occur re d durin g tr ansit . Ch eck for a ny l oose, m is sing or d amaged
part s. I f the han d dr yer is da maged or mi ssing p ar ts, pro mp tly inf or m the dea le r where y ou p urcha se d it.
Stand ard items incl uded with the ha nd dryer are:
Clea ni ng Brus h
Insta llat ion Temp late
Manu al
HEPA Fil ter
HE PA Filte r
Water Col lecti on Tray
Air Pre- filter
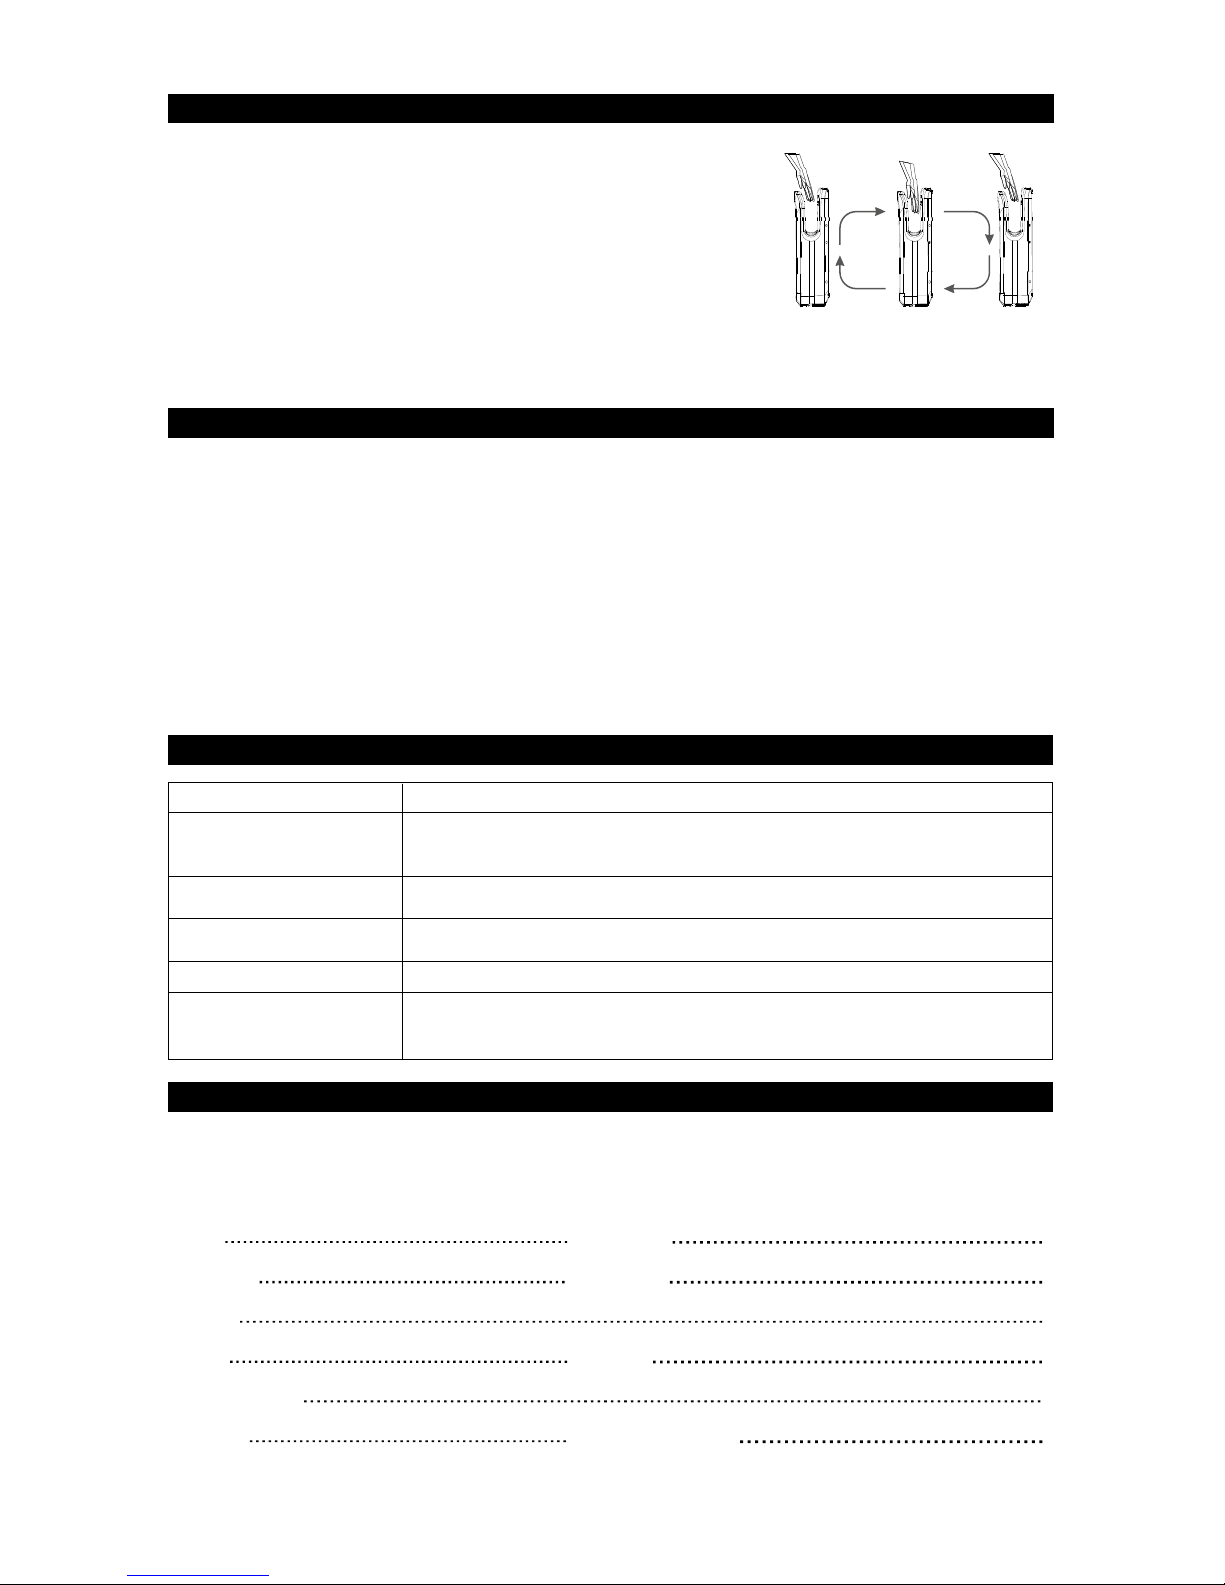
(Push ba ck then down to open it )
Power Sw itch
Hot/C old Swit ch
Speed Sw itch
Anti- theft sc rew
Po wer S upp ly Kit
Po wer S upp ly
Ki t Cov er
Moun ti ng anch ors
Wal l Mountin g Brack et
User Manua l
11. Connect plug to power supply socke t or tu rn on power.
CA U TION Improp er mounting may result in pers onal injury or prop erty damage.
1. Use the mounting te mplate provided to mark th e locations
for the 8 wall mount ing anc hors to atta ch the wall mo unting
bracket to the wall.
2. It is recommended that at least 2 of the 6 mo unting anchors
for the unit be fast ened in to a wall stud or support.
3. To use the holl ow wall anchors inc luded with the wall
mounting kit, pre-dr ill the wall in the marked locations
using a 6/25"(6mm) drill, in
ser t the plastic ancho rs and tap
flush to the wall.
4. Complet e the attach ment of the wall mo unting bracket to
the wall with the 6 mountin g anchors.
5. If the hand dryer supplied with plug then han g it on bracket.
6. If the hand dryer is suppl ied without plug an d please open
the powe r supply kit cover on hand drye r back then co nnect
it as fo llows <Power should be OFF >:
A. Conn ect the live wire(C oloured Brow n, Red, or Black) to
the term inal block marked “L”.
B. Conne ct the neutr
al wire(Co loured Black , Blue) to the
terminal block marke d “N”.
C. Conne ct the groun d wire( Coloured Gre en&Yell ow) to the
terminal block marke d “E”.
Replace power supply kit co ver then han g dryer on bracket.
7. Remove the water co llectio n tray from the bot tom of dryer,
and comp lete the att achment of the drye r with the remaining
2 anchors.
8. Set the Heater/Air Speed setting switches as required.
9. Replace the water collection tray.
10. Open the pre-filter to install the HEPA filter if necessary with
rubber ring side up.
JETBOX Blade 3
7. HOW TO U S E
8. Maintenance and Cleaning Instructions
9. DIA G NOS T ICS & REM E DIE S
SYM P T O M
Hand d ry er fail s to start
Hand d ry er turn s on/off
erra ti cally
Hand d ry er lock ed
Clea n se nsor ar ea insi de t he dryi ng c avity.
COR R E C T I V E ACTION
Mode l: S er ial No. :
Dist ri butor : Cu stomer:
Addr es s:
Tel No.: Fax N o. :
Date o f pu rchas e:
The L ED displ ay p rovid es i nform at ion abo ut the oper ation and s ervic in g
need s of t he hand d ryer.
A. Dry in g time an d welcome d iagra m B. P ow er indi cator
C. Air st er iliza ti on indi cator D. Se lf -chec k in dicat or
1. This ha nd d ryer is e qu ipped w ith remov able in ta ke air pr e- filte r an d a repla ce able H EPA filt er.
2. Reg ul arly ch eck filte r status is r eq uired . High traffi c ma y requi re m ore fre quent rep lacemen t of the HEPA filter.
3. The rem ov able in ta ke air pr e- filte r ca n be clea ned and re- used.
4. Rep la cemen t filters c an be purch ased th ro ugh you r de aler wh er e you pur ch ased th e hand drye r.
5. H E A P fil te r is reco mm ended t o be c leane d by a vacuum c leane r.
The dr ye r is equi pped with a n O N/OFF Powe r Sw itch, S pe ed Cont ro l Switc h and Hot/C old Switc h.
The fa ct ory def au lt sett in g for the P ow er Swit ch “ O N ”, Speed Co ntrol Swi tch “ HIGH” a nd Hot/ Co ld Swit ch “ H O T”.
All th e sw itches ar e located i nside the d ryer on the le ft s ide of th e wa ter col le ction t ra y. To acces s, r emove t he water
coll ec tion tr ay.
CAU T I O N o n H E PA : Failure t o repla ce a u sed / dir ty HEPA fil ter can cau se over he ating o f th e han
d drye r ’s m ot or or
heat e le ment and ma y invalid ate you r wa rrant y. I t is reco mm ended t o check it o nce per we ek .
CAU T I O N o n Wate r Co
llec ti on Tray: Check the water level regularly via the front viewer and empty as required.
Clea n
the tr ay and r eplac e it. If the tray is overfull, it will overflow onto the floor and may present a slip hazard.
CLE A N I N G
All su rf aces of th e hand drye r can be clea ned wit h a so ft clot h an d non-ab ra sive, n on -caus ti c clean in g
solu ti ons. A cleaning brush for the drain hole in the bottom of the drying cavity is provided.
Chec k po wer sup ply is turn ed on and the p ower sw it ch on the han d dr yer is on .
Chec k fo r forei gn object s in the dryi ng cavi ty t hat may be b locki ng t he sens or s.
Inse rt h ands a li tt le furt he r into th e dr ying ca vity to act ivate sensor s.
1. Automatic, no- to uch ope ration.
2. There i s a bl ue LED li ght to gu id e user to t he a ir flow.
3. The han d dr yer wil l st art aut om atica ll y when ha nds are ins erted .
4. Slo wl y move yo ur hands up a nd down thr ough th e ai r strea m fo r 7-10 se co nds.
5. The han d dr yer wil l st op auto ma tical ly after ha nds are rem oved.
Heat er will n ot work if amb ie nt tempe ra ture is mor e t ha n 25 C
Not ho t ai r
Chec k he ater switch is on and fuse is intact.
Hand d ry er will b e locke d if the supply v oltage fluctuates by more than 15 %. Turn off
the hand dryer for 10 minutes and then restart.
Low air speed
Switch spee d co ntrol to “ H”. Check and clean filters.
For Se ll er: Signa ture :
10. L IMI T ED WAR R ANT Y
This h an d dryer h as a 2 year wa rrant y fr om the da te o f purch as e for any m an ufact ur ing def ec t. It cov er s repla ce ment
of def ec tive pa rt s excep t when caus ed by imp ro per use o f th e hand dr ye r. It excludes motor brush replacement.
This w ar ranty i s only vali d if the form c ard has bee n prope rl y completed.
For an y wa rrant y cl aim you s hould con tact your supplier.
4 JETBOX Blade
.

Jet Force Junior 5
Pre ai r fi lter
HEPA filte r
Soft r ub ber rin g
Hard p la stic ri ng
Replace H E PA F i l t e r a n d C l e a n Pre-filter
Replace wate r tray and uninstall hand dryer f rom wall
Wat er Tray
Wat er overfl ow pipe
to flo or d rain
Powe r ON /OFF
Air Ho t/ Cold
Spee d Hi gh/Lo w
WARNI NG : Disco nn ect pow er a t the ser vi ce brea ke r or unpl ug t he hand d ry er befo re s ervic in g & mai nt enanc e.
1. Pre ss b ack the n down to remove the pre-f ilter.
2. Take the HE PA fil te r out. Wh en r eplacing the H EPA filter, ensure the soft rubber edge is uppermost.
3. Cle an any d ust from the pre -filter.
2 x anti -tamper s crews
1. If t here is a w ater ov erflo w pipe co nnect ed, remov e it.
2. Remove the tray by pulling it forward. Th en undo the2 x anti-tamper screws.
3. Fi rst pul l up then p ull fro nt to tak e hand dr yer fro m wall. Do this carefully as the dryer weighs 11KG.
5. On re insta llati on, bef ore rep lacing the wat er tray, make sure the heater and speed switches are set as required.

Sens or D etect or
&LED L ig ht
circ ui t board
Disp la y circu it b oard
Replace Sensor Detecto r & L ED Light Circuit Board
Replace Display Circuit Board
Repl ac e Senso r De tecto r& LED Light C ir cuit Bo ar d:
1. Loo sen s crew on t he s ensor d et ector &L ED light ci rcuit boa rd h older. U se a s crewd ri ver to pu ll t he cove r a li ttle to ope n it.
2. Take carefully remove the cover along with the circuit boar d. Take care of the wire connected to the circuit board.
3. Loo sen the 2 s crews on the c ir cuit bo ar d and rep la ce with the new on e.
Repl ac e Displ ay C ircuit Bo ar d:
1. Remove the sticker. Take car e no t damag e th e hand dr ye r edge.
2. Loo sen the t wo scre ws on t he time r ci rcuit boa rd holder. U se a s crewd ri ver to pu ll t he hold er a l ittle t o op en it.
3. Gently remove the holder and t he c ircui t bo ard wil l co me out. Take care of the adjoining wire.
4. Loo sen the t wo scre ws on the c ircui t bo ard and r ep lace with the ne w on e.
5. It is recommended to also replace the sticker.
6 JETBOX Blade

2 fron t co ver scr ew
4 fron t
cove r sc rew
Plas ti c locks
Open hand dryer front cover
Replace Main Circuit Board, Sensor Recei ver Board, Motor, Heat Element
Sens or R eceiv er
Circ ui t Board
Heat e le ment
Main C ir cuit
Boar d
1. Loo sen the 4 f ront co ve r screws o n ha nd drye r ba ck base as per th e arrows mar ke d.
2. Loo sen the 2 f ront co ve r screws o n th e hand drye r front & underside.
3. Pul l th e front c ov er up the n ba ck a little t o remove it .
4. Pul l th e cover s lo wly and gent ly taking care of the plastic locks on the t op side.
Air Chamber cove r
Heat e le ment
housing
Moto r ho using
Moto r
Main cir cuit
boar d
housing
Repl ac e Main Ci rc uit Board : Remo ve circ ui t board c ov er and re pl ace the cir cu it boar d.
Repl ac e Senso r Re ceive r ci rcuit boa rd : .Undo the screw, remove the ci rc uit boa rd a nd repl ac e.
Re
Remove the Air Chamber cover and Motor housing.
plac e Mo tor:
1.
. Remove the mo to r and rep la ce it.
2. Rep la ce moto r housing. Ensu re the mo to r protect ion rubbe r and ai r seal ru bb er fits correctly.
3. R eplac e Air Chamber co ver. Ensur e th e air seal ru bber is seated correctly to avo id air l eakag e.
Repl ac e Heat El em ent:
1. Mov e ma rked Air Chamber co ve r. Remove the hea t el ement and fit the replacement .
2. Rep la ce Air Chamber cove r. Ensu re the ai r se al rubb er is seated correctly t o avoid air lea kage.
JETBOX Blade 7

Power
Termina l bl oc ks
Hand Dryer by Brushless Motor Electric Diagram
Hand Dryer by Brush Motor Electric Diagram
 Loading...