

Page 1
This .pdf document is bookmarked
Operating Instructions and Parts Manual
7-inch Horizontal-Vertical Band Saw
Model HVBS-7MW
WALTER M EIE R (Manufa c turing) Inc.
427 New Sanford Road
LaVergne, Tennessee 37086 Part No. M-414459
Ph.: 800-274-6848 Revision H 01/2012
www.waltermeier.com Copyright © 2012 Walter Meier (Manufacturi ng) Inc .
Page 2
1.0 Warranty and Service
Walter Meier (Manufacturing) Inc., warrants every product it sells. If one of our tools needs service or repair, one of
our Authorized Service Centers located throughout the United States can give you quick service. In most cases, any
of these Walter Meier Authorized Service Centers can authorize warranty repair, assist you in obtaining parts, or
perform routine maintenance and major repair on your JET® tools. For the name of an Authorized Service Center in
your area call 1-800-274-6848.
MORE INFORMATION
Walter Meier is consistently adding new products to the line. For complete, up-to-date product information, check with
your local Walter Meier distributor, or visit waltermeier.com.
WARRANTY
JET products carry a limited warranty which varies in duration based upon the product (MW = Metalworking, WW =
Woodworking).
WHAT IS COVERED?
This warranty covers any defects in workmanship or materials subject to the exceptions stated below. Cutting tools,
abrasives and other consumables are excluded from warranty coverage.
WHO IS COVERED?
This warranty covers only the initial purchaser of the product.
WHAT IS THE PERIOD OF COVERAGE?
The general JET warranty lasts for the time period specified in the product literature of each product.
WHAT IS NOT COVERED?
Five Year Warranties do not cover woodworking (WW) products used for commercial, industrial or educational
purposes. Woodworking products with Five Year Warranties that are used for commercial, industrial or education
purposes revert to a One Year Warranty. This warranty does not cover defects due directly or indirectly to misuse,
abuse, negligence or accidents, normal wear-and-tear, improper repair or alterations, or lack of maintenance.
HOW TO GET SERVICE
The product or part must be returned for examination, postage prepaid, to a location designated by us. For the name
of the location nearest you, please call 1-800-274-6848.
You must provide proof of initial purchase date and an explanation of the complaint must accompany the
merchandise. If our inspection discloses a defect, we will repair or replace the product, or refund the purchase price,
at our option. We will return the repaired product or replacement at our expense unless it is determined by us that
there is no defect, or that the defect resulted from causes not within the scope of our warranty in which case we will,
at your direction, dispose of or return the product. In the event you choose to have the product returned, you will be
responsible for the shipping and handling costs of the return.
HOW STATE LAW APPLIES
This warranty gives you specific legal rights; you may also have other rights which vary from state to state.
LIMITATIONS ON THIS WARRANTY
WALTER MEIER (MANUFACTURING) INC., LIMITS ALL IMPLIED WARRANTIES TO THE PERIOD OF THE
LIMITED WARRANTY FOR EACH PRODUCT. EXCEPT AS STATED HEREIN, ANY IMPLIED WARRANTIES OR
MERCHANTABILITY AND FITNESS ARE EXCLUDED. SOME STATES DO NOT ALLOW LIMITATIONS ON HOW
LONG THE IMPLIED WARRANTY LASTS, SO THE ABOVE LIMITATION MAY NOT APPLY TO YOU.
WALTER MEIER SHALL IN NO EVENT BE LIABLE FOR DEATH, INJURIES TO PERSONS OR PROPERTY, OR
FOR INCIDENTAL, CONTINGENT, SPECI AL, OR CONSEQUENTIAL DAMAGES ARISING FROM THE USE OF
OUR PRODUCTS. SOME STATES DO NOT ALLOW THE EXCLUSION OR LIMITATION OF INCIDENTAL OR
CONSEQUENTIAL DAMAGES, SO THE ABOVE LIMITATION OR EXCLUSION MAY NOT APPLY TO YOU.
Walter Meier sells through distributors only. The specifications in Walter Meier catalogs are given as general
information and are not binding. Members of Walter Meier reserve the right to effect at any time, without prior notice,
those alterations to parts, fittings, and accessory equipment which they may deem necessary for any reason
whatsoever. JET® branded produc ts are not sold in Canada by Walter Meier.
2
Page 3

2.0 Table of contents
Section Page
1.0 Warranty and Service ....................................................................................................................... 2
2.0 Table of contents .............................................................................................................................. 3
3.0 Safety warnings ................................................................................................................................ 4
4.0 About this manual ............................................................................................................................. 5
5.0 Specifications ................................................................................................................................... 6
6.0 Setup and assembl y ......................................................................................................................... 7
6.1 Shipping contents .......................................................................................................................... 7
6.2 Unpacking and clean- up ................................................................................................................ 7
6.3 Assembly ...................................................................................................................................... 7
6.4 Verti cal cutting plate ...................................................................................................................... 7
6.5 Coolant tank prepar ation ............................................................................................................... 8
6.6 Electrical connections .................................................................................................................... 8
6.7 Voltage conversi on ........................................................................................................................ 9
6.8 Extension cords ............................................................................................................................. 9
7.0 Adjustments .................................................................................................................................... 10
7.1 Hydraulic feed selec tor ................................................................................................................ 10
7.2 Changing blade speed................................................................................................................. 10
7.3 Adjusting blade gui des ................................................................................................................ 10
7.4 Vise adjustm ent ........................................................................................................................... 10
7.5 Blade tension .............................................................................................................................. 11
7.6 Changing blades ......................................................................................................................... 11
7.7 Adjusting blade square to t able .................................................................................................... 12
7.8 Adjusting blade square to v ise ..................................................................................................... 12
7.9 Adjusting blade tr ac ki ng .............................................................................................................. 13
7.10 Adjusting bl ade guide bear ings .................................................................................................. 13
7.11 Adjusting bow weight ................................................................................................................. 14
7.12 Adjusting automatic shutoff ........................................................................................................ 14
8.0 Operation........................................................................................................................................ 14
9.0 Maintenance ................................................................................................................................... 15
9.1 Lubricati on .................................................................................................................................. 15
9.2 Chip Cleaning Brush ................................................................................................................... 15
10.0 Replacement Parts ....................................................................................................................... 16
10.1.1 HVBS-7MW Bed Assembly – Exploded View .......................................................................... 17
10.1.2 HVBS-7MW Bow Assembly – Exploded View ......................................................................... 18
10.1.3 HVBS-7MW Bed and Bow Assembli es – Parts List ................................................................. 19
10.2.1 HVBS-7MW Cylinder A ssembly – Exploded View ................................................................... 23
10.2.2 HVBS-7MW Cylinder A ssembly – Parts List ............................................................................ 23
11.0 Electrical Connec tions................................................................................................................... 24
3
Page 4

3.0 Safety warnings
1. Read and understand the entire owner's
manual before attempting assembly or
operation.
2. Read and understand the warnings posted
on the machi ne and in this manual. F ai lure
to comply with all of these warnings may
cause serious injury.
3. Replace the warning labels if they become
obscured or removed.
4. This band saw is designed and int ended for
use by properly trained and experienced
personnel only. If you are not familiar with
the proper and safe operation of a band
saw, do not use until proper training and
knowledge have been obtained.
5. Do not use this machine for other than its
intended use. If used for other purposes,
Walter Meier (Manuf acturing) Inc., discl aims
any real or im plied warranty and holds it self
harmless from any injury that may result
from that use.
6. Always wear approved safety glasses/face
shields while using this table saw. Everyday
eyeglasses only have impact resistant
lenses; they are not s af ety glasses.
7. Before operati ng this band saw, rem ove tie,
rings, watches and other jewelry, and roll
sleeves up past the elbows. Remove all
loose clothing and confine long hair. Nonslip footwear or anti-skid floor strips are
recommended.
8. Wear ear protec tors (plugs or muffs) duri ng
extended periods of operation.
9. Some dust created by power sanding,
sawing, grinding, drilling and other
construction activities contain chemicals
known to cause cancer, birth defects or
other reproductiv e harm . Some ex amples of
these chemicals are:
•
Lead from lead based paint.
•
Crystalline sil ica from bricks, c ement and
other masonry products.
Arsenic and chromium from chemically
•
treated lum ber.
Your risk of exposure vari es, depending on
how often you do this type of work. To
reduce your exposure to these chemicals,
work in a well-ventil ated area and work with
approved safet y equipm ent, such as f ace or
dust masks that are specificall y designed to
filter out microscopic particles.
10. Do not operate this machine while tired or
under the infl uence of drugs, al cohol or any
medication.
11. Make certain the switch is in the OFF
position before connecting the machine to
the power supply.
12. Make certain the machine is properly
grounded.
13. Make all machine adjustments or
maintenance with the machine unplugged
from the power source.
14. Remove adjusting keys and wrenches. For m
a habit of checking to see that keys and
adjusting wrenches are removed from the
machine before turning it on.
15. Keep safety guards in place at all times
when the machine i s in use. If removed for
maintenance pur poses, use ext rem e cauti on
and replace the guards immediately after
completion of maintenance.
16. Never hold the material with saw in
horizontal position. Always use vise and
clamp it securely.
17. K eep hands and fingers away fr om blade at
all times duri ng oper ati on.
18. Provide adequate support for long and
heavy material.
19. Check dam aged parts. Bef ore furt her use of
the machine, a guard or other part that is
damaged should be carefully checked to
determine that it will operate properly and
perform its intended function. Check for
alignment of moving parts, binding of
moving parts, breakage of parts, mounting
and any other condi tions that m ay affect its
operation. A guard or other part that is
damaged should be properly repaired or
replaced.
20. Provide for adequate space surrounding
work area and non-glare, overhead lighting.
21. Keep the floor around the machine clean
and free of scrap mat eri al, oil and grease.
22. Keep vi sitors a safe distance f rom the work
area. Keep childr en away.
4
Page 5

23. Make your workshop child proof with
padlocks, master switches or by removing
starter keys.
24. G ive your work undivi ded attention. Look ing
around, carrying on a conversation and
“horse-play” are c ar eless acts that can result
in serious injury.
25. Maintain a balanced stance at all times so
that you do not fall into the blade or other
moving parts. Do not overreach or use
excessive force to perform any machine
operation.
26. Use the right tool at the correct speed and
feed rate. Do not forc e a tool or att achment
to do a job for which it was not designed.
The right tool will do the job bet ter and m ore
safely.
27. Use recommended accessories; improper
accessories may be haz ar dous.
30. Do not stand on the m achi ne. Serious inj ury
could occur if the machine tips over.
31. Never leave the machine running
unattended. Turn the power off and do not
leave the machine until it comes to a
complete stop.
32. Rem ove loose it ems and unnecessary work
pieces from the area before starting the
machine.
33. F eed work into a blade or cutter agai nst the
direction of rotation of the blade or cutter
only.
34. Don’t use in dangerous environment. Don’t
use power tools in dam p or wet locati on, or
expose them to rain. Keep work area well
lighted.
35. Famili arize yoursel f wit h the f ollowing safet y
notices used in this manual:
28. Maintain tools with care. Keep saw blades
sharp and clean for the best and safest
performance. Follow instructions for
lubricating and changing accessories.
29. Turn off t he machine before cl eaning. Use a
brush or compressed air t o remove chips or
debris — do not use your hands.
are not heeded, it may result in minor injury
and/or possible machine damage.
are not heeded, it may result in serious i njury or
possibly even deat h.
This means that if precautions
This means that if precautions
4.0 About this manual
This manual is provided by Walter Meier (Manufacturing) Inc. covering the safe operation and
maintenance procedures f or a JET Model HVBS-7MW Band Saw. Thi s manual contai ns instructions on
installation, safety precautions, general operating procedures, maintenance instructions and parts
breakdown. Your m achine has been designed an d constructed t o provide y ears of troubl e-free operati on
if used in accordance with the instructions as set for th in this document.
If there are questions or c omments, please contact your local suppli er or Walter Meier. Walt er Meier can
also be reached at our web site: www.walt er meier.com.
Retain this manual for future reference. If the machine transfers ownership, the manual should
accompany it.
Read and understand the entire contents of this manual before attempting
assembly or operat io n! Failure to comply may cause serious inju ry!
5
Page 6

5.0 Specifications
Model number ........................................................................................................................... HBS-7MW
Stock num ber ................................................................................................................................ 414459
Capacity:
Round at 90°....................................................................................................................... 7” (178mm)
Round at 45°................................................................................................................. 4-1/2” (144 mm)
Rectangle at 90° ........................................... 2”H x 12”W (51x305mm); 7”H x 10-7/8”W (178 x 276mm)
Rectangle at 45° ................................. 7”H x 3-1/2”W (178 x 89mm); 5-1/2”H x 4-1/2”W (140 x 114mm)
Throat depth ............................................................................................................................ 7” (178mm)
Vertical worktable ............................................................................................ 9-3/8” x 10” (238 x 254mm)
Bed heigh t from floor ............................................................................................................. 23” (584mm)
Vise tilts ................................................................................................................................................ 45°
Blade size................................................................................. 3/4” x 0.035” x 93” (19 x 0.889 x 2362mm)
Blade speed ...........................................................................................................86, 132, 178, 260 sfpm
Blade wheel diam et er ...................................................................................................... 11-3/4” (300mm)
Motor (UL listed) ...................................................... TEFC, 3/4HP, 1PH, 115/230V ( pr ewir ed 115V ) , 60Hz
Floor space required .............................................49-1/2” L x 20-1/2” W x 41” H (1257 x 521 x 1041.5mm)
Net weight (approximate) .................................................................................................... 286 lb (130 kg)
Shipping weight ( appr oximate) ............................................................................................ 331 lb (150 kg)
The specifications in this manual were current at time of publication, but because of our policy of
continuous improvem ent, Walter M eier ( M anufacturing) Inc., reserves the r ight to change specific at ions at
any time and without pr ior not ice, without incurring obligations.
6
Page 7
6.0 Setup and assembly
6.1 Shipping contents
1 Band sa w
2 Wheel axles
4 Wheels
4 Split pins
2 Strain clamps
1 Material stop bar
1 Material stop
1 Belt cover
1 Vertical cutting plate
Tools requi red for assemb ly:
#2 cross point screwdriver
Pliers
6.2 Unpacking and clean-up
1. Finish uncrating the saw. Inspect it for
shipping damage. If any damage has
occurred, cont ac t y our distr ibutor.
Figure 1
2. Unbol t t he saw f rom the ski d and plac e it on
a level surface.
3. Clean rust protected surfaces with kerosene,
diesel oil, or a mild solvent. Do not use
cellulose based solvents such as paint
thinner or lacquer thinner. These will
damage painted surfaces.
6.3 Assembly
1. Place blocking under the ends of the saw
base to allow wheel installation. Caution:
Make sure saw is steady while temporarily
supported.
2. Slide wheel axles through the holes in the
base.
3. Slide the wheels onto the axles and fasten
with pins. Bend the pins t o hold in place.
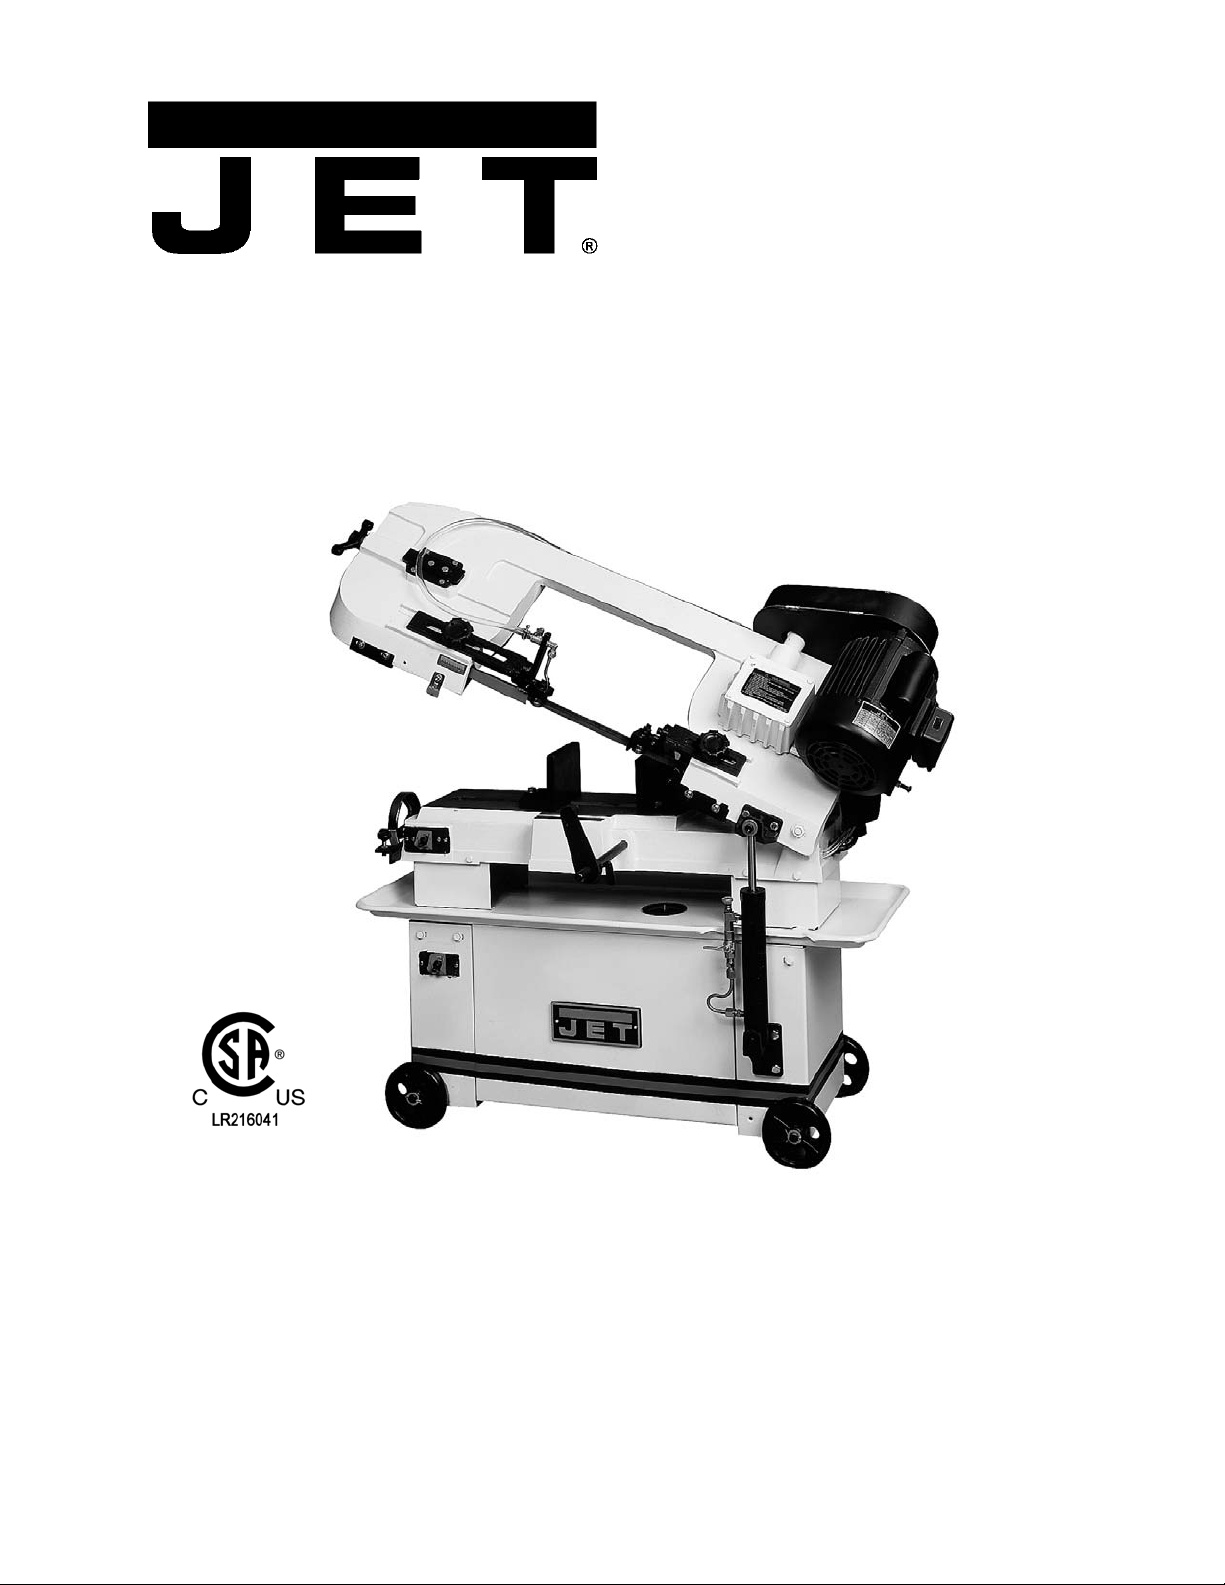
4. Slide mat erial stop bar (A, Figure 1) i nto the
base and secure by tightening bolt (B,
Figure 1). Slide material stop (C, Figure 1)
onto the bar and tight en bolt (D, Figure 1).
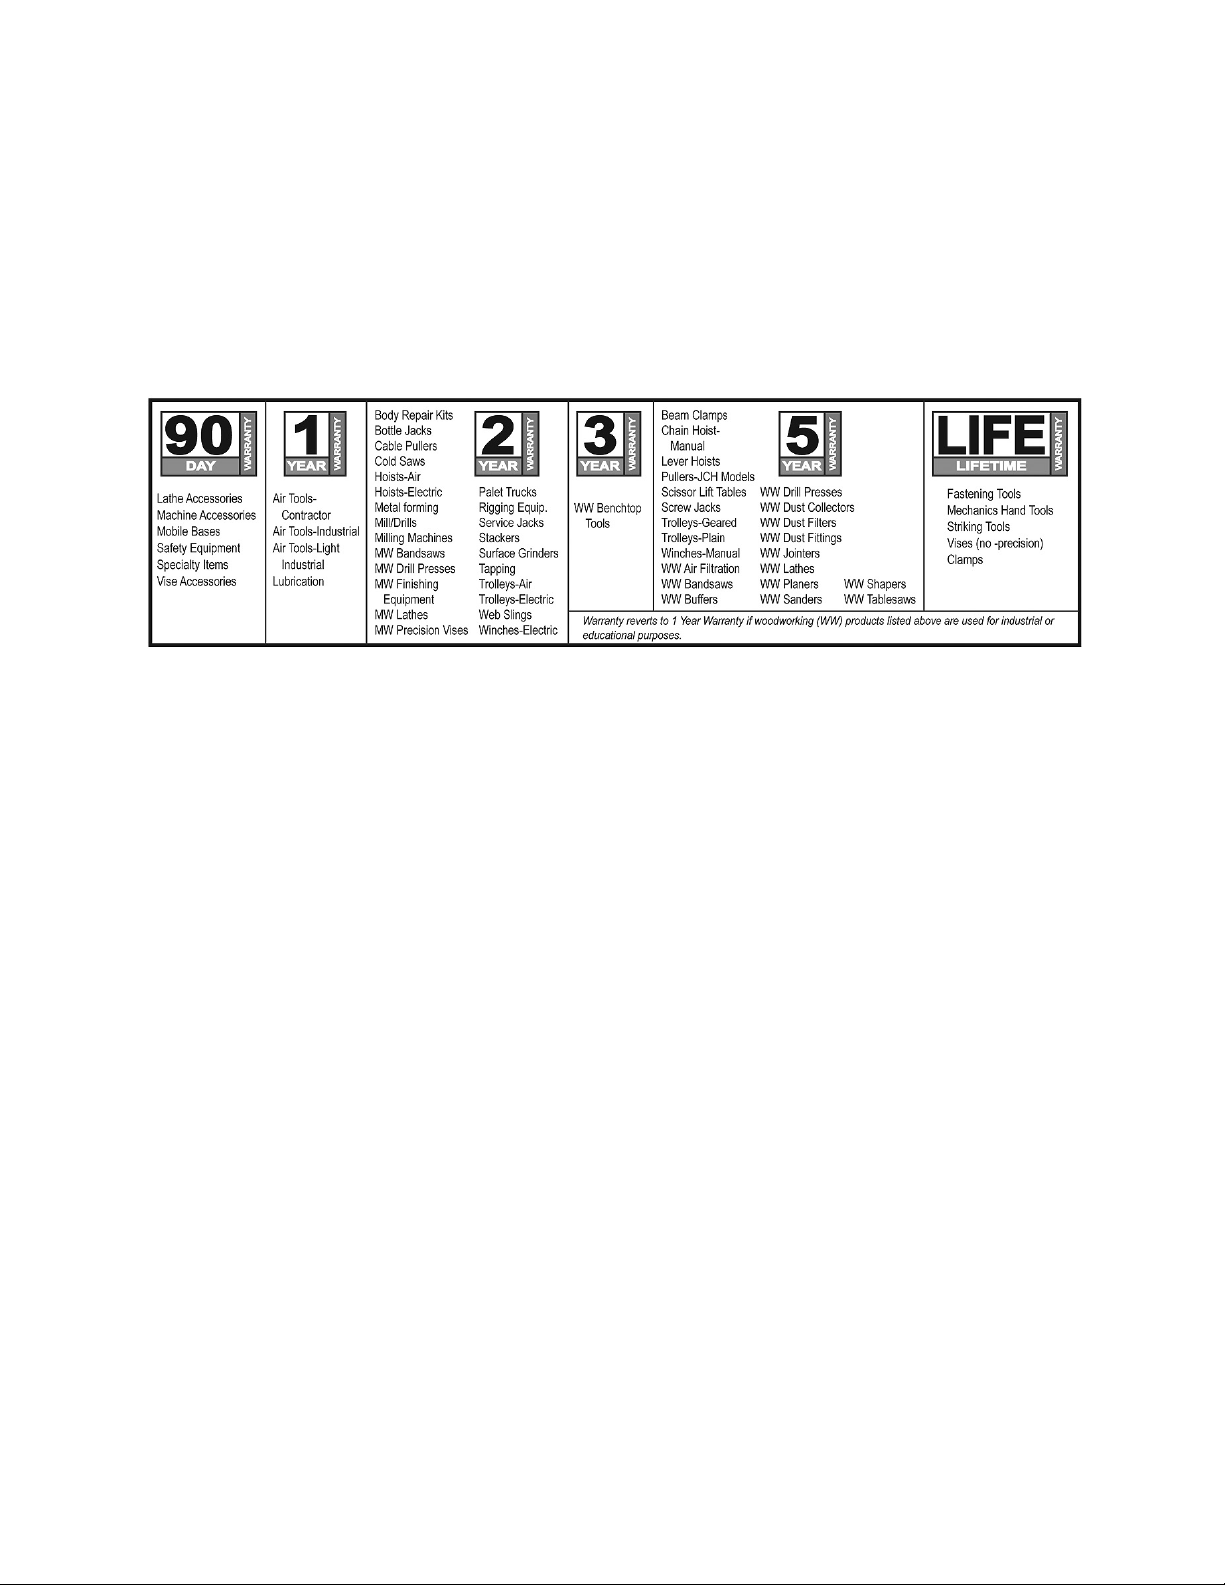
5. Slide belt cover ov er pulley assemblies and
fasten with screws and washers (A, Figure
2).
6. Close belt cover and secure with lock knob
(B, Figure 2).
7. Remove transportat ion strap which holds the
bow to the bed, and keep it for later use
should the saw be moved any distanc e.
Figure 2
6.4 Vertical cutting plate
Note: These steps are only necessary if using
the band saw in vertic al m ode.
Disconnect machine from
power source before making repairs or
adjustments.
1. Disconnect band saw fr om power source.
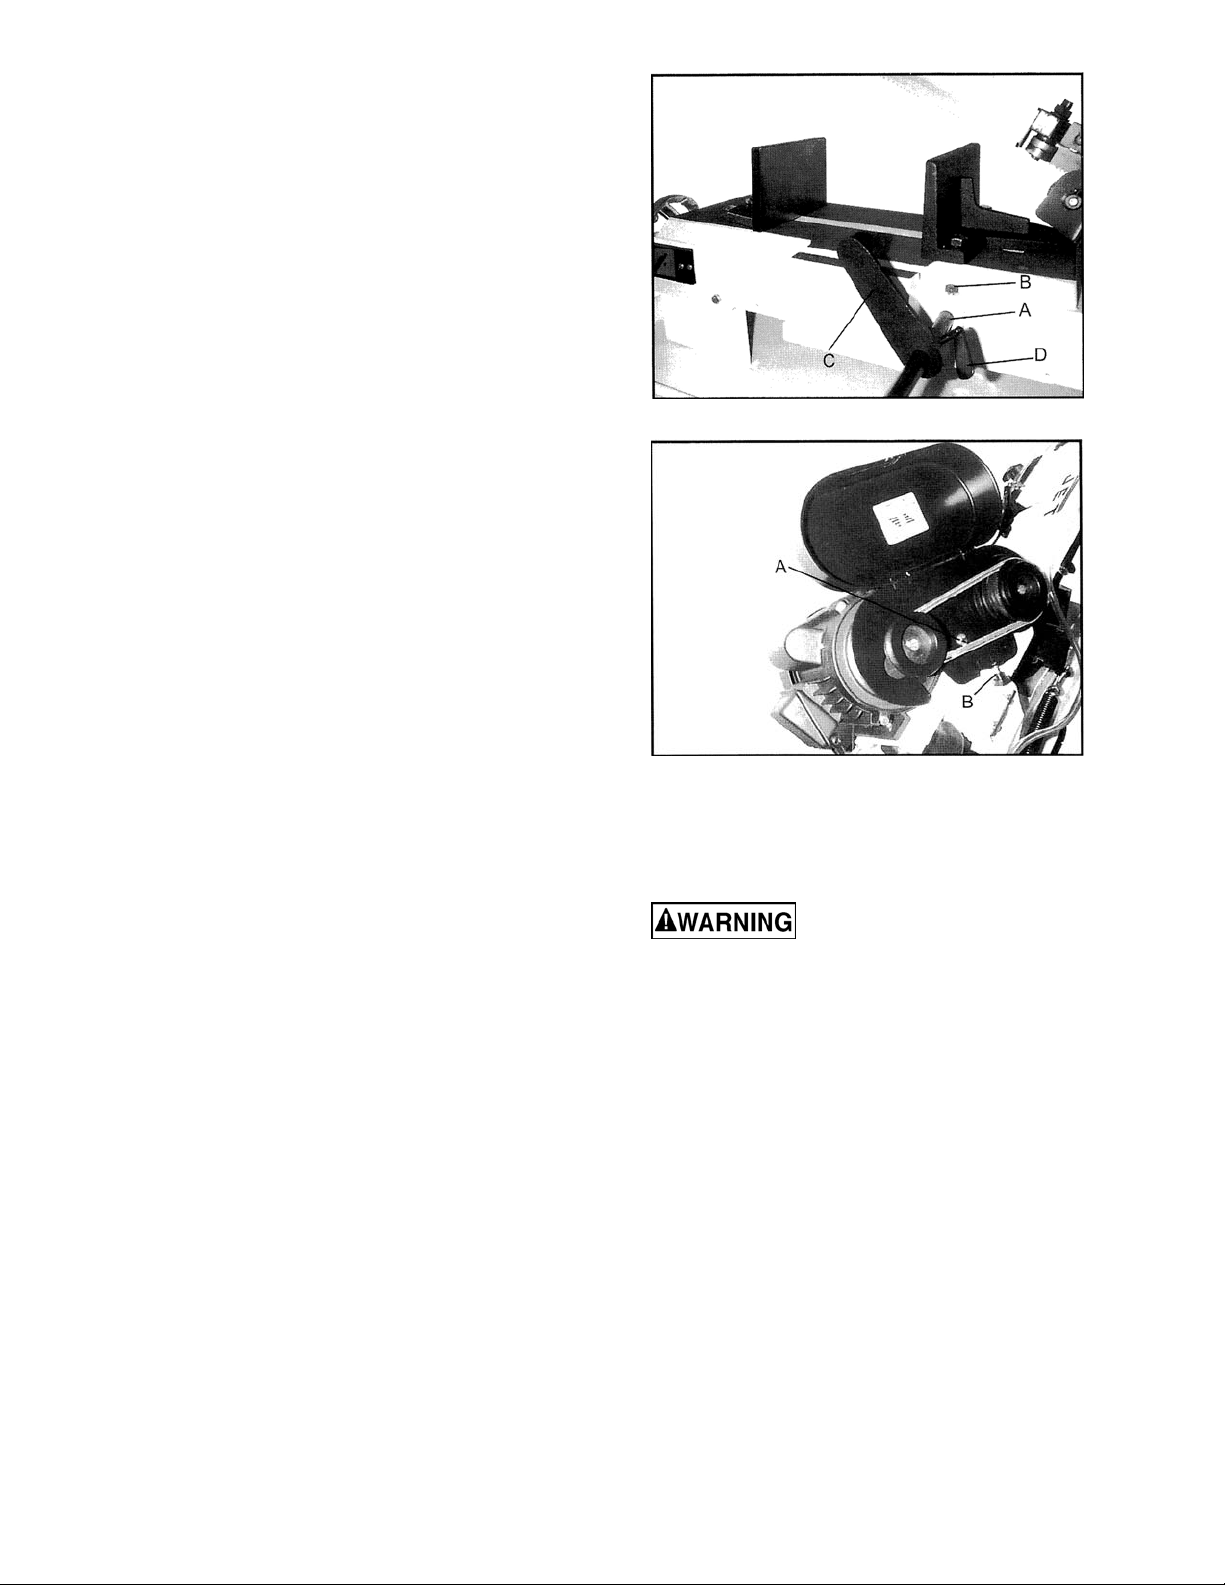
2. Raise bow to vertic al position by turning the
bow stop (A, Figure 3) a quarter turn
clockwise; slowly bring bow to v ertical and
lock in place by turning the hydraulic
cylinder valve to the off position. Caution:
Do not pinch fingers between bow stop
and bracket.
3. Remove two screws (A, Figure 4) and
remove defl ector plat e (B, Figure 4).
4. Guide blade through the slot in the table and
fasten with two screws. See Figure 5.
5. W hen v ertical operations are completed, to
lower bow turn hydraul ic cylinder lev er to on
position.
7
Page 8
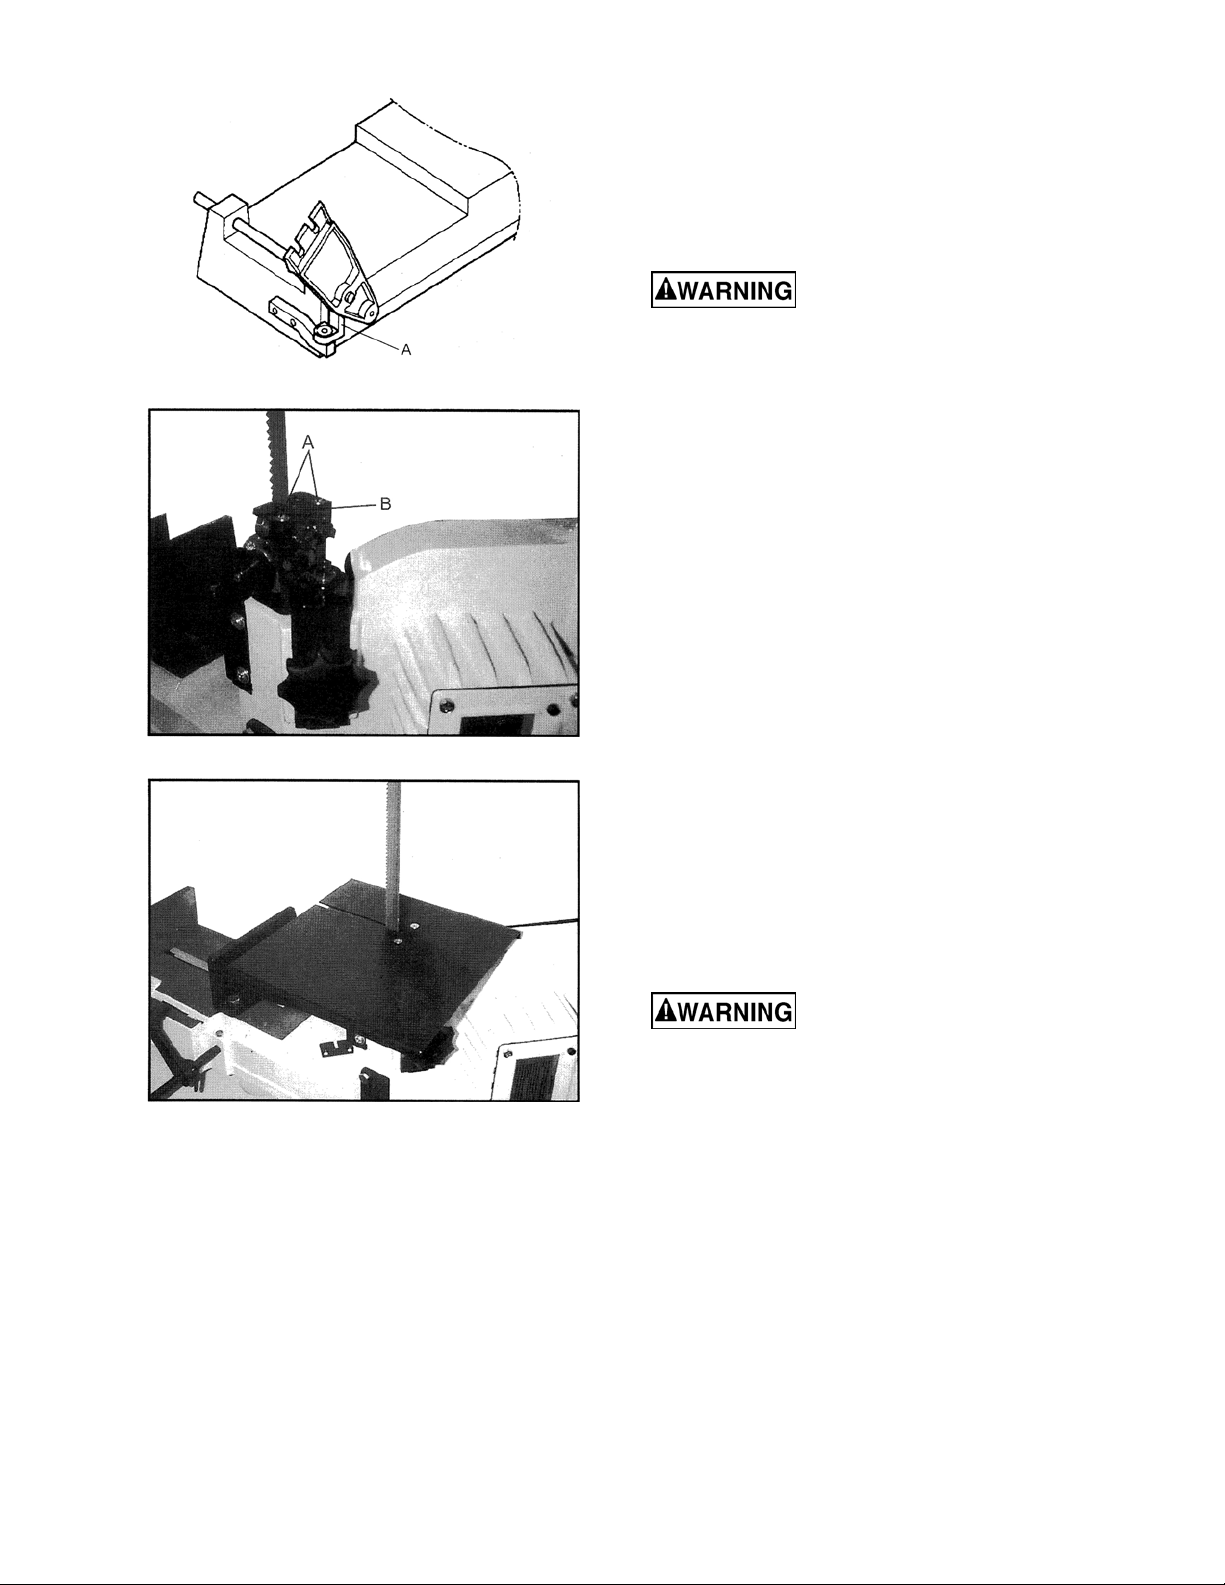
Figure 3
4. Fill tank to approximately 80% of capacity.
5. Place lid back onto tank, and place tank
assembly bac k into base.
6. Replace return hose back into the hole in
the tank lid.
6.6 Electrical connections
Electrical connections must
be made by a qualified electrician in
compliance with all relevant codes. This
machine must be properly grounded to help
prevent electrical shock and possible fatal
injury.
1. All Grounded, Cord-c onnec ted Tools:
In the event of a malfunction or breakdown,
grounding prov ides a path of least resistance f or
electric current to reduce the risk of electric
shock. This tool is equipped with an electric cord
having an equipment-groundi ng c onduc tor and a
grounding plug. The plug must be plugged into a
matching outlet that is properly installed and
grounded in accord ance wit h all l ocal codes and
ordinances.
Figure 4
Figure 5
6.5 Coolant tank preparation
Use of a water-soluble coolant will increase
cutting effi ciency and prolong blade lif e. Do not
use black cutting oil as a substitute. Change
cutting oil often and follow manufacturer’s
instructions as to its uses and precautions.
1. Disconnect machine from power source.
2. Remove coolant return hose from the tank
cover.
3. Slide tank out of saw base and carefully
remove the lid cont aining the coolant pump.
Do not modify the plug provided - if it will not fi t
the outlet , have the proper outlet i nstalled by a
qualified elec trician.
Improper connection of the equipmentgrounding conductor can result in a risk of
electric shock. The conductor with insulation
having an outer surface that is green with or
without yellow stripes is the equipmentgrounding conductor . If repair or replacement of
the electric cord or plug is necessary, do not
connect the equi pment-grounding conductor to a
live terminal.
Check with a qualified
electrician or service personnel if the
grounding instructions are not completely
understood, or if in doubt as to whether the
tool is properly grounded. Failure to comply
may cause seriou s or fat al inju ry.
Use only 3-wire extension cords that have 3prong grounding plugs and 3-pole receptacles
that accept the tool ' s pl ug.
Repair or replace damaged or worn cord
immediately.
2. Grounded, cor d-connected tools intended for
use on a supply cir cuit having a nominal rat ing
less than 150 volts:
This tool i s int ended f or use on a ci rcui t that has
an outlet t hat looks like the one illustrat ed in A,
Figure 6. A n adapter, shown in B and C, may be
8
Page 9

used to connect thi s plug to a 2-pole rec eptacle
as shown in B if a properly grounded outlet is
not avail able. The temporary adapter should be
used only until a properly grounded outlet can
be installed by a qualified electrician. This
adapter is not permitted in Canada. T he greencolored rigid ear, lug, and the like, extending
from the adapter must be connected to a
permanent gr ound such as a properly grounded
outlet box.
3. Grounded, cor d-connected tools intended for
use on a supply cir cuit having a nominal rat ing
between 150 - 250 volts, inclusive:
This tool i s int ended f or use on a ci rcui t that has
an outlet t hat looks like the one illustrat ed in D,
Figure 6. The tool has a grounding plug that
looks lik e the plug illustrated in D. Make sure the
tool is connected to an outlet having the same
configuration as the plug. No adapter is
available or shoul d be used with this tool . If the
tool must be rec onnected for use on a different
type of electric circuit, the reconnection should
be made by qualified service personnel; and
after reconnection, the tool should comply with
all local codes and ordinanc es.
Figure 7
Figure 6
6.7 Voltage conversion
The HVBS-7MW band saw is rated at 115/ 230V
and comes from the factory prewired at 115V.
To switch to 230V operation, follow the wiring
diagram found on the inside of the motor
junction box. (Similar diagrams are shown in
Figures 7/8.) The plug must be replaced wit h a
plug that is rated at 230V. The coolant pump
wiring will hav e to be changed also. Follow the
diagram found on the coolant pump head to
switch to 230V oper ati on.
Before hooki ng up to the po wer source, be sure
the power and coolant switches are in the off
position.
Figure 8
6.8 Extension cords
The use of extension cor ds is discouraged. Tr y
to position machines within reach of the power
source. If an extension cord becomes
necessary, make sure the cord is in good
condition and heav y enough to carry the current
your product will draw. An undersized cord will
cause a drop in li ne voltage result ing in loss of
power and overheating. Table 1 shows correct
size to use depending on cord length and
nameplate ampere rating. If in doubt, use the
next heavier gauge. The smaller the gauge
number, the heavier the cord.
Ampere
Rating
More
Than
00 06 18 16 16 14
06 10 18 16 14 12
10 12 16 16 14 12
12 16 14 12
Not
More
Than
Volts
120
240
AWG
Total length of
cord in feet
25
50
100
50
100
200
Recommended
150
300
Not
Extension Cord Recom m endations
Table 1
9
Page 10

7.0 Adjustments
7.1 Hydraulic feed selector
The hydraulic feed selector i s used to cont r ol the
blade feed rate and to lock the bow in vertical
position. To increase feed rate, turn knob (A,
Figure 9) counter-clockwise. To decrease feed
rate, turn k nob (A) clockwise. To turn off flow of
hydraulic fluid, turn lever (B) as shown in Figure
9. To turn hydrauli c cylinder on, raise lever ( B) t o
the 12 o'clock positi on.
Figure 10
7.3 Adjusting blade guides
1. Disconnect machine from power source.
2. Loosen knob (A, Figure 11) and bolt (B,
Figure 11). Slide bl ade guide assem blies as
close as possible to material without
interferi ng with the cut.
3. Tighten knob (A, Figure 11) and bolt (B,
Figure 11) and connect machine to power
source.
Figure 9
7.2 Changing blade speed
1. Disconnect machine from power source.
2. Loosen motor pl ate lock bolt (A, Fi gur e 10) .
3. Loosen motor plate slide bolt (B, Figure 10)
until the belt can be mov ed on the pulleys.
4. Move belt to desir ed pulley combination.
5. Tighten motor plate slide bolt (B) to retension belt.
6. Tighten motor plat e loc k bolt ( A).
7. Connect machine to power source.
Figure 11
7.4 Vise adjustment
Do not make any
adjustments or load/unload material from
vise while machine is running. Failure to
comply may cause seriou s injury.
To set the vise for 0 to 45 degree cutti ng:
1. Remove bolt and nut assemblies (C, Figure
12).
2. Posit i on the vi se and re-i nstal l as pi ctur ed in
Figure 13. P ay par ticular attention to the bolt
hole locati on.
10
Page 11

3. Set vi se to desired angle, re-instal l nuts and
bolts, and tighten the nut and bolt
assemblies.
1. Install blade bet ween the wheels, an d insert
blade between the bearings on the blade
guides.
4. Adjust the mov able vise parallel t o the fixed
vise by loosening bolt (A, Figure 13),
adjusting to par allel, and tightening bolt.
Figure 12
2. Tension blade slightly to r emove any sag in
blade between blade wheels.
3. Turn blade tension knob ( A, Figure 14) one
and three quarter to two revolutions
clockwise. T his equal s approximately 23,000
lbs. of blade tension.
Do not overtighten blade.
This may cause blad e to stretch and w arp.
Figure 13
To set vise fo r maximum width of stock cuttin g:
1. Remove the nut and bolt assem blies.
2. Position the vise and re-install the bolt
assemblies as pict ur ed in Figure 12.
7.5 Blade tension
Disconnect machine from
power source. Blades are sharp; use extra
care when remo ving, installing or adj usting.
Failure to compl y may cause seri ou s in ju ry.
Blade tension is important to the proper
operation of the saw. Proper blade tension is
22,000 to 25,000 lbs. per square inch as
measured on a blade t ensi on gauge.
To set the blade tension without the use of a
blade tension gauge:
Figure 14
4. After blade has been completely installed,
close the cov ers, connect to power source,
and run saw f or two t o three m inutes so the
blade can seat properl y .
5. Disconnect machine from power source.
Open the cov er and l oosen bl ade just u nt il it
begins to sag.
6. Tighten blade until it becomes straight
between the blade wheels and all sag has
been eliminat ed.
7. Tighten blade by turning blade tension
wheel two full revolutions. Blade is now
properly tensi oned and r eady for use.
8. Close the covers and connect machine to
power source.
7.6 Changing blades
Never operate this saw
unless all blade guards are installed and in
proper working order. Never adjust blade
brush while machin e is runni ng .
11
Page 12

This machine is designed
and intended for use with blades that are
3/4” wide by 0.032” thick x 93” long . Use of
blades with difference specifications may
cause inferio r performance.
1. Disconnect machine from power source.
2. Raise bow to vertical position and lock in
place by turning the hydr aulic cylinder off.
3. Remove red blade guard assembly (A,
Figure 15) by removing two screws (B,
Figure 15).
It is essential this guard
be install ed after the new blade has been
fitted.
4. Remove brush assembly (C, Figure 15) by
removing two screws (D, Fi gur e 15) .
13. Run the saw and make sure blade is
tracking properly (see section 7.9).
7.7 Adjusting blade square to table
1. Disconnect machine from power source.
2. Place a m achini st's square on t he tabl e and
against the blade, as shown in F igure 16.
3. Verify that bl ade makes contact with square
along the entire width of blade.
4. If adjustment is necessary, l oosen bolts (A,
Figure 16) and rotate blade guide
assemblies slightly in the same direction
until the blade makes contact with the
square along its entire width.
5. Tighten bolt s (A, Figure 16).
6. Connect machine to power source.
Note: If adj ustment to square blade t o table is
necessary, be sure to check blade adjustments
again.
Figure 15
5. Loosen blade tension by turning blade
tension knob counter-clockwise.
6. Carefully remove old blade. Caution: blade
teeth are sharp. Hand le with care.
7. Install new blade by placing the blade
between blade guides first. Make sure the
blade teeth face the same direction as
indicated on the label found on the saw bow.
8. Place the blade around both wheels. Make
sure the blade edge rests near the wheel
flange on both wheels.
9. Turn the blade tension knob clockwise to
tension the blade. Do not ov er tension. See
section 7.5, Blade tens ion.
10. Close bl ade cov er door and secure with l ock
knobs.
11. A ttach red blade guard and brush assembly.
12. Connect machine to power source.
Figure 16
7.8 Adjusting blade square to vise
1. Disconnect machine from power source.
2. Place a machinist's square flush against
vise and blade, as shown in Figure 17.
Square should l ie along the enti re length of
vise and blade without a gap.
3. If adjustment i s necessary, loosen the bol ts
holding the v ice and adj ust the vise so t hat
the square lines up properly. Tighten bolts.
4. Connect machine to power source.
12
Page 13

Figure 17
7.9 Adjusting blade tracking
Figure 18
Blade tracking adjustment
requires ru nn in g the saw with the back cover
open. This adjustment must be completed by
qualified persons only.
Note: Before m aking any tracking adj ustments,
try a new blade. Warped blades will not track.
Blade tracking has been set at the f actory and
should not require adjustment. If tracking
problems occ ur, adjust the machine as follows:
1. Move saw bow to vertical posi tion and lock
in place by shutting off hydraulic cylinder
valve.
2. Confirm that blade tension is set properly.
To adjust, see section 7.5, Blade tension.
3. Open back cover by loosening lock knobs.
4. Run the saw and observ e the blade. Blade
should run next to but not tightly against
wheel flange.
5. Loosen bolts (A, Figur e 18) .
6. Turn set screw (B, Figure 18) while
observing the blade tracking on the wheel.
Turn set screw cloc kwise to track the blade
closer to the wheel flange. Turn set screw
counter-clockwise to track blade away f rom
wheel flange.
7.10 Adjusting blade guide bearings
1. Disconnect machine from power source.
2. Raise bow to vertical position and lock in
place by turning off hy dr aulic c yli nder v alv e.
3. Loosen hex cap screw (A, Figure 19) and
adjust assembly so that the back roller
bearing is approximately 0.003" to 0.005"
from the back of the blade.
4. Turn nut (B, Figure 19) to adjust the
eccentric beari ng snug to the blade. Blade
should still move up and down freely when
grasped as in F igure 20. Warning! Make
sure power is disconnected and hands
are protect ed before handling blade. Be
sure that the blade teeth do not interfere
with the roller bearings.
5. Repeat for other blade guide assembly.
6. Connect machine to power source.
7. Once tr acking is set, ti ghten bolt s (A, Figure
18).
Figure 19
13
Page 14

Figure 20
7.11 Adjusting bow weight
Bow weight is one of the most important
adjustment s of t he saw. I f bow weight i s not set
properly, one can expect poor performance,
crooked cuts, tooth stripping, stalling, and the
blade popping off the blade wheels. The
hydraulic feed rate uni t will not compensate f or
improper bow weight . Bow weight has been set
at the factory and should not need adjustment.
7.12 Adjusting automatic shutoff
The saw should stop after the cut has been
completed:
1. If the saw completes the cut and continues
to run, adjust t he trip brack et (A, Fi gure 22)
down.
2. If the saw shuts off before the cut is
complete, adjust the trip bracket (A, Figure
22) up.
3. If the saw stop s cutti ng but conti nues to run,
adjust the stop bolt (B , Fi gur e 22) .
The saw is properly adjusted when the saw
shuts off just aft er the blade has finished the cut.
If adjustment bec om es necessary:
1. Disconnect machine from power source.
2. Turn on hydraulic cylinder valve and place
the saw bow in horizontal posi tion.
3. Turn feed rate valve on hydraulic cylinder
counter-clockwise until it stops.
4. Place a fish-type scale under the blade
tension handle and lift the saw bow. Scale
should indicate approximately 13 to 15 lbs.
5. Adj ust tensi on to approxim at ely 13 to 15 lbs.
by turning bolt (A, Figure 21).
6. Connect machine to power source.
Figure 22
8.0 Operation
Prior to Operation:
1. Check to see that the blade tooth direction
matches the diagr am on saw body.
2. Check to see that the blade is properly
seated on the wheels after proper tension
has been applied.
3. Set the blade guide roller bearings snug
against blade. See section 7.10, Adjusting
blade guide bearings, for more detail.
4. Check for a slight clearance between the
backup rollers and the bac k of t he blade.
5. Position bot h blade guides as clos e to work
as possible.
6. Select proper speed and feed rate for
material being c ut.
Figure 21
7. Material to be cut must be hel d securely in
vise.
8. Check to see that coolant lev el is adequat e.
9. Do not start a cut on a sharp edge.
14
Page 15

10. Keep machine lubricated. See section 9.1,
Lubrication.
4. Hold a container under the lower right corner
of the gear box with one hand whi le slowly
raising the saw bow with the other.
9.0 Maintenance
Disconnect machine from
power source before making any repair or
adjustment. Failu re to do this may result in
serious personal injury.
1. Keep all surfaces clean and free of rust,
slag, chips, and coolant build-up.
2. Do not use compressed air to clean the
band saw. Compr essed air m ay force chips
into the guide bearings and other critical
areas of the saw.
3. Use a small paint brush or parts cleaning
brush to remove metal par ticles.
4. W ipe the saw down with a clean, dry cloth
and oil all unpainted surfaces with light
machine oil.
5. Keep the blade guides clean and free of
metal chips.
6. Check the guide bearings frequently to
make sure they are properly adjusted and
turning freely.
9.1 Lubrication
Ball bearings on the blade guide as semblies and
the blade wheels are permanently sealed and
require no lubri c ation.
Lightly lubricate the vise screw with #2 tube
grease.
Change gear box oil after the first 90 days of
operation. Thereafter, change every six months.
To change gear box oil:
1. Disconnect machine from power source.
2. Place saw bow in horiz ontal position.
3. Remove screws (A, Figure 23) from gear
box and remove cover plate and gasket.
5. Place the saw bow in horizontal position
again. Wipe out rem aining oil with a rag.
6. Fill the gear box with approximat ely 3/4 pint
of 90 weight gear oil.
7. Replace the gasket and cover. Fasten the
cover with screws.
8. Connect machi ne to the power source.
Figure 23
9.2 Chip Cleaning Brush
Do not attempt to adjust
blade brush with machine running. Adjust
only when machine’s power cord has been
removed from power sou rce.
It is v ery im portant t hat the bl ade cleani ng brush
be properly adjusted and kept in good working
order. Replace t he brush if it becomes dam aged
or worn out. Blade lif e will be shortened severely
if the brush i s allowed to go out of adjustment,
becomes damaged, or is worn out.
15
Page 16

10.0 Replacement Parts
Replacement par ts are li sted on the f ollowing page s. To order par ts or reach our serv i ce departm ent, call
1-800-274-6848 Monday through Friday (see our website for business hours, www.waltermeier.com).
Having the Model Number and Serial Number of your mac hine available when you call will allow us to
serve you quickly and accurately.
16
Page 17

10.1.1 HVBS-7MW Bed Assembly – Exploded View
17
Page 18

10.1.2 HVBS-7MW Bow Assembly – Exploded View
18
Page 19

10.1.3 HVBS-7MW Bed and Bow Assemblies – Parts List
Index No Part No Description Size Qty
1 ............... HVBS7MW-1 ...........Coolant Pan .......................................................................................... 1
2 ............... HVBS7MW-2 ...........Base Leg (left) ....................................................................................... 1
3 ............... HVBS7MW-3 ...........Base Leg (right) ..................................................................................... 1
4 ............... HVBS7MW-4 ...........Skirt ....................................................................................................... 1
5 ............... HVBS7MW-5 ...........Shelf ...................................................................................................... 1
6 ............... HVBS7MW-6 ...........Toggle Switch ........................................................................................ 1
7 ............... HVBS7MW-7 ...........Electrical Box......................................................................................... 1
8 ............... TS-0051031 .............Hex Cap Bolt ......................................................5/16”x3/4” ................. 10
9 ............... TS-0720081 .............Lock Wash e r ......................................................5/16” ......................... 27
10 ............. TS-0680031 .............Flat Washer ........................................................5/1 6” ......................... 32
11 ............. TS-0561021 .............Hex Nut ..............................................................5/16” ......................... 27
12 ............. TS-0051011 .............Hex Ca p Bolt ......................................................5/16” x1/2” ................... 9
13 ............. HVBS7MW-13 .........Cylinder Assembly
13N .......... HVBS7MW-13N .......Cylinder Assembly
................. HVBS7MW-13-RK ...Cylinder Repair Kit (not shown) ............................................................. 1
14 ............. TS-150506 ...............Hex Socket Cap Screw ** ..................................M1 0x40 ...................... 1
15 ............. TS-0680041 .............Flat Washer ** ...................................................3/8” ............................. 4
16 ............. TS-0720091 .............Lock Washer ** ..................................................3/8”........................... 10
17 ............. TS-154007 ...............Hex Nut ** .........................................................M10 ............................ 1
18 ............. TS-0060051 .............Hex Cap Bolt ** .................................................3/8 ” x1” ........................ 2
19 ............. HVBS7MW-19 .........Support Rod ** ..................................................................................... 1
20 ............. TS-0050011 .............Hex Cap Bolt ** .................................................1/4 "x1/2” ..................... 1
21 ............. HVBS7MW-21 .........Bottom Support ** ................................................................................. 1
22 ............. 5518228N ................Flat Washer (S/N: 120141912 and higher) ..........23.8x13x2.7mm .......... 4
23 ............. HVBS7MW-23 .........Wheel (S/N: 120141911 and lower) ....................4" ............................... 4
23N .......... 5518229N ................Wheel (S/N: 120141912 and higher) ..................8" ............................... 4
24 ............. HVBS7MW-24 .........Wheel Shaft (S/N: 120141911 and lower) ................................................
24N .......... 5518230N ................Wheel Shaft (S/N: 120141912 and higher) ..........Ø16x432mm ............... 2
25 ............. 5518231N ................Cotter Pin (S/N: 120141912 and higher) ................................................ 4
................. J3410-WA ................Wheel Assembly (index # 22-25) (S/N: 120141912 and higher) .............. 1
26 ............. HVBS7MW-26 .........Power Cord ........................................................................................... 1
................. HVBS7MW-26-1 ......Power Cord (motor - main switch –not shown) ....................................... 1
................. HVBS7MW-26-2 ......Power Cord (main switch - pump - not shown) ....................................... 1
27 ............. HVBS7MW-27 .........Table ..................................................................................................... 1
28 ............. TS-0081051 .............Hex Cap Bolt ......................................................5/16”x1” .................... 10
29 ............. HVBS7MW-29 .........Filter Assembly ...................................................................................... 1
30 ............. HVBS7MW-30 .........Hex Head Screw
31 ............. HVBS7MW-31 .........Switch Box Assembly (S/N: 5011368 & lower) ....................................... 1
31N .......... HVBS7MW-31N .......Switch Box Assembly (S/N: 5011369 & higher) ...................................... 1
................. HVBS7MW-31A .......Sw itch (S/N: 5011368 & lower) .............................................................. 1
................. HVBS7MW-31AN .....Switch (S/N: 5011369 & higher) ............................................................. 1
32 ............. HVBS7MW-32 .........Wheel Handle ........................................................................................ 1
33 ............. HVBS7MW-33 .........Key.....................................................................5x20 mm ..................... 1
34 ............. HVBS7MW-34 .........Lead Screw ........................................................................................... 1
35 ............. HVBS7MW-35 .........Nut Seat ................................................................................................ 1
36 ............. HVBS7MW-36 .........Strain Relief Assembly ........................................................................... 1
37 ............. HVBS7MW-37 .........Support Plate......................................................................................... 1
38 ............. HVBS7MW-38 .........Stop Screw ............................................................................................ 1
39 ............. TS-0060061 .............Hex Cap Bolt ** .................................................3/8 ” x1-1/4” .................. 4
40 ............. TS-0561031 .............Nut ** .................................................................3/8”............................. 8
41 ............. HVBS7MW-41 .........90° Support ........................................................................................... 1
42 ............. TS-0060071 .............Hex Ca p Bolt ......................................................3/8”x1-1 /2” .................. 4
43 ............. TS-0270031 .............Set Screw ...........................................................5/16”x3/8” ................... 4
44 ............. HVBS7MW-44 .........Thumb Screw ........................................................................................ 1
45 ............. HVBS7MW-45 .........Stop Block ............................................................................................. 1
(S/N: 010218160 and lower)
(S/N: 010218161 and higher) ....
................................................3/16”x3/8” ................... 4
......................................... 1
................................... 1
19
Page 20

Index No Part No Description Size Qty
46 ............. HVBS7MW-46 .........Stop Rod ............................................................................................... 1
47 ............. TS-0561031 .............Hex Nut ..............................................................1/2" ............................ 2
48 ............. TS-0680061 .............Flat Washer ........................................................1/2 " ............................ 4
49 ............. TS-026702 ...............Set Screw ...........................................................1/4"x1/4” ..................... 2
50 ............. HVBS7MW-50 .........Support Shaft ........................................................................................ 1
51 ............. HVBS7MW-51 .........Pivot Arm (S/N: 80910746 and lower) .................................................... 1
51N .......... HVBS7MW-51N .......Pivot Arm (S/N: 80910747 and higher) ................................................... 1
52 ............. TS-0720091 .............Lock Washer ......................................................3/8”............................. 2
53 ............. HVBS7MW-53 .........Spring .................................................................................................... 1
54 ............. HVBS7MW-54 .........Spring Adj usting Rod ............................................................................. 1
55 ............. HVBS7MW-55 .........Spring Bracket ....................................................................................... 1
56 ............. TS-0051061 .............Hex Ca p Bolt ......................................................5/16” x1-1/2” ................ 5
57 ............. HVBS7MW-57 .........Vise Jaw (left) ........................................................................................ 1
58 ............. HVBS7MW-58 .........Vise Jaw (right) ...................................................................................... 1
59 ............. HVBS7MW-59 .........Scale (S/N: 010217984 and lower) ........................................................ 1
59N .......... HVBS7MW-59N .......Scale (S/N: 010217985 and higher) ....................................................... 1
60 ............. HVBS7MW-60 .........Arm Support Plate ................................................................................. 1
61 ............. TS-020908 ...............Hex Socket Cap Screw .......................................3/8”x1-3/4” .................. 1
62 ............. HVBS7MW-62 .........Hos e ..................................................................................................... 1
63 ............. HVBS7MW-63 .........Pump .................................................................................................... 1
64 ............. TS-0050021 .............Hex Cap Bolt * ...................................................1/4”x5/8” ..................... 4
65 ............. HVBS7MW-65 .........Tank Cov er (S/N: 8091100 and lower) ................................................... 1
66 ............. HVBS7MW-66 .........Coolant Tank (S/N:
66N .......... HVBS7MW-66N .......New Coolant Tank (S/N:80911001 and higher) ...................................... 1
66-1 .......... HVBS7MW-66-1N ....Plastic Funnel (S/N: 80911001 and higher) ............................................ 1
67 ............. HVBS7MW-67 .........Hose Fitting ........................................................................................... 1
68 ............. HVBS7MW-68 .........Hose Clamp .......................................................................................... 1
69 ............. HVBS7MW-69 .........Hos e ..................................................................................................... 1
70 ............. HVBS7MW-70 .........Saw Bow (S/N: 8091100 and lower)....................................................... 1
70N .......... HVBS7MW-70N .......Saw Bow (S/N: 8091101 and hi gher ) ..................................................... 1
70N1 ........ HVBS7MW-70N1 .....Saw Bow (JET Mark) (S/N: 010218161 and higher) ............................... 1
71 ............. HVBS7MW-71 .........Vent Plug * ........................................................................................... 1
72 ............. HVBS7MW-72 .........Gear Box Cover * ................................................................................. 1
73 ............. HVBS7MW-73 .........Gear Box Gasket * ................................................................................ 1
74 ............. HVBS7MW-74 .........Worm Gea r *(S/N: 00114808 and lower) ............................................... 1
74N .......... HVBS7MW-74N .......Worm Gea r *(S/N: 00114809 and higher) ............................................. 1
75 ............. TS-051061 ...............Hex Cap Bolt * ...................................................5/16”x1-1/4” ................ 1
76 ............. BB-6005Z ................Ball Bearing * ........................................................................................ 3
77 ............. HVBS7MW-77 .........C-Ring * ............................................................R -4 7 ........................... 2
78 ............. HVBS7MW-78 .........Oil Seal * .............................................................................................. 1
79 ............. HVBS7MW-79 .........Gear Box * ............................................................................................ 1
80 ............. HVBS7MW-80 .........Blade Wheel (S/N: 00114808 and lower) ............................................... 1
80N .......... HVBS7MW-80N .......Blade Wheel (S/N: 00114809 and higher) .............................................. 1
81 ............. HVBS7MW-81 .........Worm Bushing * ................................................................................... 1
82 ............. HVBS7MW-82 .........Bi-Metal Blade ....................................................................................... 1
83 ............. HVBS7MW-83 .........Wheel Cover ......................................................................................... 1
84 ............. HVBS7MW-84 .........Rear Wheel Cover ................................................................................. 1
85 ............. HVBS7MW-85 .........Plum Screw ........................................................................................... 2
86 ............. HVBS7MW-86 .........Lock Knob ............................................................................................. 2
87 ............. HVBS7MW-87 .........Adjustable Bracket (right)....................................................................... 1
88 ............. BB-608ZZ ................Ball Bearing ........................................................................................... 2
89 ............. HVBS7MW-89 .........Adjustable Blade Seat (right) ................................................................. 1
90 ............. HVBS7MW-90 .........Bearing Pin ............................................................................................ 2
91 ............. HVBS7MW-91 .........Eccentric Shaft Assem bly (outside) ........................................................ 2
91A .......... HVBS7MW-91A .......Center Shaft Assembly(inside)(S/N: 80910747 and higher) .................... 2
................. BB-608ZZ ................Ball Bearing (not shown) ........................................................................ 8
................. HVBS7MW-91-2 ......Eccentric Shaft (outside) (not shown) ..................................................... 2
8091100 and lower) ................................................ 1
20
Page 21

Index No Part No Description Size Qty
................. HVBS7MW-91A-2 ....Center Shaft (inside)(S/N: 80910747 and higher) ................................... 2
................. HVBS7MW-91-3 ......C-Ring (not shown) ................................................................................ 4
92 ............. TS-0561031 .............Hex Nut ..............................................................3/8”............................. 4
93 ............. TS-081F021 .............Flat Head Machine Screw ...................................1/4"x3/8” ..................... 2
94 ............. HVBS7MW-94 .........Vertical Cutting Plate ............................................................................. 1
95 ............. HVBS7MW-95 .........Top Support ** ...................................................................................... 1
96 ............. TS-0813032 .............Round Head Screw ............................................1/4"x1/2” ..................... 4
97 ............. TS-0680021 .............Flat Washer ........................................................1/4 " .......................... 12
98 ............. HVBS7MW-98 .........Brush Holder ......................................................................................... 1
99 ............. TS-0060111 .............Hex Ca p Bolt ......................................................3/8”x2-1 /2” .................. 2
100 ........... HVBS7MW-100........Brush .................................................................................................... 1
101 ........... HVBS7MW-101........Nozzle Cock .......................................................................................... 1
102 ........... TS-0267021 .............Set Screw ...........................................................1/4"x1/4” ..................... 3
103 ........... HVBS7MW-103........Nozzle Cock Support ............................................................................. 1
104 ........... HVBS7MW-104........Valve ..................................................................................................... 1
105 ........... TS-0208071 .............Hex Socket Cap Screw .......................................5/16”x1-1/4” ................ 2
106 ........... HVBS7MW-106........Adjustable Bracket (left) ......................................................................... 1
107 ........... HVBS7MW-107........Adjustable Blade Seat (left) ................................................................... 1
108 ........... HVBS7MW-108........Bl ade Guard .......................................................................................... 1
109 ........... HVBS7MW-109........Brush Support ....................................................................................... 1
110 ........... TS-0050011
111 ........... HVBS7MW-111........Guide Plate ........................................................................................... 2
112 ........... HVBS7MW-112........Set Screw ...........................................................5/16”x3/4” ................... 1
113 ........... TS-0051071 .............Hex Cap Bolt ......................................................5/16”x1- 1/2” ................ 2
114 ........... HVBS7MW-114........Bl ade Tension Block .............................................................................. 1
115 ........... HVBS7MW-115........Sliding Draw Block ................................................................................. 1
116 ........... HVBS7MW-116........Switch Cut-Off Bracket .......................................................................... 1
117 ........... HVBS7MW-117........Bearing Bus hing .................................................................................... 1
118 ........... BB-6203Z ................Ball Bearing ........................................................................................... 2
119 ........... HVBS7MW-119........Bl ade Wheel (left) .................................................................................. 1
120 ........... HVBS7MW-120........Bl ade Tension Handwheel ..................................................................... 1
121 ........... HVBS7MW-121........Vertical Cutting Plate ............................................................................. 1
122 ........... VB-3V270 ................V-Belt .................................................................................................... 1
123 ........... HVBS7MW-123........Worm Pulley .......................................................................................... 1
124 ........... HVBS7MW-124........Motor Pulley .......................................................................................... 1
125 ........... HVBS7MW-125........Hex Head Screw ................................................1/4"x3/8” ..................... 2
126 ........... HVBS7MW-126........Pulley Cov er ......................................................................................... 1
127 ........... HVBS7MW-127........Lock Screw ............................................................................................ 1
128 ........... TS-0720071 .............Lock Was h e r ......................................................1/4" ............................ 1
129 ........... HVBS7MW-129........Motor ..................................................................................................... 1
................. HVBS7MW-129A .....Motor Fan (not shown) ........................................................................... 1
................. HVBS7MW-129B .....Motor Fan Cover (not shown) ................................................................ 1
130 ........... HVBS7MW-130........Motor M
131 ........... HVBS7MW-131........C-Ring * ............................................................S-17 ........................... 1
132 ........... BB-6003Z ................Ball Bearing * ........................................................................................ 3
134 ........... HVBS7MW-134........Oil Seal * .............................................................................................. 1
135 ........... HVBS7MW-135........Bearing Bushing * ................................................................................. 1
136 ........... HVBS7MW-136........Worm Sha ft * ........................................................................................ 1
137 ........... HVBS7MW-137........Support Plate......................................................................................... 1
138 ........... HVBS7MW-138........Motor Support Plate ............................................................................... 1
139 ........... HVBS7MW-139........Hex Cap Bolt ......................................................1/2"x1-1/4” .................. 1
139A ........ HVBS7MW-139A .....Hex Ca p Bolt ......................................................1/2"x1-3 /16” ................ 1
140 ........... TS-0720111 .............Lock Was h e r ......................................................1/2" ............................ 2
141 ........... HVBS7MW-141........Key.....................................................................5x20 mm ..................... 1
142 ........... HVBS7MW-142........Key * .................................................................6x20mm ..................... 2
143 ........... HVBS7MW-143........Hose Clamp .......................................................................................... 3
143A ........ HVBS7MW-143A .....Round Head Screw ............................................3/16”x3/8” ................... 3
.............Hex Cap Bolt ......................................................1 /4"x1/2” ..................... 7
ount Plate ................................................................................. 1
21
Page 22

Index No Part No Description Size Qty
144 ........... HVBS7MW-144........Bearing Bus hing .................................................................................... 1
145 ........... HVBS7MW-145........Flat Washer ........................................................3/8”............................. 4
146 ........... HVBS7MW-146........Cross Screw .......................................................1/8”x1/4" ..................... 2
147 ........... HVBS7MW-147........Flat Washer ........................................................1/8”............................. 2
148 ........... HVBS7MW-148........Strain Relief Bushing ............................................................................. 2
149 ........... HVBS7MW-149........Strain Relief ........................................................................................... 2
150 ........... HVBS7MW-150........E-Ring ................................................................E-7 ............................. 2
151 ........... HVBS7MW-151........Support Screw ....................................................................................... 1
152 ........... HVBS7MW-152........Bracket .................................................................................................. 1
................. HVBS7MW-152A .....Arm Stop Assembly CP ......................................................................... 1
153 ........... HVBS7MW-153........Spring.................................................................................................... 1
154 ........... HVBS7MW-154........Spring Cap ............................................................................................ 1
155 ........... HVBS7MW-155........H e x Socket Cap Screw .......................................3/16”x1/2” ................... 1
156 ........... TS-0561031 .............Nut .....................................................................3 /8”............................. 1
157 ........... TS-0710091 .............Lock Was h e r ......................................................3/8”............................. 2
158 ........... TS-0060051 .............Hex Cap Bolt ......................................................3/8”x1” ........................ 1
159 ........... HVBS7MW-159........Hex Cap Bolt ......................................................5/16”x 3/4” ................... 1
160 ........... HVBS7MW-160........Hex Cross Head Bolt w/ Lock Washer *.....1/4x5/8 ................................. 4
................. HVBS7MW-GB ........Gear Box Assembly (not shown)(index #161 thru 163)
(S/N: 070935060 and higher) ................................. 1
161 ........... TS-0206021 .............Socket Head Cap Screw* ...................................3/16”x1/2” ................... 3
162 ........... HVBS7MW-162........Block Plate* ........................................................................................... 1
163 ........... TS-0271032
164 ........... HVBS7MW-164........Fix bracket............................................................................................. 1
* included in HVBS7MW-GB Gear Box Assembly
** included in HVBS7MW- 13- RK Cylinder Repair Kit
.............Socket Set Screw* ..............................................3/8”x3/8” ..................... 1
22
Page 23

10.2.1 HVBS-7MW Cylinder Assembly – Exploded View
10.2.2 HVBS-7MW Cylinder Assembly – Parts List
Index No Part No Description Size Qty
13N .......... HVBS17M W-13N ........... Cylinder Complete Assembly (S/N: 01028161 and higher) ............... 1
................. HVBS17M W-13N-1 ........ Dust Cover ...................................................................................... 1
................. HVBS17M W-13N-2 ........ C-Ring ............................................................................................ 2
................. HVBS17M W-13N-3 ........ Oil Seal ........................................................................................... 1
................. HVBS17M W-13N-4 ........ Oil Piston ........................................................................................ 1
................. HVBS17M W-13N-5 ........ O-Ring ............................................................................................ 1
................. HVBS17M W-13N-6 ........ Cylinder Body .................................................................................. 1
................. HVBS17M W-13N-7 ........ Oil Pressure Regulator .................................................................... 1
................. HVBS17M W-13N-8 ........ Open/Close Valve ........................................................................... 1
23
Page 24

11.0 Electrical Connections
24
 Loading...