

Page 1
Operation MANUAL
Continuous Flow Air Grease Gun – Heavy Duty
Please read and save these instructions. Read through this owner’s manual carefully
before using product. Protect yourself and others by observing all safety information,
warnings, and cautions. Failure to comply with instructions could result in personal
injury and/or damage to product or property. Please retain instructions for future
!
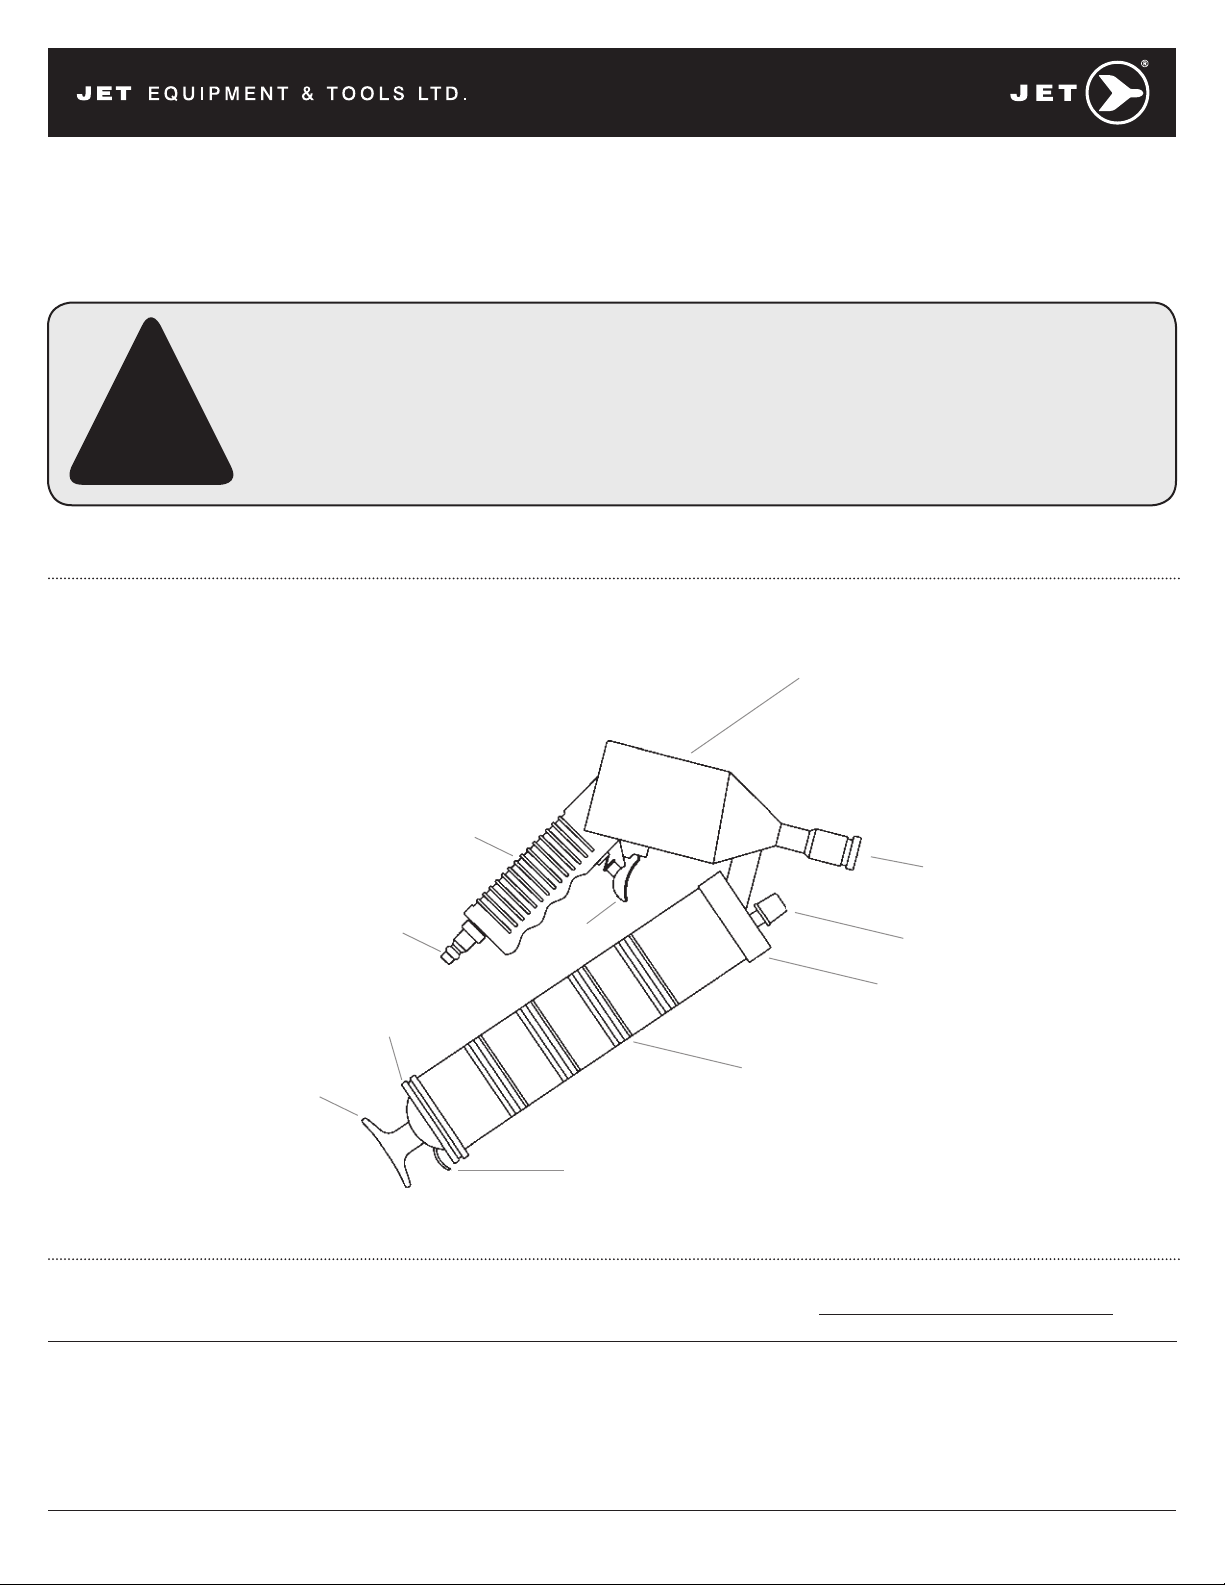
Description
Designed for general lubrication of equipment and machines that are equipped with grease fittings.
Grease can also be applied to bearing surfaces that require lubrication.
reference. Note that this is a general service instruction sheet. All specifications as
detailed in this sheet may not match your air grease gun exactly.
Pumping Chamber
Prod. No. 350162
Mod. No. CFAGG-14HD
Plunger Rod Handle
Specifications
Handle
Style
Pistol 40-120 PSI (3-8 Bar)
Air Inlet
Pressure
Recommended:
90 PSI (6 Bar)
Quick Coupler Air Fitting
End Cap
Discharge
per Minute Pressure Ratio
14 oz.
(400 gms)
Die Cast Handle
Trigger
Lock Lever
Compressed Air
Volume
40:1 1 CFM
Minimum
Outlet Nozzle
Grease Loader Fitting
Grease Gun Head
Grease Gun Barrel
Grease Filling Options
Cartridge Bulk Filler Pump
Yes Yes Yes*
* For grease guns fitted with bulk loader valve on grease gun head
www.jetequipment.com
Page 2

General Safety Information
Always wear safety glasses when using a grease gun. Keep work
area clean and remove any excess grease from tools, hands, and
clothing after use. Do not use grease gun whip hose for other
applications or at pressure levels above rated pressures.
WARNING - HIGH PRESSURE GREASE
NEVER allow contact of the output of the Grease Gun (coupler)
to a person's skin or body, injection of grease under the skin
could occur causing serious illness or death.
CAUTION
If left on floors, tools, or equipment, excess grease can cause
surfaces to become slippery.
Getting Ready to Use the Air Powered Grease Gun:
Air supply: You need dry air to operate this gun. Make sure an FRL
(Filter, Regulator, and Lubricator) unit is installed on your airline.
Moisture in the air will damage the grease gun. The compressor
you use must have a minimum volume of 1 CFM (0.026 cubic
meter). Inlet air supply should have a pressure between 40-120 PSI
(3–8 BAR). The recommended working pressure is 90 PSI (6 BAR).
This grease gun has a 40:1 pressure ratio; i.e. the grease discharge
pressure will be 40 times the inlet air pressure.
Lubrication: Like all air equipment, this grease gun needs regular
lubrication. To lubricate, add a few drops of oil through the air inlet
on the grease gun. It is recommended to use SAE 30 or greater oil.
Connecting the grease gun to air supply: There are several types
of quick connect couplers available in the market. This grease gun
comes with one standard male quick connect coupler. The coupler
must fit properly onto the female quick connect coupler on your
airline. If it does not fit properly, use a coupler that does.
Operating the grease gun trigger: This is a continuous action
grease gun, whereby there is continuous grease discharge with the
trigger pressed. Care must be taken not to over-lubricate due to
continuous action. Grease gun is capable of dispensing a full
14 oz. (400 gms) grease cartridge in 1 minute.
Setting Up the Grease Gun Head:
Attach the male quick connect coupler air fitting onto the air inlet on
the die cast handle. The male quick connect coupler air fitting has
1/4" NPT threads and should be threaded into the female hole on
the die cast handle using thread sealant. The connection should
be tight.
CAUTION
Grease or empty cartridge in barrel is under pressure from the
internal spring, use caution when removing either end of
the barrel.
Do not apply excessive torque or over-tighten the air fitting
as this will apply undue stress to the die cast outlet and may
cause it to fracture.
Preparing to Load Your Grease Gun:
1. Make sure the gun is disconnected from the air supply. Remove
any cartridge in the grease gun barrel prior to refilling. To check if
a cartridge is in the barrel first compress the spring by pulling the
plunger handle out to its maximum distance and lock it in place.
2. Remove the grease gun head by turning it counter clockwise.
3. Remove any empty cartridge.
There are 3 ways to load your grease gun: cartridge, bulk,
or filler pump. Always follow the steps listed above when
preparing to load your grease gun before proceeding to the
appropriate loading method.
Loading Grease Gun Cartridges:
1. Make sure the gun is disconnected from the air supply. Loosen
but do not remove the grease gun head from the grease gun
barrel by turning the grease gun head in a counter clockwise
direction 1-1/2 turns. Pull back and lock the plunger handle all
the way to the end of the barrel so the grease cartridge can
be fully inserted.
2. Now rotate the grease gun head in a counter clockwise direction
to unscrew the grease gun head from the barrel completely.
3. Remove the plastic cap from the grease cartridge and insert the
open end of the cartridge into the grease gun barrel until the rim
of the pull-tab end meets the rim of the grease gun barrel.
Now remove the pull-tab seal.
4. Screw the head of the gun onto the barrel, but do not fully
tighten the barrel. For now leave at least 2-3 turns before the
barrel is fully tightened against the gasket in the head.
5. Unlock the plunger rod handle from the end cap.
6. Move the plunger rod forward and backward to force out any
trapped air pockets from the grease. Air will escape from the
connection between the grease gun head and the barrel,
which is not fully tightened.
7. Reconnect the air supply and “prime” the system by pressing
the trigger until the grease starts coming out of the discharge
nozzle. Initial grease discharge may have trapped air. Once the
gun has been primed, fully tighten the grease gun head onto
the barrel.
8. Push the plunger rod into the barrel for easier manoeuvrability
during use.
9. You should now connect the grease gun extension and coupler
onto the grease gun outlet. The connection between the
extension and grease gun must be tight and it is advisable to
use a thread sealant to ensure a leak-proof joint.
www.jetequipment.com
Page 3

CAUTION
Do not apply excessive torque or over-tighten the grease gun
extension as this will apply undue stress to the die cast outlet
and may cause it to fracture.
10. Press the trigger until grease flows out from the coupler. The
grease pressure can be adjusted by regulating the inlet air
pressure. Grease pressure is 40 times greater than the air
inlet pressure.
CAUTION
Note that this is a continuous flow grease gun and will keep
dispensing grease while the trigger is pressed. Be careful not
to over lubricate!
Loading Grease Gun Using Bulk Grease:
NOTE: Always remove any cartridges from the grease gun prior
to bulk filling.
1. Make sure the gun is disconnected from the air supply. Loosen
but do not remove, the grease gun head from the grease gun
barrel by turning the grease gun head in a counter clockwise
direction 1-1/2 turns. Pull back the plunger rod handle all the
way to the end and lock the handle.
2. Now rotate the grease gun head in the counter clockwise
direction to unscrew the grease gun head from the barrel
completely. Release plunger handle and allow the handle
to move to its most forward position.
3. Insert the open end of the barrel about 2" into the grease.
4. Slowly pull the plunger rod handle while pushing the barrel
deeper into the grease until the plunger rod is all the way
extended.
5. The grease gun barrel should now be filled with grease. The
barrel’s outside surface will have a lot of grease sticking to it,
wipe off all excess grease before use.
6. Screw the head of the gun onto the barrel, but do not fully
tighten the barrel. For now leave at least 2-3 turns before the
barrel is fully tightened against the gasket in the head.
7. Unlock the plunger rod handle from the end cap.
8. Move the plunger rod forward and backward to force out any
trapped air pockets from the grease. Air will escape from the
connection between the grease gun head and the barrel,
which is not fully tightened.
9. Reconnect the air supply and “prime” the system by pressing
the trigger until the grease starts coming out of the discharge
nozzle. Initial grease discharge may have trapped air. Once the
gun has been primed, fully tighten the grease gun head onto
the barrel.
10. Push the plunger rod into the barrel for easier manoeuvrability
during use.
11. You should now connect the grease gun extension and coupler
onto the grease gun outlet. The connection between the
extension and grease gun must be tight and it is advisable to
use a thread sealant to ensure a leak-proof joint.
CAUTION
Do not apply excessive torque or over-tighten the grease gun
extension as this will apply undue stress to the die cast outlet
and may cause it to fracture.
12. Press the trigger until grease flows out from the coupler. The
grease pressure can be adjusted by regulating the inlet air
pressure. Grease pressure is 40 times greater than the air
inlet pressure.
CAUTION
Note that this is a continuous flow grease gun and will keep
dispensing grease while the trigger is pressed. Be careful not
to over lubricate!
Loading Grease Gun Using a Filler Pump:
(For models fitted with bulk loader valve on grease gun head)
NOTE: Always remove any cartridges from the grease gun prior
to filling by filler pump.
1. Wipe the grease gun’s bulk loader to clean.
2. Make sure that the filler pump is fully primed. Do this by
operating the lever handle on the pump to make sure there
is grease discharge.
3. Connect the bulk loader valve on the grease gun to the bulk
loader adaptor on the grease gun filler pump. The connection
must be tight. If the two do not fit together properly, change
one or both as needed.
4. Operate the pump to fill grease into the barrel.
CAUTION
Do not overfill grease as this may result in grease leaking from
the joints.
5. Disconnect the grease gun loader adaptor from the filler pump.
Slightly loosen the grease gun head 2-3 turns.
6. Unlock the plunger rod handle from the end cap.
7. Move the plunger rod forward and backward to force out any
trapped air pockets from the grease. Air will escape from the
connection between the grease gun head and the barrel, which
is not fully tightened.
8. Reconnect the air supply and “prime” the system by pressing
the trigger until the grease starts coming out of the discharge
nozzle. Initial grease discharge may have trapped air. Once the
gun has been primed, fully tighten the grease gun head onto
the barrel.
9. Push the plunger rod into the barrel for easier manoeuvrability
during use.
10. You should now connect the grease gun extension and coupler
onto the grease gun outlet. The connection between the
www.jetequipment.com
Page 4

extension and grease gun must be tight and it is advisable to
use a thread sealant to ensure a leak-proof joint.
CAUTION
Do not apply excessive torque or over-tighten the grease gun
extension as this will apply undue stress to the die cast outlet
and may cause it to fracture.
11. Press the trigger until grease flows out from the coupler. The
grease pressure can be adjusted by regulating the inlet air
pressure. Grease pressure is 40 times greater than the air
inlet pressure.
Greasing a Grease Fitting / Grease Nipple:
The grease coupler provided at the end of the grease gun
extension has a jaw type construction. The coupler jaws will snap
on to a grease fitting and maintain a tight fit. When connecting the
coupler to the grease fitting, press the coupler straight onto the
grease fitting to form a snug fit. Start operating the grease gun
with the coupler as square to the grease fitting as possible. Once
greasing is completed, slightly tilt the coupler, twist and pull back.
The tilt and twist action will allow easy removal of the coupler
from the grease fitting.
CAUTION
Note that this is a continuous flow grease gun and will keep
dispensing grease while the trigger is pressed. Be careful not
to over lubricate!
Troubleshooting Chart
Symptom (s) Possible Causes (s) Corrective Action (s)
Grease gun pumps little or
no grease.
1. Barrel not completely tightened.
2. Air Pockets are trapped in grease.
3. Blocked grease gun extension.
Maintenance:
Grease guns and hoses should be kept clean and checked for
damage before each use. Use an air supply system that incorporates a filter, regulator, and lubricator, or add a few drops of lubricator oil (SAE 30 or greater) through the gun’s air supply
quick connect fitting in the die cast handle.
1. Tighten the barrel completely.
2. Prime grease gun as detailed in instructions.
3. Remove the extension and operate the grease gun.
If the gun dispenses grease then the gun is fine and
you need to either clean the extension or replace it.
4. Store grease gun and grease away from extreme cold
or use thinner grease.
Excessive grease leaking past the
follower.
Gun cycles very slowly. 1. Inadequate lubrication of the pumping chamber. 2. Put a few drops of lubricator oil through the quick
®Registered trademark of JET Equipment & Tools Ltd.
1. Follower is damaged.
2. Improper seal between the plunger and the grease
gun barrel when using bulk fill or transfer pump.
1. Replace the grease gun.
connect coupler fitting.
M12-HT350162
www.jetequipment.com
 Loading...