

Page 1
Operating Instructions and Parts Manual
Arbor Press – ½-, 1-, 2-, 3-, 5-Ton
Model No. AP0-M, AP1-M, AP2-M, AP3-M, AP5-M
JET
427 New Sanford Road
LaVergne, Tennessee 37086 Part No. M-333605M
Ph.: 800-274-6848 Revision A2 10/2014
www.jettools.com Copyr ight © 2014 JET
1
Page 2

Warranty and Service
JET warrants every product it sells against manufacturers’ defects. If one of our tools needs service or repair, please contact
Technical Service by calling 1-800-274-6846, 8AM to 5PM CST, Monday through Friday.
Warranty Period
The general warranty lasts for the time period specified in the literature included with your product or on the official JET
branded website.
• JET products carry a limited warranty which varies in duration based upon the product. (See chart below)
• Accessories carry a limited warranty of one year from the date of receipt.
• Consumable items are defined as expendable parts or accessories expected to become inoperable within a
reasonable amount of use and are covered by a 90 day limited warranty against manufacturer’s defects.
Who is Covered
This warranty covers only the initial purchaser of the product from the date of delivery.
What is Co vered
This warranty covers any defects in workmanship or materials subject to the limitations stated below. This warranty does not
cover failures due directly or indirectly to misuse, abuse, negligence or accidents, normal wear-and-tear, improper repair,
alterations or lack of maintenance.
Warranty Limitations
Woodworking products with a Five Year Warranty that are used for commercial or industrial purposes default to a Two Year
Warranty. Please contact Technical Service at 1-800-274-6846 for further clarification.
How to Get Technical Support
Please contact Technical Service by calling 1-800-274-6846. Please note that you will be asked to provide proof of initial
purchase when calling. If a product requires further inspection, the Technical Service r epr esent ative will explai n and assis t
with any additional action needed. JET has Authorized Service Centers located throughout the United States. For the name of
an Authorized Service Center in your area call 1-800-274-6846 or use the Service Center Locator on the JET website.
More Informa tion
JET is constantly adding new products. For complete, up-to-date product information, check with your local distributor or visit
the JET w ebsite.
How S tate Law A pplies
This warranty gives you specific legal rights, subject to applicable state law.
Limitations on This Warranty
JET LIMITS ALL IMPLIED WARRANTIES TO THE PERIOD OF THE LIMITED WARRANTY FOR EACH PRODUCT.
EXCEPT AS STATED HEREIN, ANY IMPLIED WARRANTIES OF MERCHANTABILITY AND FITNESS FOR A PARTICULAR
PURPOSE ARE EXCLUDED. SOME STATES DO NOT ALLOW LIMITATIONS ON HOW LONG AN IMPLIED WARRANTY
LASTS, SO THE ABOVE LIMITATION MAY NOT APPLY TO YOU.
JET SHALL IN NO EVENT BE LIABLE FOR DEATH, INJURIES TO PERSONS OR PROPERTY, OR FOR INCIDENTAL,
CONTINGENT, SPECIAL, OR CONSEQUENTIAL DAMAGES ARISING FROM THE USE OF OUR PRODUCTS. SOME
STATES DO NOT ALLOW THE EXCLUSION OR LIMITATION OF INCIDENTAL OR CONSEQUENTIAL DAMAGES, SO THE
ABOVE LIMITATION OR EXCLUSION MAY NOT APPLY TO YOU.
JET sells through distributors only. The specifications listed in JET printed materials and on official JET website are given as
general information and are not binding. JET reserves the right to effect at any time, without prior notice, those alterations to
parts, fittings, and accessory equipment which they may deem necessary for any reason whatsoever. JET
are not sold in Canada by JPW Industries, Inc.
Product Listing with Warranty Period
90 Days – Parts; Consumable items; Light-Duty Air Tools
1 Year – Motors; Machine Accessories; Heavy-Duty Air Tools; Pro-Duty Air Tools
2 Year – Metalworking Machinery; Electric Hoists, Electric Hoist Accessories; Woodworking Machinery used
for industrial or commercial purposes
5 Year – Woodworking Machinery
Limited Lifetime – JET Parallel clamps; VOLT Series Electric Hoists; Manual Hoists; Manual Hoist
Accessories; Shop Tools; Warehouse & Dock products; Hand Tools
NOTE: JET is a division of JPW Industries, Inc. References in this document to JET also apply to JPW Industries, Inc., or any
of its successors in interest to the JET brand .
®
branded products
2
Page 3

Table of Contents
Warranty and Servic e .................................................................................................................................... 2
Table of Contents .......................................................................................................................................... 3
Warnings ....................................................................................................................................................... 4
Introduction .................................................................................................................................................... 5
Specifica tio ns ................................................................................................................................................ 5
Arbor Press Features ..................................................................................................................................... 6
Set-up and Operation ..................................................................................................................................... 6
Changing Ram Positi on ................................................................................................................................. 6
Maintenance .................................................................................................................................................. 6
Parts Lists ...................................................................................................................................................... 7
Exploded View ............................................................................................................................................... 8
The specificati ons in t his manual are giv en as general inf ormation and are not bindi ng. JET reserv es the right
to effect, at any time and without prior notice, changes or alterations to parts, fittings, and accessory
equipment deemed nec essary for any reason whatsoever.
3
Page 4

Warnings
1. Read and understand the ent ire owners' manual bef or e att em pting assembly or operation.
2. Read and understand the warnings po sted on the m achine and i n thi s manual. Fail ure to comply wit h
all of these warnings m ay cause seriou s i njury.
3. Replace the warning labels if they become obscured or remov ed.
4. This arbor press is designed and intended f or use by properly trained and experienced personnel
only. If you are not familiar with t he proper and safe operat ion of an arbor press, do not use until
proper trai ning and k nowledge have been obtained.
5. Do not use this arbor pr es s for other t han i ts i ntended use. If used f or ot her purpos es, JET discl aim s
any real or implied warrant y and holds itself harmless f rom any injury that may result fr om that use.
6. Always wear approved saf ety glasses/f ace shiel ds while using thi s arbor pr ess. Ev ery day eyegl asses
only have impact resi stant lenses; they are not saf ety glasses.
7. Do not operate this arbor pr ess while tired or under the influenc e of drugs, alcohol or any medication.
8. Make sure this arbor press is firmly secured to the floor or benc h before use.
9. Check damaged parts. Before further use of the arbor press, a part that is damaged should be
carefully c hecked to determi ne that it will operate properl y and perform it s intended func tion. Check
for alignment of moving parts, binding of moving parts, breakage of parts, m ounting and any other
conditions that may affect its operati on. A guard or ot her part that is damaged should be prop erly
repaired or replaced.
10. P r ov ide for adequate space surrounding work area and non-glar e, overhead lighti ng.
11. K eep the floor around the ar bor pr ess clean and free of scrap material, oil and gr ease.
12. K eep v isitors a safe distanc e from the work area. Keep children away.
13. M ak e y our workshop child proof wit h padloc k s, m aster switc hes or by r em ov ing starter keys.
14. Giv e your work undivi ded attention. Looki ng around, carryi ng on a conversati on and “horse-play” ar e
careless acts that can r esul t in serious injury.
15. Mai ntain a bal anced stance at all t imes so that you do not f all i nto t he arbor pr ess. Do not ov err each
or use excessive force to perform any machine operation.
16. Use recom mended accessories; i mproper accessories may be hazardous.
17. M ak e sure t he work piece is securely att ac hed or clamped to the table.
18. Remove loose items and unnecessary work pieces from the area before starting the machine.
19. Do not overload the arbor pr ess by using extension (cheater) bar s.
20. Use steel c ollars to support par ts when pressing on bearings to prevent damage to the bearings.
Familiariz e you rself with the following safety no tices used in this manual:
This means that if precautions are not heeded, it may result in minor injury and/or
possible machine damage.
This means that if precautions are not heeded, it may result in serious, or even fatal,
injury.
4
Page 5

Introduction
The arbor press is designed f or riv eting, swaging, ben di ng, punc hing, and flatt eni ng. The arbor pr ess can
be used to press on or remove close-fitting bearings and bushings. It is suited for the production
environment as well as machine shop s, automobile repair shops, and home workshops.
The anvil has four sl ots that are available for a variety of pressing operations.
Specifications
Stock# ..................................... 333605 .............. 333610 ................. 333620 ................ 333630 ................. 333650
Model# ..................................... AP0-M ............... AP1-M .................. AP2-M ................. AP3-M .................. AP5-M
Pressure (ton) ........................... ½ Ton ................. 1 Ton ................... 2 Ton ................... 3 Ton ..................... 5Ton
Capacity over Table (in.) ............. 4-3/4 ........................ 5 .................... 7-1/2 .................. 11-1/2 ......................... 17
Diameter of Work (in.) ................. 6-5/8 ........................ 8 .................. 10-3/4 .................. 11-3/8 ......................... 17
Anvil Diameter (in.) ...................... 3-1/2 .................. 3-1/2 ................ 6-11/16 ................ 6-11/16 ..................... 9-3/4
Size of Ram (in.) ................ 3/4 x 7-7/8 ............ 1 x 9-1/8 ............. 1-1/4 x 13 ............ 1-1/2 x 18 ............. 2 x 27-1/2
Ram Bore (in.) ................................ 3/8 ..................... 1/2 ........................ 1/2 ....................... 1/2 ........................ 1/2
Ram Travel (in.) ........................... 4.72 ..................... 5.9 ...................... 9.05 ..................... 12.6 ...................... 18.1
Base Size (in.) ....................... 4 x 9-1/2 ............ 5 x 9-1/2 ...... 6-3/8 x 15-3/4 ............ 8-1/2 x 18 ............. 9-7/8 x 26
Overall Dimensions:
Length (in.) ............................ 9-5/16 .................. 9-1/2 .................. 15-3/4 .................. 18-1/8 ......................... 27
Width (in.) ................................ 6-5/8 .................. 7-1/2 ......................... 10 .................. 10-1/4 ......................... 13
Height (in.) ........................... 10-3/8 ...................... 12 .................. 17-1/2 .................. 22-1/2 ................... 31-1/2
Net Weight (lb.) ......................... 17-1/2 ................ 25-1/2 .................. 67-1/2 ...................... 108 ....................... 262
Shipping Weight (lb.) ....................... 19 ................ 26-1/2 .................. 69-1/2 ...................... 116 ................. 296-1/2
The above specifications were current at the tim e this manual was publi shed, but because of our policy of
continuous impr ovement, JET reserves the right to change specificati ons at any tim e and without prior
notice, without incurring obligati ons.
Read and understand the entire contents of this manual before attempting
assembly or operat io n! Failure to comply may cause serious inju ry!
5
Page 6

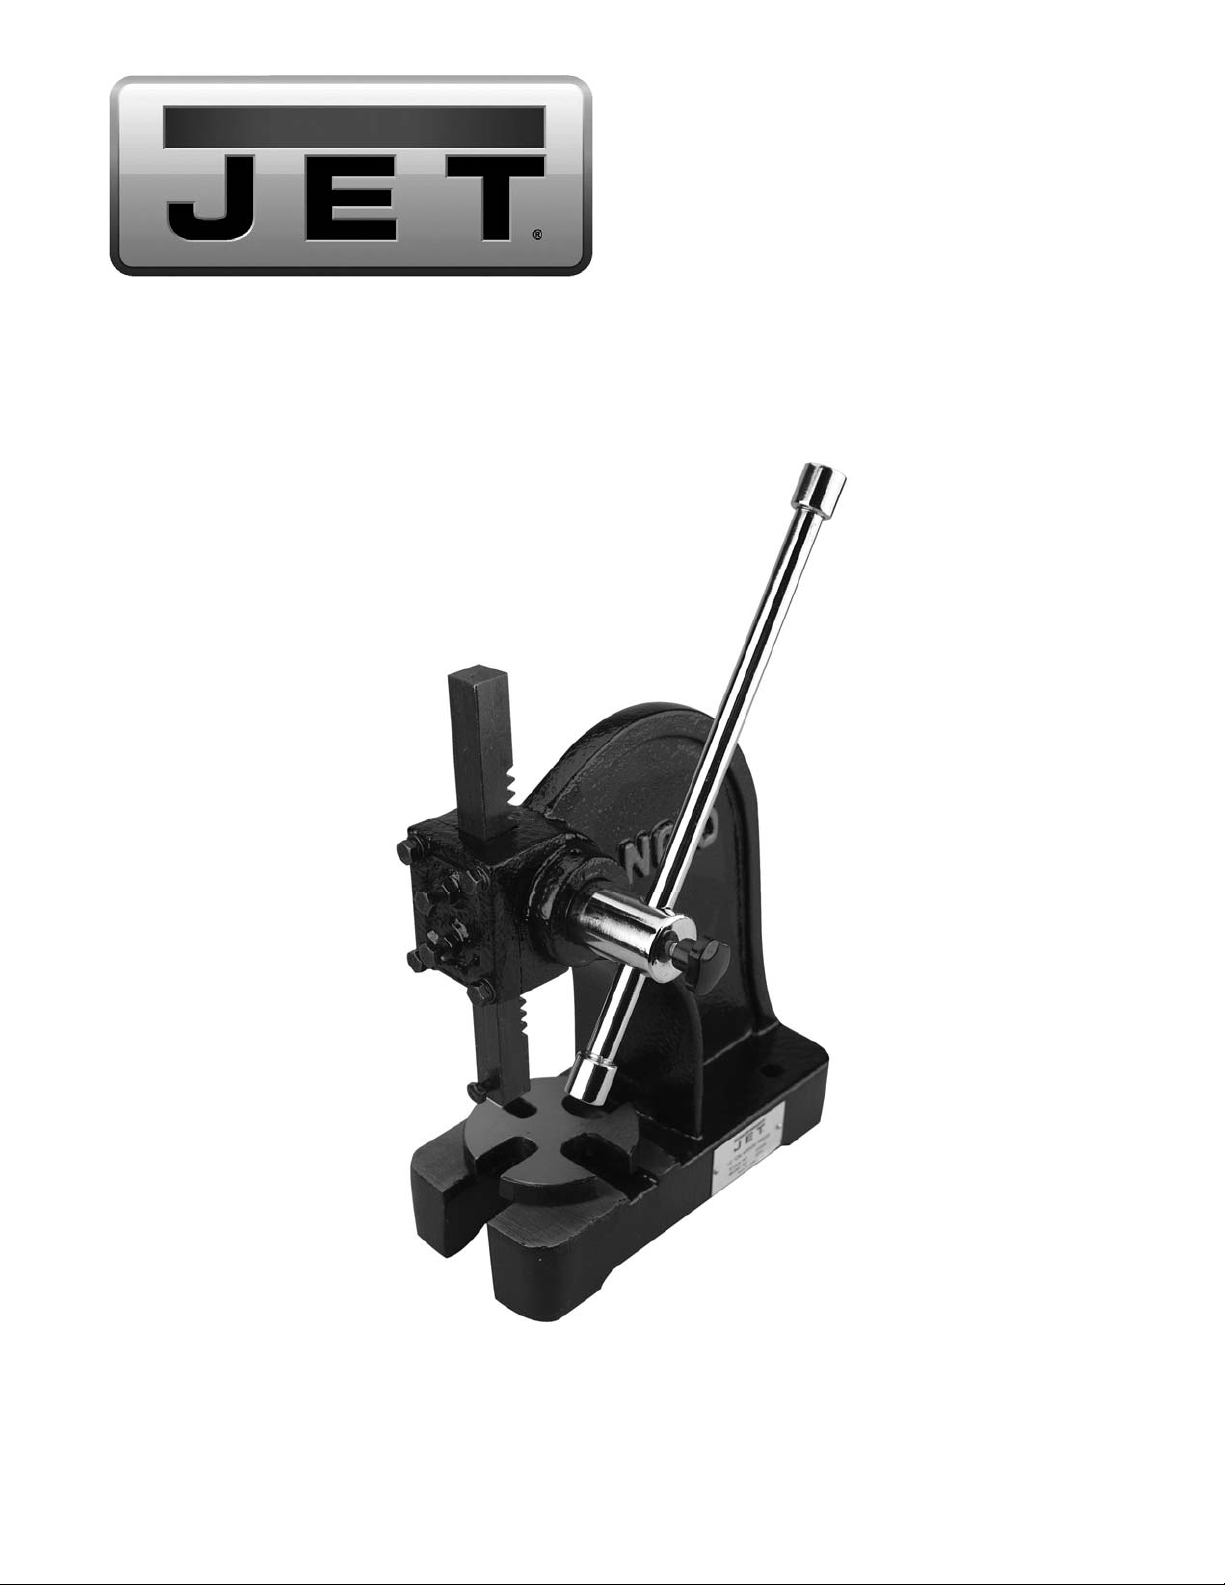
Arbor Press Features
Maintenance
The arbor pre ss (see Expl oded vi ew on page 8)
consists of a cast i ron ba se, an anv il , a pressing
handle with l ock knob, and a rac k -ty pe r am.
The removabl e anvil has four cutouts that can
be used for pressing off or pressing on beari ngs
or bushings of various sizes.
Set-up and Operation
Note: Numbers in parentheses below
correspond to item numbers in the exploded
view on page 8.
Do not use the arbor press
without first secu ring the arbor press to the
workbench and anchoring the workbench to
the floor.
Mount the arbor pr ess to the workbench or stand
and secure with bol ts using the holes in the base
(1). Al so, secure the workbench or stand to t he
floor.
Changing Ram Position
The ram has a flat surface on one end and a
hole on the other end. The hole is used to
accept the punch inserts. Change-out the ram
as follows:
A. Peri odically lubricate the arbor press with a
ligh t ma c hine oil.
B. Wipe off or vacuum the acc umulated debris
and dust after using t he ar bor pr ess.
C. Periodically check the ram for si de- to-sid e and
front-to-back play. If the play is excessive,
loosen th e hex nuts (11) and adjust ( tighten)
the screws ( 10 o n side, 9 i n f r ont) j ust e nou gh
to eliminate the excess play. Tighten them
equally to assure even contact with the ram
(4).
D. Once the pl ay is eliminat ed, hold the screw
(10 or 9) in po sition and ti ghten the hex nut
(11). Check t o m ak e sure t he amount of play
is acceptabl e.
A. Remove the handle by loosening the knob
(17). Then remove one cap (5) from the
handle assembly. Remove handle (6) from
the pinion (16).
B. Remove the pinion retai ner (14) by backing
off the Set Scr ew (13). No w sli de the pi ni on
retainer ( 14) off of the pinion (16).
C. Pull up on the ram (4) enough to provide
slack to remove the pinion (16) from the
arbor press.
D. Pull the ram (4) out the top of the arbor
press body. Turn t he r am (4) end-for-end.
Tip: If ram does not freely come out of ar bor
press body, loosen the t wo hex nuts (11) on
side of arbor press body and the two hex
nuts (11) on the front plate (12).
E. Repeat steps A – D in reverse.
6
Page 7

Parts Lists
Model AP0-M – 1/2-ton Arbo r P ress
Index Part No. Description Qty
1 .......... AP0-01 ............. Base .......................... 1
2 .......... AP0-06 ............. Anvil ........................... 1
3 .......... AP0-16 ............. Spring Pin 6x16 .......... 1
4 .......... AP0-02 ............. Ram ........................... 1
5 .......... AP0-5-1............ Cap ............................ 2
6 .......... AP0-6-1............ Handle ....................... 1
7 .......... TS-1482051 ..... Bolt, Hex M6x25 ......... 4
8 .......... TS-1550041 ..... Washer M6................. 4
9 .......... TS-1482051 ..... Bolt, Hex M6x25 ......... 2
10 ........ TS-1482061 ..... Bolt, Hex M6x30 ......... 2
11 ........ TS-1540041 ..... Nut, Hex M6 ............... 4
12 ........ AP0-12 ............. Plate .......................... 1
13 ........ TS-1523011 ..... SHSS M6x6 ............... 1
14 ........ AP0-10 ............. Pinion Retainer........... 1
15 ........ TS-1482021 ..... Bolt, Hex M6x12 ......... 1
16 ........ AP0-03 ............. Pinion ......................... 1
17 ........ AP0-05 ............. Knob .......................... 1
18 ........ TS-2361061 ..... Lock Washer M6 ........ 4
............ AP0-19 ............. ID Label (not shown) .. 1
Model AP1-M – 1-ton Arbor Press
Index Part No. Description Qty
1 .......... AP1-01 ............. Base .......................... 1
2 .......... AP1-06 ............. Anvil ........................... 1
3 .......... AP0-16 ............. Spring Pin 6x16 .......... 1
4 .......... AP1-02 ............. Ram ........................... 1
5 .......... AP1-5-1............ Cap ............................ 2
6 .......... AP1-6-1............ Handle ....................... 1
7 .......... TS-1482051 ..... Bolt, Hex M6x25 ......... 4
8 .......... TS-1550041 ..... Washer M6................. 4
9 .......... TS-1482051 ..... Bolt, Hex M6x25 ......... 2
10 ........ TS-1482061 ..... Bolt, Hex M6x30 ......... 2
11 ........ TS-1540041 ..... Nut, Hex M6 ............... 4
12 ........ AP1-12 ............. Plate .......................... 1
13 ........ TS-1523011 ..... SHSS M6x6 ............... 1
14 ........ AP1-10 ............. Pinion Retainer........... 1
15 ........ TS-1482021 ..... Bolt, Hex M6x12 ......... 1
16 ........ AP1-03 ............. Pinion ......................... 1
17 ........ AP1-05 ............. Knob .......................... 1
18 ........ TS-2361061 ..... Lock Washer M6 ........ 4
............ AP1-19 ............. ID Label (not shown) .. 1
Model AP2-M – 2-ton Arbor Press
Index Part No. Description Qty
1 .......... AP2-01 ............. Base .......................... 1
2 .......... AP2-06 ............. Anvil ........................... 1
3 .......... AP2-16 ............. Spring Pin 6x25 .......... 1
4 .......... AP2-02 ............. Ram ........................... 1
5 .......... AP2-5-1............ Cap ............................ 2
6 .......... AP2-6-1............ Handle ....................... 1
7 .......... TS-1490051 ..... Bolt, Hex M8x30 ......... 4
8 .......... TS-1550061 ..... Washer M8................. 4
9 ..........TS-1490051 .....Bolt, Hex M8x30 ......... 2
10 ........TS-1490051 .....Bolt, Hex M8x30 ......... 2
11 ........TS-1540061 .....Nut, Hex M8 ............... 4
12 ........AP2- 12 .............Plate ........................... 1
13 ........TS-1523011
14 ........AP2- 10 .............Pinion Retainer ........... 1
15 ........TS-1490021 .....Bolt, Hex M8x16 ......... 1
16 ........AP2- 03 .............Pinion ......................... 1
17 ........AP2- 05 .............Knob .......................... 1
18 ........TS-2361081 .....L o ck Was h er M8 ........ 4
............AP2-19 .............ID Label (not shown)... 1
Model AP3-M – 3-ton Arbor Press
Index Part No. Description Qty
1 ..........AP3-0 1 .............Bas e ........................... 1
2 ..........AP3-0 6 .............An vil ........................... 1
3 ..........AP2-16 .............Spring Pin 6x25 .......... 1
4 ..........AP3-0 2 .............Ram ........................... 1
5 ..........AP3-5 -1 ............Cap ............................ 2
6 ..........AP3-6 -1 ............Handle........................ 1
7 ..........TS-1490051 .....Bolt, Hex M8x30 ......... 4
8 ..........TS-1550061 .....Washer M8 ................. 4
9 ..........TS-1490051 .....Bolt, Hex M8x30 ......... 2
10 ........TS-1490051 .....Bolt, Hex M8x30 ......... 2
11 ........TS-1540061 .....Nut, Hex M8 ............... 4
12 ........AP3- 12 .............Plate ........................... 1
13 ........TS-1524011 .....SHSS M8x8 ................ 1
14 ........AP3- 10 .............Pinion Retainer ........... 1
15 ........TS-1490031 .....Bolt, Hex M8x20 ......... 1
16 ........AP3- 03 .............Pinion ......................... 1
17 ........AP3- 05 .............Knob .......................... 1
18 ........TS-2361081 .....L o ck Was h er M8 ........ 4
............AP3-19 .............ID Label (not shown)... 1
Model AP5-M – 5-ton Arbor Press
Index Part No. Description Qty
1 ..........AP5-0 1 .............Bas e ........................... 1
2 ..........AP5-0 6 .............An vil ........................... 1
3 ..........AP5-16 .............Spring Pin 6x24 .......... 1
4 ..........AP5-0 2 .............Ram ........................... 1
5 ..........AP5-5 -1 ............Cap ............................ 2
6 ..........AP5-6 -1 ............Handle........................ 1
7 ..........TS-1491061 .....Bolt , He x M10 x40 ....... 4
8 ..........TS-1550071 .....Washer M10 ............... 4
9 ..........TS-1491061 .....Bolt , He x M10 x40 ....... 2
10 ........TS-2210501 .....Bo lt, Hex M10x50 ....... 2
11 ........TS-1540071 .....Nut, Hex M10 ............. 4
12 ........AP5- 12 .............Plate ........................... 1
13 ........TS-1524031 .....SHSS M8x12 .............. 1
14 ........AP5- 10 .............Pinion Retainer ........... 1
16 ........AP5- 03 .............Pinion ......................... 1
18 ........TS-2361101 .....L o ck Was h er M10....... 4
............AP5-19 .............ID Label (not shown)... 1
.....SHSS M6x6 ................ 1
7
Page 8

Exploded View
427 New Sanford Road
LaVergne, Tennessee 37086
Ph: 800-274-6848
www.jettools.com
8
 Loading...