

Page 1

®
Operation
How to Enjoy Your XCC 6120 AM/FM
Stereo Receiver/Cassette Tape Player
with Optional CD Changer Control and
Detachable Security Panel
PWR
REL
VOL
MAN
SEK
SEL
MAN
SEK
VOL
BND
ST
12345 6
AUTO-REVERSE
4X25W PLL TUNER
CH
REPSCND.UP D.DN RDM
XCC 6120CDC CONTROLLER
LOUD
Welcome!
What you're holding in your hands is no ordinary owner's
manual. We've tried to make the instructions in this owner's
manual clear and easy to follow. If you take a few minutes to
look through it, you'll learn how to use all of the features on
your new Jensen car stereo for maximum enjoyment.
For your Jensen stereo to work right, it must be installed
correctly. The enclosed installation manual will show you how
to install your new stereo like a pro. It's a good idea to read
all of these instructions before you begin the installation.
Most installations are straightforward and can be handled by
a do-it-yourselfer with the right tools, patience, and the ability
to follow instructions. But, do-it-yourself installation isn't for
everyone. If you still don't feel confident after reading this
book, consider turning the installation job over to someone
better suited to it.
Warranty Service
If your Jensen stereo should ever require service, you will
need to have the original dated receipt. If you ever need to
return the unit for any reason, always include the receipt with
the product.
DIGITAL AUDIO
AMS
CD
COMPACT
LOC
MONO
LOU
MUT
T echnical Assistance
For technical assistance with the operation of the XCC 6120,
call 1-800-323-0221.
XCC 6120 Features
Basic Operation ................2
On/Off .................................. 2
Select Mode .........................2
Volume................................. 2
Bass .....................................2
Treble................................... 3
Balance ................................3
Fader.................................... 3
Loudness ............................. 3
Mute .....................................3
Removable Faceplate.......... 4
Radio Operation ................4
Select a Band ...................... 4
Seek Local or Distant
Stations (LOC) ..................... 4
Select a Station.................... 4
Preset Stations .................... 5
Automatically Store
Stations ................................ 5
Scan Stations Already
Stored (Preset Scan) ........... 5
Tape Player Operation....6
Insert and Eject Tape ........... 6
Fast Forward and Rewind.... 6
Auto Reverse ....................... 6
Change Program
(Tape Direction) ................... 6
CD Changer Operation ....7
Pause CD ............................ 7
Skip Tracks .......................... 7
Change Discs ...................... 7
Scan (Preview all Tracks) .... 7
Repeat the Same Track ....... 7
Random: Play all Tracks ...... 7
Specifications
and Warranty......................8
XCC6125_EOP.P65 3/14/00, 2:53 PM1
Page 2

®
VOL
Basic Operation
XCC 6120
PWR
REL
MAN
SEK
SEL
VOL
VOL
MAN
SEK
BND
ST
12345 6
On/Off
PWR
Press PWR to turn the radio
or tape player on. Press again
to turn it off.
Select Mode
Press SEL button to move display through
volume, bass, treble, balance and fader functions.
Use the control button
selected mode. When mode has not been
adjusted for 3 seconds, display returns to
normal radio or cassette display.
(Volume)
VOL
SEL
to adjust the
VOL
MAN
SEK
VOL
SEL
Control
Button
MAN
SEK
AUTO-REVERSE
4X25W PLL TUNER
CH
REPSCND.UP D.DN RDM
MAN
SEK
1
XCC 6120CDC CONTROLLER
LOUD
Volume
VOL
MAN
SEK
VOL
Bass
SEL
DIGITAL AUDIO
AMS
MONO
LOU
CD
MUT
LOC
COMPACT
Adjust volume
by pressing
or
MAN
SEK
VOL
VOL
VOL
MAN
on the control
SEK
button.
1. Press SEL button two
times.
2. Adjust Bass level using
VOL
or
VOL
button.
or
VOL
(Fader)
SEL
SEL
(Balance) (Treble)
2
XCC6125_EOP.P65 3/14/00, 2:53 PM2
SEL
(Bass)
MAN
SEK
VOL
VOL
MAN
SEK
or
2
10 = maximum bass
–10 = minimum bass
MAN
SEK
VOL
VOL
MAN
SEK
Page 3

XCC 6120
®
Treble
1
MAN
VOL
SEK
VOL
2
10 = maximum treble
–10 = minimum treble
1. Press SEL button three
SEL
times.
2. Adjust Treble level using
VOL
MAN
SEK
or
MAN
SEK
Balance
1
SEL
1. Press SEL button four
2. Adjust sound balance
or
VOL
VOL
VOL
MAN
SEK
button.
times.
left and right using
VOL
or
VOL
button.
Fader
1
SEL
2
VOL
MAN
SEK
VOL
F 10 = front speaker only
r 10 = rear speaker only
Loudness
LOU
Press LOU to increase bass
output.
Mute
1. Press SEL button five
times.
2. Adjust sound balance
front and rear using
or
MAN
SEK
or
VOL
MAN
SEK
VOL
VOL
VOL
MAN
SEK
button.
MAN
SEK
VOL
VOL
MAN
SEK
2
r 10 = right speaker only
L 10 = left speaker only
XCC6125_EOP.P65 3/14/00, 2:53 PM3
or
MAN
SEK
VOL
VOL
MAN
SEK
MUT
Press MUT (MUTE) to silence the
receiver. Press again to resume
listening.
3
Page 4
®
Removable Faceplate
3
1
PWR
REL
REL
VOL
MAN
MAN
SEK
SEK
VOL
SEL
AUTO-REVERSE
4X25W PLL TUNER
CDC CONTROLLER
BND
123 5
REPSCND.UP D.DN RDM
CH
4
COMPACT
LOC
DIGITAL AUDIO
MONO
XCC 6120
AMS
LOU
CD
MUT
6
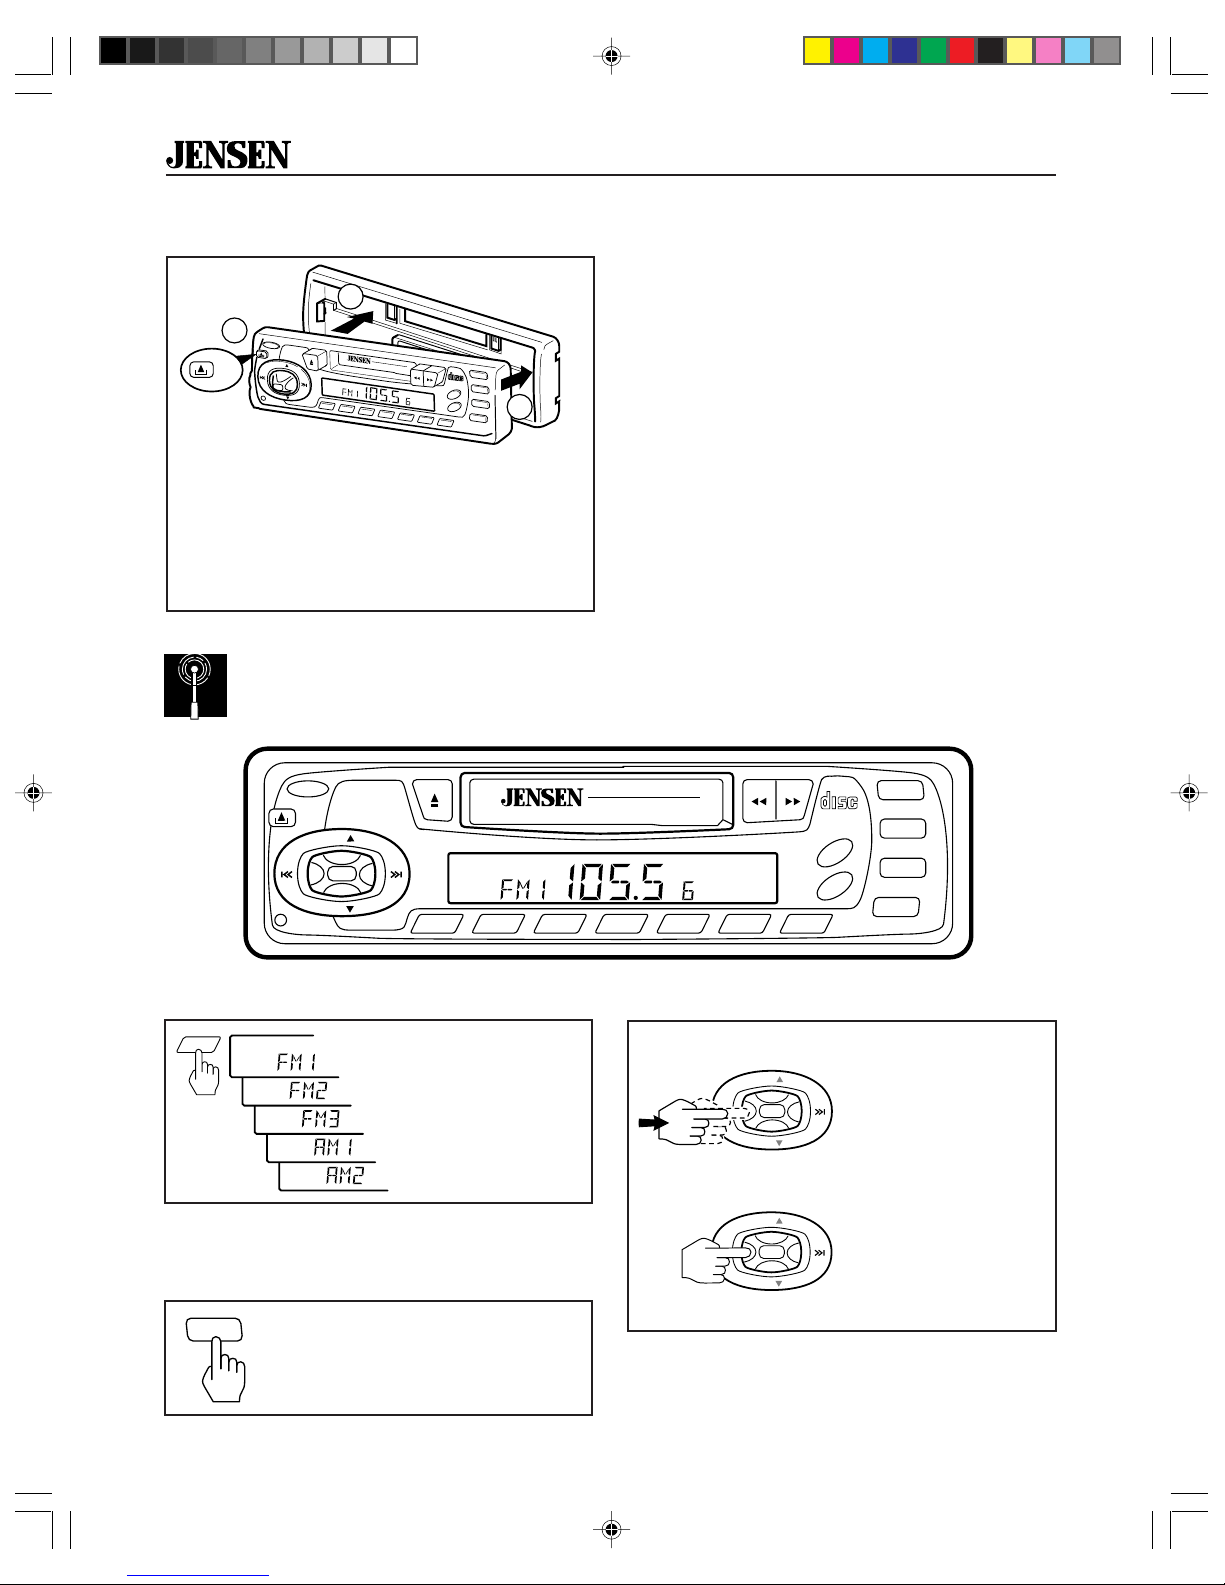
1. Press REL button and pull gently on left
side of faceplate to remove.
2. To reinstall, slip right edge into radio.
3. Press into place.
4. Press PWR to play radio or tape.
Radio Operation
XCC 6120
2
PWR
REL
VOL
MAN
SEK
SEL
VOL
MAN
SEK
BND
Select a Band
BND
Press BND button to
change radio between
three FM bands and
two AM bands. Each
band stores up to six
preset stations.
Seek Local or Distant
Stations (LOC)
LOC
Press the LOC button to select
between local and distant stations
when using seek.
AUTO-REVERSE
4X25W PLL TUNER
ST LOC
12345 6
REPSCND.UP D.DN RDM
XCC 6120CDC CONTROLLER
CH
LOUD
COMPACT
DIGITAL AUDIO
AMS
CD
Select a Station
Options for selecting a station
<2 Sec
>2 Sec
MAN
SEK
MAN
SEK
VOL
VOL
VOL
VOL
Touch
MAN
button for less than two
SEK
seconds to move radio
frequency number up
or down one step.
Hold
MAN
button for more than
SEK
two seconds to seek
the next clear station.
LOC
MONO
LOU
MUT
a MAN/SEK
a MAN/SEK
4
XCC6125_EOP.P65 3/14/00, 2:53 PM4
Page 5
XCC 6120
Preset Stations Automatically Store Stations
®
12345 6
REPSCND.UP D.DN RDM
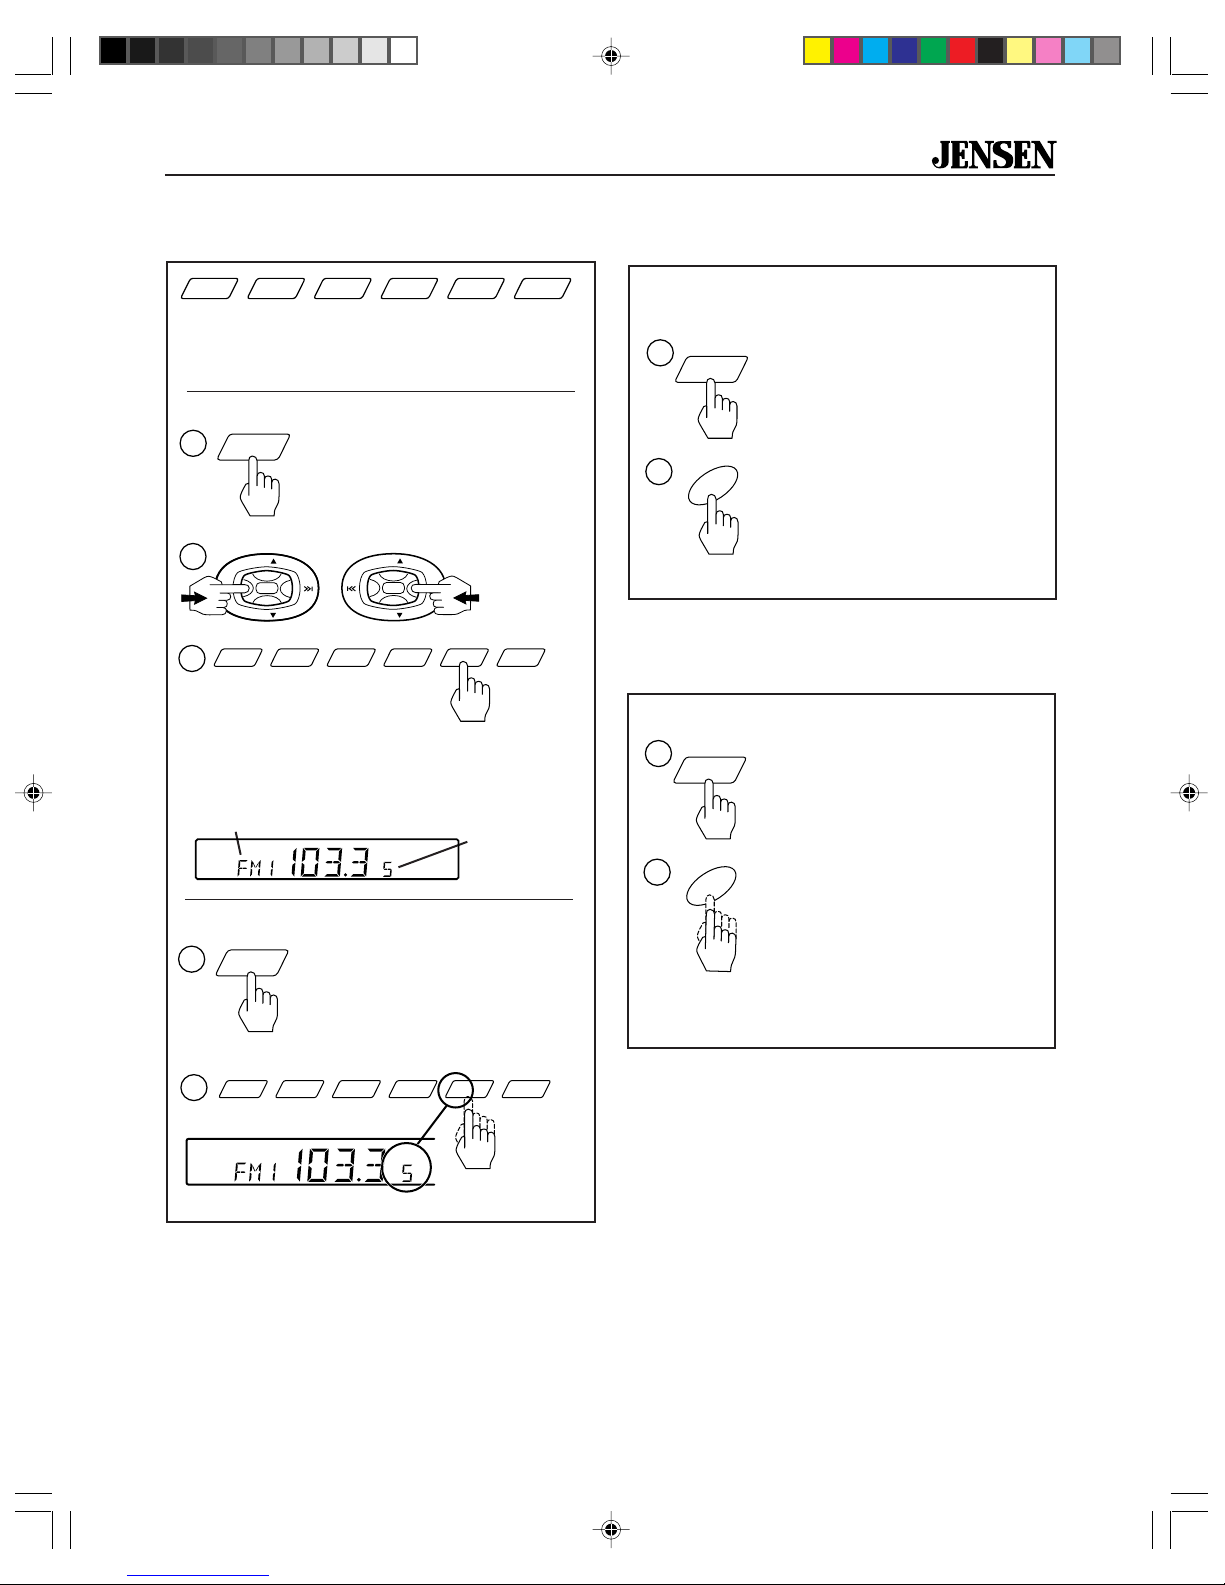
Six numbered preset buttons store and
recall stations for each band.
Store a station:
1
BND
1. Select a band (if needed)
2. Select a station
2
3
3.
VOL
MAN
SEK
12345 6
Hold
MAN
SEK
VOL
a preset button for three seconds.
VOL
MAN
or
SEK
VOL
REPSCND.UP D.DN RDM
MAN
SEK
3 Sec
The preset station number appears on
the display when station is saved.
Band
CH
Preset
Station
Number
Recall a station:
1
BND
1. Select a band (if needed)
2. Press a preset button for
less than three seconds to
select stored station.
12345 6
2
REPSCND.UP D.DN RDM
Select six strong stations and store them in
current band.
1
BND
1. Select a band
(if needed)
2.
Hold
2
AMS
AMS button for
more
than three seconds.
The six new stations
replace stations already
>3 Sec
stored in that band.
Scan Stations Already
Stored (Preset Scan)
Scan stations stored in current band.
1
BND
2
AMS
<3 Sec
1. Select a band
(if needed)
Touch
2.
AMS for
three seconds. Radio
pauses for five seconds
at each station.
AMS again to stop
scanning when desired
station is reached.
less
Touch
than
CH
XCC6125_EOP.P65 3/14/00, 2:54 PM5
<3 Sec
5
Page 6
®
XCC 6120
Tape Player Operation
PWR
REL
VOL
MAN
SEK
SEL
VOL
MAN
SEK
TAPE
BND
12345 6
Insert and Eject Tape
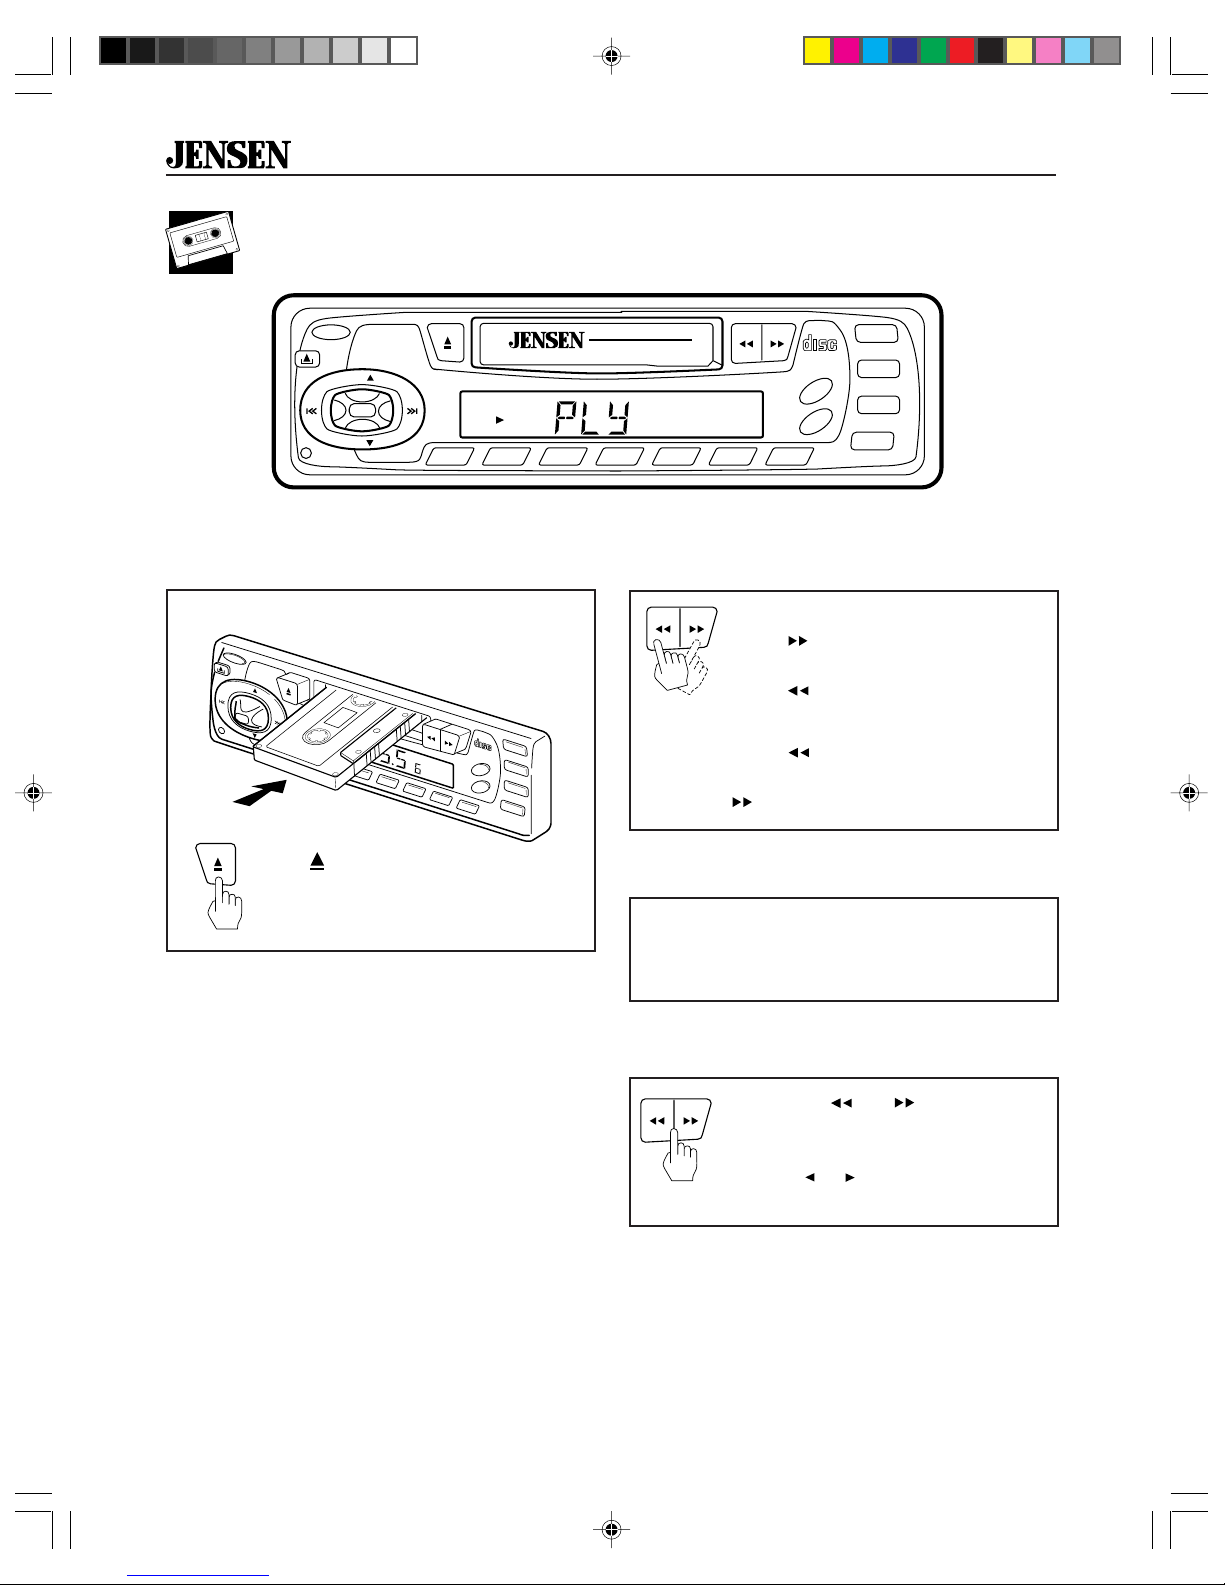
Push a tape into slot. The tape will begin to play.
PWR
REL
VOL
MAN
SEK
3EL
CDC CONTROLLER
MAN
SEK
VOL
BND
Press
and eject tape from slot. Receiver
switches to radio operation.
AUTO-REVERSE
4X25W
ST LOC
123 5
CH
REPSCND.UP
4
D.DN RDM
XCC 6120
COMPACT
DIGITAL AUDIO
AMS
CD
6
LOC
MONO
LOU
MUT
(EJECT) to stop tape play
LOC
AUTO-REVERSE
4X25W PLL TUNER
REPSCND.UP D.DN RDM
XCC 6120CDC CONTROLLER
LOUD MTL
COMPACT
DIGITAL AUDIO
AMS
CD
MONO
LOU
MUT
Fast Forward and Rewind
Fast Forward:
Press
. The button will pop out
while the tape moves in fast forward.
Press
to resume playing.
Reverse:
Press
. The button will pop out
while tape moves in reverse. Press
to resume playing.
Auto Reverse
When a tape reaches the end of one side,
the tape player
direction and plays the other side of the tape.
automatically
changes
6
XCC6125_EOP.P65 3/14/00, 2:54 PM6
Change Program (Tape Direction)
Press both and at the same
time to change tape direction and
play the other side of the tape.
Arrows (
tape direction.
or ) on the display show
Page 7
XCC 6120
CD Changer Operation
®
PWR
REL
VOL
MAN
SEK
SEL
VOL
MAN
SEK
CD-C
BND
12345 6
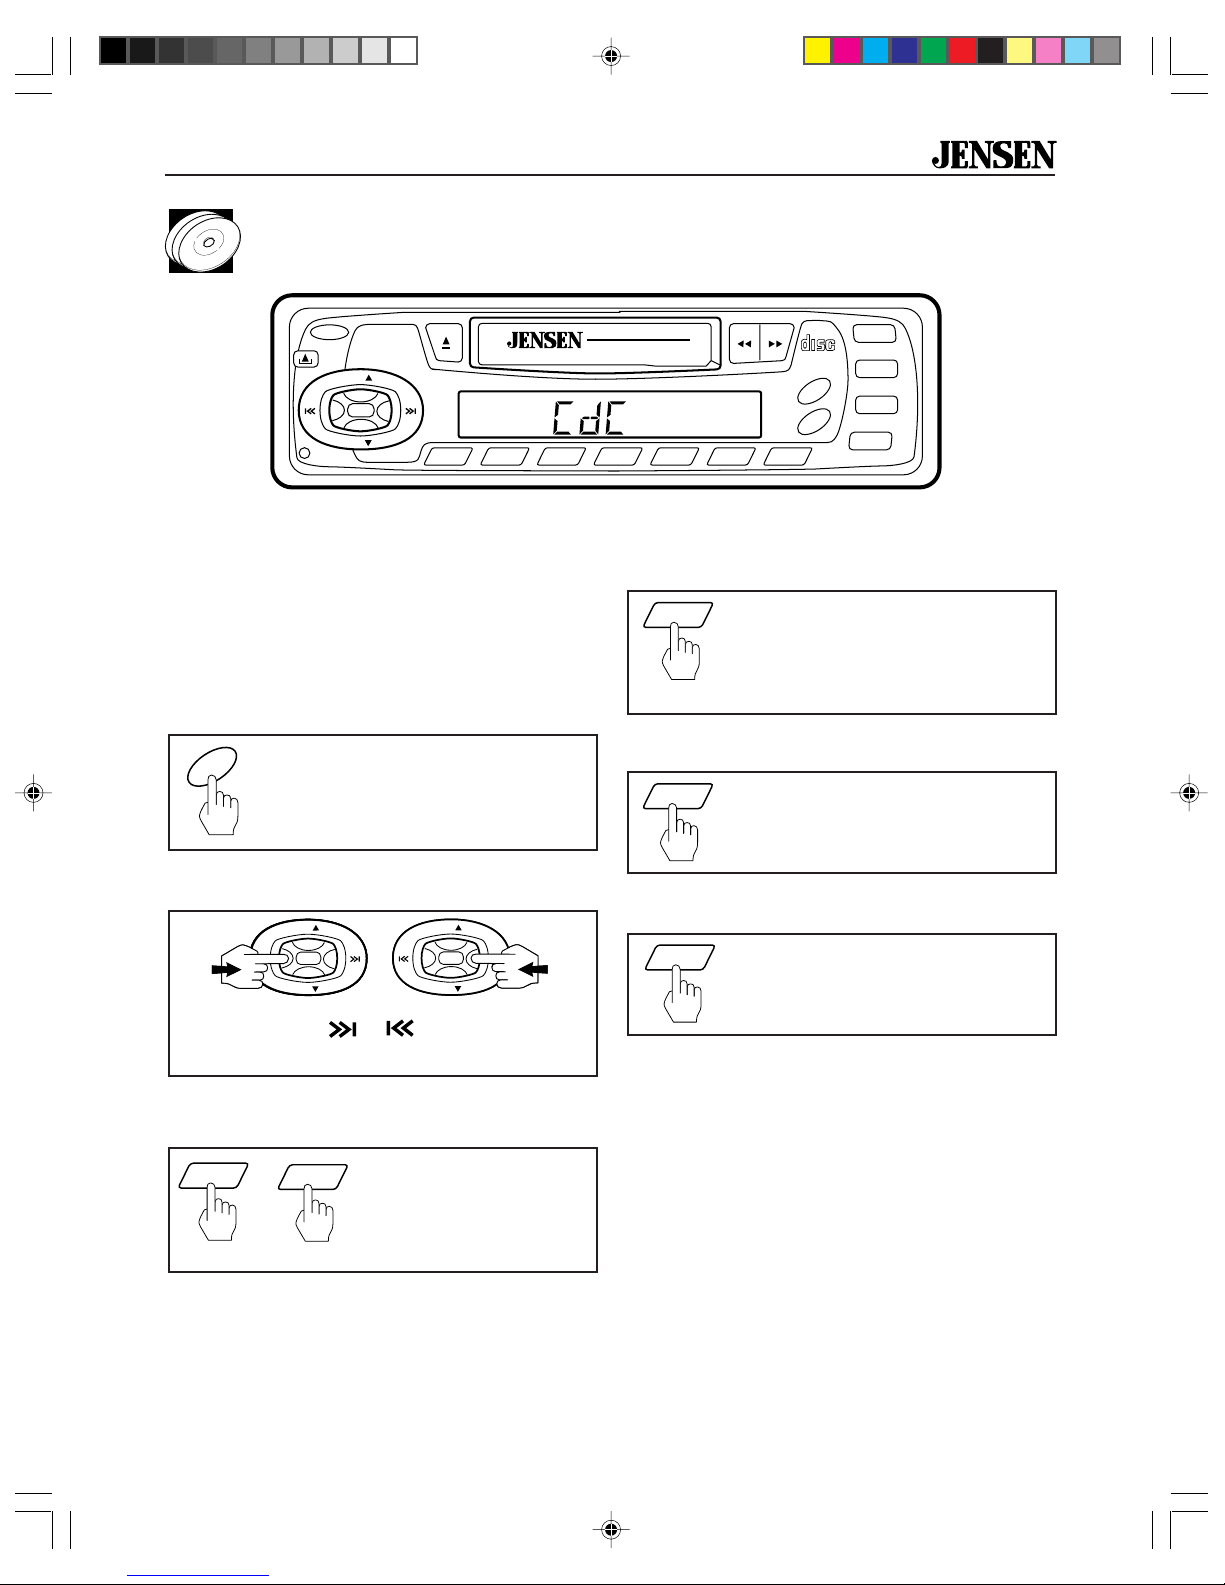
The XCC 6120 is designed to control an optional
6-disc CD changer.
Press CD button to start CD changer operation.
CdC appears in the display.
Pause CD
CD
Press CD to pause CD play. PAUS
shows in the display. Press CD
again to resume CD play.
Skip Tracks
VOL
MAN
MAN
SEK
SEK
VOL
MAN
MAN
SEK
SEK
VOL
VOL
VOL
VOL
MAN
MAN
SEK
SEK
MAN
MAN
or
or
SEK
SEK
VOL
VOL
Press MAN/SEK or to advance to next
track. Track numbers show on display.
AUTO-REVERSE
4X25W PLL TUNER
SCAN
REPSCND.UP D.DN RDM
RPT RND
LOUD
XCC 6120CDC CONTROLLER
COMPACT
DIGITAL AUDIO
AMS
CD
Scan (Preview all Tracks)
SCN
2
Press SCN to play first ten seconds
of each track on current CD. SCAN
appears in the display. Press again
to stop SCAN and listen to track.
Repeat the Same Track
REP
3
Press REP to continuously repeat
same track. Press again to stop
repeat.
Random: Play all Tracks
RDM
5
Press RDM to play all tracks
on CD in random order one time.
Press again to stop random play.
LOC
MONO
LOU
MUT
Change Discs
D.UP
1
4
or
XCC6125_EOP.P65 3/14/00, 2:54 PM7
Press D.UP or D.DN to
D.DN
advance to next disc.
Disc numbers show on
display.
7
Page 8

Specifications
FM Tuner
Tuning range...................................................................................................... 87.5 MHz-107.9 MHz
FM mono sensitivity ...................................................................................................................12 dBf
50 dB quieting sensitivity (stereo) ..............................................................................................16 dBf
Stereo separation @ 1 kHz.........................................................................................................40 dB
AM Tuner
Tuning range........................................................................................................... 530 kHz-1720 kHz
Amplifier
Total system power ..................................................................................................... 100 Watts peak
Power output ........................................................................................................... front: 2 x 25 Watts
rear: 2 x 25 Watts
General
Power supply...........................................................................................11-16 VDC, negative ground
Speaker output impedance .................................................................................................. 4-8 Ohms
Fuses ............................................................................................. fast blow AGC (1 amp and 6 amp)
Specifications subject to change without notice.
Limited One Year Warranty–USA and Canada
Length of Warranty. This warranty from Recoton Mobile
Electronics shall be in effect for a period of one year from
the date of the first consumer purchase.
Persons Protected. This warranty will be enforceable by
the original owner and any subsequent owners during the
warranty period so long as proof of date of purchase from
an authorized Jensen dealer is presented whenever
warranty service is required.
What is Covered. Except as otherwise specified below,
this warranty covers all defects in material and workmanship in this product. The following are not covered: damage
resulting from accident, misuse, abuse, neglect, product
modification, improper installation, incorrect line voltage,
unauthorized repair or failure to follow instructions supplied
with the product; damage occurring during shipment (claims
must be presented to the carrier); elimination of car static
or other electrical interferences; any product purchased
outside USA or Canada, or on which the serial number
has been defaced, modified or removed.
How You Can Get Service.
U.S. Purchasers. Please telephone Jensen at
1-800-323-4815. We will either inform you of the name
and address of an authorized Jensen repair station which
will service the product or will advise you to send the
product to a factory service center.
Canadian Purchasers. The product should be returned
to the Jensen dealer from whom it was purchased and
such dealer either will service or arrange for service of
the product.
If shipment of the product is required, it should be packed
securely. The original dated bill of sale must always be
included with the product as proof of warranty coverage.
What We Will Pay For. We will pay for all labor and
material expenses required to repair the product, but you
must pay any labor costs for the removal and/or installation
of the product. If the product is shipped for warranty
service, you must prepay the initial shipping charges, but
Jensen will pay the return shipping charges if the product is
returned to an address inside the USA or Canada.
Limitation of Implied or Statutory Warranties and
Conditions. All implied or statutory warranties and
conditions, including warranties or conditions of merchantability, fitness for particular purposes and non-infringement,
are limited in duration to the length of this warranty.
Exclusion of Certain Damages. Jensen’s liability is
limited to the repair or replacement, at our option, of any
defective product and shall not include incidental or
consequential economic damages of any kind.
Some states and/or provinces do not allow limitations on
how long an implied warranty lasts and/or do not allow the
exclusion or limitation of incidental or consequential
damages, so the above limitations and exclusions may not
apply to you.
This warranty gives you specific legal rights, and you may
also have other rights which vary from state to state and
province to province.
®
XCC6125_EOP.P65 3/14/00, 2:54 PM8
Recoton Mobile Electronics
A Division of Recoton Audio Corporation
A RECOTON
®
COMPANY
1090 Emma Oaks Trail
Lake Mary, Florida 32746
©1998 Recoton Audio Corporation
 Loading...