

Page 1
SERIES
SD1513
Owner's Manual/Manual del Usario/Manual de L'Utilisateur
iPod Ready AM/FM/CD/MP3/
WMA
Receptor iPod AM/FM/CD/MP3/
WMA
SD1513
Recepteur iPod AM/FM/CD/MP3/
WMA
PS/AS
AUX IN
Page 2

SD1513
ii
Page 3

SD1513
Para obtener instrucciones en Español, diríjase a la página 23.
INTRODUCTION
Contents
Operating Instructions............................... 2
Tuner Operation........................................ 6
CD Player Operation................................. 8
MP3/WMA File Requirements.................10
MP3/WMA Operation .............................. 12
Using a USB Device or SD Card............. 14
iPod Operation ........................................ 16
Remote Control....................................... 18
Care and Maintenance............................ 19
Troubleshooting....................................... 20
Specifications.......................................... 21
Toll-Free Installation Assistance
If you require assistance, contact Technical
Support at 1-800-323-4815 from 9:00 a.m. to
6:00 p.m. EST Monday through Friday (U.S.A.
and Canada only).
Pour des instructions en Francais, référez-vous à la page 45.
1
Page 4

OPERATING INSTRUCTIONS
SD1513
5
10
7
19
202123
1
18
22
24
15
14
PS/AS
13
17
25
2
3
4
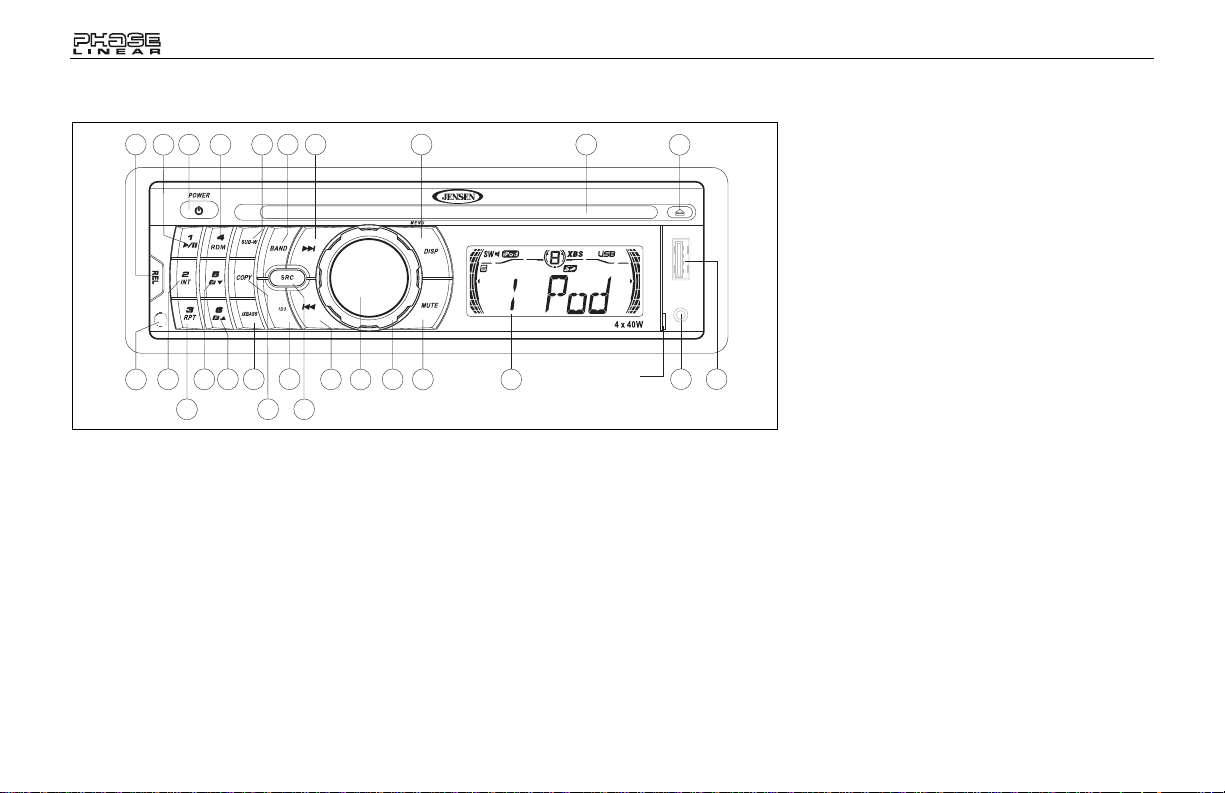
Power
Press the power button (1) or any other
button on the face of the receiver to turn the
unit on when the ignition switch is on. Press the
power button again to turn the receiver off. If
the radio was left on when the ignition was last
turned off, the receiver will turn on automatically
when the ignition switch is again turned on. If
the receiver was off when the ignition was last
turned off, the receiver must be turned on
manually when restarting the vehicle.
9
6
8
SD1513
11
LIFT
12
16 27
Source
Press the SRC button (2) to select a different
mode of operation as indicated on the display
panel. Available sources include Tuner, CD,
SD, USB, and Auxiliary Input. During CD
player operation, pressing SRC will change to
the tuner source without ejecting the disc. To
access the Auxiliary Input source, press the
SRC button until "AUX" is indicated in the
display.
Volume
To increase the volume, turn the AUDIO
CONTROL (3) clockwise. To decrease the
volume, rotate the AUDIO CONTROL counter
clockwise. When volume is adjusted, the
volume level is shown on the display panel as a
number ranging from “00” (lowest) to “46”
(highest).
2
Page 5
SD1513
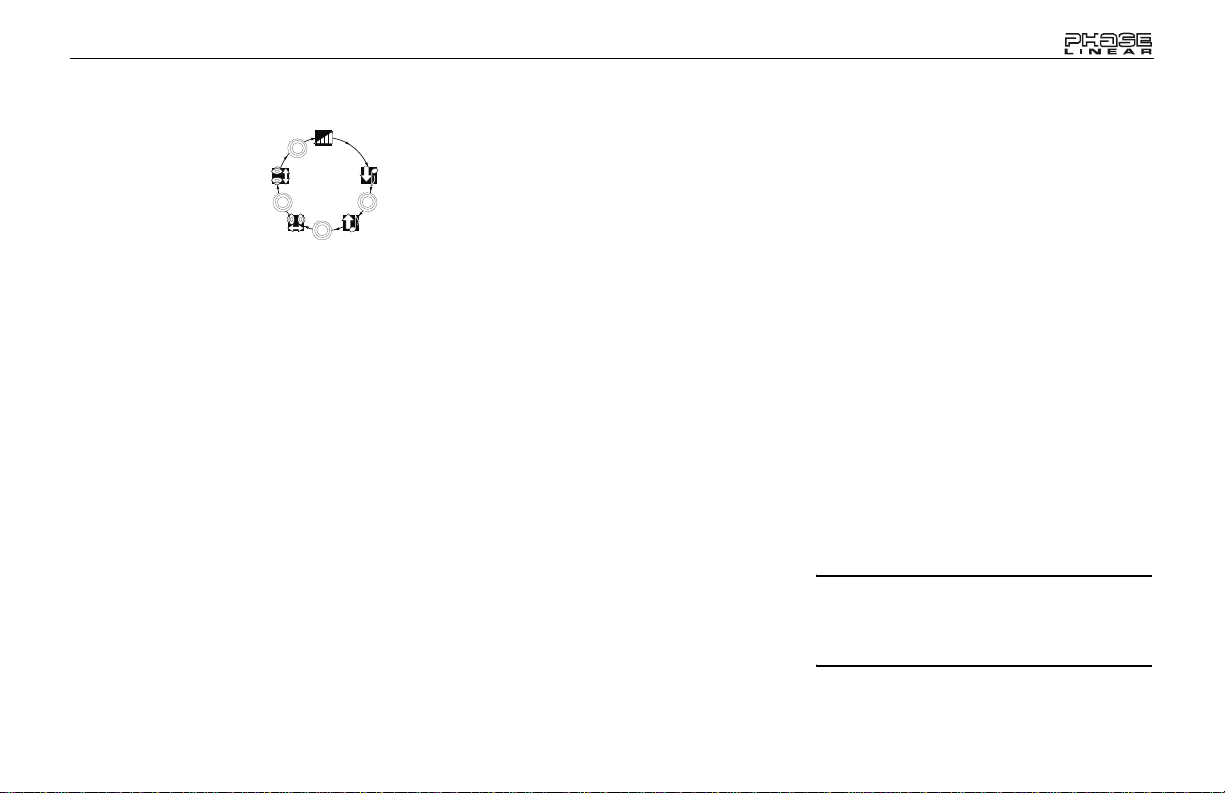
Select
Press the AUDIO
CONTROL button (4)
to step through the
menu of audio
FAD
functions: volume
(VOL), bass (BAS),
treble (TRB), balance
(BAL), fader (FAD),
and volume (VOL). When adjusting audio
functions, the unit will automatically exit select
mode and return to the normal display after five
seconds or when another function is activated.
Bass
Press the AUDIO CONTROL button (4) twice
until “BAS” appears in the display. Within five
seconds, turn the AUDIO CONTROL (3)
clockwise or counter clockwise to adjust the
bass from “-6” to “+6”. “0” represents a flat
response. The bass level is shown on the
display for five seconds or until another function
is activated.
Treble
Press the AUDIO CONTROL button (4) three
times until “TRB” appears in the display. Within
five seconds, turn the AUDIO CONTROL (3)
clockwise or counter clockwise to adjust Treble
from “-6” to “+6”. “0” represents a flat response.
The treble level is shown on the display for five
seconds or until another function is activated.
BAL
VOL
VOL
D
A
F
E
R
T
S
A
B
L
A
B
P
U
S
H
S
E
L
E
C
T
BAS
D
D
A
F
E
R
T
S
A
B
L
A
B
P
U
S
H
S
E
L
E
C
T
A
F
E
R
T
S
A
B
L
A
B
P
U
S
H
S
E
L
E
C
T
D
A
F
E
R
T
S
A
B
L
A
B
TRB
P
U
S
H
S
E
L
E
C
T
Balance
Press the AUDIO CONTROL button (4) four
times until “BAL” appears in the display. Within
five seconds, turn the AUDIO CONTROL (3)
clockwise (or counter clockwise) to adjust
Balance between the right and left speakers
from “BAL R12” (full right) to “BAL L12” (full
left). “BAL C00” represents an equal balance
level between the right and left speakers. The
balance position is shown on the display for five
seconds or until another function is activated.
Fader
Press the AUDIO CONTROL (4) five times until
“FAD” appears in the display. Within five
seconds, turn the AUDIO CONTROL (3)
clockwise or counter clockwise to adjust
balance between the front and rear speakers
from “FAD R12” (full rear) to “FAD F12” (full
front). “FAD C00” represents an equal balance
level between the front and rear speakers. The
fader position is shown on the display for five
seconds or until another function is activated.
System Menu
Press and hold the DISP button (9) to
view the system “MENU”. Press the DISP
button repeatedly or use the >>| (14) or |<< (13)
button to access the following MENU options.
Clock (CLK)
Turn the AUDIO CONTROL left to adjust the
hours and right to adjust the minutes.
AREA
Turn the AUDIO CONTROL to select the
appropriate frequency spacing for your area:
USA, LAT (Latin America), EUR (Europe), or
RUS (Russia).
DISTANT/LOCAL
This feature is used to designate the strength of
the signals at which the radio will stop during
automatic tuning. “Distant” is the default setting,
allowing the radio to stop at a broader range of
signals. To set the unit to select only strong
local stations during automatic tuning, turn the
AUDIO CONTROL to choose “Local”.
P-VOL (00-46)
Use the “VOL PGM” option to select the default
volume the radio will assume when first turned
on. To program a specific start-up volume level,
turn the AUDIO CONTROL to select the
desired level.
NOTE: If the P-Vol is set higher than the
volume selected when the unit is turned off,
the unit will resume the lower volume when
turned back on - not the P-Vol.
3
Page 6
SD1513
BEEP ON/OFF
The beep tone feature allows the selection of
an audible beep tone to be heard each time a
button is pressed on the face of the radio. Turn
the AUDIO CONTROL to select from the
following Beep Tone options:
• BEEP ON: Beep is heard any time a
button is pressed (function activated).
• BEEP OFF: Beep is not heard.
iX-BASS
Press the iXBASS button (15) to activate the
iXBASS feature. When listening to music at low
volume levels, this feature will boost the bass
and treble ranges to compensate for the
characteristics of human hearing. Press
iXBASS again to deactivate this feature.
Subwoofer
Press the SUB-W button (18) to activate the
Subwoofer function. Press again to turn the
Subwoofer function off.
NOTE: The Subwoofer feature only works
when an external amplifier and subwoofer
are connected via the Sub line out
connection on the back of the unit.
Audio Mute (MUTE)
Press the MUTE button (6) to mute the audio
volume. “MUTE” flashes on the display. Restore
volume to the previous setting by pressing the
mute button again, adjusting the AUDIO
CONTROL.
Liquid Crystal Display (LCD)
The liquid crystal display (LCD) panel (8)
displays the frequency, time and activated
functions of the unit.
NOTE: After being subjected to cold
temperatures, LCD panels may take longer
to respond and visibility of the numbers on
the LCD may decrease slightly. The LCD
display will return to normal when the
temperature increases to a normal range.
Display (DISP)
When the unit is on, the LCD automatically
shows the display for the current source of
operation.
When the unit is on, press the DISP button (9)
to display the time of day. After five seconds,
the display reverts to the current source.
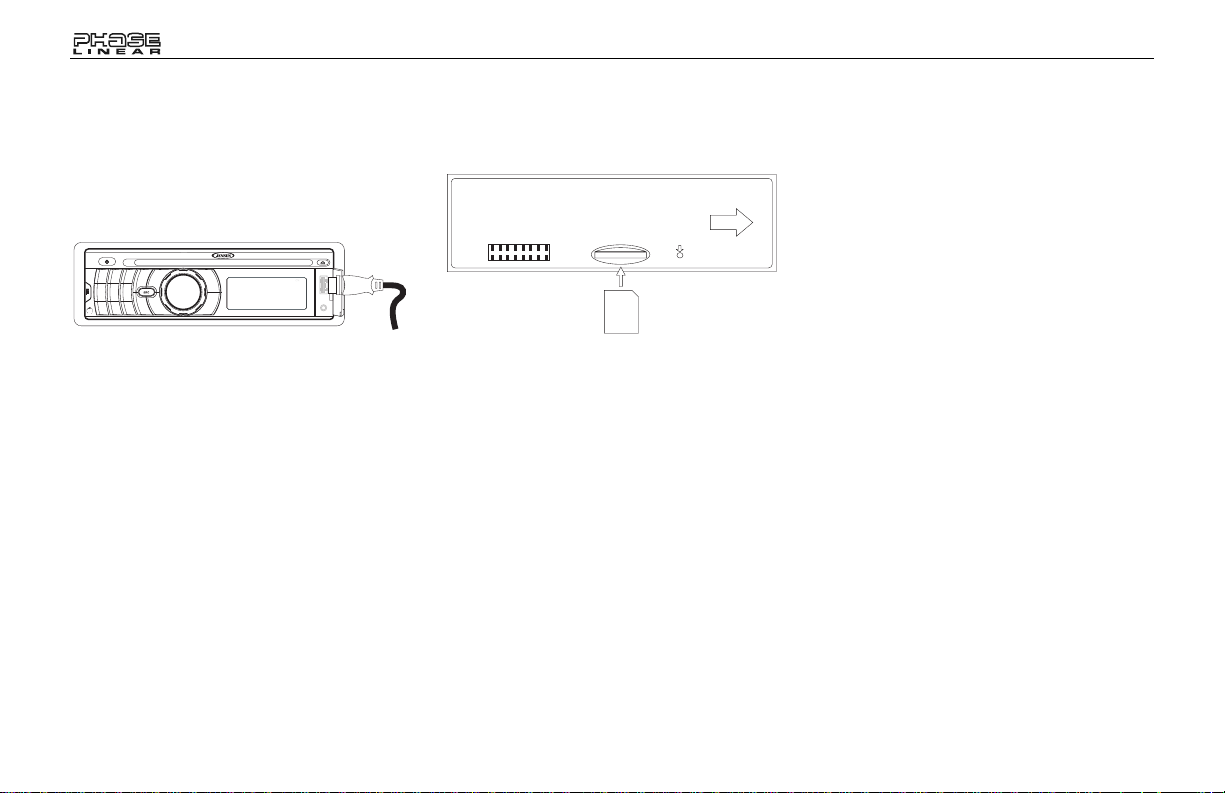
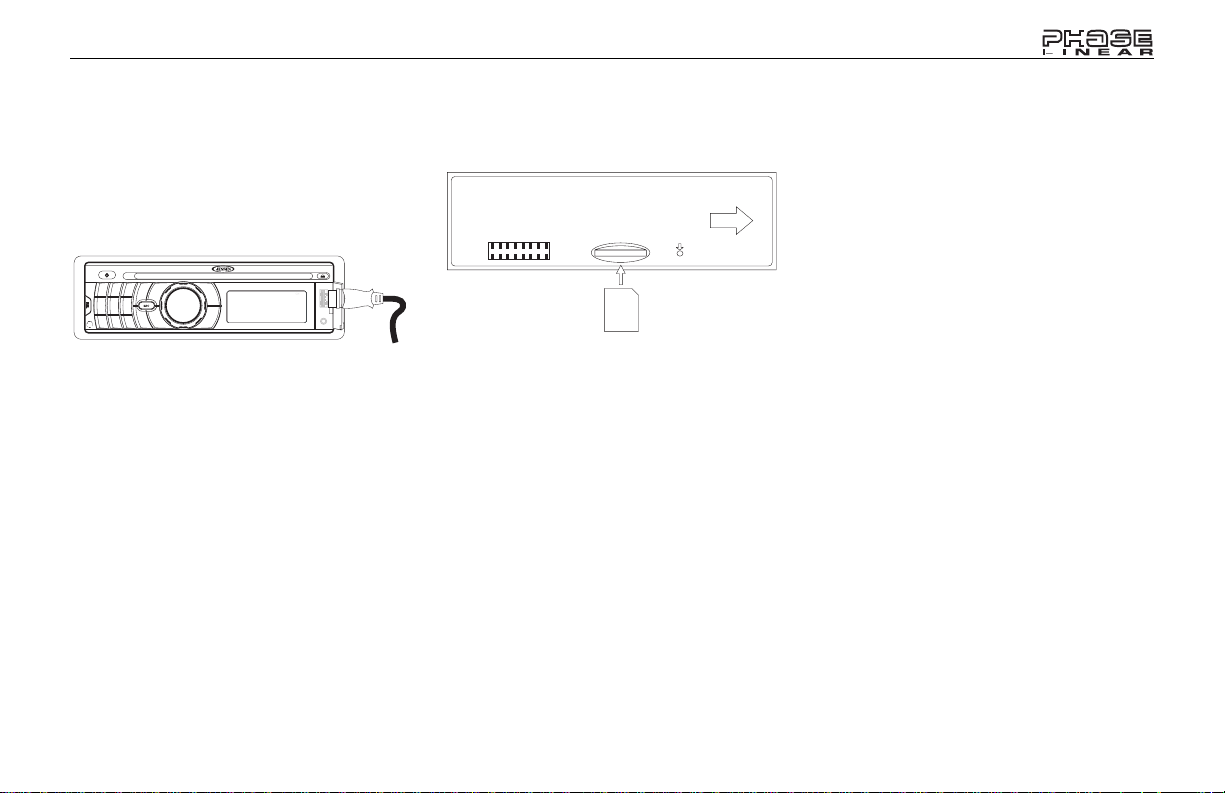
Auxiliary Input
Lift the cover on the right side of the radio to
reveal the AUX IN connector (16). Use the
included 3.5mm media cable to connect a
portable media device for playback through the
vehicle sound system.
Front Panel Release
The front panel REL (release) button (10)
releases the mechanism that holds the front
panel to the chassis.
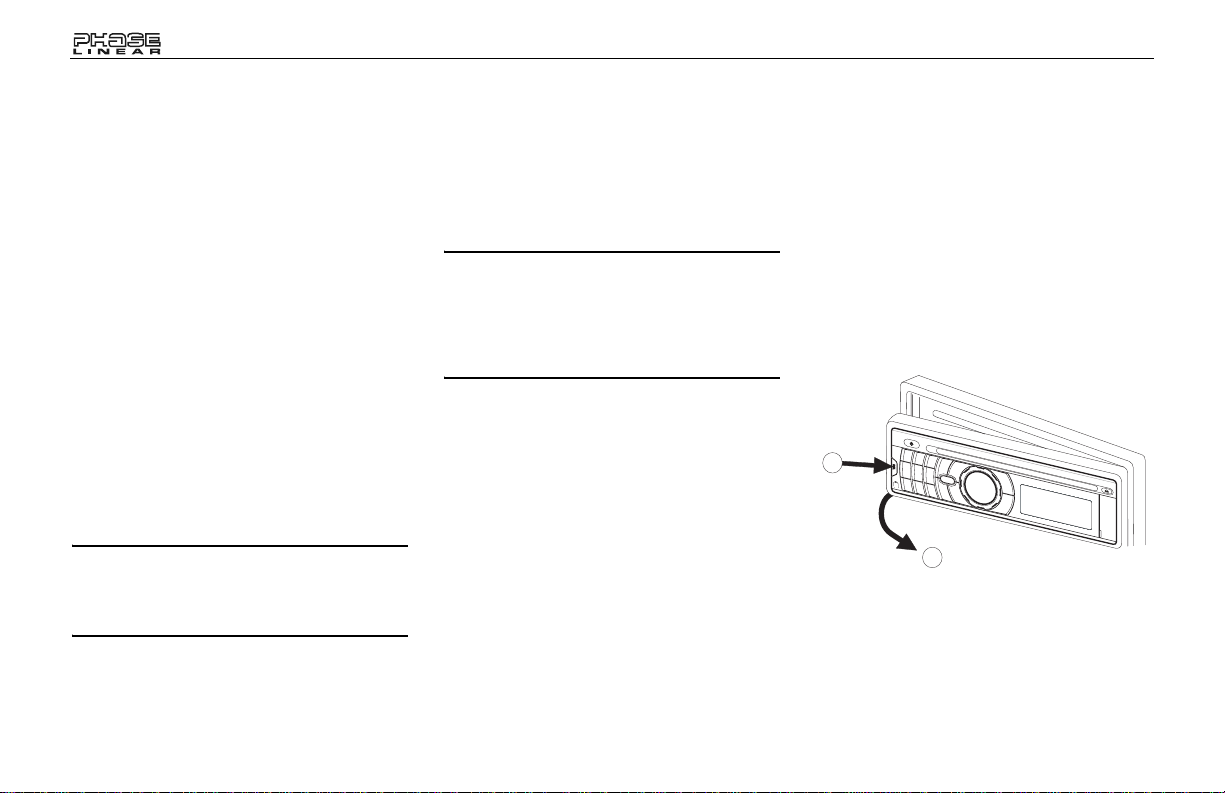
Detaching the Front Panel
To detach the front panel, first press the REL
button (10) to release the left side of the panel.
Next, grasp the released side and pull the panel
off the chassis. After removing the front panel,
store it in the supplied carrying case to protect it
from dirt and damage.
REMOVE FRONT PANEL
1
2
Re-attaching the Front Panel
To re-attach the front panel, make sure the
electrical terminals on the back of the panel are
free of dust and dirt, as debris could cause
intermittent operation or other malfunctions.
Position the right side of the panel in place so
that it is correctly engaged, and then lightly
4
Page 7

SD1513
press the left side of the panel until the panel
locks into place.
Reset Button
The reset button (26) is located on the front of
the chassis and can only be accessed with the
front panel removed. The reset circuitry
protects the microprocessor circuitry. Since
resetting the unit will erase the time and preset
memories, it should only be activated upon
initial installation after all wiring is complete, or
if there is a malfunction of any of the switches
on the unit. In these circumstances, pressing
the reset button will clear the system and return
the unit to normal operation.
RESET
26
5
Page 8

TUNER OPERATION
SD1513
10
7
19
202123
22
1
24
15
14
PS/AS
13
17
25
4
2
5
18
9
3
6
8
SD1513
11
LIFT
12
16 27
6
Page 9

SD1513
AM/FM Band Selector (BAND)
Press the BAND button (5) during radio play to
switch between three FM bands and two AM
bands. “F1”, “F2”, “F3” or “AM”, “AM2” will
appear in the display to indicate the band
currently selected.
Tuning
Automatic Tuning
Press the >>| button (14) to tune upward in
frequency and the |<< button (13) to tune
downward in frequency. The unit will
automatically stop at the next strong station. If
the Local mode is active, the radio will seek the
next strong local station when either button is
pressed.
Manual Tuning
Press the >>| (14) or |<< (13) button for more
than two seconds to select manual tuning
mode. “MANUAL” will appear in the display.
Press the Up or Down Tuning buttons to move
radio frequency up or down two digits at a time.
Press and hold the Up or Down Tuning buttons
to quickly advance to a certain frequency.
Release when the desired frequency is
reached. If tuning is not adjusted within five
seconds of entering manual tuning mode, the
radio will revert to automatic tuning and “AUTO”
will appear in the display.
Preset Stations
Up to six stations on each band can be stored
as presets and can then be instantly recalled by
pressing the associated preset button on the
front panel (19-24) or remote control. T o store a
station, turn the radio on and select the desired
band and station. Press and hold the desired
preset button (numbered one through six on the
face of the radio or remote control) for more
than two seconds. When stored, the preset
number will appear in the display. The station is
now stored and can be recalled at any time by
pressing the corresponding preset button.
Repeat for the remaining five presets on the
current band and for all presets on the other
three bands.
Preset Scan/Automatically Store
(PS/AS)
Automatically Store
Select six strong stations and store them for
the current band using the Automatic Store
feature. To enable this feature, press and hold
the PS/AS button (17) for more than two
seconds. The radio will automatically scan each
band and enter strong stations into the preset
memory positions. After entering the stations
into memory, the unit will automatically stop at
each station for five seconds so each can be
heard. When using the Automatically Store
feature, the new stations replace any stations
already stored in preset memory.
Preset Scan
Press the PS/AS button (17) to scan the six
preset stations in the AM band or all FM bands.
The unit will stop at each station for five
seconds before continuing to the next preset
station, and the preset number will flash on the
display during the preset scan. Press PS/AS
again to stop scanning and listen to the current
station.
7
Page 10

CD PLAYER OPERATION
SD1513
5
10
7
19
202123
1
18
22
24
15
14
PS/AS
13
17
25
2
3
4
Insert CD
With the label surface facing up, gently insert
the disc into the CD slot (11) until the softloading mechanism engages and pulls the disc
in. Disc play begins. The track number and
elapsed time appear in the display.
Track Select
Track select features are used to quickly
access the beginning of a particular track when
a disc is in play. Press the >>| button (14) to
move forward or the |<< button (13) to move
backward on the disc to locate the desired
9
6
8
SD1513
11
LIFT
12
16 27
track. Track numbers will appear in the display
as they are accessed.
Press and hold the >>| or |<< button to fast
forward or fast reverse through a disc. During
either function, the elapsed time will appear on
the display. Release the button to resume CD
play.
Play/Pause
Press the play/pause button (19) to suspend
disc play. “PAUSE” will appear in the display.
Press the play/pause button again to resume
disc play. The “PAUSE” indication will
NOTE: The unit is designed for play of
standard 5” (12 cm.) compact discs only. Do
not attempt to use 3” (8 cm.) CD singles in
this unit, either with or without an adaptor,
as damage to the player and/or the disc may
occur. Such damage will not be covered by
the warranty on this product.
disappear from the display, and play will
resume from the pausing point.
Disc Intro Scan (INT)
During disc play, press the 2 INT button (20) to
play the first 10 seconds of each track on the
disc. “INT” will appear in the display. When the
desired track is reached, press 2 INT again to
end the scan function and play the selected
track. “INT” will disappear from the display. The
scan function will also be canceled when
activating the repeat or shuffle functions.
8
Page 11

SD1513
Disc Repeat (RPT)
Press the 3 RPT button (21) during disc play to
continuously repeat the selected track. “RPT”
will appear in the display. Press 3 RPT again to
stop repeating.“RPT” will disappear from the
display, and regular play will resume. The
repeat function will also be canceled when
activating the scan or shuffle functions.
Disc Shuffle (RDM)
Press the 4 RDM button (22) during disc play to
play all tracks on a CD in random, shuffled
order. “RDM” will appear in the display. Press 4
RDM again to stop random play. “RDM” will
disappear from the display and regular play will
resume. The shuffle function will also be
canceled when activating the scan or repeat
functions.
Disc Eject
Press the eject button (12) to stop CD play and
eject the disc. The unit will change to tuner or
AUX operation, depending on which mode was
in operation prior to disc play. If the disc is not
removed from the unit within 15 seconds, the
disc will be reloaded to prevent accidental
damage. Disc play can be resumed by pressing
SRC (2) to choose the CD player function.
CD Player Error Codes
If a problem should develop while operating the
CD player, “Disc Error” or “Error 1” may appear
on the display panel. If “Disc Error” appears, try
ejecting and reloading the disc into the player.
While the disc is out of the unit, make sure it is
clean and undamaged, and then load it
correctly. “Error 1” can indicate a number of
problems with the unit, including a mechanical
error or an error in the microprocessor control
of the player. Pressing the reset button (26)
may help, but will erase the time and preset
memory. If the suggested measures do not
solve the problem, contact an approved
warranty station near you for further assistance.
9
Page 12

MP3/WMA FILE REQUIREMENTS
MP3 and WMA (Windows Media Audio) music
files are digital audio files that are compressed
to allow more files on a single CD. This unit can
play MP3/WMA directly from files contained on
a CD-R/RW, USB device or SD card using the
buttons on the receiver (or remote control) as
described below. Many types of software are
available for converting audio files into MP3/
WMA formats. Phase Linear recommends Nero
or Roxio Easy CD Creator. Depending on the
media type and recording method, some CD-R/
RWs may be incompatible with this unit. The
unit supports playback of MP3/WMA and CDDA
(CDA), Mixed-Mode CDs and CD-Extra
(including multi-session discs), but discs on
which the session has not been closed will
not play.
Notes on MP3/WMA Play
This unit can play MP3 (MPEG1, 2, 2.5 Audio
Layer 3). However, the MP3 recording media
and accepted formats are limited. When writing
MP3/WMA, pay attention to the following
restrictions.
Acceptable Media
The MP3/WMA recording media acceptable to
this unit are CD-ROM, CD-R and CD-RW.
When using CD-RW, use full format rather than
quick format to prevent malfunction.
Acceptable Disc Formats
The following formats are available for the
media used in this unit. The maximum number
of characters used for file name including the
delimiter (".") and three-character extension are
indicated in parentheses.
• ISO 9660 Level 1 (11 characters)
• ISO 9660 Level 2 (31 characters)
• Joliet (31 characters)
• Romeo (31 characters)
Up to 200 characters can be displayed in the
long file name format. For a list of available
characters, see the instruction manual of the
writing software and the section “Entering File
and Folder Names” below. The media
reproducible on this unit has the following
limitations:
• Maximum number of nested folders: 8
• Maximum number of files per disc: 999
• Maximum number of folders per disc: 255
MP3/WMA written in formats other than those
listed above will not play successfully and their
file names or folder names will not be displayed
properly.
SD1513
MP3/WMA Encoder and CD
Writer Settings
Use the following settings when compressing
audio data in MP3 data with the MP3 encoder.
• Transfer bit rate: 32 - 320 kbps
• Sampling frequency: 32, 44.1, 48kHz
(WMA) and 16, 22.05, 24, 32, 44.1, 48kHz
(MP3)
When using a CD writer to record MP3/WMA up
to the maximum disc capacity, disable
additional writing. T o record an empty disc up to
the maximum capacity at once, select the “disc
at once” option.
10
Page 13
SD1513
Entering ID3 Tag
This unit supports ID3 tag versions 1.0 and 1.1.
For the character codes, refer to the table
below.
Entering File and Folder Names
Names using the code list characters are the
only file names and folder names that can be
entered and displayed. Other characters will not
display correctly. The unit recognizes and plays
only files with the MP3/WMA extension.
NOTE: A file name entered with characters
not on the code list may not play correctly.
Writing Files into a Disc
When a disc containing MP3/WMA data is
loaded, the unit checks all data. If the disc
contains many folders or non-MP3/WMA files,
MP3/WMA play will be delayed, it may take
time for the unit to move to the next file, and
searches may not be performed smoothly.
Loading such a disc may produce loud noise
and cause damage to the speakers.
NOTE: Do not attempt to play a disc
containing a non-MP3/WMA file with the
MP3/WMA extension or a disc containing
non MP3/WMA files.
Electronic Shock Protection
• 10 seconds for CDDA (CDA)
• 60 seconds for MP3/WMA recorded at
44.1kHz, 128kbps
Bit Rates
The unit supports bit rates from 32 - 320 kbps.
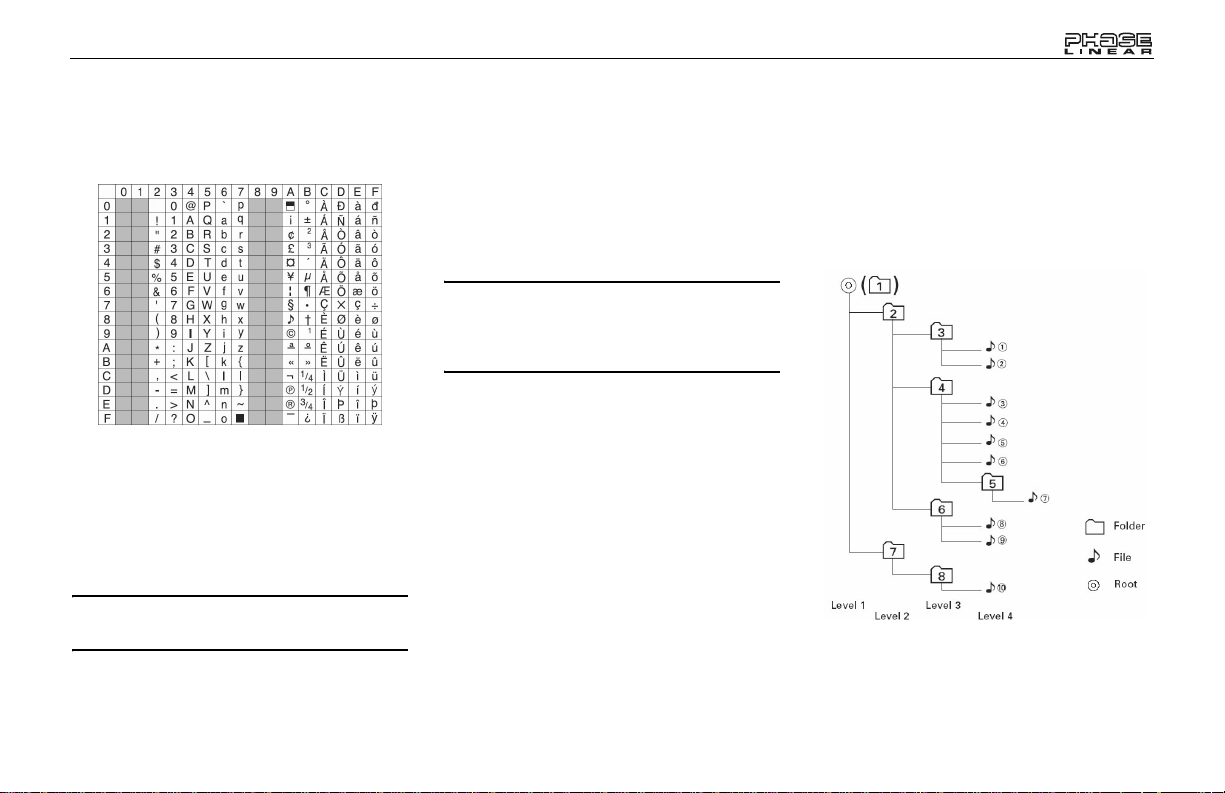
File Playing Order
When selected for play, files and folders (Folder
Search, File Search or Folder Select) are
accessed in the order they were written by the
CD writer. As a result, the order in which they
are expected to be played may not match the
order in which they are actually played.
You may be able to set the order in which MP3/
WMA are to be played by writing them onto a
disc such as a CD-R with their file names
beginning with play sequence numbers such as
"01" to "99".
For example, a disc with the following folder/file
hierarchy is subject to Folder Search, File
Search or Folder Select as shown below.
11
Page 14
MP3/WMA OPERATION
SD1513
5
10
7
19
202123
1
18
22
24
15
14
PS/AS
13
17
25
2
3
4
Pause
Press the 1 >/|| button (19) to suspend disc
play. Press the play/pause button again to
resume play.
Track Select
Press the >>| (14) or |<< (13) button for less
than one second to advance to the next track
on the disc, or press and hold to fast forward or
fast reverse through the disc. Disc play starts
when the button is released.
9
6
8
SD1513
11
LIFT
12
16 27
Navigating Folders
Press the 5 \/ and 6 /\ buttons (23, 24) to select
the next or previous folder/directory.
Intro Scan (INT)
During disc play, press the 2 INT button (20) to
play the first 10 seconds of each track on the
disc. When the desired track is reached, press
2 INT again to end the scan and play the
selected track.
Repeat (RPT)
Press the 3 RPT button (21) to repeatedly play
the current file. Press 3 RPT again to resume
normal playback.
Random (RDM)
Press the 4 RDM button (22) to randomly play
all files on the disc. Press 4 RDM again to
resume normal playback.
12
Page 15

SD1513
MP3/WMA File or Folder Search
The unit offers two methods of searching for
files or folders:
Direct File Number Search
Press the BAND button (5). The LCD will
display "Number". Turn the AUDIO CONTROL
to select the desired track number, then press
the AUDIO CONTROL to confirm and play the
selected file.
Navigation Search
Press the BAND button (5) twice. The LCD will
display "File". Turn the AUDIO CONTROL to
navigate through all folders and sub-folders on
the disc. The folder names will be displayed on
the LCD. Press the AUDIO CONTROL to
access the sub-folders or files. Turn the AUDIO
CONTROL to navigate, then press the select
knob to confirm and begin file play. During
navigation search, turn the AUDIO CONTROL
counter-clockwise to return to the previous
folder level.
Display Information
Press the DISP button (9) to display the clock
or available ID3 information, as follows: song
title, directory name, artist name, etc.
13
Page 16
USING A USB DEVICE OR SD CARD
Loading a USB Device
USB devices can be played through the USB
connector on the front panel. T o access files on
a USB device, insert the USB device as
indicated below:
After inserting an USB device containing MP3
or WMA files, “USB HOST” appears on the
display and the unit will automatically scan the
card for music files and begin playback.
To eject the USB device, press the SRC button
(2) to select a different source. Pull the USB
device straight out and return the cover to the
closed position.
Loading an SD Card
To insert an SD card, you must first remove the
front panel to reveal the SD card slot (see
“Front Panel Release” on page 4). Insert your
SD Card as illustrated below and then reinstall
the front panel.
After inserting an SD card containing MP3 or
WMA files, “SD/MMC” appears on the display
and the unit will automatically scan the card for
music files and begin playback.
To eject the SD card, remove the front panel
and then press in on the SD card to release it.
Pull the SD card straight out and replace the
front panel.
Navigating Files
Please refer to “MP3/WMA Operation” on
page 12 for information regarding directory
navigation and file searching.
RESET
SD1513
Copying Music
Your SD1513 is equipped with a Copy feature
that allows you to copy an MP3 or WMA file to
an SD/MMC card or USB device. To copy
music, perform the following steps:
1. Insert a disc and select the track you
would like to copy.
2. Press the COPY button (25) to activate the
Copy feature.
3. Turn the AUDIO CONTROL (3) to select
the USB or CARD (SD/MMC) source.
4. Press the AUDIO CONTROL button (4) to
begin copying.
• The unit will begin copying the
current file, starting at the beginning
of the track. The LCD will display
“>>> ##”. Copying will stop at the
end of the file.
• The recorded information is stored in
a folder named “MY_MP3” or
“MY_WMA” on the destination
source.
• Copying will stop and the unit will
display “Memory Full” if the selected
storage device is full.
To stop copying before the file is complete,
press the COPY button. The LCD will display
“STOP” and the incomplete track will be deleted
from the destination folder.
14
Page 17

SD1513
NOTE: Never remove a USB device during
recording or music transfer. This may
damage the device or cause the system to
lock up. Do not switch modes or turn the
radio power or ignition off while recording.
Erasing Copied Files
You can erase copied files from a USB device
or SD/MMC card while the file is playing, or
after selecting the file in Number Search or
Navigation Search mode. To erase a file,
perform the following steps:
1. Press and hold the BAND button (5) to
activate the Erase function. The LCD will
display “ERASE 010”.
2. Press the AUDIO CONTROL button (4) to
select Erase mode.
3. Turn the AUDIO CONTROL (3) and select
“Y” to erase (or select “N” to cancel the
erase function).
4. Press the AUDIO CONTROL button to
confirm. The file will stop playback (if
playing) and will be erased. When
finished, the system will display
“ERASE OK”.
File Management
Music recorded or transferred using the
SD1513 will be stored in the default folders
listed below:
• MY_MP3: Transferred MP3 files.
• MY_WMA: Transferred WMA files.
Recorded/transferred music is stored in the
corresponding folder and given the following
naming convention: “XX0001.MP3”, where XX
is the name of the source (i.e. SD0001.MP3).
15
Page 18

iPod OPERATION
Accessing iPod Mode
This unit is equipped with an iPod ready
function that will allow you to control and charge
your iPod (if compatible) using the front panel
control buttons.
The unit will automatically switch to iPod mode
when an iPod is plugged into the iPod cable.
8 Din iPod Ready Cable
HEAD UNIT
iPod
iPod iPod
photo
To return to the iPod menu from any other
source menu, press the SRC button (2) on the
front panel or remote control until “iPod”
appears on the display.
mini
iPod
nano
iPod Cable
NOTE: The SD1513 will not select video files
regardless of whether or not a video file was
the last file playing when the iPod was
plugged into the radio. Only music files are
supported.
Turning the iPod On/Off
The iPod power turns on automatically when
the iPod is connected to 30-pin iPod cable, as
long as the automobile ignition is turned on.
You can turn the iPod off by disconnecting it
from the cable or by turning the ignition off.
When the ignition is turned off, the iPod will
pause and then enter sleep mode after 2
minutes. The iPod cannot be turned on/off from
the iPod itself while connected.
NOTE: The iPod will continuously recharge
when connected to unit, as long as the
vehicle ignition is turned on.
Viewing Playback Information
Press the PS/AS button (17) to display iPod
playback information in the following order:
• Song Title
•Artist
•Album Name
SD1513
•Elapsed Time
Play/Pause
Press the 1 >/|| button (19) to suspend or
resume play.
Track Selection
Select a Track
Press the >>| (14) or |<< (13) button for less
than 1 second to advance to the next song in
the current folder.
Fast Forward / Fast Reverse
Press and hold the >>| (14) or |<< (13) button
button for more than 1 second to fast forward or
fast reverse. Playback begins when the button
is released.
Repeat (RPT)
Press the 3 RPT button (21) during disc play to
continuously repeat the selected song. Press
3 RPT again to stop the repeat function.
Press and hold the 3 RPT button (21) for more
than 3 seconds to continuously repeat the
entire album/folder. Press and hold 3 RPT
again to stop the repeat function.
16
Page 19

SD1513
Shuffle (RDM)
Press the 4 RDM (22) button to randomly play
all files in the current folder/album. Press
4 RDM again to resume normal play. Press and
hold 4 RDM for more than three seconds during
iPod playback to randomly play the songs in all
folders. Press 4 RDM again for more than three
seconds to resume normal play.
Searching Mode
During iPod playback mode, press the BAND
button (5) to enter iPod Searching Mode. Press
the BAND button repeatedly to access search
modes in the following order:
• Playlist
•Artist
• Album
• Song
•Genre
After selecting the desired search mode, press
the AUDIO CONTROL button (4) within 10
seconds to confirm the search mode. Rotate
the rotary encoder knob to navigate through the
Album, Artist or Songs contained on your iPod.
Press the AUDIO CONTROL to play the
selected song. During the searching mode,
press PS/AS to quickly return to the top level of
the Album, Playlist, Genre, etc.
17
Page 20
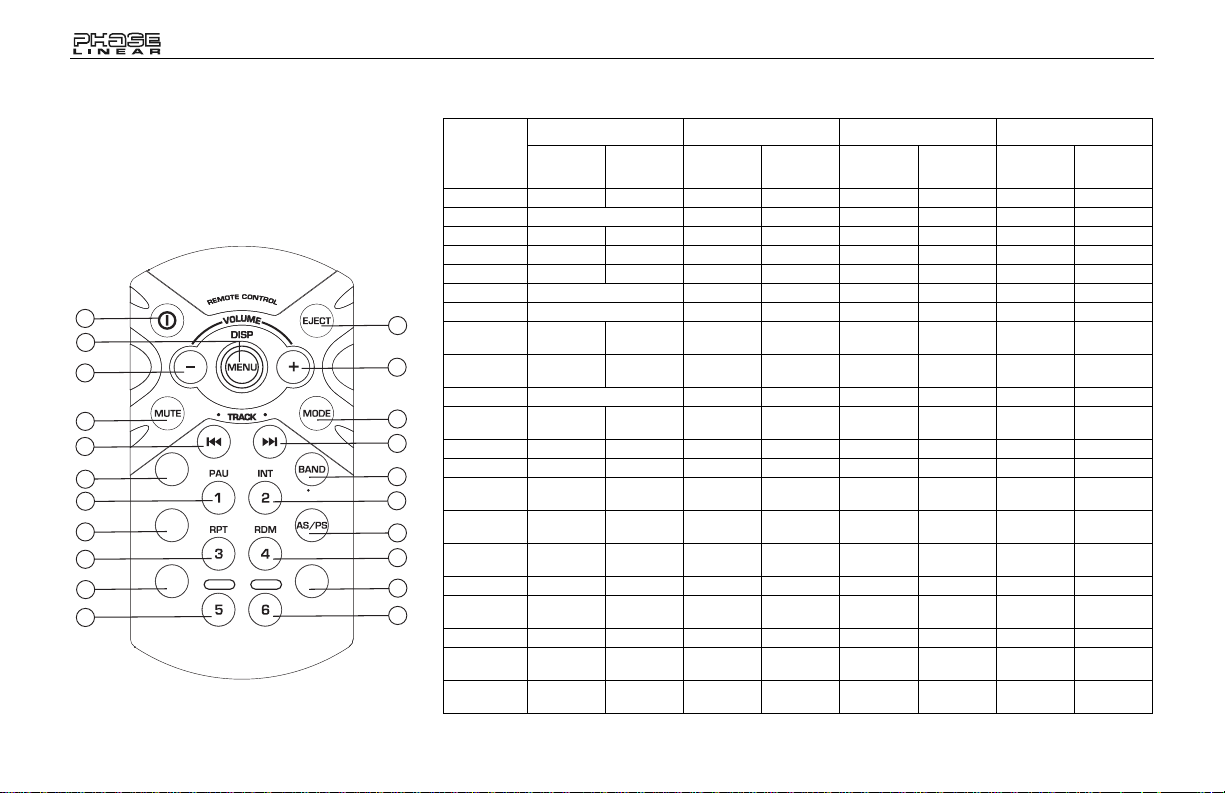
REMOTE CONTROL
The remote control will allow you to control the
basic functions of the SD1513.
The remote control sensor is located on the left
side of the front panel to the left of the 3 RPT
button (21).
1
3
7
5
9
10
12
18
14
20
16
AUDIO
ENTER
SUB-W
REC
COPY
F- DN
F- UP
E
H
R
A
R
S
A
E
E
S
ID3
XBS
11
C
13
19
15
21
17
SD1513
SYSTEM TUNER CD/MP3/WMA iPod
KEY
1 Power
2Eject
3 Display Menu
4Mode
5Mute
6 Volume Up
2
6
7 Volume Down
8 Seek Up Tune Up Track/File UpFast
9 Seek Down Tune Down Track/File
10 Audio Menu Enter Enter
4
8
11 Band File/Folder
12 M1 Memory 1 Pause/Play Pause/Play
13 M2 Memory 2 Intro Folder Intro
14 M3 Memory 3 Repeat Folder
15 M4 Memory 4 Random Random
16 M5 Memory 5 Folder
17 M6 Memory 6 Folder Up
18 Subwoofer
19 PS AS ID3 Info
20 Record/
21 iX-Bass on/
Short
Press
on/off
Copy
off
Long
Press
Short
Press
Long
Press
Short
Press
Down
Search
Down
Long
Press
Forward
Fast
Reverse
File Erase iPod
Repeat
Folder
Short
Press
File Up Fast
File Down Fast
Search
Repeat Album
Shuffle Album
Long
Press
Forward
Reverse
Repeat
Shuffle
18
Page 21

SD1513
CARE AND MAINTENANCE
CD Player
The following guidelines will help you extend
the life of your CD player:
1. When cleaning the vehicle interior, do not
get water or cleaning fluids on the unit.
2. The CD player will not operate properly in
extreme hot/cold or under damp
conditions. In case of such conditions, wait
until the vehicle interior reaches a normal
temperature or any condensation on the
disc player lens has evaporated before
using the player.
3. Never insert anything other than round 5”
CDs into the player. Attempting to insert
CDs of other sizes (even with an adaptor)
will cause damage not covered by the
warranty.
4. Always remove the CD when the player is
not is use.
5. The unit is designed with a vibration
dampening CD mechanism to minimize
interruption of disc play due to normal
vibration in a moving vehicle. However,
occasional sound skips may occur when
driving on very rough roads. This will not
scratch or damage the disc, and normal
play will resume when the rough
conditions cease.
Compact Discs
CD-R / CD-RW
Depending on media type and method of
"recording / burning", some CD-R/RWs may be
incompatible with this unit. After "recording /
burning" the session
refer to your software's recommended
procedures for closing a disc / session. Review
your recording software to familiarize yourself
with the correct "recording / burning"
procedures. We recommend using the latest
versions of ROXIO
software.
In addition, this unit will only recognize the
CDDA (Compact Disc Digital Audio), .MP3
and .WMA formats "recorded / burned" onto a
CD-R/RW. This unit does not support .WAV,
.OGG or other formats.
CD Care and Handling
Dirt, dust, scratches and warpage can cause
skips in the playback and deterioration of sound
quality. Please follow these guidelines to take
care of your compact discs.
1. Carefully wipe fingerprints, dust and dirt
from the disc’s playing surface with a soft
cloth. Wipe in a straight motion from the
inside to the outside of the disc.
must be closed. Please
TM
or NEROTM burning
2. Never use chemicals such as record
sprays or household cleaners to clean
CDs, as they can irreparably damage the
disc’s surface.
3. Discs should be kept in their storage
cases when not in use.
4. Do not expose discs to direct sunlight,
high temperatures or high humidity for
long periods.
5. Do not stick paper, t ape or CD labels on
disc surfaces, as internal damage may
occur.
19
Page 22
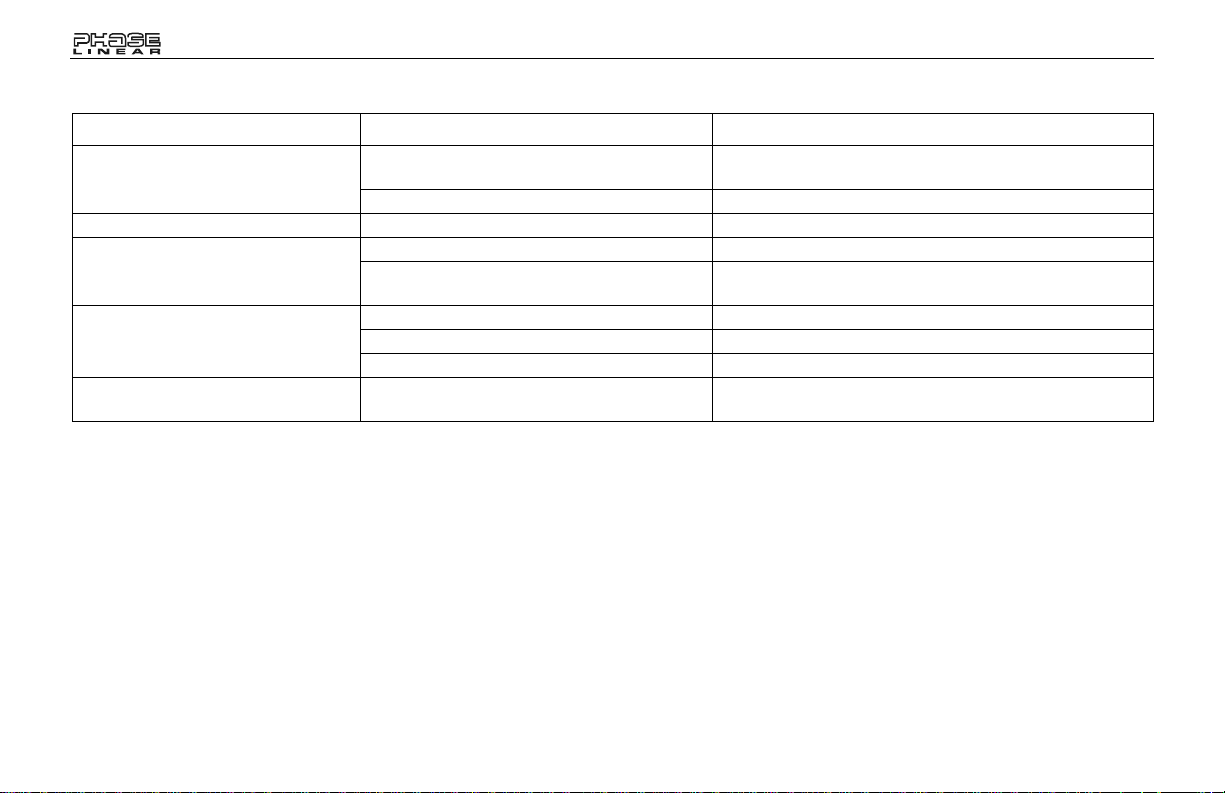
TROUBLESHOOTING
Problem Cause Corrective Action
Does not operate (display does not
light)
No power to unit Inline fuse blown Check/replace fuse.
Not all speakers operate Incorrect splices or connections Check all splices and connections.
Blows fuses Power wire shorting to ground Make sure wire is not pinched.
CD skips too much Receiver mount is not solid or backstrap is not
No power to yellow wire; no power to red wire Check connection with test light; check vehicle fuse with test
Inline fuse blown Replace fuse.
Speaker wires shorting to chassis ground or to
each other
Speaker wires shorting to ground Make sure wire is not pinched.
Incorrect fuse or fuse too small Install fuse of correct rating.
secure
light.
Check splices; insulate all bare wires.
Check mounting and backstrap; tighten if needed.
SD1513
20
Page 23

SD1513
SPECIFICATIONS
CEA Power Ratings
Power output: 13 watts RMS X 4 channels into
4-ohms @ <
Signal to noise ratio: 70dBA below reference.
(Reference: 1 watt, 4-ohms)
Frequency response: 20Hz to 20kHz (-3dB),
Auxiliary input used as source reference
Reference supply voltage: 14.4VDC
CD Player
Signal-to-noise ratio: >90dBA
Frequency response: 20Hz-20kHz, -3dB
Channel separation: >55dB @ 1kHz
D/A converter: 1 Bit/CH
FM Tuner
Tuning range (USA): 87.5MHz - 107.9MHz
Tuning range (Europe): 87.50MHz-108.00MHz
Mono sensitivity: 12dBf
50dB quieting sensitivity (stereo): 16dBf
Stereo separation @ 1kHz: >35dB
1% THD+N
Frequency response: 30Hz-14kHz. +
AM Tuner
Tuning range (USA): 530 kHz - 1710 kHz
Tuning range (Europe): 522kHz-1620kHz
Sensitivity @ 20dB signal to noise: 30uV
Frequency response: 50Hz-2kHz., -3dB
Auxiliary Input
Input sensitivity: 400mV RMS for 1 watt RMS
into 4-ohms
Frequency response: 20Hz to 20kHz, -3dB
Input impedance: 10 k-ohms
General
Power supply: 11-16 VDC, negative ground
Power Antenna (Blue): 500mAmp Max, current
limited protection.
Operating Temp: -10C~60C
Fuses: 15 amp fast blow ATO
DIN chassis dimensions: 2"H x 7"W x 7"D
(51mm x 178mm x 178mm)
Specifications subject to change without
notice.
3dB
21
Page 24

SD1513
22
Page 25

SD1513
For instructions in English, see page 1.
INTRODUCCIÓN
Contenido
Instrucciones de Funcionamiento............ 24
Operación de Sintonizador...................... 28
Operación del Reproductor de CD.......... 30
Requisitos de Archivo MP3/WMA ........... 32
Operación de MP3/WMA......................... 35
Cómo usar un Dispositivo USB
o Tarjeta SD............................................. 37
Operación de iPod................................... 39
Control Remoto....................................... 41
Cuidado y Mantenimiento........................ 42
Resolución de Problemas ....................... 43
Especificaciones...................................... 44
Línea Gratuita de Asistencia de
Instalación
Si requiere asistencia, contacte al Soporte
Técnico al 1-800-323-4815 de 9:00am a
6:00pm EST De Lunes a Viernes (sólo EE.UU.
y Canadá).
Pour des instructions en Francais, référez-vous à la page 45.
23
Page 26

INSTRUCCIONES DE FUNCIONAMIENTO
SD1513
5
10
7
19
202123
1
18
22
24
15
14
PS/AS
13
17
25
2
3
4
Encendido
Presione el botón de Encendido (1) o
cualquier otro botón en el frente del receptor
para encender la unidad cuando el interruptor
de encendido está en ON. Presione el botón
de encendido (1) nuevamente para apagar la
unidad. Si la radio quedó encendida cuando se
apagó el encendido, el receptor encenderá
automáticamente cuando el interruptor de
encendido se vuelve a colocar en ON. Si el
receptor estaba apagado cuando se apagó el
encendido, el receptor debe encenderse
manualmente cuando rearranca el vehículo.
9
6
8
SD1513
11
LIFT
12
16 27
Fuente
Presione SRC (2) para seleccionar un modo
distinto de funcionamiento como se indica en el
panel de muestra. Las fuentes disponibles
incluyen Sintonizador, CDSD, USB, y entrada
Auxiliar. Durante la operación de reproductor
de CD, presionando SRC cambiará a la fuente
de sintonizador si expulsa el disco. Para
acceder la fuente de Entrada Auxiliar, presione
el botón SRC hasta que se indique "AUX" en la
pantalla.
24
Volumen
Para aumentar el volumen, girar el CONTROL
DE AUDIO (3) en sentido horario. Para
disminuir el volumen, girar el CONTROL DE
AUDIO en sentido anti horario. Cuando se
ajusta el volumen, el nivel de volumen se
mostrará en el panel de pantalla como un
número que varía desde "00" (más bajo) a “46”
(más alto).
Page 27

SD1513
Seleccionar
Presione el botón
CONTROL DE
AUDIO (4) para
pasar por el menú de
FAD
funciones de audio:
volumen (VOL),
graves (BAS),
agudos (TRB),
balance (BAL), fader (FAD), y volumen (VOL).
Cuando ajusta funciones de audio, la unidad
automáticamente saldrá del modo seleccionar
y volver a la muestra normal después de cinco
segundos o cuando otra función se activa.
Graves
Presione el botón CONTROL DE AUDIO (4)
dos veces hasta que aparezca “BAS” en la
pantalla. Dentro de los cinco segundos, gire el
CONTROL DE AUDIO (3) en sentido horario o
anti horario para ajustar los graves de “-6” a
“+6”. “0” representa una respuesta plana. El
nivel de graves es mostrado en la pantalla por
cinco segundos o hasta que se active otra
función.
Agudos
Presione el botón CONTROL DE AUDIO (4)
tres veces hasta que aparezca “TRB” en la
pantalla. Dentro de los cinco segundos, gire el
CONTROL DE AUDIO (3) en sentido horario o
anti horario para ajustar los agudos de “-6” a
“+6”. “0” representa una respuesta plana. El
BAL
VOL
VOL
D
A
F
E
R
T
S
A
B
L
A
B
P
U
S
H
S
E
L
E
C
T
BAS
D
D
A
F
E
R
T
S
A
B
L
A
B
P
U
S
H
S
E
L
E
C
T
A
F
E
R
T
S
A
B
L
A
B
P
U
S
H
S
E
L
E
C
T
D
A
F
E
R
T
S
A
B
L
A
B
TRB
P
U
S
H
S
E
L
E
C
T
nivel de agudos es mostrado en la pantalla por
cinco segundos o hasta que se active otra
función.
Balance
Presione el botón CONTROL DE AUDIO (4)
cuatro veces hasta que aparezca “BAL” en la
pantalla. Dentro de los cinco segundos, gire el
CONTROL DE AUDIO (3) en sentido horario (o
anti horario) para ajustar el Balance entre los
parlantes derecho e izquierdo de “BAL R12”
(todo a la derecha) o “BAL L12” (todo a la
izquierda). “BAL C00” representa un nivel de
balance igual entre los parlantes derecho e
izquierdo. La posición de balance es mostrada
en la pantalla por cinco segundos o hasta que
se active otra función.
Fader
Presione el CONTROL de AUDIO (4) cinco
veces hasta que aparezca “FAD” en la pantalla.
Dentro de los cinco segundos, gire el
CONTROL DE AUDIO (3) en sentido horario o
anti horario para ajustar el Balance entre los
parlantes frontales o traseros de “FAD R12”
(todo atrás) o “FAD F12” (todo al frente). “FAD
C00” representa un balance igual entre los
parlantes delanteros y traseros. La posición de
fader es mostrada en la pantalla por cinco
segundos o hasta que se active otra función.
Menú de Sistema
Presione y mantenga el botón DISP (9) para
25
ver el sistema "MENÚ" Presione repetidamente
el botón DISP o use los botones >>| (14) o |<<
(13) para acceder las siguientes opciones el
MENÚ.
Reloj (CLK)
Gire el CONTROL DE AUDIO a la izquierda
para ajustar las horas y a la derecha para
ajustar los minutos.
ÁREA
Gire el CONTROL DE AUDIO para seleccionar
el espaciado de frecuencia adecuado para su
área. USA (EE.UU), LAT (América Latina),
EUR (Europa), o RUS (Rusia).
DISTANTE/LOCAL
Esta función es usada para designar la fuerza
de las señales en las cuales la radio se
detendrá durante la sintonía automática.
“Distante” es la fijación predeterminada,
permitiendo que la radio se detenga en un
rango de señales más amplio. Para fijar a la
unidad para seleccionar sólo las estaciones
locales fuertes durante la sintonía automática,
gire el CONTROL DE AUDIO para elegir
“Local”.
P-VOL (00-46)
Use la opción "VOL PGM" para seleccionar el
volumen predeterminado que la radio asumirá
en principio cuando se encienda. Para
programar un nivel de volumen inicial
Page 28

SD1513
específico, gire el CONTROL DE AUDIO para
seleccionar el nivel deseado.
NOTA: Si el P-Vol estoa fijado más alto que
el volumen seleccionado cuando se apagó
la unidad, la unidad volverá al volumen más
bajo cuando se encienda de nuevo - no al PVol.
BEEP ON/OFF
La función de tono beep permite la selección
de un tono beep audible para ser escuchado
cada vez que es presionado un botón en el
frente de la radio. Girar el CONTROL DE
AUDIO para seleccionar entre las siguientes
opciones de Tono Beep:
• BEEP ON: se escucha un beep cada vez
que es presionado un botón (función
activada)
• BEEP OFF: No se escucha el Beep.
iX-BASS
Presione el botón iXBASS (15) para activar la
función iXBASS. Cuando escucha música a
volúmenes bajos, esta función reforzará los
rangos de graves y agudos para compensar las
características de la audición humana.
Presione iXBASS nuevamente para desactivar
esta función.
Subwoofer
Presione el botón SUB-W (18) para activar la
función Subwoofer. Presione nuevamente para
apagar la función Subwoofer.
NOTA: La función Subwoofer sólo funciona
cuando se conectan un amplificador
externo y un subwoofer vía la conexión de
línea de salida Sub en la parte trasera de la
unidad.
Silenciar Audio (MUTE)
Presione el botón MUTE (6) para silenciar el
volumen de audio. “MUTE” parpadea en la
pantalla. Restaurar el volumen a la fijación
previa presionando el botón mute nuevamente,
ajustando el CONTROL DE AUDIO.
Pantalla de Cristal Líquido (LCD)
El panel de pantalla de cristal líquido (LCD) (8)
muestra la frecuencia, hora y funciones
activadas de la unidad.
NOTA: Después de estar sujeta a
temperaturas frías, los paneles LCD pueden
tomar más tiempo para responder y la
visibilidad de los números en el LCD podría
disminuir ligeramente. La pantalla LCD
volverá a normal cuando la temperatura
aumenta a valores normales.
Pantalla (DISP)
Cuando la unidad está encendida, el LCD
muestra automáticamente la pantalla para la
fuente de funcionamiento actual.
Cuando la unidad está encendida, presione el
botón DISP (9) para mostrar la hora del día.
Después de cinco segundos, la pantalla vuelve
a la fuente actual.
Entrada Auxiliar
Levante la cubierta en el lado derecho de la
radio para destapar el conector AUX IN (16).
Use el cable de medios de 3.5mm incluido para
conectar el dispositivo portátil para
reproducción a través del sistema de sonido del
vehículo.
Liberación del Panel Frontal
El Botón REL del panel frontal (10) libera el
mecanismo que mantiene el panel frontal en el
chasis.
Cómo Sacar el Panel Frontal
Para quitar el panel frontal, primero presione el
botón REL (10) para liberar el lado izquierdo
del panel. Luego, tomar el lado liberado y tire
del panel sacándolo del chasis. Después de
quitar el panel frontal, guardarlo en el estuche
26
Page 29

SD1513
provisto para transporte para protegerlo del
polvo y daños.
QUITAR EL PANEL FRONTAL
1
2
Re-Colocando el Panel Frontal
Para volver a colocar el panel frontal,
asegúrese que los terminales eléctricos en la
parte trasera del panel están libres de polvo y
suciedad, como partículas podrían producir un
funcionamiento intermitente u otras fallas.
Posicione el lado derecho del panel en su lugar
hasta que enganche correctamente, y luego
presione ligeramente el lado izquierdo del
panel hasta que el mecanismo se bloquee en el
lugar.
Botón de Restaurar
El botón de restaurar (26) está ubicado en el
frente del chasis y sólo puede accederse con el
panel frontal removido. El circuito de
restauración protege el circuito del
microprocesador. Dado que el restaurar la
unidad borrará la hora y las memorias
preseleccionadas, sólo debería activarse luego
de la instalación inicial después de haber
completado el cableado, o si hay algún mal
funcionamiento de alguno de los interruptores
de la unidad. En estos casos, el presionar el
botón restaurar limpiará el sistema y volverá la
unidad al funcionamiento normal.
RESET
26
27
Page 30

OPERACIÓN DE SINTONIZADOR
SD1513
5
10
7
19
202123
1
18
22
24
15
14
PS/AS
13
17
25
2
3
4
Selector de Banda AM/FM
(BAND)
Presione el botón BAND (5) durante la
reproducción de radio para intercambiar entre
tres bandas de FM y dos bandas AM. “F1”,
“F2”, “F3” o “AM”, “AM2” aparecerá en la
pantalla para indicar la banda actualmente
seleccionada.
Sintonizador
Sintonización Automática
Presione el botón >>| (14) para sintonizar hacia
arriba en frecuencia y el botón |<< (13) para
9
6
8
SD1513
11
LIFT
12
16 27
sintonizar hacia abajo en frecuencia. La unidad
se detendrá en la próxima estación fuerte. Si
está activo el modo local, la radio buscará la
próxima estación local fuerte cuando
cualquiera de los botones es presionado.
Sintonizado Manual
Presione el botón >>| (14) o |<< (13) por más
de dos segundos para seleccionar el modo de
sintonización manual. “MANUAL” aparecerá
en la pantalla. Presione los botones de
sintonización Arriba o Abajo para mover la
frecuencia de radio dos dígitos arriba o abajo a
la vez. Presione y mantenga los botones Arriba
28
o Abajo para avanzar rápidamente a una
frecuencia determinada. Liberar cuando se
alcanza la frecuencia deseada. Si la sintonía
no es ajustada dentro de los cinco segundos de
haber ingresado al modo de sintonización
manual, la radio volverá a sintonización
automática y aparecerá en la pantalla “AUTO”.
Estaciones Prefijadas
Pueden almacenarse hasta seis estaciones en
cada banda como predeterminadas que luego
pueden recuperarse presionando el botón de
predeterminada asociada en el panel frontal
Page 31

SD1513
(19-24) o el control remoto. Para almacenar
una estación encienda la radio y seleccione la
banda y estación deseada. Presione y
mantenga pulsado el botón predeterminado
deseado (numerado de una a seis en el frente
de la radio o el control remoto) por más de dos
segundos. Cuando se almacena, el número
prefijado aparecerá en la pantalla. Ahora la
estación está almacenada y puede volver a
llamarse en cualquier momento presionando el
botón predeterminado correspondiente. Repetir
para las restante cinco predeterminadas en la
banda actual y para todas las predeterminadas
en las otras tres bandas.
Explorar Predeterminadas /
Almacenar Automáticamente
(PS/AS)
Almacenamiento Automático
Selecciona seis estaciones fuertes y las
almacena para la banda actual usando la
función de Almacenamiento Automático. Para
activar esta función, presione y mantenga el
botón PS/AS (17) por más de dos segundos.
La radio explorará automáticamente cada
banda e ingresará las estaciones fuertes dentro
de las posiciones de memoria
predeterminadas. Después de ingresar las
estaciones en memoria, la unidad se detendrá
automáticamente en cada estación por cinco
segundos para que cada una pueda oírse.
Cuando usa la función Almacenamiento
Automático, las nuevas estaciones
reemplazarán cualquier estación ya
almacenada en la memoria de
predeterminados.
Buscar Prefijadas
Presione el botón PS/AS (17) para explorar las
seis estaciones predeterminadas en la banda
de AM o todas las bandas de FM. La unidad se
detendrá en cada estación por cinco segundos
antes de continuar a la siguiente estación
predeterminada, y el número de
predeterminada parpadeará en la pantalla
durante la exploración de predeterminadas.
Presione SCAN nuevamente para detener la
exploración y reproducir la estación actual.
29
Page 32

OPERACIÓN DEL REPRODUCTOR DE CD
SD1513
5
10
7
19
202123
1
18
22
24
15
14
PS/AS
13
17
25
2
3
4
Insertar CD
Con la superficie de etiqueta hacia arriba
inserte suavemente el disco dentro de la ranura
de CD (11) hasta que enganche el mecanismo
de carga y tome el disco. Comienza la
reproducción del disco. Aparece en la pantalla
el número de pista y el tiempo transcurrido.
Selección de Pista
Las funciones de seleccionar pista son usadas
para acceder rápidamente el comienzo de una
pista particular cuando hay un disco en
reproducción. Presione el botón >>| (14) para
9
6
8
SD1513
11
LIFT
12
16 27
mover hacia adelante o el botón |<< (13) para
mover hacia atrás en el disco para ubicar una
pista deseada. Los números de pista
aparecerán en la pantalla a medida que son
accedidos.
Presione y mantenga el botón >>| o |<< para
avance rápido o retroceso rápido a través del
disco. Durante ambas funciones, aparecerá el
tiempo restante en pantalla. Liberar el botón
para volver a la reproducción del CD.
NOTA: La unidad está diseñada para
reproducir sólo discos compactos estándar
de 5” (12 cm). No intente usar CD simples de
3” (8 cm) en esta unidad, con o sin
adaptador, dado que se podría producir el
daño del reproductor y/o disco. Tales daños
no estarán cubiertos por la garantía de este
producto.
Reproduce/Pausa
Presione el botón play/pause (19) para
suspender la reproducción del disco. “PAUSE”
aparecerá en la pantalla. Presione el botón
play/pause nuevamente para volver la
reproducción del disco. La indicación “S-PAUSE” desaparecerá de la pantalla, y se
volverá a la reproducción desde el punto de
pausa.
30
Page 33

SD1513
Búsqueda de Ingreso a Disco
(INT)
Durante la reproducción del disco, presione el
botón 2 INT (20) para reproducir los primeros
10 segundos de cada pista en el disco. “INT”
aparecerá en la pantalla. Cuando se alcanza la
pista deseada, presione nuevamente 2 INT
para finalizar la exploración y reproducir la pista
seleccionada. “INT” desaparecerá de la
pantalla. La función exploración también se
cancelará cuando se activan las funciones de
repetición o aleatorio.
Repetir Disco (RPT)
Presione el botón 3 RPT (21) durante la
reproducción del disco para repetir
continuamente la canción seleccionada. “RPT"
aparecerá en la pantalla. Presione 3 RPT
nuevamente para detener la repetición. “RPT”
desaparecerá de la pantalla, y se volverá a la
reproducción normal. La función repetición
también se cancelará cuando se activan las
funciones de repetición o aleatorio.
Aleatorio (RDM)
Presione el botón 4 RDM (22) durante la
reproducción del disco para reproducir todas
las pistas en un CD en forma aleatoria “RDM”
aparecerá en la pantalla. Presione 4 RDM
nuevamente para detener la reproducción
aleatoria. “RDM” desaparecerá de la pantalla, y
se volverá a la reproducción normal. La función
aleatoria también se cancelará cuando se
activan las funciones de repetición o
exploración.
Expulsar Disco
Presione el botón expulsar (12) para detener la
reproducción de CD y expulsar el disco. La
unidad cambiara la operación de sintonizador o
AUX, dependiendo en que modo de operación
estaba antes de la reproducción de disco. Si el
disco no es quitado de la unidad en 15
segundos, el disco será vuelto a cargar para
evitar un daño accidental. La reproducción de
disco puede reiniciarse presionando SRC (2)
para elegir la función reproductor de CD.
Códigos de error del Reproductor
de CD
Si se desarrollara un problema durante el
funcionamiento del reproductor de CD, un
código de error "Disc Error" o "Error 1" podrían
aparecer en el panel de pantalla. Si apareciera
"Disc Error", intente expulsando y volviendo a
cargar el disco dentro del reproductor. Mientras
el disco está fuera de la unidad, asegúrese que
está limpio y sin daños, y luego cárguelo
correctamente. "Error 1" puede indicar un
número de problemas con la unidad,
incluyendo un error mecánico o un error en el
microprocesador de control del reproductor. El
presionar el botón restaurar (26) podría ayudar,
pero borrará la hora y las memorias
predeterminadas. Si las medidas sugeridas no
resuelven el problema, contacte a una estación
de garantía aprobada cerca suyo para más
asistencia.
31
Page 34

REQUISITOS DE ARCHIVO MP3/WMA
Los archivos de música MP3 y WMA (Windows
Media Audio) son archivos de audio digital que
están comprimidos para permitir más archivos
en un solo CD. Esta unidad puede reproducir
directamente MP3/WMA de archivos
contenidos en un CD-R/RW, dispositivo USB o
tarjeta SD usando los botones en el receptor (o
el control remoto) como se describe a
continuación Hay varios tipos de software
disponible para convertir archivos de audio en
formatos MP3/WMA. Phase Linear recomienda
Nero o Roxio Easy CD Creator. Dependiendo
del tipo de medio y método de grabación,
algunos CD-R/RWs podrían ser incompatibles
con esta unidad. La unidad soporta
reproducción de MP3/WMA y CDDA (CDA),
CDs Modo Mixed y CD-Extra (incluyendo
discos multi sesión), pero los discos en donde
no se cerró la sesión no reproducirán.
Notas sobre reproducción de
MP3/WMA
Esta unidad puede reproducir MP3 (MPEG1, 2,
2.5 Capa de Audio 3). Sin embargo, los medios
de grabación de MP3 y los formatos aceptados
están limitados. Cuando graba MP3/WMA,
preste atención a las siguientes restricciones.
Medios Aceptables
Los medios aceptables de grabación MP3/
WMA para esta unidad son CD-ROM, CD-R y
CD-RW. Cuando usa CD-RW, use el formato
completo en lugar del formato rápido para
evitar el mal funcionamiento.
Formatos Aceptables de Disco
Los siguientes formatos están disponibles para
los medios usados en esta unidad. El número
máximo de caracteres usados para nombre de
archivo incluyendo el delimitador (".") y la
extensión de tres caracteres están indicados en
paréntesis.
• ISO 9660 Nivel 1 (11 caracteres)
• ISO 9660 Nivel 2 (31 caracteres)
• Joliet (31 caracteres)
• Romeo (31 caracteres)
Pueden mostrarse hasta 200 caracteres en el
formato de nombre largo de archivo. Para una
lista de caracteres disponibles, ver el manual
de instrucciones del software de escritura y la
sección “Cómo Ingresar Nombres de Archivos
y Carpetas” a continuación. El medio
reproducible en esta unidad tiene las siguientes
limitaciones:
• Numero máximo de carpetas
jerarquizadas 8
SD1513
• Numero máximo de archivos por disco
999
• Numero máximo de carpetas por disco
255
Los MP3/WMA grabados en formatos distintos
a los listados anteriormente no se reproducirán
satisfactoriamente y sus nombres de archivos
no serán mostrados adecuadamente.
Preferencias de Codificador
MP3/WMA y Grabador de CD
Use las siguientes preferencias cuando
comprime datos de audio en datos MP3 con el
codificador de MP3.
• Tasa de Transferencia de Bit: 32 - 320
kbps
• Frecuencia de la Muestra: 32, 44.1, 48kHz
(WMA) y 16, 22.05, 24, 32, 44.1, 48kHz
(MP3)
Cuando usa un grabador de CR para grabar
MP3/WMA hasta la máxima capacidad del
disco, desactive escritura adicional. Para
grabar un disco vacío hasta la máxima
capacidad de una vez, seleccione la opción
“disc at once”.
32
Page 35

SD1513
Cómo ingresar una Etiqueta ID3
Esta unidad soporta etiquetas ID3 versiones
1.0 y 1.1. Para los códigos de caracteres,
refiérase a la siguiente tabla.
Cómo ingresar nombres de
Archivo y Carpeta
Los nombres que usan los caracteres de lista
de código son los únicos nombres de archivo y
nombres de carpeta que pueden ingresarse y
mostrarse. Los demás caracteres no se
mostrarán correctamente. La unidad reconoce
y reproduce sólo archivos con la extensión
MP3/WMA.
NOTA: Un nombre de archivo ingresado con
caracteres que no están en la lista de
código podrían no reproducirse
correctamente.
Cómo grabar archivos en un
disco
Cuando se carga un disco que contiene datos
MP3/WMA, la unidad verifica todos los datos.
Si el disco contiene muchas carpetas o
archivos no MP3/WMA files, la reproducción
MP3/WMA se demorará, podría tomarle tiempo
a la unidad para moverse al próximo archivo, y
las búsquedas podrían no realizarse
suavemente o podría no reproducir nada. El
cargar tal disco podría producir ruido fuerte y
causar daños a los parlantes.
NOTA: No intente reproducir un disco que
contenga archivos no MP3/WMA con la
extensión de MP3/WMA o un medio que
contenga archivos no MP3/WMA.
Protección Electrónica contra
Choque
• 10 segundos para CDDA (CDA)
• 60 segundos para MP3/WMA grabado a
44.1kHz, 128kbps
Velocidades de Transferencia
Esta unidad soporta velocidades de
transferencia de 32 a 320 kbps.
Orden de Reproducción de
Archivo
Cuando se seleccionan para reproducción los
archivos y carpetas (Búsqueda de Carpeta,
Búsqueda de Archivo o Selección de Carpeta)
son accedidos en el orden que fueron grabados
por el grabador de CD. Como resultado, la
orden en cual se espera que sean reproducidos
podría no coincidir con el orden en que son
realmente reproducidos.
Podría fijar el orden en el cual los archivos
MP3/WMA serán reproducidos grabándolos en
un disco tal como un CD-R con sus nombres de
archivos comenzando con los números de
secuencia de reproducción como "01" a "99".
Por ejemplo, un disco con la siguiente
organización de carpeta/archivo está sujeto a
Búsqueda de Carpeta, Búsqueda de Archivo o
Selección de Carpeta, como se muestra a
continuación.
33
Page 36

SD1513
34
Page 37

SD1513
OPERACIÓN DE MP3/WMA
5
10
7
19
202123
1
18
22
24
15
14
PS/AS
13
17
25
2
3
4
Pausar
Presione el botón 1 >/|| (19) para suspender la
reproducción del disco. Presione el botón
reproducir/pausar nuevamente para volver la
reproducción.
Selección de Pista
Presione el botón >>| (14) o |<< (13) por menos
de un segundo para avanzar a la próxima pista
en el disco, o presione y mantenga para
avance o retroceso rápido por el disco. La
reproducción del disco comienza cuando se
libera el botón.
9
6
8
SD1513
11
LIFT
12
16 27
Cómo navegar por Carpetas
Presione los botones 5 \/ y 6 /\ (23, 24) para
seleccionar la carpeta/directorio próxima o
previa.
Ingresar Búsqueda (INT)
Durante la reproducción del disco, presione el
botón 2 INT (20) para reproducir los primeros
10 segundos de cada pista en el disco. Cuando
la pista deseada se alcanza, presione 2 INT
nuevamente para finalizar la búsqueda y
reproducir la pista deseada.
Repetir (RPT)
Presione el botón 3 RPT (21) repetidamente
para reproducir el archivo actual. Presione 3
RPT nuevamente para volver a la reproducción
normal.
Aleatorio (RDM)
Presione el botón 4 RDM (22) para reproducir
aleatoriamente todos los archivos en el disco.
Presione 4 RDM nuevamente para volver a la
reproducción normal.
35
Page 38

Búsqueda de Archivo o Carpeta
MP3/WMA
La unidad ofrece dos métodos de búsqueda
por archivos o carpetas:
Búsqueda Directa de Número de Archivo
Presione el botón BAND (5). El LCD mostrará
"Number". Gire el CONTROL DE AUDIO para
seleccionar el número de pista deseada, luego
presione el CONTROL DE AUDIO para
confirmar y reproducir el archivo seleccionado.
Navegación de Búsqueda
Presione el botón BAND (5) dos veces. El LCD
mostrará "File". Gire el CONTROL DE AUDIO
para navegar a través de todas las carpetas y
sub-carpetas en el disco. Los nombres de
carpetas serán mostrados en el LCD. Presione
el CONTROL DE AUDIO para acceder las subcarpetas o archivos. Gire el CONTROL DE
AUDIO para navegar, luego presione la perilla
seleccionada para confirmar y comenzar la
reproducción de archivo. Durante la
navegación de búsqueda, gire el CONTROL
DE AUDIO en sentido anti horario para volver
al nivel de carpeta anterior.
Pantalla de Información
Presione el botón DISP (9) para mostrar el reloj
o información ID3 disponible, como sigue: título
de canción, nombre de directorio, nombre de
artista, etc.
SD1513
36
Page 39
SD1513
COMO USAR UN DISPOSITIVO USB O TARJETA SD
Cómo cargar un Dispositivo USB
Los dispositivos USB pueden reproducirse a
través del conector USB en el panel frontal.
Para acceder archivos en el dispositivo USB,
insertar el dispositivo USB como se indica
abajo:
Después de insertar un dispositivo USB que
contiene archivos MP3 o WMA, aparece “USB
HOST” en la pantalla y la unidad explorará
automáticamente la tarjeta por archivos de
música y comienza la reproducción.
Para expulsar el dispositivo USB, presione el
botón SRC (2) para seleccionar una fuente
distinta. Tire el dispositivo USB derecho y
vuelva al cubierta a la posición cerrada.
Cómo Cargar una Tarjeta SD
PAra insertar una tarjeta SD, primero debe
quitar el panel frontal para revelar la ranura de
tarjeta SD (ver “Liberación del Panel Frontal” en
página 26). Inserte su Tarjeta SD como se
ilustra abajo y luego reinstalar el panel frontal.
RESET
Después de insertar una tarjeta SD que
contiene archivos MP3 o WMA, aparece “SD/
MMC” en la pantalla y la unidad explorará
automáticamente la tarjeta por archivos de
música y comienza la reproducción.
Para sacar la tarjeta SD, quitar el panel frontal y
luego presione la tarjeta SD para liberarla. Tire
la tarjeta SD en forma recta y vuelva a colocar
el panel frontal.
Cómo Navegar Archivos
Por favor refiérase a “Operación de MP3/WMA”
en página 35 información en relación de
navegación de directorio y búsqueda de
archivo.
Cómo Copiar Música
Su SD1513 está equipado con una función de
Copia que le permite copiar archivos MP3 o
WMA a una tarjeta SD/MMC o dispositivo USB.
Para copiar música, realizar los siguientes
pasos:
1. Insertar un disco y seleccionar la pista que
desea copiar.
2. Presione el botón COPY (25) para activar
la función Copia.
3. Gire el CONTROL DE AUDIO (3) para
seleccionar la fuente USB o CARD (SD/
MMC).
4. Presione el botón CONTROL DE AUDIO
(4) para comenzar a copiar.
• La unidad comenzara a copiar el
archivo actual, comenzando desde el
inicio de la pista. El LCD mostrará
“>>> ##”. La copia se detendrá al
final del archivo.
• La información grabada es
almacenada en una carpeta llamada
“MY_MP3” o “MY_WMA” en la fuente
de destino.
• La copia se detendrá y la unidad
mostrará “Memory Full (memoria
llena)” si el dispositivo de
almacenamiento seleccionado está
lleno.
37
Page 40

SD1513
Para detener la copia antes de que finalice la
copia del archivo, presione el botón COPY . El
LCD mostrará “STOP” y la pista incompleta
será borrada de la carpeta de destino.
NOTA: Nunca quite el dispositivo USB
durante la grabación o transferencia de
música. Esto podría dañar el dispositivo o
causar el bloqueo del sistema. No
intercambie modos o apague la radio o el
encendido mientras está grabando.
Cómo borrar archivos copiados
Puede borrar archivos copiados de un
dispositivo USB o tarjeta SD/MMC mientras el
archivo se está reproduciendo, o después de
seleccionar en archivo en modo Búsqueda de
Número o Búsqueda de Navegación. Para
borrar un archivo, realizar los siguientes pasos:
1. Presione y mantenga el botón BAND (5)
para activar la función Borrar. El LCD
mostrará “ ERASE 010”.
2. Presione el botón CONTROL DE AUDIO
(4) para seleccionar el modo Borrar.
3. Gire el CONTROL DE AUDIO (3) y
seleccione “Y” para borrar (o seleccione
“N” para cancelar la función borrar).
4. Presione el botón CONTROL DE AUDIO
para confirmar. El archivo detendrá la
reproducción (si estaba reproduciendo) y
será borrado. Cuando finaliza, el sistema
mostrará “ERASE OK”.
Administración de Archivos
La música grabada o transferida usando el
SD1513 será almacenada en las carpetas
predeterminadas listadas a continuación:
• MY_MP3: Archivos MP3 transferidos
• MY_WMA: Archivos WMA transferidos.
La música grabada/transferida es almacenada
en la carpeta correspondiente y se le da la
siguiente convención de nombre:
“XX0001.MP3”, donde XX es el nombre de la
fuente (por ejemplo SD0001.MP3).
38
Page 41

SD1513
OPERACIÓN DE iPod
Cómo Acceder al Modo iPod
Esta unidad está equipada con una función lista
para iPod que le permitirá controlar su iPod (si
es compatible) usando los botones de control
del panel frontal.
La unidad cambiará automáticamente a modo
iPod cuando un iPod es enchufado dentro del
cable iPod.
8 Din iPod Ready Cable
HEAD UNIT
iPod
iPod iPod
photo
Para volver al menú iPod desde cualquier otro
menú de fuente, presione el botón (2) SRC en
el panel frontal o el control remoto hasta que
aparezca “iPod” en la pantalla.
NOTA: El SD1513 no seleccionará archivos
de video sin importar si un video o no fue el
último archivo reproducido cuando el
mini
iPod
nano
iPod Cable
último archivo que se reprodujo cuando el
iPod fue enchufado a la radio. Sólo están
soportados archivos de música.
Cómo encender/apagar el iPod
El iPod enciende automáticamente cuando se
conecta el iPod a un cable iPod de 30 pines,
siempre que la llave del automóvil esté en
posición de encendido. Puede apagar el iPod
desconectándolo del cable o apagando el
encendido. Cuando se apaga el encendido, el
iPod pausará y luego ingresa a modo dormir
después de 2 minutos. El iPod no puede
encenderse/apagarse por si mismo cuando
está conectado.
NOTA: El iPod se recargará continuamente
cuando está conectado a la unidad, siempre
que el encendido del vehículo se enciende.
Información de vista de
Reproducción
Presione el botón PS/AS (17) para mostrar
información de reproducción de iPod en el
siguiente orden:
• Título de Canción
•Artista
• Nombre de Álbum
• Tiempo Restante
Reproduce/Pausa
Presione el botón 1 >/|| (19) para suspender o
reactivar la reproducción.
Selección de Pista
Seleccionar una Pista
Presione el botón >>| (14) o |<< (13) por menos
de 1 segundo para avanzar a la siguiente
canción en la carpeta actual.
Avance Rápido/Retroceso Rápido
Presione y mantenga el botón >>| (14) o |<<
(13) por más de 1 segundo para avance o
retroceso rápido. La reproducción comienza
cuando se libera el botón.
Repetir (RPT)
Presione el botón 3 RPT (21) durante la
reproducción del disco para repetir
continuamente la canción seleccionada.
Presione
3 RPT nuevamente para detener la función de
repetición.
Presione y mantenga pulsado el botón 3 RPT
(21) por más de 3 segundos para repetir
continuamente todo el álbum/carpeta. Presione
y mantenga 3 RPT nuevamente para detener la
función repetición.
39
Page 42

SD1513
Aleatorio (RDM)
Presione el botón 4 RDM (22) para reproducir
aleatoriamente todos los archivos en la
carpeta/álbum actual. Presione Presione
4 RDM nuevamente para volver a la
reproducción normal. Presione y mantenga 4
RDM por más de tres segundos durante la
reproducción de iPod para reproducir las
canciones en todas las carpetas. Presione 4
RDM nuevamente por más de tres segundos
para volver a la reproducción normal.
Modo de Búsqueda
Durante el modo reproducción de iPod,
presione el botón BAND (5) para ingresar al
modo búsqueda de iPod. Presione el botón
BAND repetidamente para acceder los modos
de búsqueda en el siguiente orden:
• Lista de Reproducción
•Artista
• Álbum
• Canción
• Género
Después de seleccionar el modo de búsqueda
deseado, presione el botón CONTROL DE
AUDIO (4) dentro de los 10 segundos para
confirmar el modo búsqueda. Gire la perilla del
codificador giratorio para navegar a través de
Álbum, Artista o Canciones contenidas en su
iPod. Presione el CONTROL DE AUDIO para
reproducir la canción seleccionada. Durante el
modo búsqueda, presione PS/AS para volver
rápidamente al nivel superior del Álbum, Lista
de Reproducción, Género, etc.
40
Page 43

SD1513
CONTROL REMOTO
El control remoto le permitirá controlar las
funciones básicas del SD1513.
El sensor de control remoto está ubicado en el
lado izquierdo del panel frontal a la izquierda
del botón 3 RPT (21).
1
3
7
5
9
10
12
18
14
20
16
AUDIO
ENTER
SUB-W
REC
COPY
F- DN
F- UP
E
H
R
C
A
R
S
A
E
E
S
ID3
XBS
SISTEMA SINTONIZADOR CD / MP3 / WMA iPod
Tecla
Pulsación
Corta
Pulsación
Larga
Pulsación
Corta
Pulsación
Larga
Pulsación
Corta
Pulsación
Larga
Pulsación
Corta
Pulsación
Larga
1 Encendido
2 Expulsar
3 Mostrar Menú
4Modo
5 Silenciar
6 Subir Volumen
7 Bajar Volumen
8Buscar
2
6
4
8
11
13
19
15
21
17
9Buscar
10 Menú Audio Ingresar Ingresar
11 Banda Búsqueda de
12 M1 Memoria 1 Pausar/
13 M2 Memoria 2 Ingresar Ingreso de
14 M3 Memoria 3 Repetir Repetir
15 M4 Memoria 4 Aleatorio Carpeta
16 M5 Memoria 5 Bajar Carpeta
17 M6 Memoria 6 Subir Carpeta
18 Subwoofer
encendido/
desactiv.
19 PS AS ID3 Info
20 Grabar/
Copiar
21 iX-Bass encendido/
desactiv.
Arriba
Abajo
Sintonizar
Arriba
Sintonizar
Abajo
Pista/Archivo
Arriba
Pista/Archivo
Abajo
Archivo/carpeta
Reproducir
Rápido
Adelante
Retroceso
Rápido
Borrar
Archivo
Carpeta
Carpeta
Aleatoria
Subir
Archivo
Bajar
Archivo
Búsqueda
iPod
Pausar/
Reproducir
Repetir Repetir
Aleatoria Álbum
Rápido
Adelante
Retroceso
Rápido
Álbum
Aleatorio
41
Page 44

CUIDADO Y MANTENIMIENTO
Reproductor de CD
Las siguientes guías le ayudarán a extender la
vida de su reproductor de CD:
1. Cuando limpia el interior del vehículo, no
aplique agua o fluidos de limpieza en la
unidad.
2. El reproductor de CD podría no funcionar
adecuadamente en calor o frío extremo o
bajo condiciones de humedad. En caso de
estas condiciones, espere a que el interior
del vehículo alcance una temperatura
normal o cualquier condensación en los
lentes del reproductor de disco se haya
evaporado antes de usar el reproductor.
3. Nunca inserte otra cosa que CDs
redondos de 5" dentro del reproductor. El
intentar insertar CDs de otros tamaños
(incluso con adaptador) causará daños no
cubiertos por la garantía.
4. Siempre quite el CD cuando el
reproductor no está en uso.
5. La unidad está diseñada con un
mecanismo atenuador de vibraciones de
CD para minimizar la interrupción de la
reproducción del disco debido a la
vibración normal de un vehículo en
movimiento. Sin embargo, podrían
producirse saltos de sonido ocasionales
cuando maneja en rutas muy rudas. Esto
no romperá o dañará el disco, y la
reproducción normal se reasumirá cuando
cesen las condiciones rudas.
Discos Compactos
CD-R / CD-RW
Dependiendo del tipo de medio y método de
"grabación", algunos CD-R/RWs podrían ser
incompatibles con esta unidad. Después de la
"grabación/ quemado", la sesión
cerrarse. Por favor refiérase a los
procedimientos recomendados por su software
para cerrar un disco/sesión. Revise su software
de grabación para familiarizarse con los
procedimientos correctos de "grabación".
Recomendamos la última versión del software
de grabación ROXIO
Además, esta unidad sólo reconocerá
formatos CDDA (Disco Compacto de Audio
Digital), .MP3 y .WMA "grabados / quemados "
sobre un CD-R/RW. Esta unidad no soporta
.WAV, .OGG u otros formatos.
Cuidado y Manipulación de CD
La suciedad, polvo, rayones y ondulaciones
pueden producir saltos en la reproducción y
deterioro de la calidad de sonido. Por favor siga
estas guías para cuidar sus discos compactos.
1. Limpie cuidadosamente las impresiones
digitales, polvo y suciedad de la superficie
de reproducción del disco con un paño
TM
o NEROTM .
debe
SD1513
suave. Limpie con movimientos rectos
desde el interior al exterior del disco.
2. Nunca use químicos como sprays o
limpiadores hogareños para limpiar CDs,
dado que pueden dañar irreparablemente
la superficie del disco.
3. Los discos deberían mantenerse en sus
cajas de almacenamiento cuando no
están en uso.
4. No exponga los discos a la luz directa del
sol, altas temperaturas o elevada
humedad por largos períodos.
5. No pegue papel, cinta o etiquetas de
CD en las superficies del disco, dado
que podrían producir daños internos.
42
Page 45
SD1513
RESOLUCIÓN DE PROBLEMAS
Problema Causa Acción Correctiva
No funciona (la pantalla no enciende) Sin energía en el cable amarillo; sin energía en
el cable rojo
Fusible en línea quemado. Reemplace el fusible.
Sin energía en la Unidad Fusible en línea quemado. Verifique/Reemplace el fusible.
No todos los parlantes funcionan Empalmes o Conexiones Incorrectos Verifique todos los empalmes y conexiones.
Cables de parlantes en corto a tierra del chasis o
a algún otro parlante
Fusibles quemados Cable de energía en corto a tierra Asegúrese que los cables no están pellizcados.
Cables de parlante en corto a tierra Asegúrese que los cables no están pellizcados.
Fusible Incorrecto o fusible muy pequeño Instale un fusible con la especificación correcta
El CD salta demasiado Montaje del receptor no es sólido o la tira trasera
no está asegurada
Verifique la conexión con una lámpara de prueba; verifique el
fusible del vehículo con una lámpara de pruebas.
Verifique empalmes, aislar todos los cables desnudos.
Verifique el montaje y la tira trasera, ajuste si es necesario.
43
Page 46

ESPECIFICACIONES
Especificaciones de Potencia CEA
Potencia de Salida: 13 Watts RMS x 4 canales
dentro de 4-Ohms @ <
Relación Señal Ruido: 70dBA debajo de
referencia. (Referencia: 1 Watt, 4-Ohms)
Respuesta a Frecuencia: 20Hz a 20 kHz, -3dB,
entrada auxiliar usada como fuente de
referencia
Voltaje de Alimentación de Referencia:
14.4VDC
Reproductor de CD
Relación Señal Ruido: >90dBA
Respuesta a Frecuencia: 20Hz-20kHz, -3dB
Separación de Canales: >55dB @ 1kHz
Convertidor D/A: 1 Bit/CH
Sintonizador FM
Rango de Sintonización (USA): 87,5MHz 107,9MHz
1% THD+N
Rango de Sintonización (Europa): 87.50MHz-
108.00MHz
Sensibilidad monoaural: 12dBf
50dB sensibilidad silenciado (estéreo): 16dBf
Separación Estéreo @ 1kHz: >35dB
Respuesta a Frecuencia: 30Hz-14kHz. +
Sintonizador AM
Rango de Sintonización (USA): 530 kHz - 1.710
kHz
Rango de Sintonización (Europa): 522kHz-
1.620kHz
Sensibilidad @ 20dB señal ruido: 30uV
Respuesta a Frecuencia: 50Hz-2kHz, -3dB
Entrada Auxiliar
Sensibilidad de Entrada: 400mV RMS para 1
watt RMS sobre 4-ohms
Respuesta a Frecuencia: 20Hz a 20kHz, -3dB
Impedancia de Entrada: 10 k-ohms
General
Fuente de Alimentación: 11-16 VDC, negativo a
tierra
Alimentación de Antena (Azul): 500mAmp
máx., protección limitada de corriente
Temperatura de funcionamiento: -10C~60C
Fusibles: 15 amp disparo rápido ATO
Dimensiones de chasis DIN: 2"H x 7"W x 7"D
(51mm x 178mm x 178mm)
3dB
SD1513
Especificaciones sujetas a cambio sin
aviso.
44
Page 47

SD1513
For instructions in English, see page 1.
COMMENCER
Table des matières
Instructions d’opération........................... 46
Opération Tuner...................................... 50
Opération du lecteur CD.......................... 52
Exigences de fichier MP3/WMA.............. 54
Opération MP3/WMA ............................. 57
Se servir d’un dispositif USB ou une
Carte SD.................................................. 59
Opération iPod ........................................ 61
Télécommande........................................ 63
Soin et Maintenance................................ 64
Dépannage.............................................. 65
Spécifications.......................................... 66
Aide d’installation gratuit
Si vous avez besoin d’aide ; prenez contact
avec le Soutient Technique à 1-800-323-4815
de 9H à 18H EST Lundi à Vendredi (les EtatsUnis et le Canada uniquement).
Para obtener instrucciones en Espa
ñol, diríjase a la página 23.
45
Page 48

OPERATING INSTRUCTIONS
SD1513
5
10
7
19
202123
1
18
22
24
15
14
PS/AS
13
17
25
2
3
4
Puissance
Pressez le bouton puissance (1) ou tout
autre bouton sur la face du récepteur pour
allumer l’appareil lorsque le commutateur
d’allumage est allumé. Pressez le bouton
puissance de nouveau pour mettre le récepteur
en arrêt. Si la radio était en marche lorsque le
commutateur d’allumage avait été éteint, le
récepteur se mettre automatiquement en
marche lorsque le commutateur d’allumage est
allumé de nouveau. Si le récepteur était éteint
lorsque le commutateur d’allumage avait été
9
6
8
SD1513
11
LIFT
12
16 27
éteint, il faudra mettre le récepteur en marche à
la main lors du redémarrage du véhicule.
Source
Pressez le bouton SRC (2) pour sélectionner
un mode d’opération différent comme indiqué
sur le panneau d’affichage. Des sources
disponibles comprennent Tuner, CD, SD, USB,
et Entrée auxiliaire. Pendant l’opération du
lecteur CD, presser SRC changera à la source
tuner sans éjecter le disque. Pour accéder à la
source d’entrée auxiliaire, pressez le bouton
SRC jusqu’à ce que « AUX » soit indiqué dans
l’affichage.
Volume
Pour augmenter le volume, tournez AUDIO
CONTROL (3) dans le sens des aiguilles d’une
montre. Pour diminuer le volume, tournez le
AUDIO CONTROL contre le sens des aiguilles
d’une montre. Lorsque le volume est ajusté, le
niveau de volume est montré sur le panneau
d’affichage comme un nombre allant de « 00 »
(le plus bas) à « 46 » (le plus haut).
46
Page 49

SD1513
Sélectionner
Pressez le bouton
AUDIO CONTROL
(4) pour passer à
travers le menu des
FAD
fonctions audio :
volume (VOL), basse
(BAS), aigu (TRB),
balance (BAL),
équilibreur (FAD) et volume (VOL). Lorsque
vous ajustez des fonctions audio l’appareil
sélectionnera automatiquement le mode et
reviendra à l’affichage normal dans cinq
secondes ou lorsqu’une autre fonction est
activée.
Basse
Pressez le bouton AUDIO CONTROL (4) deux
fois jusqu’à ce que « BAS » apparaisse dans
l’affichage. Dans cinq secondes, tournez le
AUDIO CONTROL (3) dans ou contre le sens
des aiguilles d’une montre pour ajuster le basse
de « -6 » à « +6 ». « 0 » représente une
réponse plate. Le niveau de basse est affiché
pendant cinq secondes ou jusqu’à ce qu’une
autre fonction ne soit activée.
Aigu
Pressez le bouton AUDIO CONTROL (4) trois
fois jusqu’à ce que « TRB » apparaisse dans
l’affichage. Dans cinq secondes, tournez le
AUDIO CONTROL (3) dans ou contre le sens
des aiguilles d’une montre pour ajuster l’aigu de
BAL
VOL
VOL
D
A
F
E
R
T
S
A
B
L
A
B
P
U
S
H
S
E
L
E
C
T
BAS
D
D
A
F
E
R
T
S
A
B
L
A
B
P
U
S
H
S
E
L
E
C
T
A
F
E
R
T
S
A
B
L
A
B
P
U
S
H
S
E
L
E
C
T
D
A
F
E
R
T
S
A
B
L
A
B
TRB
P
U
S
H
S
E
L
E
C
T
« -6 » à « +6 ». « 0 » représente une réponse
plate. Le niveau d’aigu est montré dans
l’affichage pour cinq secondes ou jusqu’à ce
qu’une autre fonction ne soit activée.
Balance
Pressez le bouton AUDIO CONTROL (4)
quatre fois jusqu’à ce que « BAL » apparaisse
dans l’affichage. Dans cinq secondes, tournez
l’AUDIO CONTROL (3) dans (ou contre) le
sens des aiguilles d’une montre pour ajuster la
balance entre les hauts parleurs de gauche et
de droite de « BAL R12 » (droite jusqu’au bout)
à « BAL L12 » (gauche jusqu’au bout). « BAL
C00 » représente un niveau de balance égal
entre les hauts parleurs de gauche et de droite.
La position de balance est montré dans
l’affichage pendant cinq secondes ou jusqu’à
ce qu’une autre fonction soit activée.
Equilibreur
Pressez l’AUDIO CONTROL (4) cinq fois
jusqu’à ce que « FAD » apparaisse dans
l’affichage. Dans cinq secondes ; tournez
l’AUDIO CONTROL (3) dans ou contre le sens
des aiguilles d’une montre pour ajuster
l’équilibre entre les hauts parleurs d’avant et
d’arrière de « FAD R12 » (arrière jusqu’au bout)
à « FAD F12 » (avant jusqu’au bout).
« FAD C00 » représente un niveau d’équilibre
égal entre les hauts parleurs d’avant et
d’arrière. La position de l’équilibreur est montré
47
dans l’affichage pendant cinq secondes ou
jusqu’à ce qu’une autre fonction ne soit activée.
Menu Système
Pressez et maintenez le bouton DISP (9) pour
voir le système « MENU ». Pressez le bouton
DISP plusieurs fois de suite ou bien utilisez les
boutons >>| (14) ou |<< (13) pour accéder aux
choix MENU suivantes.
Horloge (CLK)
Tournez l’AUDIO CONTROL à gauche pour
ajuster les heures et à droite pour ajuster les
minutes.
ZONE
Tournez l’AUDIO CONTROL pour sélectionner
l’espacement de fréquence approprié pour
votre zone : Etats-unis, LAT (Amérique Latine),
EUR (Europe), ou RUS (Russie).
DISTANT/LOCAL
Cette fonction est utilisée pour désigner la force
des signaux auxquels la radio s’arrêtera
pendant la syntonisation automatique.
« Distant » est le réglage par défaut permettant
à la radio de s’arrêter à une gamme plus large
des signaux. Pour régler l’appareil pour
sélectionner uniquement des stations fortes
pendant la syntonisation automatique tournez
l’AUDIO CONTROL pour choisir « Local ».
Page 50

SD1513
P-VOL (00-46)
Utilisez la choix « VOL PGM » pour
sélectionner le volume par défaut que la radio
assumera lorsqu’ellest allumée. Pour
programmer un niveau de volume spécifique
tournez l’AUDIO CONTROL pour sélectionner
le niveau désiré.
A NOTER : Si le P-Vol est réglé plus haut
auqe le volume sélectionné lorsque
l’appareil est éteint, l’appareil reprendra au
volume inférieur lorsqu’il est rallumé - et
non pas le P-Vol.
Tonalité Bip Allumée/Eteinte
La fonction de la tonalité bip permet la sélection
d’une tonalité bip audible qui se fait entendre
chaque fois qu’un bouton est pressé sur la face
de la radio. Tournez l’AUDIO CONTROL pour
sélectionner entre les choix de Tonalité Bip
suivante :
• BEEP ON : Le Bip est entendu chaque
fois qu’un bouton est pressé (fonction
activée).
• BEEP OFF : Bip n’est pas entendu.
iX-BASS
Pressez le bouton iXBASS (15) pour activer la
fonction iXBASS. Lorsque vous écoutez la
musique à des niveaux de volume bas ; cette
fonction augmentera les gammes de basse et
d’aigu pour compenser les caractéristiques de
l’ouie humaine. Pressez iXBASS de nouveau
pour désactiver cette fonction.
Caisson de basse
Pressez le bouton SUB-W (18) pour activer la
fonction Caisson de basse. Pressez de
nouveau pour éteindre la fonction.
A NOTER : La fonction Caisson de basse ne
fonctionne que lorsqu’un amplificateur
externe et le caisson de basse sont
branchés par un branchement sortie de
ligne caisson de basse sur le dos de
l’appareil.
Assourdir l’Audio (MUTE)
Pressez le bouton MUTE (6) pour assourdir le
volume audio. « MUTE » clignote dans
l’affichage. Rétablissez le volume au réglage
précédent en pressant le bouton MUTE de
nouveau et ajuster l’AUDIO CONTROL.
Affichage aux cristaux liquides
(LCD)
Le panneau à l’affichage aux cristaux liquides
(8) affiche la fréquence, l’heure et les fonctions
activées de l’appareil.
A NOTER : Après avoir été soumis à des
températures froides ; les panneaux à
l’affichage aux cristaux liquides prennent
plus longtemps à répondre et la visibilité
des numéros sur l’affichage peut
légèrement diminuer. L’affichage aux
cristaux liquides reviendra à normal lorsque
la température augmente jusqu’à atteindre
le niveau normale.
Affichage (DISP)
Lorsque l’appareil est en marche, l’affichage
aux cristaux liquides montre automatiquement
l’affichage pour la source actuelle de
l’opération.
Lorsque l’appareil est allumé, pressez le bouton
DISP (9) pour afficher l’heure de la journée. Au
bout de cinq secondes ; l’affichage revient à la
source actuelle.
Entrée auxiliaire
Soulevez le couvercle à la droite de la radio
pour révéler le connecteur AUX IN (16). Utilisez
le câble média 3.5mm pour brancher un
dispositif portatif pour reproducton à travers le
système acoustique du véhicule.
Relâchement du panneau avant
Le bouton REL (relâchement) du panneau
avant (10) relâche le mécanisme qui tient le
panneau avant au châssis.
48
Page 51

SD1513
Détacher le panneau avant
Pour détacher le panneau avant, pressez
d’abord le bouton REL (10) pour relâcher le
côté gauche du panneau. Ensuite ; tenez le
côté relâché et tirez le panneau du châssis.
Après avoir enlevé le panneau avant gardez-le
dans l’étui portatif fourni pour le protéger de la
poussière et de l’endommagement.
ENLEVER LE PANNEAU AVANT
1
2
Rattacher le panneau avant
Pour rattacher le panneau avant, soyez sûr que
les bornes électriques sur le dos du panneau
sont libre de poussière et de saletés, comme le
débris peut provoquer l’opération intermittente
ou d’autres malfonctions. Positionnez le côté
droite du panneau pourq qu’il soit correctement
engagé et puis pressez légèrement le côté
gauche du panneau jusqu’à ce que la panneau
se verrouille sur place.
Bouton de réinitialisation
Le bouton de réinitialisation (26) est situé sur
l’avant du châssis et ne peut être accédé que
lorsque le panneau avant est enlevé. La
circuiterie de réinitialisation protège la
circuiterie du microprocesseur. Puisque la
réinitialisation de l’appareil effacera l’heure et la
mémoire préréglée, il ne doit être activée que
lors de l’installation initiale après que tout le
câblage ne soit terminé ou s’il y a une
malfonction d’un interrupteur quelconque sur
l’appareil. Dans ces circonstances, pressez le
bouton de réinitialisation va dégager le système
et retournera l’appareil à l’opération normale.
RESET
26
49
Page 52

OPERATION TUNER
SD1513
5
10
7
19
202123
1
18
22
24
15
14
PS/AS
13
17
25
2
3
4
Sélecteur de bande AM/FM
(BAND)
Pressez le bouton BAND (5) pendant que la
radio est allumée pour changer entre trois
bandes FM et deux bandes AM. « F1 », « F2 »,
« F3 » ou « AM », « AM2 » apparaît dans
l’affichage pour indiquer la bande actuellement
sélectionnée.
Syntonisation
Syntonisation Automatique
Pressez le bouton >>| (14) pour syntoniser vers
le haut en fréquence et le bouton |<< (13) pour
9
6
8
SD1513
11
LIFT
12
16 27
syntoniser vers le bas en fréquence. L’appareil
s’arrêtera automatiquement à la prochaine
station forte. Si le mode Local est actif ; la radio
va chercher la prochaine station locale forte
lorsque l’un ou l’autre bouton est pressé.
Syntonisation à la main
Pressez le bouton >>| (14) ou |<< (13) pour
plus de deux secondes pour sélectionner le
mode de syntonisation à la main. « MANUAL »
apparaîtra dans l’affichage. Pressez les
boutons de syntonisation Vers le haut/Vers le
bas pour déplacer la fréquence de radio vers le
haut ou vers le bas deux chiffres à la fois.
50
Pressez et maintenez les boutons de
Syntonisation vers le haut/vers le bas pour
avancer rapidement jusqu’à une fréquence
particulière. Relâchez lorsque la fréquence est
atteinte. Si la syntonisation n’est pas ajustée
dans cinq secondes après être entrédans le
mode de syntonisation à la main, la radio va
revenir à la syntonisation automatique et
« AUTO » apparaîtra dans l’affichage.
Stations préréglées
Vous pouvez mettre en mémoire jusqu’à six
stations sur chaque bande comme des
Page 53

SD1513
préréglés et qui peuvent être instantanément
rappelés en pressant le bouton préréglé
associé sur le panneau avant (19-24). Pour
mettre une station en mémoire, allumez la radi,
et sélectionnez la bande et la station désirées.
Pressez et maintenez le bouton préréglé désiré
(numéroté un à six sur la face de la radioou sur
la télécommande) pendant plus de deux
secondes. Lorsqu’elle est mise en mémoire le
numéro préréglé apparaîtra dans l’affichage. La
station est alors mise en mémoire et peut être
rappelée en pressant le bouton préréglé
correspondant. Répétez pour les cinq préréglés
qui restent sur la bande actuelle et pour tous
les préréglés sur trois autres bandes.
Scanner les préréglés/Mise en
mémoire automatique (PS/AS)
Mise en mémoire automatique
Sélectionnez six stations fortes et les mettre en
mémoire pour la bande actuelle en utilisant la
fonction Mise en Mémoire Automatique. Pour
activer cette fonction, pressez et maintenez le
bouton PS/AS (17) pour plus de deux
secondes. La radio va automatiquement
scanner chaque bande et entrer des stations
fortes dans des positions de mémoire
préréglées. Après avoir entré les stations dans
la mémoire, l’appareil s’arrêtera
automatiquement à chaque station pendant
cinq secondes pour qu’on puisse l’entendre.
Lorsque vous utilisez la fonction Mise en
Mémoire Automatique, les nouvelles stations
remplaceront toute station déjà mise en
mémoire préréglée.
Scanner les préréglés
Pressez le bouton PS/AS (17) pour scanner les
six stations préréglées dans la bande AM ou
toutes les bandes FM. L’appareil s’arrêtera à
chaque station pendant cinq secondes avant de
continuer jusqu’à la prochaine station préréglée
et le numéro du préréglé clignotera dans
l’affichage pendant le scan des préréglés.
Pressez le bouton PS/AS de nouveau pour
arrêter le scan et écouter la station actuelle.
51
Page 54

OPERATION LECTEUR CD
SD1513
5
10
7
19
202123
1
18
22
24
15
14
PS/AS
13
17
25
2
3
4
Insérer le CD
Avec la face étiquette en haut, insérez
doucement le disque dans la fente pour CD (11)
jusqu’à ce que le mécanisme à chargement
doux s’engage et tire le disque vers l’intérieur.
La reproduction du disque commence .Le
numéro de la piste et le temps écoulé
apparaissent dans l’affichage.
Sélection de piste
Les fonctions pour sélection de piste sont
utilisées pour accéder rapidement au début
d’une piste particulière lorsque le disque est en
9
6
8
SD1513
11
LIFT
12
16 27
train d’être reproduit. Pressez le bouton >>|
(14) pour aller en avant ou le bouton |<< (13)
pour aller en arrière pour trouver la piste
désirée. Les numéros de piste apparaissent
dans l’affichage au fur et à mesure qu’ils sont
accédés.
Pressez et maintenez le bouton >>| ou |<< pour
faire avance rapide ou recul rapide à travers un
disque. Pendant les deux fonctions le temps
écoulé apparaîtra dans l’affichage. Relâchez le
bouotn pour reprendre la reproduction du CD.
A NOTER : Cet appareil est conçu pour jouer
les disques compacts de taille 5” (12 cm.)
standardisée seulement. N’essayez pas
d’utiliser des CDs simples de 3” (8 cm.) dans
cet appareil soit avec ou sans un adaptateur
comme cela peut endommager le lecteur et/
ou le disque. De tels endommagements ne
sont pas couverts par la garantie.
Reproduction/suspension
Pressez le bouton de la reproduction/
suspension (19) pour suspendre la reproduc
tion du disque. « PAUSE » apparaîtra dans
l’affichage. Pressez le bouton encore une fois
pour reprendre la reproduction du disque.
L’indication « S--PAUSE » disparaîtra de
l’affichage et la reproduction reprendra à partir
du moment de suspension.
52
Page 55

SD1513
Scannage de l’intro du disque
(INT)
Pendant la reproduction du disque, pressez le
bouton 2 INT (20) pour jouer les 10 premières
secondes de chaque piste sur le disque.
« INT » apparaîtra dans l’affichage. Lorsque la
piste désirée est atteinte, pressez 2 INT de
nouveau pour terminer la fonction de scannage
et jouer la piste sélectionnée.
« INT » disparaîtra de l’affichage. La fonction
de scannage sera annulée aussi lorsque l’on
active les fonctions de répétition ou de
mélange.
Répétition du disque (RPT)
Pressez le bouton 3 RPT (21) pendant la
reproduction du disque pour répéter de manière
continuelle la piste sélectionnée. « RPT »
apparaîtra dans l’affichage. Pressez 3 RPT de
nouveau pour arrêter la répétition. « RPT »
disparaîtra de l’affichage et la reproduction
normale se reprendra. La fonction de répétition
sera annulée lorsque l’on active le scannage et
ou la fonction de mélange.
Mélange du disque (RDM)
Pressez le bouton 4 RDM (22) pendant la
reproduction du disque pour jouer toutes les
pistes sur un CD dans un ordre mélangé au
hasard. « RDM » apparaîtra dans l’affichage.
Pressez le bouton 4 RDM de nouveau pour
arrêter la reproduction au hasard. « RDM »
disparaîtra de l’affichage et la reproduction
régulière reprendra. La fonction de mélange
sera annulée lorsque l’on activer les fonctions
de scannage ou de répétition.
Ejection du disque
Pressez le bouton d’éjection (12) pour arrêter la
reproduction du CD et éjecter le disque.
L’appareil changera au tuner ou à l’opération
AUX en fonction du mode qui était en opération
avant la reproduction du disque. Si le disque
n’est pas enlevé de l’appareil dans 15
secondes, le disque se rechargera pour éviter
des endommagements accidentels. La
reproduction du disque peut être reprise en
pressant SRC (2) pour choisir une fonction du
lecteur CD.
Codes d’erreur du lecteur CD
Si un problème survient lors de l’opération du
CD, « Disc Error » ou « Error 1 » peuvent
apparaître dans le panneau d’affichage. Si
« Disc Error » apparaît, essayez d’éjecter et de
recharger le disque dans le lecteur. Lorsque le
disque est en dehors de l’appareil, assurezvous qu’il soit propre et intact et puis rechargezle. « Error 1 » peut indiquer un certain nombre
de problèmes y compris une erreur mécanique
ou une erreur de commande du
microprocesseur du lecteur. Presser le bouton
de réinitialisation (26) peut aider, mais effacera
le temps et la mémoire préréglée. Si les
mesures suggérées ne résolvent pas le
problème prenez contact avec une station de
garantie près de vous pour assistance
supplémentaire.
53
Page 56

EXIGENCES DE FICHIERS MP3/WMA
Les fichiers musiques MP3 et WMA (Windows
Media Audio) sont des fichiers audio
numériques qui sont comprimés pour permettre
plus de fichiers sur un seul CD. Cet apparaît
peut jouer MP3/WMA directement depuis des
fichiers contenus sur un CD-R/RW, un dispositif
ou une carte SD en utilisant les boutons sur le
récepteur (ou la télécommande) comme décrit
ci-dessous. Plusieurs types de logiciels sont
disponibles pour la conversion des fichiers
audio dans des formats MP3/WMA. Phase
Linear recommande Nero ou Roxio Easy CD
Creator. En fonction du type de média et la
méthode d’enregistrement certains CD-R/RWs
peuvent être incompatibles avec cet appareil.
Cet appareil soutient la reproduction du MP3/
WMA, et CDDA (CDA), CDs de Mode Mélangé
et CD-Extra (y compris des disques multiséances), mais les disques sur lesquels la
séance n’a pas été fermée ne joueront pas.
Notes sur la reproduction MP3/
WMA
Cet appareil peut jouer MP3 (MPEG 1, 2, 2.5,
Audio Layer 3). Cependant la média
d’enregistrement MP3 et les formats acceptés
sont limités. Lorsque vous écrivez MP3/WMA
faites attentions aux restrictiosn suivantes :
Média Acceptable
La média d’enregistrement MP3/WMA
accetable pour cet appareil sont CD-ROM, CDR et CD-RW. Lorsque vous utilisez le CD-RW,
utilisez le format plein plutôt que le format
rapide pour éviter des malfonctions.
Des formats de disque
acceptables
Les formats suivaqnts sont disponibles pour la
médié utilisée dans cet appareil. Le nombre
maximum de caractères utilisés pour un nom
de fichier y compris le délimiteur (« . ») et
l’extensions à trois caractères sont indiqués
entre parenthèses.
• ISO 9660 Level 1 (11 caractères)
• ISO 9660 Level 2 (31 caractères)
• Joliet (31 caractères)
• Romeo (31 caractères)
Jusqu’à 200 caractères peuvent être affichés
dans le format de fichier à nom long. Pour une
liste des caractères disponibles veuillez voir le
mode d’emploi du logiciel d’écriture et la
section « Entrer les noms de Fichers et de
Dossiers » cidessous. La média reproductible
sur cet appareil à des limitations suivantes :
• Nombre maximum de dossiers imbriqués :
8
SD1513
• Nombre maximum de fichiers par disque :
999
• Nombre maximum de dossiers par disque
: 255
Des fichiers MP3/WMA écrits dans un format
uatre que ceux spécifiés ici ne joueront pas
avec succès et leur nom de fichier ou leur nom
de dossier ne seront pas bien affichés.
Enchiffreur MP3/WMA et des
réglages de l’écrivain CD
Utilisez les réglages suivants lorsque vous
comprimez des données audio dans des
données MP3 avec un enchiffreur MP3.
• Transfert de débit binaire : 32 - 320 kbps
• Fréquence d’échantillonnage : 32, 44.1,
48kHz (WMA) et 16, 22.05, 24, 32, 44.1,
48kHz (MP3)
Lorsque vous utilisez un écrivain CD pour
enregistrer des MP3/WMA jusqu’à la capacité
maximale du disque, désactivez écriture
supplémentaire. Pour enreigstrer un disque
vide jusqu’à sa capacité maximale sélectionnez
« disc at once ».
54
Page 57

SD1513
Entrer Repère ID3
Cet appareil soutient les versions de repère ID3
1.0 et 1.1. Pour des codes de caractères
référez-vous au tableau ci-dessous.
Entrer les noms de fichiers et de
dossiers
Des noms utilisant des caractères de liste de
codes sont les seuls noms de fichiers ou de
dossiers qui peuvent être entrés et affichés.
D’autres caractères ne s’afficheront pas
correctement. Cet appareil ne reconnaît et ne
joue que des fichiers avec extensions MP3/
WMA.
A NOTER : Un nom de fichier entré avec des
caractères qui ne sont pas sur la liste de
codes peut ne pas jouer correctement.
Ecrire des fichiers sur un Disque
Lorsqu’un disque contenant des données MP3/
WMA est chargé, l’appareil vérifie toutes les
données. Si le disque contient beaucoup de
dossiers ou des fichiers non-MP3/WMA, la
reproduction des fichiers MP3/WMA sera
retardée, l’appareil peut mettre du temps pour
aller au fichier prochain et des recherches
peuvent ne pas être exécutées efficacement.
Charger un tel disque peut produire un grand
bruit et endommager les hauts parleurs.
A NOTER : N’essayez pas de jouer un
disque contenant un fichier non-MP3/WMA
avec une extension MP3/WMA ou un disque
contenant des fichiers non MP3/WMA.
Anti-choc Electronique
• 10 secondes pour le CDDA (CDA)
• 60 secondes pour des fichiers MP3/WMA
enregistrés à 44.1kHz, 128kbps
Débit binaire
Cet appareil soutient des débits binaires de 32 320 kbps.
L’ordre d’écoute des fichiers
Lorsqu’ils sont recherchés pour reproduction,
des fichiers et des dossiers (Recherche
Dossier, Recherche Fichier ou Sélection de
Dossier) sont accédés dans l’ordre dans lequel
ils ont été écrits par le graveur de CD. Par
conséquent, l’ordre dans lequel on s’attend à
les écouter peut ne pas être l’ordre dans lequel
ils sont en fait joués.
Vous pouvez régler l’ordre dans lequel MP3/
WMA sont joués en les gravants sur un disque
tel qu’un CD-R avec leur nom commençant par
des numéros de jeu par séquence tels que
« 01 » à « 99 ».
Par exemple, un disque avec hiérarchie
dossier/disque suivant est soumis à Recherche
Dossier, Recherche Fichier ou Sélection de
Dossier comme montré ci-dessous.
55
Page 58

SD1513
56
Page 59

SD1513
OPERATION MP3/WMA
5
10
7
19
202123
1
18
22
24
15
14
PS/AS
13
17
25
2
3
4
Suspension
Pressez le bouton 1 >/|| (19) pour suspendre la
reproduction du disque. Pressez le bouton de
nouveau pour reprendre la reproduction.
Sélection de piste
Pressez le bouton >>| (14) ou |<< (13) pour
moins d’une seconde pour avancer jusqu’à la
prochaine piste sur le disque ou bien pressez et
maintenez pour faire avance ou recul rapide à
travers le disque. Le jeu du disque commence
lorsque le bouton est relâché.
9
6
8
SD1513
11
LIFT
12
16 27
Naviguer des dossiers
Pressez les boutons 5 \/ et 6 /\ (23, 24) pour
sélectionner le dossier/répertoire prochain ou
précédent.
Intro Scan (INT)
Alors qu’un disque est en train de jouer,
pressez le bouton 2 INT (20) pour jouer les 10
premières secondes de chaque piste sur le
disque. Lorsque vous arrivez à la piste désirée,
pressez 2 INT de nouveau pour terminer le
scannage et jouer la piste sélectionnée.
Répétition (RPT)
Pressez le bouton 3 RPT (21) pour répéter le
fichier actuel. Pressez 3 RPT de nouveau pour
reprendre la reproduction normale.
Au hasard (RDM)
Pressez le bouton 4 RDM (22) pour jouer tous
les fichiers sur un disque au hasard. Pressez 4
RDM de nouveau pour reprendre la
reproduction normale.
57
Page 60

SD1513
Recherche de fichier ou de
dossier MP3/WMA
Cet appareil offre deux méthodes de chercher
des fichiers ou des dossiers.
Recherche du numéro du fichier direct
Pressez le bouton BAND (5). L’affichage aux
cristaux liquides affichera « Number ». Tournez
l’AUDIO CONTROL pour sélectionner le
numéro de piste désirée, et puis pressez
l’AUDIO CONTROL pour confirmer et jouer le
fichier sélectionné.
Recherche par navigation
Pressez le bouton BAND (5) deux fois.
L’affichage aux cristaux liquides affichera
« File ». Tournez l’AUDIO CONTROL pour
naviguer à travers tous les dossiers et les sousdossiers sur le disque. Les noms du dossier
seront affichés sur l’affichage aux cristaux
liquides. Pressez l’AUDIO CONTROL pour
accéder aux sous-dossiers ou des fichiers.
Tournez l’AUDIO CONTROL pour naviguer et
puis pressez le bouton de sélection pour
confirmer et commencer la reproduction.
Pendant la rechercher par navigation, tournez
l’AUDIO CONTROL contre le sens des aiguilles
d’une montre pour revenir au niveau de dossier
précédent.
Information d’affichage
Pressez le bouton DISP (9) pour afficher
l’horloge ou l’information ID3 disponibles,
comme suit : titre de chanson, nom du
répertoire, le nom d’artiste ; etc.
58
Page 61
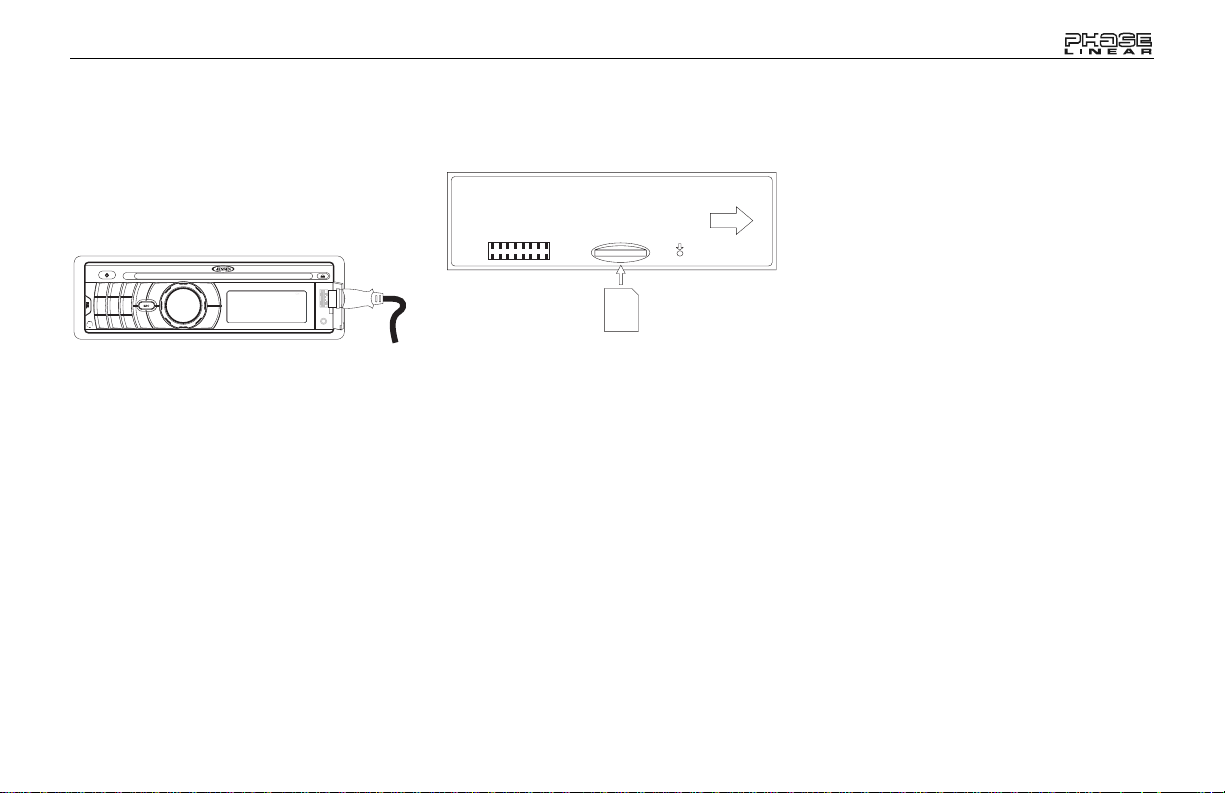
SD1513
UTILISER UN DISPOTIF USB OU UNE CARTE SD
Charger un dispositif USB
Des dispositifs USB peuvent être joués à
travers le connecteur USB sur le panneau
avant. Pour accéder aux fichiers sur un
dispositif USB, insérez un dispositif USB
comme indiqué ci-dessous.
Après l’insertion un dispositif USB contenant
des fichiers MP3 ou WMA, « USB HOST »
apparaît dans l’affichage et l’appareil se mettra
automatiquement à scanner la carte pour des
fichiers musiques et commencer la
reproduction.
Pour éjecter le dispositif USB, pressez le
bouton SRC (2) pour sélectionner une source
différente. Tirez le dispositif USB tout droit et
retournez le couvercle à la position fermée.
Charger une carte SD
Pour insérer une carte SD, vous devez d’abord
enlever le panneau avant pour révéler la fente
de la carte SD (voir ‘Relâchement du panneau
avant » à la page 12) . Insérez votre carte SD
comme illustré ci-dessous et puis réinstaller le
panneau avant.
RESET
Après l’insertion d’une carte SD contenant des
fichiers MP3 ou WMA, « SD/MMC » apparaît
dans l’affichage et l’appareil se mettra à
scanner automatiquement la carte pour des
fichiers musiques et commencer la
reproduction.
Pour éjecter la carte SD, enlevez le panneau
avant et puis pressez sur la carte SD pour le
relâcher. Tirez la carte SD tout droit et
remplacer le panneau avant.
Naviguer les fichiers
Veuillez vous « Operation MP3/WMA » á la
page 57 pour des informations concernant la
navigation des répertoire et la recherche des
fichiers.
Copier la musique
Votre SD1513 est équipé d’une fonction Copier
qui vous permet de copier de fichiers MP3 ou
WMA à une carte SD/MMC ou un dispositif
USB. Pour Copier la musique, exécuter les
étapes suivantes :
1. Insérez un disque et sélectionner la piste
2. Pressez le bouton COPY (25) pour activer
3. Tournez l’AUDIO CONTROL (3) pour
4. Pressez le bouton AUDIO CONTROL (4)
Pour arrêter Copier avant que le fichier ne soint
terminé, pressez le bouton COPY. L’affichage
que vous voudriez copier.
la fonction Copier.
sélectionner soit l’USB ou la CARTE (SD/
MMC).
pour commencer à copier.
• L’appareil commencera à copier le
fichier actuel, commençant au début
de la piste. L’affichage aux cristaux
liquides affichera « >>> ## ». Copier
s’arrêtera à la fin du fichier.
• L’information enregistrée est stockée
dans un dossier qui s’appelle «
MY_MP3 » ou « MY_WMA » sur la
source de destination.
• Copier s’arrêtera et l’appareil va
afficher « Memory Full » si le
dispositif de stockage est tout rempli.
59
Page 62

SD1513
aux cristaux liquides va afficher « STOP » et le
fichier incomplet sera effacé du dossier de
destination.
A NOTER : N’enlevez jamais un dispositif
USB pendant l’enregistrement ou le
transfert de musique. Cela peut
endommager le dispositif ou causer le
système à se verrouiller. Ne changez pas de
mode ou allumer la puissance radio ou
éteignez le commutateur d’allumage
pendant l’enregistrement.
Effacer des fichiers copiés
Vous pouvez effacer les fichiers copiés depuis
un dispositif USB ou une carte SD/MMC alors
qu’un fichier est en train de jouer ou après avoir
sélectionné le fichier en mode Recherche par
Numéro ou Recherche par Navigation. Pour
effacer un fichier pratiquez les étapes
suivantes :
1. Pressez et maintenez le bouton BAND (5)
pour activer la fonction Effacement.
L’affichage aux cristaux liquides affichera
« ERASE 010 ».
2. Pressez l’AUDIO CONTROL (4) pour
sélectionner le mode Erase.
3. Tournez l’AUDIO CONTROL (3) et
sélectionné « Y » pour effacer (ou
sélectionnez « N » pour annuler la fonction
d’effacement).
4. Pressez le bouton AUDIO CONTROL
pour confirmer. Le fichier va arrêter la
reproduction (s’il est en train d’être joué) et
sera effacé. Lorsque ceci est terminé, le
système va afficher « ERASE OK ».
Gestion des fichiers
La musique enregistrée ou transférée en
utilisant le SD1513 sera stockée dans les
dossiers par défaut que voici :
• MY_MP3 : Des fichiers MP3 transférés.
• MY_WMA : Des fichiers WMA transférés
La musique enregistrée/transférée est stockée
dans le dossier correspondant auquel est
donné la convention de nomination suivantes :
« XX0001.MP3 », où XX est le nom de la
source (i.e. SD0001.MP3).
60
Page 63

SD1513
OPERATION iPod
Accéder au mode iPod
Cet appareil est équipé d’une fonction prête
pour l’iPod qui vous permet de commander et
charger votre iPod (si compatible) en utilisant
les boutons de commande du panneau avant.
L’appareil va automatiquement changer au
mode iPod lorsqu’un iPod est branché au câble
iPod.
8 Din iPod Ready Cable
HEAD UNIT
iPod
iPod iPod
photo
Pour rentrer au menu iPod depuis n’importe
quelle autre source menu, pressez le bouton
SRC (2) sur le panneau avant ou la
télécommande jusqu’àce que « iPod »
apparaisse sur l’affichage.
A NOTER : Le SD1513 ne sélectionnera pas
de fichiers vidéo peu importe un fichier
mini
iPod
nano
iPod Cable
vidéo était ou non le dernier fichier
reproduit lorsque l’iPod a été branché à la
radio. Seuls les fichiers musiques sont
supportés.
Allumer/Eteindre l’iPod
La puissance iPod s’allume automatiquement
lorsque l’iPod est branché au câble iPod à 30
aiguilles, autant que le commutateur d’allumage
du véhicule est en marceh. Vous pouvez
éteindre l’iPod en le débranchant du câble et en
éteignant le commutateur d’allumage. Lorsque
le commutateur d’allumage est éteint, l’iPod
fera pause et puis entrera dans le mode
sommeil au bout de 2 minutes. L’iPod ne peut
pas être allumé ou éteint depuis l’iPod luimême lorsqu’il est branché.
A NOTER : L’iPod va se recharger
continuellement lorsqu’il est branché à
l’appareil autant que le commutateur
d’allumage du véhicule est en marche.
Voir l’information de la
reproduction
Pressez le bouton PS/AS (17) pour afficher
l’information de reproduction iPod dans l’ordre
suivant :
• Titre de chanson
•Artiste
• Nom de l’Album
• Temps écoulé
Jouer/ Suspendre
Pressez le bouton 1 >/|| (19) pour suspendre ou
reprendre la reproduction.
Sélection de piste
Sélectionner une piste
Pressez le bouton >>| (14) ou |<< (13) pendant
moins d’une seconde pour avancer jusqu’à la
prochaine chanson dans le dossier actuel.
Avance rapide/Recul rapide
Pressez et maintenez le bouton >>| (14) ou |<<
(13) pendant plus d’une seconde pour faire
avance rapide ou recul rapide. Reproduction
recommence lorsque le bouton est relâché.
Répéter (RPT)
Pressez le bouton 3 RPT (21) pendant la
reproduction du disque pour répéter
continuellement la chanson sélectionnée.
Pressez 3 RPT de nouveau pour arrêter la
fonction de répétition.
Pressez et maintenez le bouton 3 RPT (21)
pour plus de trois secondes pour répéter
continuellement l’album/dossier tout entier.
61
Page 64

SD1513
Pressez et maintenez le bouton 3 RPT de
nouveau pour arrêter la fonction de répétition.
Mélange (RDM)
Pressez le bouton 4 RDM (22) pour jouer tous
les fichiers dans l’album/dossier actuel au
hasard. Pressez 4 RDM de nouveau pour
reprendre la reproduction normale. Pressez et
maintenez 4 RDM pour plus de trois secondes
pendant la reproduction de l’iPod pour jouer
toutes les chansons dans tous les dossiers
dans le désordre. Pressez 4 RDM de nouveau
pendant plus de trois secondes pour reprendre
la reproduction normale.
Mode de recherche
Pendant le mode de reproduction de l’iPod
pressez le bouton BAND (5) pour entrer dans le
mode de recherche iPod. Pressez le bouton
BAND plusieurs fois de suite pour accéder aux
modes de rechercher dans l’ordre suivant :
• Liste d’écoute
•Artiste
• Album
• Chanson
•Genre
Après avoir sélectionné le mode de recherche
désiré, pressez le bouton AUDIO CONTROL
(4) dans 10 secondes pour confirmer le mode
de recherche. Tournez l’enchiffreur à rotation
pour naviguer à travers l’Album, l’artiste ou les
chansons contenus dans votre iPod. Pressez
l’AUDIO CONTROL pour jouer la chanson
sélectionnée. Pendant le mode de recherche,
pressez le PS/AS pour revenir rapidement au
niveau le plus haut de l’album, la liste d’écoute,
le Gendre ; etc.
62
Page 65
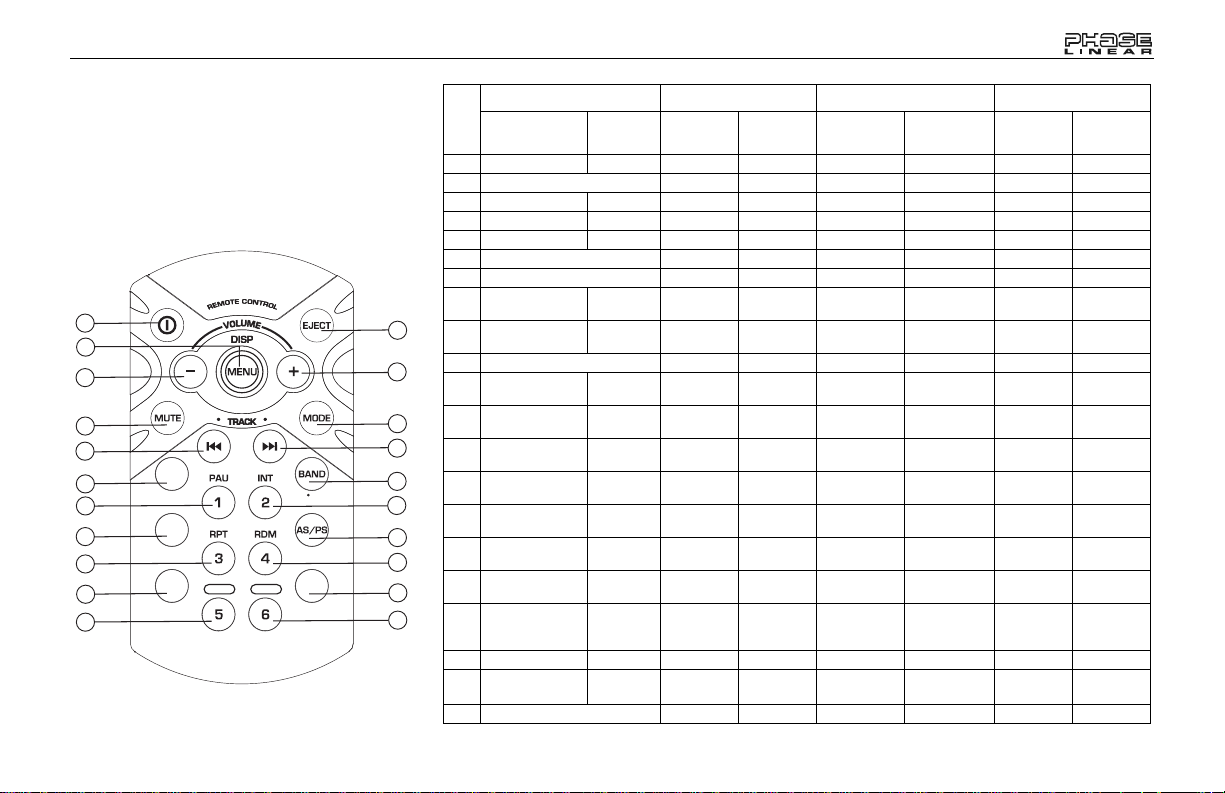
SD1513
TELECOMMANDE
La télécommande vous permet de commander
les fonctions de base du SD1513.
La sonde de la télécommande est située au
côté gauche du panneau avant à gauche du
bouton 3 RPT (21).
1
3
7
5
9
10
12
18
14
20
16
AUDIO
ENTER
SUB-W
REC
COPY
F- DN
F- UP
E
H
R
A
R
S
A
E
E
S
ID3
XBS
11
C
13
19
15
21
17
SYSTEME TUNER CD/MP3/WMA iPod
CLE
PRESSER
COURT
PRESSER
LONG
PRESSER
COURT
PRESSER
LONG
PRESSER
COURT
PRESSER
1 Puissance
2Ejecter
3 Affichage Menu
4 Mode
5Mute
6 Volume Vers le haut
7 Volume Vers le bas
8 Chercher
2
6
4
8
9 Chercher
10 Menu audio Entrer Entrer
11 Band Cherche fich-
12 M1 Mémoire Suspendre/
13 M2 Mémoire 2 Intro Intro de dos-
vers le haut
vers le bas
Syntoniser
vers le haut
Syntoniser
vers le bas
Piste/fichier
vers le haut
Piste/fichier
vers le bas
ier/dossier
jouer
Recul rapide Fichier vers
Effacement
14 M3 Mémoire 3 Répéter Répétition du
15 M4 Mémoire 4 Hasard Dossier au
16 M5 Mémoire 5 Dossiers vers
17 M6 Mémoire 6 Dossier vers
18 Caisson de
basse allumé/
éteint
le bas
le haut
19 PS AS ID3 Info
20 enregistrée/
transférée
21 iX-Bass Marche/Arrêt
LONG
Avance
rapide
de fichier
sier
dossier
hasard
PRESSER
COURT
Fichier vers
le haut
le bas
Cherche
Suspendre/
jouer
Répéter Répétition
Mélange Mélange
iPod
PRESSER
LONG
Avance
rapide
Recul
rapide
d’album
d’album
63
Page 66

SOIN ET MAINTENANCE
Lecteur CD
Les consignes suivantes vous aideront à
prolonger la vie de votre lecteur CD :
1. Lorsque vous nettoyez l’intérieur du véhicule ne faites pas tomber de l’eau ou des
fluides quelconques sur l’appareil.
2. Le lecteur CD ne fonctionnera pas bien
dans des conditions de chaleur ou de froid
extrêmes ou dans des conditions
humides. En cas de telles conditions
attendez jusqu’à l’intérieur du véhicule
revienne à une température normale ou la
condensation sur la lentille du lecteur CD
s’est évaporée avant d’utiliser le lecteur.
3. N’insérez jamais rien d’autre qu’un CD de
5” rond dans le lecteur. Essayer d’insérer
des CDs d’autres taille (même avec un
adaptateur) provoquera de
l’endommagement qui n’est pas couvert
sous la garantie.
4. Enlevez toujours le CD lorsque le lecteur
n’est pas en usage.
5. L’appareil a été conçu avec un mécanisme
pour minimiser la vibration pour minimiser
l’interruption de la reproduction du disque
à cause de la vibration normale d’un
véhicule en mouvement. Cependant, des
sauts de son occasionnels peuvent
survenir lorsque vous conduisez sur des
routes rugueuses. Cela n’égratignera pas
Compact Discs
CD-R / CD-RW
Dépendant du type de média et la méthode
d’enregistrement, certains CD-R/RWs peuvent
être incompatibles avec cet appareil. Après
l’enregistrement, la séance doit être fermée.
Veuillez vous référer aux procédures
recommandéesde votre logiciel pour fermer un
disque/séance. Réviser votre logiciel
d’enregistrement pour vous familiariser avec
les bonnes procédures d’enregistrement. Nous
recommandons les dernières versions de
ROXIO ou NERO en ce qui concerne les
logiciels d’enregistrement.
En plus, cet appareil ne reconnaîtra que le
format CDDA (Compact Disc Digital Audio),
.MP3 et .WMA formats « enregistré » sur un
CD-R/RW. Cet appareil ne supporte pas les
autres formats tels que WAV, ou OGG.
Soin et manipulation du CD
De la poussère, des saletés et des égratignures
et des voilures peut causer des sauts de son
pendant la reproduction et une détérioration de
ni ne nuira pas au disque et la
reproduction normale se reprendra
lorsque les conditions rugueuses cessent
d’opérer.
SD1513
la qualité de son. Veuillez suivre ces consignes
pour prendre soin de vos disques compacts.
1. Essuyez avec soin des empreintes digitales, de la poussière et des saletés de la
surface du disque avec un tissu doux.
Essuyez dans un mouvment droit allant du
centre vers la périphérie du disque.
2. N’utilisez jamais des produits chimiques
tels que des vaporisateurs ou des fluides
détergentes pour nettoyer les CDs,
comme ils peuvent endommager la
surface du disque de manière irréparable.
3. Les disques doivent être gardés dans leur
étuis de protection lorsqu’ils ne sont pas
utilisés.
4. N’exposez pas les disques aux rayons de
soleil direct, des températures hautes ou
de l’humidité haute pendant de longues
périodes.
5. Ne collez pas de papier, de la bande ou
des étiquettes CD sur la surface du
disque comme cela peut cause de
l’endommagement interne.
64
Page 67

SD1513
DEPANNAGE
Problème Cause Correction
Ne fonctionne pas (l’affichage en s’illumine pas)
Pas de puissance à l’appareil Fusible en ligne sauté Vérifiez/remplacez le fusible
Tous les haut sparleurs ne fonctionnent
pas
Saute les fusibles Fil de puissance fait court-circuit à la terre Assurez-vous que le fil n’est pas pincé
Le CD saute trop Le montage du récepteur n’est pas solide ou la
Pas de puissance au fil jaune ; pas de puissance
au fil rouge
Fusible en ligne sauté Remplacez le fusible
Des greffes ou des branchements incorrects Vérifiez toutes les greffes et les branchements
Les fils d’hauts parleurs font court-circuit à la
terre châssis ou l’un à l’autre.
Les fils d’hauts parleurs font court-circuit à la
terre
Fusible incorrect ou fusible trop petit Installez le fusible du rating correct
courroie arrière n’est pas sûre.
Vérifiez le branchement avec une lumière d’essai, vérifiez le
fusible du véhicule avec une lumière d’essai.
Vérifiez les greffes et isoler tous les fils nus
Assurez-vous que le fil n’est pas pincé
Vérifiez le montage et la courroie arrière ; serrez s’il le faut.
65
Page 68

SPECIFICATIONS
CEA Power Ratings
Sortie puissance : 13 watts RMS X 4 channels
into 4-ohms @ <
Rapport signal au bruit : 70dBA sous référence
(Référence : 1 watt, 4-ohms)
Réponse en fréquence : 20Hz to 20kHz (-3dB),
Entrée auxiliaire utilisée comme source de
référence
Voltage de fournitures référence : 14.4VDC
Lecteur CD
Rapport signal au bruit : >90dBA
Réponse en fréquence : 20Hz-20kHz, -3dB
Séparation des canaux : >55dB @ 1kHz
Adaptateur D/A : 1 Bit/CH
FM Tuner
Gamme de syntonisation(USA) : 87.5MHz -
107.9MHz
Gamme de syntonisation (Europe) : 87.50MHz-
108.00MHz
1% THD+N
Sensibilité mono : 12dBf
50dB sensibilité de mise en sourdine(stereo) :
16dBf
Séparation stéréo @ 1kHz : >35dB
Réponse en fréquence : 30Hz-14kHz. +
AM Tuner
Gamme de syntonisation (USA) : 530 kHz 1710 kHz
Gamme de syntonisation (Europe) : 522kHz1620kHz
Sensibilité @ 20dB signal to noise : 30uV
Réponse en fréquence : 50Hz-2kHz., -3dB
Entrée auxiliaire
Sensibilité d’entrée : 400mV RMS pour 1 watt
RMS multiplié par 4-ohms
Réponse en fréquence : 20Hz to 20kHz, -3dB
Impédance d’entrée : 10 k-ohms
Général
Alimentation : 11-16 VDC, terre négative
Antenne bleu (Bleu) : 500mAmp Max,
protection actuelle limitée.
Température d’opération : -10C~60C
Fusibles : 15 amp fast blow ATO
Dimensions du châssis DIN : 2"H x 7"W x 7"D
(51mm x 178mm x 178mm)
Les spécifications sont susceptible à changer
sans avis préalable.
3dB
66
SD1513
Page 69

Limited Warranty DO NOT RETURN THIS PRODUCT TO THE STORE
CD or Multimedia Radios/Head Units
Audiovox Electronics Corporation (“the Company”) is committed to quality
and customer service, and are pleased to offer you this Warranty. Please read
it thoroughly and contact the Company at 1-800-323-4815 with any questions.
Who is covered?
The Company extends this warranty to the original retail purchaser of products
purchased through an authorized Audiovox retailer in the U.S.A., Puerto Rico or
Canada. This warranty is not transferable or assignable. Proof of purchase is
required in the form of an original sales receipt.
What is covered?
The Company warrants that should this product or any part thereof, under normal
use, be proven defective in material or workmanship within 12 months from the date
of original purchase, such defect(s) will be repaired or replaced with a new or
reconditioned product (at the Company's option) without charge for parts and repair
labor.
What is not covered?
This Warranty does not cover the following:
• Damage incurred during shipping or transporting the product to the Company
or a service center
• Elimination of car static or motor noise
• Defects in cosmetic, decorative or non-operative structural parts
• Correction of antenna problems
• Costs incurred for installation, removal or reinstallation of the product
• Consequential damage to compact discs, USB devices, digital media cards,
accessories or vehicle electrical systems
• Damage caused by improper installation, mishandling, misuse, neglect,
accident, blown fuse, battery leakage, theft or improper storage
• Products whose factory serial number/bar code label(s) or markings have been
removed or defaced
• Damage resulting from moisture, humidity, excessive tem perature, extreme
environmental conditions or external natural causes
Please review the “Care and Maintenance” section of your Installa tion and Operation
Manual for additional information regarding the proper use of your product.
Limitations
THE EXTENT OF THE COMPANY'S LIABILITY UNDER THIS WARRANTY IS
LIMITED TO THE REPAIR OR REPLACEMENT PROVIDED ABOVE AND, IN NO
EVENT, SHALL THE COMPANY'S LIABILITY EXCEED THE PURCHASE PRICE
PAID BY PURCHASER FOR THE PRODUCT.
This Warranty is in lieu of all other express warranties or liabilities. ANY IMPLIED
WARRANTIES, INCLUDING ANY IMPLIED WARRANTY OF MERCHANTABILITY,
SHALL BE LIMITED TO THE DURATION OF THIS WRITTEN WARRANTY. ANY
ACTION FOR BREACH OF ANY WARRANTY HEREUNDER INCLUDING ANY
IMPLIED WARRANTY OF MERCHANTABILITY MUST BE BROUGHT WITHIN A
PERIOD OF 24 MONTHS FROM DATE OF ORIGINAL PURCHASE. IN NO CASE
SHALL THE COMPANY BE LIABLE FOR ANY CONSEQUENTIAL OR INCIDENTAL
DAMAGES FOR BREACH OF THIS OR ANY OTHER WARRANTY, EXPRESS OR
IMPLIED, WHATSOEVER. No person or representative is authorized to assume for
the Company any liability other than expressed herein in connection with the sale of
this product.
Some states do not allow limitations on how long an implied warranty lasts or th e
exclusion or limitation of incidental or consequential damage so the above limitations
or exclusions may not apply to you. This Warranty gives you specific legal right s an d
you may also have other rights which vary from state to state.
Obtaining Warranty Service
• To obtain repair or replacement within the terms of this Warranty, call 1-800323-4815 for the location of a warranty station serving your area.
• You must prepay the initial shipping charges to the Company. The Company
will pay the return shipping charges for all warranteed products returned t o an
address within the U.S.A., Puerto Rico or Canada.
• Please package the product securely to avoid shipping damage. We
recommend using a carrier that provides tracking service to prevent lost
packages. Lost or damaged packages are not covered by this warranty.
• Provide a detailed description of the problem(s) for which you require service.
67
Page 70

Garantía Limitada NO RETORNE ESTE PRODUCTO A LA TIENDA
Radios del CD o de los Multimedia
Audiovox Electronics Corporation ("la Compañía) es una corporación
comprometida con la calidad y el servicio al cliente, y se complace en ofrecerle
esta Garantía. Por favor, léala completamente y contacte a la Compañía al 1800-323-4815 por cualquier duda.
¿Quién está cubierto?
La Compañía extiende esta garantía al comprador minorista original de los
productos comprados a un distribuidor Audiovox autorizado en USA, Puerto Rico o
Canadá. Esta garantía no es transferible o asignable. Se requ iere prueba de comp ra
en forma de recibo de venta original.
¿Qué está cubierto?
La Compañía garantiza que si este producto o cualquier parte del mismo, bajo uso
normal, se prueba que tiene defectos en materiales o mano de obra dentro de los 12
meses desde la fecha de compra original, dichos defectos serán reparados o
reemplazados con un producto nuevo o reacondicionado (a op ci ón de la Co mp a ñía )
sin costos por repuestos o por labor de reparación.
¿Qué no está cubierto?
Esta Garantía no cubre lo siguiente:
• Daños ocurridos durante el envío o transporte del producto a la Compañía o al
centro de servicio
• Eliminación de estática o ruido de motor
• Defectos en cosmética, partes estructurales decorativas o no operativas
• Corrección de problemas de antena
• Costos incurridos por instalación, retiro o reinstalación del producto
• Daños consecuentes a discos compactos, dispositivos USB, tarjetas
multimedia digitales, accesorios o sistemas eléctricos del vehículo
• Daños causados por instalación inadecuada, mal manejo o uso, negligencia,
accidentes, fusibles quemados, goteras en la batería, robo o almacenamiento
inadecuado.
• Productos cuyo número de serie o código de barra de fábrica o sus marcas
hayan sido quitados o borrados
• Daños resultantes de la humedad, temperatura excesiva, condiciones
medioambientales extremas o causas naturales externas
Por favor, revea la sección "Cuidado s y Manten imiento" de su Manu al de Inst alación
y Operación para obtener información adicional relacionada al uso adecuado de su
producto.
Limitaciones
LA EXTENSIÓN DE LA RESPONSABILIDAD DE LA COMPAÑÍA BAJO ESTA
GARANTÍA SE LIMITA A LA REPARACIÓN O REEMPLAZO PROVISTO ARRIBA Y,
EN NINGÚN CASO, EXCEDERÁ LA RESPONSABILIDAD DE LA COMPAÑÍA EL
PRECIO DE COMPRA PAGADO POR EL COMPRADOR DEL PRODUCTO.
Esta Garantía está en lugar de todas las otras garantías o responsabilidades.
CUALQUIER GARANTÍAS IMPLICADAS, INCLUYENDO CUALQUIER GARANTÍA
IMPLICADA DE MERCANTIBILIDAD, SERÁ LIMITADA A LA DURACIÓN DE ESTA
GARANTÍA ESCRITA. CUALQUIER ACCIÓN POR INCLUMPLIMIENTO DE
CUALQUIER GARANTÍA AQUÍ ESPECIFICADA INCLUIDA CUALQUIER
GARANTÍA IMPLÍCITA DE MERCANTIBILIDAD DEBE SER LLEVADA A CABO
DENTRO DE UN PERIDO DE 24 MESES DESDE LA FECHA DE COMPRA
ORIGINAL. IN NINGÚN CASO LA COMPAÑÍA SERÁ RESPONSABLE POR
NINGÚN DAÑO CONSECUENTE O INCIDENTAL POR INCLUMPLIMIENTO DE
ESTA O CUALQUIER OTRA GARANTÍA, EXPRESA O IMPLICADA, DE NINGUNA
FORMA. No se autoriza a ninguna persona o representante a asumir por p ar te de la
Compañía ninguna responsabilidad diferente a la aquí expresad a en conexión con la
venta de este producto.
Algunos estados no permiten limitaciones sobre el tiempo de duración de una
garantía implicada o de la exclusión o limitación de daños incidental es o
consecuentes, entonces las limitaciones y exclusiones antes mencionadas pueden
no aplicarle a usted. Esta Garantía le da derechos legales específicos y usted
también puede tener otros derechos que pueden variar de estado en estado.
Obteniendo el Servicio de Garantía
• Para obtener reparación o reemplazo dentro de los términos de esta Garantía,
llame al 1-800-323-4815 por la ubicación de un servicio de garantía en su
área.
• Usted debe pagar previamente los costos de envío inicial a la Compañía. La
Compañía pagará los costos de envío de retorno de todos los productos en
garantía enviados a direcciones dentro de USA, Puerto Rico o Canadá.
• Por favor empaquete el producto de forma segura para evitar daños en el
transporte. Recomendamos usar una empresa de transporte que provea
servicio de rastreo para prevenir la pérdida de paqu etes. Paquet es perdidos o
dañados no están cubiertos por esta garantía.
• Provea una descripción detallada del problema o problemas por los cuales
usted requiere servicio.
68
Page 71

Garantie Limitée NE RENVOYEZ PAS CE PRODUIT AU MAGASIN
Radios CD ou Multimédia / Unités principales
Audiovox Electronics Corporation (la Société) s'engage à la qualité et au
service des clients, et est content de vous offrir cette garantie. Nous vous
prions de le lire attentivement et prendre contact avec la Société au 1-800-3234815 avec des questions.
Qui est couvert ?
La Société étend cette garantie à l'acheteur d'origine en détail des produit s achetés à
un détaillant autorisé d'Audiovox aux Etats-Unis, Puerto Rico ou Canada. Cette
garantie ne peut pas être transférée ni aliénée. Preuve d'achat est exigé sous forme
du récépissé de vente d'origine.
Ce qui est couvert ?
La Société garantit que si ce produit ou une partie de ce produit, sous l'utilisation normale par
l'acheteur d'origine, dans des conditions norm ales, s'avère défectueux en matériel ou en
artisanat, dans 12 mois depuis la date d'achat d'origine, de tels défauts seront réparés ou
remplacés avec un nouveau produit ou un produit reconditionné (à la seule discrétion de la
société) sans frais pour les pièces de rechange ou le travail réparateur.
Ce qui n'est pas couvert ?
Cette garantie ne couvre pas le suivant :
• Des dommages survenus lors de la transportation de ce produit à la Société ou à un
centre d'entretien.
• Elimination des parasites de voiture ou le bruit du moteur
• Des défauts dans des parties cosmétiques, décoratives ou structurelles non-opératives
• Rectification des problèmes d'antenne
• Le coût de l'installation, de l'enlèvement ou de la réinstallation du produit
• Dommages indirects aux disques compacts, des engins USB, des cartes de média
digitales, des accessoires ou le système électrique du véhicule
• Des dégâts survenus à cause de la manipulation mauvaise , l'installation incorrecte,
mauvaise utilisation, négligence, des accidents, des fusibles sautés, fuite de la pile, du
vol et du stockage incorrect
• Produits soumis à l'enlèvement ou la dégradation du numéro de série d'usine/étiquettes
de code à barres ou des marquages.
• Des dégâts survenus à cause de la moisissure, l'humidité, des températures
excessives, des conditions environnementales extrêmes ou des causes naturelles
externes
Veuillez revoir la section Soin et Entretien de votre Guide d'Opération, pour avoir des
informations supplémentaires quant à la bonne utilisation de votre produit.
Limitations
LA MESURE DE LA RESPONSABILITE DE LA SOCIETE SOUS CETTE GARANTIE EST
LIMITEE A LA REPARATION OU REMPLACEMENT MENTIONNES CI-DESSUS ET DANS
AUCUN CAS LA RESPONSABILITE DE LA SOCIETE N'EXCEDERA LE PRIX D'ACHAT
PAYE PAR L'ACHETEUR POUR CE PRODUIT.
Cette garantie tient lieu de toute autre garantie ou responsabilité expresses. TOUTE
GARANTIE IMPLIQUEE, Y COMPRISE UNE GARANTIE IMPLIQUEE DE
MARCHANDABILITE, SERA LIMITEE A LA DUREE DE CETTE GARANTIE ECRITE. TOUTE
ACTION POUR RUPTURE D'UNE GARANTIE QUELCONQUE SOUS LA PRESENTE, Y
COMPRIS TOUTE GARANTIE IMPLIQUEE DE MARCHANDABILITE DOIT ËTRE PORTEE
DANS UNE PERIODE DE 24 MOIS DEPUIS LA DATE D'ACHAT D'ORIGINE. EN AUCUN
CAS LA SOCIETE NE SERA RESPONSABLE POUR TOUT DOMMAGE INDIRECT OU
ACCESSOIRE POUR RUPTURE DE CETTE GARANTIE OU TOUTE AUTRE GARANTIE,
EXPRESSE OU IMPLIQUEE. Aucune personne ni un représentant n'est autorisée d'assumer
de la part de la société une responsabilité autre que celle exprimée ici relatif à la vente de ce
produit.
Certains états ne permettent pas de limitations sur la durée d'une garantie impliquée
ou sur l'exclusion ou la limitation des dommages indirects et accessoires, tels que les
informations ci-dessus ne s'appliquent pas à vous. Cette garantie vous donne des
droits légaux spécifiques et vous pouvez aussi jouir d'au tres droit s qui varient d'état à
l'état.
Obtenir le service de garantie
• Pour obtenir la réparation ou le remplacement dans les termes de cette garantie,
appelez 1-800-323-4815 pour avoir l'emplacement d'une station de garantie qui dessert
votre région.
• Si le produit est envoyé pour un service de garantie vous devez payer les frais de
transportation de départ. La Société payera la transportation de retour pour tout produit
sous garantie si le produit est retourné à une adresse située aux Etats-Unis, Puerto
Rico ou Canada.
• Assurez-vous que le produit soit bien emballé pour éviter des accidents pendant la
transportation. Nous recommandons un transporteur qui fourni un service de dépistage
pour éviter la perte des paquets. Des paquets perdus ou endommagés n e sont pas
couverts par cette garantie.
• Fournissez une description détaillée des problèmes que vous voulez faire
résoudre par le service de garantie.
69
Page 72

SERIES
SERIES
Audiovox Electronics Corporation
150 Marcus Boulevard
Hauppauge, NY 11788
1-800-323-4815
www.audiovox.com
N1049
©2009 Audiovox
v.061009
 Loading...