

Page 1

COLOR TELEVISION RECEIVER
INSTRUCTION MANUAL
Q2749J
Before operating the unit, please read this manual thoroughly.
Page 2

PART 2 TELEVISION OPERATIONS
Contents
Important safety instructions-1
Identification of Controls-------3
Front ------------------------------------------------------3
Back-------------------------------------------------------4
Remote Controller -------------------------------------5
Installing batteries -------------------------------------6
Effective range of the Remote----------------------6
Installation --------------------------7
Antenna connections ---------------------------------7
Cable (CATV) satellite connections---------------8
Connecting video and audio
equipment ---------------------------9
Connecting side AV inputs (AV2) ------------------9
Connecting AV1 inputs -------------------------------9
Connecting DVD -------------------------------------10
Connecting MONITOR outputs -------------------10
Turning on/off---------------------11
Turning on----------------------------------------------11
Turning off----------------------------------------------11
Select Input Signal --------------12
Watching AV program -------------------------------12
Switching from AV to TV----------------------------12
Tuning in----------------------------13
To enter the TUNING menu -----------------------13
Auto Search -------------------------------------------13
Erasing an unnecessary channel ----------------14
Fine tuning ---------------------------------------------14
Setting the TV/CATV option -----------------------15
Setting the Color System---------------------------15
Channel Selection ---------------16
Adjusting Picture ----------------17
To enter the PICTURE menu----------------------17
Adjusting picture--------------------------------------17
Setting SVM option ----------------------------------18
Setting Blue background option ------------------18
Setting Noise Reducer option---------------------18
Sound Control --------------------19
Adjusting volume -------------------------------------19
To enter the SOUND menu ------------------------20
Adjusting sound --------------------------------------20
Timer Setting----------------------21
To enter the TIMER menu--------------------------21
Setting the Clock -------------------------------------21
Setting Sleep timer ----------------------------------21
Setting the Off Time ---------------------------------22
Setting the On Time ---------------------------------22
System Setting -------------------23
To enter the SET UP menu ------------------------23
Selecting OSD language ---------------------------23
Setting Menu Demo ---------------------------------23
Setting Closed Caption(CCD)---------------------24
Selecting audio mode -------------------------------24
Recalling the On-screen display -----------------24
Parental Control------------------25
Child lock----------------------------------------------25
To enter Child lock submenu ----------------------25
Setting Child lock-------------------------------------25
Changing the password ----------------------------25
Setting V-chip----------------------------------------26
To enter the V-chip menu --------------------------26
MPAA RATING SET-UP ----------------------------26
TV RATING SET-UP --------------------------------27
Setting individual Content Categories for TV
Rating ---------------------------------------------------28
CANADIAN ENGLISH RATING SET-UP-------28
CANADIAN FRENCH RATING SET-UP -------29
CHANGING THE PASSWORD-------------------29
Troubleshooting Guide --------30
Specifications---------------------32
Page 3
Important safety instructions
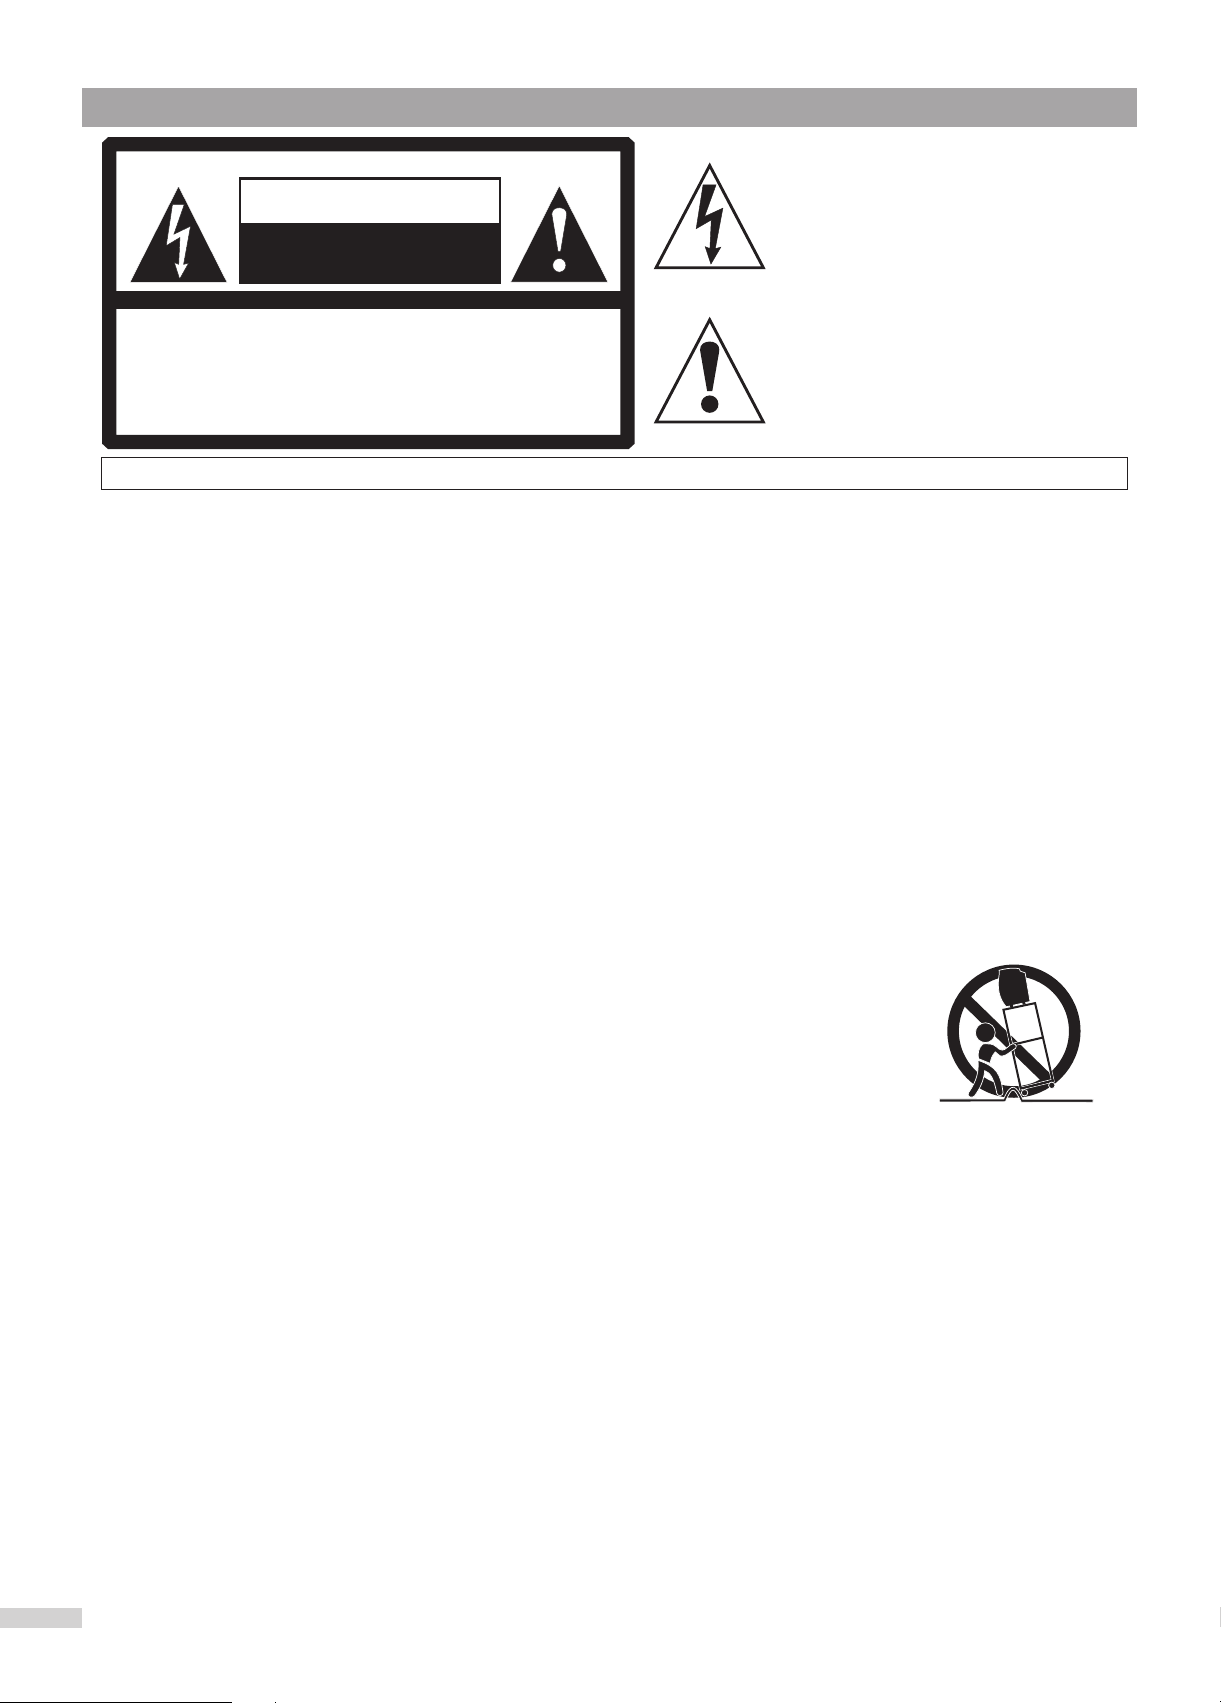
CAUTION
RISK OF ELECTRIC SHOCK
DO NOT OPEN
The lightning flash with arrowhead symbol,
within an equilateral triangle is intended to
alert the user to the presence of uninsulated
dangerous voltage within the product's
enclosure that may be of sufficient magnitude
to constitute a risk of electric shock to persons.
CAUTION: TO REDUCE THE RISK OF ELECTRIC SHOCK,
DO NOT REMOVE COVER(OR BACK). NO
USER-SERVICEABLE PARTS INSIDE.
REFER SERVICING TO QUALIFIED SERVICE
PERSONNEL.
WARNING: TO REDUCE THE RISK OF FIRE OR ELECTRIC SHOCK, DO NOT EXPOSE THIS APPLIANCE TO RAIN OR MOISTURE.
Before using the unit, be sure to read all operating instructions carefully. Please note that these are general
The exclamation point within an equilateral
triangle is intended to alert the user to the
presence of important operating and
maintenance (servicing) instructions in the
literature accompanying the appliance.
precautions and may not pertain to your particular unit. For example, this unit may not have the capability
to be connected to an outdoor antenna.
1. READ INSTRUCTIONS
All the safety and operating instructions should be read before the product is operated.
2. RETAIN INSTRUCTIONS
The safety and operating instructions should be retained for future reference.
3. HEED WARNINGS
All warnings on the product and in the operating instructions should be adhered to.
4. FOLLOW INSTRUCTIONS
All operating and use instructions should be followed.
5. CLEANING
Unplug this product from the wall outlet before cleaning. Do not use liquid cleaners or aerosol cleaners. Use a
damp cloth for cleaning.
6. ATTACHMENTS
Do not use attachments not recommended by the product's manufacturer as they may cause hazards.
7. WATER AND MOISTURE
Do not use this product near water (a bathtub, washbowl, kitchen sink, laundry tub, wet
basement, or swimming pool for example)
8. ACCESSORIES
PORTABLE CART WARNING
(symbol provided by RETAC)
Do not place this product on an unstable cart, stand, tripod, bracket, or table. The
product may fall, causing serious injury and serious damage to the product. Use only
with a cart, stand, tripod, bracket, or table recommended by the manufacturer or sold
with the product. Any mounting of the product should follow the manufacturer' s
instructions and should use a mounting accessory recommended by the manufacturer.
8A. An appliance and cart combination should be moved with care. Quick stops, excessive
S3126A
force, and uneven surfaces may cause the appliance and cart combination to overturn.
9. VENTILATION
Slots and openings in the cabinet and in the back or bottom are provided for ventilation to ensure reliable operation of
the product and to protect it from overheating. These openings must not be blocked or covered. The openings should
never be blocked by placing the product on a bed, sofa, rug, or other similar surface. This product should never be
placed near or over a radiator or heat source. This product should not be placed in a built-in installation such as a
bookcase or rack unless proper ventilation is provided or the manufacturer's instructions have been adhered to.
10. POWER SOURCES
This product should be operated only from the type of power source indicated on the marking label. If you are not
sure of the type of power supply to your home, consult your appliance dealer or local power company. For products
intended to operate from battery power, or other sources, refer to the operating instructions.
11. GROUNDING OR POLARIZATION
This product is equipped with a polarized alternating current line plug (a plug having one blade wider than the other).
This plug will fit into the power outlet only one way. This is a safety feature. If you are unable to insert the plug fully into
the outlet, try reversing the plug. If the plug should still fail to fit, contact your electrician to replace your obsolete
outlet. Do not defeat the safety purpose of the polarized plug.
12. POWER-CORD PROTECTION
Power-supply cords should be routed so that they are not likely to be walked on or pinched by items placed upon or
against them, paying particular attention to cords at plugs, convenience receptacles, and the point where they exit
from the appliance.
1
Page 4

13. LIGHTNING
To protect your product from a lightning storm, or when it is left unattended and unused for long periods of time,
unplug it from the wall outlet and disconnect the antenna or cable system. This will prevent damage to the product
due to lightning and power-line surges.
14. POWER LINES
An outside antenna system should not be located in the vicinity of overhead power lines or other electric light or
power circuits, or where it can fall into such power lines or circuits. When installing an outside antenna system,
extreme care should be taken to keep from touching power lines or circuits as contact with them might be fatal.
15. OVERLOADING
Do not overload wall outlets and extension cords as this can result in a risk of fire or electric shock.
16. OBJECT AND LIQUID ENTRY
Never push objects of any kind through openings in the product as they may touch dangerous voltage points or short
out parts that could result in fire or electric shock. Never spill or spray any type of liquid on the product.
17. OUTDOOR ANTENNA GROUNDING
If an outside antenna is connected to the product, be sure the antenna system is grounded so as to provide some
protection against voltage surges and built-up static charges. Section 810 of the National Electric Code, ANSI/NFPA
70, provides information with respect to proper grounding of the mast and supporting structure, grounding of the
lead-in wire to an antenna discharge product, size of grounding conductors, location of antenna discharge product,
connection to grounding electrodes, and requirements for grounding electrodes.
18. SERVICING
Do not attempt to service this product yourself as opening or removing covers may expose you to dangerous voltage
or other hazards. Refer all servicing to qualified service personnel.
19. REPLACEMENT PARTS
When replacement parts are required, be sure the service technician uses replacement parts specified by the
manufacturer or those that have the same characteristics as the original part. Unauthorized substitutions may result
in fire, electric shock or other hazards.
20. SAFETY CHECK
Upon completion of any service or repairs to this product, ask the service technician to perform safety checks to
determine that the product is in proper operating condition.
21. WALL OR CEILING MOUNTING
The product should be mounted to a wall or ceiling only as recommended by the manufacturer.
22. DAMAGE REQUIRING SERVICE
Unplug the product from the wall outlet and refer servicing to qualified service personnel under the following
conditions:
a. When the power-supply cord or plug is damaged.
b. If liquid has been spilled, or objects have fallen into the product.
c. If the product has been exposed to rain or water.
d. If the product does not operate normally after installation by following the operating instructions. Adjust only those
controls that are covered by the operating instructions, as adjustment of other controls may result in damage and
will often require extensive work by a qualified technician to restore the product to its normal operation.
e. If the product has been dropped or the cabinet has been damaged.
f. When the product exhibits a distinct change in performance.
23. HEAT
The product should be situated away from heat
sources such as radiators, heat registers, stoves,
or other products (including amplifiers) that
produce heat.
24. NOTE TO CATV SYSTEM INSTALLER
GROUND
CLAMP
ANTENNA
LEAD IN
WIRE
ANTENNA
DISCHARGE UNIT
(NEC SECTION 810-20)
This reminder is provided to call the CATV system
installer's attention to Article 820-40 of the NEC
that provides guidelines for proper grounding
and, in particular, specifies that the cable ground
shall be connected to the grounding system of the
building, as close to the point of cable entry as
practical.
NEC-NATIONAL ELECTRICAL CODE
S2898A
EXAMPLE OF ANTENNA GROUNDING AS PER
NATIONAL ELECTRICAL CODE
ELECTRIC
SERVICE
EQUIPMENT
GROUNDING CONDUCTORS
(NEC SECTION 810-21)
GROUND CLAMPS
POWER SERVICE GROUNDING
ELECTRODE SYSTEM
(NEC ART 250, PART H)
WARNING: FOR CONTINUED SAFETY, REPLACE SAFETY CRITICAL COMPONENTS
ONLY WITH MANUFACTURER'S RECOMMENDED PARTS (REFER TO SERVICE
LITERATURE).
2
Page 5
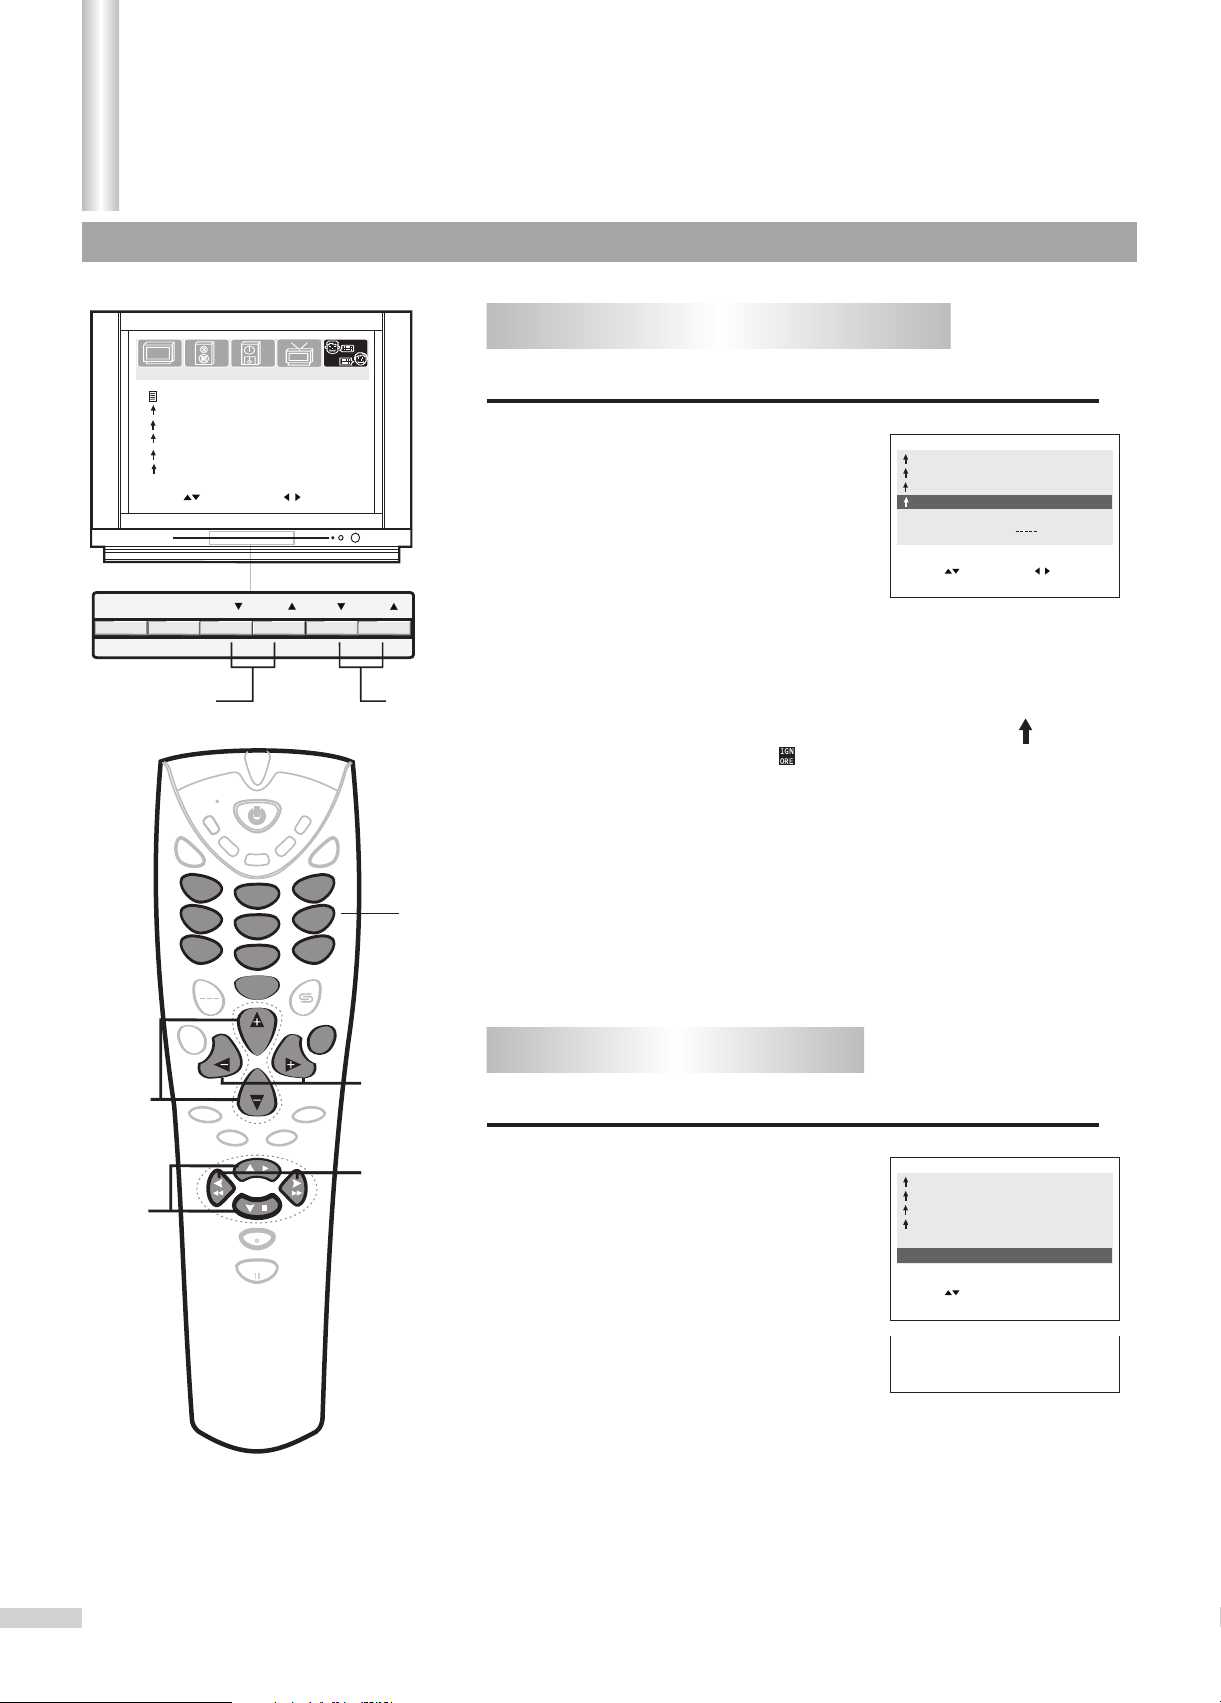
Introduction
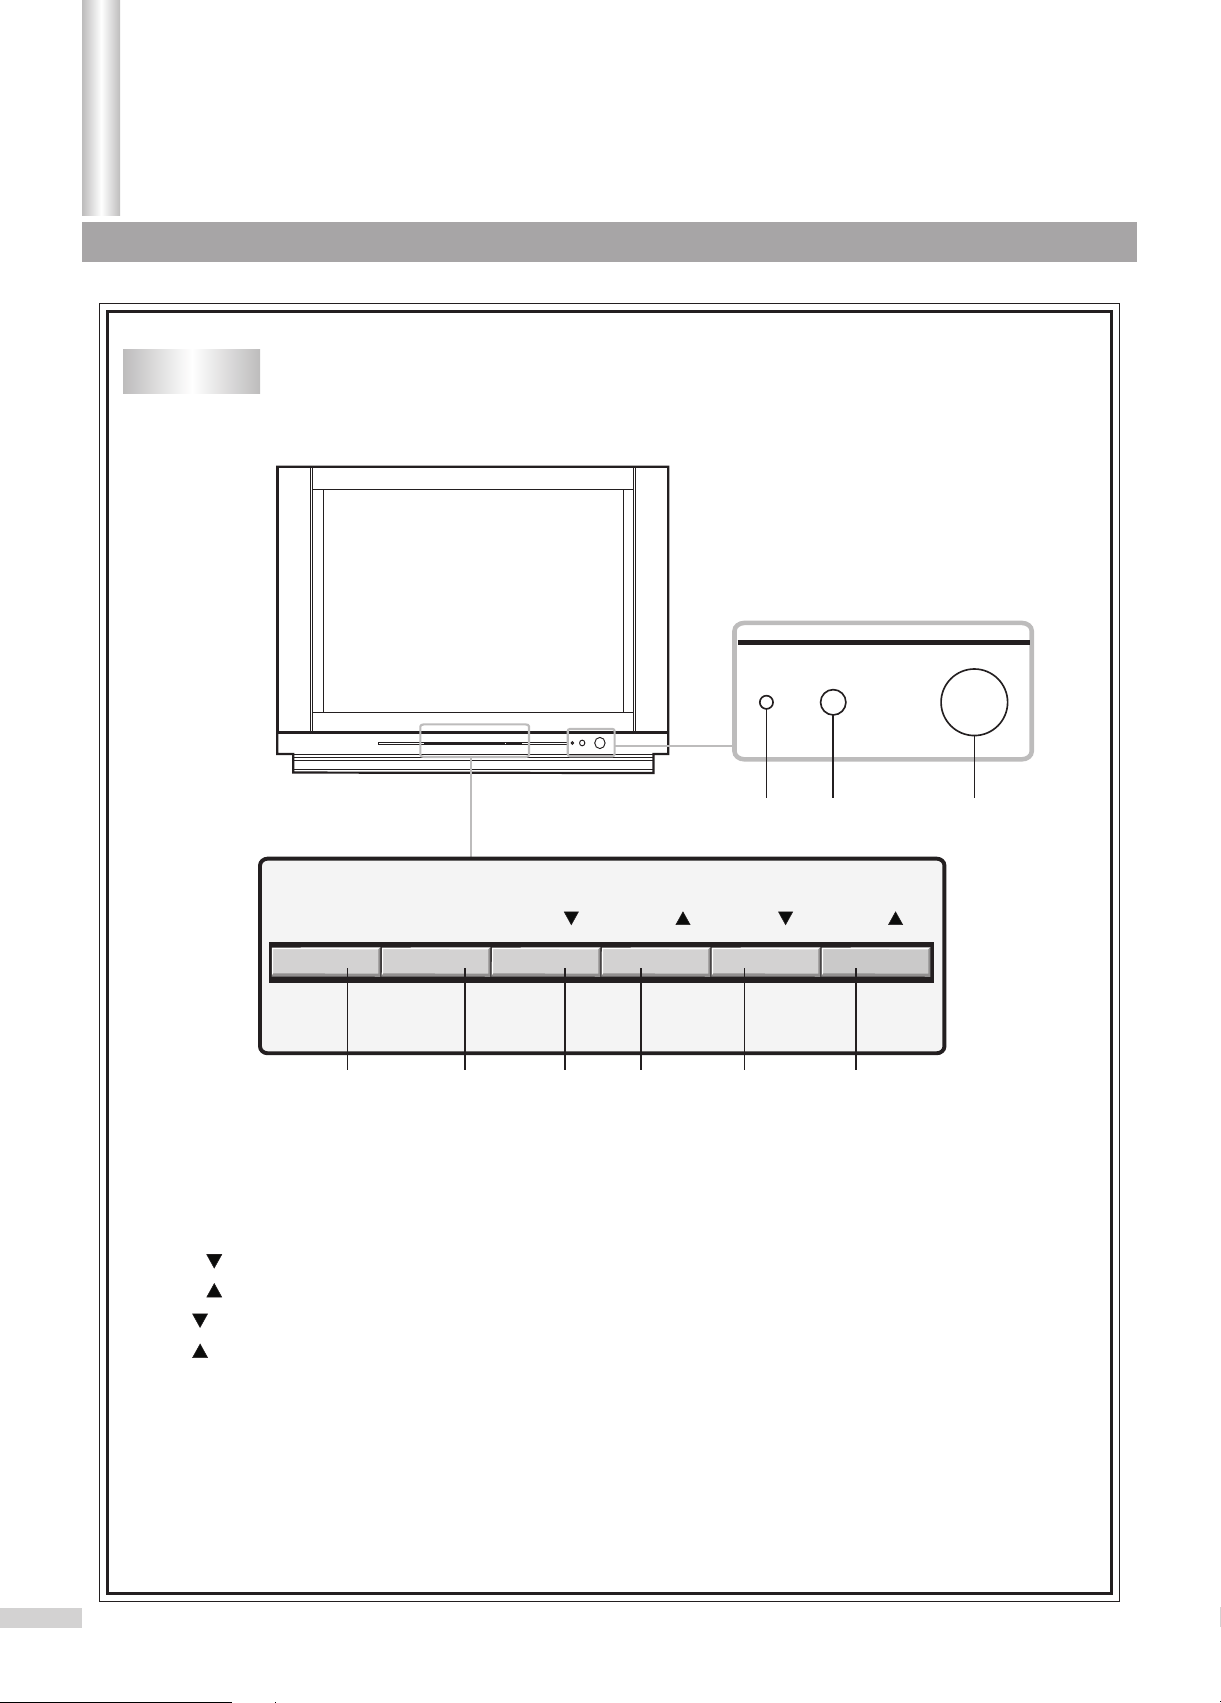
Identification of Controls
Front
MENU
1. MENU button: to enter into menu operation.
2. TV/AV button: video input select.
3. VOL button: volume down select; menu item adjust.
4. VOL button: volume up select; menu item adjust.
5. CH button: channel down select; menu item select.
6. CH button: channel up select; menu item select.
7. Indicator.
8. Remote sensor
9. Power button
TV/AV
21
VOL
3
VOL
4
7 8 9
CH CH
5
6
3
Page 6
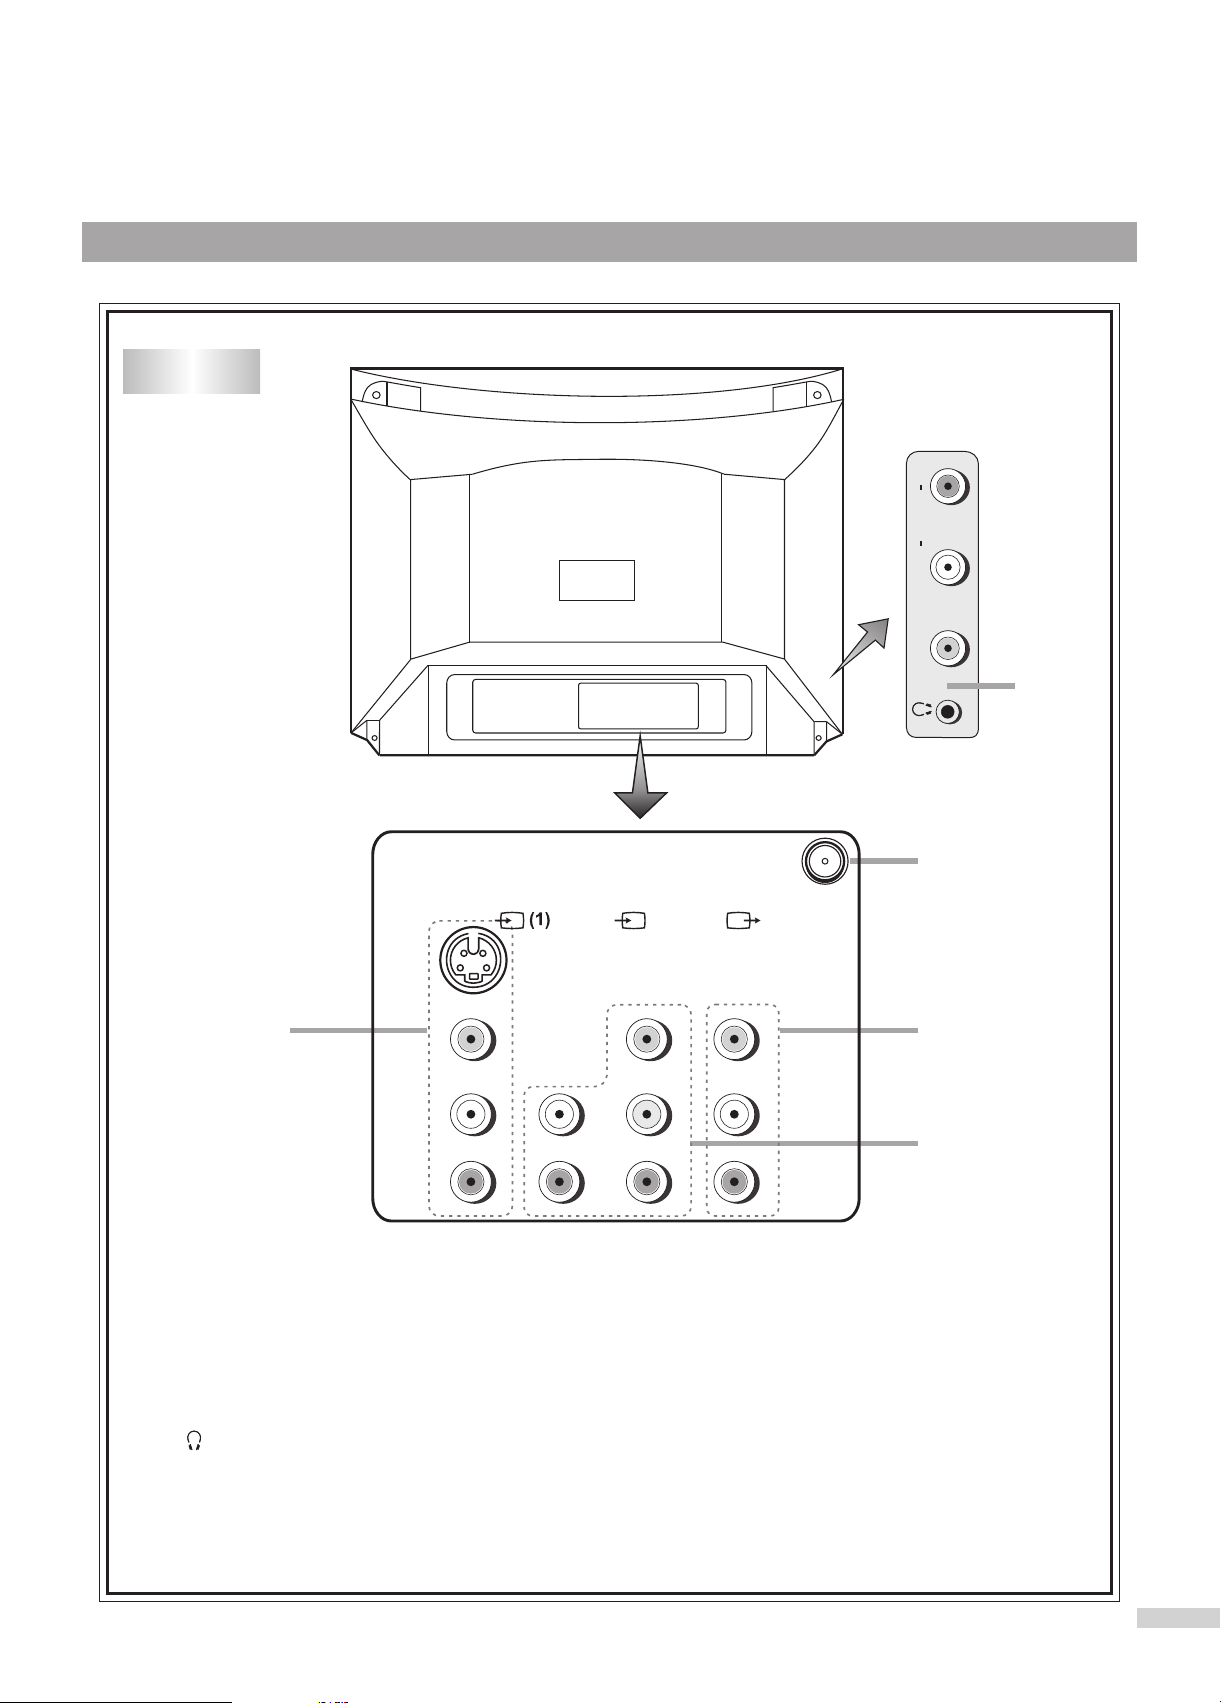
Back
(1)
S-VIDEO
DVD
COMPONENT
VIDEO
RL/MONO
AUDIO
VIDEO
5
1
RF
MONITOR
VIDEO
2
L/MONO
AUDIO AUDIO AUDIO
R
L/MONO
R
Y
C
B
C
R
1. Antenna input
2. AV1 input (S-VIDEO, VIDEO, AUDIO L/MONO, R)
3. DVD input (Y, C , C , AUDIO L/MONO, R)
B R
4. MONITOR output (VIDEO, AUDIO L, R)
5. Earphone jack
AV2 input (VIDEO, AUDIO L/MONO, R)
VIDEO
L
R
4
3
4
Page 7

Introduction
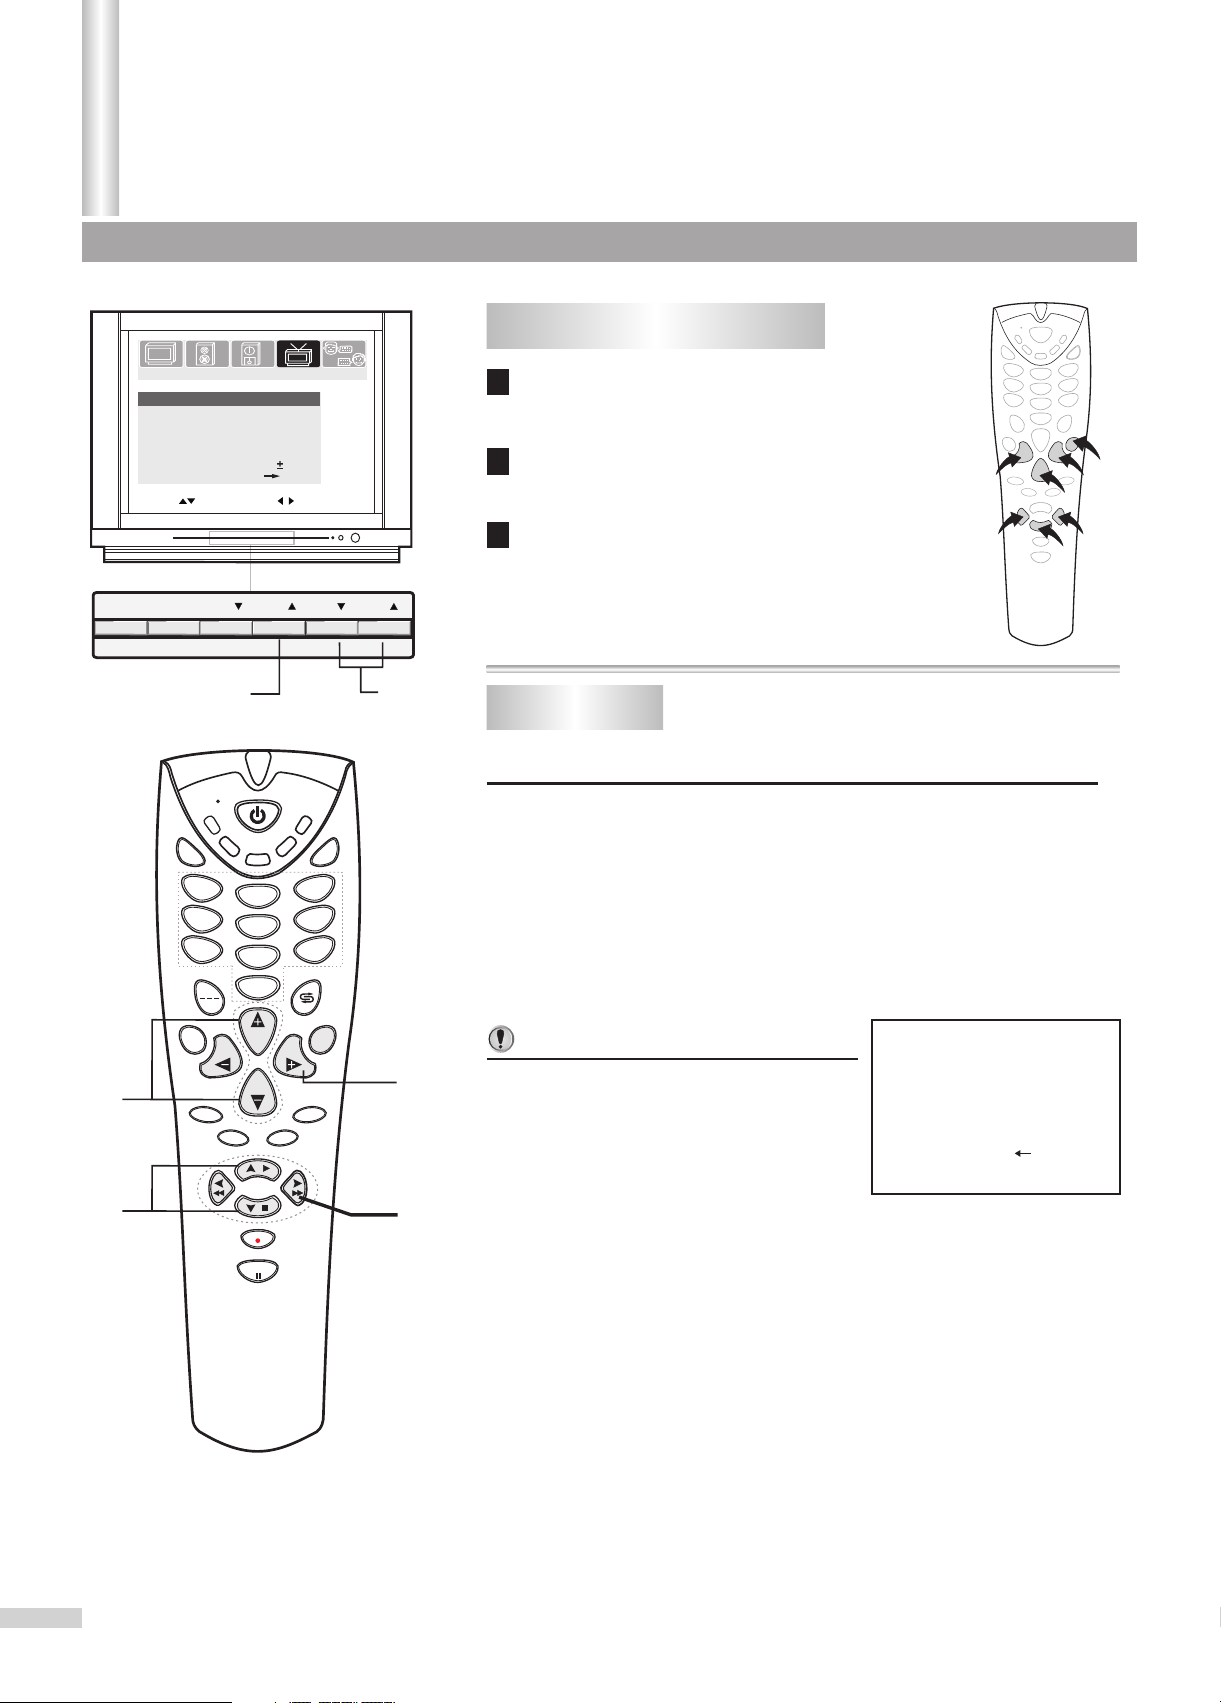
Identification of Controls(continued)
Remote Controller
Indicator: the indicator lights
up when any button is pressed
To mute the sound
To select three
digit position number
On-screen display
Channel up/down
Menu item select
Sleep timer
To switch between
STEREO, SAP or MONO
: MENU control buttons
Turn On/Off the the unit
SET
CATV
M
U
TE
SAT
HIFI
VCD
DVD
VCR
TV
V
A
To select to view program from
external video equipment (VCR,
SOUND
3
6
DVD, VCD,etc.)
Direct channel selector
9
Quickly returns to previous
selected channel
U
EN
M
VOLVOL
PIC
Access the main menu
Volume up/down
Menu item adjust
Access the Picture menu
1
4
7
2
5
8
0
D
S
P
SLEEP
CH
CH
STEREO
Access the Sound menu
Closed Caption
decoder channel select
CCD
Important:
If your remote controller does not work correctly, maybe the setting of the remote
controller is wrong, please try the following steps.
1. Press and hold the SET button, followed by the TV button at the same time until the
indicator lights up.
2. Press 1, 3, 3 buttons one by one. As a response, the indicator of the remote control
will twinkle twice, otherwise please repeat the above 2 steps.
Notes:
In MENU operations, the function of the / buttons is equal to the CH+/- buttons; and the function
of the / buttons is equal to the VOL+/- buttons.
5
Page 8
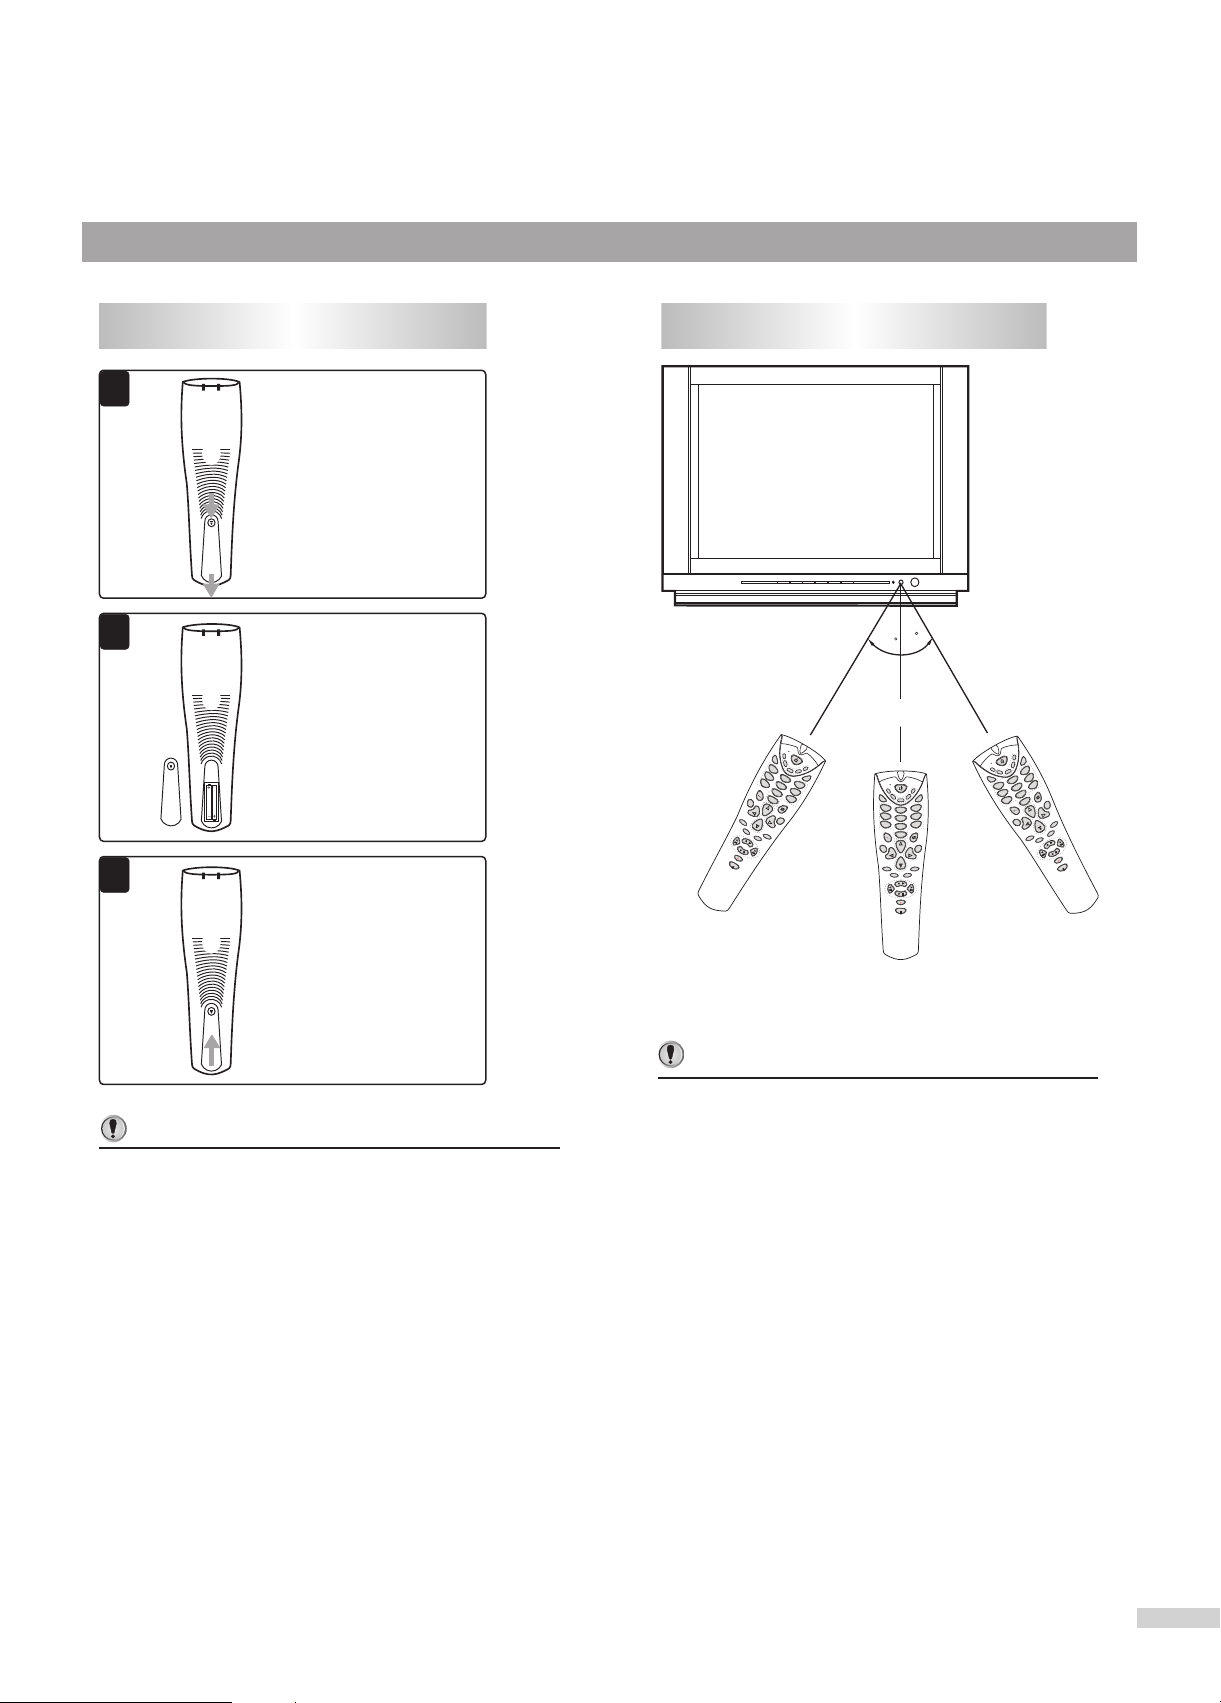
Installing batteries
Effective range of the Remote
11
Open the battery cover.
22
Install two "AAA" batteries
matching the +/- polarities
of the battery to the +/marks inside the battery
compartment.
33
Replace the battery cover.
Notes:
/
Do not try to recharge batteries they are not
intended to be recharged.
/
Use only the size and type of batteries specified.
Do not mix different types of batteries together
or old batteries with fresh ones.
/
When the remote control will not be used for a
long period of time or when the batteries are
worn out, remove the batteries.
/
Do not throw the batteries into a fire. Dispose of
used batteries in the specified manner.
/
Do not drop, dampen or disassemble the remote
control.
303
0
0
0
3
3
5m5m
SE
M
T
U
TE
CATV
SA
HIF
VCD
T
I
DV
VC
D
TV
R
1
4
2
AV
7
3
5
6
8
9
0
DSP
VO
C
H
L
VO
L
SLE
NU
ME
C
EP
H
STE
REO
PIC
SO
UN
D
CC
D
HIFI
SET
VCD
DVD
CATV
VCR
SAT
M
TV
UT
E
AV
3
1
2
6
4
5
9
7
8
0
DS
CH
P
MENU
VOLVOL
CH
SLEEP
PIC
STEREO
SOUND
CCD
I
HIF
D
VC
D
V
DV
A
R
VC
SET
T
CATV
TV
SA
3
MUTE
6
2
9
1
5
4
8
7
0
H
C
L
DSP
VO
EP
SLE
Notes:
/
When there is an obstacle between the TV
and the transmitter, the transmitter may not
operate.
/
When direct sunlight, and incandescent lamp,
fluorescent lamp or any other strong light
shines on the REMOTE SENSOR of the TV,
the remote operation may be unstable.
ENU
M
VOL
PIC
CH
D
UN
SO
STEREO
CCD
6
Page 9
INSTALL the unit in a room where direct light will not fall upon the screen.
Total darkness or a reflection on the picture screen may cause eyestrain.
Installation
Soft and indirect lighting is recommended for comfortable viewing.
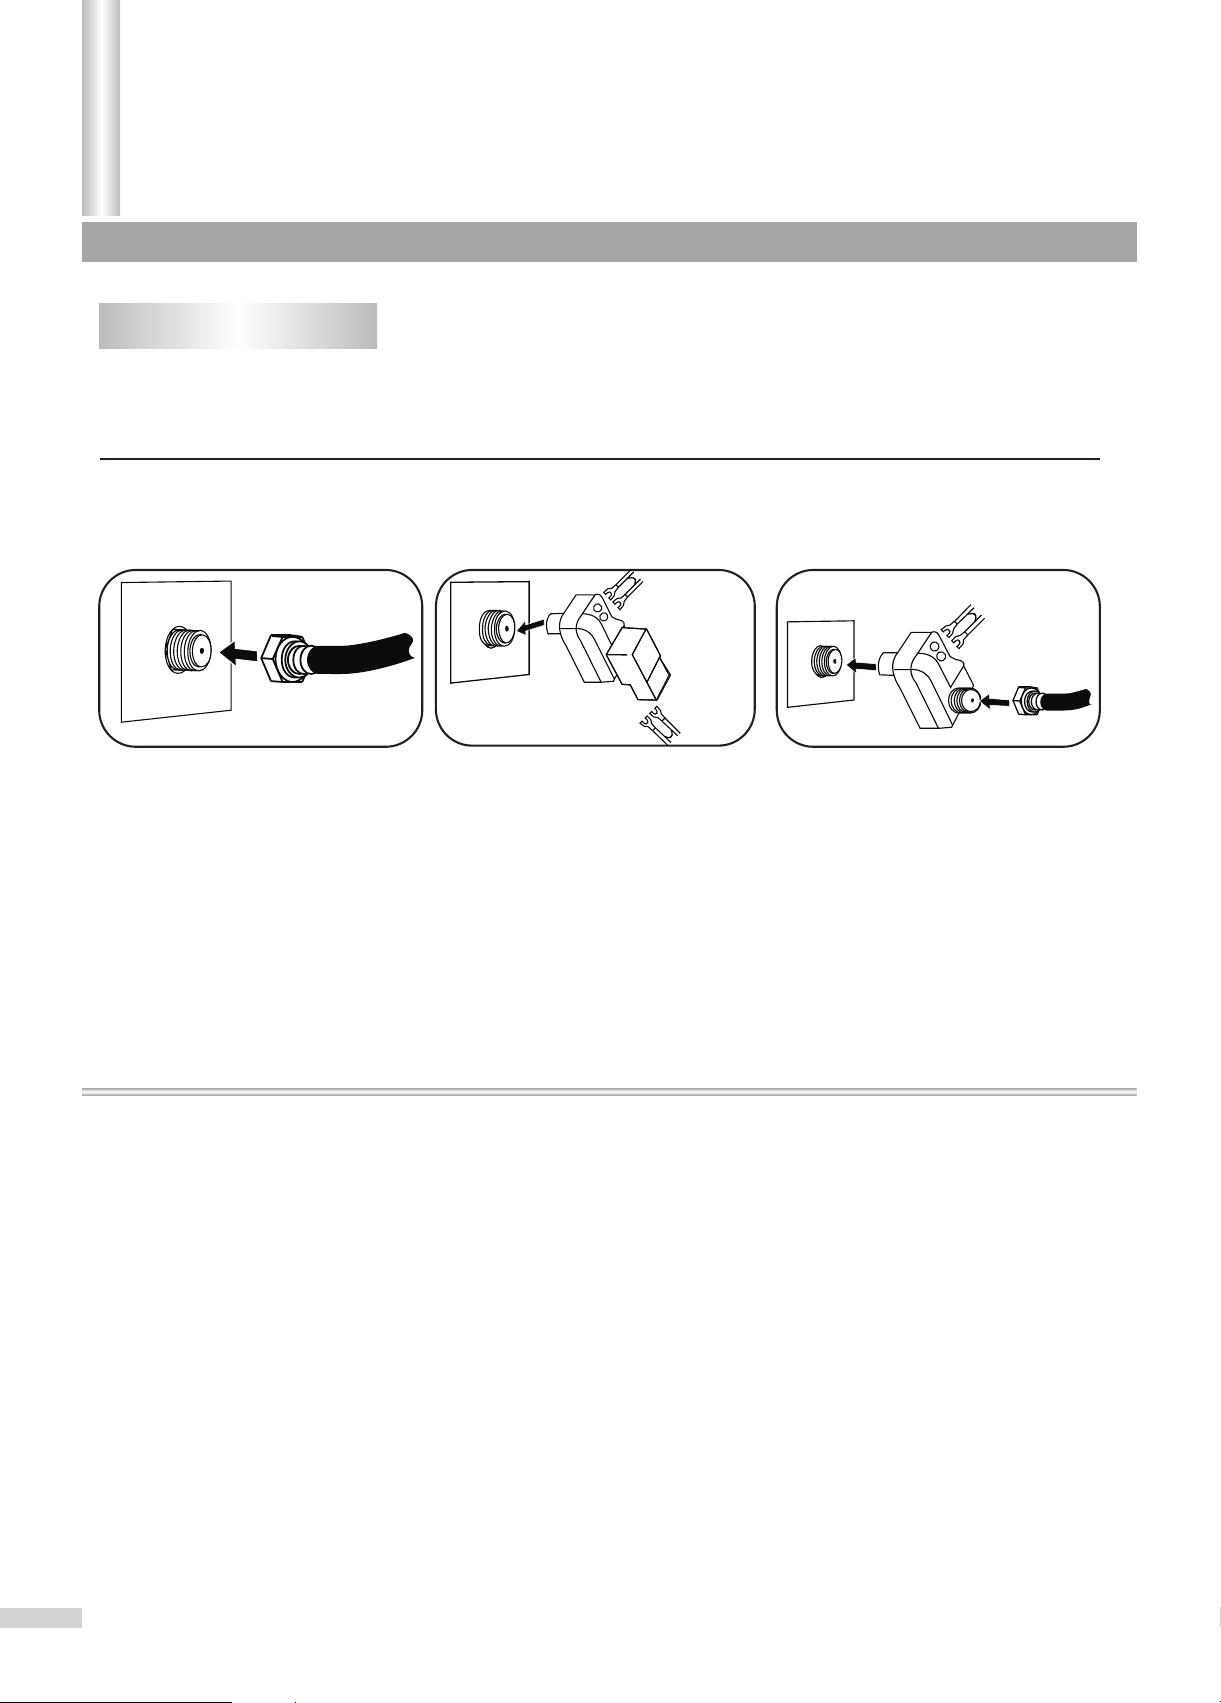
Antenna connections
OUTDOOR VHF/UHF ANTENNA CONNECTION (ANTENNA NOT INCLUDED)
Follow the instructions for the type of antenna system you intend to use. If using Cable or satellite, see
the next page.
Combination VHF/UHF
Antenna (Single 75 ohm cable
or 300 ohm twin-lead wire)
VHF/UHF
75 OHM
Connect the 75 ohm cable from
combination VHF/UHF antenna to
the antenna jack.
OR
If your combination antenna has a
300 ohm twin-lead wire, use a
300-75 ohm matching
transformer (NOT SUPPLIED).
Combination VHF/UHF
Antenna (Separate VHF and
UHF 300 ohm twin-leads)
UHF 300 Ohm UHF 300 Ohm
Combiner
VHF 300
OHM
Connect the UHF twin-lead wire to
a combiner (NOT SUPPLIED).
Connect the VHF twin-lead to a
300-75 ohm matching transformer
(NOT SUPPLIED). Attach the
transformer to the combiner.
Attach the combiner to the
antenna jack.
Separate VHF/UHF Antennas
Combiner
VHF 75 Ohm
Connect the 75 ohm cable from
the VHF antenna and the UHF
antenna twin-lead wire to a
combiner (NOT SUPPLIED).
Attach the combiner to the
antenna jack.
NOTE: If your VHF antenna has a
twin-lead wire use a 300-75 ohm
matching transformer, then
connect the transformer to the
combiner.
7
Page 10

Cable (CATV)/satellite connections
This TV has an extended tuning range and can tune most cable channels without using a Cable TV converter box.
Some Cable TV companies offer "premium pay channels" in which the signal is scrambled. Descrambling these
signals for normal viewing requires the use of a descrambler device which is generally provided by the cable
company.
FOR SUBSCRIBERS TO BASIC CABLE TV SERVICE
For basic cable service not requiring a converter/descrambler box,
connect the CATV 75 ohm coaxial cable to the VHF/UHF jack on the
rear of the TV.
FOR SUBSCRIBERS TO SCRAMBLED CABLE TV SERVICE OR SATELLITE
If you subscribe to a satellite service or a cable TV service which requires the use of a converter/
descrambler box, connect the incoming 75 ohm coaxial cable to the converter/descrambler box. Using
another 75 ohm cable, connect the output of the converter/descrambler or satellite box to the antenna jack
on the TV. Follow the connections shown below. Set the TV/VCR to the output channel of the
converter/descrambler or satellite box (usually 3 or 4) and use the converter/descrambler or satellite box to
select channels.
INCOMING
75 OHM
CATV CABLE
CONVERTER/DESCRAMBLER
OR SATELLITE BOX
75 OHM CABLE
TO TV/VCR
FOR SUBSCRIBERS TO UNSCRAMBLED BASIC CABLE TV SERVICE
WITH SCRAMBLED PREMIUM CHANNELS
If you subscribe to a satellite service or a cable TV service in which basic channels are unscrambled and
premium channels require the use of a converter/descrambler box, you may wish to use a signal splitter
and an A/B switch box (available from the cable company or an electronic supply store). Follow the
connections shown below. With the switch in the "B" position, you can directly tune any nonscrambled
channels on your TV. With the switch in the "A" position, tune your TV to the output of the
converter/descrambler box (usually channel 3 or 4) and use the converter/descrambler box to tune
scrambled channels.
INCOMING
75 OHM
CATV CABLE
SPLITTER A/B SWITCH
CONVERTER/DESCRAMBLER
75 OHM
CABLE
8
Page 11
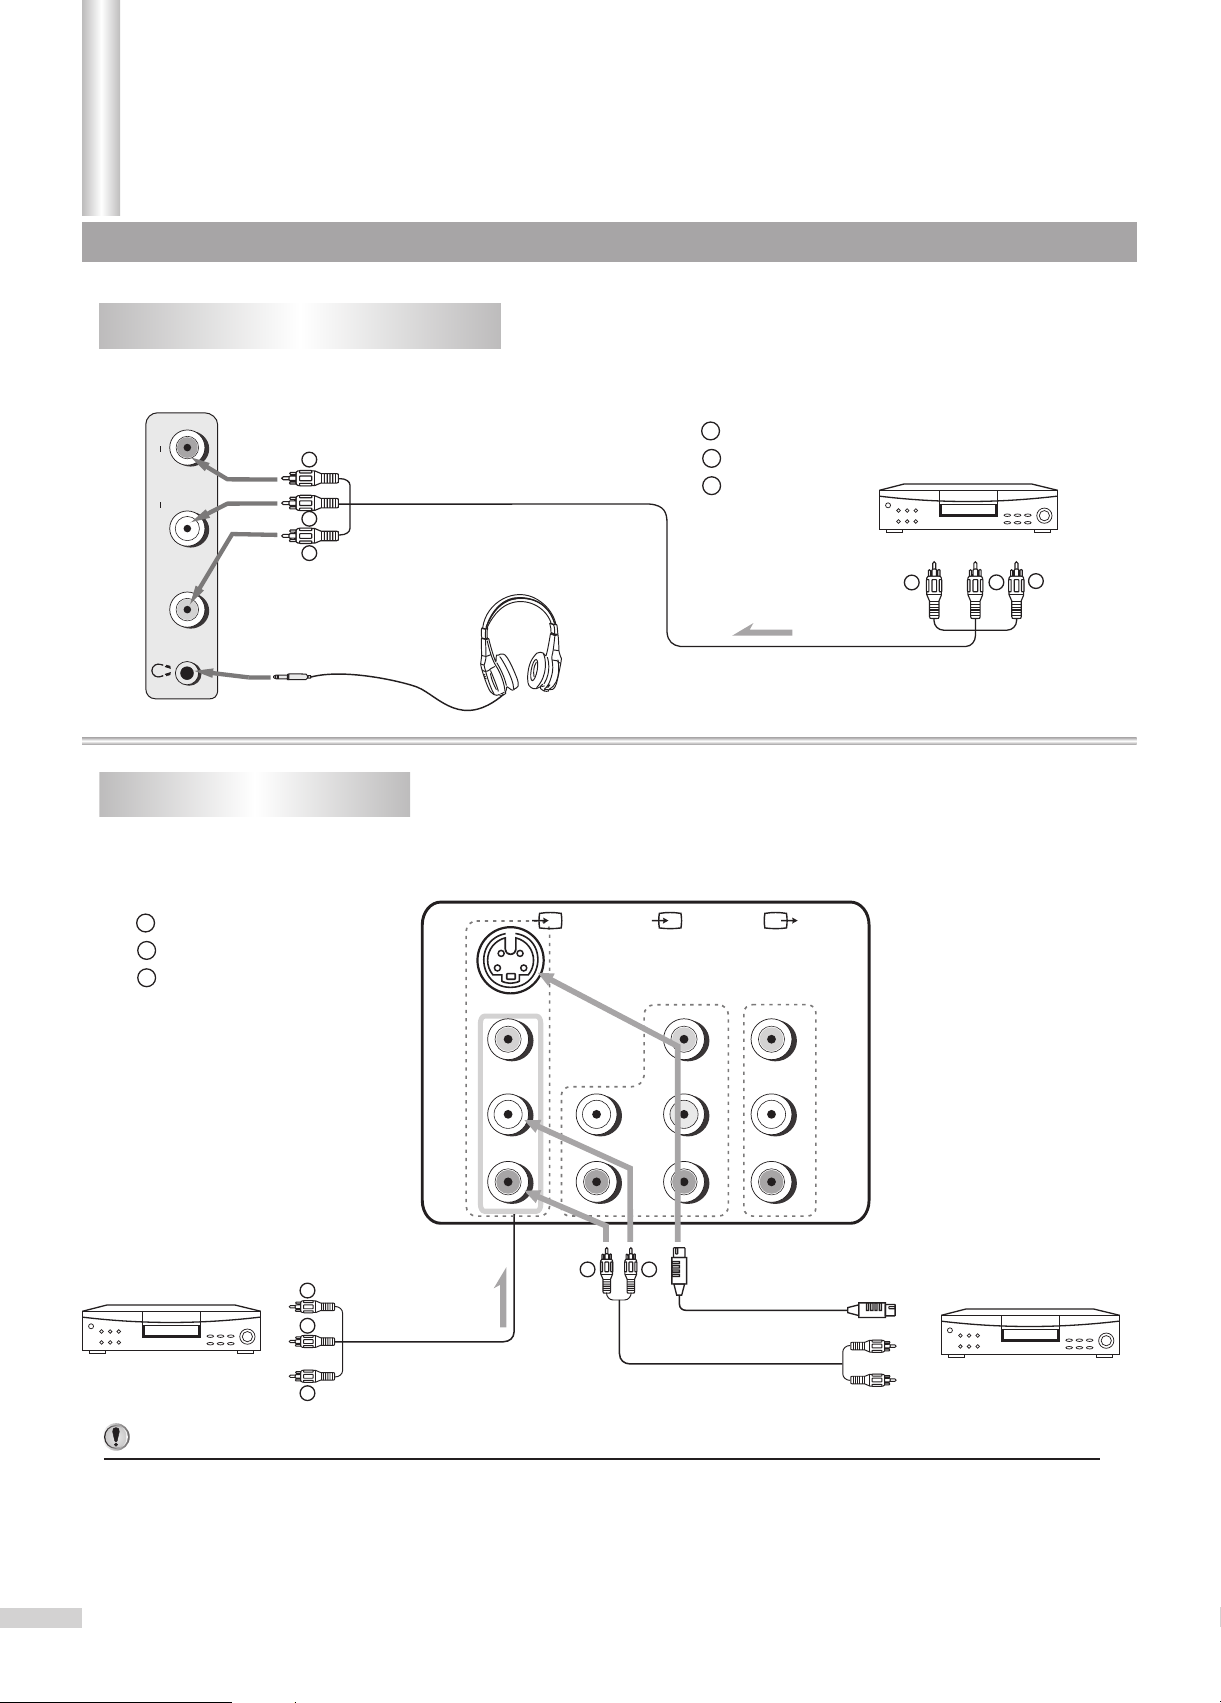
Connecting video and audio equipment
Connecting side AV inputs (AV2)
To watch video program from AV2 inputs, you need to switch the set to "Video2" by pressing AV button.
Yellow (video)
RL/MONO
TV SET SIDE
RR
AUDIO
WW
YY
VIDEO
To earphone jack
O
O
F
F
F
F
O
O
N
N
YY
white (audio L/MONO)
WW
red (audio R )
RR
Signal
VIDEO EQUIPMENT
RR
YY
WW
Connecting AV1 inputs
To watch video program from AV1 inputs, you need to switch the set to "Video1" by pressing AV button.
Yellow (video)
YY
white (audio L/MONO)
WW
red (audio R )
RR
TV SET REAR
without S-video
terminal
VIDEO EQUIPMENT
To audio
RR
outputs
WW
YY
To video
output
(1)
S-VIDEO
VIDEO
L/MONO
AUDIO AUDIO AUDIO
R
L/MONO
R
RR
DVD
COMPONENT
VIDEO
WW
MONITOR
Y
C
B
C
R
VIDEO
L
R
To S-video
output
To audio
outputs
with S-video
terminal
VIDEO EQUIPMENT
Notes:
In AV1 input terminals, the S-VIDEO terminal is prior to the VIDEO1 terminal. When both S-video
and video signal are input, the S-video signal is selected. To view a video signal, disconnect the
S-VIDEO connection.
9
Page 12

This TV set provides 3 groups of AV input terminals and 1 group of MONITOR output terminals for your
convenient connection to VCR, DVD or other video equipment.
Please refer to the Owner's Manual of the equipment to be connected as well.
Connecting DVD
To watch video program from DVD inputs, you need to switch the set to "DVD" by pressing AV button.
TV SET REAR
(1)
S-VIDEO
VIDEO
L/MONO
AUDIO AUDIO AUDIO
R
L/MONO
R
RR
DVD
COMPONENT
VIDEO
WW
MONITOR
VIDEO
Y
C
B
C
R
RR
BB
Yellow (video)
YY
white (audio L)
WW
red (audio R, C )
RR
Green (Y)
GG
Blue (C )
BB
L
R
GG
R
B
DVD PLAYER
Component
video output
GG
RR
BB
C
Y
B R
Audio
output
RR
WW
C
R
L
MONO
Signal
Connecting MONITOR outputs
You can connect a stereo system to the MONITOR output terminals on the TV set rear to enjoy a highquality sound from the stereo system, or you can connect the MONITOR output terminals to the VCR to
record the program you like.
(1)
DVD
COMPONENT
S-VIDEO
VIDEO
L/MONO
AUDIO AUDIO AUDIO
R
L/MONO
R
VIDEO
MONITOR
VIDEO
Y
C
B
C
R
TV SET REAR
Yellow (video)
YY
white (audio L/MONO)
WW
red (audio R )
RR
To external input
w
L
R
w
R
Signal
Stereo System
R
Another VCR for
recording
VHSVHS
Signal
Y Y
To video input
ww
RR
To audio inputs
10
Page 13

Operations
Turning on/off
AC Outlet
AC Plug
TV 10
Mono
MENU
TV/AV
VOL CH CHVOL
11,2
Turning on
Insert the AC plug (with the 2 blades) into a
1
conveniently located AC outlet having 120V, 60Hz.
If no picture appears and the STANDBY indicator lights up, then
the TV set is in STANDBY mode. Now please follow step 2.
Notes:
The AC plug supplied with the unit is polarized to help minimize
the possibility of electric shock. If the AC plug does not fit into a
nonpolarized AC outlet, do not file or cut the wide blade. It is the
user's responsibility to have an electrician replace the obsolete
outlet.
To prevent electric shock, do not use a
(polarized) plug with an extension cord
receptacle or other outlet unless the blades
can be fully inserted.
In STANDBY mode, press the power button on the
2
TV set or on the remote controller and the TV set is
turned on.
11
2
CATV
HIFI
VCD
DVD
VCR
SAT
TV
2
5
8
0
CH
CH
SOUND
V
A
3
6
9
ENU
M
VOLVOL
PIC
Notes:
In STANDBY mode, you can also turn on the set by pressing the
TV/AV, CHs/t or VOLs/t button on the set's panel.
If there is no input signal, then a blue background appears.
Turning off
Press the Power button on the remote controller or
11
on the TV set to turn off the TV set.
Notes:
The TV set can turn off automatically by:
A. Sleep timer function (needs to be set in advance).
CCD
B. OFF timer function (needs to be set in advance).
SET
MUT
E
1
4
7
D
SP
SLEEP
STEREO
11
Page 14

Operations
Select Input Signal
22
33
MENU
TV/AV
MUTE
D
1
4
7
SP
SLEEP
VOL CH CHVOL
SET
CATV
VCR
SAT
TV
2
5
8
0
CH
CH
STEREO
SOUND
Video1
This TV set provides 3 groups of AV input terminals for your
convenient connection to VCR, DVD or other video equipments.
To watch video program from AV inputs, Press AV
Watching AV program
1
button repeatedly until you see the appropriate
input indicator on the screen.
Video1
331,11
Notes:
Video2
DVD
In AV1 input terminals, the S-VIDEO terminal is prior to the
VIDEO1 terminal. When both S-video and video signal are input,
HIFI
VCD
DVD
V
A
3
6
9
1,
11
44
MENU
VOLVOL
PIC
the S-video signal is selected and the OSD is "S-Video". To view
a video signal, disconnect the S-VIDEO connection.
Switching from AV to TV
When the TV set is in AV mode, there are four ways for you to
switch back to TV mode as follows.
Press AV button repeatedly until the TV program
11
appears.
Press digit buttons to switch back to TV mode.
22
TV 10
MONO
CCD
Press CH+ or CH- button to switch back to TV mode.
33
Press the button to switch back to TV mode.
44
12
Page 15
Operations
Tuning in
PICTURE
Channel
Color system
TV/CATV
Add/Erase
AFT
Fine
Auto search
Move[ ] Adjust[ ]
TUNING
TIMERSOUND
7
AUTO
TV
Add
On
0
SET UP
To enter the TUNING menu
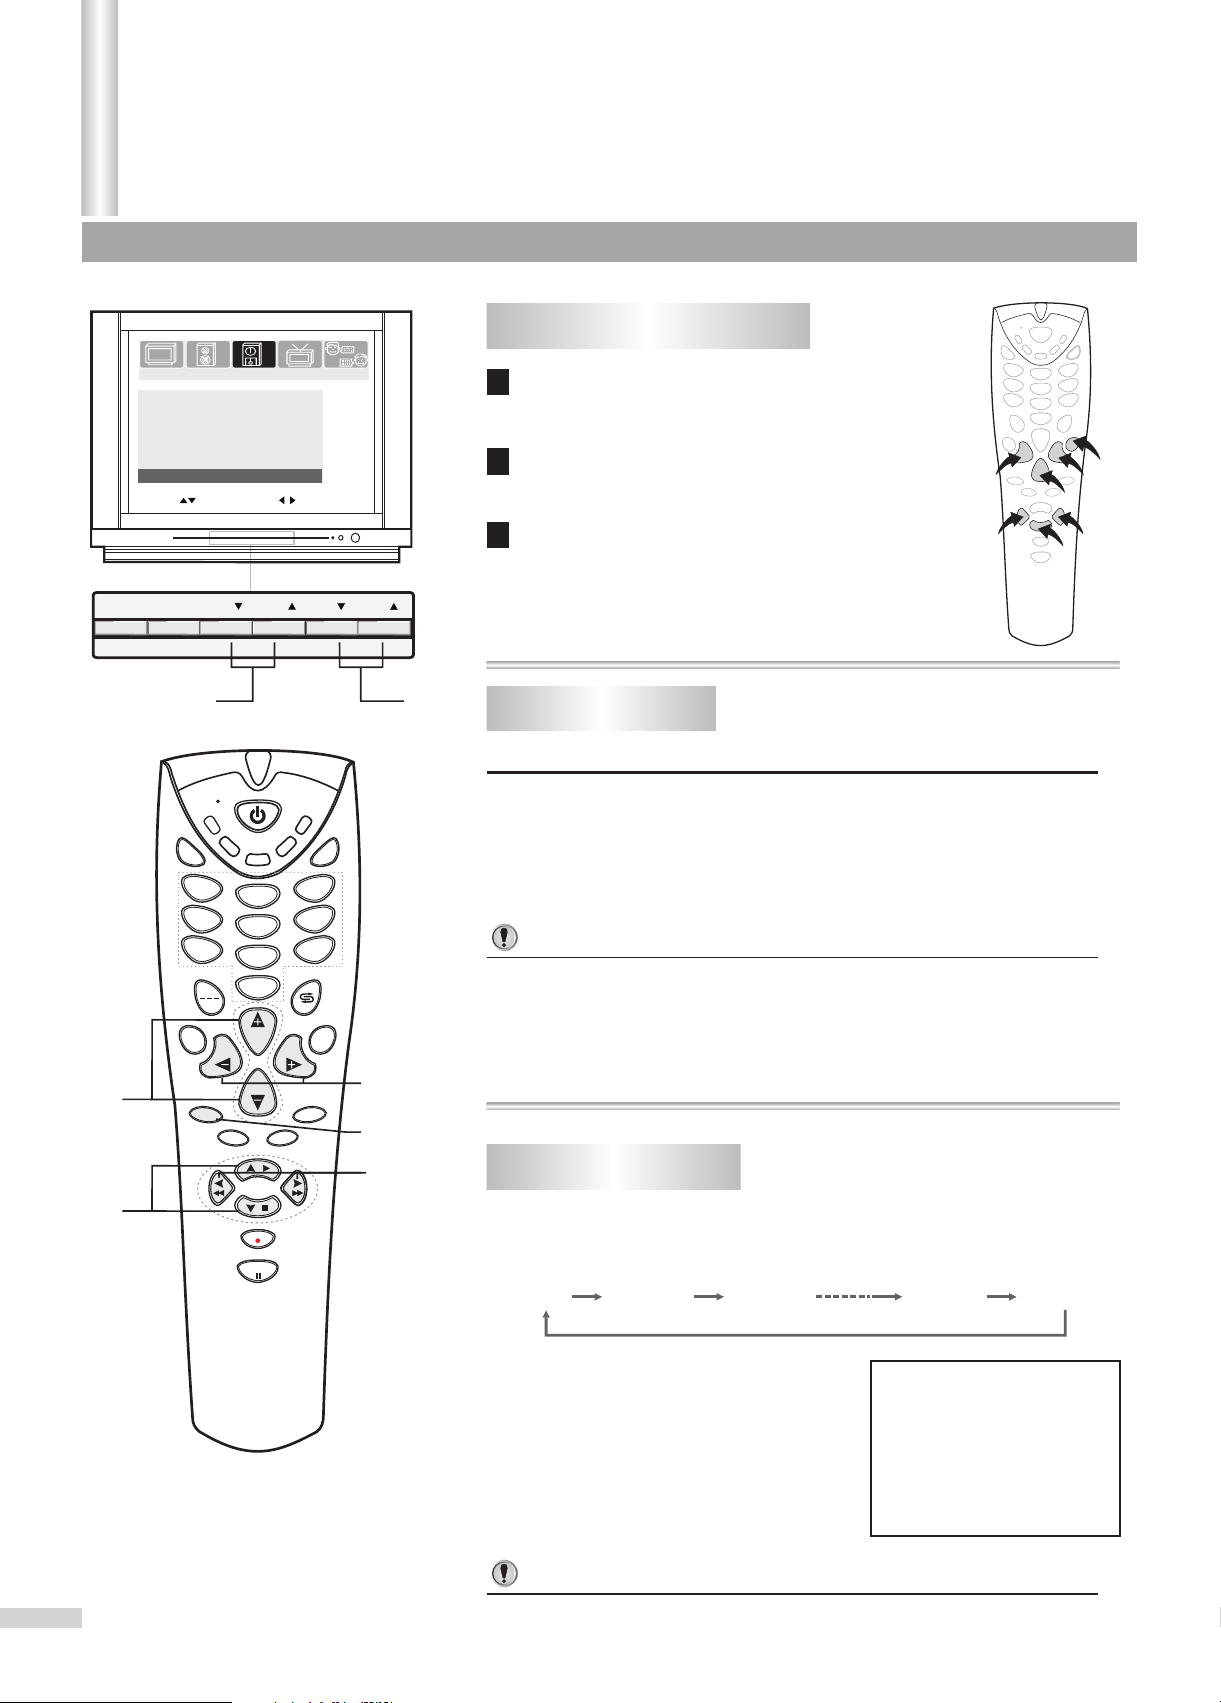
1
Press MENU button.
Press VOL+ or VOL- button to select
2
TUNING icon
Press CH- button to display the
3
TUNING menu.
1
2
2
3
2
2
3
MENU
1
TV/AV
MUTE
1
4
7
D
SP
SLEEP
VOL CH CHVOL
SET
CATV
VCR
SAT
TV
2
5
8
0
CH
CH
STEREO
SOUND
12
Auto Search
Please enter the TUNING menu first.
HIFI
VCD
DVD
V
A
3
6
9
MENU
VOLVOL
2
PIC
In TUNING menu page, press CH+ or CH- button
1
repeatedly to highlight Auto Search item.
2
Press VOL+ button to start Auto Search.
All active channels will be preset and stored into the memory
automatically. After presetting, the TV will go to the channel
before the Auto Search started.
Notes:
During the process of Auto Search,
pressing the VOL- button will stop
the process and the TV will reture to
the original channel before Auto
Search started.
TV
Auto memory
Stop
18
13
1
2
CCD
Page 16

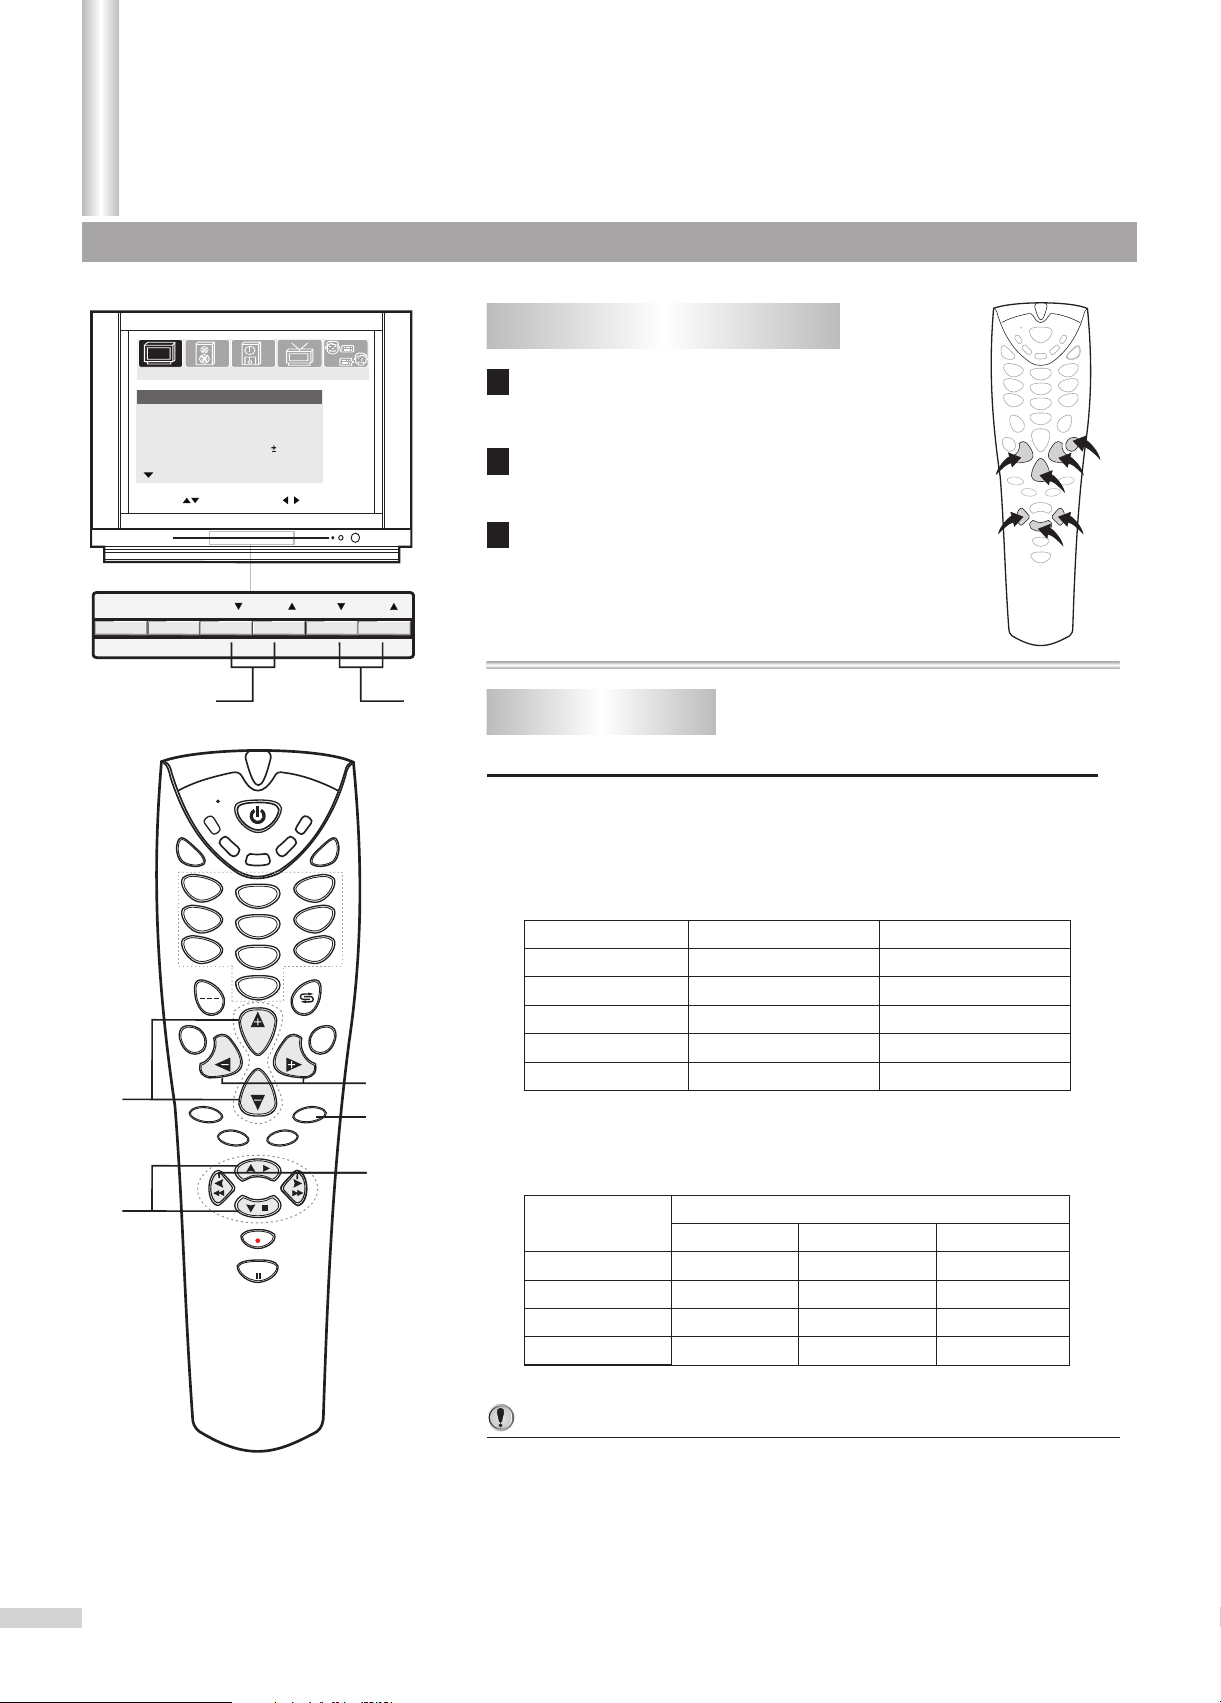
PICTURE
Channel
Color system
TV/CATV
Add/Erase
AFT
Fine
Auto search
Move[ ] Adjust[ ]
TUNING
TIMERSOUND
7
AUTO
TV
Erase
On
0
SET UP
Erasing an unnecessary channel
Please enter the TUNING menu first.
Press CH+ or CH- button repeatedly to highlight
1
Channel item.
Press VOL+ or VOL- button to select a channel
2
number (for example, channel10)
MENU
1,3
1,31,3
1,3
1,31,3
2,4
TV/AV
2,42,4
M
VOL CH CHVOL
UTE
1
4
7
DSP
SLEEP
SET
STEREO
CATV
Press CH+ or CH- button repeatedly to highlight
3
Add/Erase item.
Press VOL+ or VOL- button to set to Erase.
1,3
1,31,3
4
Now channel 10 will be skipped when you browse channels by
CH+ or CH- button.
To restore a skipped channel, please use digit buttons to select the
skipped channel, then repeat the above steps 3 and 4 and set the
HIFI
VCD
DVD
VCR
SAT
TV
2
5
8
0
AV
3
6
9
Add/Erase item to Add.
Fine tuning
Fine tuning is unnecessary under normal conditions. However, in areas
of inferior broadcast conditions where adjustment is necessary for a
better picture and sound, use Fine tuning.
Please enter the TUNING menu first.
CH
CH
SOUND
MENU
VOLVOL
2,4
2,42,4
PIC
2,4
2,42,4
Press CH+ or CH- button repeatedly to highlight
11
Channel item.
Press VOL+ or VOL- button to select a channel
22
number you want to Fine tune (for example,
channel10).
Press CH+ or CH- button repeatedly to highlight
CCD
33
Fine item.
Press VOL+ or VOL- button to
44
fine tune till the best possible
picture and sound are
obtained.
PICTURE
Channel
Color system
TV/CATV
Add/Erase
AFT
Fine
Auto search
Move[ ] Adjust[ ]
TIMERSOUND
AUTO
Erase
Notes about AFT item:
The AFT can be set to On or Off. When the AFT is set to On, the TV
set will automatically tune the program frequency to provide the
best possible picture and sound.
TUNING
7
TV
On
0
SET UP
14
Page 17

Operations
Tuning in(continued)
TUNING
PICTURE
Channel
Color system
TV/CATV
Add/Erase
AFT
Fine
Auto search
Move[ ] Adjust[ ]
MENU
TV/AV
VOL CH CHVOL
TIMERSOUND
AUTO
Erase
SET UP
7
TV
On
0
Setting the TV/CATV option
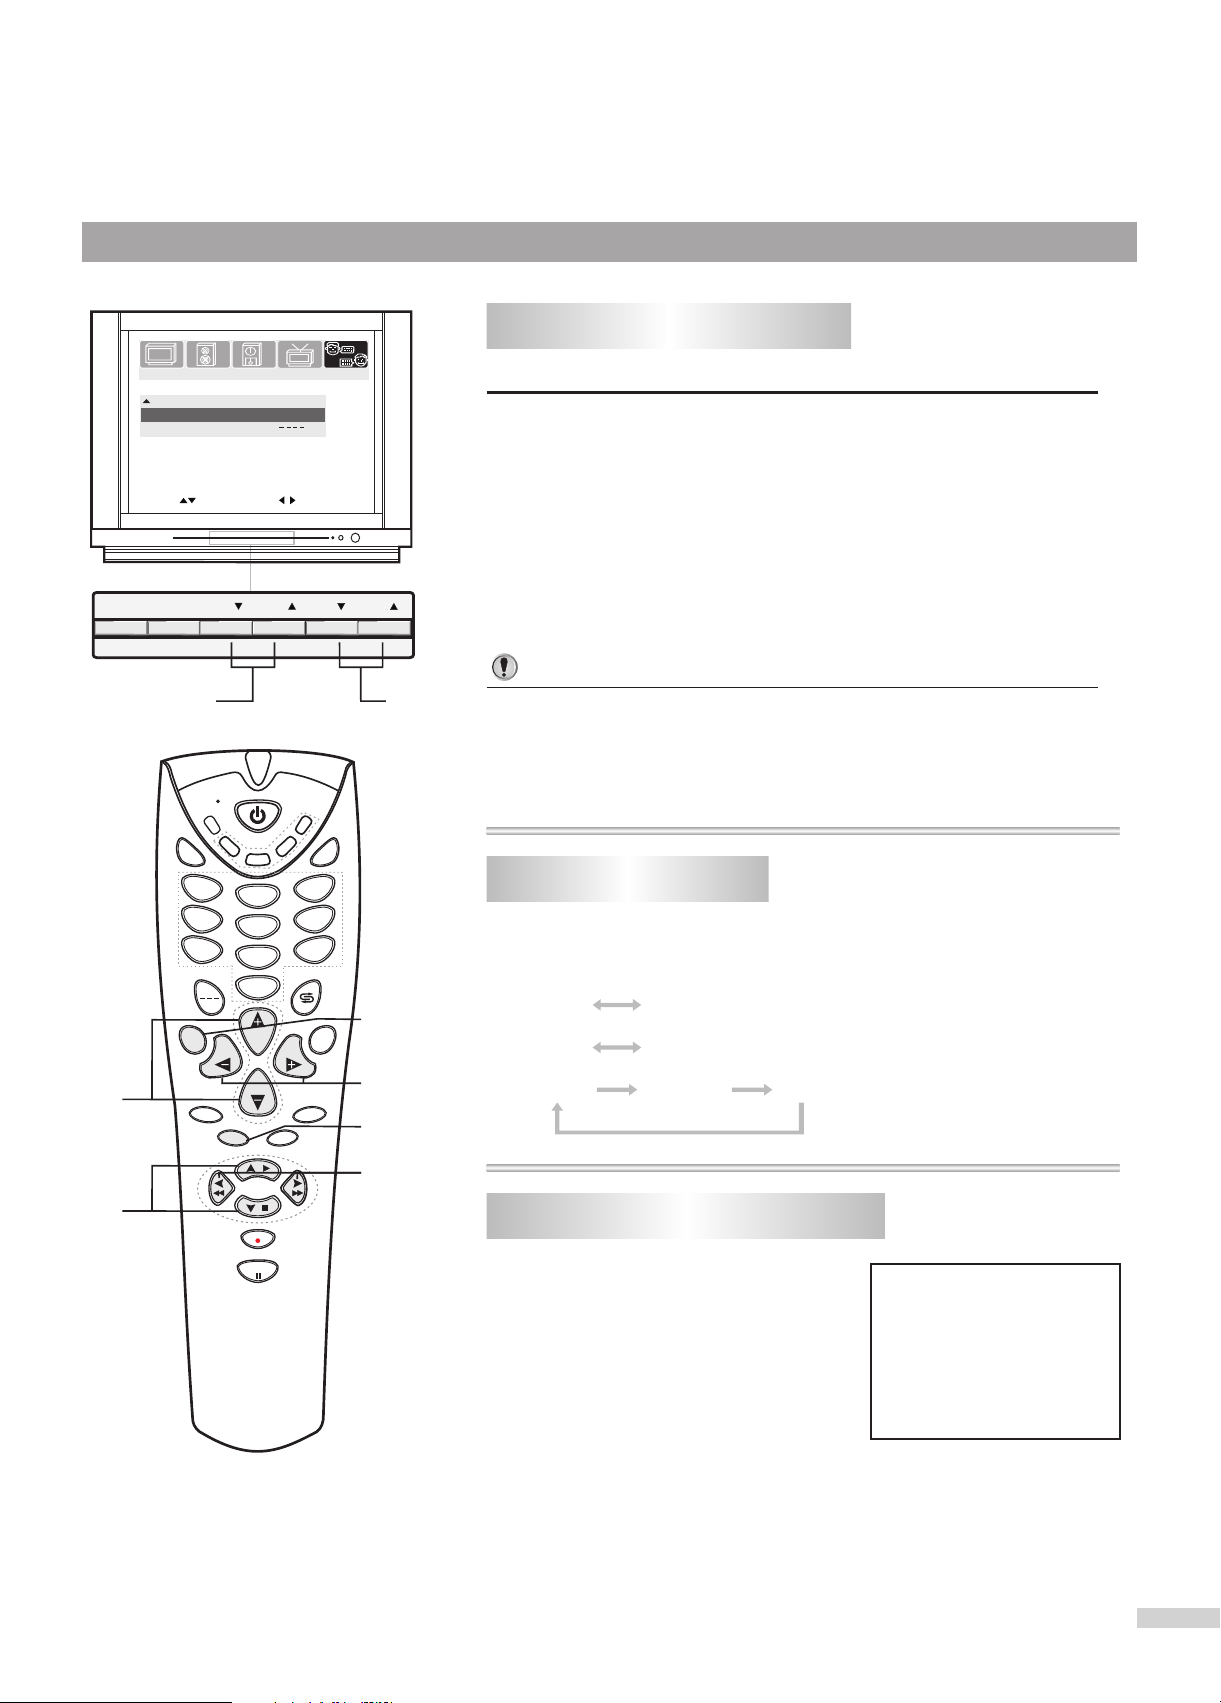
Please enter the TUNING menu first.
Press CH+ or CH- button repeatedly to highlight
1
TV/CATV item.
Press VOL+ or VOL- button to select TV or CATV.
2
In TV mode, the set receives antenna signals. In CATV mode the
set receives Cable TV programs. Please select:
TV: If using VHF/UHF antenna.
CATV: If using Cable TV.
1,
1,
11
11
2, 22
MUTE
D
SP
1
4
7
SLEEP
SET
STEREO
CATV
1,11
Setting the Color System
If the picture color is abnormal, maybe the color system setting is wrong.
HIFI
VCD
DVD
VCR
SAT
TV
2
5
8
V
A
3
6
9
0
CH
CH
CCD
SOUND
MENU
VOLVOL
22
2,
PIC
22
2,
You can select a proper color system as follows.
Please enter the TUNING menu first.
Press CH+ or CH- button repeatedly to highlight
11
Color System item.
Press VOL+ or VOL- button to
22
select a proper color system.
The color system switches between
AUTO, NTSC358 and NTSC443.
PICTURE
Channel
Color system
TV/CATV
Add/Erase
AFT
Fine
Auto search
Move[ ] Select[ ]
TIMERSOUND
TUNING
NTSC443
Erase
TV
On
SET UP
7
0
15
Page 18

TV 10
Mono
Operations
Channel Selection
Before you select a channel, please select TV or CATV input signal.
Please see the section of "To set the TV/CATV option ".
When you select TV, only channels received on antenna can be selected;
When you select CATV, channels received on cable can be selected.
Use Direct Channel Selector (0-9 and - - - buttons)
1
To select one-digit channel:
S
Press 0-9 digit buttons and wait for 2 seconds. For example,
you need channel 5, please input "5" button and the screen
displays "5-", the TV set goes to channel 5 in 2 seconds
MENU
1
2
TV/AV
MUTE
1
4
7
D
SP
SLEEP
VOL CH CHVOL
SET
CATV
VCR
SAT
TV
2
5
8
0
CH
CH
STEREO
SOUND
2
Press "5" button
To select two-digit channel:
S
Press two digit buttons in order to input the channel number.
after 2 seconds
5-
TV 5
MONO
For example, you need channel 10, please input "1" button,
followed "0" button and the set goes to channel 10. Be sure
HIFI
VCD
DVD
V
A
that the second press should be within 2 seconds.
Press "1" button
Press "0" button
1-
within 2 seconds
TV 10
MONO
3
6
9
3
To select three-digit channel:
S
Press "- - -" button to display "1--".
S
Press two digit buttons in order to input the channel number. For
example, you need channel 110, please input "1" button, followed
MENU
VOLVOL
"0" button and the set goes to channel 110. Be sure that the
second press should be within 2 seconds, otherwise, the set
goes to channel 11.
PIC
Press "---"
button
Press "1" button
1-- 11-
within 2 seconds
Press "0" button
within 2 seconds
CATV 110
MONO
CCD
Press none
and after 2
seconds
Use CH+ or CH- button
2
Press CH+ button, the channel number increases;
Press CH- button, the channel number decreases.
Use previous channel button
3
Press this button to switch between the current channel and the
previous channel.
CATV 11
MONO
16
Page 19
Operations
Adjusting Picture
TUNING
100
70
70
50
00
Sports
SET UP
1
2
3
PICTURE
Contrast
Brightness
Color
Sharpness
Tint
Picture mode
More
Move[ ] Adjust[ ]
TIMERSOUND
To enter the PICTURE menu
Press MENU button.
Press VOL+ or VOL- button to select
PICTURE icon
Press CH- button to display the
PICTURE menu.
1
2
2
3
2
2
3
MENU
1
1
TV/AV
MUTE
2
1
4
7
D
SP
SLEEP
VOL CH CHVOL
SET
CATV
VCR
SAT
TV
2
5
8
0
CH
CH
STEREO
CCD
SOUND
1
Adjusting picture
Please enter the PICTURE menu first.
HIFI
VCD
DVD
V
A
3
1
Press CH+ or CH- button to select item.
2
Press VOL+ or VOL- button to adjust.
6
9
Item
Contrast
Brightness
Color
MENU
VOLVOL
2
PIC
PIC
Sharpness
Tint
There are three preset picture modes (Sports, Standard and
VOL- VOL+
weaker
darker
paler deeper
softer
purplish
stronger
lighter
sharper
greenish
Movie) and one user-set picture mode (Personal).
The adjusted settings are stored in Personal.
2
Item
Contrast
Color
Brightness
Sharpness
Sports
100
70
70
50
Picture mode
Standard
75
60
70
50
Movie
50
50
65
50
17
Notes:
You can quickly access the PICTURE menu by pressing the PIC
button on the remote controller, and then repeat steps 1, 2 to adjust.
Page 20

Auto search/Manual search/Channel skip/Fine tuning
Setting SVM option
TUNING
Off
SET UP
On
On
Please enter the PICTURE menu first.
Press CH+ or CH- button to select SVM item.
1
PICTURE
More
SVM
Blue back
Noise reducer
TIMERSOUND
Press VOL+ or VOL- button to adjust.
Move[ ] Adjust[ ]
2
This function helps to improve the picture.
You can switch between Off, Soft, Mild and Hard.
MENU
1
1
TV/AV
MUTE
2
1
4
7
D
SP
SLEEP
VOL CH CHVOL
SET
CATV
VCR
SAT
TV
2
5
8
0
CH
CH
STEREO
CCD
SOUND
Setting Blue background option
Please enter the PICTURE menu first.
1
Press CH+ or CH- button to
1
select Blue Back item.
Press VOL+ or VOL- button to
HIFI
VCD
DVD
V
A
3
2
select On or Off.
If the Blue Back is set to On, the TV
set will display a blue background
when there is no input signal.
PICTURE
SOUND
More
SVM
Blue back
Noise reducer
Move[ ] Adjust[ ]
6
9
Setting Noise Reducer option
Please enter the PICTURE menu first.
MENU
VOLVOL
2
PIC
2
Press CH+ or CH- button to select Noise Reducer
1
item.
Press VOL+ or VOL- button to
2
select On or Off.
This function is useful when the
picture is snowy because of a poor
signal.
If the Noise Reducer is set to On,
the picture will be improved.
PICTURE
SOUND
More
SVM
Blue back
Noise reducer
Move[ ] Adjust[ ]
TIMER
TIMER
TUNING
Off
On
On
TUNING
Off
On
On
SET UP
SET UP
18
Page 21

Operations
Sound Control
MENU
2
Volume 50
VOL CH CHVOL
TV/AV
1
SET
CATV
SAT
MUTE
1
4
7
TV
2
5
8
0
Adjusting volume
1
Adjusting volume/Muting the Sound
Use VOL+ or VOL- button.
Press VOL+ button, the volume increases;
Press VOL- button, the volume decreases.
The minimum volume is 0 and the maximum volume is 100.
Use MUTE button.
2
If you want to mute the sound, press
MUTE button on the remote.
To resume the sound, press this button
again.
Notes:
HIFI
VCD
DVD
VCR
V
A
3
6
9
You can also resume the sound by pressing VOL+ or VOL- button.
D
CH
SP
CH
SLEEP
STEREO
CCD
SOUND
MENU
VOLVOL
1
PIC
19
Page 22

PICTURE
Bass
Treble
Balance
Sound mode
Move[ ] Adjust[ ]
TIMERSOUND
TUNING
59
69
00
Personal
SET UP
To enter the SOUND menu
1
Press MENU button.
Press VOL+ or VOL- button to select
2
SOUND icon
Press CH- button to display the
3
SOUND menu.
1
2
2
3
2
2
3
MENU
1
1
TV/AV
MUTE
1
4
7
D
SP
SLEEP
VOL CH CHVOL
SET
CATV
VCR
SAT
TV
2
5
8
0
CH
CH
STEREO
CCD
SOUND
12
Adjusting sound
Please enter the SOUND menu first.
HIFI
VCD
DVD
V
A
3
6
9
MENU
VOLVOL
2
PIC
SOUND
2
1
Press CH+ or CH- button to select item.
2
Press VOL+ or VOL- button to adjust.
Item
Bass
Treble
Balance
VOL- VOL+
weaker
weaker
decreases the
right channel
decreases the
stronger
stronger
left channel
There are two preset sound modes (News and Music) and
one user-set sound mode (Personal).
The adjusted settings are stored in Personal.
Sound mode
Item
Bass
Treble
News Music
50
50
90
40
Notes:
You can quickly access the SOUND menu by pressing the SOUND
button on the remote controller, and then repeat steps 1, 2 to adjust.
20
Page 23
Operations
Timer Setting
TUNING
Off
Off
SET UP
2
TV
PICTURE
Off Time
On Time
Channel
TV/CATV
Clock
Move[ ] Select[ ]
TIMERSOUND
AM 12:00
AM 12:00
AM 8:00
To enter the TIMER menu
1
Press MENU button.
Press VOL+ or VOL- button to select
2
TIMER icon
Press CH- button to display the TIMER
3
menu.
1
2
2
3
2
2
3
MENU
1
TV/AV
MUTE
2
1
4
7
D
SP
SLEEP
VOL CH CHVOL
SET
CATV
VCR
SAT
TV
2
5
8
0
CH
CH
STEREO
SOUND
1
Setting the Clock
Please enter the TIMER menu first.
HIFI
VCD
DVD
V
A
3
1
Press CH+ or CH- button to select Clock item.
2
Press VOL+ or VOL- button to set the current time.
6
9
Notes:
We recommend you to set the current time before setting the Off
Time or On Time.
If you disconnect the AC plug, the time will lost and the Off Time
MENU
VOLVOL
and On Time will not work. You need to set these items after you
re-connect the AC plug.
2
PIC
Sleep
2
Setting Sleep timer
21
1
CCD
You can quickly set the sleep timer by using the SLEEP button on
the remote controller. With every press of this button the sleep time
changes as follows:
OFF
120 Min. 110 Min. 10 Min.20 Min.
For example, you would like the TV to
auto turn off in 60 minutes, you can
press the SLEEP button repeatedly till
the screen displays as the right figure.
If you want to cancel the sleep timer,
you can press the SLEEP button
repeatedly till "Off" displays on the
screen.
Sleep:60 Min.
Notes:
When there is no input signal for 15 minutes, the TV set auto
goes to STANDBY mode.
Page 24

Notes about On Time function:
When the set is turned on automatically at the preset time, if there is no operation to the set within 2 hours, the set will
regard this as no one is watching. For the sake of power saving, the TV set will go to STANDBY mode automatically.
Setting the Off Time
TUNING
Once
Once
SET UP
2
TV
Please enter the TIMER menu first.
Press CH+ or CH- button to select Off Time item.
1
Press VOL+ or VOL- button to select Once or Every.
2
Press CH- button.
3
PICTURE
Off Time
On Time
Channel
TV/CATV
Clock
Move[ ] Select[ ]
TIMERSOUND
10:00PM
6:00PM
8:00AM
Press VOL+ or VOL- button to set the OFF time, for
MENU
TV/AV
2,4
2,4,6,82,4,6,8
VOL CH CHVOL
1,3
1,3,5,71,3,5,7
4
example 10:00PM.
The set auto turns off when the time is 10:00PM. If you set the Off
Time item to Once, this function only effects once; If you set the Off
Time item to Every, this function effects every day. To cancel this
function, please set the Off Time to Off.
Notes:
The Time can not be accessed until you set the Off Time to Once
or Every. When you are setting the time by VOL+/- button, if you
press and release within 0.7 second, the time's increase or
decrease step is 1 minute; if you press and hold for more than 0.7
second, the time's increase or decrease step is 10 minutes.
Setting the On Time
Please enter the TIMER menu first.
Press CH+ or CH- button to select On Time item.
11
Press VOL+ or VOL- button to select Once or Every.
22
Press CH- button.
33
Press VOL+ or VOL- button to set the ON time, for
44
example 6:00PM.
Press CH- button to select CHANNEL item.
55
Press VOL+ or VOL- button to select a channel
66
number, for example, channel 10.
1,3
1,3,5,71,3,5,7
1,3
1,3,5,71,3,5,7
MUTE
CATV
HIFI
VCD
DVD
VCR
SAT
TV
2
5
8
0
CH
CH
SOUND
V
A
3
6
9
MENU
VOLVOL
2,4
2,4,6,82,4,6,8
PIC
SET
1
4
7
D
SP
SLEEP
STEREO
2,4
2,4,6,82,4,6,8
CCD
77
Press CH- button to select TV/CATV item.
Press VOL+ or VOL- button to select TV or CATV.
88
The set auto turns on and goes to channel 10 when the time is 6:00PM.
If you set the On Time item to Once, this function effects only once; If
you set the On Time item to Every, this function effects every day. To
Notes:
The Time can not be accessed until you set the On Time to Once or Every. When you are setting the time by
VOL+/- button, if you press and release within 0.7 second, the time's increase or decrease step is 1 minute; if you
press and hold for more than 0.7 second, the time's increase or decrease step is 10 minutes.
cancel this function, set the On Time item to Off.
22
Page 25

Operations
System Setting
TUNING
PICTURE
SOUND
Language:
ENGLISH
FRANCAL
ESPANOL
Menu Demo:
Child lock menu:
More
Move[ ] Confirm[ ]
MENU
TV/AV
VOL CH CHVOL
TIMER
SET UP
Stop
To enter the SET UP menu
1
Press MENU button.
1
2
Press VOL+ or VOL- button to select
2
SET UP icon
Press CH- button to display the SET UP
3
2
3
2
2
3
menu.
2
1,
1,
11
11
MUTE
22
1,
11
Selecting OSD language
Please enter the SET UP menu first.
CATV
HIFI
VCD
DVD
VCR
SAT
TV
2
5
8
V
A
3
6
9
1
Press CH+ or CH- button to select an OSD language.
2
Press the VOL+ button to confirm.
There are three OSD languages in this TV set: English, French and
Spanish.
0
SET
1
4
7
2
D
CH
SP
CH
SLEEP
STEREO
SOUND
MENU
VOLVOL
22
PIC
22
Setting Menu Demo
Please enter the SET UP menu first.
11
Press CH+ or CH- button to select Menu Demo item.
2
Press the VOL+ or VOL-
CCD
22
button to start.
Then the TV set starts menu
demonstration. This function
teaches you how to operate the
menu.
PICTURE
SOUND
Language:
ENGLISH
FRANCAL
ESPANOL
Menu Demo:
Child lock menu:
More
Move[ ] Select[ ]
TIMER
TUNING
Stop
SET UP
23
Page 26
PICTURE
More
Closed Caption
Vchip password
Move[ ] Select[ ]
MENU
TV/AV
VOL CH CHVOL
Setting Closed Caption(CCD)
TUNING
OFF
SET UP
Please enter the SET UP menu first.
Press CH+ or CH- button to select Closed Caption
1
item
Press the VOL+ or VOL- button to select.
2
TIMERSOUND
You can select the caption data channel (C1/C2/C3/C4), the text
service channel (T1/T2/T3/T4) or turn off the Closed Caption (Off).
You can also quickly access the Closed Caption menu by
pressing the CCD button on the remote controller.
Notes:
1
1
MUTE
2
1
1.Some TV programs may not be broadcast with closed caption
signals, and therefore, the TV will not be able to display captions.
Also, text information is not offered by all stations.
2.Some TV programs only provide one channel caption, one
channel text , or only caption without text.
Selecting audio mode
If the program you are watching is "STEREO" or "SAP", you can
select audio mode by using the STEREO button on the remote
controller. The audio mode changes as follows.
CATV
HIFI
VCD
DVD
VCR
SAT
TV
2
5
8
V
A
3
6
9
SET
1
4
7
0
MONO
D
CH
SP
SLEEP
STEREO
VOLVOL
CH
PIC
SOUND
MENU
DSP
2
Stereo
MONO
MONO
STEREO
SAP
STEREO SAP
(If the program is STEREO)
(If the program is SAP)
(If the program is
STEREO & SAP)
2
Recalling the On-screen display
CCD
You can press the DSP button on the
remote controller to recall the On-screen
display.
First press of the DSP button displays the
channel number and audio mode; before
the display disappears, pressing DSP
button again will display the time. To cancel
the on-screen display, press the DSP
button again.
AM 10:00
TV 10
MONO
24
Page 27

Operations
Parental Control
Child lock
TUNING
PICTURE
Language:
ENGLISH
FRANCAL
ESPANOL
Menu Demo:
Child lock menu:
More
Move[ ] Number[0-9]
MENU
TV/AV
VOL CH CHVOL
TIMERSOUND
SET UP
Stop
To enter Child lock submenu
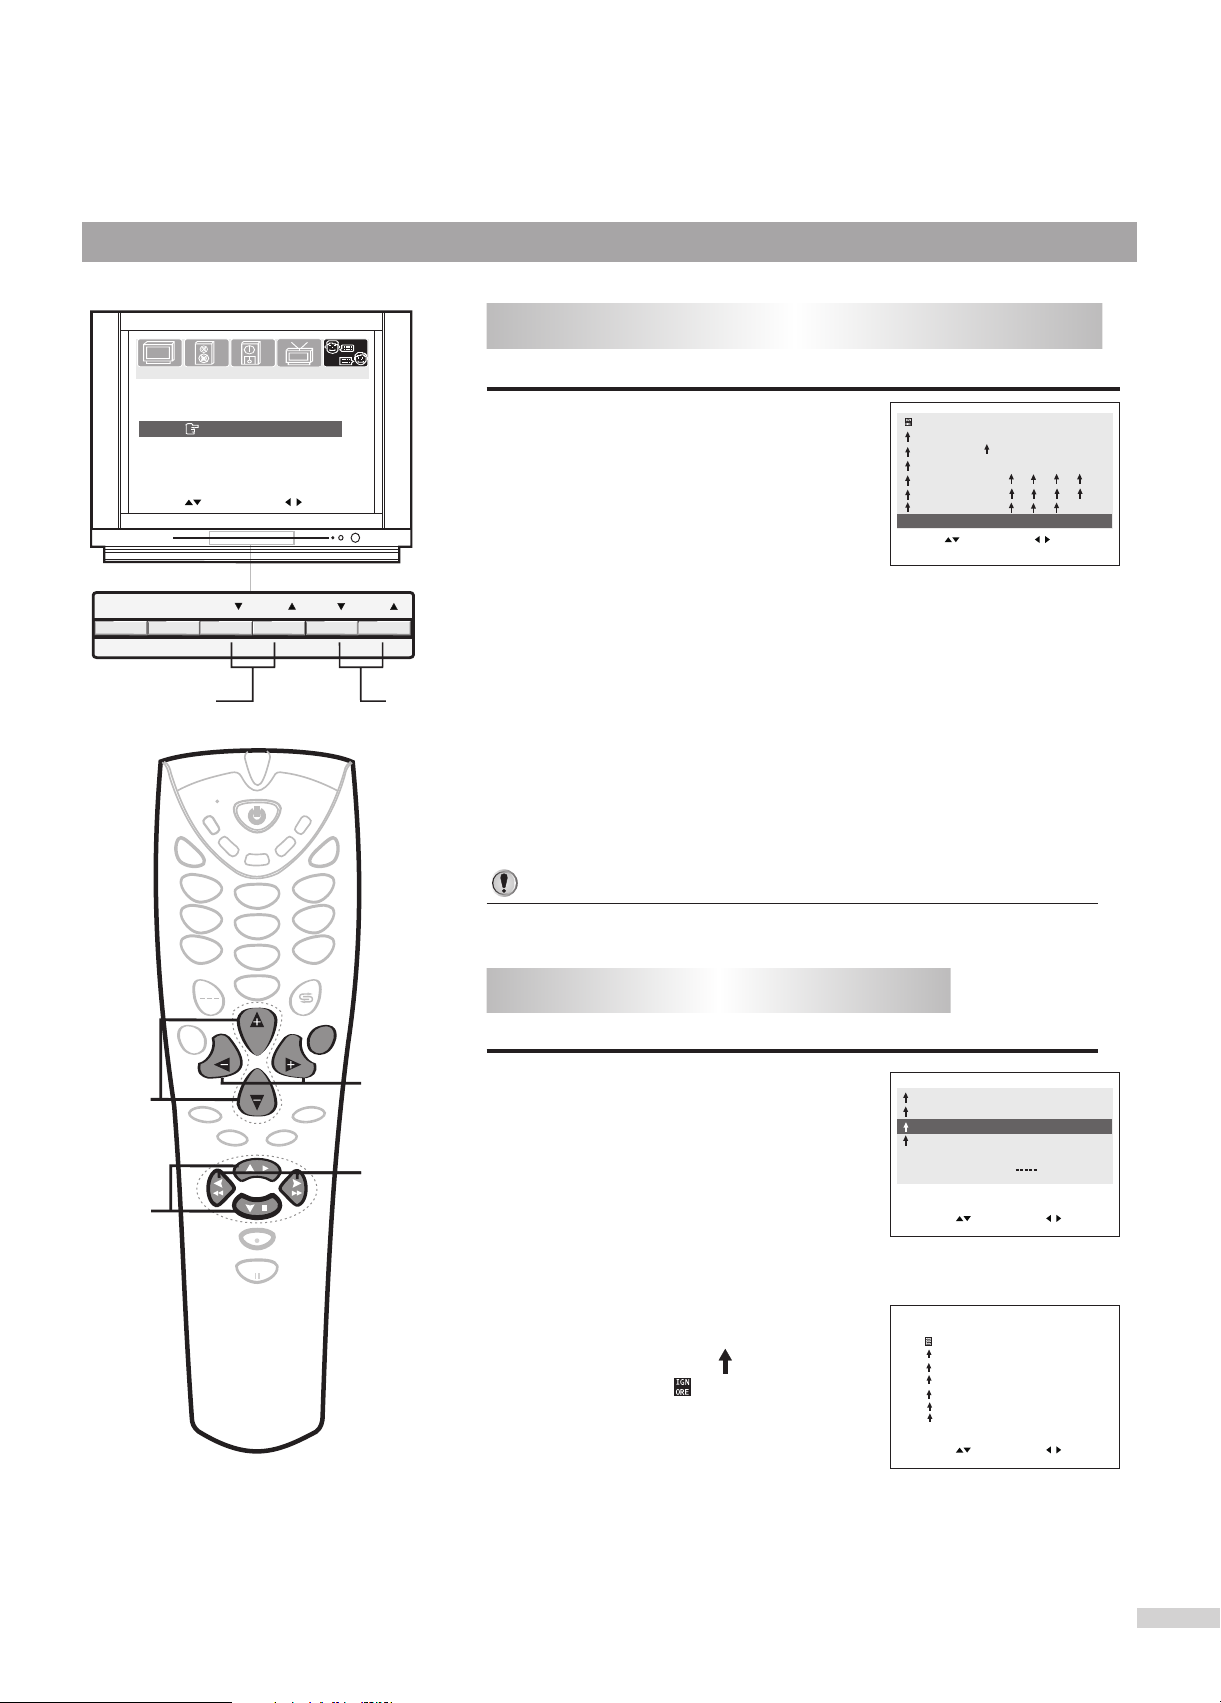
Please enter the SET UP menu first.
Press CH+ or CH- button to select Child lock menu
item.
Input the password to enter
into Child lock menu.
The default password to enter Child lock
menu is 0000 and you can change it
after you enter into Child lock submenu
as the right figure.
PICTURE
Channel:
TV/CATV:
Child lock:
New password:
Move[ ] Select[ ]
TUNING
TIMERSOUND
TV
0n
SET UP
5
1,3,5
1,3,5
2,4,6
MUTE
1
4
7
D
SP
SLEEP
SET
STEREO
CATV
1,3,5
Setting Child lock
Please enter the Child lock submenu as described above.
Press CH+ or CH- button to select Channel item.
HIFI
VCD
DVD
VCR
SAT
TV
2
5
8
V
A
3
6
9
0-9
digit
buttons
1
Press VOL+ or VOL- button to select a channel you
2
want to lock. For example, channel 10.
Press CH+ or CH- button to select TV/CATV item.
3
4
Press VOL+ or VOL- button to select TV or CATV.
0
Press CH+ or CH- button to select Child lock item.
CH
CH
SOUND
MENU
MENU
VOLVOL
2,4,6
PIC
2,4,6
5
Press VOL+ or VOL- button to select On.
6
Now the Child lock is active. When you select channel 10, a blue
background appears and the note as "Notice: child lock function
active" also appears when there is no OSD display on the screen.
To turn off the Child lock function, please select Off.
Changing the password
CCD
Please enter the Child lock submenu as described above.
Press CH+ or CH- button to
select New password item.
Input a new password by using
0-9 digit buttons. Press MENU
button to confirm after you finish
inputting the new password.
PICTURE
Channel:
TV/CATV:
Child lock:
New password:
Move[ ] Number[0-9]
TIMER
TUNING
Important:
Be sure to write down the new password and retain it for future use because you can not access the
Child lock submenu if you input an incorrect password.
If you forget the password, please input 4,3,2,1 in order and you can also enter into the Child lock
submenu.
25
5
TV
0n
SET UP
Page 28

V-Chip enables parents to prevent their children from watching inappropriate material on TV. V-Chip reads the
ratings for programming (except for news, sports, unedited movies on premium cable and Emergency System
signals ), then denies access to programming if the program's rating meets the limitations you select. In this case,
the program will be blocked.
Setting V-chip
To enter the V-chip menu
TUNING
PICTURE
MPAA RATING
TV PARENTAL GUIDELINES
CANADIAN ENGLISH RATING
CANADIAN FRENCH RATING
BLOCK
NEW PASSWORD
Move[ ] Select[ ]
MENU
TV/AV
VOL CH CHVOL
TIMERSOUND
ON
SET UP
Please enter the SET UP menu first.
Press CH+ or CH- button to select Vchip password
1
item.
Use digit buttons (0-9) to enter
2
the password (the preset
password is 0000).
IMPORTANT: This password can be
changed after the original password is
entered.
More
Closed Caption
Vchip password
Move[ ] Number[0-9]
OFF
1,
1,
1,31,3
1,31,3
2,42,4
M
UT
E
1
4
7
D
SP
SLEEP
SET
STEREO
CATV
Note: To enable V-chip setting, you
1,
1,31,3
should set BLOCK to ON in V-chip
menu.
HIFI
VCD
DVD
VCR
SAT
TV
2
5
8
0
CH
CH
SOUND
AV
3
6
2
9
MPAA RATING SET-UP
Rating guidelines are provided by broadcast stations. Most television
programs and television movies can be blocked by TV Rating and/or
Individual Categories. Movies that have been shown at the theaters or
direct-to-video movies use the Movie Rating System (MPAA) only.
U
EN
M
VOLVOL
Please enter the V-chip menu first.
2,42,4
Press CH+ or CH- button to select MPAA RATING item.
PIC
2,42,4
11
Press VOL+ or VOL- button to enter into MPAA
22
RATING sub-menu.
Use CH+ or CH- to select the desired rating.
33
MPAA RATING
TV PARENTAL GUIDELINES
CANADIAN ENGLISH RATING
CANADIAN FRENCH RATING
BLOCK ON
New password
Move[ ] Select[ ]
CCD
Press VOL+or VOL- button to
44
block the rating (" " will
appear), or unblock (" " will
appear).
Movie Ratings:
* Unblocked
N/A
G
PG
PG-13
R
NC-17
X
Move[ ] Select[ ]
* G and Above (general audience)
* PG and Above (parental guidance suggested)
* PG-13 and Above (13 years and up)
* R and Above (restricted)
* NC-17 and Above (18 years and up)
* X (adult)
If you set PG-13 and Above; G and PG movies will be available,
PG-13, R, NC-17 and X will be blocked.
26
Page 29
Operations
Parental Control(continued)
Setting V-chip
TV RATING SET-UP
TUNING
PICTURE
NONE F V S L D
TV-Y
TV-Y7
TV-G
TV-PG
TV-14
TV-MA
CONTENT
Move[ ] Select[ ]
MENU
TV/AV
TIMERSOUND
VOL CH CHVOL
SET UP
TV Parental Guidelines may have one or more letters added to the
basic rating to let parents know when a show contains higher levels
of violence, sex, adult language or suggestive dialogue:
Please enter the V-chip menu first.
Press CH+ or CH- button to
1
select TV PARENTAL
GUIDELINES item.
Press VOL+ or VOL- button
2
to enter into TV PARENTAL
GUIDELINES sub-menu.
1,32,4
3
Use CH+ or CH- to select the desired rating.
MPAA RATING
TV PARENTAL GUIDELINES
CANADIAN ENGLISH RATING
CANADIAN FRENCH RATING
BLOCK ON
New password
Move[ ] Select[ ]
1,3
1,3
Press VOL+ or VOL- to block the rating (" " will
4
appear), or unblock (" " will appear).
TV Ratings:
* Unblocked
* TV-Y and Above (all children) (individual content categories do not
apply)
* TV-Y7 (7 years and up)
* TV-G and above (general audience) (individual categories do not
apply)
* TV-PG and Above (parental guidance suggested)
* TV-14 and above (14 years and up)
* TV-MA (mature audience)
Content Categories:
* F Violence: fantasy violence (applies only to TV-Y7)
* Violence (applies to TV-PG and above, TV-
CATV
HIFI
VCD
DVD
VCR
SAT
TV
2
5
8
AV
3
6
9
SET
M
UT
E
1
4
7
0
D
SP
CH
CH
SLEEP
STEREO
SOUND
U
EN
M
VOLVOL
2,4
PIC
14 and Above, TV-MA)
2,4
* Sex scenes: sexual situations (applies to TV-PG and above, TV-
14 and Above, TV-MA)
* Language: adult language (applies to TV-PG and above, TV-
14 and Above, TV-MA)
CCD
* Dialog: sexual dialogue (applies to TV-PG and Above,
TV-14)
27
Page 30
PICTURE
CONTENT
TV-Y
FANTASY V
TV-Y7 VIEW
VIOLENCE
TV-G
SEXUAL
TV-PG
LANGUAGE
TV-14
DIALOG
TV-MA
Move[ ] Select[ ]
MENU
TV/AV
VOL CH CHVOL
2,4,6
2,42,4
SET
M
UT
E
1
4
7
CATV
Setting individual Content Categories for TV Rating
TUNING
---
---
---
---
SET UP
Please enter the TV PARENTAL GUIDELINES sub-menu first.
Press CH+ or CH- button to
1
select CONTENT item.
Press VOL+ or VOL- button to
2
enter into the CONTENT menu.
Press CH + or CH- button to select a TV Rating.
3
Press VOL + button to enter into content categories
4
menu.
NONE F V S L D
TV-Y
TV-Y7
TV-G
TV-PG
TV-14
TV-MA
CONTENT
Move[ ] Select[ ]
TIMERSOUND
1,3,5
Press CH+/- button to select content category.
1,31,3
5
Press VOL + button to set Block or View. If the
6
content category does not apply to the TV rating, - - -
HIFI
VCD
DVD
VCR
SAT
TV
2
5
8
AV
3
6
9
0
will be displayed.
Press VOL - button to exit content categories menu.
Notes:
If you want to exit the menu, please press MENU button
repeatedly.
CANADIAN ENGLISH RATING SET-UP
1,3,5
1,31,3
1,3,5
1,31,3
D
SP
CH
CH
SLEEP
STEREO
SOUND
U
EN
M
VOLVOL
2,4,6
PIC
2,42,4
2,4,6
2,42,4
Please enter the V-chip menu first.
Press CH+ or CH- button to
11
select CANADIAN ENGLISH
RATING item.
Press VOL+ or VOL- button to
22
enter into CANADIAN
MPAA RATING
TV PARENTAL GUIDELINES
CANADIAN ENGLISH RATING
CANADIAN FRENCH RATING
BLOCK ON
New password
Move[ ] Select[ ]
ENGLISH RATING sub-menu.
CCD
33
Press CH+ or CH- to select the desired rating.
Press VOL+ or VOL- to either
44
block the rating (" " will appear),
or unblock (" " will appear).
Canadian English Language Ratings:
*
E: Exempt.
*
C: Children.
*
C8+: Children 8 years and older.
*
G: General programming, suitable for all audiences.
*
PG: Parental guidance.
*
14+: Viewers 14 years and older.
*
18+: Adult programming.
Move[ ] Select[ ]
E
C
C8+
G
PG
14+
18+
28
Page 31
Operations
Parental Control(continued)
Setting V-chip
CANADIAN FRENCH RATING SET-UP
TUNING
PICTURE
E
G
8 ans+
13 ans+
16 ans+
18 ans+
Move[ ] Select[ ]
MENU
TV/AV
VOL CH CHVOL
TIMERSOUND
SET UP
Please enter the V chip menu first.
Press CH+ or CH- button to
1
select CANADIAN FRENCH
RATING item.
Press VOL+ or VOL- button to
2
enter into CANADIAN FRENCH
RATING sub-menu.
MPAA RATING
TV PARENTAL GUIDELINES
CANADIAN ENGLISH RATING
CANADIAN FRENCH RATING
BLOCK
New password
Move[ ] Select[ ]
ON
1,3,
1,3,
Press CH+ or CH- to select the desired rating.
3
11
2,4
1,3,
Press VOL+ or VOL- to block the rating (" " will
4
appear), or unblock (" " will appear).
CATV
HIFI
VCD
DVD
VCR
SAT
TV
2
5
8
AV
3
6
22
9
Canadian French Language Ratings:
*
E: Exempt.
: Children.
* G
8 ans+: Children 8 years and older.
*
* 13 ans+
* 16 ans+
18 ans+: Adult programming.
*
: Children 13 years and older.
:Viewers 16 years and older.
SET
M
UT
E
1
4
7
0
D
SP
11
CH
CH
SLEEP
STEREO
11
CCD
SOUND
U
EN
M
VOLVOL
CHANGING THE PASSWORD
2,4
PIC
2,4
Please enter the V-chip menu first.
Press CH+ or CH- button to
11
select NEW password item.
Input a new password by
22
using 0-9 digit buttons. Press
MENU button to confirm after
MPAA RATING
TV PARENTAL GUIDELINES
CANADIAN ENGLISH RATING
CANADIAN FRENCH RATING
BLOCK
New password 145-
Move[ ] Number[0-9]
ON
you finish inputting the new
password.
PRESS MENU KEY TO CONFIRM
29
Next when you want to enter the V-chip menu, you should use
this new password. Make sure to remember the password.
Page 32

Check the following before requesting service.
Others
Troubleshooting Guide
SYMPTOM
No power
PowerTV broadcast receptionRemote ControlV-CHIP
Poor or no picture.
Picture wobbles
or drifts.
No CATV reception.
No reception above
CH13.
Poor or no sound.
POSSIBLE CAUSE POSSIBLE SOLUTION
The AC power cord is not connected.
TV station experiencing problems. Try another channel.
Picture control is not adjusted.
Possible local interference.
Antenna/CATV connector is not connected. Check CATV connection or VHF/UHF ant.
TV station experiencing problems. Try another channel.
Cable TV channel is scrambled.
Possible local interference.
CATV connected or not connected. Check all CATV connections.
TV/CATV set to TV. Set TV/CATV to CATV
Cable TV service interrupted.
TV/CATV set to TV. Set TV/CATV to CATV.
TV station experiencing problems. Try another channel.
MUTE button is pressed.
Possible local interference.
Connect the AC power cord
to the AC outlet
Check picture control adjustments.
Check for source of reception disturbance.
A Cable box needs to be used (if desired).
Check for source of reception disturbance.
Contact your Cable TV company.
Press MUTE button again.
Check for source of reception disturbance.
TV Shuts off.
Closed Captioning
not working.
Remote control
does not operate.
Parental Control not
Working properly.
Antenna/CATV connector is not connected. Check CATV connection or VHF/UHF ant.
Volume is set to minimum. Increase volume.
Sleep Timer is set.
Off Timer is set. Clear Off Timer.
TV Signal is weak.
TV station experiencing problems or
program tuned is not closed captioned.
Closed Captioning not turned on.
The remote control is not aimed at the
sensor.
Distance is too far or too much light in the
room.
There is an obstacle in the path of the beam. Clear the path of the beam.
The batteries are weak.
The batteries are not inserted correctly. Insert correctly.
Block item is set to "Off". Set the block item "On".
News or sports event being broadcast.
Ratings not set.
Set Sleep Timer to "Off".
Check CATV or VHF/UHF antenna.
Try another channel.
Press the CCD button.
Aim the remote control at the Remote
sensor.
Operate within 23 feet or reduce the
light in the room.
Replace the batteries.
Parental Control does not work with
News or sporting events.
Set ratings as desired.
30
Page 33

Others
Troubleshooting Guide(continued)
Reception disturbances
Most types of television interference can be remedied by adjusting the height and position of the VHF/UHF antenna.
Outdoor antennas are recommended for best results if not using cable or a satellite. The most common types of
television interference are shown below. If one of these symptoms appear when the TV is connected to a Cable TV
system, the disturbance may be caused by the local cable company broadcast.
IGNITION:
Black spots or horizontal streaks may appear, picture may flutter or drift.
Usually caused by interference from automobile ignition systems, neon
lamps, electric drills and other electric appliances.
GHOSTS:
Ghosts are caused by the television signal following two paths. One is the
direct path and the other is reflected from tall buildings, hills or other
objects. Changing the direction or position of the antenna may improve the
reception.
SNOW:
If your receiver is located in the fringe area of a television station where the
signal is weak, your picture may be marred by the appearance of small dots.
When the signal is extremely weak, it maybe necessary to install an
external antenna to improve the picture.
RADIO FREQUENCY INTERFERENCE:
This interference produces moving ripples or diagonal streaks, and in some
cases, causes loss of contrast in the picture.
PICTURE SIZE VARIATION:
A slight picture size variation is quite normal when you adjust the
CONTRAST or BRIGHTNESS setting.
CARE AND MAINTENANCE
To prevent fire or shock hazard, disconnect your unit from the AC power source when cleaning. The finish on the
receiver may be cleaned with a dust cloth and cared for as other furniture. Use caution when cleaning and wiping
the plastic parts. Mild soap and a soft, damp cloth may be used.
31
Page 34

Power Supply: AC 120V, 60Hz
Power Consumption: 140W
Dimensions: 30.5(W) 23(H) 19.9(D) inch
Weight(kg/lb): 47 kg/105 lb
CRT: 27" FLAT SCREEN
Receiving channel:
VHF 2-13
UHF 14-69
CATV 2-69, (A-6)-(A-1), A-W, (W+1)-(W+28)
Total 181 channels
Others
Specifications
Color System:
Television: NTSC-M
AV: NTSC3.58/4.43, PAL 4.43
Audio Output: 8W 2
Antenna Impedance: VHF/UHF 75 ohm
Accessories: Remote controller 1
Design and specifications are subject to change without notice.
32
Page 35

PRINTED IN
RECYCLED PAPER
604-Q27495-00
 Loading...