

Page 1
Power Series Amplifiers
Installation Manual / Quick Start Guide
Installation Assistance
For installation assistance, call 888-921-4088 during normal business hours, or
visit www.jensenmobile.com at any time.
Supplies and Tools
To install the amplifier, you will need tools, supplies and adapters. It is best to
make sure you have everything you need before you start.
Disconnect Battery
Disconnect the negative (-) battery cable before starting the installation. Check
the battery ground (there should be two (2) ground wires coming from the
battery – one going to the starter mounting bolt or engine block and another
going to the vehicle chassis) and make sure the battery is grounded to the
chassis with at least a #8 gauge wire. Also check the alternator connections,
making sure they are tight and free from corrosion, rust or dirt.
Location and Mounting
The amplifier’s compact design allows great flexibility in mounting. Common
mounting locations include under the front passenger seat or in the trunk area.
When selecting a location, remember that amplifiers generate heat. Select a
location on a flat surface away from heat and moisture where air can circulate
around the amplifier.
Recommended Power Wire Size
MODEL NUMBER FUSE SIZE MIN. WIRE GAUGE
Power250x2
Power400x4
Power500x1
25A
2x20A
2x35A
#8
#8
#6
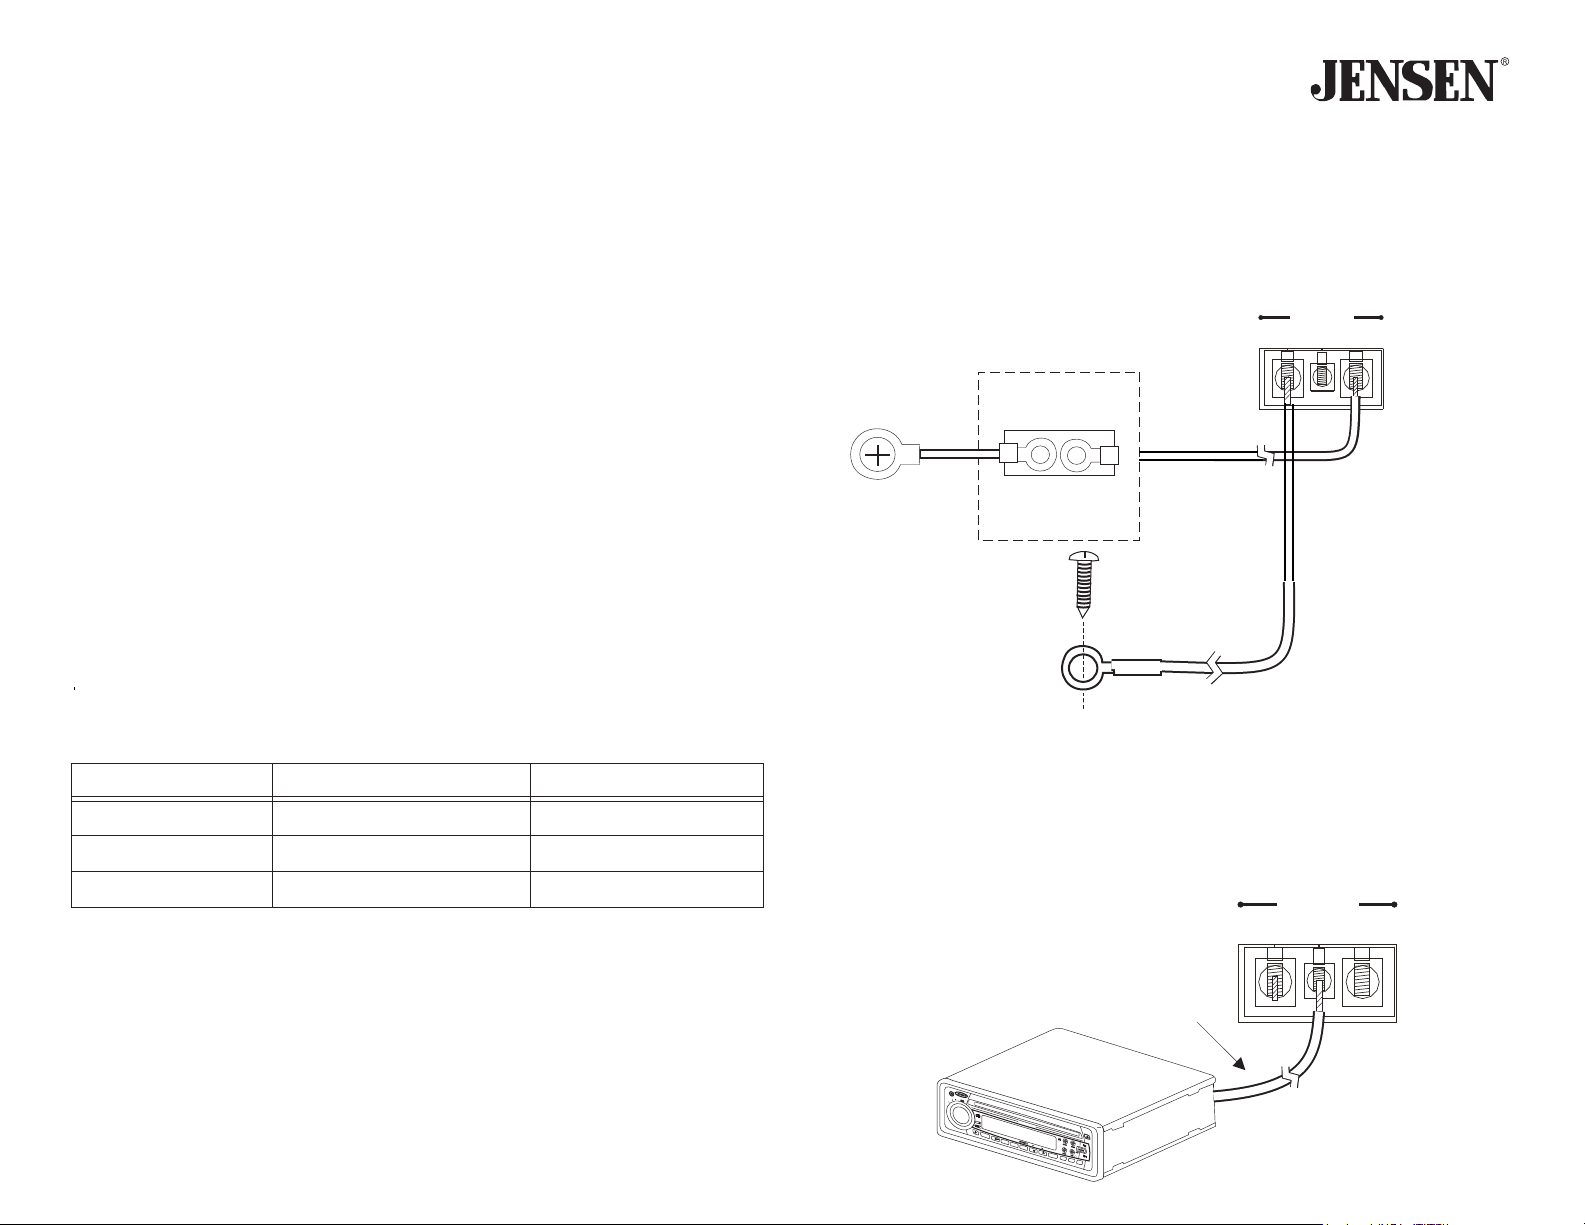
Remote Terminal (Turn-On)
Connect the power antenna or amplifier turn-on lead (Switched +12VDC)
from the receiver to the amplifier remote terminal.
Power Terminal (+12V) and Ground Terminal (Gnd)
Connect the main power wire to the battery, within 18 inches from the positive
(+) battery post, use an adequate size fuse or circuit breaker capable of
handling the current of the selected power wire. A fuse or circuit breaker must
be installed to prevent a possible electrical fire should the main power wire
short to ground.
POWER INPUT
GND REM +12V
Battery Terminal
Adapter
Make the ground lead as short as possible, leaving enough length to complete
the installation. To ensure a good ground, scrape away any paint or
undercoating to expose bare metal. Use a "ring" terminal of the proper gauge
and an "outside star washer" (between the chassis and ring terminal) when
making your ground connection.
Remote Turn-On (Power Antenna) From Head Unit Receiver
Fuse or Circuit Breaker
Install as close to the
battery as possible.
Drill hole in chassis sheet metal.
POWER INPUT
GND REM +12V
Drill hole in chassis
Note: Complete amplifier operation manuals are online at
www.jensenmobile.com
L
E
R
CD2620
A
F
L
D
A
E
B
VOL
B
E
R
T
S
S
A
B
CD
-R/R
W
AU
I
N
X
i
E
CDRECE IVER
Q
4
JPTH
LOC/DX
1
40
WA TT
2
INT
Sx4
SU
3
B-W
RPT
CH
MO
A
NGER
NO
4
SHF
MODE
DN
5
i
X
- SS
BA
AUX
6
AS
/P
UP
S
DIS
BAND
P
SCAN
i
EQ
MUTE
Page 2
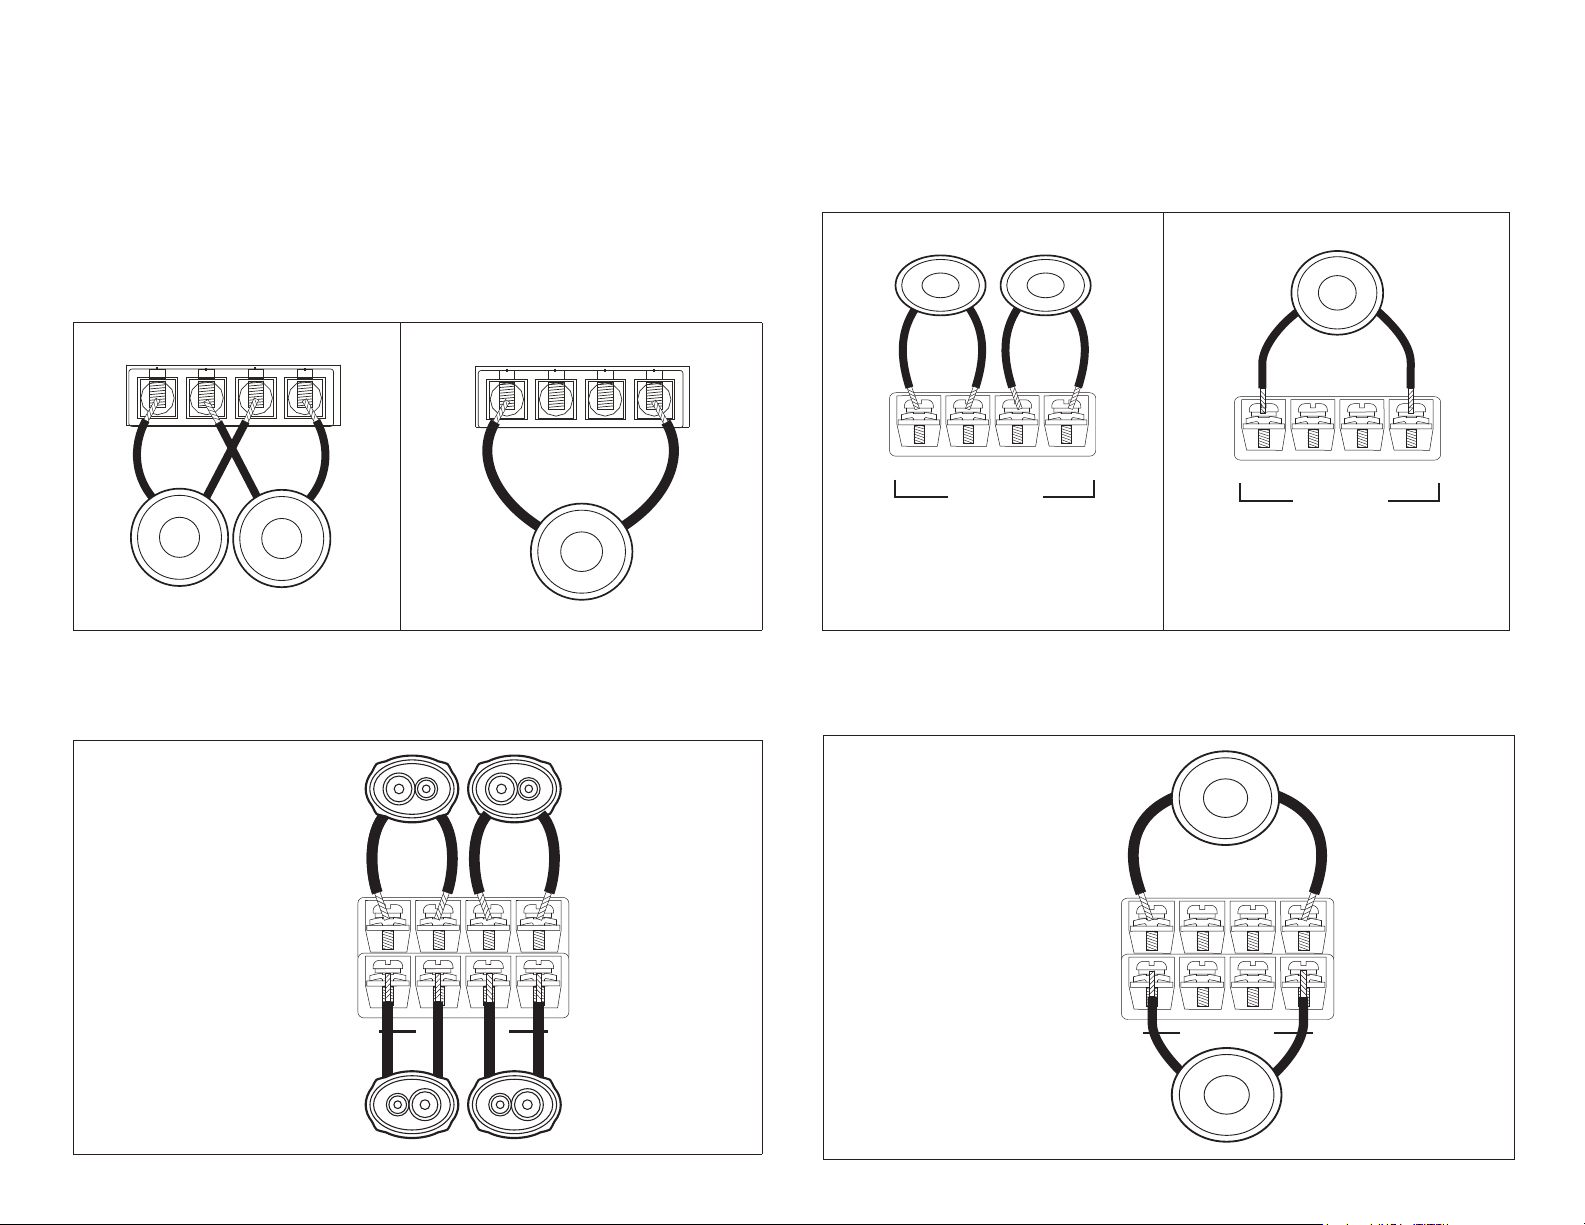
Speaker Wiring
The Speaker Wiring diagrams illustrate options for connecting one or two
speakers. Observe the proper speaker polarity.
Power500x1
Two Speakers
Power250x2
One Subwoofer
Two Subwoofers
SPEAKER OUTPUT
– – + +
4 Ohm Minimum (Each)
4 Ohm / 2 Ohm Minimum
Power400x4
Four Speakers
+ CH1 - + CH2 + CH3 - + CH4 -
One Subwoofer
SPEAKER OUTPUT
– – + +
4 Ohm / 2 Ohm Minimum
SPEAKER OUTPUT
+ LEFT - + RIGHT -
BRIDGED
4 Ohm / 2 Ohm Minimum
4 Ohm Minimum
SPEAKER OUTPUT
+ LEFT - + RIGHT -
BRIDGED
4 Ohm Minimum
Power400x4
Two Speakers
+ CH1 - + CH2 + CH3 - + CH4 -
4 Ohm / 2 Ohm Minimum
+ BRIDGED -
+ BRIDGED -
4 Ohm Minimum
Page 3

Input Wiring
Most trunk/hatchback installations will require a 15-20 foot RCA cable, while
pickup trucks and under-seat mounting will require a 6-12 foot RCA cable.
Connect an RCA cable from your receiver to the RCA input on your amplifier.
Power250x2
LEFT
RIGHT
INPUT
LF
RF
INPUT
OUTPUT
LR
RR
5
3.5
3.5
5
5
LEVEL
6
LEVEL
6
6
2.5
1.5
0.5
0.3
V
Power400x4
2.5
1.5
0.5
0.3
0.5
0.3
V
BASS
EQ
3
1
0.5
0
dB
BASS
EQ
3
1
0.5
0
0.5
0
dB
5
10
12
LPF FULL HPF
5
10
12
10
12
X-OVER
FRONT
LPF FULL HPF
X-OVER
LPF FULL HPF
LOW
PASS
80
60
45
40
300
Hz
LOW
PASS
80
60
45
40
45
40
Hz
HIGH
PASS
80
60
140
45
275
140
POWER
275
40
300
Hz
PROTECTION
HIGH
PASS
140
300
300
80
60
140
300
300
275
275
POWER
PROTECTION
45
275
40
45
275
40
Hz
REAR
Page 4

Input Wiring (Continued)
Most trunk/hatchback installations will require a 15-20 foot RCA cable, while
pickup trucks and under-seat mounting will require a 6-12 foot RCA cable.
Connect an RCA cable from your receiver to the RCA input on your amplifier.
Power500x1
LEFT
RIGHT
LEVEL
2.5
3.5
5
6
V
BASS
EQ
1.5
0.3
3
1
0.5
0.5
0
dB
SUB
SONIC
20
15
5
11
10
10
12
Hz
LOW
PASS
80
60
25
35
45
40
140
X-OVER
275
40
300
Hz
FULL LPF
REMOTE
POWER
PROTECTION
Page 5

Limited One Year Warranty
This warranty gives you specific legal rights. You
may also have other rights which vary from
state to state.
Dual Electronics Corp. warrants this product to the
original purchaser to be free from defects in
material and workmanship for a period of one year
from the date of the original purchase.
Dual Electronics Corp. agrees, at our option, during
the warranty period, to repair any defect in
material or workmanship or to furnish an equal
new, renewed or comparable product (whichever
is deemed necessary) in exchange without
charges, subject to verification of the defect or
malfunction and proof
of the date of purchase. Subsequent replacement
products are warranted for the balance of the
original warranty period.
Who is covered? This warranty is extended to the
original retail purchaser for products purchased
from an authorized Jensen dealer and used in the
U.S.A.
What is covered? This warranty covers all defects
in material and workmanship in this product. The
following are not covered: software, installation/
removal costs, damage resulting from accident,
misuse, abuse, neglect, product modification,
improper installation, incorrect line voltage,
unauthorized repair or failure to follow instructions
supplied with the product, or damage occurring
during return shipment of the product. Specific
license conditions and copyright notices for the
software can be found via www.jensenmobile.com.
What to do?
1. Before you call for service, check the
troubleshooting guide in your owner’s manual.
A slight adjustment of any custom controls
may save you a service call.
2. If you require service during the warranty
period, you must carefully pack the product
(preferably in the original package) and ship it
by prepaid transportation with a copy of the
original receipt from the retailer to an
authorized service center.
3. Please describe your problem in writing and
include your name, a return UPS shipping
address (P.O. Box not acceptable), and a
daytime phone number with your shipment.
4. For more information and for the location of
the nearest authorized service center please
contact us by one of the following methods:
• Call us toll-free at 1-888-921-4088
• E-mail us at cs@.dualav.com
Exclusion of Certain Damages: This warranty is
exclusive and in lieu of any and all other
warranties, expressed or implied, including
without limitation the implied warranties of
merchantability and fitness for a particular
purpose and any obligation, liability, right, claim
or remedy in contract or tort, whether or not
arising from the company’s negligence, actual or
imputed. No person or representative is
authorized to assume, for the company, any
other liability in connection with the sale of this
product. In no event shall the company be liable
for indirect, incidental or consequential
damages.
Dual Electronics Corporation Heathrow, FL 32746
Technical Assistance: 888-921-4088
www.jensenmobile.com © 2016 Printed in China
 Loading...