

Jenn-Air XT7036ADS, JXT7142ADS, JXT7148ADS, MK8200, MK0842 Installation Manual
...
RANGE HOOD
Model Number:
Manufacturer Number:
Size:
INSTALLATION
JXT7036ADS JXT7142ADS
MK8200 MK0842
34" 39" Liner
GUIDE
JXT7148ADS
MK0848
45" Liner
TABLE OF CONTENTS
Safety Instructions ................................................... 1
Mounting Heights ..................................... 2
Ducting .................................................................... 3
Specifications ........................................................... 4
Installation ............................................................... 5
Electrical ................................................................. 5
Liners ...................................................................... 6
Form No. A/04/03 Part No. IMK8200-0303A ({)2003 Maytag Appliances Sales Co. Litho U.S.A.
MODELS:JXT7036ADS JXT7142ADS JXT7148ADS
Installation
Theinstallationin thismanualisintendedforqualifiedinstallers,servicetechniciansorpersons
withsimilarqualifiedbackground.DONOTattempttoinstallthisapplianceyourself.Injurycould
resultfrominstallingtheunit dueto lackofappropriateelectricalandtechnicalbackground.
All electricalwiring mustbe properlyinstalled,insulatedandgrounded.Overlyaccumulated
greasein oldductworkshouldbecleanedoutorductworkshouldbereplacedif necessaryto
avoidthepossibilityof agreasefire.Checkalljointson ductwork toinsureproperconnection
andalljoints shouldbeproperlytaped.
* Please check for latest specification revisions before any custom work or cutouts.
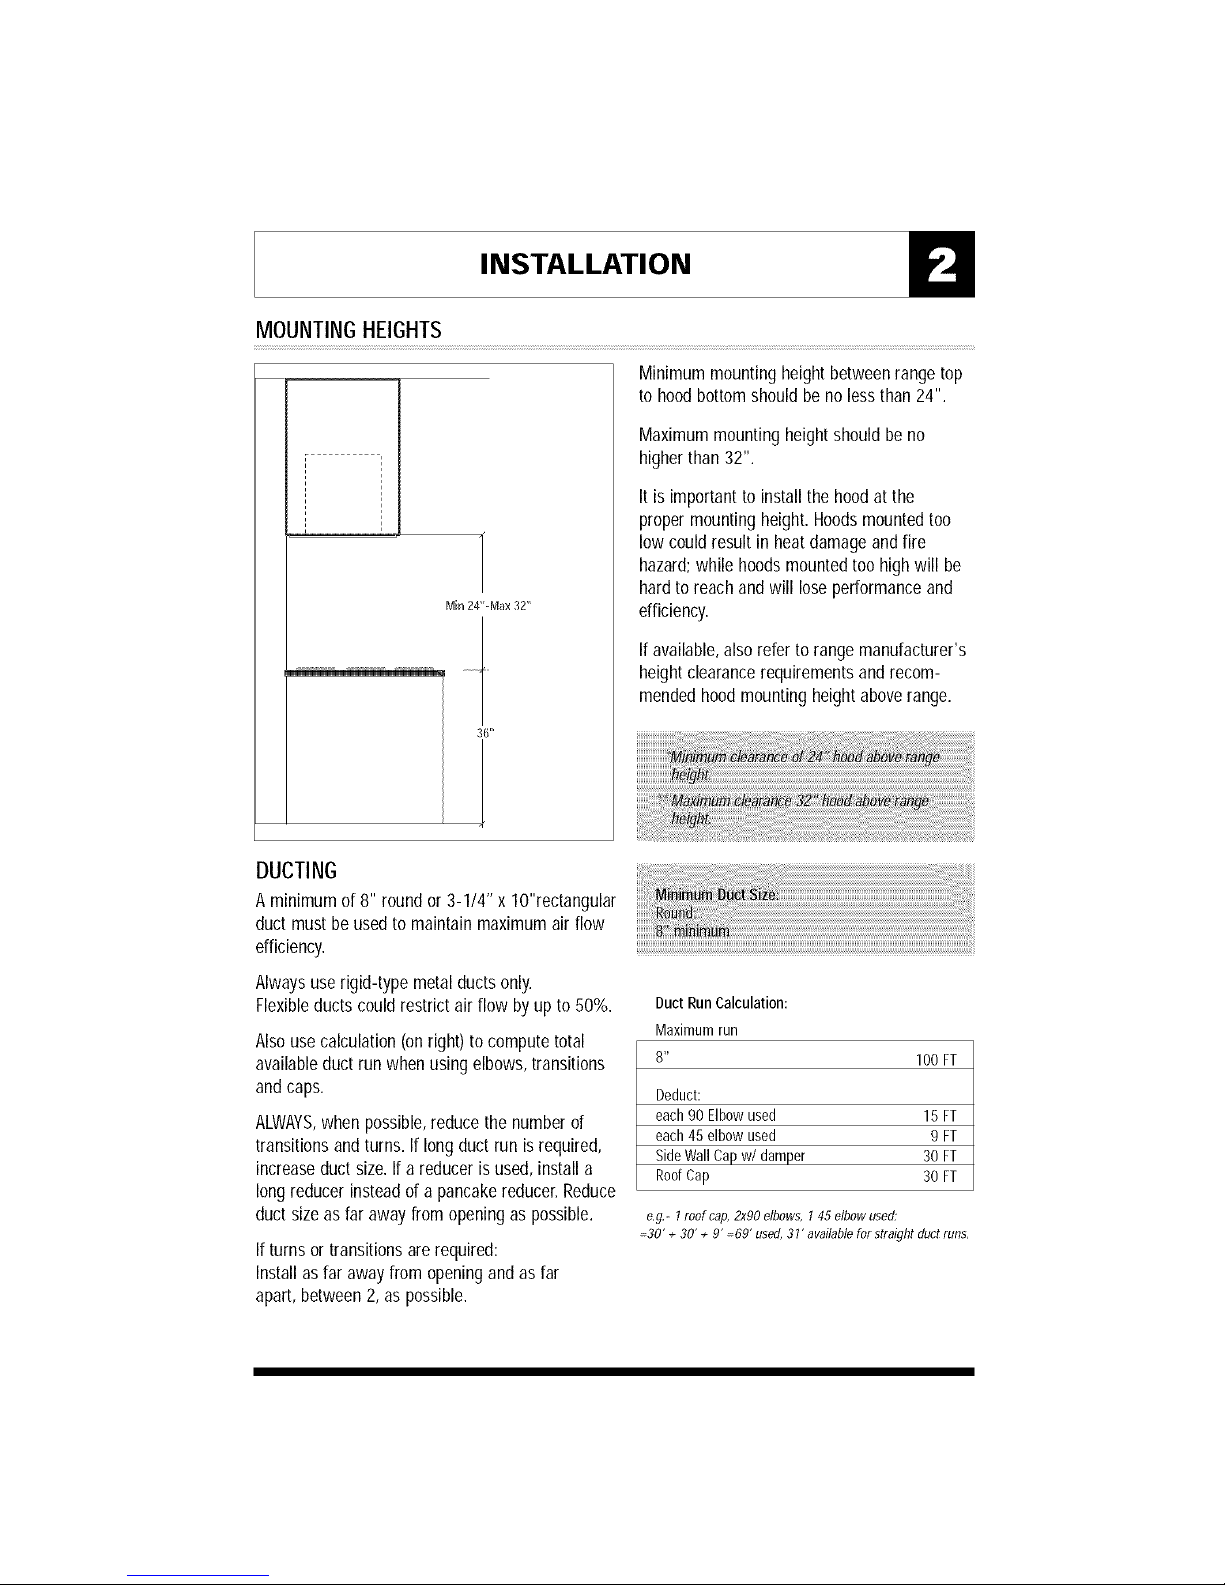
MOUNTINGHEIGHTS
INSTALLATION
Min 24"-M_}x 32"
Minimummountingheightbetweenrangetop
tohoodbottomshouldbenolessthan24".
Maximum mounting height should be no
higher than 32".
It is important to install the hood at the
proper mounting height. Hoods mounted too
low could result in heatdamage and fire
hazard;while hoodsmounted too high will be
hard to reach and will lose performance and
efficiency.
If available,also refer to range manufacturer's
height clearance requirements and recom-
mended hood mounting heightabove range.
DUCTING
A minimum of 8" round or 3-1/4" x lO"rectangular
duct must be used to maintain maximum air flow
efficiency.
Always use rigid-type metal ducts only.
Flexibleducts could restrict air flow by up to 50%.
Also use calculation (onright) to compute total
available duct run when using elbows, transitions
and caps.
ALWAYS,when possible, reduce the number of
transitions and turns. Iflong duct run is required,
increase duct size. If a reducer is used, install a
long reducer insteadof a pancake reducer. Reduce
duct size as far away from opening as possible.
Ifturns or transitions are required:
Install as far away from opening and as far
apart, between 2, as possible.
DuctRunCalculation:
Maximumrun
100 FT
Deduct:
each90 Elbowused 15 FT
each45 elbow used 9 FT
SideWallCap w/damper 30 FT
RoofCap 30 FT
e,g.- I roof cap,2x90 elbows, 145 elbow used;
=30' + 30' + 9' =69' used, 31' availablefor straight duct runs,
INSTALLATION O
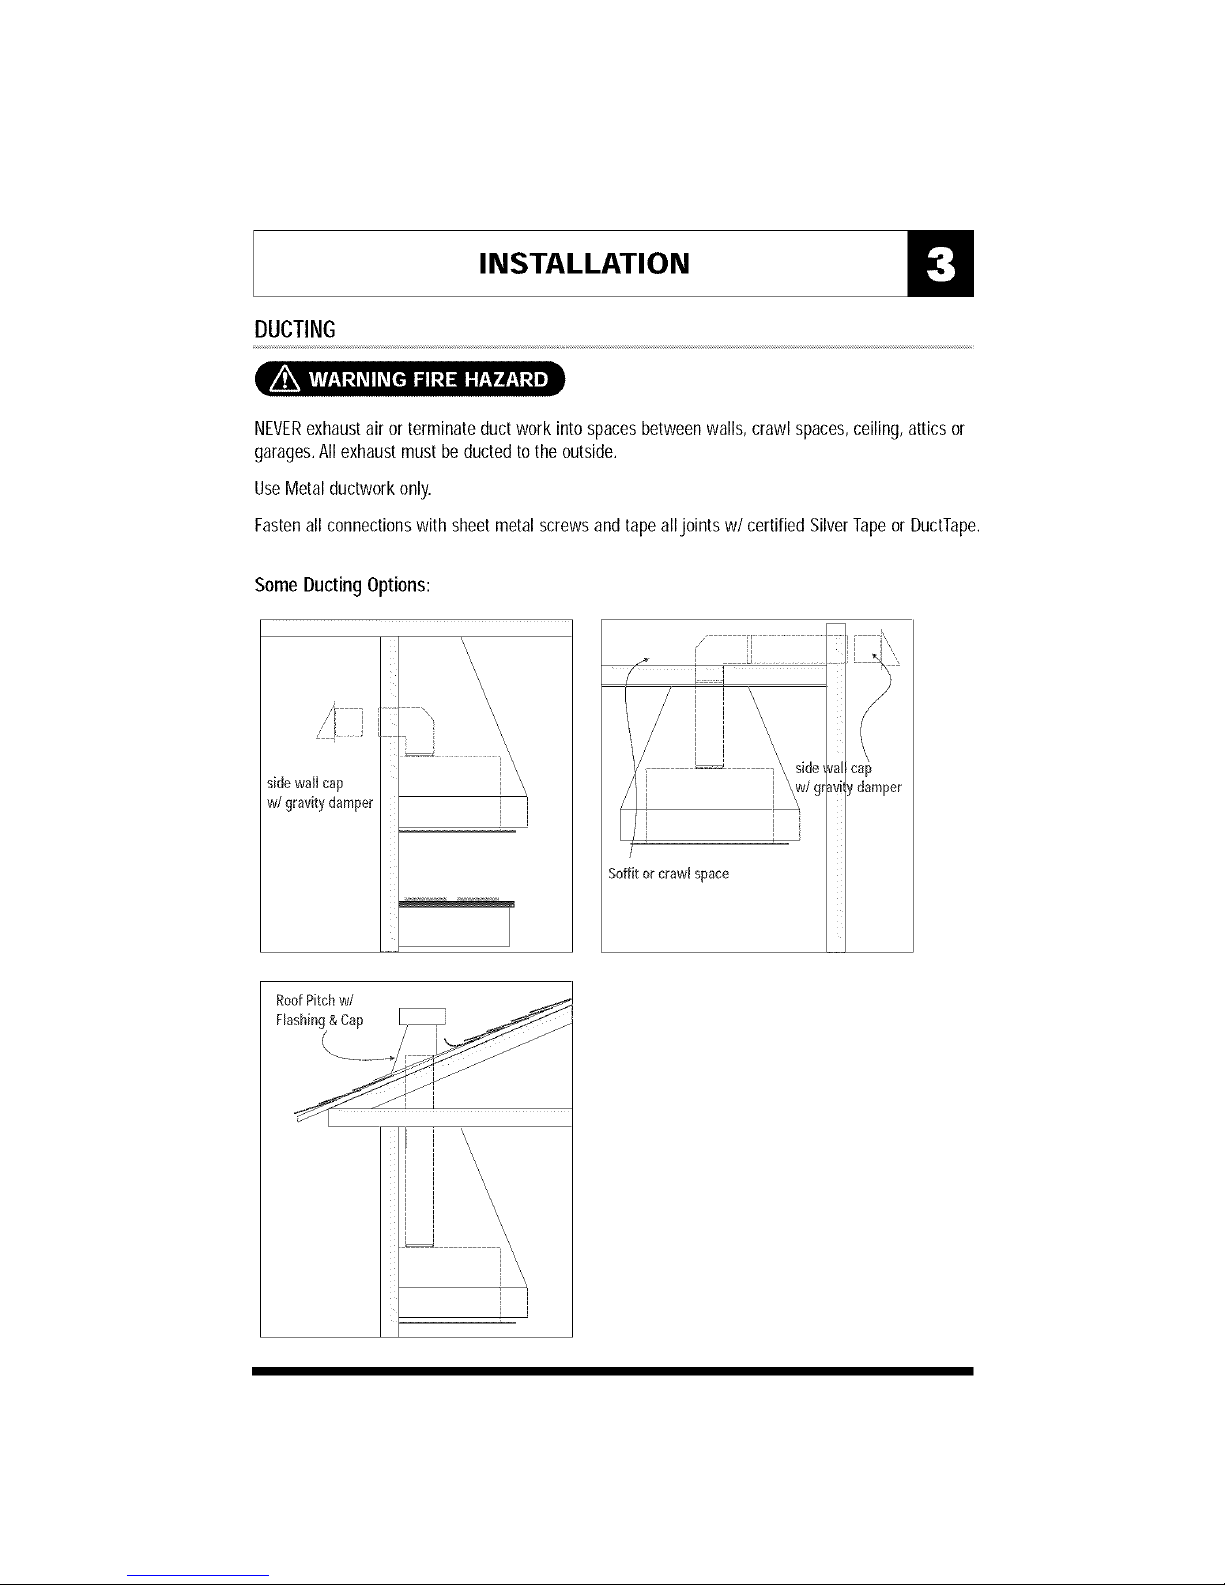
DUCTING
NEVERexhaustair or terminate duct work into spaces between walls, crawl spaces, ceiling, attics or
garages.All exhaust must be ducted to the outside.
UseMetal ductwork only.
Fastenall connections with sheet metal screws and tape alljoints w/certified Silver Tapeor DuctTape.
SomeDuctingOptions:
\
........... !\
sidewall cap
w/gravity damper
i
!
RoofPitchw/
Flashing&Cap
1
\
u\
i
!

SPECIFICATIONS
Model:
JXT7036ADS
15-1/4"
INSTALLATION
33-3/8"
cut out dimension
i
f 33-1/2", 38-I/2", 44-1/2" (cutout)
¢/L
T
1
15-3/8"
(cutout)
= cutout dimension
INSTALLATION
INSTALLATION
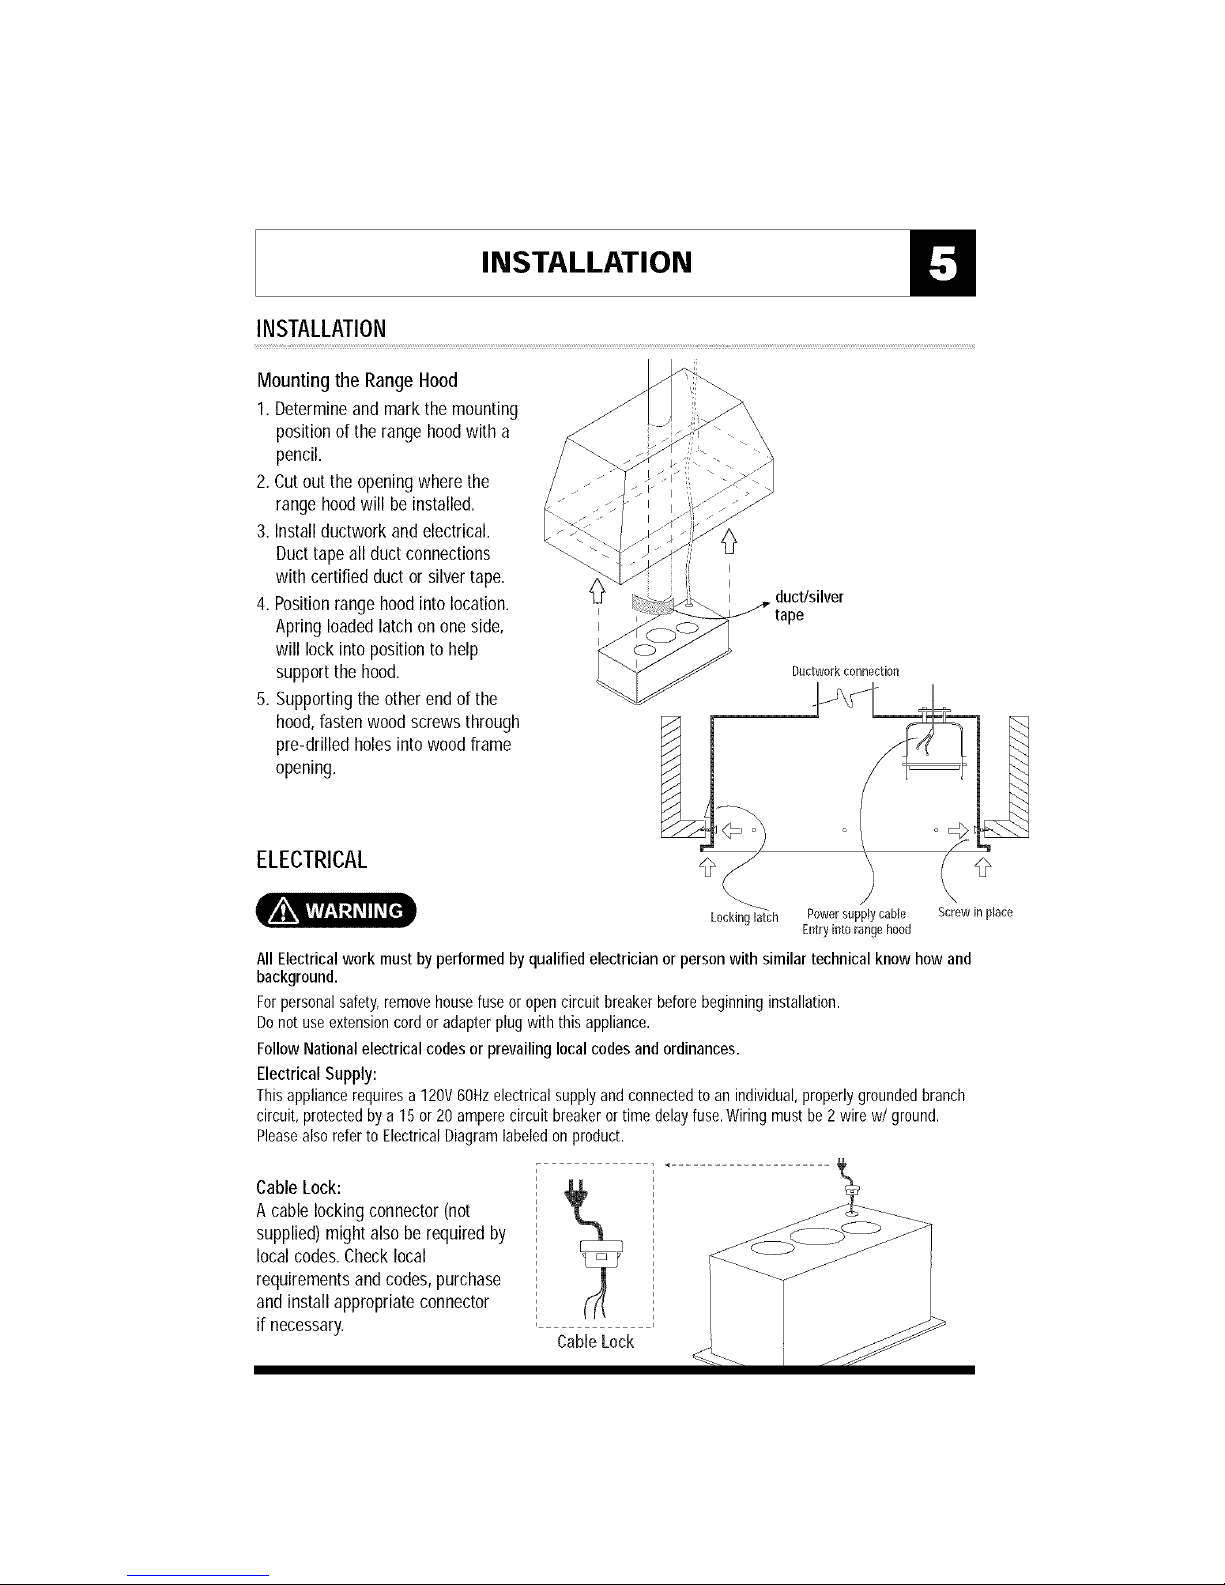
Mountingthe RangeHood
I. Determineandmarkthemounting
positionof therangehoodwith a
pencil.
2.Cutouttheopeningwherethe
rangehoodwill beinstalled.
3.Installductworkandelectrical.
Ducttapeall ductconnections
with certifiedductorsilvertape.
4.Positionrangehoodintolocation.
Apringloadedlatchon oneside,
will lockinto positionto help
supportthehood.
5. Supportingtheotherendofthe
hood,fastenwoodscrewsthrough
pre-drilledholesintowoodframe
opening.
I
I
I
I
I
ductlsilver
tape
Duc[work CORRec[io#
ELECTRICAL
Locking_ch Powersupplycane Screwinplace
All Electricalwork mustbyperformedbyqualifiedelectricianor personwith similartechnicalknowhewand
background.
Forpersonalsafety,removehousefuseoropencircuitbreakerbeforebeginninginstallation.
Donotuseextensioncordor adapterplugwith thisappliance.
FollowNationalelectrical codesor prevailinglocalcodesandordinances.
ElectricalSupply:
Thisappliancerequiresa120V60Hzelectricalsupplyandconnectedto anindividual,properlygroundedbranch
circuit,protectedbya15or 20amperecircuitbreakerortimedelayfuse.Wiringmustbe2 wire w/ground.
Pleasealsoreferto ElectricalDiagramlabeledonproduct.
Cable Lock:
Acable locking connector (not
supplied) might also be required by
local codes. Checklocal
requirements and codes, purchase
and install appropriateconnector
if necessary.
CableLock
Eetryinto rangehoed
INSTALLATION
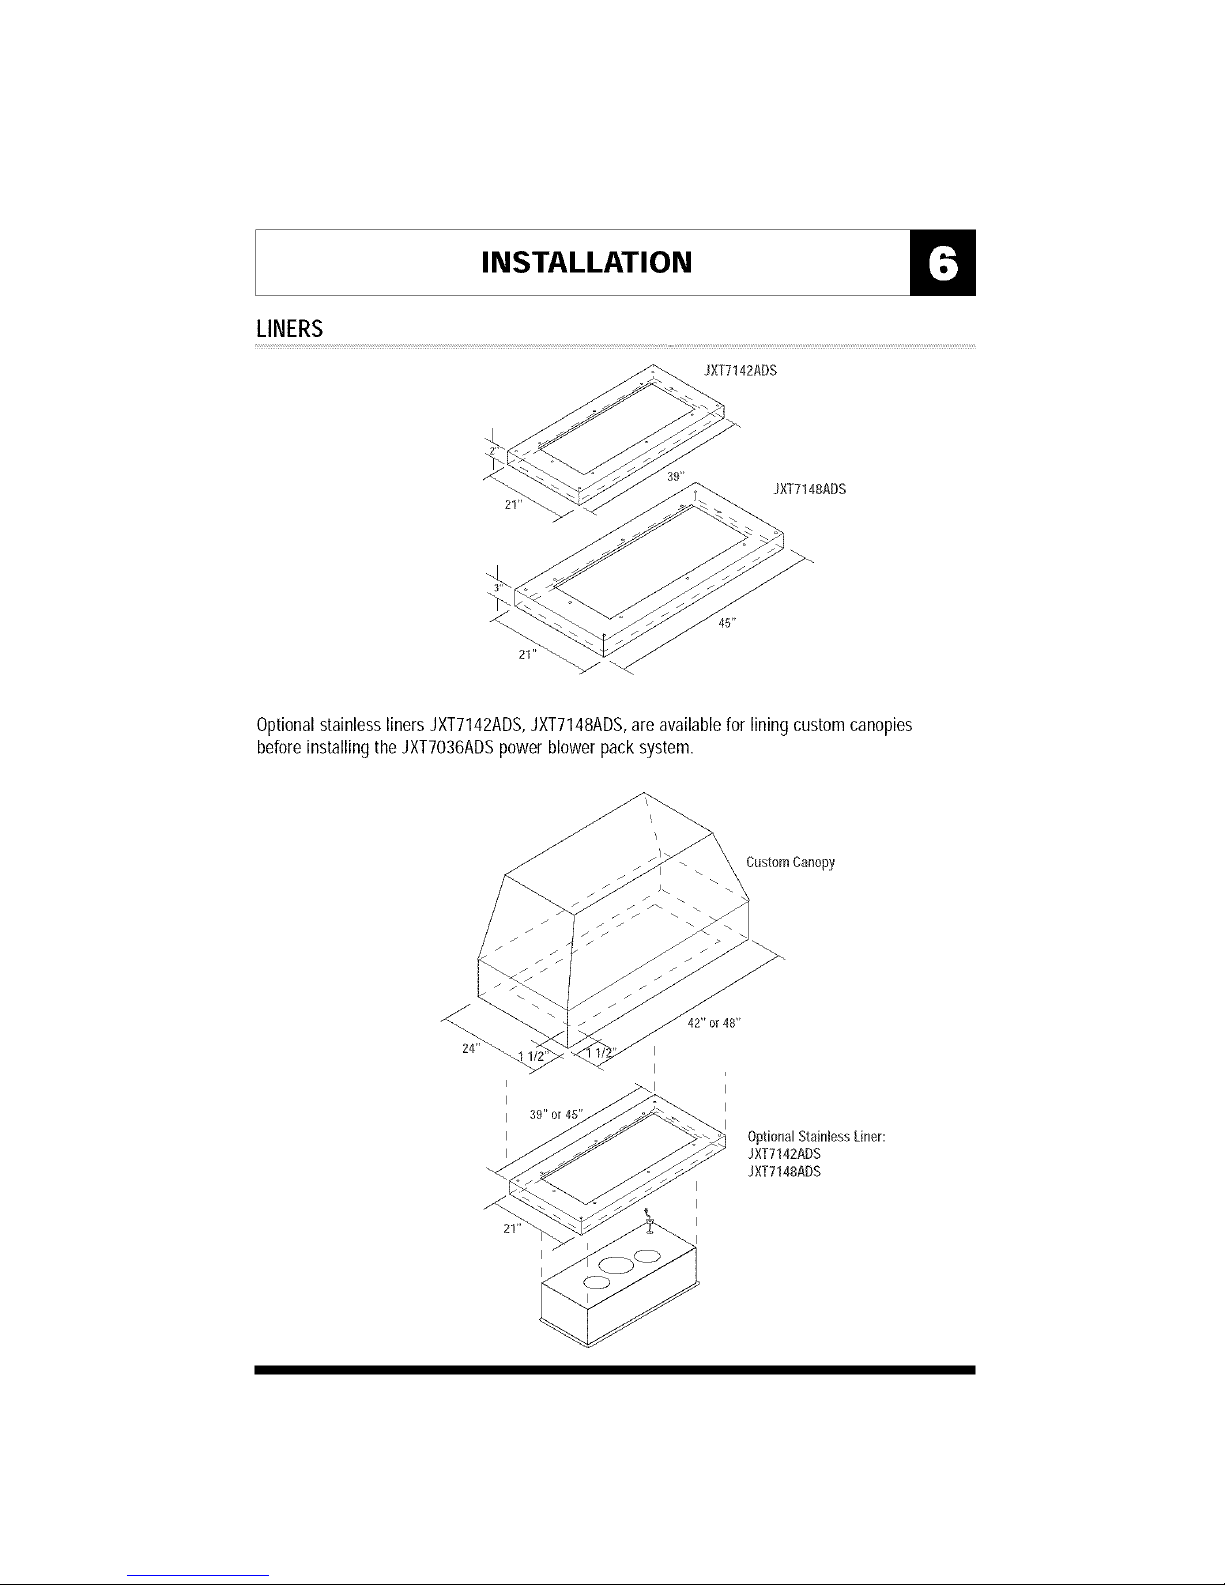
LINERS
JXT7142ADS
JXT7148ADS
Optionalstainless liners JXT7142ADS,JXT7148ADS,are available for lining custom canopies
before installing the JXT7036ADSpower blower pack system.
I
I
I 3£" or 45
I
I
42" or 48"
I
I
I
customcanopy
I
I
I
OptionaIStainless Liner:
JXT7142ADS
JXT7148ADS
 Loading...