

Jenn-Air W2780, WM2780, WW2780 User Manual

JENN-AIR
mmm °
Use and Care Manual
Self-Cleaning Convection Wall
Ovens w/Electronic Controls
Models W2780, WM2780, WW2780
iii J| annum N o
mmm in n m
Q Q
Q 0
MODEL WW2780
For Microwave Oven, refer to Use and Care Manual for M167.
About Your Jenn-Air
Congratulations on your choice of a Jenn-Air wall oven. Your Jenn-Air
convection oven combines the best of two cooking methods, convection and
radiant bake (conventional) baking or roasting, in a self-cleaning oven.
The Jenn-Air convection oven is actually a conventional oven that circulates
heatedair withintheoven. As bothbake andbroil heatingelementscycleonand
off with the thermostat, a fan keepsthe heated air circulating around the food.
The constantly recirculating heated air inthe convection oven strips away the
layer of cooler air that surrounds food. Consequently, many foods cook more
quickly. Distributed heat makes multiple rack cooking possible. Convection
roastedmeats retaintheir natural flavor and juiciness with less shrinkage than
radiant bake roasting.
Inaddition to the many exclusive benefits of convection cooking, your oven is
also a fine fullfeatured "bake and broil" oven.
You cancook your "old favorite" recipes as you have in the past. The radiant
bake oven also gives you the flexibility of preparing various foods when
convection cookingmaynotbe asbeneficial,aswhencooking foods incovered
casseroles orclay pots.
The broil element isconvenient for top browning and oven broiling offoods.
The time bake feature can be used with eitherthe convection or radiant bake
oven.
Beforeyoubegincookingwith yournewoven,please takeafew minutesto read
and become familiar with the instructionsinthis book. On thefollowing pages
youwillfind awealthofinformationregardingallaspects ofusingyournew oven.
Byfollowingthe instructionscarefully, youwill be abletofully enjoyandproperly
maintain your oven andachieve excellent results with thefood you prepare.
Shouldyou have anyquestions about usingyourJenn-Air oven,write to us. Be
sure to provide the model number.
Consumer Relations Department
Jenn-Air Company
3035 Shadeland Avenue
Indianapolis, IN46226-0901

SAFETY PRECAUTIONS
Read before operating your oven
All appliances - regardless of the manufacturer- have the potential
through improper or careless use to create safety problems.
Therefore the following safety precautions should be observed:
1. Be sure your appliance is properly installed and grounded by
a qualified technician.
2. Never use your appliance for warming or heating the room.
3. Children should not be left alone or unattended in area where
appliance is in use. They should never be allowed to sit or
stand on any part of the appliance.
4. Wear proper apparel. Loose-fitting or hanging garments
should never be worn while using the appliance.
5. Do not repair or replace any part of the appliance unless
specifically recommended in this manual. All other servicing
should be referred to an authorized Jenn-Air Service Con-
tractor.
6. Flammable materials should not be stored in an oven.
7. Do not use water on grease fires. Smother fire orflame or use
dry chemical or foam-type extinguisher.
8. Use only dry potholders. Moist or damp potholders on hot
surfaces may result inburns from steam. Do not let potholder
touch hot heating elements. Do not use a towel or other bulky
cloth.
9. Use care when opening oven door. Let hot air or steam
escape before removing or replacing food.
10. Do not heat unopened food containers. Build-up of pressure
may cause container to burst and result in injury.
11. Keep oven vent ducts unobstructed.
12. Always place oven racks in desired location while oven is
cool. If rack must be moved while oven is hot, do not let
potholder contact hot heating element in oven.

13. Do not clean door gasket. The door gasket is essential for a
good seal. Care should be taken notto rub, damage, or move
the gasket.
14. Do not use oven cleaners. No commercial oven cleaner or
oven liner protective coating of any kind should be used in or
around any part of the oven.
15. Clean only parts listed in this manual.
16. Before self-cleaning the oven, remove broiler pan and other
utensils.
17. Listen forfan. A fan noise should be heard during the broil and
cleaning cycles. If not, call a serviceman before self-cleaning
again.
18. DO NOT TOUCH HEATING ELEMENTS OR INTERIOR
SURFACES OF OVEN. Heating elements may be hot even
though they are dark in color. Interior surfaces of any oven
become hot enough to cause burns. During and after use, do
not touch, or letclothing or other flammable materials contact
heating elements or interior surfaces of oven until they have
had sufficient time to cool. Other surfaces of the appliance
may become hot enough to cause burns-among these sur-
faces are: oven vent openings and surfaces near these
openings, oven doors, windows of oven doors.
IMPORTANT SAFETY NOTICE AND WARNING
The California Safe Drinking Water and Toxic Enforcement Act of
1986 (Proposition 65) requires the Governor of California to
publish a list of substances known to the State of California to
cause cancer or reproductive harm, and requires businesses to
warn customers of potential exposures to such substances. Users
ofthis appliance are hereby warned that when the oven isengaged
in the self-clean cycle, there may be some low level exposure to
some of the listed substances, including Carbon Monoxide. Expo-
sure to these substances can be minimized by properly venting the
range to the outdoors during the self-clean cycle.
Oven Operation
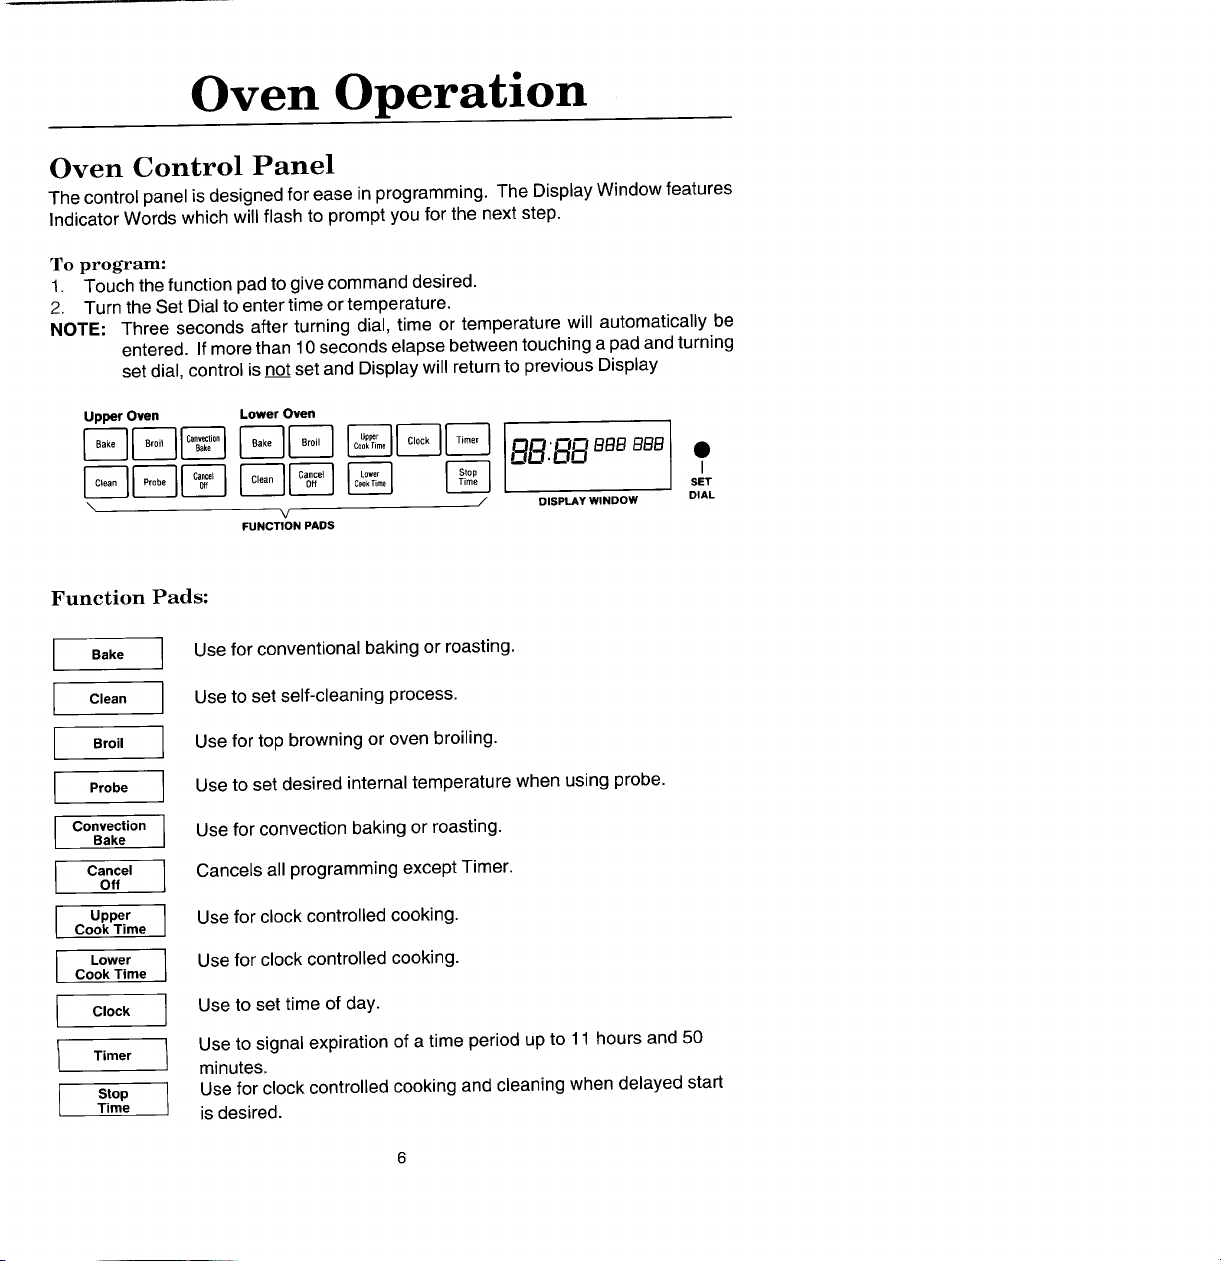
Oven Control Panel
The control panel is designed forease in programming. The DisplayWindow features
Indicator Words which will flash to prompt you for the next step.
To program:
1. Touch the function pad togive command desired.
2. Turn the Set Dialto enter time ortemperature.
NOTE: Three seconds after turning dial, time or temperature will automatically be
entered. Ifmore than 10seconds elapse between touching a pad andturning
set dial, control is notset andDisplay will return to previous Display
Upper Oven Lower Oven
\ / DISPLAyWINDOW DIAL
Function Pads:
Bake I Use for conventional baking or roasting.
Clean I Use to set self-cleaning process.
Broil Use for top browning or oven broiling.
Probe I Use to set desired internal temperature when using probe.
Convection Use for convection baking orroasting.
Bake
CanCeIoffI Cancels all programming except Timer.
upper Use for clock controlled cooking.
Cook Time
Cook Time
Lower I Usefor clock controlled cooking.
Clock I Use to set time of day.
Timer I Use to signal expiration of a time period up to 11hours and 50
minutes.
V
FUNCTIONPADS
I.
Stop I Use for clock controlled cooking and cleaning when delayed start
Time isdesired.

Set Dial: Useto settime or temperature.
Display Window: Shows time ofday, timer, and oven functions.
Oven Light Switch (Control Panel -Lower Right): The oven lightautomatically
comes on whenever the oven door isopened. When door isclosed, push in oven light
switch to turn oven light onor off.
Display Window
Time Functions lOvenFunctions IOven Functions
(Model WW2780 Lower Oven)
._ ._.__IEI " !BB'-'°:n-BB°D
,., ,, , ooo,,o.,oo,,,.o....,
I CLEANOVEN[] [] STOPON TIMER CLEANLOCK[] CLEANLO_K []
Display Numerals:
• Show time of day.
• Countdown of time remainingwhen usingtime functions.
• Show temperature of ovenasitrises toreachprogrammed temperature andthe set
temperature once itis reached.
• Show internal temperature of food as itriseswhen temperature probe isused.
• Serve as areminderto shut oven door,if it isopen, forself-cleaning operation when
the word, door, isdisplayed.
• Recall programmed temperature or time when commanded.
• Show oven selected. 1- is the upperoven; 2 - isthe lower oven. (ModelWW2780)
Indicator Words:
• Flash to prompt next step.
• Indicate status of programmed function.
DELAYTIMEDBAKE DELAYTIMED BAKE
• Show programmed function when recalled.
Clock Controls
When electrical power is supplied or after power interruption, the last clock time
displayed before power was interrupted will flash. Time will advance and continue to
flash until clock is reset.
To set time of day:
1. Touch Clock Pad.
Indicatorword TIME willflashandAMor PMandtime digitswillappearintheDisplay.
(If more than 10seconds elapse between touching Clock Pad and turningthe Set
Dial, the Clock Pad must be touched again in order to set clock.)
2. Turn Set Dial in either direction until correct time of day appears in Display.
NOTE:Three seconds after turning dial, time of day will automatically beentered.
Oncethe time is set,the AM or PM indicators will notshow unless the Clock Pad
istouched.
To recall time of day when another time function is showing: Touch Clock
Pad. (Note: AM or PMwill not remain in the Display.)
To change time of day set on clock: Repeat above sequence.
Bake,TimedConvect orSelf-clean. Cancelprogram before reprogramming clock.
NOTE: Clocktime cannotbechanged whenovenhas beenprogrammed forTimed
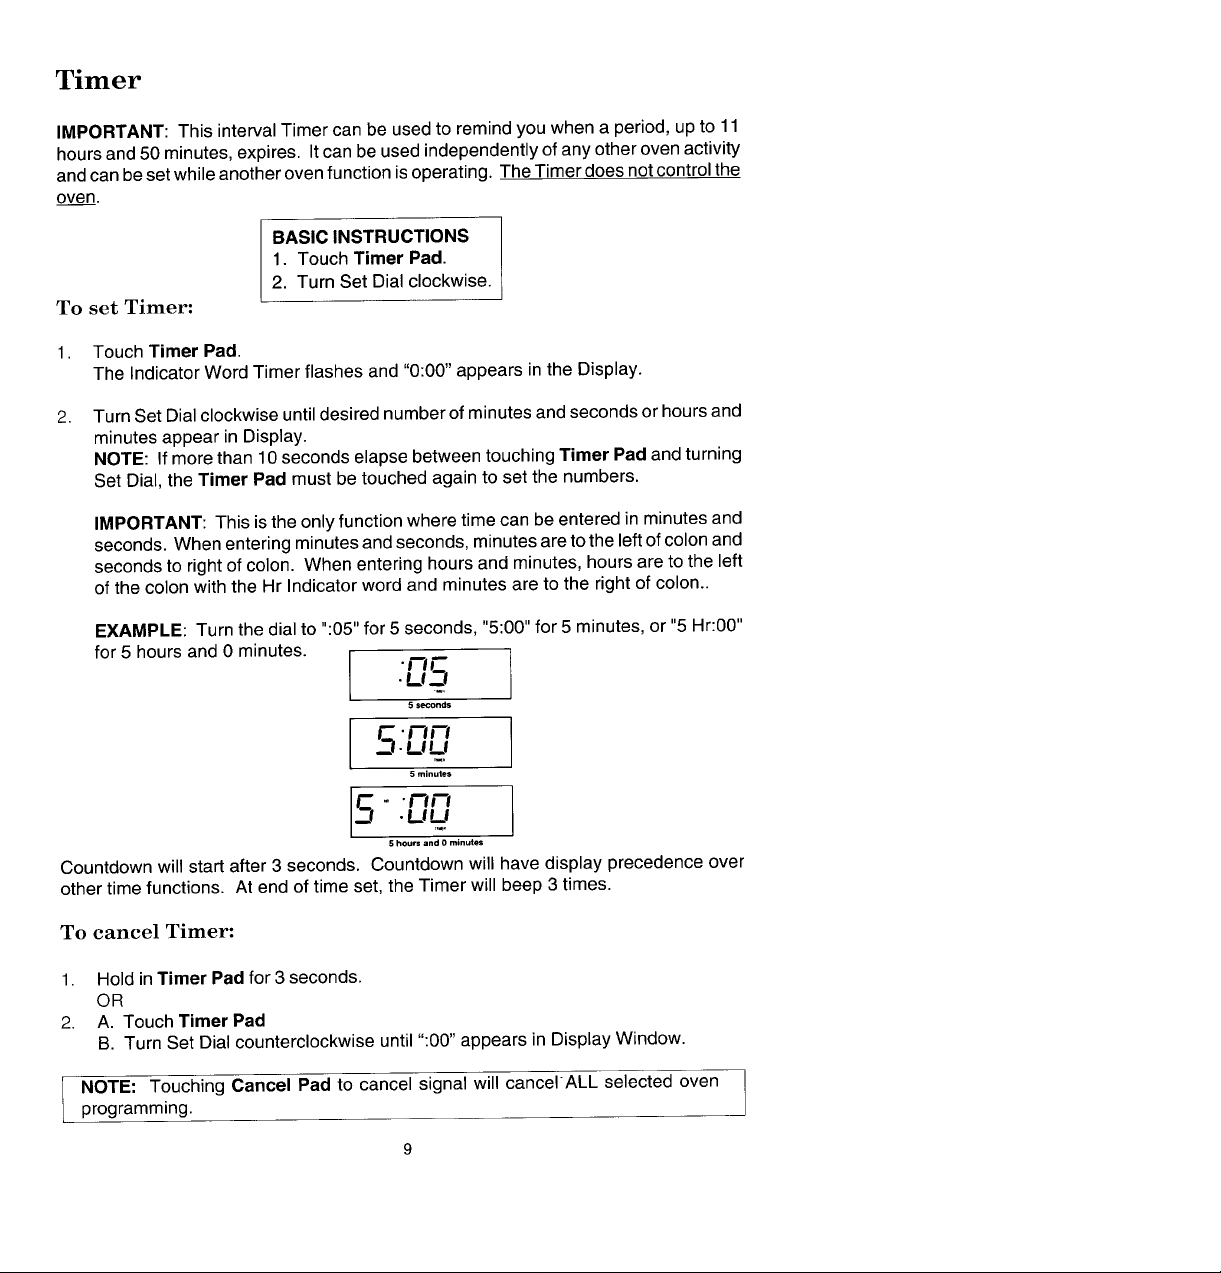
Timer
IMPORTANT: This intervalTimer can be used to remind you when aperiod, up to 11
hours and 50minutes, expires. Itcan beused independently ofany other oven activity
and can beset whileanother ovenfunction isoperating. The Timer does notcontrolthe
oven.
BASIC INSTRUCTIONS
1. Touch Timer Pad,
2. Turn Set Dialclockwise.
To set Timer:
1. Touch Timer Pad.
The Indicator Word Timer flashes and "0:00" appears inthe Display.
2. Turn Set Dialclockwise untildesired number of minutes and secondsor hoursand
minutes appear in Display.
NOTE: If more than 10seconds elapse betweentouching Timer Pad and turning
Set Dial, the Timer Pad must betouched again to set the numbers.
IMPORTANT: This is the onlyfunction where time can be entered in minutes and
seconds. When entering minutes andseconds, minutesare to the leftof colon and
seconds to rightof colon. When entering hours and minutes, hours are to the left
of the colon withthe Hr Indicator word and minutes are to the right of colon..
EXAMPLE: Turn the dialto ":05" for 5 seconds, "5:00" for 5 minutes, or "5 Hr:00"
for 5 hours and 0 minutes.
"_IF"
.L1--1
5 seconds
5 /-_/-I
"UL!
5 minutes
.CJLI
- •/-'1/-I
5 hours and 0 minutes
Countdown will start after 3 seconds. Countdown will have display precedence over
other time functions. At end of time set, the Timer will beep 3 times.
To cancel Timer:
1. Holdin Timer Pad for 3 seconds.
OR
2. A. Touch Timer Pad
B. Turn Set Dial counterclockwise until ":00" appears in Display Window.
programming.
I NOTE: Touching Cancel Pad to cancel signal will cancerALL selected oven
9
Oven Operation- Baking or Roasting
BASIC INSTRUCTIONS
1. Positionoven racks.
2. TouchBake Pad orConvection Bake Pad.
3. Turn SetDialto desiredtemperature.
To set oven on bake or convection bake:
1. Placeoven racks on proper rack positions. (See p.11 )
2. Touch Bake Pador Convection Bake Pad.
IndicatorWords BAKE or CONV BAKE will flash and 3 dashes will be shown.
NOTE: Ifmore than 10seconds elapse between touching apad andturning the Set
Dial, the oven is not set and Display will return to previous Display.
3. Turn Set Dial untildesired oven temperature appears inthe Display.
If Set Dialis turned one click, 325°will appear. The Set Dial can then beturned in
eitherdirection untilthedesired temperature isset. (Allowable range is140°to550°.)
After 3 secondsthe oven will begin to preheat. The Indicator Words ON, PRE, and
either BAKE orCONV BAKEwill appear inthe Display. The temperature shown will
be 140° or the oven temperature whichever is higher.
NOTE: The Indicator Word PRE will not appear if the actual oven temperature is
within 100oof the settemperature.
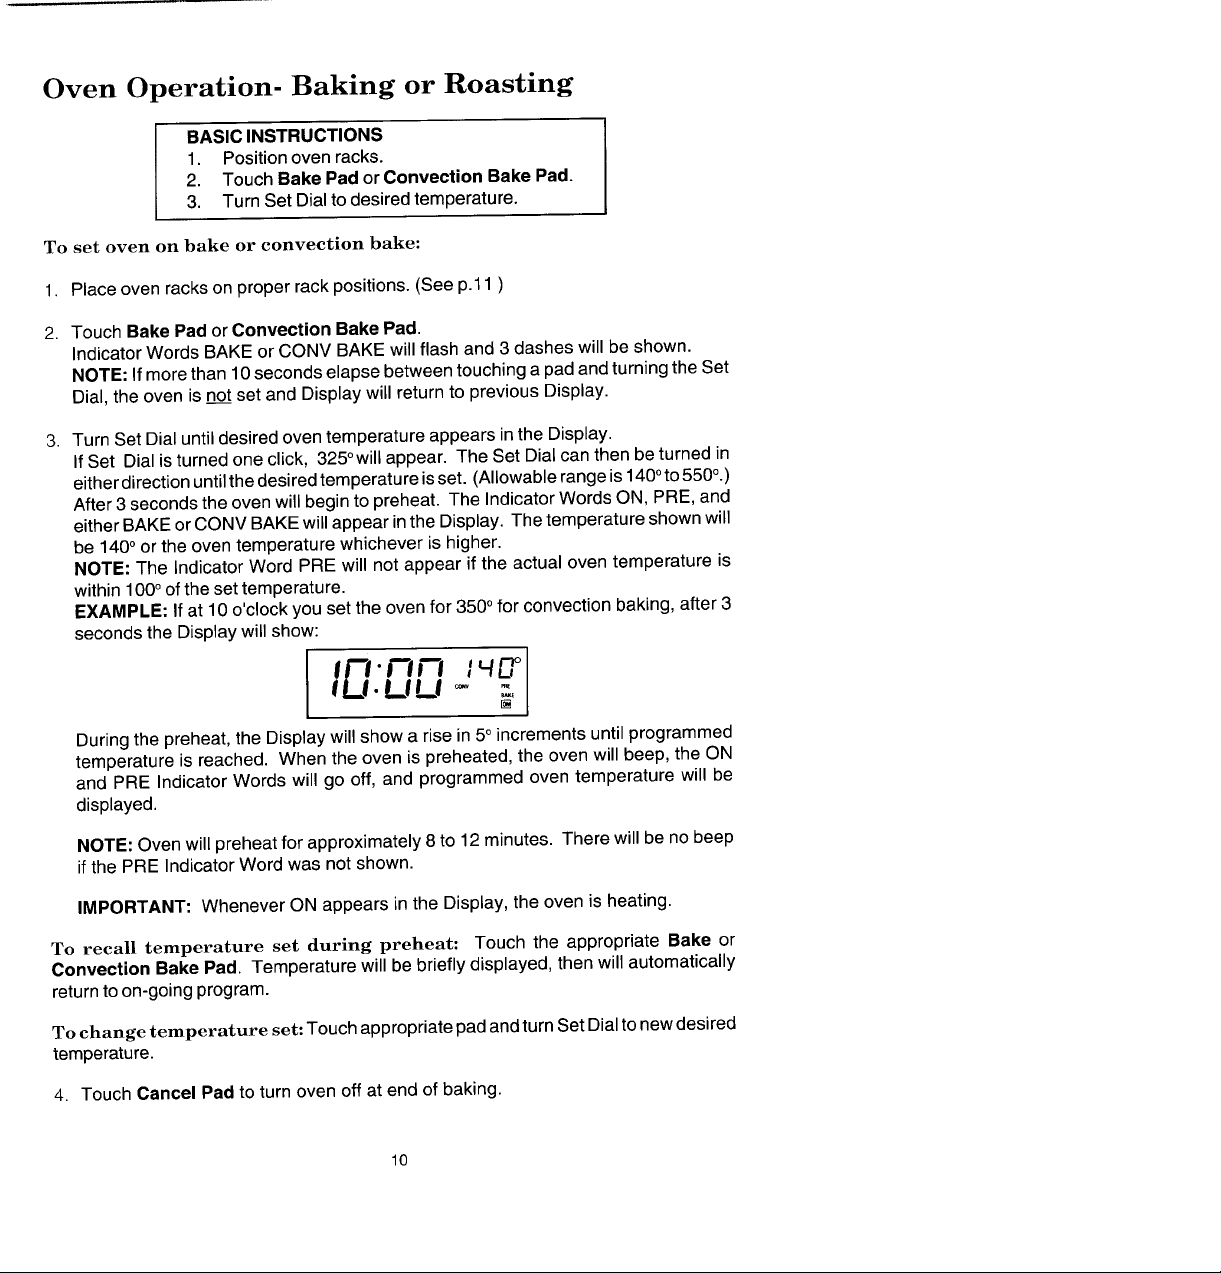
EXAMPLE: If at 10 o'clock you set the oven for 350°for convection baking, after3
seconds the Displaywill show:
I ID.r,r-,
•LIU _"
Duringthe preheat,the Displaywillshow a rise in5°incrementsuntilprogrammed
temperature is reached. When the oven ispreheated, the ovenwillbeep, the ON
and PRE IndicatorWords will go off, and programmedoventemperature willbe
displayed.
NOTE: Ovenwillpreheatforapproximately8 to 12minutes. Therewillbe nobeep
if the PRE IndicatorWordwas notshown.
IMPORTANT: WheneverON appears in the Display, theoven isheating.
To recall temperature set during preheat: Touch the appropriate Bake or
Convection Bake Pad. Temperature will be briefly displayed, then will automatically
returnto on-going program.
To change temperature set: Touch appropriate pad andturn SetDialtonewdesired
temperature.
4. Touch Cancel Pad to turn oven off at end of baking.
10
[]
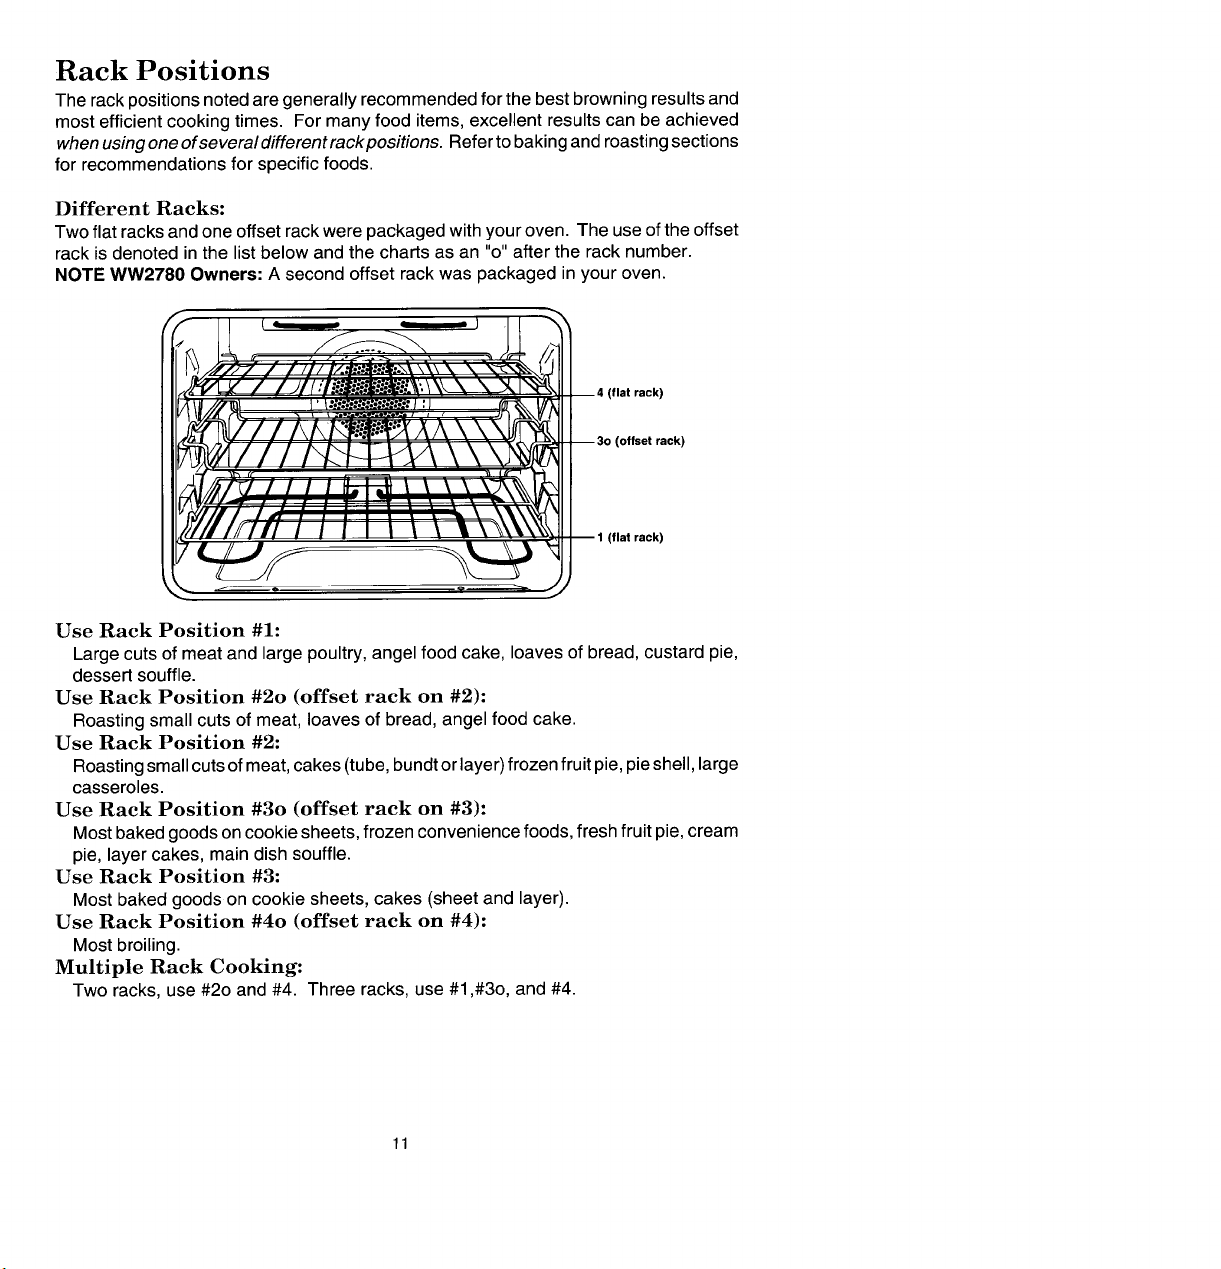
Rack Positions
The rack positions notedaregenerally recommended forthe bestbrowning results and
most efficient cooking times. For manyfood items, excellent resultscan be achieved
whenusingoneofseveral differentrackpositions. Referto bakingand roastingsections
for recommendations for specific foods.
Different Racks:
Two flat racks and oneoffset rack were packagedwith your oven. The use ofthe offset
rack is denoted in the list below and the charts as an "o" after the racknumber.
NOTE WW2780 Owners: A second offset rack was packaged in your oven.
4 (flat rack)
-- 3o (offset rack)
/,f I I "i \ .
Use Rack Position #1:
Large cuts of meat and large poultry, angel food cake, loaves of bread, custard pie,
dessert souffle.
Use Rack Position #2o (offset rack on #2):
Roasting small cuts of meat, loaves of bread, angel food cake.
Use Rack Position #2:
Roastingsmall cutsofmeat,cakes (tube,bundtor layer)frozen fruit pie,pieshell,large
casseroles.
Use Rack Position #30 (offset rack on #3):
Most bakedgoodson cookie sheets, frozen conveniencefoods, freshfruit pie,cream
pie, layercakes, main dish souffle.
Use Rack Position #3:
Most baked goods on cookie sheets, cakes (sheetand layer).
Use Rack Position #4o (offset rack on #4):
Most broiling.
Multiple Rack Cooking:
Two racks, use #20 and #4. Three racks, use #1,#3o, and #4.
(flal rack)
11
 Loading...