

Page 1
mmmJENN.AIR
Useand CareManual
30" Electric Wall Oven
Models W30100, WW30110
MODEL WW30110
Page 2
Congratulationson your choice of a Jenn-Air electronic,serf-cleaning
walloven. (Note: For ModelWW30110, onlythe upperovenis serf-
clean.)
Beforeyoubegincookingwithyournewoven,pleasetakeafew minutes
to readandbecomefamiliarwiththe instructionsin thisbook. On the
followingpagesyouwillfindawealthofinformationregardingallaspects
ofusingyournewoven. Byfollowingthe instructionscarefully,you will
be able to fully enjoy and properlymaintainyour oven and achieve
excellentresultswiththefood youprepare.
Shouldyouhave any questionsaboutusingyourJenn-Airoven,write
to us. Be sureto providethe modelnumber.
Jenn-Air Customer Assistance
c/oMaytag CustomerService
P.O. Box2370
Cleveland,TN 37320-2370
Page 3

Baking
Baking Chart ..................................................................................................... 17
General Recommendations .............................................................................. 16
Before You Gall for Service .............................................................................. 30-31
Broiling
Broiling Chart .................................................................................................... 21
Broiling Tips ...................................................................................................... 21
To Broil ............................................................................................................ 20
Caring for Your Oven
Adjust Oven Temperature ............................................................................... 28
Adjust Oven Temperature (ModelWW30110 Lower Oven).............................. 29
Cleaning Other Surfaces ................................................................................ 27
Oven Light Bulb Replacement ........................................................................ 28
Cleaning
Cleaning the Lower Oven (Model WW30110 Only) .......................................... 27
Self-Cleaning Process ............................................................................... 22-26
ClockControls
Clock Controlled Baking and Roasting ........................................................ 13-15
Time of Day Clock ............................................................................................ 11
Timer ............................................................................................................... 12
Oven Operation
Oven Control Panel......................................................................................... 6-7
RackPositions ................................................................................................. 9
Setting Controls ............................................................................................... 8
Oven Operation (Model WW30110 Lower Oven Only)
Oven Control Panel ......................................................................................... 10
Setting Controls ................................................................................................ 10
Roasting
General Roasting Recommendations ............................................................... 18
RoastingChart ................................................................................................ 19
Safety Precautions ............................................................................................. 4-5
Page 4
Read before operating your oven
All appliances - regardless of the manufacturer - have the potentialthrough
improperor carelessuseto create safetyproblems. Thereforethe following
safetyprecautionsshouldbeobserved:
1. Be sureyourapplianceisproperlyinstalledand groundedbya qualified
technician.
2. Never useyourapplianceforwarmingor heatingthe room.
3. Childrenshouldnotbe leftaloneorunattendedinareawhereappliance
isin use. Theyshouldneverbeallowedtositorstandonanypartofthe
appliance.
4. Wear properapparel. Loose-fittingorhanginggarmentsshouldneverbe
wornwhileusingtheappliance.
5. Do not repairor replaceany part of the appliance unless specifically
recommendedinthismanual.Allotherservicingshouldbe referredto an
authorizedJenn-AirServiceContractor.
6. Flammablematerialsshouldnotbe storedin an oven.
7. Do not use water on grease fires. Smotherfire or flame or use dry
chemical or foam-type extinguisher.
8. Useonlydry potholders.Moistordamppotholdersonhotsurfacesmay
resultin burnsfrom steam. Do not let potholdertouch hot heating
elements. Donotusea towelorotherbulkycloth.
9. Usecarewhen openingovendoor. Lethotairorsteamescapebefore
removingor replacingfood.
10. Donotheat unopenedfoodcontainers.Build-upofpressuremaycause
containerto burstandresultininjury.
11. Keepoven ventductsunobstructed.
12. Alwaysplaceovenracksindesiredlocationwhileoveniscool.Ifrackmust
be movedwhile oven is hot, do not let potholdercontacthot heating
elementinoven.
13. Donotcleandoorgasket. The doorgasketisessentialfora goodseal.
Care shouldbe takennotto rub,damage,or movethegasket.
14. Donotuseovencleanersina self-cleaningoven. Nocommemialoven
cleanerorovenlinerprotectivecoatingofanykindshouldbeused inor
aroundanypartof the oven.
15. Cleanonly partslistedinthismanual.
16. CAUTION: BEFORE SELF-CLEANING THE OVEN, REMOVE FOOD,
BROILER PANAND OTHER UTENSILS.
4
Page 5
17. Listen for fan. A fan noise should be heard during the bake, broil and
cleaning cycles. Ifnot, call a serviceman.
18. DONOTTOUCHHEATING ELEMENTSOR INTERIORSURFACES OF
OVEN. Heatingelementsmay behot even though they aredark in color.
Interiorsurfacesof any oven becomehot enoughto cause burns. During
and after use, donot touch, orJetclothingor other flammable materials
contactheatingelementsorinteriorsurfacesofovenuntiltheyhavehad
sufficienttimetocool. Othersurfacesof theappliancemaybecomehot
enoughto causeburns-amongthese surfacesare:ovenvent openings
andsurfacesnearthese openings,ovendoors,windowsofovendoors.
19. PREPAREDFOOD WARNING:Followfoodmanufacturer'sinstructions.
Ifa plasticfrozenfoodcontainerand/oritsfilmcoverdistorts,warpsoris
otherwisedamagedduringcooking,immediately discardthefoodand its
container. The food could be contaminated.
20. Thisappliancehasbeen testedfor safe performanceusingconventional
cookware. Do notuse any devices or accessoriesthat arenot specifically
recommendedin thismanual. Do not use add-on convectionsystems.
The useof devicesor accessories that are not expressly recommended
in this manualcouldcreate serious safety hazards, resultin performance
problems,and reduce the life ofthe components of the appliance.
21. Do not allow aluminum foil to contact heating element.
IMPORTANT SAFETY NOTICE AND WARNING
The California Safe DrinkingWater and Toxic EnforcementAct of 1986
(Preposition65) requires the Governor of California to publish a list of
substancesknowntothe Stateof Californiato causecancerorreproductive
harm, and requiresbusinessesto warncustomersof potentialexposuresto
such substances. Usersof thisapplianceare hereby warned that when the
oven isengagedin the self-cleancycle, there maybesomelowlevelexposure
to some of the listed substances, including Carbon Monoxide. Exposure to
these substances can be minimized by properly venting the oven to the
outdoors during the self-clean cycle.
-SAVE THESEINSTRUCTIONS-
5
Page 6
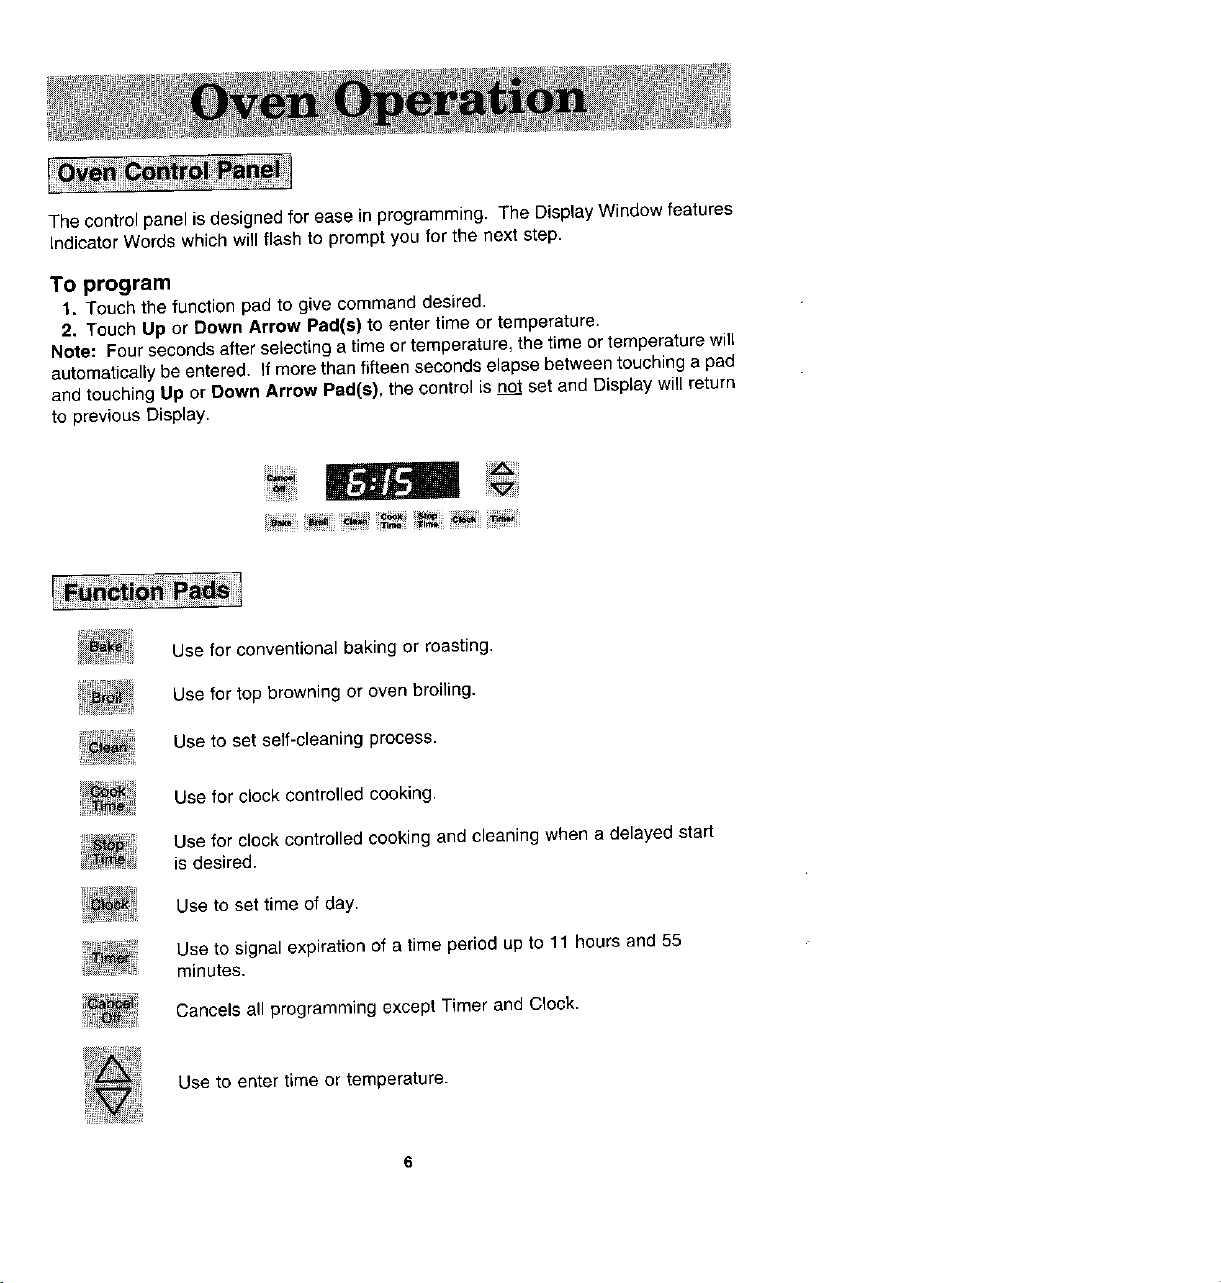
The controlpanel isdesigned for easein programming. The DisplayWindow features
Indicator Words which will flash to prompt you for the next step.
To program
1. Touch the function pad to give command desired.
2. Touch Up or Down Arrow Pad(s) to enter time or temperature.
Note: Fourseconds after selecting a time or temperature, the time ortemperature will
automaticallybe entered. If morethan fifteen seconds elapse between touching a pad
and touching Up or Down Arrow Pad(s), the control is not set and Display will return
to previous Display.
Use for conventional baking or roasting.
Use for top browning or oven broiling.
Use to set self-cleaning process.
Use for clock controlled cooking.
Use for clock controlled cooking and cleaning when a delayed start
is desired.
Use to set time of day.
Use to signal expiration of a time period up to 11 hours and 55
minutes.
Cancels all programming except Timer and Clock.
Use to enter time or temperature.
Page 7
Oven Light Switch (Control Panel)
Theoven lightautomaticellycomes on wheneverthe oven door is opened. When door
is dosed, pushthe Oven Light Switch to turn oven light on or off.
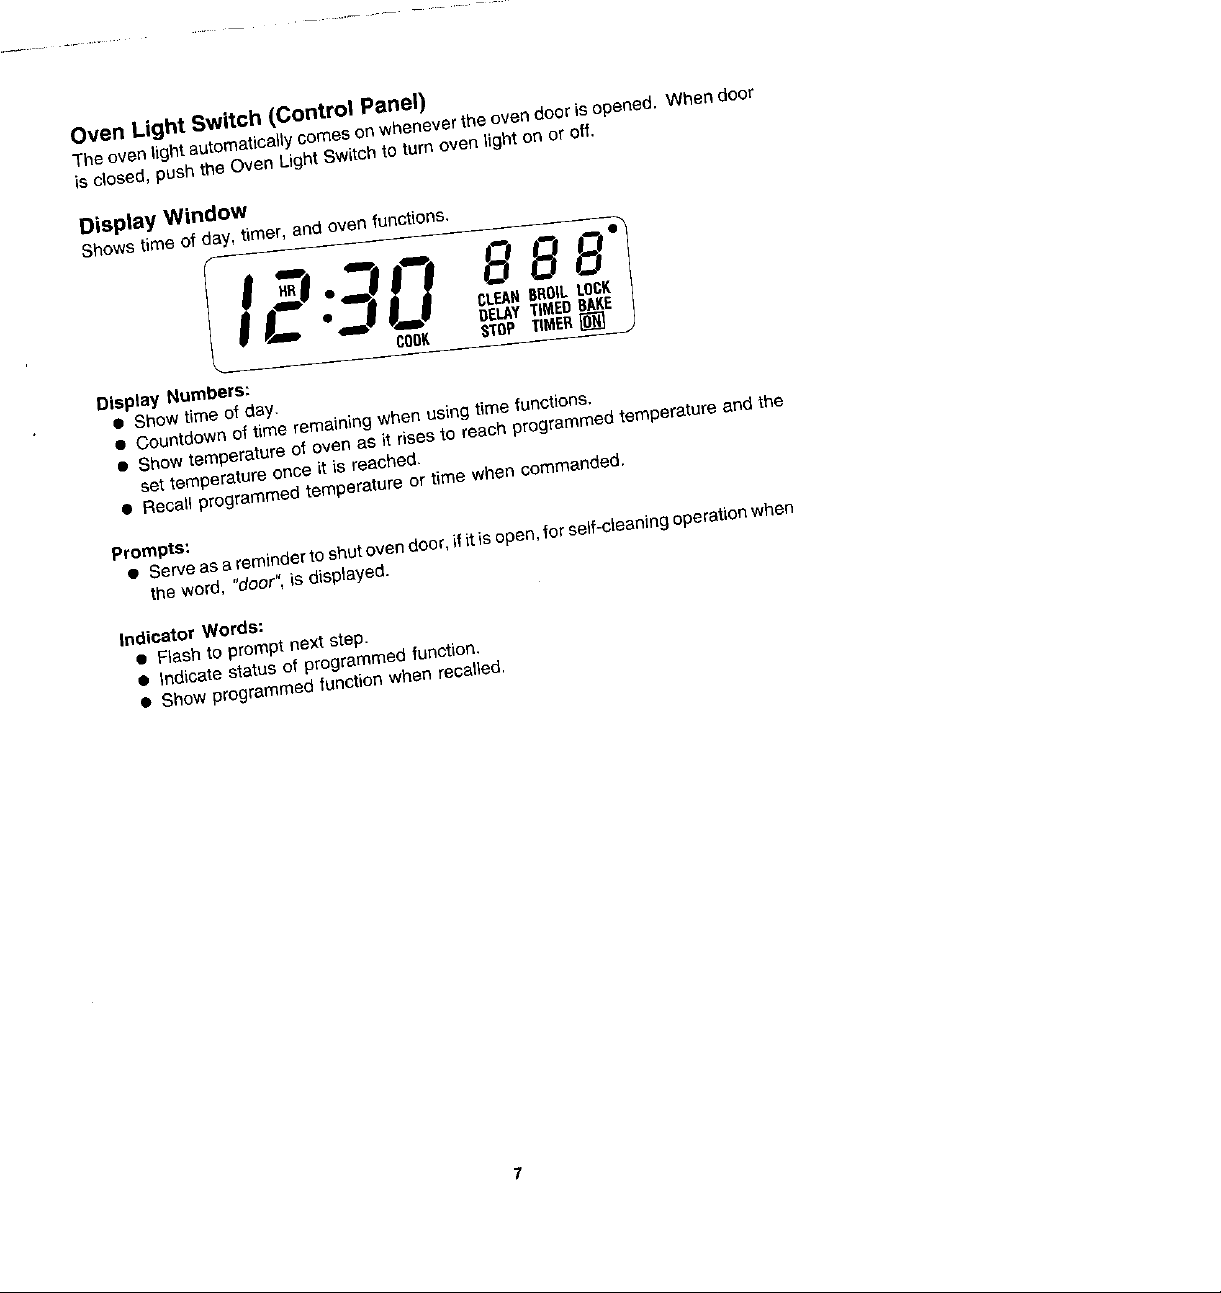
Display Window
Showstime of day,timer, and oven functions,
I,.,I cLE..
COOK STOPTIMER
Display Numbers:
• Show timeof day,
• Countdown of time remainingwhen usingtime functions,
• Show temperatureof oven as it risesto reach programmed temperature and the
set temperature once it is reached,
• Recallprogrammed temperature or time when commanded.
Prompts:
• Serveas a reminderto shutoven door,if itisopen,for self*cleaningoperationwhen
the word, "door",is displayed.
Indicator Words:
• Flash to prompt next step.
• Indicate status of programmed function.
• Show programmedfunction when recalled.
DELAYTIMED
Page 8

To set oven on Bake
1. Place oven racks on proper rack positions. (See p. 9.)
2. Touch Bake Pad.
Indicator Word BAKE will flash and three dashes will be shown in the Display.
Note: If more than fifteen seconds elapse between touching the Bake Pad and
touching an Arrow Pad, the Display will return to previous Display.
3. Touch Up or Down Arrow Pad(s) until desired oven temperature appears inthe
Display.
(Allowablerange is 100° to 550°.)Note: The first tap of an Arrow Pad will give you
350°.
After four seconds, the oven wiIJbegin to preheat. The indicator Words ON and
BAKEwill appearin the Display. The temperature shown will be f00°or the actual
oven temperature whichever is higher.
Example: Ifat 10 o'clock you set the oven for 3500for baking, after four seconds
the Display willshow:
I0:00 oo"
Duringthe preheat, the Displaywillshow a nse in 5° increments until programmed
temperatureis reached. When theoven is preheated, theoven wi[Ibeep once, the
ON fndicatorWordwill go off and the BAKE Indicator Word and programmed oven
temperature will remain in the DispJay.
Note: Oven will preheat for approximately 7 to 11 minutes.
Important: Whenever ON appears inthe Display, the oven is heating.
To recall temperature set during preheat: Touch the Bake Pad. Temperature
will be briefly displayed, then will automaticafly returnto on-going program.
To change temperature set: Touch the Bake Pad and Up or Down Arrow Pad(s)
for the new desired temperature. Note: if you are loweringthe temperature beJow
the current oven temperature, the Indicator Word ON will appear briefly in the
Displayand thepreheat beep will sound. Then, the Display will show programmed
temperature and indicator Word BAKE only.
4. Touch Cancel Off Pad to turn oven off at end of baking.
Page 9

The rackpositions noted are generally recommendedfor the best browning results and
most efficient cookingtimes. For many food items, excellent results can be achieved
whenusing oneofseveral differentrackpositions. Refer tobakingand roasting sections
for recommendations for specific foods.
Different Racks
One flat rack and one offset rack are packaged withyour oven. The use of the offset
rack is denoted in the list below and the charts as an "o" after the rack number. Note
WW30110 Owners: Anadditional offsetrackiSpackaged in yourovenfor atotal ofthree
racks.
4 (flat rack)
20 (offset rack)
Rack Uses
Rack Position #40 (offset rack on #4):
Most broiling.
Rack Position #3:
Mostbaked goodson cookie sheets, cakes (sheet and layer).
Rack Position #30 (offset rack on #3):
Mostbakedgoodsoncookiesheets,frozen conveniencefoods,freshfruit pie,cream
pie, layer cakes, main dish souffle.
Rack Position #2:
Roasting small cuts of meat, cakes (tube, bundt or layer), frozen fruit pie, pie shell,
large casseroles.
Rack Position #20 (offset tack on #2):
Roasting small cuts of meat, [oaves of bread, angel food cake.
Rack Position #1:
Large cuts of meat and large poultry, angel food cake, loaves of bread, custard pie,
dessert souffle.
Multiple Rack Cooking:
Two racks, use #20 and #4.
Page 10
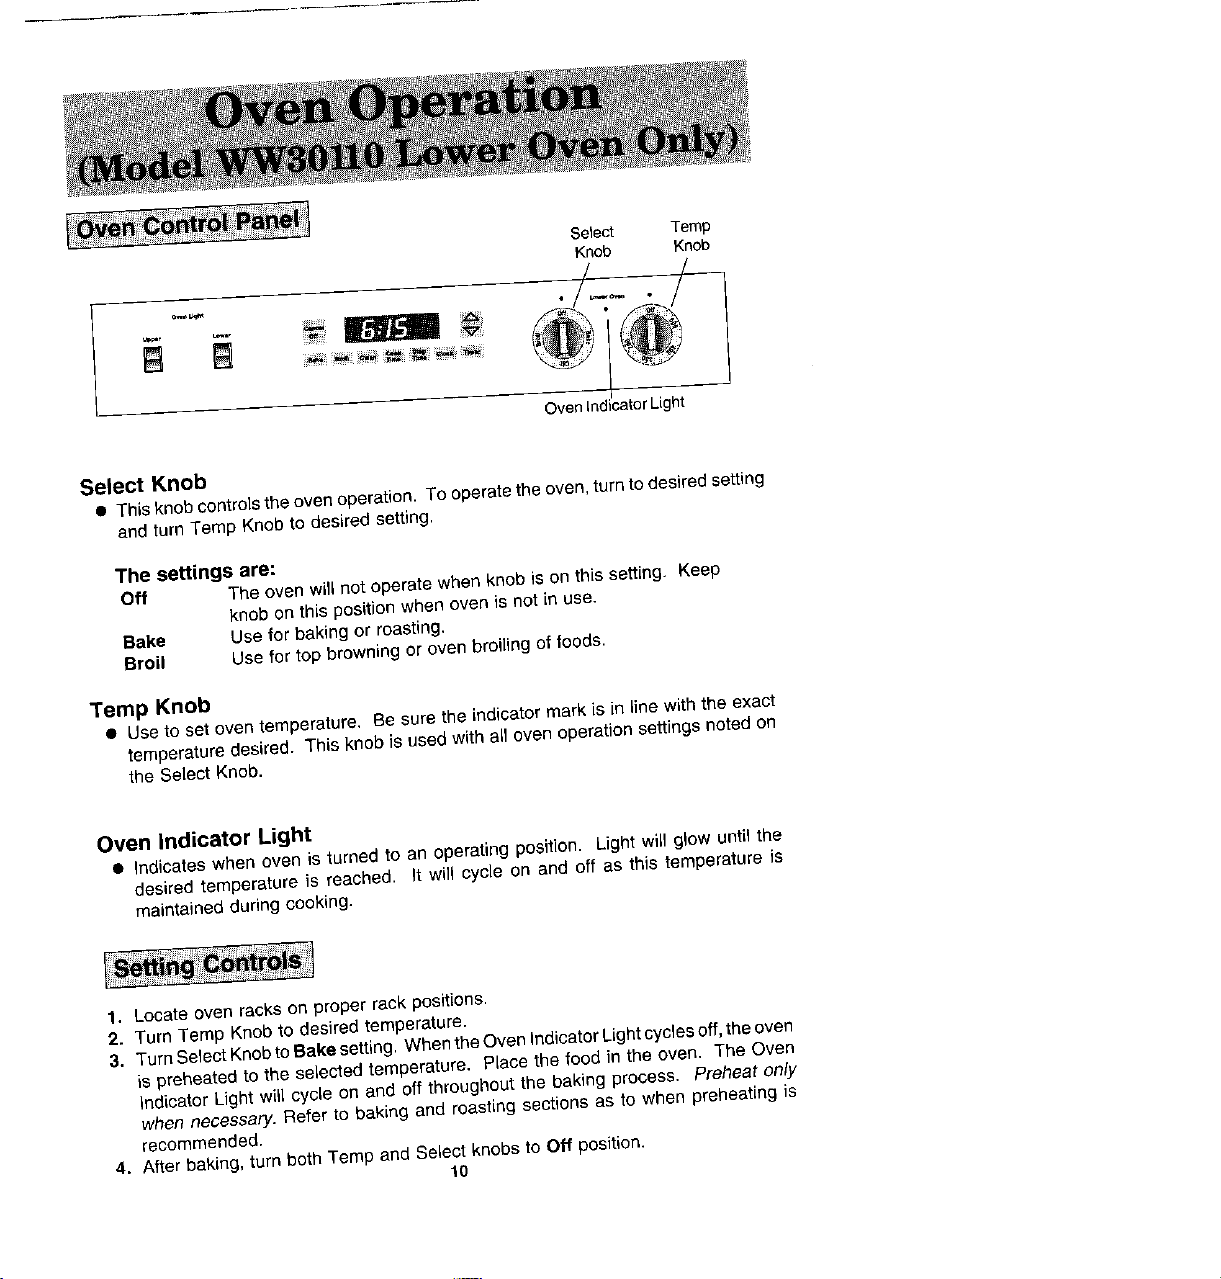
Select Ternp
Knob Knob
Oven IndicatorLight
Select Knob
• This knob controls the oven operation. To operate the oven, turn to desired setting
and turn Tamp Knob to desired setting.
The settings are:
Off The oven will not operate when knob is on this setting. Keep
knob on this position when oven is not in usa.
Bake Use for baking or roasting.
Broil Use for top browning or oven broiling of foods.
Ternp Knob
• Use to set oven temperature, Be sure the indicator mark is in line with the exact
temperature desired. This knob is used with all oven operation settings noted on
the Select Knob.
Oven Indicator Light
• indicates when oven is turned to an operating position. Light will glow until the
desired temperature is reached. It will cycle on and off as this temperature is
maintained during cooking.
1. Locate oven racks on proper rack positions.
2. Turn Temp Knob to desired temperature.
3. Turn Select Knob to Bake setting. When the Oven Indicator Light cycles off, the oven
is preheated to the selected temperature, P(ace the food in the oven. The Oven
Indicator Light will cycle on and off throughout the baking process. Preheat only
when necessary. Refer to baking and roasting sections as to when preheating is
recommended.
4. After baking, turn both Temp and Select knobs to Off position.
10
Page 11

When electrical power is supplied or after power interruption, the last clock time
displayed before power was interrupted will flash. Time will advance and continue to
flash until clock is reset.
To set time of day
1. Touch Clock Pad.
Indicator Word TIME will flash and time digits will remain in the Display. (If more
than fifteen seconds elapse between touching Clock Pad and touching an Arrow
Pad, Clock Pad must be touched again in order to setclock.)
2. Touch the Up or Down Arrow Pad(s) until correct time of day appears in the
Display.
Note: Four seconds later, the time of day will eutomatically be entered.
IMPORTANT
• TOrecatttime of day when another time function is showing: Touch Clock
Pad.
• To change time of day set on the clock: Repeat Steps 1 and 2 above.
• Clock timecannot be changedwhen oven has beenprogrammed for Timed Bake
or Self-clean. Cancel program before reprogramming clock.
11
Page 12

Important: This interval Timer can be used to remind you when a period, upto 11 hours and
55minutes, expires. Itcan beused independently of any other ovee activity and can be aetwhile
another oven function is operating. The Tirn_erdoes not control th ov n.
To setTimer
1, Touch Timer Pad,
The Indicator Word TIMER will flash and "0HR:O0" appears inthe Display.
2. Touch Up Arrow Pad until the desired number of minutes or hours and minutes appear
in the Display.
Note: If more than fifteen seconds elapse between touching the Timer Pad and Up Arrow
Pad, Timer Pad must be touched again.
Example: To set the Timer for 5 minutes, touch: Timer Pad and Up Arrow Pad. After
four seconds, the Display will show:
:05
Example: To set the Timer for ] hour, touch: Timer Pad and Up Arrow Pad. After four
seconds, the Display willshow:
"1:00
After four seconds, the Timer will start to countdown. Display will countdown in minutes
untilthe last minute. When the last minute is reached there will be a beep and Display will
go to seconds.
Example: 55 sec. :55
Atthe end oftime set, tile timer will bee _four times and"Eno _will appear in the D=splay.
Ifthe timer is not cancelled (see below), there will be two beeps every thirty seconds for
five minutes and the Display will remain as below.
E nd
Note: Countdown will have display precedence over other time functions. After Timer
ends, Display wit1return to time of day.
TIMER
=I_IER
TLMER
TIME_
To cancel Timer
1. Touch and hold Timer Pad for three seconds.
OR
2. a. Touch Timer Pad and
b. Touch Down Arrow Pad until time is returned to "00".
NOTE: Touching Cancel Off Pad to cance) beeps wJ]l cancel ALL se)eeted ovenJ
programming.
12
J
Page 13

*Omitsteps 5 & 6 ff you want baking to start immediately.
TO set oven to start immediately and shut off automatically
1. Touch Bake Pad.
IndicatorWord BAKE will flashand three dashes will beshown in the Display
2, Touch Up or Down Arrow Pad(e) until desired oven temperature appearsin the
Display.
After four seconds the oven willbegin to preheat. The Indicator Words ON and
BAKEwill appear in the Display. The temperatureshown willbe I00 _orthe actual
temperature of the oven, whichever is higher.
Example: If at 10 o'clock you set the oven for 350_for baking, after four seconds
the Displaywill show:
I0:00 1
Duringthe preheat, the Displaywill show a rise in 5° incrementsuntil programmed
temperature is reached. When the oven is preheated, the oven will beeponce, the
ON indicator wordwill go off, and the BAKE Indicator Word and programmed oven
temperature will remain in the Display.
Important: Whenever ON appears in the Display, the oven is heating.
3, Touch Cook Time Pad.
IndicatorWords COOK TIME will flash and Display will show"0 HR:00".
4. Touch Up Arrow Pad to enter cooking hours and minutes.
Hours are to left of colon and minutes to right of colon.
(Allowable range is 10 minutesto 11 hours and 55 minutes.)
Example: If cooking time selected for the oven is 2 hours and 30 minutes, the
Display will show:
After four seconds, the time of day returns to the Display.
I0:00 Ioo"
18
Page 14

Important: Oven will preheatfor approximately 7 to 11 minutes. At the end of the
preheat, there will be one beep. At end of programmed Cook Time, oven will shut
off automatically and retained heatwill continue to cook the food. Clock controlled
cooking is not recommended for baked items that require a preheated oven, such
as cakes, cookies, pies, breads. For these foods, place food in preheated oven,
then use Timer to signal end of baking time.
At the end of programmed Cook Time, the oven will shut off automatically, four
beeps will be heard and the word "End" will show in the Display. The beeps will
continue atone beepper minute forone houror untilthe Cancel Off Padistouched.
To set oven to start at future time and shut off automatically
1-4. Follow preceding steps 1-4 on page 14.
5. Touch Stop Time Pad.
IndicatorWords STOPTIME will flash. Displaywill show thecalculated stop time
based on currenttime of day andcook time.
6. Touch Up Arrow Padto enter desired stop time.
A stop time can only be accepted for laterin the day. Note: Since food continues
to cook if left in the oven, it is suggested that the clock controls be used primarily
to start theoven whenno one isin the kitchen. Provisions shouldbe made to have
the food removed as soon as the cook time is completed.
Example: If at 10 o'clock you set the oven for 350° baking and 2 hours and 30
minutes cooking time, the calculated stop time would be "12:30". The Display
would show:
12:30' oo"
Ifyou want the stop time to be 1 o'clock, touch Up Arrow Pad until 1:00appears
in the Display. The Display would show:
1:oo
After four seconds, the Display will return to current time of day, thus showing:
350"
I0:00 ...........
14
Page 15

At the endof the delayed period, the DELAY indicator Word will go off, the ON
IndicatorWordwillappearandtheovenwlllbeginteheat. lO0°ortheourrentoven
temperature,whichever is higher,wi}lbe shown. As the oven heats,the Display
will show a nse in incrementsof 5° untilprogrammed temperature is reached.
At the end of programmedCook Time, the oven will shutoff automatically, four
beepswillbe heardand"End" willappear in the Display, If oven isnotcancelled,
"End"will remainintheDisplayandtherewillbe one beepevery minutefor 1 hour,
IMPORTANT
• To recall time function programmed: Touchthe appropriatetime pad.
• To cancel timed function only: Hold CookTime Pad forfour seconds. Thiswill
only cancel cook time and stoptime, not programmedbake mode.
• If morethan fifteensecondselapse betweentouchingafunctionpadand touchin
an Arrow Pad, the oven is_ setand Displaywillreturnto previousDisplay.
15
Page 16

• When cooking foodsfor the first time in your new oven, use recipe cooking times
and temperatures as a guide.
• Use tested recipes from reliable sources.
• Preheat the oven only when necessary. For baked foods that rise and for richer
browning, a preheated oven is better. Casseroles can be started in a cold oven.
Preheating takes from 7 to It minutes; place food in oven after preheat beep.
• Arrange oven racks before turning on oven. Follow suggested rack positions on
page 9 and in various charts.
• Allowabout 1to 11/2inches of space betweenthe oven side walls and pans toallow
proper air circulation.
• When baking foods in morethan one pan, place them on opposite corners of the
rack. Stagger pans when baking on two racks so that one pan does not shield
another unlessshielding iS intended. (See above left.)
• To conserve energy, avoid frequent or prolonged door openings. At the end of
cooking, turn oven off before removing food.
• Alwaystest fordoneness (fingertip, toothpick,sides pulling away from pan). Do not
rely on time or brownness as only indicators.
• Use good quality baking pans and the size recommended in the recipe.
• Dull,dark,enameled orglasspans willgenerallyproducea brown,crisp crust. Shiny
metal pans produce a light, golden crust.
• Frozen pies in shiny aluminum pans should be baked on a cookie sheet on rack2
or be removed to a dull or glass pan.
• If edgeofpie crustbrowns tooquickly, fold a strip offoil around rimofcrust, covering
edge. (See above right.)
NOTE: Acoolingfan willoperate during allcooking modes. The fanmay alsocontinueto operate after the oven is turned off until the oven has cooled down.
16
Page 17

* An"o" aftera racknumberimpliesthattheoffsetrackshouldbeused,
** Thetimesgivenarebasedonspecificbrandsofmixesorrecipestested.Actualtimes
will dependonthe onesyoubake.
17
Page 18

• Preheating is not necessary.
• Use open pan roasting fortender cuts of meat. Do notadd water to the pan. Less
tender cuts of meat need to be cooked by moist heat in a covered pan.
• For best results, a meat thermometer is the most accurate guide to degree of
doneness. The tip of the thermometer should be located in the thickest part of a
roast, not touching fat, bone, or gristle. For turkeys and large poultry products,
insert the tip of the thermometer into the thickest part of the inner thigh.
• Place roast fat side up to allow self basting of meat during roasting.
• Since meats continue to cook after being removed from the oven, remove roast
from oven when it reaches an internal temperature about 5 degrees belowthe
temperature desired.
• For less loss of juices and easier carving, allow about 15 minutes "standing time"
after removing meat from oven.
• Forbest resultsin roasting poultry, thaw completely. Duetothe structure of poultry,
partially thawed poultry will cook unevenly.
• Minutes per pound will vary according to the size, shape, quality, and initial
temperature of meatas well asthe electrical voltage in your area. Times are based
on refrigerator cold meat.
• A large cut of meat will usually require fewer minutes per pound to roast than a
smaller cut of meat.
• Since the breast meat on a large turkey cooks more quickly than the thigh area,
placea "foilcap"overthe breastarea after desiredbrownnessis reachedto prevent
overbrowning. (See above.)
• A stuffed turkey will require and extra 30 to 60 minutesdepending on size. Stuffing
should reach an internal temperature of 165°F.
• Use meat roasting charts in standard cookbooks for recommended times and
temperatures for roasting cuts of meat not found on page 20.
NOTE: A cooling fan will operate during all cooking modes. The fan may also
continue to operate after the oven is turned off until the oven has cooled
down.
18
Page 19

Chart time based on thawed meats only.
iii_i_iis!iiiiii_i,iiiii ii!i i_iii
_NiN
,=
19
Page 20

1. Place oven rack on the rack position suggested in the chart. (See p. 21 .) Distance
from broiling element depends on foods being prepared. Rack position 4o (offset
rack in position #4) is usually recommended unless otherwise stated.
2. Touch Broil Pad.*
Indicator Word BROIL will flash and Display will show three dashes.
Note: If more than fifteen seconds elapses between touching Broil Pad and
touching Up or Down Arrow Pad(a), the oven is not set and Display will return to
previous Display.
NOTE* : TempM°delKnobWW30110to550°F.-Steps 2 & 3 - Turn Select Knob to Broil setting and
3. Touch Up or Down Arrow Pad(s).*
The first touch of an Arrow Pad will enter "HI" in the Display. The oven has a
variable broil featu re which means that a lower temperatu recan be selected. Touch
Down Arrow Pad if a lower temperature is desired.
Use "HI" broil for most broil operations. Use variable broil for delicate and long-term
items.
Four seconds after entedng "HI" or entering a temperature, the broil element will
come on and the Indicator Words BROIL and ON will remain in the Display along
with the selected Broil temperature. If the variable broil feature was selected, the
Indicator Word ON will cycle with the element.
Example: If at 10 o'clock you set the oven for broil ("HI"), the Display will show:
I0:00 "!ol
4. Broil element will preheat in 2 to 3 minutes. After broil element is red, place food
in oven. Oven door MUST be left open at broil stoo position.
5. Touch Cancel Off Pad to turn off oven when food is cooked.
2O
Page 21

• Tender cuts of meat or marinated meats are best for broiling, This includes rib and
loincuts of steak, ground beef, ham steaks, poultry pieces or fish. For best results,
steaks should be at least 1" thick. Thinner steaks should be pan-broiled.
• Do not cover broiler grid with foil since this prevents fat drippings from draining into
the bottom of the pan.
• Before broiling, remove excess fat from meat and score edges of fat (donot cut into
meat) to prevent meat from cuffing. Salt after cooking.
• To prevent dry surface on fish or lean meats, brush melted butter on top,
• Foods that require turning should be turned on)y once dudng broiling. Turn meat
with tongs to avoid piercing and loss of juices.
will cycle on and off. If the fan does not operate, contact your authorized
NOTE: A fan comes on during the BROIL cycle. If it does not, the oven broil element
Jenn-Air Service Contractor for repair.
21
Page 22

When the oven controL,s are set to CLEAN, the oven heats to temperatures thst are
higher than those used for cooking. The high temperatures cause food soil to burn Off
and substantially disappear. While this occurs, a device in the oven vent helps to
consume normal amounts of smoke. The oven is vented through an opening under the
control panel.
• Remove the broiler pan and any other utensils from the oven. These utensils cannot
withstand the high temperatures of the cleaning process.
• Clean spatters and spills from those areas which will not be cleaned during the self-
cleaning process:
- center front of oven and door near opening in door
gasket. _'_ 7---_//;_,.,'
- porcelain oven door liner (area outside the door \ _._//H
gasket).
- oven front frame. • _
Note: DO NOT CLEAN serial plate located on the ___I_)_
oven front. "_"."_:_y'_ t#/
To clean these areas, use hot water and detergent, _f,_ /
nonabrasive c_eansers or soap filled steel wool pads.
Rinse thoroughly, being careful notto use an excessive
amount of water that would dampen the door gasket. Soil left in these areas will
be more difficult to remove after the self-cleaning process since the high heat will
bake on any soil that is present. DO NOT USE COMMERCIAL OVEN CLEANERS
TO CLEAN THESE AREAS.
• DO NOT A'I-FEM PT TO CLEAN, RUB, OR APPLY WATER TO GASKET ON OVEN
DOOR. The gasket is essential for a good door seal Rubbing or cleaning will
damage the gasket and may affect the seal.
• Wipe up excess grease and food spillovers which have not baked on the bottom of
the oven. Large accumulations of soil can cause heavy smoke or fire in the oven
during the c_eaning process. For ease of cleaning, the heating element can be lifted
slightly.
• Although smoke or fire in the oven is a normal occurrence and there is no safety
problem, there will be venting of excessive smoke and odor.
22
Page 23

• Theovenrackscanbecleanedin theoven. However,theovenreckswilldiscolor,
loseshininess,andbecomedifficulttoslideinandoutifleftintheovenduringthe
cleaningprocess.REMOVE RACKS FROM OVEN IF THIS DISCOLORATION
WILLBEOBJECTIONABLE.Asa suggestion,donotleavetheracksintheoven
duringeachself-cleaningprocessifthey donotneedtobecleanedsincetheywill
discolorto a dullsilverafterthe firstcleaning. Moderatelysoiledrackscan be
cleanedwitha soapyS.O.S.padorScotch-Britescourpad. Stubbornstainsneed
toberemovedinthe self-cleaningprocess.Besureto readspecialtipsonpages
25-26 if ovenrackserecleanedduringthese/f-cleaningprocess.
........................................
*Omitsteps4 &5 ifyouwishcleaningto beginimmediately.
To set oven to start cleaning immediately
1. Closethe ovendoor.
2. TouchClean Pad.
IndicatorWordsCLEANTIME willflashandDisplaywillshow" HR :_ _".
3. TouchUpor Down Arrow Pad(s) toselectcleaningtime.
ThefirsttouchofanArrowPadwillgiveyou3hoursofcleaningtime. Thecleaning
timecanbevarieddependingontheamountofsoil.Set"2:00"for lightsoilor"4:00"
forheavysoil.
Note: If morethan fifteensecondselapse betweentouching Clean Pad and
touchinganArrow Pad,theovenisnotsetandtimeofdaywillautomaticallyreturn
totheDisplay.
Example: If at 10 o'clock youselectedto self-cleanyouroven for3 hours,the
Displaywillshow:
3:00"
FoursecondsafterselectingdesiredcleaningtimetheDisplaywillreturntotimeof
dayandtheIndicatorWordsHRandTIMEwillgooff.TheLOCKIndicatorWordand
thecoolingfanwillcomeonwhenthedoorislatched.TheIndicatorWordCLEAN
willremainandONwillappearand cyclewiththeelementsto maintainthe clean
temperature.
Example:Ifat 10o'clockyouselecteda3 hourclean,afterfoursecondstheDisplay
wi((show:
I /O:O0= ;
23
Page 24

Note: Ifthe ovendoor was left opened, the word"door" will flash in theDisplay and
a signal will continuously beep until the door is closed and the Clean Pad is
touched.
Whenthe clean functionhas been completed,the Indicator Words CLEANand ON
will go off. The Indicator Word LOCK and the cooling fan will remain on until the
oven has cooled downand the door has unlocked.
To set oven to start cleaning at a later time
1-3. Followsteps1-3 in previoussectiononpage 23,
4, Touch Stop Time Pad,
JndicatorWords STOP TIME willflashin the DispJay.The IndicatorWord CLEAN
and the calculatedstop time will also appear in Display.
Example: If at 10:00, you set the Clean time for 3 hours, the calculatedstop time
would be 1:00 and the Display would show:
I:00 °,-
5. Touch the Up Arrow Pad to enter new stop time.
A stop time can only be accepted for later in the day.
Example: Ifyou wantthe stop time to be 4:30 instead of 1:00,then touchthe Up
Arrow Pad until the Display shows:
4-30
After four seconds, the Displaywill returnto the Time of Day, thus showing:
fIooo-_
When the oven begins to clean, the Indicator Word DELAY will go off and the
Display will show the Indicator Words CLEAN and ON.
When the cleanfunction hasbeencompleted,the IndicatorWords CLEAN andON
will go off. The IndicatorWord LOCK and the ccoling fan will remainon untilthe
oven has cooled down and the door has unlocked.
24
Page 25

To cancel self-clean
• Touch Cancel Off Pad,
• Theovendoorwillbe lockedwhilethe LOCK IndicatorWordremainsintheDisplay.
Dependingonthelengthoftimetheovenhadbeenself-cleaning,itmaytake upto
45 minutesfortheovento cooldown,the doorto unlockandcoolingfantoturnoft.
IMPORTANT
• To recall cleaning time or stop time: Touchthe appropriatepad (Clean Pad
or Stop Time Pad).
• To change cleaning time or stop time before cleaning begins: Repeatthe
stepson page 23-24.
• When theClean Pad istouched,a fan comeson. Ifthisfanis notoperating,the
ovenwillgothroughthecleaningprocessata reducedoventemperatureandthe
ovenwillnotcleaneffectively.Ifthefandoesnotoperate,contactyourauthorized
Jenn-AirServiceContractorfor service.
• A slightodormay be detected, and if anoven is heavily soiled,some smokemay
be visible. Some smoke and odor during the cleaning process is a normal
occurrence. Sincethe ovenisvented underthe controlpanel,vapors,moisture,
etc.may be seencomingfrom this area.
• Duringthe cleaningprocess,do notbe alarmed if an occasionalflame isvisible
throughthe oven window. This is caused by excessivefood soilthat was not
removedbefore theoven was set to clean.
• SINCE THE DOOR AND WINDOW OF THE OVEN WILL GET WARM DURING
THE SELF-CLEANINGPROCESS, AVOID CONTACT.
• Sometypesofsoilmaydisintegratebutleavea lightfilm orheavierdepositof ash.
The amountofashdependsontheamountofsoilwhichwasintheoven. Afteroven
hascooled,thisashmay be removedwitha dampsponge. If otherdarkdeposits
remainafter wipingwithasponge,thetimeset forthe lengthofcleaningwas not
enough. Increasethe cleaningtimeforfuturecleaningsor cleanmorefrequently.
The normalcleaningtime is 3 hours. A maximumof4 hoursmay be selectedif
necessary.
25
Page 26

• If rackshavebeen leftin oven duringthe cleaning process,they shouldbetreated
as follows. After thecleaningprocessiscompletedandthe ovenhascooled,buff
theundersideofrackedgeswithScotch-Britescourpadorrublight/ythe underside
of rackedgeswitha coatingofvegetableoil. Use a lightapplicationof oilso itdoes
notsoilthe oven. Thiswilt makethe cleaned racksslide moreeasily.
• To removeoccasionalspilloversbetweencleanings,usea soap-filledscouringpad
or mildcleanser;rinsewell,
• Itisbetter tocleanthe oven regularlyratherthanwaituntilthere is a heavybuild-
up ofsoil in the oven.
• Ouringthecleaningprocess,thekitchenshouldbe well ventilatedto helpeliminate
normalodorsassociatedwithcleaning.
• DO NOT USE COMMERCIAL OVEN CLEANERS.
• DO NOT USE ALUMINUM FOIL OR OTHER LINERS IN THE OVEN.
26
Page 27

Door and control panel trim
The metal tdm around the door and the control panel can be cleaned with a household
cleaner or soapy water, rinse well. Be careful not to use an excessive amount of water.
Glass on the oven door front
Use any suitable glass cleaner or soapy water.
Control Panel Area and Display Window
Wipe with paper towels dampened with soapy water or glass cleaner. Do not spray any
cleaning solutions directly onto the Display window or use large amounts of soap and
water. Do not scrub with S.O.S. pads or abrasive cleaners.
Since the upper oven isself-cleaning, itsuse issuggested for foods that have atendency
to spatter or spill over. The lower oven porcelain walls and door, which are of the same
high quality porcelain as the upper oven, can be wiped clean with soap and water if food
is not allowed to bake on a second time. Heavy spattering of spillovers will require
cleaning with mild abrasive cleansers such as Bar Keepers Friend, S.O.S. or Bon Ami.
Household ammonia may be used to loosen soil by placing V2cup household ammonia
in a glass dish on oven rack in a closed, cold oven overnight.
• To remove difficult stains, use an oven cleaner such as Easy-Off on oven liner.
Follow oven cleaner directions. Do not spray electrical controls, temperature
sensing bulb, door gasket or exterior of oven. Remove oven racks before spraying
with oven cleaner.
• For cleaning other areas of the oven, clean oven racks with S.O.S. pads. Oven
window may be cleaned with soap and water or a glass cleaner. Be careful not to
soak or rub the oven door gasket.
27
Page 28

To removepullforwardtothe "stop"position;liftup _ ___
on the front of the rack and pull out, _/_T_
Beforereplacingbulb, disconnect power to oven at the main fuse or circuit breaker
panel. Besurethattheentireovencavityincludingthelightbulbiscoolbeforeattempting
to remove.
TO replace light bulb
1. Carefullyunscrewthe glasslightlens.
2. To obtain firm grasp on the bulb, wear protectiverubber /"
gloves. Removebyturningbulbtotheleft. Do not touch a
hotovenfightbulbwitha damp cloth asbulb wi/Ibreak. Note:
Ifthe bulb doesbreakendyouwishto removeit,be certain
power supplyis disconnectedand wear protectivegloves.
YoumaycontactyourauthorizedJenn-AirServiceContractor
for service.
3. Rep]acebulbwitha40 wattoven-ratedapp/iance bulb. Bulb
with brass base isrecommendedto preventfusingof bulb
intosocket.
4. Replace bulbcover and reconnectpowerto oven. Reset
clock.
The oven temperature can be adjustedif all oventemperaturesare too low or too high
and the length of time to cook ALL foods is too long or too short. Do NOT adjust the
temperature if only one or two items are not baking properly.
To adjust
1. Touch the Bake Pad.
2. Touchand holdthe Up Arrow Pad until500° or higherappears inthe Display.
3. Touchand holdthe Bake Pad for six secondsuntil"00°" appearsinthe Display.
4. Touchthe Up or Down Arrow Pad(s) to enter the desiredoffsettemperature.
(Allowable range is -35° to +35 o.) Four secondslater, the Display will return to
current time of day.
Note; Do notchange the temperature setting morethat t0° before checking the oven.
Important; The oven shouldbeadjusted only 10° and theoven should betested. (We
recommendbaking two 9" yellow layer cakes using a purchased box mix.) If the oven
temperature is still too low or too high repeatthe procedure described above.
28
Page 29

The oven Temp Knob can be adjusted if the oven temperature is too low or too high and
the length of time to cook ALL foods is too long or too short. Do NOT adjust the Temp
Knob if only one or two items are not baking properly.
To adjust the Temp Knob
Turn the oven Temp Knob to Off. Re-
move the knob and turn it to the under-
neath side. (See Fig. 1.) Loosen the two _Screw
screws slightly. Holding the skirt in place,
move the top screw by rotating the knob
one notch, as noted by one click, in
direction necessary. Rotate screw coun-
terclockwise for hotter and clockwise for
cooler tempereture. If notch indentation
isnot apparent, tighten screws until click-
ing isheard. There are seven notches in
each direction. Move only one notch at a FIG.1
time.
Example: If the oven temperature istoo
cool and ALL foods are requiringa longer
time period to cook, the knob should be
rotated to move the top screw counter-
clockwise for a hotter oven. (See Fig 2.)
Tighten the screws while tightly holding
knobto skirt..To replace knob, match flat
part of knob opening with spring on the FIG. 2
shaft, returning to Off position.
Important: The oven Temp Knob should be adjusted one notch and then the oven
should be tested. (We recommend baking two 9" yellow layer cakes using a purchased
box mix.) If the oven temperature is still too low or too high, repeat the procedure
described above.
If the knob is rotated too far or in the wrong direction, rotate the knob in the opposite
direction until the center of the screw is directly under the triangle, which is the starting
point. Initiate the procedure again until the desired temperature is reached.
29
Page 30

Checkthefollowinglistto be surea service call is reallynecessary. A quickreference
of this manual may prevent an unneededservice call,
If nothing on the oven operates:
• checkfor a blowncircuitfuse or a trippedmaincircuitbreaker,
• checkifoven is properlyconnectedtoelectriccircuitin house.
If clock, indicator words, and/or lights operate but oven does not
heat:
• the controlsmay have been set incorrectly.
• clockcontrolsmaybe set for delayed startof oven.
If the oven light does not work:
• the lightbulbis looseor defective.
• ovenlightdoesnotworkduring self-cleaningprocess,
If oven will not go through self-cleaning process:
• controlsmay be improperlyset.
• checktheclock controlledtimesettingsand the currenttime of dayon the clock,
If oven did not clean properly:
• ovenmayneed longercleaningtime.
• excessivespillswere not removedpriorto self-cleaningprocess.
If oven door will not unlock:
• ovenmay not havecooledto safetemperature after self-c[eaningprocess.
• electriccurrentcomingintotheoven may be off,
If foods do not broil properly:
• the controlmay not be set properly.
• checkrackposition,
• voltage intohousemaybe low,
If baked food is burned or too brown on top:
• foodmay be positionedincorrectlyin oven,
• oven notpreheatedproperly.
If foods bake unevenly:
• theoven may be installedimproperly.
• checkthe oven rackwith a level.
• staggerpans,do notallowpansto toucheach otheror ovenwall.
• check instructionsfor suggestedplacement of panson oven rack.
30
Page 31

If oven baking results are less than expected:
• the pans being used may not be of the size or material recommendedfor best
results.
• theremaynotbesufficientroomaroundsidesofthepansforproperaircirculation
in theoven,
• checkinstructionsfor preheating,rackpositionand oventemperature.
If baking results differ from previous oven:
• oventhermostatcalibrationmaydifferbetweenoldandnew ovens. Followrecipe
anduse andcare directionsbeforecallingfor servicesince the calibrationon the
previousovenmayhave driftedto a too highortoo low setting. (See pp.28-29 -
AdjustingOven Temperature.)
If the cooling fan continues to operate after the oven has been
turned off:
• thisis normeJandthe fan willautomaticeJlyshutoffwhenthe oven iscooled,
If a fan is heard while using the bake mode:
• thisisthecoolingfan andisnormal Thefanwill continuetorunafteruse untilthe
oven cools.
If F plus a number appears in the Display:
• a faultcode is being shown. When a faultcode appearsand a continuousbeep
sounds,touchthe Cancel Off Pad. If the faultcodereappears,disconnectpower
tothe ovenand call an authorizedJenn-AirServiceContractor.
3t
 Loading...