

Page 1
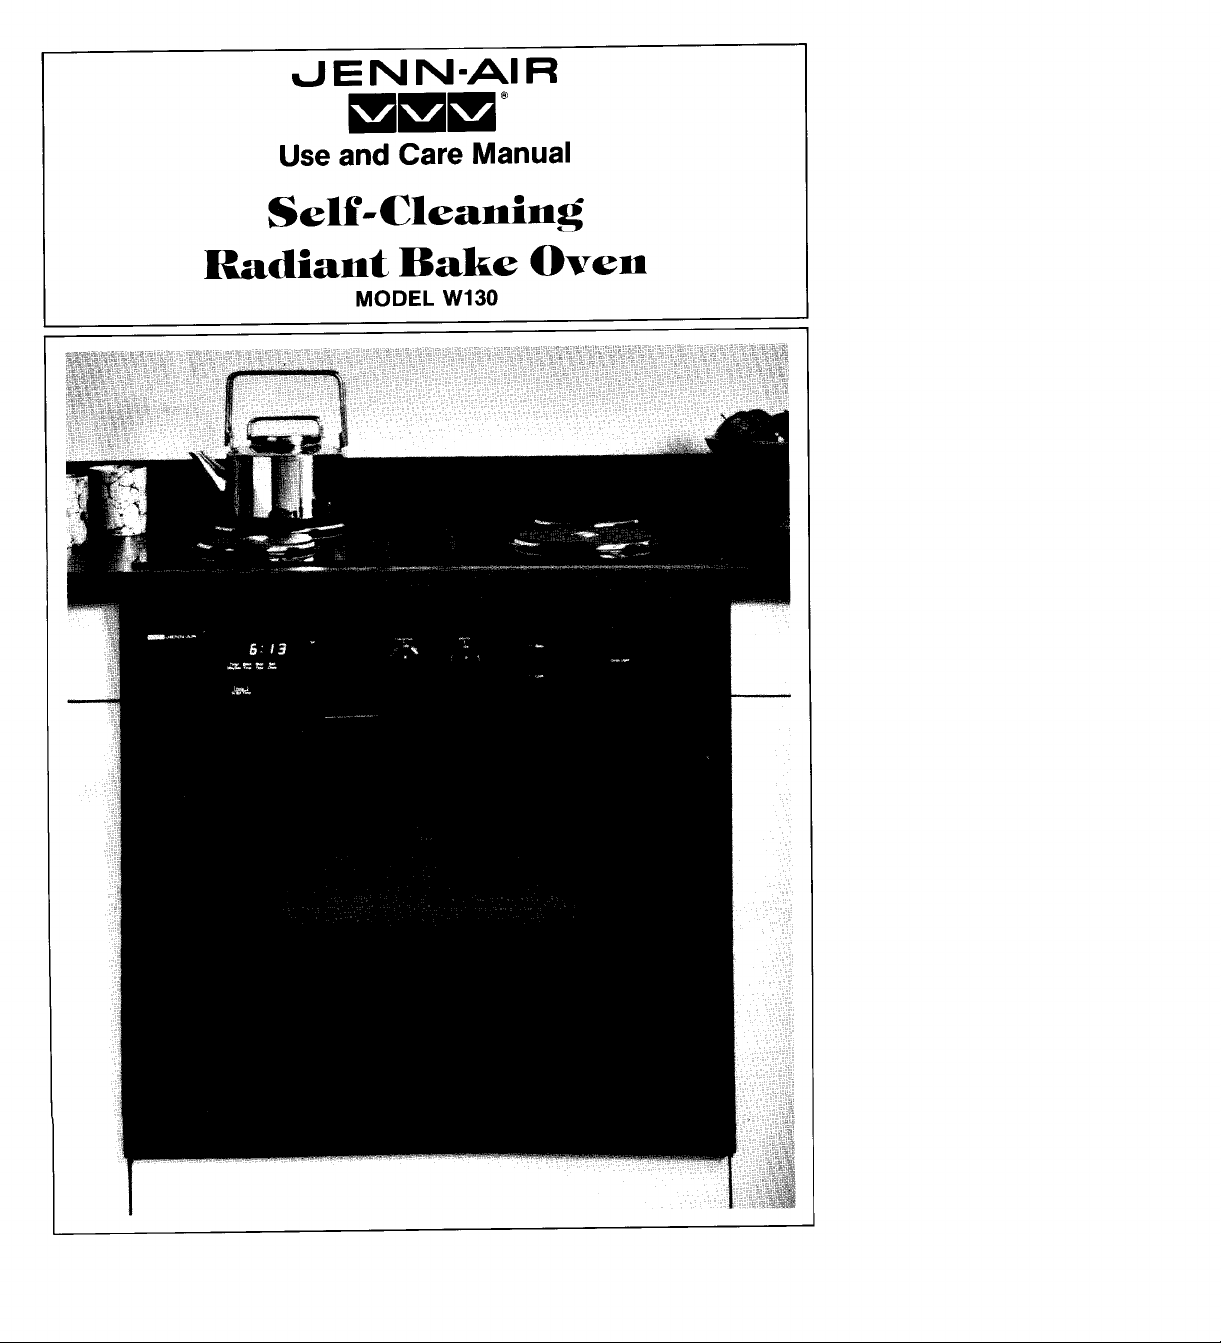
,j i= N N-AI R
m_m _
Use and Care Manual
Self-Cleaning
Radiant Bake Oven
MODEL W130
Page 2
Jenn-Air Oven
About Your
Your Jenn-Air oven is a fine full-featured "bake and broil"oven.
Since this manual explains how you can obtain the best use of
you r oven, it is essential that you follow the instructions carefully.
This will enable you to fully enjoy and properly maintain your
Jenn-Air oven and will also assure you of achieving the finest
cooking results with the foods you prepare.., year after year.
Should you have any questions about using your Jenn-Air
appliance, write to us. Be sure to provide the model number of
your appliance.
Consumer Relations Department
Jenn-Air Company
3035 Shadeland Avenue
Indianapolis, IN 46226-0901
Index
Baking ....................... General Recommendations ................. 12-13
Broiling ................................................................ 16-17
Cleaning ..................... Self-Cleaning Process ..................... 18-21
Other Cleaning Tips ........................ 22-23
Clock Controls ............................................................ 8-10
Control Panel.............................................................. 6-7
Light Bulb Replacement .................................................... 22
Rack Positions ............................................................. 11
Roasting ..................... General Recommendations ................. 14-15
Safety Precautions ......................................................... 4-5
Service Tips ............................................................ 24-25
Page 3
SAFETY
PRECAUTIONS
Read before operating your oven
All appliances -- regardless of the manufacturer -- have the
potential through improper or careless use to create safety
problems. Therefore the following safety precautions should
be observed:
1. Be sure your appliance is properly installed and grounded
by a qualified technician.
2. Never use your appliance for warming or heating the room.
3. Children should not be left alone or unattended in area
where appliance is in use. They should never be allowed
to sit or stand on any part of the appliance.
4. Wear proper apparel. Loose-fitting or hanging garments
should never be worn while using the appliance.
5. Do not repair or replace any part of the appliance unless
specifically recommended in this manual. All other
servicing should be referred to an authorized Jenn-Air
Service Contractor.
6. Flammable materials should not be stored in an oven.
7. Do not use water on grease fires. Smother fire or flame
or use dry chemical or foam-type extinguisher.
8. Use only dry potholders. Moist or damp potholders on
hot surfaces may result in burns from steam. Do not let
potholder touch hot heating elements. Do not use a towel
or other bulky cloth.
9. Use care when opening oven door. Let hot air or steam
escape before removing or replacing food.
10. Do not heat unopened food containers. Build-up of pres-
sure may cause container to burst and result in injury.
11. Keep oven vent ducts unobstructed.
12. Always place oven racks in desired location while oven
is cool. If rack must be moved while oven is hot, do not
let potholder contact hot heating element in oven.
Page 4
13. Do not clean door gasket. The door gasket is essential
for a good seal. Care should be taken not to rub, damage
or move the gasket.
14. Do not use oven cleaners. No commercial oven cleaner
or oven liner protective coating of any kind should be
used in or around any part of the oven.
15. Clean only parts listed in this manual.
16. CAUTION: BEFORE SELF-CLEANING THE OVEN,
REMOVE BROILER PAN, FOOD, AND OTHER
UTENSILS.
17. Listen for fan. A fan noise should be heard anytime the
oven is turned on. If not, call a serviceman before self-
cleaning again.
18. DO NOT TOUCH HEATING ELEMENTS OR INTERIOR
SURFACES OF OVEN. Heating elements may be hot even
though they are dark in color. Interior surfaces of any
oven become hot enough to cause burns. During and
after use, do not touch, or let clothing or other flammable
materials contact heating elements or interior surfaces
of oven until they have had sufficient time to cool. Other
surfaces of the appliance may become hot enough to
cause burns -- among these surfaces are: oven vent
openings and surfaces near these openings, oven doors,
windows of oven doors.
19. Do not allow aluminum foil or meat probes to contact
heating elements.
IMPORTANT SAFETY NOTICE AND WARNING
The California Safe Drinking Water and Toxic Enforcement
Act of 1986 (Proposition 65) requires the Governor of
California to publish a list of substances known to the State
of California to cause cancer or reproductive harm, and
requires businesses to warn customers of potential exposures
to such substances. Users of this appliance are hereby
warned that when the oven is engaged in the self-clean cycle,
there may be some low level exposure to some of the listed
substances, including Carbon Monoxide. Exposure to these
substances can be minimized by properly venting the range
to the outdoors during the self-clean cycle.
Page 5

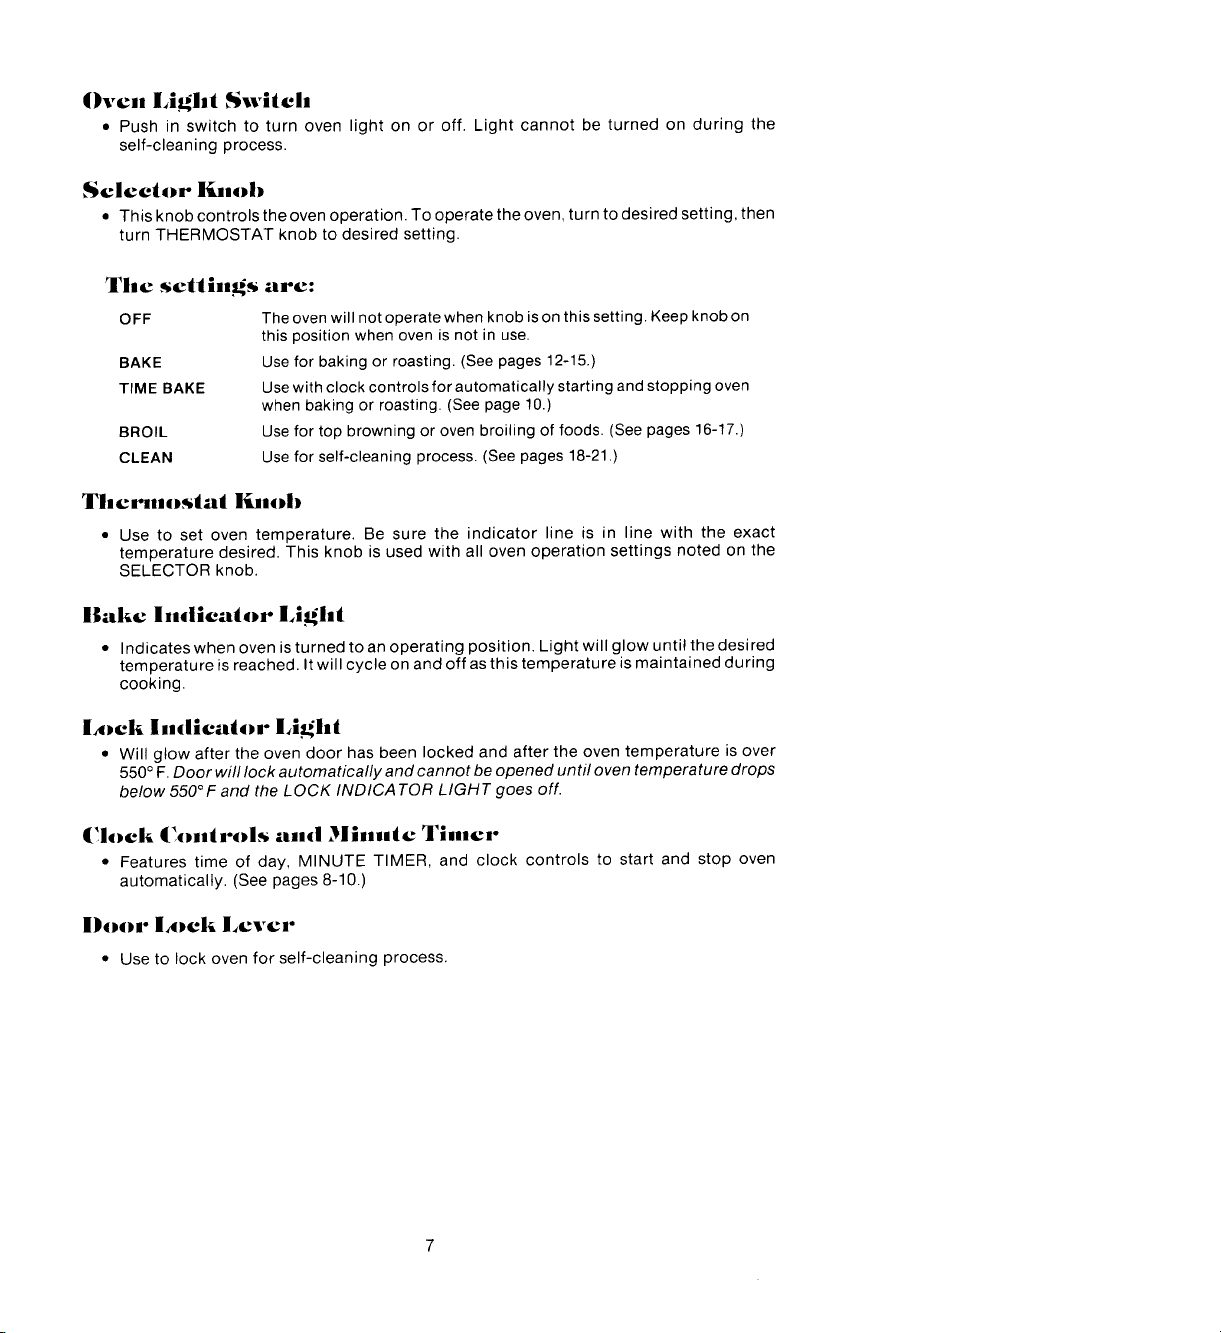
_Oven Operation
Oven Condrols Panel
Indicator Lights:
Thermostat knob Bake
Set knob
Clock controls and Selector knob
minute timer Door lock lever
Oven light switch
Page 6
Oven Light Switch
• Push in switch to turn oven light on or off. Light cannot be turned on during the
self-cleaning process.
Selector l_.ob
• This knob controls the oven operation. To operate the oven, turn to desired setting, then
turn THERMOSTAT knob to desired setting.
The scllln_s are:
OFF The oven will notoperate when knob ison this setting. Keep knob on
BAKE Use for baking or roasting. (See pages 12-15.)
TIME BAKE Usewith clock controls for automatically starting andstopping oven
BROIL Use for top browning or oven broiling of foods. (Seepages 16-17.)
CLEAN Use for self-cleaning process. (See pages 18-21.)
Tl.ermos/al l_.ob
• Use to set oven temperature. Be sure the indicator line is in line with the exact
temperature desired. This knob is used with all oven operation settings noted on the
SELECTOR knob.
llake Indicator l,ight
• Indicates when oven isturned to an operating position. Light will glow until the desired
temperature is reached. Itwill cycle on and off as this temperature is maintained during
cooking.
this position when oven is not in use.
when baking or roasting. (See page 10.)
i_Dek Indiea/or Light
• Will glow after the oven door has been locked and after the oven temperature is over
550°F.Door will lock automatically and cannot be opened until oven temperature drops
below 550° F and the LOCK INDICA TOR LIGHT goes off.
Clock Controls and )linulc 'l'imnncm-
• Features time of day, MINUTE TIMER, and clock controls to start and stop oven
automatically. (See pages 8-10.)
l)oor l_Dck L_vcr
• Use to lock oven for self-cleaning process.
Page 7
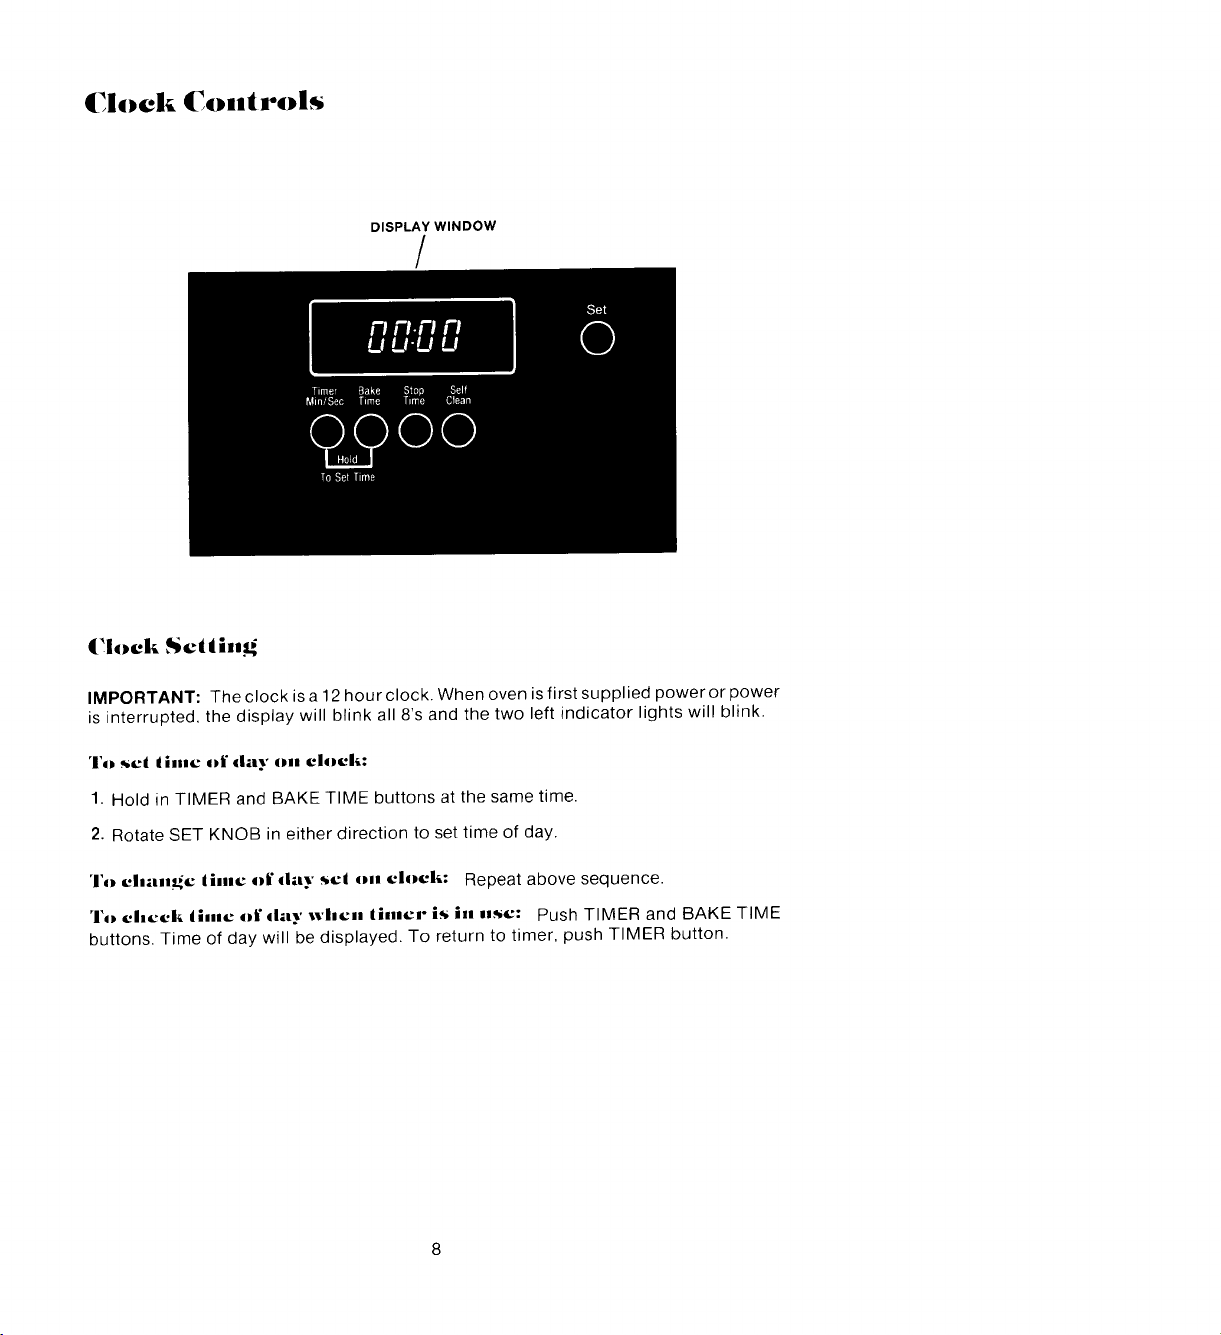
Clock Controls
Clock Setting
DISPLAY WINDOW
/
u u.oJ u
i"l n.i-I FI Q
Timer Bake Stop Self
Min/Sec Time Time Clean
200
T0SetTime
Set
IMPORTANT: The clock is a12 hour clock. When oven is first supplied power or power
is interrupted, the display will brink all 8's and the two left indicator lights will blink.
To s_t tlnnt: of d_uy on clock:
1. Hold in TIMER and BAKE TIME buttons at the same time.
2. Rotate SET KNOB in either direction to set time of day.
To cl=_ungc linnc of da T ,,el on clock: Repeat above sequence.
To tint:ok di,n_ oi" day wlnt:n tlnnt:r is in .=st:: Push TIMER and BAKE TIME
buttons. Time of day will be displayed. To return to timer, push TIMER button.
Page 8
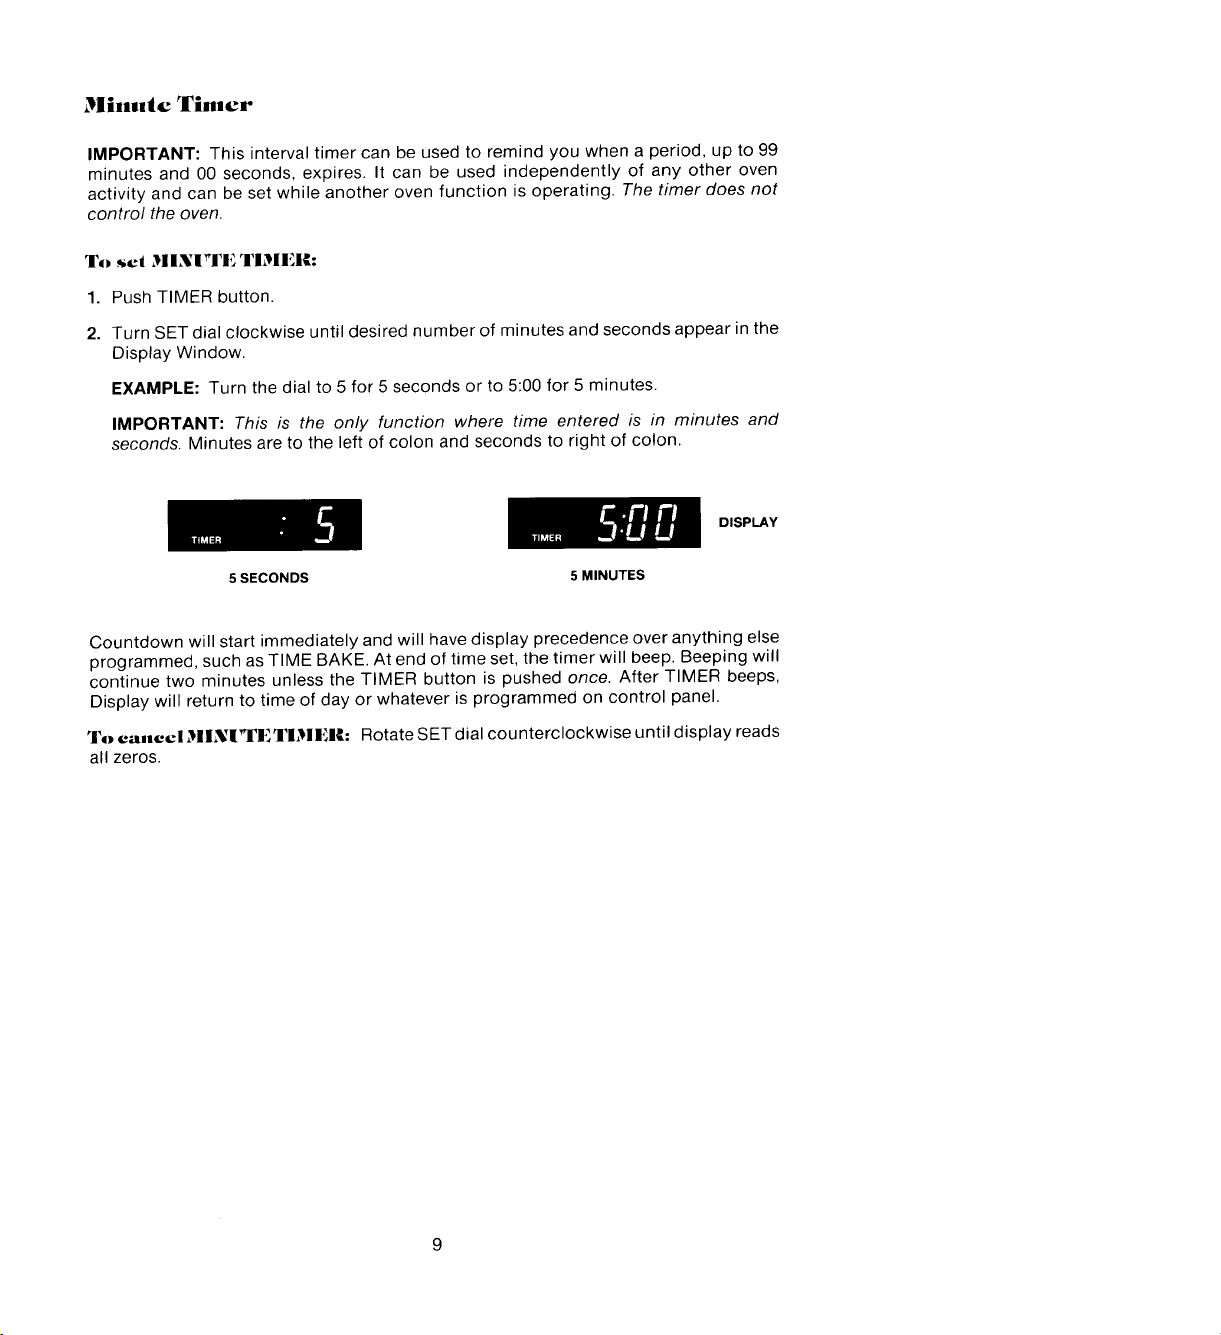
Minute Timer
IMPORTANT: This interval timer can be used to remind you when a period, up to 99
minutes and 00 seconds, expires. It can be used independently of any other oven
activity and can be set while another oven function is operating. The timer does not
control the oven.
To set MINUTE TIMER:
1. Push TIMER button.
2. Turn SET dial clockwise until desired number of minutes and seconds appear in the
Display Window.
EXAMPLE: Turn the dial to 5 for 5 seconds or to 5:00 for 5 minutes.
IMPORTANT: This is the only function where time entered is in minutes and
seconds. Minutes are to the left of colon and seconds to right of colon.
DISPLAY
5SECONDS 5MINUTES
Countdown will start immediately and will have display precedence over anything else
programmed, such as TIME BAKE. At end of time set, the timer will beep. Beeping will
continue two minutes unless the TIMER button is pushed once. After TIMER beeps,
Display will return to time of day or whatever is programmed on control panel.
To cancel MINI_rETIMEll: Rotate SET dial counterclockwise until display reads
all zeros.
Page 9

Clock-Controlled IBakinn_ or l;oastinn_
To sod ovcan do sd_urd innnincdiatcly ain(I slant off a|idoinnadicall),:
1. Turn SELECTOR knob to TIME BAKE.
2. Turn THERMOSTAT knob to desired temperature.
3. Push BAKE TIME button.
4. Turn SET dial to set amount of baking time.
The oven will turn on immediately, cook for the programmed time and turn off
automatically. To cancel the beeping, push TIMER button.
NOTE: To prevent accidentally changing the bake time, push TIMER button to return
to time of day.
To set oven to sdart ad i'udun-c tinnnc and slnuu( off automatically:
1. Turn SELECTOR knob to TIME BAKE.
2. Turn THERMOSTAT knob to desired temperature.
3. Push BAKE TIME button.
4. Turn SET dial to set amount of baking time.
5. Push STOP TIME button.
6. Turn SET dial to set the time of day baking should stop.
The clock calculates automatically when the oven will turn on.
NOTE: To prevent accidentally changing programmed information push TIMER
button to return to time of day.
At the end of delayed bake time, the timer will beep and display will revert to
time of day. Push TIMER button to cancel the beeping.
To elncek S_)I" TIME: Push STOP TIME button.
To ('anneal i'uuncllon pro._rannnnncd: Push BAKE TIME button and turn SET dial
until all zeros appear in the Display.
NOTE: After clock-controlled baking, turn SELECTOR and THERMOSTAT knobs to
OFF position.
NOTE: Since food continues to cook if left in the oven, it is suggested that the clock
controls be used primarily to start the oven when no one is in the kitchen.
Provisions should be made to have the food removed as soon as the signal has
sounded,
10
Page 10

Oven Opcradion
Baking or l;oas|in_
1. Locate oven racks on proper rack positions.
2. Turn THERMOSTAT knob to desired temperature.
3. Turn SELECTOR knob to BAKE setting. When the BAKE INDICATOR LIGHT
cycles off, the oven is preheated to the selected temperature. Place the food in the
oven. The BAKE INDICATOR LIGHT will cycle on and off throughout the baking
process. Preheat only when necessary. Refer to baking and roasting sections as to
when preheating is recommended.
4. After baking, turn both THERMOSTAT and SELECTOR knobs to OFF position.
l_.ck Positions
The rack positions noted are generally recommended for the best browning results and
most efficient cooking times. Refer to charts in the baking and roasting sections for
recommendations for specific foods.
Use Rack Posi|ion # I for:
Roasting large cuts of meat and large poultry, frozen pies, angel food cake.
Use l_ack Position #2 for:
Roasting small cuts of meat, large casseroles, loaves of bread, cakes (in either
tube, bundt or layer pans), most baked goods on cookie sheet or jelly roll pan,
frozen convenience foods.
Use l_ck Position #3 for:
Used for two rack baking.
Use lack Position #4 for:
Most broiling.
Use lack Position #1 and #3 for:
Two racks baking of cookies, layer cakes, biscuits.
11
Page 11

Baking
General IBaking Recomnnendations
• When cooking foods for the first time in your new oven, use recipe cooking
times and temperatures as a guide.
• Use tested recipes from reliable sources.
• Preheat the oven only when necessary. For baked foods that rise and for
richer browning, a preheated oven is better. Casseroles can be started in a
cold oven. Preheating takes from 6 to 8 minutes; place food in oven after
BAKE INDICAT©R LIGHT cycles off.
• Arrange oven racks before turning on oven. Follow suggested rack posi-
tions on pages 11 and 13.
• Allow about 1 to 1'/2 inches of space between the oven side walls and
baking pans to allow proper air circulation.
• When baking foods in more than one pan, place them on opposite corners
of the rack. Stagger pans when baking on two racks so that one pan does
not shield another. (See above photo.)
• To conserve energy, avoid frequent or prolonged door openings. At the
end of cooking, turn oven off before removing food.
• Always test for doneness (fingertip, toothpick, sides pulling away from
pan). Do not rely on time or brownness as only indicators.
• Use good quality baking pans and the size recommended in the recipe.
• Dull, dark, enameled or glass pans will generally produce a brown, crisp
crust. Shiny metal pans produce a light, golden crust.
• Frozen pies in shiny aluminum pans should be baked on a cookie sheet on
rack 1 or be removed to a dull or glass pan.
NOTE: A fan should come on during the BAKE cycle.
12
Page 12

Baking Chart
Bake '
Temp. (°F) Bake
Preheated Time*
350 °
350 ° 25-30
Chocolate - 2 layers 9" 2 or 3 350 ° 30-35
Bundt 35-45
Angel Food 30-40
Pound Cake loaf 2 325 ° 40-50
Snacking Cake 8x8" 2 ' 375° , 30-35
Cupcakes 2 or 3 , 35 15-20
PIES ,
Two Crust
Fruit, fresh 9" 2 400 ° 425° 35-55
Fruit, frozen 400 - 2
One Crust
Custard, fresh 35-40
Custard, frozen 9" 1 375 ° 60-65
Pie Shell 9" 2 ! 425°-450 ° 8-12
COOKIES
Chocolate Chip 2 or 3 350°-375 ° 8-12
Peanut Butter 2 or 3 3500-375 ° 8-12
Sugar 2 or 3 3500-375 ° 8-12
Brownies 8x8" 2 350 ° 30-40
BREADS, YEAST
Loaf loaf 2 375 ° 30-40
Rolls 3 375 °-400 ° 15-20
BREADS, QUICK
Loaf, Nut, Fruit loaf 2 350° 60-75
Gingerbread 9x9" 2 350° 40
Cornbread 8x8" 2 400°-450 ° 15-30
Cornbread Muffins 2 400 ° 10-20
Biscuits 2 400°-425 ° 10-20
Muffins 2 400 ° 15-25
0o
o 4 5o
30-
35
*Thetimes given are based on specific brands of mixes or recipes tested.
Actual times will depend on the ones you bake.
13
Page 13

Roasting
General Roasting Reconnnnendations
• Preheating is not necessary.
• For open pan roasting, place meat or poultry on the slotted portion of the
two-piece pan included with the oven. Do not add water to the pan. Use open
pan roasting for tender cuts of meat. Less tender cuts of meat need to becooked
by moist heat in a covered pan.
• For best results, a meat thermometer is the most accurate guide to degree of
aloneness. The tip of the thermometer should be located in the thickest part of a
roast, not touching fat, bone, or gristle. For turkeys and large poultry products,
insert the tip of the thermometer into the thickest part of the inner thigh.
• Place roast fat side up to allow self basting of meat during roasting.
• Since meats continue to cook after being removed from the oven, remove roast
from oven when it reaches an internal temperature about 5 degrees below the
temperature desired.
• For less loss of juices and easier carving, allow about 15 minutes "standing
time" after removing meat from oven.
• For best results in roasting poultry, thaw completely. Due to the structure of
poultry, partially thawed poultry will cook unevenly.
• Minutes per pound will vary according to the size, shape, quality, and initial
temperature of meat as well as the electrical voltage in your area.
• A large cut of meat will usually require fewer minutes per pound to roast than a
smaller cut of meat.
• Since the breast meat on a large turkey cooks more quickly than the thigh area,
place a "foil cap" over the breast area after desired brownness is reached to
prevent overbrowning.
• Astuffed turkey will require an extra 30-60 minutes depending on size. Dressing
should reach an internal temperature of 165° F.
• Use meat roasting charts in standard cookbooks for recommended times and
temperatures for roasting cuts of meat not listed on page 15.
NOTE: A fan should come on during the BAKE cycle.
14
Page 14

lloastin Clnart (Tlnawcd Meats Only)
Vadety and Weight (not preheated) Roasting Time (minutes per
Cut of Meat (pounds) °F I °F pound)
BEEF
Rib Roast (cutside down) 4to8 t 325° _ 140° (rare) 25-30
Rib Eye Boast 4 to 6 325° 140 ° (rare) i 25-30
Loin Tenderloin Roast 2 to 3 400 ° 140 ° (rare) 20-25
Round Eye Round Roast 4 to 5 325 ° 140 ° (rare) 25-30
Top Sirloin Roast 3 to 6
Round Tip Roast 4 to 6 325 ° 140 ° (rare) 25-30
Shoulder Blade Roast
Loin Blade or Sirloin Roast 3 to 4
Leg (Fresh Ham) 10 to 16
Ham, Half (Fully cooked) 5 to 7 I
Ham, Half (Cook- 5 to 7 I
before-eating)
Arm Picnic Shoulder 5 to 8 325°275° 140°160° I 25-3035"45
LAMB
Shoulder Boast, Boneless 170° (well I 40-45
Leg, Whole 5 to 7 I 325° I 160° (medium) I 30-35
Leg, Shank Half 3 to 4 325 ° , 160° (medium) 30-35
Leg, Sirloin Half 3 to 4 325° I 160 (medium) 35-40
VEAL
Rib Roast 3 to 5 325° 170 ° ,! 40-45
Shoulder, Boneless 4 to 6 325° 170 ° 40-45
Leg, Half, Boneless 3 to 5 325 ° 170° 40-50
Approximate Roasting Time
t ] 160 ° (medium) 30-35
! 160 ° (medium) , 30-35
' 160 ° (medium) 30-35
325 ° 140 c (rare) 25-30
160° (medium) 30-35
i
3'/2 to 5 325 ° 160° (medium) 35-40
160° (medium) 30-35
170° (we) I 35-40
170_ (well) 35-40
170° (well) 40-45
I
I
Approximate
Turkey, unstuffed
POULTRY ' 8to12 I 325° 1 180°-185° 20-22
Turkey, unstuffed 12 to 16 325 ° 180°-185° I 18-20
Turkey, unstuffed 16to 20 325 ° 180°-185 ° , 16-18
Turkey, unstuffed 20 to 24 325 ° 180°-185 ° 14-16
Turkey, Whole, Boneless 4 to 6 350_ 170°-175 ° 35-45
Turkey, Breast 3 to 8 325 ° 180 ° 30-40
Chicken, Fryer 2V2to 3V2 375 ° 185 ° 20-24
Chicken, Boaster 4 to 6 375° 185 ° 20-25
Capon, unstuffed 5 to 8 375° 180°-185 ° 20-25
Cornish Game Hen 1 to 1V2 375 ° 180o-185 ° 45-55
Duck 4 to 6 350° 185° 20-25
15
Page 15

Broiling
The broil element provides flexibility for
broiling foods. If you have aJenn-Air grill,
we recommend you use the grill for most
of your broiling. There are some types
of foods that do require use of the oven
broil element. These include foods such
as stuffed lobsters, meringue pies, or
other foods which require top browning.
To Broil
1. Place oven rack on the rack position
suggested in the chart. Distance from
broiling element depends on foods
being prepared. Rack position #4 is
usually recommended unless
otherwise stated.
2. Turn SELECTOR knob to BROIL
setting.
3. Turn THERMOSTAT knob to BROIL.
4. Place food on pan provided with oven.
After top broil element is red place food
in oven. Preheating takes a few
minutes, or until element glows a bright
cherry red.
5. Leave oven door open at broil stop
position when broiling.
Broiling Tips
• Tender cuts of meat or marinated meats are best for broiling. This includes
rib and loin cuts of steak, ground beef, ham steaks, lamb chops, poultry pieces
or fish. For best results, steaks should be at least 1" thick. Thinner steaks
should be pan-broiled.
• Do not cover broiler grid with foil since this prevents fat drippings from draining
into bottom of pan.
• Before broiling, remove excess fat from meat and score edges of fat (do
not cut into meat) to prevent meat from curling. Salt after cooking.
16
Page 16

• To prevent dry surface on fish or lean meats, brush melted butter on top.
• Foods that require turning should be turned only once during broiling. Turn
meat with tongs to avoid piercing and loss of juices.
• Cooking times given in the chart are to be used only as a guide.
NOTE: A fan should come on during the BROIL cycle. If the fan does not
operate, contact your authorized Jenn-Air Service Contractor for repair.
PORK
Bacon
Chops (W')
Chops (1")
Ham Steak
Sausage Links 4 I 4 (no turning)
Sausage Patties i 4 4 2LAMB
Chops (1") 4 6 ' 5
Medium
Well
POULTRY
Breast Halves 3 8 7
SEAFOOD
Fish Fillets, Buttered (V4") 4 3-4 (no turning)
Salmon Steaks (1") 4 10 (no turning)
MISCELLANEOUS
Hot Dogs 4 2 1
Toast 4 1 1
NOTE: This chart is a suggested guide. The times may vary with food being cooked.
I t .....
17
7 6
Page 17

Oven Cleaning
How the Self-Cleaning Process Works
When the oven controls are set to CLEAN, the oven heats to temperatures that are
higher than those used for cooking. The high temperatures cause food soil to burn off
and substantially disappear. While this occurs, a device in the oven vent helps to
consume normal amounts of smoke. The oven is vented through an opening below the
control panel.
How to Prepare Oven Before Operating
the Self-Cleaning Process
• Remove the roasting pan and any other
pans from the oven. These pans cannot
withstand the high temperatures of the
cleaning process.
• Clean spatters and spills from those areas
which will not be cleaned during the self-
cleaning process:
--center front of oven and door near open-
ing in door gasket.
--porcelain oven door liner (area outside
the door gasket).
--porcelain oven front frame.
NOTE: DO NOT CLEAN the serial plate located on the oven front.
To clean these areas, use hot water and detergent, nonabrasive cleansers or
soap filled steel wool pads. Rinse thoroughly, being careful not to use an
excessive amount of water that would dampen the door gasket. Soilleft in these
areas will be more difficult to remove after the self-cleaning process since the
high heat will bake on any soil that is present. DO NOT USE COMMERCIAL
OVEN CLEANERS TO CLEAN THESE AREAS.
• DO NOT ATTEMPT TO CLEAN, RUB, OR APPLY WATER TO GASKET. The
gasket is essential for a good door seal. Rubbing or cleaning will damage the
gasket and may affect the seal.
• Wipe up excess grease and food spillovers which have not baked on the bottom
of the oven. Large accumulations of soil can cause heavy smoke or fire in the
oven during the cleaning process.
• Although smoke or fire in the oven isa normal occurrence and there is no safety
problem, there will be venting of excessive smoke and odor.
18
Page 18

• The oven racks can be cleaned in the oven. However, the oven racks will
discolor, lose shininess, and become difficult to slide in and out if left inthe oven
during the cleaning process. REMOVE RACKS FROM OVEN IF THIS DIS-
COLORATION WILL BE OBJECTIONABLE. As a suggestion, do not leave the
racks in the oven during each self-cleaning process if they do not need to be
cleaned since they will discolor to adull silver after many cleanings. Moderately
soiled racks can be cleaned with asoapy S.O.S. pad or Scotch-Brite scour-pad.
Stubborn stains need to be removed in the self-cleaning process. Be sure to
read special tips on page 21 if oven racks are cleaned during the self-cleaning
process.
Steps to Follow for Self-Cleaning Process
1. Turn SELECTOR knob to CLEAN.
2. Turn THERMOSTAT knob fully clockwise to
CLEAN until it comes to a full stop.
3. Close oven door.
4. Move DOOR LOCK LEVER to the full right position.
5. Set clock controls to clean oven using one of the following procedures:
To sel oven to slarl cleaning inaiuedl;alely:
An automatic program of 3 hours is pre-set for an average soiled oven. For a heavily
soiled oven, program can be extended up to 4 hours.
For an average soiled oven: Push SELF-CLEAN button.
For a heavily soiled oven: Push SELF-CLEAN button. Turn SET dial to 4:00.
NOTE: To prevent accidentally changing the cleaning cycle, push TIMER button to
return to time of day.
19
Page 19

To set oven to start cleaning at at later time:
An automatic program of 3 hours is pre-set for an average soiled oven. For a heavily
soiled oven, program can be extended up to 4 hours.
a. For an average soiled oven: Push SELF-CLEAN button.
For a heavily soiled oven: Push SELF-CLEAN button. Turn SET dial to 4:00.
b. Push STOP TIME button. Turn SET dial to time of day desired for clean cycle to
end. The start time will be calculated.
NOTE: To prevent accidentally changing the cleaning cycle, p.ush TIMER button to
return to time of day.
6. The cleaning process begins immediately unless the self-cleaning process has been
set for a delayed start When the oven temperature reaches 550 °F, the LOCK
INDICATOR LIGHT will glow and the door cannot be opened until the temperature
drops below 550° F. DO NOT TRY TO UNLOCK THE DOOR WHILE LOCK INDI-
CATOR LIGHT IS ON. The normal cleaning process takes the time selected on the
clock plus about 45 minutes for the oven to cool down before the LOCK INDICA-
TOR LIGHT goes out and the door can be opened.
7. After the LOCK INDICATOR LIGHT goes out, move the DOOR LOCK LEVER to the
left. The oven door can now be opened.
8. Turn the SELECTOR AND THERMOSTAT knobs from CLEAN to OFF after the
door is unlocked.
To stolD cleaning process before lock indicator light comes on:
1. Move the DOOR LOCK LEVER to the left.
2. Turn SELECTOR and THERMOSTAT knobs from CLEAN to OFF.
3. Push SELF-CLEAN button.
To stop cleaning process after lock indicator light comes on:
1. Push SELF-CLEAN button.
2. Leave the THERMOSTAT and SELECTOR knobs in the CLEAN position.
3. Allow oven to cool until the LOCK INDICATOR LIGHT goes out. This may take up to
45 minutes, depending on how long the oven has been on.
4. After LOCK INDICATOR LIGHT goes off, move the DOOR LOCK LEVER to the left.
5. Turn SELECTOR and THERMOSTAT knobs from CLEAN to OFF.
2O
Page 20

More Information on the
SelfoCleaning Process
• A slight odor may be detected, and if an oven is heavily soiled, some smoke may
be visible. Some smoke and odor during the cleaning process is a normal
occurrence. Since the oven is vented in front, vapors, moisture, etc. may be
seen coming from this area.
• During the cleaning process, do not be alarmed if an occasional flame is visible
through the oven window. This is caused by excessive food soil that was not
removed before the oven was set to clean.
• SINCE THE DOOR AND WINDOW OF THE OVEN WILL GET WARM DURING
THE SELF-CLEANING PROCESS, AVOID CONTACT.
• Some types of soil may disintegrate but leave a light film or heavier deposit of
ash. The amount of ash depends on the amount of soil which was in the oven.
After oven has cooled, this ash may be removed with a damp sponge. If other
dark deposits remain after wiping with a sponge, the time set for the length of
cleaning was not enough. Increase the cleaning time for future cleanings or
clean more frequently. The normal cleaning time is 3 hours. A maximum of 4
hours may be selected if necessary.
• If racks have been left in oven during the cleaning process, they should be
treated as follows. After the cleaning process is completed and the oven has
cooled, buff the underside of rack edges with Scotch-Brite scour-pad or rub
lightly the underside of rack edges with a coating of vegetable oil. Use a light
application of oil so it does not soil the oven. As a suggestion, use fingertips to
apply oil. This will make the cleaned racks slide more easily.
• To remove occasional spillovers between cleanings, use a soap-filled scouring
pad or mild cleanser; rinse well.
• It is better to clean the oven regularly rather than wait until there is a heavy build-
up of soil in the oven.
• During the cleaning process, the kitchen should be well ventilated to help
eliminate normal odors associated with cleaning.
• Any attempt to force the self-clean DOOR LOCK LEVER to lock or unlock
may result in damage to the door locking mechanism.
• DO NOT USE COMMERCIAL OVEN CLEANERS IN OR AROUND THE SELF-
CLEANING OVEN AREA.
• DO NOT USE ALUMINUM FOIL OR OTHER LINERS IN THE OVEN.
21
Page 21

Other Hints on
Caring for Your Oven
Cleaning Otlner Surfaces of Your Oven
Door and control panel drinn: The metal trim around the door and the control
panel can be cleaned with any nonabrasive cleanser such as Bon-Ami or soapy water;
rinse well. Be careful not to use an excessive amount of water.
Glass on fine coudrol i):uncl front ;und oven door front: To clean,use any
suitableglasscleanerorsoapy water.To preventmoisturefrom gettingbehindtheglass
controlpanel,spraya clothwithglasscleanerthenwipe thepanel.
Control I_nobs:
The knobs on the control panel can be removed with the controls in the OFF position.
Pull each knob straight from the shaft. Clean knobs with a hot sudsy cloth then dry. To
replace each knob, match flat part of knob opening, returning in OFF position.
Ovefn Light IBulb
Before replacing bulb, disconnect power to oven at the main fuse or circuit breaker
panel. Be sure that the entire oven cavity including the light bulb is cool before
attempting to remove.
1'o f't_ll,lacc light I.ull.:
1. Carefully remove the glass light lens, lens retainer,
and heat resistant gasket by removing the four
screws in the light lens retainer using a phillips
screwdriver. Note: The light lens is separate from
the light lens retainer. The three pieces will drop
down into your hands at the same time.
2. To obtain firm grasp on bulb, wear protective
rubber gloves. Remove by turning bulb to the left.
Do not touch a hot oven light bulb with a damp
cloth as bulb will break. Note: If the bulb does
break and you wish to remove it, be certain power
supply is disconnected and wear protective gloves.
You may contact your authorized Jenn-Air Service
Contractor for service.
3. Replace bulb with a 40 watt oven-rated appliance
bulb. Bulb with brass base is recommended to
prevent fusing of bulb into socket.
4. Place light lens inside of light lens retainer. Hold-
ing the light lens, lens retainer, and heat resistant
gasket in place, insert the fourscrews into the light
lens retainer and tighten.
22
Page 22

()vcnn l_leks
Ovcnn llaek_: To remove, pull forward to the "stop" position; lift up on the front of the
rack and pull out.
Oven annd Ilroiler Doors
The oven and broiler doors are removable for
easier cleaning. To remove, open door to auto-
matic stop position (about 4"). Grasp with both
hands at sides of the door. Lift up evenly, at the
same angle, until the door clears the hinges.
To replace door: Hold door in the same posi-
tion and insert hinge openings on the door lin-
ing onto the hinge arms. Hinge arms are spring
mounted and will slam shut against the oven if
accidentally hit with the door. Neverplace your
hand between the hinges and the oven front
frame with door removed.
23
Page 23

Before You Callfor Service
Check the following list to be sure aservice call is really necessary. A quick reference
of this manual, as well as reviewing additional information on items to check, may
prevent an unneeded se, _ice call.
If nothing on the oven oi)Cl'_l/t_s:
• check for a blown circuit fuse or a tripped main circuit breaker.
• check if oven is properly connected to electric circuit in house.
if clock and/or lights operate but oven does nod heal:
• the SELECTOR and/or THERMOSTAT knobs may be set incorrectly.
• clock controls may be set for delayed start of oven.
If oven light does nod work:
• the light bulb is loose or defective.
• oven light does not work during self-cleaning process.
If oven will nod go through self-cleaning process:
• controls may be improperly set.
• door may not be locked.
if oven did nod clean iDropcrly:
• oven may need longer cleaning time.
• excessive s_)ills were not removed prior to self-cleaning process.
• one or several controls may have been turned from CLEAN to another position
after self-cleaning process started.
lb"oven door will nod unlock:
• oven may not have cooled to safe temperature after self-cleaning process.
if foods do not broil iH-op_rly:
• the SELECTOR and/or THERMOSTAT knobs may not be set properly.
• check rack position.
• voltage into house may be low.
If b-'lked food is burned or too brown on lop:
• the SELECTOR knob may be in the BROIL position.
• food may be positioned incorrectly in oven.
• oven not preheated properly.
24
Page 24

If foods bake unevenly:
• the oven may be installed improperly.
• check the oven rack with a level.
• stagger pans; do not allow pans to touch each other or oven wall.
• check instructions for suggested placement of pans on oven rack.
If cooking results are less than expected:
• the pans being used may not be of the size or material recommended for
best results.
• there may not be sufficient room around sides of the pans for proper air circula-
tion in the oven.
• check instructions for preheating, rack position and oven temperature.
If baking results differ from previous oven:
• oven thermostat calibration may differ between old and new ovens. Follow
recipe and use and care directions before calling for service since the calibration
on the previous oven may have drifted to a too high or too low setting.
If You Need Service
• call the authorized Jenn-Air Service Contractor listed in the Yellow Pages
or the dealer from whom your appliance was purchased.
• your Jenn-Air Service Contractor can provide better and faster service if
you can accurately describe problems and give model and serial number
of the appliance. Be sure to retain proof of purchase to verify warranty
status. Refer to WARRANTY for further information of owner's
responsibilities for warranty service.
NOTE: Complete service and parts literature are available from any auth-
AI1specifications subject to change by manufacturer without notice.
orized Jenn-Air Parts Distributor.
25
 Loading...