

Jenn-Air W11325607A, 400011325607A Use & Care Manual

JENNAIR® BUILT-IN COFFEE SYSTEM
MACHINE À ESPRESSO ENCASTRÉE JENNAIR
®
For questions about features, operation/performance, parts, accessories, or service in the U.S.A., call:
1-800-JENNAIR (1-800-536-6247) or visit our website at www.jennair.com.
In Canada, call: 1-800-JENNAIR (1-800-536-6247) or visit our website at www.jennair.ca.
Guide d’utilisation et d’entretien
Pour des questions à propos des caractéristiques, du fonctionnement/rendement, des pièces, accessoires ou dépannage,
composerle:1-800-JENNAIR (1-800-536-6247) ou visitez notre site Web au www.jennair.com.
Au Canada, composer le 1800JENNAIR (1800536-6247) ou visiter notre site Web au www.jennair.ca.
W11325607A
04-Mar-2019 07:49:57 EST | RELEASED
Use & Care Guide
In some European factories the letter "W" of the part code mentioned herein will be automatically
replaced by the number "4000" (e.g. "W12345678" becomes "400012345678")

TABLE OF CONTENTS
COFFEE SYSTEM SAFETY ..........................................................3
PARTS AND FEATURES
BEFORE USING THE COFFEE SYSTEM
COFFEE SYSTEM USE
Settings
Selecting Coffee Strength
Making Coffee or Espresso Using Coffee Beans
Selecting the Coffee Size
Adjusting the Coffee Mill
Making Coffee using Pre-Ground Coffee
Making Milk-Based Hot Drinks
Delivering Hot Water
Steam Delivery
COFFEE SYSTEM CARE
General Cleaning
TROUBLESHOOTING
ASSISTANCE OR SERVICE
In the U.S.A.
In Canada
WARRANTY
........................................................................................7
...........................................................................14
...............................................................................22
...................................................................................22
..................................................................................23
................................................................4
......................................6
..................................................................7
..........................................................10
......................10
...........................................................11
............................................................11
..................................12
..................................................12
..................................................................14
.............................................................14
........................................................................14
..................................................................17
.........................................................22
2
04-Mar-2019 07:49:57 EST | RELEASED
In some European factories the letter "W" of the part code mentioned herein will be automatically
replaced by the number "4000" (e.g. "W12345678" becomes "400012345678")
COFFEE SYSTEM SAFETY
Your safety and the safety of others are very important.
We have provided many important safety messages in this manual and on your appliance. Always read and obey all safety
messages.
This is the safety alert symbol.
This symbol alerts you to potential hazards that can kill or hurt you and others.
All safety messages will follow the safety alert symbol and either the word “DANGER” or “WARNING.”
These words mean:
You can be killed or seriously injured if you don't immediately
DANGER
WARNING
All safety messages will tell you what the potential hazard is, tell you how to reduce the chance of injury, and tell you what can
happen if the instructions are not followed.
IMPORTANT SAFETY INSTRUCTIONS
To reduce the risk of fire, electric shock, or injury to persons when using the appliance, follow basic precautions,
WARNING:
including the following:
Read all instructions before using the appliance.
■
Do not touch hot surfaces. Use handles or knobs.
■
■ To protect against fire, electric shock and personal injury
do not immerse cord, plugs, or appliance in water or other
liquids.
The appliance is not intended for use by young children or
■
infirm persons without supervision.
Unplug from outlet when not in use and before cleaning.
■
Allow to cool before putting on or taking off parts, and
before cleaning.
■ Do not operate any appliance with a damaged cord or
plug, or after appliance malfunctions or has been
damaged in any manner. Return the appliance to the
nearest authorized service center for examination, repair or
adjustment.
follow instructions.
You
can be killed or seriously injured if you don't
instructions.
The use of accessory attachments not recommended by
■
the appliance manufacturer may result in fire, electric
shock, or personal injury.
■ Do not use outdoors.
■ Do not let cord hang over edge of table or counter, or
touch hot surfaces.
■ Do not place on or near a hot gas or electric burner, or in a
heated oven.
■ Always switch the appliance off, then plug cord into the
wall outlet. To disconnect, turn the appliance off, then
remove plug from wall outlet.
■ Do not use appliance for other than intended use.
■ Use extreme caution when using hot steam.
■ Check hopper for presence of foreign objects before using.
follow
SAVE THESE INSTRUCTIONS
04-Mar-2019 07:49:57 EST | RELEASED
In some European factories the letter "W" of the part code mentioned herein will be automatically
replaced by the number "4000" (e.g. "W12345678" becomes "400012345678")
3
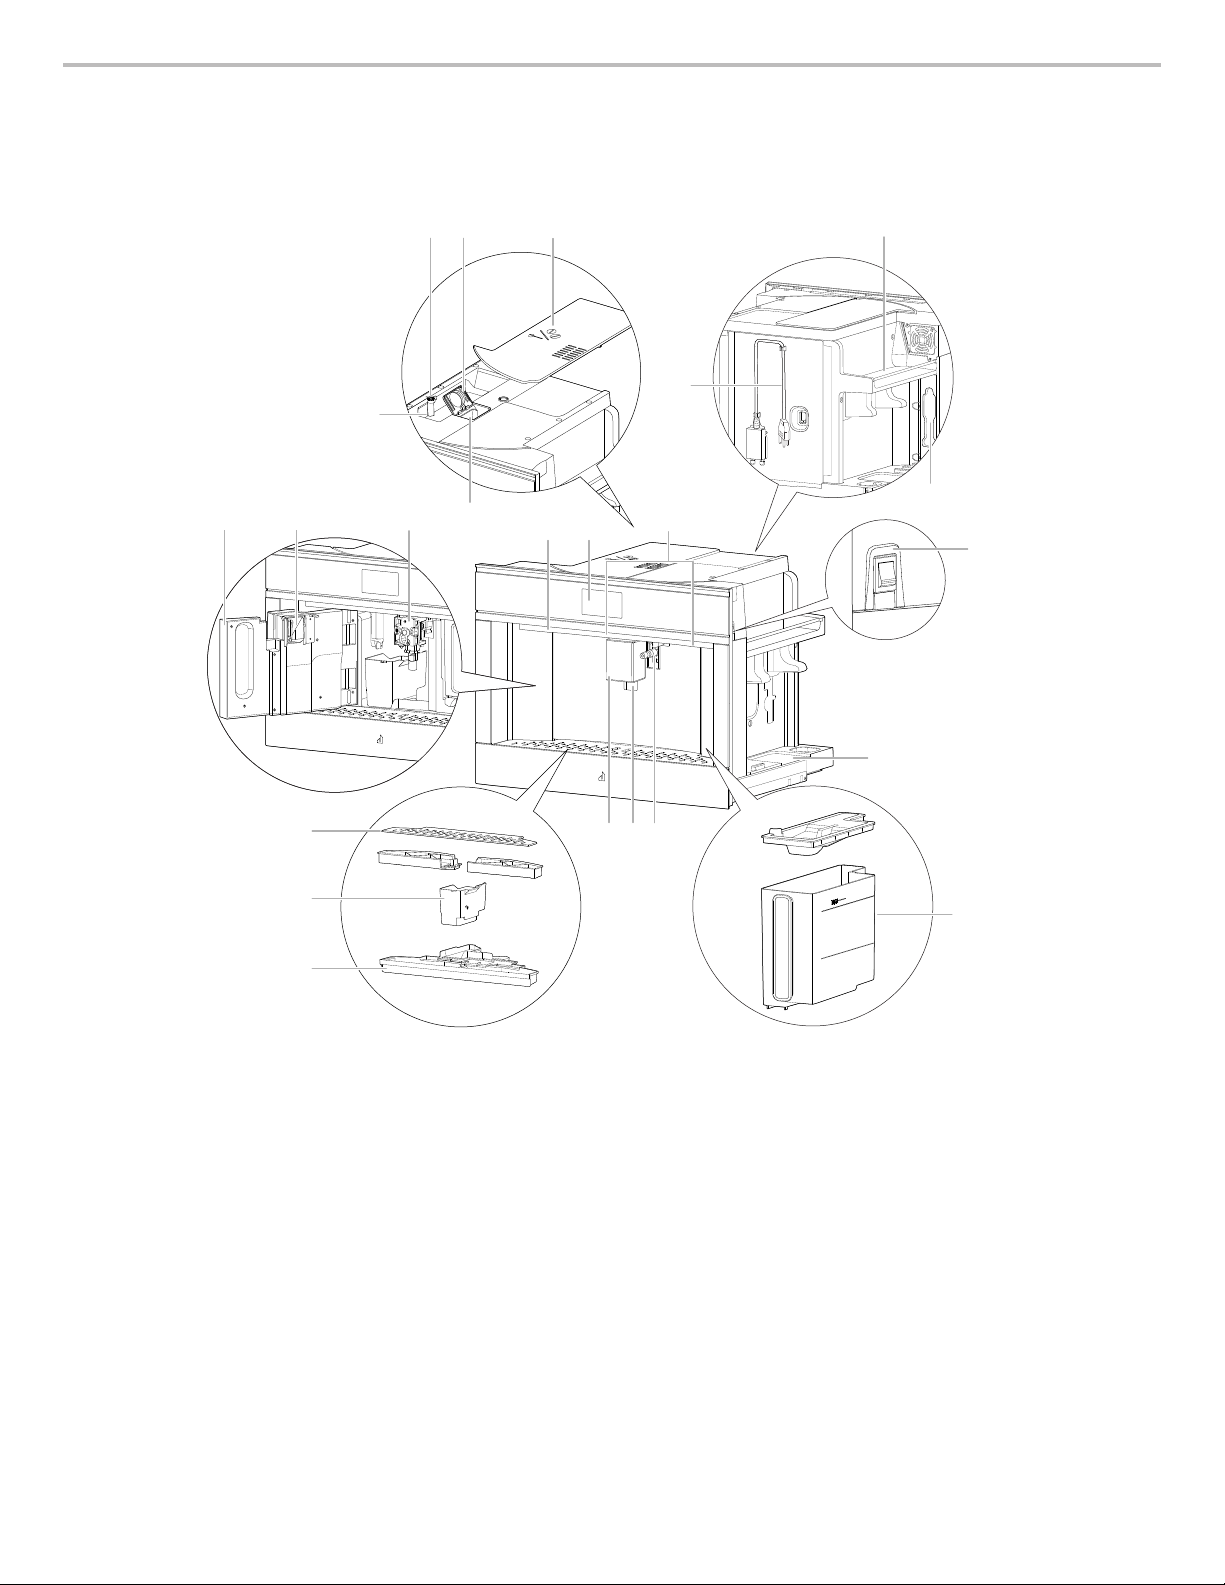
PARTS AND FEATURES
PUSH
This manual covers several models. The coffee system you have purchased may have some or all of the items listed. The locations and
appearances of the features shown here may not match those of your model.
Coffee System:
AC B
T
D
S
FGH
E
I
J
K
A. Beans container lid
B. Pre-ground door
C. Grinding adjustment dial
D. Beans container
E. Ground coffee funnel
F. Infuser
G. Coffee guide
H. Service door
I. Cup holder tray
J. Coffee grounds container
K. Drip tray
L. Coffee spouts (adjustable height)
VW
L M N
R
U
Q
P
O
M. Lights to illuminate cup
N. Hot water/steam connection nozzle
O. Water tank
P. Storage tray
Q. Main ON/OFF switch
R. Measure holder
S. Cup warming ledge
T. Power cord
U. Lighting to illuminate interior
compartment
V. Control panel
W. On/standby button
4
04-Mar-2019 07:49:57 EST | RELEASED
In some European factories the letter "W" of the part code mentioned herein will be automatically
replaced by the number "4000" (e.g. "W12345678" becomes "400012345678")
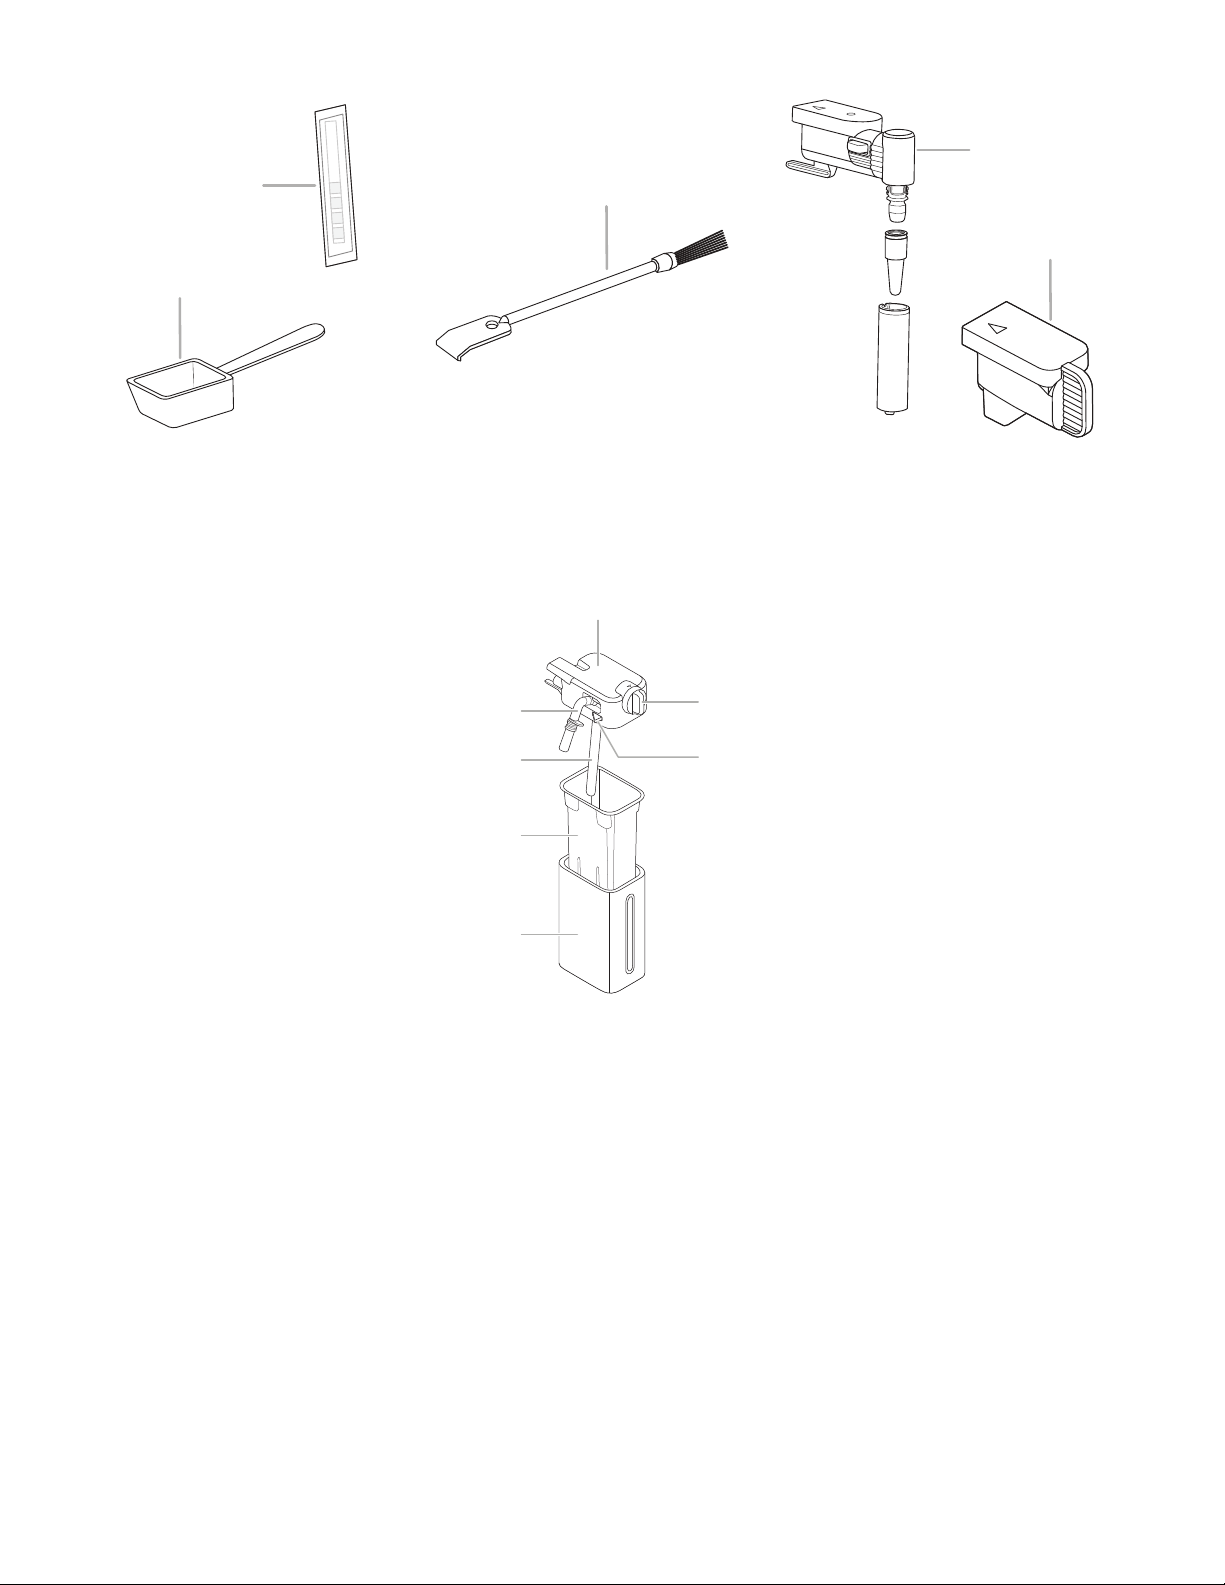
Accessories:
D
A
B
A. "Total Hardness Test" indicator paper
B. Ground coffee measure
C. Cleaning brush
Milk and Accessories Container:
C
E
D. Hot water/steam spout
E. Connection nozzle cover
G
F
E
A
B
D
C
A. Froth adjustment and CLEAN
function dial
B. Lid release buttons
C. Thermal casing
D. Milk container
E. Milk intake tube
F. Adjustable frothed milk spout
G. Lid with milk frother
*Water lter not available on this model.
04-Mar-2019 07:49:57 EST | RELEASED
In some European factories the letter "W" of the part code mentioned herein will be automatically
replaced by the number "4000" (e.g. "W12345678" becomes "400012345678")
5
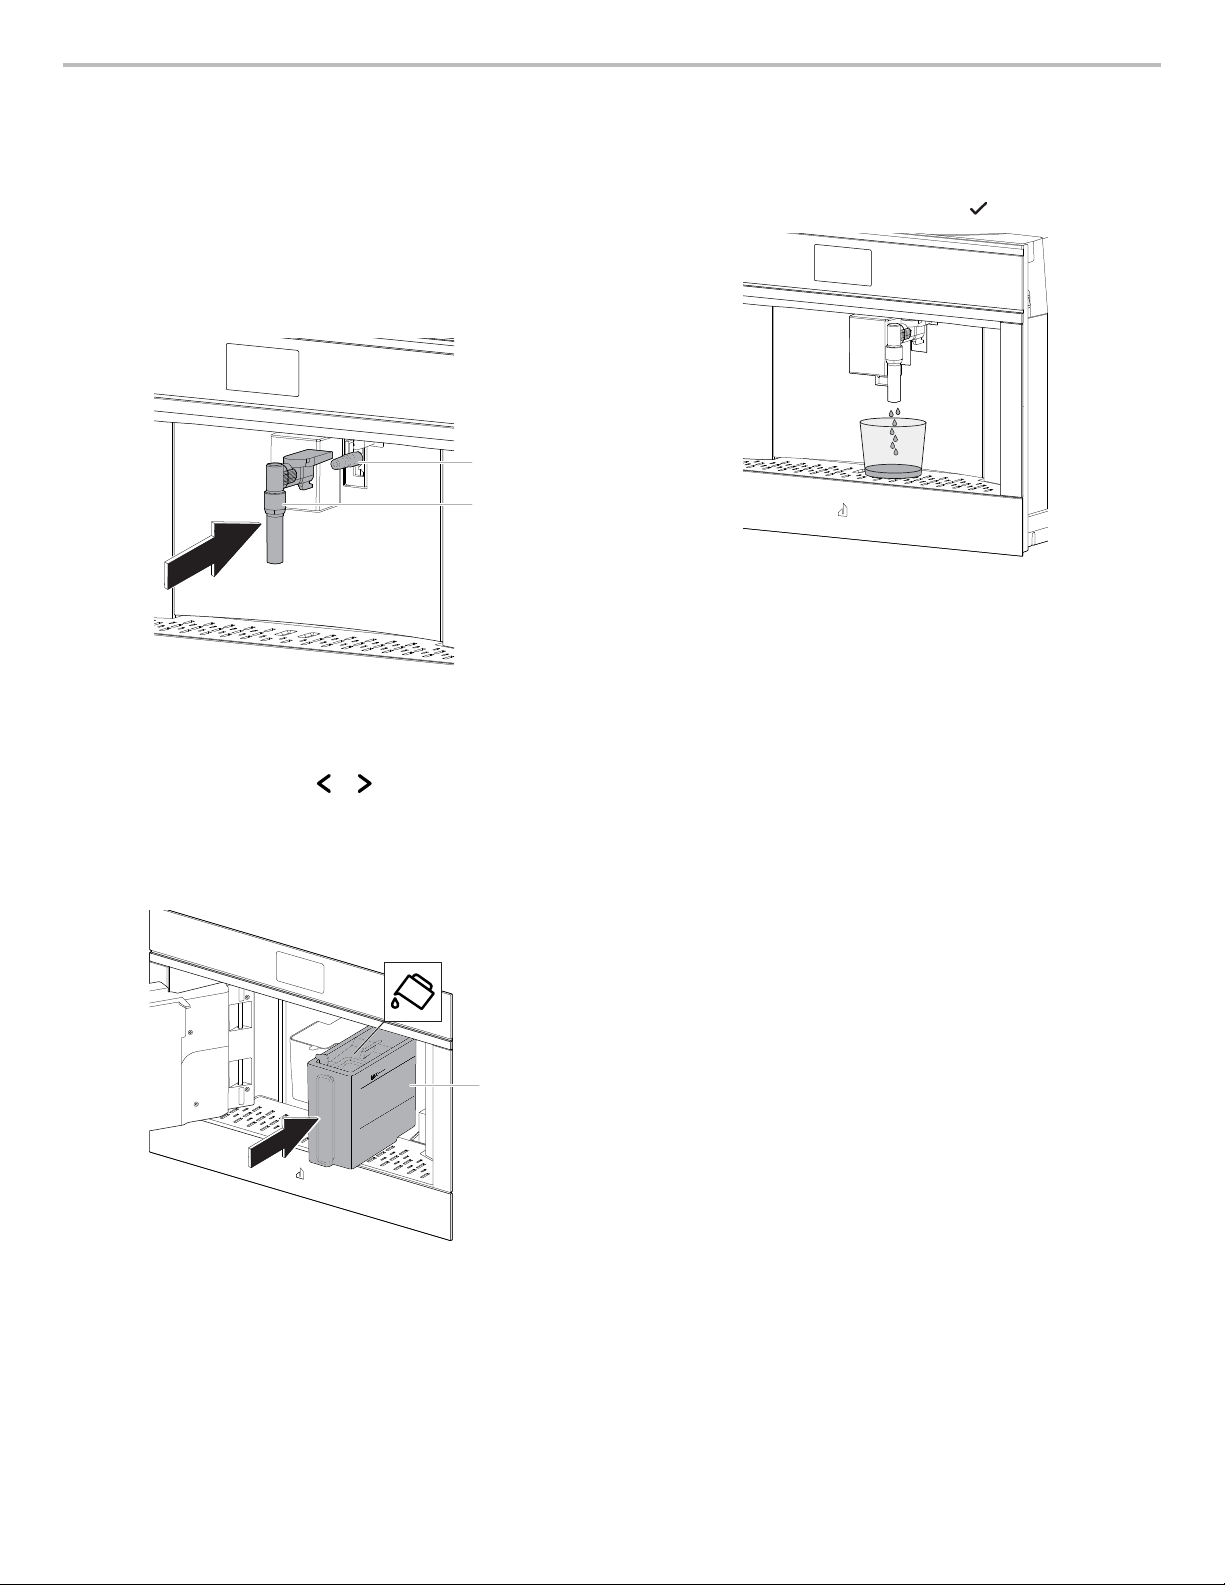
BEFORE USING THE COFFEE SYSTEM
OK
NOTE: This product is intended for household use only.
Coffee has been used to factory test the machine. It is completely
normal for there to be traces of coffee in the mill.
Customize water hardness as soon as possible. See “Water
Hardness” in the “Settings” section.
IMPORTANT: Complete the following steps before the coffee
system is used for the rst time.
1. INSERT WATER OUTLET: Check that the hot water/steam
spout is inserted on the connection nozzle.
A
B
A. Hot water and steam nozzle
B. Hot water spout
2. Turn on the coffee system.
3. To select a language, press or until the ag
corresponding to the required language appears on the
display, then press the ag.
4. FILL WATER TANK WITH FRESH WATER: Remove the water
tank, open the lid and ll to the MAX line with fresh water.
Replace water tank.
5. Place a container with a minimum capacity of 1/2 cup (100 mL)
underneath.
WATER CIRCUIT EMPTY PRESS OK TO START FILLING
PROCESS will show on display. Press
6. The coffee system will deliver fresh water from the spout then
turns off automatically. The coffee system is now ready for
normal use.
NOTES:
■ When rst using the coffee system, you need to make
4-5 cappuccinos before the coffee system gives good results.
■ Before turning the coffee system on, make sure the main
switch is turned on. Each time the coffee system is turned on,
it performs an automatic preheat and rinse cycle which cannot
be interrupted. The coffee system is ready for use only after
the cycle is complete.
to conrm.
A. Water tank
6
04-Mar-2019 07:49:57 EST | RELEASED
A
In some European factories the letter "W" of the part code mentioned herein will be automatically
replaced by the number "4000" (e.g. "W12345678" becomes "400012345678")
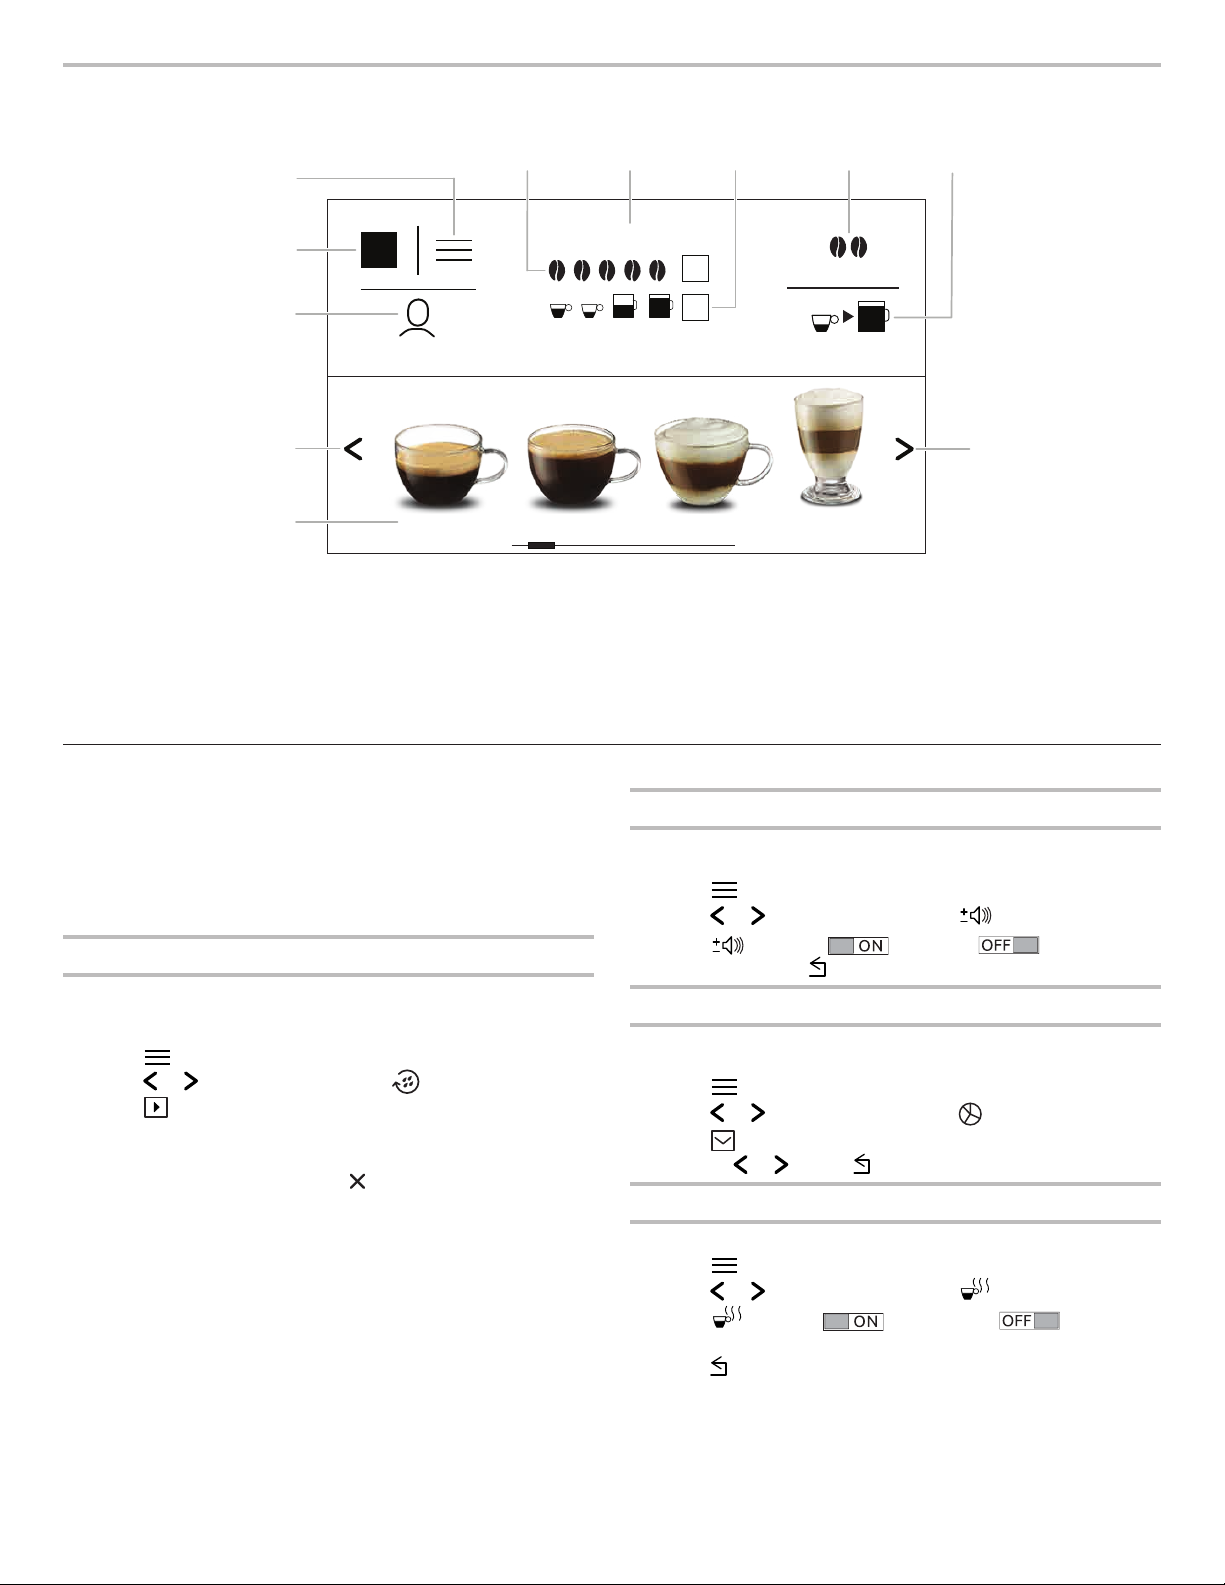
COFFEE SYSTEM USE
STOP
ESC
ESC
ESC
C
D
E
F
G
B
A
MY
K
User 2 Size
J
I
A. Menu to customize beverages settings
B. Appliance settings menu
C. Selected strength
D. Clock
E. Selected size
F. Strength selection
Espresso Coee
Settings
You can control several settings through the Settings Menu:
Rinsing, Beep, Statistics, Cup Warmer, Water Hardness, Auto-Off,
Coffee Temperature, Descaling, Auto-Start, Set Language, Set
Time, Cup Lighting, Drink Settings, Energy Saving, Background,
Demo Mode and Default Values.
To access the Settings Menu, press MENU. To exit the Settings
Menu, press ESC.
Rinsing
Use this function to rinse the coffee spouts and preheat the
brewing unit. Place a container with a minimum capacity of
1/2 cup (100 mL) under the coffee and hot water spouts.
1. Press to enter the menu.
2. Press or until the display shows RINSING.
3. Press to start rinsing.
4. After a few seconds, hot water will come out of the coffee
spout and RINSING HOT WATER RUNNING will be displayed.
5. To stop the rinsing cycle, press
stop automatically.
IMPORTANT: Do not leave the coffee system unattended while
hot water is being delivered.
NOTES:
■ If the coffee system is not used for more than 3-4 days, we
strongly recommend doing 2-3 rinse cycles before use.
■ After rinsing, it is normal for some water to remain in the
grounds container.
or wait for rinsing to
00:00
MY
MY
Cappuccino Latte
G. Size selection
H. Right scroll arrow
I. Selectable drinks (press on the scrolling
arrows to see all the drinks)
J. Left scroll arrow
K. Customizable proles (see “Memorizing
Your Personal Prole”)
Beep
This function will enable or disable tones that sound when an icon
is pressed or an accessory is inserted/removed.
1. Press to enter the menu.
2. Press or until the display shows BEEP.
3. Press to enable or disable the sound
notication. Press
Statistics
This function displays statistical data relating to the coffee
system.
1. Press to enter the menu.
2. Press or until the display shows STATISTICS.
3. Press . It is possible to check all the available statistics by
pressing
Cup Warmer
Use to warm cups before making coffee.
1. Press to enter the menu.
2. Press or until the display shows CUP WARMER.
3. Press to active or deactivate the cup
warmer.
4. Press
or . Press
Strength
H
macchiato
to return to the home page.
to return to the home page.
to return to the home page.
04-Mar-2019 07:49:57 EST | RELEASED
In some European factories the letter "W" of the part code mentioned herein will be automatically
replaced by the number "4000" (e.g. "W12345678" becomes "400012345678")
7
 Loading...