

Jenn-Air W10419852A, JBS7524BS Use & Care Manual
JENN-AII_SEAMANDCONVECTIONBUILT-INOVEN
F
OUR A VAPEUR _.A.CONVECTION
ENCASTREJENN-AIR_
For questions about features, operation/performance, parts, accessories, or service inthe U.S.A., call:
1-800-JENNAIR (1-800-536-6247) or visit our website at www.jennair.com.
In Canada, call: 1-800-807-6777, or visit our website at www.jennair.ca.
Au Canada, pour assistance, installation ou service, composez le 1-800-807-6777 ou visitez notre site web & www.jennair.ca.
Table of Contents/Table des matieres ................... 2
Model/ModUle JBS7524BS
JENN-AIR°
W10419852A
Use& CareGuide
Guided'utilisationetd'entretien
TABLEOF CONTENTS TABLEDESMATIERES
OVEN SAFETY ................................................................................ 2
PARTS AND FEATURES ................................................................ 4
BEFORE USING THE OVEN .......................................................... 5
ELECTRONIC OVEN CONTROL ................................................... 5
Control Panel ................................................................................ 5
On/Off/Pause ............................................................................... 5
Settings ........................................................................................ 5
Control Lock ................................................................................. 6
Most Used Functions ................................................................... 6
Changing Cooking Function Settings .......................................... 7
OVEN USE ....................................................................................... 7
Aluminum Foil............................................................................... 7
Positioning Wire Shelf, Trays and Bakeware ............................... 7
Water Container ........................................................................... 7
Temperature Probe ...................................................................... 8
Oven Vent ..................................................................................... 8
Preset Foods ................................................................................ 9
Manual - Steam .......................................................................... 10
Manual - Convection Bake ........................................................ 11
Manual - Convection Bake + Steam .......................................... 12
Steam Defrost ............................................................................ 13
Steam Reheat ............................................................................. 14
Sous Vide Reheating .................................................................. 14
Special Functions ....................................................................... 17
OVEN CARE .................................................................................. 18
Maintenance Functions .............................................................. 18
General Cleaning ........................................................................ 19
Shelf Supports ............................................................................ 20
Oven Light .................................................................................. 20
TROUBLESHOOTING .................................................................. 21
ASSISTANCE OR SERVICE ......................................................... 22
In the U.S.A................................................................................ 22
Accessories ................................................................................ 22
In Canada ................................................................................... 22
WAR RANTY .................................................................................. 23
SleCURITle DU FOUR ................................................................... 25
PIECES ET CARACTleRISTIQUES .............................................. 26
AVANT D'UTILISER LE FOUR ..................................................... 27
COMMANDE I_LECTRONIQUE DU FOUR ................................. 27
Tableau de commande .............................................................. 27
On/Off/Pause (marche/arr6t/pause) ........................................... 27
Reglages ..................................................................................... 27
Verrouillage des commandes ..................................................... 28
Fonctions les plus utilisees ........................................................ 29
Modification des reglages de fonctions de cuisson .................. 29
UTILISATION DU FOUR ............................................................... 29
Papier d'aluminium ..................................................................... 29
Positionnement des grilles metalliques, plaques de
cuisson et ustensiles de cuisson au four ................................... 29
Recipient & eau........................................................................... 30
Sonde thermometrique .............................................................. 30
#vent du four .............................................................................. 31
Aliments prer6gl6s ...................................................................... 31
Manuel - Vapeur ......................................................................... 32
Manuel - Cuisson aufour par convection .................................. 33
Manuel - Cuisson au four par convection + vapeur .................. 34
D6congelation & la vapeur .......................................................... 35
Rechauffage & la vapeur ............................................................ 36
Rechauffage sous vide ............................................................... 37
Fonctions speciales .................................................................... 39
ENTRETIEN DU FOUR ................................................................. 40
Fonctions d'entretien ................................................................. 40
Nettoyage gen6ral ...................................................................... 42
Supports de grille ....................................................................... 43
Lampe du four ............................................................................ 43
DI_PANNAGE ................................................................................. 44
ASSISTANCE OU SERVICE ......................................................... 45
Aux €:tats-Unis ............................................................................ 45
Accessoires ................................................................................ 45
Au Canada .................................................................................. 45
GARANTIE ..................................................................................... 46
Your safety and the safety of others are very important.
We have provided many important safety messages in this manual and on your appliance. Always read and obey all safety
messages.
This is the safety alert symbol.
This symbol alerts you to potential hazards that can kill or hurt you and others.
All safety messages will follow the safety alert symbol and either the word "DANGER" or "WARNING."
These words mean:
All safety messages will tell you what the potential hazard is, tell you how to reduce the chance of injury, and tell you what can
happen if the instructions are not followed.
2
OVEN SAFETY
You can be killed or seriously injured if you don't immediately
follow instructions.
You can be killed or seriously injured if you don't follow
instructions.
iMPORTANT SAFETY iNSTRUCTiONS
WARNING: To reduce the risk of fire, electrical shock,
injury to persons, or damage when using the oven, follow
basic precautions, including the following:
m Proper Installation - Be sure the oven is properly installed
and grounded by a qualified technician.
m Never Use the Oven for Warming or Heating the Room.
m Do Not Leave Children Alone - Children should not be left
alone or unattended in area where oven is in use. They
should never be allowed to sit or stand on any part of the
oven.
m Wear Proper Apparel - Loose-fitting or hanging garments
should never be worn while using the oven.
m User Servicing - Do not repair or replace any part of the
oven unless specifically recommended in the manual. All
other servicing should be referred to a qualified technician.
m Storage in Oven - Flammable materials should not be
stored in an oven.
m Do Not Use Water on Grease Fires - Smother fire or flame
or use dry chemical or foam-type extinguisher.
m Use Only Dry Potholders - Moist or damp potholders on
hot surfaces may result in burns from steam. Do not let
potholder touch hot heating elements. Do not use a towel
or other bulky cloth.
m Use Care When Opening Door - Let hot air or steam
escape before removing or replacing food.
m Do Not Heat Unopened Food Containers - Build-up of
pressure may cause container to burst and result in injury.
m Keep Oven Vent Ducts Unobstructed.
m Placement of Oven Racks - Always place oven racks in
desired location while oven is cool. If rack must be moved
while oven is hot, do not let potholder contact hot heating
element in oven.
m DO NOT TOUCH HEATING ELEMENTS OR INTERIOR
SURFACES OF OVEN - Heating elements may be hot
even though they are dark in color. Interior surfaces of an
oven become hot enough to cause burns. During and after
use, do not touch, or let clothing or other flammable
materials contact heating elements or interior surfaces of
oven until they have had sufficient time to cool. Other
surfaces of the oven may become hot enough to cause
burns - among these surfaces are oven vent openings and
surfaces near these openings, oven doors, and windows of
oven doors.
For self-cleaning ovens:
m Do Not Clean Gasket - The gasket is essential for a good
seal. Care should be taken not to rub, damage, or move
the gasket.
m Do Not Use Oven Cleaners - No commercial oven cleaner
or oven liner protective coating of any kind should be used
in or around any part of the oven.
m Clean Only Parts Listed in Manual.
m Before Self-Cleaning the Oven - Remove broiler pan and
other utensils.
SAVE THESE
State of California Proposition 65 Warnings:
WARNING: This product contains one or more chemicals known to the State of California to cause cancer.
WARNING: This product contains one or more chemicals known to the State of California to cause birth defects or other
reproductive harm.
iNSTRUCTiONS
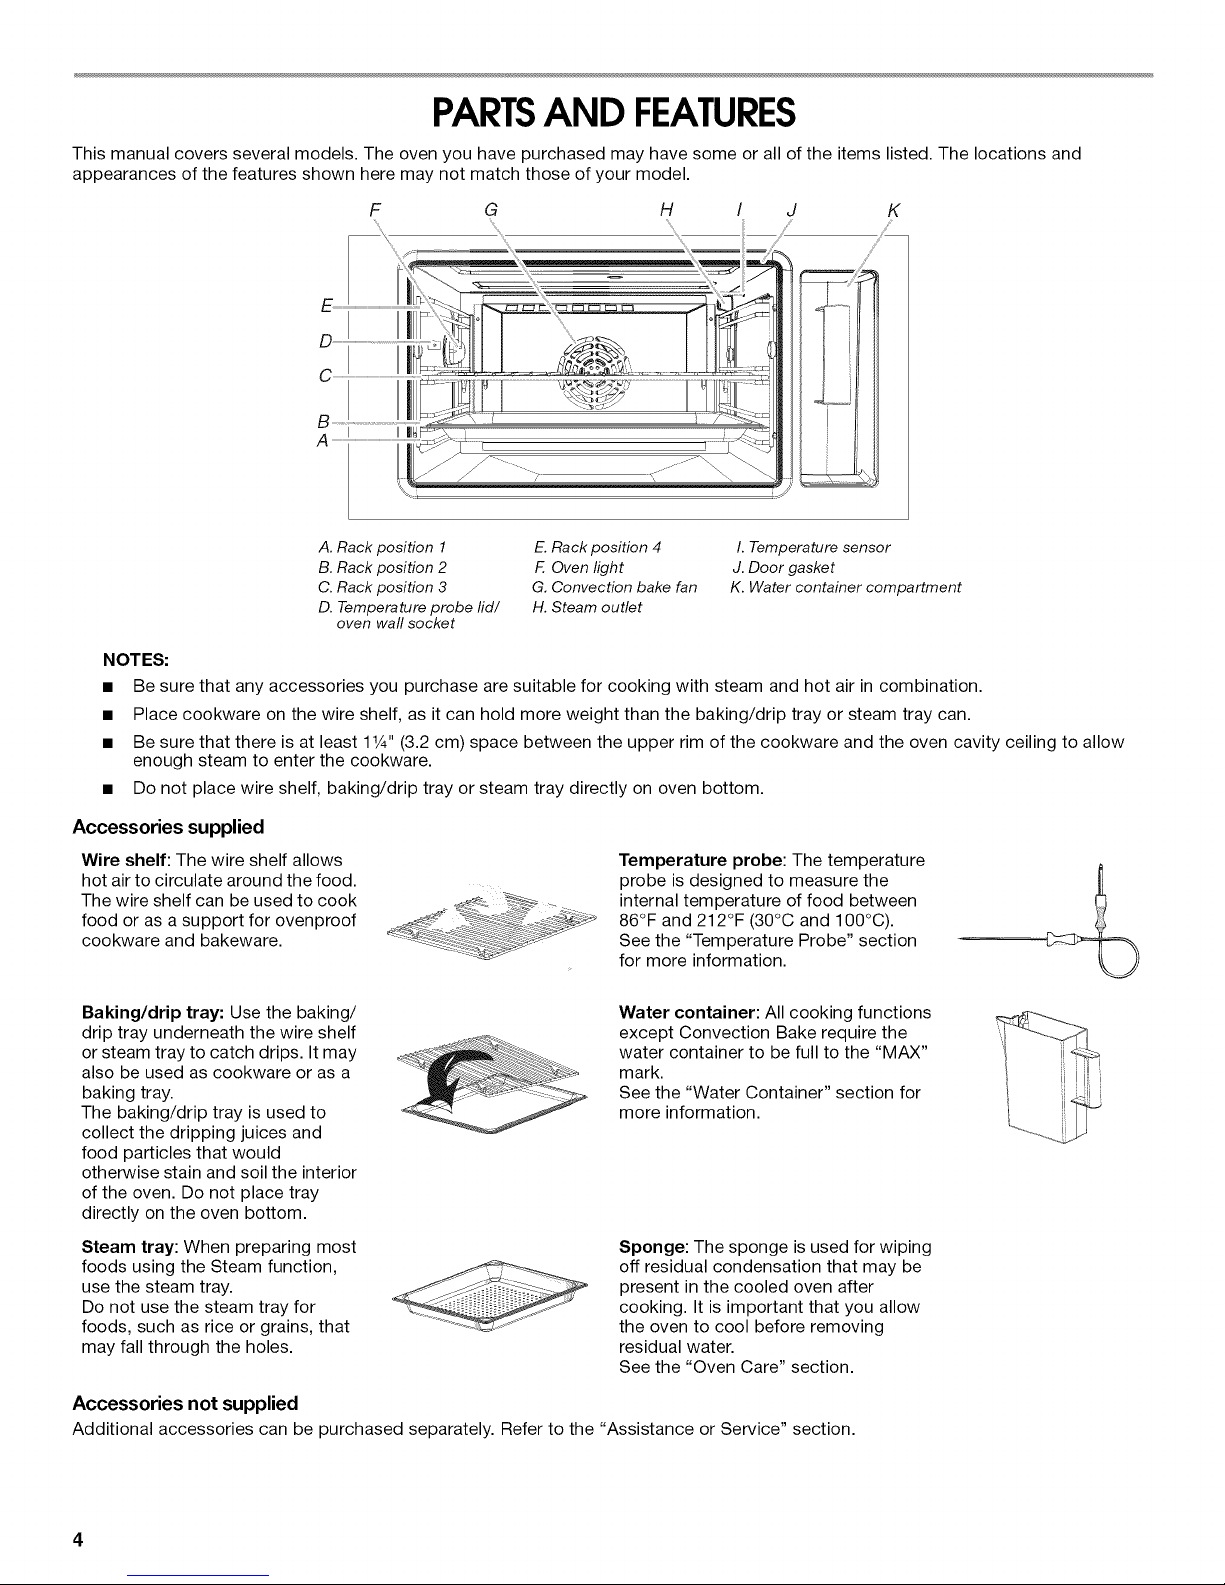
PARTSAND FEATURES
This manual covers several models. The oven you have purchased may have some or all of the items listed. The locations and
appearances of the features shown here may not match those of your model.
F G H J K
C
B
A
S
////'
A. Rack position 1
B. Rack position 2
C. Rack position 3
D. Temperature probe rid/
oven waft socket
E. Rack position 4
F. Oven light
G. Convection bake fan
H. Steam outlet
I. Temperature sensor
J. Door gasket
K. Water container compartment
NOTES:
• Be sure that any accessories you purchase are suitable for cooking with steam and hot air in combination.
• Place cookware on the wire shelf, as it can hold more weight than the baking/drip tray or steam tray can.
• Be sure that there is at least 11¼"(3.2 cm) space between the upper rim of the cookware and the oven cavity ceiling to allow
enough steam to enter the cookware.
• Do not place wire shelf, baking/drip tray or steam tray directly on oven bottom.
Accessories supplied
Wire shelf: The wire shelf allows
hot air to circulate around the food.
The wire shelf can be used to cook
food or as a support for ovenproof
cookware and bakeware.
_ - Li _;. _
Temperature probe: The temperature
probe is designed to measure the
internal temperature of food between
86°F and 212°F (30°C and 100°C).
See the "Temperature Probe" section
for more information.
Baking/drip tray: Use the baking/
drip tray underneath the wire shelf
or steam tray to catch drips. It may
also be used as cookware or as a
baking tray.
The baking/drip tray is used to
Water container: All cooking functions
except Convection Bake require the
water container to be full to the "MAX"
mark.
See the "Water Container" section for
more information.
collect the dripping juices and
food particles that would
otherwise stain and soil the interior
of the oven. Do not place tray
directly on the oven bottom.
Steam tray: When preparing most
foods using the Steam function,
use the steam tray.
Do not use the steam tray for
foods, such as rice or grains, that
may fall through the holes.
Sponge: The sponge is used for wiping
off residual condensation that may be
present in the cooled oven after
cooking. It is important that you allow
the oven to cool before removing
residual water.
See the "Oven Care" section.
Accessories not supplied
Additional accessories can be purchased separately. Referto the "Assistance or Service" section.
BEFOREUSINGTHEOVEN
IMPORTANT: Complete the following steps before oven is used
for the first time.
1. Open the oven door, remove the accessories and make sure
that the oven is empty.
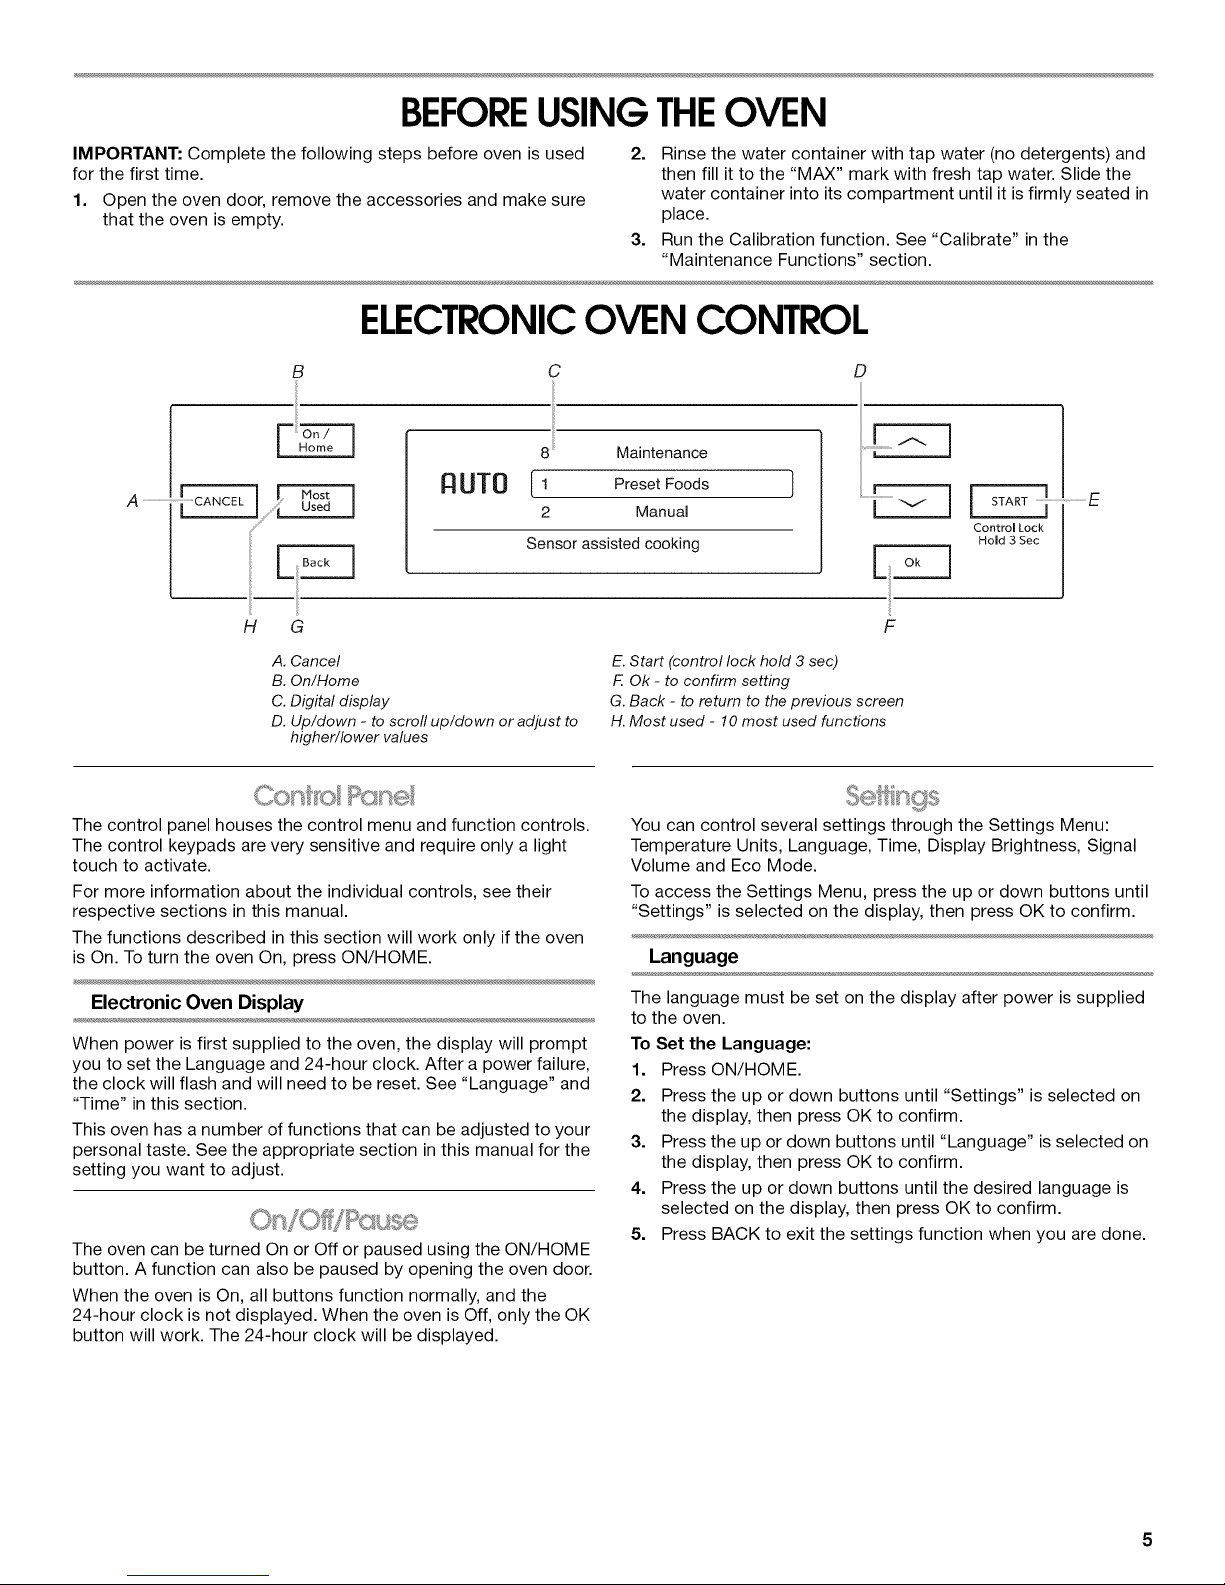
ELECTRONICOVEN CONTROL
C
i
!
8 Maintenance
I I Host
A ...........................
RUT0
H G
A. Cancel
B. On/Home
C. Digital display
D. Up/down - to scroll up/down or adjust to
higher/lower values
1 Preset Foods
2 Manuam
Sensor assisted cooking
2. Rinse the water container with tap water (no detergents) and
then fill it to the "MAX" mark with fresh tap water. Slide the
water container into its compartment until it is firmly seated in
place.
3. Run the Calibration function. See "Calibrate" in the
"Maintenance Functions" section.
D
....................E
Control Lock
HoJd 3 Sec
!
F
E. Start (control lock hold 3 sec)
F. Ok - to confirm setting
G. Back - to return to the previous screen
H. Most used - 10 most used functions
The control panel houses the control menu and function controls.
The control keypads are very sensitive and require only a light
touch to activate.
For more information about the individual controls, see their
respective sections in this manual.
The functions described in this section will work only if the oven
is On. To turn the oven On, press ON/HOME.
Electronic Oven Display
When power is first supplied to the oven, the display will prompt
you to set the Language and 24-hour clock. After a power failure,
the clock will flash and will need to be reset. See "Language" and
"Time" in this section.
This oven has a number of functions that can be adjusted to your
personal taste. See the appropriate section in this manual for the
setting you want to adjust.
The oven can be turned On or Off or paused using the ON/HOME
button. A function can also be paused by opening the oven door.
When the oven is On, all buttons function normally, and the
24-hour clock is not displayed. When the oven is Off, only the OK
button will work. The 24-hour clock will be displayed.
You can control several settings through the Settings Menu:
Temperature Units, Language, Time, Display Brightness, Signal
Volume and Eco Mode.
To access the Settings Menu, press the up or down buttons until
"Settings" is selected on the display, then press OK to confirm.
Language
The language must be set on the display after power is supplied
to the oven.
To Set the Language:
1. Press ON/HOME.
2. Press the up or down buttons until "Settings" is selected on
the display, then press OK to confirm.
3. Press the up or down buttons until "Language" is selected on
the display, then press OK to confirm.
4. Press the up or down buttons until the desired language is
selected on the display, then press OK to confirm.
5. Press BACK to exit the settings function when you are done.

Time
The time must be set on the display after power is supplied to the
oven or after a power failure.
To Set the Time:
1. Press ON/HOME.
2. Press the up or down buttons until "Settings" is selected on
the display, then press OK to confirm.
3. Press the up or down buttons until "Time" is selected on the
display, then press OK to confirm.
The digits on the display will flicker.
4. Press the up or down buttons until the correct time is
displayed, then press OK to confirm.
5. Press BACK to exit the settings function when you are done.
Brightness
To Set the Brightness of the Display:
1. Press ON/HOME.
2. Press the up or down buttons until "Settings" is selected on
the display, then press OK to confirm.
3. Press the up or down buttons until "Brightness" is selected
on the display, then press OK to confirm.
4. Press the up or down buttons until the desired brightness is
selected on the display, then press OK to confirm.
5. Press BACK to exit the settings function when you are done.
To Set Eco Mode:
1. Press ON/HOME.
2. Press the up or down buttons until "Settings" is selected on
the display, then press OK to confirm.
3. Press the up or down buttons until "Eco Mode" is selected on
the display, then press OK to confirm.
4. Press the up or down buttons until "On" or "Off" is selected
on the display, then press OK to confirm.
5. Press BACK to exit the settings function when you are done.
The Control Lock function can be used to avoid unintended use
of the oven. When the keypads are locked, the keypads will
become nonresponsive.
To Activate/Deactivate:
1. Press and hold START for approximately 3 seconds, then
release. Two beeps will sound.
NOTE: The keypad can be locked only when the oven is Off.
2. A confirmation message will appear on the display for
3 seconds before returning to the previous view.
3. Repeat Step 1 to deactivate the control lock.
Messages
During some functions, the oven may stop and a message may
appear on the display, prompting you to perform an action or
advising you on which accessory to use.
Volume
To Set the Signal Volume:
1. Press ON/HOME.
2. Press the up or down buttons until "Settings" is selected on
the display, then press OK to confirm.
3. Press the up or down buttons until "Volume" is selected on
the display, then press OK to confirm.
4. Press the up or down buttons until the desired volume is
selected on the display, then press OK to confirm.
5. Press BACK to exit the settings function when you are done.
Temperature Unit
The temperature unit default is Fahrenheit, but it can be changed
to Celsius.
To Set the Temperature Unit:
1. Press ON/HOME.
2. Press the up or down buttons until "Settings" is selected on
the display, then press OK to confirm.
3. Press the up or down buttons until "Temperature Unit" is
selected on the display, then press OK to confirm.
4. Press the up or down buttons until the desired temperature
unit is selected on the display, then press OK to confirm.
5. Press BACK to exit the settings function when you are done.
Eco Mode
During Eco Mode, the display switches off after inactivity. To view
information on the display, press ON/HOME or open the oven
door.
When Eco Mode is Off, the display will not turn off, and the
24-hour clock will always be visible.
Temperature reached
Insert food and press START
When a Message Appears:
1. Open the door (if needed).
2. Perform the action listed on the display (if needed).
3. Close the door and restart by following the on-screen
message or pressing START.
For your convenience, the oven automatically compiles a list of
your favorite shortcuts for you to use.
When you begin using your oven, the lists consists of 8 empty
positions marked "Most used," as well as two permanent
shortcuts at the top of the list: Steam and Convection Bake. Over
time, it will automatically fill in the list with shortcuts to your most
frequently used functions.
NOTE: The order of the functions presented in the shortcut menu
will automatically change according to your cooking habits.
To Access Your Shortcuts:
1. Press ON/HOME.
2. Press MOST USED.
The default selection will be number 1.
3. Press the up or down buttons until the desired shortcut is
selected on the display, then press OK to confirm.
4. Make any necessary adjustments using the up/down and OK
buttons.
5. Press START.
6
To Change Temperature or Cook Time After the Cooking
Process Has Been Started:
1. Press START to increase the cook time. Each press will
increase the time by 1 minute.
2. Press the "up" or "down" buttons to toggle between
changing the Temperature or Cook Time. The selected setting
will be highlighted.
OVEN USE
Odors and smoke are normal when the oven is used the first few
times, or when it is heavily soiled.
During oven use, the heating elements will not remain on, but will
cycle on and off throughout oven operation.
IMPORTANT: The health of some birds is extremely sensitive to
the fumes given off. Exposure to the fumes may result in death to
certain birds. Always move birds to another closed and well-
ventilated room.
IMPORTANT: To avoid permanent damage to the oven bottom
finish, do not line the oven bottom with any type of foil or liner.
• For best cooking results, do not cover entire wire shelf with
foil because air must be able to move freely.
• To catch spills, use the baking/drip tray provided with your
oven.
3. Press OK when the setting you want to edit is selected on the
display.
The current time or temperature setting will flash.
4. Press the "up" or "down" buttons until the desired cook time
or temperature is displayed, then press OK again to confirm.
The oven will automatically continue with the new settings.
5. Press BACK to return directly to the last setting you changed.
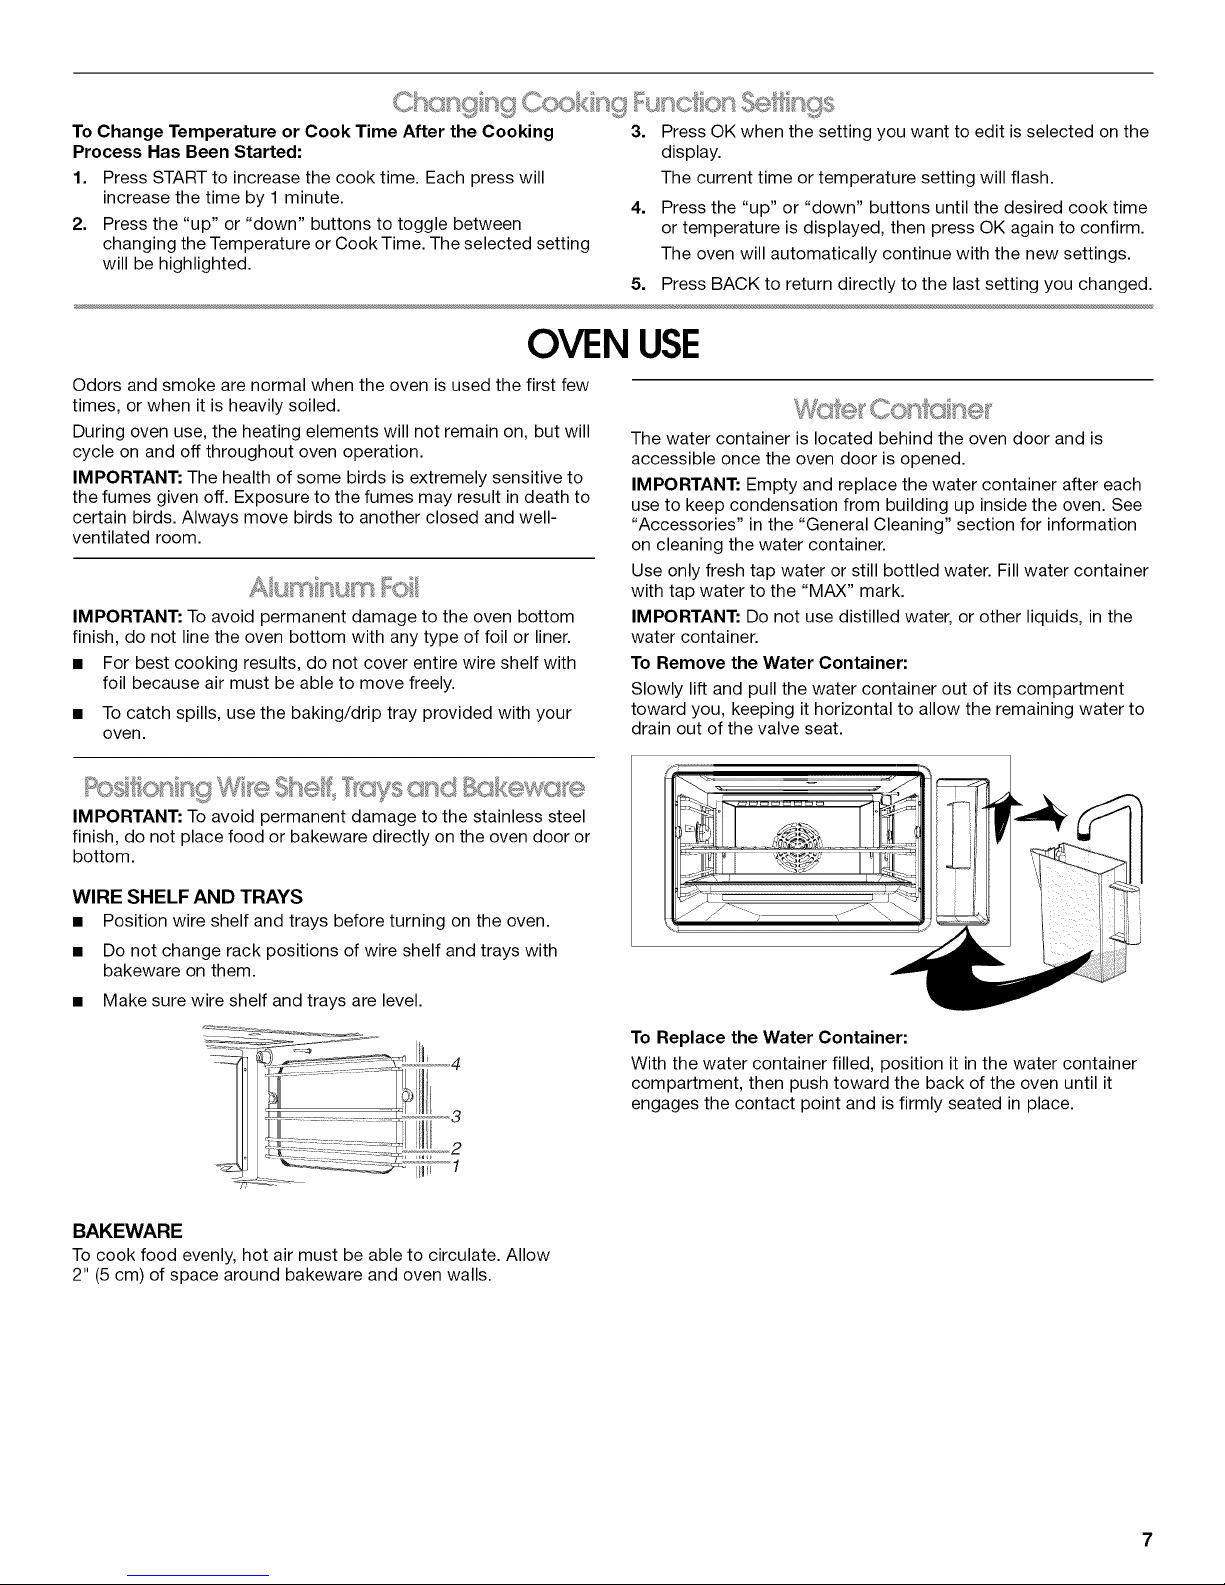
The water container is located behind the oven door and is
accessible once the oven door is opened.
IMPORTANT: Empty and replace the water container after each
use to keep condensation from building up inside the oven. See
"Accessories" in the "General Cleaning" section for information
on cleaning the water container.
Use only fresh tap water or still bottled water. Fill water container
with tap water to the "MAX" mark.
IMPORTANT: Do not use distilled water, or other liquids, in the
water container.
To Remove the Water Container:
Slowly lift and pull the water container out of its compartment
toward you, keeping it horizontal to allow the remaining water to
drain out of the valve seat.
IMPORTANT: To avoid permanent damage to the stainless steel
finish, do not place food or bakeware directly on the oven door or
bottom.
WIRE SHELF AND TRAYS
• Position wire shelf and trays before turning on the oven.
• Do not change rack positions of wire shelf and trays with
bakeware on them.
• Make sure wire shelf and trays are level.
BAKEWARE
To cook food evenly, hot air must be able to circulate. Allow
2" (5 cm) of space around bakeware and oven walls.
To Replace the Water Container:
With the water container filled, position it in the water container
compartment, then push toward the back of the oven until it
engages the contact point and is firmly seated in place.
Thetemperatureprobeallowsyoutomeasuretheinternal
temperatureofmeatduringcooking.Thetemperatureprobe
measuresbetween86°F(30°C)and212°F(100°C)toensurethat
foodiscookedtothedesiredtemperature.Therequiredinternal
temperaturecanbesetforthetypeoffoodbeingcooked.
• Thetemperatureprobeshouldnormallybeinsertedsothat
thetipoftheprobeisinthethickestpartofthefood,which
takesthelongesttimetoheat.Readthissectionformore
informationaboutthespecifictypeoffoodyouarecooking.
• Avoidplacingthetipofthetemperatureprobeinfattyareas
ofthefoodorwhereitistouchingbone;theseareasheatup
morequicklyandwillgivemisleadingtemperaturereadings.
• Thetemperatureprobeshouldbepositionedsothatthetip
doesnottouchthesidesorbottomofthecookware.
• Thetemperaturethatissetmustbehigherthanthecurrent
temperatureofthefood.
• Becausethetemperatureprobecanonlybesetto
temperaturesupto212°F(100°C),thetemperatureprobe
cannotbeusedtomakesweets,jamsandmarmalade,or
foodthatneedstobecookedorsimmeredforalongperiod.
• Alwaysunplugandremovethetemperatureprobefromthe
ovenbeforeremovingfood.
• Donotimmersethetemperatureprobeinwaterwhen
cleaning.Simplywipethetemperatureprobecleanwitha
clean,dampclothorpapertowelwithmilddetergentand
waterafteruse.
• Toavoiddamagetothetemperatureprobe,donotusethe
ovenwiththetemperatureprobeintheovencavityifit isnot
pluggedintotheoven.
• Toensureproperresultsandtoavoiddamagetoyouroven,
useonlythetemperatureprobesuppliedwiththeoven.
• Forrecipesthatrequirepreheating,placethefoodintheoven
withthetemperatureprobeinsertedonlyafterpreheating.Be
suretoplugthetemperatureprobeintothetemperature
probeconnectorintheovenchamber.
IMPORTANT:Positionthetemperatureprobeaccuratelyinthe
meattoobtaingoodcookingresults.
Ifthemeatyouarecookinghasveryirregularthicknesses,check
thetemperatureinmultipleareastomakesureitiscooked
properlybeforeremovingitfromtheoven.
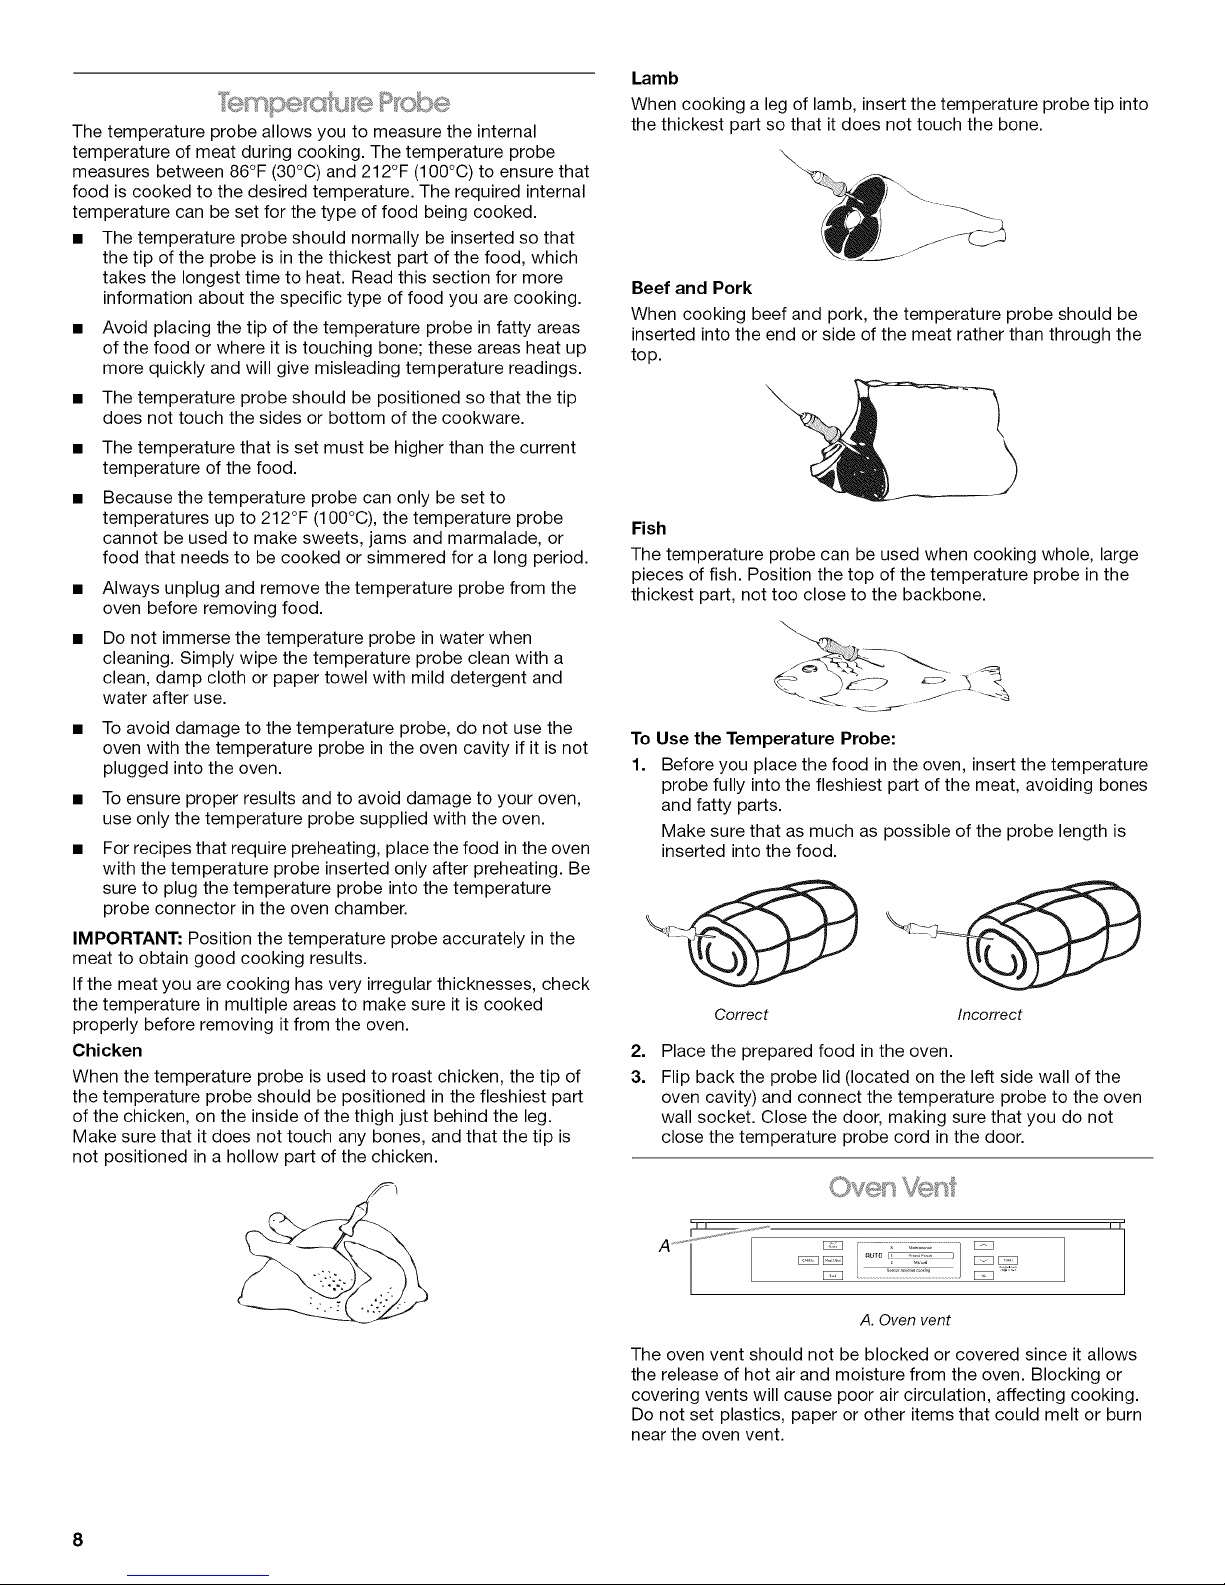
Chicken
Whenthetemperatureprobeisusedtoroastchicken,thetipof
thetemperatureprobeshouldbepositionedinthefleshiestpart
ofthechicken,ontheinsideofthethighjustbehindtheleg.
Makesurethatitdoesnottouchanybones,andthatthetipis
notpositionedinahollowpartofthechicken.
Lamb
When cooking a leg of lamb, insert the temperature probe tip into
the thickest part so that it does not touch the bone.
Beef and Pork
When cooking beef and pork, the temperature probe should be
inserted into the end or side of the meat rather than through the
top.
Fish
The temperature probe can be used when cooking whole, large
pieces of fish. Position the top of the temperature probe in the
thickest part, not too close to the backbone.
To Use the Temperature Probe:
1. Before you place the food in the oven, insert the temperature
probe fully into the fleshiest part of the meat, avoiding bones
and fatty parts.
Make sure that as much as possible of the probe length is
inserted into the food.
Correct Incorrect
2.
Place the prepared food in the oven.
3.
Flip back the probe lid (located on the left side wall of the
oven cavity) and connect the temperature probe to the oven
wall socket. Close the door, making sure that you do not
close the temperature probe cord in the door.
8
A _ EZ3
[ j
A. Oven vent
The oven vent should not be blocked or covered since it allows
the release of hot air and moisture from the oven. Blocking or
covering vents will cause poor air circulation, affecting cooking.
Do not set plastics, paper or other items that could melt or burn
near the oven vent.
The Preset Foods function will display prompts and allow you to
make selections to assist you in preparing a variety of foods.
You can choose from 11 categories of food: Meat, Poultry, Fish/
Shellfish, Potatoes, Vegetables, Rice/Grain, Pasta, Eggs, Pizza/
Pie, Desserts, or Bread/Cakes. Once you select a food category,
you will be prompted to make additional selections.
IMPORTANT: At the end of the cooking cycle, make sure to
empty the water container and return it to its compartment before
closing the oven door.
To Use:
IMPORTANT: For best results, rotate food from front to back
halfway through cooking.
Use the on-screen prompts or the following instructions to
prepare foods using the Preset Foods function.
1. Open the oven door and place food in the oven.
(Optional): If you are using the temperature probe, make sure
that it is properly inserted into the food, and plug in the
temperature probe. The oven will sense that the temperature
probe is connected and display the appropriate prompts.
2. Press ON/HOME.
3. "Preset Foods" is the default selection. Press OK to confirm.
4. Press the up or down buttons until the desired food category
is selected on the display, then press OK to confirm.
5. Press the up or down buttons until the desired food type is
selected on the display, then press OK to confirm.
6. Follow the on-screen instructions concerning the water
container and other accessories.
7. Press the up or down buttons to select which setting to edit,
then press OK to confirm.
8. Press the up or down buttons until the display shows what
you want, then press OK to confirm.
9. Press the up or down buttons until the Temperature setting is
selected on the display, then press OK to confirm.
10. Press the up or down buttons until the desired temperature is
displayed, then press OK to confirm.
11. Press the up or down buttons until the Cook Time setting is
selected on the display, then press OK to confirm.
12. Press the up or down buttons until the desired cook time is
displayed, then press OK to confirm.
The maximum Cook Time depends on the type of food being
cooked.
13. Press START to begin the cooking cycle.
14. To change temperature or cook time after the cooking
process has been started, see the "Changing Cooking
Function Settings" section.
15. When the Cook Time is complete, an alert will sound and a
message will appear on the display prompting to you to add
more time to the cycle if desired.
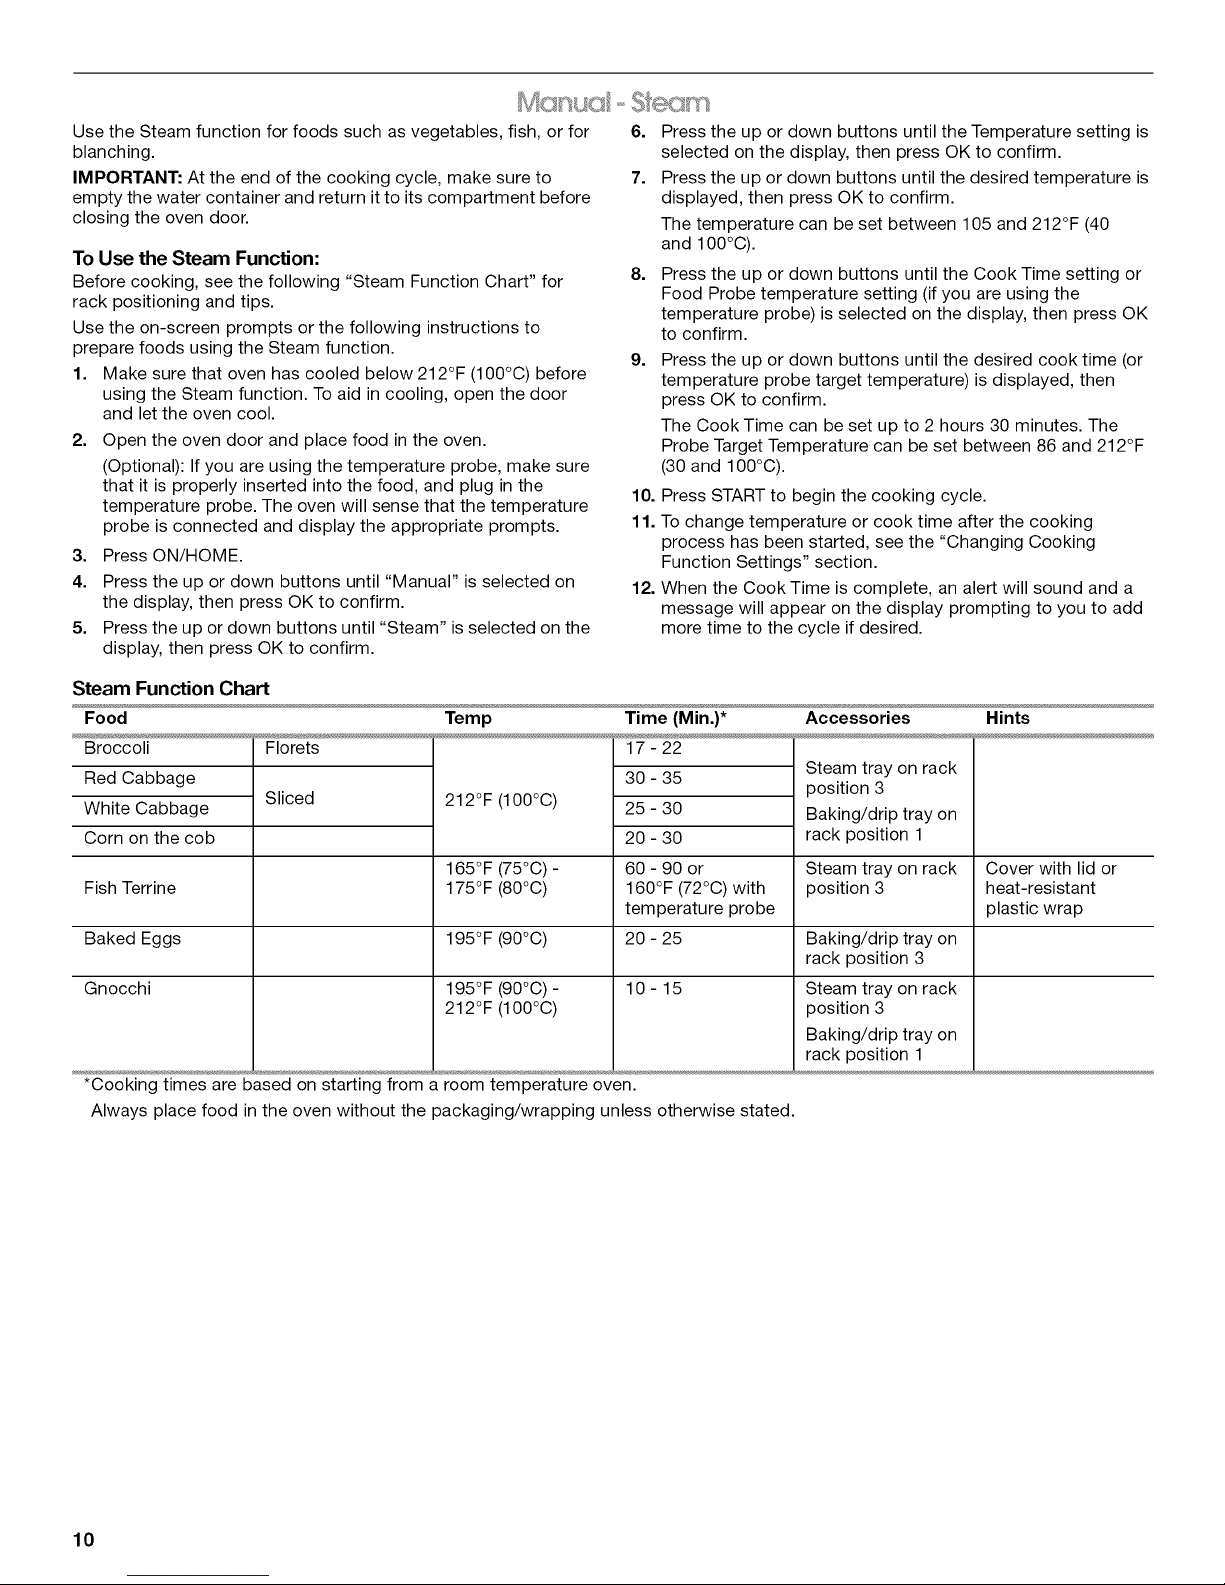
UsetheSteamfunctionforfoodssuchasvegetables,fish,orfor
blanching.
IMPORTANT:Attheendofthecookingcycle,makesureto
emptythewatercontainerandreturnittoitscompartmentbefore
closingtheovendoor.
To Use the Steam Function:
Before cooking, see the following "Steam Function Chart" for
rack positioning and tips.
Use the on-screen prompts or the following instructions to
prepare foods using the Steam function.
1. Make sure that oven has cooled below 212°F (100°C) before
using the Steam function. To aid in cooling, open the door
and let the oven cool.
2. Open the oven door and place food in the oven.
(Optional): If you are using the temperature probe, make sure
that it is properly inserted into the food, and plug in the
temperature probe. The oven will sense that the temperature
probe is connected and display the appropriate prompts.
3. Press ON/HOME.
4. Press the up or down buttons until "Manual" is selected on
the display, then press OK to confirm.
5. Press the up or down buttons until "Steam" is selected on the
display, then press OK to confirm.
6. Press the up or down buttons until the Temperature setting is
selected on the display, then press OK to confirm.
7. Press the up or down buttons until the desired temperature is
displayed, then press OK to confirm.
The temperature can be set between 105 and 212°F (40
and 100°C).
8. Press the up or down buttons until the Cook Time setting or
Food Probe temperature setting (if you are using the
temperature probe) is selected on the display, then press OK
to confirm.
9. Press the up or down buttons until the desired cook time (or
temperature probe target temperature) is displayed, then
press OK to confirm.
The Cook Time can be set up to 2 hours 30 minutes. The
Probe Target Temperature can be set between 86 and 212°F
(30 and 100°C).
10. Press START to begin the cooking cycle.
11. To change temperature or cook time after the cooking
process has been started, see the "Changing Cooking
Function Settings" section.
12. When the Cook Time is complete, an alert will sound and a
message will appear on the display prompting to you to add
more time to the cycle if desired.
Steam Function Chart
Food
Broccoli
Red Cabbage
White Cabbage
Corn on the cob
Fish Terrine
Baked Eggs
Gnocchi
*Cooking times are based on starting from a room temperature oven.
Always place food in the oven without the packaging/wrapping unless otherwise stated.
Florets
Sliced
Temp
212°F (100°C)
165°F (75°C) -
175°F (80°C)
195°F (90°C)
195°F (90°C) -
212°F (100°C)
Time (Min.)*
30 - 35
25 - 30
20 - 30
60 - 90 or
160°F (72°C) with
temperature probe
20 - 25
10-15
Accessories
;_L_rll tray Ull r_cK
position 3
Baking/drip tray on
rack position 1
Steam tray on rack
position 3
Baking/drip tray on
rack position 3
Steam tray on rack
position 3
Baking/drip tray on
rack position 1
Hints
Cover with lid or
heat-resistant
plastic wrap
10
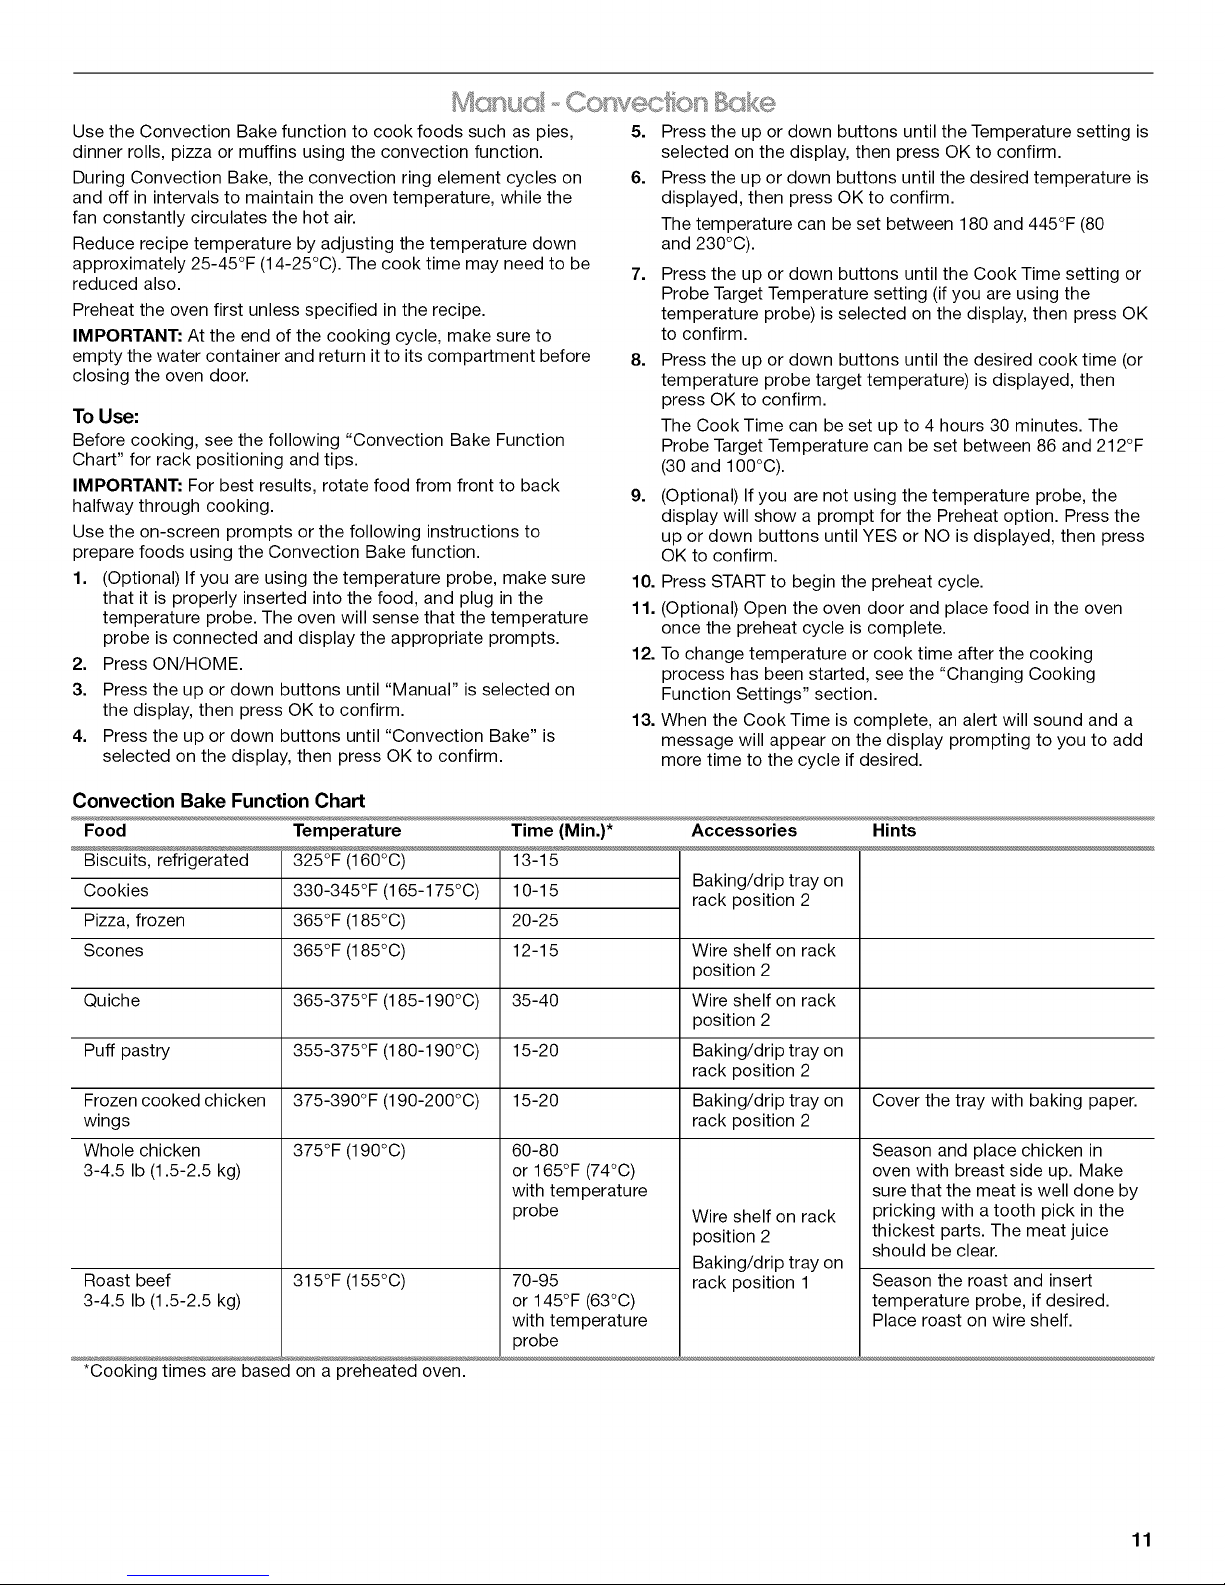
Use the Convection Bake function to cook foods such as pies,
dinner rolls, pizza or muffins using the convection function.
During Convection Bake, the convection ring element cycles on
and off in intervals to maintain the oven temperature, while the
fan constantly circulates the hot air.
Reduce recipe temperature by adjusting the temperature down
approximately 25-45°F (14-25°C). The cook time may need to be
reduced also.
Preheat the oven first unless specified in the recipe.
IMPORTANT: At the end of the cooking cycle, make sure to
empty the water container and return it to its compartment before
closing the oven door.
To Use:
Before cooking, see the following "Convection Bake Function
Chart" for rack positioning and tips.
IMPORTANT: For best results, rotate food from front to back
halfway through cooking.
Use the on-screen prompts or the following instructions to
prepare foods using the Convection Bake function.
1. (Optional) If you are using the temperature probe, make sure
that it is properly inserted into the food, and plug in the
temperature probe. The oven will sense that the temperature
probe is connected and display the appropriate prompts.
2. Press ON/HOME.
3. Press the up or down buttons until "Manual" is selected on
the display, then press OK to confirm.
4. Press the up or down buttons until "Convection Bake" is
selected on the display, then press OK to confirm.
5. Press the up or down buttons until the Temperature setting is
selected on the display, then press OK to confirm.
6. Press the up or down buttons until the desired temperature is
displayed, then press OK to confirm.
The temperature can be set between 180 and 445°F (80
and 230°C).
7. Press the up or down buttons until the Cook Time setting or
Probe Target Temperature setting (if you are using the
temperature probe) is selected on the display, then press OK
to confirm.
8. Press the up or down buttons until the desired cook time (or
temperature probe target temperature) is displayed, then
press OK to confirm.
The Cook Time can be set up to 4 hours 30 minutes. The
Probe Target Temperature can be set between 86 and 212°F
(30 and 100°C).
9. (Optional) Ifyou are not using the temperature probe, the
display will show a prompt for the Preheat option. Press the
up or down buttons until YES or NO is displayed, then press
OK to confirm.
10. Press START to begin the preheat cycle.
11. (Optional) Open the oven door and place food in the oven
once the preheat cycle is complete.
12. To change temperature or cook time after the cooking
process has been started, see the "Changing Cooking
Function Settings" section.
13. When the Cook Time is complete, an alert will sound and a
message will appear on the display prompting to you to add
more time to the cycle if desired.
Convection Bake Function Chart
Food
Biscuits, refrigerated
Cookies
Pizza, frozen
Scones Wire shelf on rack
Temperature
325°F (160°C)
330-345°F (165-175°C)
365°F (185°C)
365°F (185°C)
Time (Min.)*
13-15
10-15
20-25
12-15
Accessories Hints
_a_HIg/urlp Lray on
rack position 2
position 2
Quiche Wire shelf on rack
365-375°F (185-190°C)
35-40
position 2
Puff pastry Baking/drip tray on
355-375°F (180-190°C)
15-20
rack position 2
Frozen cooked chicken
wings
Whole chicken
3-4.5 Ib (1.5-2.5 kg)
375-390°F (190-200°C)
375°F (190°C)
15-20
60-80
or 165°F (74°C)
Baking/drip tray on Cover the tray with baking paper.
rack position 2
with temperature
probe
Wire shelf on rack
position 2
Bakina/driD trav on
Roast beef
3-4.5 Ib (1.5-2.5 kg)
315°F (155°C)
70-95
or 145°F (63°C)
rack position 1
with temperature
probe
*Cooking times are based on a preheated oven.
Season and place chicken in
oven with breast side up. Make
sure that the meat is well done by
pricking with a tooth pick in the
thickest parts. The meat juice
should be clear.
Season the roast and insert
temperature probe, if desired.
Place roast on wire shelf.
11
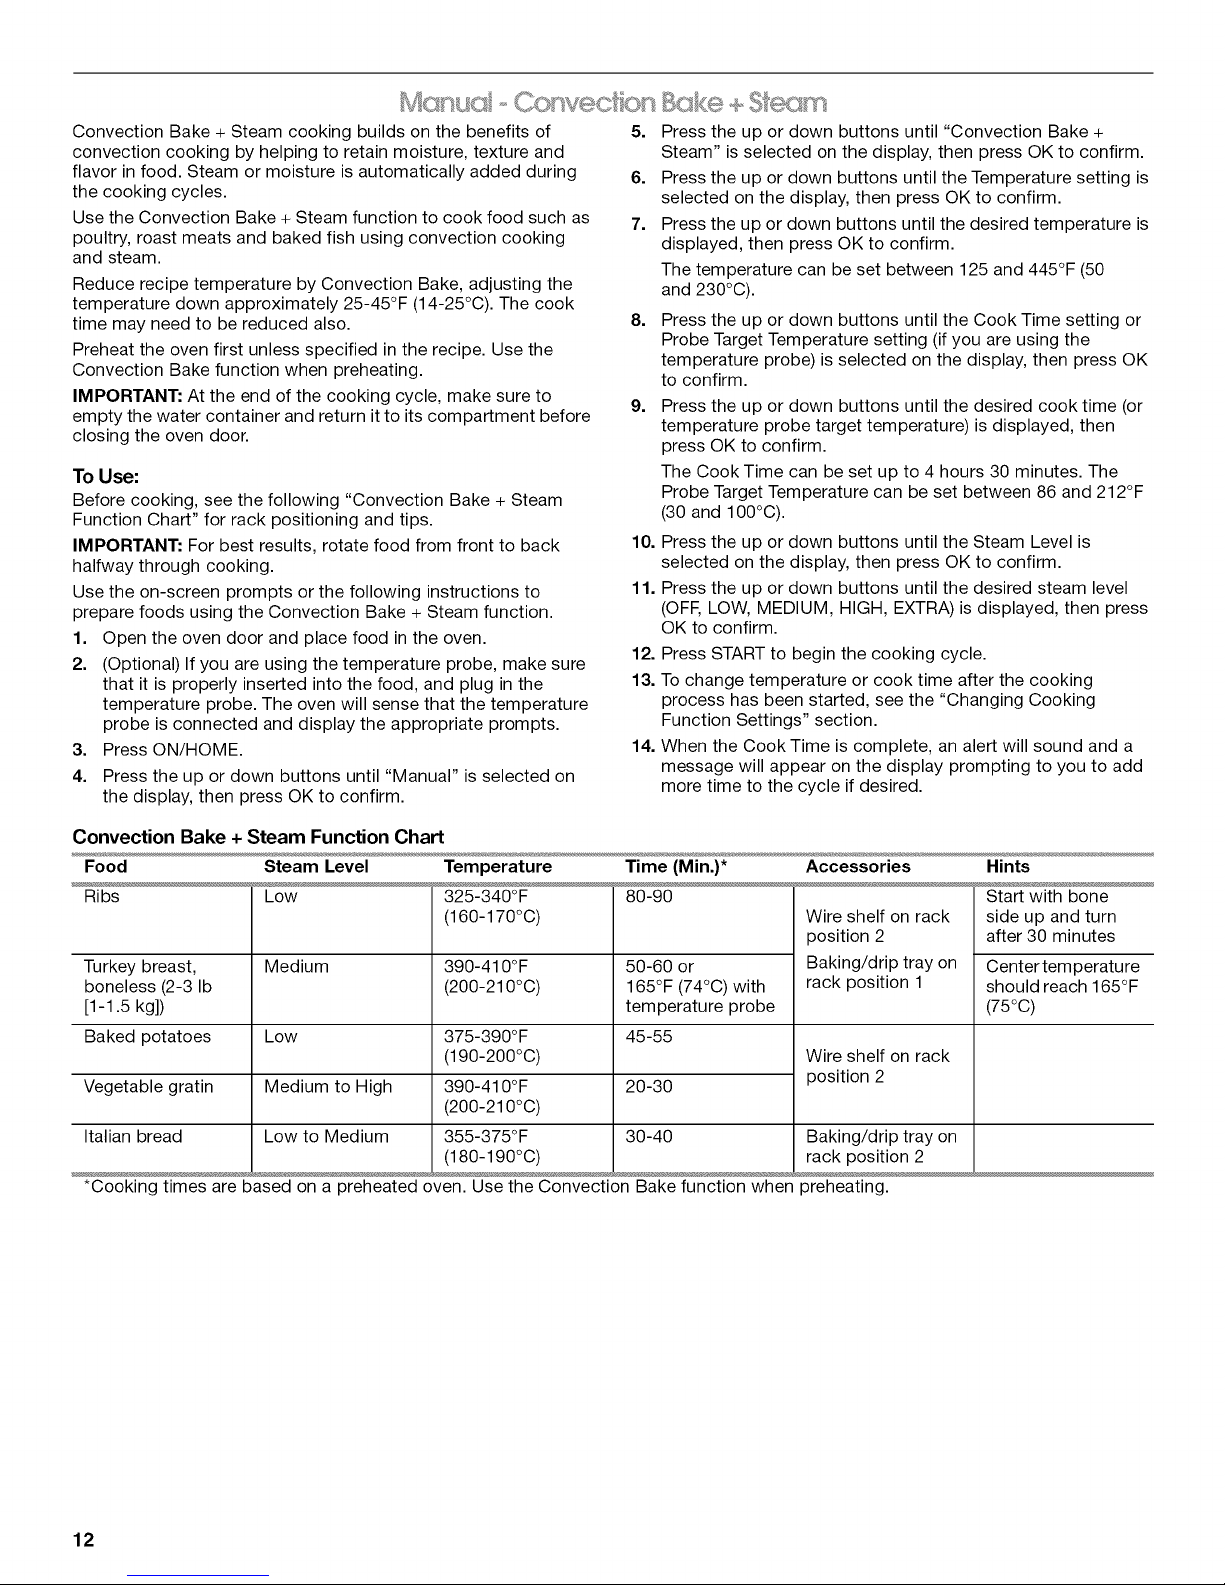
Convection Bake + Steam cooking builds on the benefits of 5.
convection cooking by helping to retain moisture, texture and
flavor in food. Steam or moisture is automatically added during 6.
the cooking cycles.
Use the Convection Bake + Steam function to cook food such as 7.
poultry, roast meats and baked fish using convection cooking
and steam.
Reduce recipe temperature by Convection Bake, adjusting the
temperature down approximately 25-45°F (14-25°C). The cook
time may need to be reduced also. 8.
Preheat the oven first unless specified in the recipe. Use the
Convection Bake function when preheating.
IMPORTANT: At the end of the cooking cycle, make sure to
empty the water container and return it to its compartment before
9.
closing the oven door.
To Use:
Before cooking, see the following "Convection Bake + Steam
Function Chart" for rack positioning and tips.
IMPORTANT: For best results, rotate food from front to back 10.
halfway through cooking.
Use the on-screen prompts or the following instructions to 11.
prepare foods using the Convection Bake + Steam function.
1. Open the oven door and place food in the oven.
2. (Optional) If you are using the temperature probe, make sure
12.
that it is properly inserted into the food, and plug in the 13.
temperature probe. The oven will sense that the temperature
probe is connected and display the appropriate prompts.
3. Press ON/HOME. 14.
4. Press the up or down buttons until "Manual" is selected on
the display, then press OK to confirm.
Press the up or down buttons until "Convection Bake +
Steam" is selected on the display, then press OK to confirm.
Press the up or down buttons until the Temperature setting is
selected on the display, then press OK to confirm.
Press the up or down buttons until the desired temperature is
displayed, then press OK to confirm.
The temperature can be set between 125 and 445°F (50
and 230°0).
Press the up or down buttons until the Cook Time setting or
Probe Target Temperature setting (if you are using the
temperature probe) is selected on the display, then press OK
to confirm.
Press the up or down buttons until the desired cook time (or
temperature probe target temperature) is displayed, then
press OK to confirm.
The Cook Time can be set up to 4 hours 30 minutes. The
Probe Target Temperature can be set between 86 and 212°F
(30 and 100°C).
Press the up or down buttons until the Steam Level is
selected on the display, then press OK to confirm.
Press the up or down buttons until the desired steam level
(OFF, LOW, MEDIUM, HIGH, EXTRA) is displayed, then press
OK to confirm.
Press START to begin the cooking cycle.
To change temperature or cook time after the cooking
process has been started, see the "Changing Cooking
Function Settings" section.
When the Cook Time is complete, an alert will sound and a
message will appear on the display prompting to you to add
more time to the cycle if desired.
Convection Bake + Steam Function Chart
Food Steam Level
Ribs Low
Turkey breast,
Medium
boneless (2-3 Ib
[1-1.5 kg])
Baked potatoes
Low
Temperature
325-340°F
(160-170°C)
390-410°F
(200-210°C)
375-390°F
Time (Min.)*
80-90
50-60 or
165°F (74°C) with
temperature probe
45-55
(190-200°C)
Vegetable gratin
Medium to High
390-410°F
20-30
(200-210°C)
Italian bread
Low to Medium
355-375°F
30-40
(180-190°C)
*Cooking times are based on a preheated oven. Use the Convection Bake function when preheating.
Accessories
Wire shelf on rack
position 2
Baking/drip tray on
rack position 1
Wire shelf on rack
position 2
Baking/drip tray on
rack position 2
Hints
Start with bone
side up and turn
after 30 minutes
Center temperature
should reach 165°F
(75°C)
12
I,,JI];;'l I B=J@
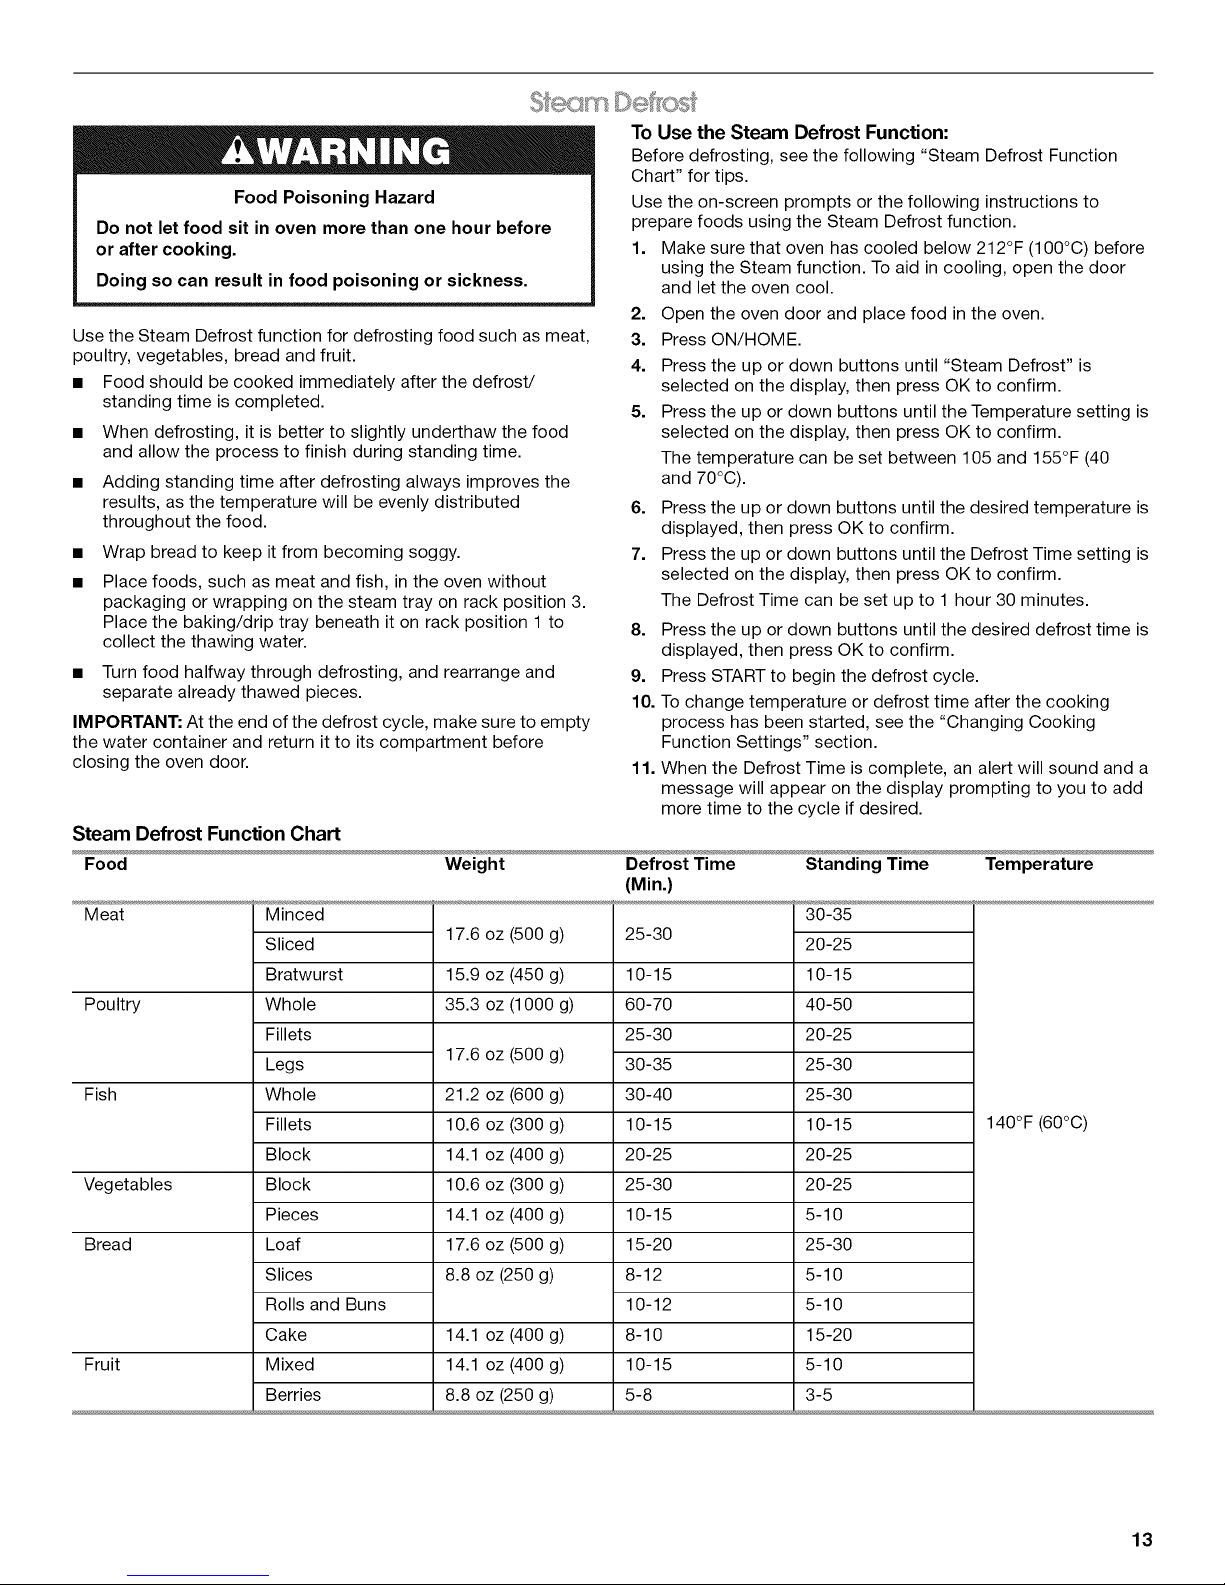
To Use the Steam Defrost Function:
Before defrosting, see the following "Steam Defrost Function
Chart" for tips.
Food Poisoning Hazard
Do not let food sit in oven more than one hour before
or after cooking.
Doing so can result in food poisoning or sickness.
Use the on-screen prompts or the following instructions to
prepare foods using the Steam Defrost function.
1. Make sure that oven has cooled below 212°F (100°C) before
using the Steam function. To aid in cooling, open the door
and let the oven cool.
2. Open the oven door and place food in the oven.
Use the Steam Defrost function for defrosting food such as meat,
poultry, vegetables, bread and fruit.
• Food should be cooked immediately after the defrost/
standing time is completed.
• When defrosting, it is better to slightly underthaw the food
and allow the process to finish during standing time.
• Adding standing time after defrosting always improves the
results, as the temperature will be evenly distributed
throughout the food.
• Wrap bread to keep it from becoming soggy.
• Place foods, such as meat and fish, in the oven without
packaging or wrapping on the steam tray on rack position 3.
Place the baking/drip tray beneath it on rack position 1 to
collect the thawing water.
• Turn food halfway through defrosting, and rearrange and
separate already thawed pieces.
IMPORTANT: At the end of the defrost cycle, make sure to empty
the water container and return it to its compartment before
closing the oven door.
3. Press ON/HOME.
4. Press the up or down buttons until "Steam Defrost" is
selected on the display, then press OK to confirm.
5. Press the up or down buttons until the Temperature setting is
selected on the display, then press OK to confirm.
The temperature can be set between 105 and 155°F (40
and 70°C).
6. Press the up or down buttons until the desired temperature is
displayed, then press OK to confirm.
7. Press the up or down buttons until the Defrost Time setting is
selected on the display, then press OK to confirm.
The Defrost Time can be set up to 1 hour 30 minutes.
8. Press the up or down buttons until the desired defrost time is
displayed, then press OK to confirm.
9. Press START to begin the defrost cycle.
10. To change temperature or defrost time after the cooking
process has been started, see the "Changing Cooking
Function Settings" section.
11. When the Defrost Time is complete, an alert will sound and a
message will appear on the display prompting to you to add
more time to the cycle if desired.
Steam Defrost Function Chart
Food Weight Defrost Time Standing Time Temperature
(Min.)
Meat
Poultry
Fish
Vegetables
Bread
Fruit
Minced
Sliced
Bratwurst
Whole
Fillets
Legs
Whole
Fillets
Block
Block
Pieces
Loaf
Slices
Rolls and Buns
Cake
Mixed
Berries
i/.ouz _ouug)
15.9 oz (450 g)
35.3 oz (1000 g)
17.6 oz (500 g)
21.2 oz (600 g)
10.6 oz (300 g)
14.1 oz (400 g)
10.6 oz (300 g)
14.1 oz (400 g)
17.6 oz (500 g)
8.8 oz (250 g)
14.1 oz (400 g)
14.1 oz (400 g)
8.8 oz (250 g)
LO-OU
10-15
60-70
25-30
30-35
30-40
10-15
20-25
25-30
10-15
15-20
8-12
10-12
8-10
10-15
5-8
30-35
20-25
10-15
40-50
20-25
25-30
25-30
10-15
20-25
20-25
5-10
25-30
5-10
5-10
15-20
5-10
3-5
140°F (60°C)
13
% m £eh
Use the Steam Reheat function to reheat 1 or2 portions of chilled
or room temperature food.
Always cover food when using the Steam Reheat function.
IMPORTANT: At the end of the reheating cycle, make sure to
empty the water container and return it to its compartment before
closing the oven door.
To Use:
Before reheating, see the following "Steam Reheat Function
Chart" for rack positioning and tips.
Use the on-screen prompts or the following instructions to
prepare foods using the Steam Reheat function.
1. Open the oven door and place food in the oven.
2. Press ON/HOME.
3. Press the up or down buttons until "Steam Reheat" is
selected on the display, then press OK to confirm.
4. Press the up or down buttons until the Temperature setting is
selected on the display, then press OK to confirm.
Steam Reheat Function Chart
Chilled Food
Dinner plate
Soup
Vegetables
Rice and pasta
Potatoes
Meat (sliced)
Meat (in sauce)
Fish fillets
Servings
1-2
Reheat Time (Min.)*
18-25
20-25
20-25
15-20
20-25
15-20
25-30
10-15
5. Press the up or down buttons until the desired temperature is
displayed, then press OK to confirm.
The temperature can be set between 140 and 212°F (60
and 100°C).
6. Press the up or down buttons until the Reheat Time setting is
selected on the display, then press OK to confirm.
7. Press the up or down buttons until the desired reheat time is
displayed, then press OK to confirm.
The Reheat Time can be set up to 1 hour 30 minutes.
8. Press START to begin the reheating cycle.
9. To change temperature or reheat time after the cooking
process has been started, see the "Changing Cooking
Function Settings" section.
10. When the Reheat Time is complete, an alert will sound and a
message will appear on the display prompting to you to add
more time to the cycle if desired.
Temperature
212°F (100°C)
Hints
If possible, arrange the thicker, denser food
to the outside of the tray and the thinner or
less dense food in the middle.
Cover food with lid or heat-resistant plastic
wrap and place in the steam tray on rack
position 3.
Place the baking and drip tray beneath to
collect the water.
*For best results, allow some additional standing time.
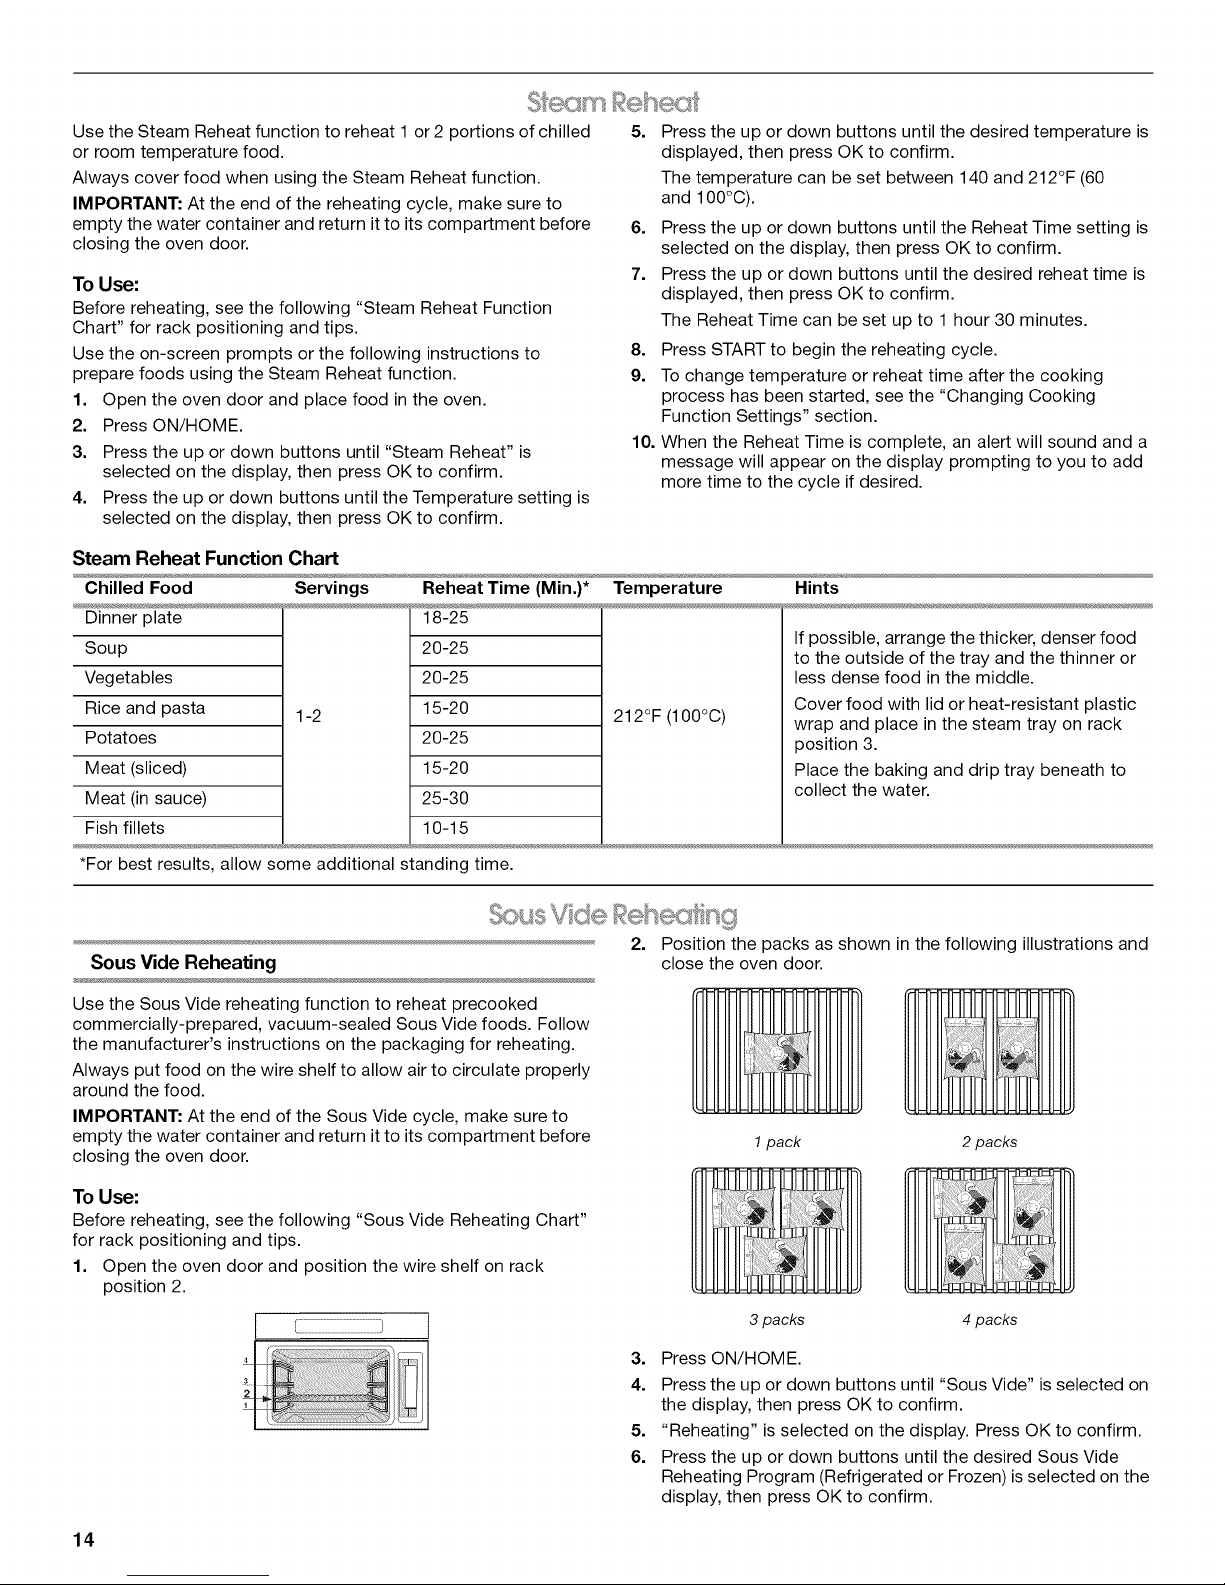
Sous Vide Reheating close the oven door.
Use the Sous Vide reheating function to reheat precooked
commercially-prepared, vacuum-sealed Sous Vide foods. Follow
the manufacturer's instructions on the packaging for reheating.
Always put food on the wire shelf to allow air to circulate properly
around the food.
IMPORTANT: At the end of the Sous Vide cycle, make sure to
empty the water container and return it to its compartment before 1pack 2 packs
closing the oven door.
To Use:
Before reheating, see the following "Sous Vide Reheating Chart"
for rack positioning and tips.
1. Open the oven door and position the wire shelf on rack
position 2.
[
2. Position the packs as shown in the following illustrations and
3 packs 4 packs
3. Press ON/HOME.
4. Press the up or down buttons until "Sous Vide" is selected on
the display, then press OK to confirm.
5. "Reheating" is selected on the display. Press OK to confirm.
6. Press the up or down buttons until the desired Sous Vide
Reheating Program (Refrigerated or Frozen) is selected on the
display, then press OK to confirm.
14

7. Follow the instructions that appear in the oven display
concerning the water container and other accessories.
8. Press the up or down buttons until the Reheat Time setting is
selected on the display, then press OK to confirm.
9. Press the up or down buttons until the desired reheat time is
displayed, then press OK to confirm.
The Reheat Time can be set up to 4 hours.
Sous Vide Reheating Chart
Sous Vide pouches have to be reheated only using the Sous Vide function. Use the following chart as a guide.
Category Cut/Portion/Description Reheating Time (from Reheating Time
Swordfish (steaks) 10-20 20-30
Sole/turbot (fillets) 10-20 25-35
Salmon (steak) 25-35 35-45
Fish Bass (whole) 10-20 50-60
Bass (fillet) 10-20 20-30
Grouper (fillet) 10-20 50-60
Cod (steak or fillet) 40-20 50-60
Shellfish
Lamb
Pork
Beef Roast beef (whole) 35-45 75-85
Veal
Chicken Breast (whole or half) 15-25 70-50
Turkey Breast (piece) 40-50 75-85
Shrimp/prawn (without shell) 10-20 20-30
Tiger prawn (without shell) 10-20 20-30
Loin stew (steaks or cubes) 15-25 40-50
Loin (roast) 20-30 30-40
Fillet (whole) 45-55 80-90
Leg (whole or boneless roast) 45-55 85-90
Shoulder (whole) 50-60 100-110
Boneless loin (whole) 55-65 80-90
Beef stew (steaks or cubes) 15-25 80-90
Fillet (whole) 50-60 85-95
Boneless loin (steaks) 15-25 25-35
Boneless loin (whole) 55-65 85-95
Veal stew (steaks or cubes) 20-30 40-50
Fillet (whole) 45-55 75-85
Leg (whole) 15-25 40-50
Leg (whole or boneless) 30-40 75-85
10. Press START to begin the Sous Vide cycle.
11. To change reheat time after the reheating process has been
started, see the "Changing Cooking Function Settings"
section.
12. When the Reheat Time is complete, an alert will sound and a
message will appear on the display prompting to you to add
more time to the cycle if desired.
13. After reheating is complete, take the food out of the oven.
refrigerated state) (from frozen)
(Min.) (Min.)
15
 Loading...