

Page 1
JENN -AIR
COMPACTORS
TableofContents..............................2
®
9871852
Page 2
TABLEOFCONTENTS
COMPACTORSAFETY..............................................................3
INSTALLINGYOUR COMPACTOR...............................................4
UnpackingYourCompactor........................................................4
LocationRequirements................................................................4
ElectricalRequirements...............................................................5
UndercounterJnstallat}on.............................................................5
AirFreshener................................................................................7
Installinga Custompanel.............................................................7
COMPACTORUSE.........................................................................7
How YourCompactorWorks.......................................................7
Loadingthe Compactor...............................................................8
StartingYourCompactor.............................................................8
StoppingYourCompactor...........................................................8
Removinga FilledBag.................................................................8
Installinga NewBag ....................................................................9
COMPACTORCARE......................................................................9
CleaningYour Compactor...........................................................9
TROUBLESHOOTING..................................................................10
RECYCLINGWITHYOURCOMPACTOR..................................10
ASSISTANCEORSERVICE.........................................................11
IntheU.S,A................................................................................11
Accessories................................................................................11
WARRANTY..............................................................................12
Page 3

COMPACTORSAFETY
Yoursafetyand thesafety of othersarevery important.
Wehave providedmany importantsafetymessagesinthis manualand onyourappliance.Always readand obeyall
safetymessages.
This isthe safetyalert symbol.
Thissymbolalertsyou to potentialhazardsthat cankill or hurtyouand others.
Allsafety messageswillfollowthe safetyalertsymboland eithertheword "DANGER"or
"WARNING."Thesewordsmean:
You canbe killedor seriouslyinjuredif you don't
ADANGER immediately follow instructions.
Youcan be killedor seriouslyinjured if you don't
AWARNING
All safety messageswilltell you what the potentialhazardis,tell you howto reducethechanceof injury,and tell you
whatcan happenif the instructionsare notfollowed.
IMPORTANTSAFETYINSTRUCTIONS
follow instructions.
WARNING: When using an electrical appliance,basic precautions should always be followed, including the
following:
• Readall instructions beforeusing the compactor. • Donot compact toxic or volatile flammable material
such asoily ragsand insect sprays. Do not compact
• Close supervision isnecessarywhen used by or lighted cigarettes, cigars, or other hot or burning
nearchildren. Do not allow to be used as atoy, or
to run unattendedat any time. Lock Key Switch items. Do not overload the compactor.
whennot in useand store key out of reach of • Donot take apartthe compactor, incorrect
children, reassemblycancause electric shockwhen
• Do not touch movingparts, subsequentlyused.
• Do not operate with a damaged cord set, plug,
motor,or after damagein any manner.Havethe can piercethe bag and causeinjury. Do not
compactor examined, repaired or adjusted by an
authorized serviceperson, glass.
• Use onlyfor intendeduseas described inthis • This compactor is intendedfor household useonly.
manual.Do not use other than manufacturer's
recommendedattachments.
• Handlea loaded trash bag with care. Sharpobjects
overloadtrash bagwith heavymaterialsuch as
SAVETHESEINSTRUCTIONS
Page 4
INSTALLINGYOUR
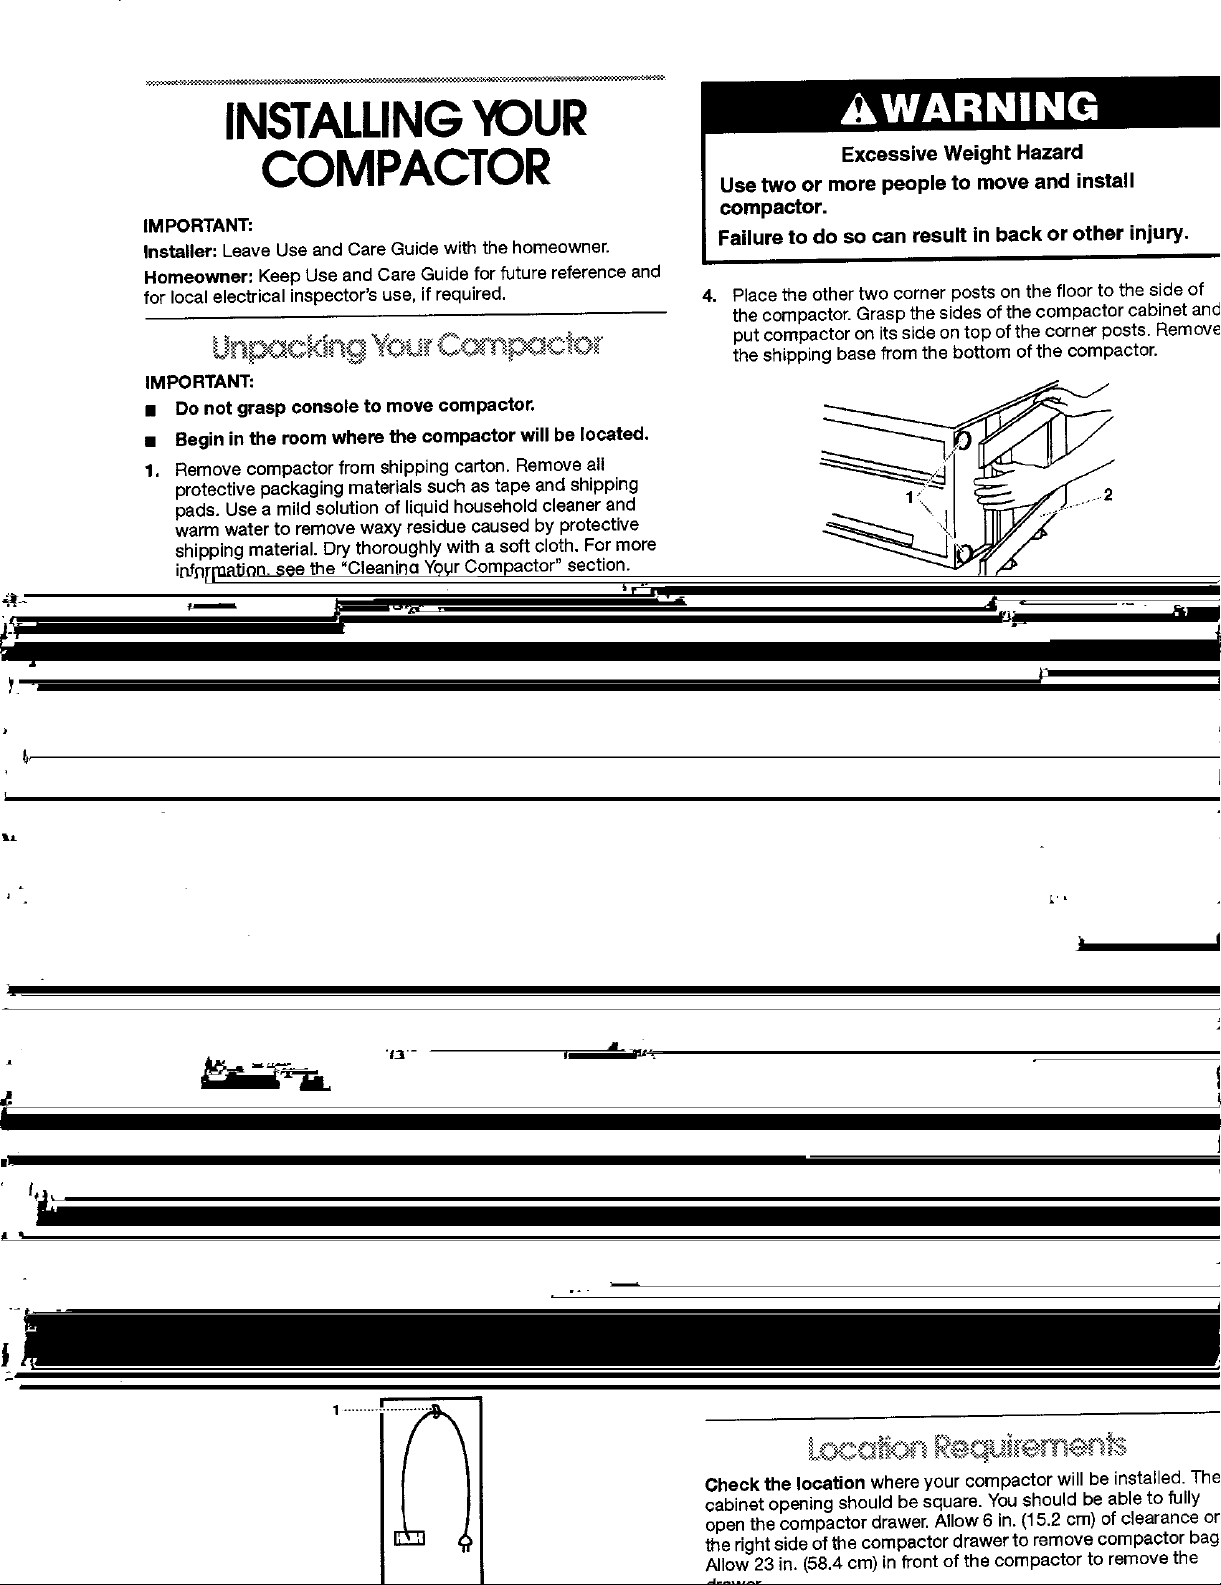
Use two or more people to move and install
IMPORTANT: compactor.
Installer:LeaveUseandCareGuidewiththehomeowner. Failure to do so can result in back or other injury.
Homeowner: Keep UseandCare Guideforfuture referenceand
for local electricalinspector'suse,if required. 4. Placetheother two corner posts on the floor to the sideof
IMPORTANT.
• Do not graspconsoleto movecompactor. _ ._
• Beginin the roomwherethe compactor will be located. _"_i_
1. Removecompactorfromshippingcarton.Removeall
protectivepackagingmaterialssuchastape andshipping
pads. Useamildsolutionof liquidhouseholdcleanerand
warmwaterto removewaxyresiduecausedby protective __ \,Jl
shippingmaterial.Dry thoroughlywith a soft cloth. Formore
information,seethe "CleaningYourCompactor"section.
2. Checkto besure the powercord isattached to the cord clip
on therear ofthe compactor. 1,Levelinglegs
COMPACTOR I Excessive Weigh, Hazard
thecompactor.Grasp thesides ofthe compactor cabinet ant
_._,.._,_,_-_..:._%_"_-.- ,.:__'_'._._._-,_-_,o.-__..-_.o_. put compactoron itsside ontop of thecorner posts. Remow
- -_" _ .... the shipping base from the bottom ofthe compactor.
1.................._ __',_'._'_'_e'__'__:_'_._::_"_'_,_"_'_:
WARNING
2,Shippingbase
Check the location whereyour compactorwill be installed.Th
cabinet openingshould be square. Youshould beable to fully
open the compactor drawer.Allow6in. (15,2cm)of clearancec
therightsideof thecompacter drawerto removecompactorha!
Allow 23 in. (58.4cm)infrontof the compactor to removethe
drawer.
Product dimensions
1,Cordclip
3. Placethe two corner posts fromthecarton on the floor near - _- _/-_
the compactor. Open the compactor drawerand removeany [_--
shippingmaterialsor other itemsfromthe drawer.Do not
removethecompactor bag. Graspthe handle and raisethe
front ofdraweruntil it clearsthe drawerstops. Graspsides of
drawerand lift drawerout of compactor. Placethe draweron
thetwo corner posts.
34_"
(86.7cm)
(38.1cm) (61cm)
15" 24"
Page 5

Cutout dimensions
/ WARNING
34t/,°rain.
l 187cm)
ElectricalShockHazard
18"min. Plugintoa grounded3prongoutlet.
(4s.7cm) Donotremovegroundprong.
24"min. I
161_ _ DOnotuseanadapter.
I_ (38.7cm) _
1.Groundedelectricaloutletmustbeaminimumof Recommended Grounding Method
3 in.(7.6cm)awayfromsurroundingcabinetsor Thiscompactorisfor useon asinglephase,115-volt,60 Hz,A
nearbywallsasshown./tcanbeplacedeitherto onJy15or20 amperefusedandproperlygroundedcircuitand i
the/eftortherightsideoftheproduct, equippedwitha groundingplugasshownbelow.Timedelayfu_
Clearance dimensions separatecircuitservingonlythisappliancebe provided.Inthe
2..........i ---_ _ accordancewith the NationalElectricalCodeand Local codes
15'_"min. death,fire,orelectricalshock.
', Theoutlet should be properlyinstalledand grounded in
................ andordinances.Noadaptershould be used with this applianc_
1
Failuretofollowtheseinstructionscanresultin
orcircuitbreakerisrecommended.It isrecommendedthata
eventof anelectricalshortcircuit,groundingreducestherisk o
electricshock by providingan escape wire for the electTic
current. Donot modify the plug attachedto the compactor; use
onlywith a grounded receptacle.
Thiscompactor must be groundedwhile inuseto reduce the ri_
ofelectric shock.Thecompactor is equipped with a three-
conductorcord and three-pronggrounding-type plug to fit the
propergrounding-typereceptacle.Thegreen (orgreen and
yellow)conductor in the cord Is thegrounding wire. Never
connectthe green(orgreenandyellow)wire to a live terminal.
1.Leave6in.(15.2cm)ofclearancespacetothe _'=_;_'_'_"_ _'"_'_ _ _.;,C_i_
rightsideofthecompactorinordertoremovethe NOTE:Properinstallationisyourresponsibility.Makesureyou
compactorbags. haveeverythingnecessaryfor correctinstallation.Itisthe
2.Leave23in. (58.4cm)ofclearanceinfrontof the personalresponsibilityandobligationof the customerto cont_
compactorinordertofullyopenorremovethe a qualifiedinstallerto assurethat electricalinstallationmeets
compactordrawer, nationaland localcodes and ordinances.
Toolsand materialsneeded for installation:
Level Scissors _ in. Hex-Hea
TapeMeasure PhillipsNo.2 Screwdriver SocketWrench
Pliers Flat-HeadScrewdriver UtilityKnife
IMPORTANT:
• Do notgrasp controlpanel to movecompactor.
• Slide compactor onto cardboardorhardboardbefore
movingcompactoracrossfloorto preventdamagingfk
covering.
• Donotallowthe rearframe ofthe compactorto touch1
floor coveringwhenlifting or movingcompactor.
Page 6

The solid air freshener system is designed to help control odors
that might develop in the trash. An air freshener disc can be ""
purchased in department stores (not sold with compactor). Place
the disk-shaped solid air freshener into the air freshener
compartment. The air freehener should last 4 to 6 weeks. It is
used more rapidly when the temperature is high or the air is very 1 .......................
dry. 23_5_6"
t,_._:_ _ _ _,_, _,__,_ both aides (8 mm)
To order a color-matched trim kit for the installationof a custom- 1,Raisedpanelor decorative trim.
made panel, contact your local authorized dealer. 2. Outersectionofpanel,
l_im Kits for Custom Front Panels: Raisedpanel: Theouter section of the panelmust be
Order Part #TCDW (Trim kit for custom made panel) dimensionsas shownabove.
Order Part #TCBS (Stainless steel door panel)
....... _"_'_'_ _ _..... (5.6 mm) _'_b " "mm)
r
3/16"
(8 mm)- _ Sll_"
7/32" (5.6ram)thick to fit into trim. Raisedpanel
(60.5 cm)
'r COMPACTORUSE
23_/_" compresses the trash, The compacting ram does not go to
(60,5 cm) the bottom of the drawer, Youwill not see compacting of
14%"
(37.2 ¢m)
Flatpanel:A 7132"(5,6ram)thickpanelisrequired, r..... "_ _ -_
Thisis the samethicknessas a standard 1/4" _-=_ F]_,.__,
(6.4ram,)plywood or paneling.
The compacting ram Is the part of the compactor which
NOTE: The compactor drawer should be more than Z_ full
before the compactor can begin to compress the load,
You may hear a noise when glass breaks. Strong glass bottles
may not break at all. The trash in a full compactor bag will be
kash the first few times you load the compactor.
about V_the size of its original bulk.
....
i i, '
I I l
tL i :
Load bulk'y trash, bottles, and cans in the center of the drawer
Bottles or cans not placed in the center may become caught
between the ram and the drawer. The Drawer Monitor Switch
then senses a "misload" and causes the ram to return to the %
posit(on without compacting.
'_ ,.._ ' _
Page 7

'_ ............ 6. CarefullyIjftthe front slightJyandrol}compactor intothe
Undercounter Installal]on cabinet opening.
Usingthetwo #8-18x I/2in. screws, fastenthe retaining
1. Measurethe heightof your cabinetopening.Thetop of the bracketsto the countertopwith the mounting screws.
compactorshould be atleast 1_in. (3mm)from the top of the
cabinet opening, if bracketscannot be attached to the undersideof
countertop, attach mountingclips to brackets.Fasten
Therearwheelsarepresetfor a cabinet openingof 34 1/4in. compactorto cabinet front with mounting screwsthrough
(87cm).SeePositionA in picturefollowing, mountingclips.
Toadjust for other cabinet opening heights: Countertop Mounting
• Loosenself-tapping screwjust enoughto clearstud from
hole In Position =A,"
needed for your cabinet opening measurement: 1.........
PositionB:341/4in.to 347Asin.(87 to 87.5cm) ..........
PositionC: 347A6in. to 34% in.(87.5to 88 cm)
NOTE:Tolevelthe unitinposition"C," you may needto
addshimsunderthelevelinglegs.
• Tighten screw.Repeatfor otherrearwheel.... _,
3/i
0 .................2 1,Countertop
2,Retainingbracket
3,Mountingscrew
B,,.............._,.,3 Cabinet-frontmounting
"" • 3
2,Cabinet
3.Locatingstud 2 ......... "
4.Salf-tappingscrew(pivot)
2. Usepliersto lowerlevelinglegsaway from cabinet. Adjust
legsso there will be a _/_in. (3ram)to _,4in. (6.4ram)space
betweenthe top of the compactor andthe top of the cabinet
opening.Standthe compactor upright. 2.Cabinet
1,Mount#i clip
3. Movethe compactorcloseto itsfinalposition. 3.Retainingbracket
4. Plug into agrounded 3 prongoutlet. 4.Mountingscrew
5. Determineif youwant the compactorframe or drawerfront 7. Graspsides ofcompactor drawer and place bottom of
flushwiththe cabinetfront, drawer intotracks.Lift atthe handlesodrawer will go ova
Usingthe two#8-18 x _s in.screws,installthe retaining drawerstops. Closedrawer.Checkto seeif draweropen_
brackets to cabinet top as needed: freely.If thetoe platerubs against floor,see"Adjustingth
ToePlate"forfurther instructions.
• If the compactorframe is to beflush with the cabinet _ ..........
front, placeretainingbracket screwsthrough "A."
• if the compactordrawer front is to beflushwith the _ .........,
Adjusting the Toe Plate
cabinetfront, place retainingbracketscrewsthrough If the toe platerubsthe floor covering,the toe plate clearanc,
"C," may be changedasfollows:
• Ifthe compactoris to be midway between"A" and 1. Markoneach side ofthe toe plate the amount oftoe pla
"C", placethe retainingbracketscrewsthrough"B." thatrubsthefloorcovering.
..................t 2. Removethe drawerfromtheunit.(SeeStep3 inthe
,,............. . _. ,. :::.....= "Unpacking YourCompactor" section.)
1.Countartop
2.Retainingbracket
i 3, Use arulerandapencil orcha)kto draw a linebetween
markson eachside of toe plate.
eA 5. Replacedrawer.Iftoe plate stillrubs floorcovering,rep_
steps1-4.
__ 4. Usescissorsorutilityknifeto cut toe platealongline.
Page 8

• Load bottles orcans on their sides inthe center of the
L_%_,_'_ _;_ C:I{_[_.'_/_C_O[ drawer.Do not load bottles in an upright position.
WARN NG
3. Closethe drawer.
Do not compact any container, aerosol cans, or 1. TurntheControl Knobto START.As soon as the compactor
cloths which might contain insecticide, hair spray, starts,releasethe ControlKnob, Theknob will thenadvanc_
engine starting fluid, paints, liquids, thinners, or to the RUNposition and begin the compactingcycle.
any other poisonous or explosive products. 2. Acompletecompacting cycle takesabout 27 seconds.The
Doing so can result in death, explosion, or fire.
compactorwillautomaticallystop.
WARNING
NOTE:When thecompactingcycleis done,turn the Key-Knobt
OFF& LOCK.RemovetheKey-Knoband store it outof children
reach.
1, Turnthe ControlKnob to OFF& LOCK.
Cut Hazard 2. Turnthe ControlKnob to RUN.Thiswillraisethe ram to its
Do not push items down into compactor with topmost position.Thecompactorwill automaticallyadvan(
hands or feet. totheendofthecycleandstop.
Doing so can result in cuts. 3. Youcan openthedrawerafterthe compactorstops.
NOTE:Youwill not see compacting oftrash thefirst few _'_"_;,-_.__/_,...;.'_:_'_%,_..,'_-_I_:_:___,_,_......_ _(_.,_
timesyouloadthecompactor.The compactordrawer should
be about 1/_full before the compactor can begin to compress Whenthetrashis compactedto the top of the drawer,remove
the load. the bag.If the bag is tooheavy, compact less trashbefore
1. Openthe drawer.Liftand pull the handleor pressthe toe bar emptyingit inthe future.
to open the drawer.
&WARNINGNOTE:Pressingthetoe bar opensthe containeronly3 in.to
6 in. (7.6 cmto15.2cm), dependingontheload.
Cut Hazard
2. Placetrashincompactor. Do not push items down into compactor with
• Wraporcoverwet ormessytrash, hands or feet.
• Donotcompactitemsthat may developoffensiveodors Doing so can result in cuts.
suchas rawmeat,fish,grapefruitrinds,disposable
diapers,orpersonalhygieneitems.
1. Pullthe drawercompletelyopen.
2, Removetop of bag from bag retainerbuttons. Pullup all
bag cuffs.Closebagwith twist tie provided.
8
Page 9

3. PushSide-Lock Latch down and tilt drawerside open.
Beforecleaning the compactor,turn the Key-Knob (orKey-
Switch)to the OFF& LOCKposition and remove it.
NOTE:Anyservices otherthanthose outlined in this section
_.x _S should be performedby a designatedservice representative.
4. Liftoutbag. Cleaning Exterior Surfaces
1. Washexteriorsurfaces(includingstainlesssteel)with a clear
spongeor soft cloth anda mild detergentin warm water.Do
not use abrasiveor harshcleaners.Rinseanddry thoroughly
with a soft cloth.
2. Wipeup spillsright away.Somefoods candamagethe finish
if left on the compactor surface.
Cleaning Inside the Drawer
_ _•_'_ bitsNOTE:ofglassY°umayintheWantdrawer.t°wear protectiveglovesasthere may be
IMPORTANT: 1. Removethe bag.(Seethe "Removinga FilledBag" section.)
Beforeinstallinganew bag, be sure: 2. Pressdown on the lever-actionlock (orSide-Lock latch).
• The drawersideis securelylocked. _.
• Thecontainer is cleanandfreeof debris. I I_
Donot use any kind of bag otherthan those designedespecially
for usein your compactor. Orderreplacementcompactorbags
throughyour local dealeror bycallingthetoll-free number on the
cover or in the "Assistanceor Service"section.
t. Placefolded bag intothe drawer.Openbagand pulltop 3. Holdthelever-actionlockdownand tilttheside of the draw_
edgesoverthe drawertop. out untilthe lock clearsthe drawerfront.
up, then lifting it out.
NOTE:Ifdesired,thedrawer sidecanbe removed bytilting
2, Lock bag in placebypullingthefour prepunchedholesover
the bag retainerbuttons.Holeswillexpandoverthe buttons 4, Washthe interiorof the drawerwitha cleanspongeorsoft
withoutdamagingthe bag. clothandamilddetergentinwarmwater.Rinseanddry
3. Pressinsideof bag againstthe drawerbottom, sides and thoroughlywith asoft cloth.
corners for a smooth fit. 5. If the drawerside wasremoved, slide it back into the tilted
pushingthedrawerside to the upright position.
7. Latch the drawerside by pushingup the lever-actionlock ((
Side-Lock Latch).
6. Pressthe lever-actionlock(or Side-Lock Latch) down while
-- Cleaning Inside the Cabinet
!__= position.
......... NOTE:Youmaywanttowearprotectiveglovesastheremay l-
COMPACTORCARE b,teofg,ass inthe cabinet.
Yournewcompactor isdesigned to give you manyyearsof Itwill be easier to replacethe drawerwhen you arefinishe(
dependableservice.However,thereare a few thingsyouare cleaning.
expectedto do in orderto maintainyourcompactor properly. \'_, I_'1
This section will tellyou how to cleanand care for your
compactor.
1. Pullthe drawerout untilit stops.
NOTE:Looktosee howthe drawerrollersmove in the trac_
L
Page 10

2. Liftthe front ofthe drawerto clearthestops. ,.... _ .................
3. Graspthe draweronthe sides and pullit out therest of the Yourcompactor won't operate
way.Set the drawerdowngently. __ .........................
4. Vacuumthe insideof the cabinet,Liquidspillsor wet trash Turnthe Key-Knob(Key-Switch)fully toSTARTandrelease
shouldbecleanedup by hand, or by usinga vacuum (onsomemodels),Seethe "Starting YourCompactor"
designedto pickup liquids, section.
5. Washthe insideof the cabinet with clean sponge orsoft Switch):
cloth and a mild detergentinwarm water. Rinseand dry Turnthe Key-Knob (Key-Switch)to STARTand release.See
thoroughlyw(tha softcloth, the "Starting YourCompactor" section.
6. Toreplacethedrawer,graspit by thesidesand insertthe • Toraisethe ram onmodelswith push button controls:
rollersontothetracks. PressOFF,andthen pressON.See the "StartingYour
7. Liftthefrontofthe drawerandpushit infullypastthestops. Compactor"section.
• Isthepower supplycordunplugged?
• Hasa householdfuseor circuitbreakertripped?
Replacethefuseorresetthecircuitbreaker,
- Isthe drawer completelyclosed?
Closethe drawerfirmlyand start the compactor again.
• Isthe Key-Knobturned all the way to START?
PressON beforepressing START(on some models).Seethe
"StartingYourCompactor" section.
The drawer won't open
• Isthe ramall the way up?
Drawerwill openonly whenram isfully raised.
• Didyou pressONbefore pressingSTART?
• Toraise the ram on models with e Key-Knob (or Key-
CleaningtheRam Thereisnotenoughcompactionorforce
NOTE:Youmaywantto wearprotectiveglovesastheremay be • Doyouuse the compactingcycle frequentlyenough?
bitsofglassontheramcover. Compactingworksbestwhenonlya fewitems areloaded.
1. Wipeglassparticlesoffof theramcoverwitha clothorpaper ............................
towels. Bottles don't break
2, Removefoodswithacleanspongeorsoftclothanda mild
detergentinwarmwater.Rinseanddry thoroughlywitha soft • Howoften do younoticethis?
cloth. Bottleswillnotbreakeverytime.Thethicknessof thebottle
L._ glassand the content of the trash loadbelow itmay preyer
the bottlefrom breaking,
RECYCLINGWITHYOUR
COMPACTOR
......""-'_" P_I= HDPE V
If youwillbeawayformorethanacoupleofdays,removethe
itc°mpact°rbag.RemovetheKey-Knob(orKey-Switch)andstOreoutof children's reach. _1_ _ _
TROUBLESHOOTING Thesecodesindicatewhichtypeofplasticwasused
Trythe solutionssuggestedherefirstIn orderto avoidthe recycling.
cost ofan unnecessaryservice call,
LDPE PP PS
inmanufacturingthecontainer.Yourrecycling
programwillconfirmwhichcodesareacceptedfor
• Isthe drawer lessthan half full? OTHER
Drawermustbe morethan halffull beforetrashis Plasticswiththissymbolcannotberecycled,
compacted.
10
Page 11

compacting cycle iscomplete, removethe plastic bag asshown
enoughto recycle.
in "Removingafilled bag" and return it to storage until it is full
Remember,compactingbothrecyclablssand non-
Itemswiththissymbolcanberecycledor weremade recyclablesmeanslesssolid waste and waste transportation
fromrecycledmaterials, costs--and a better environmentfor all,
Acompactor makes recyclingandlandfillreductionefforts
moreeffectiveand efficient. Reduce- Reuse- Recycle
Recycling Guidelines
Contact your community recycling program or local recycling ASSISTANCEORSERVICE
organizationsto find out which itemsareaccepted for recycling
and how they should be preparedand organized.These Beforecallingfor assistanceorservice, please check
programswill provide essentialrecyclingguidelines: "Troubleshooting."Itmay saveyouthe cost of aservice call. If
• Methodand frequencyofcollection--curbside collections youstillneed help, follow the instructionsbelow.
anddrop-off centers. Whencalling, please know the purchasedateand the complete
modelandserialnumberof your appliance.This informationwill
• Categoriesof recyclableitems,and how to distinguish help us to better respondto your request.
betweenthem. Plastic containers are identified by codes on
the bottom. Sort bythe numbersinsidethetriangular arrows.
Forexample,most plasticsoda bottles andsome cleaning _'_ ::_._...---_,.,,,_............_.._ _,_
bottleshavecode 1; most milk and water jugs, laundryand
personalhygieneproduct containershavecede 2. Paperand If the problem is not due to one of the items listed in the
cardboardcontainers(paperboard)alsohave recycle "TroubleshootJrlg" section.,.
symbolsto indicatea containerisrecyclable.
Callthe dealerfromwhomyour appliancewaspurchased,or ca
• Preparationsof recyclableitems. Mostrecyclingprograms MaytagApplianceSalesCompany,Jenn-Air Customer
providespecificguidelineson preparation.Forexample, Assistanceat 1-800-688-1100 or 1-423-472-3333to locatean
aluminumcans and plastic containersneedto be rinsedout, authorizedservicecompany.When calling, pleaseknow the
lidsremoved, butoften labelscan beleft on. purchasedateandthe completemodeland serialnumberofyo_
IMPORTANT: appliance.Besureto retainproof of purchaseto verifywarrant_
• Some items,suchas glass,shouldnotbe compacted.
status.
• Most recycfingprogramswill not accept crushedglass, writeto:
• Check with yourrecyclingprogramfor specific guidelineson Jenn-Air CustomerService
preparingrecyclabtes, Attn."CAIR"_Center
.......................................................................................................... P.O.Box2370
Organizing the Recycling Workspace Cleveland,TN37320-2370
Convenientrecycle binsaremade to fit in thecompactor drawer. Web address:www.jennair,com
Thesebins,aswellas plasticcompactorbags,can bepurchased Or call:1-800-688-1100.
ina varietyof colorsat hardwarestoresand supermarkets.Set U.S.customersusingTTYfordeaf, hearingimpairedor speecl
upa systemofcolor-coded bagsinan areachosenfor impaired,call:1-800-688-2080 (Monday-Friday,8:00 a.m.-8:01
processingrecyclables.Eachcolorcanrepresenta categoryof
recyclableitems,based on typesspecifiedby your recycling p.m.EasternTime).
program.Separaterecyclableitems from non-recyctableitems: NOTE:Whenwritingorcallingabout aserviceproblem, pleas
• Recyclableitemscanbesorted usingthecolor-codedbags.
includethe following information:
Prepareitems according to guidelinesprovidedby your 1. Yourname,addressand daytime telephone number.
recyclingprogram. 2. Appliancemodel numberand serialnumber.
• Non-recyclableitemsshould becompacted because 3. Nameandaddressof your dealer or servicer.
compaction reducestrashvolume to its originalsize:four 4. A clear descriptionof the problemyou arehaving.
bagsof trash can be compacted intoone bag.This 5. Proofof purchase(salesreceipt).
contributesto reducinglandfillvolumeandrelatedwaste
A_Ispecificationsaresubjectto change by manufacturerwith
transportationburdens, notice.
REMEMBER:Do notexpect itemswhichcontainminimalair,
suchasfolded newspapers,to compact significantly. ._......._.- __•_,_. _
Compacl_tlg Recyclable IleiTis Toorder a color-matchedtrim kitfor the installationof a oust
.................................................................................................. madepanel,contactyour localauthorizeddealer.
Most recyclingprogramswant the consumerto crush orflatten Replacement Bags- Callfor Part Number
recyclableitemssuchas plastics,cans,andpaperboard.
Compactingrecyclabie itemsconsolidatesvolumeandthereby TrimKitsfor Custom FrontPanels:
reducestransportation costs--and also helpsmanagerecycling OrderPart#TCDW(Trimkitfor custommade panel)
workspace moreeffectively.Thecompactor(s idealfor such a OrderPart#TCBS(Stainlesssteeldoorpanel)
task.When a plastic bag isfull enoughto requirecompacting,
placethe bag in the draweras shownin"Installinganew bag."
Thenfollow instructionsin"UsingYourCompactor."Whenthe
Page 12

JENN-AIRCOMPACTORWARRANTY
FULL ONE-YEAR WARRANTY
Forone (1)yearfrom the date of originalretail purchase,anypartwhichfailsinnormalhomeusewillberepairedorreplacedfreeof
charge.
LIMITED "I'WO-YEAR WARRANTY
Fromthesecondyearthroughtheendofthethirdyearfollowingthe dateoforiginalretailpurchase,parts whichfail innormalhomeus
willbe repairedorreplacedfreeof chargeforthe partitself,withtheownerpayingallothercosts,includinglabor,mileageand
transportation.
PLEASENOTE:Thefullwarrantyappliesonlywhenthecompactorislocatedin theUnitedStatesorCanada.Compactorslocated
elsewhereare coveredbythelimitedwarrantyonly,includinglimitedwarrantiesforpartswhichfailduringthe firstyear.
CANADIANRESIDENTS:ThesewarrantiescoveronlythosecompactorsinstalledinCanadathathavebeenlistedwithCanadian
StandardsAssociationunlessthecompactorsarebroughtintoCanadaduetotransferofresidencefromtheUnitedStatesto Canad_
The specific warranties expressed above are the ONLY warranties provided by the manufacturer. These warrantie:
give you specific legal rights, and you may also have other rights that vary from state to state.
What is Not Covered by These Warranties:
1. Conditionsanddamagesresultingfrom anyof thefollowing:
a. Improper installation,deliveryor maintenance.
b. Any repair,modification,alteration or adjustmentnot authorizedby the manufactureror an authorizedservicer.
c. Misuse,abuse, accidents or unreasonableuse.
d. Incorrectelectric current,voltage orsupply.
e. Impropersetting of any control.
2. Warrantiesarevoid if the originalserialnumbershavebeenremoved,alteredor cannot bereadilydetermined.
3. Products purchasedfor commercialor industrialuse.
4. Thecost of serviceorservice call to:
a. Correct installationerrors.
b, Instructthe useron properuse of the product.
c.Transportthe appliance to the servicer.
5. Consequentialor incidental damagessustainedby any personas a resultof any breachof these warranties.
Some states do not allow the exclusion or limitation of consequential or incidental damages, so the above
exclusion may not apply,
User's guides, service manuals and parts catalogs are available from Maytag Appliances Sales Company, Mayta(,
Customer Assistance.
6/_
Keep this bookand yoursales sliptogether for future Dealer name
reference.Youmust provideproofofpurchaseor installation
date for in-warranty service. Address
Writedownthefollowinginformationaboutyourcompactorto
betterhelpyouobtainassistanceorserviceifyoueverneedit. Phonenumber
Youwillneedto knowyourcompletemodelnumberandserial
number.Youcan findthisinformationonthemodelandserial Model number
numberlabellocatedontheinsidewallofthecompactordrawer. Serialnumber
Purchasedate
9871852
© 2001 MaytagAppliance All warrantiesare madeby MaytagApplianceSaiasCompany 2/
SalesCompany. ® MaytagApplianceSalesCompany PrintedinU.S
 Loading...