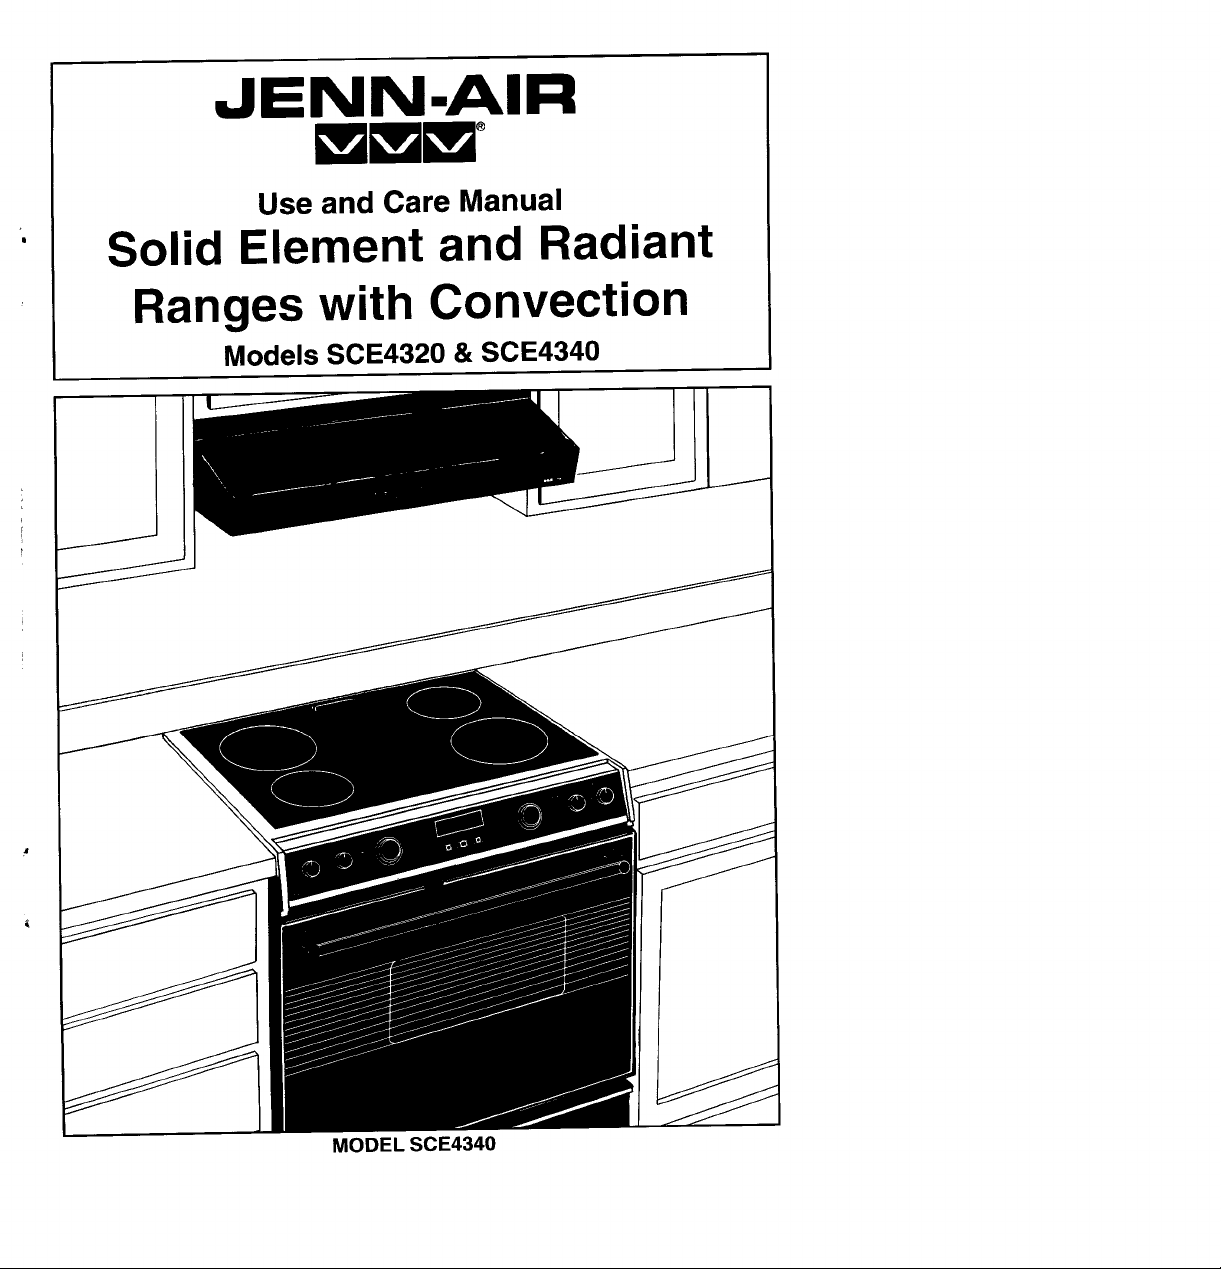
JENN-AIR
Use and Care Manual
• Solid Element and Radiant
Ranges with Convection
Models SCE4320 & SCE4340
MODEL SCE4340
About Your Jenn-Air
Congratulations on your choice of a Jenn-Air range.
Model SCE4320 - Your range has 4 solid elements with thermalimiters. The
elements in the rear, designated by a bullseye, are Ultra
Power solid elements. The elements in the front, desig-
nated by a dot, are standard elements.
Model SCE4340 - Your range has 4 radiant elements with thermalimiters.
Your Jenn-Air self-cleaning oven combines the best of two cooking methods,
convection and radiant bake (conventional) baking or roasting.
The Jenn-Air convection oven is actually a conventional oven that circulates
heated air within the oven. As both bake and broil heating elements cycle on and
off with the thermostat, a fan keeps the heated air circulating around the food.
The constantly recirculating heated air in the convection oven strips away the
layer of cooler air that surrounds food. Consequently, many foods cook more
quickly. Distributed heat makes multiple rack cooking possible. Convection
roasted meats retain their natural flavor and juiciness with less shrinkage than
radiant bake roasting.
In addition to the many exclusive b e nefits of convection cooking, your Jenn-Air
oven is also a fine full featured "bake and broil" oven. You can cook your "old
favorite" recipes as you have in the past. The radiant bake oven also gives you
the flexibility of preparing various foods when convection cooking may not be as
beneficial, as when cooking foods in covered casseroles. The broil element is
convenient for top browning and oven broiling of foods.
Before you begin cooking with you r new range, please take a few minutes to read
and become familiar with the instructions in this book. On the following pages
you will find a wealth of information regarding all aspects of using your new
range. By following the instructions carefully, you will be able to fully enjoy and
properly maintain your range and achieve excellent results with the food you
prepare.
Should you have any questions about using your Jenn-Air range, write to us. Be
sure to provide the model number.
Consumer Relations Department
Jenn - Air Company
3035 Shadeland Avenue
Indianapolis, IN 46226-0901
2
SAFETY
PRECAUTIONS
Read before operating your range
All appliances -- regardless of t he manufacturer -- ha v e the
p o tential through improper or car e less us e to create safety prob-
lems. Therefore the following safety precautions should be
observed:
1. Be sur e your appliance is pr o p e rly installed a nd grounded by a
qualified technician.
2. Never use your appli a nce for w a rming or he a ting the ro o m.
3. Children should not be left alone or unattended in area where
appliance is in use . They should never be allowed to sit or stand
on any part of the appliance.
4. Wear proper apparel. Loose-fitting or hanging garments should
never be worn while using the appliance.
5. Do not repair or replace any part of the appliance unless specifi-
cally recommended in this manual. All other servicing should be
referred to an authorized Jenn-Air Service Contractor.
6. Flammable materials should not be stored in an oven or near
surface units.
7. Do not use water on grease fires. Smother fire or flame or use dry
chemical or foam-type extinguisher.
8. Use only dry potholders . Moist or damp potholders on hot surfaces
may result in burns from steam. Do not let potholder touch hot
heating elements. Do not use a towel or other bulky cloth.
9. Use proper pan size. Many appliances are equipped with one or
more surface units of different size. Select cookware having flat
bottoms large enough to cover the surface unit heating element .
The use o f undersized cookware wi ll expose a port i on of the
heating element to direct contact and may result in ignition of
cloth i ng. Proper r e lationship of cookware to heating element will
also improve efficiency and performance.
10. N e v e r l e ave surfac e units unattend e d at high heat s e ttings. B o il
over causes smoking and greasy spillovers that may ignite.
5
11. Glazed cookware -- only certain types of glass, glass-ceramic,
ceramic, earthenware, or other glazed cookpots are suitable for
range top surface without breaking due to the sudden change in
t e mper a tur e . Use o nly such co o kw a re a s y o u know h a ve been
approved for this purpose .
12. Cookware handles should be turned inward and not extend over
adjacent surface heating elements to avoid burns, ignition of
flammable materials and spillage due to unintentional contact with
the cookware.
13. CAUTION -- Do not store items of interest to children in cabinets
a bove a r a ng e or on the b ac kguard of a r a nge -- children c limbing
on the range to reach items could be seriously injured.
14. Do not touch surface units or areas near units, heating elements
or interior surfaces of oven. Surface units or heating elements may
be hot even though they are dark in color. Areas near surface units
and interior surfaces of an oven may become hot enough to cause
burns. During and aft e r use, do not touch or let clothing or oth e r
fl a mm a ble m a terials c ontact th e se a reas until they h a ve had
sufficient time to cool. Other surfaces may become hot enough to
cause burns --among these surfaces are the cooktop, the upper
door frame and glass, oven vent opening and surfaces near the
opening, and the top edge of the control panel.
15. Use care when opening oven door . Let hot air or steam escape
b e fore r e m o ving or replacing food.
16 . Do not heat unop e ned food containers. Build-up of pressure may
cause container to burst and result in injury.
17 . Keep oven vent ducts unobstructed.
18. Always place oven racks in desired location while oven is cool. If
rack must be moved while oven is hot, do not let potholder contact
hot heating element in oven.
19. D o not clean d oo r gasket. Th e door gask e t is e ssenti a l for a g o od
seal . Care should be taken not to rub , damage or move the gasket .
20 . Do not use oven cleaners. No commercial oven cleaner or oven
liner protective coating of any kind should be used in or around any
part of the oven.
21. Clean only parts listed in this manual and use procedures recom-
mended.
22 . B e fore s e lf-cl e aning th e o v e n, remove br o iler p a n a nd o ther
utensils .
23. Listen for fan. A f a n noise should be heard during the cleaning
cycle. If not, call a serviceman before self-cleaning again.
24. Do not cook on glass-ceramic cooking surface if the cooktop is
broken . C leaning solutions and spillov e rs m a y p e netr a te the
broken cooktop and create a shock hazard. Contact an authorized
Jenn-Air Service Contractor .
25. Cle a n gl a ss-c e r a mi c c o okt o ps with c a ution . If wet spong e or c loth
is used to wipe spills on a hot cooking area, be careful to avoid
steam burns. Some cleansers can produce noxious fumes if
applied to a hot surface.
26. Do not operate with damaged cooking element after any product
malfunction until proper repair has been made.
27. Keep all switches "OFF" when unit is not in use.
28. Do not allow aluminum foil or meat probes to contact heating
elements.
29 . WARNING: To reduce the risk of tipping of the appliance, the
appliance must be secured by properly installed anti-tip devices.
T o ch e ck if d e vic e s a re installed pr o p e rly, rem o ve the a cc ess p a nel
and verify that the anti-tip devices are engaged.
IMPORTA NT S AFETY N O TICE AN D W ARNING
The California Safe Drinking Water and Toxic Enforcement Act of 1986
(Proposition 65) requires the Governor of California to publish a list of
substances known to the State of C alifornia to cause cancer or reproduc-
tive harm, and requires businesses to warn customers of potential
exposures to such substances. Users of this appliance are hereby
w a rned that wh e n the oven is eng a ged in th e self-cle a n cycl e , th e re m a y
be some low level exposure to some of the listed substances, including
Carbon Monoxide. Exposure to these substances can be minimized by
properly venting the range to the outdoors during the self-clean cycle.
Cooktop & Oven Controls
Oven V e nt Clock Controls &
Oven Light
Switch " Ov en
Sur f ace _ Te mperature
Ind
Light Indicator
Ov e n Light
Selector
Knob Indicator
Door Lock Indicator Lights
L e v e r
mer
Knob
Light
Surface
Controls
Indicator
and Lock
Surface Controls
• Use to provide variable heat t o cook t op hea t ing elemen t s. ( See pg.9)
Oven Controls
• Use to se t o v en for bak i ng, broil i ng, con v ection baking, and self-clean. ( See
pg . 15)
Clock Controls and Minute Timer
• Fea t ures t i me of day, minute timer, and oven clock contr o ls. (See pg. 16-19)
Surface Controls
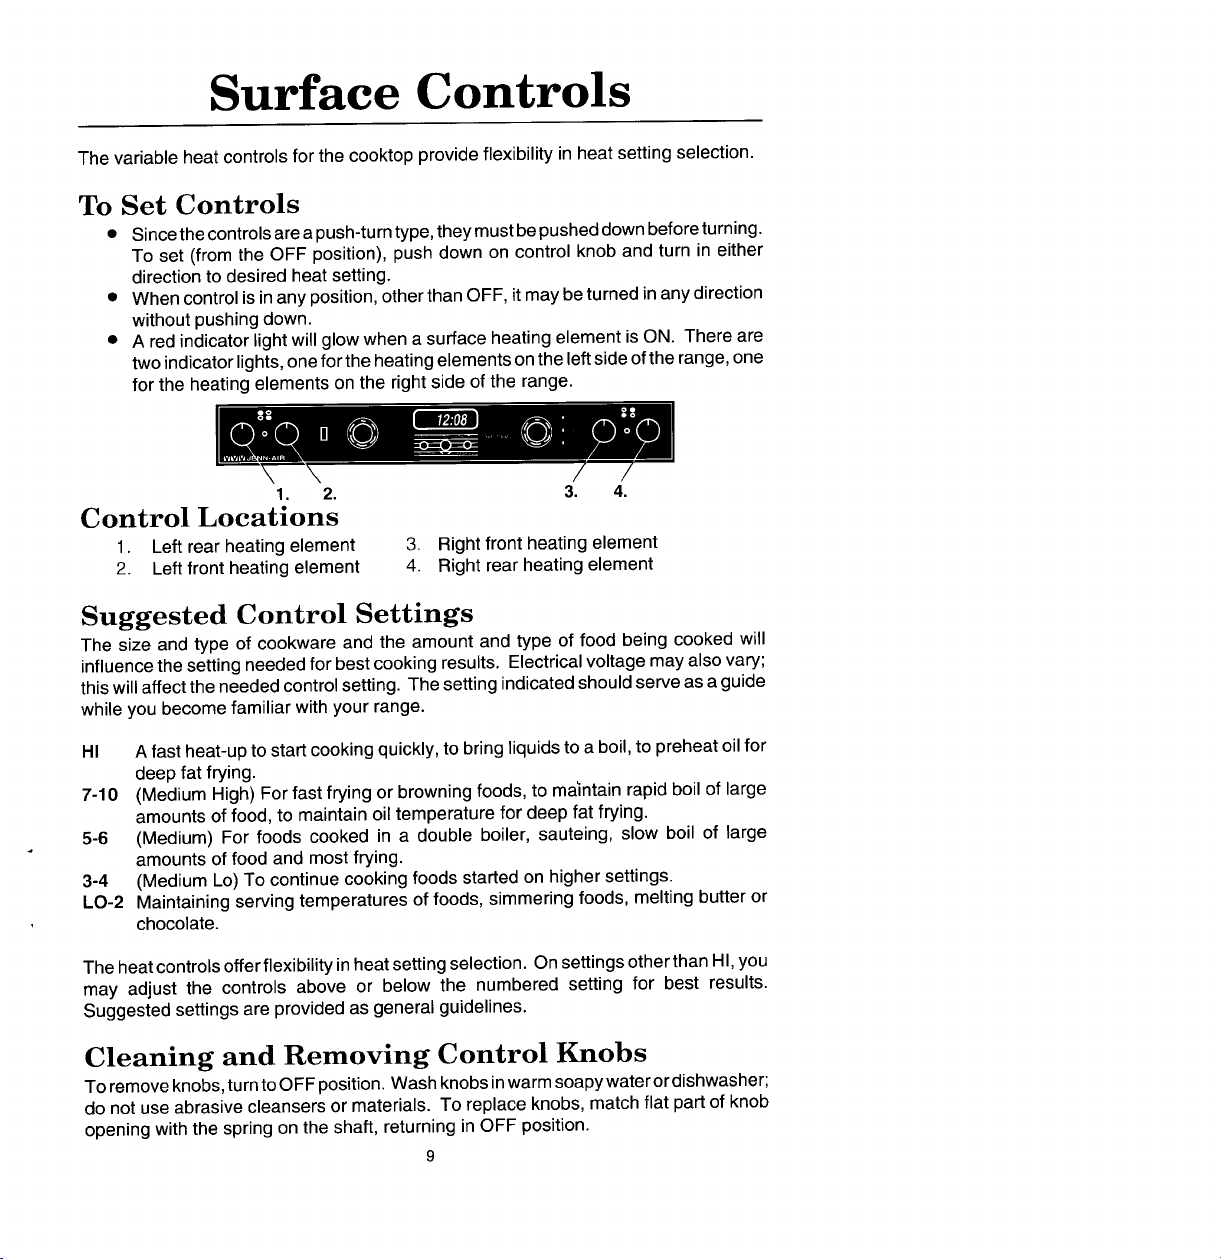
The variable heat controls for the cooktop provide flexibility in heat setting selection.
To Set Controls
• Since the controls are a push-turn type, they must be pushed down before turning.
To set (from the OFF position), push down on control knob and turn in either
direction to desired heat setting .
• When control is in any position, other than OFF, it may be turned in any direction
without pushing down.
• A red indicator light will glow when a surface heating element is ON . There are
two indicator lights, one for the heating elements on the left side of the range, one
for the heating elements on the right side of the range.
1. 2. 3. 4.
Control Locations
1 . Left rear heat i ng element 3. Right front h e ating element
2 . Left front heating element 4. Right rear heating element
Suggested Control Settings
The size and type of cookware and the amount and type of food being cooked will
influence the setting ne e ded for best cooking results . Electrical voltage may also vary;
this will affect the needed control setting. The setting indicated should serve as a guide
whil e you bec o me famili a r with your r an ge .
HI A fast heat-up to start cooking quickly, to bring liquids to a boil, to preheat oil for
deep fat frying.
7-10 (Medium High) For fast frying or browning foods, to ma)ntain rapid boil of large
amounts o f fo o d, to m a int a in o il temp e r a ture for d e ep f a t frying.
5-6 (Medium) For foods cooked in a double boiler, sauteing, slow boil of large
amounts of food and most frying.
3-4 (Medium Lo) To continue cooking foods started on higher settings.
LO-2 Maintaining serving temperatures of foods, simmering foods, melting butter or
chocolate .
The heat controls offer flexibility in heat setting selection. On settings other than HI, you
may adjust the controls above or below the numbered setting for best results.
Suggested settings are provided as general guidelines .
Cleaning and Removing Control Knobs
To remove knobs , turn to OFF position. Wash knobs in warm soapy water or dishwasher;
do not use abrasive cleansers or materials. To replace knobs, match flat part of knob
opening with the spring on the shaft, returning in OFF position.
9
Cookware
T o a chi e v e optimum c oo king perf o rm a n c e, us e heavy gauge, flat, smooth bottom
cookpots that conform to the diameter of the solid or radiant element (no m o re than one
inch overhang). Proper cookpots will minimi z e cooking times, use less electricity, cook
food more evenly and require less water or oil.
Cookpots with thin, uneven bottoms do not adequately conduct heat from the solid or
radiant element to the food in the cookpots which results in hot spots , burned or
underdone food. Using bad cookpots also requires more water, time, and energy to cook
fo o d.
Sele ct in g Pr oper Cook ware
• Select heavy gauge cookpots . Usu al ly h e av y g a ug e c oo kpo t s w i ll n ot ch an ge
s hap e w h e n h e at e d.
• Use cookpots with flat, smooth bottoms. Th e two way s to d e t e r min e i f cookpot s
h av e a fl at, smoot h bottom a r e th e ru l er te s t a nd th e cooking te s t.
Ruler Te st:
1. Pl a c e th e edg e of ruler across the
bottom of the pot.
3. No light should be visible under t h e
ruler.
C oo k i ng T e st :
1. Put 1 inch of water into the cookpot.
2. Place cookpot on the element. Turn control to the HI setting.
3 . Observe the bubble formation to determine the heat distribution. If the
bubbles are uniform across the cookpot, the cookpot will perform satisf ac -
torily. If the bubbl e s a re not uniform, the bubbles will indi ca te the hot spots .
• Match the size o f the cookpot to the size o f the element. Ideal l y, the co o kp o t
w il l b e th e sam e siz e or sli ghtly l ar g e r.
10
I m prope r Cookware
• Do not use cookware that extends more than 1 inch beyond the edge of the
element .
• Do not use a small cookpot on a large element . Not only can this cause the
element to require more energy and time, but it can also result in spillovers burning
onto th e e J ement wh i ch cause extra effort Jn cleaning .
• Do not us e nonfl a t specialty items th a t are oversi z ed, uneven or do not m e et
proper cookware specifications such as round bottom woks with rings, griddles,
rippled b o ttom c ann e rs, l o bst e r p o ts, larg e pr e ssur e ca nners, et c .
Home Canning
Acceptable canning pots should not be oversized and must have a flat bottom. When
canners do not meet these standards , the use of the HI heat setting becomes excessive
and may result in damage to the cooktop. In addition, water may not come to a boil and
ca nn e rs m a y not re ac h 10 lb. of pressure.
The a c cept a ble c anning pr o cedure us e s th e HI s e tting just l o ng e n o ugh to bring th e w a t e r
to a boil, then lower the setting to maintain the water temperature.
Characteristics of Cookware Materials
Heavy gauge cookpots with flat , smooth bottoms will usually work in a similar way .
However, there are some differences in the c ooking performance of various materials.
• Aluminum cookpotsheatquicklyandevenly . Bestsuitedforsimmering, braising,
boiling a nd frying.
• Stainless steel co o kpots will evenly distribut e heat if c o nstructed of tri-ply o r
combined with other metals such as aluminum and copper. Use for cooking
functions similar to aluminum .
• Cast iron cookpots are slow to heat but cook more evenly once temperature is
reached. Use for long term low heat cooking or for browning and frying .
• Glass ceramic, earthenware, heat - proof glass orglazed cookpots can be used
if recommended bythe manufacturer for cookpot cooking . Do not use with trivets.
Best used on low to medium control settings.
• Porcelain enamel - on - steel or porcelain enamel - on - cast iron should be used
according to manufacturer's directions. Do not allow to boil dry .
11
Solid Element Cooktop
(Model SCE4320)
IMPO RTANT
BEFORE USIN G THE COOKT O P F OR THE FI R STTIME, HEAT THE ELEMENTS
WITH O UT A PAN F O R 3 T O 5 MINUTES O N THE HI SETTIN G . Th e e l e m e nts ar e
shipped w i th a coating (lacquer) wh i ch protects them against corros i on . Heat i ng the
elements allows the coating to be hardened and burned into the elements . During
the curing process, a non-toxic smoke will be created. Turn on the overhead hood
fan if the smoke is objectionable. If the elements are not cured , the coating can stick
to a p a n when first used on the solid element .
Cooki n g Proc e d u r e s
• Make sure bottom o f cookware is dry before plac i ng o n element.
• Do not use wire trivets, fire rings, pads or any such item between the cookware
and the element.
• Cover cookware with lids to shorten cooking time and save energy . This is
e spe c i a lly import a nt when co o k i ng l a rge qu a ntities of f o od.
• Use as l i ttle water to cook food as is nec e ssary. Cov e red cookware requires less
water.
• The solid elements retain heat for a period of time after the elements have been
turned off. Put this residual heat to good use. Turn the elements off a few
minutes before food is comp l etely cooked and use the retained heat to complete
th e c o o k i ng o p e rati o n. B eca us e o f this h ea t r e t e ntion ch a r a ct e ristic, the
elements will not respond to changes in heat sett i ngs as quickly as coil elements .
In the event of a potential boil over, move the cookpot to a cool element or from
the cooking su r face.
• Do not lay lids (with moisture in them) , spatulas , or other food laden utensils on
solid el e ment.
I M PORTA N T
• Do not use decorative covers over the solid element . These trap moisture
which c an c o rrode the cast iron element. If the element is accidentally turned
on, the covers could permanently damag e th e s o l i d el e m e nt or th e c o oktop.
• Do not use wet pans or leave pan bottoms wet . Moisture could cause corrosion
and will not allow your pans to heat properly.
12
Radiant Element Cooktop
(Model SCE4340)
Cooking Procedures
• BEFORE FIRST USE . CLEAN COOKTOP (See pg.39)
• For best results, always use recommended cookware.
• Different cookpots and different amounts of food being prepared will influence the
cont r ol settings needed for best res u lts. For fastest c ooking, sta r t with the surfa c e
control on H i for one minute; then turn the control to the lower desired setting.
Covering pans, whenever possible, speeds cooking and is more energy efficient.
• The glass ceramic cooking area retains heat for a period of time after the elements
have been turned off. Put this retained heat to good use. Turn the elements off
a few minutes before food is completely cooked and use the retained heat to
complete the cooking. Because of this heat retention characteristic, the elements
will not respond to changes in heat settings as quickly as coil elements. In the
event of a potential boil over, remove the cookpot from the cooking area.
• When preparing foods which can be easily scorched or over-cooked, start
cooking at a lower temperature setting and gradually increase temperature as
needed.
• A higher setting than normal may be necessary when using cookpots made with
material that is sl o w to co nd uc t heat, such as c ast ir on .
• A lower setting can be used when cooking small quantities of foods or when using
a cookpot that conducts heat quickly.
I M P O R T A NT
• Do not use wire trivets, fire rings, pads or any such item between the cookware
and the element .
• Do not cook foods directly on cooktop .
• D o n o t a l low p a n to boil dry as this c o uld d a mage the c oo ktop and th e pan
• Do not slide heavy metal or glass cookpots across surface since these may
scratch the surface.
• Do not use or place plastic items anywhere on cooktop.
Hot Indicator Light
A red light will come on to indicate that cooking area is hot and will remain on until area
h a s cooled.
13
Avoid D a m ag e to Cooktop
• Do not allow plastic objects, sugar, or foods with high sugar content to melt onto
the hot cooktop . Melted materials can cause permanent damage to the cooktop.
If you accidentally melt anything onto the cooktop, remove it immediately while
the cooktop is still hot. Carefully, use a single edge razor blade held with a pot
holder to remove melted on material.
• Do not use aluminum foil or foil-type containers under any circumstances.
Aluminum foil will damage the cooktop if it melts onto the glass. If metal melts
on cooktop, do not use. Call an authorized Jenn-Air Service Contractor.
• Do not use the glass-ceramic cooktop as a cutting board.
• Do N O T use the abrasive cleansing or scouring pads (including metal scouring
pads), which will scratch the cooktop .
• Do N O T use chlorin e bleach, ammonia, rust remov e rs, ov e n cle a n e rs, or oth e r
cleanser not specifically recommended for use on glass-ceramic.
• T e st cast ir o nwar e sin ce a ll ar e not fl a t. Also b e cauti one d a g a inst p o ssibl e
"impact damage" should the heavy cookpot be dropped on the glass-ceramic
surface.
Save on Clean - up Time
• Make sure bottoms of cookpots are always clean and dry. (Soil from the cookpot
b o ttom can be transf e rr e d t o th e c o o ktop surf a ce.) B e for e using co okpots o n the
glass-ceramic cooktop for the first time, and periodically as needed, clean the
bottoms with scouring pads or other cleansers. Rinse and dry thoroughly.
• Make it a practice to wipe cooktop surface with a clean damp cloth or paper towel
before each use; dry thoroughly. Invisible spatters, dust specks, cleansers or
wa t e r ca n ca use st a ins th a t a ppear aft e r unit is heated. A sponge or dishcloth
which is not clean will leave film and soil laden detergent water which may cause
stains on surface after area is heated.
• When frying, use a spatter shield to reduce spattering.
• Use c o rrect control settings and cookware large enough to hold food and liquid
to prevent boilovers and spattering.
• If a bad spillover occurs while cooking , spills may be cleaned from the cooktop
while it is hot to prevent a tough cleaning chore later . Using extreme care, wipe
with a clean damp towel. Be careful to avoid burns from steam or hand touching
the hot cooktop.
14
Oven Operation
Oven Con t ro ls (pictured on p. 8 )
O v en L igh t Sw i tch
* The oven light automatically comes on whenever the oven door is opened. When
the door is closed, the oven light may be turned on by pushing the switch at the top.
To turn oven light off, push on the bottom of the switch . Light cannot be turned on
during the self-cleaning process.
Clean Indicator Light
• Indicates when all controls have been properly set for the self-cleaning process . Light
will remain on during the entire cleaning process and until the timer has advanced
through the set c le a ni n g time.
Lock I n d i cator Light
• Will glow after the oven door has been automatically locked (after the oven
temperature is over 550°F) Door cannot be opened until oven temperature drops
below 550°F and the lock indicator light goes off .
S e l e c to r Kno b
• This knob controls the oven operation. To operate the oven, turn to desired setting
and turn TEMPERATURE knob to desired setting.
The settings are:
O FF The oven will not operate when knob is on this setting . Keep
knob on this position when oven is not in use.
BAKE Use for radi a nt b a k e ( c onventional) b a ki n g or roasting. (Se e
pg. 21,23 and 26.)
T IME ]_A V -J_ Use with c lo c k c o ntrols for a utom a tic a lly st a rting and st o pping
oven when baking or roasting in the radiant bake oven (See
pages 18-1 9 .)
CON V ECT Use for convection baking or roasting. (See pages 22-28.)
TIME CONVECT Use with clock controls for automatically starting and stopping
oven when baking or roasting in the convection oven. (See
pages 18-19.)
BROIL Use for top browning or oven broiling of foods . (See pages 29-
30.)
CLEAN Use for self-cleaning process. (See pages 31-36.)
Door Lock Lever
• Use to lock oven for self- c leaning process. (C a n only be l oc ked when t e mp e rature
knob is on CLEAN setting.)
Ove n I n d i cato r L i ght
• Indicates when oven is turned to an operating position other than the CLEAN setting.
Light will glow until the desired temperature is reached. It will cycle on and off as this
temperature is maintained during cooking.
Tempe rat u r e Kno b
• Use to set oven temperature. Be sure the indicator line is in line with the exact
temperature desired. This knob is used with all oven operation settings noted on the
SELECTOR knob.
15


 Loading...