

Page 1
GAs RANGERS-1
Us
GUIDE
Installer:Pleaseleavethismanualwith Ifyouhavequestions,call: ' [A
thisappliance, _./_BLE OF CONTENTS
Consumer:Pleasereadandkeepthis 1-800-688-1100USAandCanada SafetyInstructions....................................1-3
manualforfuturereference.Keepsales 1-800-688-2080(U.S.TTYfor SurfaceCooking......................................4-5
receiptand/orcancelledcheckasproofof hearingorspeechimpaired)
purchase. (Mon.-Fri.,8am-8pmEasternTime) OvenCooking........................................6-11
ModelNumber Internet:http://www.jennair.com Care&Cleaning..................................12-16
SerialNumber GuidedeI'utilisateur..................................20
DateofPurchase provethequalityandperfor-
Jenn-AirCustomerAssistance
Forserviceinformation,seepage19. BeforeYouCallforService..................17-18
Warranty....................................................19
......................... GuiadelUsuario........................................42
In ourcontJnuJngeffortto ira-
manceofourcookingproducts,
it maybenecessaryto make
changestotheappliancewith-
FormNo A/04/01 PartNo.8113P310-60 74006043 Litho U.S,A
JENN-AIR ,°utrevisingthisguide....
Page 2

IMPORTANTSAFETYIFISTIUCTIOFIS
Read and follow all instructions technicianshowyou the locationof the Keepareaaroundapplianceclearand
beforeusing this appliance toprevent gasshut offvalveandhowto shut it off freefromcombustiblemateriats,gaso-
the potentialriskof fire, electricshock, in an emergency, line,and otherflammablevaporsand
personalinjuryordamageto the appli- materials.
ance as a resultof improperusageof Always disconnectpower to appliance Ifapplianceis installedneara window,
theappliance.Useapplianceonlyfor its beforeservicing.
intendedpurpose as described in this prevent curtains from blowing over
guide GENERALINSTRUCTIONSburners.
IF THE INFORMATION IN THIS ignite flammable items and may
MANUAL IS NOT FOLLOWED >- ALL RANGES _ increasepressureinclosedcontainers
SlON MAY RESULT CAUSING CAUSE Manyaerosol-typespraycansareEX-
PROPERTY DAMAGE, PERSON- INJURIES TO PLOSIVEwhen exposedto heat and
EXACTLY, A FIRE OR EXPLO- CAN TIP AND _ whichmaycausethemto burst.
AL INJURY OR DEATH. PERSONS may be highlyflammable.Avoid their
> DO NOTSTOREOR USEGASO- > INSTALL _ useorstoragenearan appliance.
VAPORSAND LIQUIDS IN THE DEVICE Keepplastics away from partsof the
VACINITY OF THIS OR ANY PACKED appliancethat may becomewarm or
LINE OR OTHER FLAMMABLE ANTI-TIP (_ Manyplasticsare vulnerableto heat.
APPLIANCE. WITH RANGE hot. Do not leaveplastic itemson the
> WHAT TO DO IF YOU SMELL > FOLLOW ALL INSTALLA- cooktopas they may meltor softenif
GAS: TION INSTRUCTIONS left too closeto the vent or a lighted
properprecautionsshouldbetakento
NEVERleaveany itemsonthe cook-
top. The hot air from the vent may
surfaceburner.
- Do not try to light any appli- WARNING: To reduce risk of To eliminatethe hazard of reaching
ante. tipping of the appliance from overhotsurfaceburners,cabinetstor-
- Do not touch any electrical abnormal usage or by exces- age should not be provided directly
switch, sire loading of the oven door, abovea unit. If storageis provided,it
- Do not use any phone in your the appliance must be se- shouldbe limitedto itemswhicharc
building, cured by a properly installed usedinfrequentlyandwhicharesafel_
-Immediately call your gas anti-tip device, stored in an area subjectedto hen
supplier from a neighbor's fromanappliance.Temperaturesmat
phone. Follow the gas sup- Tocheckif deviceis properlyinstalled, be unsafe for some items, such a._
plier's instructions, removestoragedraweror broilercorn- volatile liquids, cleaners or aeroso
- If you cannot reach your gas partmentand look underneathrange sprays.
supplier, call the fire depart- with a flashlightto make sureone of
rnent, the rear leveling legs is properly
INSTALLATIONAND SERVICE engagedin thebracketslot.Theanti- IN(AS[0FfIRE
MUST BE PERFORMED BY A tipdevicesecuresthe rearlevelingleg
QUALIFIEDTECHNICIAN,SER- You should check this anytime the to avoid spreading the flame
VICE AGENCY OR THE GAS rangehas beenmoved. Extinguishflame,thenturnonhoodtc
SUPPLIER. removesmokeandodor.
Toensureproperand safeoperation: TOPREVENTfiR[ pan with a lid or cookiesheet. Neve
Appliancemustbeproperlyinstalledand usewateron a greasefire.
groundedby a quatifiedtechnician.Do SMOKEDAM.G[notattemptto adjust,repair,service,or OR OVENDOOR:If fireis in theoven c
replace any part of your appliance broiler pan, smotherby closing ove,
unlessit is specificallyrecommendedin Be sure all packing materials are door.
this guide.All otherservicingshouldbe removed from the appliancebefore Neverattemptto pick up or move
referredto a qualifiedservicer.Havethe operatingit. flaming pan. Do not use water ot
to the floor when properly engaged. Turnoffapplianceandventilatinghooc
COOKTOP:Smotherfireorflamein
1
Page 3
greasefires,usebakingsodaor a dry oven vent, surfaces near the vent Alwaysletquantitiesof hotfatusedfor
chemicalor foam-typeextinguisherto opening,ovendoorand areasaround deepfatfryingcool beforeattempting
smotherfire orflame, doorandwindow, to moveor handle.
WARNING: NEVER use appliance Do not let cooking grease or other
(HI[D S,_f[ff door,or drawer,if equipped,asa step flammablematerialsaccumulateinor
stoolorseatas thismayresultin pos- nearthe appliance,hoodor vent fan.
NEVERleavechildrenalone or unsu- sibletippingof theappliance,damage Clean hood frequently to prevent
pervisedneartheappliancewhenit is tothe appliance,andseriousinjuries, greasefromaccumulatingon hoodor
in useor isstill hot. Donottoucha hotovenlightbulbwith filter. When flaming foods under the
hood,turnthefan on.
NEVERallow childrento sit or stand adampcloth asthe bulbcouldbreak.
on any part of the applianceas they Should the bulb break, disconnect NEVERweargarmentsmadeof flare-
couldbeinjuredor burned, powerto theappliancebeforeremov- mablematerialor loose-fittingorlong-
ingbulbto avoidelectricalshock, sleevedapparelwhilecooking.Cloth-
Childrenmustbetaughtthatthe appli- ingmayigniteor catchutensilhandles.
anceandutensilsin it can behot. Let
hotutensilscoolin a safeplace,outof (00KIN6 S,_f[ff Alwaysplaceovenracksinthedesired
reach of small children. Children positions while oven is cool. Slide
shouldbe taughtthat an applianceis Alwaysplacea panona surfaceburn- oven rackout to addor removefood,
not a toy. Children should not be er beforeturning it on. Be sure you usingdry, sturdypot holders.Always
allowedto playwith controlsor other knowwhich knobcontrolswhich sur- avoidreachingintotheovento addor
partsofthe unit. face burner. Make sure the correct removefood.Ifa rackmustbe moved
CAUTION:NEVERstore itemsof in-
terestto childrenincabinetsabovean
burneristurnedonand thattheburn- whilehot,usea drypotholder.Always
er has ignited.Whencookingis corn- turnthe ovenoffat theendofcooking.
pleted,turnburneroffbeforeremoving Usecarewhenopeningtheovendoor.
applianceor onbackguardofa range, pan to prevent exposure to burner Let hot air or steam escape before
Children climbing on the appliance flame, movingor replacingfood.
doorto reachitemscouldbeseriously
injured. Alwaysadjustsurfaceburnerflameso PREPAREDFOOD WARNING:Fol-
thatitdoesnotextendbeyondthebot- lowfood manufacturer'sinstructions.If
_BOUT fOUR _,IPP[IAN([ tom edge of the pan. An excessive a plasticfrozenfoodcontainerand/or
flame is hazardous,wastes energy its cover distorts, warps, or is other-
and may damagethe appliance,pan wise damagedduringcooking,imme-
NEVER use appliance as a space orcabinetsabovetheappliance, diatelydiscardthe food and its con-
heaterto heator warma roomto pre-
ventpotentialhazardto the userand NEVERleavea surface-cookingoper- tainer.The food couldbe contaminat-
damagetothe appliance.Also,donot ation unattended, especially when ed.
usethe cooktopor ovenas a storage usingahighheatsettingorwhendeep NEVERusealuminumfoil to coveran
areaforfoodorcookingutensils, fat frying. Boiloverscause smoking oven rack or oven bottom. Misuse
and greasy spillovers may ignite, could result in risk of electricshock,
Donotobstructtheflowofcombustion Cleanupgreasyspillsassoonaspos- fire, or damageto the appliance.Use
andventilationairbyblockingtheoven sible.Donot usehighheatfor extend- foilonly asdirectedinthis guide.
vent or air intakes.Restrictionof air edcookingoperations.
flowtothe burnerpreventsproperper-
formanceand increasescarbonmen- NEVERheatan unopenedcontainer Uf[NSI[ S,_f[ff
oxideemissionto unsafelevels, on the surfaceburneror in the oven.
Pressurebuildup maycausecontain-
Avoidtouchingoven vent area while ertoburst,resultinginseriousperson- Use pans with flat bottomsand han-
oven is on and for severalminutes al injuryor damageto theappliance.
dlesthat are easilygraspedand stay
afterovenisturnedoff.Somepartsof cool. Avoid using unstable, warped,
theventandsurroundingareabecome Usedry,sturdypotholders.Damppot easily tippedor loose-handledpans.
hotenoughto causeburns.Afteroven
is turned off, do not touchthe oven
holdersmaycauseburnsfromsteam. Also avoid using pans, especially
Dishtowelsor othersubstitutesshould small pans, with heavy handlesas
vent or surroundingareas until they neverbeusedaspot holdersbecause they could be unstableand easilytip.
havehadsufficienttimeto cool. theycantrailacrosshotsurfaceburn- Pans that are heavy to move when
ersand igniteor getcaughton appli- filled with food mayalso be hazard-
Otherpotentiallyhot surfacesinclude ancepads. ous.
cooktop, areas facing the cooktop,
J
Page 4
IMPORTANTSAFETYINSTRUCTIONS,CONT.
Besureutensi,is,argeenoughto (LEAFIIFIGSAFETY IMPORTAHTSAFETYNOTICE
properly contain food and avoid
boilovers.Pan size is particularlyim- Turnoff allcontrolsandwaitfor appli- AHD WARHIHG
portantindeepfatfrying.Besurepan ancepartsto coolbeforetouchingor
will accommodatethe volumeof food cleaningthem.Do nottouchthe bum-
thatisto be addedaswellasthe bub- The California Safe Drinking Water
bleactionoffat. theyhavehadsufficienttimeto cool. (Proposition65)requirestheGovernor
Tominimizeburns,ignitionofflamma- Clean appliance with caution. Use of Californiato publisha list of sub-
blematerialsandspillagedueto unin- care to avoid steam burns if a wet stancesknowntothe Stateof Califor-
tentionalcontactwith the utensil,do
notextendhandlesoveradjacentsur- on a hot surface.Somecleanerscan harm,andrequiresbusinessestowarn
faceburners.Alwaysturn panhandles producenoxiousfumes if appliedto a customers of potential exposuresto
towardthe side or backof the appli- hotsurface, suchsubstances.
ance,notoutintotheroomwherethey
areeasilyhit orreachedby smallchil- Users of this appliance are hereby
dren. ,_I[L[1_.LL,/Arq(lrlr'_"|rA_lOVEH warned that the burning of gas can
Neverlet a panboil dry as this could the listedsubstances,includingben-
damagethe utensilandtheappliance. Cleanonlypartslistedinthisguide.Do zene,formaldehydeandsoot,duepri-
Followthe manufacturer'sdirections ketis essentialfor a goodseal.Care natural gas or liquid petroleum(LP
whenusingovencookingbags. shouldbetakennotto rub,damageor fuels. Properly adjusted burners wil
Onlycertaintypesof glass,glass/ce- removethe gasket.Do not useoven minimizeincompletecombustion.Ex
ramic,ceramicor glazedutensilsare cleanersof any kindin or aroundany posureto these substancescan als(
suitable for cooktop or oven usage partofthe self-cleanoven.
without breaking due to the sudden Beforeself-cleaningthe oven,remove burnerstothe outdoors.
changein temperature.Followmanu- broilerpan,ovenracksandotheruten- Users of this appliance are hereb_
facturer's instructions when using sils and wipe up excessivespillovers
glass, to preventexcessivesmokeor flare- warnedthatwhenengagedintheself
This appliance has been tested for ups. exposureto some of the listed sub.
safe performanceusing conventional CAUTION:Donot leavefoodor cook- stances,includingcarbon monoxide
cookware.Donot useanydevicesor ing utensils,etc., in the oven during Exposurecanbe minimizedbyproper
accessoriesthat are not specifically the self-cleancycle, ly venting the oven to the outdoor,,
recommendedin this guide. Do not duringthe self-cleancycleto openin(
useeyelidcoversforthesurfaceunits, It is normalfor the cooktopof the a window and/or door in the roorr
stovetopgrills,oradd-onovenconvec- range to become hot during a self- wheretheapplianceis located.
tion systems.The use of devicesor clean cycle. Therefore,touching the
accessoriesthatarenotexpresslyrec- cooktopduringacleancycleshouldbe IMPORTANTNOTICE REGARDIN(
ommendedin this manualcancreate avoided.
serioussafetyhazards,resultin per- the kitchen or in rooms where th
formanceproblems,and reduce the fumes from the kitchencould reac}
life of the componentsof the appli- Birdshavea verysensitiverespirator
ance. system. Fumes released during a
er grates or surroundingareas until and Toxic EnforcementAct of 1986
spongear cloth is usedto wipe spills nia to cause cancer or reproductive
resultin low-levelexposureto someof
notclean door gasket.The door gas- marilytothe incompletecombustiono
be minimizedby properlyventingthe
clean cycle, there may be Iow-leve
PET BIRDS:Neverkeeppet birds i
ovenself-cleaningcyclemaybe harrr
ful or fatal to birds. Fumes release
due to overheatedcooking oil, fa
margarineand overheatednon-stic
cookwaremaybe equallyharmful.
SAVETHESEIFISTRUCTIOHSFORFUTUREREFEFlEHCE
Page 5
SURFACE(OOKIFIG
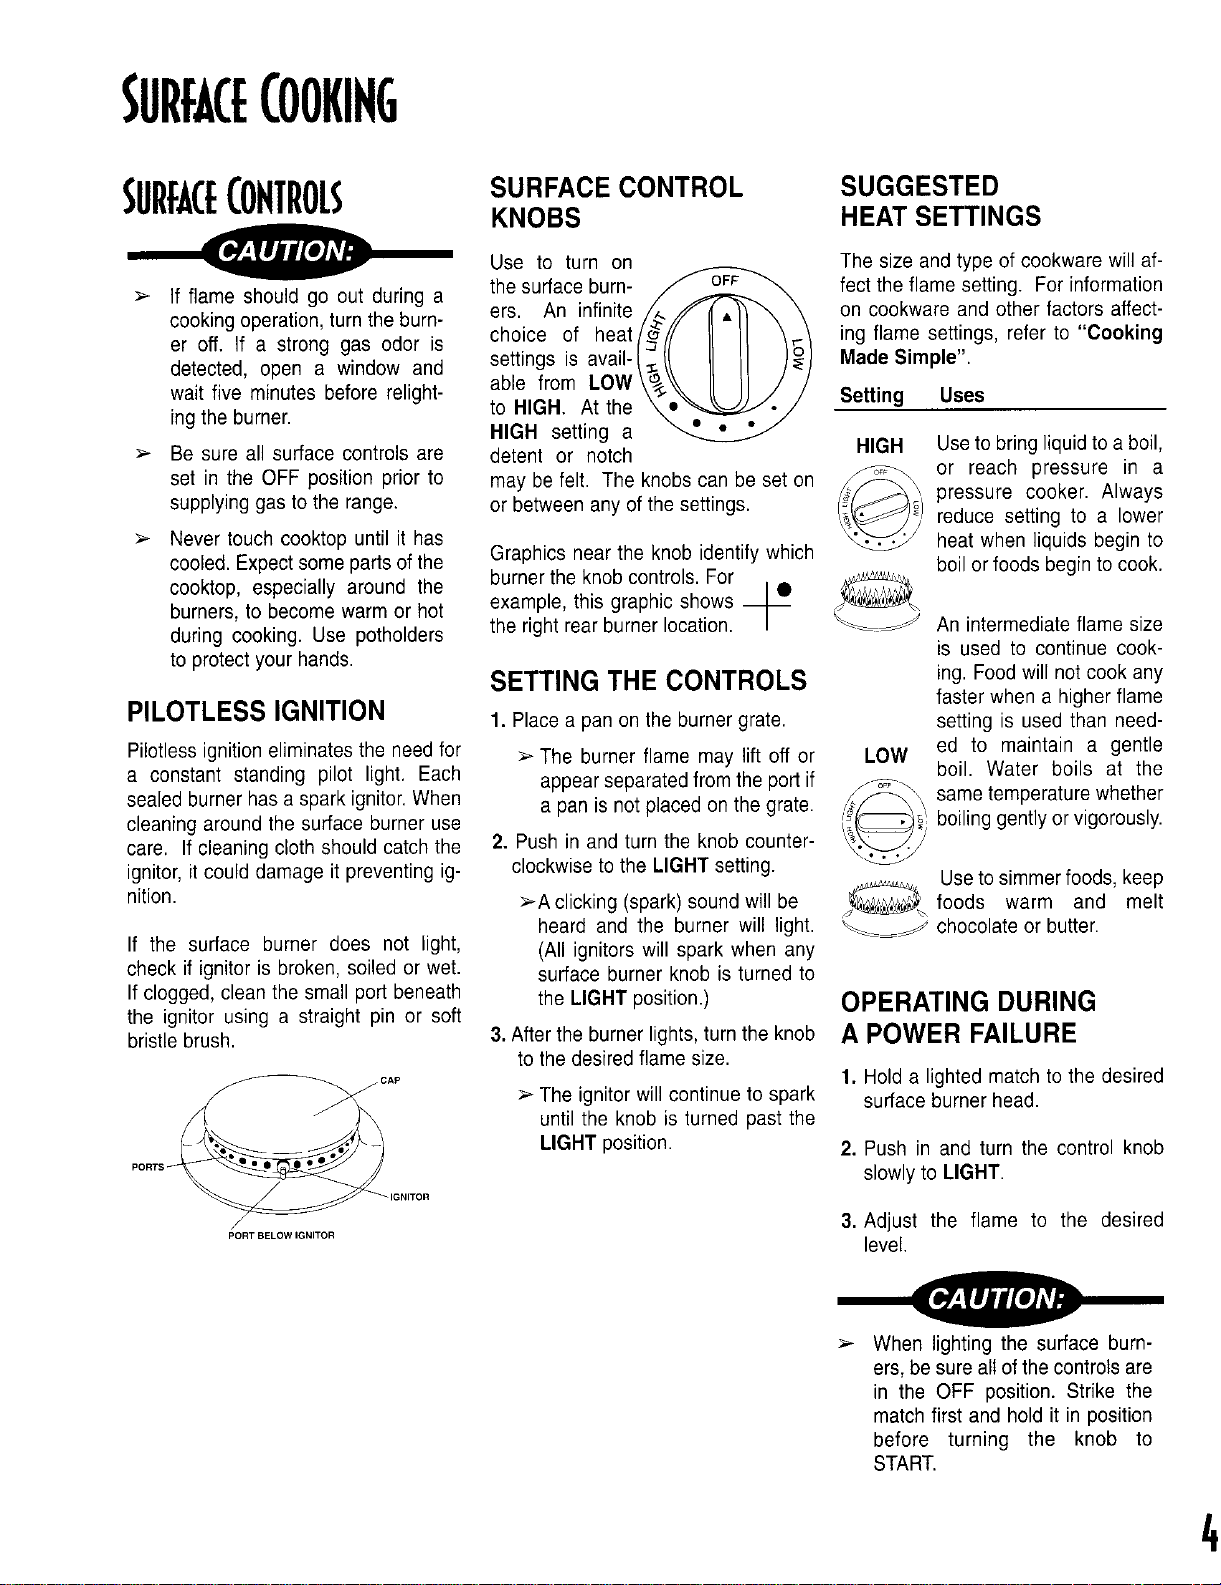
SURFACE(OFITROLS SURFACEcOntROL SUGGESTED
during
cookingoperation,turntheburn- choice of heat[_// II II _/ ing flame settings,referto "Cooking
er off. If a strong gas odor is settings is avail-/_// II II MadeSimple".
detected,open a window and able from LOW \_..% [[ )1 / /
wait five minutesbeforerelight- to HIGH. At the _e _oj Setting Uses
ingthe burner. HIGH setting a _ ° y
> Be sureall surfacecontrolsare detent or notch HIGH Useto bringliquidto aboil,
set in the OFF positionprior to maybefelt. The knobscan be set on pressure cooker. Always
supplyinggasto the range, orbetweenanyof thesettings. ) reducesetting to a lower
> Nevertouch cooktopuntilit has _ heatwhenliquids beginto
cooled.Expectsomepartsofthe Graphicsnearthe knob identifywhich boilorfoodsbeginto cook.
cooktop, especially around the burnertheknobcontrols.For i,
burners,to becomewarmor hot example,this graphicshows
duringcooking.Use potholders the right rearburnerlocation. __ _f Anintermediateflamesize
to protectyourhands.
KNOBS HEATSETTINGS
Use to turn on _ The sizeandtype ofcookwarewillaf-
thesurfaceburn- __ fecttheflamesetting. ForinformationIf flame shouldgoout
a
ers. An infinite/_ _" I • )'}_. \ on cookwareandother factorsaffect-
or reach pressure in a
g-:
is used to continuecook-
SETTING THE CONTROLS ing.Foodwill notcookany
fasterwhena higherflame
PILOTLESSIGNITION 1.Placea panonthe burnergrate, settingis usedthan need-
Pilotlessignitioneliminatesthe needfor > The burnerflame maylift off or LOW ed to maintain a gentle
a constant standing pilot light. Each appearseparatedfromtheportif s_-_,_. boil. Water boils at the
sealedburnerhasa sparkignitor.When apanis not placedonthe grate. ,_, sametemperaturewhether
cleaningaroundthesurfaceburneruse _._
care. If cleaningclothshouldcatchthe 2. Pushin andturnthe knobcounter- _
ignitor,itcoulddamageit preventingig- clockwisetothe LIGHTsetting. Usetosimmerfoods,keep
nition. >Aclicking (spark)soundwillbe foods warm and melt
heard and the burner will light. ___ chocolateorbutter.
If the surface burner does not light, (All ignitorswill sparkwhen any
checkif ignitoris broken,soiledor wet. surfaceburnerknobis turnedto
If clogged,cleanthesmallportbeneath theLIGHTposition.) OPERATINGDURING
the ignitor using a straightpin or soft
bristlebrush. 3.Afterthe burnerlights,turnthe knob A POWERFAILURE
c_,, 1. Holda lightedmatchtothe desired
_o._ slowlyto LIGHT.
IGNITOR
tothedesiredflamesize.
>-The ignitorwillcontinueto spark surfaceburnerhead.
untiltheknob isturnedpast the
LIGHTposition. 2. Push in and turn the control knob
L_ _ boilinggentlyor vigorously.
,_o._o.,._.,_o. 3. Adjust the flame to the desired
level.
> When lightingthe surface burn-
ers,besureallofthecontrolsare
in the OFF position.Strike the
matchfirstand holdit in position
before turning the knob to
START.
4
Page 6
SURFACECOOKIHG,corn,
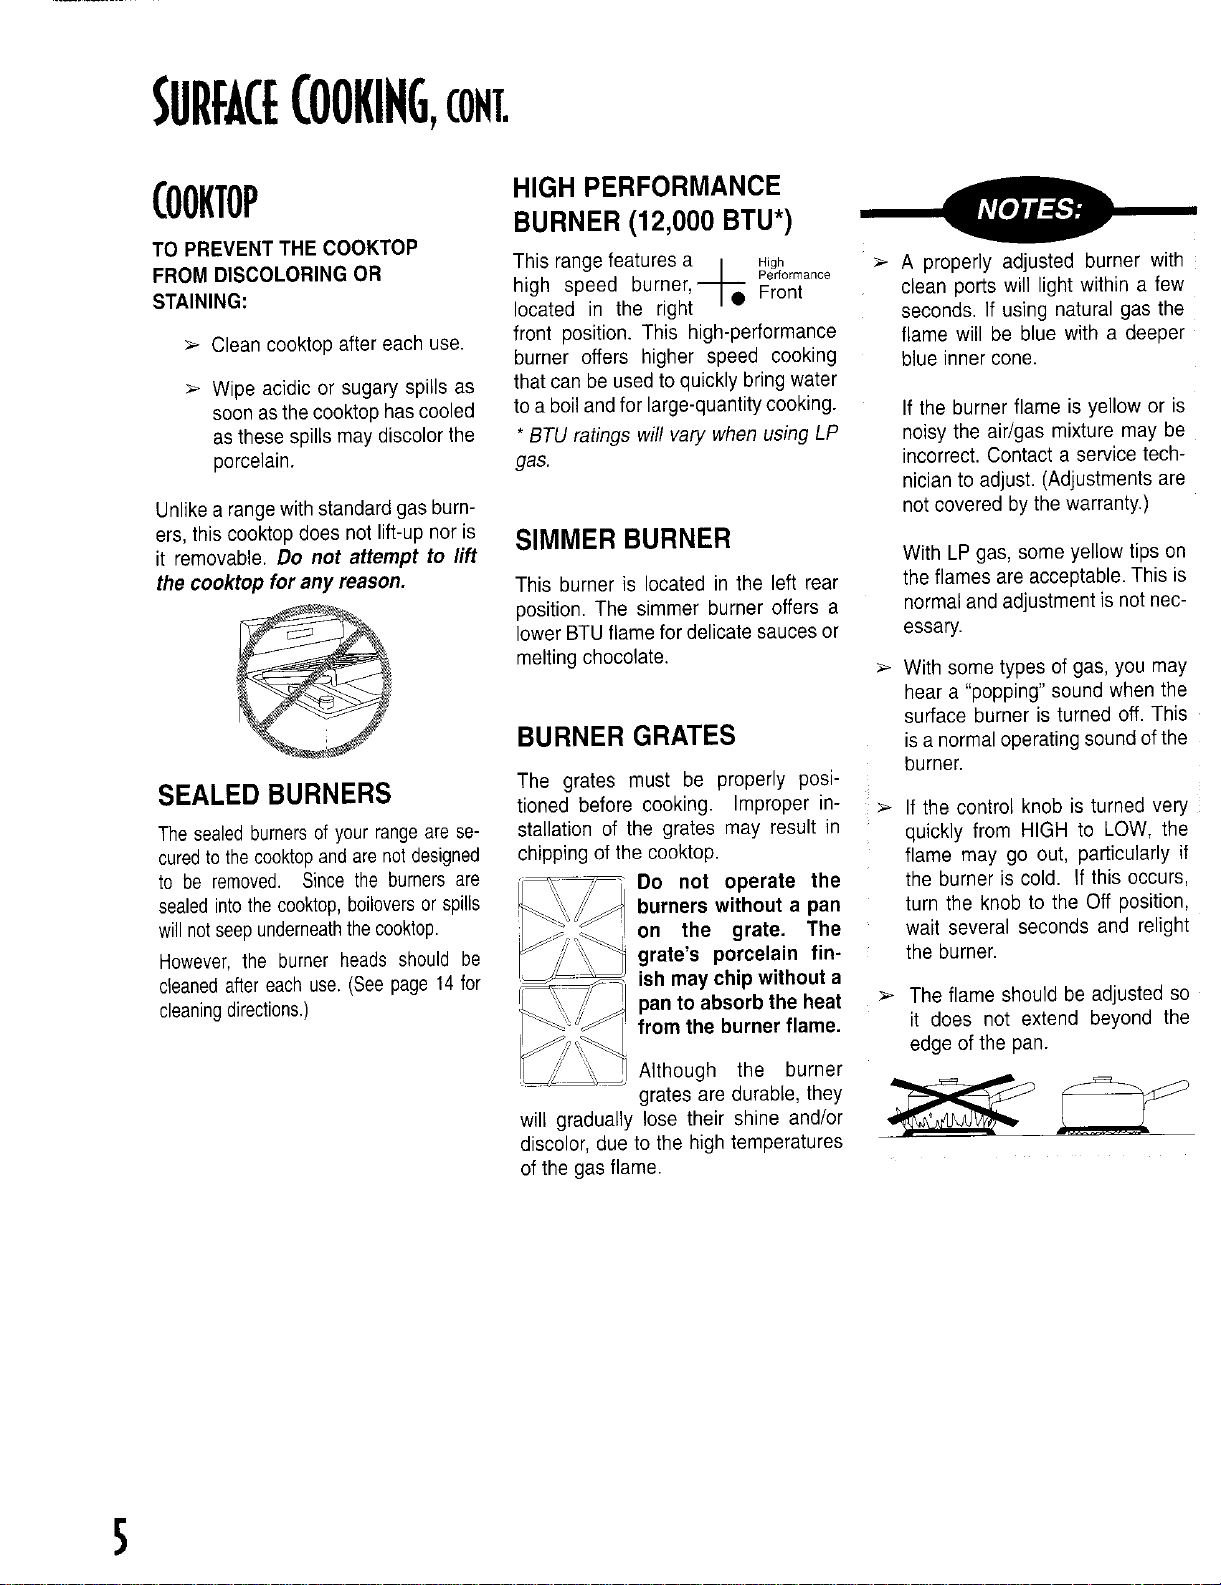
(OOKTOP HIGHPERFORMANCE
TOPREVENTTHECOOKTOP
FROMDISCOLORINGOR Thisrangefeaturesa/ High _ A properlyadjustedburner with
STAINING: located in the right I• Front clean portswilllight withina few
> Cleancooktopaftereachuse. front position.This high-performance flamewill be blue with a deeper
> Wipeacidicor sugaryspills as thatcanbeusedto quicklybringwater
soonasthecooktophascooled toa benandfor large-quantitycooking. Ifthe burnerflameis yellowor is
asthesespillsmaydiscolorthe *BTUratingswillvary whenusingLP noisythe air/gasmixturemaybe
porcelain, gas. incorrect.Contacta servicetech-
Unlikearangewithstandardgasburn- notcoveredbythewarranty.)
ers,thiscooktopdoesnotlift-upnoris SIMMERBURNER
it removable.Do not attempt to lift WithLPgas,someyellowtipson
the cooktop for any reason. Thisburner is locatedin the left rear theflamesareacceptable.Thisis
SEALEDBURNERS The grates must be properly posi-
Thesealedburnersof yourrangearese- stallationof the grates may result in quicklyfrom HIGH to LOW,the
curedtothecooktopandarenotdesigned chippingofthe cooktop, flame may go out, particularlyif
to be removed.Sincethe burnersare Do not operate the theburneriscold. If this occurs,
sealedintothecooktop,boiloversorspills burners without a pan turnthe knobto the Off position,
willnotseepunderneaththecooktop, on the grate. The wait several secondsand relight
However,the burnerheadsshouldbe grate's porcelain fin- the burner.
cleanedaftereachuse.(Seepage14for ish maychip without a
cleaningdirections.) panto absorb the heat > Theflameshouldbe adjustedso
BURNER(12,000BTU*)
high speed burner,,_l--- Pe,_o_,oe
seconds.If usingnaturalgas the
burner offers higher speed cooking blueinnercone.
nicianto adjust.(Adjustmentsare
position.The simmerburneroffers a normalandadjustmentisnotnec-
lowerBTUflamefordelicatesaucesor essary.
meltingchocolate.
> Withsometypesofgas,youmay
heara "popping"soundwhenthe
surfaceburner is turned off. This
BURNERGRATES isanormaloperatingsoundofthe
burner.
tioned beforecooking. Improperin- >- If the controlknob isturnedvery
from the burner flame, it does not extend beyond the
edgeof the pan.
Although the burner
gratesaredurable,they
will graduaNylose their shine and/or
discolor,dueto the hightemperatures
ofthegasflame.
S
Page 7

OVEN(OOKiN6
[ECTROHICCLOCKAHDOV[HCOHTROL
BROILPAD
I1 Usefor top browningandbroiling.
Bakei More+TimerC,ockt.PressBroi,pad
"= i ii
SetCIock or LO broil.
ID ll ll OvenOn ll I1 Seepage10foradditionalinformation.
Broil Self ll Preheat Less- Cook Stop
Clean Time Time
II Lock
2. PressMore+or Less- padfor HI
CLEANPAD
Useto setself-cleancycle.
fUNCTIONPADS _ The indicatorlight on the first 1. CloseandIockovendoor.
> Press,or pressand hold,
these padsto enter time, More+ pressedwillbe"full on."Thislets 3. Oven willautomaticallycleanfor 3
oventemperatureor tose- SetClock controlfor twooperations, padtoselect2to 4 hoursof clean-
lect HI or LO broil. No
beep will sound when Less- ing.
thesepadsarepressed. For example: If you set "O_M"
> Pressthis pad to cancel andthensetat/ruingoper- Bake
all operationsexcept the .: at/on,the indicatorlighton COOKTIME/
TimerandClock. the Bake pad will "dim"
> Functionpadsare theBake,Broil, the Timerpad willbe "full ll Useto programthe oven to startand
Clean,Timer, Clock, CookTime, on." stopautomatically.
Stop Time and Cancel pads. A The display will showthe Bake 1. PressCook Time pad and enter
beepwill sound when these pads operationfor the padwith thedesiredcookingtime.
arepressed, the "full on" indicatorlight. Pressthe
>- Allfunctionpadsexceptthe functionpad with the "dim"indicator temperature.
Cancelpadfeatureanindi- lightto recallthatoperation.
catorlight. Bake 3. Todelaythestartofcooking,press
> WhenBakeor Broilpadis II elapsebetween pressing a function timeyouwishthe oventoturn off.
pressed,the indicatorlight pad and a More+ or Less- pad, the Seepage11foradditionalinformation.
willturn on to letyou know Bake program will be canceled and the
that theoven issetfor this display will return to the previous
operation, display.
Indicator lights on Clean, Timer,
Clock,Cook Time and Stop Time BAKE PAD
pads will flash when the pad is Usefor bakingor roasting.
pressed.These indicatorlightswill 1. PressBakepad.
stopflashingbutwillremainlitonce 2. PressMore+orLess-paduntilthe
thefunctionstarts.
>- Ifanindicatorlighton afunctionpad inthe display.
islitandyousetasecondoperation: Seepage8for additionalinformation.
- Eitherthe controlwill not accept
theoperationor
padwill"dim"slightlyandthe in- 2. PressCleanpad."3:00"willappear
dicatorlightonthepad youjust inthe display.
youknowthatyou havesetthe hours or press More+ or Less-
theovento bakeat 350°F Seepages12-13foradditionalinformation.
and the indicatorlight on "FULL-ON" STOPTIME PADS
2. PresstheBakepadandenteroven
NOTE: If more than 30 seconds the Stop Time padand enter the
correctoven temperatureappears
Page 8

OVEHCOOKIHG,CONT.
SETTING THE CLOCK COHTROLOPTIONS TO RESTORE:Pressthe Clock and
1. PressClockpad. hold for three seconds. Thetime of
2. Pressor pressandhold More+or CLOCK CONTROLLED day will reappearinthe display.
Less- paduntilthe correcttimeof
dayappearsinthedisplay. OVEN COOKING BEEPS
The displaywill flash when electrical Option1.(defaultoption)Fourbeeps AUTOMATICOVENTURN
powerisfirstsuppliedtothe rangeor if at the end of cooking, then, one OFF/SABBATHMODE
therehasbeena powerfailure, beep every 30 seconds for the The oven will automaticallyturn off
Torecallthetimeof daywhenanother next five minutes or until the after 12 hours, if you accidentally
functionisdisplayed,presstheClock Cancelpadis pressed, leave it on. You can deactivatethis
pad. Option 2. Four beepsat the end of feature,ifdesired.
Clocktime cannot be changedwhen cooking,then,nootherbeeps.
the oven has been programmedfor Option 3. Four beeps at the end of
clockcontrolledcooking,self-cleanor cooking, then, one beep every
delayedself-clean, minute for the next 12 hours or 1. Pressthe Clockpad and holdfor
untiltheCancelpadispressed, threeseconds.
Cancel padsat the same time and
TOELIMINATE12HOURTURN
OFF:
SETTINGTHETIMER 2. Pressandholdthe More+or Less-
Thetimercanbesetfromoneminute SETTINGCLOCKCONTROLLED pad until8:88 appearsin the dis-
(0:01)upto 9 hours and 50 minutes OVENCOOKINGBEEPS: play.Currenttimeofday willreap-
(9:50). 1. PressCookTimeandClockpads onds.
The timercanbe usedindependently atthesametimeandholdforthree
ofanyotherovenactivityanditcan be seconds. TO RESTORE:Repeatsteps1and2.
setwhileanotherovenfunctionis op- 12:00willappearbrieflyin the display
erating. THE TIMER DOES NOT > A singlebeepwillsound, followedby thecurrenttimeof day.
CONTROLTHEOVEN. > Displaywillshowcurrentoption.
pearin the displayafterfour sec-
1. PresstheTimer pad. 2. Pressthe More+or Less- padto CONTROLLOCK-OUT
2. PressorpressandholdtheMore+ The currenttime of day will reap-
orLess- paduntilthecorrecttime pearin the displayafter four sec- the ovenfrombeingturnedon.
appearsin thedisplay, onds.
> Thetimerwillstart automatical- TO SETCONTROLLOCK-OUT:
ly.The TIMERindicatoron the
Timer pad will light whenever CANCELCLOCK DISPLAY 1.Press and hold both Stop Time
thetimeris inuse. ifyoupreferthatthetimeof daynotbe
> Onelongbeepand"End"willbe displayed:
briefly displayedto signal the 2. "OFF" will appear in the display
endofthetimeroperation. TO SET: Press Clock and Cancel whenthisfeatureisactivated.Only
TOCANCELTIMER: Pressand hold threeseconds, operate when Control Lock-Out
Timer padfor threeseconds.Timeof When clock display is not shown, featureisactivated.
daywillreappearinthe display, press Clock pad to briefly recallthe
selecttheoptionnumberyouwish. TheControlLock-Outfeatureprevents
and Cancel pads for three sec-
onds.
pads at the same time and hold for the clock and timer functions will
timeofday,if desired. Repeatstep1to deactivate.
7
Page 9

OVEN TEMPERATURE BJKIHGJ HDROASTING.EAT indicatorwilllight.Theprese-
ADJUSTMENTOPTION
Youmay adjustthe oventemperature
ifyouthinktheovenisnotbakingcor- 4. Allow 8-15 minutesfor the ovento
rectly.Todecidehow muchto change > Youmay find that the cooking preheat.A singlebeepwillindicate
the temperature,set the temperature times and temperaturesvary that the oven has preheated.The
25 degreeshigheror lowerthan your slightlyfromyouroldoven.This OVEN ON indicatorwill remainlit
reciperecommends,then bake.The is normal.Everyoven has its while the PREHEATindicatorwill
resultsofthe "test"shouldgiveyouan owncharacteristics, turnoff.
ideaofhowmuchtoadjustthetemper-
ature. > During some extended oven 5. Placefoodin theoven.
cooking operations,you may > The oven temperaturecan be
TOADJUSTTHE heara "popping"soundwhen changedat anytimebypressing
OVENTEMPERATURE: theoven burnercycles.This is theMore+or Less- padfor the
normal, desiredtemperature.If another
1. Pressthe Bakepad. functionis displayed,pressthe
> See roastingchart in "Cooking Bake pad, then press the
2. Enter550°by pressingMore+pad. Made Simple"bookletfor rec- More+or Lees- pad to select
3. Pressand hold the Bake padfor ommendedroasting tempera- newtemperature.
threesecondsuntil00° appearsin turesandtimesandbakingand
thedisplay, roastingtips. 6. Checkcookingprogressatthemin-
> Ifthe oventemperaturewaspre- imumcookingtimeandcooklonger
viouslyadjusted,the changewill PILOTLESSIGNITION if needed.
bedisplayed.Forexample,if the
oven temperaturewas reduced Your range is equiped with pilotless 7. PressCancelpadandremovefood
by15°,thedisplaywillshow-15°. ignition.With thistype of ignitionsys- from theoven.TheBAKEindicator
4. PressandholdtheMore+or Less- andthe oven will not operateduring OVENONindicatorwillturnoffand
pad to change the temperature, a power failure, thetime of daywill reappearinthe
Eachtime a pad is pressed,the A lighted match will not light the display.
temperaturechangesby5°. oven burner. No attempt should be > Ifyouforgetto turnoffthe oven,
>-The oven temperaturecan be made to operate the oven during a it will automaticallyturn off at
increasedor decreasedby 5 ° power failure, theendof 12hours.Ifyou wish
to 35o. to deactivatethis feature, see
tern, the gas automaticallyshuts off on the Bake pad will turn off. The
lected temperaturewill remainin
thedisplay.
SETTINGTHECONTROLS page7.
5. The time of day will automatically FORBAKINGAND
reappearinthedisplay. ROASTING OV[NVENT
Itis notnecessaryto readjusttheoven
temperatureif thereis a powerfailure 1. PressBakepad. TheBAKEindica-
or interruption.Broilingand cleaning tor on the Bake pad will light, and theWhenventtheopening.°Venis in use,never block
temperaturescannotbe adjusted. Theovenventislocatedatthebaseof
000will lightin display.
2. Pressor pressand holdthe More+ the backguard.When the oven is in
or Less- pad to select oven tern- use,thisareamaybecomehotenough
perature, to causeburns. Do not place plastics
>- 350°willlightwheneitherpadis neartheventopeningas heatfromthe
pressed.Theoventemperature vent coulddistortor melttheplastic.
canbesetfrom170° to 550°.
3. There will be a four seconddelay 0V[N [16HT
before oven turns on. When the Push the switch on the
oventurnsontheOVENONindica- controlpanelto turnthe IUUI
tot will light, and then the PRE-
ovenlighton andoff. ov_NLIGHT
I
Page 10

OYENCOOKING,cons,
OVENRACKS RACKPOSITIONS ROASTINGPOSITION:
!_-.-_ | or turkey. Place both oven racks,
_,_ one abovethe other,on the raised
f_,_ _ _ ____ --5 sidesof theovenbottom.
> Do not attempt to changethe !_ --4
Yourovenhastworacks.Theyare de-
signedwitha lock-stopedge. RACK5: =_
Usedfor toasting breador broiling
hot.rackpositionwhenthe ovenis _, -- _ ,_--2_1 l_i = = [_
TO REMOVE: Pull rack straightout thin non-fattyfoods.
untilit stopsat thelock-stopposition;
lift up onthe frontoftherackand pull RACK4: MULTIPLERACKCOOKING:
out. Used for most broilingand some
two-rackbaking. Tworack:
Usedfor most baked goodson a
_%\\',_ i_./_,1 cookiesheetor jelly roll pan,layer NOTE: Neverplacepans directlyon
!_'_l_ cakes, fruit pies, or frozen conve- the ovenbottom.
Usedforroastingtallercutsof meat
Userackpositions2 and4,or 1and
Ii:if¢I] niencefoods.
HALFRACKACCESSORY
Used for roasting small cuts of A half rack,to increaseoven capacity,is
meat,casseroles,bakingloavesof availableasanaccessory.Itfitsintheleft,
bread,bundtcakes,custardpiesor upperportionof the ovenandprovides
TOREPLACE:Placerackontherack two-rackbaking, spacefora vegetabledishwhena large
supportintheoven;tiltthefrontendup RACK1: Jenn-Airdealerfor the "HALFRACK"Ac-
slightly;slide rack backuntil it clears Usedforroastinglargecutsof meat cessoryKitorcall1-800-688-8408toorder.
the lock-stopposition;lowerfront and and poultry,frozen pies, dessert
slidebackintothe oven. souffles,angel food cake, or two-
Donot coveran entirerack withalu- rackbaking.
minumfoil or place foil on the oven
bottom. Baking results will be af-
fected and damage may occur to
theoven bottom.
roasteris onthelowerrack.Contactyour
Page 11

BROILING
SETTINGTHECONTROLS Rack TotalCook
FORBROILING TypeofMeat Position* Doneness Time(Min.)**
1. Pressthe Broil pad. Bacon 4 WellDone 6-10rain.
> Broil indicatoronthe Broil pad BeefSteaks- 1"thick 4 Medium 15-20rain.
willlight. 4 Well 18-24min.
> 000willlightin the display
> TheOvenOnindicatorwill light. Chicken-Pieces 3 WellDone (LOBroil)
Therewill be an eight second 30-40rain.
delaybeforetheoventurnson.
2. Pressthe More+ pad to select HI Steaks,1"thick 4 Flaky 10-15rain.
(high)broilorthe Loss-padto set
LO(low)broil. GroundBeef- Patties,3/4"thick 4 WellDone 15-18rain.
>- SelectHI broilfor normalbroil- Ham- PrecookedSlice,1/2'thick 4 Warm 8-12rain.
ing.
> SelectLObroilfor lowtempera- PorkChops- 1"thick 4 WellDone 22-26rain.
ture broilingof longercooking .........................
foodssuchas poultry. *Toprackpositionis#5.
3. Placefoodinthe oven,
4. Turn meat once about half way
throughcooking.
5. PressCancel pad. Removefood
andbroilerpanfromtheoven.
TheOvenOn indicatorwill turn
Off.
> TheBroilindicatoron the Broil
padwinturnoff.
Timeofdaywill reappearin dis-
play.
Fish- Fillets 4 Flaky 8-12min.
**Broilingtimesareapproximateandmayvarydependingonthemeat.
Page 12

OVEHCOOKIHG,coNT.
CLOCK(0NTROLI.EDSETTING THE CONTROLS 6.When theoventurns on,the Oven
FOR CLOCK CONTROLLED Onindicatorwill light. The oven
OVENCOOKING temperaturewill appearin the dis-
>- Highlyperishablefoodssuchas mine when to turn the oven on
dairy products,pork, poultry or >-0:00will lightindisplay, basedonthecooktimeyouset.
seafoodare not recommended 2. Pressor pressandholdtheMore+
fordelayedcookoperations, or Less-padto entercookingtime. 7. Oven will automatically turn off.
> Clock controlled baking is not 3. PressBakepad. light in the display. A beep will
recommendedfor baked items _-Bakeindicatoron Bake pad will sound every 30 seconds for the
that require a preheatedoven, light, next5 minutes.
such as cakes, cookies and > 000will lightindisplay. >- NOTE:Seepage7 if youwishto
breads, change the end of cooking
Clock Controlled Oven Cooking is Less- pad to enter oventempera-
usedto turnthe oven on and off at a
presettimeof day.Thisfeaturecanbe NOTE: Beepswill sound and 000 stop.Removefood fromoven.
usedwith eitherovencookingorself- willflashindisplayif theBakepadis
cleaning, notpressedwithinfourseconds.
> Immediate Start: Oven turns on
immediatelyandautomaticallyturns STARTOFCOOKING:
offata presettime. (ifnot skipto#6)
> DelayedStart: Delaysthe start of
cookingor cleaningand automati- b. PressorpressandholdMore+or
callyturnsoffata presettime. Less- pad to enter time of day
Cooktime canonlybesetfor up to 11
hoursand59 minutes(11:59).
Theclockmustbe functioningandset display.
at the correcttimeof dayfor thisfea-
tureto operatecorrectly.
OVENCOOKING play.Pressthe CookTime pad to
1. Pressthe Cook Time pad.
>-CookTimeindicatoron the Cook > NOTE:It is not necessaryto set
Time padwill flash, a start time. Control will deter-
4. Pressor pressand hold More+or
ture. 8. Press Cancel pad and beepswill
5. IF YOU WISH TO DELAY THE
a. PressStopTimepad.
youwishtheovento turnoff.
c. PressClock pad.
>Time ofdaywill reappearinthe
recallthe remainingcooktime.
Fourbeepswill soundand ENDwill
reminderbeeps.
11
Page 13

CARE&CLBHIHG
________.,SI If-CLIAHOVEN O,eanoven ovenheats,youmayhearso,nds
outside of oven.
gasket)
> It isnormalforpartsoftherangeto andaround
becomehotduringa cleancycle, the open- AFTERSELF-CLEANING
> Avoidtouchingcooktop,door,win- ingin the doorgasketwitha nonabra-
dow,or oven vent area during a sivecleanersuchasBonAmior deter- About one hour after the end of the
cleancycle, gentand water. Theseareasare not cleancycle, the LOCK indicatorlight
> To preventdamageto oven door, shouldbecleanedto preventsoilfrom beopened.
do not attemptto open the door bakingonduringthe cleancycle.
whenthe LOCK indicatorword is Somesoilmayleavea lightgray,pow-
displayed, deryashwhichcanberemovedwitha
> Donotusecommercialovenclean- rubthe gasketaroundthe ovendoor. that the clean cycle was not long
ersonthe self-cleanovenfinishor The gasketisdesignedtosealin heat enough.Thesoilwill beremoveddur-
aroundanypartofthe ovenasthey duringthe cleancycle, ingthe nextcleancycle.
wiltdamagethefinishor parts. If the ovenrackswere leftin the oven
Theself-cleancycleusesabovenormal from the oven bottom to prevent cycle,wipe racksand embossedrack
cookingtemperaturesto automatically excessivesmoking,flare-upsor flare- supportswith a smallamountof veg-
cleantheentireoveninterior, ingduringthecleancycle, etableoil to restoreeaseof movement.
frame,door ____ ',I of metalpartsexpandingandcontract-
frame(area _ ing.Thisisnormalandwillnotdamage
exposedtocleaningtemperaturesand will turnoff. Atthis point,thedoor can
To preventdamage,do not clean or dampcloth.If soilremains,itindicates
Wipe up excessgreaseor spillovers anddonotslidesmoothlyafteraclean
It is normalfor flare-ups,smokingor Wipe up sugary and acidic spillovers Finelinesmayappearinthe porcelain
flamingto occurduringcleaningif the such as sweet potatoes, tomato or resultingfrom theheatingand cooling
oven is heavily soiled. It is betterto milk-basedsauces.Porcelainenamel of the finish.Thisisnormalandwillnot
cleanthe oven regularlyratherthan to is acid resistant,not acid proof.The affectperformance.
wait until there is a heavybuild-upof porcelainfinish may discolorif acidic
soilinthe oven. spills are not wipedup priorto a self- A whitediscolorationmayappearafter
During the cleaning process, the not wiped up beforethe clean cycle.
kitchenshouldbewellventilatedtohelp This discolorationis normal and will
eliminatenormalodorsassociatedwith NOTaffectperformance.
cleancycle, cleaningifacidicor sugaryfoodswere
cleaning. DURINGCLEANCYCLE
Whenthe LOCK indicatorlights, the
door cannot be opened.To prevent
BEFORESELF-CLEANING damageto door, do not force door
Turnoff theoven lightbeforecleaning openwhenthe LOCKlightis illuminat-
as the light may burn out during the ed.
cleancycle.
Somesmokeandodormaybedetect-
Removebroilerpan, all pans and the ed the first few times the oven is
oven racks from the oven. The oven cleaned.This is normalandwill lessen
rackswill discolorand may not slide intime. Smokemayalsooccurifoven
easilyaftera self-cleancycle, is heavilysoiledor if broiler panwas
leftinoven.
Page 14

CARE&CLE,HIHG,,coils,
SETTINGTHECONTROLS TOCANCELCLEANCYCLE: er, (Do not spraysurroundingsur-
FORSELF-CLEAN 1. PressCancelpad. faces.) Place in plastic bags for
_ 2. If Lock indicatoris NOT lit, open Wearing rubber gloves, remove
oven door. If Lock indicatoris lit, from bags. Wash, rinse, dry and
allowoven to coolabout one hour replaceoncooktop.
thenopenovendoor.
1. Closeovendoor. CLOCK AND CONTROL
2. Movedoorlookleverrightto locked CLEANING PROCEDURES PAD AREA
position. > To activate"Control Lock-out"for
3. PressCleanpad. cleaning,seepage7.
> "--:--" or "3:00"will light in dis- > Be sure applianceis off and all > Wipewitha dampclothanddry.
play. partsare cooJbeforehandlingor > Glass cleaners may be used if
> CLEANlightwillflash, cleaning.This isto avoiddamage sprayedon a cloth first. DO NOT
> If door is not closedor locked, display area.
beepswin sound and "dr" will > To prevent staining or discol-
appearindisplay, oration, clean appliance after CONTROLKNOBS
3. PressMore+or Less-padtoselect > Removeknobsin the OFFposition
cleantimeorchangecleantime. > If a part is removed,be sureit is bypullingforward.
> Oven is preset to clean for 3 correctlyreplaced. > Wash,rinse and dry. Do net use
hours.Or, abrasivecleaning agents as they
andpossibleburns, spray directly on control pad and
eachuse.
BROILERPAN& INSERT mayscratchthefinish.
> Select2 hoursfor lightsoilupto > Turnon eachburnerto be sure the
4 hoursfor heavysoil. Nevercover insertwithaluminumfoil knobs have been correctly re-
asthispreventsthefatfromdrainingto placed.
4. IF YOU WISH TO DELAY THE thepanbelow.
STARTOFCLEANING(if not,skip _- Placesoapy cloth over insertand COOKTOP&
to #6): pan;letsoakto loosensoil. BACKGUARD,
a. PressStop Time pad. > Wash in warm soapy water. Use PORCELAINENAMEL
b. Press More+ or Less- pad to soapfilledscouringpadto remove
selectthetime of day youwish stubbornsoil. Porcelainenamel is glass fused on
theoventoturn off. > Broiler pan and insert can be
c. PressClockpadandtimeofday cleanedindishwasher. Allspillovers,especiallyacidicor sug-
will reappearindisplay. BURNERGRATES immediatelywitha drycloth.
d. PressStop Time pad to recall
thetimeyou set.
5. Whentheoventurnson: For stubbornsoils, clean with a > Neverwipe off a warmor hot sur-
> The OvenOn indicatorwilllight, soap-filled, nonabrasive pad or
TheLockindicatorwilllight. CleaningCreme.*(Part#2000001.)** > Neveruse ovencleaners,abrasive
> Door cannot be openedwhen > Forburnedon soils,removegrates, or causticcleaningagentsonexte-
Lockisdisplayed, placeon newspapersand carefully riorfinishofrange.
6. About one hour after the clean spraywithcommercialovenclean-
cycleends,theLock indicatorlight
will turn off. The ovendoorcanbe
opened.
> Wash grates with warm, soapy > Whencool,washwith soapywater,
water and a nonabrasive,plastic rinseanddry.
scrubbingpadorinthe dishwasher.
spongeand a commercialCooktop causecrackingor chipping.
several hours or over night.
metaland maycrackor chipwith mis-
use.It isacidresistant,notacidproof.
ary spillovers, should be wiped up
face with a damp cloth. This may
13
Page 15

ENAMEL (PAINTED) METAL FINISHES NOTE:Neveruseovencleaners,abra-
SIDEPANELS,STORAGEDRAWER& TRIMPARTS sive or caustic liquid or powdered
DOORHANDLES > Washwithsoapandwater,a glass cleanserson plastic finishes. These
> Whencool,washwithwarm,soapy cleaner,or mild liquidsprays,such cleaningagentswillscratchor mar fin-
water,rinseanddry. Neverwipe a asFantastik*or Formula409*. ish.
warm or hotsurface with a damp > To preventscratchingor dullingof NOTE:Topreventstainingordiscolor-
clothas this maydamagethesur- the finish, do not use mildlyabra- ation,wipe upfat, greaseor acid (to-
faceandmaycausea steamburn. sive, abrasive, harsh or caustic mato,lemon, vinegar,milk,fruitjuice,
> For stubbornsoil, use mildlyabra- cleanerssuchasovencleaners, marinade)immediatelywitha dry pa-
sive cleaningagents suchas bak- OVEN INTERIOR pertowel.
ingsodapasteorBonAmi*.Donot
useabrasivecleanerssuchassteel > Followinstructionsonpages12-13
woolpadsorovencleaners.These forSelf-CleaningOven SEALEDGASBURNERS
productswillscratchorpermanent-
lydamagethe surface. OVENRACKS
NOTE:Usedrytowelor cloth to wipe > Cleanwithsoapywater. > Clean frequently.Allow burner to
up spills, especiallyacidic or sugary > Removestubbornsoilwith cleans- scouring pad. For stubbornsoils,
spills.Surfacemaydiscoloror dull if ing powderor soap-filledscouring clean with a soap-filled,nonabra-
soilisnotimmediatelyremoved.Thisis pad. Rinseanddry. sivepad.Trytopreventthecleaner
especiallyimportantfor whitesurfaces. Racks will permanentlydiscolor and fromseepingintothe gas portsas
may not slide smoothlyif left in the this will affect the flame. If the
GLASS oven duringa self-cleanoperation.If cleanerdoesentertheports,clean
OVENWINOOW&DOOR this occurs, wipe the rack and withasoft bristlebrushora straight
> Avoidusing excessiveamountsof embossedracksupportswitha small pin, especiallythe port belowthe
water which may seep under or amount of vegetableoil to restore ignitor. Do not enlarge or distort
behindglasscausingstaining, ease of movement, then wipe off holes.
> Washwith soap and water.Rinse excessoil. > Be careful not to get water into
with clear water and dry. Glass burnerports.
cleanercanbeusedifsprayedon a PLASTICFINISHES
clothfirst. TRIM& ENDCAPS
> Donotuseabrasivematerialssuch > When cool, clean with soap and surfaceburnerwillnot light.
as scouring pads, steel wool or water,rinseanddry.
powdered cleaners as they will > Use a glass cleaner and a soft
scratchglass, cloth.
cool. Cleanwith soap and plastic
Usecarewhencleaningthe ignitor.
Ifthe ignitoris wetor damagedthe
*Brandnamesforcleaningproductsareregisteredtrademarksoftherespectivemanufacturers.
**Toorderdirect,call1-800-688-8408.
li
Page 16

CARE&CLEAFIIHG,(ore.
MAINTENANCE OVENL,GHT OVENWINDOW
TO PROTECT THE OVEN
OVEN DOOR DOORWINDOW:
> Disconnect power to range 1. Do not use abrasive cleaning
beforereplacinglightbulb. agentssuchassteelwoolscouring
> Usea dry potholderto prevent pads or powdered cleansers as
> Donotplaceexcessiveweighton possible harmto handswhen they mayscratchtheglass.
or standon an openoven door. replacingbulb.
Thiscouldcausethe rangetotip 2. Donothittheglasswithpots,pans,
over,breakthedoor,or injurethe > Be sure bulb is cool before furniture,toysor otherobjects.
user. touchingbulb.
> Do not attemptto open or close > Do not touch hot bulb with a racksarein place.
doororoperateovenuntildooris damp clothas this maycause
properlyreplaced, thebulbto break. Scratching,hitting,jarringor stressing
> Never place fingers between causingan increasedriskof breakage
hinge and front oven frame, atalaterdate.
Hingearmsarespring mounted. _ULBCovER
If accidentallyhit,the hinge will __
slam shut against oven frame " LEVELINGLEGS
andcouldinjureyourfingers. _' '
TO REMOVE: RE_,*,NER > Be surethe anti-tipbracketse-
1. When cool,openthe oven doorto TO REPLACEOVENLIGHTBULB: cures one of the rear leveling
thefirststopposition(openedabout legsto thefloor to preventthe
fourinches). 1. Whenovenis cool, holdbulbcover rangefromaccidentallytipping.
in place,thenslidewire retaineroff
2. Graspdoor at eachside. Do not cover.NOTE:Bulb cover will fall
usethedoorhandleto liftdoor. if not held in place while remov-
3. Liftupevenlyuntildoorclearshinge ing wire retainer, the plastic leveling legs, located at
arms. 2. Removebulbcoverandlightbulb. eachcorneroftherange,untilrangeis
TOREPLACE:
1. Graspdoor _:
ateachside. 4. Replacebulbcoverandsecurewith _._ _ :
3. Replacewith a 40-watt appliance
bulb.
wireretainer. _
3. Donotclosethedooruntilthe oven
the glass may weaken its structure
The rangeshouldbe leveledwhenin-
stalled. If the rangeis not level,turn
level.
2. Align slots in _,," --
thedoorwiththehingearmsonthe 5. Reconnectpowerto range. Reset _ _AANTI-TIPBRACKET
range, clock. _" _'LEVELINGLEG
3. Slidethedoor downontothe hinge
arms until the door is completely
seatedon the hinges.Push down
on the top cornersof the door to
completely seat door on hinges.
Doorshouldnotappearcrooked.
NOTE:Theovendooron a newrange
mayfeel "spongy"when it is closed.
This is normalandwill decreasewith
use.
15
Page 17

STORAGEDRAWER ELECTRICAL TOREMOVE:
CONNECTION When cool, remove the oven racks.
Slidethe two catches,locatedat each
Appliances which require electrical rearcornerof the ovenbottom,toward
> Donotstoreplastic,paperprod- prong grounding
ucts,food or flammablemateri- plug which must
als in this drawer. The drawer be pluggeddirect-
maybecometoowarmforthese ly into a properly
itemswhentheovenisinuse. grounded three-
Thestoragedrawercanberemovedto tricaloutlet.
allowyouto cleanundertherange.
TOREMOVE: beforeservicing.
1. Emptydrawerandpulloutto thefirst The three-prong grounding plug _ t3il
stopposition, offers protection againstshock haz-
2. Liftupthefrontofthe drawer, grounding prong from the power Lift the rear edgeof the oven bottom
3. Pulloutto secondstopposition, edge of the oven bottom clears the
4. Graspsidesand liftdrawerup and type electricaloutlet is encountered,it fromoven.
out. is the personal responsibility of the
TOREPLACE: replaced with a properly grounded Fit the front edge of the oven bottom
1. Fitthe endsofthedrawerglidesinto rear of the oven bottomand slide the
therailsin therange. OVENBOTTOM two catchesbackto lockthe ovenbot-
2. Lift up front of drawer and gently Protectovenbottomagainstspillovers,
pushinto the firststopposition, especiallyacidic or sugary spills, as REMOVALOFGAS
3. Lift drawerup againand pushuntil Use the correct pan size to avoid APPLIANCE
drawerisclosed, spilloversand boilovers.Never place Gasapplianceconnectorsusedto con-
power are equipped with a three- thefrontoftheoven.
hole120voltelec- 2'_
Alwaysdisconnectpowertoappliance
ards. Do not cut or remove the third
cord plug. slightly,thenslideit backuntilthe front
If an ungrounded,two-hole or other ovenfront frame.Removeovenbottom
appliance owner to have the outlet TO REPLACE:
three-holeelectrical outlet, into the oven front frame. Lower the
tom inplace.
theymaydiscolorthe porcelainenamel.
utensils or foil directly on the oven nectthis applianceto the gas supply
bottom.
The ovenbottommay be removedfor Tent. Onceinstalled,DO NOT repeat-
easiercleaning, edly movethisgas applianceforclean-
are notdesignedforcontinuousmove-
ing orto relocate.Ifthis appliancehas
to bemovedand/orremovedforservic-
ing, followthe proceduredescribedin
the installationinstructions.For infor-
mation contact Jenn-Air Customer
Serviceat 1-800-688-1100.
To prevent range from accidentlytip-
ping,rangemustbesecuredtofloorby
slidingtherearlevelinglegintotheanti-
tip bracket.
|(
Page 18

STORAGEDRAWER ELECTRICAL TOREMOVE:
CONNECTION When cool, remove the oven racks.
Slidethe two catches,locatedat each
Appliances which require electrical rearcornerof the ovenbottom,toward
> Donotstoreplastic,paperprod- prong grounding
ucts,food or flammablemateri- plug which must
als in this drawer. The drawer be pluggeddirect-
maybecometoowarmforthese ly into a properly
itemswhentheovenisinuse. grounded three-
Thestoragedrawercanberemovedto tricaloutlet.
allowyouto cleanundertherange.
TOREMOVE: beforeservicing.
1. Emptydrawerandpulloutto thefirst The three-prong grounding plug _ t3il
stopposition, offers protection againstshock haz-
2. Liftupthefrontofthe drawer, grounding prong from the power Lift the rear edgeof the oven bottom
3. Pulloutto secondstopposition, edge of the oven bottom clears the
4. Graspsidesand liftdrawerup and type electricaloutlet is encountered,it fromoven.
out. is the personal responsibility of the
TOREPLACE: replaced with a properly grounded Fit the front edge of the oven bottom
1. Fitthe endsofthedrawerglidesinto rear of the oven bottomand slide the
therailsin therange. OVENBOTTOM two catchesbackto lockthe ovenbot-
2. Lift up front of drawer and gently Protectovenbottomagainstspillovers,
pushinto the firststopposition, especiallyacidic or sugary spills, as REMOVALOFGAS
3. Lift drawerup againand pushuntil Use the correct pan size to avoid APPLIANCE
drawerisclosed, spilloversand boilovers.Never place Gasapplianceconnectorsusedto con-
power are equipped with a three- thefrontoftheoven.
hole120voltelec- 2'_
Alwaysdisconnectpowertoappliance
ards. Do not cut or remove the third
cord plug. slightly,thenslideit backuntilthe front
If an ungrounded,two-hole or other ovenfront frame.Removeovenbottom
appliance owner to have the outlet TO REPLACE:
three-holeelectrical outlet, into the oven front frame. Lower the
tom inplace.
theymaydiscolorthe porcelainenamel.
utensils or foil directly on the oven nectthis applianceto the gas supply
bottom.
The ovenbottommay be removedfor Tent. Onceinstalled,DO NOT repeat-
easiercleaning, edly movethisgas applianceforclean-
are notdesignedforcontinuousmove-
ing orto relocate.Ifthis appliancehas
to bemovedand/orremovedforservic-
ing, followthe proceduredescribedin
the installationinstructions.For infor-
mation contact Jenn-Air Customer
Serviceat 1-800-688-1100.
To prevent range from accidentlytip-
ping,rangemustbesecuredtofloorby
slidingtherearlevelinglegintotheanti-
tip bracket.
|(
Page 19

STRONGODOROR LIGHT
SMOKEOCCURSWHENOVENIS
TURNEDON.
> Thisisnormalforanewrangeandwill
disappearafterafewuses.Initiatinga
cleancyclewill"burnoft"thesmells
morequickly.
> Turningon a ventilationfan willhelp
removethesmokeand/orodor.
> Excessivefoodsoilsontheovenbot-
tom.Useaself-cleancycle.
"F" PLUSA NUMBERAPPEARS
IN THE DISPLAY.
> Thisis calleda faultcode.If a fault
codeappearsinthedisplayandbeeps
sound,presstheCancelpad.If the
faultcodeandbeepscontinue,discon-
nectpowertotheappliance.Waitafew
minutes,thenreconnectpower.Iffault
codeandbeepsstillcontinue,discon-
nectpowertotheapplianceandcallan
authorizedservicer.
> Iftheovenisheavilysoiled,excessive
flare-upsmayresultinafaultcodedur-
inga cleancycle.PressCancelpad
andallowtheoventocoolcompletely.
Wipeoutheavysoilandthenresetthe
cleancycle.Ifthefaultcodeandbeeps
stillcontinue,disconnectpowerto the
applianceandcallanauthorizedser-
vicer.
11
Page 20

JEHH-AIRRAHG[WARRAHTY
FullOneYearWarranty- PartsandLabor
Forone(1) yearfromtheoriginalretailpur-
chasedate,any partwhichfailsin normal a. Improperinstallation,delivery,ormaintenance.
homeusewillberepairedorreplacedfreeof b. Anyrepair,modification,alteration,or adjustmentnotauthorizedbythe
charge, manufactureroranauthorizedservicer.
LimitedWarranties- PartsOnly c. Misuse,abuse,accidents,or unreasonableuse.
SecondYear- Afterthefirstyearfromthe d. Incorrectelectriccurrent,voltage,orsupply.
originalpurchasedate,partswhichfailinnor-
maihomeuse will berepairedor replaced
free of chargefor the part itself,withthe 2. Warrantiesarevoidiftheoriginalserialnumbershavebeenremoved,altered,
ownerpayingallothercosts,includinglabor, orcannotbereadilydetermined.
mileageandtransportation. 3. Lightbulbs.
ThirdThroughFifthYear- Fromtheoriginal 4. Productspurchasedforcommercialor industrialuse.
purchasedate,partslistedbelowwhichfailin 5. Thecostofserviceorservicecallto:
normalhomeusewillberepairedorreplaced
freeof chargefor the partitself,withthe
ownerpayingall othercosts,includinglabor, b. Instructtheuserontheproperuseoftheproduct.
mileageandtransportation, c.Transporttheappliancetotheservicer.
ElectronicControls 6. Consequentialorincidentaldamagessustainedbyanypersonasaresultof
ThirdThroughTenthYear- Fromtheorigi- anybreachofthesewarranties.Somestatesdonotallowtheexclusionorlim-
nalpurchasedate,partslistedbelowwhich itationof consequentialorincidentaldamages,sotheaboveexclusionmay
failinnormalhomeusewillberepairedorre- notapply.
placedfreeof chargeforthepartitself,with
theownerpayingallothercosts,including
labor,mileageandtransportation. If YOU NEED _;ERYI(E
SealedGasBurners
CanadianResidents AppliancesSalesCompany,Jenn-AirCustomerAssistanceat 1-800-688-
Theabovewarrantiesonlycoveranappliance "It00,USAandCanadatolocateanauthorizedservicer.
installedinCanadathathasbeencertifiedor I Besuretoretainproofofpurchasetoverifywarrantystatus.RefertoWAR-
listedbyappropriatetestagenciesforcompl{- RANTYforfurtherinformationon owner'sresponsibilitiesfor warrantyser-
ancetoaNationalStandardofCanadaunless vice.
theappliancewasbroughtintoCanadadueto
transferofresidencefromtheUnitedStatesto
Canada. AppliancesSalesCompany,Attn:CAIR®Center,P.O.Box2370,Cleveland,
LimitedWarrantyOutsidetheUnitedStates
andCanada- PartsOnly 1-800-688-2080.
Fortwo(2)yearsfromthedateoforiginalre-
tail purchase,anypartwhichfailsin normal NOTE:Whenwritingor callingaboutaserviceproblem,pleaseincludethe
homeusewillberepairedor replacedfreeof followinginformation:
chargeforthepartitself,withtheownerpay- a.Yourname,addressandtelephonenumber;
ingall othercosts,includinglabor,mileage b.Modelnumberandserialnumber;
andtransportation, c.Nameandaddressofyourdealerorservicer;
Thespecificwarrantiesexpressedaboveare
theONLYwarrantiesprovidedbythemanu-
facturer.Thesewarrantiesgiveyouspecific e.Proofofpurchase(salesreceipt).
legalrights,andyou mayalso haveother I User'sguides,servicemanualsand partsinformationareavailablefrom
rightswhichvaryfromstatetostate. MaytagAppliancesSalesCompany,Jenn-AirCustomerAssistance.
WIIAIISHOT(OVEREDBYTILES[WkRRkHII[S:
1. Conditionsanddamagesresultingfromanyof thefollowing:
e. Impropersettingofanycontrol.
a.Correctinstallationerrors.
I Callthe dealerfromwhomyourappliancewaspurchasedor callMaytag
I Ifthedealerorservicecompanycannotresolvetheproblem,writetoMaytag
TN37320-2370,orcall1-800-688-1100USAandCanada.
U.S.customersusingTTYfordeaf,hearingimpairedorspeechimpaired,call
d.Acleardescriptionof theproblemyouarehaving;
19 JENN-AIR • 403 West Fourth Street North • P.O. Box 39 • Newton, Iowa 50208
 Loading...