

Jenn-Air ProStyle JDS9861AAP User Manual
JENNoAm DUALoFUEL DOWNDRAFT SLIDEo_[N RANGE
PROSTYLE
Form No, B/06/02
_ABLE OF CONTENTS
Safety Instructions ...................................................................I-4
Ducting Information ....................................................................4
Surface Cooking .......................................................................5-9
Oven Cooking ..................................................................... I0-17
Accessories ................................................................................ 17
Care & Cleaning ..................................................................I8-20
Maintenance ...............................................................................2[
Before You Call for Service ...................................................22
Warranty ....................................................................................23
Guide de I'utilisateur ................................................................24
Guia (]el Usuario .......................................................................48
JENNoAIR
Part No, 8113P365-60 74005521 _:)2002 Maytag Appliances Sales Co. Litho U.S.A,
installer: Hease leave this manua[
with this apphance.
Consumer: Hease read and keep
this manualfor future reference.Keep
salesreceipt and/or cancelled check
asproof of purchase.
Hodd Number
Serial Number
Date of Purchase
if you have questions, call:
Jenn-Air Customer Assistance
1800-688-[ [00
18001688-2080_U.S. TTY for hear-
mgor speechimpaired)
(Non.-FrL 8am-8 pm EasternTimel
[nternet: http:Hwww.jennamcom
For service information, see page
23.
in our continuing effort 1:o
formance of our cooking
products, it may be neces-
saryto make changesto the
appliance without revising
this guide
pOP, TAN , ............. ,,,,,...... , .............,
SA:F:gTY [NSTRL CTIONS
Warning and important Safety instructions
appearingin thisguideare not meantto cover
all possibleconditions andsituationsthat may
occur. Common sense, caution, and care
must beexercised when installing,maintain-
ing,or operating the appliance.
Always contact your dealer, distributor, ser-
vice agent, or manufacturer about problems
or conditions you do not understand,
RECOGNIZE SAFETY SYMBOLS,
WORDS, LABELS
WARNING - Hazards or unsafepractices
which COULD result in severe persona[
injury or death.
A
CAUTION - Hazardsor unsafe practices
which COULD resuk in minor persona[ in-
jury.
Read and follow all instructions before
using this appliance to prevent the poten-
tial riskof fire, electric shock,persona[injury
or damageto the appliance as a result of
improper usageof the appliance.Use appli-
ance only for its intended purpose as de-
scribed in this guide.
To ensure properand safe operation:
Appliance must be properly ins:ailed and
grounded by aqualified technician. Do not
attempt to adjust,repair, service,or replace
anypart of your applianceunlessit isspecifi-
cally recommended in this guide, All other
servicing should be referred to a qualified
servicer, Have the installer show you the
location of the gasshut off valveand how to
shut it off in anemergency.
Always disconnect power to appliance be-
fore servicing.
_]IIL W@R@t@@: If the ino
formation in this manual is
not [olbwed exactly, a _re or
expbsion may resuff causing
property damage, personal ino
_ury or death.
- Do not store or use gasoline or
other flammable vapors and liq-
uids in the vicinity of this or any
[F YOU SMELL GAS:
• Do not tryto lightany appli-
ance.
• Do not touch any electrical
switch,
• Do not use any phone in your
• immediately call your gassup
plier from aneighbor's phone.
Followthe gas supplier'sin-
structions.
• if you cannot reach your gas
supplier,callthefire depart-
men:.
installation and service must be
performed by a qualified in-
staller, serviceagency orthegas
install a UL approvedgas detector(s)in
Pleaseinstall, maintain and usethe gas
detector manufacturer sinstructions,
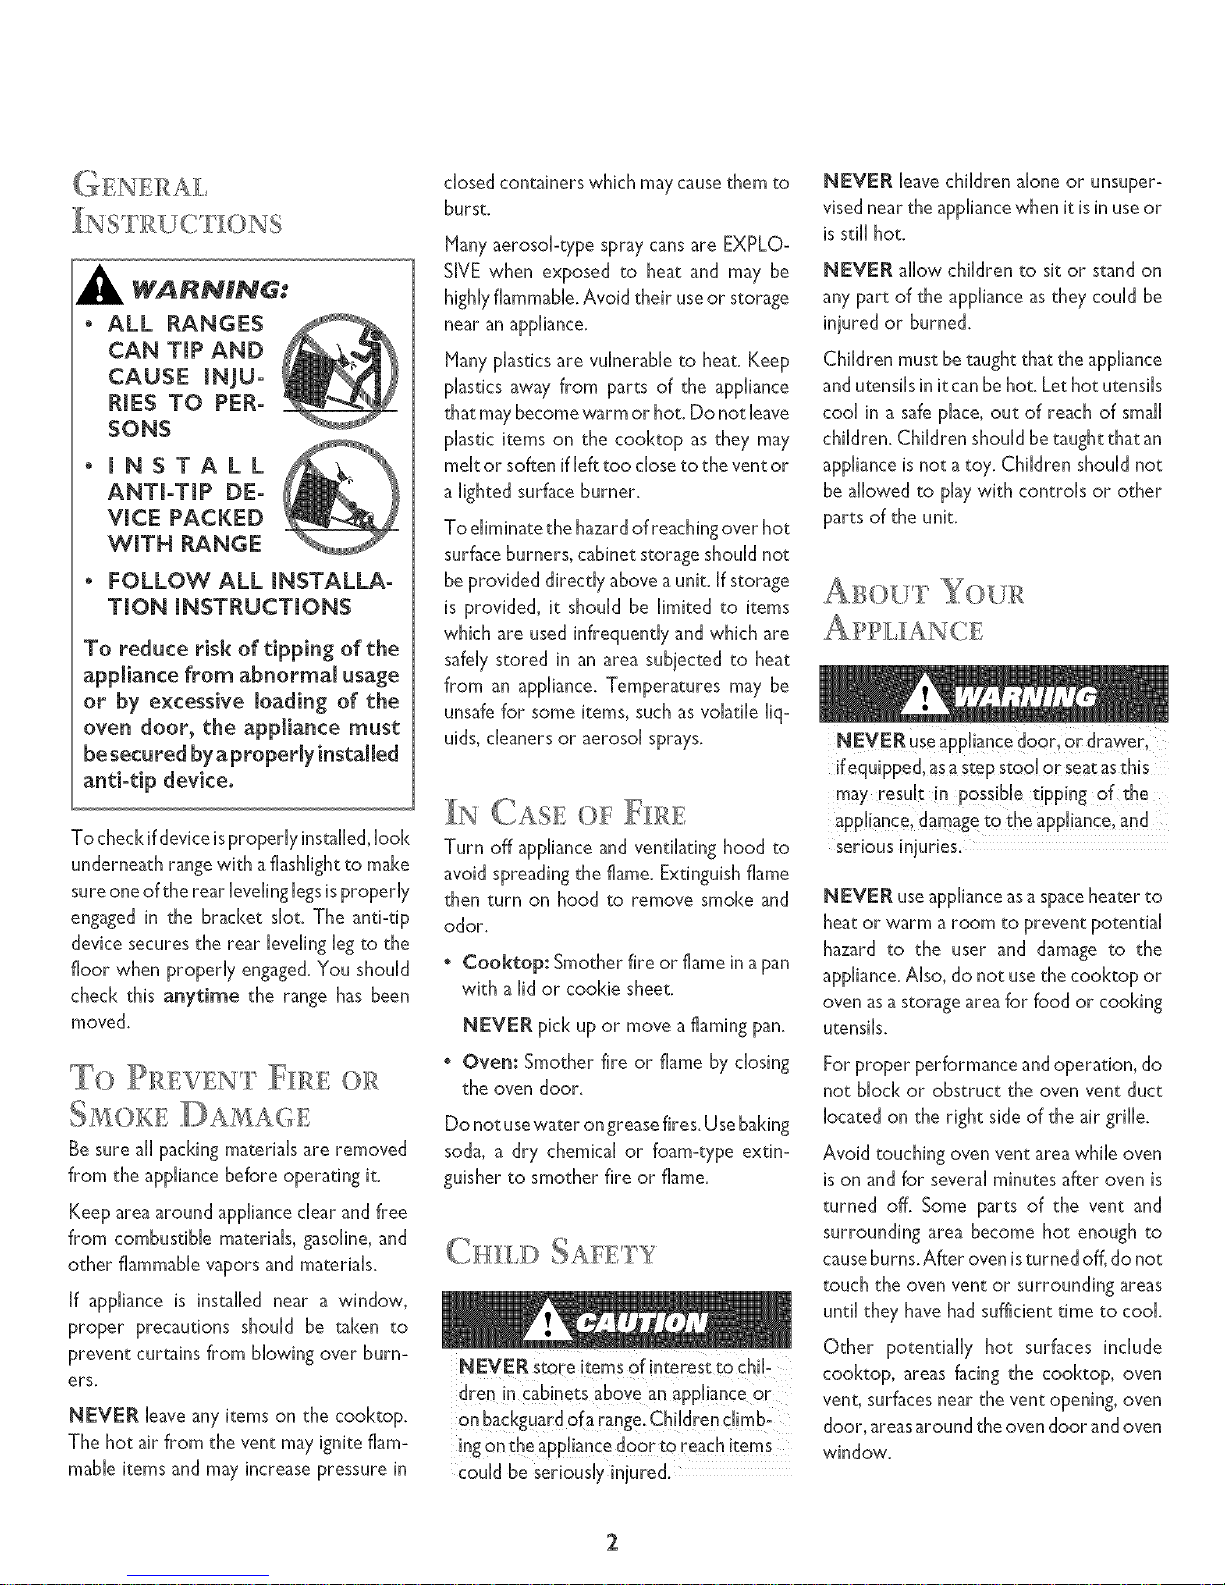
WARNING:
o ALL RANGES
CAN Trap AND
CAUSE [NJU-
RmES TO PER-
SONS
[NSTALL
ANTbTmP DE-
VmCE PACKED
WroTH RANGE
FOLLOW ALL [NSTALLA-
TmON [NSTRUCTmONS
To reduce risk of tipping of the
appliance from abnormal usage
or by excessive loading of the
oven door, the appliance must
be secured by a properly instammed
anti-tip device.
To check if device is properly installed, look
underneath range with a flashlight to make
sure one of the rear leveling legs isproperly
engaged in the bracket slot. The anti-tip
device secures the rear leveling leg to the
floor when property engaged. You should
check this anytime the range has been
moved,
TO P: :: EVENT O:R
' (SM ,)KE DAkIA(::;E
Be sure at[ packing materials are removed
from the appliance before operating it.
Keep area around appliance dear and free
from combustible materials, gasoline, and
other flammable vapors and materials.
[f appliance is installed near a window,
proper precautions should be taken to
prevent curtains from blowing over burn-
ers,
NEVER leaveanyitems on the cooktop.
The hot air from the vent may ignite flam-
mableitems and may increasepressure in
dosed containers which maycausethem to
burst.
HaW aerosol-type spray cansare EXPLO-
SIVE when exposed to heat and may be
highlyflammable.Avoid their useor storage
near an appliance.
Many plasticsare vulnerable to heat. Keep
plastics away from parts of the appliance
that maybecomewarm or hot. Do not leave
plastic items on the cooktop as they may
melt or soften if [efttoo dose to the vent or
a lighted surfaceburner.
To eliminatethe hazardof reachingover hot
surfaceburners, cabinet storageshould not
beprovided directly above a unit. [f storage
is provided, it should be limited to items
which are used infrequendy and which are
safelystored in an area subjected to heat
from an appliance. Temperatures may be
unsafefor some items, such asvolatile liq-
uids,cleaners or aerosol sprays.
[N (}£s:E { ,
Turn off appliance and ventilating hood to
avoid spreading the flame. Extinguish flame
then turn on hood to remove smoke and
odor.
• Cool<top: Smother fire or flame ina pan
with a lid or cookie sheet.
NEVER pick up or move a flaming pan.
* Oven: Smother fire or flame by dosing
the oven door.
Do not usewater ongreasefires.Usebaking
soda, a dry chemical or foam-type extin-
guisher to smother fire or flame.
ing on the appliance door to reach items
could be seriously injured.
NEVER leavechildren alone or unsuper-
visednear the appliancewhen it isin useor
is still hot.
NEVER allow children to sit or standon
any part of the applianceas they could be
injured or burned.
Children must be taught that the appliance
andutensilsin itcan behot. Let hot utensils
cool in a safeplace, out of reach of small
children. Children should be taughtthat an
applianceis not atoy. Children should not
be allowed to playwith controls or other
parts of the unit.
,}u i YOUR
appliance, damage tothe apphance, and
serious injuries.
NEVER use appliance as a space heater to
heat or warm a room to prevent potential
hazard to the user and damage to the
appliance.Aim, do not use the cooktop or
oven as a storage area for food or cooking
utensils.
For proper performance and operation, do
not block or obstruct the oven vent duct
located on the right side of the air grille.
Avoid touching oven vent area while oven
is on and for several minutes after oven is
turned off. Some parts of the vent and
surrounding area become hot enough to
causeburns. After oven isturned off, do not
touch the oven vent or surrounding areas
until they have had sufficient time to cook
Other potentially hot surfaces include
cooktop, areas facing the cooktop, oven
vent, surfaces near the vent opening, oven
door, areas around the oven door and oven
window.
2

P()RTANT SAFE Y NSTRUCT ONS, (:,}N ro
Do not touch a hot oven hght bulb with a
dampcloth asthe bulb could break.Should
the bulb break, disconnect power to the
apphance before removing bulb to avoid
e[ectrka[ shock.
£OOXIN6 SAFETY
Always place a pan on a surface burner
before turning it on. Be sure you [<now
which [<nob controls which surface burner.
Hake sure the correct burner is turned on
and that the burner has ignited. When cook-
ing is completed, turn burner off before
removing pan to prevent exposure to burner
flame.
Always adjust surfaceburner flamesothat
it doesnot extend beyondthe bottom edge
of the pan.An excessiveflame ishazardous,
wastes energy and may damagethe appli-
ance,pan or cabinets abovethe appliance.
NEVER leavea surfacecooking operation
unattended especially when using a high
heatsettingor whendeepfatfrying.Boilovers
cause smoking and greasy spit[overs may
ignite. Clean up greasy spills as soon as
possible,Do not usehighheatfor extended
cooking operations,
NEVER heat an unopened container on
the surfaceburner or in the oven. Pressure
buiN-up may cause container to burst re-
suiting in seriouspersonal injury or damage
to the appliance.
Use dry, sturdy pothoiders. Damp pot-
holders may cause burns from steam.
Dishtowelsor other substitutesshouldnever
be usedaspotho[ders becausethey can trail
acrosshot surfaceburners andignite or get
caught on applianceparts.
Alwayslet quantitiesof hot fat usedfor deep
fat fryingcoo[ beforeattempting to move or
handle.
Do not let cooking grease or other flare-
mane materials accumulate in or near the
rangetop or in the vents. Clean frequently
to prevent grease from accumulating.
NEVER wear garments made of flammable
material or loose fitting or long-sleeved
@pare[while cooking. Clothing may ignite
or catch utensil handles.
Always place oven racks in the desired
positions white oven is coo[. SHe oven rack
out to add or remove food, using dry,
sturdy pothoiders. Always avoid reaching
into the oven to add or remove food. [f a
rack must be moved while hot, use a dry
pothoider. Always turn the oven off at the
end of cooking.
Use care when opening the oven door. Let
hot air or steam escape before moving or
replacing food.
NEVER use aluminum foil inside the grill
area, to cover oven racks or oven bottom.
This could result in risk of electric shock,
fire, or damage to the appliance. Use foil
only as directed in this guide.
PREPARED FOOD WARNING: Fol-
low food manufacturer's instructions. [f a
plastic frozen food container and/or its
cover distorts, warps, or isotherwise dam-
aged during cooking, immediately discard
the food and its container. The food could
be contaminated.
[,,JT:gN 5H_, SAFETY
Use pans with flat bottoms and handles that
are easilygrasped and stay cool Avoid using
unstable, warped, easily tipped or bose-
handled pans. Also avoid using pans, espe-
cially sinai[ pans, with heavy handles asthey
could be unstable and easily tip. Pans that
are heavy to move when filled with food
may also be hazardous.
Be sure utensil is large enough to properly
contain food and avoid boiiovers. Pansize is
particularly important in deep fat frying. Be
sure pan wii[ accommodate the volume of
food that isto be added aswell asthe bubbie
action of fat.
To minimize burns, ignition of flammable
materials and spillage due to unintentional
contact with the utensil, do not extend
handles over adjacent surface burners. Al-
ways turn pan handles toward the side or
back of the appliance, not out into the room
where they are easily hit or reached by
smallchildren.
Never let a pan boil dry as this could
damage the utensil and the appliance.
Follow the manufacturer's directions when
using oven cooking bags.
Only certain types of glass, glass/ceramic,
ceramic or glazed utensils are suitable for
cooktop or oven usage without breaking
due to the sudden change in temperature.
Follow manufacturer's instructions when
using glass.
This appliance has been tested for safe
performance using conventional coN<ware.
Do not use any devices or accessories that
are not specifically recommended in this
guide. Do not use eyelid covers for the
surface units, stovetop grills, or add-on
oven convection systems. The use of de-
vices or accessories that are not expressly
recommended in this manual can create
serious safety hazards, result in perfor-
mance problems, and reduce the life of the
components of the appliance.
HE££'_N<::; EL:EM:gNT5
N EVER touch oven heating elements,
areas near elements, or interior sur-
faces of oven.
Heating dements may be hot even though
they are dark in color.Areas near dements
and interior surfaces of an oven may be-
come hot enough to cause burns.
During and after use, do not touch or let
clothing or other flammable materials con-
tact heating dements, areas near dements,
or interior surfaces of oven until they have
had sufficient time to cool
£LEANIN(::; SAFETY
Turn off all controls and wait for appliance
parts to cool before touching or cleaning
them. Do not touch the burner grates or
surrounding areas until they have had suffi-
cient time to cool.
Clean apphancewith caution. Use care to
avoid steamburns if awet spongeor cloth
isusedto wipe spillson ahot surface.Some
cleanerscan produce noxious fumes if ap-
phed to a hot surface.
SS:I:, oCL:sAN©VSS
Cleanonly partshsted in thisguide. Do not
dean door gasket. The door gasket is es-
sentialfor agood sea[.Care shouN betaken
not to rub, damage,or movethe gasket.Do
not use oven cleaners of any kind in or
around any part of the serf-dean oven.
Before serf-cleaningthe oven, remove air
grille, broiler pan, oven racks and other
utensilsandwipe up excessivespilloversto
prevent excessivesmoke,flare-upsor flam-
ing. CAUTION: Do not leave food or
cooking utensils,etc. inthe oven duringthe
serf-dean cycle.
Slide-in ranges feature a cooling fan which
operates autornaticaiiyduringadean cycle.
If the fandoesnot turn on, cancd the dean
operation and contact an authorized
servicer.
It isnormal for the cod<top of the rangeto
becomehot duringaself-cleancycle.There-
fore, touching the cod<top during a clean
cycle should beavoided.
..... . _- _" ._ 7.._
N } AND
The California Safe Drinking Water and
Toxic Enforcement Act of i986 (Proposi-
tion 65) requires the Governor of Califor-
nia to punish a list of substancesknown to
the State of California to causecancer or
reproductive harm,andrequires businesses
to warn customers of potential exposures
to such substances.
Users of this applianceare hereby warned
that the burning of gas can result in low-
[eve[exposure to some of the listed sub-
stances,including benzene,formaldehyde
and soot, due primarily to the incomplete
combustion of natural gas or liquid petro-
leum (LP)fuels.Properly adjusted burners
will minimize incomplete combustion, Ex-
posure to these substances can also be
minimized by properly venting the burners
to the outdoors.
Users of this applianceare hereby warned
that when the oven is engagedin the serf-
dean cycle, there may be some low [eve[
exposure to someof the listed substances,
including carbon monoxide. Exposure to
thesesubstancescanbeminimizedbyprop-
eriy venting the oven to the outdoors
during the self-clean cycle by opening a
window and/or door in the room where
the applianceislocated.
[HPORTANT NOTICE REGARDING
PET BIRDS: Never keep pet birds in the
kitchen or in rooms where the fumesfrom
the kitchen could reach. Birds havea very
sensitive respiratory system. Fumes re-
leased during an oven self-cleaningcycle
may be harmful or fatal to birds. Fumes
releaseddue to overheated cooking oil, fat,
margarineandoverheated non-stick cook-
ware may be equally harmful.
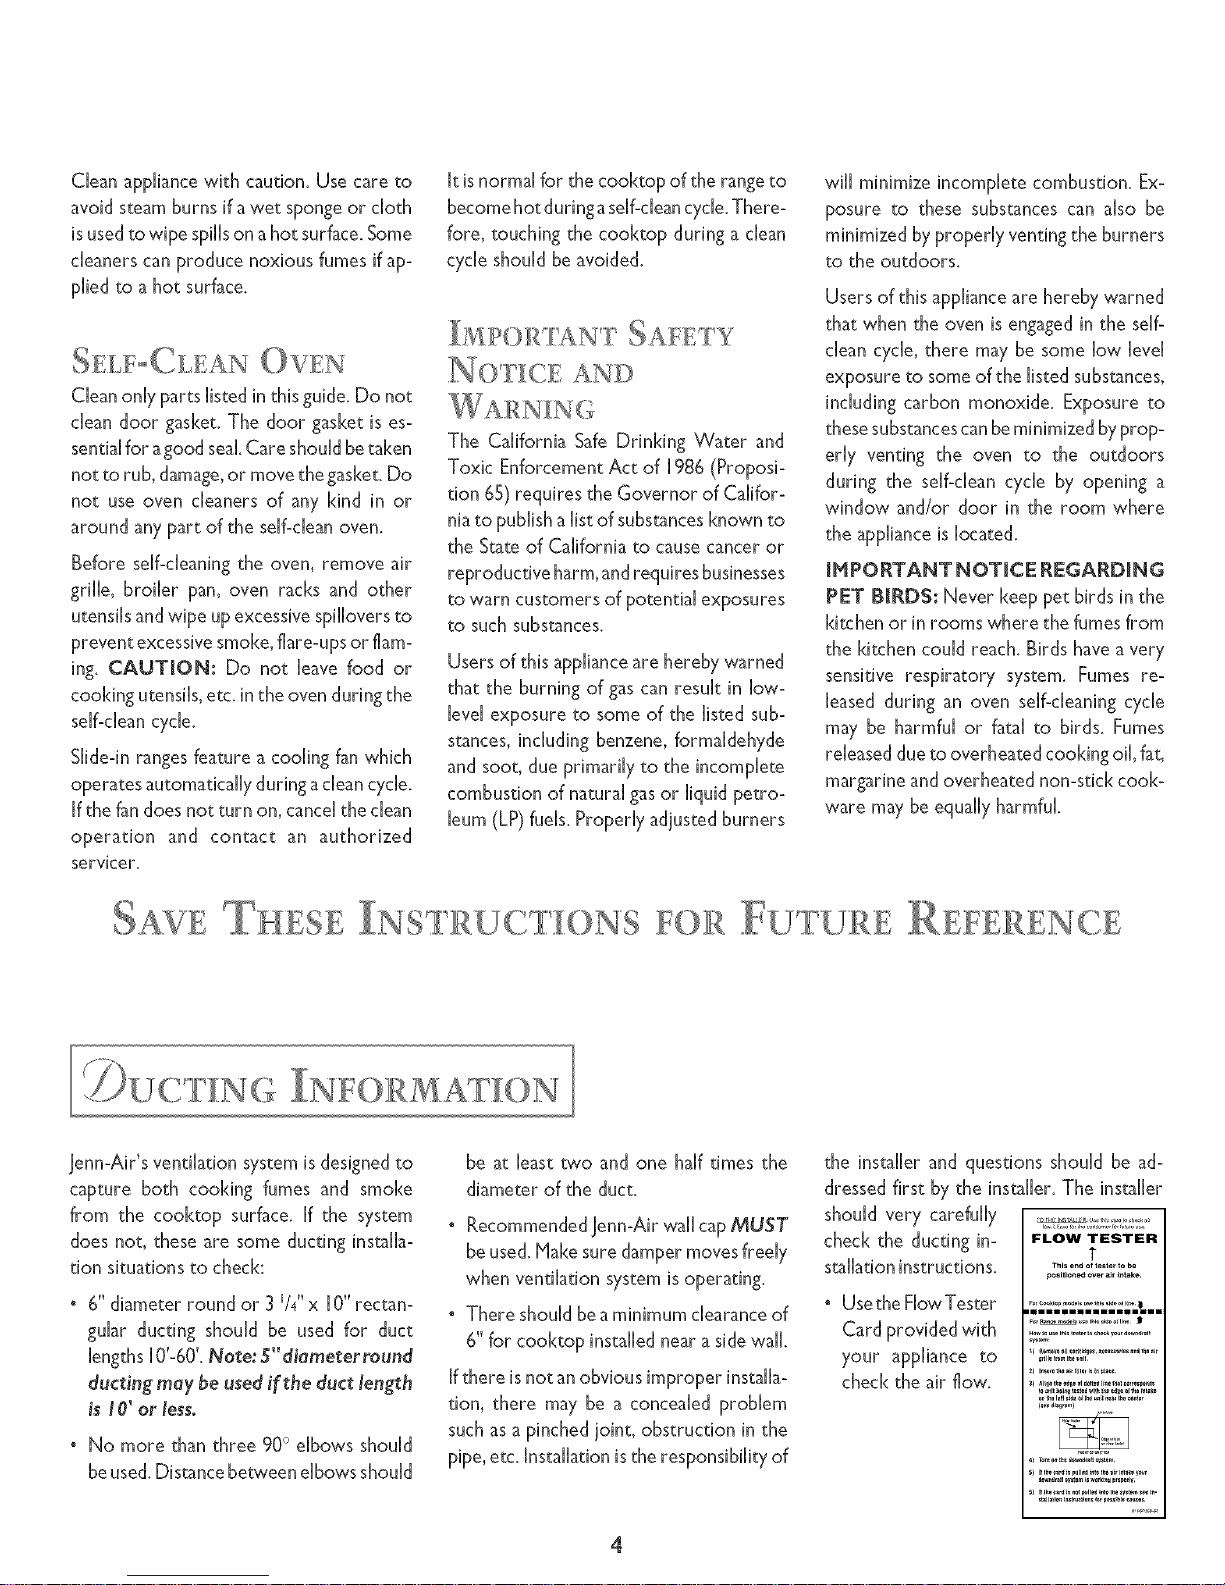
.............JUC FING NF©RMATION
Jenn-Air's ventilation system is designed to
capture both cooking fumes and smoke
from the cod<top surface, ff the system
does not, these are some ducting installa-
tion situations to check:
° 6" diameter round or 3 I/4"x [0" rectan-
gular ducting should be used for duct
lengths [0'-60'. Note: S'diameterround
dueting may be usedi[the duct length
is t 0' or less.
• No more than three 90° elbows should
beused.Distancebetweenelbows should
be at least two and one haft times the
diameter of the duct.
• Recommended Jenn-Air wail cap MUST
be used. Hake sure damper moves freely
when ventilation system is operating.
• There should be a minimum clearance of
6" for cookmp installed near a side wall.
Ifthere is notan obvious improper installa-
tion, there may be a concealed problem
such as a pinched joint, obstruction in the
pipe, etc. Installation is the responsibility of
the installer and questions should be ad-
dressedfirst by the installer. The installer
should very carefully
check the ducting in-
stallationinstructions.
° UsetheFiowTester
Card providedwith
your appliance to
check the air flow.
FLOW TESTER
Thts end of te_ter to b_
i_osllion_t over _if l_l_Re.
4
SV[ FA(E (} 0IZS/
° ffflame should go out duringa cook-
mgoperatuon, turn the burner off. ffa
strong gas odor is detected, open a
window and wait five minutes before
reiighti qgthe burner.
" Be sure all surface controls are set in
the OFF position prior to supplying
NEVER touch cooktop und[ it has
cooled. Expect some parts of the
cooktop, especially around the burn-
ers. to become warm or hot during
cooking. Use pothoHers to protect
hands.
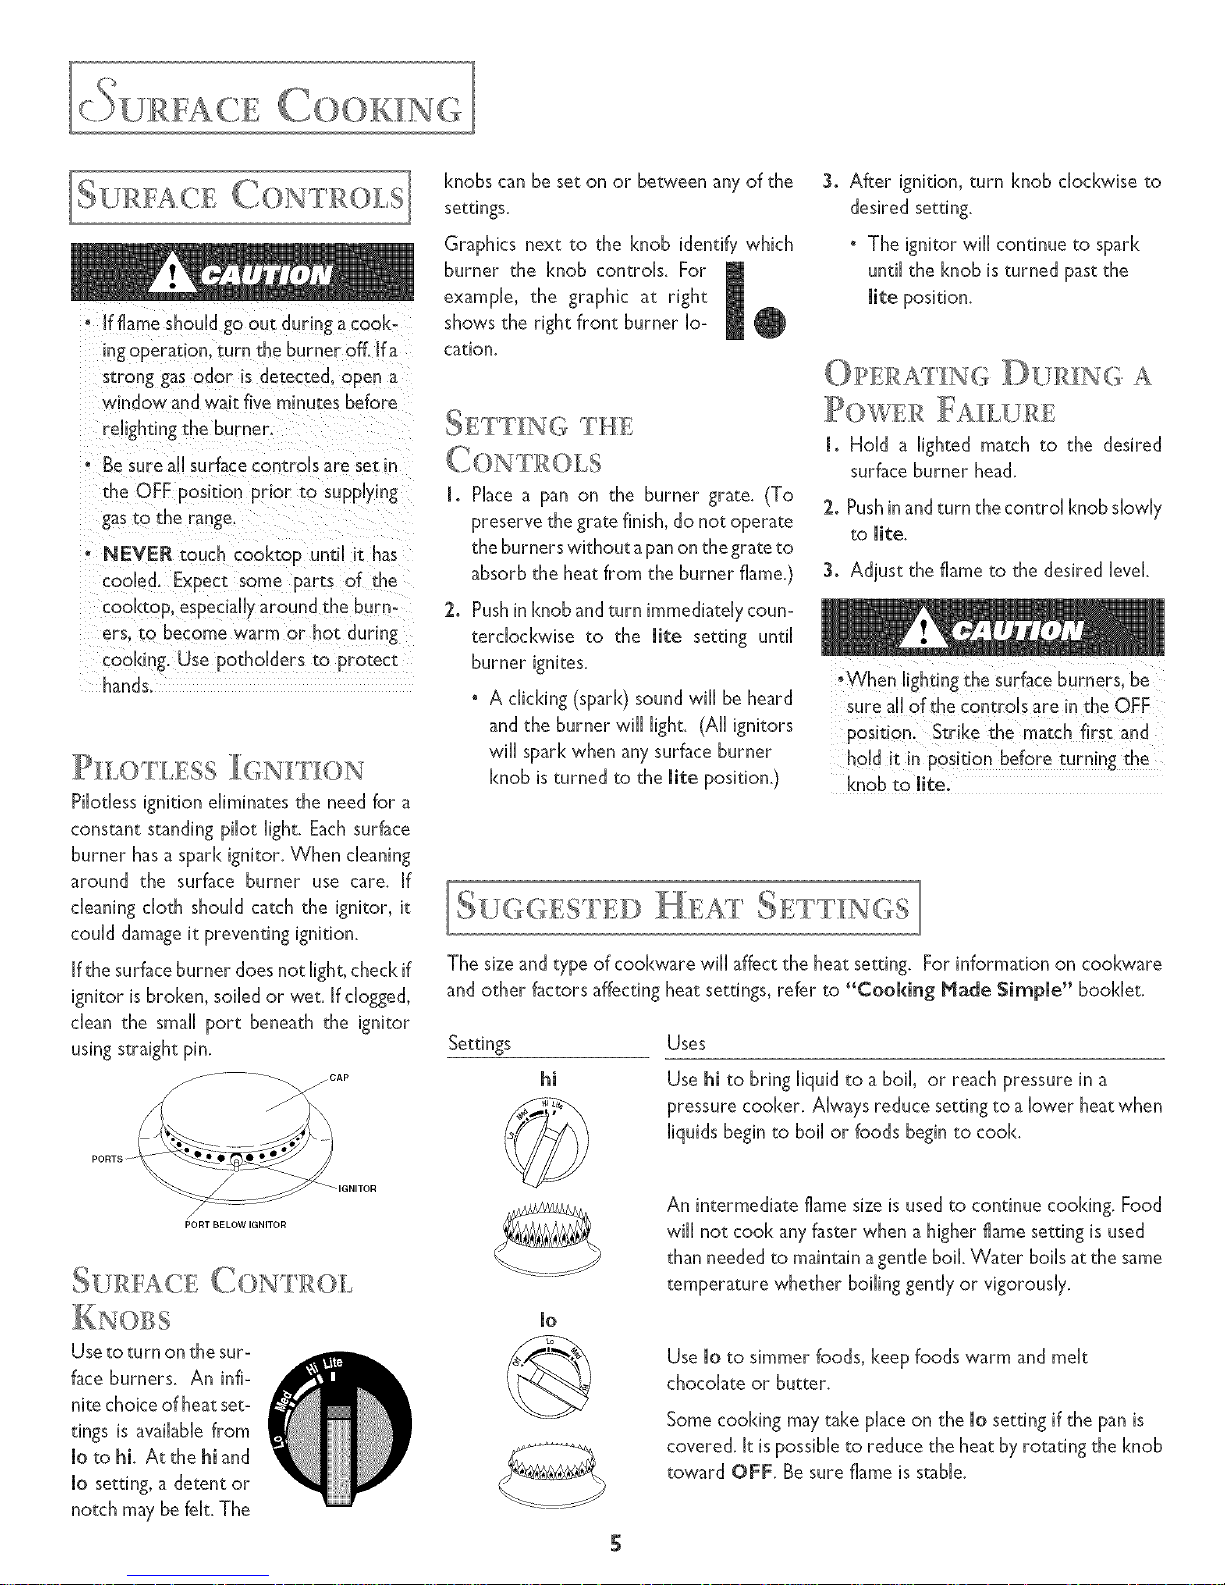
Pilotless ignition eliminates the need for a
constant standing pilot light. Each surface
burner has a spark ignitor. When cleaning
around the surface burner use care. If
cleaning cloth should catch the ignitor, it
could damage it preventing ignition.
Ifthe surface burner does not light, check if
ignitor is broken, soiled or wet. Ifclogged,
dean the sinai[ port beneath the ignitor
usingstraight pin.
-- CAP
PONT BgLOW IGNITOR
SU ::ZFACE(} }N R }L{' (
Use to turn on the sur-
face burners. An infi-
nite choice of heat set-
tings is available from
1o to hi. At the hi and
1o setting, a detent or
notch may be fek, The
knobs can be set on or between any of the
settings.
Graphics next to the knob identify which
burner the [<nob controls. For
example, the graphic at right
shows the right front burner lo-
cation.
ETTIN(; THE
[. Place a pan on the burner grate. (To
preserve the grate finish, do not operate
the burners without apan on the grate to
absorb the heat from the burner flame,)
2, Push in [<noband turn immediately coun-
terclockwise to the lite setting until
burner ignites,
• A clicking (spark) sound wiil be heard
and the burner wiil light, (Ail ignitors
wiil spark when any surface burner
knob is turned to the mite position.)
3o After ignition, turn [<nobclockwise to
desired setting.
• The ignitor wii[ continue to spark
und[ the [<nobis turned pastthe
OPF:R£ 'ING DU:RIN(; A
I. Hold a lighted match to the desired
surfaceburner head.
2. Pushinandturn the control knob slowly
to lite.
3. Adjust the flame to the desired level.
•When lightingthe surfaceburners, be
knob to life,
SU(;(;ES'[EiD ]EAI[ SETTINGS
The size and type of cookware wii[ affect the heat setting. For information on cookware
and other factors affecting heat settings, refer to "Cooking Hade Simple" booklet.
Settings
hi
Uses
Use hi to bring liquid to a boil, or reach pressure in a
pressure cooker. Always reduce setting to a lower heatwhen
liquids beginto boil or foods beginto cook.
An intermediate flame size is used to continue cooking. Food
will not cool< any faster when a higher flame setting is used
than needed to maintain a gentle boil, Water boils at the same
temperature whether boiling gently or vigorously,
Use 1oto simmer foods, keep foods warm andmelt
chocolate or butter.
Some cooking may take place on the lo setting if the pan is
covered. It is possible to reduce the heat by rotating the [<nob
toward OFF, Be sure flame is stable,
ICOO: TOP ]
To prevent the cooktop from discol-
oring or staining:
• Clean cooktop after each use.
• Wipe acid or sugar spills as soon as
SEA],ED BU]{NERS
The sealed burners on your range are se-
cured to the cooktop cartridge and are not
designed to be removed. Since the burners
are sealed into the cartridge, boiiovers or
spills wiiI not seep underneath the cooktop.
However, the burner heads shouH be
cleaned after each use.
The grates must be properly positioned
before cooking. Improper installation of
the grates may result in chipping of the
cooktop.
Do not operate the burners without a
pan on the grate. The grate's porce-
lain finish may chip without a pan to
absorb the heat from the burner flame.
Although the burner grates are durable,
they will gradually lose their shine and/or
discolor, due to the high temperatures of
the gas flame.
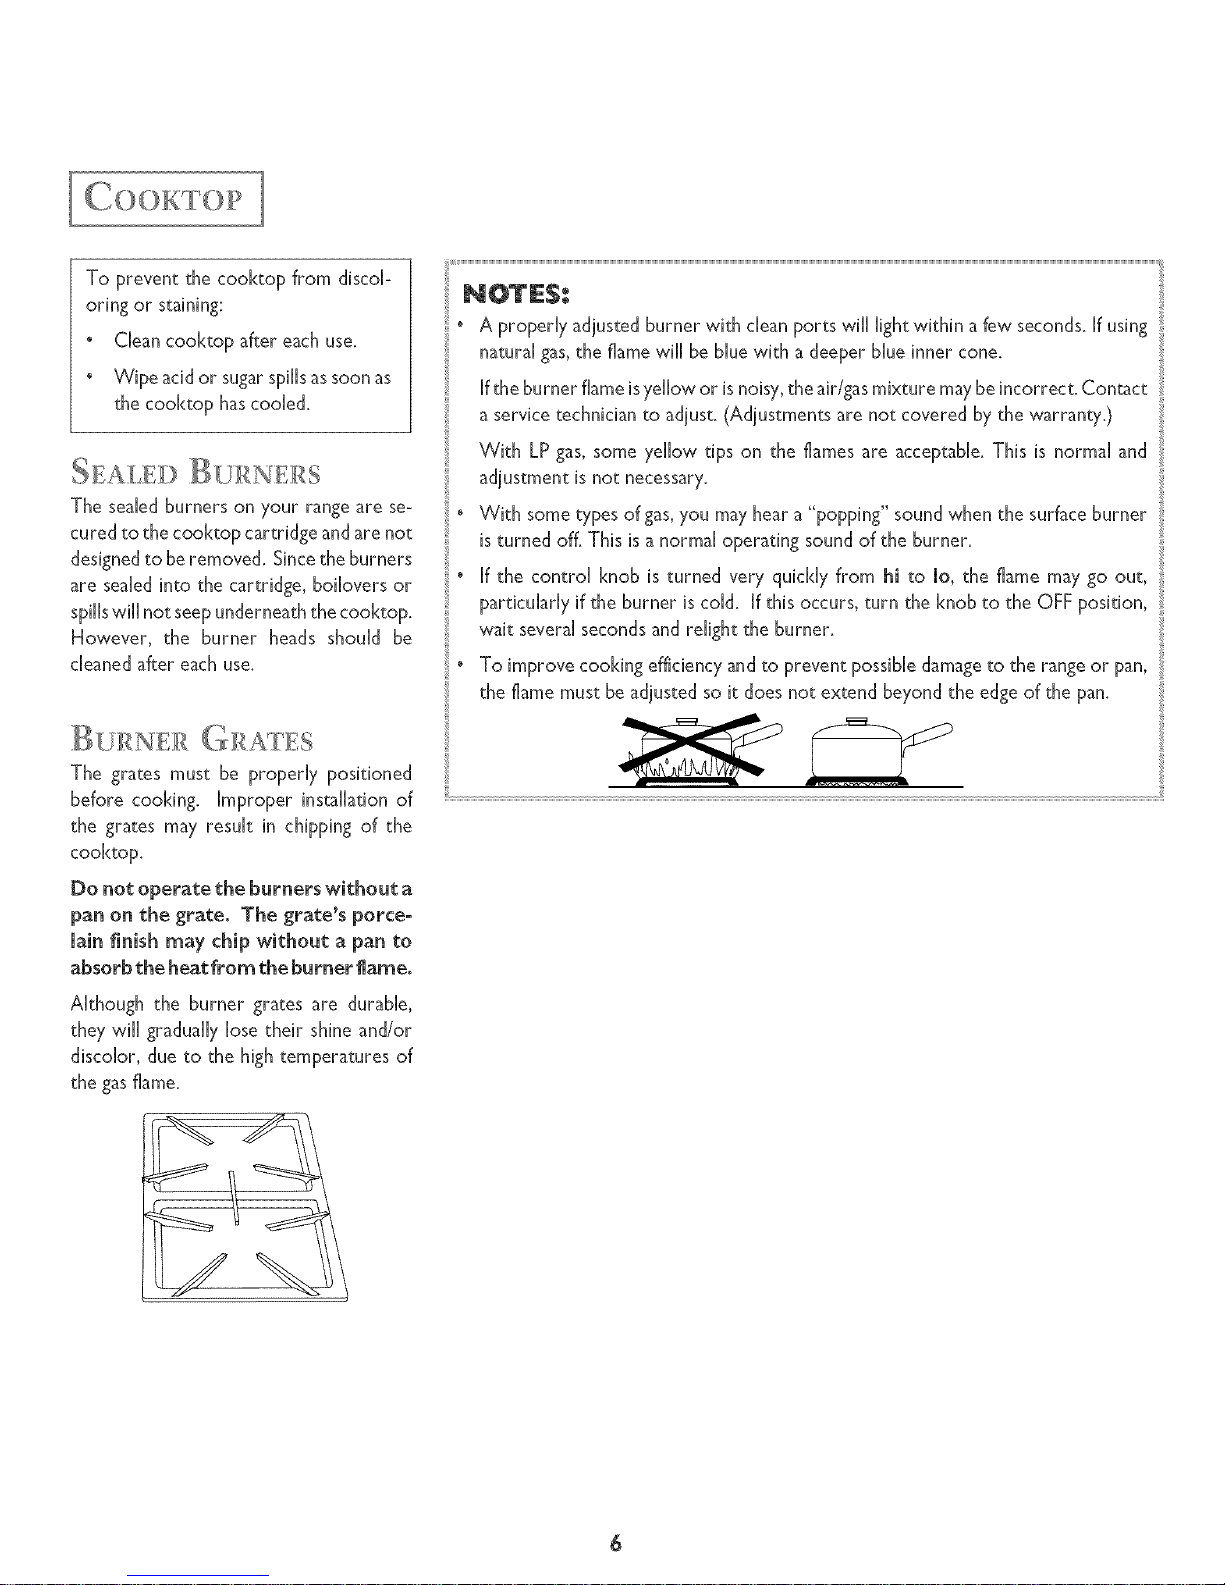
Ifthe burner flame is yellow or is noisy, the air/gas mixture may be incorrect. Contact
a service technician to adjust. (Adjustments are not covered by the warranty.)
With LP gas, some yellow tips on the flames are acceptable. This is normal and
adjustment is not necessary.
' With some types of gas, you may hear a "popping" sound when the surface burner
is turned off. This is a normal operating sound of the burner.
* If the control knob is turned very quickly from hi to 1o, the flame may go out,
particularly if the burner is cold. If this occurs, turn the [<nob to the OFF position,
wait several seconds and reiight the burner.
' To improve cooking efficiency and to prevent possible damage to the range or pan,
the flame must be adjusted so it does not extend beyond the edge of the pan.

r C ,)N Fo
SEA ,:ED BL):RN:ER
TO iNSTALL SEALED BURNER
CARTRIDGE:
1. Besure contrd knobsare turned OFF.
2. Ifthe grill burner and grill grates are in
place, remove before installing a burner
cartridge. Clean basin of any grease
accumulation. (See page 20 for cleaning
recommendations.}
3. Position the burner cartridge with the
mixer tube openings and ignitor rods
toward the orifices andterminal recep-
tacle.Slide the cartridge until the tubes
andignitors engage,then lower the car-
tridge so that it rests on the range
surface.
TO REMOVE SEALED BURNER
CARTR(DGE:
I. Control knobs should be in the OFF
position and the range should be coo[.
2. Liftupthe edgeof thecartridge until the
bottom ofthe cartridgedears the basin.
(Lifting the cartridge too highwhile still
engagedcould damagethe ignitor rods
and mixer tubes.)
3. To disengagethe cartridge, hold by the
sidesand pull away from the terminal
receptacle and orifices. Lift out when
fully unplugged.
4. Do not stack cartridges where they may
fall or be damaged.
NOTE: Optional SealedBurner Car-
tridge, modelJGA8[00,canreplacethe
grill burner assembly.
I( R: LL INsrALIA )N [
The grill assembly consists of two grill
gratesandagrill burner. Only installthe grill
on the LEFTSIDEof your range.
TO INSTALL GRILL:
2_
Before installing grill components, be
sure controls knobs are in the OFF
position.
Position the grill burner with mixer
tubes and ignitor rod toward the ori-
rices and terminal receptacle. Slidethe
burner until the tubes and ignitor en-
gage,then lower the burner until it rests
in the burner basin.
3. Place the grill grates on top of the
rangetop.
NOTE: Before usingthe grill for the
first time, heat the grill burner to re-
move the protective shipping coating.
Heat the grill burner on Hi for 10
minutes and use the vent system to
remove anysmoke.
TO REMOVE GRILL:
I. Be sure control knobs are in the OFF
position and the grill components are
COd.
2_
3.
Removegrill grates.
Lift the burner up s[ighdy. Slide the
burner awayfrom the orifices andter-
minal receptacle.
THE
Before the first use,wash grill grates in
hot soapy water, rinse and dry. Then
"season" the surface bywipingon a thin
coating of cooking oil. Remove excess
oil by wiping with paper towel.
This procedure should be repeated when
either: a} cleaning in the dishwasher
since the detergent may remove sea-
soning or b) anytime a sugar-based
marinade (for example, barbecue sauce)
isgoingto be used.
Preheat the grill on Hi for 5 minutes.
Preheating improves the flavor and ap-
pearance of meats and quickly sears the
meat to help retain the juices.
Use nonmetallic spatulas or utensils to
prevent damaging the nonstick gril!grate
_nish.
_cessive amounts oFf'atshouldbe trimmed
from meats. Only a normal amount is
necessaryto producethe smokeneeded
for that smoked, "outdoor" flavor. Ex-
cessive fat can create cleaning and flare-
Albwing excessive amounts of grease or
drippings to constantly flare-up voids the
warranty on the grill grates.
Excessive flare-ups indicate that either
the grill interior needs to be cleaned or
that excessive amounts of fat are in the
meat or the meat was not properly
trimmed.
° Grease drippingswi[[ occasiona[[yignite
m produce harmless puffsof flame for a
second or two. This is a normal part of
the cooking process. NOTE: For infor-
mation on the grease cup, see pg. 20.
• NEVER LEAVE GRILL UNAT-
TENDED DURING GRILL OP-
ERATION°
7
SHOULD EXCESS GREASE
CAUSE SUSTAINED FLARE-
UPS:
1° Turn on thefan manually.
2. Immediately turn gM[[ controls to
Off,
3. Remove meat from grill.
|MIPORYANT
Do not use aluminum foil inside the
gM[[ area.
Do not use charcoal or wood chips in
the gM[[ area.
Do not allow burner basin to become
overloaded with grease. Clean fre-
quendy.
Do not cover grates
completely with meat.
Leave air space be-
tween each steak
etc. to allow
proper ventila-
tion as we[[ as
prevent flare-
ups,
GRILLING TIPS
° Be sure to fallow directions for using the
gMi[.
° Suggestedcooking times and control
settings (see Grill guide, pg. 9) are ap-
proximate dueto variationsin thefoods.
• For best results, buy top grade meat.
Meat that is at least 3/4inch will grill
better than thinner cuts.
° Score fat on edges of steak, but do not
cut into meat, to prevent curling while
cooking.
• For the attractive "branded" look on
steaks, be sure grill is preheated. Allow
one side of meat to coo[< to desired
aloneness, or until juices appear on the
top surface, before turning. Turn steaks
and hamburgers justonce. Manipulating
food causes loss of juices.
• When basting meats or applying sauces
to foods, remember that excessive
amounts accumulate inside your grill
and do not improve the food flavor.
Apply sauces during the last 15 to 20
minutes of cooking time unless recipe
specifies otherwise. Plus,anytime a sugar-
based marinade (for example barbecue
sauce) is going to be used, the grates
should be "seasoned" prior to preheat-
ing. (See Using the Grill section.)
° There are many meat marinades which
wii[ help tenderize less expensive cuts of
meat for cooking on the grill.
° Certain foods, such as poukry and non-
oily fish, may need some extra fat. Brush
with oil or melted butter occasionally
Use tongs with long handles or spatulas
for turning meats. Do not use forks as
these pierce the meat, allowing juices to
be lost.
VEN rH,nr ,}s SYSTEM
The buik-in ventilation system removes
cooking vapors, odors and smoke from
foods prepared on your cod<top and grill.
• To operate the ventilation sys- Fan
Hi
tern manually, push the vent
fan switch located on the con-
tro[ panel. LO
The ventilation system will operate au-
tomadcammy on Hi when the grill burner
is in use.
° The fan can be used to remove strong
odors from the kitchen aswhen chop-
pingonions near the fan.
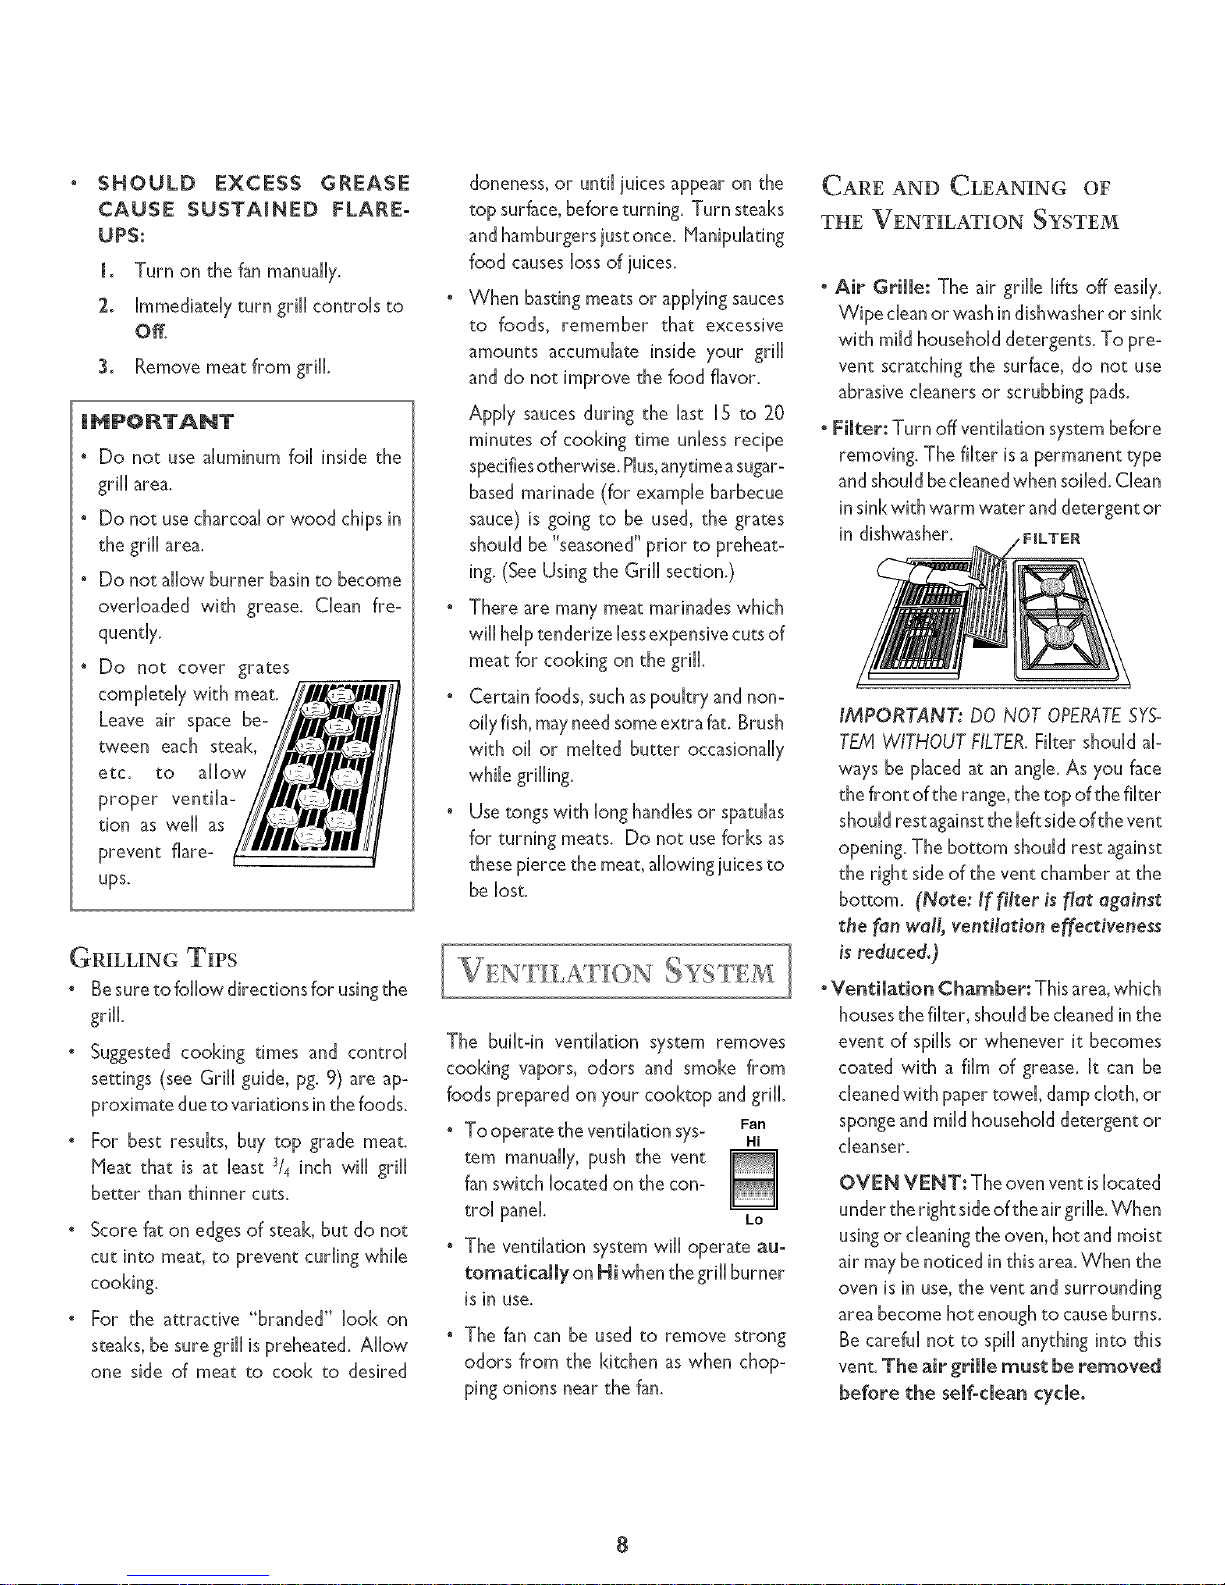
CARE AND CLEANING OF
THE VENTILATION SYSTEM
• Air 6rille: The air grille lifts off easily.
Wipe clean or wash in dishwasher or sink
with mild household detergents. To pre-
vent scratching the surface, do not use
abrasive cleaners or scrubbing pads.
° Filter: Turn off ventilation system before
removing. The filter is a permanent type
andshouldbecleaned when soiled. Clean
in sink with warm water and detergent or
in dishwasher.
IMPORTANT: DO NOT OPERATE SYS-
TEM WITHOUT FILTER. Fiker should al-
ways be placed at an angle. As you face
the front of the range, the top of the filter
should rest against the [eft side of the vent
opening. The bottom should rest against
the right side of the vent chamber at the
bottom. (Ne_e: I[ Jilter is [let against
_he [an wall, ventilation effectiveness
is reduced.)
• Ventilation Chamber: This area, which
houses the filter, should be cleaned in the
event of spills or whenever it becomes
coated with a film of grease. It can be
cleaned with paper towel damp cloth, or
sponge and mild household detergent or
cleanser.
OVEN VENT: The oven vent islocated
under the right side of the air grille. When
using or cleaning the oven, hot and moist
air may be noticed in this area. When the
oven is in use, the vent and surrounding
area become hot enough to cause burns.
Be careful not to spill anything into this
vent, The air grille must be removed
before the self-dean cycle.
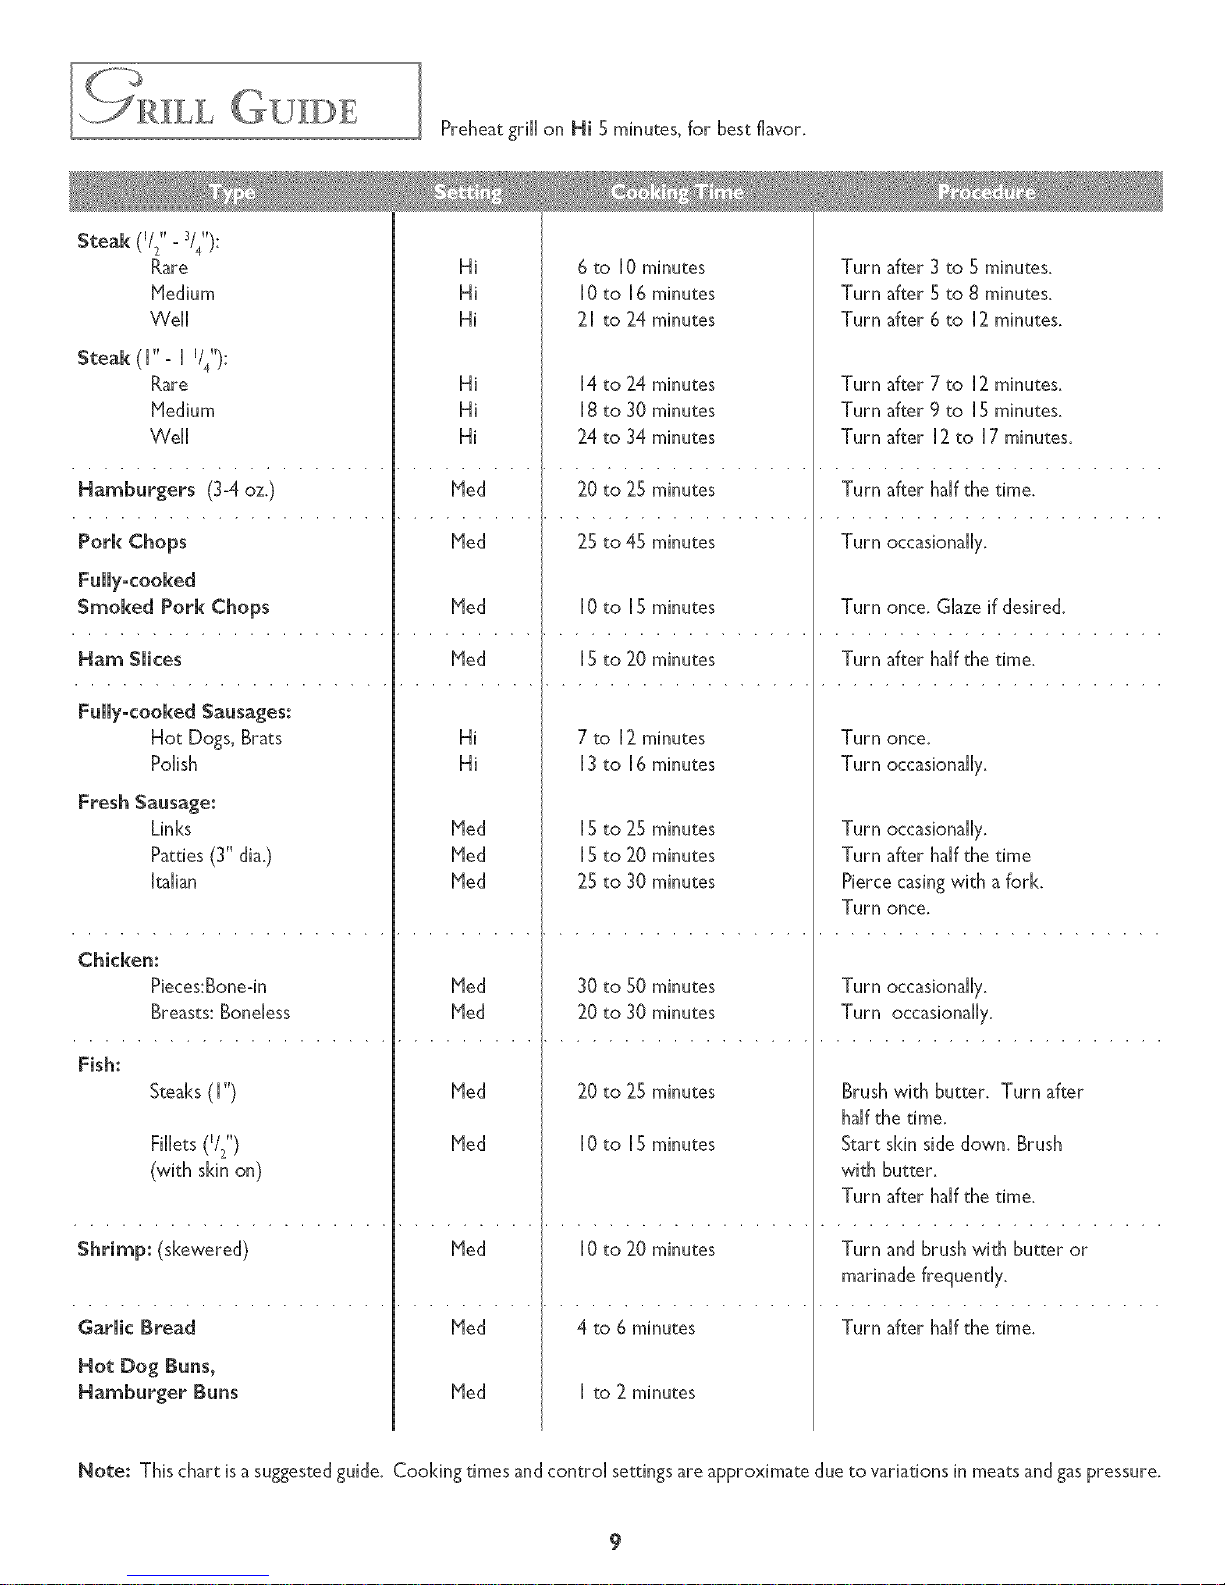
?JR LL GUDE
Steak (i/2,,_3//,):
Preheat grill on HI S minutes, for best flavor.
Rare
Medium
Well
Steak (['- [ i/4,,):
Rare
['4edium
Well
Hi
Hi
Hi
Hi
Hi
Hi
6 to [0 minutes
10 to 16 minutes
21 to 24 minutes
[4 to 24minutes
18to 30minutes
24 to 34 minutes
Turn after 3 to S minutes.
Turn after S to 8 minutes.
Turn after 6 to [2 minutes.
Turn after 7 to [2 minutes.
Turn after 9 to [S minutes.
Turn after [2 to [7 minutes.
Hamburgers (3-4 oz.) Ned 20 to 25 minutes Turn after half the time.
Pork Chops Ned 25 to 45 minutes Turn occasionally.
Smoked Pork Chops Ned 10to iS minutes Turn once.Glazeif desired.
Ham Slices
Fullyocooked Sausages:
Hot Dogs, Brats
Polish
Fresh Sausage:
Links
Patties(3" dia.)
ffaiian
Chicken:
Pieces:Bone-in
Breasts:Boneless
Fish:
Steaks(I ")
Fillets(Iiz")
(with skin on)
Shrimp: (skewered)
Garlic Bread
Hot Dog Buns,
Hamburger Buns
Ned [Sto 20 minutes Turn after haft the time.
Hi
Hi
Ned
Ned
Ned
7 to [2minutes
13to 16minutes
[ S to 25 minutes
I S to 20 minutes
25 to 30 minutes
Turn once.
Turn occasionally.
Turn occasionally.
Turn after half the time
Piercecasingwith a fork.
Turn once.
Ned 30 to S0minutes Turn occasionally,
Ned 20 to 30 minutes Turn occasionally,
Ned 20 to 25 minutes Brushwith butter. Turn after
halfthe time.
Ned 10to iS minutes Start skin sidedown. Brush
with butter.
Turn after haft the time.
Ned 10to 20 minutes Turn and brush with butter or
marinade frequently.
Ned 4 to 6 minutes Turn after haft the time,
Ned I to 2 minutes
Note: This chart is asuggested guide. Cooking times and control settings are approximate due to variations in meats and gas pressure,
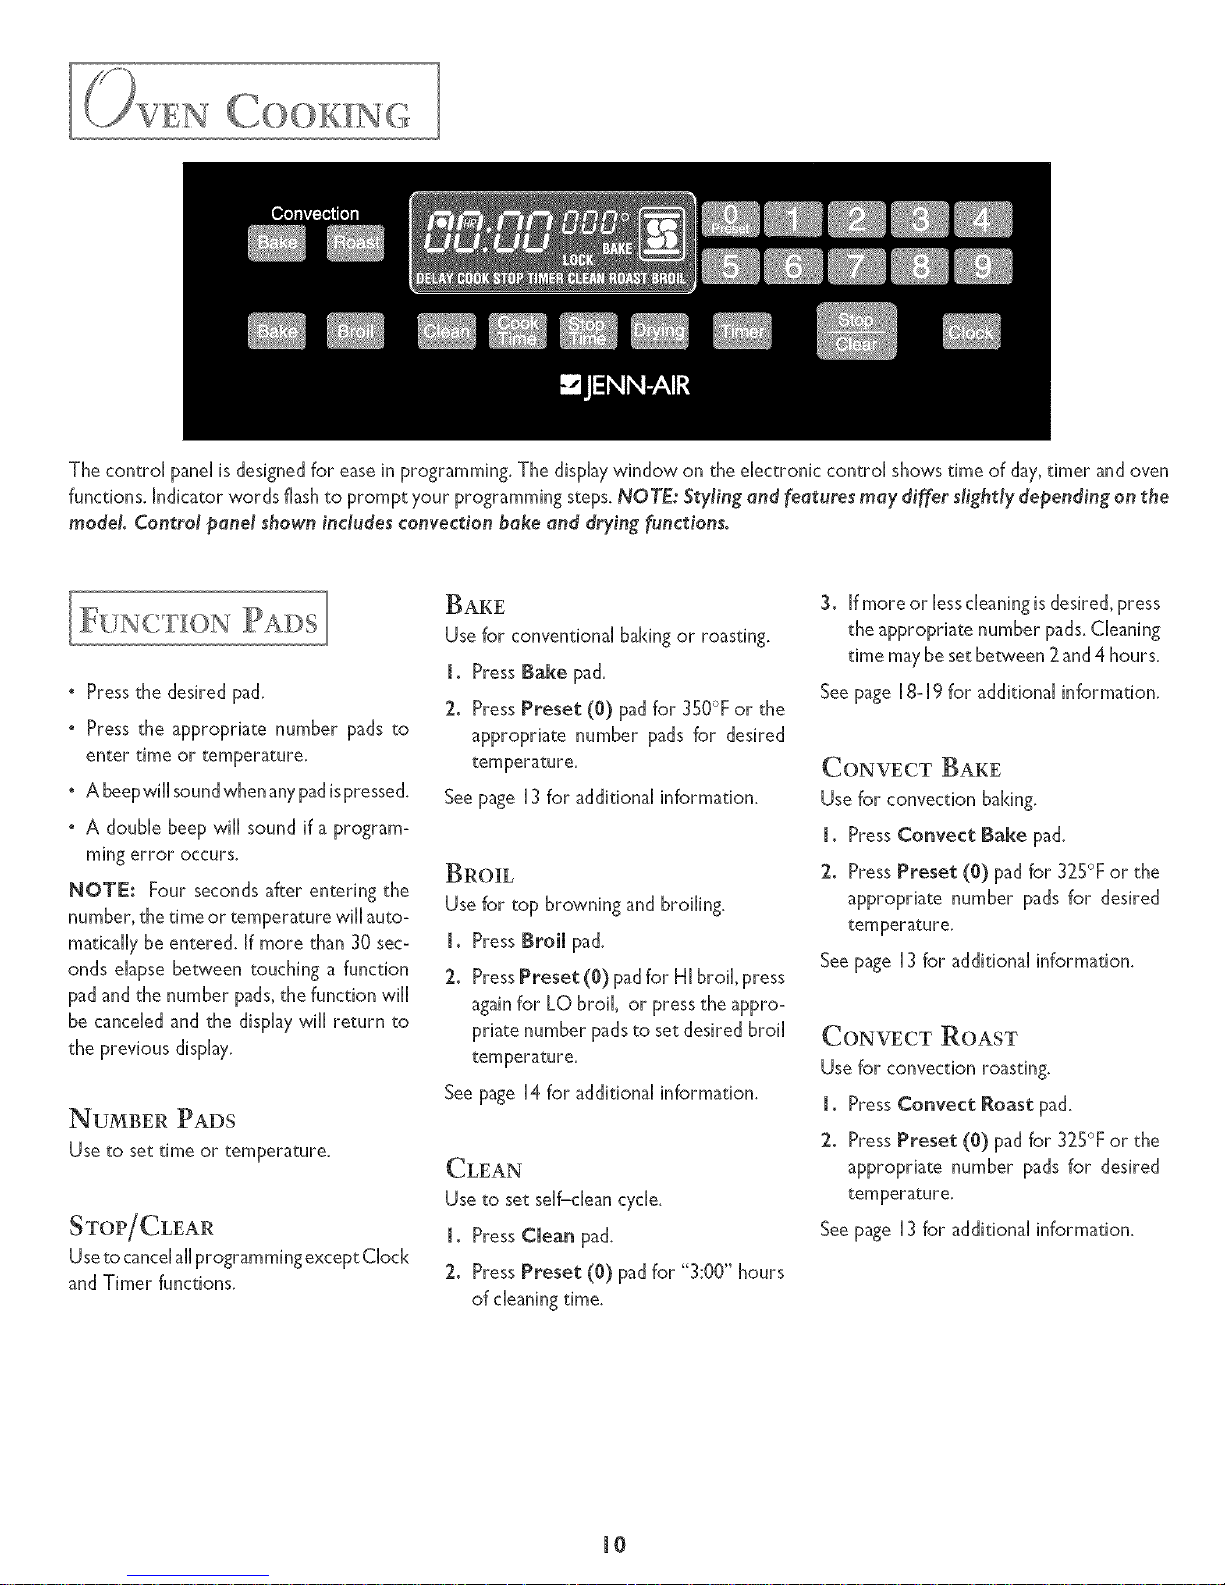
The control pane[ is designedfor easein programming. The disphy window on the dectronic control shows time of day,timer and oven
functions. Indicator words flashto prompt your programming steps.NOTE: Styling and features may differ dight/y depending on the
model Control panel shown includes convection bake and drying functions.
F{. NCF_ON PADS
° Pressthe desired pad.
• Press the appropriate number pads to
enter time or temperature.
• A beepwillsoundwhen anypadispressed.
° A double beep will sound if a program-
mingerror occurs,
NOTE: Four secondsafter entering the
number, the time or temperature will auto-
matically be entered. Ifmore than 30 sec-
onds elapse between touching a function
padand the number pads,the function will
be canceled and the displaywill return to
the previous display.
NU_BER PADS
Use to set time or temperature.
Useto cancdallprogrammingexceptClock
and Timer functions.
BAKE
Use for conventional bakingor roasting.
1° PressBake pad.
2. PressPreset (0) padfor 350°F or the
appropriate number pads for desired
temperature.
Seepage [3 for additional information.
BROIL
Use for top browning and broihng.
l° PressBroil pad.
2. PressPreset (0) padfor HI broil, press
againfor LO broil, or pressthe appro-
priate number padsto set desired broil
temperature.
See page [4 for additional information.
Use to set serf-dean cycle.
l° Press Clean pad.
2. Press Preset (0) pad for "3:00" hours
of cleaning time.
3. Ifmore or lesscleaningis desired, press
the appropriate number pads. Cleaning
time maybe set between 2and4 hours.
See page [8-[9 for additional information.
CONVECT BAKE
Use for convection baking,
l° Press Convect Bake pad.
2. Press Preset (0) pad for 325°F or the
appropriate number pads for desired
temperature.
See page [3 for additional information.
CONVECT ROAST
Use for convection roasting.
I. PressConvect Roast pad.
2. Press Preset (0) pad for 325°F or the
appropriate number pads for desired
temperature.
Seepage [3 for additional information.
[0
7.
LC,)Nro
Cook TIME/SToP TIME
Use to program the oven to start and stop
automatically.
m. Press Bake, Convect Bake, or Con-
vect Roast pad. Press the appropriate
number pads for desired temperature.
2. Press Cook Time pad. Press the ap-
propriate number pads to enter cooking
time in hours and minutes.
3. To dday the start of cooking, press
Stop Time pad. Press the appropriate
number pads to enter the time you want
the oven to stop.
Seepage 14-15for additional information.
DRYING
Use to dry or dehydrate foods such asfruits,
vegetables and herbs.
m. Press Drying pad.
2. Press Preset (0) pad for 140°F or the
appropriate number pads for the drying
temperature desired.
See page I5-16 for additional information.
SETTING THE CLOCK
1. Press Clock pad.
° The indicator word TIHE will flash in
the display.
2. Press the appropriate number pads until
the correct time of day appears in the
display.
When electrical power is supplied or after
a power interruption, the last clock time,
before power was interrupted, will flash.
To recall the time of day when another time
function is showing, press the Clock pad.
Clock time cannot be changed when the
oven has been programmed for clock con-
trolled cooking, self-clean or delayed self-
clean.
SETTING THE TIMER
Use to set and then signal the completion
of a time period up to 99 hours and 59
minutes.
The timer can be used independently of any
other oven activity and can be set while
another oven function is operating. The
timer does not control the oven.
2.
Press Timer pad.
• The indicator word TIHER will flash
and "0Hr:00" appears in the display.
Press the appropriate number pads until
the desired number of minutes or hours
and minutes appear in the display.
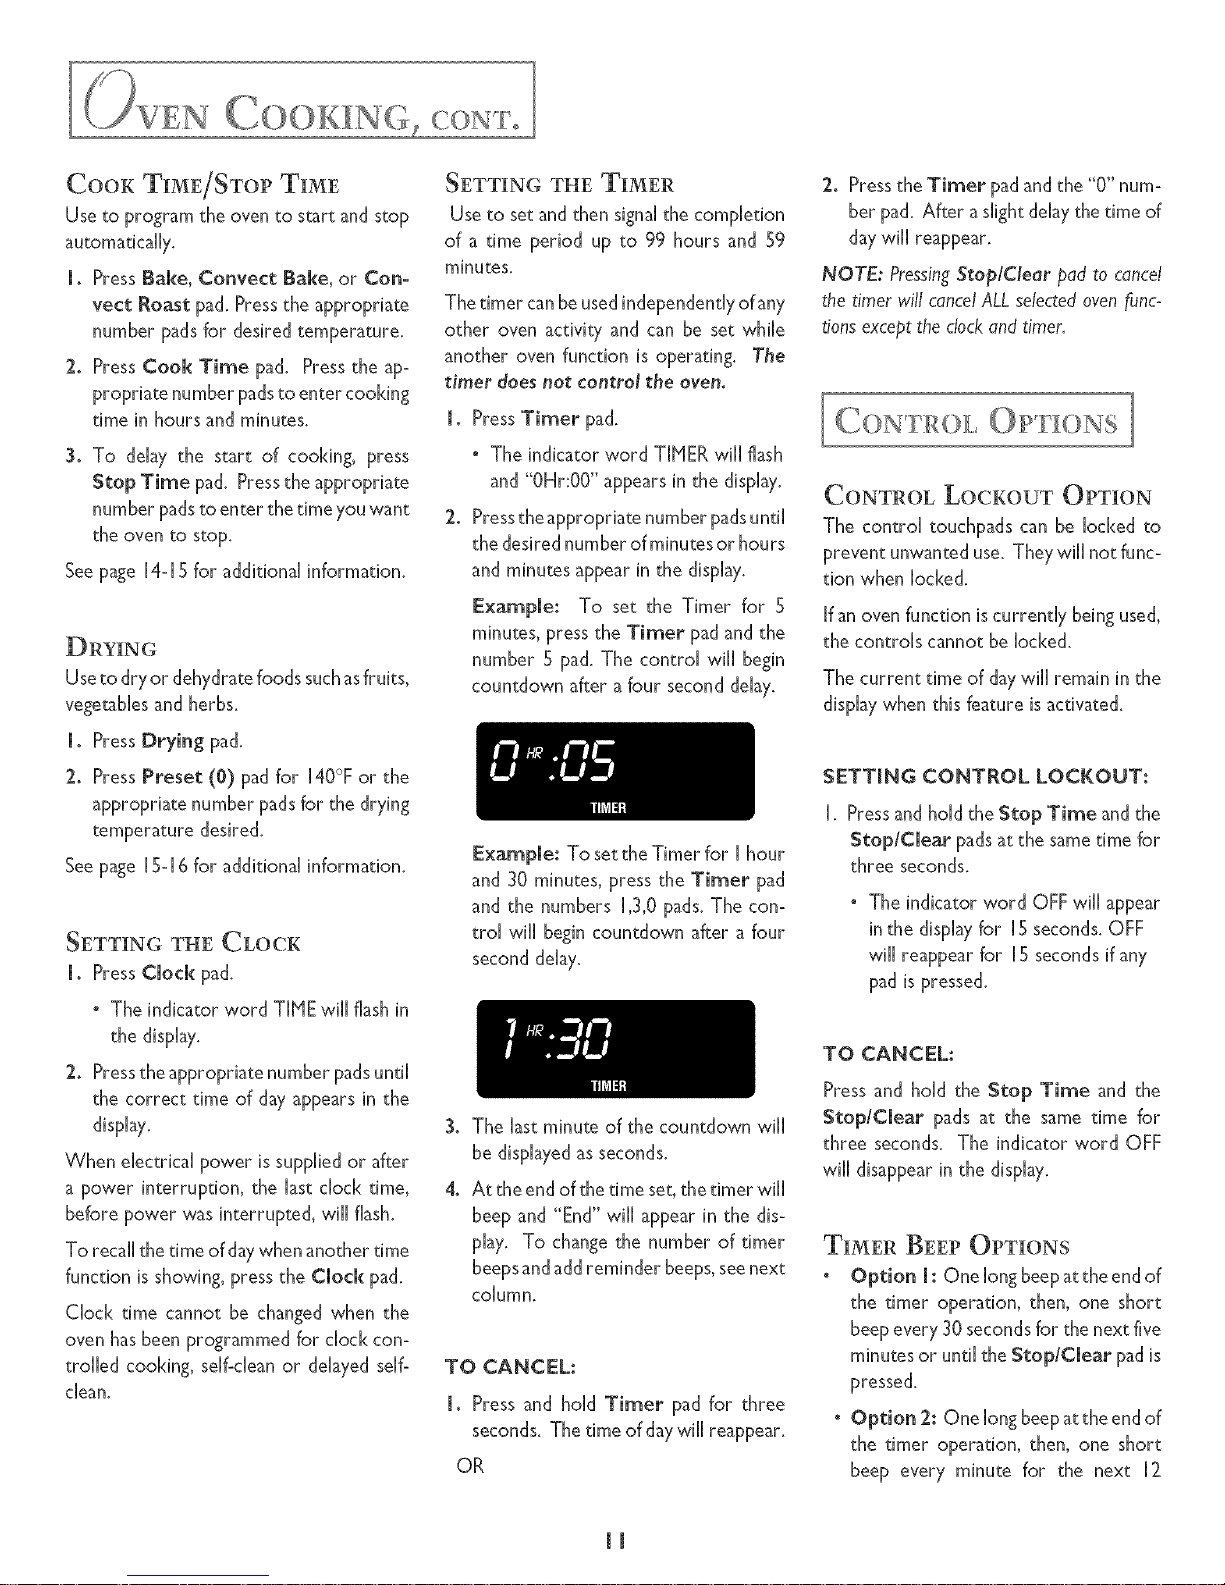
To set the Timer for S
minutes, press the Timer pad and the
number S pad. The control will begin
countdown after a four second delay.
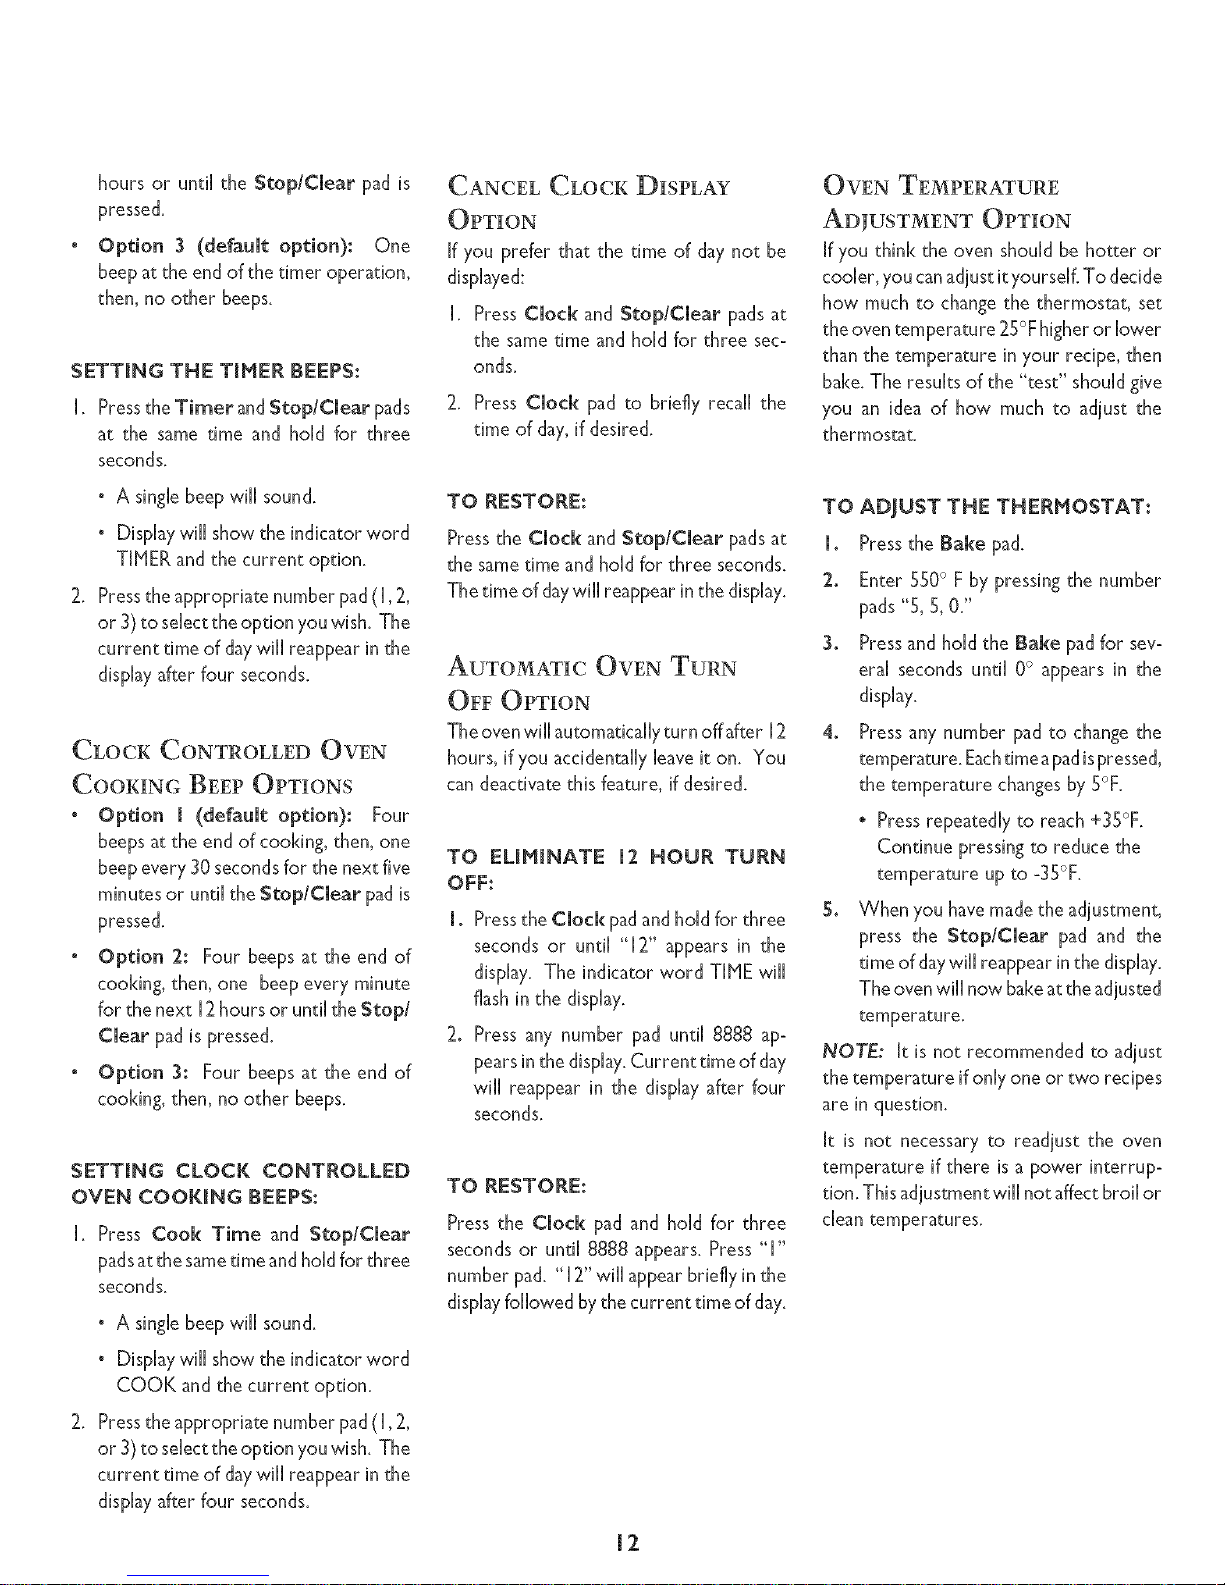
Example: To set the Timer for I hour
and 30 minutes, press the Timer pad
and the numbers 1,3,0 pads. The con-
trd will begin countdown after a four
second dday.
3_
4.
The last minute of the countdown will
be displayedas seconds.
At the endof the time set,the timer will
beep and "End" will appear in the dis-
play. To change the number of timer
beeps and add reminder beeps, see next
Column,
TO CANCEL:
m. Press and hold Timer pad for three
seconds. The time of day will reappear.
OR
2. Press the Timer pad and the "0" num-
ber pad. After a slight delay the time of
day will reappear.
NOTE: PressingStoplClear pad to cancel
the timer will cancel ALL selected oven func-
tions except the clock and timer.
[CONTROL f 3Ns ]
CONTROL LOCKOUTOPTION
The control touchpads can be locked to
prevent unwanted use. They will not func-
tion when locked.
If an oven function is currently being used,
the controls cannot be locked.
The current time of daywill remain in the
displaywhen this feature is activated.
SETTING CONTROL LOCKOUT:
I. Press and hold the Stop Time and the
Stop/Clear pads at the same time for
three seconds.
• The indicator word OFFwill appear
in the displayfor I Sseconds.OFF
will reappear for IS seconds if any
pad is pressed.
TO CANCEL:
Press and hold the Stop Time and the
Stop/Clear pads at the same time for
three seconds. The indicator word OFF
will disappear in the display.
TIY ER BEEPOPTIONS
• Option l: Onelongbeepattheendof
the timer operation, then, one short
beepevery 30secondsfor the next five
minutesor until the Stop/Clear padis
pressed.
° Option 2: One long beepatthe endof
the timer operation, then, one short
beep every minute for the next 12
JJ
hours or until the Stop/Clear pad is
pressed.
Option 3 (default option): One
beep at the end of the timer operation,
then, no other beeps.
SETTING THE TIMER BEEPS:
I.PresstheTimer andStop/Clearpads
atthe same timeand holdforthree
seconds.
° A singlebeepwill sound.
° Displaywill show the indicator word
T[HER and the current option.
2. Pressthe appropriate number pad([, 2,
or 3)to sdect the option youwish. The
current time of daywill reappear inthe
display after four seconds.
CLOCK CONTROLLED OVEN
COOKING BEEP OPTIONS
• Option I (defaultoption): Four
beepsat the end of cooking, then, one
beep every 30secondsfor the next five
minutes or until the Stop/Clear padis
pressed.
• Option 2: Four beeps at the end of
cooking, then, one beep every minute
for the next [ 2hours or until theStop/
Clear padispressed.
• Option 3: Four beepsat the end of
cooking, then, no other beeps.
SETTING CLOCK CONTROLLED
OVEN COOKING BEEPS:
[. Press Cook Time and Stop/Clear
padsat the sametime andhdd for three
seconds.
• A singlebeepwill sound.
• Displaywill show the indicator word
COOK and the current option.
2. Pressthe appropriate number pad([, 2,
or 3)to selectthe option youwish. The
current time of daywill reappear inthe
display after four seconds.
CANCEL CLOCK DISPLAY
OPTION
[f you prefer that the time of day not be
displayed:
[. PressClock and Stop/Clear pads at
the same time and hold for three sec-
onds.
2. Press Clod_ pad to briefly recall the
time of day,if desired.
TO RESTORE:
Pressthe Clock and Stop/Clear padsat
the sametime and hold for three seconds.
Thetime of daywill reappearin the display.
AUTOMATIC OVEN TURN
OFF OPTION
Theovenwill automaticallyturn offaffer [2
hours, if you accidentally leaveit on. You
candeactivate this feature, if desired.
TO EUM[NATE 12 HOUR TURN
OFF:
l o Pressthe Clod_ Padand hdd for three
seconds or until "[2" appears in the
display. The indicator word TIHE will
flash in the display.
2. Press any number pad until 8888 ap-
pearsinthe display.Current time of day
will reappear in the display after four
seconds,
TO RESTORE:
Press the Clod< pad and hold for three
seconds or until 8888 appears. Press"["
number pad. "[2" will appearbriefly in the
displayfollowed by the current time of day.
12
OVEN TEMPERATURE
ADJUSTMENT OPTION
[f you thin[< the oven should be hotter or
coder, you canadjustit yourseff. To decide
how much to changethe thermostat, set
theoventemperature 25°Fhigher or lower
than the temperature in your recipe, then
bake.The results of the "test" should give
you an idea of how much to adjust the
thermostat.
TO ADJUST THE THERMOSTAT:
I. Pressthe Bake pad.
2o Enter 550° Fby pressing the number
pads"5, 5, O."
3. Pressand hold the Bake padfor sev-
eral seconds until O° appears in the
display.
4. Pressany number pad to changethe
temperature. Eachtime apadispressed,
the temperature changesby 5°F.
• Pressrepeatedly to reach+35°F.
Continue pressingtoreduce the
temperature up to-35°F.
5. When you havemadethe adjustment,
press the StoplClear pad and the
time of daywill reappear inthe display.
Theovenwill now bakeattheadjusted
temperature.
NOTE: [t is not recommended to adjust
the temperature if only one or two recipes
are in question.
[t is not necessary to readjust the oven
temperature if there is a power interrup-
tion. This adjustmentwill not affectbroil or
dean temperatures.
_ -7 "¸ ._
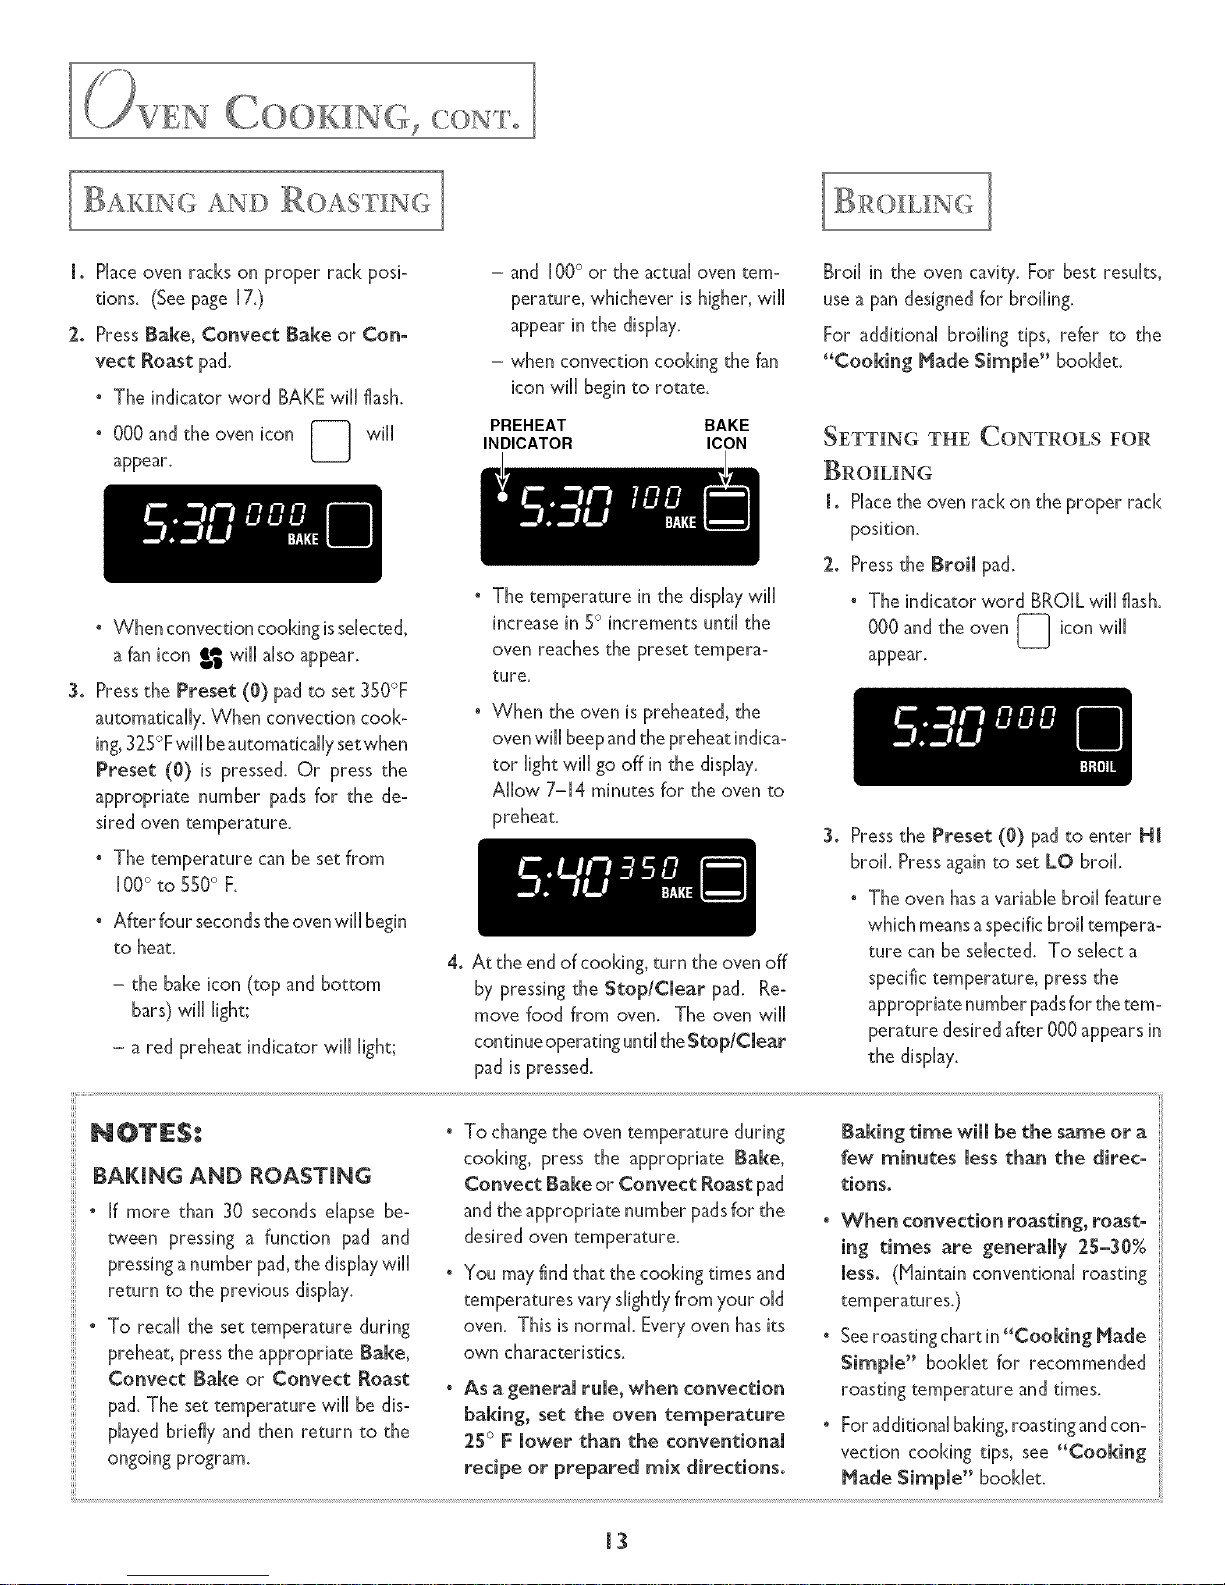
BAX_NG AND _OAST_NG
lo Place oven racks on proper rack posi-
tions. (See page i7.)
2. Press Bake, Convect Bake or Con-
vect Roast pad.
° The indicator word BAKEwill flash.
° 000 and the oven icon ['---1 wii[
L_iJ
appear.
• When convection cooking isselected,
a fan icon _ wiil also appear.
3o Pressthe Preset (O) pad to set 350°F
automatically. When convection cook-
ing,325°Fwill beautomaticallysetwhen
Preset (0) is pressed. Or press the
appropriate number pads for the de-
sired oven temperature.
• The temperature can be set from
iO0° to 550° F.
° After four seconds the oven will begin
to heat.
- the bake icon (top and bottom
bars)wiii light;
- a red preheat indicator wii[ light;
- and 100° or the actual oven tem-
perature, whichever is higher,wiil
appear in the display.
- when convection cooking the fan
icon wiil beginto rotate.
PREHEAT BAKE
INDICATOR ICON
Broil in the oven cavity. For best results,
usea pan designedfor broiling.
For additional broiling tips, refer to the
"CooMngMade Simple" booklet.
SETTING THE CONTROLS FOR
The temperature in the displaywiil
increasein 5° increments until the
oven reachesthe preset tempera-
ture.
When the oven is preheated, the
ovenwii[ beepandthe preheatindica-
tor light wiil go off in the display.
Allow 7-14 minutes for the oven to
preheat.
4o Atthe end of cooking, turn the oven off
by pressing the Stop/Clear pad. Re-
move food from oven. The oven will
continue operating until the Stop/Clear
pad is pressed.
l o Placethe oven rack on the proper rack
position.
2. Pressthe Broimpad.
° The indicator word BROILwill flash.
000 and the oven [---] icon will
L_
appear.
3o Pressthe Preset (0) pad to enter H[
broil. Pressagainto set LO broil.
• The oven hasa variablebroil feature
which meansa specificbroil tempera-
ture can be selected. To selecta
specifictemperature, press the
appropriate number padsfor thetem-
perature desiredafter 000 appearsin
the display.
BAKING AND ROASTING
° If more than 30 seconds elapse be-
tween pressing a function pad and
pressinga number pad,the displaywii[
return to the previous display.
. To recall the settemperature during
preheat, pressthe appropriate [}am(e,
Convect Bake or Convect Roast
pad.The set temperature wii[ be dis-
played briefly and then return to the
ongoing program.
• To changethe oven temperature during
cooking, press the appropriate Bake,
Convect Bake or Convect Roast pad
and the appropriam number pads for the
desired oven temperature.
• You may find that the cooking times and
temperatures vary slightly from your old
oven. This is normal. Every oven has its
own characteristics.
As a general rule, when convection
baking, set the oven temperature
25° F mowerthan the conventional
recipe or prepared mix directions.
Baking time wimmbe the same or a
few minutes messthan the direc-
tions°
• When convection roasting, roast-
ing times are generally 25-30%
mess.([V[aintainconventiona[ roasting
temperatures.)
• Seeroastingchartin"Cooking Made
Simple'* booklet for recommended
roasting temperature and times.
° Foradditional baking,roasting andcon-
vection cooking tips, see "Cooking
Made Simple" booklet.
[3
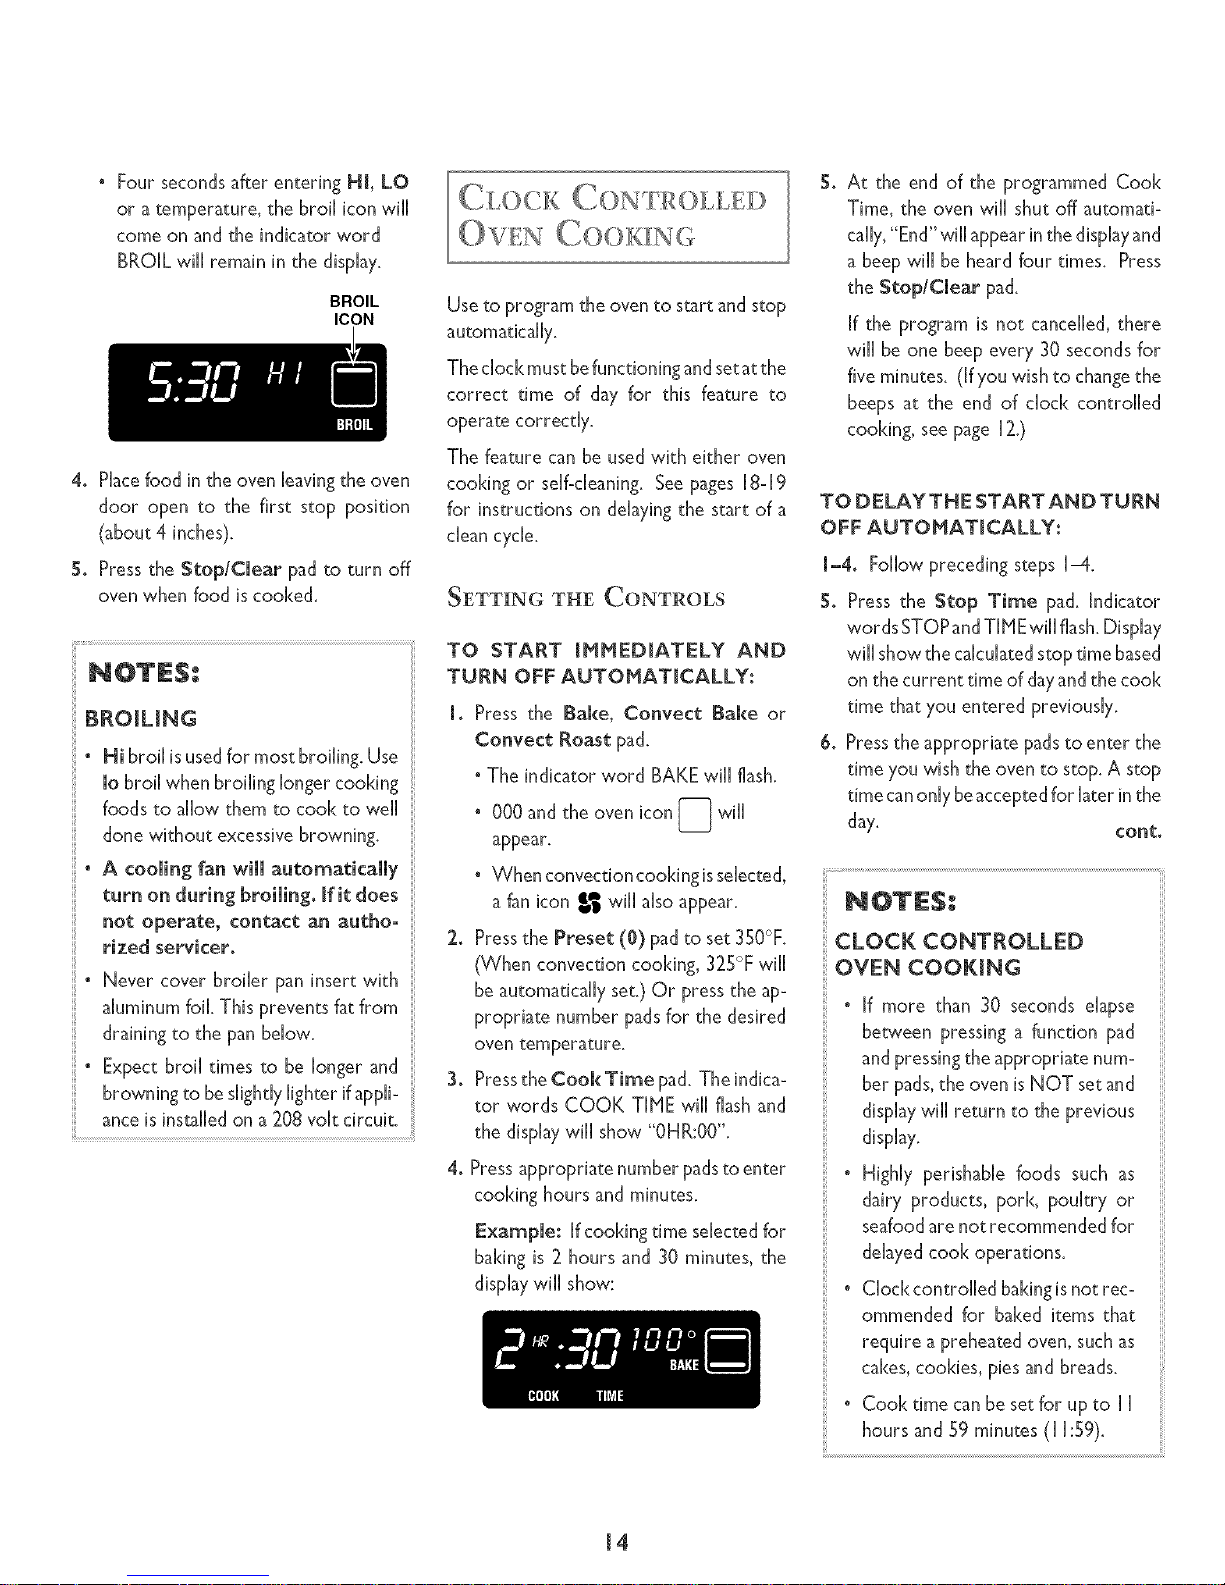
Four secondsafter entering HI, LO
or a temperature, the broil icon wiI[
come on and the indicator word
BROIL wiI[ remain in the disphy,
BROIL
ICON
;]ilJ]II
4. Phcefood in the oven leavingthe oven
door open to the first stop position
(about 4 inches).
5. Pressthe Stop/Clear pad to turn off
oven when food iscooked.
BROILING
o Hi broil is usedfor most broiling. Use
1obroil when broiling longer cooking
foods to allow them to cook to well
done without excessivebrowning.
o A cooling fan will automatically
turn on during broiling. If it does
not operate, contact an autho-
rized servicer.
o Never cover broiler pan insert with
aluminum foil. This prevents fatfrom
draining to the panbelow.
o Expect broil times to be longer and
browning to be slighd),lighter ifappli-
anceis instalbd on a208 volt circuit.
CLOCK C()N'F:ROLL:ED
OVEN COO:K NC
Use to program the oven to start and stop
Theclock mustbefunctioningandsetat the
correct time of day for this feature to
operate correct[)'.
The feature can be used with either oven
cooking or serf-cleaning, geepages [8-[9
for instructions on de[a),ingthe start of a
dean c),c[e,
SETTING THE CONTROLS
TO START [HHED[ATELY AND
TURN OFF AUTOHAT[CALLY:
I. Press the Bake, Convect Bake or
Convect Roast pad.
• The indicator word BAKE will flash.
• 000 and the oven icon [_ wi[[
appear.
• When convection cookingisselected,
a fan icon Iw_wi[[ a[soappear.
2. Pressthe Preset (0) padto set 350°F.
(When convection cooking, 325°F will
be automaticai[),set.) Or press the ap-
propriate number padsfor the desired
oven temperature.
3. Pressthe Cook Time pad, The indica-
tor words COOK TIME wH[flash and
the disp[a),wi[[ show "OHR:O0".
4. Pressappropriate number padsto enter
cooking hours and minutes.
Example: If cooking time selectedfor
bakingis 2 hours and 30 minutes, the
disp[a),wi[[ show:
S_
At the end of the programmed Coo[<
Time, the oven wi[[ shut off automati-
cal[),,"End" wi[[appearinthe disp[a),and
a beep wi[[ be heard four times. Press
the Stop/Clear pad.
If the program is not cancelled, there
will be one beep ever)' 30 secondsfor
five minutes. ([f),ouwish to changethe
beeps at the end of dock controlled
cooking, seepage [2.)
TO DELAY THE START AND TURN
OFF AUTOHAT[CALLY:
1-4. Follow preceding steps 1-4.
So Press the Stop Time pad. Indicator
words STOPandT[MEwill flash.Disph),
wi[[ showthe calculatedstop time based
on the current time of da),andthe coo[<
time that ),ou entered previous[)'.
6o Pressthe appropriate padsto enter the
time ),ouwish the oven to stop. A stop
time canon[),beacceptedfor later in the
da),. cont.
CLOCK CONTROLLED
OVEN COOKING
° If more than 30 seconds dapse
between pressing a function pad
and pressingthe appropriate num-
ber pads,the oven is NOT set and
displaywill return to the previous
disp[a),.
° High[)' perishable foods such as
dair), products, pork, poukr), or
seafoodare not recommended for
de[a),edcoo[<operations.
° Clock controlled bakingisnot rec-
ommended for baked items that
require a preheated oven, suchas
cakes,cookies, pies and breads.
° Coo[<time can be setfor up to [ [
hours and 59 minutes (1 [:59).
14
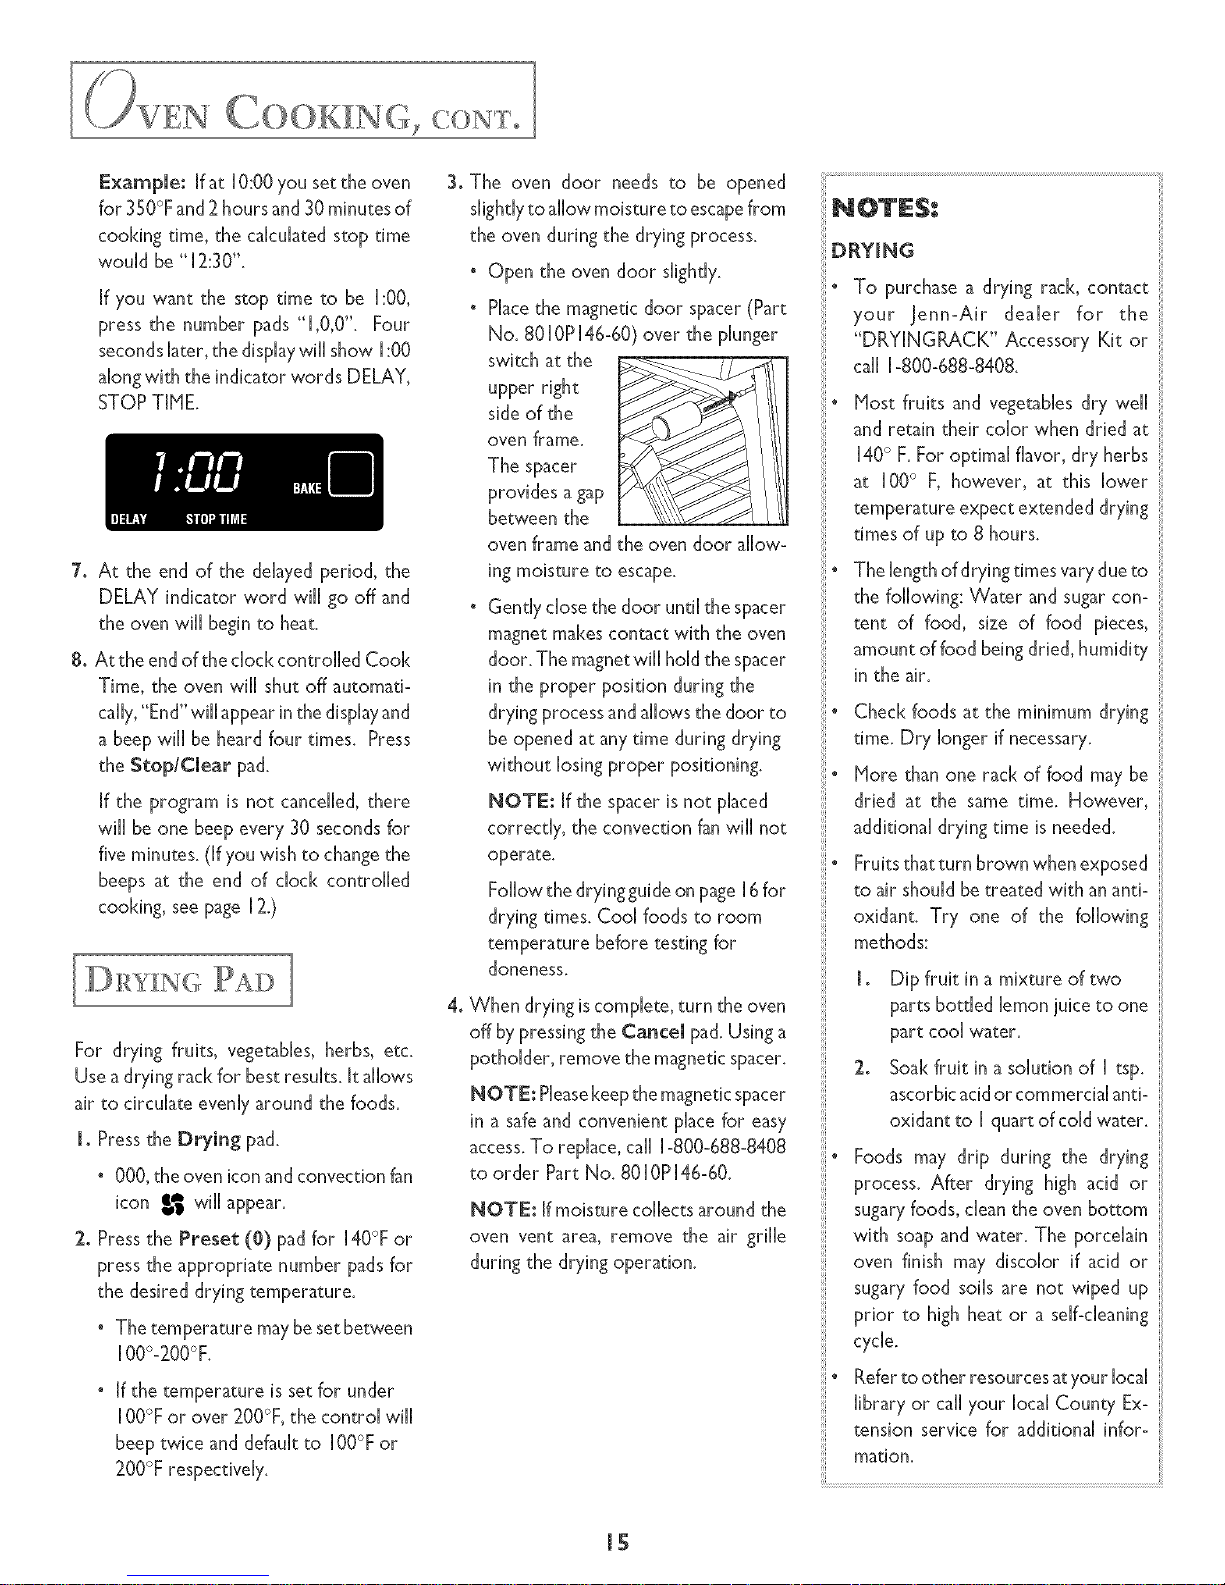
Example: [f at [0:00you set the oven
for 350°Fand2hoursand 30minutesof
cooking time, the calculated stop time
would be "[ 2:30".
[f you want the stop time to be [:00,
press the number pads "[,0,0". Four
seconds later, the display wiI[show 1:00
alongwith the indkamr words DELAY,
STOP TIME.
7. At the end of the delayed period, the
DELAY indicator word wilego off and
the oven wiI[ begin m heat.
8. Atthe endof the dock contrd[ed Coo[<
Time, the oven wile shut off automati-
cally,"End"wileappearinthe displayand
a beepwii[ be heard four times. Press
[f the program is not cancelled,there
wilebe one beep every 30 seconds for
five minutes. (Elyou wish to changethe
beeps at the end of dock controlled
cooking, see page [2.)
[D}ZY[NGPAD ]
For drying fruits, vegetables, herbs, etc.
Usea drying rack for best results. [t allows
air to circulate evenlyaround the foods.
I. Press the Drying pad.
• 000, the oven icon and convection fan
icon _ will appear.
2. Press the Preset (0) pad for 140°F or
press the appropriate number pads for
the desired drying temperature.
• Thetemperature maybeset between
[00°-200°F.
° [f the temperature isset for under
[00°For over 200°F,the control wile
beep twice and defauk to [00°F or
200°F respectively.
3. The oven door needs m be opened
slightly to allow moisture to escape from
the oven during the drying process.
• Open the oven door slightly.
• Place the magnetic door spacer (Part
No. 8010PI46-60) over the plunger
switch at the
upper right
side of the
oven frame.
The spacer
provides a gap
between the
oven frame andthe oven door allow-
ing moisture to escape.
Gendy dose the door untiethe spacer
magnet makes contact with the oven
door. The magnetwilehold the spacer
in the proper position during the
drying processandallows the door to
be opened at any time during drying
without losing proper positioning.
NOTE: [f the spaceris not placed
correctly, the convection fanwill not
operate.
Follow the dryingguide on page[6for
drying times. Cool foods to room
temperature before testing for
doneness.
4_
When drying iscomplete, turn the oven
off by pressingthe Cancel pad. Using a
pothdder, remove the magneticspacer.
NOTE: Pleasekeepthe magneticspacer
in a safeand convenient place for easy
access.To replace, ca[[ 1-800-688-8408
to order Part No. 80[0P[46-60.
NOTE: [f moisture collects around the
oven vent area, remove the air grille
during the drying operation.
DRYING
To purchase a drying rack, contact
your ]enn-Air dealer for the
"DRY[NGRACK" Accessory Kit or
call 1-800-688-8408.
° Most fruits and vegetables dry we[[
and retain their color when dried at
140° F. For optima[ flavor, dry herbs
at [00° F, however, at this lower
temperature expect extended drying
times of up to 8 hours.
° The lengthof dryingtimesvarydueto
the fallowing: Water and sugarcon-
tent of food, size of food pieces,
amount of food being dried, humidity
in the air.
° Check foods at the minimum drying
time. Dry longer if necessary.
° More than one rack of food may be
dried at the same time. However,
additional drying time is needed.
o Fruits thatturn brown when exposed
to air should be treated with an anti-
oxidant. Try one of the fallowing
methods:
l. Dip fruit in a mixture of two
parts botded lemon juice to one
part coo[ water.
2. Soakfruit in a solution of [tsp.
ascorbicacidor commercialanti-
oxidant to [ quart of cold water.
Foods may drip during the drying
process. After drying high acid or
sugaryfoods, cleanthe oven bottom
with soap and water. The porcelain
oven finish may discolor if acid or
sugary food soils are not wiped up
prior to high heat or a serf-cleaning
cycle.
Refer to other resources at your local
library or call your local County Ex-
tension service for additional infor-
mation.
Jg
Apples*
Firmvarieties:Graven
Stein,GrannySmith,
Jonathan,Winesap,
RomeBeauty,Newton
Blenheim/Royalmost
common.Tikon alsogood
Firm varieties
Napdeon, Vanor Bing
Wash, peel if desired, core and s[ke
into [/8" s[kes.
Wash, halve, and remove pits.
Peel and cut into [/4" s[kes.
remove pits,
4-8 hours Pliable to crisp.Dried
applesstore bestwhenthey
are shght[ycrisp.
Orange and
Lemon Peel
Nectarines Freestonevarieties Halveandremovepits. Peelingis 24-36 hours Pliableandleathery.
and Peaches* optional but resuksin better-looking
dried fruit.
Pears* Bartlett Peelhalveandcore. 24-36 hours Soft andpliable.
Slicelengthwise andremove the small [4-[8 hours
core. Cut crosswiseinto [/2" slices. Fresh:
[2-[6 hours
Wash well. Thinlypeelthe outer [/[6 [-2 hours Toughto brittle.
Tomatoes
Parsley, Hint,
Ci[antro, Sage,
Oregano
Selectrough-skinnedfruit
Do not dry the pealof fruit
marked"color added"
Hum,Roma
DanversHalfLong,
Imperator, RedCored
Chantenay
Ancho,Anaheim
Basil
to [/8" ofthe peal.Do not usethe
white bitter pith underthe peel
Halve,removeseeds.Placetomatoes
skin side upon rack.Prickskins.
Do not usecarrots with woody fiber or
pithy core. Wash,trim tops and peelif
desired.Slicecrosswiseor diagonally
in [/4" s[kes.Steamblanchfor 3 min.
Wash, halveandseed.Prick
skin severaltimes.
Rinsein cold water. Leavestemson
until [eavesare dry,thendiscard.
iust asbudsappear.Rinse[eavesin
cold water.
[2-[8 hours Toughto crisp.
4-8 hours Tough to brittle.
4-6 hours
1-3hours
[dark redandcrisp.
Brittle andcrumbly.
*Fruits requiring an antioxidant to prevent discoloration and loss of nutrients. Refer to the notes on page l Sfor
specific methods.
** 12 Hour Offwili not occur during drying functions.
[6
;VEN
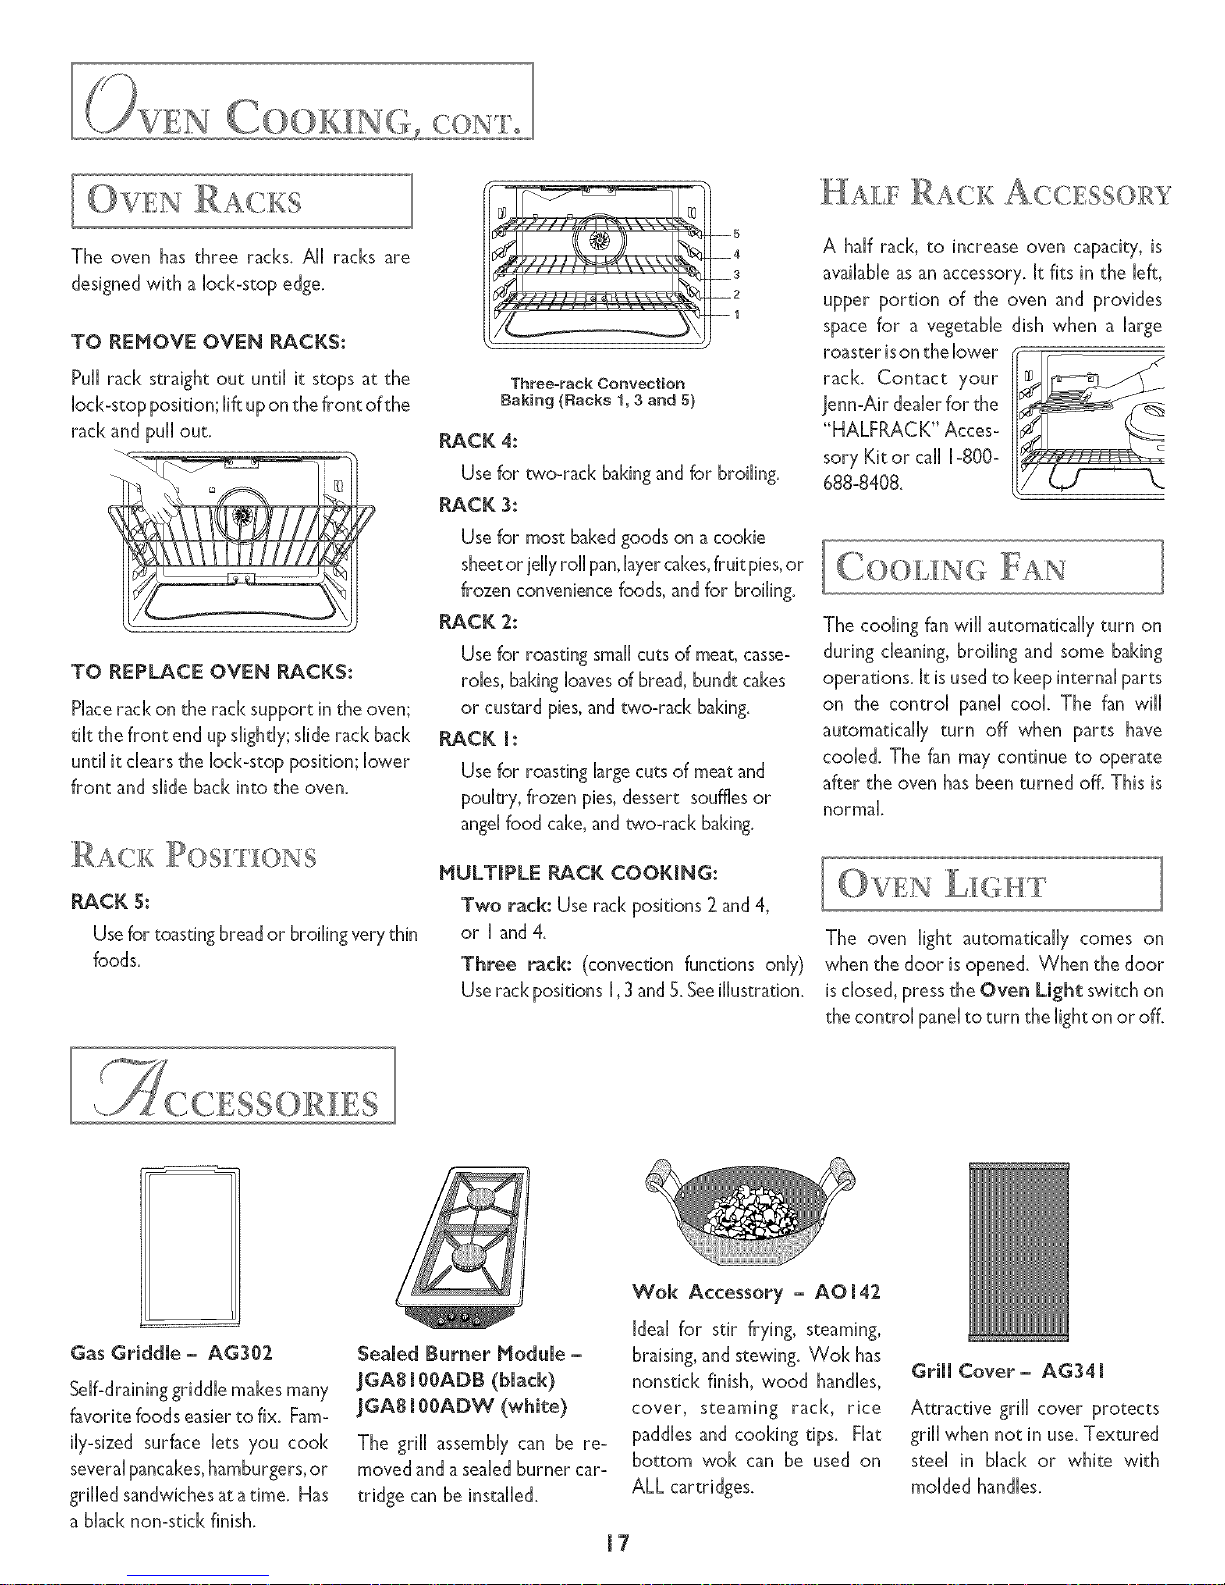
OVEN RA(: :}{S
The oven has three racks. Ai[ racks are
designedwith a lock-stop edge.
TO REMOVE OVEN RACKS:
P@I rack straight out until it stops at the
lock-stop position; lift up on the front of the
rack and pui[ out.
TO REPLACE OVEN RACKS:
PLacerackon the rack support in the oven;
tilt the front end up shghdy;shderack back
unq[ it dears the Lock-stopposition; Lower
front and she back into the oven.
RACK P ,}SII I ,}NS
( ..... ,
RACK 5:
Usefor toastingbreador broiling verythin
foods.
--5
__4
3
__2
--1
Three:rack Convection
Baking (Racks 1, 3 and 5)
RACK 4:
Use for two-rack bakingandfor broiling.
RACK 3:
Use formostbakedgoodson a cookie
sheetor jelly roil pan,layercakes,fruit pies,or
frozen conveniencefoods,andfor broiling.
RACK 21
Use for roastingsmallcutsof meat casse-
roles, bakingloavesof bread,bun& cakes
or custard pies,andtwo-rack baking.
RACK l :
Use for roastinglargecuts of meat and
poukry, frozen pies,dessert soufflesor
angelfood cake,andtwo-rack baking.
MULTIPLE RACK COOKING:
Two rack:Userack positions2 and4,
or I and4.
Three rack: (convection functions only)
Userackpositions 1,3 and5, See illustration.
HALF RACX ACCESS,}Ry
A half rack, to increase oven capacity, is
availableas an accessory.[t fits in the [eft,
upper portion of the oven and provides
space for a vegetable dish when a large
roaster isontheiower --
r J
rack. Contact your __
Jenn-Air dealerfor the
"HALFRACK" Acces-
sory Kit or call 1-800-
688-8408.
FAN
The cooling fan wii[ automatically turn on
during cleaning,broiling and some baking
operations. [t is usedto keep internal parts
on the control panel cool. The fan will
automaticaLLyturn off when parts have
coned. The fan may continue to operate
after the oven hasbeen turned off. This is
normal,
©YEN L:K:;H'r
The oven light automatically comes on
when the door isopened. When the door
isclosed,pressthe Oven Lightswitch on
the control pane[to turn thelight onor off.
Gas Griddle- AG382
Self-draining griddle makes many
favorite foods easier to fix. Fam-
ily-sized surface lets you cook
several pancakes, hamburgers, or
grilled sandwiches at atime. Has
a black non-stick finish.
Sealed Burner Hodule -
JGA8 [88ADB (black}
JGA8 i88ADW (white)
The grill assembly can be re-
moved andasealedburner car-
tridge canbe installed.
Wok Accessory - AO 142
ideal for stir flying, steaming,
braising,and stewing. Wok has
nonstick finish, wood handles,
cover, steaming rack, rice
paddiesand cooking tips. Fiat
bottom wok can be used on
ALL cartridges.
[7
Grill Cover - AG341
Attractive grill cover protects
grill when not in use.Textured
steel in black or white with
molded handles.
& C:L N N(;
CLEAN PAD
° Clean oven
frame, door
frame (area
outside of gas-
ket) and
around the
opening in the door gasket with a non-
abrasivecleanersuchasBonAmi_,These
areasare not exposed to cleaningtem-
peratures.
• Remove oven racks° [fracksare [eft in
during a dean cycle, it may impair func-
tion and they w@discolor. Turn off the
oven light and close door.
• Removeair gr@e.
Brand names for cleaning products are
registered trademarks of the respective
manufacturers.
SETTING THE CONTROLS FOP, A
SELF-CLEAN CYCLE:
l o Close the oven door.
2. Pressthe Cmeanpad.
• The indicator word CLEAN wii[ flash.
The displaywill show" : "along
with the oven icon [_
@
° [f the door has not been dosed, the
displaywill show "door".
3. PressPreset (@)padfor "3:00" hoursof
cleaningtime for an averagesoiled oven.
• The cleaningtime can be varied de-
pendingon the amount of soil. Press
the appropriate number pads to set
anyamount of time between 2.and4
hours. '%00" hours of cleaningfor
light soil up to "4:00" hours of dean-
ing for heavysoil
° Four secondsafter entering the dean-
ingtime, the oven door will automati-
cally lock. The indicator word LOCK
will appear in the displayalongwith
the dean icon (top and bottom bars).
When the cleaningtime hasbeencom-
pleted, the indicator word CLEAN will
turn off. The indicator word LOCK wii[
remain on until the oven has coded.
When the oven hascooled, the indica-
tor word LOCK will turn off and the
door wii[ automatically unlock.
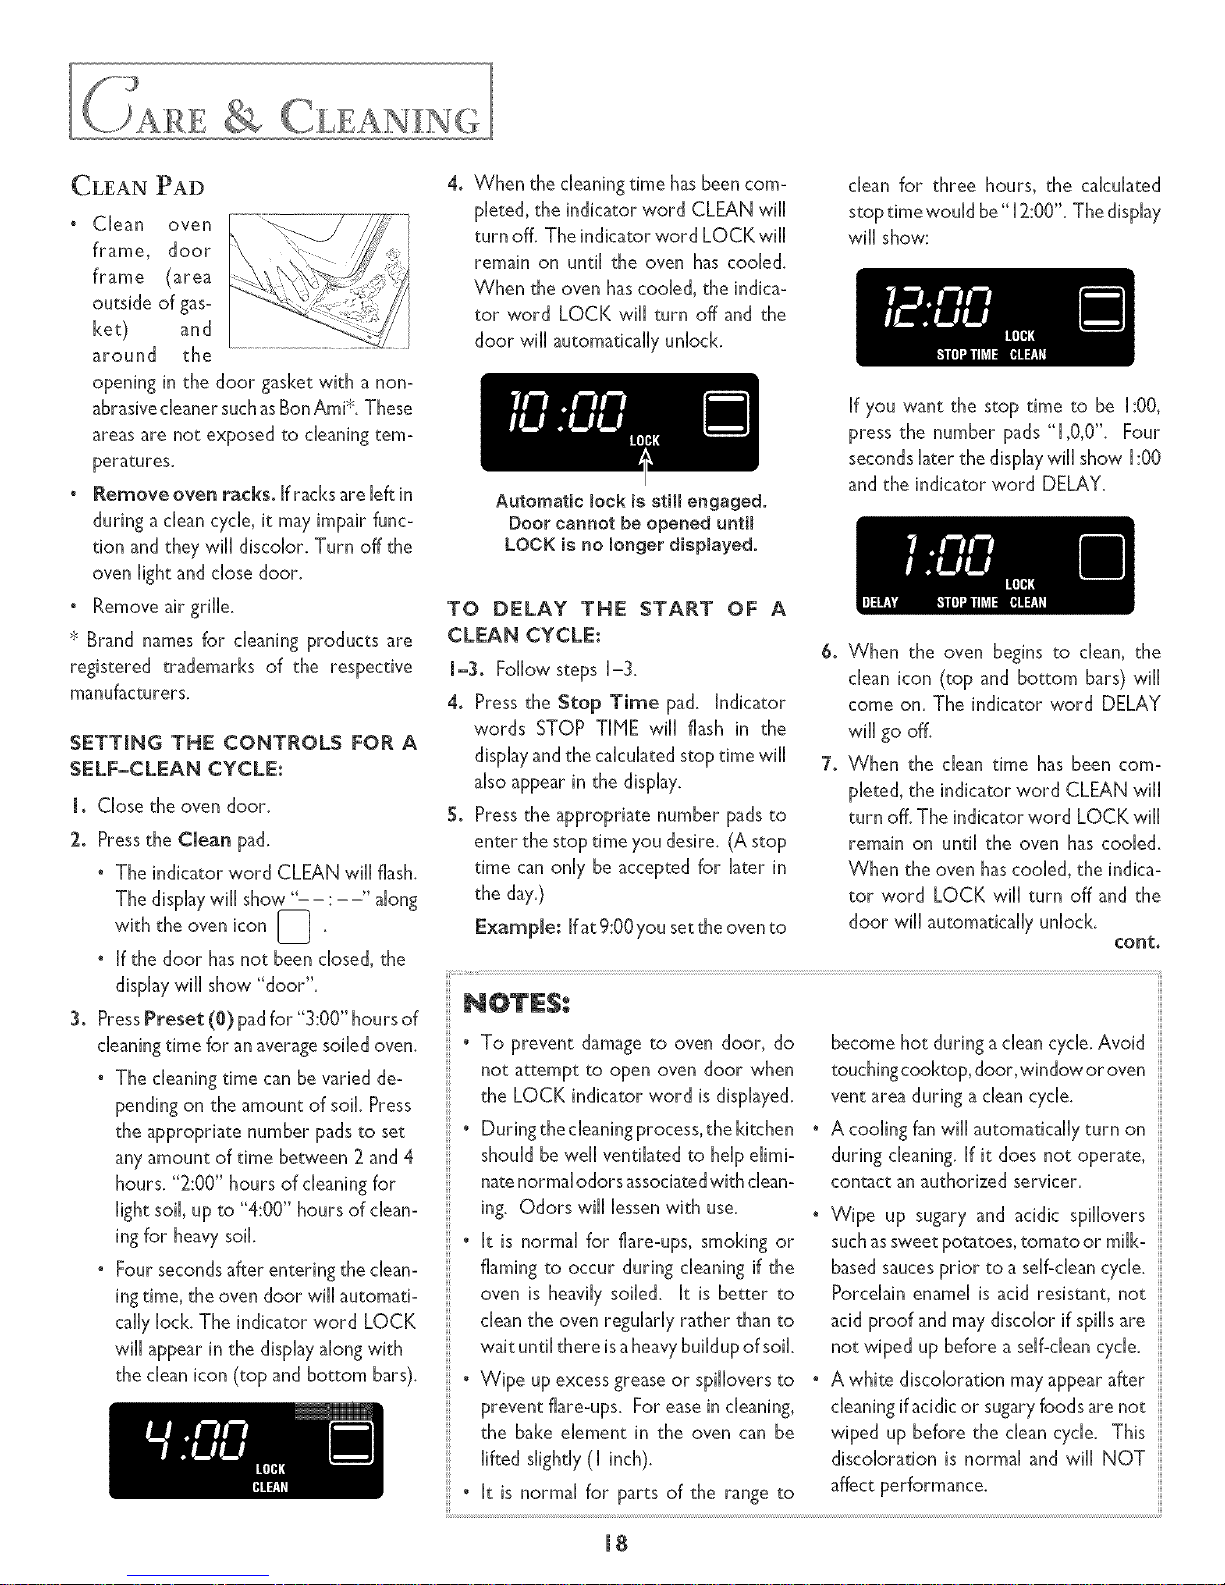
dean for three hours, the calculated
stop time would be" [2:00". The display
wii[ show:
Automatic Bock is still engaged.
Door cannot be opened untiB
LOCK is no longer dispmayed.
[f you want the stop time to be [:00,
press the number pads "[,0,0". Four
secondslater the displaywill show I:00
and the indicator word DELAY.
TO DELAY THE START OF A
CLEAN CYCLE:
1-3o Follow steps I-3.
4. Pressthe Stop Time pad. Indicator
words STOP T[NE will flash in the
displayandthe calculatedstop time will
also appearin the display.
So Pressthe appropriate number padsto
enter the stop time you desire. (A stop
time canonly be accepted for later in
the day.)
Example: ffat9:00you setthe oven to
6o When the oven begins to dean, the
dean icon (top and bottom bars) wii[
come on. The indicator word DELAY
wiii go off.
7o When the dean time has been com-
pleted, the indicator word CLEAN wiil
turn off. The indicator word LOCK wiii
remain on until the oven has coded.
When the oven has cooled, the indica-
tor word LOCK wiil turn off and the
door w@ automatically unlock.
cont.
• To prevent damage to oven door, do
not attempt to open oven door when
the LOCK indicator word is displayed,
° During the cleaning process, the kitchen
should be weil ventilated to help elimi-
nate normal odors associated with dean-
ing. Odors wiii lessen with use.
° [t is normal for flare-ups, smoking or
flaming to occur during cleaning if the
oven is heavily soiled. [t is better to
dean the oven regularly rather than to
wait until there is a heavy buildup of soil
° Wipe up excess grease or sp@overs to
prevent flare-ups. For ease in cleaning,
the bake dement in the oven can be
lifted slightly (1 inch).
• [t is normal for parts of the range to
become hot during a dean cycle.Avoid
touchingcod<top, door, window or oven
vent area during a clean cycle.
A cooling fanwill automatically turn on
during cleaning. If it does not operate,
contact an authorized servicer.
• Wipe up sugary and acidic spiiiovers
suchassweetpotatoes,tomato or milk-
basedsaucesprior to a serf-deancycle.
Porcelain enamel is acid resistant, not
acid proof and may discolor if spills are
not wiped up before aserf-deancycle.
• A white discoloration mayappearafter
cleaningif acidicor sugaryfoods arenot
wiped up before the clean cycle. This
discoloration is normal and wiil NOT
affect performance.
J8
TO CANCEL SELF-CLEAN:
1o Pressthe Stop/Clear pad.The door
wH[beLockedwhile the LOCKindicator
word remains inthe display.
Depending on the Length of time the
oven had beencleaning,it may take up
to an hour for the oven to coo[ down.
When the oven is coo[, the door will
automatically unlock and it can be
opened.
[( I,EAN NG
PR )( EDURES
" Be sure appliance is off and all
pares are coo[ before handming or
cleaning° This is to avoid dam-
age and possibme burns.
° To prevent stain ng or discoloration.
clean appliance after each use
° If a part is removed, be sure it is
correctly replaced.
STAINLESS STEEL
• DO NOT USE ANY CLEANING
PRODUCT CONTAINING CHLO-
RINE BLEACH.
• ALWAYS WIPE WITH THE GRAIN
WHEN CLEANING.
• Daily Cleaning/Light Soil E Wipe
with one of the fo[[owing - soapywater,
white vinegar/water solution, Formula
409 Glass and Surface Cleaner* or a
similar glasscleaner - usinga sponge or
soft cloth. Rinseand dry. To polish and
help prevent fingerprints, follow with
Stainless Steel Magic Spray (Jenn-Air
Mode[ A9[ 2, Part No. 20000008)**.
° Moderate/Heavy Soil -- Wipe with
one of the foLLowing- Bon Ami, Smart
Cleanser,or Soft Scrub* - using a damp
sponge or soft cloth. Rinse and dry.
Stubborn soils may be removed with a
dampScotch-Brite* pad;rub evenlywith
the grain. Rinse and dry. To restore
luster and remove streaks, follow with
StainlessSteel MagicSpray.
° Discoloration _ Using a damp sponge
or soft cloth, wipe with Cameo Stainless
Steel Cleaner*. Rinse immediately and
dry. To remove streaks and restore lus-
ter, follow with Stainless Steel Magic
Spray.
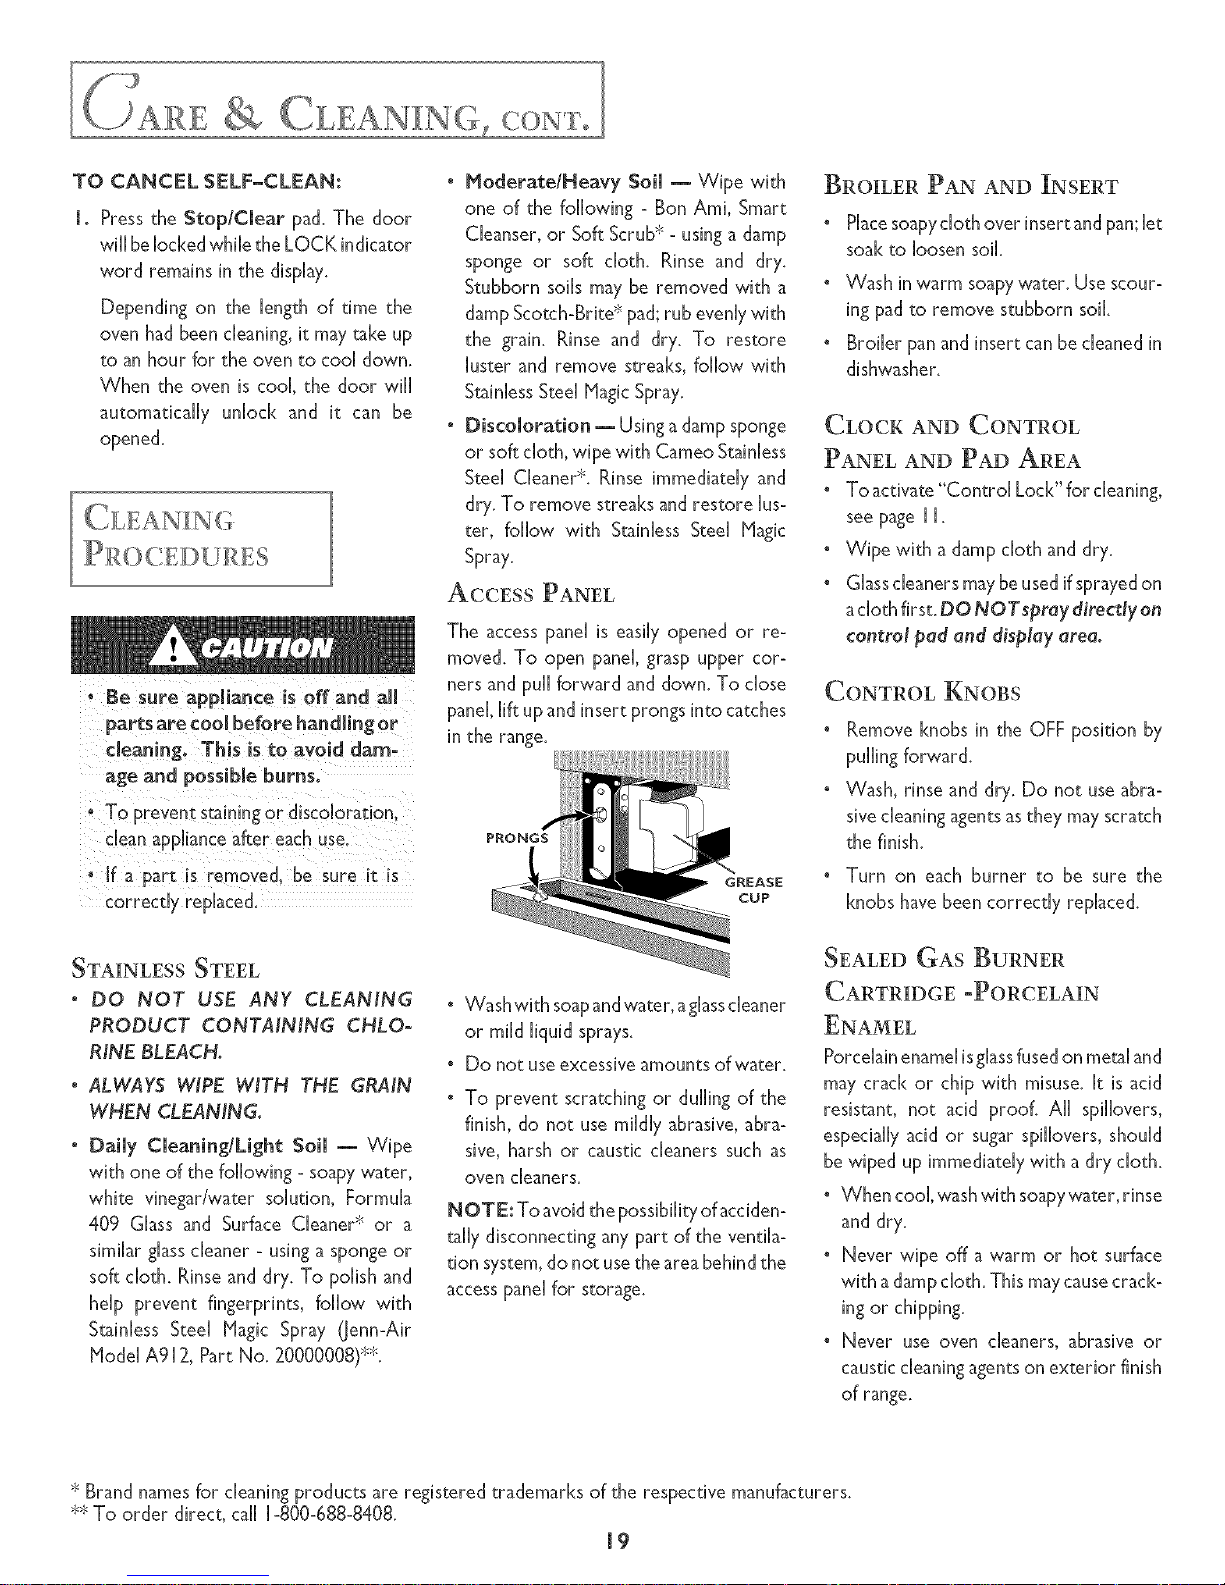
ACCESS PANEL
The access panel is easily opened or re-
moved. To open panel, grasp upper cor-
ners andpull forward and down. To dose
pane[,lift upand insert prongsinto catches
in the range.
• Washwith soapandwater,ag[assc[eaner
or mild liquid sprays.
" Do not use excessiveamountsof water.
• To prevent scratching or dulling of the
finish, do not use mildly abrasive,abra-
sive, harsh or caustic cleaners such as
oven cleaners.
NOTE: To avoid the possibilityof acciden-
tally disconnecting any part of the ventila-
tion system,do not usethearea behindthe
accesspane[for storage.
BROILER PAN AND ]NSERT
• Placesoapyc[oth over insertand pan;let
soakto loosen soil
• Wash in warm soapywater. Usescour-
ing padm remove stubborn soil
• Broiler panand insert canbe cleaned in
dishwasher.
CLOCK AND CONTROL
PANEL AND PAD AREA
• To activate"Control Lock" for cleaning,
see page [[.
° Wipe with a damp cloth and dry.
° Glass cleaners may be used ifsprayed on
acloth first. DO NO Tspray d#recdy on
control pad and d#splay area.
CONTROL KNOBS
• Remove knobs in the OFF position by
Wash, rinse and dry. Do not useabra-
sivecleaningagentsasthey mayscratch
the finish.
Turn on each burner to be sure the
knobs have been correcdy replaced.
SEALED GAS BURNER
CARTRIDGE -PORCELAIN
Porcelainenamelisglassfusedon metaland
may crack or chip with misuse. It is acid
resistant, not acid proof. All spillovers,
especiallyacid or sugarspi[[overs, should
be wiped up immediately with a dry cloth.
• When coo[,washwith soapywater, rinse
and dry.
° Never wipe off a warm or hot surface
with a damp cloth. This may cause crack-
• Never use oven cleaners, abrasive or
causticcleaningagentson exterior finish
of range.
* Brand namesfor cleaningproducts are registered trademarks of the respective manufacturers.
** To order direct, call 1-800-688-8408.
19
OVEN WINDOW- GLASS
Avoid usingexcessiveamounts ofwater
which may seep under or behind glass
causing staining.
Wash with soap andwater. Rinse with
clear water and dry. Glasscleaner can
be usedif sprayed on a cloth first.
Do notuse abrasive materials such as
scouring pads,steelwool or powdered
cleanersasthey will scratch glass.
OVEN RACKS
° Cleanwith soapywater.
, Remove stubborn soil with cleansing
powder or soap-filledscouringpad.Rinse
anddry.
° Ifover time, racksdo not slide out easily,
wipe the rack edge and rack support
with a smallamount of vege_b[e oil to
restore easeof movement,then wipeoff
excessoil Likewise, place one drop of
vegetableoil on rack guides.
NOTE: Removeoven racksduring a dean
cycle.If racksarelef: intheoven,itmayimpair
funcdonandthey wJl!discolor.
OVEN _NTERIORS
° Follow instructions on page[Bto set a
serf-cleancycle.
SEALED GAS BURNER
° Allow burner and grates to coo[. Wash
with soapy water and a plastic scouring
pad. For stubborn soils, dean with a
soap-filled,nonabrasivepad or a sponge
and a commercial Cooktop Cleaning
Creme (Part #2000000 [)**.
• Cleangasports with a soft brisde brush
or straight pin, especiallythe port below
the ignitor. Do not enlarge or distort
holes.
Be careful not to get water into burner
ports,
When cleaning, use care to prevent dam-
age to the ignitor, If the ignitor is soiled,
wet or damaged the surface burner will
not light.
ASSEb{BIX
BASIN -- PORCELAIN
° Removestubborn soilswith a plasticmesh
puffor pad. Useonly those cleaningprod-
ucts which state they are recommended
for usewhen cleaningnonstick surfaces.
° [f grates were washed in the dishwasher,
seasonwith oil prior to grilling.
• Do not use metal brushes or abrasive
scouringpads or other scrubbers intended
to cleanoutdoor charcoalgrills.Thesewill
remove the finish aswell as scratch the
grates. Do not clean in self-cleaningoven
or useoven cleanerson the grates.
The basinis located under the grill burner
and/or cartridges. Cleanafter eachuse of
the grill
• To remove light soil, clean with soapy
water or spray with cleansers such as •
Fantastik# or Formula 409*. For easier
cleanup: a) spray with a household
cleanser;b) cover with paper towels; c)
add small amount of hot water to keep
the paper towels moist; d) cover and
wait [5 minutes; ande) wipe dean.
• To remove moderate soil, scrub with
BonAmP, asoft scrubcleanseror plastic
scrubber.
Note: Check the greasedrain after each
useof the grill or grill accessories.To clean:
Pour about 73cup of very hot tap water
mixedwith [teaspoondish detergent down
the drain.
GRATES -- CAST ALUI_INUM
COATED WITH NON-STICK
FINISH
• Wash coo[ grates (DO NOT IMMERSE
HOT GRILL GRATESINWATER) with
detergent in hot water in the sin[<or
wash them inthe dishwasher. Besureto
remove all food residue before cooking
on the grill grates again.
GRILL BURNER
Follow instructions on page7 for removing
the grill burner.
The grill burner should be cleaned after
eachusewith asoapyS.O.S.*pador in the
dishwasher. Rinseand dry thoroughly be-
fore usingagain.
NOTE: Check to besureall burner ports
are open. To open dogged ports, insert a
straight pin into eachport.
GREASE CUP
The container is located on the [eft side
behind the bottom accesspanel, under-
neaththe range.(See page 19 for opening
accesspanel.)It collects greaseandother
hquidscreated while gri[hng.Check each
time after grillingandempty whengreaseis
noticeable. To remove, simply grasp the
handle,and pull from the bracket holding
the container.
• The container canbewashedin hot, soapy
water or in the dishwasher.
* Brand namesfor cleaningproducts are registered trademarks of the respective manufacturers.
** To order direct, call 1-800-68B-8408.
2O

{)V:EN ])OO:R
N EVER place excessive weght on or
stand on an open oven door This
:ouUd cause the range to tip over,
break the door. or injure the user.
NEVER attempt to open or close
door or operate oven until door is
" NEVER place fingers between hinge
and front oven frame. Hinge arms are
spring mounted, ifacddentally hit,the
hingewi[[ damshutagainstovenframe
and could injure your fingers.
TO REMOVE:
1. When cook open the oven door to the
broil stop position (opened about four
inches).
2. Grasp door at each side. Do not usethe
door handleto lift door.
3. Lift up evenly until door dears hinge
arms.
TO REPLACE:
I. Grasp door at each side.
2. Ahgn slots in the door with the hinge
arms on the range.
3. Slidethe door down onto the hingearms
until the door iscompletdy seatedon the
hinges.Pushdown on the top corners of
the door to completely seat door on
hinges.Door shouldnot appearcrooked.
NOTE: The oven door on a new rangemay
feel"spongy" when it isclosed.This isnormal
andwill decreasewith use.
OvEN W N >OW
TO PROTECT THE OVEN DOOR
W_NDOW:
m.Do not hit the glass with pots, pans,
furniture, toys, or other objects.
2 Do not close the oven door until the oven
racks are in place.
Scratching, hitting, jarring or stressing the
glass may weaken its structure causingan
increased risk of breakageat alater date.
L:E(::;S
• Besurethe anti-tip bracket securesoneof
the rear leveling legs to the floor. This
bracket prevents the rangefrom acciden-
tally tipping.
The range should be leveled [_
when installed. If the range is N'II[lid
notUeveLturnthepUast cUeveU-IIL iil
legs,locatedateachjji' jiJ
corner of the /_o .:;'-'-5/
ran[e is level _ _ ANTI-TIPRRACKET
g " {_' LEVELING LEG
REi%' RANGE FO]:{
£LEAN_NG &, SERVICE
1. Shut offgas supplyto appliance.
2. Disconnectdectrical supplytoappliance.
3. Disconnect blower system.
4. Disconnect gas supply tubing to appliance.
S. Slide range forward to disengage from
anti-tip bracket. (See Installation Instruc-
tions for location of bracket.)
6. Reverse procedure to reinstall. Ifgas line
has been disconnected, check for gas
leaks after reconnection. NOTE: A
qualified servicer should disconnect
and reconnect gas supply.
7. To prevent accidental tipping, range must
be secured to the floor by sliding rear
leveling leg into anti-tip bracket.
OVEN
To assurethe proper replacement bulb is
used_order bulb from Maytag Customer
Sen,ice.Call 1-800-688-840g, askfor part
number 74004458 - halogen bulb.
, Disconnect power to range before re-
placing hght bulb.
before
touching.
TO REPLACE OVEN L_GNT BULB:
1.When oven iscool, usefingertips to grasp
edgeof bulb cover. Pull out and remove.
2. Carefully remove old bulb by pulling
straight out of ceramic base.
3. To avoid damaging or decreasing the life
of the new bulb, do not touch the bulb
with bare hands or fingers. Hold with a
cloth or paper towel. Push new bulb
prongs straight into small holes of ce-
ramic base.
4. Replace bulb cover by snapping into place.
S. Reconnect power to the range. Reset
clock.
2m
 Loading...