

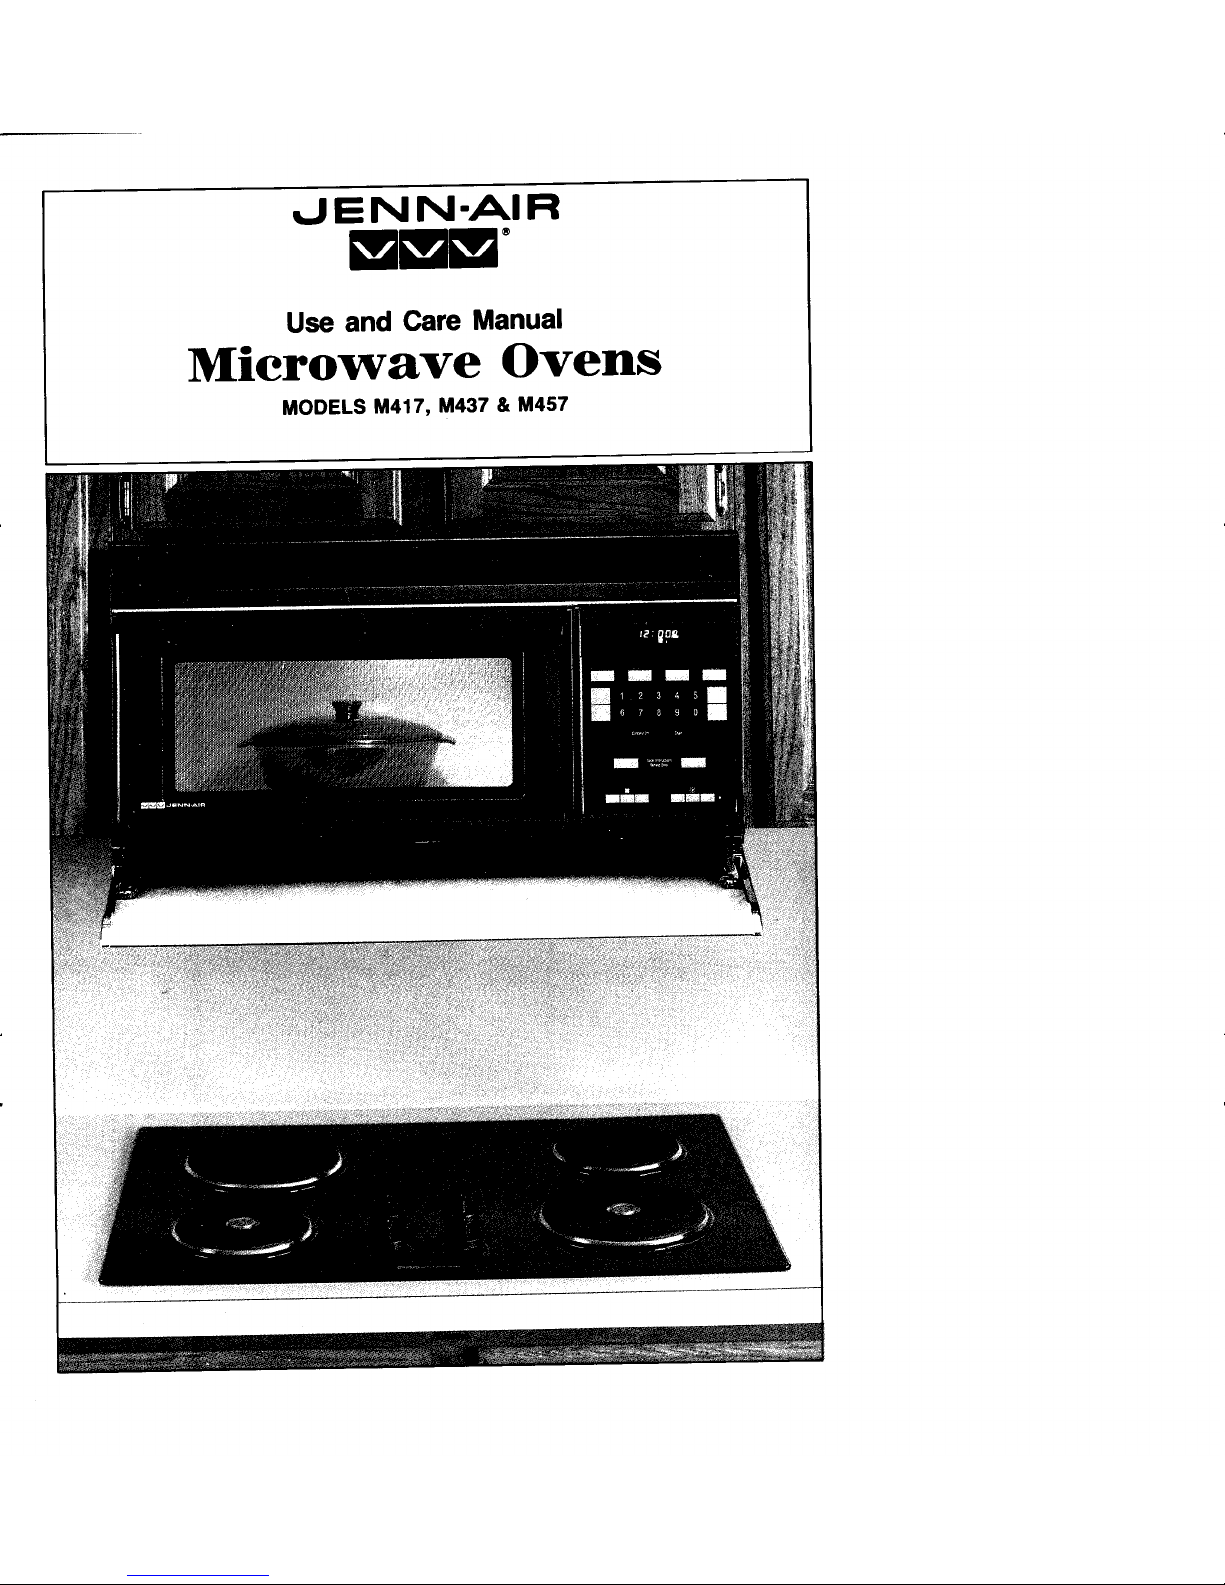
Jenn-Air M417, M437, M457 Use And Care Manual
d E N N-AI R
mm "
Use and Care Manual
Microwave Ovens
MODELS M417, M437 & M457
IMPORTANT SAFETY
INSTRUCTIONS
When using electrical appliances, basic safety precautions should be
followed, including the following:
WARNING - reduce the risk of burns, electric shock,
fire, injury to persons or exposure to excessive microwave energy:
1. Read all instructions before using the appliance.
2. Read and follow the specific "PRECAUTIONS TO AVOID
POSSIBLE EXPOSURE TO EXCESSIVE MICROWAVE
ENERGY" found on Page 7.
3. This appliance must be grounded. Connect only to prop-
erly grounded outlet. See "GROUNDING INSTRUCTIONS"
on Page 8.
4. Install or locate this appliance in accordance with the pro-
vided installation instructions.
5. Some products such as whole eggs and sealed containers
for example, closed glass jars -- may explode and
should not be heated in this oven. In rare instances,
poached eggs have been known to explode. Cover poached
eggs and allow a standing time of one minute before cutting
into them.
6. Foods with unbroken outer "skin" such as potatoes,
sausages, tomatoes, apples, chicken livers and other giblets,
and egg yolks (see previous caution) should be pierced to
allow steam to escape during cooking.
7. Use this appliance only for its intended use as described in
this manual.
8. As with any appliance, close supervision is necessary when
used by children.
9. Do not operate this appliance if it has a damaged cord or
plug, if it is.not working properly, or if it has been damaged
or dropped.
10. This appliance should be serviced only by qualified service
personnel. Contact nearest authorized Jenn-Air service
facility for examination, repair or adjustment.
11. Do not cover or block any openings on the appliance.
12. Do not use outdoors.
13. Do not immerse cord or plug in water.
14. Keep cord away from heated surfaces.
15. Do not let cord hang over edge of table or counter.
16. When cleaning surfaces of door and oven that come
together on closing the door, use only mild, non-abrasive
soaps or detergents applied with a sponge or soft cloth.
17. To reduce the risk of fire in the oven cavity:
a. Do not overcook food. Carefully attend appliance if
paper, plastic, or other combustible materials are placed
inside the oven to facilitate cooking. Avoid using re-
cycled paper products. Such products sometimes con-
tain impurities which could ignite.
b. Remove wire twist-ties from paper or plastic bags before
placing bag in oven.
c. If materials inside the oven should ignite, keep oven
door closed, turn oven off, and disconnect the power
cord, or shut off power at the fuse or circuit breaker
panel.
_1.Do not use the oven for storage.
e. Do not pop popcorn except in a microwave approved
popcorn popper or in a commercial package recom-
mended especially for microwave ovens.
18. Do not operate the oven when empty.
19. Do not lean on the oven door. The door is designed to close
tightly and seal properly for safe operation. Leaning on the
door may warp or break the hinges.
20. To avoid exposure to dangerous high voltage, DO NOT
REMOVE THE OUTER CASE.
21. Do not store metal oven rack in oven. Use the rack only
when cooking more than one dish. Do not use microwave
browning dish on shelf; the shelf could overheat.
22. Do not store the temperature probe in the oven.
23. Use metal only as directed in cookbook. TV dinners may be
microwaved in foil trays less than 3/_,,deep; remove top foil
cover and return tray to box. When using metal in microwave
oven, keep metal (other than metal shelf) at least 1-inch
away from sides of oven.
24. "Boilable" cooking pouches and tightly closed plastic bags
should be slit, pierced, or vented.
25. Do NOT defrost frozen beverages in narrow necked bottles.
26. Liquids heated in certain shaped containers (especially
cylindrical-shaped containers) may become overheated,
splash out with a loud noise. For best results, stir the liquid
several times before heating. Always stir liquids several
times between reheatings.
27. Read and follow specific microwave oven preparation
instructions on food packages or containers (especially
baby food). Above all, this is a cooking appliance designed
to prepare food.
28. Cookware may become hot because of heat transferred
from the heated food. Pot holders may be needed to handle
the cookware.
29. Use only cooking utensils and accessories made for use in
the microwave and specifically described in this manual or
cookbook.
Safety Precautions for Exhaust Fan
(Models M437 & M457 Only)
In addition to starting by touching the fan switch, the exhaust fan
may start automatically if excessive temperatures occur around
the microwave oven. This may occur with high temperature frying
or long term cooking on the cooktop surface below the hood or
during broiling or the pyrolytic (self) cleaning of a range.
This automatic exhaust fan feature isdesigned to prevent damage
from overheating of the oven parts. The exhaust fan may stay on as
long as 30 minutes to cool the oven. The cooling time will depend
on removal of the heat source. Pushing the fan switch will not turn
the fan off.
Because of the automatic exhaust fan feature, the following cau-
tions must be observed:
1. DO NOT leave the area when using your cooktop at a high
setting. Accidental fires from boilover or spattering on the
surface unit could spread, especially if the exhaust fan is
operating.
2. DO NOT allow grease and soil to build up in the exhaust
filter. Exhaust fan efficiency will decrease and fire may
result. Clean frequently following the filter cleaning
instructions.
3. DO NOT flame foods when operating the exhaust fan. The
fan, if operating, may spread the flame and cause personal
injury or property damage.
4. In the event of a grease fire, smother flaming pan on surface
unit by covering pan completely with well-fitting lid.
5. Model M457 Only: Raise and lower the smoke and spatter shield
carefully to avoid tipping over tall cooking utensils.
SAVE THESE INSTRUCTIONS
Precautions To Avoid Possible
Exposure To Excessive
Microwave Energy
(a) Do not attempt to operate this oven with the door open since open
door operation can result in harmful exposure to microwave
energy. It is important not to defeat or tamper with the safety
interlocks.
(b) Do not place any object between the oven front face and the door or
allow soil or cleaner residue to accumulate on sealing surfaces.
(c) Do not operate the oven if it is damaged. It isparticularly important
that the oven door close properly and that there is no damage to
the: (1) door (bent), (2) hinges and latches (broken or loosened), (3)
door seals and sealing surfaces.
(d) The oven should not be adjusted or repaired by anyone except
properly qualified service personnel.
REGISTRATION
Federal law requires registration of all microwave ovens. To comply with the
law, please fill out theCUSTOMER PRODUCTOWNERSHIP REGISTRATION CARD
packaged in the oven:
1. Check the model and serial numbers on the card to see that they match the
numbers on the rating label. Ratirlg label islocated on the upper left corner of
the oven front frame. Ifthe numbers on the card are not the same asthose on
the rating label cross out the numbers on the card and write in the numbers
as they appear on the rating label.
ICONSUMERPRODUCT OWNERSHIP REGISTRATIONJ 2. Mail the card. The
UOO_LNO SERIAL_O MAYCOR
WARRANTYADMINISTRATION
,.o._ox,_,0 return address is in-
CLEVELAND, TN 37311
............................. cluded onthe reverse
ou_ _1_ YouIN T_EU_UKELVEVB_ A S_FtWMO_F¢,_IO_
....................... side of card and post-
(.'i'. ......... i"_"._', ...... i'l age is prepaid for
A_ _UMBER S'mE_T_C_ESS
mailing within the
I ..... I ................. I United States.
i".............. £iI =01Tm-I
_EAC_DE p_ONENUME_R
I° 1 i ttlnllLIlll
FILL IN AND MAIL THIS CARD TODAY!
If you move or are not the original owner of this oven, you must, by law, renew
the registration. Send the renewal registration information to:
Maycor
Warranty Administration
P.O. Box 4970
Cleveland. TN 37311
Renewal Registration information must provide: a) Your name and address
and b) the microwave oven's model and serial numbers.
Grounding Instructions
This appliance must be grounded. In the event of an electrical short circuit,
grounding reduces the risk ofelectric shock by providing anescape wire for the
electric current. This appliance isequipped with a cord having a grounding wire
with a grounding plug. The plug must be plugged into an outlet that is properly
installed and grounded.
WAR
NIN
G-Improperuse of the grounding plug can result ina risk
of electric shock.
Consult a qualified electrician or serviceman if the grounding instructions are
not completely understood, or if doubt exists as to whether the appliance is
properly grounded.
Use of an extension cord is not recommended, but if it is absolutely necessary
to use an extension cord, use only a 3-wire extension cord that has a 3-blade
grounding plug, and a 3-slot receptacle that will accept the plug on the
appliance. The marked rating of the extension cord shall be equal to or greater
than the electrical rating of the appliance.
Where an electrical wall receptacle is encountered which will accept only a
two-prong plug, it is the personal responsibility and obligation of the owner to
contact a qualified electrician and have the outlet replaced with a properly
grounded and polarized receptacle for a three-prong, grounding plug. Such
receptacle must also meet local electrical codes, if applicable, and/or the
National Electrical Code.
Do not under any circumstance cut or remove the third (ground) prong
from the power cord.
Do not use an adapter plug with this appliance
IMPORTANT
The above grounding instructions must be followed not only for your
personal protection against shock and fire hazards, but also to insure
satisfactory operation of the electronic controls. In addition to proper
grounding, a polarity check of outlet should be made to insure that
polarity is not reversed. Improper grounding or reversed polarity can
damage the electronic control or cause it to operate erratically.
Installation
Please refer to the separate installation booklet packed with the oven. Read all
the installation instructions and cautions before beginning. It is important to
follow carefully each section of the installation booklet.
NOTE: These microwave ovens are UL listed for installation over certain cook-
tops and ranges as outlined below.
Model M457
The M457 can be installed above all gas and electric cooktops and ranges,
including grill-ranges which require updraft ventilation. Not recommended for
installation over electric and gas grill-ranges and grill-range cooktops with
downdraft ventilation.
Model M437
The M437 can be installed above al_non-grill gas and electric conventional
cooktops which require updraft ventilation. Not recommended over ranges or
cooktops with grilling capability unlessthe range or cooktop is equipped with
downdraft ventilation.
Model M417
The M417 can be installed above all electric and gas grill-ranges and grill-
rangecooktopsfeaturingdowndraftventilation.Not recommendedaboveranges
or cooktops without downdraft ventilation.
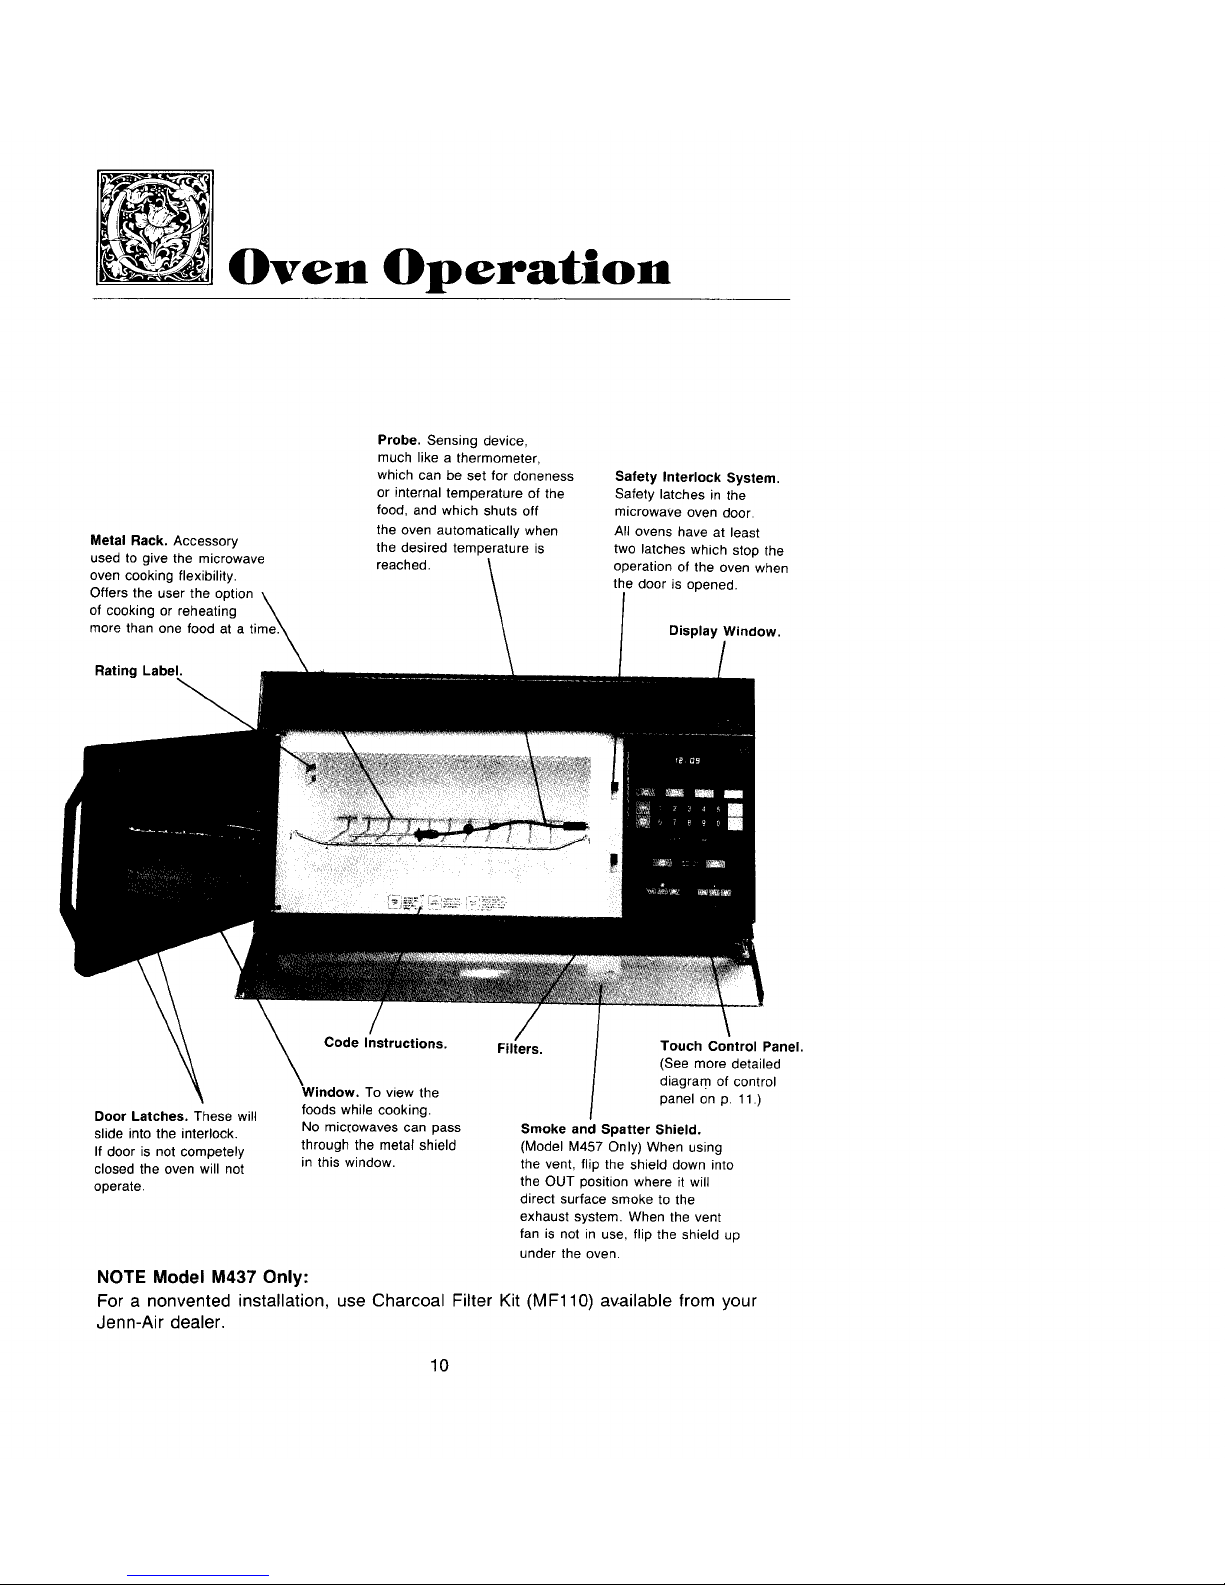
Oven Operation
Probe. Sensing device,
much like a thermometer,
which can be set for doneness Safety Interlock System.
or internal temperature of the Safety latches in the
food, and which shuts off microwave oven door.
the oven automatically when All ovens have at least
Metal Rack. Accessory the desired temperature is two latches which stop the
used to give the microwave reached, operation of the oven when
oven cooking flexibility, the door is opened.
Offers the user the option
of cooking or reheating
more than one food at a Display Window.
Rating Label.
Code Instructions. Filters. Touch Control Panel.
(See more detailed
diagra m of control
Window. To view the panel on p. 11.)
Door Latches. These will foods while cooking.
slide into the interlock. No mic[owaves can pass Smoke and Spatter Shield.
If door is not competely through the metal shield (Model M457 Only) When using
closed the oven will not in this window, the vent, flip the shield down into
operate, the OUT position where it will
direct surface smoke to the
exhaust system. When the vent
fan is not in use, flip the shield up
under the oven.
NOTE Model M437 Only:
For a nonvented installation, use Charcoal Filter Kit (MF110) available from your
Jenn-Air dealer.
10
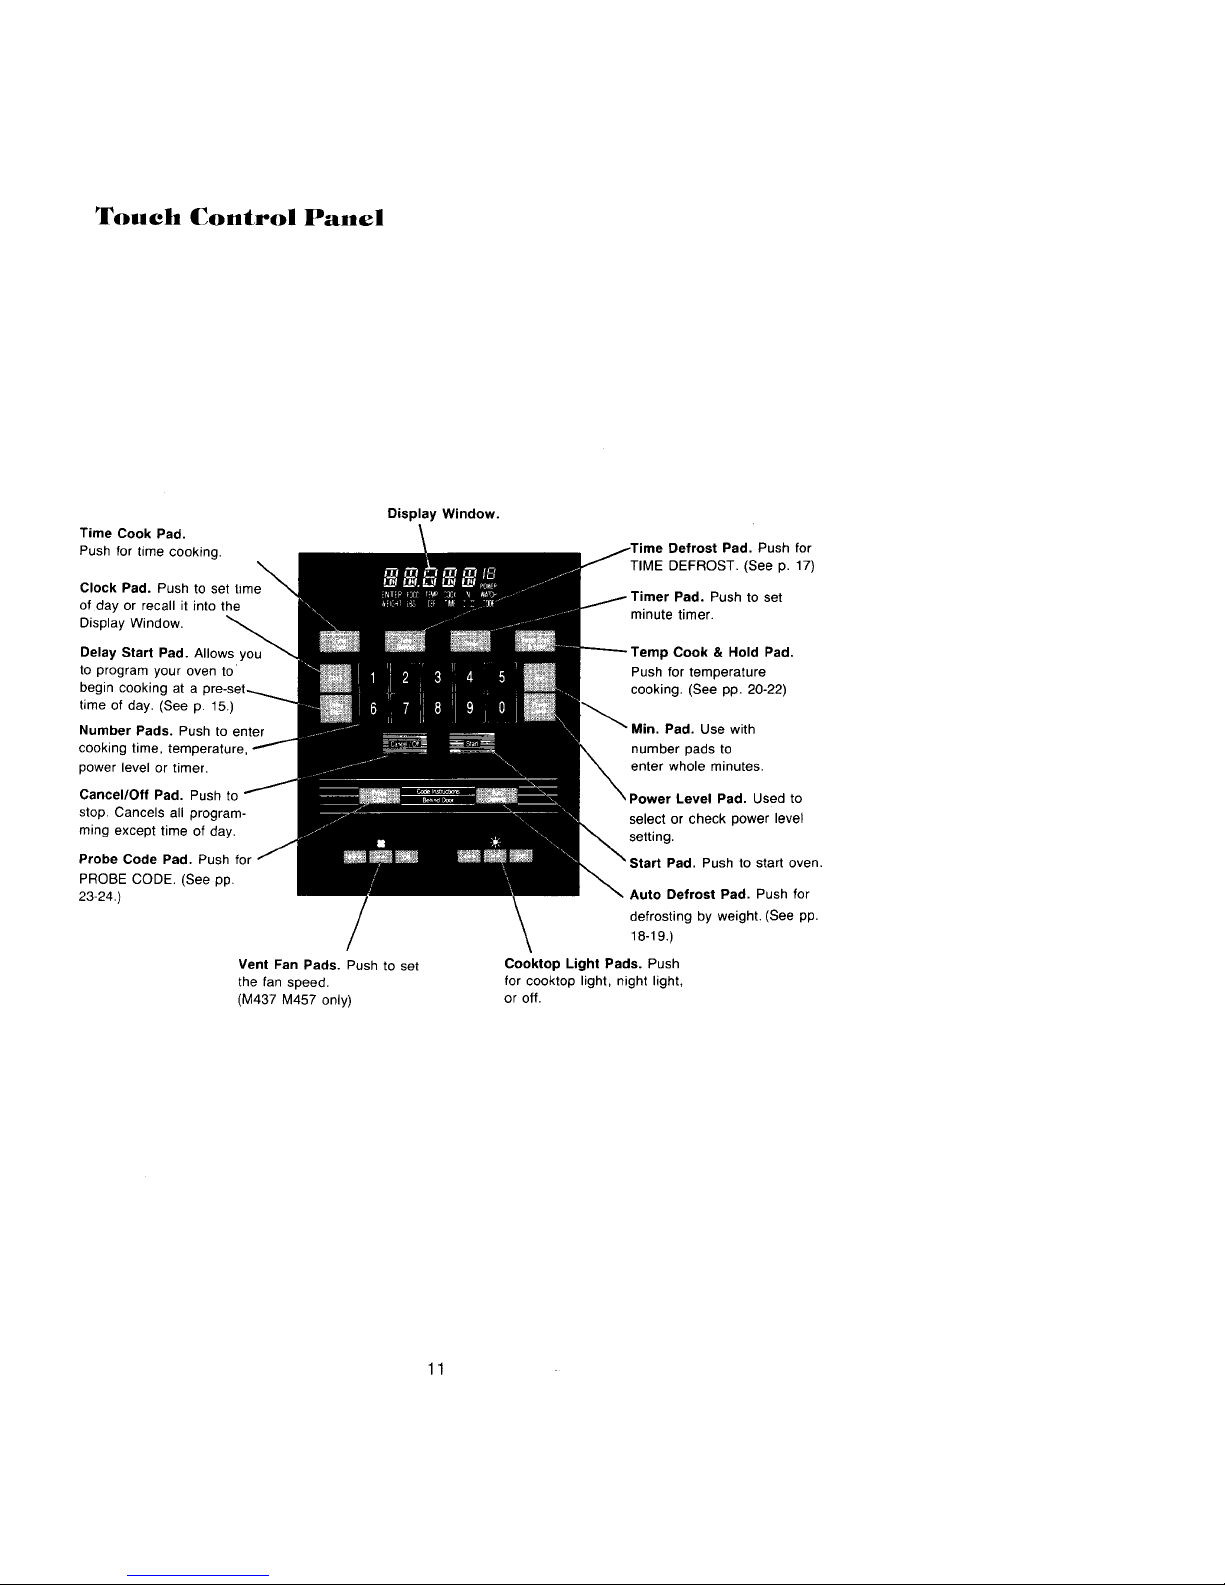
Touch Control Panel
Display Window.
Time Cook Pad. Defrost Pad. Push for
Push for time cooking. TIME DEFROST. (See p. 17)
Clock Pad. Push to set time Pad. Push to set
of day or recall it into the minute timer.
Display Window. wsy°u_Delay Start Pad. AIIo _ Cook & Hold Pad.
to program your oven to' Push for temperature
begin cooking at a cooking. (See pp. 20-22)
time of day. (See p. 15.)
Number Pads. Push to enter Min. Pad. Use with
cooking time, temperature, number pads to
power level or timer, enter whole minutes.
Cancel/Off Pad. Push to r Level Pad. Used to
stop. Cancels all program- select or check power level
ming except time of day. setting.
Probe Code Pad. Push Pad. Push to start oven.
PROBE CODE. (See pp.
23-24.) Auto Defrost Pad. Push for
defrosting by weight. (See pp.
18-19.)
Vent Fan Pads. Push to set Cooktop Light Pads. Push
the fan speed, for cooktop light, night light,
(M437 M457 only) or off.
11
Time of Day Clock
• After plugging in the oven or after a power outage, the Display will display
five 8's, 18 POWER. and all of the oven functions. After 15 seconds, all
lights disappear and "RESET" comes on in the upper portion. Set clock
using the instructions below.
• If set, the time of day will always be displayed when no other cooking
function is being used.
• To check the time of day when programming your oven or cooking push
the Clock Pad.
• To return to time of day after cooking open door or push the Cancel/Off
Pad.
BASIC INSTRUCTIONS
1. Push the Cancel/Off Pad.
2. Push Clock Pad.
3. Set the time of day by pushing the appropriate numbers. "Start" will
appear in the Display Window.
4. Push Start Pad. The Time of Day clock will not be activated until the
Start Pad is pushed. Time will change in one minute increments.
TillleP
The Timer feature of this oven has two timing functions:
• It operates as a minute timer.
• It can be used as a hold setting after defrosting.
BASIC INSTRUCTIONS -- TIMER
1, Push the Timer Pad.
2. Enter desired time.
3. Push the Start Pad. When time is up, oven signals and flashes "End",
and display shows time of day.
BASIC INSTRUCTIONS -- HOLD SETTING
1. Push the Time Defrost Pad.
2. Enter desired defrost time.
3. Push the Timer Pad.
4, Enter desired holding time.
5. Push the Start Pad.* When time is up, oven signals and flashes
"End", and display shows time of day.
NOTE*: A microwave cooking function could be programmed to take place after the
"Hold Time". If so desired, program the function prior to completing step 5.
12
 Loading...