

Page 1
_.JENN-AIR
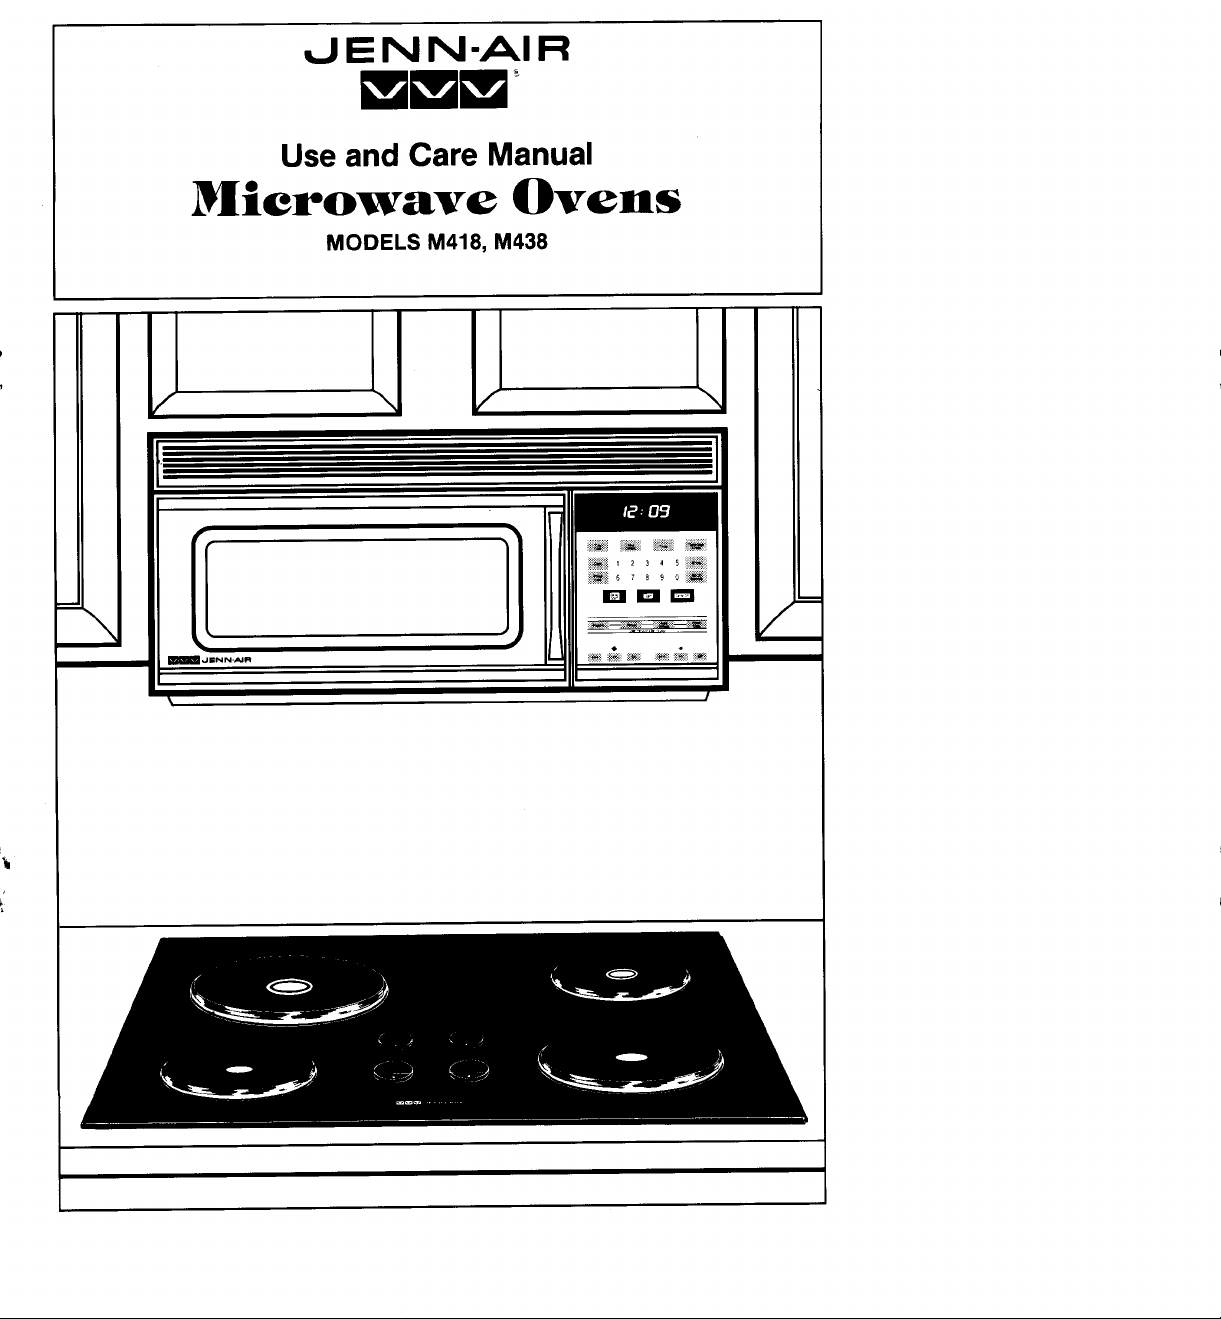
Useand Care Manual
Microwave Ovens
MODELS M418, M438
X \ f
II IIIII __ii
_ , .
= II [lll _iiii!iiiiii i_iiiiii:_:: /_
% #
Page 2
IMPORTANT SAFETY
INSTRUCTIONS
When using electrical appliances, basic safety precautions should be
followed, including the following:
WARNING_ To reduce the risk of burns, electric shock,
fire, injury to persons or exposure to excessive microwave energy:
1. Read all instructions before using the appliance.
2. Read and follow the specific "PRECAUTIONS TO AVOID
POSSIBLE EXPOSURE TO EXCESSIVE MICROWAVE ENERGY"
found on Page7.
3. This appliance must be grounded. Connect only to properly
grounded outlet. See "GROUNDING INSTRUCTIONS" on Page 8.
4. Do not mount this appliance over a sink. Install or locate this
appliance in accordance with the provided installation instructions.
5. Some products such as whole eggs and sealed containers -- for
example, closed glassjars -- may explode and should not be heated
in this oven. In rare instances, poached eggs have been known
to explode. Cover poached eggs and allow a standing time of one
minute before cutting into them.
6. Foods with unbroken outer "skin" such as potatoes, sausages,
tomatoes, apples, chicken livers and other giblets, and egg yolks
(see previous caution) should be pierced to allow steam to escape
during cooking.
7. Use this appliance only for its intended use as described in this
manual. Do not usecorrosive chemicals or vapors in this appliance.
This type of oven is specifically designed to heat, cook, dry, or
defrost food. It is not designed for industrial, laboratory, or
commercial use. It is intended for home use only. Do not use for
drying clothes, linens, newspaper, or similar non-food type items.
8. As with any appliance, close supervision is necessary when used
by children.
9. Do not operate this appliance if it has a damaged cord or plug,
if it is not working properly, or if it has beendamaged or dropped.
10. This appliance should be serviced only by qualified service
personnel. Contact nearest authorized Jenn-Air service facility for
examination, repair or adjustment.
11. Do not cover or block any openings on the appliance.
12. Do not store this appliance outdoors. Do not use this product near
water -- for example, in a wet basement, near a swimming pool
or near a sink.
13. Do not immerse cord or plug in water.
Page 3
14. Keep cord away from heated surfaces.
15. Do not let cord hang over edge of table or counter.
16. When cleaning surfaces of door and oven that come together
on closing the door, use only mild, non-abrasive soaps or
detergents applied with a sponge or soft cloth.
17. To reduce the risk of fire in the oven cavity:
a. Do not overcook food. Carefully attend appliance if paper,
plastic, or other combustible materials are placed inside
the oven to facilitate cooking. Avoid using recycled paper
products. Such products sometimes contain impurities
which could ignite.
b. Remove wire twist-ties from paper or plastic bags before
placing bag in oven.
c. If materials inside the oven should ignite, keep oven door
closed, turn oven off, and disconnect the power cord, or
shut off power at the fuse or circuit breaker panel.
d. Do not use the oven for storage purposes. Do not leave
paper products, cooking utensils or food in the oven when
not in use.
e. Do not pop popcorn except in a microwave approved
popcorn popper or in a commercial package recommended
especially for microwave ovens.
18. Do not operate the oven when empty.
19. Do not lean on the oven door. The door is designed to close
tightly and seal properly for safe operation. Leaning on the
door may warp or break the hinges.
20. To avoid exposure to dangerous high voltage, DO NOT
REMOVE THE OUTER CASE.
21. Do not store metal oven rack in oven. Use the rack only when
cooking more than one dish. Do not use microwave browning
dish on shelf; the shelf could overheat.
22. Do not store the temperature probe in the oven.
23. Use metal only as directed in cookbook. TV dinners may be
microwaved in foil trays less than 3,4"deep; remove top foil
cover and return tray to box. When using metal in microwave
oven, keep metal (other than metal shelf) at least 1-inch away
from sides of oven.
24. "Boilable" cooking pouches and tightly closed plastic bags
should be slit, pierced, or vented.
25. Do NOT defrost frozen beverages in narrow necked bottles.
26. Liquids _:,:r !_ certain shaped containers (especially
cylinc: _,:: :_ :' --tainers) may become overheated, splash
out with a ioL,_,_-,oise.For best results, stir the liquid several
times before heating. Always stir liquids several times between
reheatings.
5
Page 4
27. Read and follow specific microwave oven preparation
instructions on food packages or containers (especially baby
food). Above all, this is a cooking appliance designed to prepare
food.
28. Cookware may become hot because of heat transferred from
the heated food. Pot holders may be needed to handle the
cookware.
29. Use only cooking utensils and accessories made for use in the
microwave and specifically described in this manual or
cookbook.
30. Microwave oven manufacturers do not recommend deep fat
frying or frying in a microwave oven. Hot oil can damage oven
parts and utensils and even result in skin burns.
31. Plastic wrap: Use only those types designed for microwave oven
use and avoid forming an air-tight seal. Fold back a small corner
or cut a small slit to allow steam to escape.
32. Stay near the appliance while it is in use and check cooking
progress frequently. Leaving the appliance unattended may
result in overcooked food and possibly a fire in your oven.
33. This over-the-range oven was designed for use over ranges
no wider than 42 inches. It may be installed over both gas and
electric cooking equipment.
NOTE" These microwave ovens are UL listed for installation over
certain cooktops and ranges as outlined below.
Model M438
The M438 can be installed above all non-grill gas and electric
conventional cooktops which require updraft ventilation. Not
recommended over ranges or cooktops with grilling
capability unless the range or cooktop is equipped with
downd raft ventilation.
Model M418
The M418 can be installed above all electric and gas grill-
ranges and grill-range cooktops featuring downdraft
ventilation. Not recommended above ranges or cooktops
without downdraft ventilation.
NOTE: Model M418 only install above Jenn-Air cooktop and
grill range series:
CP2 C200 $100
CP3 CG200 D100
6
Page 5
Safety Precautions for Exhaust Fan
(Model M438 Only)
In addition to starting by touching the fan switch, the exhaust fan
may start automatically if excessive temperatures occur around the
microwave oven. This may occur with high temperature frying or long
term cooking on the cooktop surface below the hood or during broiling
or the pyrolytic (self) cleaning of a range.
This automatic exhaust fan feature is designed to prevent damage from
overheating of the oven parts. The exhaust fan may stay on as long
as 30 minutes to cool the oven. The cooling time will depend on removal
of the heat source. Pushing the fan switch will not turn the fan off.
Because of the automatic exhaust fan feature, the following cautions
must be observed:
1. DO NOT leave the area when using your cooktop at a high
setting. Accidental fires from boilover or spattering on the
surface unit could spread, especially if the exhaust fan is
operating.
2. DO NOT allow grease and soil to build up in the exhaust filter.
Exhaust fan efficiency will decrease and fire may result. Clean
frequently following the filter cleaning instructions.
3. DO NOT flame foods when operating the exhaust fan. The fan,
if operating, may spread the flame and cause personal injury
or property damage.
4. In the event of a grease fire, smother flaming pan on surface
unit by covering pan completely with well-fitting lid.
5. Use care when cleaning the vent hood filter. Corrosive cleaning
agents, such as lye-based oven cleaners, may damage the filter.
SAVE THESE INSTRUCTIONS
Page 6
PRECAUTIONS TO AVOID POSSIBLE
EXPOSURE TO EXCESSIVE
MICROWAVE ENERGY
(a) Do not attempt to operate this oven with the door open since
open door operation can result in harmful exposure to microwave
energy. It is important not to defeat or tamper with the safety
interlocks.
(b) Do not place any object between the oven front face and the door
or allow soil or cleaner residue to accumulate on sealing surfaces.
(c) Do not operate the oven if it is damaged. It is particularly important
that the oven door close properly and that there is no damage
to the: (1) door (bent), (2) hinges and latches (broken or loosened),
(3) door seals and sealing surfaces.
(d) The oven should not be adjusted or repaired by anyone except
properly qualified service personnel.
REGISTRATION
Federal law requires registration of all microwave ovens. To comply with the
law, please fill out the CUSTOMER REGISTRATION CARD packaged in the
oven:
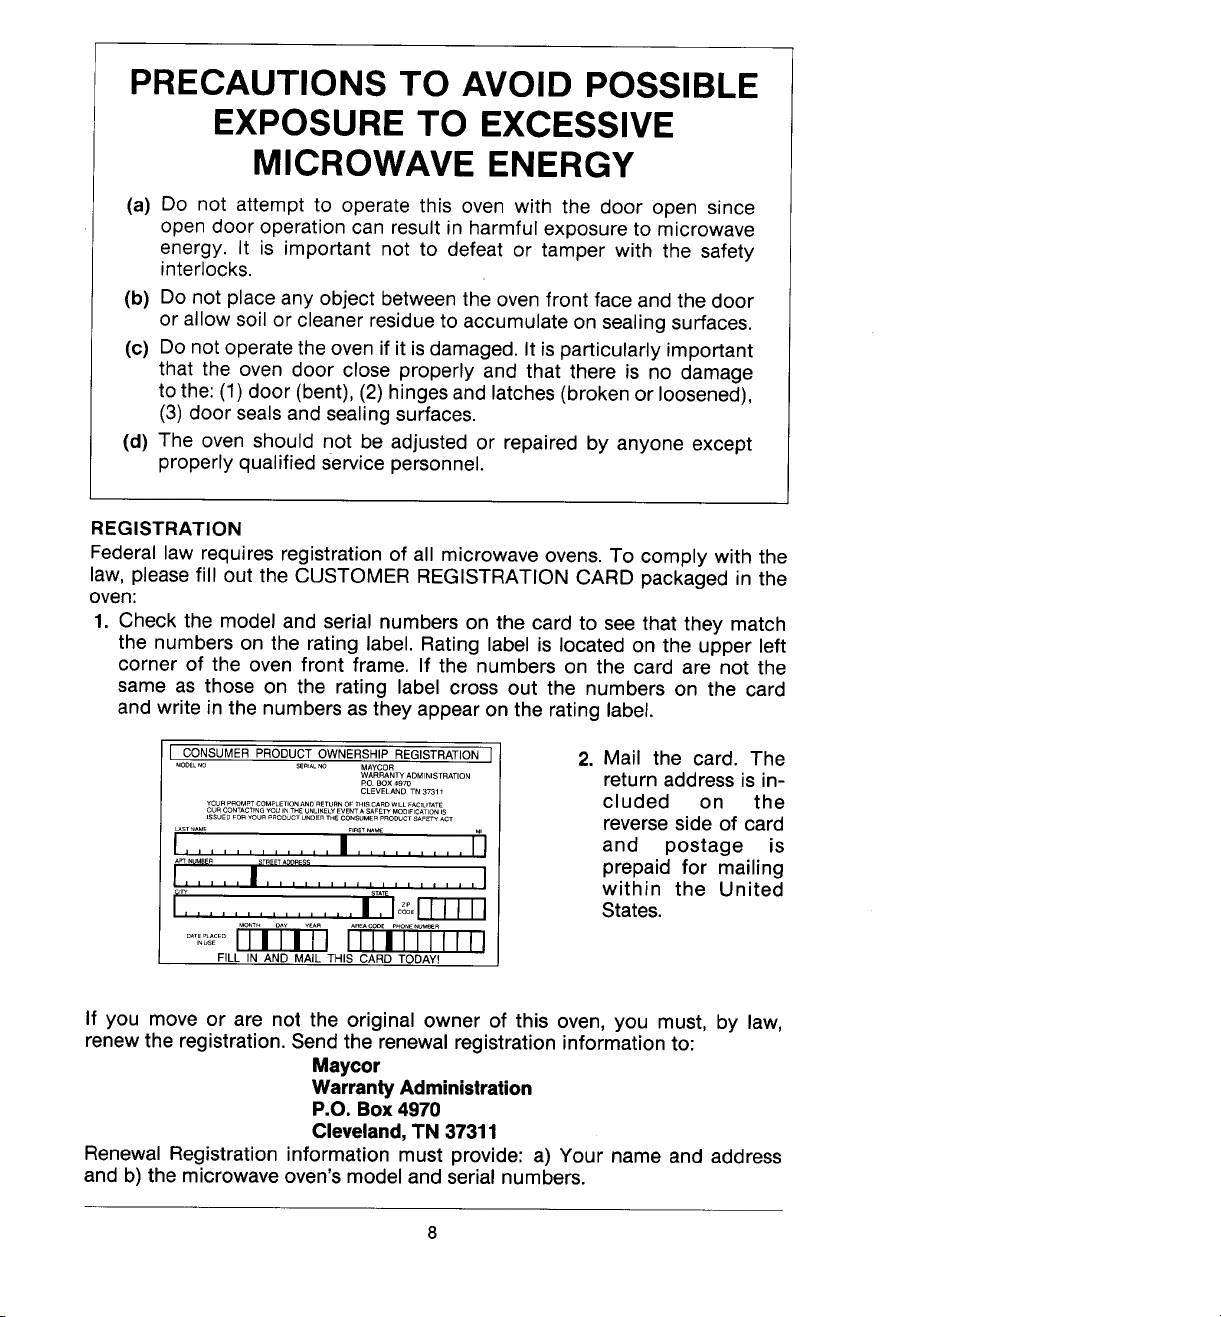
1. Check the model and serial numbers on the card to see that they match
the numbers on the rating label. Rating label is located on the upper left
corner of the oven front frame. If the numbers on the card are not the
same as those on the rating label cross out the numbers on the card
and write in the numbers as they appear on the rating label.
I CONSUMERPRODUCTOWNERSHIPREGISTRATIONI 2. Mail the card. The
_OOEL_o SERIALNO
..................................................... cluded on the
OURCONTACTINGYOUINTHEUNLIKELYEVENTA SAFE_MODIFICATIONIS
................................................... reverse side of card
rT: ,.... iT
........... I"1 and postage is
MAYCOR
....................._o_o×40,0 return address is in-
CLEVELAND TN37311
................... prepaid for mailing
J..... II ................. j within the United
i'_ ............. J_':"Jc;;E[-r-j-_ states.
FILL IN AND MAIL THIS CARD TODAY!
If you move or are not the original owner of this oven, you must, by law,
renew the registration. Send the renewal registration information to:
Maycor
Warranty Administration
P.O. Box 4970
Cleveland, TN 37311
Renewal Registration information must provide: a) Your name and address
and b) the microwave oven's model and serial numbers.
Page 7
Grounding Instructions
This appliance mustbe grounded. In the event of an electrical short circuit,
grounding reduces the risk of electric shock by providing an escapewire
for the electric current. This appliance is equipped with a cord having a
groundingwire with a grounding plug. The plug must be plugged into an
outletthat is properlyinstalledand grounded.
WARNIN
a riskof electricshock.
Consult a qualified electricianor serviceman if the grounding instructions
are notcompletelyunderstood,or if doubt existsastowhether the appliance
isproperlygrounded.
Useof an extensioncord isnot recommended,butif itisabsolutelynecessary
to use an extension cord, use only a 3-wire extension cord that has a 3-
blade groundingplug, and a 3-slot receptaclethat will accept the plug on
the appliance. The marked rating of the extension cord shall be equal to
or greaterthan the electricalrating of the appliance.
Where an electrical wall receptacle is encountered which will accept only
a two-prongplug,it isthe personalresponsibilityand obligationof the owner
to contacta qualifiedelectricianand havetheoutlet replacedwith a properly
groundedand polarizedreceptaclefor a three-prong,grounding plug. Such
receptacle mustalso meet local electrical codes, if applicable, and/or the
NationalElectricalCode.
Do not under any circumstancecut or remove the third (ground) prong
from the powercord.
Do not usean adapter plugwith thisappliance.
IMPORTANT
The abovegroundinginstructionsmust be followed not only for your
personalprotectionagainst shock and fire hazards, but alsoto insure
satisfactoryoperationof the electronic controls. In addition to proper
grounding, a polarity check of outlet should be made to insure that
polarity is not reversed. Improper grounding or reversed polarity can
damage the _lectronic control or cause it to operate erratically.
G- Improper use of the grounding plug can result in
Page 8
Oven Operation
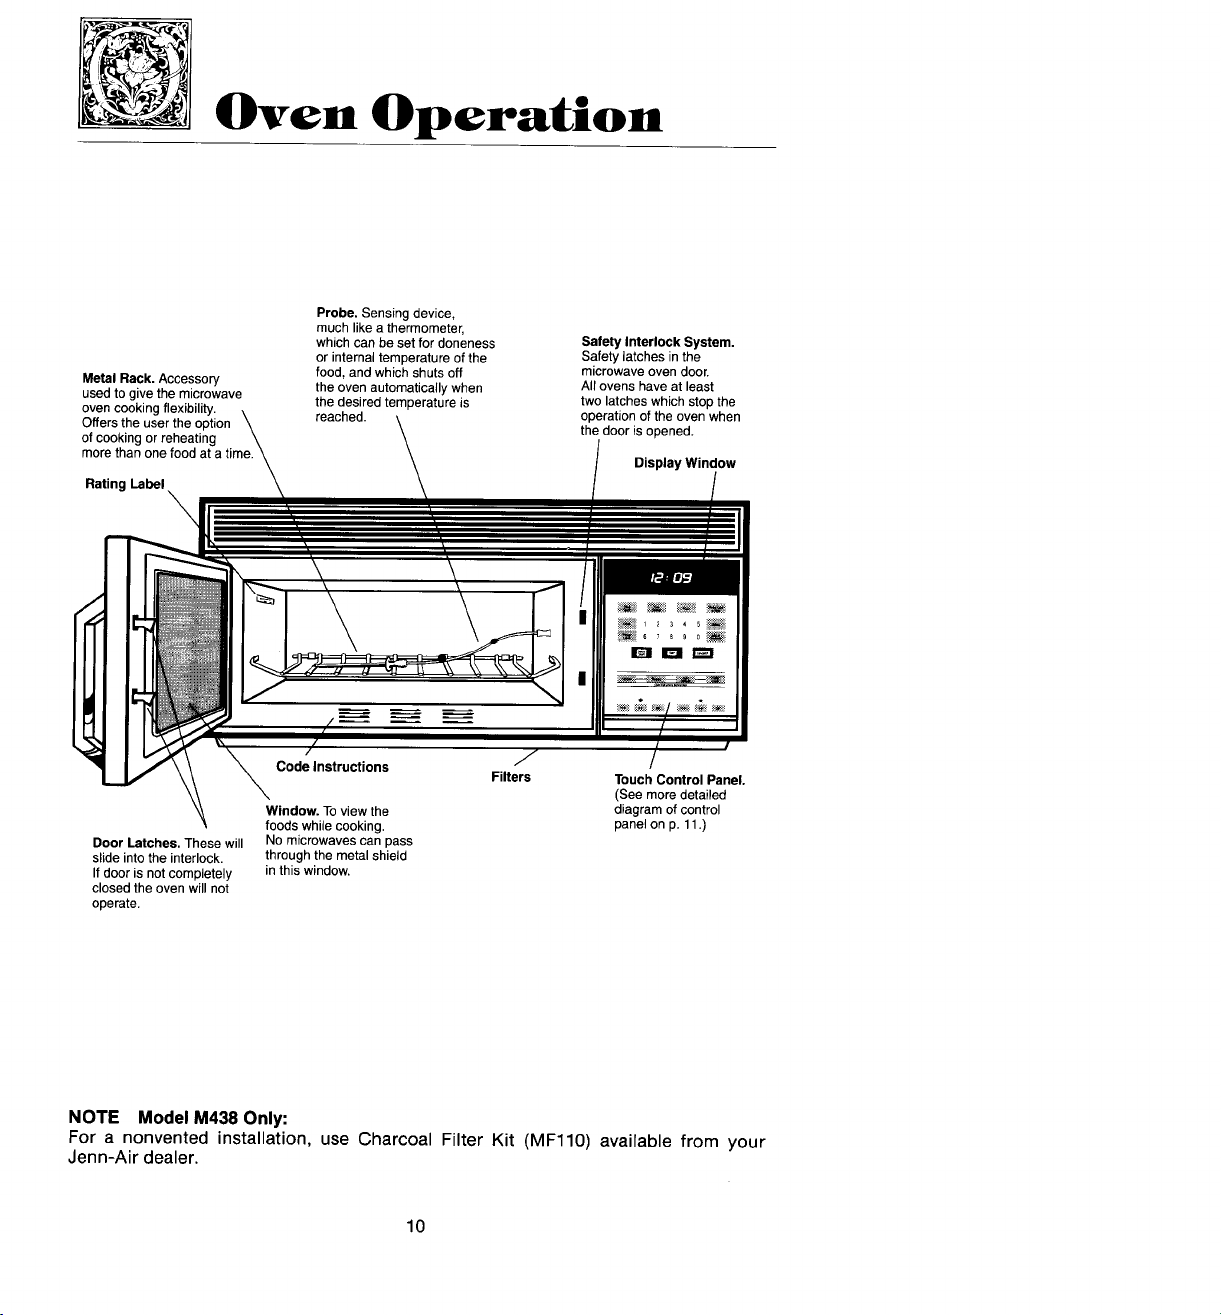
Probe.Sensingdevice,
much likeathermometer,
whichcan be set fordoneness SafetyInterlockSystem.
or internaltemperatureof the Safetylatchesinthe
MetalReck.Accessory the oven automaticallywhen Allovens haveatleast
usedtogivethe microwave thedesiredtemperatureis twolatcheswhichstopthe
ovencookingflexibility, reached, operationof the ovenwhen
Offersthe usertheoption thedooris opened.
of cookingor reheating
morethanone food ata time. Display Window
RatingLabel
food,and whichshutsoff microwaveovendoor.
Code Instructions J
Window.Toviewthe diagramof control
DoorLatches.Thesewill Nomicrowavescan pass
slideinto theinterlock, throughthe metalshield
Ifdooris notcompletely inthis window.
closedtheovenwillnot
operate.
foodswhilecooking, pane_on p. 11.)
Filters TouchControlPanel.
(Seemoredetailed
NOTE Model M438 Only:
For a nonvented installation, use Charcoal Filter Kit (MF110) available from your
Jenn-Air dealer.
10
Page 9
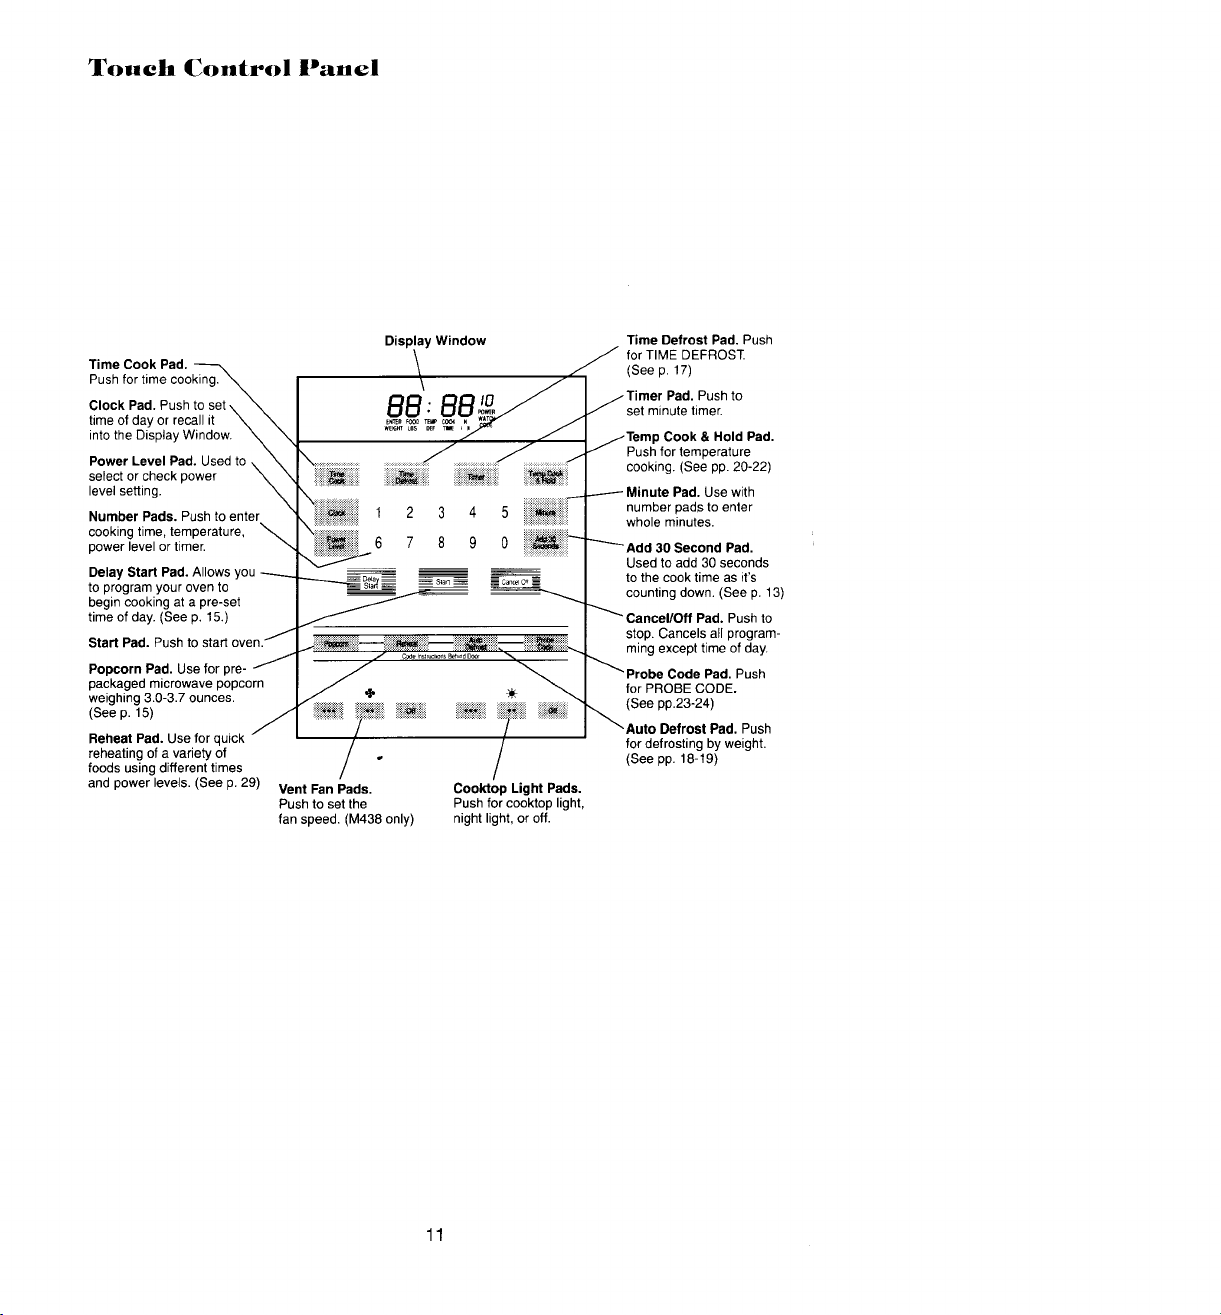
Touch Control Panel
Display Window Time Defrost Pad. Push
Time Cook Pad. (See p. 17)
Push for time cooking.
Clock Pad. Push to set \ _1, j(_l set minute timer.
time of day or recall it \
into the Display Window. _Cook & Hold Pad.
Power Level Pad. Used to Push for temperature
select or check power .........._ :::::::::::::::::::::::::i::_ :
level setting.
Number Pads. Push to enter iiiiii_ii;:ii::i 1 2 3 4 5 iiiii_:ii_i!:ii number pads to enter
cooking time, temperature,
power level or timer. :.................................... _econd Pad.
Delay Start Pad. Allows to the cook time as it's
to program your oven to _ _,_'_7,_ = S;att _ i Cance0 _ i I -
begin
time of day. (See p. 15.) _- ] _ Cancel/Off Pad. Push to
Start Pad. Push to start oven. / ming except time of day.
Popcorn Pad. Use for pro- / "/ C°del"sl=l_SBeh'ndCCer_
packaged microwave popcorn _J ....... _ _"........._""'_:::"k for PROBE CODE.
weighing 3.0-3.7 ounces. _ _ _ _ _ _ (See pp 23-24)
(Seep. 15) ............/ "/ _;ii I_
Reheat Pad. Use for quick
reheating of a variety of / o i (See pp. 18-19)
foods using different times
and power levels. (See p. 29) Vent Fan Pads. Cook'top Light Pads.
cooking
at a
pro-set
............................._..... cooking. (See pp. 20-22)
:::::;::::::;:::::;::::::::: whole minutes.
.....................................
6 7 8 9 0
_ _ _ counting down. (See p. 13)
..................................................................................................................I stop. Cancels all program-
f _ I _Pr°be Code Pad. Push
/ / for defrosting by weight.
/
Push to set the Push for cooktop light,
fan speed. (M438 only) night light, or off.
/
for TIME DEFROST
Used to add 30 seconds
Auto Defrost Pad. Push
11
Page 10
Time of Day Clock
• After plugging in the oven or after a power outage, the Display will
display five 8's, 18 POWER, and all of the oven functions. After 15
seconds, all lights disappear and "RESET" comes on in the upper portion.
Set clock using the instructions below.
• If set, the time of day will always be displayed when no other cooking
function is being used.
• To check the time of day when programming your oven or cooking
push the Clock Pad.
• To return to time of day after cooking open door or push the Cancel/
Off Pad.
BASIC INSTRUCTIONS
1. Push the Cancel/Off Pad.
2. Push Clock Pad.
3. Set the time of day by pushing the appropriate numbers. "Start"
will appear in the Display Window.
4. Push Start Pad. The Time of Day clock will not be activated until
the Start Pad is pushed. Time will change in one minute increments.
r_uep
The Timer feature of this oven has two timing functions:
• It operates as a minute timer.
• It can be used as a hold setting after defrosting.
BASIC INSTRUCTIONS m TIMER
1. Push the Timer Pad.
2. Enter desired time.
3. Push the Start Pad. When time is up, oven signals and flashes
"End", and display shows time of day.
BASIC INSTRUCTIONS -- HOLD SETTING
1. Push the Time Defrost Pad.
2. Enter desired defrost time.
3. Push the Timer Pad,
4. Enter desired holding time.
5. Push the Start Pad.* When time is up, oven signals and flashes
"End", and display shows time of day.
NOTE*: A microwave cooking function could be programmed to take place after the
"Hold Time". If so desired, program the function prior to completing step 5.
12
Page 11

Time Cooking
Consult your cookbook for the approximate cooking time for each recipe.
Start with the shortest recommended time and add more if needed. Check
the food as it cooks. The oven door can be opened any time during operation;
the oven will automatically stop cooking and maintain the time setting until
the door is closed and the Start Pad is pushed. Remember, the cookbook
is only a guide. Starting temperatures and density of the food can vary the
cooking time required.
BASIC INSTRUCTIONS
1. Push the Time Cook Pad.
2. Enter cooking time.*
3. Push the Start Pad.
NOTE*: Fullpower cooking isautomatic. If you wishto usea variable power setting,
Example: To heat a cup of coffee for 11/2minutes, touch the Time Cook Pad, then
The oven blower will come on and the oven will begin cooking. Time count down
will begin. When the time is up, a tone will sound four times and oven will stop
automatically and "End" flashes in the Display. The oven will continue to signal once
everyminute until the door isopened or the Cancel/Off Padis pushed.
NOTE: Push Cancel/Off Padto returnto Time of Day in the Display.
Minute Pad
The Minute Pad allows you to quickly set whole minutes. This feature can be used
with either the Timer Pador the Time Cook Pad.
follow the instructionson page 14.
thenumbers 1,3, 0.Then pushthe Start Pad.The Displaywillshow:
BASIC INSTRUCTIONS
1. Pusha function Pad.
2. Enter whole minutes.
3. PushMinute Pad.
4. PushStart Pad.
Add 30 Second Pad
The Add 30 Second Pad provides a convenient way to extend cooking time by 30
seconds while the oven time is counting down. It will add 30 seconds to the time
shown each time the pad istouched.
13
Page 12

Variable Power
As with conventional cooking methods, your microwave oven gives you the
flexibility of choosing the cooking speed (microwave power) you need for
each type of food. The variable power feature can be used when cooking
with time or temperature.
BASIC INSTRUCTIONS
1. Push the Time Cook Pad or Temp Cook & Hold Pad.
2. Enter cooking time or temperature.
3. Push the Power Level Pad.
4. Enter power level.*
5. Push the Start Pad.
*See Power LevelGuidebelow.
Example: If the recipe calls for cooking with 50% power for 3 minutes, you
would touch: Time Cook Pad; then 3, 0, 0; then Power Level Pad;
then 5; then Start Pad.
Power Level Guide*
Power Power
Level % SuggestedUses
10 100 For vegetables;beverages;quick reheating (observeclosely to
avoid overcooking);generallyfor quickestcooking.
9 90 Sauteingvegetables.
8 80 Forwholepoultry, cheeseand egg dishes;cookingcertain
7 70 Forcakes,quickbreadsand muffins.
6 60 Reheating leftoversor for cooking recipes using precooked
5 50 Reheatinglargeramountsof leftovers;cooking roasts.
4 40 Stewingor developingflavor in main dishes,soupsor sauces;
3 30 Defrosting;tenderizing lesstender cutsof meatin liquid;
2 20 Softening cheese,butter or chocolate.
1 10 Keepingfood(s) warm or taking chill off refrigeratedfoods
*Guide gives percentage of magnetron "on" time at differentpower levelsand
suggesteduses.
seafoods(clams, oystersor scallops).
or canned ingredients.
cooking riceor pasta(afterwater isboiling).
cooking dried beans,lentilsor peasinwater.
before serving.
14
Page 13

To Change Variable Power or Time IXllile Cookin_
To Change Variable Power Setting
1. Push Power Level Pad.
2. Enter new power setting by pushing Number Pad.
To Change Time
1. Open and reclose the door.
2. Push Time Cook Pad.
3. Enter new time.
4. Push Start Pad.
Delay Start
The Delay Start feature allows you to program your oven to begin cooking
at a preset time of day -- up to a delay of 11 hours and 59 minutes.
BASIC INSTRUCTIONS
1. PushDelay Start Pad (insteadof Start Pad).
2. Entertheclock time you want the ovento start.
3. Enterdesiredcookingprogram.
4. PushStart Pad.
Popcorn Pad
The popcorn feature is designed to be used only with prepackaged microwave
popcorn weighing 3.0 to 3.7 ounces.
BASIC INSTRUCTIONS
1. PushPopcornPad.
2. Touch number pad2 for Light Popcorn.*
3. Touch Start Pad.
*Omit step2 for regularmicrowavepopcorn.
NOTE: The cooking time can be adjusted if your popcorn is undercooked or
overcooked.To adjustcookingtime, follow the directionsbelow.
1. PushPopcornPad.
2. Touch numberpad 1 (for regularpopcorn)or 2 (for Lightpopcorn).
3. Touch number pad 9 (for undercooked popcorn) and a plus sign will be
displayed indicating 20 extra seconds; OR, touch number pad 1 (for
overcooked popcorn) and a minus sign will be displayed indicating 20
lessseconds.
4. Touch Start Pad.
NOTE: You'llwant to makea noteof whichbrand requiresthis adjustmentprocedure
sothatyoucanfollowthesestepseachtimeyou preparethatbrandof popcorn.
15
Page 14

Memories
The two memories of this microwave oven let you program two sequential operations
such ascooking using two different power levels.Any combination oftime and variable
power can be preprogrammed. "l"he memory feature automatically changes power
settings and cooking times.
BASIC INSTRUCTIONS
1. PushTime Cook Pad.
2. Entercookingtime.
3. PushPowerLevel Pad.*
4. Enterpower level.
5. PushTime Cook Pad.
6. Entercookingtime.
7. PushPower LevelPad.**
8. Enter power level.
9. PushStart Pad.
*If you wishto cook usingPower Level10, skipsteps3 &4.
**If you wishto cook usingPower Level10,skipsteps7 &8.
To Check, Change or Cancel Memories
(During Cooking)
To Check SetTime or VariablePower for Time Cook II
1. Pushthe Time Cook Pad.
To ChangeVariable PowerSettingfor Time Cook Being Used
1. PushPower LevelPad.
2. Pushnumberpad for new powerlevel.
To Cancel
1. PushCancel/Off Pad.
NOTE: Do NOT pushthe Cancel/Off Pad unlessentireprogramisto be cancelled.
16
Page 15

Time Defrost
The Time Defrost setting is designed for even thawing for large amounts
of food.
BASIC INSTRUCTIONS
1. Push the Time Defrost Pad.
2. Enter defrost time.
3. Push the Power Level Pad.*
4. Enter power level.*
5. Push the Start Pad.
Note'_: Power Level 3 is automatically set for defrosting, but you may change
this for more flexibility. If you wish to use Power Level 3, skip steps
3 and 4.
As indicated under the Microwave Techniques -- defrosting section, of the
cookbook, microwave defrosting can be done at different power level settings.
However this microwave oven automatically uses the optimum power level
to thaw most frozen foods without starting to cook them.
As illustrated inthe Microwave Techniques section of the cookbook defrosting
results vary with different shapes, types and amounts of food, so progress
of a defrost operation should be checked periodically. Suggested defrost
times are given for specific types and amounts of foods along with recipes
in several sections of the cookbook.
Defrosting Tips
• Foods frozen in paper or plastic can be defrosted in the package.
• For even defrosting, some foods need to be broken up or separated
part of the way through the defrosting time.
• Pre-packaged frozen dinners can be defrosted and microwave cooked.
If dinner is in paper board or plastic container, remove dinner from
the box and turn back one corner of plastic wrap to vent steam. Then,
cook dinner in original containers. For dinners in foil containers, transfer
it to a microwave-safe dish.
• Check your Cookbook for other defrosting tips.
• Remove metal clips and/or metal twist ties before defrosting.
17
Page 16

Auto Defrost
With the Auto Defrost feature, the oven automatically sets the defrosting
time and Power Levels for you. You enter the food weight in pounds and
tenths of a pound (See Conversion Chart below) and touch Start Pad. The
oven calculates the defrosting time and changes power levels during
defrosting to give even defrosting results.
Twice during defrosting, the oven beeps 4 times and the readout flashes
"TURN", telling you to turn food over and will not continue defrosting until
door is opened and Start Pad is touched again.
When using the Auto Defrost feature, it is necessary to allow the food to
stand. This standing period is necessary to finish the defrosting of the interior
of the food.
Auto Defrost Chart
Recommended Min.-Max.
Foods Weight FirstSignal Second Signal StandTime
Chicken pieces 0.1--5.0 Ibs. Turn over. Separate and remove
Ground beef 0.1--5.0 Ibs. Turn over. Remove defrosted 5 minutes
Pork Chops 0.1--5.0 Ibs. Turn over. where necessary. 5 minutes
Roasts 0.1--5.0 Ibs. 20 minutes
Steaks 0.1--5.0 Ibs. Turn over. 5 minutes
*It is necessary to allow some meats to stand after defrosting. You may take the
meat out of the oven if you prefer.
Turn over Shield where
and shield, necessary.
defrosted pieces. 5 minutes
areasand break apart.
Separate and shield
Conversion Chart
If the weight is stated in pounds and ounces, the ounces must be converted
to tenths (.1) of a pound.
Ounces Pounds
1-2 .1
3 .2
4-5 .3
6-7 .4
8 .5
9-10 .6
11 .7
12-13 .8
14-15 :9
18
Page 17

Auto Defrost
With the Auto Defrost feature, the oven automatically sets the defrosting
time and Power Levels for you. You enter the food weight in pounds and
tenths of a pound (See Conversion Chart below) and touch Start Pad. The
oven calculates the defrosting time and changes power levels during
defrosting to give even defrosting results.
Twice during defrosting, the oven beeps 4 times and the readout flashes
"TURN", telling you to turn food over and will not continue defrosting until
door is opened and Start Pad is touched again.
When using the Auto Defrost feature, it is necessary to allow the food to
stand. This standing period is necessary to finish the defrosting of the interior
of the food.
Auto Defrost Chart
Recommended Min.-Max.
Foods Weight FirstSignal Second Signal StandTime
Chicken pieces 0.1--5.0 Ibs. Turn over. Separate and remove
Ground beef 0.1--5.0 Ibs. Turn over. Remove defrosted 5 minutes
Pork Chops 0.1--5.0 Ibs. Turn over. where necessary. 5 minutes
Roasts 0.1--5.0 Ibs. 20 minutes
Steaks 0.1--5.0 Ibs. Turn over. 5 minutes
*It is necessary to allow some meats to stand after defrosting. You may take the
meat out of the oven if you prefer.
Turn over Shield where
and shield, necessary.
defrosted pieces. 5 minutes
areasand break apart.
Separate and shield
Conversion Chart
If the weight is stated in pounds and ounces, the ounces must be converted
to tenths (.1) of a pound.
Ounces Pounds
1-2 .1
3 .2
4-5 .3
6-7 .4
8 .5
9-10 .6
11 .7
12-13 .8
14-15 :9
18
Page 18

Temperature Probe
The special temperature probe takes the guesswork out of microwave cooking
by allowing you to test doneness by the internal temperature of the food
being prepared. It is particularly hel,pful when preparing meats, beverages,
soups and sauces. When food reaches the temperature you select, the oven
automatically switches to "Hold" setting and maintains that temperature for
up to one hour or until you touch the Cancel/Off Pad.
ProbeClip ---------
_._.___.--
Probe Handle------____ --i _]
Probe__ _ _ _- _ _
BASIC INSTRUCTIONS
1. Insert probe.*
2. Push the Temp Cook & Hold Pad.
3. Enter temperature.**
4. Push the Power Level Pad.***
5. Enter power level.***
6. Push Start Pad.
NOTE* : "Probe" appears in the display window if probe is not installed properly.
NOTE** : Temperatures can be setfrom 90°F. to 199°F.
NOTE***: If you wish to cook on Power Level 10,omit these steps.
Probe Placement
• The first 1/2 inch of the sharp tip of the probe contains the temperature sensor.
The probe should always be inserted into solid foods with this tip located as
close to the center of the food as possible. For roasts or whole poultry, the
probe's sharp tip should be placed into the thickest part of meat away from
fatty portions and not touching any bone.
• It is usually better to place the sensor tip of the probe in food before inserting
its plug end into the receptacle.
20
Page 19

Example: To heat a casserole to 150°F. on Power Level 10, touch Temp Cook &
Probe Handling, Precautions and Suggestions
Hold Pad;then the numbers 1,5,0; then the Start Pad.
Blower will come on and "COOL" will appear in the Display Window if
food isbelow 90°F. or actual temperature if greater than 90°F. (If the Probe
Plug has not been inserted into the plug receptacle, the word "PROBE"
will appear in the Display Window. The oven will not start until the Probe
is inserted.) As the food cooks, the temperature displayed will increase
by one degree increments.
When the set temperature is reached, a tone will sound four times and
the oven will automatically switch to the "HOLD" setting for up to one
hour or until you touch the Cancel/Off Pad.
• To prevent harm to the oven, do not leave the temperature probe in a dry
utensilor operatethe ovenwhen probeis in a dry utensil.
• After cooking is completed remove the probe from its receptacle, Then use
a potholder to remove the probe from the food since the probe itself may
be hot.
• Clean the probe in warm soapywater. Do not clean it in dishwasher.
• Do not store the probe in theoven when it is not in use.
• Do not defrostwiththe probe. It should be usedonly for cooking.
• Do not use the probe for conventional cooking with any other appliance, It
was designedfor usein thismicrowaveovenonly.
Cooking Tips
• Many of the same foods vary in shape, form and density, so the same results
cannot be expected each time you microwave. For this reasonwe do not recom-
mend using the temperature probe with thin food items and foods that require
tenderizing by simmering.
• In some cases, your microwave oven may turn off prematurely. When this
happens, it indicates either that the temperature probe is not inserted properly
or that it should not be used with the food you are preparing.
• Use a lower power level; it will heat more evenly even though requiring more
time.
• Be sure frozen food has been completely defrosted before inserting probe.
Probe may break off if used in frozen foods.
• Use the clip to keep the probe in place while heating food.
• Cover foods loosely for moisture control and quick, even heating.
• For the best results, place the longest portion of the food item crosswise in
the oven.
21
Page 20

Temperature Guide
FOOD TEMPERATURE TiPS
AppetizerDips 130° F Stir before serving.
Beverages 115-130° F
Frozen& Convenience Defrost foods completely before
Frozen Foods 150° F inserting probe. Use setting "g".
Leftover& Canned Foods 150° F
Main Dishes& Partially coverdish to speed
Casseroles 150° F cooking. Stir beforeserving.
Meats
Beef Rare--140° F Place on a microwaveroastingrack
Pork 170° F
Poultry,whole 185° F Whole poultry has many variables
SETTING*
Meat must be completely thawed.
Medium--160 ° F in aglassbaking dish. During
Well--170 ° F standing time, conduction of heat
to the center will increase temp-
eratures5 to 10° F.
whichaffect aloneness.Always use
another conventionalalonenesstest
suchascutting near boneto check
for pink.
Sandwiches 120° F Place sandwichon paper plate or
_\ towel. For multiple sandwiches,
Sauces 150° F
Seafood 160-170° F
SOups 150-160° F If soup hasadditionalsolidin-
Vegetable,cannedor 150-170oF Partiallycovercontainerto
pre-cooked speedcooking.
WholeMeals As specifiedfor
particularfoods.
*Recommendedinternaltemperaturesettingssincefood will continueto cook during standing
timeand temperaturewill risefrom 5° F. to 10° F.
22
place sensor in center sandwich.
gredients,increasetemperature
setting.
Page 21

Probe Code
Probe Code uses the temperature probe to cook to the desired serving temperature.
Unlike Temp Cook & Hold, which uses a single power level, Probe Code uses up
to 3 power settings which automatically switch during roasting. Thus, even, tender
cooking results are provided without overcooking.
BASIC INSTRUCTIONS
1. Insert probe.
2. Push Probe Code Pad.
3. Enter Code Number.
4. Push Start Pad.
Example: To cooka beef roast to medium, you would touch ProbeCode Pad; then
Probe Code Chart
1;then Start Pad.
Display will show "Med Code 1". When you select Probe Codes 1 or 2,
oven flashes"Turn" and beeps 4 times. Open the door and turn the meat
over.(NOTE: Ovencontinuesto cook afterthe signalwhether or not roast
is turned over.) The probe may be disconnectedfor easier access to the
meat without interruptingtheprogram. (Remember to re-insertthe probe.)
Close door and touch Start Pad.Oven monitorsinternalfood temperature;
automaticallyswitching to lower power as meat'stemperature rises.This
helps preventtoughening or overcooking.
After final temperature is reached, oven switches to Hold Temp for up
toone hour,then shutsoff. Followthe standing time inthe chart.
Hold*
Food Code Minutes
Beef
Tender Roast(5 poundmax.)
Medium 1 0
Well 2 5-10
Pork (5 poundmax.)
Loin Roast 2 10
Poultry
Turkey Breast 3 10-15
(Insertprobe horizontally
into meatiestarea.)
*Recommendedstandingtime before serving.
NOTE: By touching the Probe Code Pad during cooking, the meat's internal
temperaturewill be displayed. ("COOL" will be displayed until meat reaches
90°F.) When pad isreleased,donenessCode reappearsinthe display.
23
Page 22

Simmer Cook Code
Probe Code 4 is a unique setting. It allows you to simmer foods for long
periods of time such as spaghetti sauces, chili, soups, etc. Probe Code
4 will automatically bring the food up to 180°F. then hold (slow simmer)
until you touch Cancel/Off Pad or Ol:/enthe door.
Food Time/Hrs.
Beef
Pot Roast 5-7
Chili* 5-8
Chicken
Stewing 4-6
Broiler/Fryer 3-4
Ham or Pork
Roast 4-6
Soup
Stock/Vegetable* 7-10
Split Pea* 5-7
*Stir every 3 hours if possible.
Tips
• Just as in conventional roasting, only tender roasts should be roasted
using Probe Code until specified internal temperatures are reached. Less
tender roast should be microwaved by time, according to the Cookbook
which comes with your oven. Complete information on preparing roasts
for microwaving is in your Cookbook.
• Place tender beef roast in
cooking bag on trivet in
microwave safe dish. Insert
probe horizontally into the __
center meaty area not touching _,#__-/_-___/__/' _.
Approx.
handle does not touch the food _ " -
bone or fat. Make sure the /____,.,_//_ __, __ 1_1_
• Pork or ham roasts need no
trivet. Place in cooking bag and
in microwave safe dish.
or top or sides of the oven. _/__
• For best results, place the
longest portion of the roast
crosswise in the oven and with
the eye of the roast facing up.
24
Page 23

Metal Oven Rack
The two position wire shelf is specifically designed for added capacity heating
and reheating in your microwave oven. Heating and reheating, which are
the most popular uses of microwave ovens, may now be done in multiple
quantities, so several foods are ready to serve at the same time.
When microwaving with the oven shelf, it is important to arrange foods prop-
erly. Utensil size is important. Also, food size should be considered; foods
over 3_/_inches high, or 3 pounds are not recommended for shelf cooking.
Inserting the Rack
1. Tip the rack down slightly in the back and fit back of the rack into the
rack supports on the back oven wall.
2. Set rack on the side wall supports near the front of the oven. To remove,
lift up in front and then in back.
3. The rack can be inserted two-ways to provide upper and lower rack
positions.
Upper Position Lower Position
Use for heating plates and leftovers. Use when heating two casseroles or
reheating frozen TV dinners or entrees.
BASIC INSTRUCTIONS
1. Insert oven rack.
2. Place food in oven.
3. Push Time Cook Pad.
4. Enter cooking time.
5. Enter power level if appropriate.
6. Push Start Pad.
Utensils for Shelf Heating and Reheating
Before placing food in the dishes you plan to use for shelf microwaving,
check to see that they will fit together on or under the shelf. Also, be sure
utensils are microwave safe.
• Utensils for heating or reheating include 1 cup measuring cup, 8x4x3-
inch loaf dishes, 9x5x3-inch loaf dishes or 9-inch pie plates.
• Leftovers may be placed in small individual ceramic or plastic bowls or
divided plates.
• Use wax paper or plastic wrap instead of lids on casseroles. Lids may
add too much height to dish.
25
Page 24

ilow to Reheat Different Types of Foods Together
• In general, dense or long cooking foods should be started a few minutes ahead
of time.
• Foods that need to be served hot should be placed on the floor, while foods
which are only warmed should be placed on the shelf.
• Stagger food in the oven whenever possible. Place food on right side of shelf
and left side of floor.
• If preparing a very fast cooking item, add it during the last one or two minutes
of cooking.
• Heator reheat different types of food at HIGH (10). To determine heating times,
add times for all foods together.
• Stir or rearrange foods after half of time (do not reversepositions). Check foods
(oven floor especially) after 3/_of total time and remove any which are done.
Continue cooking others.
How to Reheat Similar Types of Food
• Two plates of leftovers may be reheated
together. Arrange thick or dense foods to
outside edges of plate and cover with I _ ,
plastic wrap. Microwave at HIGH (10) for
2-3 minutes. Reverse position of plates
tinue microwaving at HIGH (10) for 2 to
3 minutes. Continue heating, if necessary,
until hot.
(t°pt°b°tt°m) and r°tatel/2turn" C°n" __- - " -_
• Reheating two casseroles (height should
be less than 3_/_inches) is now possible.
arrangements of food, placing food on
right side of shelf and left side of floor.
Microwave at HIGH (10) reversing position
Coverwithplasticwrap. Usestaggered l____J
Also, heat several small bowls of leftovers
this way, stirring and reversing positions
after half of time.
offoods(toptobottom) afterhalfoftime. _/_
• Two frozen individual entrees (5 to 7 oz.
each) ortwo TV dinners (10to 12oz.each)
are both ready to serve at the same time.
Remove trays of food from their boxes. I I
If there are foil covers, remove them and
return the trays of food to their boxes.
Remove batter foods; cook these conven-
tionally. Place in oven with one TV dinner
on right shelf and the second dinner on
left floor. Microwave at HIGH (10) for 7
minutes. Reversepositions (top to bottom)
and rotate foods 1/2turn. Continue micro-
waving at HIGH (10)for 7 minutes. Check
dinners for heating. If one dinner seems
less done than desired, return it to the box
and continue heating on floor 1 to 2 more
minutes.
26
Page 25

Additional Tips
• Batters and dough foods and also uncooked foods which need to be prepared
from scratch should be cooked without the oven shelf, following Cookbook
directions.
• Use potholders when handling foods heated together with your oven shelf,
especially when heating larger amounts of food in 8-inch square or other 2-
quart size casseroles. Extra steam generated from multiple food cooking may
make utensils hotter than with regular microwaving.
• Do not store or use microwave browning dish on metal shelf. Arcing could
OCCUr.
Important Reminders
• The rack should not be used when cooking a single item. Always remove the
rack from the oven after cooking multiple dishes. Operating the oven with the
rack still in place and no food in the oven could result in damage to the oven
or rack.
• Meat items, like roast and poultry should always be in a container on the rack
--not directly on the rack itself. When cooking instructions specify placing
meat or poultry on a rack or trivet, they are referring to a microwave cooking
accessory which is placed in a dish to keep the food above fats and juices.
The oven rack is not designed for that purpose.
• Use the lower rack level when microwaving high profile roasts to prevent the
roast from touching the top of the oven.
27
Page 26

Heating or Reheating Guide
F Power Approximate
ITEM Amount Level Time, Min.
Meatsand Main Dishes
Saucy Main Dishes: chop suey, 1to 2 servings HI (10) 3-7
spaghetti, creamed chicken, chili, 3 to 4 servings HI (10) 8-14
stew, macaroni and cheese, etc. 1can (16-oz.) ,HI (10) 5-7
_-1 cup/serving
Hamburgers or meat loaf 1 to 2 servings HI (10) 2-3
4-oz./serving 3to 4servings HI (10) 4-5
Chicken pieces 1to 2 pieces HI(10) 2-3
Hot Dogs and sausages 1to 2 HI (10) 1-11/2
Rice and pasta 1to 2 servings HI (10) 1-2
2/3-3/4 cup/serving
3 to 4 pieces HI (10) 3-4
3to4 HI (10) 2-3
Vegetables
Small pieces: peas, beans, corn, etc. 1 to 2 servings HI (10) 1-3
1/2cup/serving 3to 4 servings HI (10) 3-4V2
Large pieces or whole: asparagus 1to 2 servings HI (10) 3-4
spears, corn on the cob, etc. 3 to 4 servings HI (10) 4-5
Mashed 1to 2 servings HI (10) 1-3
Y2cup/serving 3to 4 servings HI (10) 3-8
1 can (16-oz.) HI (10) 3V2-41_
1 can (16-oz.) HI (10) 5-6
BakeryFoods
Cake, coffee cake, doughnuts, sweet 1piece Low (3) 1/_-1
rolls, nut or fruit bread 2pieces Low (3) 1-2
Dinner roils, muffins 1 Med (5) _A-I,_
4 pieces Low (3) 11/2-2_,_
9-in, cake or Low (3) I 2-4
12rolls or
doughnuts
2 Med (5) 1/2-%
4 Med (5) 1-1'/2
6-8 Meal (5) 1-2
L
Pie: fruit, nut or custard 1 slice HI (10) V_-I
1/8of 9-in. pie = 1 slice 2 slices HI (10) 1-11/2
(use minimum time for custard) 4 slices Med-HI (7) 2_,_-3
9-in. pie Med-HI (7) 5-7
*Foods reheateed to 160°-165°F will provide safe platable results. Be sure foods
are heated thoroughly before serving.Letstanda few minutesbeforeserving.
28
Page 27

Reheat Pad
The ReheatPadmakes it easy to reheat many popular foods. Choose a code number
from 1 to 6 (seechart below).
BASIC INSTRUCTIONS
1. Push ReheatPad.
2. Enter Code Number.
3. Enternumber of servings.*
4. Touch StartPad.
*Forone serving, omitthis step.For codes 1-5,up to 3 servingsmay be selected.
Reheat Chart
Time per
Code Display serving Foods Recommended Serving Size
1 BREAD 20 sec. bakery goods Variable
2 MEATS 11/2min. pizza, solid foods 1/2-3/_c.
3 VEGS 11/_min. Vegetables & fruits 1/__3/_c.
4 BEV 11,_min. Beverages 6 oz.
5 SAUCE 2 min. Soups, stews, sauces 8 oz.
6 PLATE 33/_min. 2 to 3foods 1/2c. ea.
Breads, pastries,pies,
Meats, casseroles, 4-6 oz. or
4-6 oz. or
4 oz. each
Microwaving Tips
• Makesure allcookware usedin your microwave ovenissuitablefor microwaving.
Most glass casseroles, cooking dishes, measuring cups, custard cups, pottery
or china which does not have metallic trim or glaze with a metallic sheen can
be used. Some cookware is labeled "suitable for Microwaving."
If you are unsure, use this dish test: Measure 1 cup water in a glass cup.
Place in oven on or beside dish. Microwave 1-11/2minutes at "10". If water
becomes hot, dish is microwave safe. If dish heats, it should not be used for
microwaving.
• Paper towels, wax paper, and plastic wrap can be used to cover dishes in
order to retain moisture and prevent spattering.
• Some microwaved foods require stirring, rotating, or rearranging. Check your
Cookbook.
• Steam builds up pressure in foods which are tightly covered by a skin or mem-
brane. Pierce potatoes, egg yolks and chicken livers to prevent bursting.
29
Page 28

Cleaning
Be Certain Power is off before Cleaning any Part
of the Oven.
Cleaning the Microwave Oven Interior
A minimum of maintenance is needed to keep the microwave oven clean and
trouble free. The oven itself should be cleaned after each use with a damp
cloth to keep it free from grease and soil buildup. Stubborn soils can be removed
with a plastic scrub pad. When cleaning interior surfaces and surfaces of door
and oven that come together when the door is closed, use only mild, nonabrasive
soaps or detergents applied with a sponge or soft cloth.
Odors can be eliminated from the inside of the oven by boiling a solution
of one cup of water and several tablespoons of lemon juice in the oven for
5-7 minutes. ,This also helps loosen any dried soil in the oven. Be very careful
not to scratch the door and interior surface. Wipe out excess moisture after
every use.
DO NOT USE abrasive cleaners, oven cleaners, abrasive cleaning pads or
steel wool, as they can scratch or dull oven surfaces or remove lettering on
oven door.
DO NOT USE SHARP-EDGED UTENSILS WITH YOUR OVEN. The inside
and outside oven walls can be scratched and the control panel can be damaged.
Keep your oven clean and sweet-smelling. Opening the oven door a few minutes
after cooking helps "air out" the interior. An occasional thorough wiping with
a solution of baking soda and water keeps the interior fresh.
Special note when using Brown 'N Sear Dish: If grease is present, high heat
generated on bottom of a Brown 'N Sear dish may cause the grease to burn
onto the oven floor. This may be removed with a cleanser such as Bon Ami.
After using Bon Ami, rinse and dry thoroughly, following instructions on can.
Do not use Bon Ami on the painted surfaces such as the walls. It may scratch
the paint.
NEVER USE A COMMERCIAL OVEN CLEANER ON ANY PART OF YOUR
MICROWAVE OVEN.
How to Clean the Outside
Control Panel. Wipe with a damp cloth. Dry thoroughly. Do not use cleaning
sprays, large amounts of soap and water, abrasives, or sharp objects on
the panel -- they can damage it.
Door Surface, When cleaning surfaces of door and oven that come together
on closing the door, use only mild, nonabrasive soaps or detergents applied
with a sponge or soft cloth. Wipe the window clean with a damp cloth.
3O
Page 29

Cleaning the Temperature Probe
Remove the temperature probe from the receptacle. Wipe food or liquid from the
probe with a damp cloth. Dry completely after use and washing.
DO NOT clean temperature probe in the dishwasher. Probe is sturdy, but care should
be taken in handling. Do not twist or bend; avoid dropping temperature probe.
Cleaning the Oven Rack
Wash the oven rack with a mild soap and a soft or nylon scrub brush. Be sure
to dry completely after washing. Do not clean in a self-cleaning oven.
Cleaning the Vent Hood Exterior (Model M438
only)
The exterior surfaces of the hood shbuld be cleaned often using a solution of mild
soap and warm water and a soft sponge, cloth or paper towel. A chrome cleaner
or polish may also be used to clean chrome, metal and aluminum surfaces.
DO NOT USE oven cleaners, steel wool, abrasive cleaning pads, or abrasive cleaners
as they can scratch or dull surfaces.
Cleaning the Exhaust Filter (Model M438 only)
The aluminum mesh exhaust filter should be removed and cleaned frequently, at
least once a month. Disconnect power to the oven at the circuit breaker panel or
by unplugging.
1. Remove grease filter, grasp the "finger hold" on
the filter and slide to the rear. Then pull filter
downward and to the front. The filter will drop L
out.
2. Soak filter in a sink or bucket filled with hot
water and detergent. DO NOT use ammonia or
clean in an automatic dishwasher. Ammonia and
dishwasher detergent darken aluminum.
3. Agitate and scrub filter to remove embedded
dirt and grease.
4. Rinse thoroughly and shake to dry.
5. To replace grease filter, slide the filter in the frame slot on the back of the opening.
Pull filter upward and to the front to lock into place.
Never operate your hood without the filters in place. In situations where flaming
might occur on surfaces below the hood, the filters will retard the entry of flames
into the unit,
NOTE: Filters should be cleaned at least once a month.
31
Page 30

Replacing the
Light Bulbs
Replacing the Cooktop/
Night Light Light Bulb
1. Disconnect power to the oven at the
circuit breaker panel or by unplugging. Ill _lllllllh_,_
2. Remove screw on right side of light
compartment cover and lower cover until
3. Be sure bulbs to be replaced are cool
before removing. Break the adhesive seal
,,s,o s
by gently unscrewing the bulbs.
4. Removebulbs and replace with 40-watt incandescent bulbs (part number 747001)
available from any authorized Jenn-Air Parts Distributor. High intensity 40-watt
bulbs (40SllN/1) which are available in supermarkets and hardware stores may
also be usedfor replacements.
5. Raise light compartment cover and replace screw.
6. Connect electrical power to microwave oven.
Replacing the Oven Interior Light
1. Disconnect power at main fuse or circuit
breaker or pull plug. ------
2. Remove the top grill by taking out 2 _ I_
screws that hold it in place. / _l
3. Remove the single screw located above
door near center of oven that secures
lamp housing.
4. Replace burned out bulbs with a 30 watt ,
appliance bulb (part number 747000)
available from any authorized Jenn-Air
Parts Distributor.
L
5. Replace the lamp housing and the top
grill.
6. Connect electrical power to microwave II
oven.
32
I'%
Page 31

Before You Call
for Service
r
Check the following list to be sure a service call is really necessary. A quick
reference of this manual as well as reviewing additional information on items
to check, may prevent an unneeded service call.
If nothing on the oven operates:
• check for a blown circuit fuse or a tripped main circuit breaker.
• check if oven is properly connected to electric circuit in house.
• check that controls are set properly.
If control panel lights, yet oven will not start:
• door is not securely closed.
• Start Pad must betouched after entering cooking selection.
• another selection entered already in oven and Cancel/Off Pad not touched to
cancel it.
• make sure you haveentered cooking time after touching Time Cook Pad.
• Cancel/Off Pad was touched accidentally. Reset cooking program and touch
Start Pad.
• temperature probe not inserted properly nor not being used during Probe Code
or Temp Cook.
• make sure you haveentered a desired finished temperature after touching Temp
Cook & HoldPad.
If "ERROR" appears on display:
• a temperature less than 90°F. or more than 199°F. has been entered.
• weight is incorrect for Auto Defrost. It is necessary to reset oven.
• a valid clock time was not entered.
If "PROBE" appears on display:
• probe has been forgotten or not seated properly in oven wall when using Temp
Cook & Hold or Probe Code functions.
If the oven interior light or cooktop light does not work:
• the light bulb is loose or defective.
If oven floor is hot:
• this is normal. The floor is absorbing heat from the food.
If interior of oven collects moisture:
• this is normal. Food gives off moisture when cooking and the steam collects
on the door and the oven surface. Wipe excess moisture from oven after each
use.
If the exhaust fan does not work:
• check for a blown fuse or a tripped circuit breaker.
• check if oven is properly connected to electric circuit in house.
If the exhaust fan starts automatically:
• check for high temperature cooking on the cooktop or in the range below. (See
Safety Precautions for exhaust fan.)
34
Page 32

If foods are either overcooked or undercooked:
• cooking times may vary because of starting food temperature, food density or
amount of foods in oven.
• incorrect power level entered. Check Cookbook for recommended power level,
or changing levelsduring cooking if necessary.
• dish was not rotated, turned or stirred. Some dishes require specific instructions.
Check Cookbook or recipe for instructions.
• too many dishes in oven at same time. Cooking time must be increased when
cooking more than one food item.
• probe not inserted properly into meat or dish when using Temp Cook & Hold
or Probe Code functions.
If You Need Service
• call the dealer from whom your appliance was purchased or the
authorized Jenn-Air Service Contractor listed in the Yellow Pages.Your
Jenn-Air Service Contractor can provide better and faster service if you
can accurately describe problems and give model and serial number
of the appliance. Be sure to retain proof of purchase to verify warranty
status. Refer to WARRANTY for further information of owner's
responsibilities for warranty service.
• if the dealer or service company cannot resolve the problem, write to
MAYCOR Parts and Service Co., P.O. Box 2370, Cleveland, TN 37320-
2370,615-472-3333.
• useand care manuals, service manuals, and parts catalogs are available
from MAYCOR for a nominal charge.
All specifications subject to change by manufacturer without notice.
35
 Loading...