

Page 1
1. SAFETY
IMPORTANT SAFETY
INSTRUCTIONS
When using electrical appliances, basic safety precautions should be followed,
including the following:
WARNIN--G_ To reduce the risk of burns, electric shock,
fire, injury to persons or exposure to excessive microwave energy:
I Read all instructions before using the appliance.
2. Read and follow the specific "PRECAUTIONS TO AVOID POSSIBLE
EXPOSURE TO EXCESSIVE MICROWAVE ENERGY" found on Page 2.
3. This appliance must be grounded. Connect only to properly grounded
outlet. See "GROUNDING INSTRUCTIONS" on Pages 3 & 4.
4. Install or locate this appliance in accordance with the provided installation
instructions.
5 Some products such as whole eggs and sealed containers--for example,
closed glass jars--may explode and should not be heated in this oven.
6 Use this appliance only for its intended use as described in this manual.
7. As with any appliance, close supervision is necessary when used by
children.
8. Do not operate this appliance if it has a damaged cord or plug, if it is not
working properly, or if it has been damaged or dropped.
9. This appliance should be serviced only by qualified service personnel.
Contact nearest authorized service facility for examination, repair or
adjustment.
10. Do not cover or block any openings on the appliance.
11. Do not use outdoors.
12. Do not immerse cord or plug in water.
13. Keep cord away from heated surfaces.
14. Do not let cord hang over edge of table or counter.
15. When cleaning surfaces of door and oven that come together on closing
the door, use only mild, non-abrasive soaps or detergents applied with a
sponge or soft cloth.
16. To reduce the risk of fire in the oven cavity:
a. Do not overcook food. Carefully attend appliance if paper, plastic, or
other combustible materials are placed inside the oven to facilitate
cooking. Avoid using recycled paper products. Such products
sometimes contain impurities which could ignite.
b. Remove wire twist-ties from paper or plastic bags before placing bag in
oven.
c If materials inside the oven should ignite, keep oven door closed, turn
oven off, and disconnect the power cord, or shut off power at the fuse
or circuit breaker panel.
SAVE THESE INSTRUCTIONS
Page 2
Precautions To Avoid Possible
Exposure To Excessive
Microwave Energy
a. Do not attempt to operate this oven with the door open since open door
operation can result in harmful exposure to microwave energy. It is
important not to defeat or tamper with the safety interlocks.
b. Do not place any object between the oven front face and the door or
allow soil or cleaner residue to accumulate on sealing surfaces.
c. Do not operate the oven if it is damaged. It is particularly important that
the oven door close properly and that there is no damage to the: (1) door
(bent), (2) hinges and latches (broken or loosened), (3) door seals and
sealing surfaces.
d. The oven should not be adjusted or repaired by anyone except properly
qualified service personnel.
REGISTRATION
Federal law requires registration of all microwave ovens. To comply with the law,
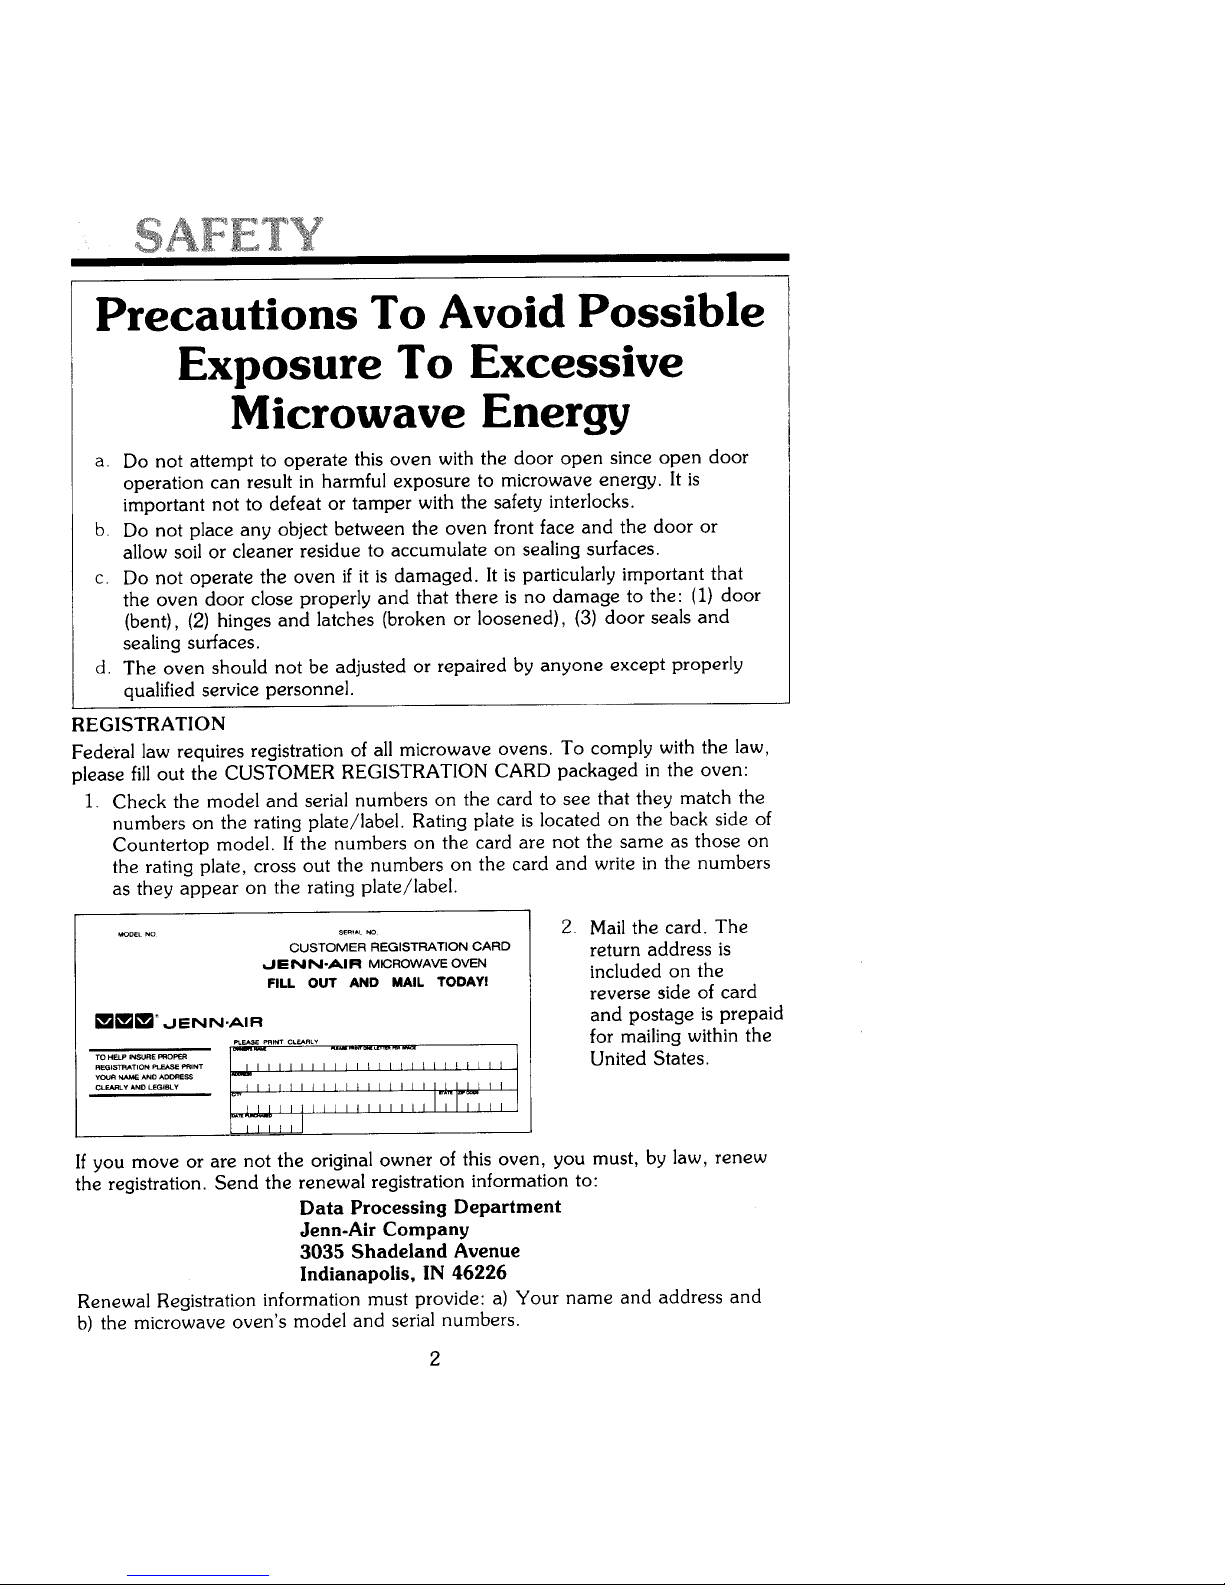
please fill out the CUSTOMER REGISTRATION CARD packaged in the oven:
1. Check the model and serial numbers on the card to see that they match the
numbers on the rating plate/label. Rating plate is located on the back side of
Countertop model. If the numbers on the card are not the same as those on
the rating plate, cross out the numbers on the card and write in the numbers
as they appear on the rating plate/label.
............. 2. Mail the card. The
CUSTOMER REGISTRATION CARD return address is
,J,=NN-AIR M,_ROWAVEOVEN included on the
FILL OUT AND MAIL TODAYI
reverse side of card
[]_m ,,JsNN-AIR and postage is prepaid
for mailing within the
........... United States.
nr_s're_TiONPLe...se_,.rr .._..I I I I I I I I I I t 1 I i ] i I I I _ [ [ l
your NA_ _O A_.SS
_ L I I I I I I I I I I I I I
If you move or are not the original owner of this oven, you must, by law, renew
the registration. Send the renewal registration information to:
Data Processing Department
Jenn-Air Company
3035 Shadeland Avenue
Indianapolis, IN 46226
Renewal Registration information must provide: a) Your name and address and
b) the microwave oven's model and serial numbers.
Page 3
ADDITIONAL SAFETY PRECAUTIONS
• Do not operate the oven when empty.
• The removable glass tray MUST ALWAYS BE IN PLACE WHEN oven
is in use.
• Do not lean on the oven door. The door is designed to close tightly and
seal properly for safe operation. Leaning on the door may warp or break
the hinges.
• To avoid exposure to dangerous high voltage, DO NOT REMOVE THE
OUTER CASE.
INSTALLATION
Before you install and use your new microwave oven, check it for possible
concealed shipping damage. If damage has occurred, immediately report it to your
authorized dealer. Do not attempt to operate the oven.
Free movement of air to and from the microwave oven is required to keep the
magnetron and other electrical components cool as well as to remove moisture
from the oven during cooking. Vents and intakes for air movement must be kept
clean and unobstructed. Air intakes and vents are located as follows:
Air intake underneath oven. Do not remove legs or obstruct air flow beneath
unit.
Air vents across top of oven. Do not cover or obstruct vent openings.
GROUNDING INSTRUCTIONS
This appliance must be grounded. In the event of an electrical short circuit,
grounding reduces the risk of electric shock by providing an escape wire for
the electric current. This appliance is equipped with a cord having a grounding wire
with a grounding plug. The plug must be plugged into an outlet that is properly
installed and grounded.
WARNIN _ Improper use of the grounding plug can result in
a risk of electric shock.
Consult a qualified electrician or serviceman if the grounding instructions are not
completely understood, or if doubt exists as to whether the appliance is properly
grounded.
Use of an extension cord is not recommended, but if it is absolutely necessary to
use an extension cord, use only a 3-wire extension cord that has a 3-blade
grounding plug, and a 3-slot receptacle that will accept the plug on the appliance.
The marked rating of the extension cord shall be equal to or greater than the
electrical rating of the appliance.
Page 4
SAFETY
Where an electrical wall receptacle is encountered which will accept only a two-
prong plug, it is the personal responsibility and obligation of the owner to
contact a qualified electrician and have the outlet replaced with a properly
grounded and polarized receptacle for a three-prong, grounding plug. Such
receptacle must also meet local electrical codes, if applicable, and/or the National
Electrical Code.
If local codes permit, a temporary connection may be made to a properly
grounded and polarized, two-prong outlet using an adapter. Note, however, that
attaching the adapter grounding terminal to the outlet cover screw will not ground
the oven unless the outlet itself is grounded through the house wiring. Proper
grounding and polarization for the use of a temporary adapter are the personal
responsibility and obligation of the owner.
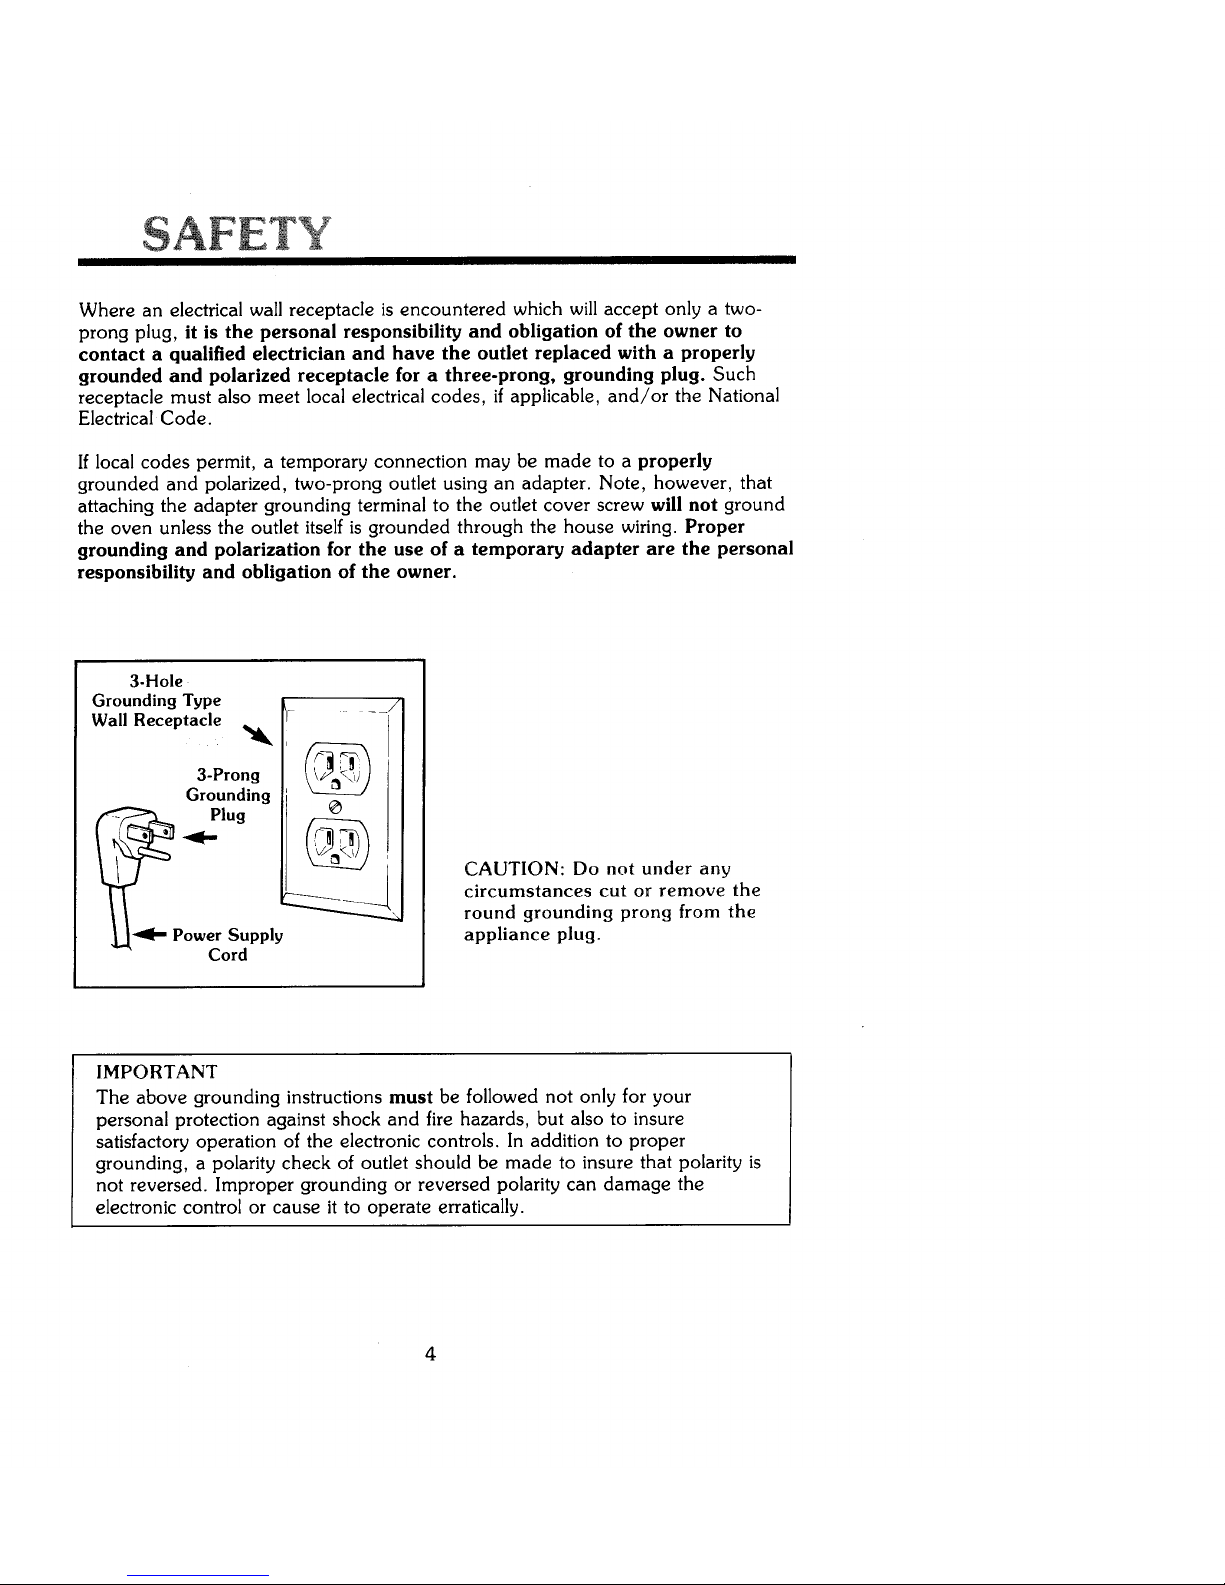
3-Hole
Grounding Type
Wall Receptacle /..... /
3-Prong
Grounding
circumstances cut or remove the
round grounding prong from the
L_91- Power Supply appliance plug.
Cord
i
IMPORTANT
The above grounding instructions must be followed not only for your
personal protection against shock and fire hazards, but also to insure
satisfactory operation of the electronic controls. In addition to proper
grounding, a polarity check of outlet should be made to insure that polarity is
not reversed. Improper grounding or reversed polarity can damage the
electronic control or cause it to operate erratically.
4
Page 5
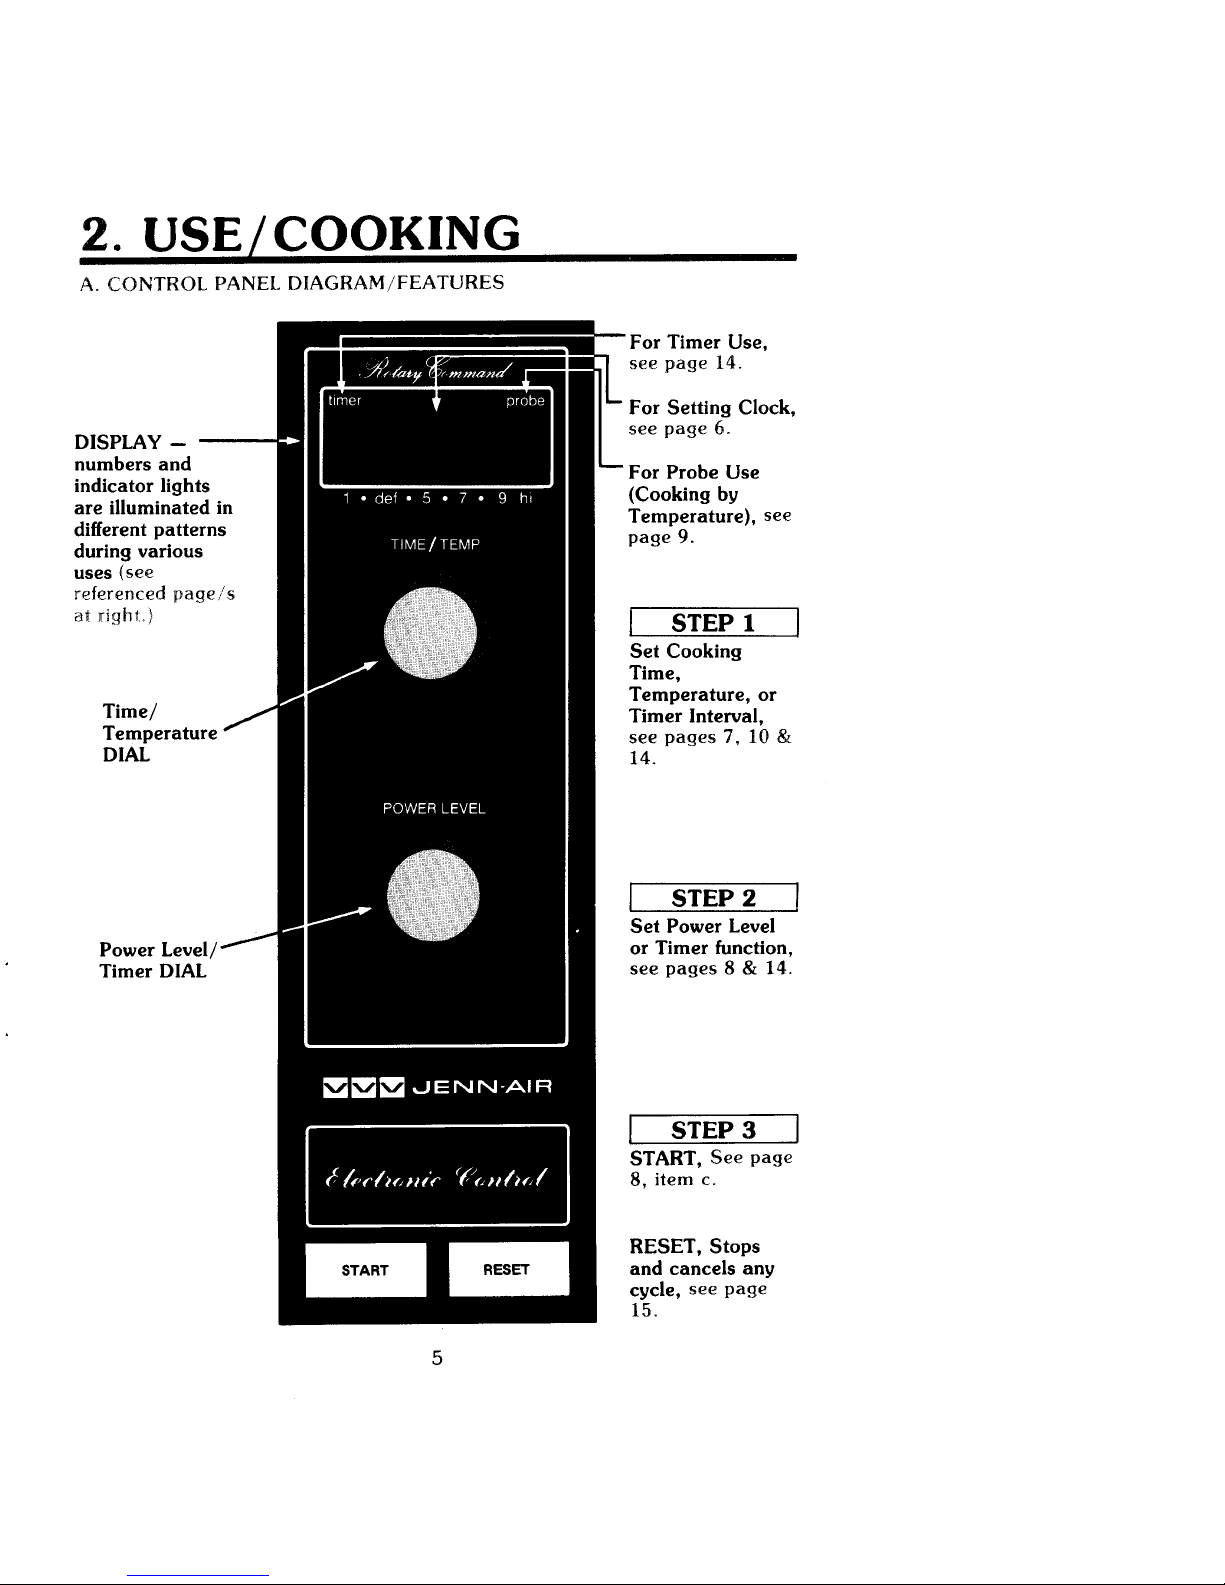
2. USE COOKING
A. CONTROL PANEL DIAGRAM/FEATURES
Timer Use,
see page 14.
For Setting Clock,
DISPLAY -- see page 6.
numbers and
indicator lights For Probe Use
are illuminated in (Cooking by
different patterns Temperature), see
during various page 9.
uses (see
referenced page/s
at r_h_:o_ ] STEP 1 I
Set Cooking
Time,
Time/ Temperature, or
Timer Interval,
Teml see pages 7, 10 &
DIAL 14.
[ STEP 2 j
Set Power Level
Power Level or Timer function,
Timer DIAL see pages 8 & 14.
I STEP 3 I
START, See page
8, item c.
RESET, Stops
START RESET and cancels any
cycle, see page
15.
5
Page 6
B. CLOCK
This oven has an electronic clock which will display the time-
of-day any time the oven is not set for a cooking or timer
operation.
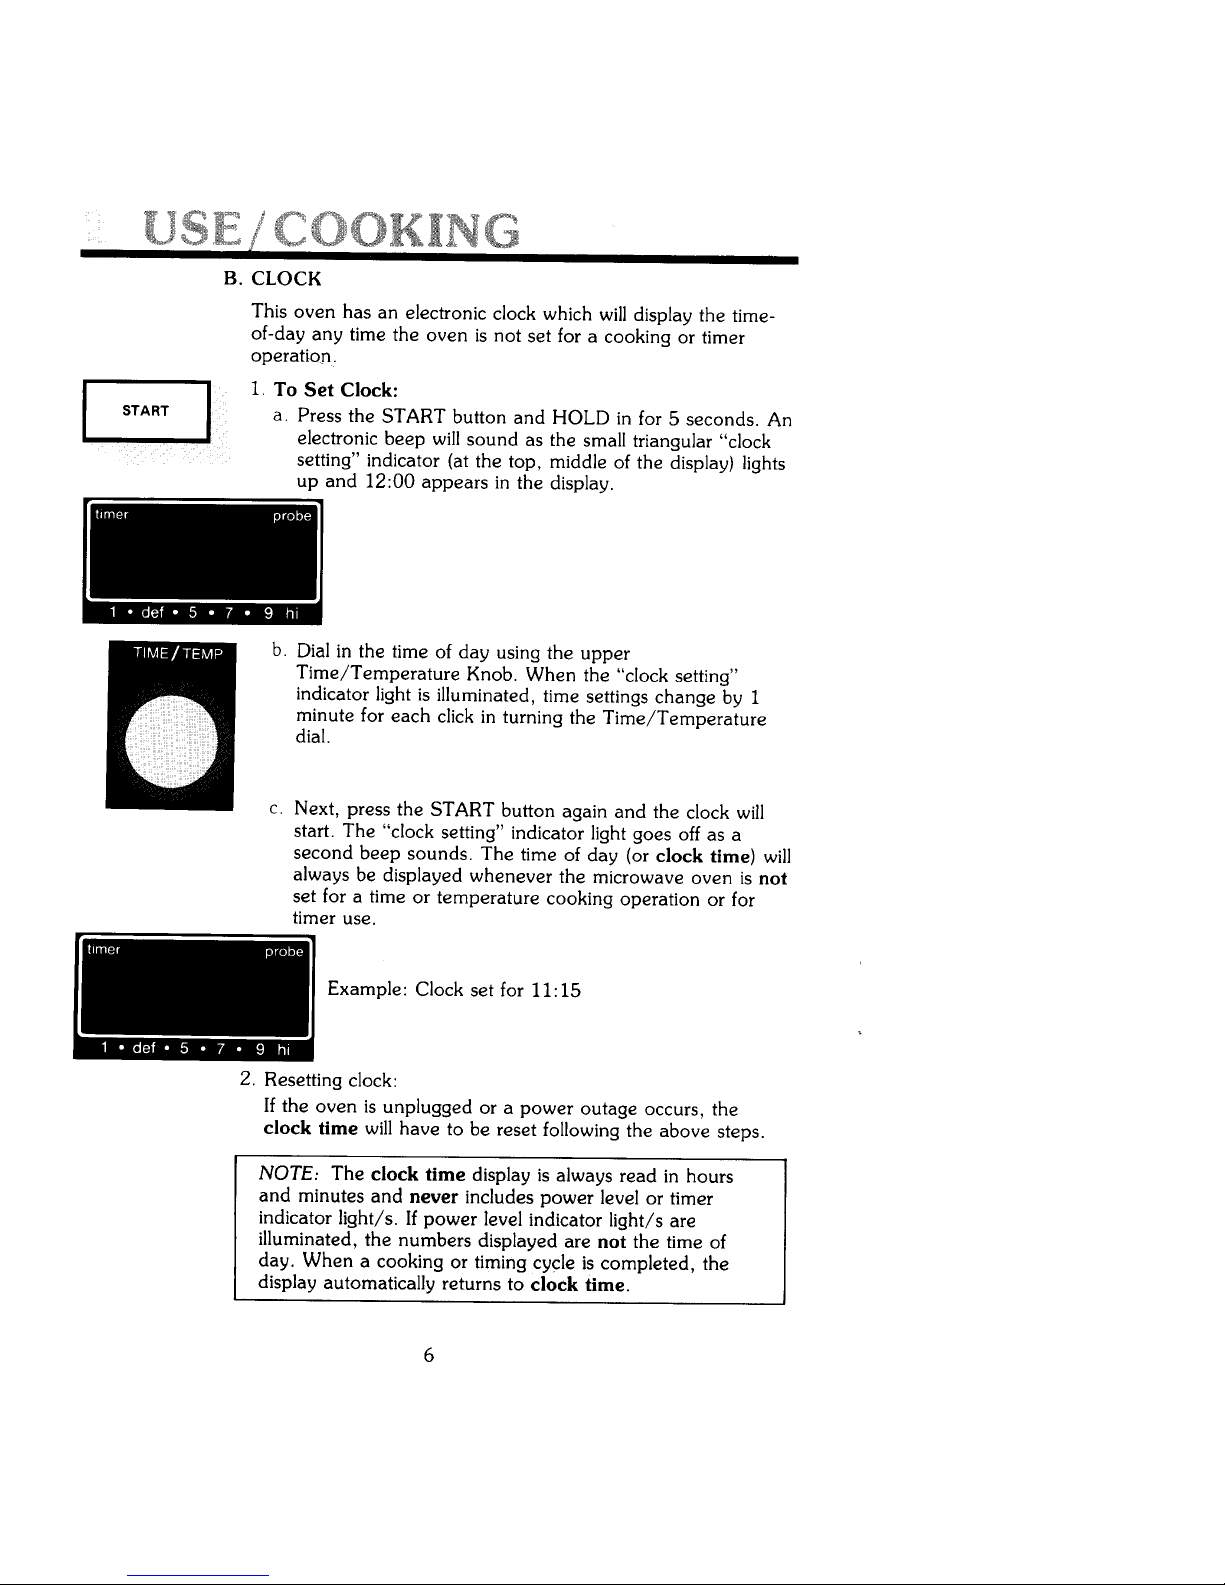
I START I = l T° Set Cl°ck:
a. Press the START button and HOLD in for 5 seconds. An
electronic beep will sound as the small triangular "clock
setting" indicator (at the top, middle of the display) lights
up and 12:00 appears in the display.
timer probe
1 •def • 5 • 7 • 9 hi
b. Dial in the time of day using the upper
Time/Temperature Knob. When the "clock setting"
indicator light is illuminated, time settings change by 1
minute for each click in turning the Time/Temperature
dial.
c. Next, press the START button again and the clock will
start. The "clock setting" indicator light goes off as a
second beep sounds. The time of day (or clock time) will
always be displayed whenever the microwave oven is not
set for a time or temperature cooking operation or for
timer use.
timer probe
1 • def ° 5 • 7 • 9 hi
Example: Clock set for 11:15
2. Resetting clock:
If the oven is unplugged or a power outage occurs, the
clock time will have to be reset following the above steps.
NOTE. The clock time display is always read in hours
and minutes and never includes power level or timer
indicator light/s. If power level indicator light/s are
illuminated, the numbers displayed are not the time of
day. When a cooking or timing cycle is completed, the
display automatically returns to clock time.
6
Page 7

C. TIMED COOKING
1. Basic Instructions
a. Place food in oven and close door.
b. Set desired cooking time. (upper dial)
c. Set desired power level. (lower dial)
d. Press START button.
2. Detailed Operation
[_ a. In setting cooking time, the time displayed is always read
in minutes and seconds. It increases or decreases with
decrease increase each small click of the upper, Time/Temperature dial.
Turn the dial to the right (clockwise) to increase or to
the left (counterclockwise) to decrease:
Display changes by
5 seconds from 0 seconds to 2 minutes
(00:00) (02:00)
I0 seconds from 2 minutes to 10 minutes
(02:00) (I0:00)
30 secondsfrom 10 minutes to 20 minutes
(I0:00) (20:00)
1 minute from 20 minutes to 99 minutes
(20:00) (99:00)
Remember, cooking time settings are always in minutes
and seconds (unlike clock time). Display must always
include at least one illuminated power level indicator light
for cooking. As soon as the Temperature/Time dial is
turned to the right (clockwise), the display changes to
cooking time and power level indicator light/s illuminate.
Note that turning the Temperature/Time dial to the left
(counterclockwise) initially will not change the displayed
clock time.
b. The power level indicator light/s illuminate when cooking
time is displayed according to the position of the lower
(Power Level/Timer) dial. If, for example, previous use
of the oven was at full power (lower dial set fully to the
right--clockwise) all of the power level indicator lights
illuminate upon setting the cooking time. Or, if the
previous use of the control was for interval timing only (0
power level), the small triangular timer indicator light
illuminates upon setting cooking time. So, you should
always set power level unless the last level used is
acceptable.
Page 8

USE/
POWER LEVEL
b. To set power level:
Turn the lower (Power Level/Timer) dial to the desired
power level. The power level indicator lights provide a
visual bar graph. Power level may be changed at any
point during a cooking cycle.
Note: Turning the lower (Power
Level/Timer) dial when the display
shows clock time (or is not set for
cooking) does not affect the power
level indicator ',;,ghts,
Power Power
Level %
1 10%
• 20%
def defrost
• 40%
5 50%
• 60%
7 70%
• 80%
9 90%
h_ 100% (full)
TIMER (0 %)
(See Item G, page 14)
See Item E, page 12, for suggested power level uses and
some additional information on power level selection.
c. With food placed in oven and door closed, press START
button and cooking begins. The oven light automatically
turns on when cooking starts and will remain on until the
cooking cycle is completed. A short beep signals the end
of the cooking time.
Note also that the oven light comes on any time the door
is opened and goes off when the door is closed. If the
door is not securely closed, the oven light remains on
even though the oven is not being operated. The oven
light does not come on during a timer cycle.
8
Page 9

D. TEMPERATURE (PROBE) COOKING
1 Basic Instructions
a. Insert Probe (sharp tip) into food.
b. Place food in oven and insert probe (plug end) into
receptacle.
c. Set desired cooking temperature. (upper dial)
d. Set desired power level. (lower dial)
e. Press START button.
-_ Note: Be sure to use the upper, rear
y receptacle if model is equipped
your
with accessory receptacle. Probe plug
will not fit the lower, front, accessory
receptacle.
2 Detailed Operation
Use of the probe allows cooking by temperature and can
take uncertainty out of microwave cooking times,
particularly if you have limited experience with microwave
cooking times for some foods. The probe automatically
monitors the internal temperature of food and turns the
oven off or goes into a HOLD operation [see (2), page 11]
when food reaches the desired temperature.
The probe can be used when cooking, reheating or warming
foods at any of the power level settings.
a. Probe Placement
(I) The first 1/2 inch of the sharp tip of the probe
contains the temperature sensor. The probe should
always be inserted into solid foods with this tip located
as close to the center of the food as possible. For
roasts or whole poultry, the probe's sharp tip should
be placed into the thickest part of meat away from
fatty portions and not touching any bone.
(2) It is usually better to place the sensor tip of the probe
in food before inserting its plug end into the
receptacle located in the right hand oven wall. When
the probe is plugged into the receptacle, the display
automatically changes to the lowest or minimum
temperature setting, 100°F. With the probe in place,
the display will always show the degree (o) symbol
and the letter F for Fahrenheit.
Page 10

E ING
b. Setting Temperature
After probe is properly positioned in the food and
plugged into its receptacle, the desired temperature is set
by turning the upper dial (TimeTemperature). Displayed
temperature increases or decreases by 5°F for each click
when turning the dial.
The maximum temperature setting is 195°F. The probe
must be in place before a temperature can be set. (See
below [d.] for differences in operations with temperature
settings below 140°F and at 140°F or above.)
See Suggested Probe Temperature Setting Chart, item 4,
page 12.
c. Setting Power Level
Power level is set in the same manner as described for
timed cooking, Item C.2.b., page 8.
NOTE: As with timed cooking, one or more of the 10
power level indicator lights must be illuminated for cooking
to take place. However, unlike timed cooking, the
triangular, timer indicator light will not illuminate at the
"zero power level" because the display is locked into
temperature (°F) readings only when the probe is plugged
in. So, be sure in using the probe (cooking by temperature)
that power level lights are illuminated, or no cooking will
occur.
The power level may be changed at any point during a
temperature cooking cycle. Also see Item E, page 12, for
additional information on power level selection.
d. Probe Operations
(1) For temperature settings below 140°F: with probe
properly placed, food in oven, desired end
temperature and power level set, press START
button and cooking begins. Depending on the initial
temperature of the food, display will show actual
internal temperature (not applicable to setting) or
-95°F, indicating that food temperature is below
the minimum set temperature (100°F).
10
Page 11

As food reaches the desired, preset temperature, the
display goes blank and an electronic beep signals the
end of cooking. Note that the last temperature
displayed before the beep will always be 5°F below
the desired preset temperature. As the 3-second
beep ends, the desired preset temperature reappears
and will remain in the display until the probe is
unplugged from its receptacle.
(2) For temperature settings of 140°F and above:
The operation of the oven is the same as described
above up to the end of the 3-second beep which
signals the end of cooking. For desired, preset
temperature of 140°F or higher the probe "Hold"
feature operates automatically: at the end of the
3-second beep, "Hold" will appear in the display and
the oven will automatically cycle off and then on (for
short intervals) to keep food at the desired, preset
temperature.
This "Hold" operation will continue until you turn the
oven off. For best results, generally, foods should not
be kept in a "Hold" operation for more than an
hour. Note that the temperature setting cannot be
changed after "Hold" appears in the display.
3. Probe Handling, Precautions and Suggestions
a. To prevent harm to the oven, do not leave the
temperature probe in a dry utensil or operate the oven
when probe is in a dry utensil.
b. After cooking is completed remove the probe from its
receptacle. Then use a potholder to remove the probe
from the food since the probe itself may be hot.
¢. Clean the probe in warm soapy water. Do not clean it in
dishwasher.
d. Do not store the probe in the oven when it is not in use.
e. Do not defrost with the probe. It should be used only for
cooking.
f. Do not use the probe for conventional cooking or in any
other appliance. It was designed for use in this microwave
oven only.
11
Page 12

4. Suggested Temperature Settings for Probe Cooking
Temperature
Setting Some Suggested Use/s
100 105 ° Warming baby food (stir and test before serving), dips,
baked goods and precooked ham.
110 1_15° Warming sandwiches, spreads and liquid for yeast bread
(using traditional breadmaking method.)
120 125 ° Reheating pancakes, waffles, French toast and pudding;
cooking beef to rare doneness; heating liquid for yeast
bread (using rapidmix breadmaking method.)
130 135 ° Heating cheese-based dips; for rare or medium doneness
of sliced meats; reheating precooked meats other than
ham; warming syrups or ice cream toppings.
]40 !45° Heating milk-based soups, sauces or beverages, cooking
beef to medium doneness; warming leftovers containing
critical or delicate ingredients.
150-155 ° Heating canned vegetables, leftovers, individual meal plates
(do not use aluminum TV dinner tray when cooking with
temperature probe); to reheat well done meats, pasta and
rice dishes; for cooking beef to well done.
160 ] 65 ° Heating water-based soups, sauces and beverages; heating
main dishes or casseroles, fruit dishes and gravy; cooking
ground beef dishes such as chili, meatloaf or stuffed green
peppers; cooking veal or lamb to medium doneness.
170 175 ° Cooking poultry, pork, fresh ham, veal and game to well
done.
180 185 ° Cooking lamb, ground pork or ham-based dishes to well
done.
190- 195 ° Heating water for gelatin dishes, scalding milk.
E. POWER LEVEL
The Power Level/Timer Dial, as described on page 8, Item
C.2.b., is used to set or change power level. The Power Level
Settings provide a choice of cooking speeds. At hi or full
power the magnetron is on 100% of the time. As power level
is reduced the magnetron cycles on for shorter periods of time
and is off for longer periods.
As with conventional cooking, different cooking rates are used
for different foods, recipes or cooking methods. Since
microwave cooking is much faster than conventional cooking
methods, changes in power level settings take effect quickly.
POWER LEVEL
0
12
Page 13

For example, in cooking a sauce in the microwave oven at hi
or full power, boiling starts quickly and within a relatively short
time the sauce could boil over, but by turning power level
down, the boiling can be quickly reduced. Since power level
affects cooking speed, remember that you may need to
increase cooking time to some extent as power level is
reduced.
The power level may be changed at any time during cooking
by turning the Power Level/Timer knob. Note again that no
cooking can take place unless at least one of the power level
indicator lights is lit; with timer indicator light illuminated or no
power level indicator lights illuminated, power level is at zero.
The following chart will provide you with some suggested uses
of different power levels:
Power Power Suggested
Leve_ • Uses
Keeping food/s warm or taking chill off refrigerated
I 10 foods before serving.
• (21, 20 Softening cheese, butter or chocolate.
30 Defrosting (See item F., page 14), tenderizing tougher
def_3) defrost cuts of meat in liquid, or cooking dried beans, lentils, or
peas in water; for second stage* cooking of beef roasts.
• (4) 40 Stewing or developing flavor in main dishes, soups or
sauces; cooking rice or pasta (after water is boiling).
Reheating larger amounts of leftovers; for second stage*
.5 50 cooking of pork roasts.
Reheating leftovers or for cooking recipes using
• (6) 60 precooked or canned ingredients.
7 70 For cakes, quick breads and muffins.
For whole poultry, cheese and egg dishes; cooking
• (8) 80
certain seafoods (clams, oysters or scallops.)
9 90 Sauteing vegetables.
hi 100 For quick reheating (observe closely to avoid
full overcooking) or generally for quickest cooking; first
stage" (10 minutes) for beef and pork roasts.
•American Meat Board recommendation: for best results in cooking roasts
use two cooking stages: 1st stage, 10 minutes at hi; 2nd stage, to
completion at reduced power level 3 for beef and 5 for pork. Also refer to
item 4, page 12, Suggested Temperature Settings for Probe Cooking.
13
Page 14

F. DEFROSTING
The defrost setting is marked by the small triangle between
power levels 2 and 4 on the power level scale. To defrost, turn
the Power Level dial until the 3 indicator lights, above and to
the left of the defrost (triangle) position, are illuminated. This
setting is the optimum setting for defrosting most frozen foods
as quickly as possible while minimizing the chance that food
will begin to cook. Refer to cookbook for special defrosting
techniques and alternate defrost settings, suggestions and
handling procedures.
POWER LEVEL
0
G. TIMER
The oven control allows for timing any interval up to 99
minutes by turning the Power Level/Timer dial to the extreme
left (counterclockwise) to the Timer position. At this point the
small triangular timer indicator light at the top left of display is
illuminated. Next simply dial in the desired time interval (as
described for setting timed cooking) with the upper,
Time/Temperature dial.
TIME/TEMP
0
NOTE: The Timer setting is always distinguished by illumination of the
Timer indicator light. No cooking takes place during a Timer cycle. The
oven light, fan and power (magnetron) are locked out and cannot come
on as long as the timer indicator light is illuminated at the beginning of
a timer cycle.
However, if a timed cooking cycle is started and the power level is then
turned down until the triangular timer indicator light comes on, the
oven light will stay on, the fan will continue to run and the power level
may be turned up again to continue cooking.
Remember: the timer cannot be used when the probe is
plugged into its receptacle since this locks out time, allowing
temperature display only.
When using the timer, opening the door will interrupt the timer
countdown. To restart the timer, close the door and press the
START button.
14
Page 15

H. RESET BUTTON
Any operation may be cancelled at anytime by pressing the
RESET button. If the RESET button is pressed during an
operating cycle, the cycle is stopped and the display
automatically returns to a clock time or time-of-day display or
to the original 100°F if probe is in place.
The RESET button should not be used to momentarily
interrupt an operation but only to cancel it. Pressing the
RESET button will always stop and cancel the current
operation.
I. INTERRUPTING A CYCLE
For checking progress, stirring, turning, or handling food,
interrupt the cycle by simply opening the door. The remaining
cooking time continues to be displayed while the door is open,
or if the probe is in place, the original set temperature is
displayed. The cycle may be changed while the door is opened
by simply dialing a new setting. When ready to continue the
cycle, close the door and press the START button.
J. CHANGING SETTINGS
I. For Timed Cooking Cycle--A change may be made during
a cycle, without interrupting cooking, or after interrupting
cooking, by opening the oven door. Simply dial in a
different time, either longer or shorter. If cycle is not
interrupted, the new cooking time countdown will start
immediately when you stop turning the dial. If you interrupt
the cycle (by opening the door) you must press the START
button after closing the door again to continue cooking.
2. Temperature (Probe) Cycle--A change cannot be made
during operation of temperature (probe) cycle. By turning
the upper dial, during operation you may recall the current
temperature setting for 3 seconds, but the display will
automatically return to the actual temperature after 3
seconds. Further turning of the dial during an operating
cycle will have no effect on the temperature setting. You
must open the door before making a temperature change.
To change a temperature setting, after opening door, simply
turn the upper dial to increase or decrease the original
temperature setting. To continue cooking, close the door
and press the START button again.
15
Page 16

3. CARE CLEANING
One of the major conveniences of your microwave oven is its
ease of cleaning. Since the oven interior remains cool during
many cooking operations, soil will not bake on the oven walls.
Foods that spatter during cooking can be covered with paper
towels to prevent soiling oven interior.
Clean the oven interior with a solution of mild dishwashing
detergent and water, rinse and dry. To loosen soil that has
dried on oven walls, place a cup of water in the oven and
allow it to boil for several minutes, then wash with soapy
water, rinse and dry. The glass shelf can be removed from the
oven and cleaned at the sink. Always place the side of glass
shelf with two supports at the front of the oven. Be sure to
replace the shelf after cleaning. DO NOT OPERATE THE
OVEN IF THE GLASS SHELF IS NOT IN PLACE.
DO NOT ALLOW SOIL TO BUILD UP AROUND THE
DOOR SEAL.
Clean the exterior of the oven with a mild detergent and water
or a liquid cleaner. To prevent scratching of the finish, never
use harsh or abrasive cleaning agents on any surface of the
oven.
Do not lean on the oven door while cleaning the oven.
4. SERVICE
A. HOW TO CHANGE THE OVEN LIGHT BULB
Be sure to disconnect power to the oven before replacing the
oven light bulb. Access to the bulb is located through the back
side of the unit. Remove the screw that holds the access cover
plate in place. Then remove the cover plate. Replace bulb with
a 40 watt incandescent appliance bulb. Replace access cover
plate and connect power to the oven. It will be necessary to
reset the Clock Time. See instructions on page 6.
B. USER SERVICE CHECKS
If your microwave oven should become inoperative, check the
following before you call a serviceman:
I. Does the oven light operate? Check to see if bulb needs to
be replaced.
2. Does the oven operate? Check to see if:
a. the power cord is securely plugged into the wall outlet.
b_ the house fuse or circuit breaker is blown or tripped; also,
on Model W204 depress circuit breaker reset switch
located in left hand corner of lower oven control panel. If
circuit breaker continues to trip, call authorized service
contractor as this indicates an electrical problem.
c. the oven door is securely closed.
d. the oven is correctly set.
16
Page 17

e. the air vents are blocked. (Oven may overheat and turn
off if the air vents are blocked. Allow oven to cool one
hour, then restart oven. If oven does not operate after
one hour, service will be required.)
3. Does food take longer to cook than suggested times given in
the cookbook? Voltage in your area may have fluctuated
below the normal operating voltage range. This is referred to
as a "brownout." If the oven is operating on the same circuit
with another appliance, cooking times can be affected when
both units are on at the same time.
Cooking times will also be affected if the glass shelf is not in
place.
If larger amounts of food are placed in the oven than called
for in the recipe, the cooking time will be affected.
If a problem still exists, do not attempt to service the oven
yourself.
C. AUTHORIZED SERVICE
If You Need Service
• call the authorized Jenn-Air Service Contractor listed in
the Yellow Pages or the dealer from whom your appliance
was purchased.
• your Jenn-Air Service Contractor can provide better and
faster service if you can accurately describe problems and
give model and serial number of the appliance. Be sure to
retain proof of purchase to verify warranty status. Refer to
WARRANTY for further information of owner's
responsibilities for warranty service.
NOTE: Complete service information, warranty service
term, and parts list information are available from
the Jenn-Air Company to any qualified appliance
service contractor requesting it.
All specifications subject to change by manufacturer without
notice.
17
 Loading...