

Page 1
INSTALLATION
USE AND CARE MANUAL
HOW THIS GUIDE WILL HELP YOU
This brochure describes everything you need to know to install your new garbage disposer. If you take
your time, follow the clear descriptions and drawings, you should have no trouble making a first-rate
installation. Note: Read through the entire manual before you start installation so you can get all the
tools and materials you will need with one trip to the store.
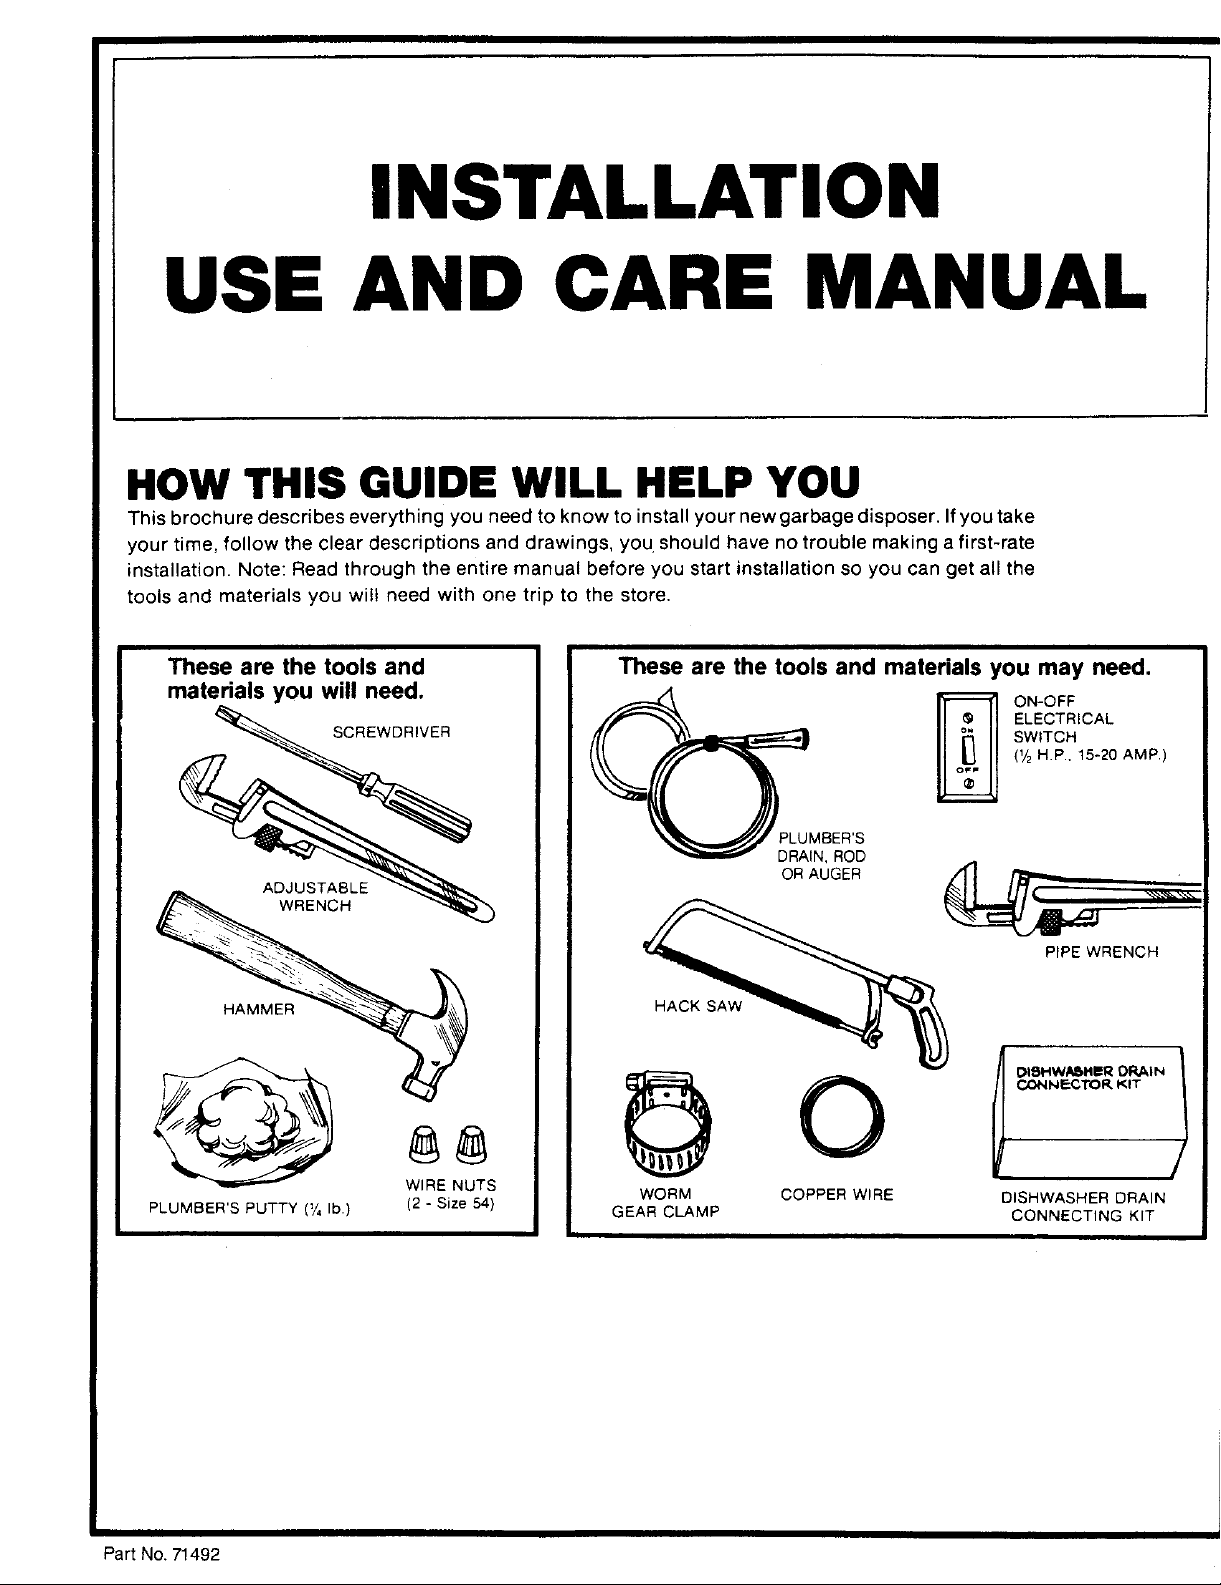
These are the tools and These are the tools and materialsyou may need.
materialsyou will need. __ _SO_iTO!!ICA u
H HACK SAW __/J
x,___% PIPE WRENCH
PLUMBER'S PUTTY (_/4lb.) (2 - Size 54) GEAR CLAMP CONNECTING KIT
MBER'S
(1/2H.P., 15-20 AMP.)
PartNo.71492
Page 2
USE AND CARE OPERATING INSTRUCTIONS
1. Remove drain cover from disposer and turn and water mixture flows at the rate of 2 seconds Replace Stopper in drain position emma-
on a fullflow ofcold water (Water should remain per foot in a horizontal drain line. A minimum of diately (see figs. below) to minimize poe-
on during complete disposing operation). Fail- 15 seconds is recommended, sible ejection of material while grinding.
ure to turn on a full flow ofwater before turning on NOTE:After all the foodwaste has been fed into the
2. Flip switch to ON position to start disposer, the possible ejection of materiel while grinding.
Feed food waste into disposer while it is
operating, TO SEAL SINK FOR DISHWASHING,.. Press
3. To avoid drain pipe blockage allow water to Stopper down, Remove for draining.
flow sufficient time after grinding is completed to
be sureall waste isflushedaway.Groundweste Do'sand Don'ts Stop.r,.in.ra,n,g...po..,o..
cold water
DO grind food waste only with a strong flow of allow it to soli_Of_,then dispose of =tin the trash heard.
DO rindhard materialsuchasbones.fruit pits. DO flush disposer for self-cleansing Allow DON'T become alarmed if a brown discolora- unit was turned off before the grind cycle was
etc_scounngacl_oniscreatedbythepanic_es disposerandcoJdwatettorunaffergnndingor lion appears on the face of the grinding disc completed or not enough water was used Try
inside Of the grind chamber alter draining the sink of dish water Some ThiSi$ normal, _tis a surface discoloration only this remedy, after all remaining food waste is
DO dispose ol coffee grounds in your disposer detergents are caustic: flushing will pass such and will not affect the life or performance of the disposed of inside the unit:
regardless of whether you are on metropolitan malerial into the drain line withoul disposer disposer Heat a targe pan of water lapproximstely 3 to 4
sewer or sepsc tank Coffee grounds wifl not mlurY" DON'T grind extremely fibrous material like quarts) Tothlsaddone-haLfcupofbakingsoCa.
harm the action of the septic tank DON'T use hot water when grir_ding food wasto corn husks, artichokes, etc. to avoid possible When water reaches approximate boiling potht
DO dispose of small amounts of fats and However. hot water can be drained into the drain blockage turn disposer on and pour heated mixture iht£
greases in your disposer Be sure to have the disposer between grinding periods If you should encounter an ob actionable odor sink This hot, swirling, treated water will ther
d=sposer operating and use a strong fJow of co_b DON'T lurn Off motor or water until grinding is coming from your disposer, it may be the water flush the inside ot the disposer housing
waler ff you have a large amount of fat and itself, wh=ch in some areas develops a slight
i i
INSTRUCTIONS PERTAINING TO A RISK OF FIRE, ELECTRIC SHOCK, OR INJURY TO PERSONS
IMPORTANT SAFETY INSTRUCTIONS b, Draincleaner
WARNING: When using electric appliances, b_sic c. Glass, china,or plastic. DANGER - Improper connection of the
precautionsshould alwaysbefollowed,includingthe d, Large wholebones
following: e, Metal, suchasbottlecaps,tincans, oraluminum risk of electric shock. Chock with a qualified
1. Read all the instructions before using the appliance, foil. electrician or serviceman if you are in doubt as
2. TO reduce the risk of injury, close supervision _s Do not modify the plug provided with the
necessarywhen an appliance is used near children 8. When not operating a disposer, leave the drain
3. Do not put fingers or hands into a waste disposer cover in place to reduce the risk of objects falling appliance -- if it will not fit the outlet, have a
4. Turn the power switch to the off position before into the disposer proper outlet installed by a Qualified electrician.
attempting to clear a jam or remove an object from b GROUNDING INSTRUCTIONS FOR PER-
the disposer 9. a. GROUNDING INSTRUCTIONS FOR CORD
5. When attempting to loosen aiam m a waste CONNECTED UNITS. This aplohance must be MANENTLY CONNECTED UNITS: This apple.
disposer, use a self service wrenchette as des- grounded in the event of a ma}function or ance must be connected to a grounded, metal,
cribed below, breakdown, grounding provides a path of least permanent wiring system; or an equipment-
6. When attempting to remove objects from a waste resistance for electric current to reduce the risk grounding conductor must be run with the circuit
disposer use a long-handled tongs or pliers of electric shock If this appliance is equipped conductors and connected to the equipment-
7. To reduce the risk of injury by materials that may be with a cord having an equipment-grounding con - gounding terminal or lead on the appliance.
expelled by a waste disposer, place the stopper in ductor and a grounding p_ug, the plug must be
the drain/grind position when grinding. DO not put plugged into an appropriate outlet that is SAVE THESE INSTRUCTIONS.
the toJJowing into a disposer: properly installed and grounded in accordance
a. Clam or oyster shells, with all local codes and ordinances,
grease, we su pest you place Ltin a container, completed and only a motor and water soundts OdOr at times (Jr it may be Comln from bits of
drain/grind position (eee illustrations) to minimize
i i
food waste left inside the disposer,gbecause the
Mix in thoroughly so it is completely dissolved
equipment-groundingconductorcanresult in a
to whether the appliance is properly grounded.
i i
USER MAINTENANCE INSTRUCTIONS
Trouble Shooting
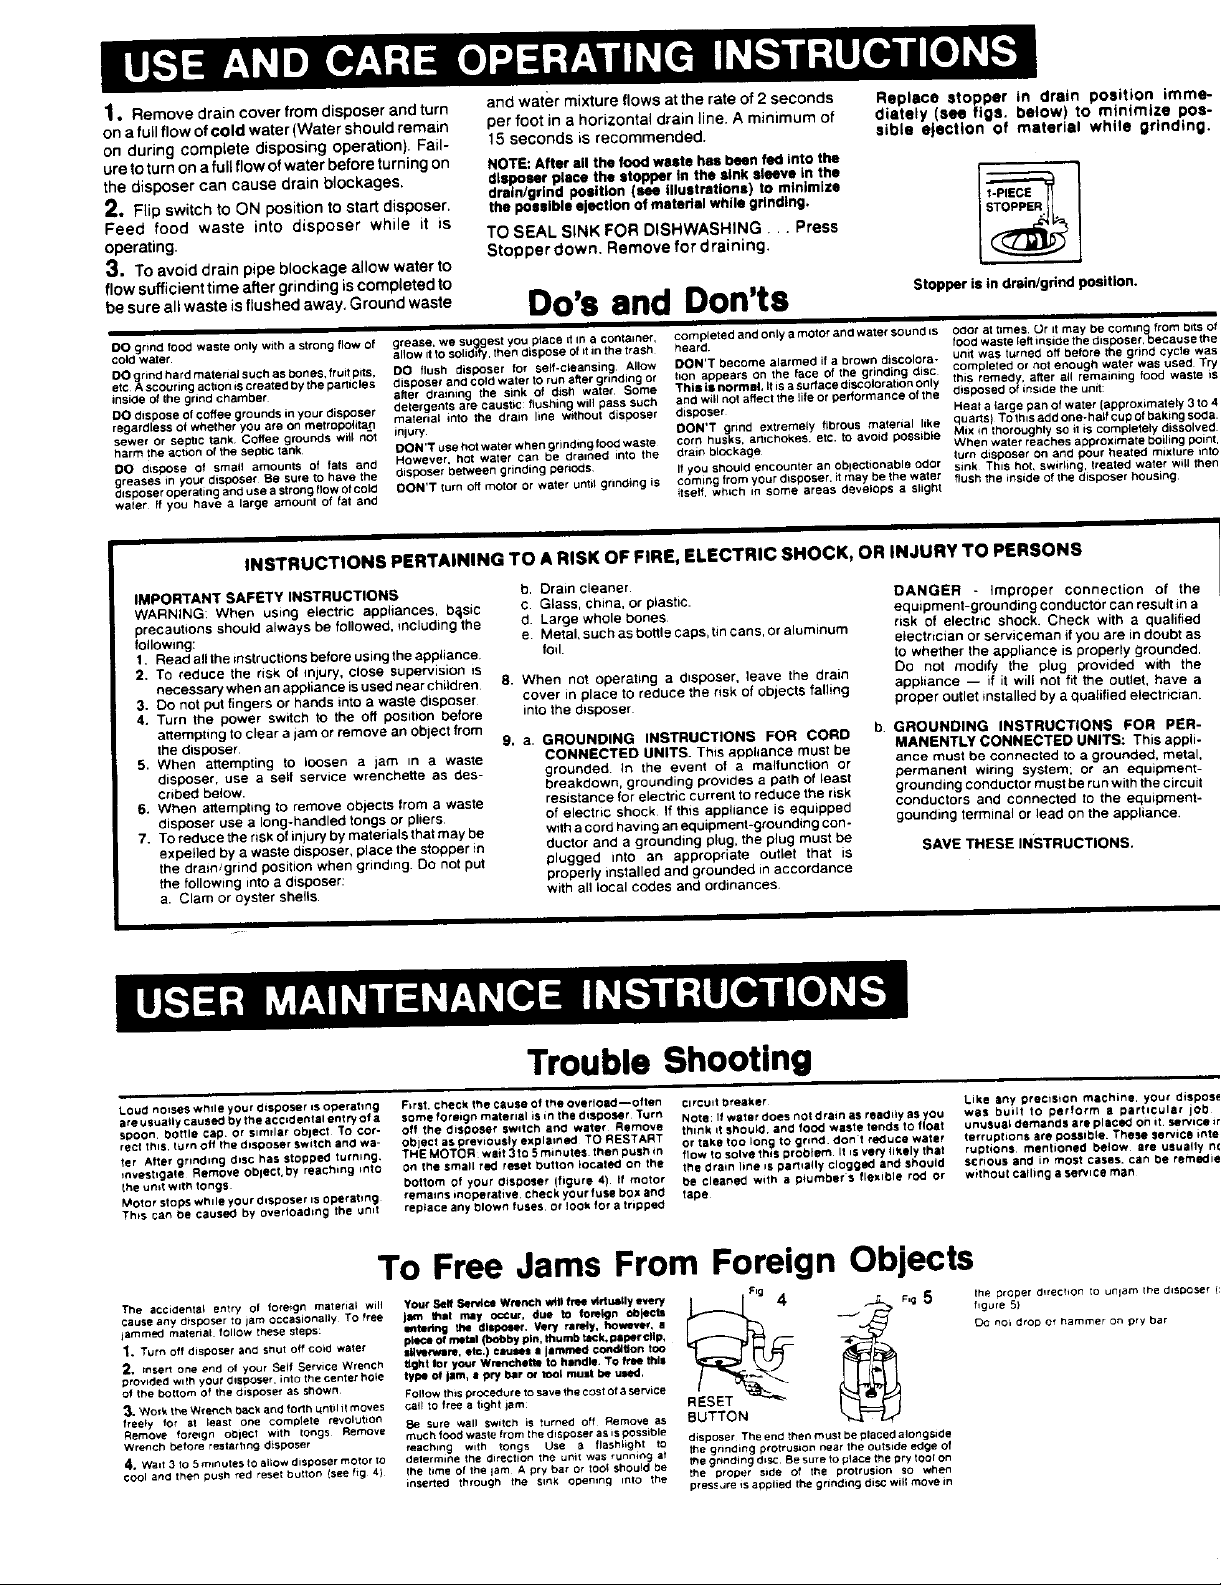
Loud noises while your disposer is operating F_rst. check the CSuSe of the overload--often circuit breaker Like any precision machine, your disboe_
ateusustlycausedbytheacc_dentalenlryofa someforaignmaterialisinthedis_poNr Turn Note If waterdoesnotdrainasreadi_yasyou WSS built tO perlorm e particular job
spoo_bonleca_orsimtlarobfeCt Tocor- offfhedisooserswrtchandwater eemove think lt shouLd, and food waste tends to float unusuaLdemandssreplecedohit, servlceh
rect this. turn off the disposer Switch and we- object as previously explained TO RESTART or take too long to gnntt, don t reduce water terruptions sre possible. These service inta
tar Attar grinding btsc has stopped turmng. THE MOTOR wait 3to 5 minutes, then push in how to solve this problem It JsvePJ likely that ruptions mentioned below are usually nq
_nvesbgste Remove Oblect, by reaching into On the smstt red reset button Iocatelct on the the drain line Jspamagy clogged antt should serious and in most cases, can be rsmediq
the unrt with tongs bottom of your disposer (figure 4) tf motor be cleaned with a plumbers flexible rod or without calling a service man
Motor stops whde ),our disposer is 0perstmg remains inoperative, Check your fuse box afld tape
Th_s can be caused by overloading the unit replace any blown fuses or lOOk for a tripped
To Free Jams From Foreign Objects
The accidental enlry of foreign material will YOur Serf SaP/teD Wrench _Jl free virluBSyevery i I£1g 4 #_Fig 5 the proper d,rechOn lo unlam Ihe disposer (I
lammed marshal, follow these steps: intedng the dhlpoler. Very rllrldy, however, a E_o noi drop or hammer on pry bar
'_. Turn off disposer and shut Off coid water lUYen_lre, etc.) cau_s a Jlmmed condition too
2. tnSert one end of your Serf Service Wrench ltltht thr your Wmnchettc to handle. TO free this
prowde_ w_fh your b_spose_, into the center ho_e lyre _ _11_,• pry bar _ _ n_glt be ule_,
of the bottom of the disposer as shown FOllow this procedure to savethe cost of _ service
3. Work the Wrertch dacl_and forth L_ntilit moves call to free a tight }am
freely for at least one complete revolution
cause any disposer to jam occasionally TO free Jam thai rely o¢¢ur, due to foreign objects _ _ hgure 5)
Remove foreign oPiecl with tongs Remove _e sure wall switch is turned off Remove as _UTTON
WrenCh before restarting disposer reaching with tongs Use a t_asd_ghl to disposer The end the_ must be placedalongside
4. Wad g to 5 minutes Io allow disposer motor to determine the direction the unit was running at the gnnding protrusion near the outside edge of
cool and then push red _eset button (see fig 4) the time of the lain A pry bar Or roof should be _e grinding d=SC Be sure to place the pry tool on
piece Of merci (bobby pin. b'tumb tack. aa_r clip,
much food waste from the disposer as is possi01e
inserted through the s_nJ_ open_n_ _nto the pressure_saDpliedthegrindingaiscwillmovein
the proper side of the protrusion SO when
Page 3
I I
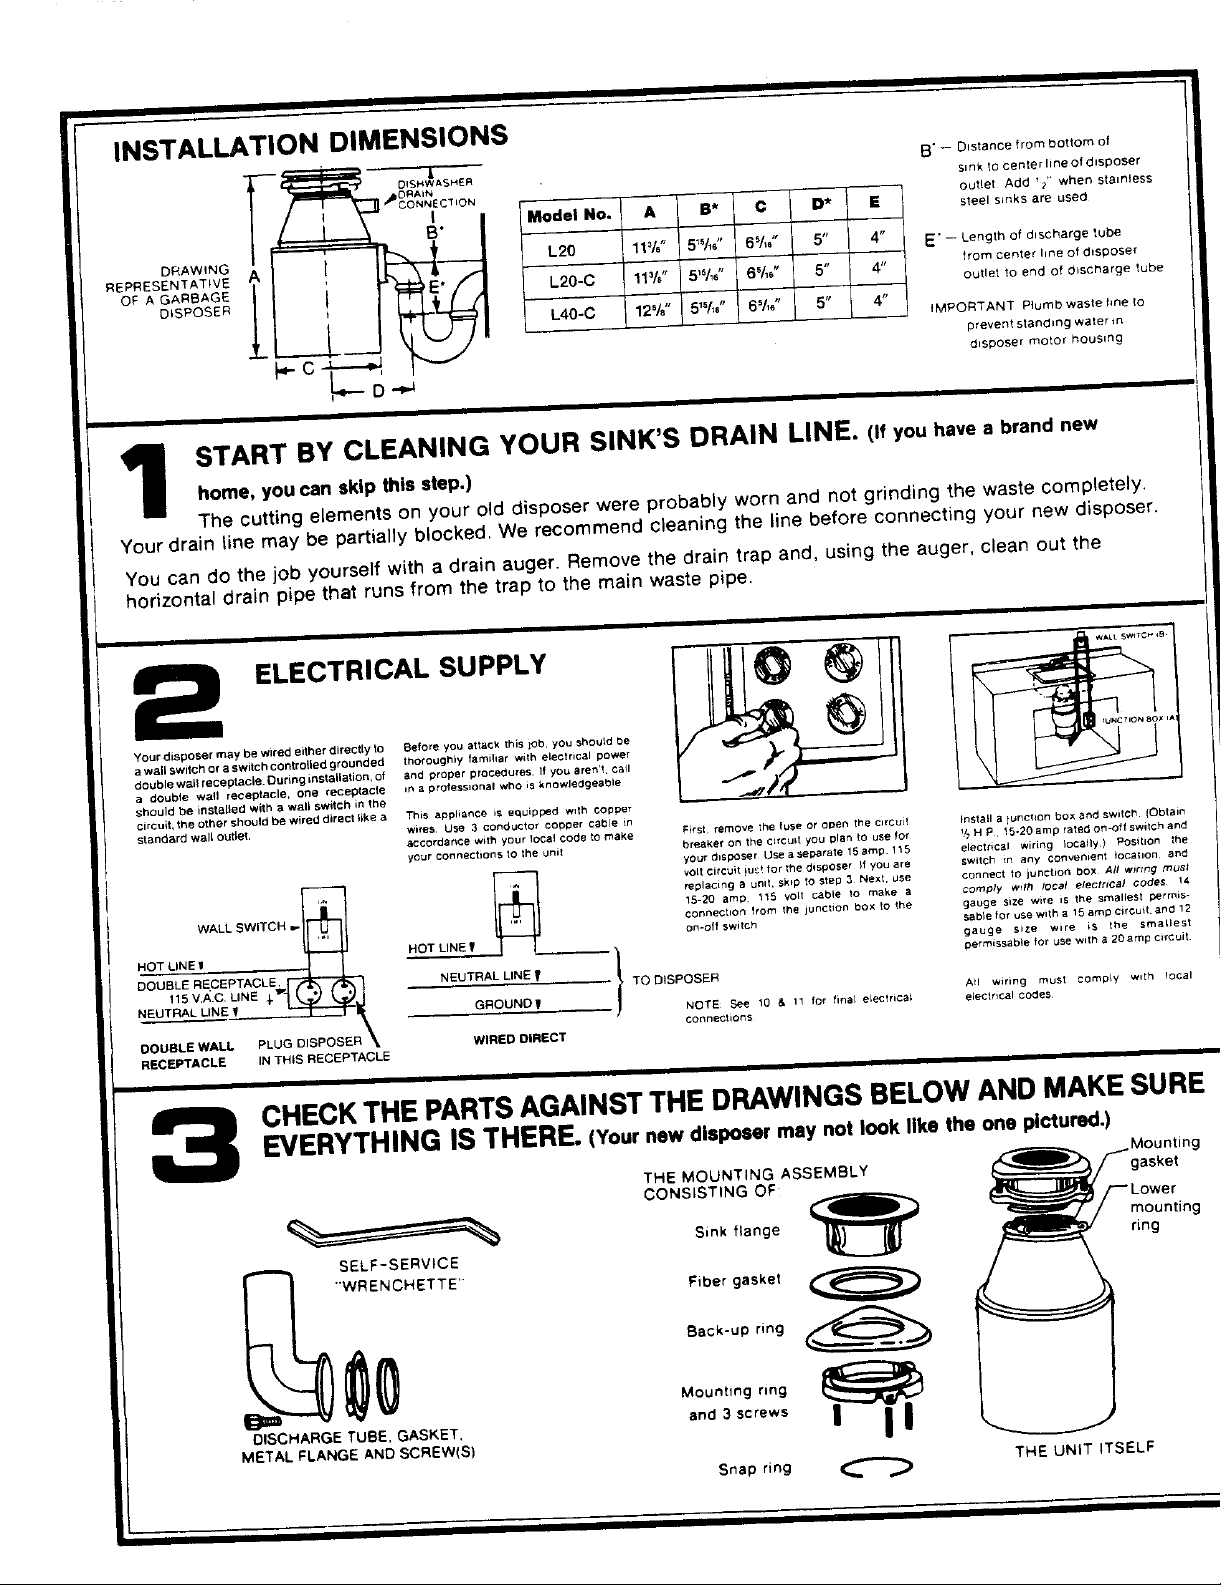
INSTALLATIONDIMENSIONS
0AAIN sJnk to center hns of disposer
J]_ICONNECTION _ ( outlet Add _p" when stemless
I Model No. A I B* C O* I E steelsinksare used
B"
I
1 _ _ L20 11%" 5_"/,6" 65A," 5" 4" E' - Lengthof d,scharge tube
REPRESENTATIVE 5" _rom center hne of disposer
OF A GARBAGE } * L20-C 11%" 5_5/_J' 6_A_" 4" outlet to end of 01scharge tube
DISPOSER _ L40-O 12%" 5_f_," 6_A_" 5" 4" IMPORTANT Plumb waste hne Io
I I B"- Oo,omot
D£AWfNG I j_
I i i
home, you can skip this step.)
START BY CLEANING YOUR SINK'SDRAIN LINE,(ifyouhavea brand new
The cutting elements on your old disposer were probably worn and not grinding the waste completely.
Your drain line may be partially blocked. We recommend cleaning the line before connecting your new disposer.
You can do the job yourself with a drain auger. Remove the drain trap and, using the auger, clean out the
horizontal drain pipe that runs from the trap to the main waste pipe.
ii ii i i L
C i "-" disposer motor housing
," D"_
I
prevent standing water m
t
Your disposer rosy be wired either directly to Before you attack this iob, you should be
awaBswitchoraswitchcontroUedgrounded thoroughly familiar with electrical power
double we,it receptacle. Oubng installation, of and proper procedures. If you aren't, taft
a double wall receptacJe, one receptacle Jn a professional who is WnowJedgeable
should be installed with a w_,ll switch in the
circuit, the other should be wired diroct like _ This aPbli_nc_ is equipped with CoPper
standard wail outlet, wires _Jse 3 conductor copper cohle tn
WALL SWITCH =- connecllon from the jur_ctlon box to the gauge size wire is the smartest permis-
HOTLINEI HOTLINET ", gauge size wire is the smaUest
O"OUSLE RECEPTACLE. NEUTRAL LiNE _ | permissab_e for use with a 20 amp circuit
NEUTRAL LINE _ I f GROUNO_I NOTE See 10 & 11 for final electrical electrical codes
115 V.A.C UNE _" / TO blSPOSER
DOUBLE WALL PLU WIRED DIRECT
RECEPTACLE IN THIS RECEPTACLE
i II i I
i_ replacing 8 unit, Skip to step 3 Next, use connect to junction box All winng mut_l
G ISSERk--D_/POT--I( All .....g must comply w,th local
accordance with yDur local code to make First remove the fuse or open the circuit Install a Iurlchon box and swilch (Obtain
y(3ur connections IO the unit breaker on th_ CilcuLt you plan to use for u_H P 15,20 amp rated on-off switch and
[_ volt circuit iusf for l_e di_oser It you are switch in any convenient IocaIion and
your dlSl_3ser LJsea _ep_rate f5 amp. 11S electrical wiring locally / POsition tile
1S-_O amp 115 volt cable _o make a Cort)ply with IOCat electrical codes t4
On-Oil switch $able fo_ use with a t5 amp citcud, anP 12
Corrneclion$
CHECKTHEPARTSAGAINSTTHE DRAWINGSBELOWANDMAKESURE
EVERYTHINGISTHERE.(Your new disposer may not look like the one pictured.)
...._.Mounting
SELF-SERWCE
THE MOUNTING ASSEMBLY _/ gasket
Sink flange ring
_ / mounting
Back-up ring
I I
_ "WRENCHETTE'" Fiber gasket
--------"_I_HARP-I= and 3 screws
METAL FLANGE AND SCREW(S)
CONSISTING OF: _ __:::::;:_'al_T-"'-lawi;a_///---L°wer
Snap ring
THE UNIT ITSELF
Page 4

HERE IS WHAT YOU DO IF YOU ARE REPLACING AN OLD DISPOSER.
FIRST, TURN OFF ELECTRICAL POWER at the service panel (fuse box or circuit breaker box). If the
mounting is the same as your new disposer's mounting, you can use the existing mounting. Follow
instructions A through E, Step 4, then go on to Step 10.
Use a pipe wrench to dis- IF YOUR OLD DISPOSER HAS If your old disposer has a Once the disposer,s off turn it
connect the drain line where it A DIFFERENT MOUNTING different mounting than your upside clown and remove the
attaches to the disposer THAN YOUR NEW ONE. GO new one. use a pliers or electrical plate
discharge tube. ON TO INSTRUCTION C adjustable wrench to remove
If your old disposer has the Then remove old disposer
Wire Nuts one. insert the end of your removed by taking off a clamp
Now. use a screwdriver to fall when the mounting ring is sleeve bypushtng_t upthrough
remove ground wire Remove disconnected from the sink the sink hole
the wire nuts from the power mounting assembly GO TO
wires Separate the disposer INSTRUCTION D
power wires from the cable
wires Loosen the screw(s} on
the cable clamp and remove the Loosen screws and remove old
cable from the disposer mounting ring and back-up
If your old disposer has a ring YOu may need a hammer
different mounting than your to loosen assembly parts
new one. follow steps F and G
Otherwise go on to Step 3
"wrenchette" or screwdriver or by twisting the disposer to J
into the right side of one of the remove it from its mounting
disposer mounting ring lugs at Easy to figure out)
the top of the disposer. Then.
turn the "wrenchette" or screw-
driver to the left (counter-
clockwise) until the lug lines up
with one of the sink mounting
assembly screws
CAUTION: Be sure to hold the G. J
disposer with one hand while
performing this step or it may Finally remove the old sink
the nuts on the mounting ring
YOU ARE INSTALLING YOUR
SINK'S FIRST DISPOSER.
Ise a wrench to loosen the Next, remove the nut at the
nut at the top of the"P'-trap top of the sink strainer and
Now, remove the large-diameter nut at the base of the strainer The nut should be loosened Now. push the strainer as-
by placing the tip of your screwdriver on the edge of the nut enough that you can spin it sembly up through the
(There are usually ridges tohoIdyour screwdriver.) off by hand sink hole and remove _t
remove the extension pipe
Page 5

Page 6

................_.>... oo_= 0 I__ o® I
m= =-=_ E=.
°..- ,._I...°.
_N® °°. ,
"I(@YI-,'01
_-_ ._
=_ "," _. I =-_
=_-_ I I" --------_ 1
=-= "_ / .-,-=_._ I
f_g X_o_g =: -o- E®= _-
.='o_"_ .- ,_ - _ ,',
=_ ,i\\lll;I/%YI.___.=-:
E E: e)
g'_ .: c o o_-
®'o>,= (/) _'_"=_o
o,_--
c,= E >. '_ === ='_
_ . ¢z_
I -
E _o
Of_ _"
.i _ _.
0= ©-_o
_ c C
>,
Page 7

Page 8

PREPARING THE DISHWASHER DRAIN CONNECTION.
(if you have a dlahwuher.) if you do NOT plan to connect a dishwasher drain to the disposer,
. go on to alep 13,
Lay the dis _oseron its side and insert the tip of Rap the end of the screwdriver with a hammer until
your screwdriver into the dishwaser drain hole the molded plug pops out. Make sure you take the
opening at an angle, loose plug out of your disposer.
WE'RE ALMOST THERE. CONNECT THE DISPOSER TO ITS
MOUNTING ASSEMBLY.
Then, while holding the disposer in place, turn
the lower mounting ring with the ears to the right
until all three ears are engaged in the mounting
Lift the disposer and position it so that the assembly.
disposer's three mounting ears are lined up under The disposer will now hang by itself. You will lock
the ends of the sink mounting assembly screws, this ring later, after the plumbing connections are
made.
NOW, ATTACH THE DISPOSER DISCHARGE TUBE TO YOURSINK'S DRAIN
"=' I :
, J
First, check inside the disposer Rotate the disposer around and attach the Install discharge tube gasket into disposeri. : _ ;_ i
grinding chamber to remove discharge tube to the disposer. First, insert the discharge outlet. Gasket will be held inT ........
any foreign material that might rubber washer in the discharge opening. Then, put place by the discharge tube flange.
have dropped in. the metal flange over thedischarge tube and screw _.....
Rotate the disposer so that the TUBE TO LONG? Simply cut TUBE TO SHORT? If the IF iT FITS-- Simply tighten the slip
discharge tube a_igns with off as much asnecessary with a discharge tube doesn't reach the trap to make your connection '
your drain trap. hack saw, making sure you your draintrapoutlet, measure discharge tube complete, IF DO
the tube into place using the bolt(s) provided.
have a clean, straight cut. the shortness and buy a drain SINK EXISTS, WE RECOMMEND U_
trap extension that includes a SEPARATE TRAPS FOR DISPOSEF
slip nut and install it in place. SECOND SINK.
NOTE: Be sure to comply with all
cable plumbing codes.
Page 9

MAKE THE DISHWASHER DRAIN CONNECTION.
Make all connections tocomply with local plumbing codes. An approved dishwasher connector kit is available from Maintenance
Warehouse. Use worm gear hose clamp on dishwasher connection.
J |Dishwasher Clamp Clamp _ _
Remove the clamp or fit- Slide large end of rubber Insert one end of the plastic Slip the remaining clamp
tings from the end of your coupler, from dishwasher tube into the coupler and (the one you purchased)
dishwasher drain hose. drain connection kit, over fasten with 7/a"clamp, over the dishwasher drain
NOTE: Check the three clamps to be sure you have tightened all of them, and tighten.
the inlet tube of the dis- hose and back two or three
poser. Fasten the coupler to inches. Now, slip the drain
disposer with the clamp hose over the plastic tube,
provided, slide the ctamp into place
NOW, LOCK DISPOSER IN PLACE. CHECK FOR LEAKS.
"wrenchette" or a screw-
driver into the left side of _ !
one of the disposer
mount(ng lugs., . at the
top of the disposer. Then,
turn the screwdriver or
"wrenchette" to the right
until the disposer is firmly
secured in position, en-
gaging the locking notch. I,_"_ Run water slowly through the unit Finally, remove the stopper a
L
Then, place the stopper in seal permit the water to flow. Check
position and fill the sink with water, leaks and correct, if necessary,
DISPOSER WARRANTY
1. Unreasonableuse,suchasbutnotlimitedto:
Improperinstallationincludingfailuretoconformto localelectriccodes.
Impropervoltagesupply,looseelectricalconnectionsorblownhousefuses.
2.Circumstancesnotattributabletea defectin materialorworkmanship.
.... " _" = ' "= .... -- ........ , ---- 3.Unsuthorizedrepair,alteration,modificationor adjustment.
LIMITATIONOF LIABILITY
iN NO EVENT SHALL JENN-AIR BE LIABLE FOR ANY INCIDENTAL OR CONSEQUENTIAL
DAMAGESSUSTAINEDBYANY PERSONASA RESULTOFANY BREACHOFTHISWARRANTY
OR ANYIMPLIEDWARRANTYUNLESSHEREINOTHERWISEPROVIDED.SOMESTATESDO
NOT ALLOW THE EXCLUSION OR LIMITATION OF INCIDENTAL OR CONSEQUENTIAL
DAMAGES,SOTHEABOVEUMITAT]ONSOREXCLUSIONMAYNOTAPPLYTO YOU.
FULL ONE YEAR WARRANTY
Jenn-Air warrantsthis disposerto consumersonly,againstdefectsin materialor workmanshipfor
s periodof oneyearfrom thedate ofits 0dginalpurchaseby a consumerfor home use.
Jenn-Air, throughits authorizeddistributor/dealerorganizationwillrepairor replace,at itsoption,
anydisposerwhichevidences,withinthewarranty pedod,a defect in matedalor workmanship.
TERMS APPLICABLE TO THIS WARRANTY
EXCLUSIONS
JENN-AiR'S OBLIGATIONS UNDER THIS WARRANTY SHALL NOT EXTEND TO ANY
MALFUNCTION OR OTHER PROBLEM CAUSED BY:
 Loading...