

Page 1
RANGE HOOD
Model Number: JXT8836AD$
Manufacturer Number: S88M90$
Size: 36"
INSTALLATION
GUIDE
TABLE OF CONTENTS
Safety nstructions .................................................... 1
Mounting Heights ........................ 3
Ducting .................................................................... 4
Specifications ........................................................... 5
Insta Ilation ............................................................ 6-7
Form No. A/04/03 Part No. US8800-0303A _2003 Maytag Appliances Sales Co. Litho U.S.A.
Page 2
MODEL: JXT8836ADS
Installation
Theinstallationinthis manualisintendedforqualifiedinstallers,servicetechniciansorpersons
withsimilarqualifiedbackground.DONOTattemptto installthisapplianceyourself.Injurycould
resultfrominstallingtheunit dueto lackof appropriateelectricalandtechnicalbackground.
All electricalwiringmust beproperlyinstalled,insulatedandgrounded.Overlyaccumulated
greaseinoldductworkshouldbecleanedout orductworkshouldbereplacedif necessaryto
avoidthepossibilityofa greasefire.Checkalljoints onductworkto insureproperconnection
andalljointsshouldbeproperlytaped.
* Please check for latest specification revisions before any custom work or cutouts.
Page 3
INSTALLATION
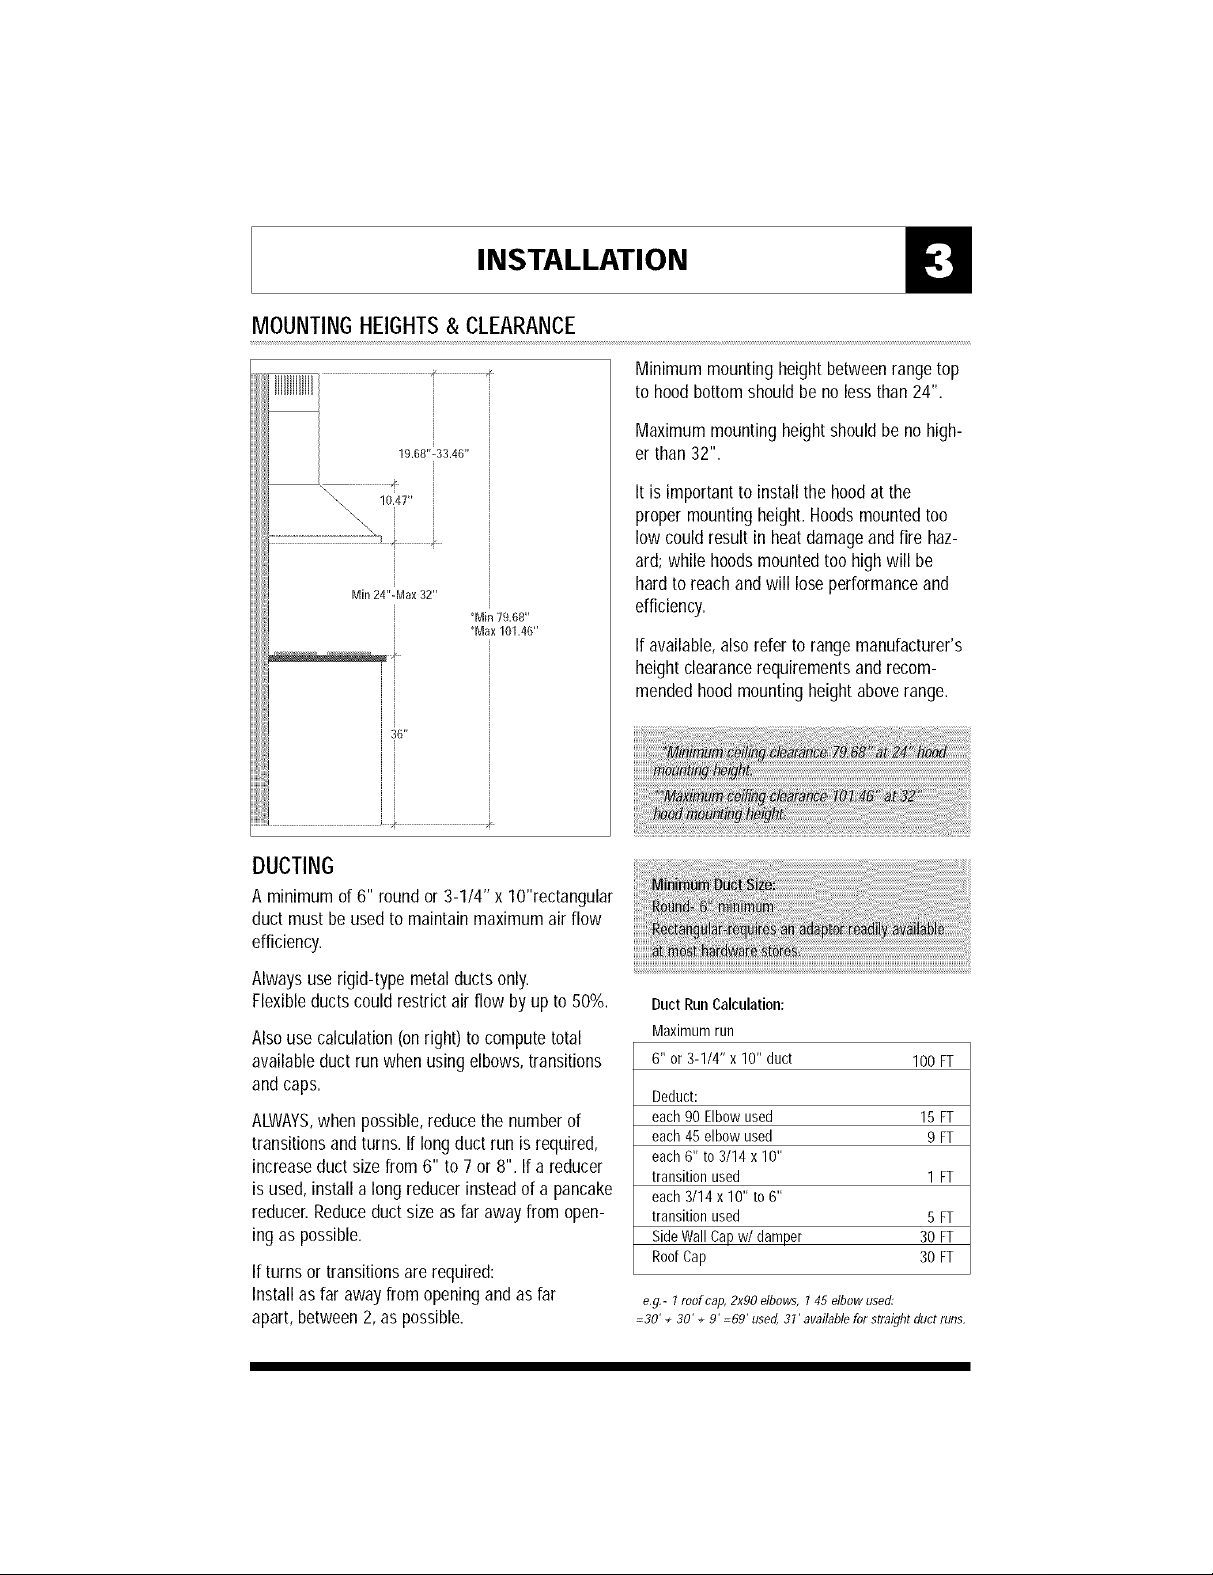
MOUNTINGHEIGHTS& CLEARANCE
Minimummountingheightbetweenrangetop
to hoodbottomshouldbeno lessthan24".
Maximummountingheightshouldbe nohigh-
er than32".
It is importanttoinstallthe hoodatthe
propermountingheight.Hoodsmountedtoo
lowcouldresultin heatdamageandfire haz-
ard;whilehoodsmountedtoohighwillbe
hardtoreachandwillloseperformanceand
efficiency.
If available, alsorefer to rangemanufacturer's
height clearancerequirements and recom-
mended hood mounting height aboverange.
DUCTING
Aminimum of 6" round or 3-1/4" x lO"rectangular
duct must be used to maintain maximum air flow
efficiency.
Alwaysuserigid-typemetalductsonly.
Flexibleductscouldrestrictair flowbyupto 50%.
Alsouse calculation (onright) to compute total
availableduct run when using elbows, transitions
andcaps.
ALWAYS,when possible, reduce the number of
transitions and turns. If long duct run is required,
increase duct size from 6" to 7 or 8". If a reducer
is used, install a long reducer instead of a pancake
reducer.Reduceduct size as far away from open-
ing as possible.
If turns or transitions are required:
Install as far away from opening and asfar
apart, between 2, as possible.
Duct Run Calculation:
Maximumrun
6" or 3-1/4" x 10" duct
Deduct:
each90 Elbowused 15 FT
each45 elbow used 9 FT
each6" to 3/14 x 10"
transitionused 1 FT
each3/14 x 10" to 6"
transitionused 5 FT
SideWallCapw/damper 30 FT
RoofCap 30 FT
e.g.- 1roof cap, 2x90 elbows, 1 45 elbow used:
=30' + 30' + 9' =69' used, 31' available for straight duet runs.
1O0 FT
Page 4

INSTALLATION
DUCTING
NEVERexhaust air or terminate duct work into spaces between walls, crawl spaces,ceiling, attics or
garages. All exhaust must beducted to theoutside.
UseMetal ductwork only.
Fastenall connectionswith sheet metal screws and tape alljoints w/certified Silver Tapeor DuctTape.
SomeDucting Options:
sidewall cap
®/gravity damper
i 1
-\
Soffitor crawtspace
Page 5

SPECIFICATIONS
ELECTRICAL
INSTALLATION
/
All Electricalworkmustbyperformedbyqualifiedelectricianor personwithsimilar technical
knowhowandbackground.
Forpersonalsafety,removehousefuseoropencircuitbreakerbeforebeginninginstallation.
Donotuseextensioncordoradapterplugwith thisappliance.
FollowNationalelectricalcodesor prevailinglocalcodesandordinances.
ElectricalSupply:
Thisappliancerequiresa 120V60Hzelectricalsupply.,andconnectedtoan individual,properly
groundedbranchcircuit,protectedbya 15or 20 amperecircuitbreakerortimedelayruse.Wiring
mustbe2 wirew/ground. PleasealsoreferElectricalDiagramlabeledon product.
CableLock:
Acablelockingconnector(not
supplied)mightalsorequiredby
localcodes.Checkwith local
requirementsandcodes,purchase
andinstallappropriateconnectorif
necessary.
CaNe Lock
<...
Page 6

INSTALLATION
MOUNTINGTHERANGEHOOD
I
I
I
1.Determinehood height, center, mark, level and hang hoodto wall through mounting keyholes on back.
2. Installduct work and electrical.
3. Centerand fasten bracket for upper telescopic duct cover onto the wall.
4. Slip upper and lower telescopic duct covers onto top of blower and screw in place.
5. Secure hood towall studs whenever possible; use appropriate wall fasteners & hardware
(notsupplied) for hollow drywall, tiled, concrete, brick wall applications for mounting hood..
Page 7

INSTALLATION
DUCTLESS CONVERSION
Ductlessconversion is intendedfor applications where an exhaust duct work is not possible to be
installed.When converted, the hoodfunctions as a "purifying" hood rather than an exhaust hood.
Fumesand exhaustfrom cooking is drawn and filtered bya set of optionalCarbonFilters.The air
is then purified and re-circulated back within the home.
Werecommend to ALWAYSexhaust air outside of the home by employing existingor installing
new duct work, if possible. The hood is mosteffective andefficient as an Exhaustunit. Onlywhen
the exhaust option is not possible should you recourse to converting the hood into a "purifying"unit.
Whenconverted to be a "purifying" unit, a set of Carbon Filtersare required ontop of itsstandard
Metal Filter set. Order according to its Part number below. The standard Metal Filtersare intended
to capture residue from cooking and the optional Carbon Filters help to purify fumes exhausted
from cooking for re-circulation.
CarbonFilters (Required)
1.PurchaseductlessCarbonFiltersas follows:
Hood Model: Part No. Filters in pkg.
JTX8836ADS JFLTRC8836 3
2. Remove metal filters on hood.Clip
carbonfilters onto each filter.
3. Re-install metal filters.
4. Turnon filter change indicator on
control panel.
5. Carbon Filters must be replaced after
every 120 hoursof use (or approximately
every 2 to 3 months basedon the average
of 1-2 hrs. of dailycooking time). The
microprocessor in the controlswhen set,
will count usage time and indicate when
carbonfilter replacement is required.
6" strah
iiiiiiiiiiiiiiiiiiiiiiiiiiiiiiiiiiii J
Ducting
1. Install a 6" straight pipe and a "T" connector/
or a 90 elbowto divert air through louvers on
duct cover.
 Loading...