

Jenn-Air JUWFR242HL User Manual

UNDER COUNTER WINE CELLAR
’’
’
CAVE À VIN SOUS COMPTOIR
For questions about features, operation/performance, parts, accessories, or service, call:
1-800-JENNAIR (1-800-536-6247) or visit our website at www.jennair.com.
In Canada, call: 1-800-JENNAIR (1-800-536-6247), or visit our website at www.jennair.ca.
Pour des questions à propos des caractéristiques, du fonctionnement/rendement, des pièces, accessoires ou service,
composer le 1800JENNAIR (1800536-6247) ou visiter notre site Web au www.jennair.com.
Au Canada, composer le1800JENNAIR (1800536-6247) ou visiter notre site Web au www.jennair.ca.
W11324867C

TABLE OF CONTENTS
TABLE DES MATIÈRES
INTRODUCTION
Safety ....................................................................................................................3
Proper Disposal of Your Old Wine Cellar ......................................4
Features ..............................................................................................................4
INSTALLATION REQUIREMENTS
Tools and Parts ...............................................................................................5
Location Requirements ...........................................................................5
Product Dimensions ..................................................................................6
Custom Overlay Panel ..............................................................................6
Handle (Optional).........................................................................................7
Electrical Requirements ..........................................................................8
INSTALLATION INSTRUCTIONS
Unpack the Wine Cellar ...........................................................................8
Custom Overlay Panel Installation ...................................................9
Installation and Door Closing ..............................................................10
USING WINE CELLAR
Controls ...............................................................................................................11
Normal Sounds ..............................................................................................12
Stocking the Wine Cellar ........................................................................13
Wine Racks .......................................................................................................13
CARE AND CLEANING
Cleaning .............................................................................................................14
Removing Base Grille ................................................................................14
Vacation Care ..................................................................................................14
Moving Care .....................................................................................................14
TROUBLESHOOTING
Operation ...........................................................................................................15
Temperature and Moisture ...................................................................15
Door .......................................................................................................................15
ASSISTANCE
IN the U.S.A. .....................................................................................................16
IN Canada ..........................................................................................................16
Warranty .............................................................................................................17
INTRODUCTION
Sécurité ...............................................................................................................19
Mise au rebut de votre vieille caveà vin .......................................20
Caractéristiques ............................................................................................20
EXIGENCES D’INSTALLATION
Outils et Pièces ..............................................................................................21
Exigences d’emplacement ....................................................................21
Dimensions du Produit ............................................................................22
Panneau Décoratif Personnalisé .......................................................22
Poignées (Facultatif) ..................................................................................23
Spécifications électriques ......................................................................23
INSTRUCTIONS D’INSTALLATION
Déballage de la cave à vin ......................................................................24
Installation du Panneau Personnalisé ...........................................24
Installation et fermeture de laporte...............................................25
UTILISATION DE LA CAVE À VIN
Commandes ....................................................................................................26
Sons normaux ................................................................................................27
Stockage dans la cave à vin ..................................................................28
Porte-bouteilles .............................................................................................28
ENTRETIEN ET NETTOYAGE
Nettoyage ..........................................................................................................29
Enlever la grille de la base ......................................................................29
Entretien avant les vacances ...............................................................30
Précautions à prendre avant undéménagement ................30
DÉPANNAGE
Utilisation ...........................................................................................................30
Température et humidité .......................................................................30
Porte ......................................................................................................................31
ASSISTANCE
Aux É.-U. ..............................................................................................................32
Au Canada .........................................................................................................32
Garantie ..............................................................................................................33
2

INTRODUCTION
SAFETY
Your safety and the safety of others are very important.
We have provided many important safety messages in this manual and on your appliance. Always read and obey all safety
messages.
This is the safety alert symbol.
This symbol alerts you to potential hazards that can kill or hurt you and others.
All safety messages will follow the safety alert symbol and either the word “DANGER” or “WARNING.”
These words mean:
You can be killed or seriously injured if you don't immediately
DANGER
WARNING
All safety messages will tell you what the potential hazard is, tell you how to reduce the chance of injury, and tell you what can
happen if the instructions are not followed.
follow instructions.
You
can be killed or seriously injured if you don't
instructions.
follow
IMPORTANT SAFETY INSTRUCTIONS
WARNING:
Plug into a grounded 3 prong outlet.
■
Do not remove ground prong.
■
Do not use an adapter.
■
Do not use an extension cord.
■
■ Disconnect power before servicing.
■ Replace all parts and panels before operating.
■ Remove doors from your old wine cellar.
■ Use non flammable cleaner.
■ Do not store or use petrol, flammable liquids or gas in the
vicinity of this or other electrical appliances. The fumes can
cause fires or explosions.
■ Do not store explosive substances such as aerosol cans with
a flammable propellant in this wine cellar.
■ Do not use or place electrical devices inside the wine cellar
compartments if they are not of the type expressly authorized
by the manufacture.
■ Use two or more people to move and install wine cellar.
To reduce the risk of fire, electric shock, or injury when using your wine celler, follow these basic precautions:
■ This appliance is not intended for use by persons (including
children) with reduced physical, sensory or mental
capabilities, or lack of experience and knowledge, unless
they have been given supervision or instruction concerning
use of the appliance by a person responsible for their safety.
■ Children should be supervised to ensure that they do not
play with the appliance.
To avoid the risk of children becoming trapped and
■
suffocating, do not allow them to play or hide inside the
wine cellar.
■ If the power supply cord is damaged, it must be replaced by
the manufacturer or its service agent or a similarly qualified
person.
■ Keep ventilation openings, in the appliance enclosure or in
the built-in structure, clear of obstruction.
■ Do not use mechanical devices or other means to accelerate
the defrosting process, other than those recommended by
the manufacturer.
■ Do not damage the refrigerant circuit.
SAVE THESE INSTRUCTIONS
3
PROPER DISPOSAL OF YOUR
OLD WINE CELLAR
WARNING
Suffocation Hazard
Remove doors from your old wine cellar.
Failure to do so can result in death or brain damage.
IMPORTANT: Child entrapment and suffocation are not
problems of the past. Junked or abandoned wine cellars
are still dangerous – even if they will sit for “just a few
days.” If you are getting rid of your old wine cellar, please
follow these instructions to help prevent accidents.
Before You Throw Away Your Old Wine Cellar:
Take off the door.
Leave the racks in place so that children may not
easily climb inside.
1. Stealth Flush Design with
Smooth Close Door
Create an unbroken silhouette. Discreet 1/8" reveals
envelop every side, without exposed hinges or trim
pieces. Quiet, soft, secure. An articulating hinge
discreetly ushers the door open and gently pulls it
closed.
2. Daring Obsidian Interior
Inspired by volcanic glass, this dark finish erupts
with reflective, high-contrast style. Let the object of
your desire emerge like vibrant art, begging to be
consumed.
3. UV-Resistant Thermal Glass
Let your tongue meet tannins. Double-paned
glass helps filter out ultraviolet light and rejects
temperature swings to sustain the body and finish
you covet.
4. Marquee Lighting
Light up the night. Strips of LED lighting run vertically
on either side of the cellar, illuminating each label so
you can select a perfect pairing.
5. Precise Temperatures & Humidity
Unwavering conviction. Two temperature sensors in
two zones keep the climate firmly within your control,
while a single humidity sensor monitors quietly in the
background for long term wine storage.
Important information to know about disposal of
refrigerants:
Dispose of refrigerator in accordance with Federal and Local
regulations. Refrigerants must be evacuated by a licensed,
EPA certified refrigerant technician in accordance with
established procedures.
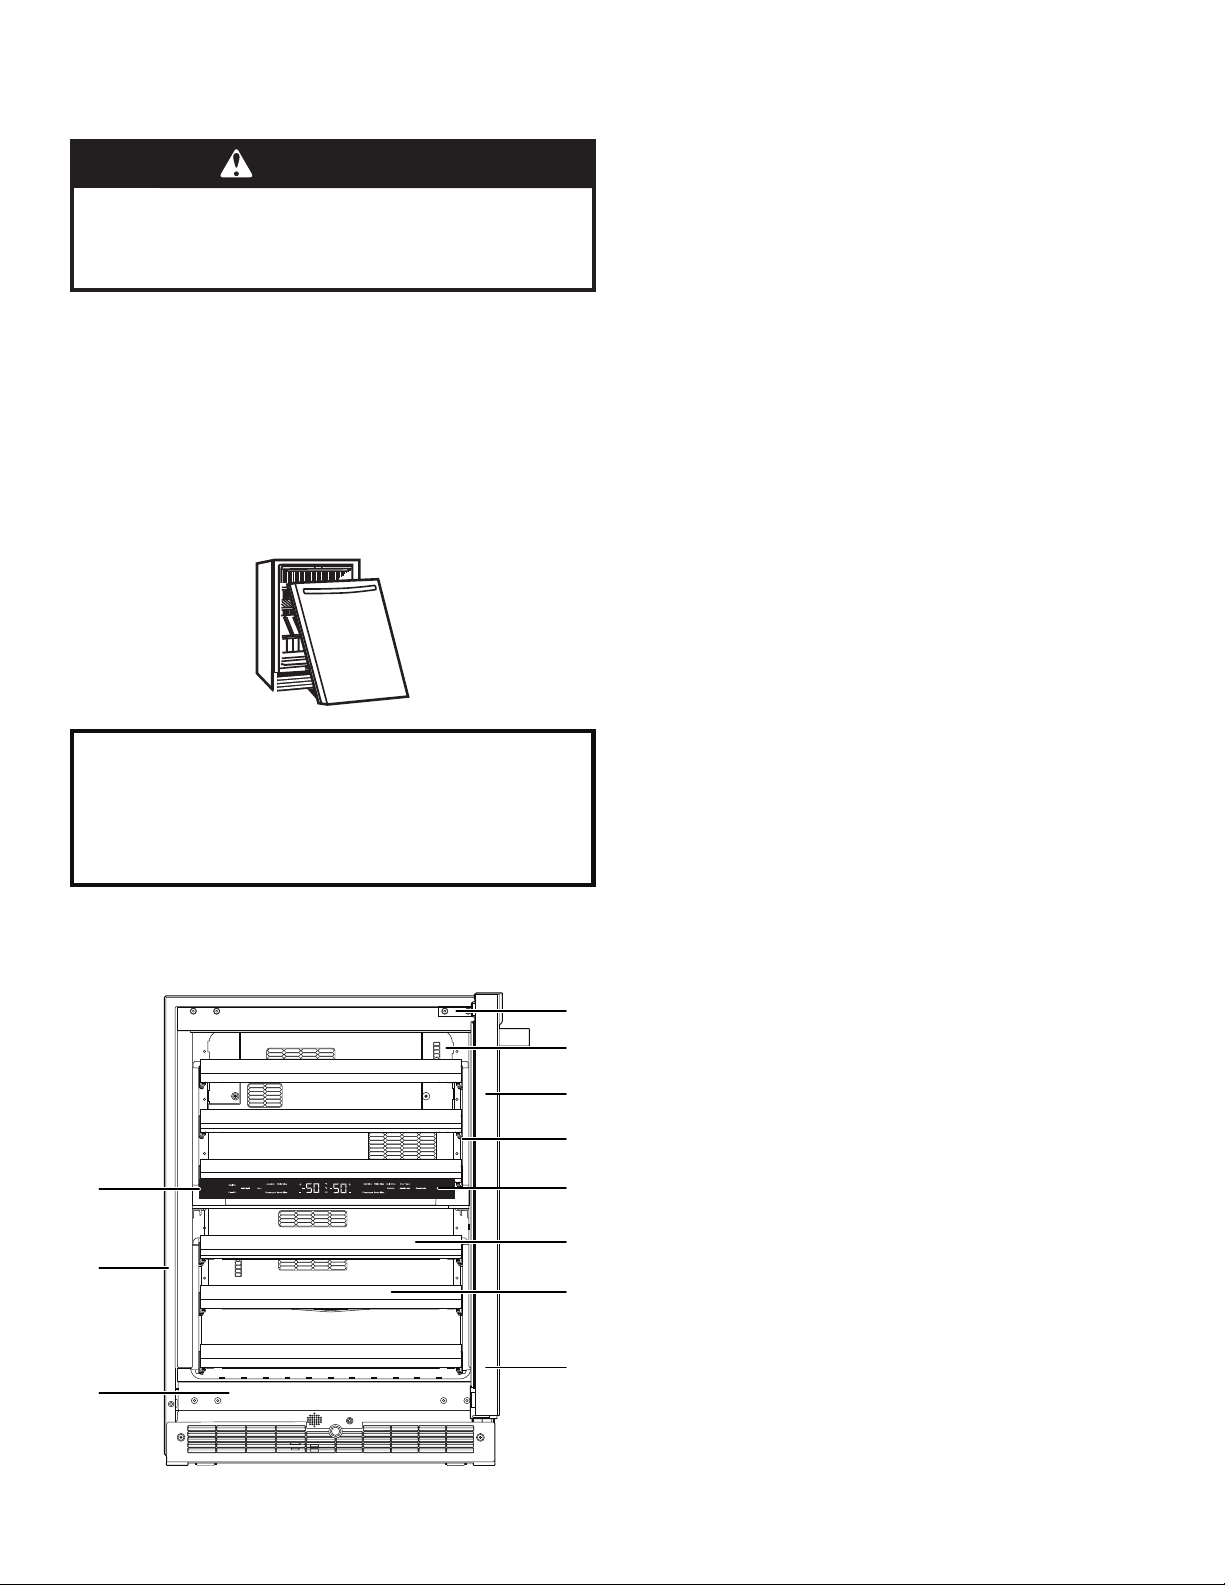
FEATURES
13.
12.
2.
3.
4.
5.
6.
7.
6. Smooth Close Racks
Smooth moves. Each beechwood rack opens and
closes fluidly and quietly, even when fully loaded.
7. 45 Bottle Capacity
Drench your desires. Chilled from neck to end, every
bottle of cool, liquid temptation is cradled in one of
two precision temperature zones.
8. NOIR™ Design Expression
Lose yourself in a world that’s yours alone. Crisp
1.
silhouettes crackle with mystique; beguiling
reflections flow in and out of sight. Taut with
ceaseless allure and minimalist appeal, the NOIR™
design expression rejects dated ideals of beauty.
9. RISE™ Design Expression
Embrace an era of striking proportions. A stainless
steel suit of armor gleams with spectacular light. This
is strength—inextricable from beauty. Forged in the
fires of progress, the RISE™ design expression towers
over stagnant, uninspired designs that have inherited
undeserved standing.
10. Custom Overlay Design
Break free with custom panels that allow
unapologetic expression. Custom panels and handles
must be purchased separately.
8,9,10.
11.
4
11. Auto Light Option
Features a proximity sensor in the base grille that
automatically ramps on the LED interior display
lighting when motion is detected.
12. Hushed Acoustics
Our internal compressor keeps your beverages
impeccably chilled, while running unobtrusively in
the background. Brilliance doesn’t have to announce
itself; it just is.
INSTALLATION REQUIREMENTS
13. Emotive Controls
Hold sway over every zone. Let your light-guided
touch coax out the distinct flavors and aroma of every
bottle.
TOOLS AND PARTS
Gather the required tools and parts before starting
installation
TOOLS AND PARTS NEEDED:
Phillips screwdriver
Custom Overlay Door Panel — Refer “Custom Overlay
Panel Preparation.”
Custom handle and mounting hardware (optional)
PARTS SUPPLIED:
M4 x 30 flathead screws (8)
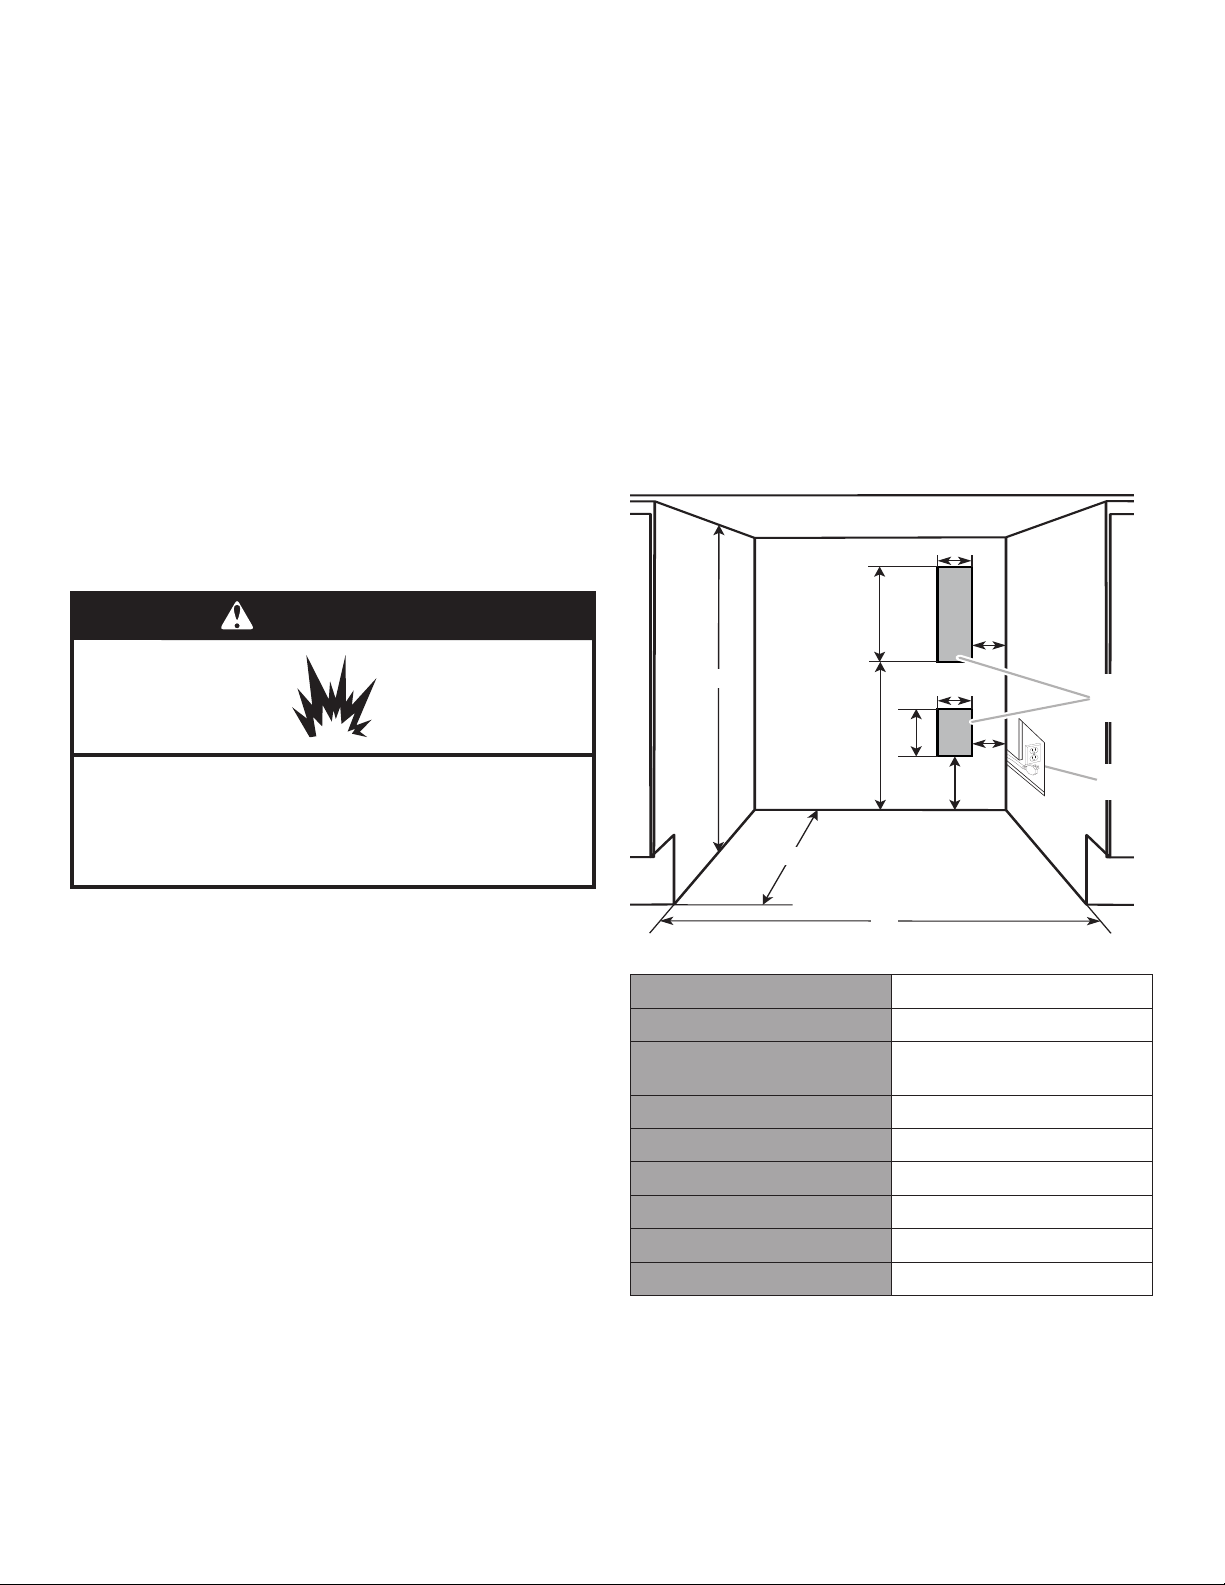
LOCATION REQUIREMENTS
WARNING
Explosion Hazard
Keep flammable materials and vapors,
such as gasoline, away from wine cellar.
Failure to do so can result in death, explosion, or fire.
OPENING DIMENSIONS
Height dimensions are shown with the leveling legs
extended to the minimum height.
NOTE: When leveling legs are fully extended, add
5/8" (15 mm) to the height dimensions. See “Product
Dimensions.”
If the floor of the opening is not level with the kitchen
floor, shim the opening to make it level with the
kitchen floor.
G
I
C
E
H
B
F
G
F
D
Recessed
receptacle
locations
Utility
opening
IMPORTANT: This appliance is intended to be used in
household and similar applications such as:
Staff kitchen areas in shops, office and other working
environments;
Farm houses and by clients in hotels, motels and
other residential type environments;
Bed and breakfast type environments;
Catering and similar non-retail applications.
NOTES:
For the wine cellar to be flush with the front of
the base cabinets, remove any baseboards or
moldings from the rear of the opening. See “Product
Dimensions” and later in this section, “Opening
Dimensions.”
It is recommended that you do not install the wine
cellar near an oven, radiator, or other heat source.
Do not install in a location where the temperature will
fall below 55°F (13°C). For best performance, do not
install the wine cellar behind a cabinet door or block
the base grille.
A
Opening and utility location dimensions
Opening width - A 24" (60.96 cm) min.
Opening depth - B 24" (60.96 cm) min.
Opening height - C 34⁄" (87.6 cm) min.
35" (88.9 cm) max.
Dimension - D 12⁄" (30.64 cm)
Dimension - E 21⁄" (55.16 cm)
Dimension - F 1⁄" (4.44 cm)
Dimension - G 3" (7.55 cm)
Dimension - H 4⁄" (11.37 cm)
Dimension - I 9⁄" (23.47 cm)
For flush installation, the power outlet can be installed in
adjacent cabinetry with a cutout on the power cord side
for routing of the power cord.
The power outlet can also be recessed on the back
wall behind the unit as per recommended receptacle
locations in the above illustration.
5
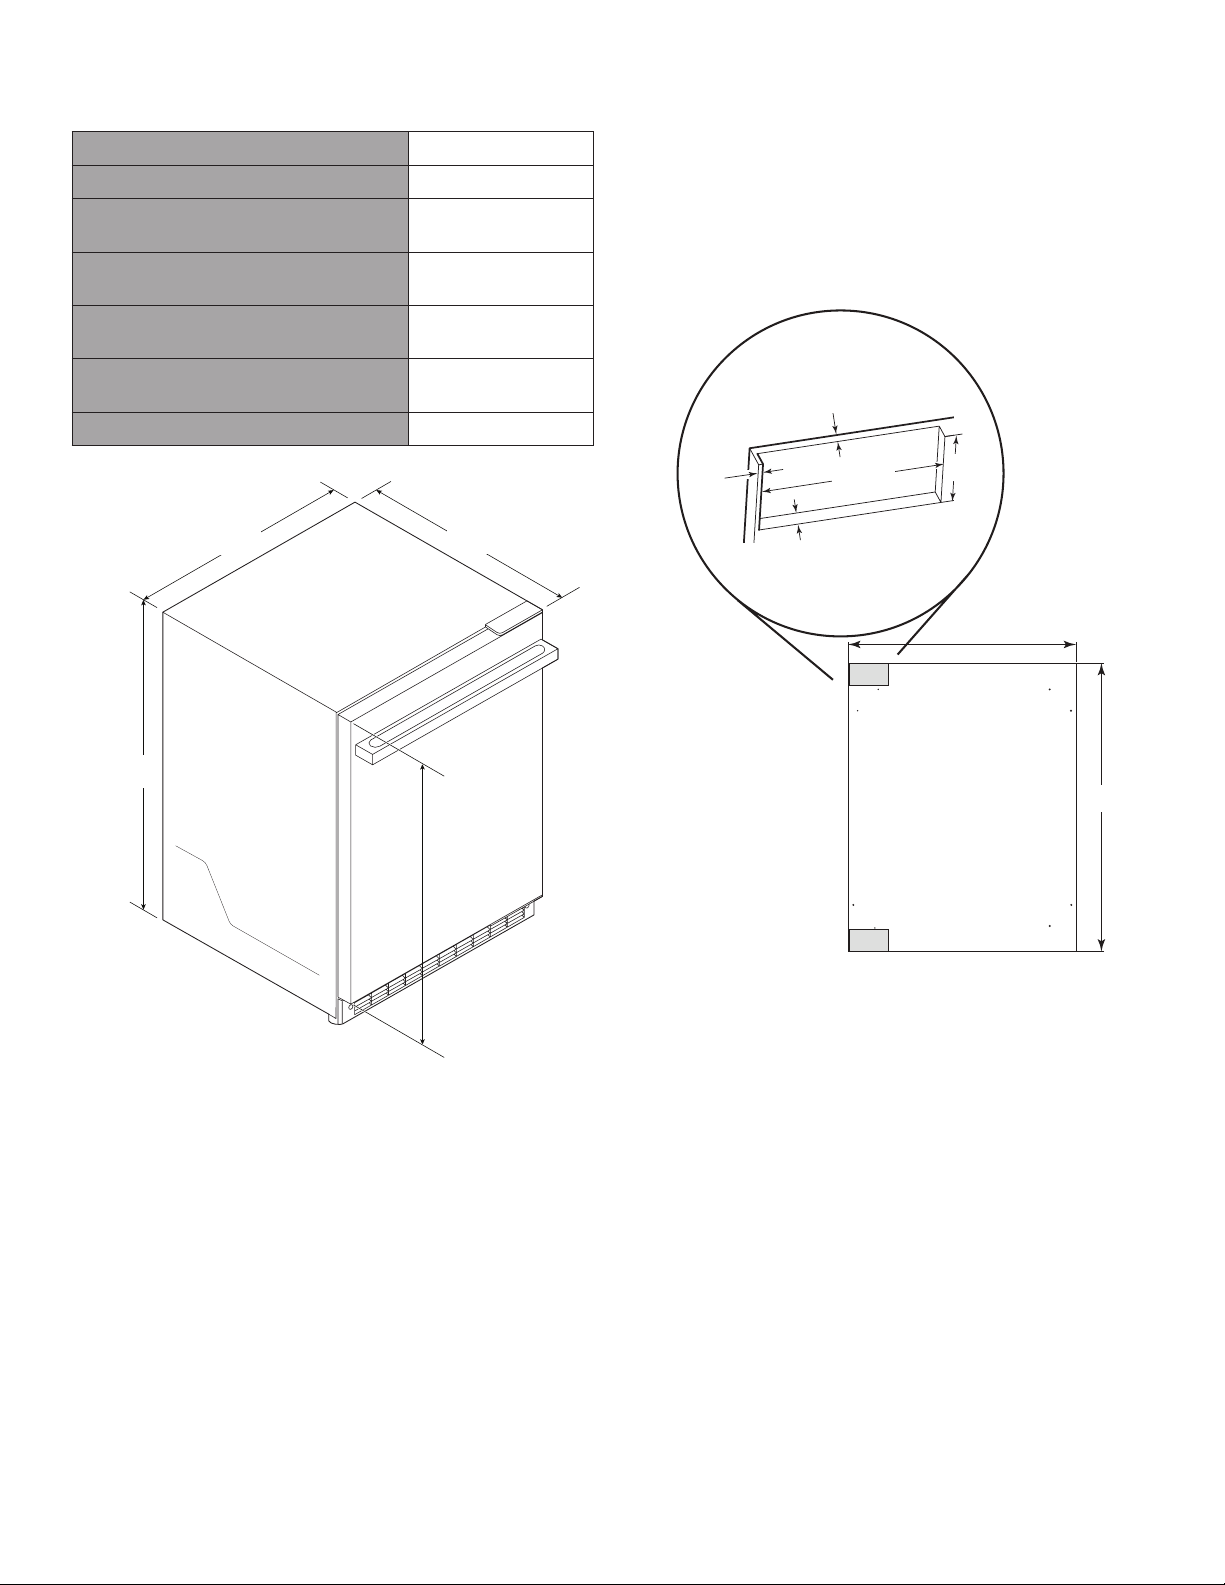
PRODUCT DIMENSIONS
OVERALL PRODUCT
Width (up to hinge cover) 23⁄" (60.72 cm)
Height (up to hinge cover) 34⁄" (87.32 cm)
Glass door model (NOIR™) depth
(no handle)
Glass door model (RISE™) depth
(no handle)
Solid door models
(NOIR™/ RISE™)
Panel ready models depth
(with 3/4" panel and no handle)
Raw Door Height 30⁄" (77.75 cm)
NOTE: The power cord is 60" (152.4 cm) long.
23⁄" (60.36 cm)
23⁄" (60 cm)
23⁄" (60 cm)
23⁄" (60.5 cm)
SOLID DOOR OVERLAY PANEL PREPARATION
Create the custom overlay panel using the dimensions
shown in the illustration "Solid door overlay panel and
hinge routing dimensions". Route shaded areas to a 1/2"
(12 mm) depth as shown.
IMPORTANT: The following graphic shows a custom
panel for a door with the hinges installed on the righthand side. If your wine cellar has the hinges installed on
the left-hand side, rotate the custom frame 180° so the
hinge markings will be on the left.
1/4"
(7 mm)
2"
1/8"
(3 mm)
4⁄"
(125 mm)
(53 mm)
23⁄"
(60.72 cm)
34⁄"
(87.32 cm)
Depth
(no handle)
30⁄"
(77.5 cm)
CUSTOM OVERLAY PANEL
NOTE: For standard stainless steel or glass door
models, skip these instructions and go to "Electrical
Requirements" section.
If you plan to install a custom overlay panel, you will
need to create the panel yourself or consult a qualified
cabinetmaker or carpenter. Refer dimension drawings for
panel specifications.
IMPORTANT:
The thickness of the overlay panel must be 3/4"
(19 mm).
Custom solid door overlay panel must not weigh
more than 20 lbs (9.07 kg).
Custom glass door overlay panel must not weigh
more than 10 lbs (4.54 kg).
Overlay panels weighing more than recommended
may cause damage to your appliance.
1/2"
(12 mm)
23⁄"
(60.3 cm)
Solid door overlay panel and hinge routing dimensions
30⁄"
(77.75 cm)
6
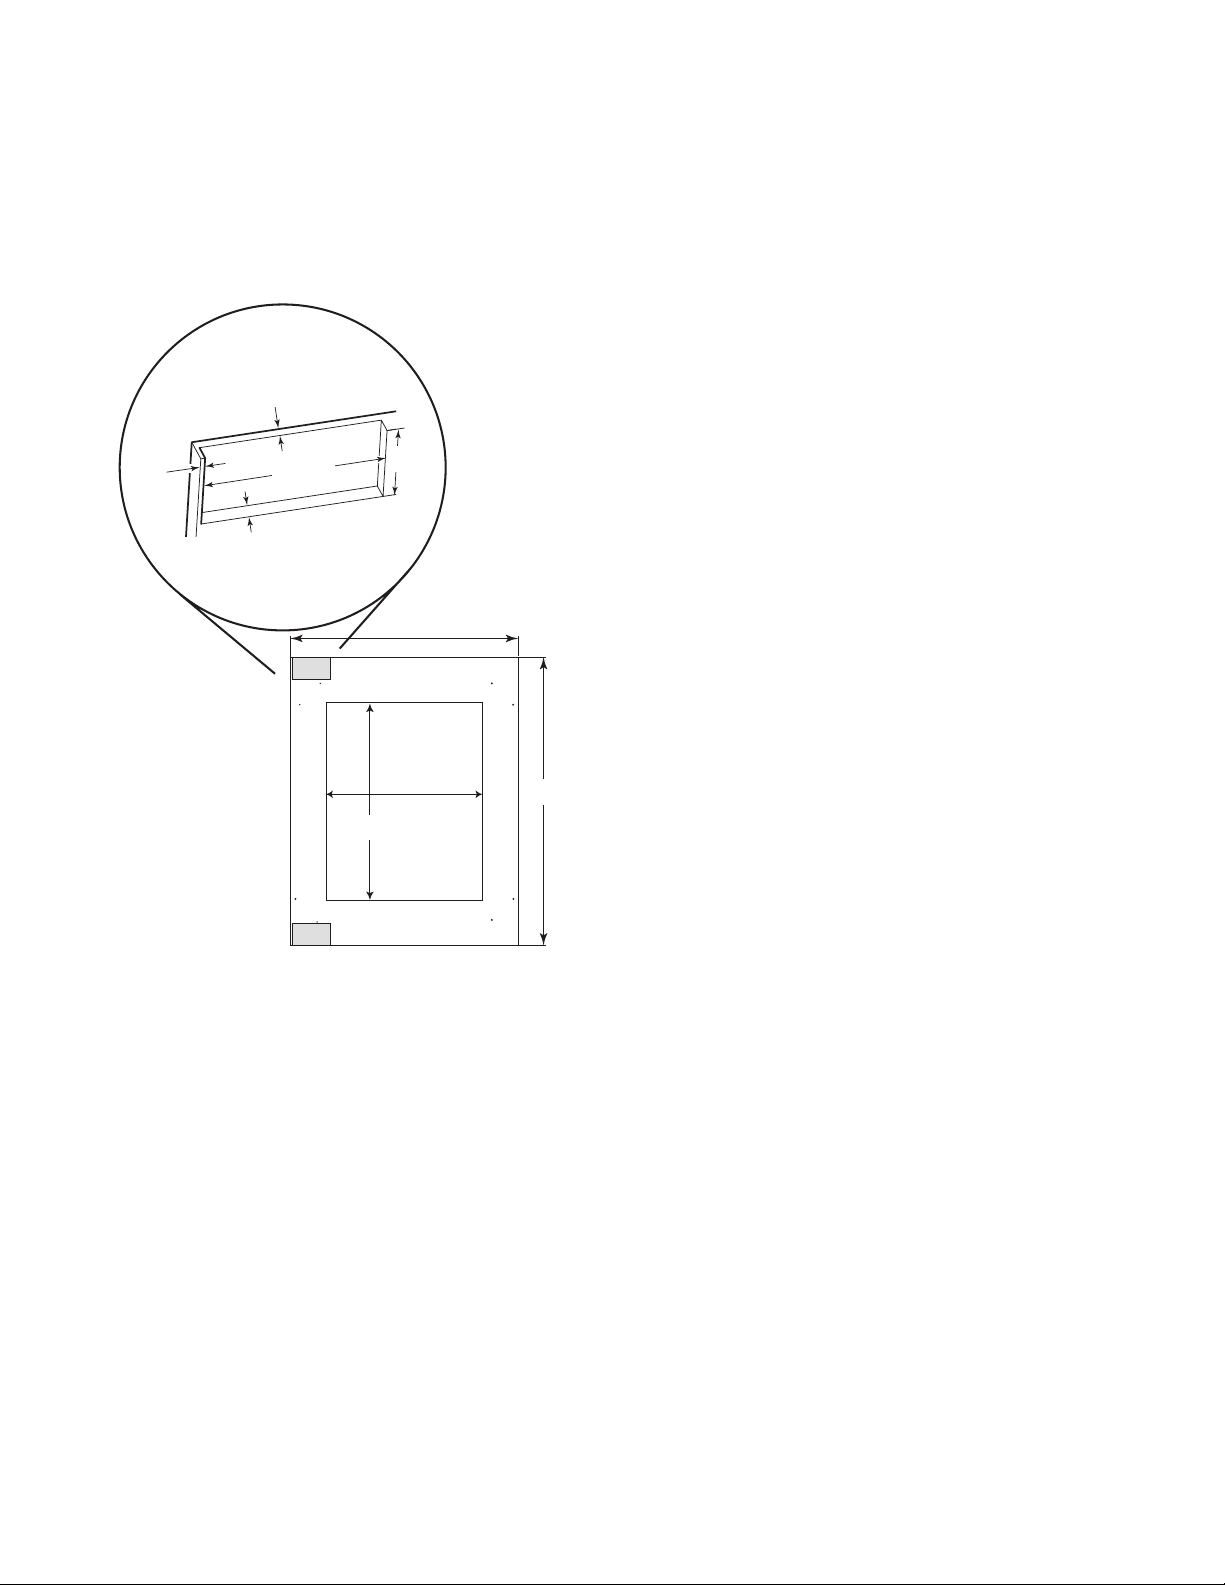
GLASS DOOR OVERLAY PANEL PREPARATION
Create the custom overlay panel using the dimensions
shown in the illustration “Glass door overlay panel and
hinge routing dimensions”. Route shaded areas to a 1/2"
(12 mm) depth as shown.
IMPORTANT: The following graphic shows a custom
panel for a door with the hinges installed on the righthand side. If your wine cellar has the hinges installed on
the left-hand side, rotate the custom frame 180° so the
hinge markings will be on the left.
1/4"
(7 mm)
2"
1/8"
(3 mm)
1/2"
(12 mm)
4⁄"
(125 mm)
(53 mm)
23⁄"
(60.3 cm)
HANDLE OPTIONAL
Custom handles are typically attached to the custom
overlay door panel only.
Refer instructions received with JennAir® RISETM and
NOIRTM handle kits to install these handles on custom
wood panels.
Custom handle needs to be installed on the door panel
with countersunk holes and installed before the custom
overlay door panel has been installed on the wine cellar
door.
17⁄"
(43.3 cm)
21⁄"
(55.4 cm)
Glass door overlay panel and hinge routing dimensions
30⁄"
(77.75 cm)
7
ELECTRICAL REQUIREMENTS
WARNING
Electrical Shock Hazard
Plug into a grounded 3 prong outlet.
Do not remove ground prong.
Do not use an adapter.
Do not use an extension cord.
Failure to follow these instructions can result in death,
fire, or electrical shock.
INSTALLATION INSTRUCTIONS
Before you move your wine cellar into its final location, it
is important to make sure you have the proper electrical
connection.
RECOMMENDED GROUNDING METHOD
A 115 V, 60 Hz, AC only, 15 or 20 A fused, grounded
electrical supply is required. It is recommended that a
separate circuit serving only your wine cellar be provided.
Use an outlet that cannot be turned off by a switch. Do
not use an extension cord.
NOTE: Before performing any type of installation,
cleaning, or removing a light bulb, unplug wine cellar or
disconnect power.
UNPACK THE WINE CELLAR
WARNING
Excessive Weight Hazard
Use two or more people to move and install wine cellar.
Failure to do so can result in back or other injury.
Before using your wine cellar, all packaging materials
should be removed and the interior should be cleaned.
Remove tape and glue residue from surfaces before
turning on the wine cellar. With your fingers, rub a
small amount of liquid dish soap over any adhesive
and wipe with warm water to remove.
Do not use sharp instruments, rubbing alcohol,
flammable fluids, or abrasive cleaners to remove tape
or glue. These can damage the surfaces of your wine
cellar. For more information, refer “Wine Cellar Safety”
section.
Dispose of and/or recycle all packaging materials.
After all packaging materials have been removed,
clean the inside of your wine cellar. Refer the cleaning
instructions in “Cleaning” section.
NOTE: For standard stainless steel or glass door models,
skip to "Door Closing" section.
8
CUSTOM OVERLAY PANEL INSTALLATION
A
B
A
IMPORTANT:
Create custom overlay panel according to the
specifications in the “Custom Overlay Panel” section.
JennAir is not responsible for the removal or addition
of molding or decorative panels that would not allow
access to the wine cellar for service.
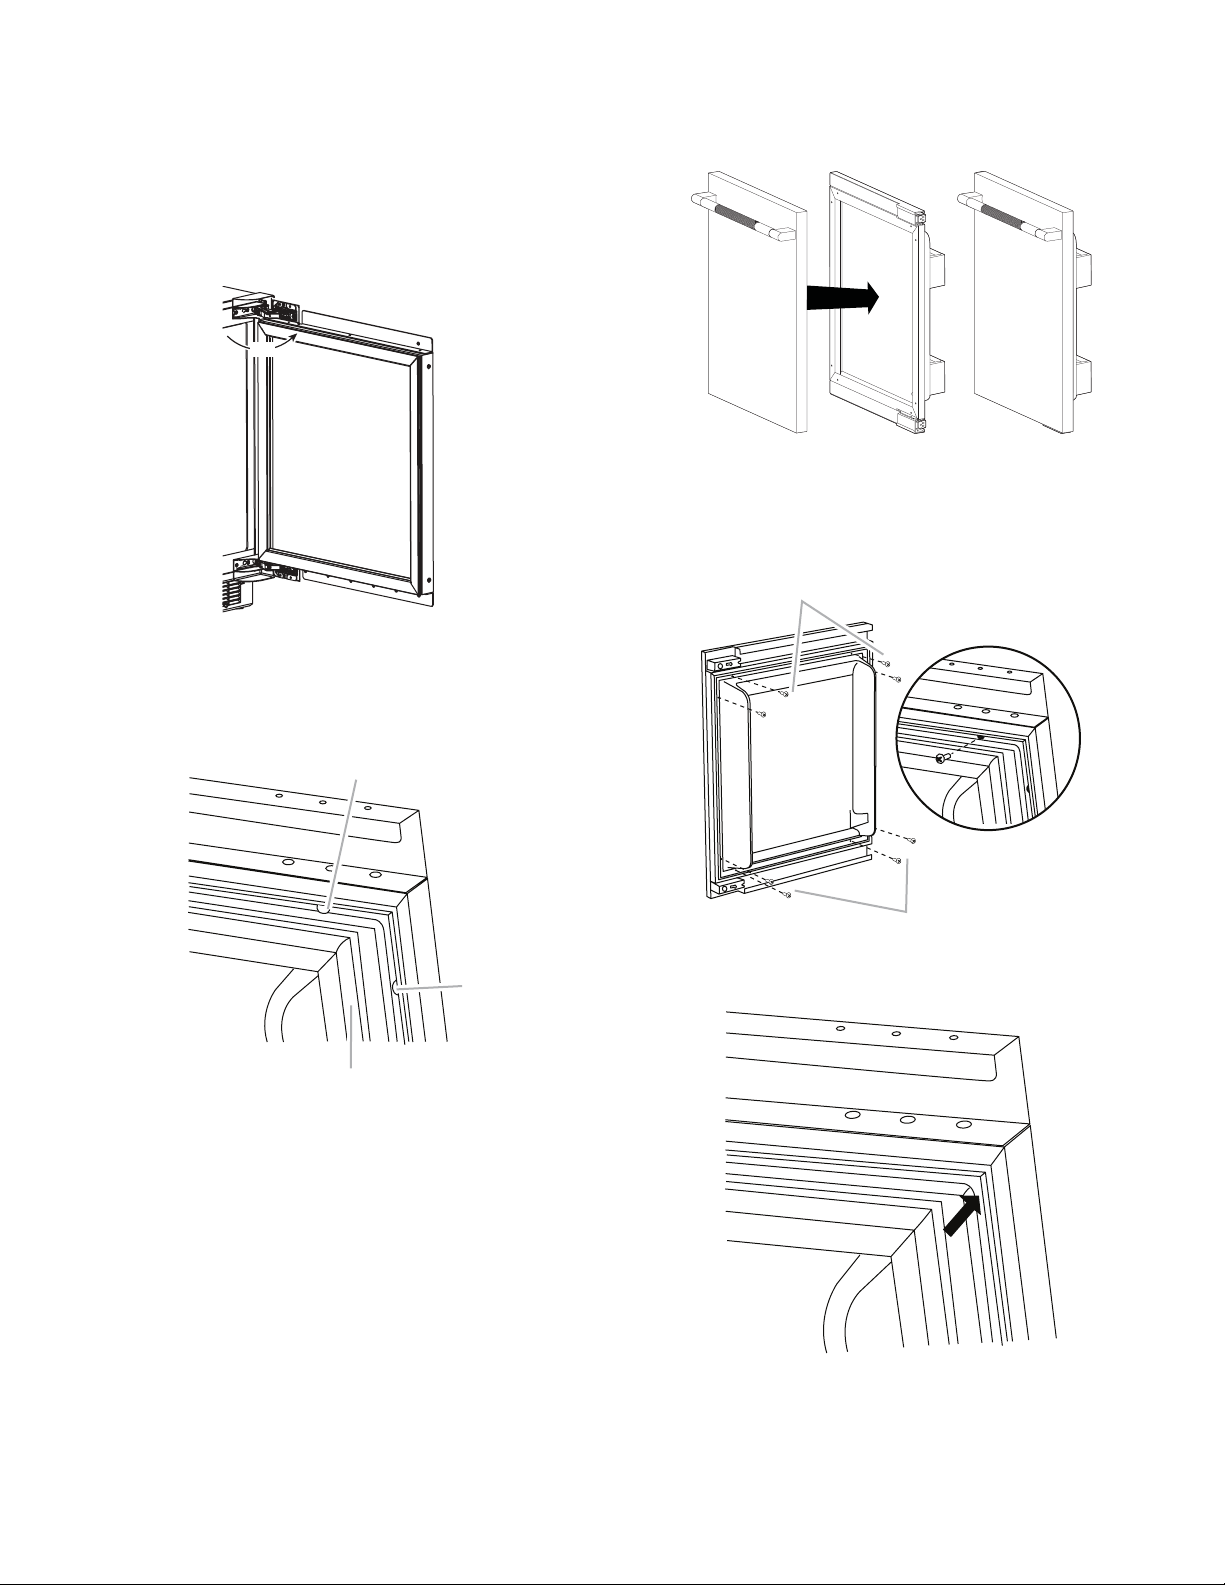
1. Open the door completely to 90°.
90°
2. Remove the gasket from the corners of the door,
pulling gently until the two screw holes in each
corner of the door can be seen.
NOTE: The gasket does not have to be removed from
the door, only the corners.
3. Using two people, hold the custom overlay panel
against the door. Be sure that the top and bottom
hinges fit accurately into the routing on back of the
custom wood panel.
NOTE: Handle needs to be installed before the custom
overlay door panel has been installed on the wine cellar
door.
4. Fasten the custom panel to the door using two wood
screws (provided in installation kit) at each corner.
A
A. M4 x 30 flathead screws (provided in installation kit)
A
A. Screw holes
B. Gasket
5. Press the gasket firmly back into it’s original position.
9
INSTALLATION AND DOOR CLOSING
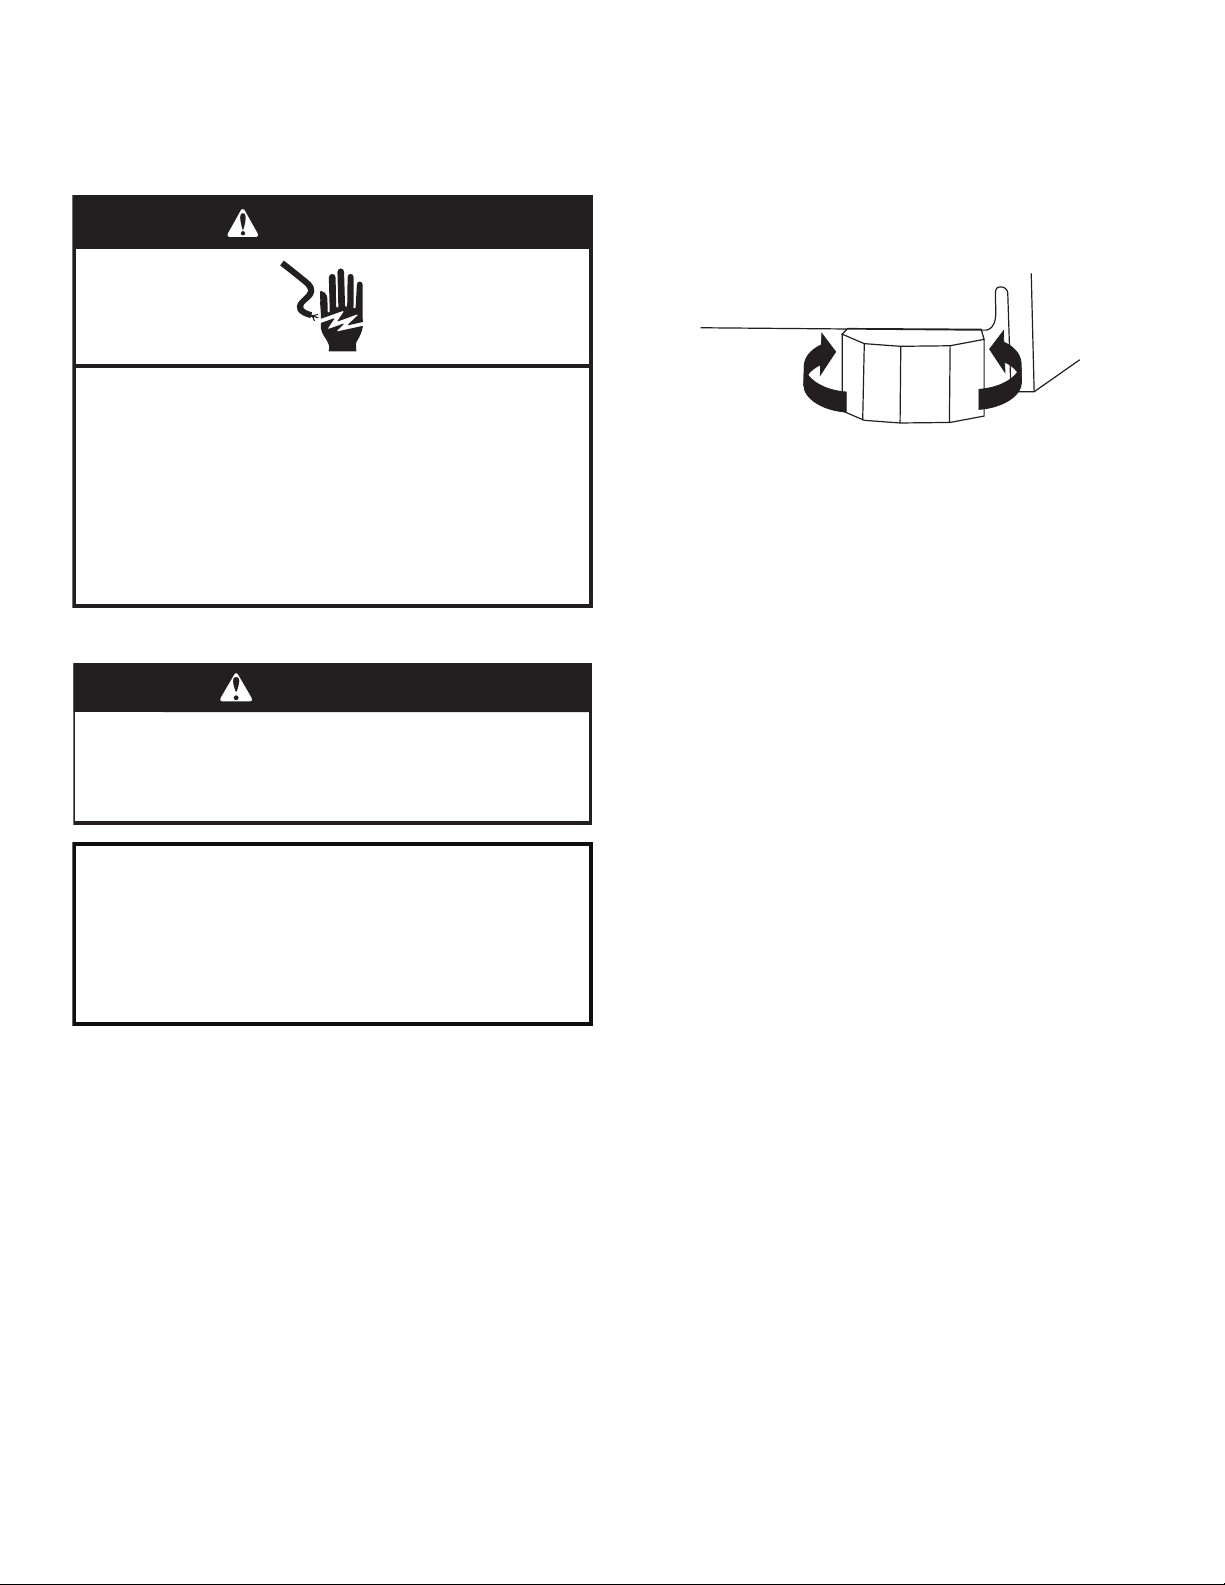
Your wine cellar has four leveling legs. If your wine cellar
seems unsteady or you want the door to close more
easily, adjust the wine cellar’s tilt using the instructions
below.
WARNING
Electrical Shock Hazard
Plug into a grounded 3 prong outlet.
Do not remove ground prong.
Do not use an adapter.
Do not use an extension cord.
Failure to follow these instructions can result in death,
fire, or electrical shock.
1. Plug into a grounded 3 prong outlet.
2. Move the wine cellar into its final location.
3. Turn the leveling legs to the right to lower the wine
cellar, or turn the leveling legs to the left to raise it. It
may take several turns of the leveling legs to adjust
the tilt of the wine cellar.
NOTE: Having someone push against the top of the
wine cellar takes some weight off the leveling legs.
This makes it easier to adjust the leveling legs.
4. Open the door and check that it closes as easily as
you like. If not, tilt the wine cellar slightly more to the
rear by turning both front leveling screws to the right.
It may take several more turns, and you should turn
both leveling legs the same amount.
WARNING
Excessive Weight Hazard
Use two or more people to move and install wine cellar.
Failure to do so can result in back or other injury.
When Moving Your Wine Cellar:
Your wine cellar is heavy. When moving the wine cellar for
cleaning or service, be sure to cover the oor with
cardboard or hardboard to avoid oor damage. Always pull
the wine cellar straight out when moving it. Do not wiggle or
“walk” the wine cellar when trying to move it, as oor
damage could occur.
10

CONTROLS
12 34 456 7895
USING WINE CELLAR
NOTE:
When the wine cellar is turned On for the first time,
the temperature defaults to the recommended
setting.
There are two adjustable temperature controls, one
for each compartment.
The left temperature and preset touch pads control
the temperature of the upper compartment.
The right temperature and preset touch pads control
the temperature of the lower compartment.
1. Turning Control On/Off
The first time that the wine cellar is plugged in, the
control will be in Cool Off mode. Cool On and Cool Off
will be the only options that display.
Press COOL ON for 3 seconds to turn on the wine
cellar. All menus and recommended temperature
settings will be displayed.
2. Auto Light Option
Features a proximity sensor in the base grille that
automatically ramps on the LED interior display
lighting when motion is detected. When motion is no
longer detected, the interior display light will turn off
after 2 minutes.
Press the AUTO LIGHT option to activate this
feature.
When the AUTO LIGHT is not activated, the
interior display light will only turn on when the
door is opened.
NOTE:
Leaving the light on for an extended period of
time will slightly increase the temperature of the
wine cellar.
4. Using Presets
For your convenience, your wine cellar also has
controls that are preset to recommended storage
temperature for specific wines. Pressing any preset
option will set the temperature to the recommended
temperature for the specified wine:
Assorted: 54°F (12°C)
Champagne: 46°F (7°C)
Red Wine: 64°F (17°C)
Sweet Wine: 42°F (5°C)
White Wine: 50°F (10°C)
5. Adjusting the Temperatures
To adjust set point temperatures, press “+” (plus) or
“-” (minus) until the desired temperature setting is
reached. The control is set correctly when the wine is
as cold as you like it.
NOTE:
The set point for the wine cellar is 50°F (10°C) for
both the upper and lower compartments. The set
point range for the upper compartment is 42°F to
54°F (5°C to 12°C) and 42°F to 64°F (5°C to 17°C) for
the lower compartment.
Wait at least 24 hours between adjustments
for the product to acclimate. Recheck
the temperatures before making further
adjustments.
6. Viewing Celsius/Fahrenheit
Temperatures
Press the F/C touch pad to toggle between displaying
the temperature in degrees Fahrenheit and degrees
Celsius. The corresponding indicator will illuminate.
3. Control Lock
Avoids unintended temperature changes and makes
it easy to clean the controls.
To activate Lock Mode, press and hold LOCK for
3 seconds. After the countdown, all other displays
will turn off and become unavailable except Cool
On, Cool Off and Lock.
7. Sabbath Mode
Allows the door of the wine cellar to be opened or
closed on the Sabbath or other religious holidays
without directly turning on or off any lights, digital
readouts, fans, valves, tones or alarms. By selecting
this feature, the temperature set points remain
unchanged, but the control panel lights, interior
lights, and control audio turn off. For most efficient
wine cellar operation, it is recommended to exit the
Sabbath Mode when it is no longer required.
Press and hold SABBATH for 3 seconds to turn on
the feature. After the 3 second countdown, the
feature will activate and all other displays will turn
Off.
Press and hold SABBATH for 3 seconds to turn off
the feature and turn on the display.
11
 Loading...