

Jenn-Air JUC2450ACX, JUC2450ARB, JUC2450ARS, JUC2450ARW Owner's Manual

J ENN-AIR
U NDER C OUNTER R EFRIGERATOR
OWNER’S
GUIDE
TABLE OF C O NTENTS
Introduction..............................................................................1
Safety ........................................................................................2
Installation ...........................................................................3–7
Operation ..................................................................................8
Features.....................................................................................8
Care and Cleaning ................................................................9
Before Calling for Service ................................................10
Warranty..................................................................................11
Guide de l'utilisateur..........................................................12
Guía del Usuario..................................................................24
Form No. A/05/03 Part No. 41007710 Litho U.S.A.

Introduction
Congratulations on the purchase of a Jenn-Air
Refrigerator.
We appreciate your purchase decision and feel
confident you will be happy with this appliance for
years to come. For best results, please read this guide
carefully. You will find instructions on the proper
operation and maintenance.
Should you ever need our future assistance with your
refrigerator, a complete model and serial number
recorded in the spaces below will be extremely helpful.
These numbers are found on a data plate located on
the upper left side inside the refrigerator.
Model Number__________________________________
Serial Number __________________________________
Purchase Date __________________________________
Dealer Name ___________________________________
Dealer Address _________________________________
Dealer Phone ___________________________________
Before Calling for Service . . .
If something seems unusual, please check the “Before
Calling For Service” section, which is designed to help
solve basic problems before calling a servicer.
What if These Features are Different
from Mine?
This book is intended to show the variety of features
that are available in the product line. If you have
questions, write us (include your model number and
phone number) or call:
Maytag Services
Attn: Jenn-Air CAIR®Center
P.O. Box 2370
Cleveland, TN 37320-2370
U.S.A and Canada 1-800-JENNAIR
1-800-688-2080 (U.S.A. TTY for hearing
or speech impaired)
(Mon.-Fri., 8 a.m.-8 p.m. Eastern Time)
Internet: http://www.jennair.com
SM
(1-800-536-6247)
What You Need to Know About
Safety Instructions
Warning and Important Safety Instructions appearing in
this manual are not meant to cover all possible
conditions and situations that may occur. Common
sense, caution and care must be exercised when
installing, maintaining or operating appliance.
Always contact your dealer, distributor, service agent or
manufacturer about problems or conditions you do not
understand.
Recognize Safety Symbols, Words,
Labels
DANGER
DANGER – Immediate hazards which WILL result in
severe personal injury or death.
WARNING
WARNING – Hazards or unsafe practices which
COULD result in severe personal injury or death.
CAUTION
CAUTION – Hazards or unsafe practices which COULD
result in minor personal injury.
1
Important Safety Instructions
WARNING
•When using your appliance, always follow basic
precautions.
• Use the refrigerator only for its intended purpose.
•To prevent possibility of hazard due to electrical
shock, never plug the refrigerator in to a receptacle
which has not been grounded adequately and in
accordance with the local and national electrical
codes. See warning and the grounding
instructions that follow.
• Disconnect the power cord to the refrigerator before
cleaning, servicing or replacing a light bulb.
• In case of power failure, minimize door openings.
• Any electrical service cord that becomes frayed or
damaged should be immediately repaired or
replaced. Never unplug your appliance by pulling on
the power cord.
•To prevent fire hazard, your refrigerator should not be
operated in the presence of gasoline or other
flammable vapors and liquids.
WARNING
•This appliance is designed to operate on a normal
115 volt, 15 amp, 60 cycle line. There should be a
separate, grounded circuit serving this appliance
only. Do not use an extension cord. Do not use
any device that will alter the electrical
performance of this appliance.
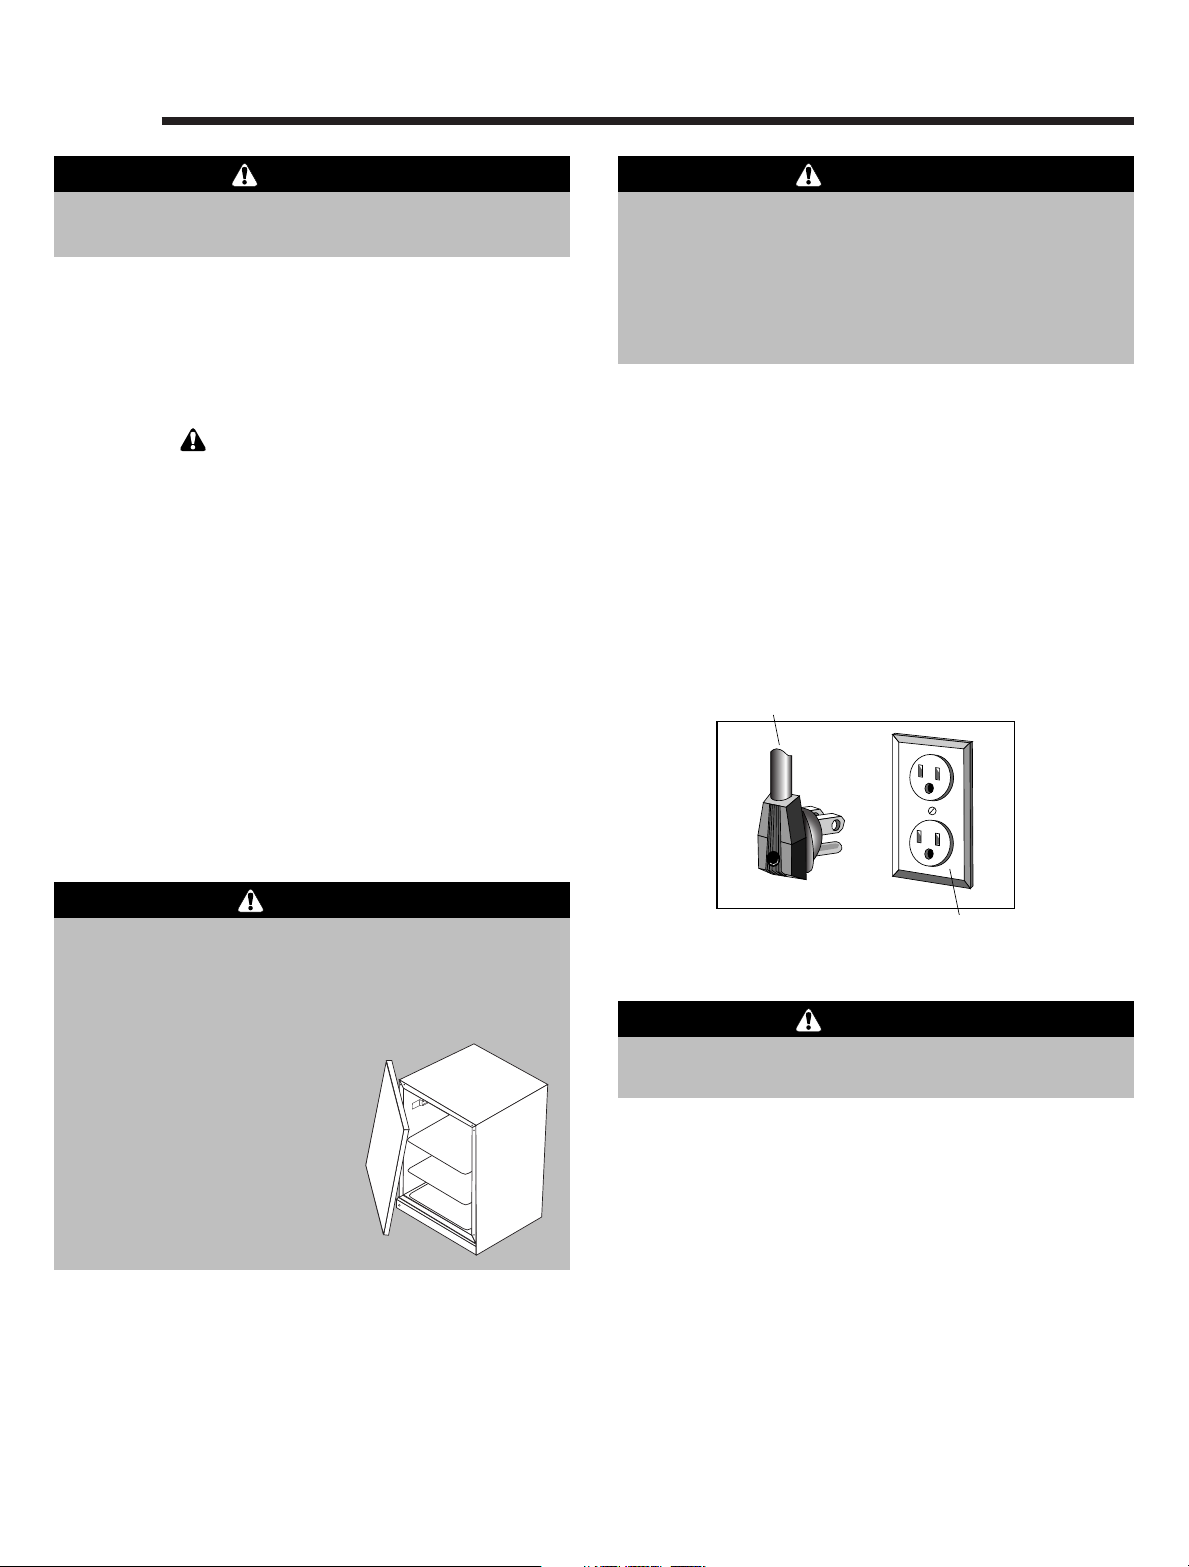
This appliance is equipped with a three-pronged
grounding plug for your protection against possible
electrical shock hazards. It must be plugged in to a
grounding receptacle. Where a standard two-prong
wall receptacle is encountered, it is the personal
responsibility and obligation of the customer to have it
replaced with a properly grounded three-prong wall
receptacle. Do not, under any circumstances, cut or
remove the third (ground) prong from the power cord.
Do not use an adapter plug.
Power Supply Cord With
3-prong Grounding Plug
•To prevent injury, children should not climb, hang or
stand on this refrigerator.
DANGER
Child entrapment and suffocation are not problems
of the past. Junked or abandoned refrigeration
products are still dangerous…even if they will sit for
“just a few days.” If you are getting rid of your old
refrigeration products, please
follow the instructions below
to help prevent accidents.
•Take off the doors.
•Leave the shelves in place
so that children may not
easily climb inside.
Grounding Type
Wall Receptacle
WARNING
• This refrigerator should not, under any
circumstances, be ungrounded.
Save These Instructions For Future Reference
2
Installation
Materials Needed
1
•
⁄8" Allen wrench
5
•
⁄16" socket
• Phillips screwdriver
•Putty knife
• Carpenter’s level
Select Location
The refrigerator was designed to be installed under the
counter. Its proper location will ensure peak
performance. Choose a location indoors, away from
heat and out of direct sunlight. Best performance will
be maintained when installed within the following
parameters:
Ideal Ambient
Temperature Range
Built-In..........................................................65-80° F
(18.3-26.7° C)
Provisions for electricity should be determined before
placing the refrigerator in its final location (see page 2).
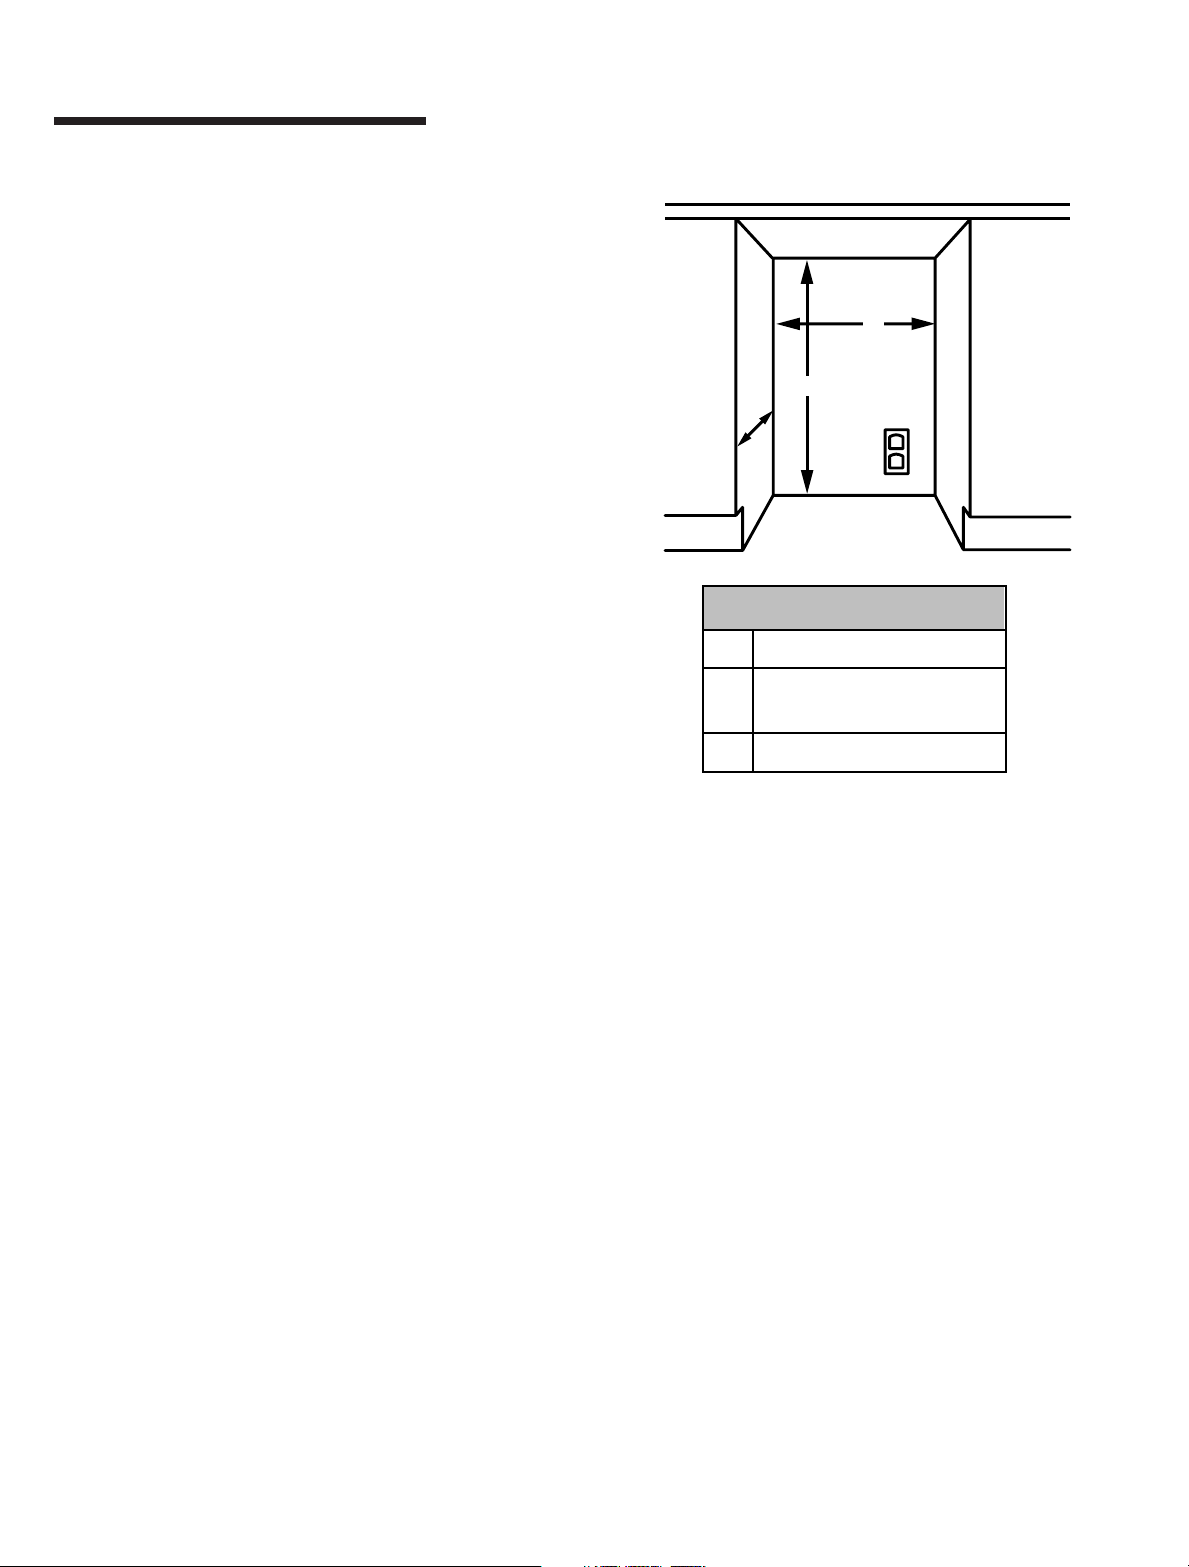
Cabinet Cutout Dimensions
A
B
C
UNDER COUNTER CUTOUT
A 24" (61.0 cm)*
1
B Min. 34
Max. 35
C 24
⁄2" (87.6 cm)
1
⁄4" (89.5 cm)
1
⁄8" (61.3 cm)
* If door is recessed between cabinets, cabinet cutout
1
must be 24
⁄4" (61.6 cm).
Cabinet Clearance
Ventilation is required from the bottom front
section of the refrigerator for efficient operation.
Keep this area open and clear of any obstructions.
The adjacent cabinets and countertop can be built
around the refrigerator as long as no top trim or
countertop is installed lower than the top of the hinge.
Installation should allow for the refrigerator to be
moved if service is ever required.
3
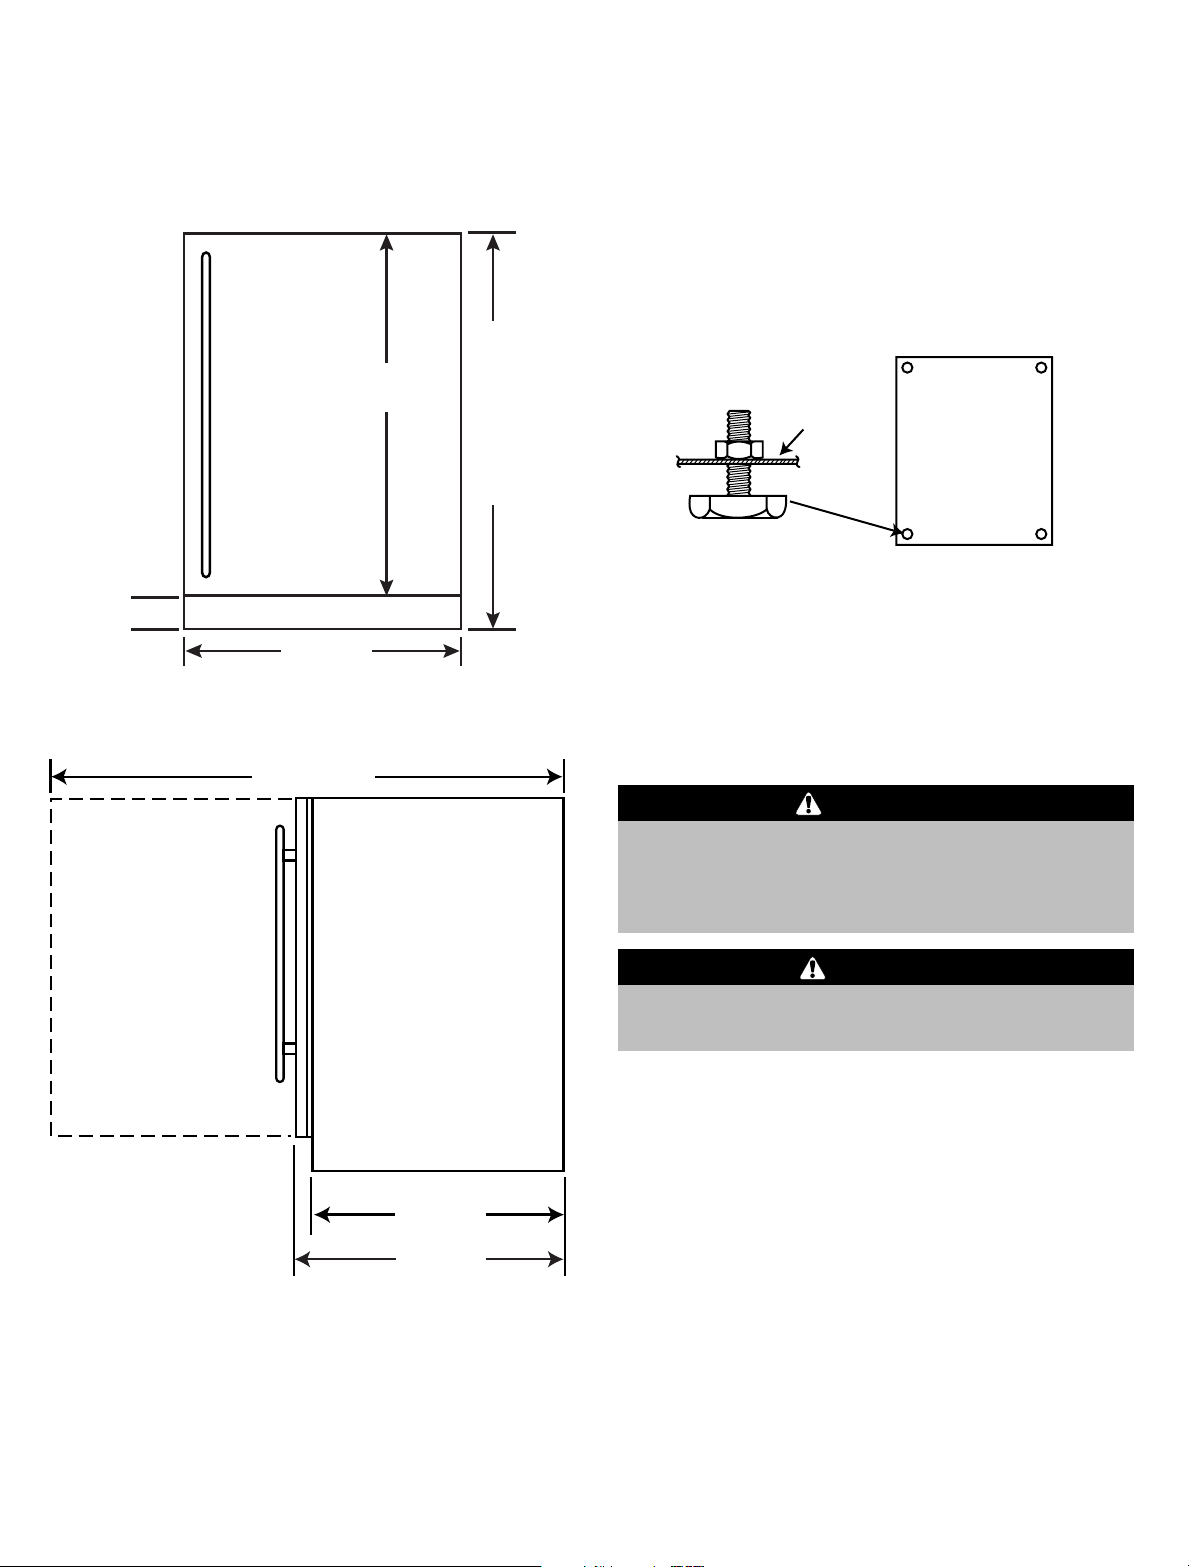
Dimensions Leveling Legs
Front
3"
(7.6 cm)
Side
7
23
⁄8"
(60.6 cm)
1
47
⁄4"
(120.0 cm)
5
30
⁄16"
(77 cm)
min. 34"
(86.4 cm)
max. 35"
(88.9 cm)
with
leveling
legs fully
extended
Install leveling legs (located in literature pack):
•At least 2 people are needed to tip the refrigerator
backwards until there is approximately 12" (30.5 cm)
of clearance between the floor and the refrigerator.
Weldnut
(each bottom
corner of
refrigerator)
Bottom of
Refrigerator
Leveling Leg
(4 per refrigerator)
• Screw one front leveling leg into the screw
impression found in each corner. Leveling legs
should be screwed in until snug.
•Repeat the above procedures to install the rear
leveling legs.
WARNING
22"
(55.9 cm)
1
24
⁄4"
(61.6 cm)
• To prevent injury, one person should not attempt to
tilt the refrigerator by himself. Have someone else
assist to prevent the refrigerator from falling during
leveling leg installation.
CAUTION
•The refrigerator should remain upright at least
30 minutes prior to plugging it in.
Level the Refrigerator
Using a carpenter’s level, check to be sure the
refrigerator is level from side to side and from front to
back. Leveling adjustments can be made by turning
the leveling legs counter-clockwise to increase height
and clockwise to decrease height.
NOTE: The refrigerator should not wobble. Use shims
to add stability when needed.
4

Installation, cont.
Reversing the Door
WARNING
•To avoid electrical shock which can cause severe
personal injury or death, disconnect power to the
refrigerator before reversing the door.
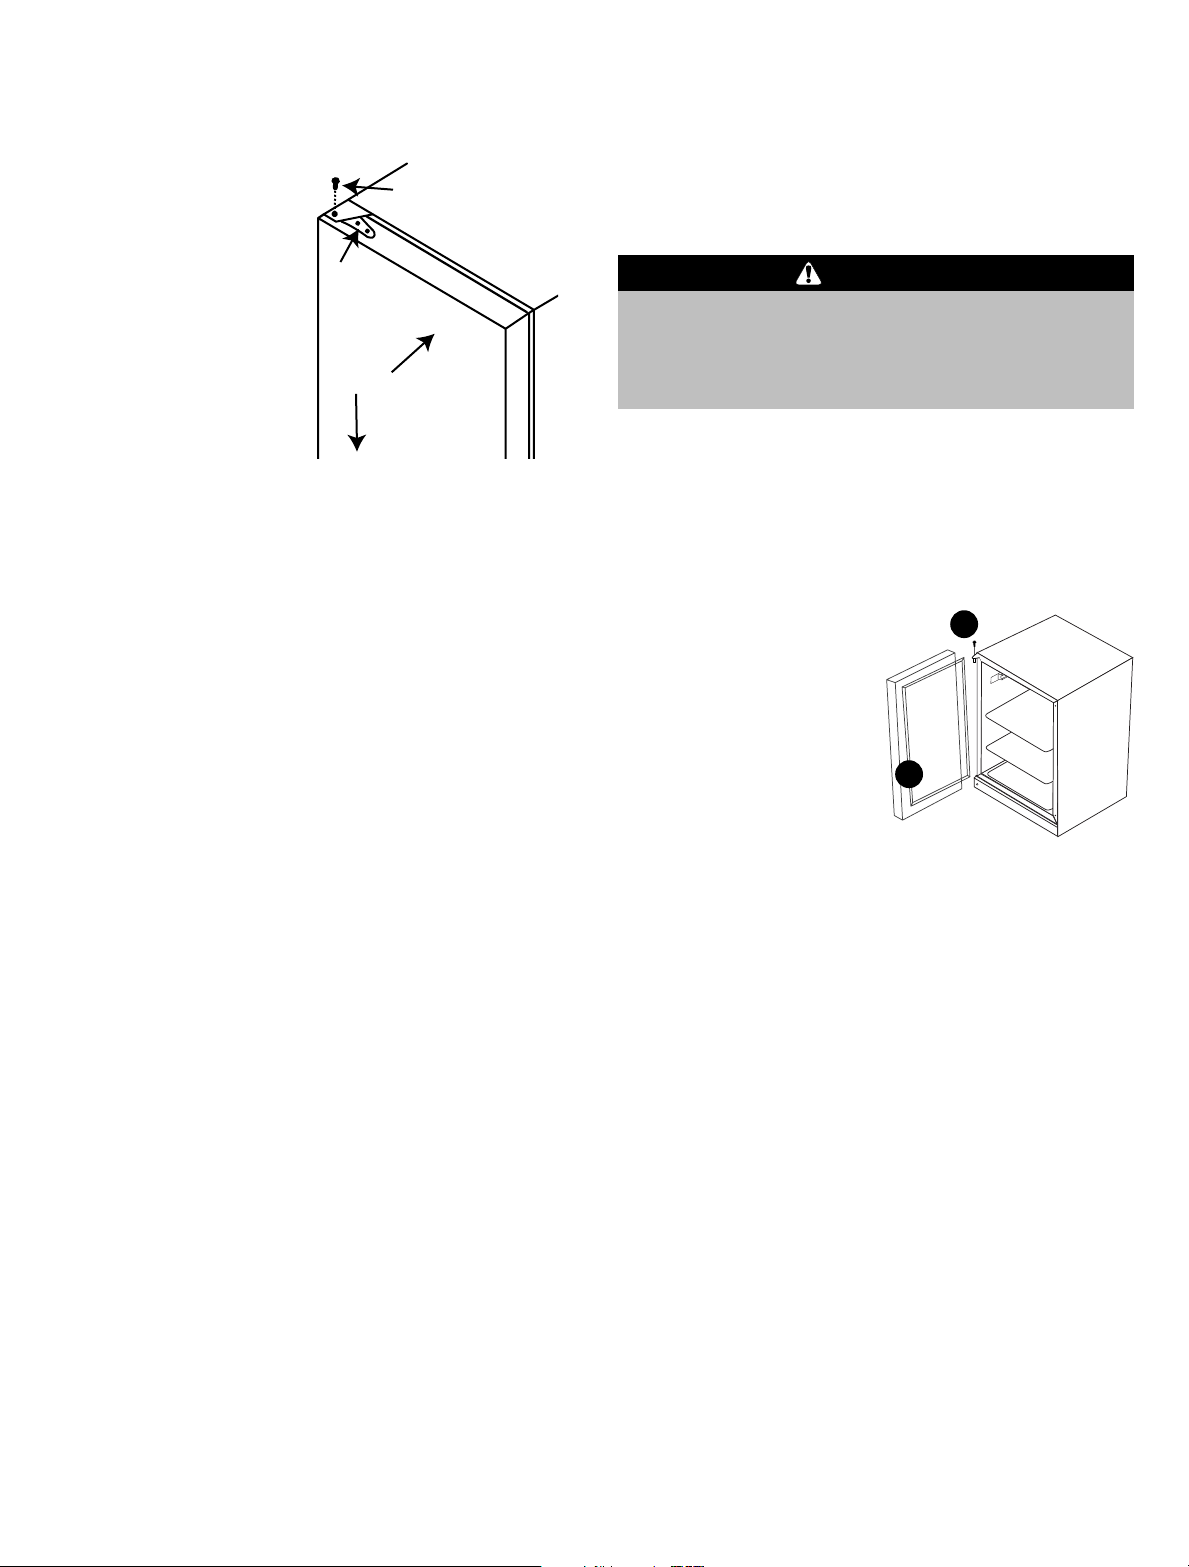
1. Turn OFF the refrigerator
and disconnect the
power. Remove top
hinge pin with a
1
⁄8" Allen wrench.
Remove door by pulling
it out and upward off
bottom hinge pin. Set
aside, face down on
surface that will not
scratch the finish.
Remove the small plastic washer from bottom
hinge pin.
2. Remove the six small
plastic hole plugs from the
left hand hinge holes
using the putty knife.
Using a
wrench or nut-driver,
remove bottom hinge.
Reinstall hinge, moving it
to the top left hand side.
Using a
from the top left hinge, and install in top right
hinge. Now move top right hinge to left bottom.
Reinstall the small plastic washer on the bottom
hinge pin. Install hole plugs in right side.
5
⁄16" socket,
1
⁄8" Allen wrench, remove the hinge pin
Out
Top of
Refrigerator
Hinge
Bracket
Up
Hole Plugs
Move
Hinge
Pin
• Using a Phillips screwdriver, remove the 6 screws
that are attaching the liner to the door. The
screw covers will rotate with the screws.
• Rotate the door liner 180º and align the screw
holes in the door liner with the well nuts in the
door.
• Reinstall the screws into the well nuts by first
starting all 6 screws and then tightening all 6
screws. This will reattach the door liner to the
door. Close the screw covers.
• Move the striker plate to the opposite end of the
door.
NOTE: Be sure to install the spacer behind the
striker plate in its correct orientation. Failure to
do this can interfere with the ability to reinstall
the striker plate correctly.
• Reinstall the door seal by pressing it into the
door channel, making certain the corners are
fully inserted.
Door
Door liner
Well nuts
Rotate
180°
Spacer
3. Reverse the door interior liner.
• Remove the door seal.
• Open the 6 hinged screw covers
found on the door liner by
sliding the blade of thin putty
knife into the seam on each
cover (be careful not to run the
knife through the hinge found
on each screw cover).
5
Striker plate
Seam
Hinge
4. Reinstall the door by
locating it over the
bottom hinge pin and
pushing down and in.
Reinstall the top
hinge pin. Check the
Hinge
Bracket
Hinge
Pin
Top of
Refrigerator
door for proper
alignment. The top
In
and sides of the door
should run parallel to
the top and side
Down
edges of the cabinet.
Some misalignment is acceptable, but the door
gasket must seal fully against the cabinet.
Realigning the door may be necessary. Using a
Allen wrench, loosen the two screws on the top
and bottom adjustable door hinge bracket. Adjust
the door to proper alignment. Make sure door
gasket seals fully against the cabinet front.
Retighten screws after making adjustments.
5. Reconnect power to the refrigerator and turn
the control back to the ON setting.
Installing the Custom Door
Panel (select models)
WARNING
•To avoid electrical shock which can cause severe
personal injury or death, disconnect power to
refrigerator before installing the custom door
panel.
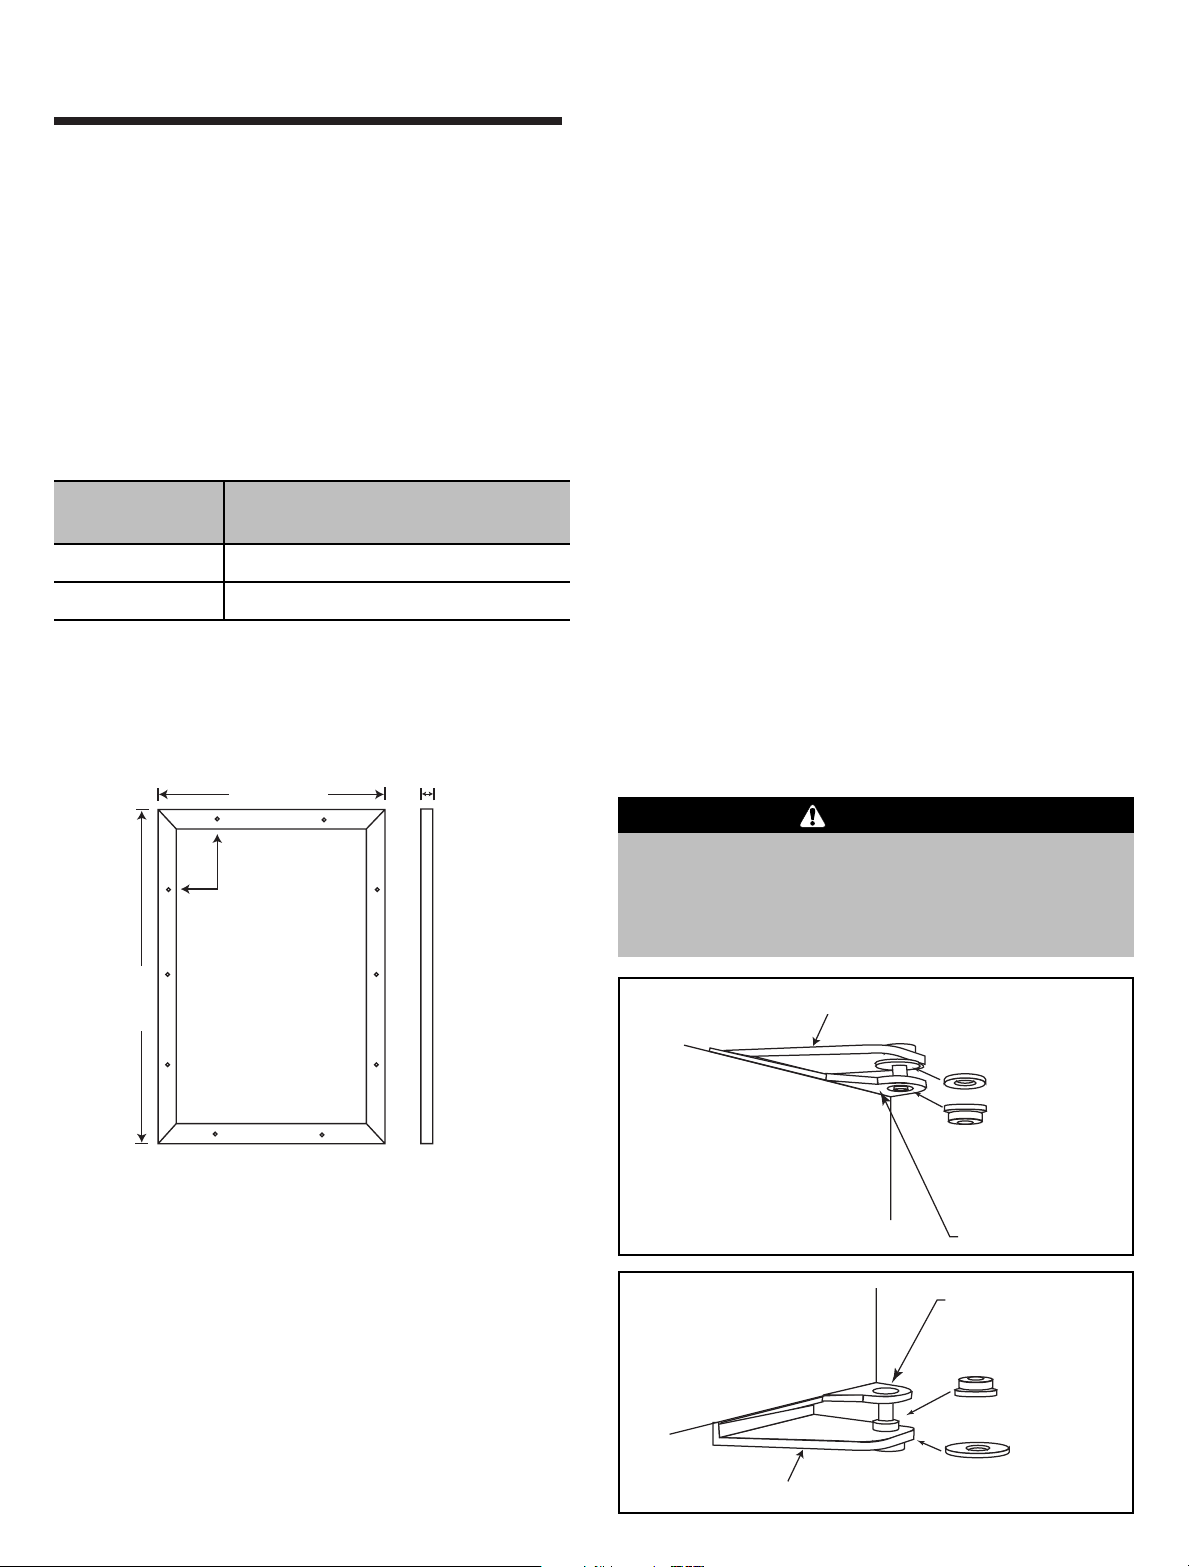
The dimensions for a decorative custom door panel are:
3
23
⁄4" (60.3 cm) Width
5
30
⁄16" (77 cm) Height
3
1
⁄8"
⁄4" (1.9 cm) Thickness (maximum)
1. Turn OFF the refrigerator and disconnect the
power.
2. Remove
1
⁄8" top hinge
A
pin (A). Remove the
door off the bottom
hinge pin, noting
washer location.
3. Remove the door seal
B
(B) to expose the screw
holes.
Custom Handle
1. A custom handle (not supplied) must be installed.
2. Drill pilot holes through the custom panel to match
the handle. Countersink the holes on the back of
the panel.
3. Attach the custom handle to the front door panel
assembly.
NOTE: The custom handle screws should be installed
through the custom panel and into the custom handle.
The screw heads should be countersunk, so the inside
panel surface can be installed flush with the
refrigerator door.
6
Installation, cont.
Wood Screws
1. #8 pan head wood screws are recommended to
properly secure the custom wood panel to the
refrigerator door.
2. A total of 10 screws are needed.
3. Use only pan head screws.
4. Be sure the screw length is NOT longer than the
wood thickness at the screw locations.
5. Use the following pilot hole drill sizes.
Type of Pilot Hole Drill Size for
Wood #8 Pan Head Wood Screws
Hardwood
Softwood
3
⁄32" (.23 cm)
5
⁄64" (.20 cm)
Prepare the Wood Panel
3
23
⁄4"
(60.3 cm)
10 Pilot Hole
Locations
Custom panel
thickness:
5
⁄8" to 3⁄4"
(1.6-1.9 cm)
Attach the Wood Panel to the
Refrigerator Door
1. Place the custom wood panel on a non-abrasive
surface, protected by towels or rugs, to avoid
accidental damage to the door finish.
2. Place the refrigerator door flush with the inside
surface of the custom wood panel. Clamp the
wood panel to the door, if necessary.
3. Mark the hole locations with a pencil.
4. Drill the pilot holes into the custom panel.
5. Insert the wood screws through the back of the
door and into the pilot holes in the custom wood
panel and tighten.
6. Reinstall the door seal by pressing it into the door
channel, making certain the corners are fully
inserted.
7. Install the door back on the refrigerator using the
supplied plastic washers (as shown below).
8. Realigning the door may be necessary (see page 6).
CAUTION
• Door can become disengaged if washers are not
installed.
• Door may not swing properly if all nylon components
are not installed as shown.
7
5
30
⁄16"
(77 cm)
Inside of Door
Cabinet Hinge
Top Hinge Corner
Bottom Hinge
Corner
Cabinet Hinge
Washer
(Optional)
Shoulder Bushing
Door Hinge
Door Hinge
Shoulder Bushing
Washer
Operation
Features
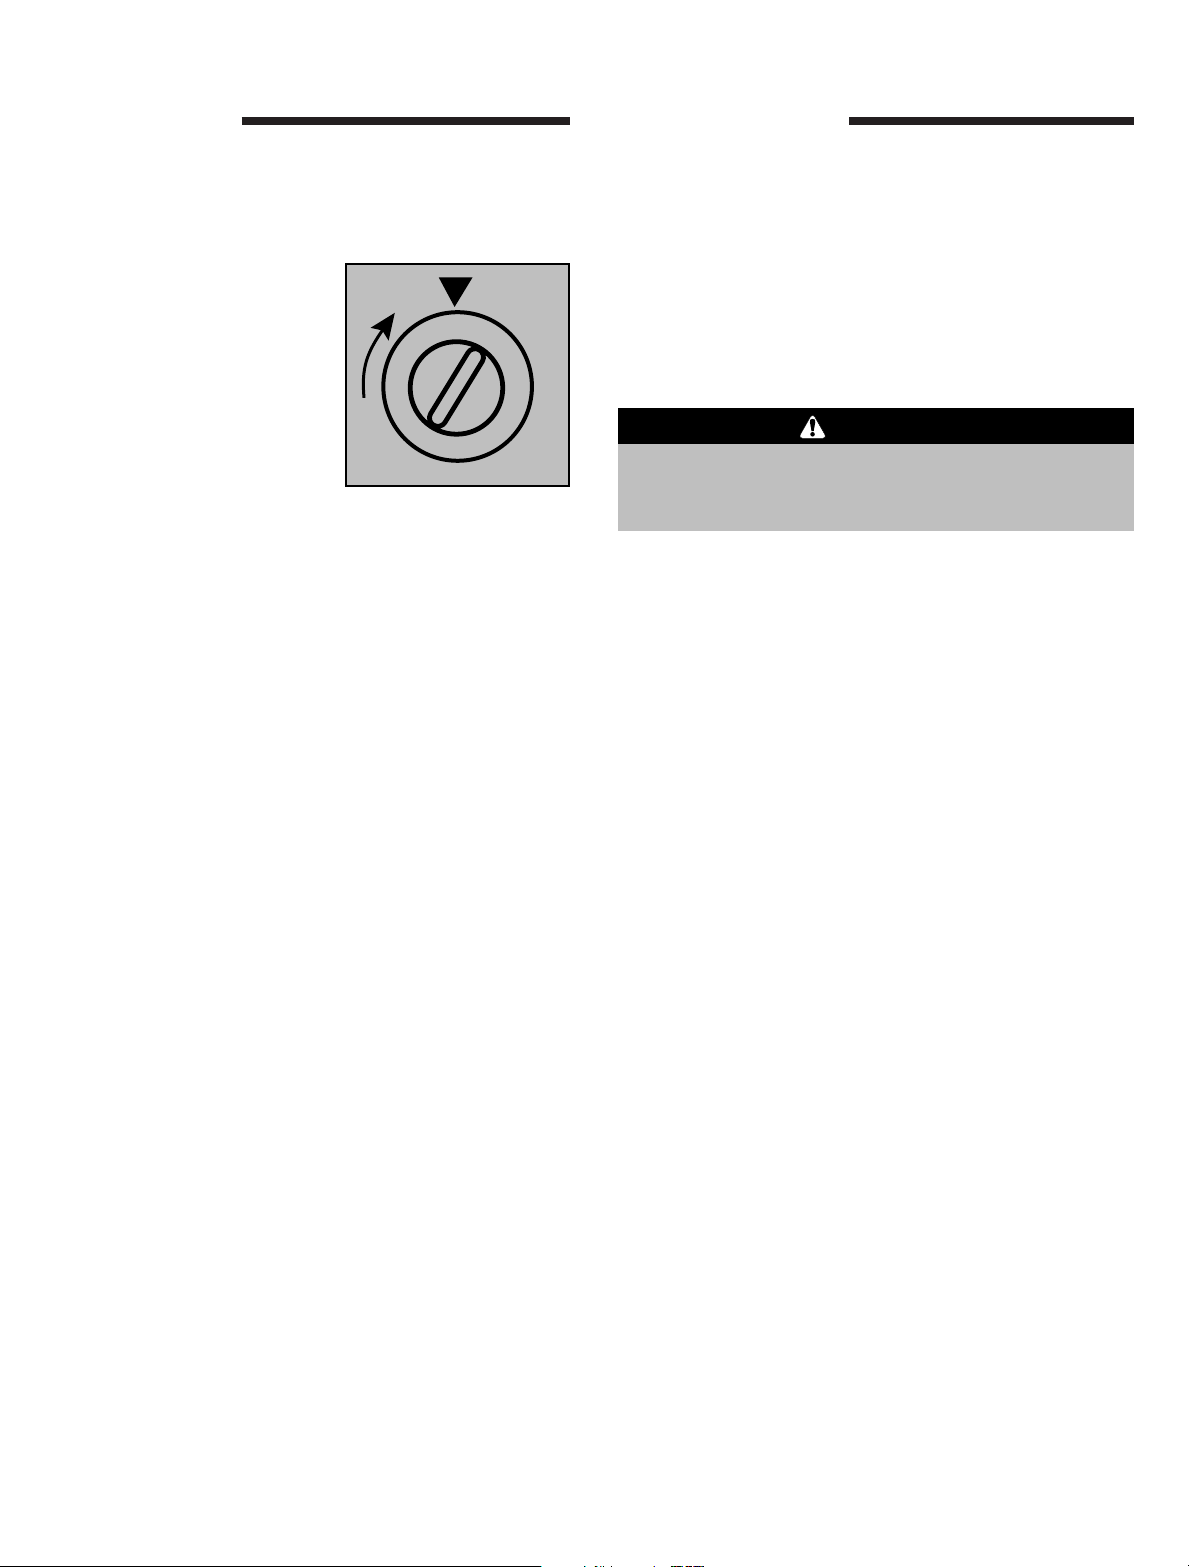
1. Setting the Control:
The temperature control knob is located at the
bottom front of the refrigerator, near the center of
the grille.
Initially turn the control
clockwise to the middle
thermostat setting (4).
Allow at least 48 hours
for the refrigerator to
stabilize before making
any adjustments to the
initial setting.
The temperature can be adjusted by turning the
control clockwise for a colder temperature or
counterclockwise for a warmer temperature.
All refrigerator models automatically defrost. No
manual defrosting is required.
NOTE: Turning the control knob to OFF stops
cooling but does not shut off power to the
refrigerator. To disconnect power, the refrigerator
must be unplugged or the circuit breaker or fuse
board turned off.
F
F
O
1
2
3
7
4
Interior Light
The interior light makes it easy to view what is stored
in the refrigerator.
The light automatically comes on when the door is
opened.
6
R
E
D
5
L
O
C
Adjustable Shelves
CAUTION
• To prevent injury, do not attempt to adjust a shelf
while it is loaded. Always empty the shelf prior to
adjusting it or moving it to another location.
The interior refrigerator shelves are adjustable.
The shelves rest on rails formed in the side of the
refrigerator cabinet.
To adjust shelf height:
• Unload the shelf completely.
•Lift the rear of the shelf up slightly.
•Pull the shelf straight out.
• Slide the shelf onto an alternative railing.
8

Care and Cleaning
Cleaning Light Bulb Replacement
WARNING
•To avoid electrical shock which can cause severe
personal injury or death, disconnect power to the
refrigerator before cleaning.
• Condenser: The condenser tubing inside the
refrigerator does not require frequent cleaning;
however, satisfactory cooling depends on adequate
ventilation over the coils. Be sure that nothing
obstructs the required air flow openings in front of
the refrigerator. At least twice a year, brush or
vacuum lint and dirt from the condenser for efficient
performance by unscrewing the grille on the bottom
front of the refrigerator.
• Cabinet: The painted cabinet can be washed with
mild detergent and water, and thoroughly rinsed with
clear water. Never use abrasive scouring powders.
• Stainless Steel Door: Use a soft cloth or sponge
and wipe with the grain of the stainless steel. Use
mild detergent and water for light soil, Bon Ami* for
more moderate soil and Cameo Stainless Steel
Cleaner* for discoloration. Do not use chlorine
bleach or products containing chlorine bleach on
stainless steel.
After cleaning, rinse and dry. To restore luster and
remove streaks, follow with Stainless Steel Magic
Spray* (Jenn-Air model A912, part number
20000008).
WARNING
•To avoid electrical shock which can cause severe
personal injury or death, disconnect power to the
refrigerator before replacing light bulb. After
replacing light bulb, connect power.
CAUTION
To avoid personal injury or property damage,
observe the following:
• Allow light bulb to cool.
•Wear gloves when replacing light bulb.
The refrigerator uses a 15-watt appliance light bulb. To
replace the light bulb, proceed as follows:
1. Unplug the power cord from the wall receptacle.
2. Open the cabinet door.
3. Remove lower shelf.
4. Remove the 3 screws on the front face of the light
lens.
5. Remove the lens.
6. Unscrew the existing bulb and replace with an
equivalent 15-watt, threaded, intermediate base
appliance bulb. Do not replace with a bulb higher
than 15 watts.
7. Reassemble.
• Interior: Wash interior compartment with mild
detergent and water. Do not use an abrasive
powder, solvent, polish cleaner or undiluted
detergent.
• Door Gasket: The vinyl gasket may be cleaned with
mild detergent and water or a solution of
2 tablespoons baking soda to 1 quart of warm water.
* Brand names for cleaning products are registered trademarks of the respective manufacturers.
9
8. Reconnect power.
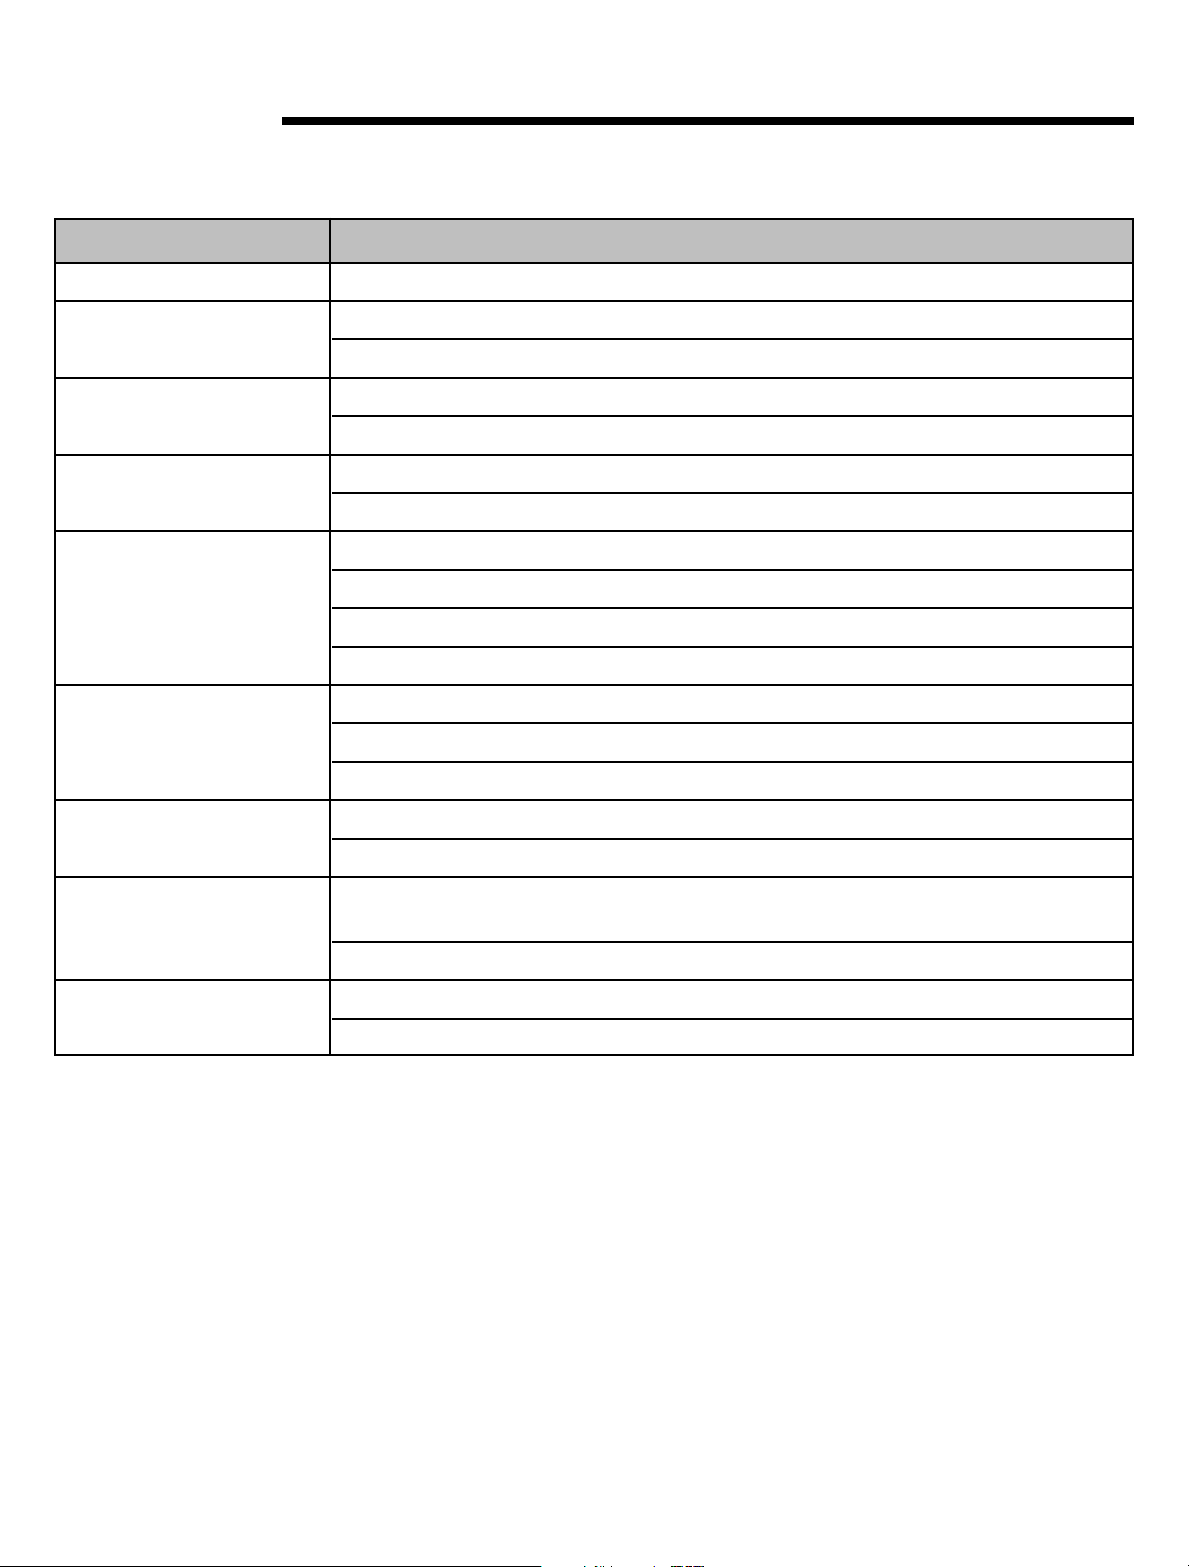
Before Calling for Service
Before calling for service check the troubleshooting table below. This table lists possible problems that you can
remedy without difficulty to avoid an unnecessary service call.
PROBLEM POSSIBLE CAUSE/SOLUTIONS
Odor in refrigerator • Interior needs cleaning.
Noisy operation • Refrigerator not level.
•Weak floor.
Refrigerator cabinet • Refrigerator not level.
vibrates
Refrigerator light • Bulb burned out.
not working
Appliance will not run • Temperature control turned to OFF.
•Weak floor.
• No power at outlet.
•Line cord not plugged in.
• No power to electrical outlet.
• House fuse blown.
Appliance runs long • Prolonged door openings.
• Control set too cold.
• Condenser needs cleaning.
Moisture collects inside • Too many door openings.
• Hot, humid weather increases condensation.
Moisture collects on • Hot, humid weather increases condensation.
outside surface As humidity decreases, moisture will disappear.
• Control improperly set.
Interior too hot/too cold • Control improperly set.
•Temperature is being checked with a faulty thermometer.
If you do need service, contact your dealer or the manufacturer. In any correspondence, refer to the model number
and serial number of your refrigerator which is located on the lower front refrigerator flange. Retain your proof of
purchase. Record these numbers in the space provided on page 1.
10
 Loading...