

Jenn-Air JTO500BAAB, JTO500EAAU, JTO500NAAN, JTO500SAAS, JTO500UAAU Owner's Manual
JENN-AIR™toasteR
model no. jto500
USER GUIDE
Part No.399-60-000600
4/05
1
JENN-AIR
™
TOASTERS
Congratulations on your purchase of a Jenn-Air™toaster. Inspired by classic
Italian design, Jenn-Air captures the European appetite for life – combining art,
form and function into beautiful appliances for your home.
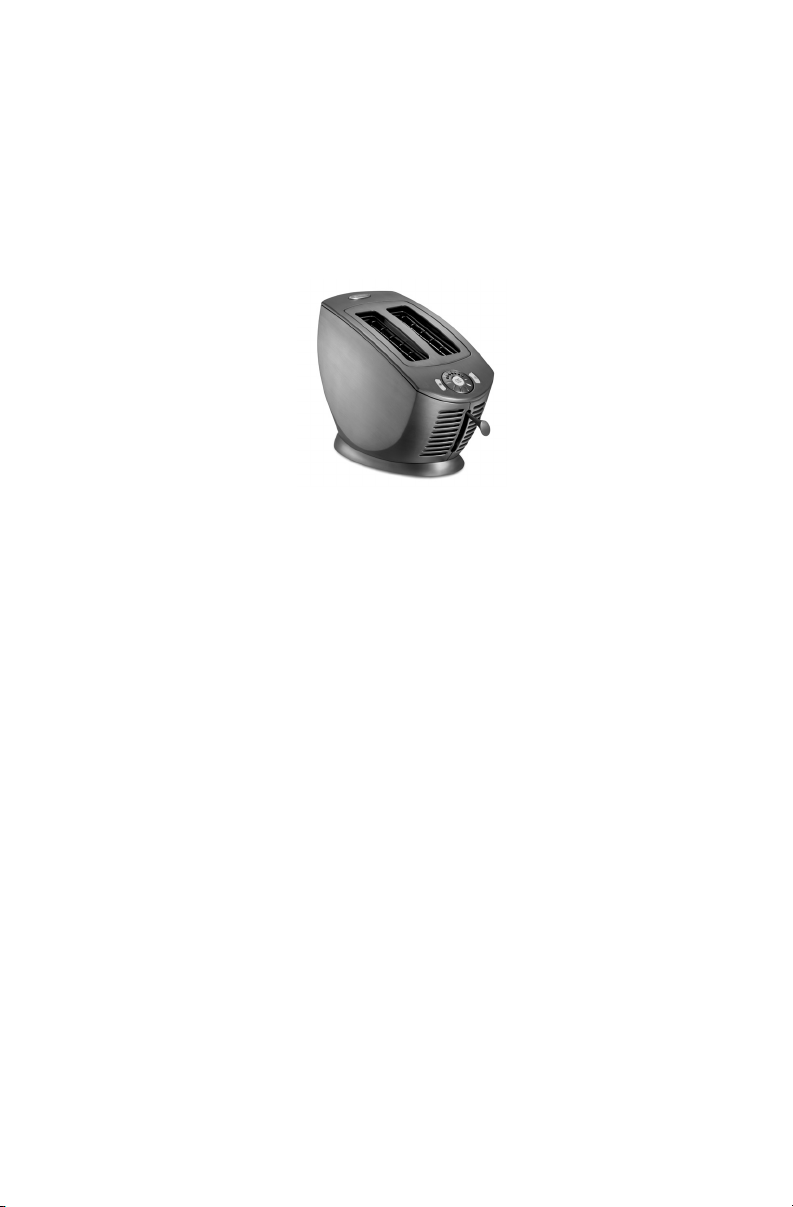
Your elegant Jenn-Air toaster is designed with a unique angled body with all metal
construction. It’s as durable as it is beautiful and has a number of unique features
you’re sure to enjoy.
The touch wheel control features seven unique shade settings with soft blue LED
indicator lights. Dual extra-wide slots accommodate the widest variety of breads,
bagels and pastries.The Jenn-Air toaster also features exclusive Auto-Adjust heating
elements that move to maintain the optimum distance between heat and toast,
giving you uniform, consistent browning slice after slice.And our innovative Keep
Wa rm feature keeps toast warm until you’re ready.
The Jenn-Air toaster is the newest companion to our unique line of blenders and
mixers.And of course, a beautiful addition to our broad line of fine built-in kitchen
major appliances. Jenn-Air. For the love of cooking™.

2
Proof of Purchase
and Product Registration
Always keep the sales receipt showing the date of purchase of your toaster.
Please return the product registration card packaged with this unit or visit
www.JennAir.com to register online. Returning this card will allow us to contact
you in the unlikely event of a product safety recall notification and assist us in
complying with the provisions of the Product Safety Recall Act.
Please complete the following for your personal records:
Model Number ________________________________________________
Serial Number ________________________________________________
Date Purchased ________________________________________________
Store Name ________________________________________________
Table of Contents
Safety Instructions . . . . . . . . . . . . . . . . . . . . . . . . . . . . . . . . . . . . . . . . . . 3-5
Parts and Features . . . . . . . . . . . . . . . . . . . . . . . . . . . . . . . . . . . . . . . . . . . 5-6
Before Using Your Toaster . . . . . . . . . . . . . . . . . . . . . . . . . . . . . . . . . . . . . . . 7
Operating Your Toaster . . . . . . . . . . . . . . . . . . . . . . . . . . . . . . . . . . . . . . . . 7-8
Toasting Tips . . . . . . . . . . . . . . . . . . . . . . . . . . . . . . . . . . . . . . . . . . . . . . 8-9
Checking on the Toasting Process . . . . . . . . . . . . . . . . . . . . . . . . . . . . . . . . 9
Canceling the Toasting Cycle . . . . . . . . . . . . . . . . . . . . . . . . . . . . . . . . . . . 9
Special Features . . . . . . . . . . . . . . . . . . . . . . . . . . . . . . . . . . . . . . . . . . . 9-10
Bagel Setting . . . . . . . . . . . . . . . . . . . . . . . . . . . . . . . . . . . . . . . . . . . . . . 9
Defrost Setting . . . . . . . . . . . . . . . . . . . . . . . . . . . . . . . . . . . . . . . . . . . . 10
Care and Cleaning . . . . . . . . . . . . . . . . . . . . . . . . . . . . . . . . . . . . . . . . . . . 11
Changing the Accent Base . . . . . . . . . . . . . . . . . . . . . . . . . . . . . . . . . . . . . . 12
Before You Call for Service . . . . . . . . . . . . . . . . . . . . . . . . . . . . . . . . . . . . . 13
Wa r ranty . . . . . . . . . . . . . . . . . . . . . . . . . . . . . . . . . . . . . . . . . . . . . . . . . 14
Contacting Customer Service . . . . . . . . . . . . . . . . . . . . . . . . . . . . . . . . . . . 15
Guide de L’utilisateur . . . . . . . . . . . . . . . . . . . . . . . . . . . . . . . . . . . . . . . . . 16
Guía del Usuario . . . . . . . . . . . . . . . . . . . . . . . . . . . . . . . . . . . . . . . . . . . . 30
What You Need to Know
About Safety Instructions
Wa r ning and important safety instructions appearing in this manual are not meant to
cover all possible conditions and situations that may occur. Common sense, caution
and care must be exercised when installing, maintaining or operating this appliance.
Always contact your dealer, distributor, service agent or manufacturer about problems or conditions you do not understand.
Important Safeguards
When using electrical appliances, basic safety precautions should always be
observed, including the following:
1. Read all instructions.All users of this toaster must read and understand all instructions in this User Guide before attempting to operate or clean this appliance.
2.To protect against risk of electrical shock, do not immerse the cord, plug or
toaster in water or other liquids.
3. Close supervision is necessary when any appliance is used by or near children.
4.To disconnect when not in use, ensure all controls are in the “Off” position.
The START/STOP button should not be illuminated.Then unplug toaster
from wall outlet.
5. Do not touch hot surfaces.Use handles or knobs. Always use caution when moving.
6.Allow the toaster to cool before storing. Unplug the toaster from outlet when
not in use and let it cool before cleaning.
7. Use only approved flat style Jenn-Air toaster power cord to operate the toaster.
Due to temperature requirements, do NOT use other Jenn-Air small appliance
power cords to operate the toaster. Do not operate any appliance with a damaged cord or plug or after the appliance malfunctions, is dropped or damaged
in any manner. Return appliance to the nearest authorized service facility for
examination, repair, electrical or mechanical adjustment. Call the Jenn-Air
Customer Service Center at 1-866-982-3313 for assistance.
8.Always unplug the power cord from the wall outlet first, then disconnect from
the toaster if desired for storage. Do not unplug appliance by pulling on power
cord.Always grasp the plug and pull to disconnect.
Your safety and the safety of others is very important.
We have provided many important safety messages in this manual and on your appliance.Always
read and obey all safety messages.
This is the safety alert symbol.
This symbol alerts you to potential hazards that can kill or hurt you and others.
All safety messages will follow the safety alert symbol and the word “WARNING”.
This words means:
WARNING indicates hazards or unsafe practices which COULD
result in severe personal injury or death.
All safety messages will tell you what the potential hazard is, tell you how to reduce the chance of
injury, and tell you what can happen if the instructions are not followed.
WARNING
3

9. Never leave the power cord plugged into the wall outlet when disconnected from the toaster.
10. Using accessories or attachments not recommended or sold by the appliance
manufacturer for use with this model, including sandwich racks or bun warmers,
is not recommended and may cause fire, electric shock or injury to persons.
11. Do not use the toaster outdoors or in damp, humid environments.
12. Do not let the cord hang over the edge of a table or counter. Do not let cord
contact hot surfaces, including stove or cooktop.
13. Do not place on or near a hot gas or electric burner, or in a heated oven.
14. Do not insert oversized foods, metal packages, foil,utensils or materials of any
kind into the toaster as they may introduce the risk of fire or electric shock.
15. Fire may occur if the toaster is covered or touching any flammable material,
including fabrics, walls, wall coverings, towels, curtains, draperies or like materials when in operation.
16. Do not put paper towels, cardboard, paper or plastic under the toaster.
17. Never leave toaster unattended while in operation.
18. Do not insert broken pieces of bread or other bread products into the slots.
19. Do not attempt to dislodge food when toaster is plugged in.
20. Do not use an extension cord with this toaster. If the power supply cord is too
short, have a qualified electrician install an outlet near the appliance.
21. Do not use the toaster without the crumb tray in place.
22. This product is designed for household use only. Do not use toaster for other
than intended purpose.
23. If this toaster begins to malfunction during use, immediately cancel the toasting
cycle and unplug the power cord from the electrical outlet. Do not use or
attempt any repair to the malfunctioning appliance.
24.To reduce the risk of electrical shock or fire, do not take apart the toaster for any
reason.All repairs must be performed only by factory authorized personnel.
SAVE THESE INSTRUCTIONS FOR FUTURE REFERENCE.
Electrical Grounding Instructions – This appliance is equipped with a (3-
prong) grounding plug for your protection against shock hazard and it should be
plugged directly into a properly grounded, 110V/120V AC receptacle only. Do not
cut or remove the grounding prong from this plug. If the plug fails to fit into an
existing outlet, contact a qualified electrician to update the outlet.
Do not use an extension cord. If the power supply cord is too short, have a qualified
electrician install an outlet near the appliance.
4
• Plug into a grounded 3-prong outlet.
• Do not remove ground prong.
• Do not use an adapter.
• Do not use an extension cord.
• Failure to follow these instructions can result in death, fire
or electrical shock.
WARNING
Electrical Shock Hazard
5
JENN-AIRTMTOASTER
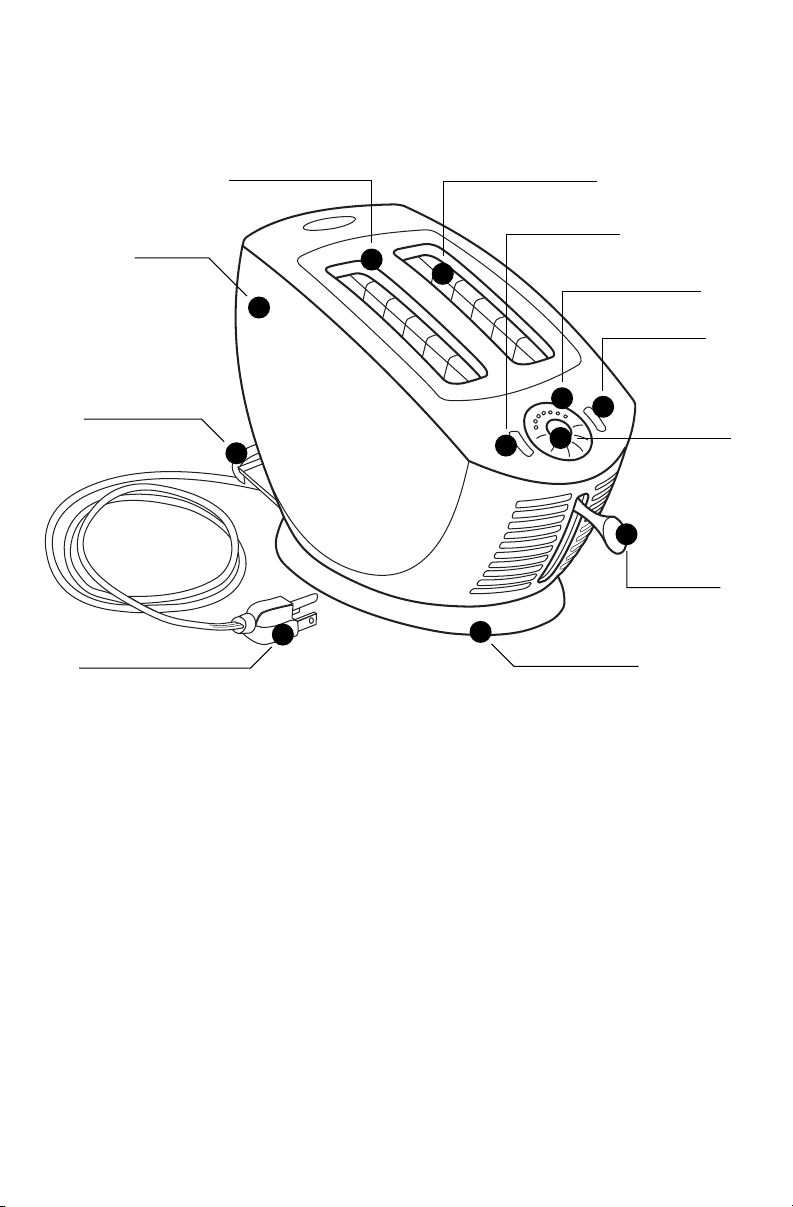
Parts and Features
1. Die-Cast Body
The sleek, attractive design is durable and easy to clean.
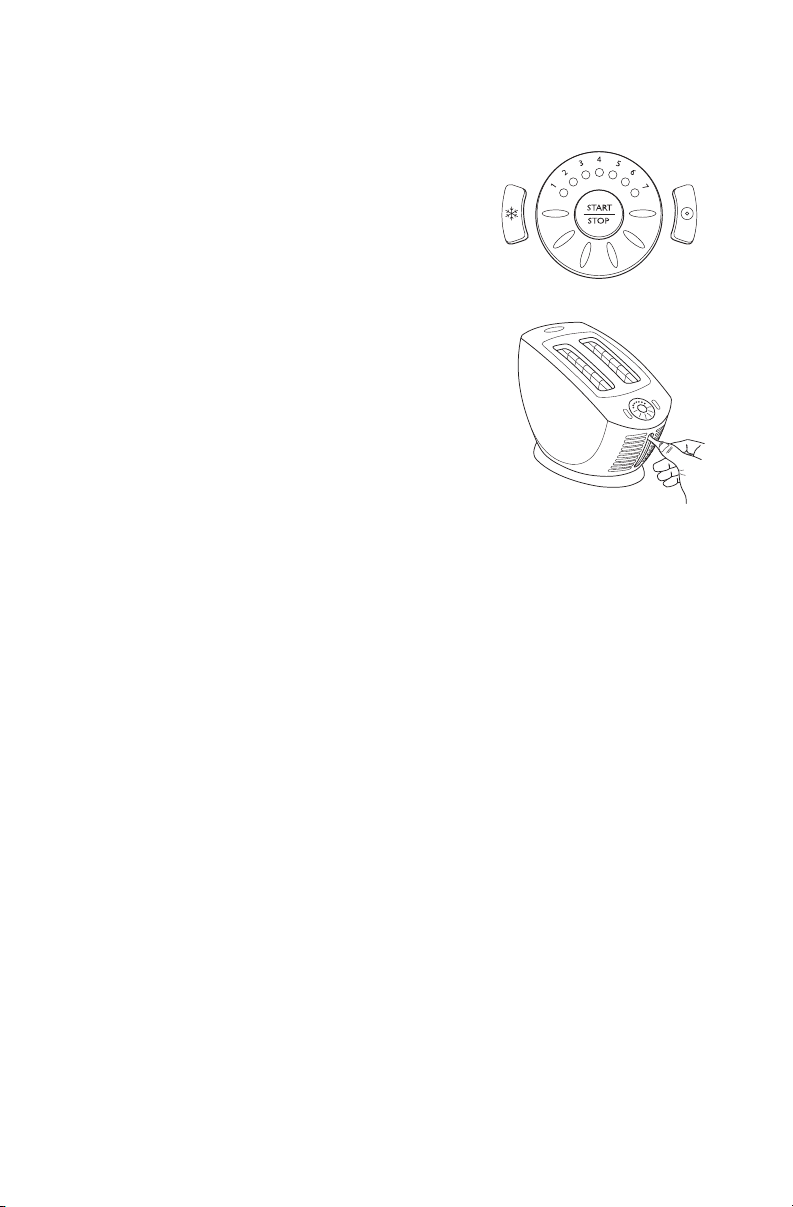
2.Touch Wheel Shade Control
Offers 7 distinct shade settings that put browning control at your fingertips.
The soft blue illuminated display shows the toasting mode and shade selections.
3. Manual Lift Lever
Allows you to control toasting without the annoyance of an end-of-cycle “pop up.”
Once the cycle is complete, you can leave the lever lowered in the Keep Warm mode.
1
9
10
11
8
7
6
5
4
3
Removable Crumb Tray
Die-Cast Body
Flat-Style Detachable Power Cord
Changeable Accent Base
Dual Extra-Wide, Deep Slots
Manual Lift Lever
Auto-Adjust Heating Elements
Touch Wheel Shade Control
Bagel Setting Button
Start/Stop Button
Defrost Setting Button
2

6
4. Start/Stop Button
Starts or cancels the toasting cycle with a simple touch of the button.
5. Bagel Setting Button
Specially designed for toasting bagels or English muffins, this setting carefully browns the
cut sides of the bagel.
6. Defrost Setting Button
This innovatively designed dual cycle gently defrosts and then toasts to the desired level of
browning.It’s perfect for frozen bread,bagels,waffles or other frozen bread products.
7. Dual Extra-Wide, Deep Slots
Large enough to accommodate a wide variety of breads,bagels and pastries.The angled
heat chamber lets you “peek” without interrupting the toasting cycle.
8. Auto-Adjust Heating Elements
The heavy-gauge heating elements move to maintain an optimum distance between the
heat source and the item being toasted – whether a thick bagel or a thin piece of bread.
9. Removable Crumb Tray
Slides out for easy, mess-free cleaning.
10. Changeable Accent Base
Can be removed and interchanged with other designer accent base finishes for a
customized look that coordinates with your kitchen décor and matches other Jenn-Air
small appliances.
11. Flat-Style Detachable Power Cord
Can be removed for clutter-free storage on countertop. Use only approved flat style
Jenn-Air toaster power cord to operate the toaster.Due to temperature requirements,do
NOT use other Jenn-Air small appliance power cords to operate the toaster.
Before Using Your Toaster
for the First Time
1. Carefully remove the toaster and any parts from the packaging.
2. Check the slots for any loose packing or printed material that may have fallen
inside during shipping or handling.
3. Place the toaster on a solid, clean, dry and level surface.
4. Make sure the crumb tray is in place.
5. Plug the detachable power cord into the plug receptacle at the rear of the
toaster and then into a properly grounded 3-prong, 110V/120V AC electrical
outlet.The toaster is now ready to use.
NOTE: The toaster may emit a pungent odor or light smoke the first time the
toaster heats up.This is a normal result of the manufacturing process.The odor or
smoke is harmless and will dissipate quickly.
Operating Your Toaster
1. Be sure your toaster is plugged into a grounded 3-prong, 110V/120V AC
electrical outlet.When first plugged in, the START/STOP button will light
for a few seconds, two beeps will sound, and the touch wheel shade setting
will illuminate.This will signal that the toaster is connected and receiving
power from the outlet. (Note: If left unattended for more than two minutes,
the touch wheel will no longer illuminate.To reactivate, simply move the
touch wheel.)
2. Remove any protective wrapping from bread products before placing them into
the toasting slots. Cut bread products such as bagels and English muffins in half
before toasting.
3. Raise the lift lever to fully open the toasting slots. Insert the desired bread product
into the slots. If you have only a single slice to toast, choose either of the slots.
Never force bread products into the toaster;the wide slots should accommodate
most items. Do not place spreads or butters on bread products prior to toasting.
4.Turn the touch wheel shade control to the desired degree of browning. Rotate
counter-clockwise for darker browning and clockwise for lighter browning.
Plug into grounded outlet. Do not remove ground
prong. Do not use an adapter. Do not use an extension
cord. Failure to follow these instructions can result in
death, fire or electrical shock.
WARNING
Electrical Shock Hazard
7
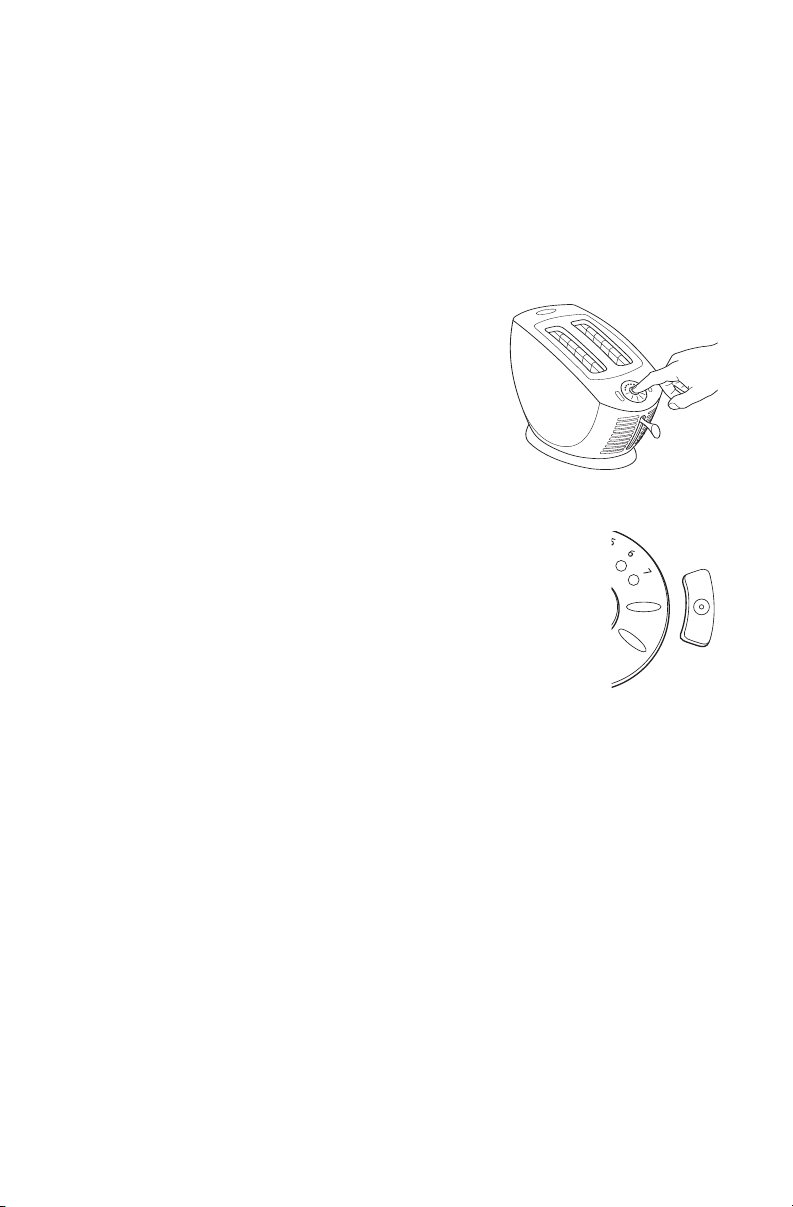
Shade settings
1-2 Light, 3- 5 Medium, 6- 7 Dark
5. Lower the lift lever until bread is lowered as far as
possible into the toaster cavity, then press the
START/STOP button once to begin the toasting
cycle.The START/STOP button and the touch
wheel will illuminate to indicate that the toasting
cycle is in process.
6.When the toasting cycle is complete, two beeps will
sound and the START/STOP button will turn off to
indicate that the toasting cycle is complete.The
toast will remain warm in the toasting cavity until
the lift lever is raised to retrieve the finished toast.
Never leave toaster unattended during use.
Toasting Tips
Bread Temperature
The temperature of a bread product can affect the toasting time.A bread product at
room temperature will require a lower setting than the same bread product that has
been refrigerated.The toaster’s DEFROST button should be used for frozen bread
products (See page 10 for details).
Bread Types
Different types of bread products may require different shade settings due to their
moisture levels, thickness and texture. In general:
• Drier bread products toast quicker than moist, so choose a lower setting.
• Fresh, moist bread or whole wheat bread should be toasted on a slightly
darker setting.
• Bread products with uneven surfaces or firmer textures, such as English muffins,
may require darker settings.
• Use caution when warming or toasting sugar coated or filled products (such as
toaster pastries or strudels). Be sure that filled pastries are free from cuts or tears
prior to toasting.This will prevent the filling from leaking into the toaster and
causing a fire hazard.These products generally should be toasted using a lower
setting and should be handled with care after toasting.
• For best results, toast only similar types and thicknesses of bread products at the
same time. Insert only one slice at a time in each toaster slot. Do not insert partial or torn slices of bread, muffins, etc.
8
Checking on the Toasting Process
To c heck the progress of the toast during the toasting cycle, simply raise the manual
lift lever slightly to view the browning. Lowering the lever will return the bread to
the cavity for the remainder of the toasting cycle. Raising the lift lever will not
interrupt the toasting cycle. If you remove the toast prior to completion of the full
cycle, simply cancel the cycle by pressing the START/STOP button. If you forget
to cancel the remainder of the toasting cycle, the toaster will automatically shut off
at the end of the normal cycle.
Canceling the Toasting Cycle
To cancel the toasting cycle at anytime, press the
START/STOP button.Two beeps will sound and the
START/STOP button will turn off, indicating that the
toasting cycle has been interrupted or canceled.
Special Features
Bagel Setting
The bagel setting conveniently toasts a bagel or English muffin and
browns the cut sides to the desired shade.
To Use the Bagel Mode
1. Raise the lift lever to fully open the toasting slots.Arrange the
“cut” sides of the bagel or English muffin in the slots so that they
face toward the center of the toaster.
2. Lower the lift lever.
3. Set the touch wheel shade control for the desired degree of browning.
4. Press the BAGEL button.The BAGEL button will illuminate. For best results,
the BAGEL selection should be made before starting the toasting cycle.This
will provide the user with the optimum toasting experience. (Note: If left
unattended for more than two minutes, the BAGEL button will turn off.To
reactivate, simply press the button again.)
5. Press the START/STOP button to start the toasting cycle.The START/STOP
button will illuminate indicating that toasting is in process.
To Cancel the Bagel Mode
Simply press the BAGEL button again.The light will go out and the bagel mode will
turn off. Once the START/STOP button has been activated and the toasting cycle
started, canceling this mode may affect the quality of the final product.This feature
is provided to allow flexibility of operation. (Note:The bagel mode can not be cancelled during the final stage of browning when the outer heating elements turn off.)
9

Defrost Setting
The defrost setting defrosts frozen bread products first and
then automatically switches over to the normal toasting cycle.
This allows the frozen bread item to slowly defrost before
toasting begins.
To Use the Defrost Mode
1. Raise the lift lever to fully open the toasting slots. Place the
frozen bread product in the slot(s).
2. Lower the lift lever.
3. Set the touch wheel shade control for the desired degree of browning.
If thawing and toasting a bread product suitable for the bagel mode (i.e.,
English muffin, bagel), press the BAGEL button at this time.
4. Press the DEFROST button.The DEFROST button will illuminate. For best
results, the DEFROST selection should be made before starting the toasting
cycle.This will provide the user with the optimum toasting experience. (Note:
If left unattended for more than two minutes, the DEFROST button will turn
off.To reactivate, simply press again.)
5. Press the START/STOP button to start the defrosting cycle.The
START/STOP button will illuminate indicating that toasting is in process.
6.As the toaster completes the defrost cycle and advances to the toasting cycle, the
DEFROST light will go out indicating that the defrosting time period is complete.
Defrost-Only Feature
If you would like to use your toaster only to defrost frozen items, you can cancel
the rest of the toasting cycle by pressing the START/STOP button as soon as the
defrost button light goes out.
To Cancel the Defrost Mode
You can cancel your selection of this mode at any time.To do this, simply press the
DEFROST button again.The light will go off and the defrost mode will turn off.
Once the START/STOP button has been activated and the defrost cycle started,
canceling this mode may affect the quality of the final product.This feature is provided to allow flexibility of operation.
10
Care and Cleaning
.
Before Cleaning
Make sure that the toaster is completely turned off.The START/STOP button
should not be illuminated. Unplug the power cord from the wall outlet. Remember
that the toaster and crumb tray will be hot immediately following a toasting cycle.
Always allow the toaster to cool before attempting any cleaning.It is recommended that the
crumb tray be emptied after each use.
How to Clean the Toaster
1. Pull out the crumb tray and shake the crumbs into a
waste container.
2.The crumb tray can be cleaned by hand in warm
water with a mild dish detergent.
3.After washing, be sure to thoroughly rinse and dry
the tray before reinserting.
4.When replacing the crumb tray, be sure to insert it
into the toaster as far as possible. Do not attempt to
operate the toaster without the crumb tray in its proper position.
5.Wipe down the outside of the toaster with a damp cloth and dry it thoroughly
with a soft cloth. DO NOT immerse the toaster in water or attempt to wash in
a dishwasher. Do not use abrasive cleaners, scrubbers, liquid cleaning products,
metal polishes or cleaners, or bleach-based household cleaners.
6.The use of a toaster cover is not recommended.
How to Clean the Accent Base
1. For everyday use, wipe the accent base with a damp cloth and dry it with a
soft cloth.
2. For more thorough cleaning, begin by removing the accent base (see page 12).
3. Hand wash the removed accent base in warm, soapy water or in the top rack of
a dishwasher.
NOTE: Do not use dishwasher detergents that contain dyes or any type of coloring, as this may stain the surface of the accent base.
Injury Hazard – Unplug toaster before cleaning. Failure to do so can result in injury.
11
WARNING
Changing The Accent Base
Before Changing the Accent Base
Make sure that the toaster is completely turned off. The START/STOP button should
not be illuminated. Unplug the power cord from the wall outlet and remove the cord
from the toaster; set aside. Remember that the toaster and crumb tray will be hot
immediately following a toasting cycle.Always allow the toaster to cool before cleaning or
changing the accent base. It is recommended that the crumb tray be emptied after each
use and before performing this operation.
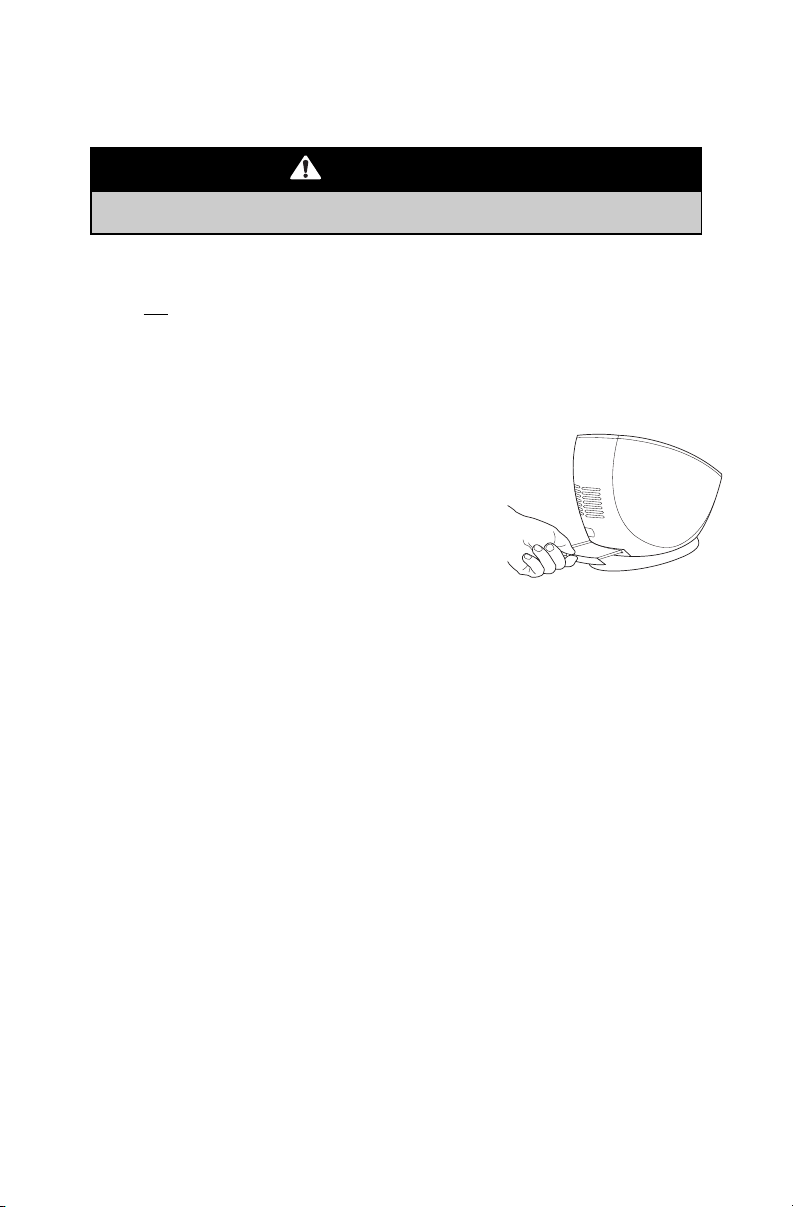
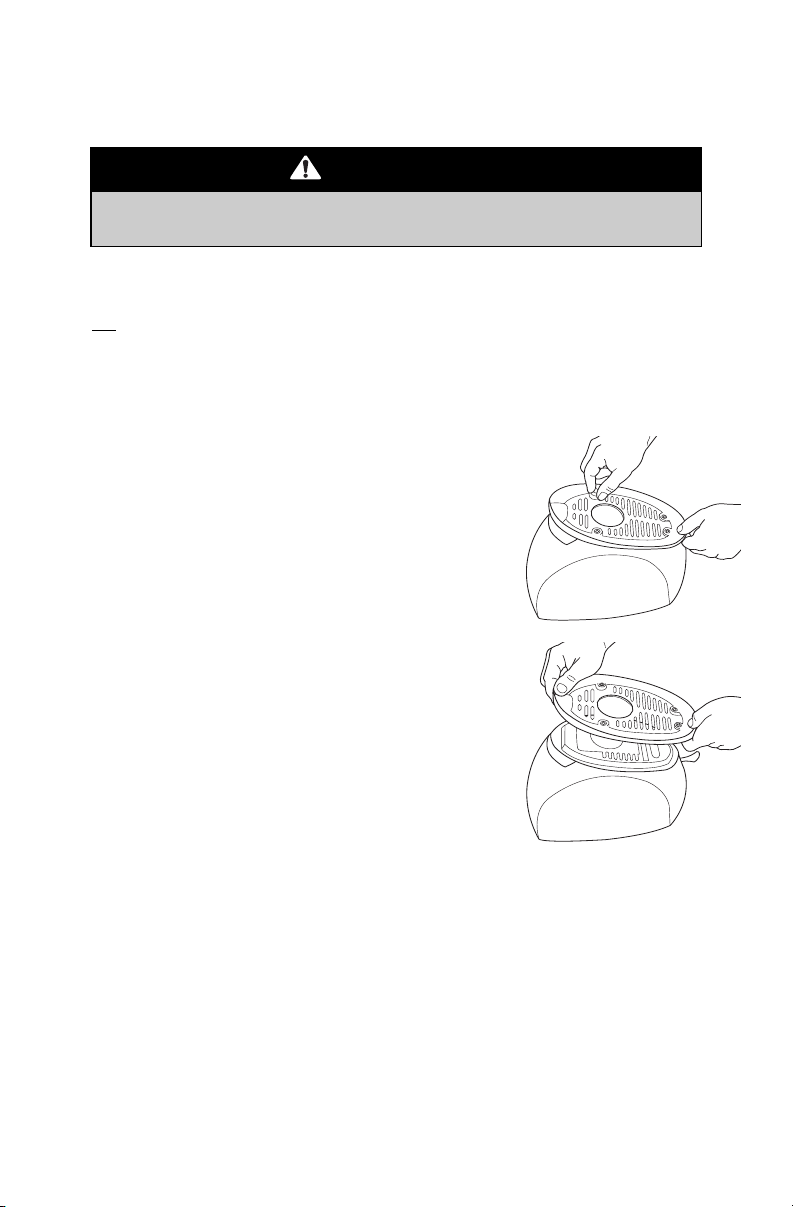
How to Change the Accent Base
1. Empty the crumb tray and reinsert. Place a soft
hand towel on a solid, level surface. Place the toaster on its top, slots facing down on the towel. (Note:
A few residual crumbs may fall from the slots.)
2. Locate the four rubber feet on the underside of
the toaster.
3. Loosen each of the feet by turning counterclockwise by hand.When all four feet are
completely removed, lift off the accent base and
carefully set aside.
4. Position the new accent base on the toaster body
and secure it to the toaster by re-installing the four
feet.Turn the feet clockwise and tighten each by
hand until snug.
NOTE: The feet are designed to be tightened by hand
only. DO NOT ATTEMPT TO OVERTIGHTEN USING
TOOLS.Attempting to do so can damage
the feet.
5. Position the toaster right side up on the countertop resting on its feet. Set the
hand towel aside. Reinsert the detachable power cord.
Injury Hazard – Unplug toaster before performing this operation. Failure to do so
can result in injury
12
WARNING

Before You Call for Service
PROBLEM
A portion of the heating
elements does not appear
to be working.
The item being toasted
does not pop up from the
toaster cavity at the end of
the cycle.
The toaster is plugged in
and the bread product has
been lowered into the cavity, but the heating elements
don’t appear to be working.
When toasting English
muffins and bagels, they
do not appear to be
browning.
A long beep sounds when
pressing the DEFROST or
BAGEL button.
POSSIBLE SOLUTION
• The heating elements come on at the beginning of any
cycle. Color intensity of the heating element may vary
during the cycle.This is normal.
• Bagel setting – the outer elements turn off to prevent
excessive browning of the uncut sides.This is normal.
• Non-bagel setting – the outer elements stay on after the
inner elements turn off to allow for even browning.
This is normal.
• This toaster is equipped with a manual lift lever.When
the toast cycle is complete, simply lift the lever up. Or,
keep the lever lowered a few extra minutes, if needed,
so your toast stays warm until serving.
• Lowering the bread product into the toaster does not
automatically start the toasting process. Simply touch
the START/STOP button to begin the cycle.
• Densely textured bread products, such as English
muffins and bagels, require a darker setting.Try turning the touch wheel shade control to a darker shade.
• Be sure to use the BAGEL button, which is specifically
designed for these bread products.
• Check to see if the cut side of the muffin or bagel is
facing toward the CENTER of the toaster.
• A beep will sound when attempting to press the
DEFROST button after the defrost period has expired
(and the toaster has automatically moved into the regular toasting mode). It is normal for the DEFROST light
to go out.
• A beep will sound if you press the BAGEL button after
the outside elements have turned off during the bagel
mode. (Note:The bagel mode is still in process.The
outer elements turn off to avoid excessive browning of
the uncut sides of the bagel.)
13
 Loading...