

Jenn-Air JMV8100AA User Manual
JENN-AIR
USER'S GUIDE
AND COOKING GUIDE
Over-The-Range Microwave Oven
Model JMV8100AA
I
Read these instructions carefully before using your microwave oven.
Part no.8112p172-60 MCS pin 74005588 N08/00
SAVE THESE INSTRUCTIONS
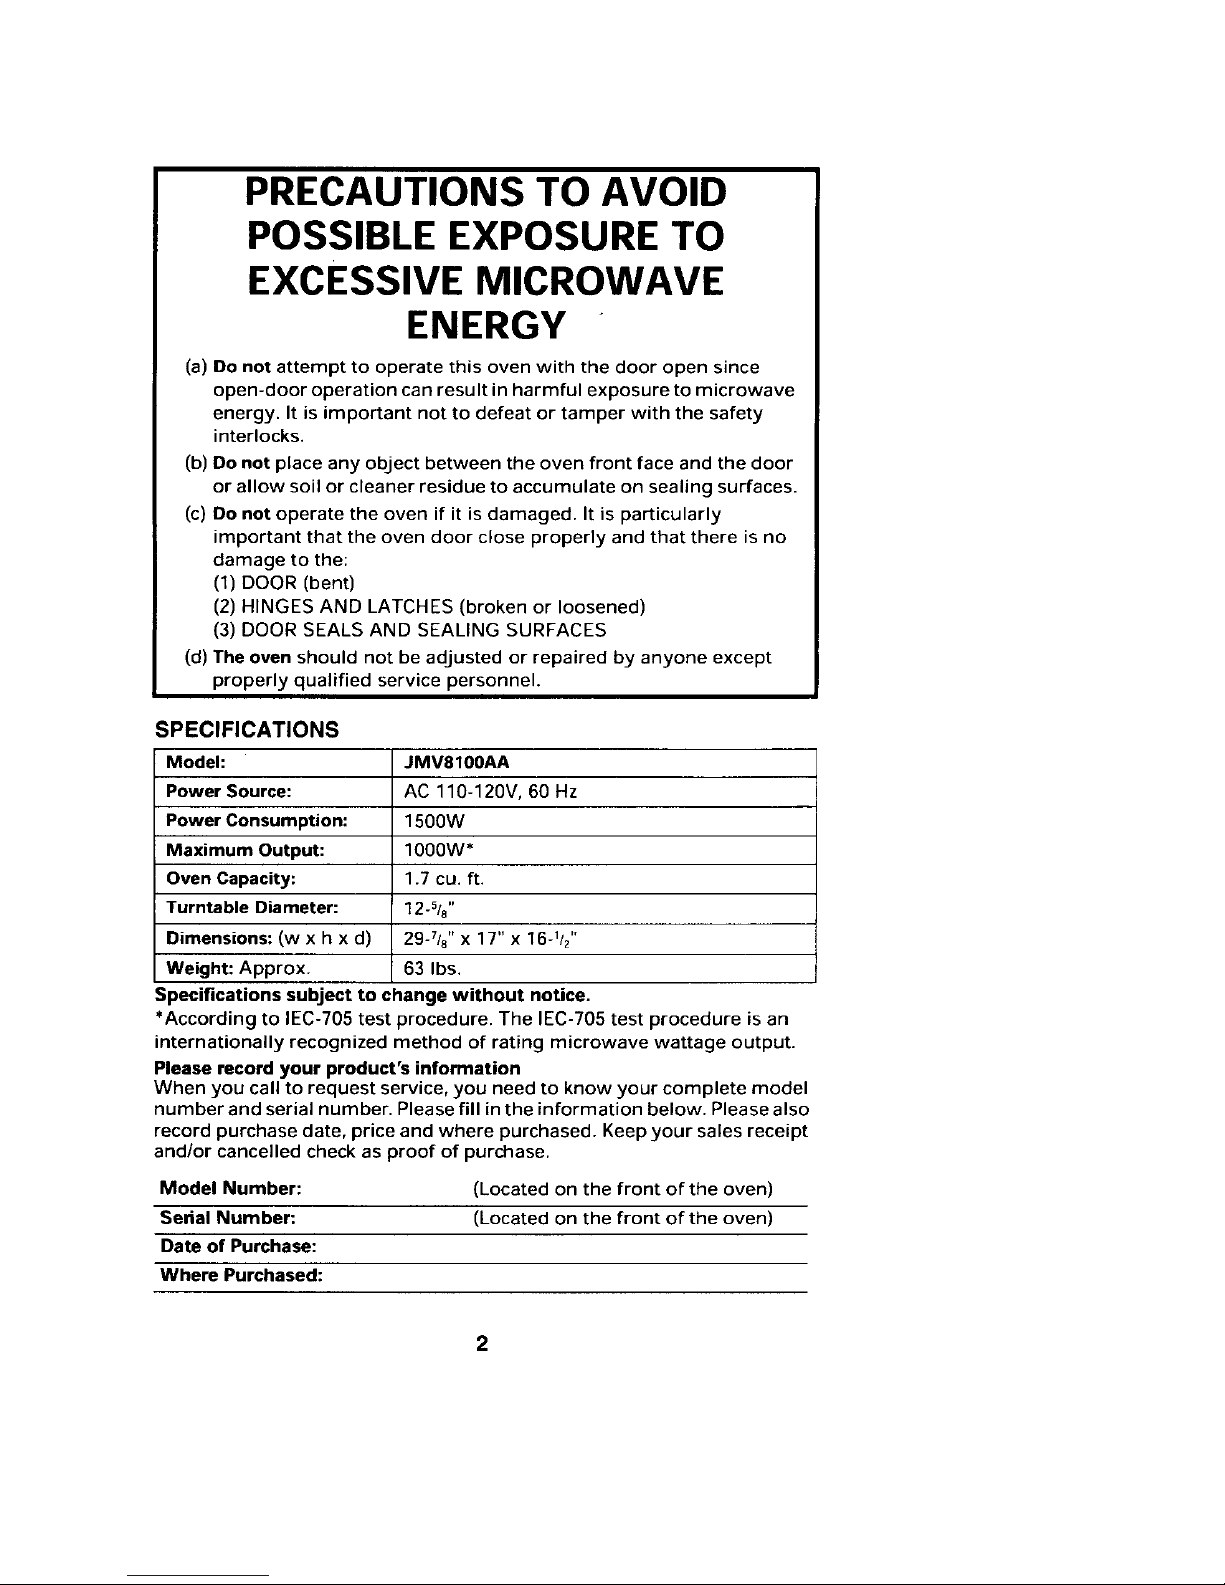
PRECAUTIONSTO AVOID
POSSIBLEEXPOSURETO
EXCESSIVEMICROWAVE
ENERGY
(a) Do not attempt to operate this oven with the door open since
open-door operation can result inharmful exposure to microwave
energy. It is important not to defeat or tamper with the safety
interlocks.
(b) Do not place any object between the oven front face and the door
or allow soil or cleaner residue to accumulate on sealing surfaces.
(c) Donot operate the oven if it is damaged. It is particularly
important that the oven door close properly and that there is no
damage to the:
(1) DOOR (bent)
(2) HINGES AND LATCHES (broken or loosened)
(3) DOOR SEALS AND SEALING SURFACES
(d) The oven should not be adjusted or repaired by anyone except
properly qualified service personnel.
SPECIFICATIONS
Model: JMV8100AA
Power Source: AC 110-120V, 60 Hz
PowerConsumption: 1500W
Maximum Output: 1000W*
OvenCapacity: 1.7 cu. ft.
Turntable Diameter: 12-s/8''
Dimensions:(w x h x d) 29-7/8'' x 17" x 16-1/2''
Weight: Approx. 63 Ibs.
Specifications subject to change without notice.
*According to IEC-705 test procedure. The IEC-705 test procedure isan
internationally recognized method of rating microwave wattage output.
Pleaserecord your product's information
When you call to request service, you need to know your complete model
number and serial number. Pleasefill inthe information below. Please also
record purchase date, priceand where purchased. Keepyour sales receipt
and/or cancelledcheck as proof of purchase.
Model Number: (Locatedon the front of the oven)
Serial Number: (Located on the front of the oven)
Date of Purchase:
Where Purchased:
For additional questions, please
contact us: REGISTRATION CARD packed with
Maytag Appliance Sales Company the oven.
Atten: CAIR _ Center 1. Check the model and serial
PO.Box 2370 numbers on the card to see that
Cleveland, TN 37320-2370 they match the numbers on the
1-800-688-1100(USA and CANADA) data plate. The data plate is
1-800-688-2080(U.S.TTY for deaf, located on the front of the oven
hearing impaired or speech when the door is open. If the
impaired) numbers on the card are not the
(Mon.-Fri., 8am-Spin Eastern Time) same as those on the data plate,
Internet: http://www.maytagcom cross out the numbers on the
card and write in the numbers as
For service and warranty they appear on the data plate.
information, see page 39-40. 2. Mail the card. The return address
IMPORTANT is included on the reverse side of
Please keep your sales slip. Should the card. _11
any warranty service be required, If you move or are not the original
I
proof of original date of purchase is owner of this oven, you must by law
needed, renew the registration. Send the
NOTE renewal registration information to:
in our continuing effort to improve Maytag Customer Service
the quality of our appliances, it may Warranty Administration
be necessary to make changes to the R O. Box 4970
appliance without revising this Cleveland, TN 37320.4970
guide. Renewal Registration information
REGISTRATION must provide:
Federal law requires registration of a) Your name and address.
all microwave ovens.To comply with b) The microwave oven's model and
the law, please fill out the PRODUCT serial numbers.
TABLEOFCONTENTS
SAFETY Auto Sensor Microwaving Tips 17
Important Safety instructions 4 Optional Settings 18
Proper and Safe Use of Your Oven 5 Defrost 19
Grounding Instructions 6 Add 30 Seconds 20
Interference Note 7 Quick Start Cooking 21
Utensils 7 Custom Programs 22
Materials 8 Turntable Setting 23
Fan Speed Control 23
SET UP Light 23
Names of Oven Parts and Delay Off-Fan 24
Accessories 9 Sound Selection 24
Turntable Installation 10
Charcoal Filter Installation 10 COOKING GUIDE
Grease Filter Installation 10 Cooking Principles and Techniques 25
Cooking with Metal Rack 26
OPERATION Auto Sensor Cooking Tips 2"I
Control Panel and Features 11 Sensor Cooking Recipes 29
Selecting Ventilation Direction 13 Meats, Poultry and Fish 31
Setting Clock 13
Child Lock-Out 13 MAINTENANCE
Timer 14 Troubleshooting 34
Timed Cooking and Power Level 14 Questions and Answers 36
Auto Sensor Microwaving 16 Care and Cleaning 37
Warranty 39
3
SAFETY
IMPORTANTSAFETYINSTRUCTIONS
When using electrical appliances, basic safety precautions should be
followed, including the following:
_l_ WARNING " To reduce the risk of burns, electric shock, fire,
injury to persons or exposure to excessive microwave energy:
1. Read all instructions before sealed containers and closed
using the appliance, giassjars may explode and
2. Read and follow the specific therefore should not be heated
"PRECAUTIONS TO AVOID in this oven.
POSSIBLE EXPOSURE TO 7. Use this appliance only for its
EXCESSIVE MICROWAVE intended use as described in the
ENERGY" on page 2. manual. Do not use corrosive
3. As with most cooking chemicals or vapors in this
appliances, close supervision is appliance. This oven is
necessary to reduce the risk of a specifically designed to heat,
cook or defrost food. It is not
fire in the oven cavity, designed for industrial or
If a fire should start: laboratory use. it is intended for
• Keep the oven door closed, home use.
• Turn the oven off. 8. As with any appliance, close
• Disconnect the power cord or supervision is necessary when
shut off power at the fuse or used by children.
circuit breaker panel. 9. Do not operate this oven if it has
Keep in mind the following rules a damaged cord or plug, if it is
at all times to reduce the risk of not working properly or if it has
fire in the oven cavity: been damaged or dropped.
a. Do not overcook food. 10. This appliance should be
Carefully attend the appliance serviced only by qualified
if paper, plastic, or other service technicians. Contact the
combustible materials are nearest authorized service
placed inside the oven to facility for examination, repair or
facilitate cooking, adjustment.
b. Do not use the oven cavity for 11. Do not cover or block any vents
storage purposes. Do not on the oven.
store combustible items such 12. Do not store or use this
as bread, cookies, paper appliance outdoors.
products, etc. inside the oven. 13. Do not use this oven near water,
If lightning strikes the power near a kitchen sink, in a wet
line, the oven may turn on by basement or near a swimming
itself, pool, and the like.
c. Remove wire twist-ties and 14. Do not immerse cord or plug in
metal handles from paper or water.
plastic containers/bags 15. Keep cord away from heated
before placing them in the surfaces.
oven. 16. Do not let cord hang over edge
4. This oven must be grounded, of table or counter.
Connect only to properly 17. When cleaning door and oven
grounded outlet. See surfaces that meet when door is
"GROUNDING INSTRUCTIONS" closed, use only mild,
on page 6. nonabrasive soaps or
5. Install or locate this oven only in detergents applied with a
accordance with the provided sponge or soft cloth. (See "Care
installation instructions, and Cleaning" instructions on
6. Some products such as whole page 37.)
eggs, water with oil or fat, 18. Do not mount over a sink.
4
19.This oven is suitable for use 22.When flaming foods under the
above both gas and electric hood, turn the fan on.
/
cooking equipment. 23.Use care when cleaning the
20.This oven is intended to be used vent-hood filter. Corrosive
above ranges with a maximum cleaning agents, such as lye-
width of 30 inches, based oven cleaners, may
21.Clean the underside of the damage the filter.
microwave oven often. Do not
allow grease to build up on the
microwave oven or the fan
filters.
SAVE THESE INSTRUCTIONS
PROPERANDSAFEUSEOFYOUROVEN
• The oven must be level. • Do not heat narrow-necked
• The turntable and turntable containers, such as syrup
roller rest must be in the oven bottles.
during cooking. • Do not attempt to deep-fry in
• Place cookware gently on the your microwave oven.
-.turntable and handle it carefully • Do not do home canning in this
to avoid possible breakage, microwave oven as it is
• Incorrect use of browning dish impossible to be sure all
may cause the turntable to contents of the jar have reached
break. See page 8. boiling temperature.
• When using the Popcorn feature • Do not use this microwave oven
of this microwave oven, use for commercial purposes. This
only the bag sizes specified in microwave oven is made for
the instruction manual, household use only.
• Do not pop popcorn except in a • Liquids, such as beverages, that
microwave approved popcorn are heated in a microwave oven,
popper or in a commercial can overheat beyond their
packagerecommended especially boiling point without any
for microwave ovens, evidence of bubbling. This
• The oven has several built-in could result in hot liquids
safety switches to ensure that suddenly boiling over. To
the power remains off when the prevent this occurrence, the
door is open. Do not tamper following steps should be taken:
with these switches. (a)Avoid using straight-sided
• Do not operate the microwave containers with narrow necks.
oven empty. Operating the oven (b)Do not overheat.
without any food or food that is (c)Stir the liquid before placing the
extremely low in moisture can container in the oven and again
cause fire, charring or sparking, halfway through the heating
• Do not cook bacon directly on time.
the turntable. Excessive local (d)After heating, allow to stand in
heating of the turntable may the oven for a short time,
cause it to break, stirring again before carefully
• Do not heat baby bottles or removing the container.
baby food in the microwave • The metal rack must be
oven. Uneven heating may removed from the oven when
occur and could cause physical the rack is not used for cooking.
injury.
5
GROUNDING INSTRUCTIONS
This appliance must be grounded, in the event
_k, DANGER of an electricalshort circuit, grounding reduces
Electric Shock Hazard the riskof electric shockby providing an escape
• Touching some of the wire for the electric current. This appliance is
internal components equipped with a cordthat hasa grounding wire
can cause serious with a grounding plug. The plug must be
personal injury or plugged into an outlet that is properly installed
death. Do not and grounded.
disassemble
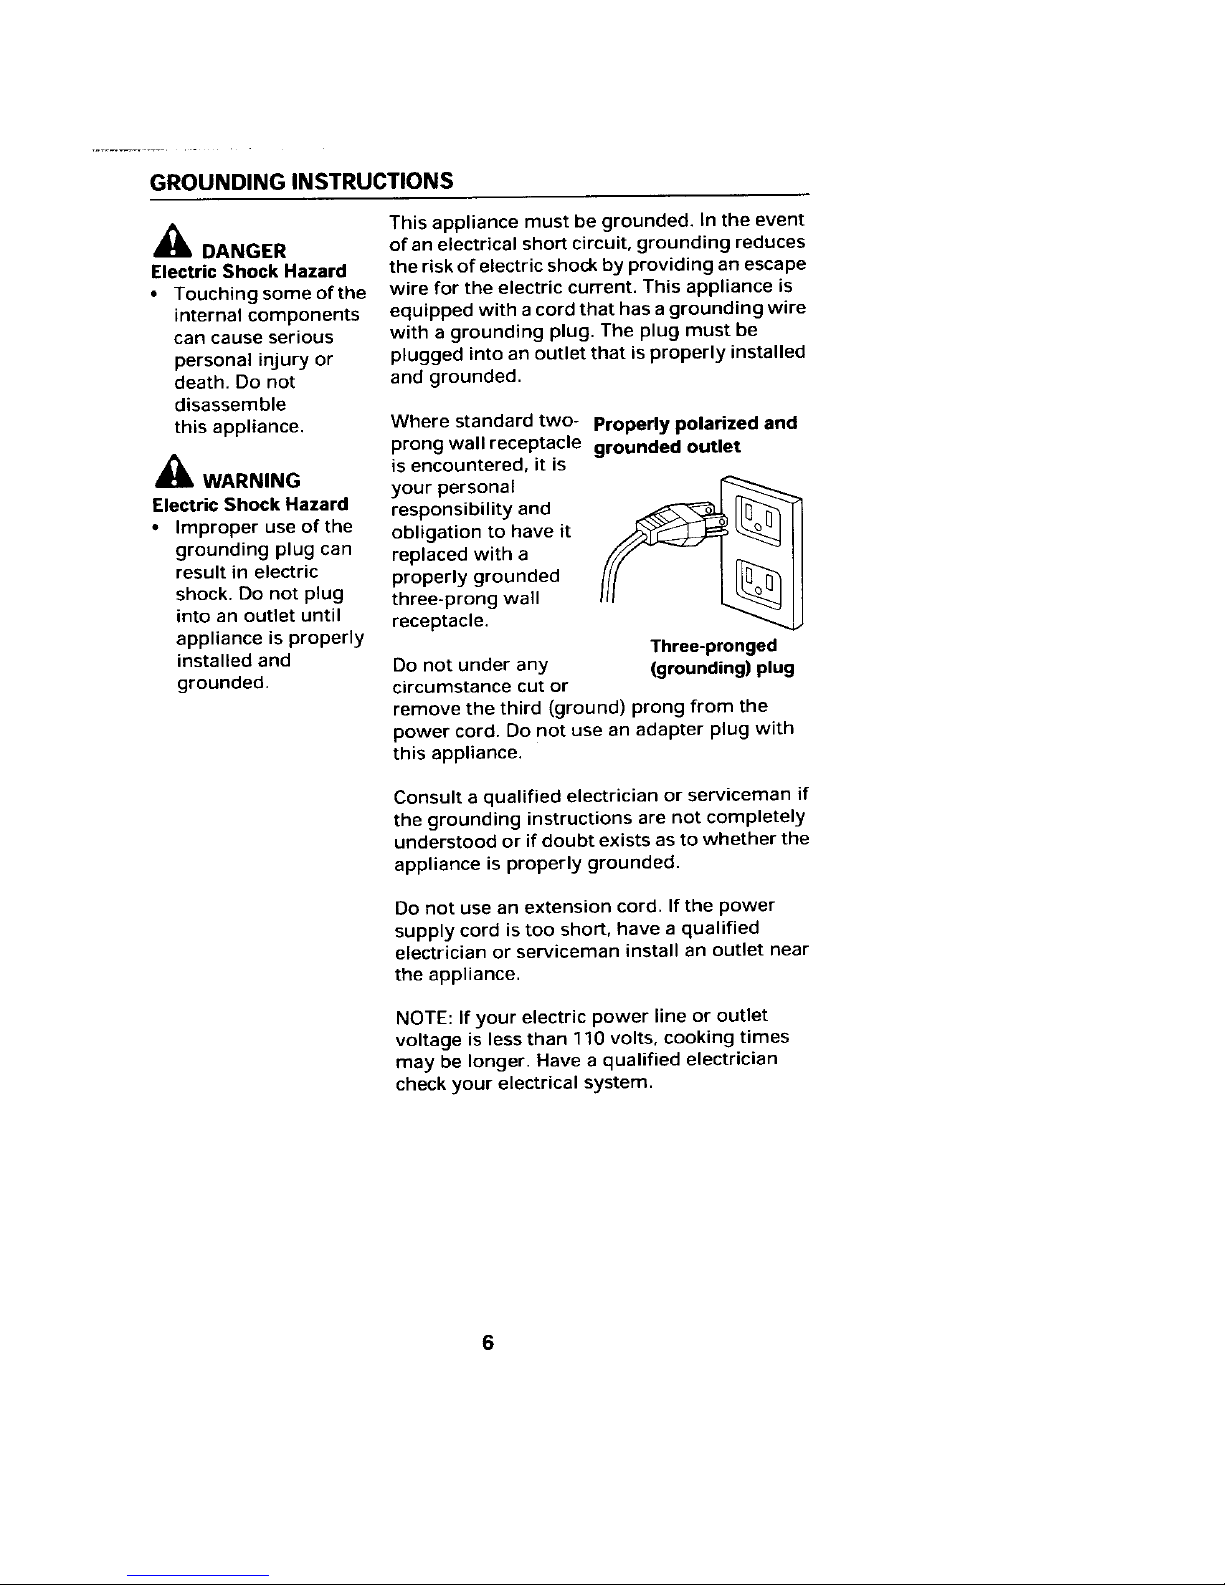
this appliance. Where standard two- Properly polarized and
prong wall receptacle grounded outlet
,_ is encountered, it is
WARNING your personal
Electric ShockHazard responsibility and
• Improper use of the obligation to have it
grounding plug can replaced with a
result in electric properly grounded
shock. Do not plug three-prong wall
into an outlet until receptacle.
appliance is properly Three-pronged
installed and Do not under any (grounding)plug
grounded, circumstance cut or
remove the third (ground) prong from the
power cord. Do not use an adapter plug with
this appliance.
Consult a qualified electrician or serviceman if
the grounding instructions are not completely
understood or if doubt exists as to whether the
appliance is properly grounded.
Do not use an extension cord. If the power
supply cord is too short, have a qualified
electrician or serviceman install an outlet near
the appliance.
NOTE: If your electric power line or outlet
voltage is less than 110volts, cooking times
may be longer. Have a qualified electrician
check your electrical system.
INTERFERENCE NOTE /
Microwave ovens generate radio frequency energy during operation and
if not installed properly may cause interference to radio and television
reception. You can determine if this unit is causing interference by turning
it on and off while the interference is occurring. If interference occurs, it
may be corrected by one or more of the following measures:
• clean door and seal surfaces of the oven.
• reorient the television or radio receiving antenna.
• relocate the oven with respect to the television or radio receiver.
• plug the oven into a different outlet so that it, and the television or
radio receiver, are on different circuits.
If the interference persists, you may want to consult an experienced radio/
television technician for additional suggestions.
UTENSILS
See following page for further instructions on
_IL CAUTION you can use oven or
"materials
in microwave
to be avoided in microwave oven," Do the test
Personal Injury Hazard below to see if the utensil is safe for use in a
• Tightly-closed microwave oven.
utensils could
explode. Closed Utensil Test:
containers should be 1. Fill a microwave-safe container with 1 cup
opened and plastic of cold water (250 mL) along with the utensil
pouches pierced, in question.
2. Cook on maximum power (P100) for 1
minute.
3. Carefully feel the utensil.
If the empty utensil is warm, do not use it for
microwave cooking,
Do not exceed 1 minute testing time.
CAUTION:
1, Do not use plastic containers for testing.
2. Some containers and dishware may be
warm (or hot) in only one area. Do not use a
container that becomes warm anywhere.
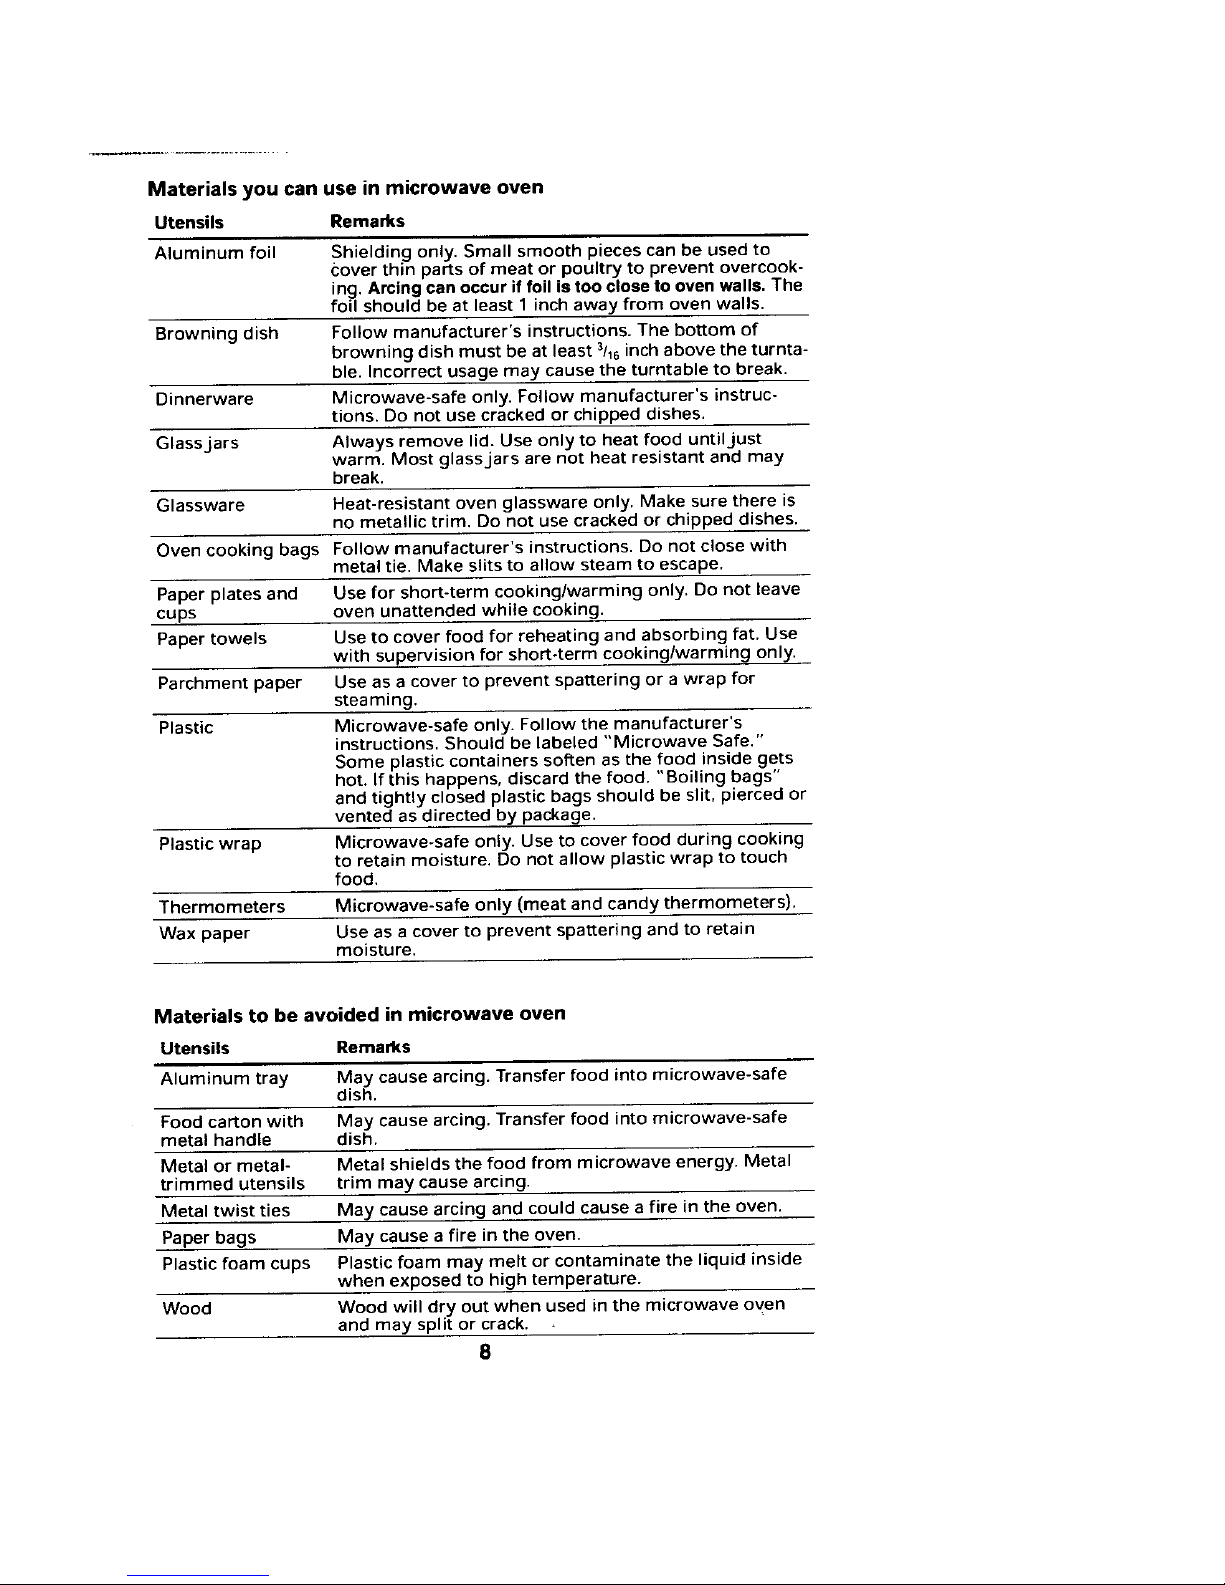
Materials you can use in microwave oven
Utensils Remarks
Aluminum foil Shielding only. Small smooth pieces can be used to
cover thin parts of meat or poultry to prevent overcook-
ing. Arcing can occur if foil is too close to oven walls. The
foil should be at least 1 inch away from oven walls,
Browning dish Follow manufacturer's instructions. The bottom of
browning dish must be at least 3/16inch above the turnta-
ble, Incorrect usage may cause the turntable to break.
Dinnerware Microwave-safe only, Follow manufacturer's instruc-
tions. Do not use cracked or chipped dishes.
Glass jars Always remove lid. Use only to heat food until just
warm. Most glass jars are not heat resistant and may
break.
Glassware Heat-resistant oven glassware only, Make sure there is
no metallic trim. Do not use cracked or chipped dishes.
Oven cooking bags Follow manufacturer's instructions. Do not close with
metal tie. Make slits to allow steam to escape.
Paper plates and Use for short-term cooking/warming only. Do not leave
cups oven unattended while cookin 9.
Paper towels Use to cover food for reheating and absorbing fat. Use
with supervision for short-term cooking/warming only.
Parchment paper Use as a cover to prevent spattering or a wrap for
steaming.
Plastic Microwave-safe only. Follow the manufacturer's
instructions. Should be labeled "Microwave Safe."
Some plastic containers soften as the food inside gets
hot. If this happens, discard the food. "Boiling bags"
and tightly closed plastic bags should be slit, pierced or
vented as directed by package.
Plastic wrap Microwave-safe only. Use to cover food during cooking
to retain moisture. Do not allow plastic wrap to touch
food.
Thermometers Microwave-safe only (meat and candy thermometers),
Wax paper Use as a cover to prevent spattering and to retain
moisture.
Materials to be avoided in microwave oven
Utensils Remarks
Aluminum tray May cause arcing. Transfer food into microwave-safe
dish.
Food carton with May cause arcing. Transfer food into microwave-safe
metal handle dish,
Metal or metal- Metal shields the food from microwave energy. Metal
trimmed utensils trim may cause arcing.
Metal twist ties May cause arcing and could cause a fire in the oven,
Paper bags May cause a fire in the oven.
Plastic foam cups Plastic foam may melt or contaminate the liquid inside
when exposed to high temperature.
Wood Wood will dry out when used in the microwave oven
and may split or crack.
8
SET UP
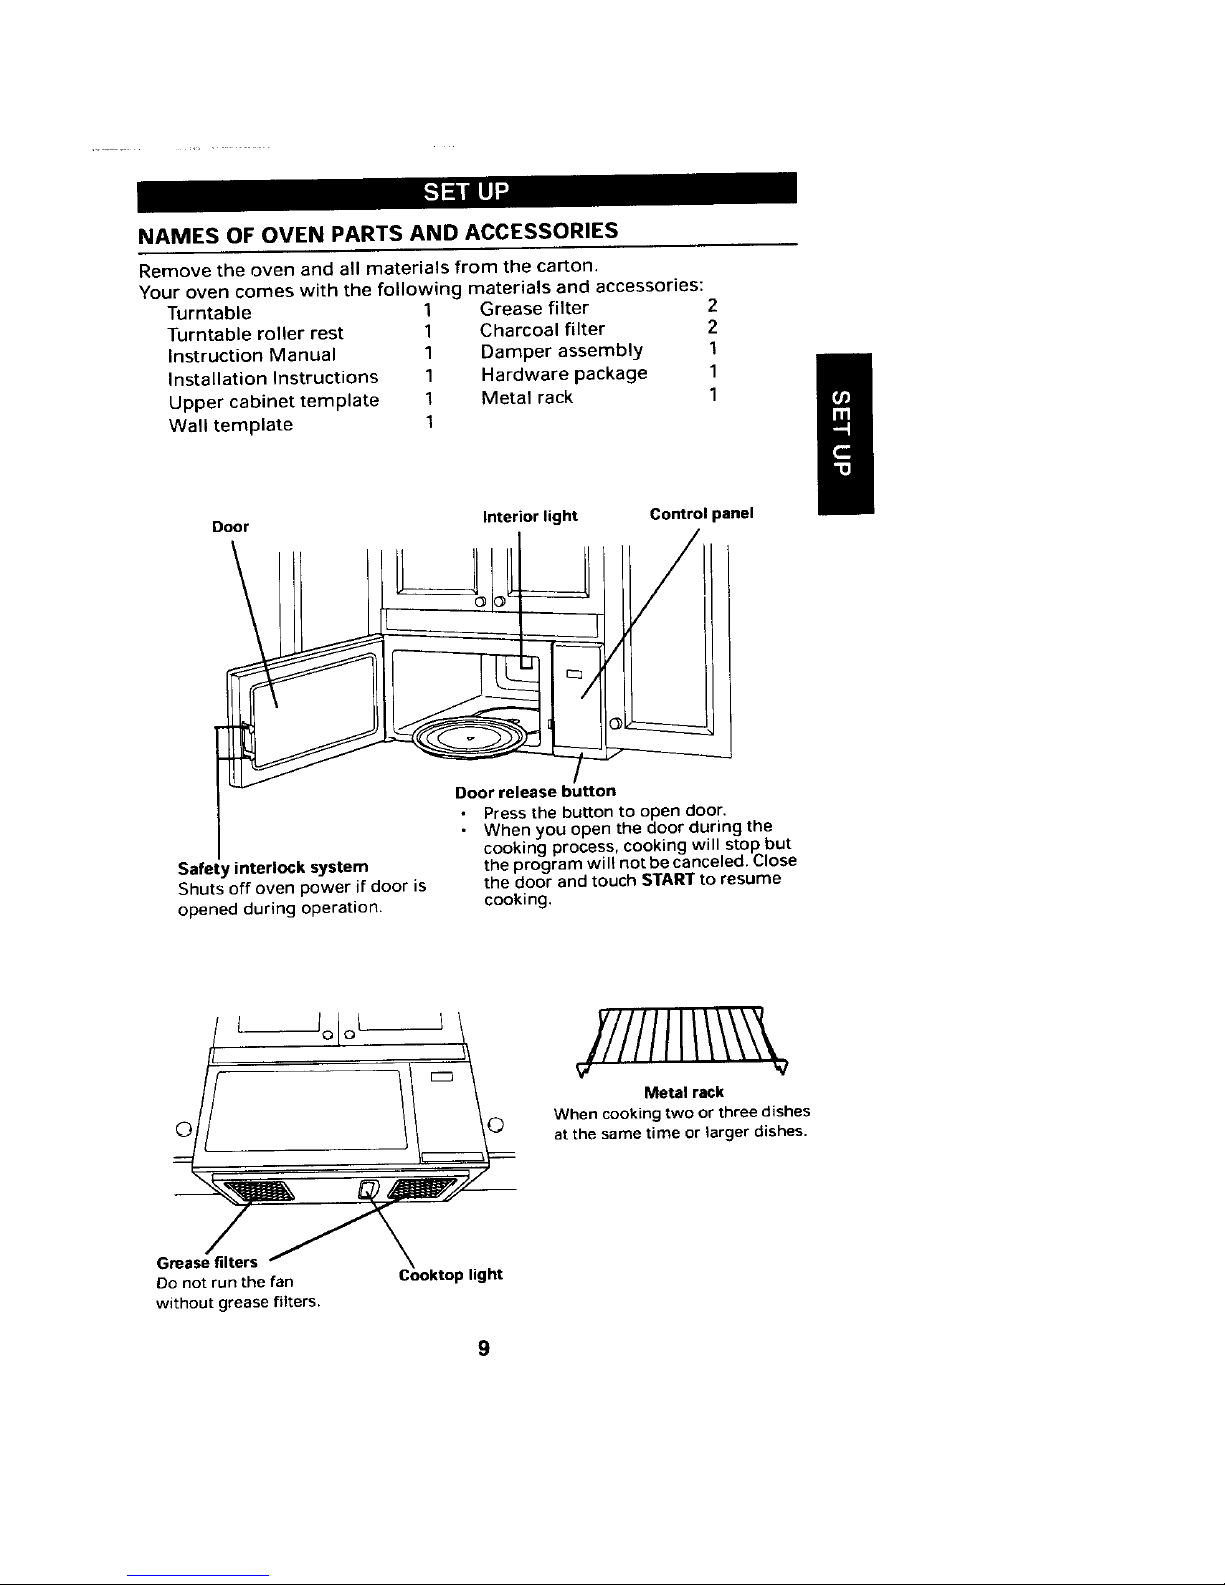
NAMES OF OVEN PARTS AND ACCESSORIES
Remove the oven and all materials from the carton.
Your oven comes with the following materials and accessories:
Turntable 1 Grease filter 2
Turntable roller rest 1 Charcoal filter 2
Instruction Manual 1 Damper assembly 1
Installation Instructions 1 Hardware package 1
Upper cabinet template 1 Metal rack 1
Wall template 1
Door Interiorlight Control panel
D°°prre/se_h: bbUtto°nto open door"
• When you open the door during the
cooking process, cooking will stop but
Safety interlock system the program will not be canceled. Close
Shuts off oven power if door is the door and touch STARTto resume
opened during operation, cooking.
Metal rack
When cooking two or three dishes
at the sametime or larger dishes.
Grease_l_fers
DOnot run the fan Cooktoplight
without greasefilters,
9
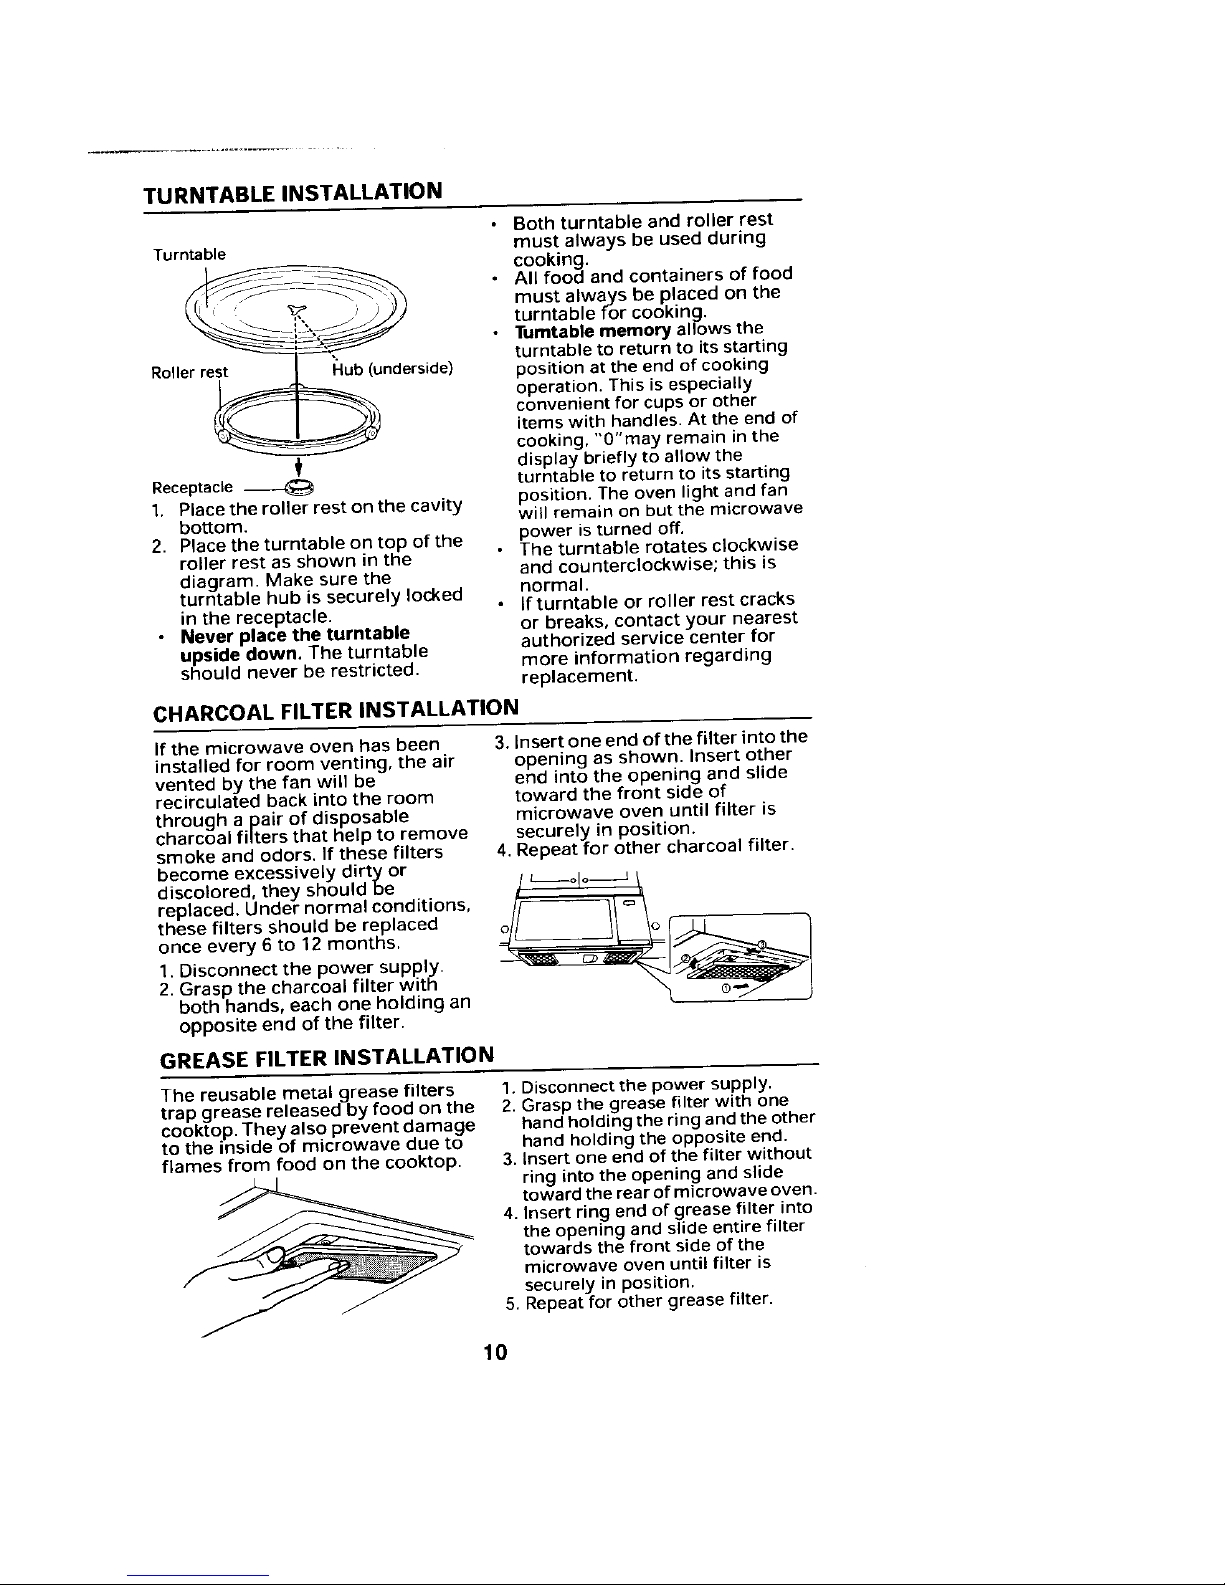
TURNTABLE INSTALLATION
• Both turntable and roller rest
Turntable must always be used during
--_: All food and containers of food
_. , ; _j) must always be placed on the
__ turntable for cooking,
•Tumtable memory allows the
turntable to return to its starting
Roller rest Hub (underside) position at the end of cooking
__ operation. This is especially
convenient for cups or other
items with handles. At the end of
cooking, "O"may remain in the
display briefly to allow the
Receptacle _ turntable to return to its starting
1. Place the roller rest on the cavity position. The oven light and fan
bottom, will remain on but the microwave
2. Place the turntable on top of the power is turned off.
roller rest as shown in the • The turntable rotates clockwise
diagram. Make sure the and counterclockwise; this is
turntable hub is securely locked normal.
in the receptacle. • If turntable or roller rest cracks
• Never place the turntable or breaks, contact your nearest
upside down. The turntable authorized service center for
should never be restricted, more information regarding
replacement.
CHARCOAL FILTER INSTALLATION
If the microwave oven has been 3. Insert one end of the filter into the
installed for room venting, the air opening as shown. Insert other
vented by the fan will be end into the opening and slide
recirculated back into the room toward the front side of
through a pair of disposable microwave oven until filter is
charcoal filters that help to remove securely in position.
smoke and odors. If these filters 4. Repeat for other charcoal filter.
become excessively dirty or
discolored, they should be j t olo L
these filters should be replaced
once every 6 to 12 months.
1. Disconnect the power supply.
2. Grasp the charcoal filter with
both hands, each one holding an
opposite end of the filter.
GREASE FILTER INSTALLATION
The reusable metal grease filters 1. Disconnect the power supply.
trap grease released by food on the 2, Grasp the grease filter with one
cooktop. They also prevent damage hand holding the ring and the other
to the inside of microwave due to hand holding the opposite end.
flames from food on the cooktop. 3. Insert one end of the filter without
ring into the opening and slide
toward the rear of microwave oven.
4. Insert ring end of grease filter into
the opening and slide entire filter
towards the front side of the
microwave oven until filter is
securely in position.
J 5. Repeat for other grease filter.
10
OPERATION
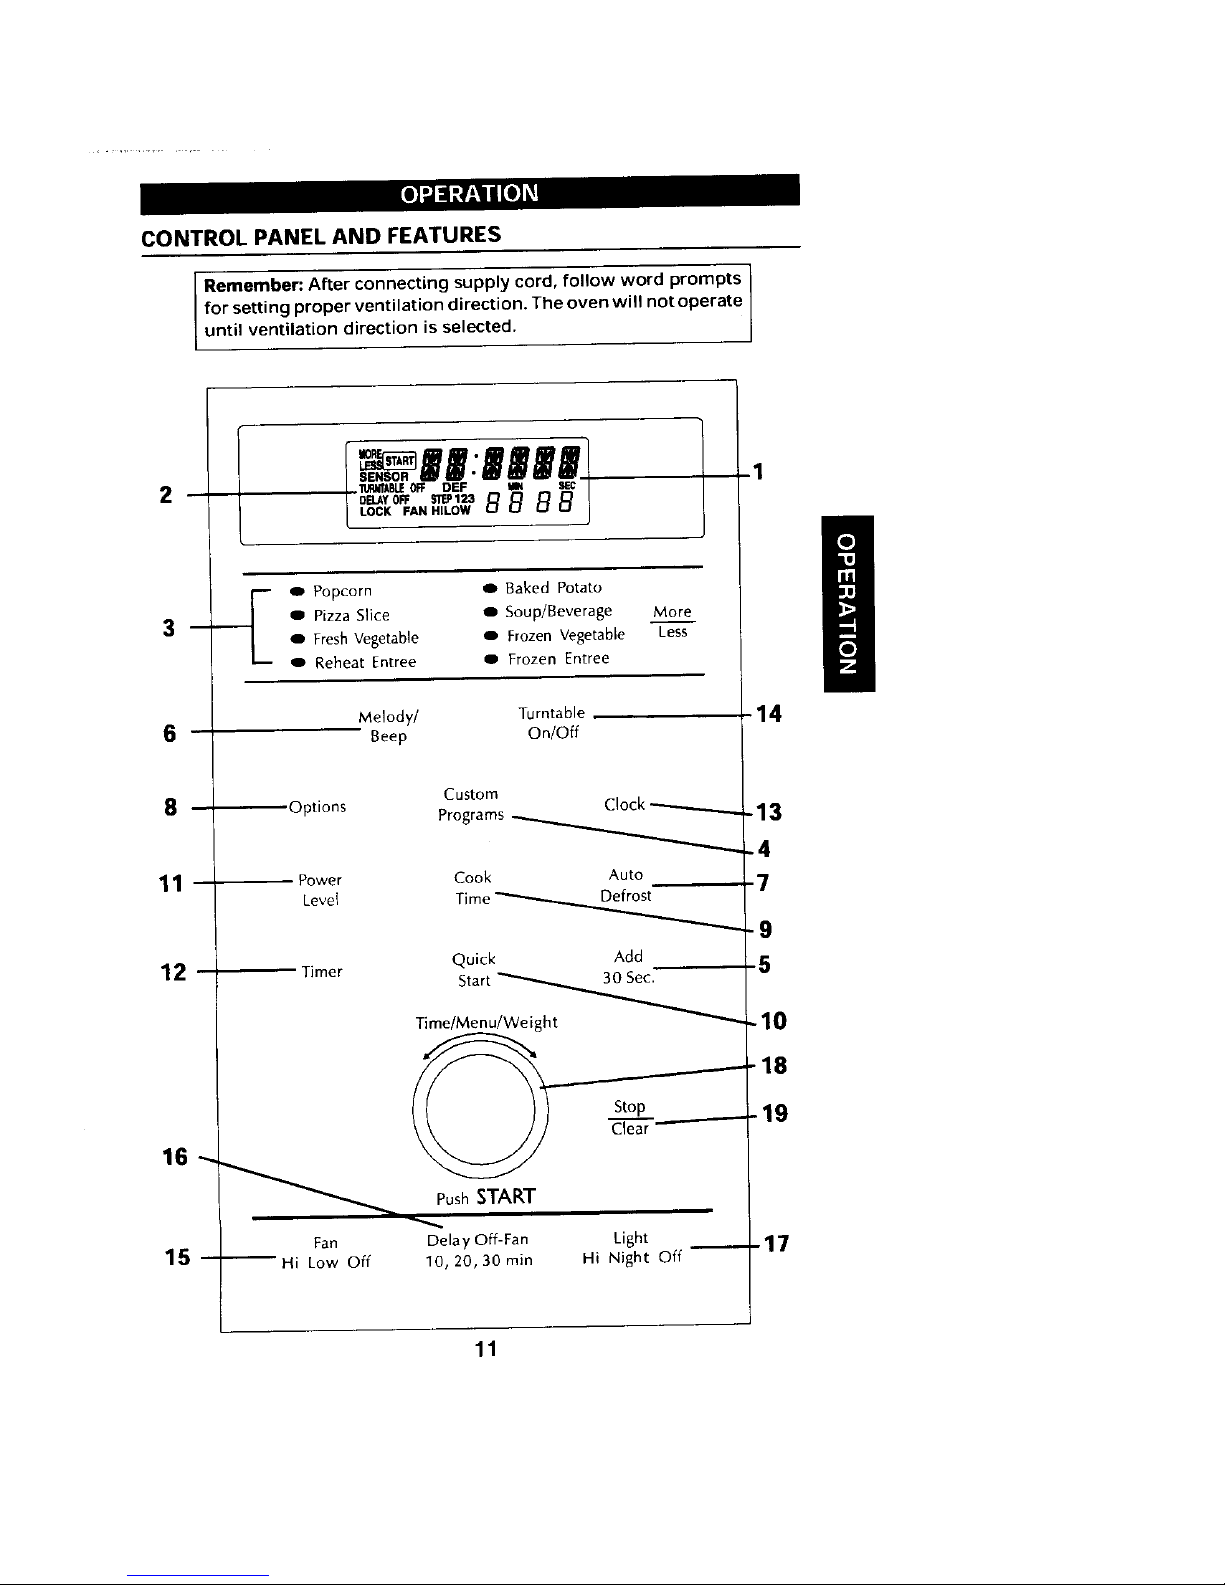
CONTROLPANELAND FEATURES
Remember: After connecting supply cord, follow word prompts
for setting proper ventilation direction. The oven will not operate
unti ventiiation direction s se ected.
E.Popcorn--Bako.Potato /
3 ' O Pizza Slice o Soup/Beverage More
o FreshVegetable o FrozenVegetable Less
ReheatEntree _ Frozen Entree
Melody/ Turntable 14
6 Beep On/Off
Custom
8 Options Programs.__./ock _ -13
-4
1 1 Power Cook Auto 7
Level Time
_Def_o,_
12 Timer Quick Add 5
Start _
TimeMenuWeight - 10
19
Clear
16 --. \_'_ -J/
PushSTART
Fan Delay Off-Fan Light 17
15 Hi Low Off 10, 20, 30 rain Hi Night Off
11
CONTROLPANELAND FEATURES(CONT.)
(1) Display Window (7) Auto Defrost (page 19)
Upper line: Countsclown cooking Provides two options. Pressonceto
time in minutes and/or seconds, set Quick Defrost, twice to set
Shows clock time when oven is not Defrost.
in use. The word prompt scrolls to DEFROST:Provides more thorough
guide you when setting the clock defrosting results.
and at every operation stage. QUICK DEFROST:Provides faster
Lower line: Shows power level defrosting results. This option is
when using Timed Cooking. Shows excellent for thawing items such as
Timer time when this feature is ground meat for use in spaghetti
selected, sauce or for taco meat.
(2) Indicators (8) Options (page 18)
indicators light or flash in the Allows you to customize the
display window, following oven feature settings:
STEP 1/2/3: Lights to indicate word prompt on/off, clock on/off,
beep on/off, word speed, language
current cooking stage.
DEF: Lights during Defrost. selection, weight selection and
LOCK:Lights to indicate the Child turbo exhaust for room venting.
Lock-Out feature is set. (9) Cook Time (page 14)
SENSOR:Flashes during Sensor
cooking. (10) Quick Start (page 21)
MORE/LESS: Lights to indicate Allows ,youto cook at 100% power
MORE/LESS has been entered, for 1 minute without pushing the
TURNTABLE OFF: Lights to indicate DIAL to start cooking, Also, allows
the TURNTABLE OFFhas been you to extend the cooking time up
selected, to 90 minutes by repeatedly
DELAYOFF: Lights to indicate the pushing this keypad during Time
DELAY OFFhas been selected. Cooking.
FAN HI/LOW: Lights to indicate fan (11) Power Level (page 14)
speed has been selected High or (12) Timer (page 14)
low.
START: Flashes to prompt you to (13) Clock (page 13)
push DIAL. (14)Turntable On/Off (page 23)
(3) Sensor Indicator Lights (page 16) To turn turntable on or off.
Popcorn (15)Fan (page 23)
Baked Potato To increase or decrease fan speed.
Fresh Vegetable (16) Delay Off-Fan (page 24)
Frozen Vegetable To turn off fan automatically at your
Reheat Entree selected time.
Frozen Entree (17) Light (page 23)
To turn the regular light or night
Pizza Slice light on and off.
These Sensor menus provide (18) DIAL
accurate and fast microwaving for a • Turn DIAL to set time, power,
variety of popular foods without any weight, or menu.
guesswork. - Push center of DIAL to start
Soup/beverage cooking.
• To set and cancel child lock-out.
This selection requires the entry of
number of servings, (19) Stop/Clear
Clears all previous settings if
More/Less pressed before cookingstarts.
Used to adjust cooking time for Press onceto stop oven during
above menus, cooking. Press twice to stop and
clear all entries.
(4) Custom Programs (page 22)
(5) Add 30 sec. (page 20) BeepSound
(6) Melody/Beep (page 24) A beep sounds when a keypad is
To change end-of.cooking sound, pressed, to confirm your key
entry.
12
 Loading...